As an Elementor user or WordPress Development Company, you have the flexibility to add a custom WordPress Dashboard on your own or client’s welcome panel. You can organize your site dashboard according to the site’s workflow. As a result, users will get an easy interface to interact with the site.
Moreover, it is compatible with both tech-savvy or non-technical persons. Also, you can add your company introduction, contact form, important videos or any type of useful content on the board according to your preference.
Most amazingly you can customize the WordPress welcome board easily by using Elementor. This page builder gives you full control over your dashboard to design with your own content.
In this article, we will show you how to create a Custom WordPress Dashboard with Elementor and free Elementor Addons. All you need to do is create a layout first and then assign it to the users. Let’s dive deep to explore the details!
Creating a Custom WordPress Dashboard

Isn’t it amazing to facilitate your clients with a custom dashboard in WordPress? Here you can decorate the welcome area with warm greetings, any special message or a helpful guideline to operate the site. Also, it can be a contact form, all types of media files and any elements or sections you want to add. Nevertheless, you can arrange the fields according to your client’s preference.
Therefore, it lets you leave a unique fingerprint on the board. You can reign the entrance where you or your clients arrive after login into the site.
Furthermore, it will accelerate your brand value and increase customer satisfaction levels. In this way, you can personalize your product and services by giving a unique identification to your WordPress Dashboard.
So, you can add a custom dashboard in your welcome zone to display:
- A welcome message
- Helpful instructions to operate the site
- A contact form for further queries or help
- Company details and contact information
- Services and product details
- Tutorial videos
- Answers to common FAQs
- Important link, updates, and news
It will enable your clients to:
- Get a quick glimpse of important links and updates
- Comprehensive guidelines to navigate the site
- Have a personalized dashboard based on his business procedures
Hence, with Elementor, you will get full control over the WordPress welcome panel following a few easy steps.
How to Create a Custom Dashboard for Elementor

Creating a Custom WordPress Dashboard with Elementor is like a piece of a cake. Elementor has already diminished the concept that only developers can build sites. Now, everyone can create all types of highly functional page layouts or content structures using a simple drag-and-drop interface.
If you own a WordPress site already, then you need to have the following plugins to start your design:
The most amazing thing is that you can design different dashboards for different user roles. For instance, you can display an individual welcome panel to your client’s administration and another to the rest per your client’s preference.
Now install and activate the above plugins and follow the step-by-step guide to customize your WordPress Dashboard.
- Create a template with Elementor
- Assign the user role to a specific Elementor layout
- Save the setting

Step 1: Design a New Elementor Template
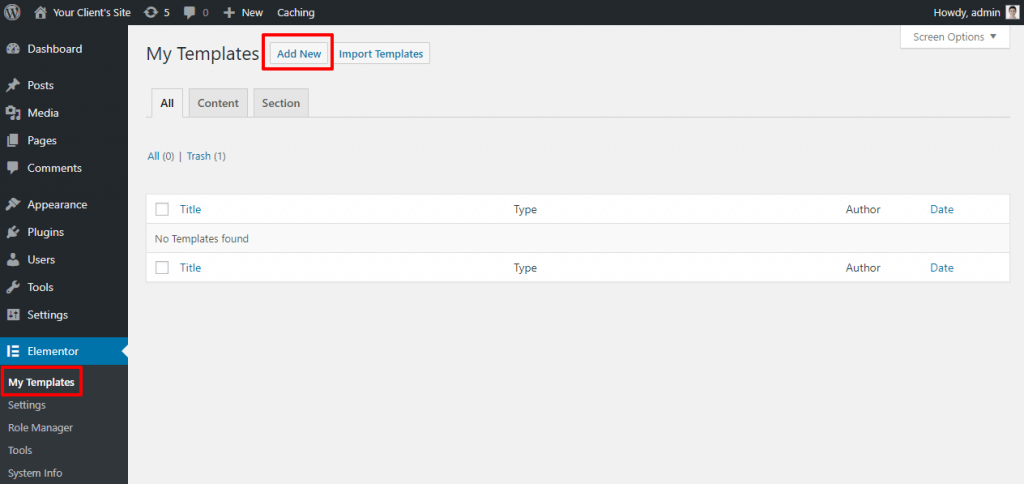
First, log into your WordPress dashboard and navigate Elementor → My Templates → Add New to build a new Elementor Template Layout.
Now, a screen will appear. Select the Page option from the drop-down menu and set a name for your template.
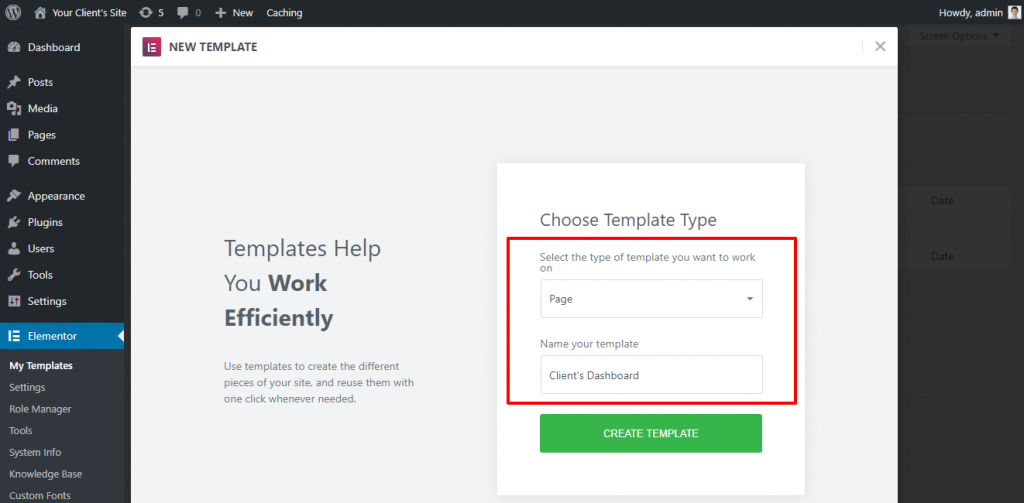
Then, click on the Create Template button and continue.
Step 2: Change the Page Layout to Elementor Canvas
Now, we will design the dashboard using Eliminator. As you are designing the backend of your client’s dashboard, there is no need to show the theme’s default header, footer, or sidebar appearing in your welcome panel.
Therefore, set your page layout to Elementor Canvas. At first, click on the gear icon in the bottom-left corner of the Elementor Setting Panel. Then select Elementor Canvas from the Page Layout drop-down on the Page Setting Panel.
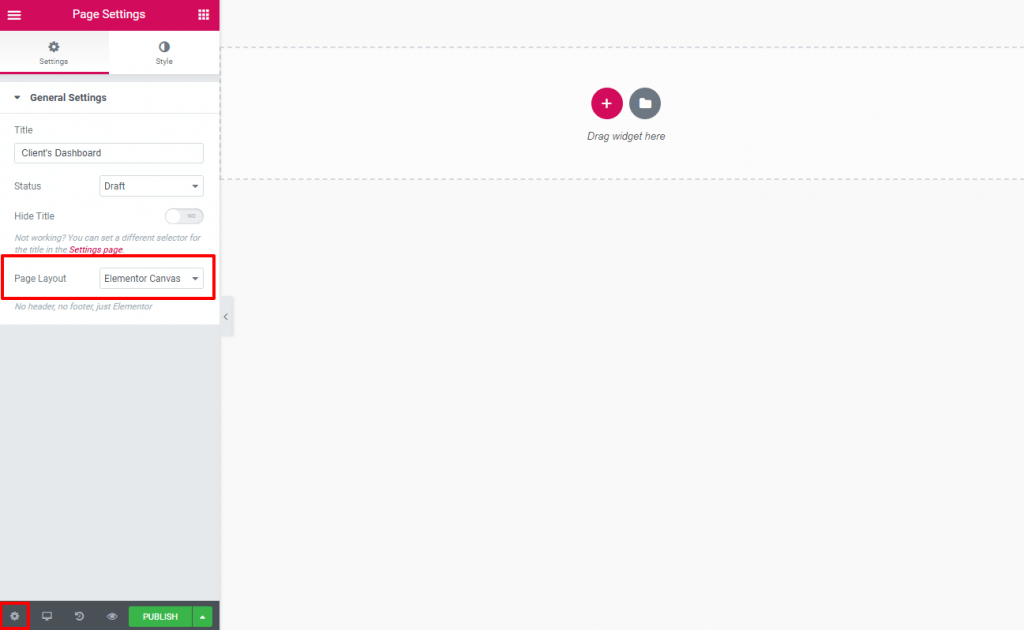
After assigning the layout, jump into the main designing arena.
Step 3: Design Your Custom WordPress Dashboard
Now, the most amazing part is to paint your board with innovative ideas. You can create any design as per your imagination here with Elementor. If you are new to Elementor design, take a quick journey to How To Use Elementor. You need zero coding knowledge to build a professional site with Elementor.
Design the page with Elementor widgets creating different sections and elements. You can personalize the dashboard with your innovative ideas and client preferences. You can add a contact form, video, images, important news, affiliate links, etc.
However, while developing the layout for your client’s dashboard, keep it simple and easy to understand. Moreover, it should convey a clear message to the audience.
There is no concrete rule to design your custom dashboard. However, you can consider the following tactics:
- Keep it simple and clean. Use black text and white background to make it easily readable to the users.
- Use enough white space that is compatible with large screen resolutions, same as the default WordPress dashboard.
- Give it a professional look that matches your brand value, client’s needs, and the theme layout.
- Display only selective and important information. Don’t mess up with too many elements.
Here is an example of a professional Custom WordPress Dashboard.

This example consists of:
- The welcome message on the left side
- A simple contact form along with a social icon on the right side
- A glimpse of services under a specific project
You can design your dashboard, including images, tutorial videos, logo or anything you want. After completing the design, press the Publish button to live it.
Step 4: Assigning Custom Elementor Template to User Roles
Great! Your Elementor Template is ready now. Now, it’s time to make the layout visible to your clients.
You can do it by going to Settings → Dashboard Welcome Elementor from the WordPress Dashboard.
Here, you will get a panel with several user roles. Select the template you built with Elementor from the drop-down menu against a user role as per the condition. Like, if you want to assign your client as an Administrator, you should select that role accordingly:
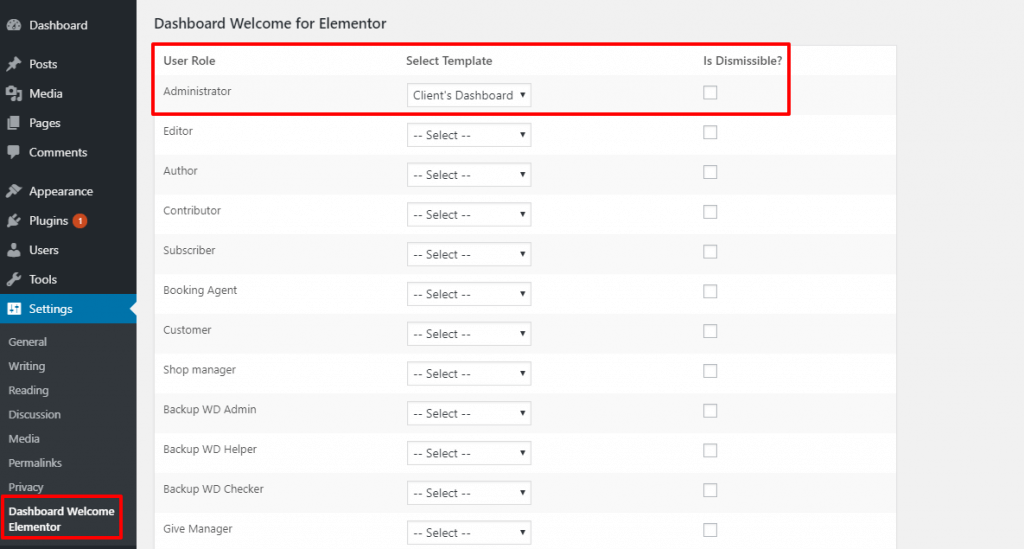
Here, for each user role, you will get a checkbox under “is dismissable”. If you check the box, the user will get a cross option (X) at the top right corner to remove the welcome screen if he/she wants. On the other hand, if you don’t check the box, the user can’t avoid the welcome screen, and it will always appear on their WordPress Dashboard.
After completing all the tasks, click on the Save Changes button.
You can head back to the WordPress Dashboard screen and check the changes there.
Now, when your clients log into their WordPress Dashboard, they will see your custom dashboard at the top. The other dashboard widgets are still there – they’re just pushed down the screen.
Step 5: Repeat (If Required)
Well, if you want to design individual Welcome Panels for different user roles, then go back and repeat steps 1 to 4. In this way, you can create and assign an isolated dashboard for each user role you want.
All you need to:
- Add a new Elementor template
- Design your alternate dashboard layout
- Assign that dashboard to another user role
- Save the changes and publish
Congratulation! You have successfully created and displayed your custom WordPress Dashboard.
Upgrade Your Design Skill with Happy Addons

This powerful extension allows your imagination to fly high and take your site to the next level. You can create a beautiful and professional personal or business website with advanced functionality.
HappyAddons will add extra features to your Elementor powered website. These carefully crafted widgets are well designed, flexible and compatible with any kind of website design.
The impressive and powerful addition of “Happy Effect” lets you add high-quality motion effect and animation to your design without writing a single line code. Now, you can create anything that you can imagine.
With the best combination of Elementor and Happy addons, you can create a highly functional media file. You can animate and rotate objects on their x-axis, y-axis, and z-axis like never seen before, and it brings lovely effects to help your websites stand out from others.
Final Verdict on Custom WordPress Dashboard
Well, WordPress and Elementor are known for their massive robustness and customization options. Nothing is concrete here, you can modify and mold everything that fits you and your business.
In this continuity, you can even change the view of the backend WordPress Dashboard for your personal assessment or for the client’s easy navigation. As a developer, the WordPress default dashboard can be familiar to you, but your clients may find difficulties in operating it.
Nothing to worry about at all! Now, you can rule over your site backend and create a custom dashboard in WordPress to evaluate your brand value and customer satisfaction.




One Response
Great article