Building a good relationship with customers through email marketing is very effective for the longevity of any business. With the power of modern-day email marketing tools like MailChimp, you can improve your email marketing strategy and ultimately increase the conversion rate.
MailChimp is highly compatible with Elementor. You can even embed the subscription form on your Elementor-powered website. But the problem is you have to design a subscription form with the help of Elementor form builder first. Then you can integrate the form using the MailChimp API key. You need to do some coding as well.
And this manual process will be a hassle for some users. To overcome this problem, Happy Addons’ comes with an advanced widget MailChimp Form that offers readymade subscription forms for free. You can simply add and customize the form in your own style.
In this blog, we are going to show how to embed an email subscription form to your website using the Happy Addons’ MailChimp Form Widget. Also, you’ll get answers to some common questions regarding MailChimp.
Before we dive into the tutorial part, let’s have a quick look at why you need to use the Happy Addons’ MailChimp Form Widget for designing a custom subscription form.
Why You Should Use Happy Addons’ MailChimp Form Widget

Designing and integrating a MailChimp subscription form into your Elementor-powered website is very tough. You need to write custom code sometimes looking for an expert to solve this issue. To help you out, the team of Happy Addons’ has recently launched an advanced widget named ‘MailChimp Form‘.
With this free widget, you can very efficiently design and customize a subscription form and ultimately use it on your website in an organized way. However, this tool comes with free newsletter form templates. You can use any of these templates and make a unique look according to your website demand.
Key Features...
- Easy to add MailChimp API key
- Fully customizable
- Offer pre-made form templates
- Separate your email subscriber using tags
How To Embed MailChimp Form Using Happy Addons’ Widget
To embed an email subscription on your website is very easy. You need to install the Happy Addons free and get the API Key offered by MailChimp. Then follow the below steps.
- Add MailChimp API Key
- Add MailChimp Form Widget
- Set API and Audience
- Manage Form Content
- Enable Success and Error Message
- Style Options of MailChimp Form Widget
These are the prerequisites you need to use the MailChimp Form widget:
- MailChimp API Key
- Elementor (Free)
- Happy Addons (Free)
Let’s get started:
Step 1: Create MailChimp API Key
Read the article About Mailchimp API Keys And follow the below steps for creating the MailChimp API Key :
- First, log in to your MailChimp account.
- Second, click your Profile Name to expand the Account Panel and choose the account.
- Third, click the Extras drop-down menu and choose API keys.
- Fourth, copy an existing API key or click the Create A Key button.
- Fifth, name your key descriptively, so you know what application uses that key.
Step 2: Add MailChimp API Key
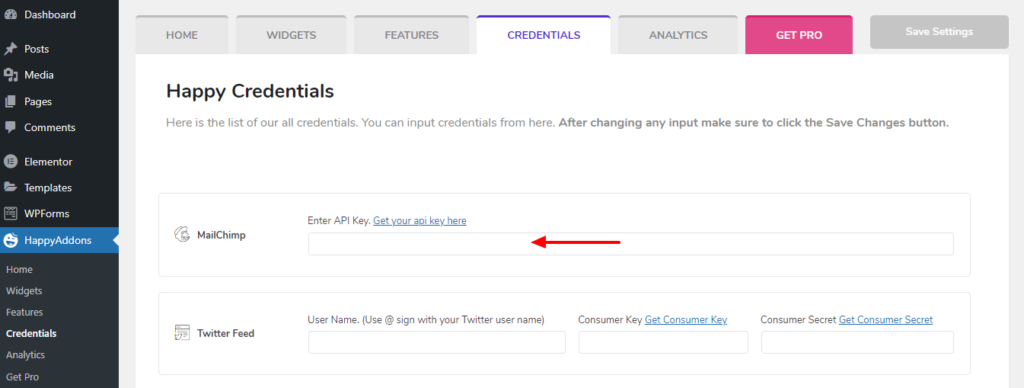
You have to integrate MailChimp and Happy Addons using the API key. First, go the Dashboard->HappyAddons->Credentials area. Then you have to paste the API Key into the MailChimp section. You are done.
Step 3: Add MailChimp Form Widget
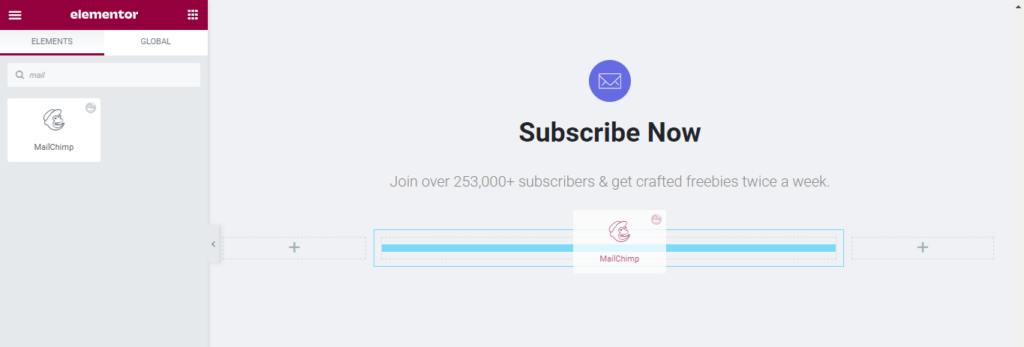
It’s time to add the Happy Addons’ MailChimp Form Widget. First, find the widget from the Elementor widgets panel then drag & drop it into the suitable place on our website.
Step 4: Set API and Audience
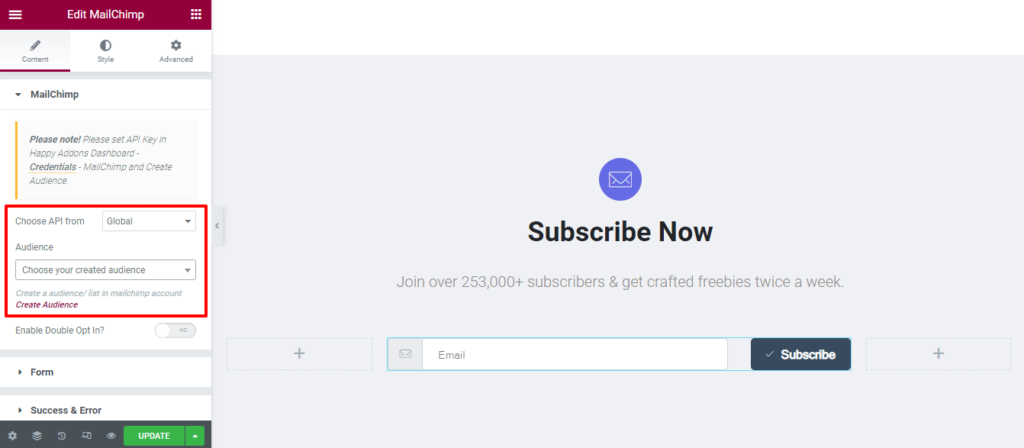
After adding the widget, you need to set the API location. Here, we’ve selected Global API because we’ve already added the API key into the HappyAddons->Credentials area. Then you need to select the Audience from the drop-down list. You can also create a new audience by clicking the Create Audience link.
If you want to enable an opting subscription, you can activate the Enable Double Opt-In option.
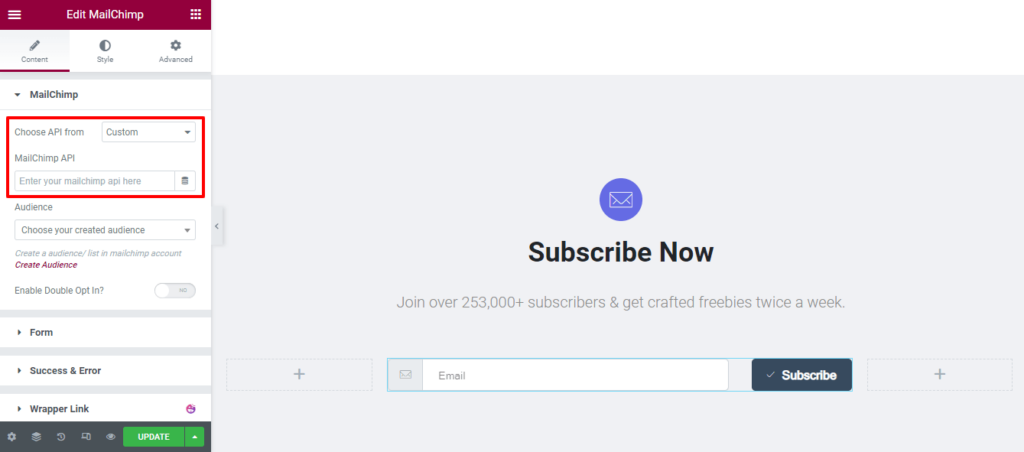
Note: If you are not adding the API key there, you should select the Choose API From->Custom then paste the API code into the MailChimp API area.
Step 5: Manage Form Content
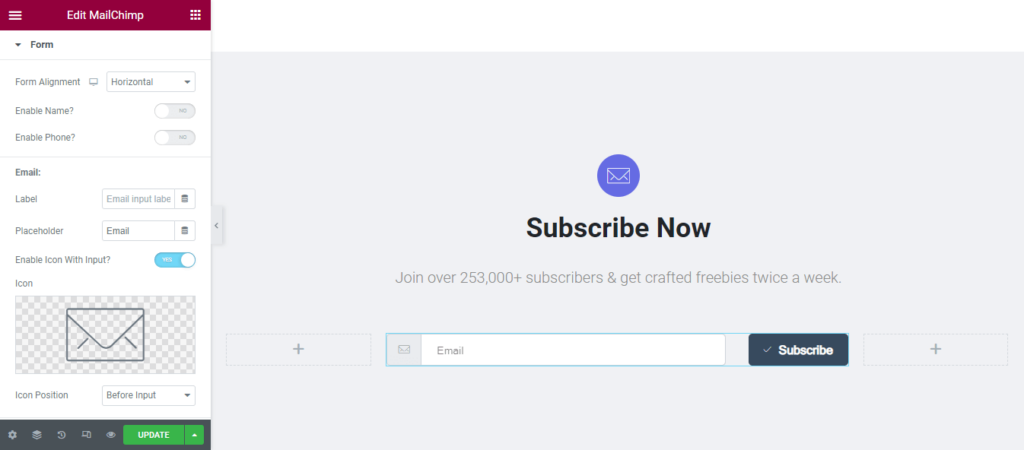
Go to the Content->Form area to manage the form content. Here, you can set the Form Alignment (Horizontal and Vertical) and Enable the Name & Phone. You can also set the Email‘ Label, Placeholder, Enable Icon with Input, and set the Icon Position.
However, you are able to change the Button Text. And Enable Icon with Button as well as define the Icon Position.
Step 6: Enable Success and Error Message
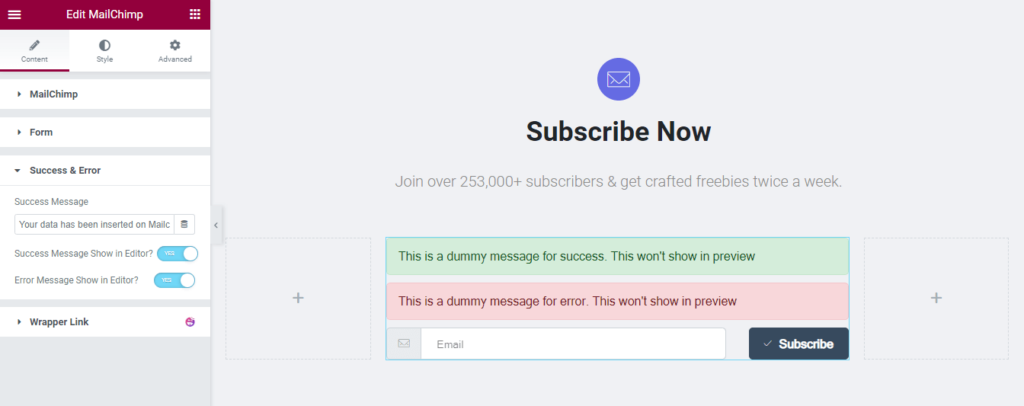
In the Content->Success & Error section, you can enable the Success Message Show in Editor? and Error Message Show in Editor? option. By doing this, you can easily customize the message style.
Step 7: Style Options of MailChimp Form Widget
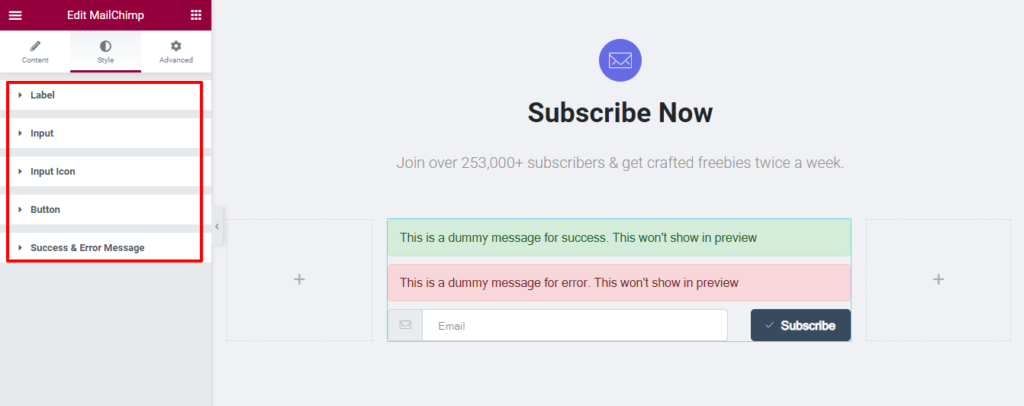
For customizing the Happy Addons’ Elementor MailChimp form widget, you can use the below styling options.
- Label
- Input
- Input Icon
- Button
- Success & Error Message
You can check the official documentation to get in-depth knowledge on how to use the Happy Addons’ MailChimp Subscription Form widget.
Final Outlook of Our MailChimp Subscription Form
This is the look of our current subscription form. If you follow the above steps, end of the tutorial you’ll get a form design like the below image.

FAQs on MailChimp Form
There are many questions that people often ask online regarding the MailChimp form. Here, we’ve answered some of the effective questions that will help you to understand more about the MailChimp form.
1. How do I create an email signup form in MailChimp?
First, log in to your MailChimp account.
Second, navigate to the Form Builder tool.
Finally, you can create and customize the email signup form.
2. Are Mailchimp forms free?
In the MailChimp Free Plan, you are able to build free signup forms.
3. Does Mailchimp offer a contact form?
MailChimp comes with a Contact Form that you can customize in your own way for further use. But the problem is the build-in contact form is generated on a third-party URL.
It means you can only able use this form via email, add it to a button or link on your website, and share it on social media.
4. How do I make multiple forms in Mailchimp?
Using the MailChimp Form Builder tool, you can create multiple forms. You are able to design, build, translate, and share the signup forms with its form builder tool.
5. How do I add a Mailchimp subscribe form to my website?
Step 1: Click on Audience and select the current audience from the drop-down list and choose the right one that you want to work with.
Step 2: Click Signup forms.
Step 3: Select Embedded forms.
Step 4: Click on the Select next to Embedded forms
Step 5: Click on the Continue button.
Step 6: Click on the Copy Code button.
Ready to Create Your Subscription Form
A well-designed email subscription form helps you to generate potential customers. It also increases the conversion rate. That’s why you should always focus on your subscription form design.
In this blog, we’ve shown how efficiently you can design a subscription form for your WordPress website using the Elementor and Happy Addons’ MailChimp form widget.
We’ve covered why you need to use an advanced Elementor MailChimp form builder widget. Also, we’ve answered some helpful questions that may improve your knowledge regarding the MailChimp email automation tool.
If you find this blog helpful then share it on your social networks. Also, we request you to join our newsletter for getting more helpful guides on WordPress and Elementor.
Subscribe to our newsletter
Get latest news & updates on Elementor


