



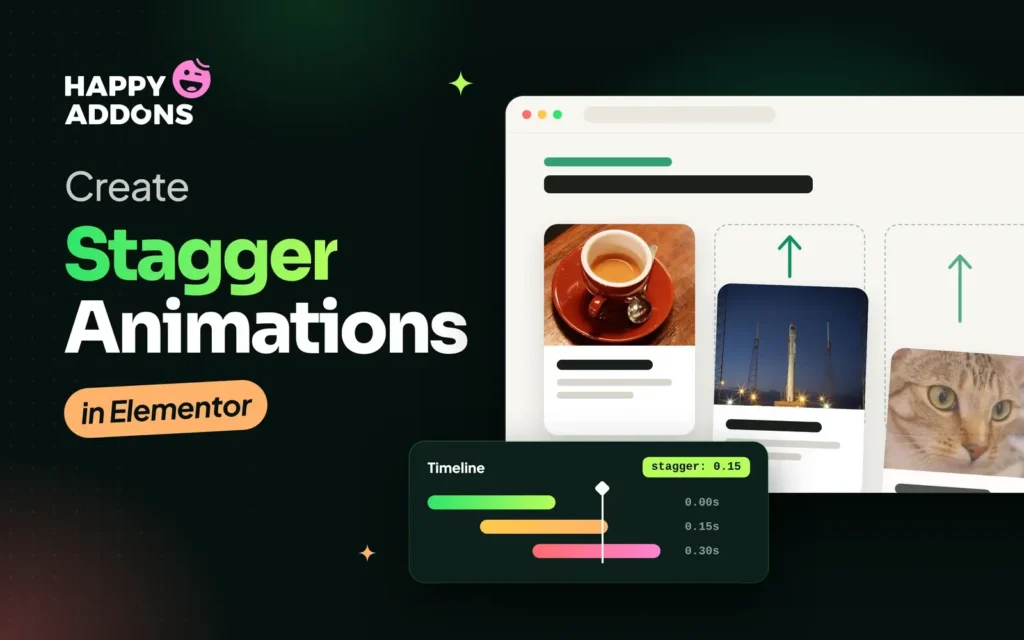

A stagger animation moves a group of items one after another instead of all at once. Letters pop up one by one, cards slide in like a wave, and images open tile by tile.
That small delay between items makes motion feel natural and guides the visitor’s eye through the content. It’s one of the most common tricks on modern agency, portfolio, and product websites.
Elementor is one of the most user-friendly drag-and-drop page builders, but it doesn’t have stagger controls. In this blog post, we’ll show you how to create stagger animations in Elementor using GSAP, with the free HappyAddons plugin and no code. Let’s get started!
What Is a Stagger Animation?
In a stagger animation, every item in a group plays the same animation, but each one starts a little later than the one before it. That small gap is called the stagger delay.
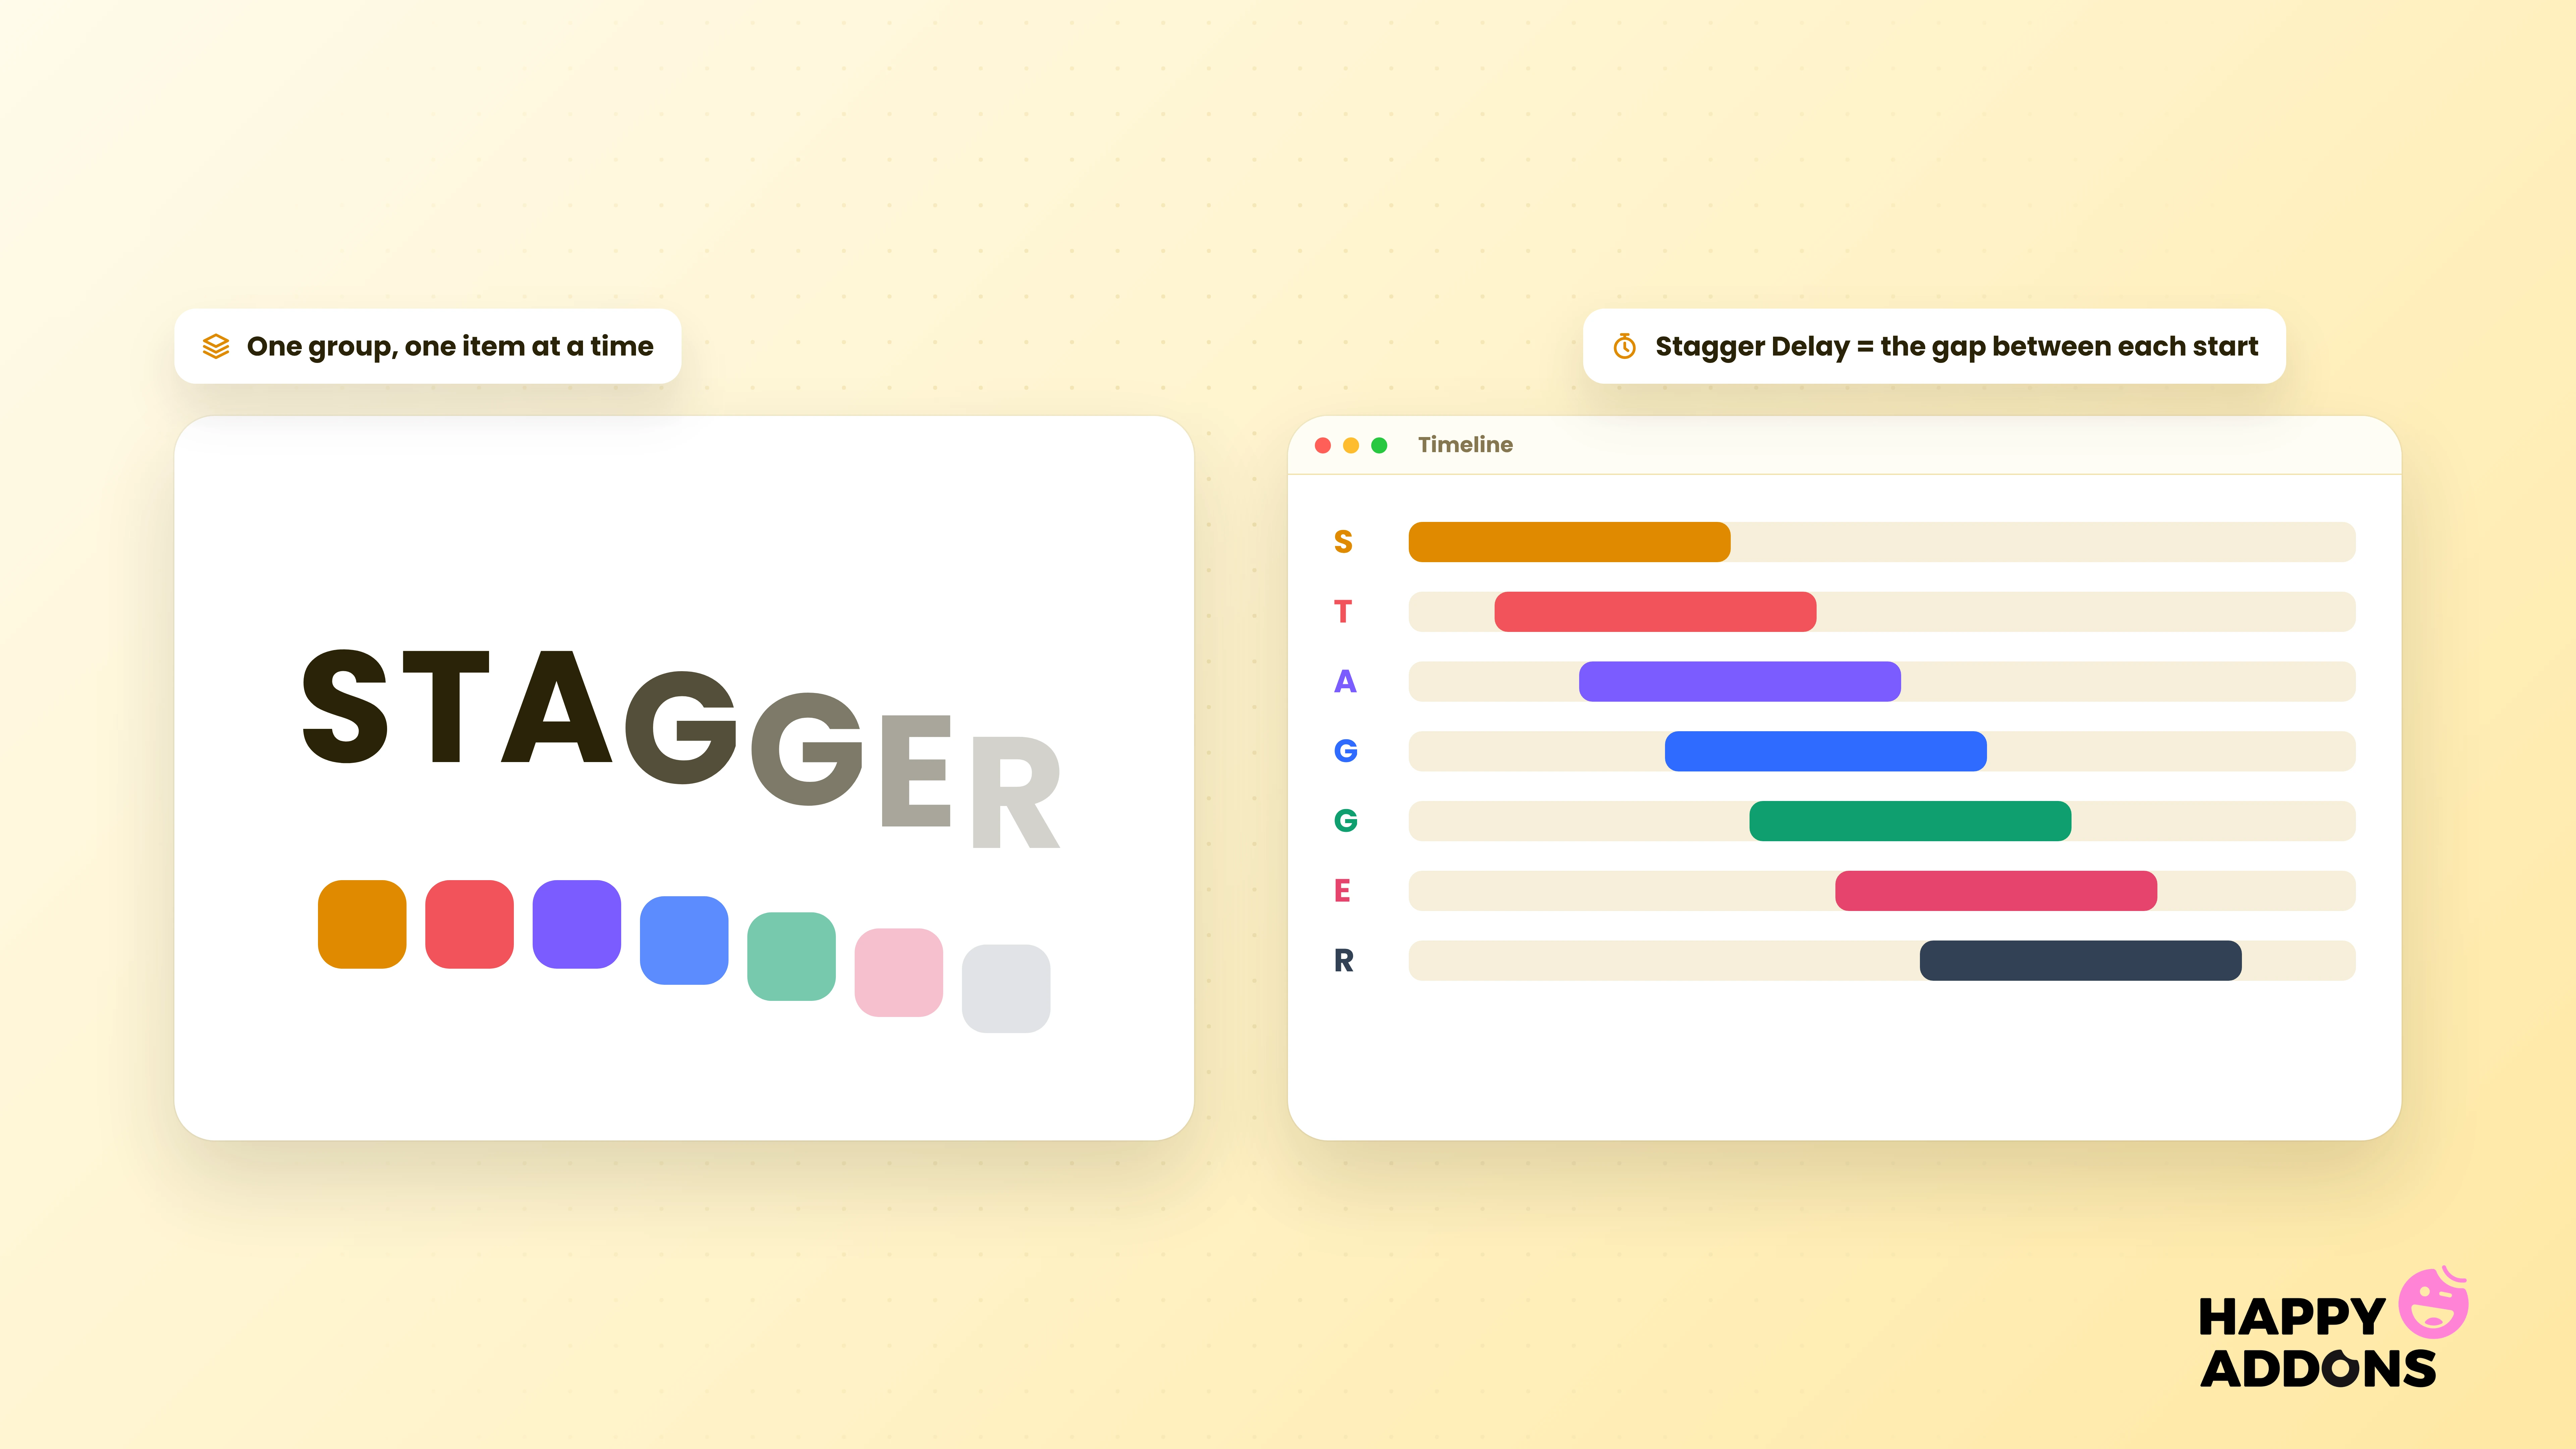
GSAP, the animation library behind HappyAddons’ motion features, can also decide where the stagger starts: from the first item, the last item, the center, both edges, or in random order.
Where to Use Stagger Animations on Your Website
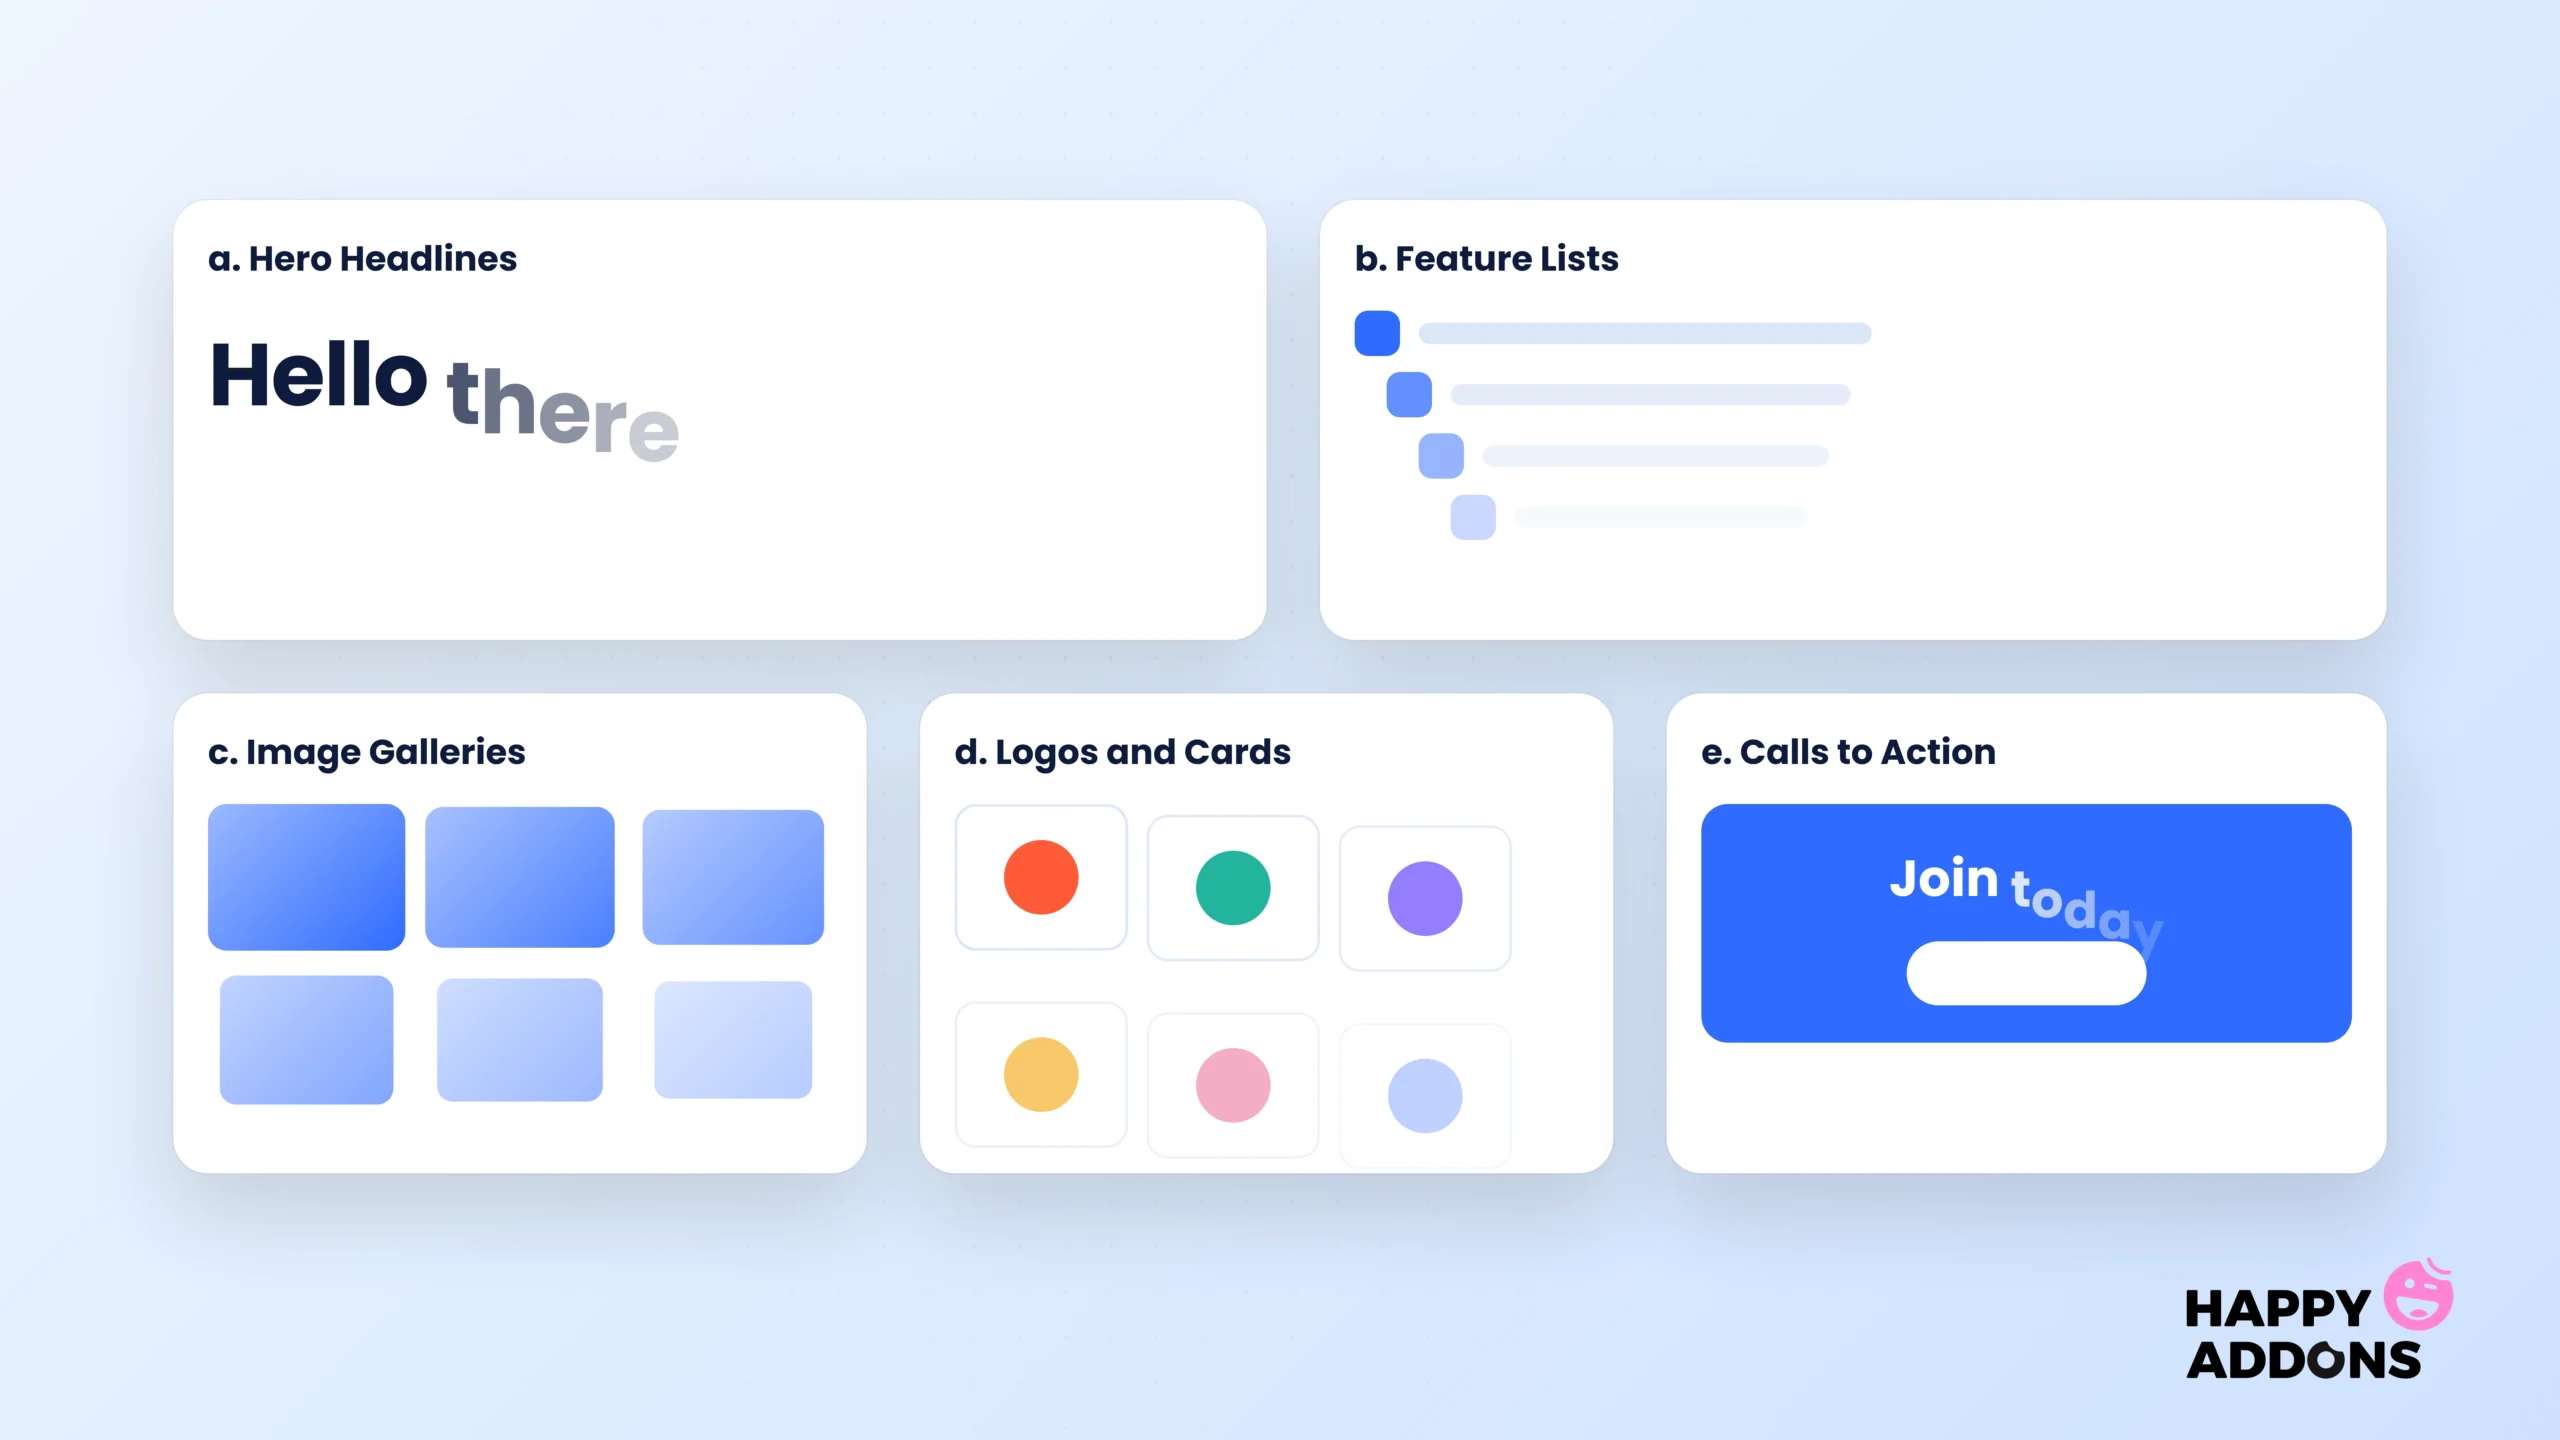
Stagger animations can make different website elements appear one after another instead of showing everything at once. You can use them in several sections to guide visitors’ attention and make your website feel more engaging.
a. Hero Headlines
Use stagger animations to reveal the letters or words of your main headline one by one. This creates an eye-catching first impression and makes your homepage hero section more engaging.
b. Feature Lists and Subheadings
Stagger the words or lines in your subheadings to make them appear at a comfortable reading pace. This helps visitors follow your message and gives important text more visual attention.
c. Image Galleries
Use stagger animations to reveal gallery images one after another in a grid or horizontal layout. This creates a smooth visual flow and makes your image gallery feel more polished.
d. Logos, Cards, and Portfolios
Apply stagger effects to display brand logos, service cards, or portfolio items one by one. This helps visitors explore each item without overwhelming them with too many elements appearing at the same time.
e. Calls to Action
Use a staggered headline or text animation near your call-to-action button to draw attention to your offer. It helps highlight your main message and naturally guides visitors toward the action you want them to take.
How to Create Stagger Animations in Elementor Using GSAP: Step-by-Step Guide
As already said, Elementor can’t stagger animations on its own. HappyAddons fills the gap with its GSAP features. It comes with 160+ widgets and 40+ features, and three of its free GSAP tools have stagger controls:
- Text Animation: Staggers letters, words, or lines in a Heading widget.
- Appearing Image Animation: Staggers the tiles of an image in Tiles Reveal mode.
- Image Cycle widget: Staggers a group of images as they move into an orbit.
For this tutorial, we’ll build the homepage of Halo Creative, a demo brand and motion studio, and use all three.
Prerequisites
- Elementor (Free)
- HappyAddons (Free)
Note: You don’t need HappyAddons Pro for this tutorial. Text Animation, Appearing Image Animation, and the Image Cycle widget are all free.
Once these plugins are ready on your site, start following the tutorial explained below.
Step 01: Enable the GSAP Features and the Image Cycle Widget
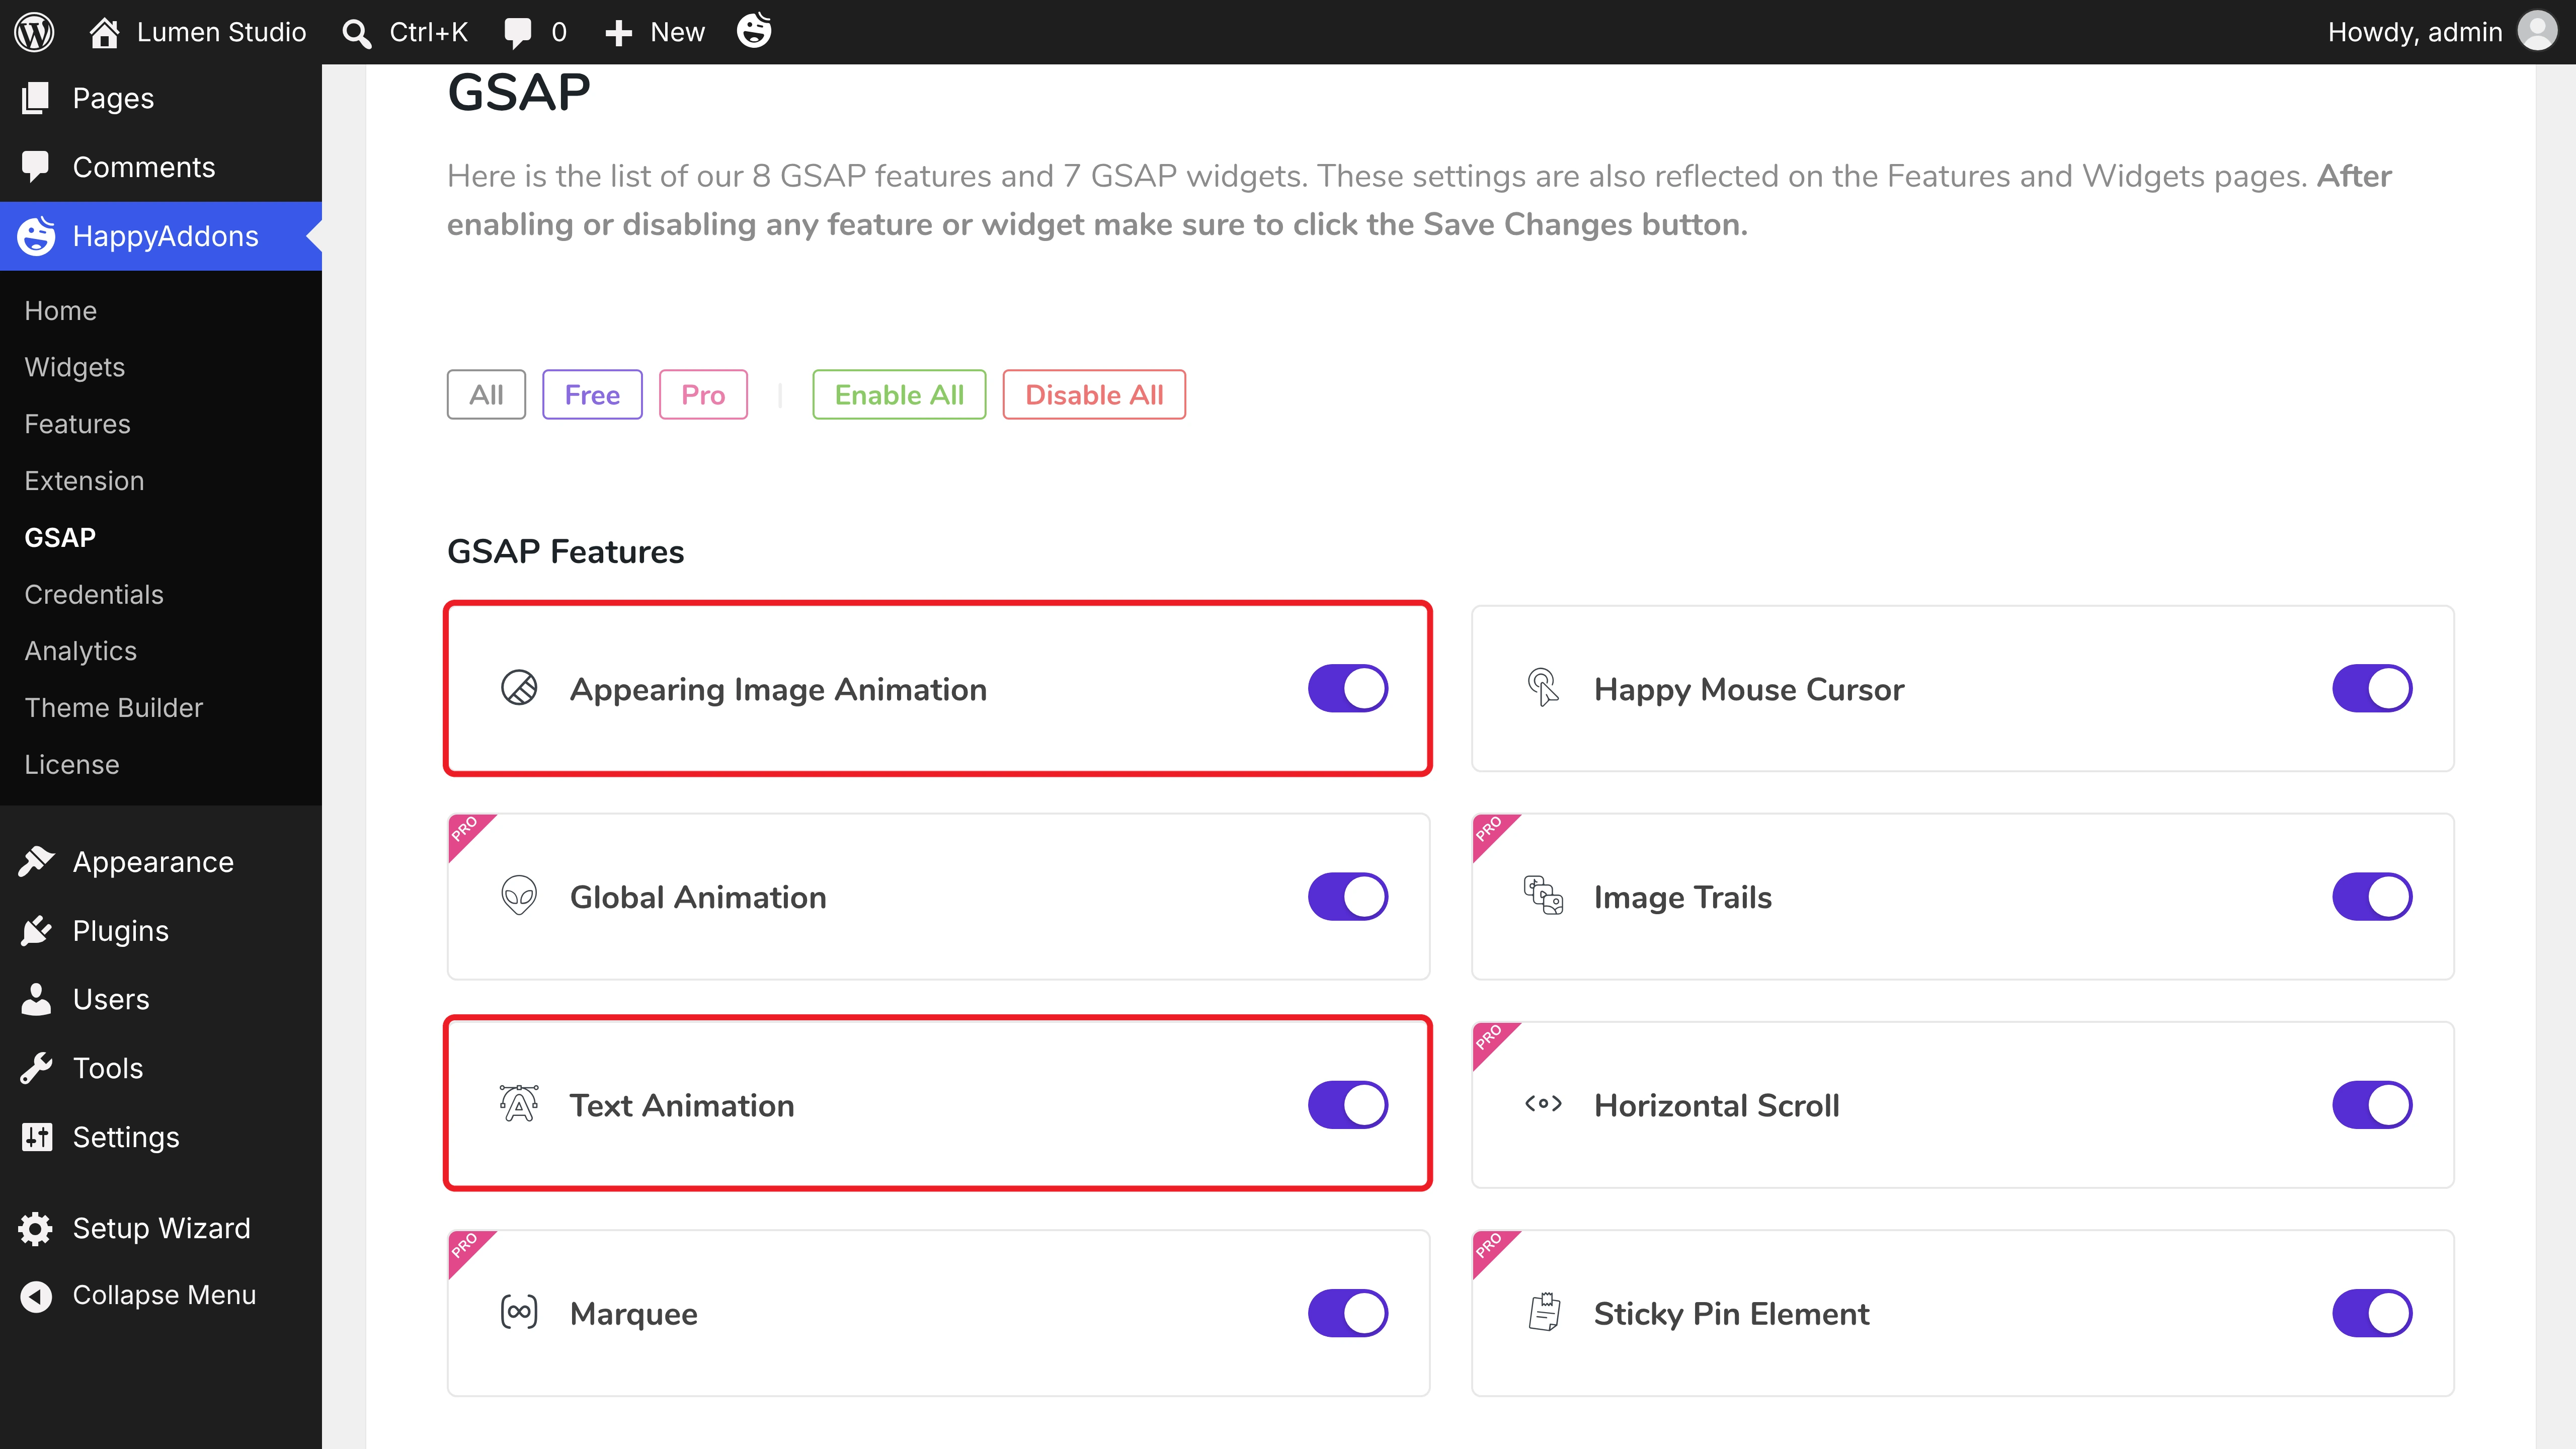
Navigate to HappyAddons > GSAP from your WordPress dashboard. Under GSAP Features, make sure Appearing Image Animation and Text Animation are toggled on.
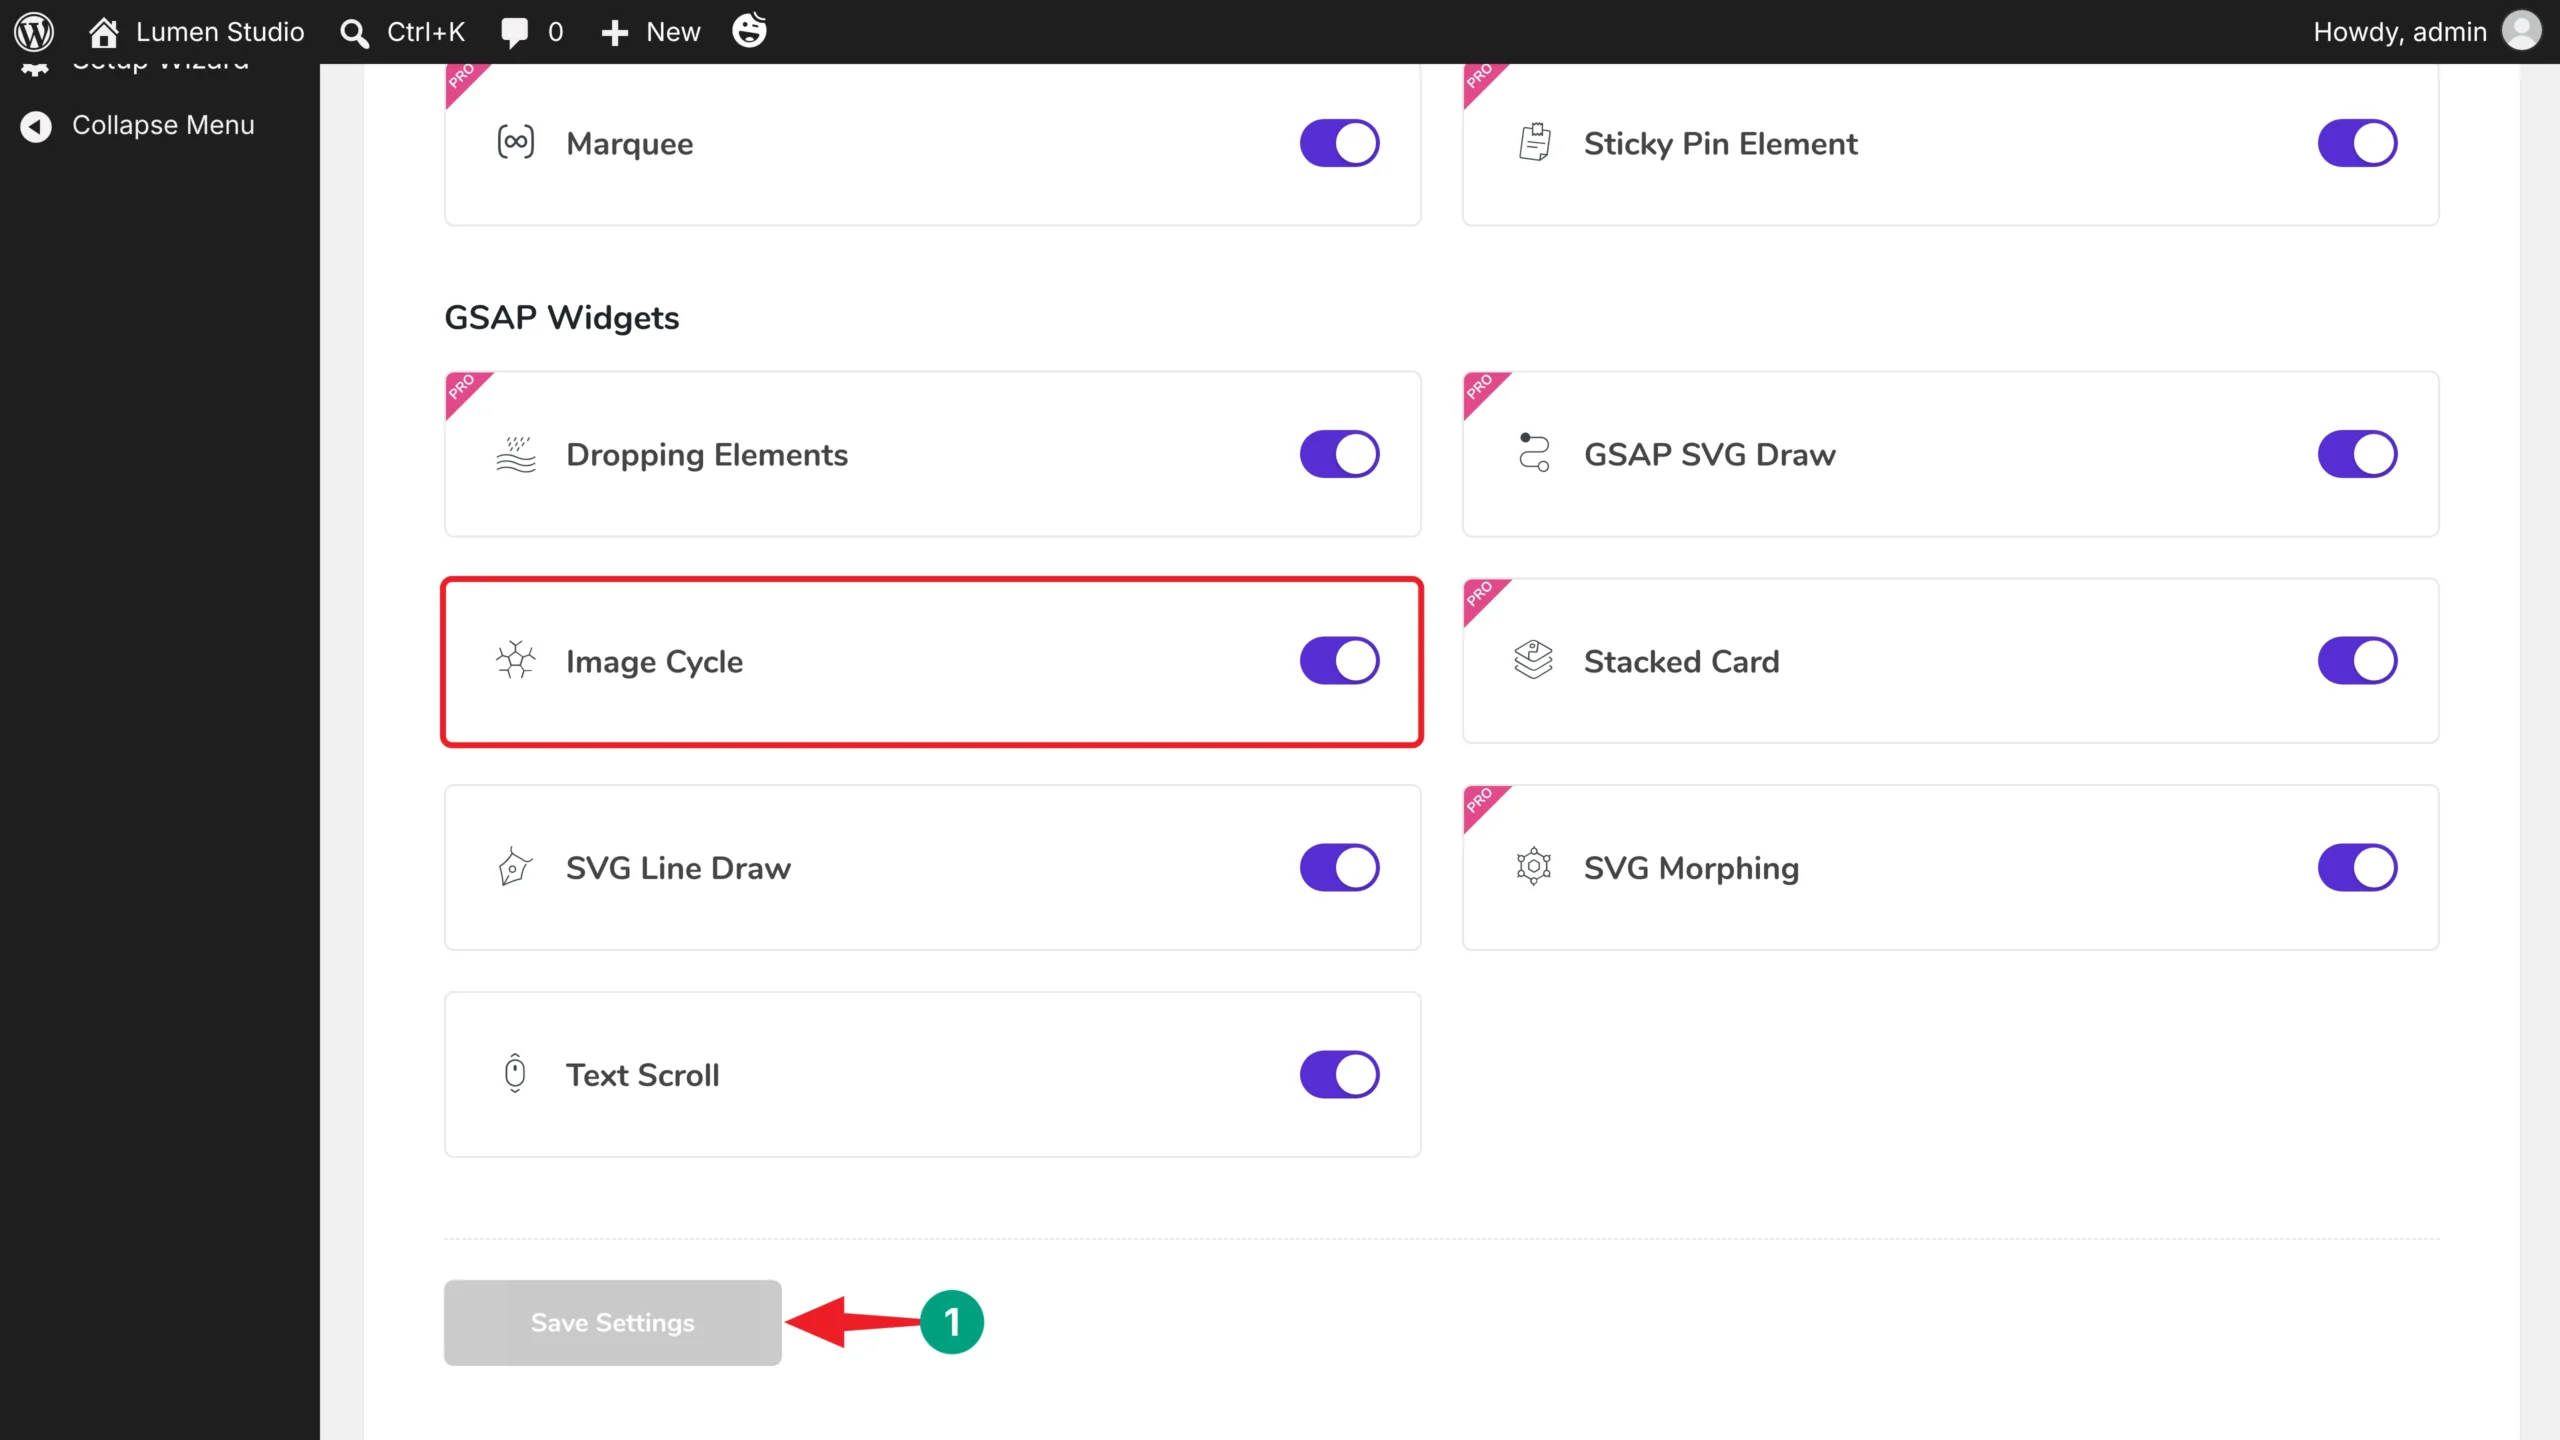
Scroll down to GSAP Widgets and check that Image Cycle is on too. If you change anything, click the Save Settings button.
Step 02: Add a Stagger Animation to a Heading
Open your page with Elementor and select a Heading widget. Our hero headline is split into two headings: “We design brands” and “that move.”
In the Content tab, expand the Text Animation section and toggle on Enable. Then choose Popup Reveal from the Animation Mode dropdown. This mode makes each letter pop up and rotate into place.
Now find the Stagger From option and select Center. The letters in the middle will appear first, and the rest will follow toward both ends.
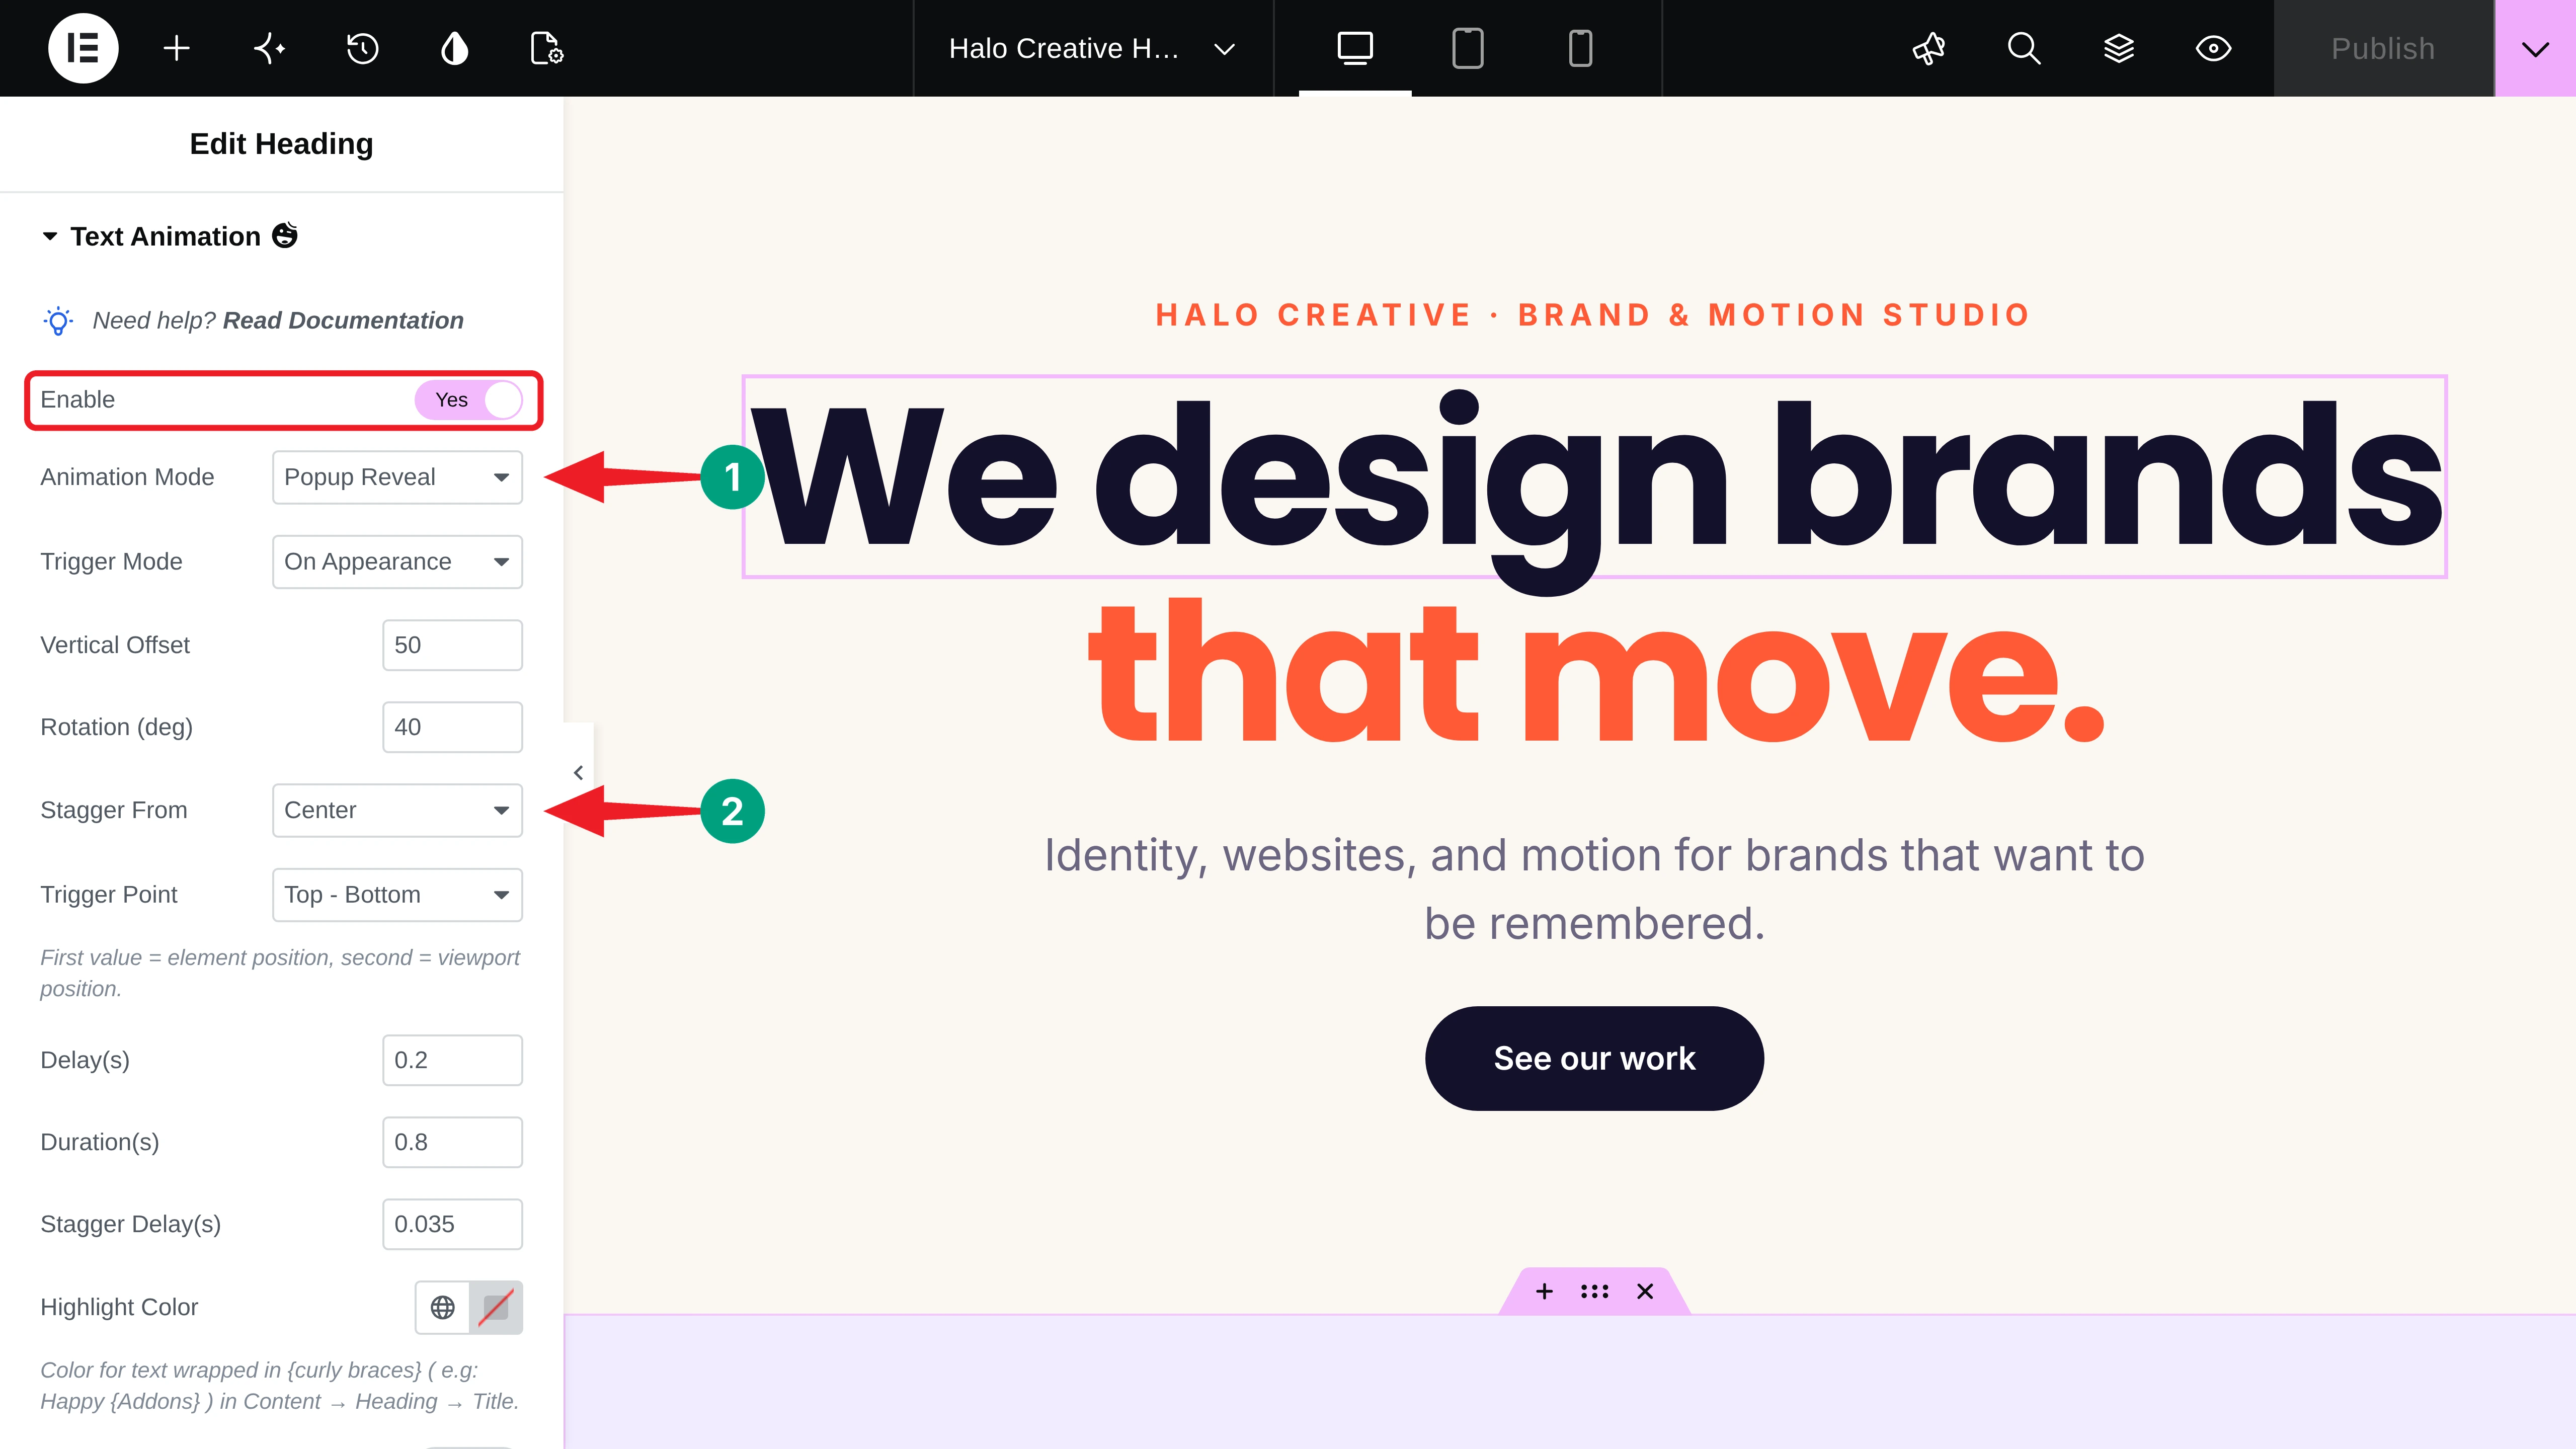
Note: Stagger From is available in the Smoky Reveal, Popup Reveal, and Mixing Reveal modes. Other modes always stagger from the first item.
Step 03: Set the Stagger Delay and Timing
Scroll down in the same section. You’ll get options for the trigger point, delay, duration, and stagger delay.
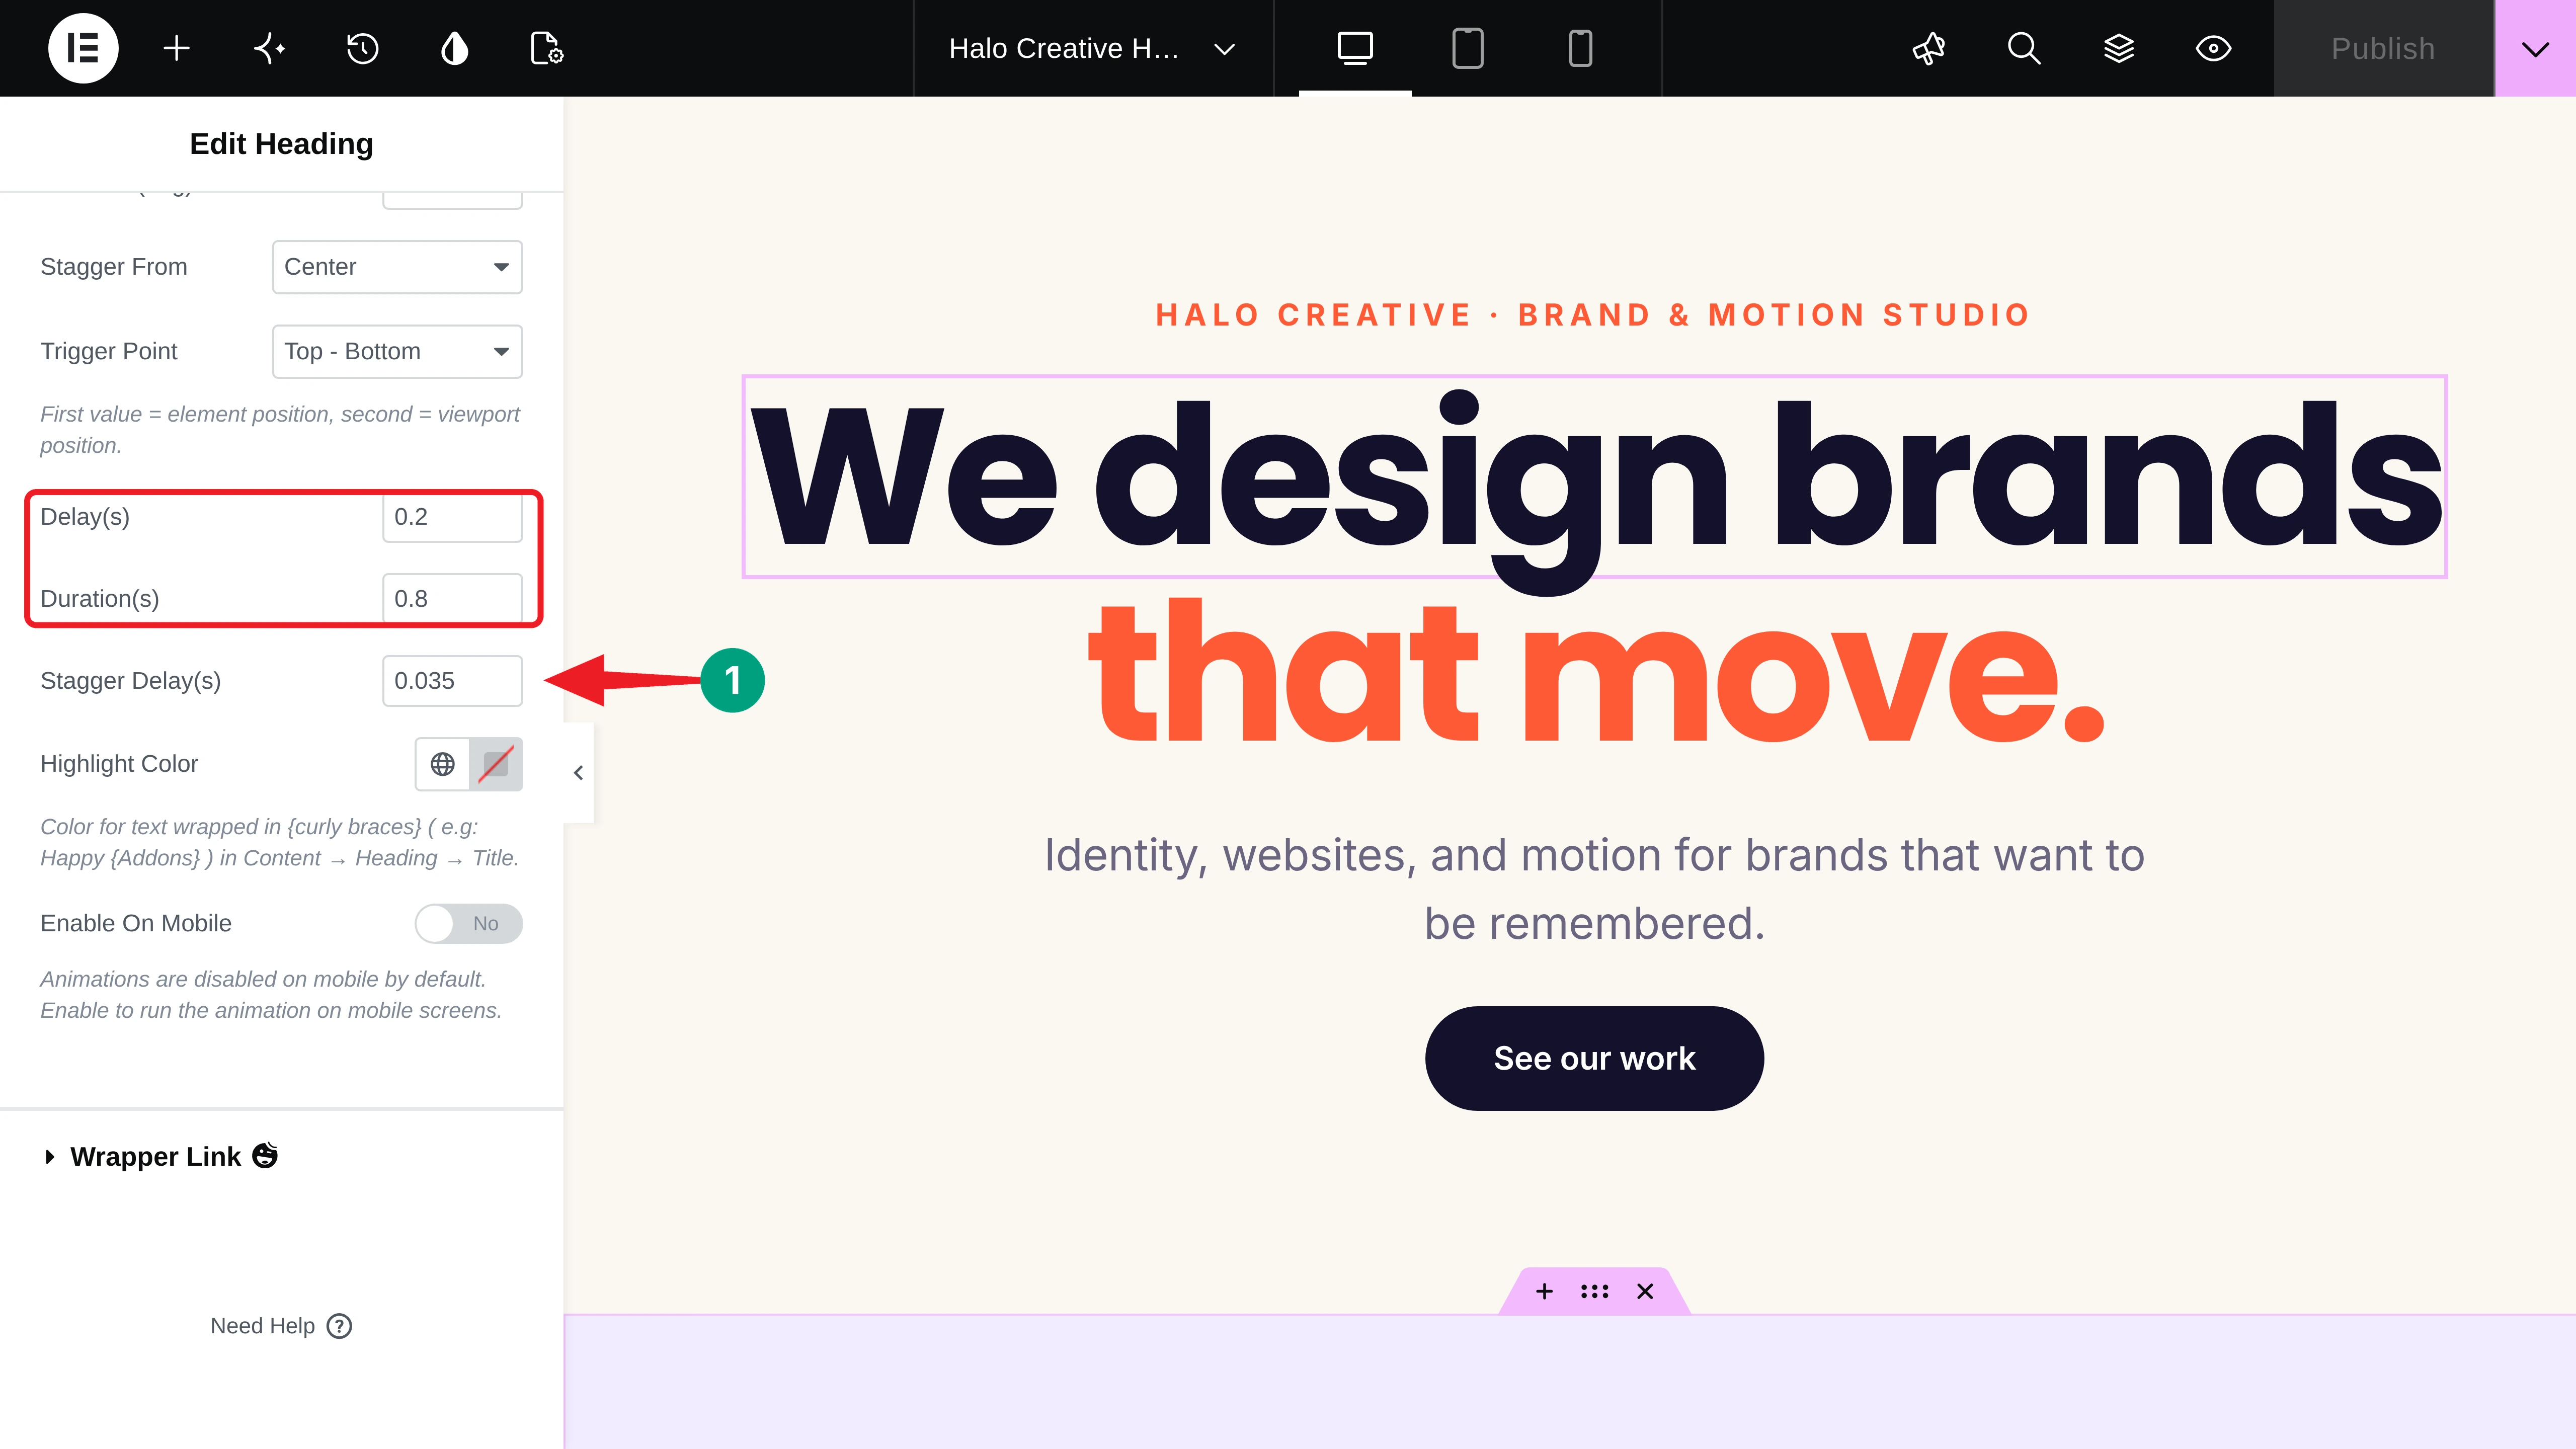
- Delay(s): How long to wait before the whole animation starts. We used 0.2 for the first heading and 0.75 for the second, so “that move.” follows the first line.
- Duration(s): How long each letter takes to animate. We used 0.8.
- Stagger Delay(s): The gap between each letter. We used 0.035 seconds. A smaller number makes a faster wave.
Here’s the result:
Step 04: Stagger Words in a Subheading
For longer lines, stagger words instead of letters. Select the subheading and enable Text Animation. Choose Mixing Reveal, which animates word by word with a blur, and set Stagger From to Start.
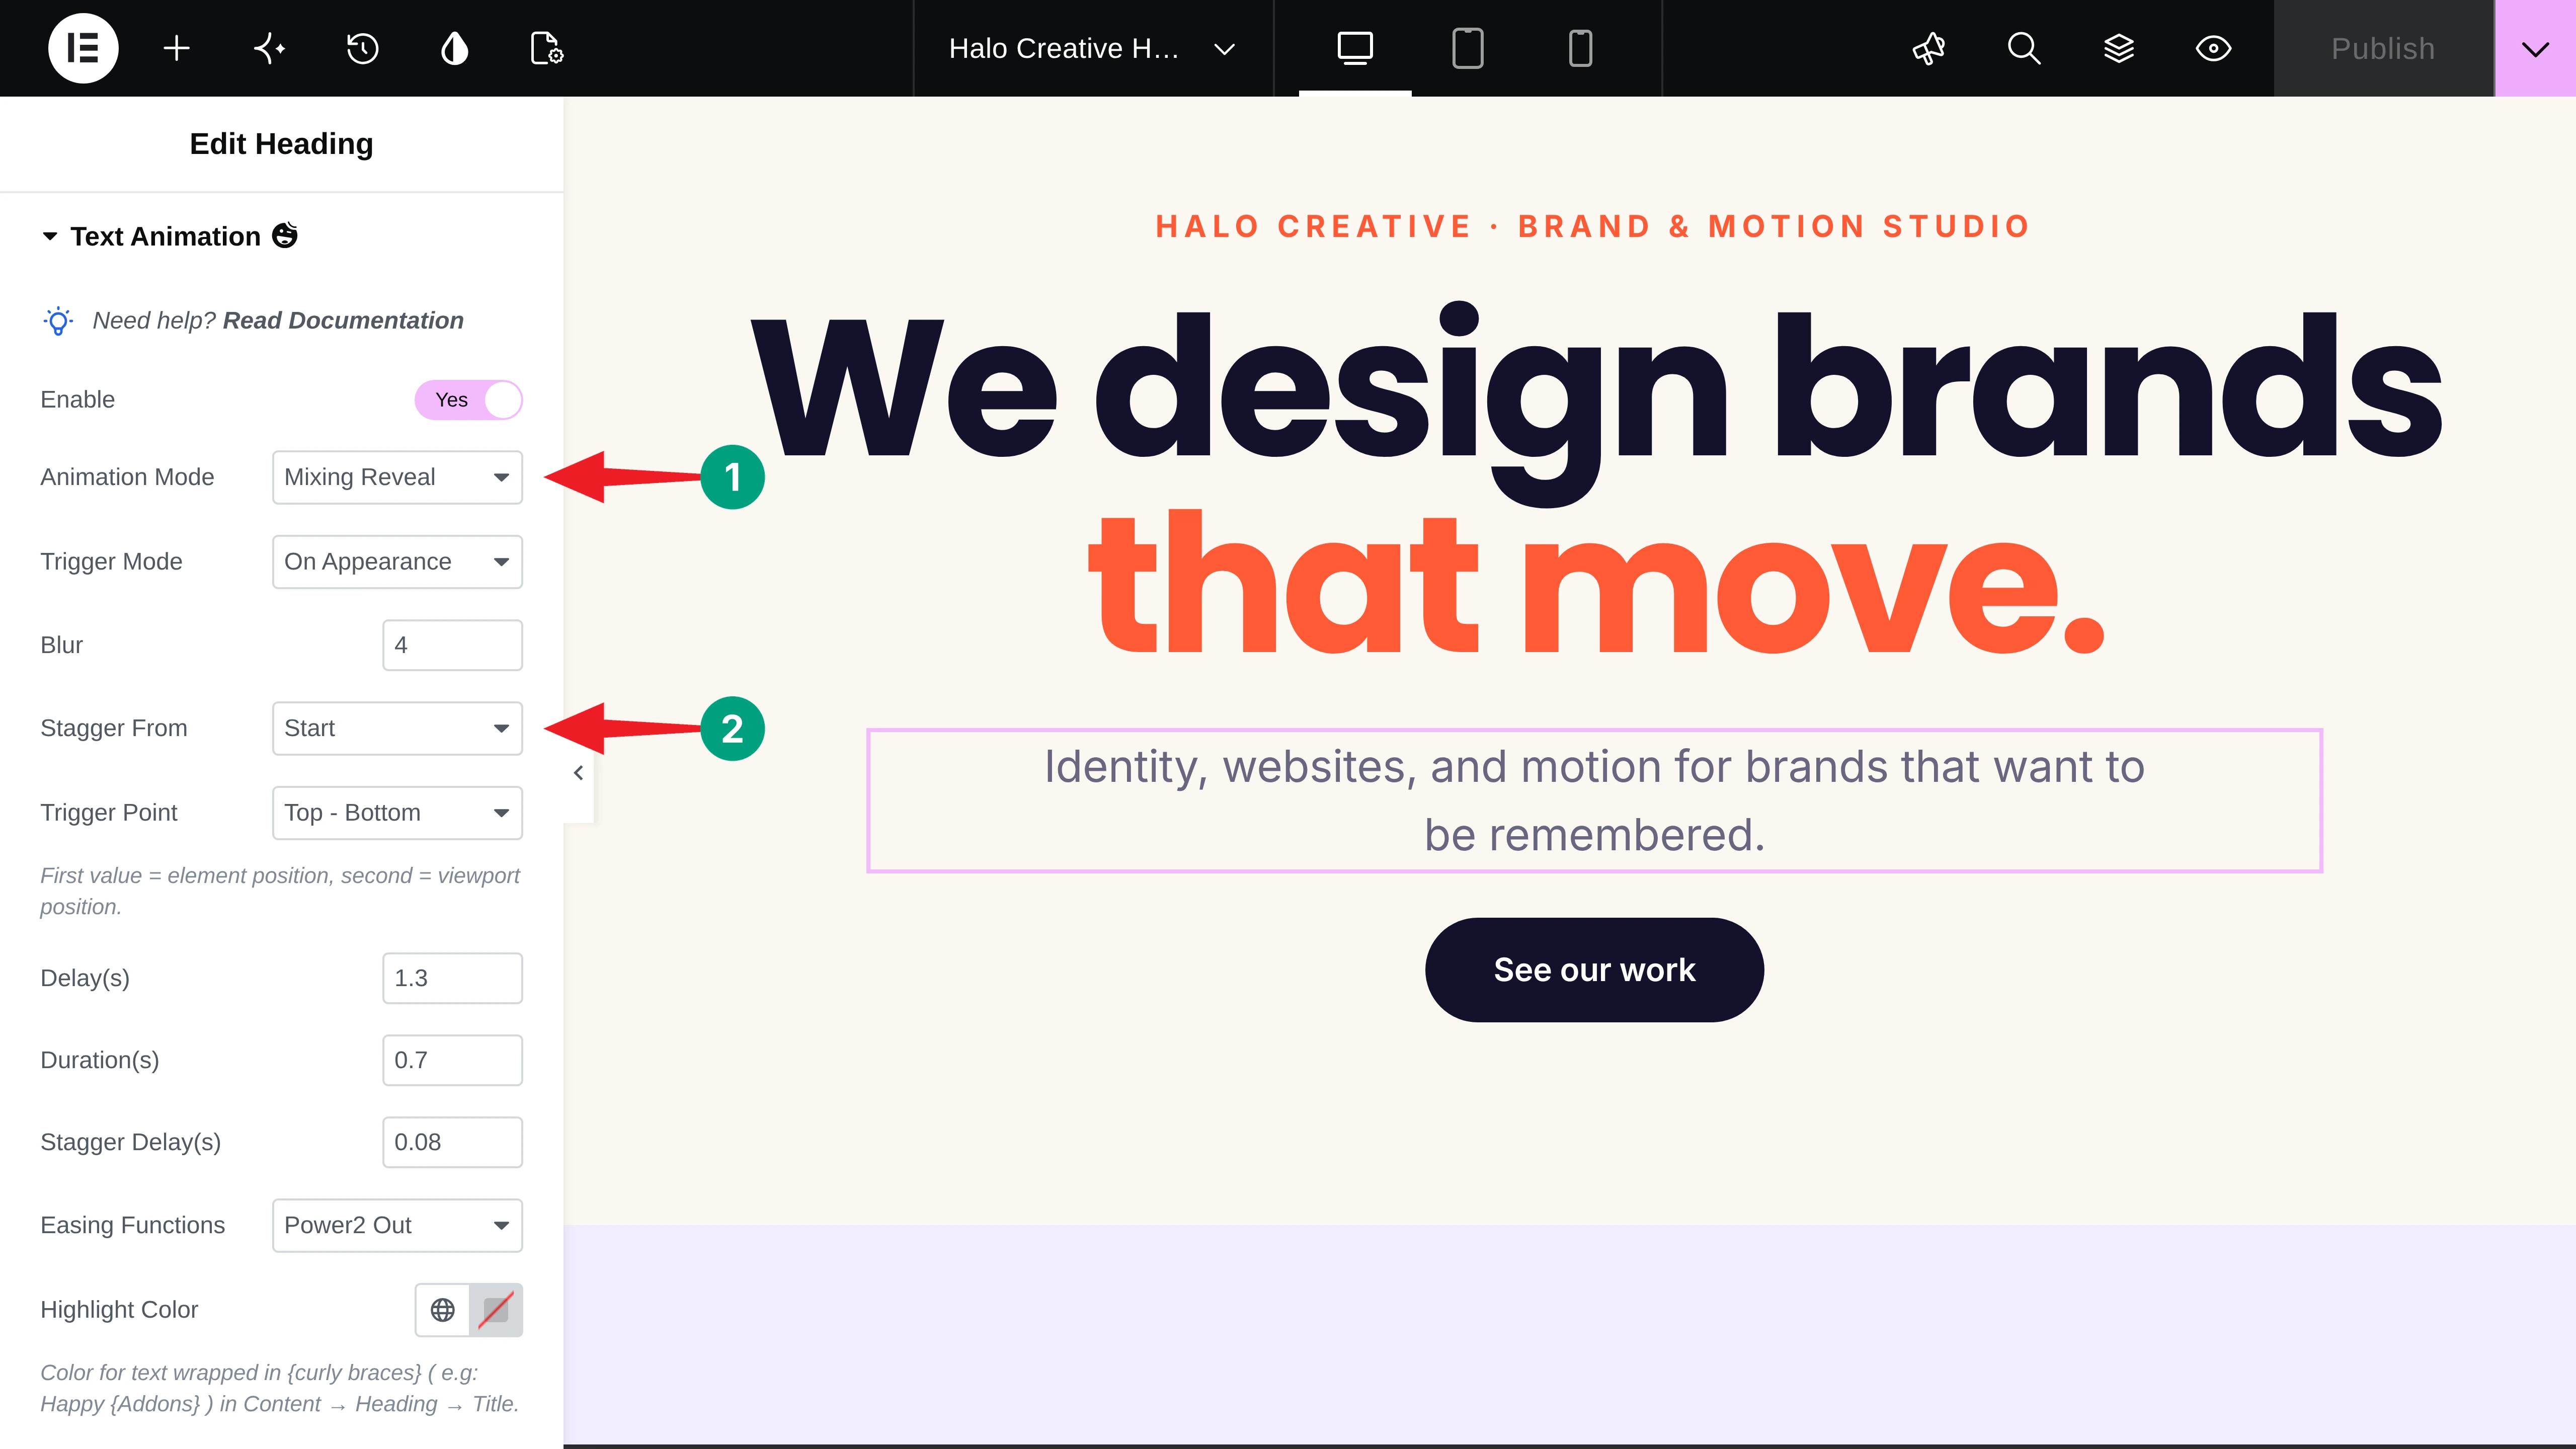
We set the Delay(s) to 1.3, so the words start after the headline, and the Stagger Delay(s) to 0.08.
Very Important: Text Animation works with the Heading widget. If your subheading is in a Text Editor widget, switch it to a Heading widget with the p HTML tag.
Step 05: Choose Where the Stagger Starts
The Stagger From option changes the rhythm of the same animation. To show the difference, we added five cards with the word MOTION, each using a different Stagger From value:
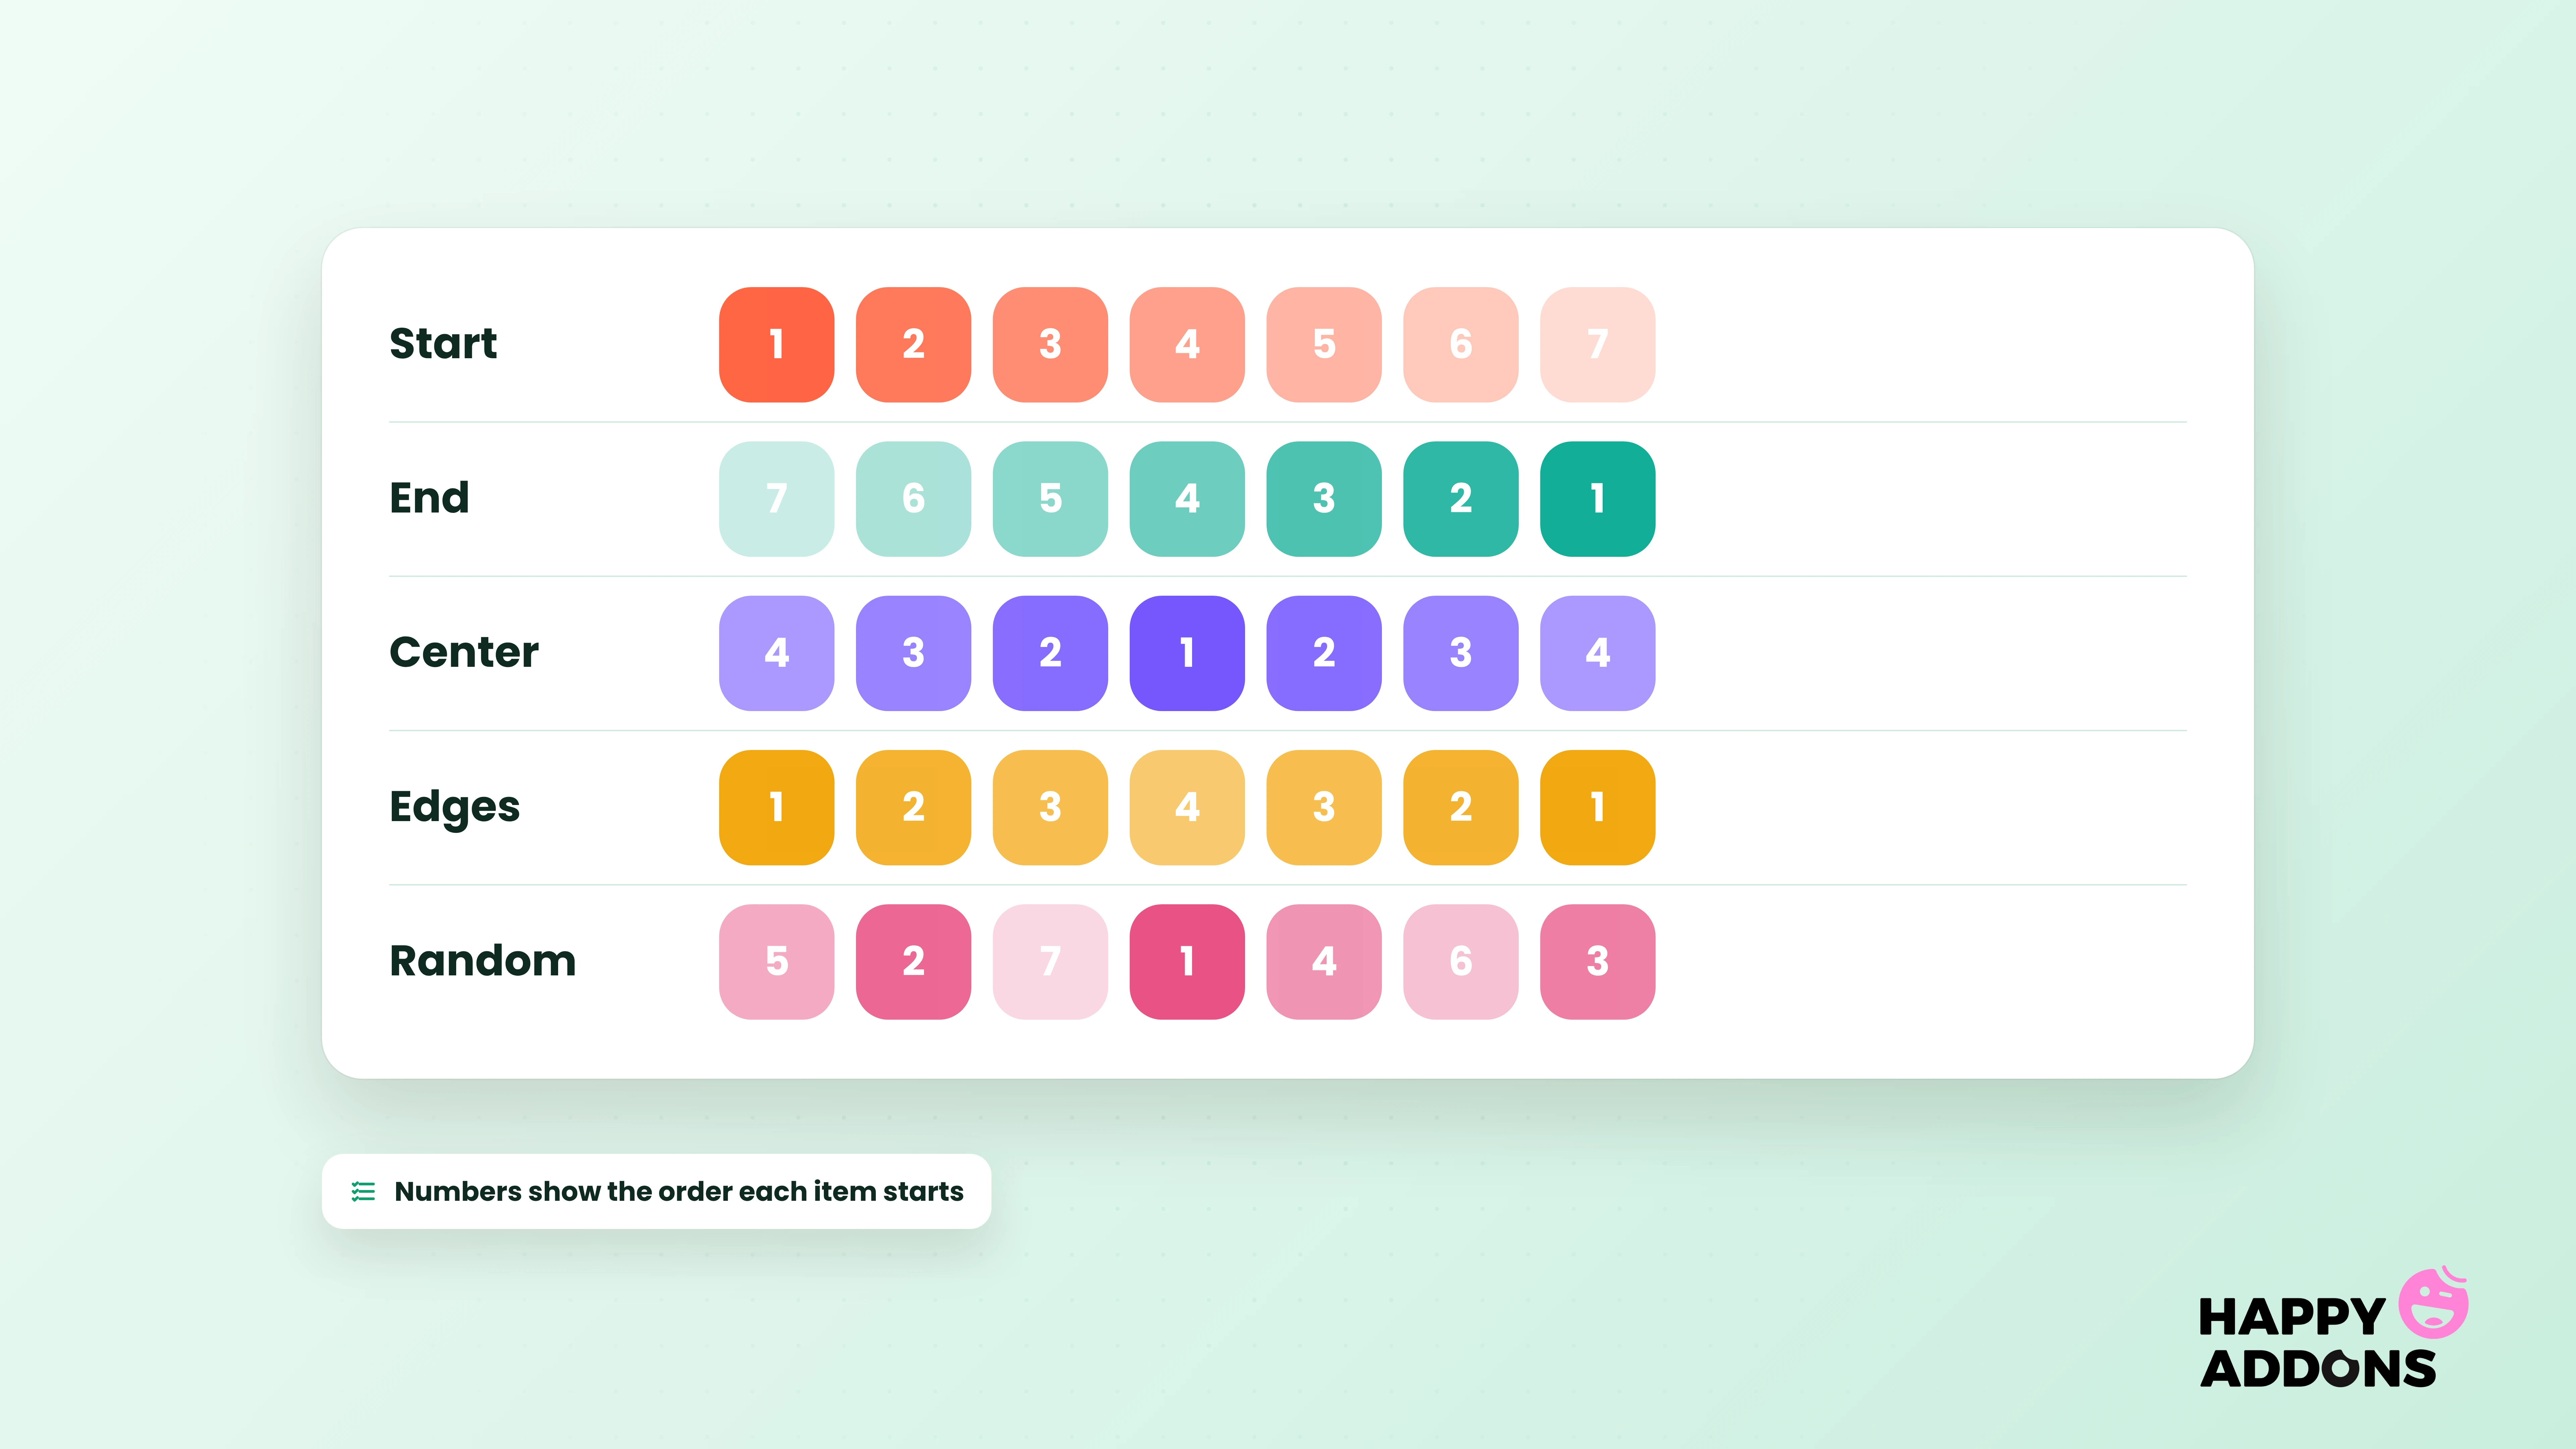
- Start: From the first letter to the last.
- End: From the last letter back to the first.
- Center: From the middle out to both sides.
- Edges: From both ends in toward the middle.
- Random: In a random order every time.
Select each heading and pick a value in Stagger From. We also set the Trigger Point to Bottom – Bottom, so each word starts when the whole card is visible.
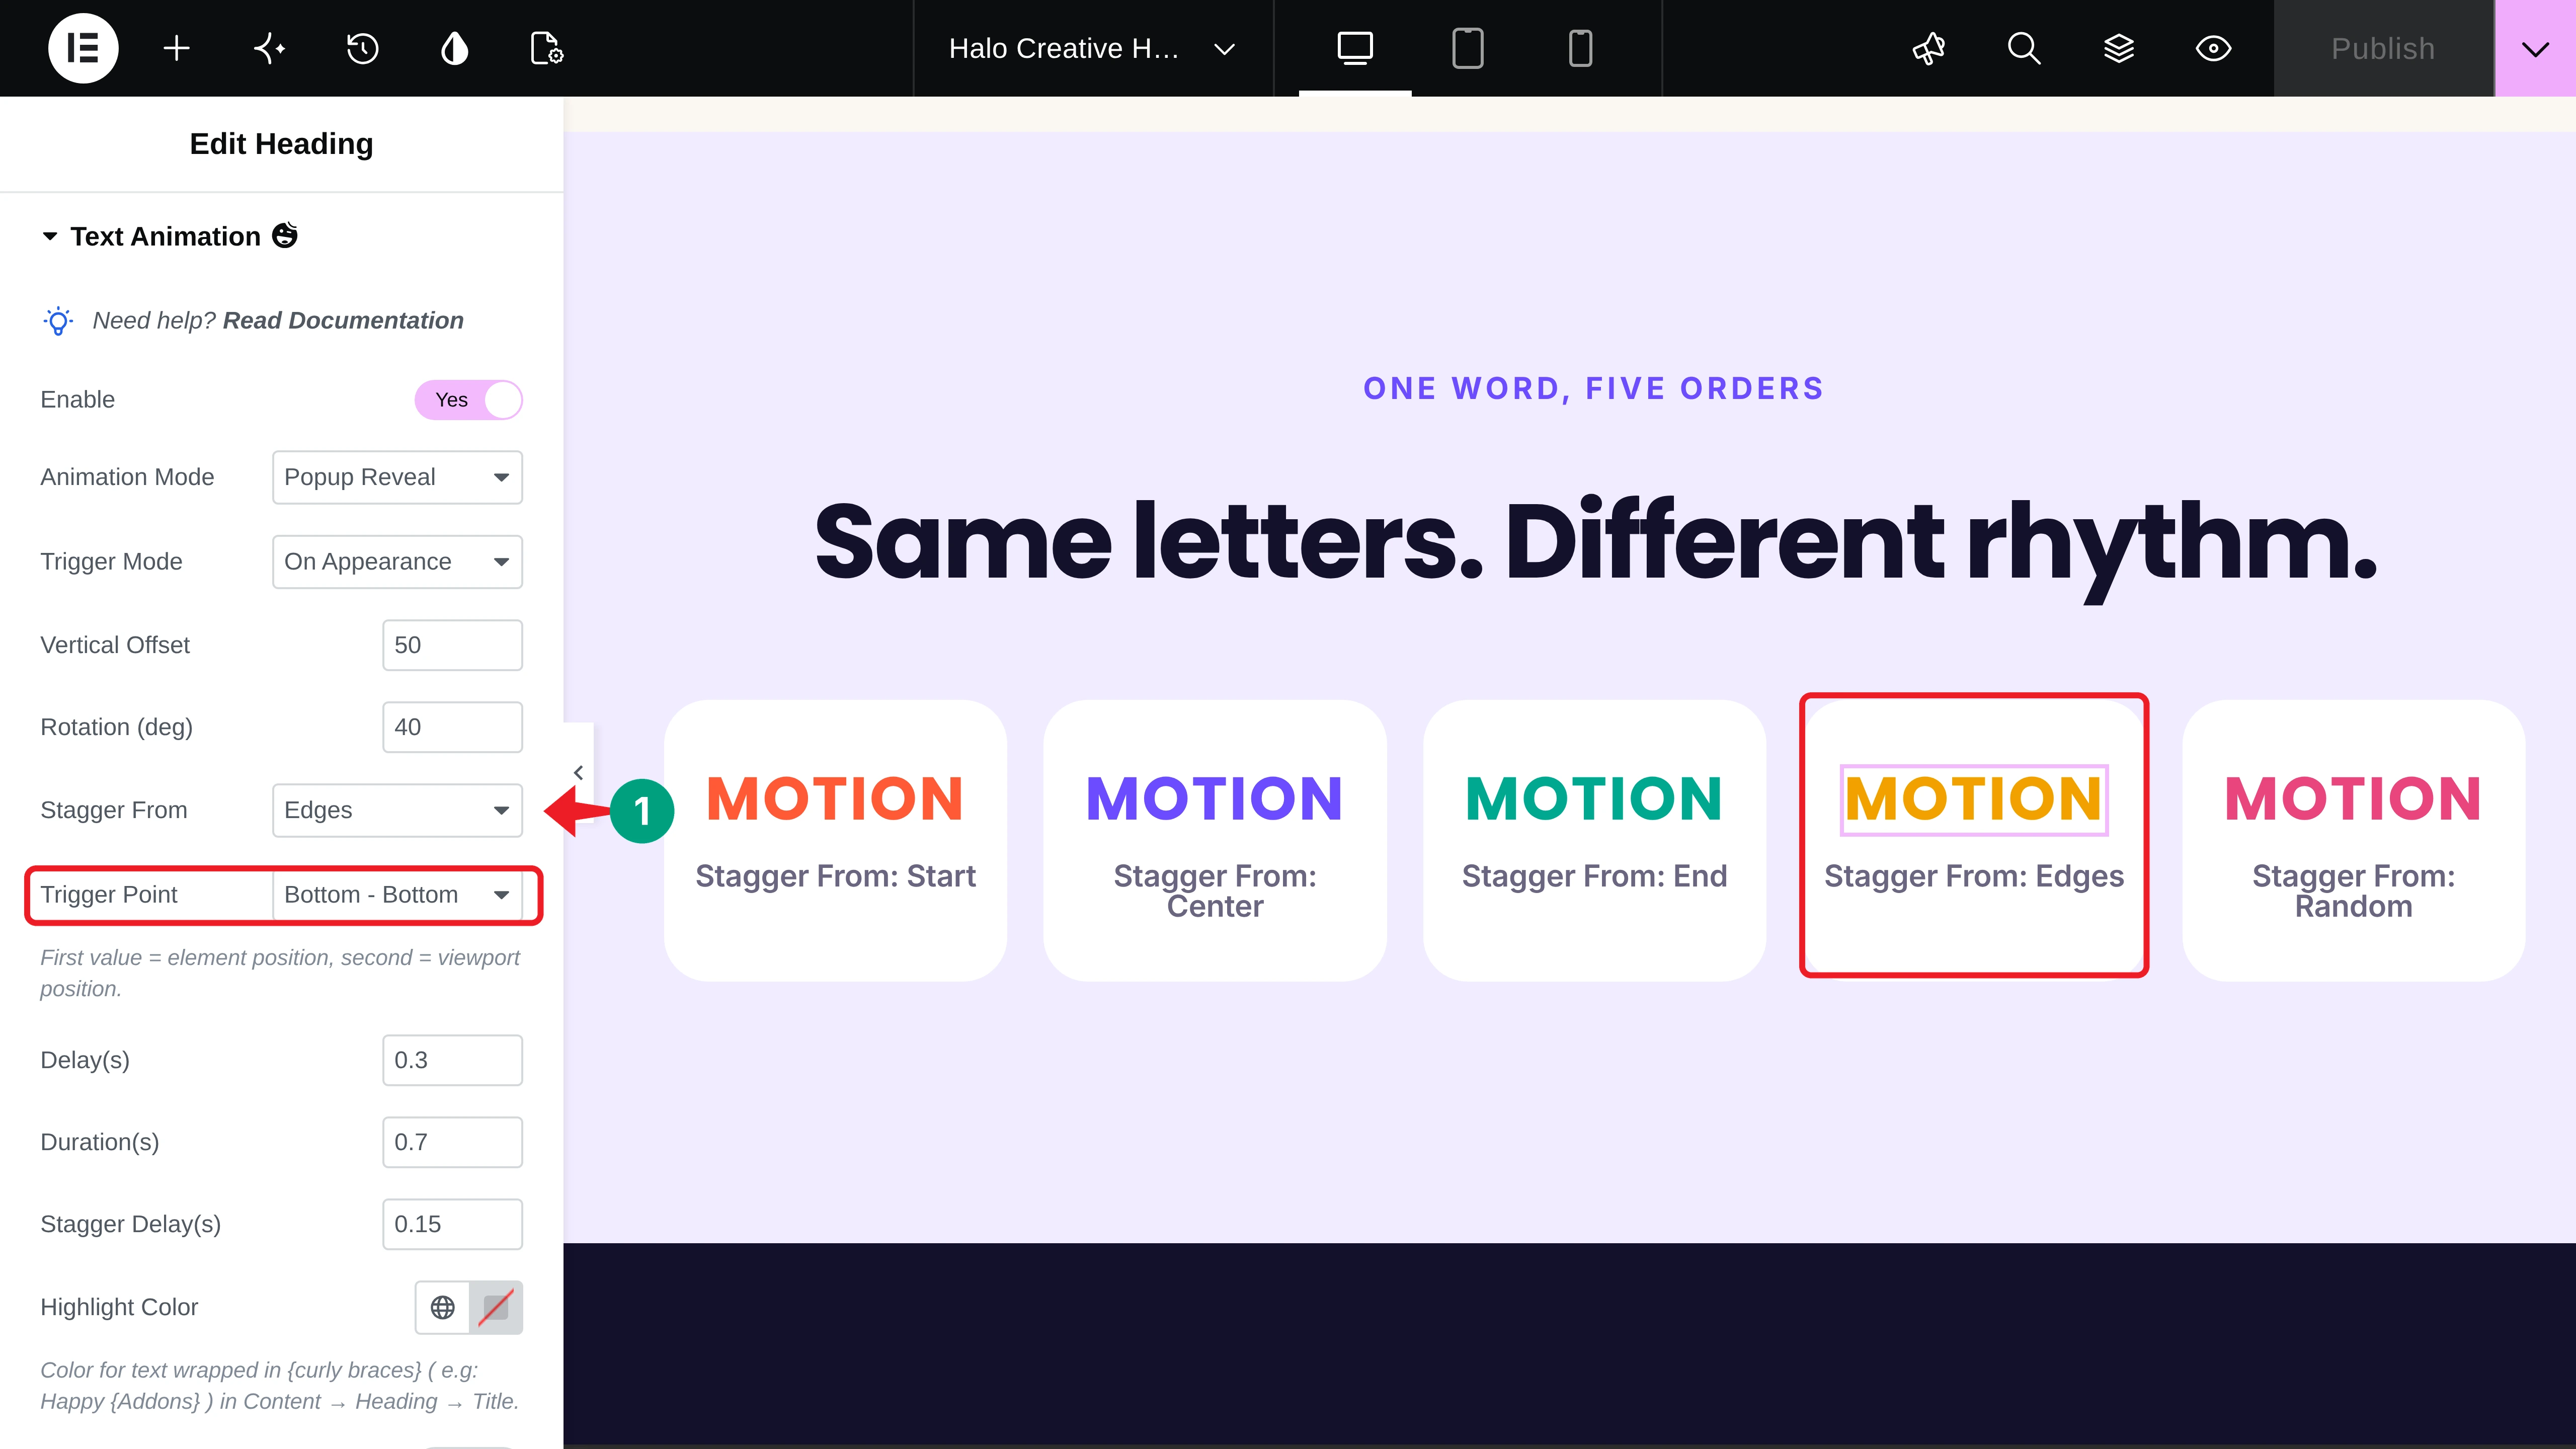
Let’s see all five side by side:
Step 06: Stagger Image Tiles on Scroll
Stagger works for images too. Select an Image widget, expand the Appearing Animation section in the Content tab, and toggle on Enable. Then choose Tiles Reveal from the Mode dropdown.
You’ll get options for the number of tiles, orientation, direction, and stagger delay. We used 8 vertical tiles that open from left to right, with a 0.09 second stagger delay.
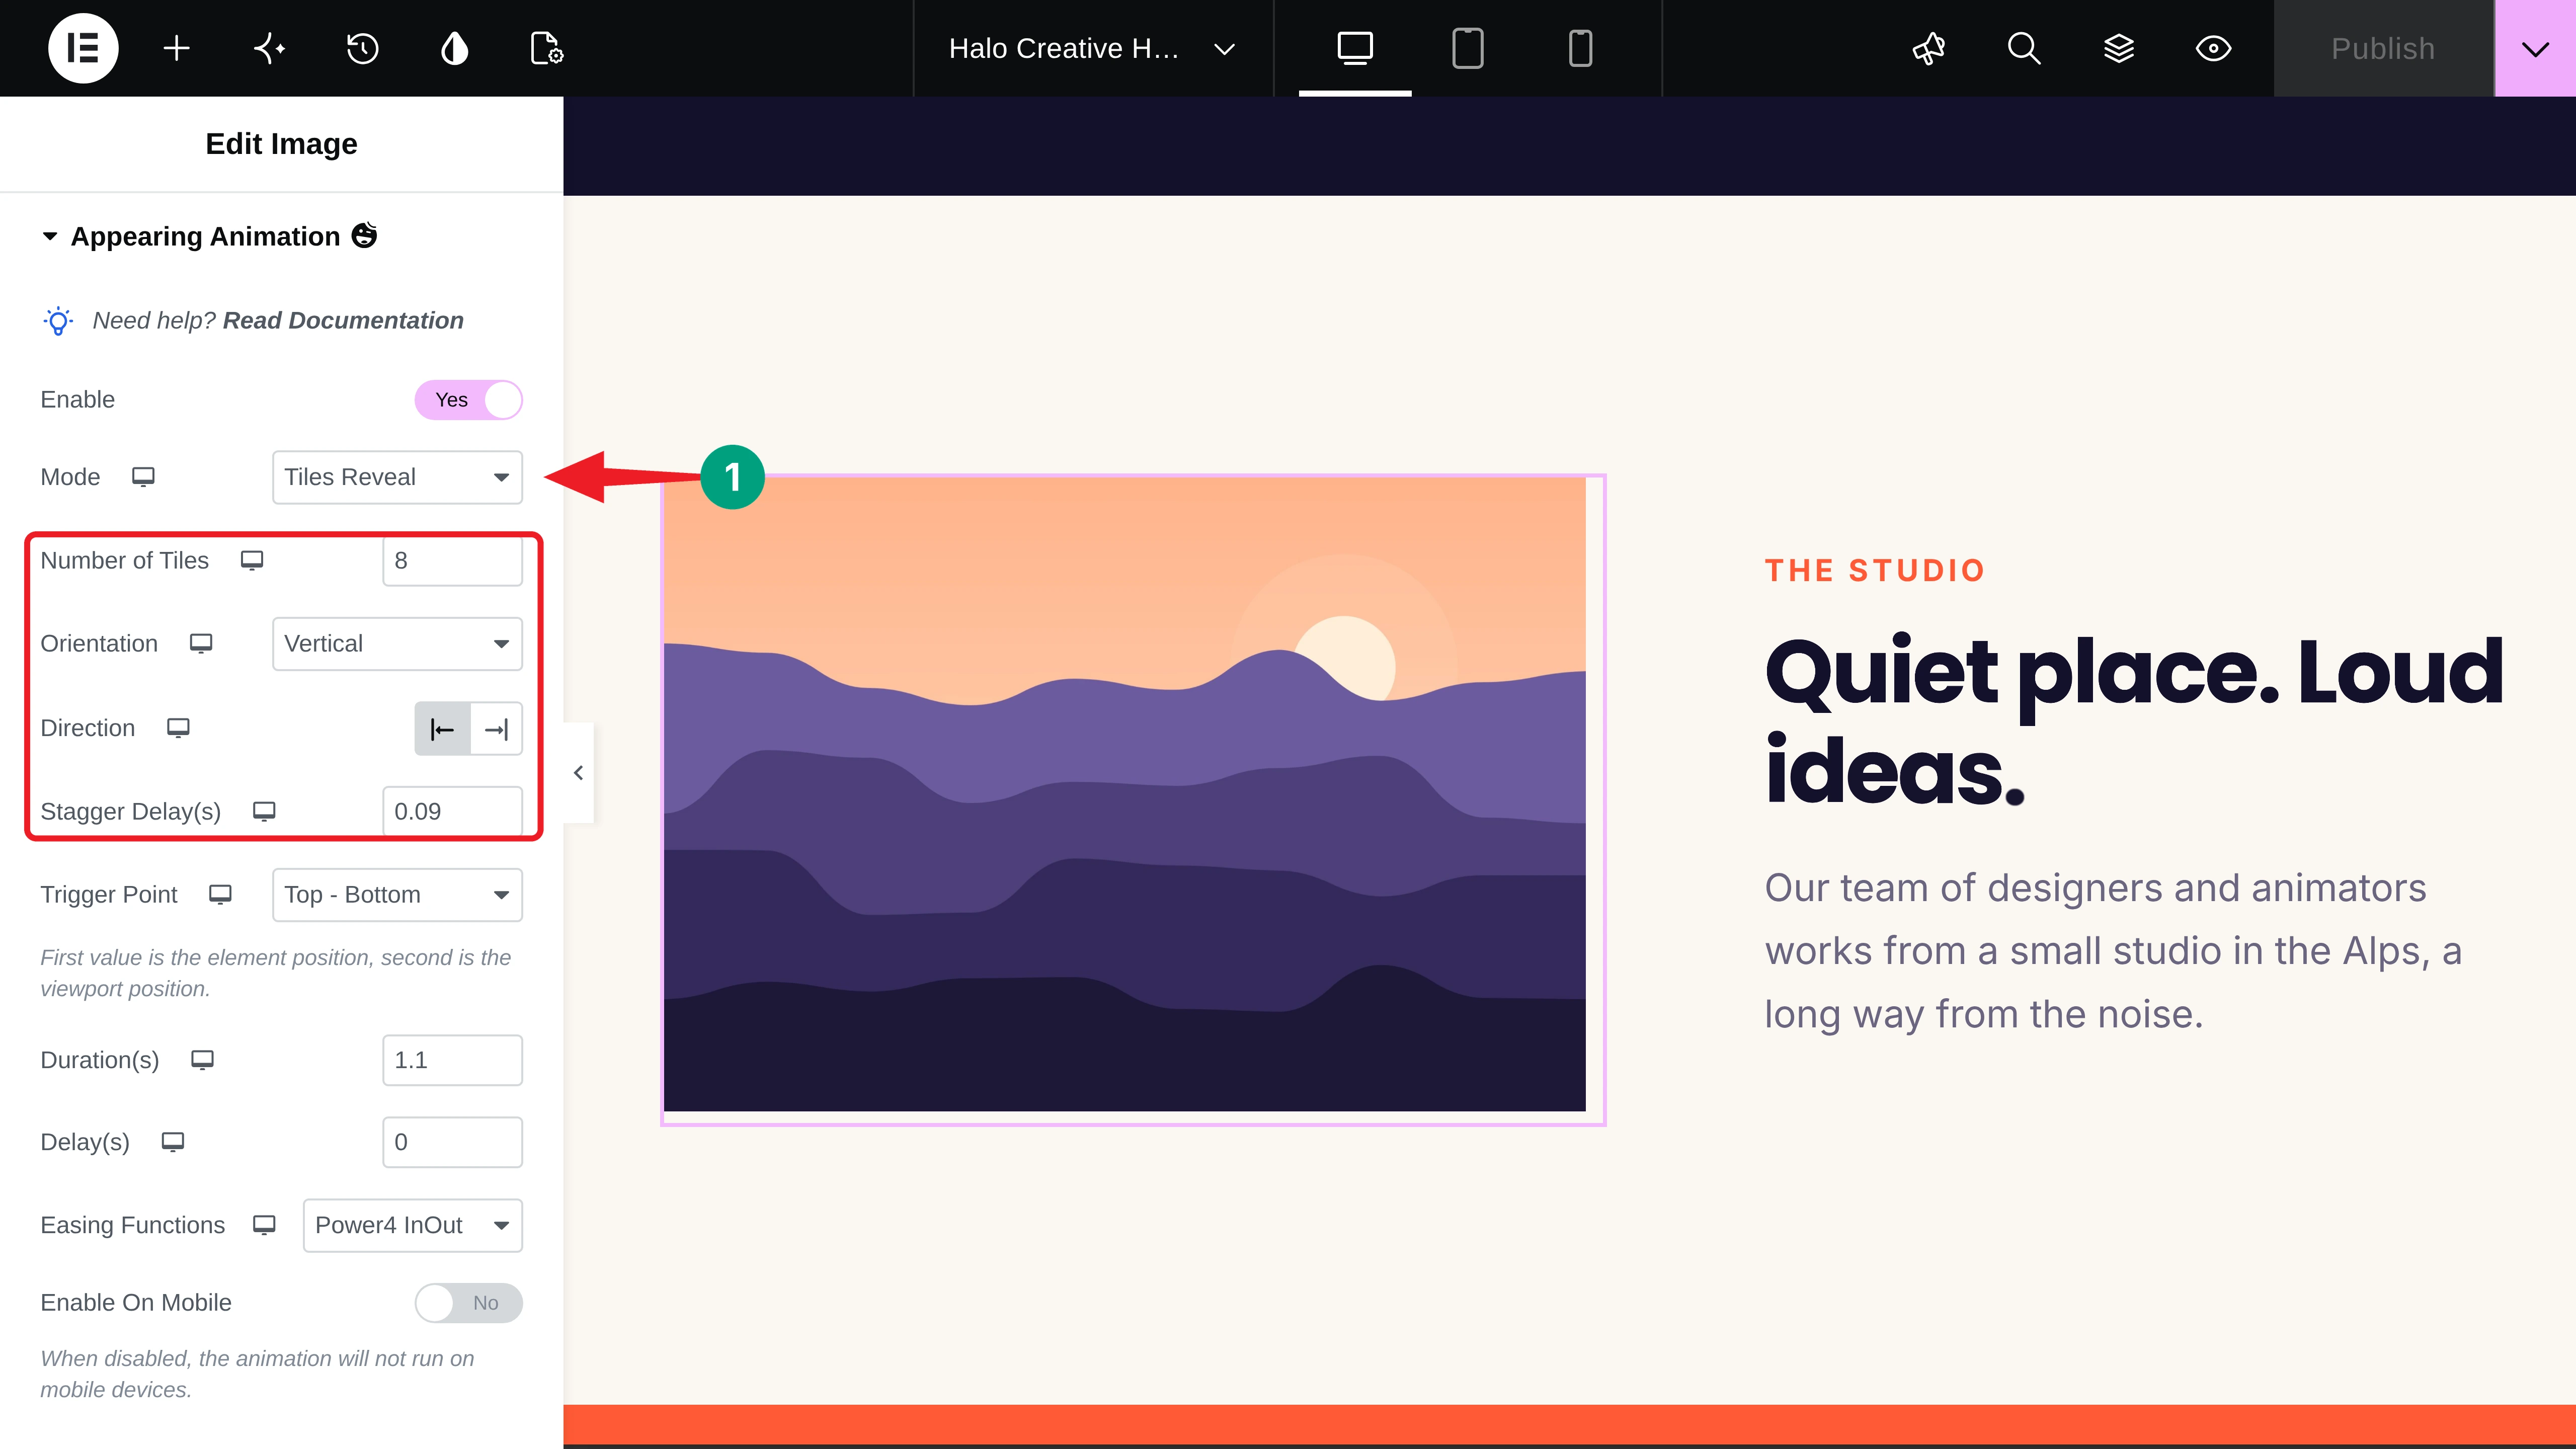
We also gave the heading next to the image a Smoky Reveal with Stagger From: Start, so both animate together:
Learn how to animate images on scroll in Elementor without coding.
Step 07: Create a Staggered Image Orbit with Image Cycle
The Image Cycle widget moves a group of images, one by one, into a circle around a heading. It’s perfect for showing off portfolio pieces or brand logos.
# Add the Image Cycle Widget
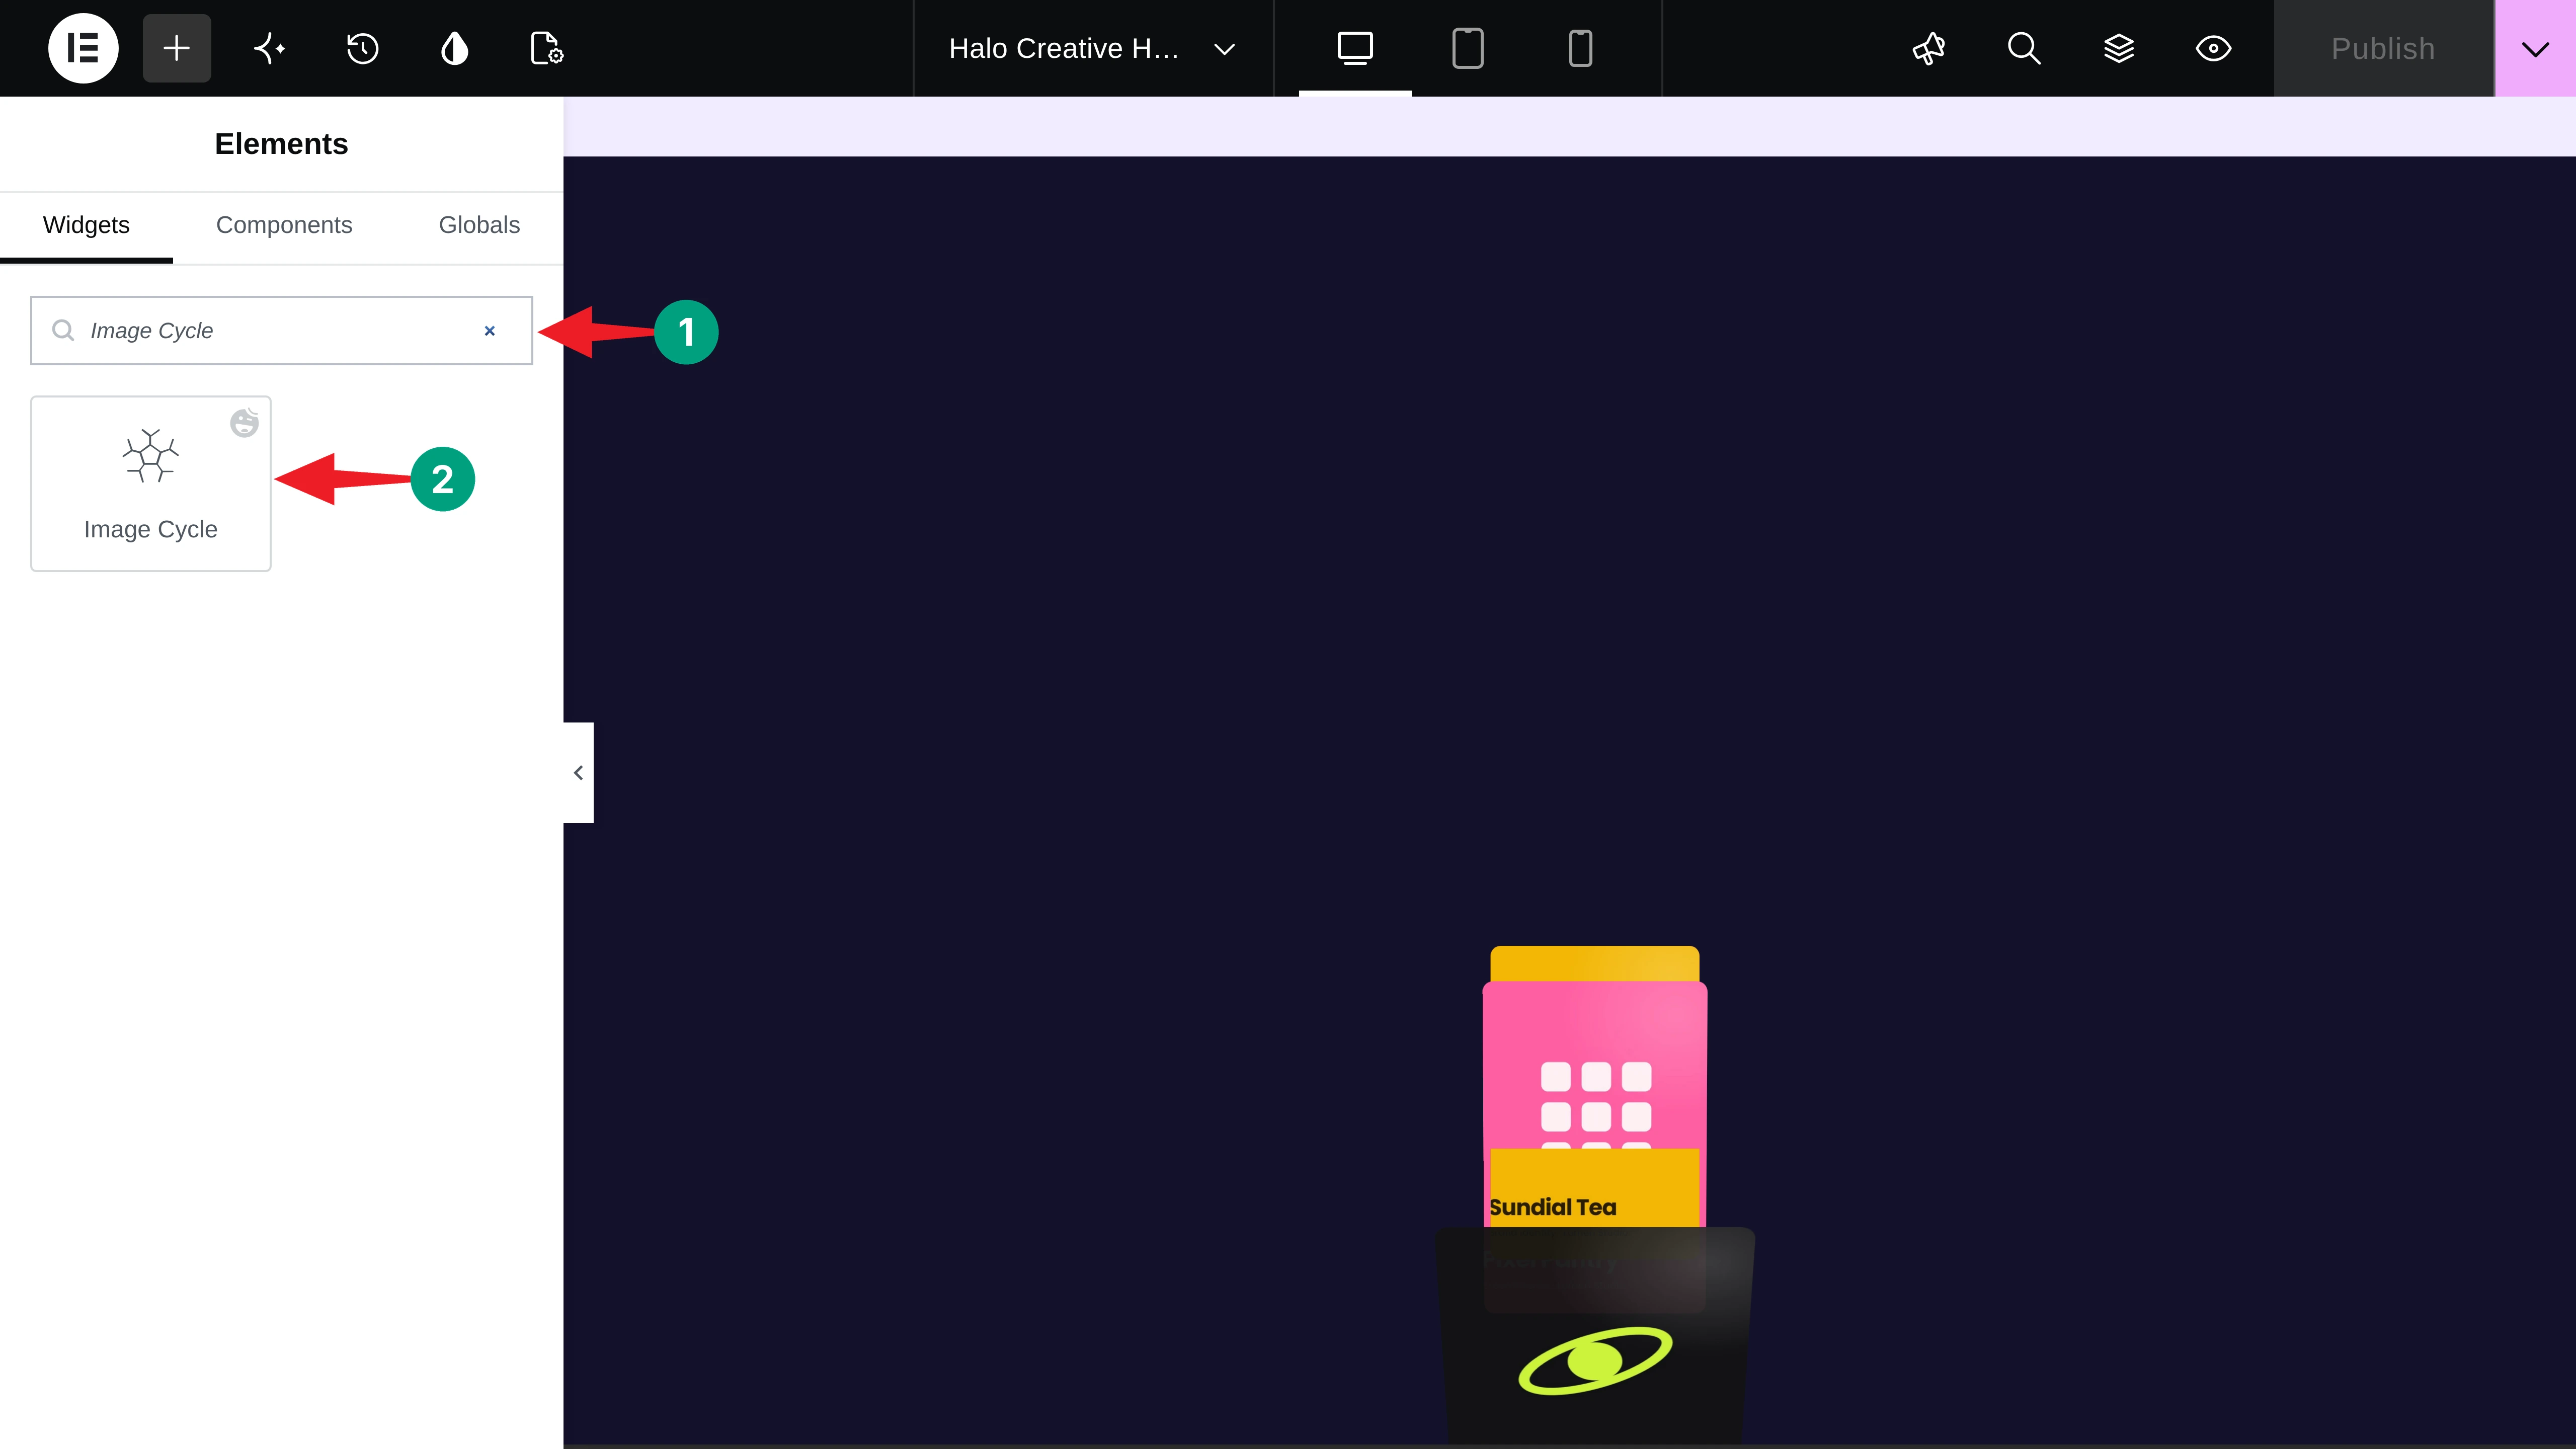
Click the + icon to open the Elements panel and type “Image Cycle” in the search box. Then drag and drop the Image Cycle widget onto the canvas.
# Add Your Images and Heading
In the Image Cycle Content section, choose an Animation Mode. We kept Variation 1 with the Entrance Direction from the bottom. Then click each item under Images to add a picture, and click + Add Item for more. We added eight brand cards.
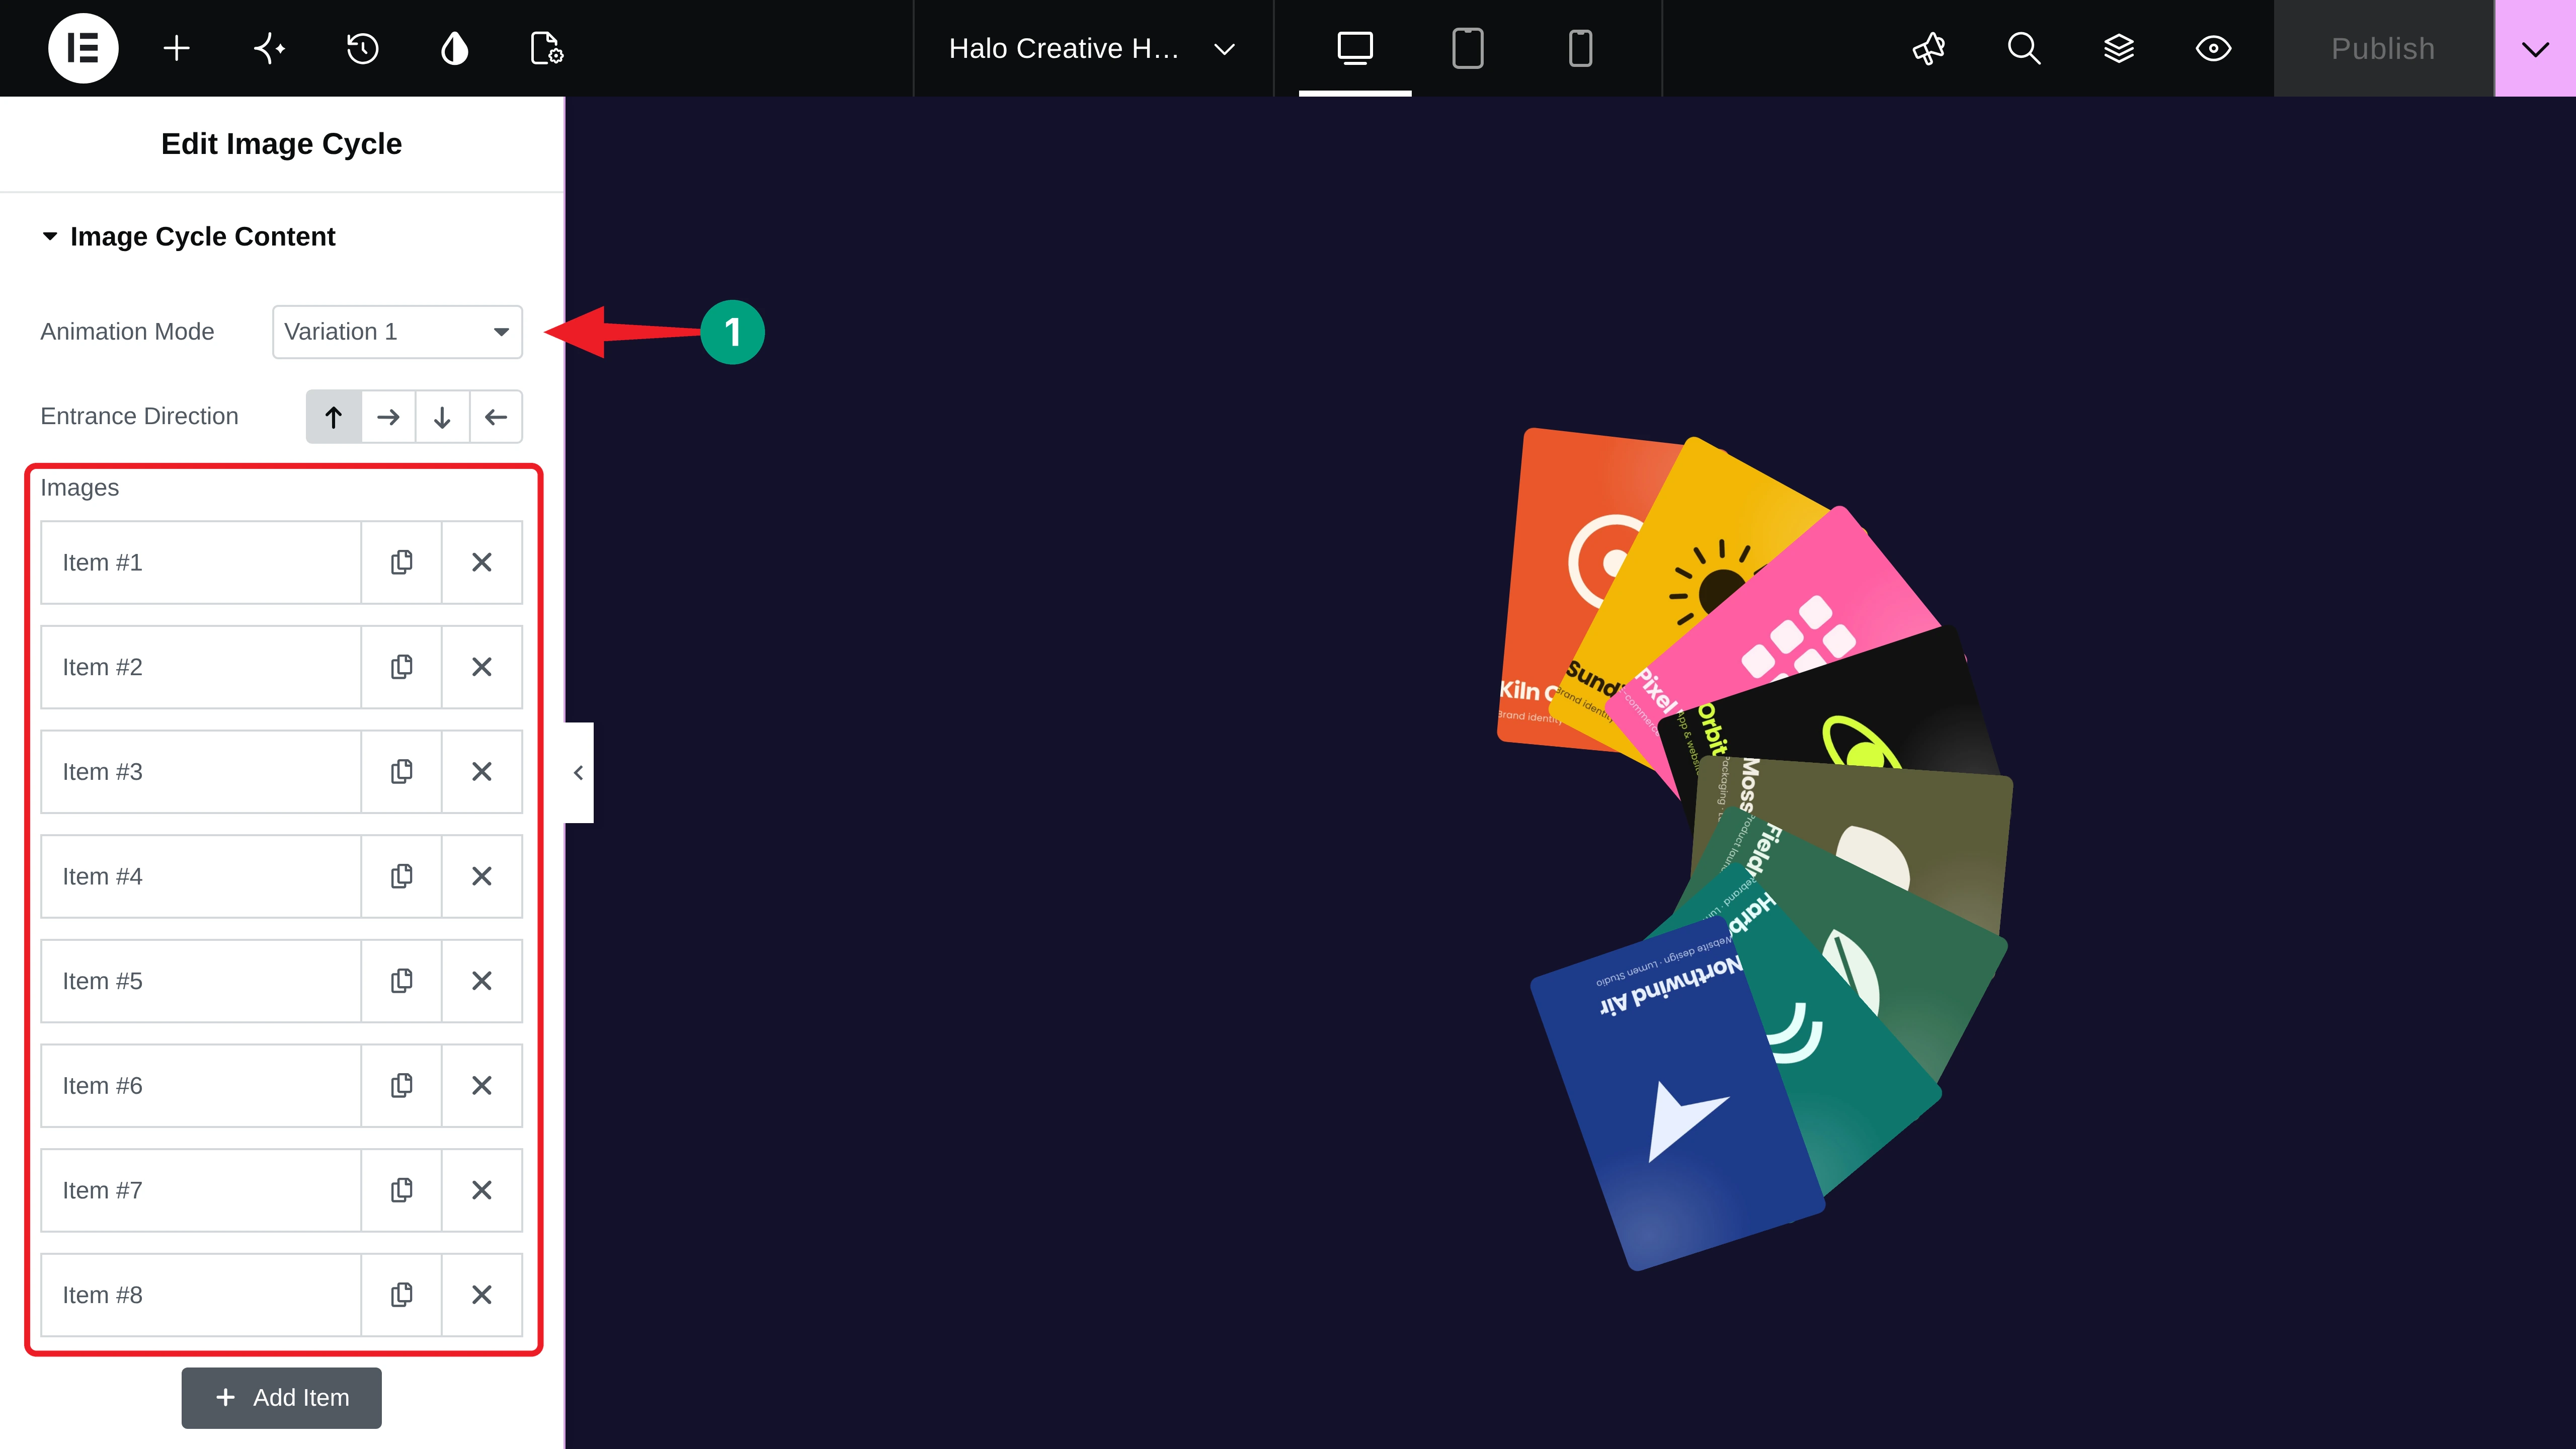
Below the images, type the Title, Title Second Line, and Subtitle. Ours say “Selected work” and “Eight brands we launched this year”.
# Set the Stagger Delay
Expand the Animation Settings section. Set the Stagger Delay to control the gap between each image. We used 0.14 seconds and a Final Circle Radius of 330 px.
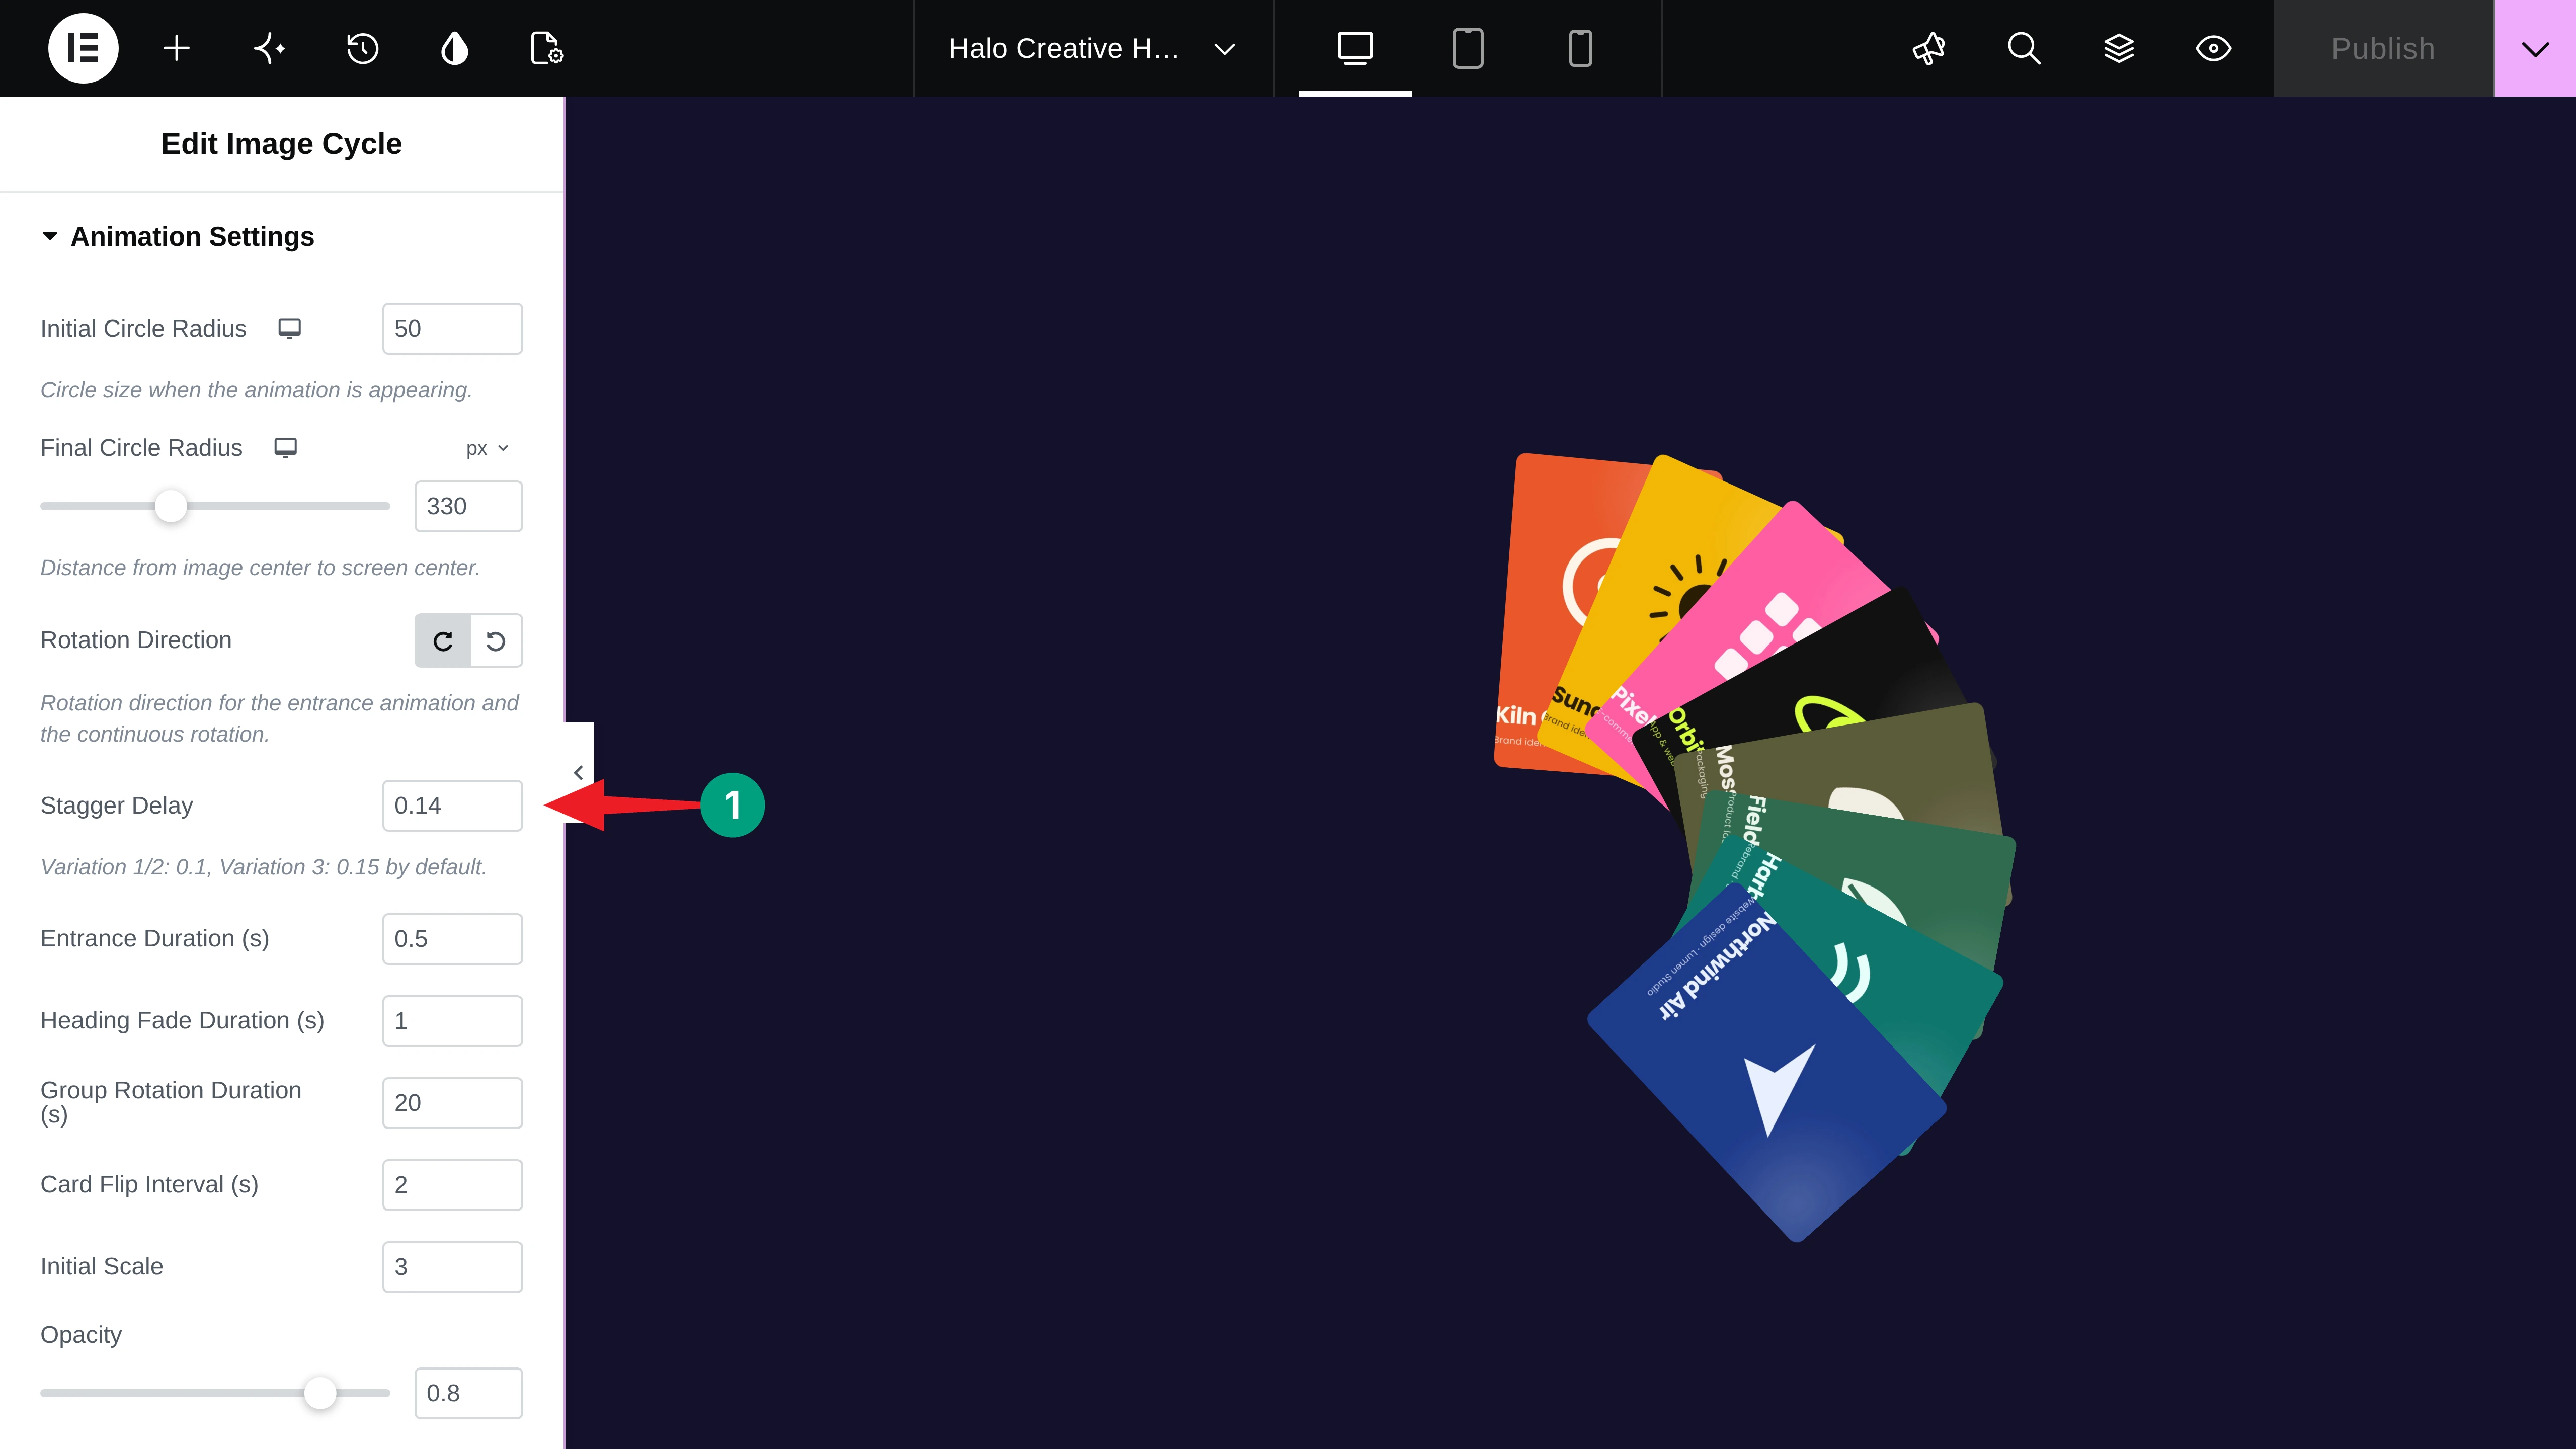
Further down, toggle on Animation Play On Appearing. Otherwise, the animation plays when the page loads, and visitors may miss it if the widget is lower on the page.
Step 08: Stagger Letters in a Call to Action
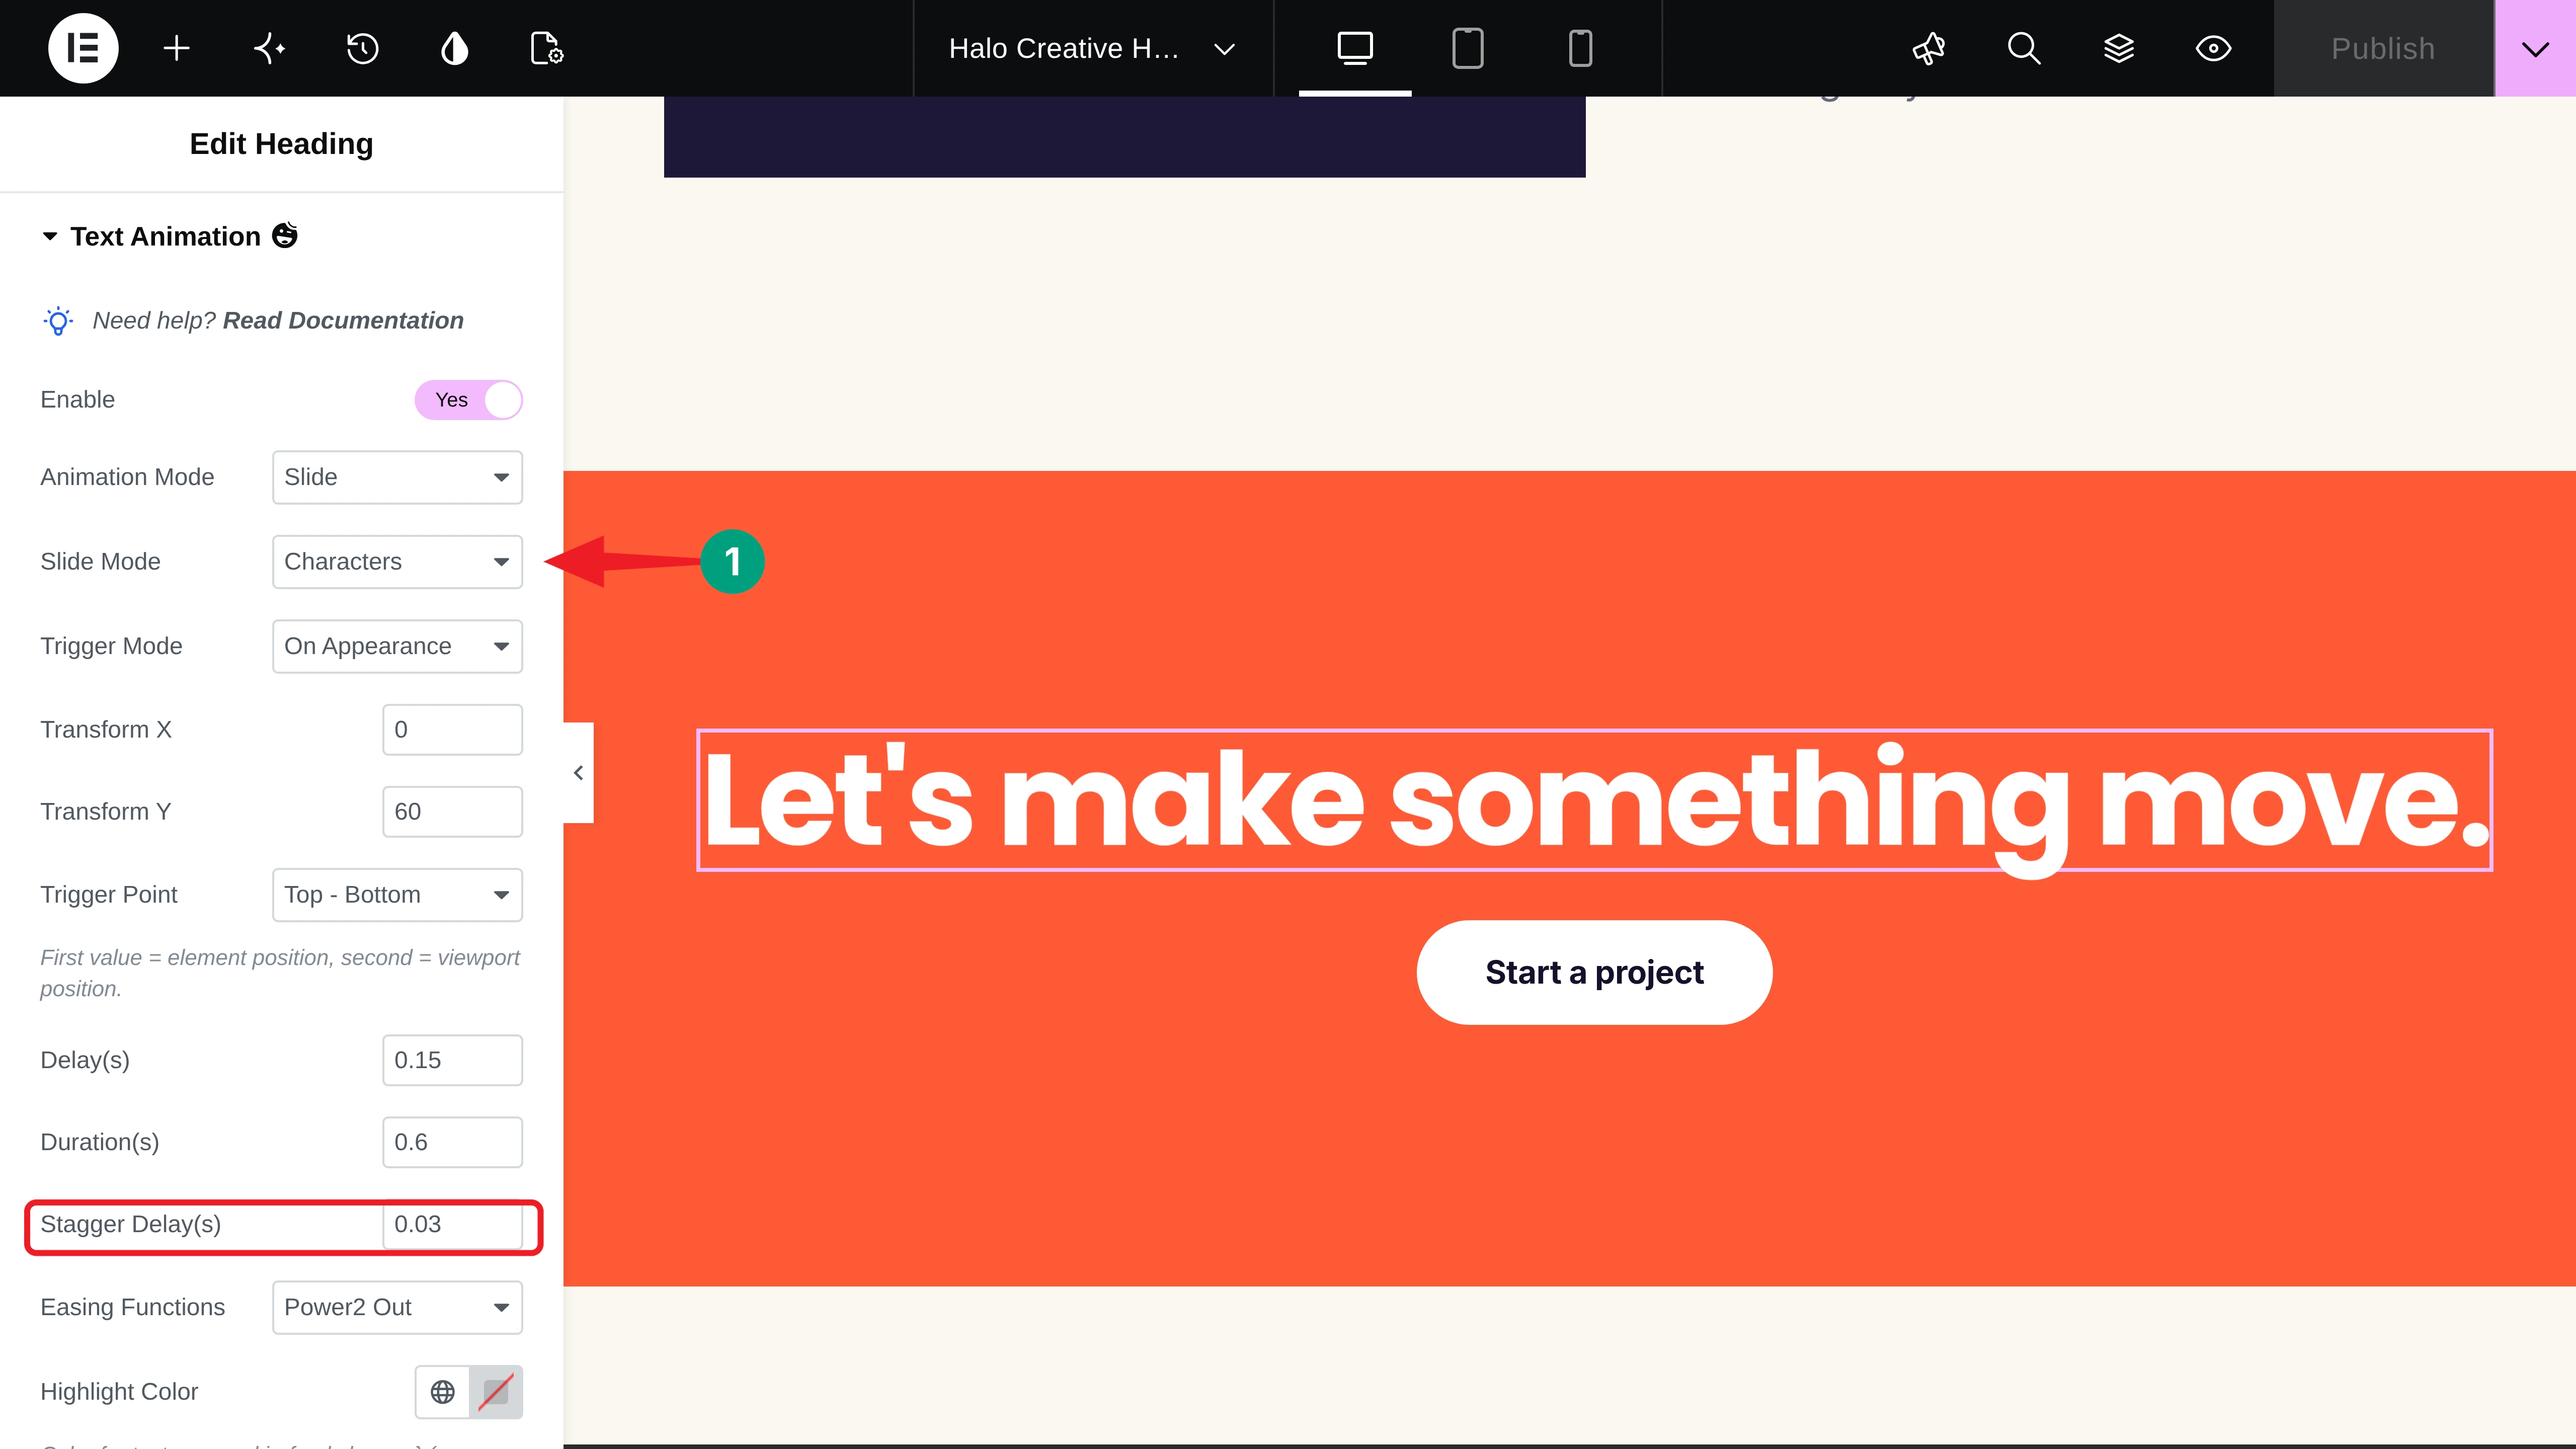
Finally, let’s add a quick stagger to the call to action. Select the CTA heading, enable Text Animation, and choose Slide as the Animation Mode. Set the Slide Mode to Characters, Transform Y to 60, and Stagger Delay(s) to 0.03.
Step 09: Preview and Publish the Page
Note: Text Animation and Appearing Image Animation are off on mobile by default. Turn on Enable On Mobile in each section if you want the effects on phones too.
When everything looks good, click the Publish button. Then open the page and scroll through it. You can see that it’s working fine on our end. Hope it will work well on your end as well.
Thus, you can create stagger animations in Elementor using GSAP and HappyAddons, without writing a single line of code.
Tips for Better Stagger Animations
Follow these tips to make your stagger animations look smooth and natural without slowing down the user experience.
a. Keep the Stagger Delay Small
Use a stagger delay of 0.02 to 0.05 seconds for letters and 0.06 to 0.15 seconds for words, cards, or tiles. Longer delays can make animations feel slow, especially when several elements appear one after another.
b. Match the Stagger From to the Layout
Choose Center for centered headlines and Start for left-aligned text to match the natural reading direction. You can also use Edges or Random for short, bold words when you want a more creative reveal effect.
c. Don’t Stagger Everything
Limit stagger animations to two or three important elements per screen to keep the design clean. Animating too many elements at once can make the page feel busy and distract visitors from the main content.
d. Put Each Line in Its Own Heading
Letter-based stagger modes may split words when a heading wraps onto multiple lines. Place each line in a separate Heading widget, as we did in our hero section, to keep the words together across different screen sizes.
FAQ on How to Create Stagger Animations in Elementor
In this section, we have answered some frequently asked questions commonly found on Google, online forums, and social media.
Are HappyAddons stagger animations free?
Yes. Text Animation, Appearing Image Animation, and the Image Cycle widget are part of the free HappyAddons plugin.
Do I need to write GSAP code?
No. HappyAddons loads GSAP for you. You only choose the mode, stagger delay, and stagger from options in the Elementor panel.
What’s the difference between Delay and Stagger Delay?
Delay waits before the whole animation starts. Stagger Delay is the gap between each letter, word, or tile inside it.
Which modes support Stagger From?
Smoky Reveal, Popup Reveal, and Mixing Reveal. The other Text Animation modes stagger from the first item.
Do stagger animations work on mobile?
Yes, but they’re off on mobile by default. Turn on Enable On Mobile in the Text Animation or Appearing Animation section.
Final Thoughts!
Stagger animations add rhythm to a page. Now you know how to create stagger animations in Elementor using GSAP: letters and words with Text Animation, image tiles with Appearing Image Animation, and image orbits with the Image Cycle widget.
Start with your main headline, keep the stagger delay small, and test the page on desktop and mobile before you publish.
If you have any questions, mention them in the comment box below. You can also give a knock on our live chat box. Thanks for being with us till the end.
Before moving away, have a few more minutes to explore the post on how to create text reveal animations in Elementor with GSAP.