An online marketplace or an eCommerce marketplace is the paradigm of earning money while you sleep or enjoy your pastimes with your friends and family.
The big guns, for example, Jeff Bezos, Jack Ma, and Rob Kalin, are all the founders of multivendor marketplaces, and we know how famous and successful they are. And if you are thinking of having a multivendor marketplace, it’s never too late!
In this article, I will be showing you the easiest ways to build an eCommerce marketplace with Dokan and Elementor. Without any further adieu, let’s jump right in.
Is It Lucrative to Build an eCommerce Marketplace?
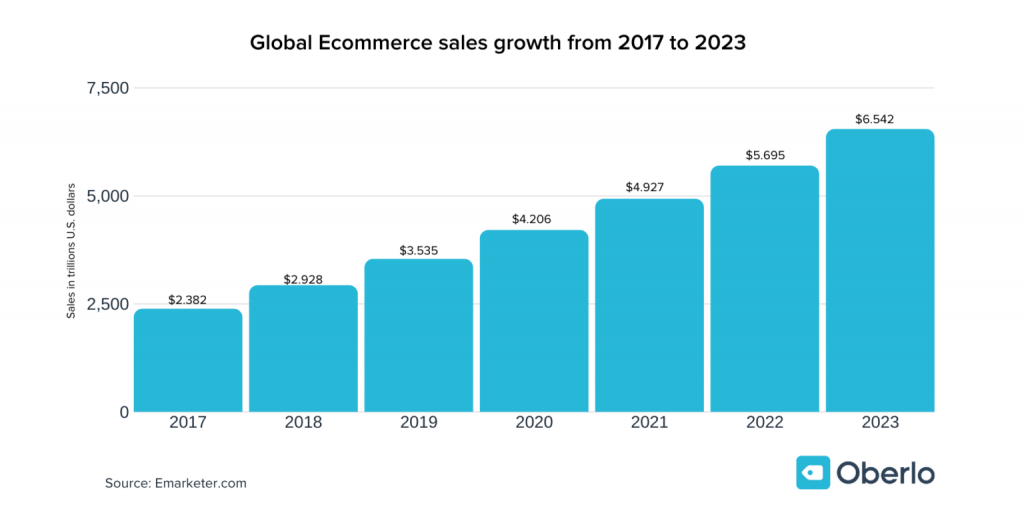
In case you are not convinced, in 2019, total global eCommerce sales amounted to more than $3.5 trillion dollars. The exciting fact is that this number is expected to grow continuously over the next few years.
Of the total global retail sales in 2019, 14.1 percent came from online purchases. That is, more than $14 of every $100 spent on retail goods was done over the internet.
This figure is expected to continue increasing and take a larger piece of the retail pie. By 2023, it’s estimated that total retail sales will hit more than $6.5 trillion, on which more than one in every five dollars spent (22 percent) will be carried out online.
Source: Oberlo
That’s how promising is the future of eCommerce business in the future.
Why Choose Dokan Multivendor
Dokan is a multivendor marketplace solution with which you can build any type of marketplace like Amazon, Alibaba, Etsy, Walmart at your disposal. You can use Dokan for any WordPress website. Currently, more than 60000 businesses from around the globe.
The solution is available in both free and premium versions. It is scalable for future business expansion. Meaning that you can activate its modules to extend its usability.
In case you are not convinced, it has earned two prestigious awards and it also has an outstanding 4.4 rating out of 5.
How to Build an eCommerce Marketplace with Dokan and Elementor
If you are already using WooCommerce, you have only one vendor or seller; That’s you! But to enhance the functionality to add multiple vendors you need a solution like Dokan.
To create an eCommerce marketplace, you need the followings:
- Domain & Hosting
- WordPress (Free)
- WooCommerce (Free)
- Dokan Lite (Free)
Now, you can jump to step-4 directly, if you are already using Woocommerce.
However, I assume that you are completely new to building a multivendor marketplace, so, I would like to start from the basics:
Step 1: Choosing Domain & Hosting
The first thing that you need is a domain and hosting. The domain is the URL of your marketplace. So, when choosing the URL, make sure that the URL resembles your brand name.
You can find numerous domain and hosting providers out there in the market. Bluehost, Namecheap, Kinsta, Godaddy, and Cloudways WooCommerce Hosting are the best.
Long story short, you can get a domain with just $10/year and host at $10/year. You can also get discounts if it is available there.
Related article: How Much Does It Really Cost To Build A WordPress Website?
You can get started with just $20 per year ($10 for hosting and $10 for domain). There might be discounts available to it might be less in that case.
Please note that when your website is flooded with a large number of visitors, you may need a better hosting provider in the future.
Related article: Top 15 Reliable Managed Hosting for WordPress and WooCommerce Sites
Step 2: Install the Best CMS, WordPress
When you are done buying a domain and hosting it, you will have to install the best content management system, WooCommerce. WordPress powers up more than 33% of websites, and its popularity is growing more than ever. What sits on top of it is that it comes with numerous SEO (search engine optimization benefits), too.
You can download WordPress from here.
After downloading the zip file, you can upload it easily from the C panel of your hosting. Here is a detailed walkthrough that correctly guides you on how to install WordPress the easy way.
Step 3: Install and Activate WooCommerce
Now, it’s time to install the best eCommerce solution, WooCommerce, on your website. It is completely free!
If you are in doubt about the popularity of WooCommerce, 42% of total websites are using WooCommerce for their solution.

To install WooCommerce, navigate to the WordPress Admin Dashboard > Plugins > Add New > Search for ‘WooCommerce’. After that, install and activate the plugin.
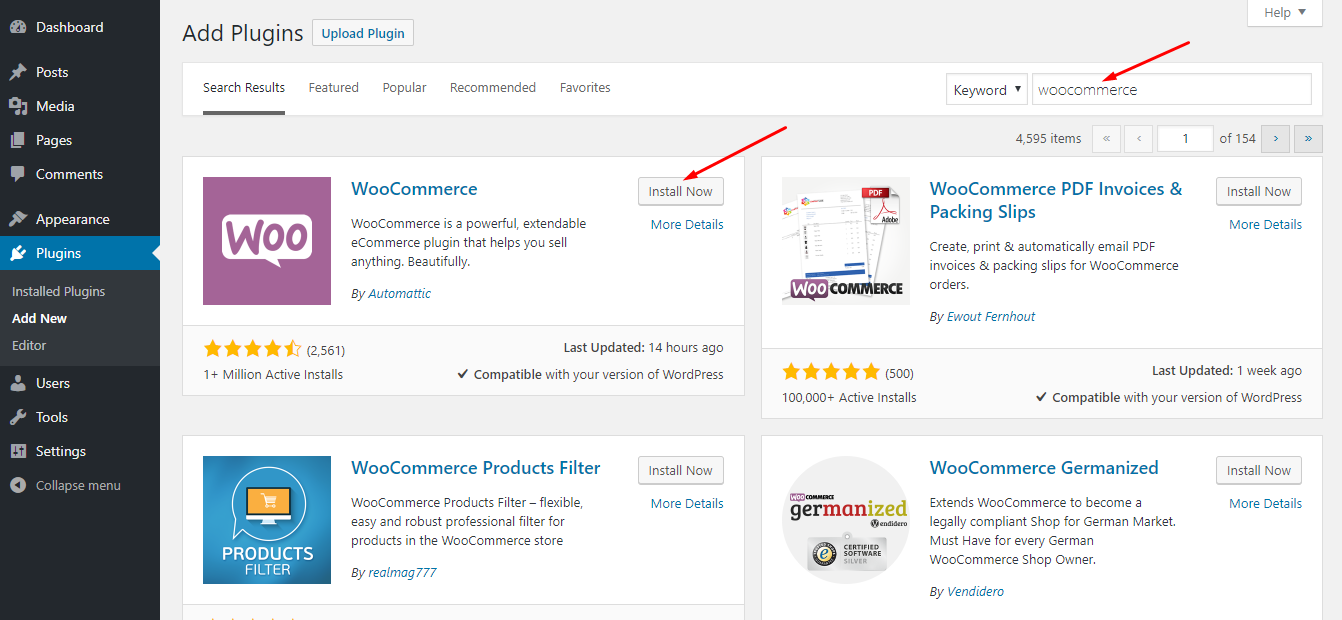
After activating WooCommerce, you will get a fantastic setup wizard that will allow you to configure payment gateways like Stripe, PayPal, and other fundamental things for your store. WooCommerce for your store.
For further assistance, you can also watch this video to complete the setup wizard:
Step 4: Time to Extend WooCommerce with a Multivendor Solution
Now, you are all set to install and activate the best multi-vendor marketplace solution, Dokan.
To install, navigate to the WP Admin Dashboard > Plugins > Add New > Search for ‘Dokan’. Then, install and activate Dokan.
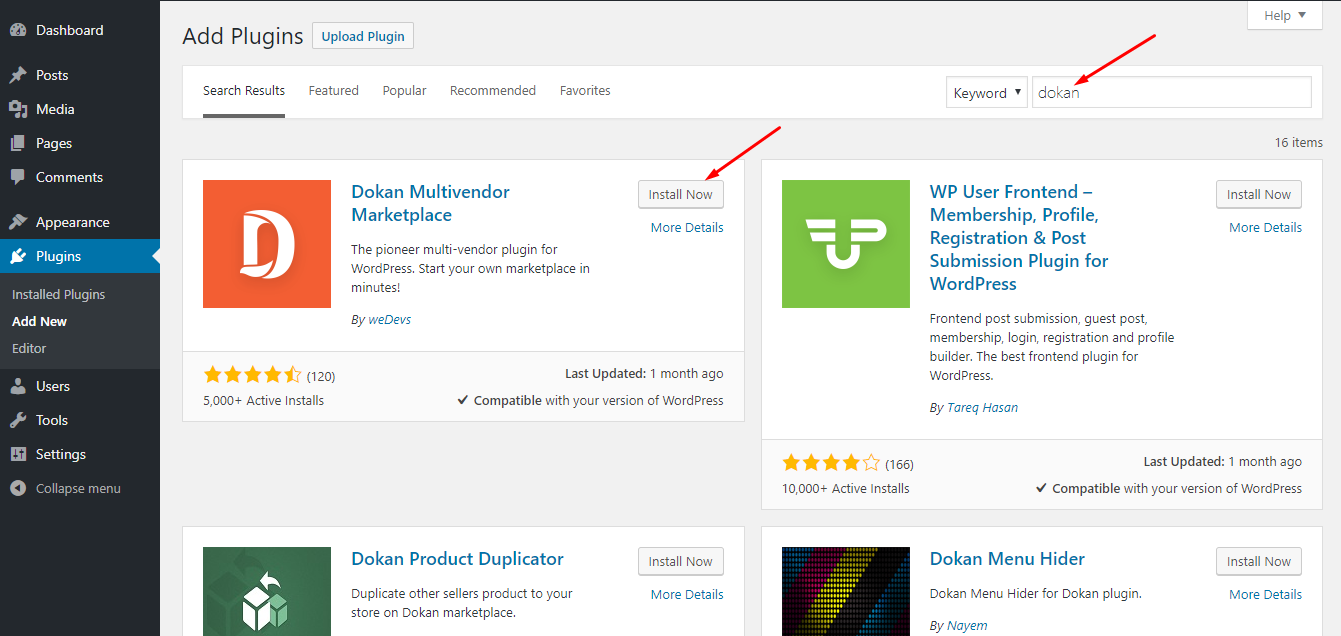
Step 5: Configure Dokan
After activating Dokan, you will get an amazing setup wizard, much like WooCommerce. Get help from this video to complete the setup wizard:
While completing the setup wizard, you have to ensure that you enabled the New vendor selling and set the vendor commission percentage for each order.
Then, keep the payment methods enabled that you have and set the minimum withdrawal limit for your vendors. After that, check the completed box so that vendors can request withdrawal only when an order is completed.
Step 6: Turn on the Anyone Can Register option
Next up, make sure to turn on anyone who can register so that your vendors and customers can register on your site. You can do it from the WP Admin Dashboard > Settings > General > Turn on Anyone can register.
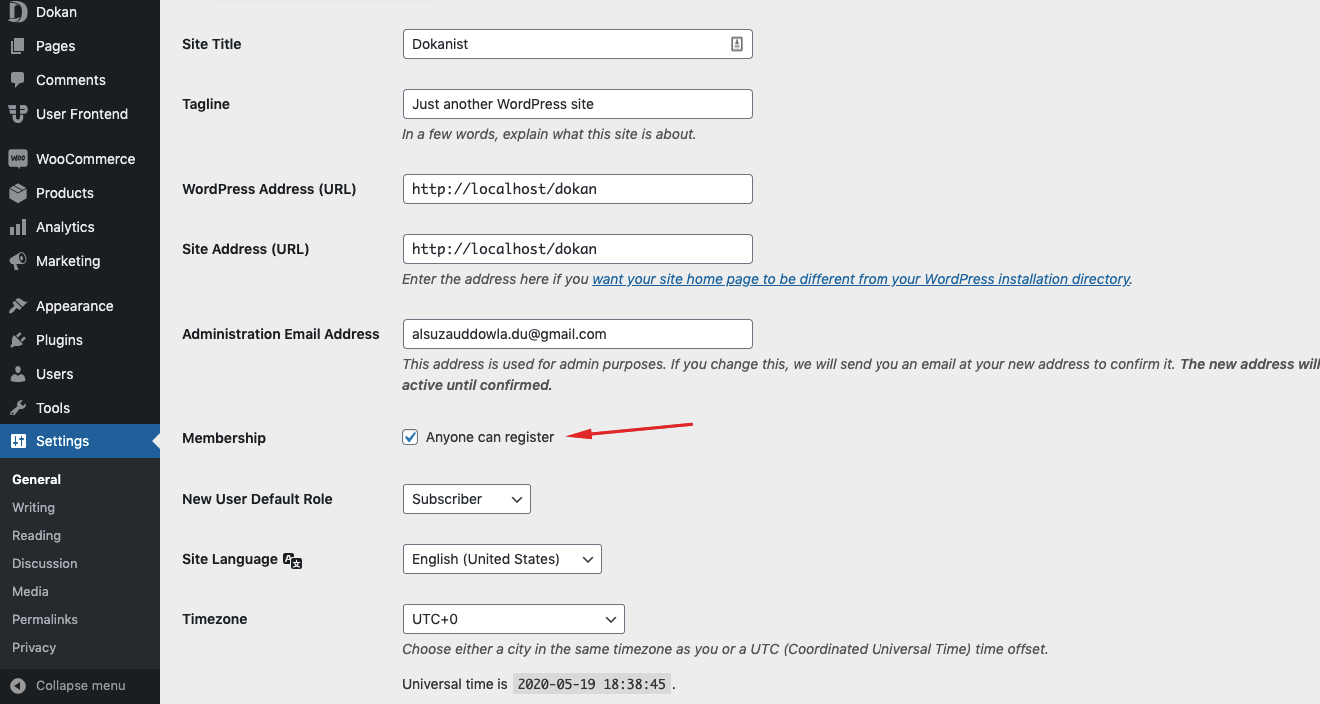
Fortunately, Dokan comes off with its own vendor and customer registration pages.
Step 7: Set a Theme for Your Marketplace
Using an appropriate theme is really important for any eCommerce store. A good theme can help create a good impression on your visitor’s mind.
Interestingly, Dokan comes with not only a special free theme but also supports a host of premium themes. For the free theme, go to this page and download the zip version. Then, upload the zip file by navigating to the WP Admin Dashboard > Themes > Add New > Upload a Theme > Upload the zip file and then activate the theme. It’s super easy!
Check out for Dokan Premium themes
Now, Your Marketplace is up and Running!
Now, after registering several vendors and uploading products by your vendors, your site will look like this from frontend:
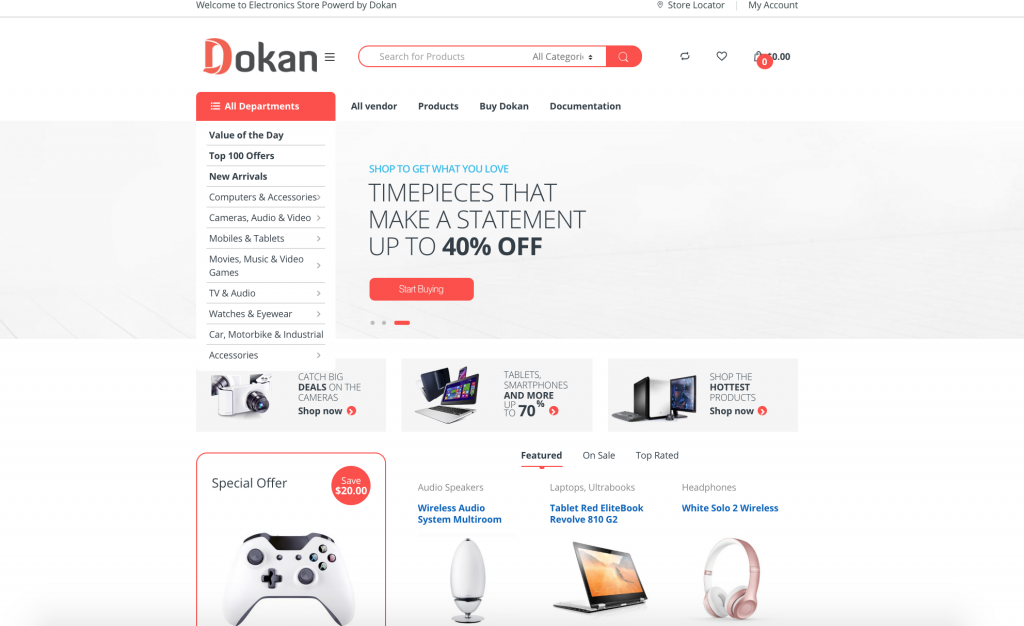
Now, your site is completely ready to make sales.
Also Read: Adding Extra Menu on Vendor Dashboard of Dokan Multivendor.
Time to Change the Appearance with Elementor
Do you want to provide a customized vendor store page? Then, it’s time to move on to the Elementor page builder.
For your information, Elementor is by far the best page builder in the WordPress ecosystem, and it has changed the whole scenario of designing and customizing web pages.
To customize the vendor store page, you need:
Follow these steps if you want to customize your vendor’s store page:
Step 1: Install and Activate Dokan Pro
The first thing you need to do is to buy Dokan Pro, download it, and activate it. You can follow this documentation to learn how to get the Dokan Pro and activate the license key.
Follow this quick little tutorial to upgrade from the free version to Dokan Pro.
Step 2: Install Elementor Free and Pro
Now, you need to install Elementor Free and Pro.
You can get the Elementor Free and Pro version from here.
To install the free version, follow this tutorial:
To install the Elementor Pro, you can follow this tutorial:
Step 3: Activate the Elementor Module
Now that you have installed all the required plugins, navigate to the WP Admin Dashboard > Dokan > Modules > Turn on the Elementor module.
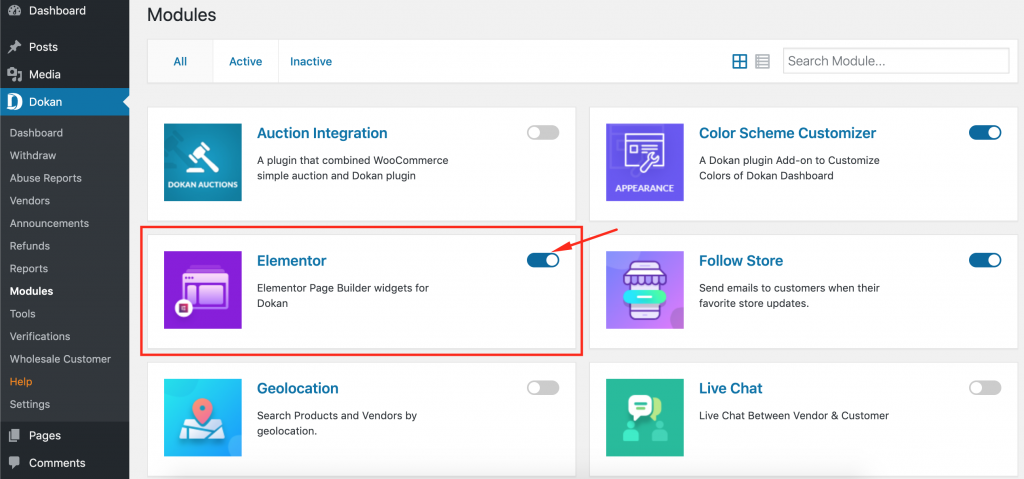
Step 4: Add New Elementor Template
Now, navigate to the WP Admin Dashboard > Templates > Add New.
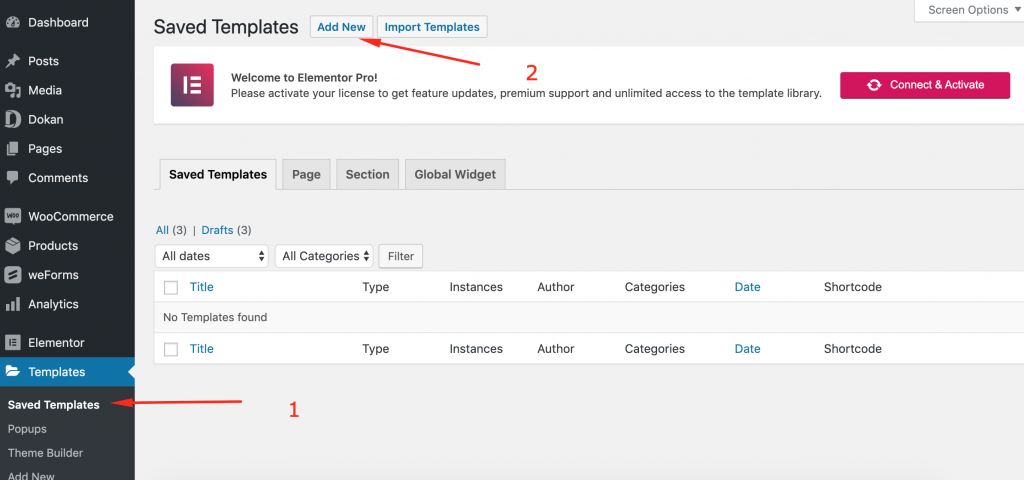
From here, you will find a modal form to create “Elementor Template”. To design the vendor store page, you have to select the “Single Store” type.
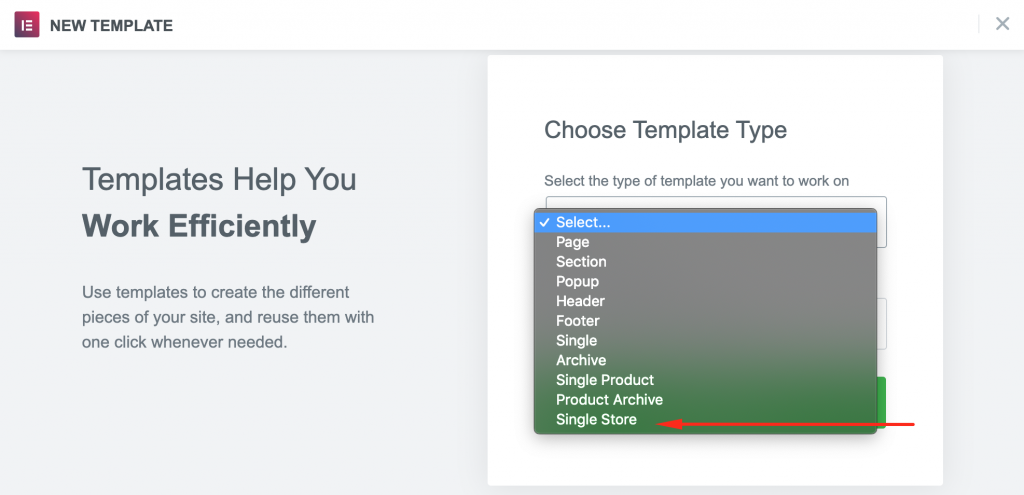
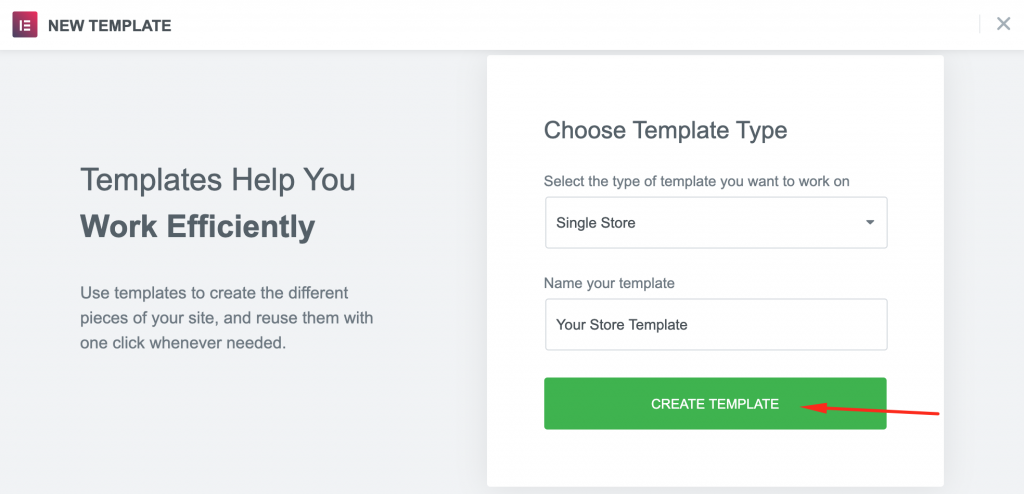
Next up, type in a name (any name) for your template. Then click on the Create Template button.
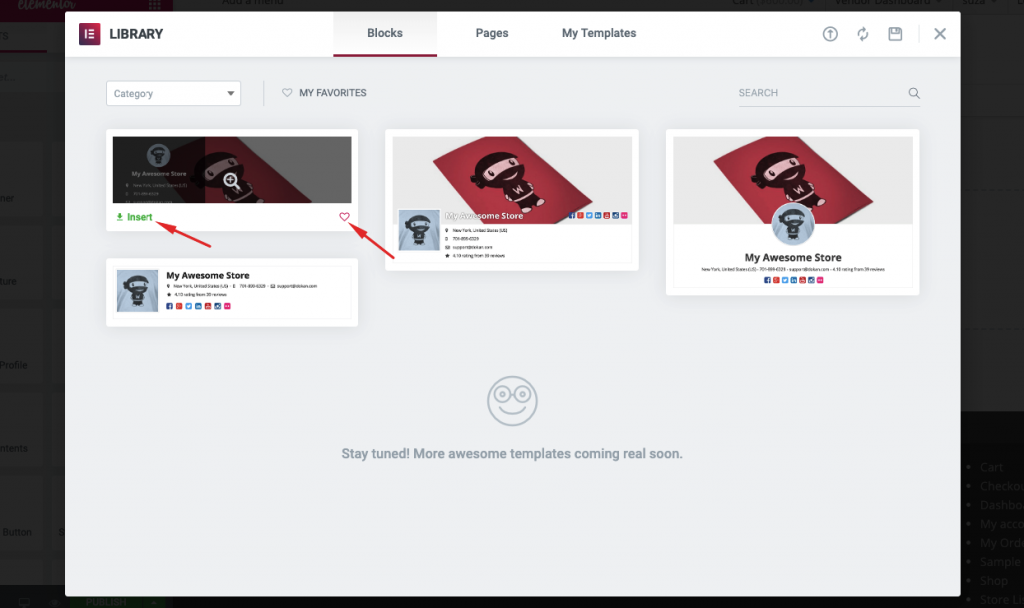
Step 5: Choose a Layout
Now, it’s time to choose the type of design or layout that you want to implement with the Elementor editor for the vendor store page. To do so, you will have to hover your mouse cursor over your desired template and click on the insert button.
Step 6: Design with the Elementor Editor
Now, you will be able to see the store’s design will become editable with the Elementor editor panel.
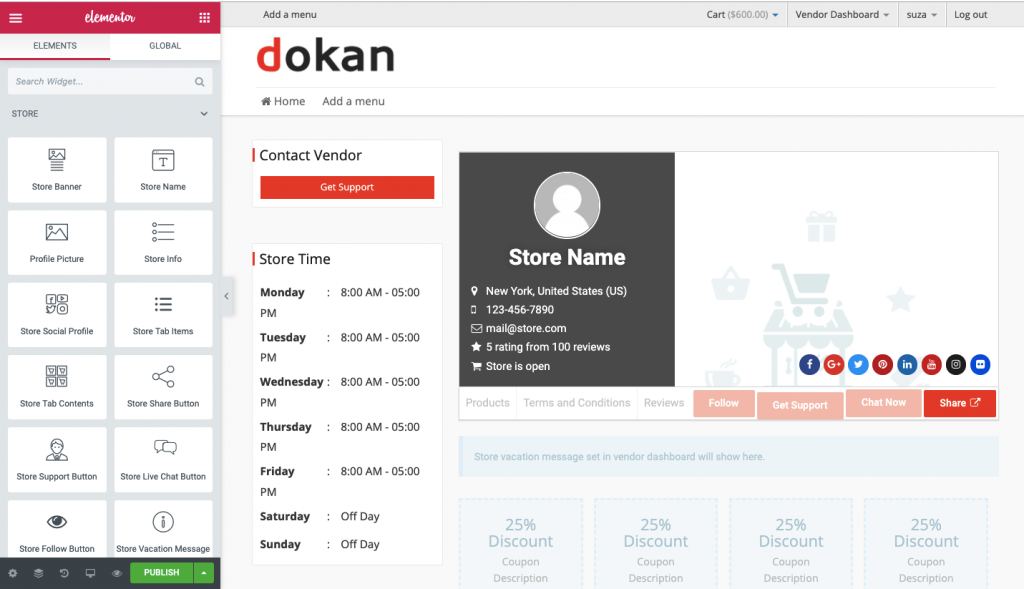
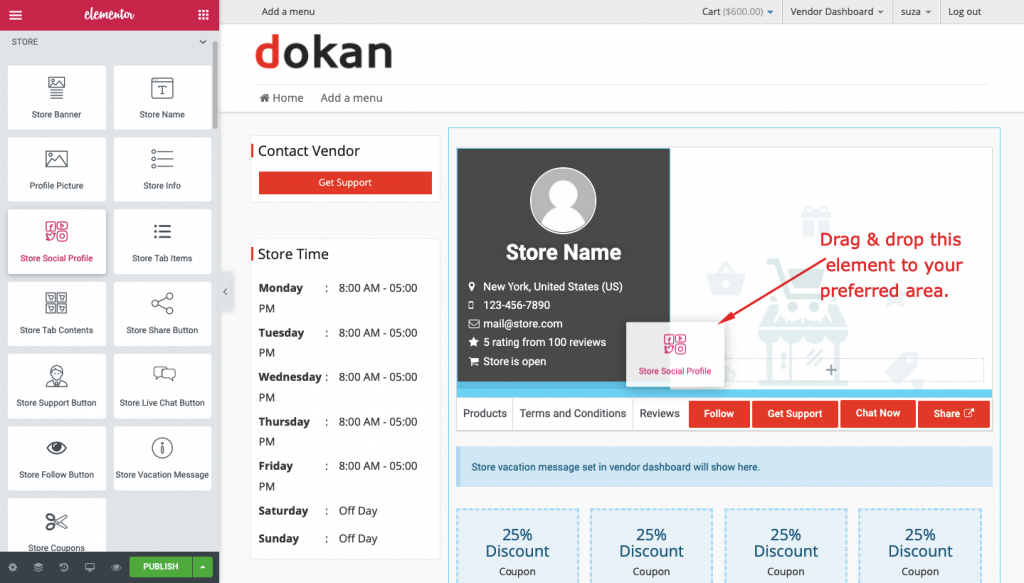
In this editor panel, you will get the following widgets:
- Store Banner: You can drag and drop these elements to any preferred area to let your vendors set their store’s banner.
- Store Name: This block is used to change the individual vendor’s store name.
- Profile Picture: This element is used to change the profile picture of the store owner.
- Store Info: Use this element to let your vendor show their store’s information.
- Store Social Profile: This element includes social sharing buttons like Facebook, Twitter, Linkedin, Google+, Pinterest, YouTube, Instagram, Flickr.
- Store Tab Items: These contain the products, terms, and conditions and reviews options. You can also show or hide these items if you want.
- Store Tab Contents: This element will show the store products as a tab.
- Store Share Button: Use this button to add a share button for your vendors.
- Store Support Button: Use this element to add a support button on the store page.
- Store Live Chat Button: Allow your vendors to set a live chat button on the store page.
- Store Follow Button: Use this element to add a follow button for the store page.
- Store Vacation Message: This element will help the vendor show texts while they are on vacation.
- Store Coupons: Using this option, the vendor will be able to show the store coupons to their customers.
Step 7: Design with Drag & Drop Functionality
Just drag a store widget or element and drop it anywhere you want with the Elementor editor. Here in this example, we have dragged the “Store Social Profile”.
Here we have dragged and dropped a few widgets like the Store Banner, Store Name, Profile Picture, Store Social Profile, etc.:
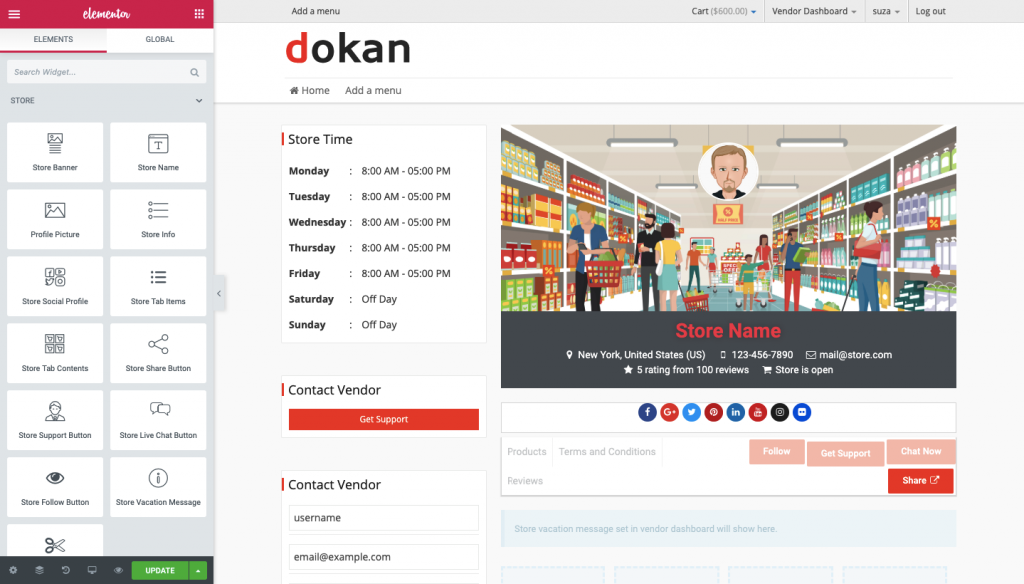
The best thing is that the store widgets are customizable like any other Elementor templates.
As you can see, we have customized the default Dokan Elementor template and changed its widget’s position and other properties.
Step 8: Save Changes
When done editing, hit the ‘UPDATE‘ button:
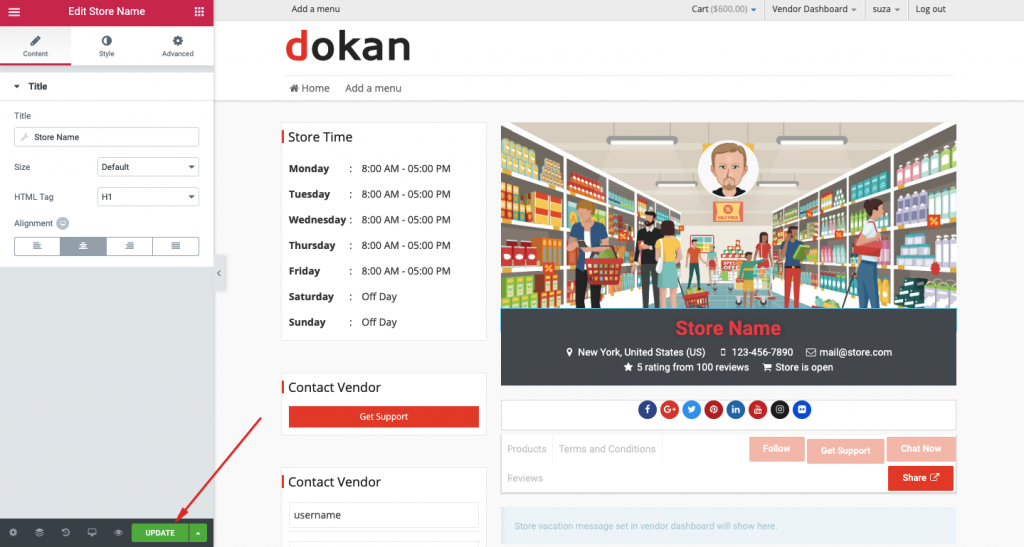
That’s how you can customize your multivendor marketplace with Dokan.
Step 9: Save Template
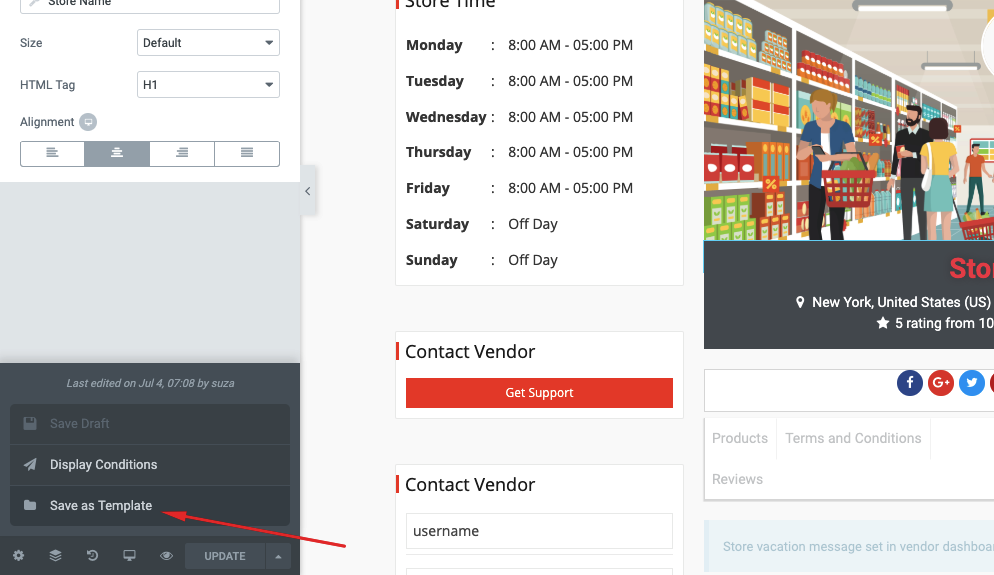
You can also save this customized template. To do so, click on the arrow beside the ‘UPDATE’ button:
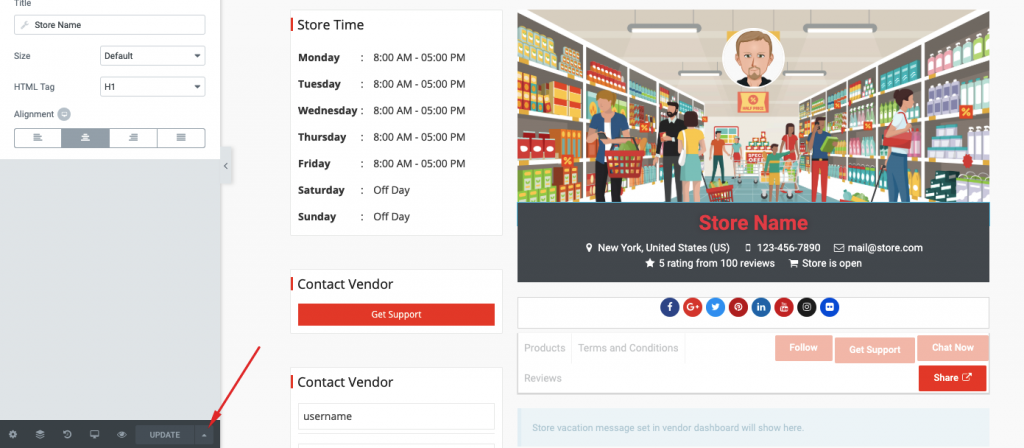
Then hit the “Save as Template” option.
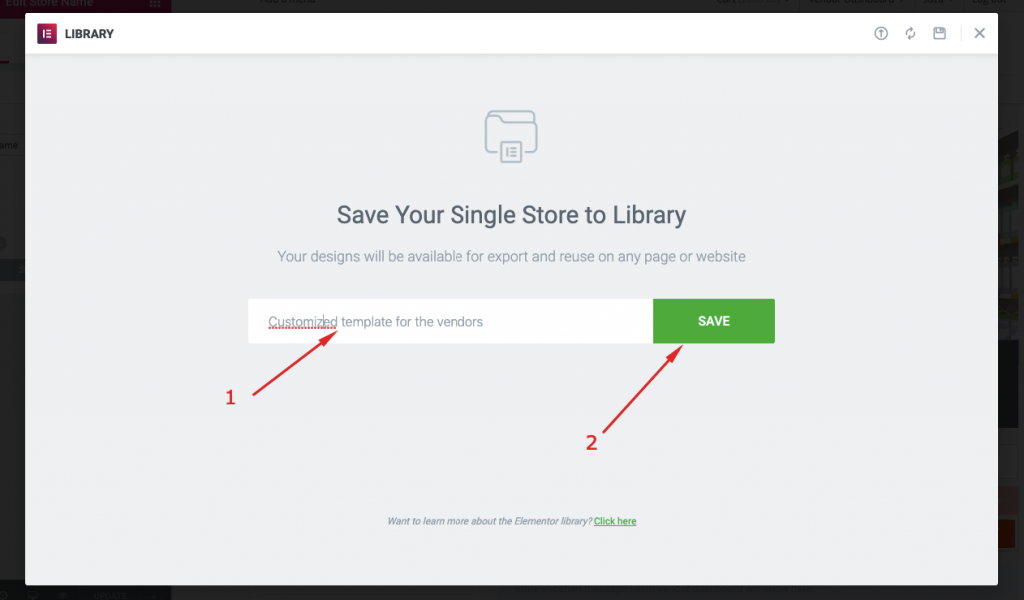
After that, you will get a pop up in which you will have to give a name and save the template:
Step 10: Set Display Condition
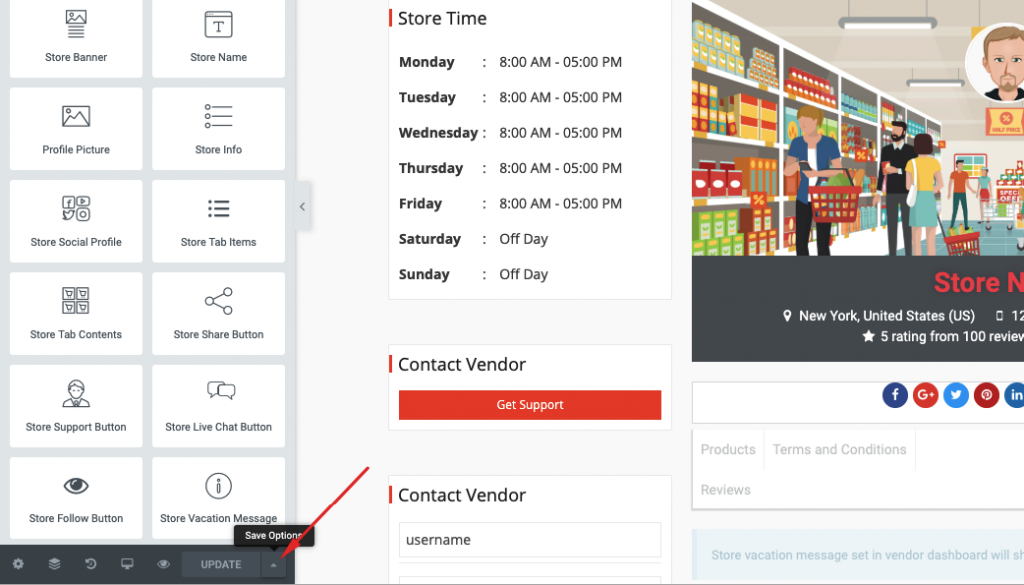
Click on the arrow again:
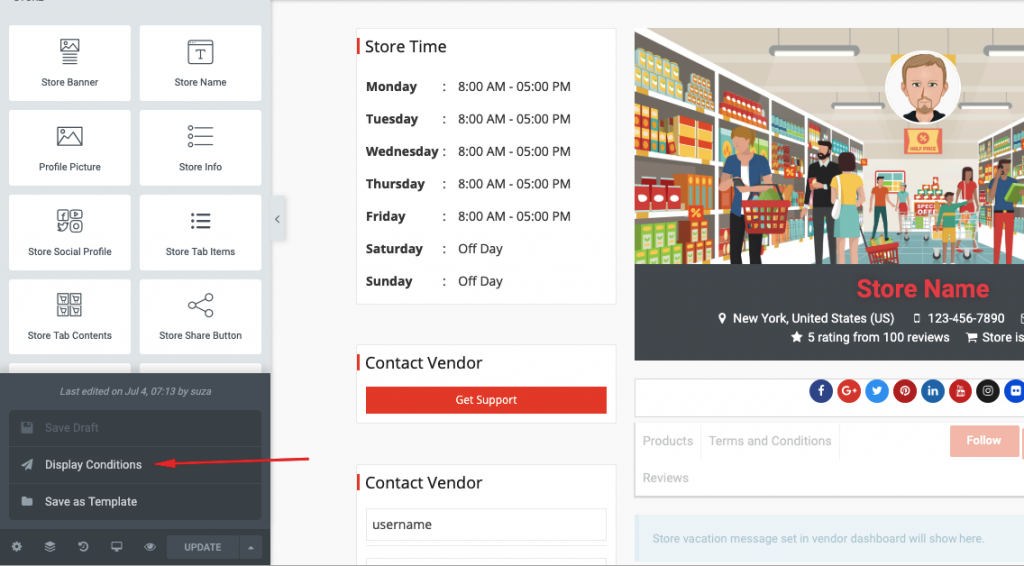
Select the “Display Condition” option:
Step 11: Save & Finish the Setup
Next, you should see another pop-up. Here, select the “Single Store” option from the dropdown menu and hit the “Save & Close” button to finish the setup.
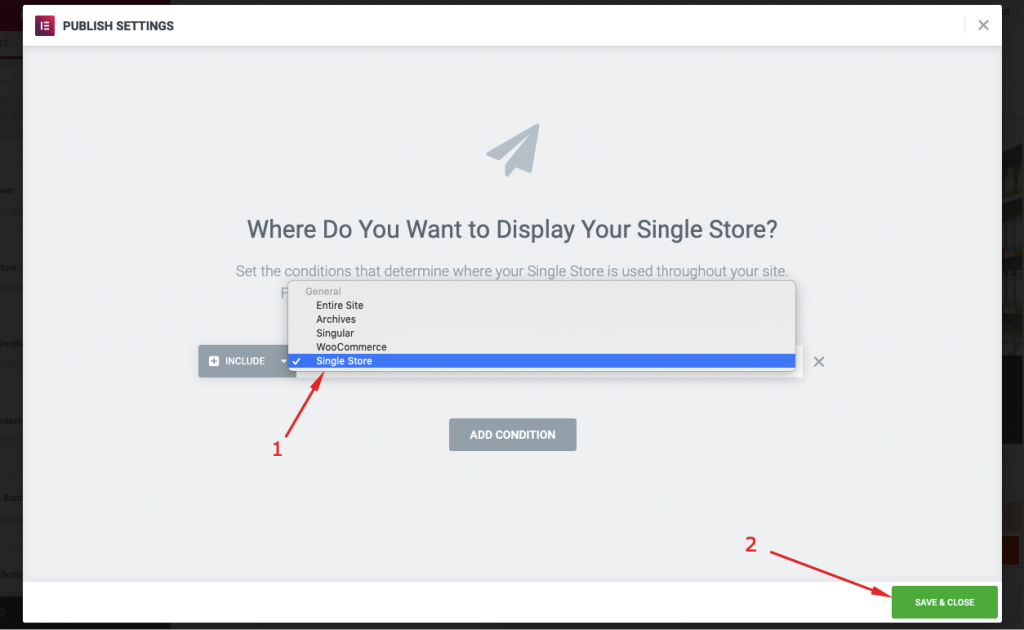
Now, all of your vendors will get to view your customized Elementor template from their individual stores.
Your Dokan store is ready. Read the blog to learn about all Dokan features.
Here is the Frontend view of the Customized Vendor Store Page
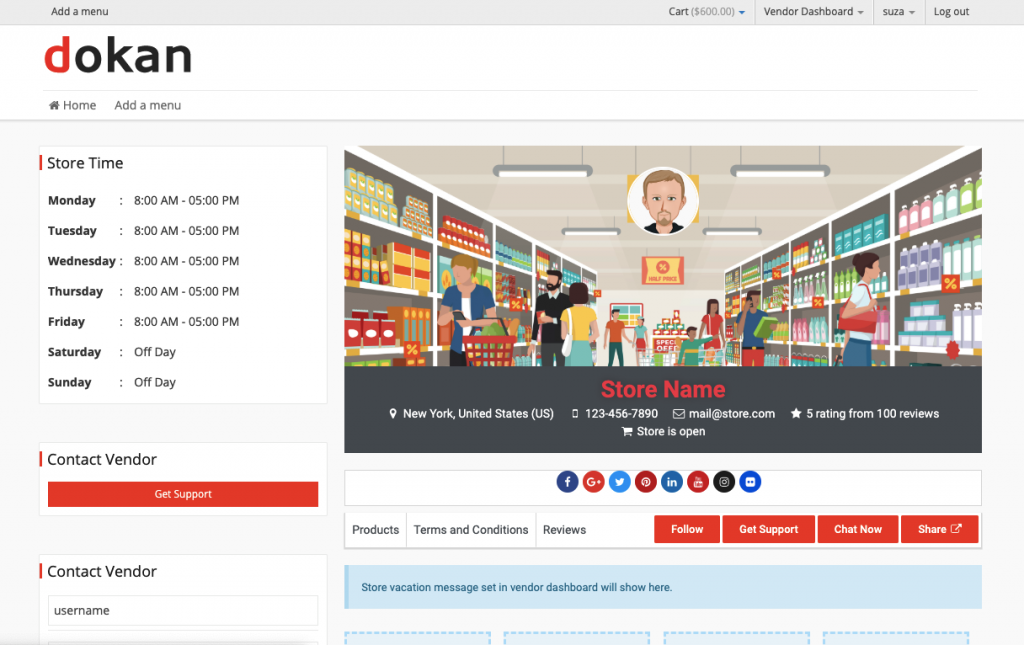
That’s how you can use the Dokan Elementor module to customize the vendor store page.
After creating a well-designed marketplace website, you need to scale it for growth. Check these 15 Marketplace Strategies to make your business profitable.
Build an eCommerce Marketplace with Dokan and Elementor – Final Thoughts
We have shown this tutorial for creating a multivendor marketplace in two sections. One is with Dokan, and the other is customizing with Elementor. We hope this tutorial will help you build your own customized multi-vendor marketplace within a few minutes.
One thing to keep in mind is that when you select the Elementor layout, the default Dokan theme will not work properly for the vendor store page. That’s why we were customizing the default theme layout with Elementor.
So, what are you waiting for? Build your own WordPress multivendor marketplace right away!



5 Responses
I bought a very pretty Dokan compatible theme listed on Dokan’s site. I found it very slow even with sample data. While I have a shared hosting plan for now, my sites made with free Astra themes (know for its light weight and speed) perform well with the same hosting plan. My guess is, using this pretty theme down the road is not going to perform well even I switch to an expensive dedicated WP server with live data when we go live. I expected 100 vendors with 5000 items. I tried the Dokan theme. What is your recommendation? Dokan vs Astra vs Pretty but slow theme? Thanks!
Hi Kevin,
Could you please mention the theme you are using? As you want 100 vendors with 5000 items, your site has to be smooth and fast enough to handle the increased visitors. The Dokan plugin developers did not develop the themes they listed on their site rather they suggest their users to use those themes for Dokan. If you think that the theme is slowing your website down then I would like to recommend you contact the customer support team of that theme. However, you can also use Astra as it is also a good theme to use.
Thanks.
You are awesome sir. it’s my first pay a quick visit to this.
Actually, you are a skilled man. It is surprising to me that you have made this issue so beautiful on your blog. I wish I could spend time on your blog so that I can learn. And I hope that we can read such good Article in the next day.
Good day
Lovely post.
I hope to get feedback on this issue I want to create single store pages for the various vendors and add new products. But I want pages in the menu dedicated to the special categories where visitors can search and see those stores in their locality.
Example grocery store and pharmacy is a category on the menu tab. When you click it takes you to all pharmacies but you must first enter your location soninly those in that location appear.
Can you help?
Hello Faithful Daniel,
Dokan Elemenor module does not allow you to create a store category section. However, there is a store listing page that shows the store category section. From that page, you can filter the store category. This page is has the shortcode [dokan-stores] and the screenshot will show you the way it will help you filter: https://nimb.ws/b7dos1
I hope this is something similar to what you are looking for. In case of any information related to Dokan, you can contact [email protected]
Thank you 🙂