WooCommerce is an excellent open-source WordPress plugin for creating a functional online shop in no time. It automatically adds many essential eCommerce pages, including a shopping cart page, when you install the plugin.
But you cannot expect higher conversion from this default cart page. Because it doesn’t look much professional, lacks enough SEO optimization, and cannot ensure better user experiences. Therefore, it is a must to customize the default cart pages.
This article will tell you how to edit the WooCommerce cart page in Elementor without any coding or technical knowledge. Also, you will learn how to add a mini cart to your website using the same solution.
Table of Contents
- How A Customized WooCommerce Cart Page Will Benefit Your Business
- Why Coding is Not a Good Idea to Create a Custom WooCommerce Cart Page
- How to Edit WooCommerce Cart Page with Elementor
- How to Add Mini Cart to WooCommerce Website with Elementor
- Bonus Tips: How to Reduce WooCommerce Cart Abandonment Rate
- Get Ready to Edit WooCommerce Cart Page
How A Customized WooCommerce Cart Page Will Benefit Your Business
The WooCommerce cart page plays an important role in the online buying journey of the customers. It allows buyers to see their order list, change order quantity, add products to the wish list, apply promo codes, and finally checkout.
Right now, more than 4+ million websites are actively using WooCommerce to run their eCommerce project. Can you imagine how boring it will be to the customers if each of them uses the same default pages?
Besides, the layout of a cart page largely depends on your theme. If you choose a theme that many other websites are also using, then most of you may have a similar look until optimized. Do you think these copycat looks are enough to convince a customer?
Moreover, using the WooCommerce plugin only, you can’t optimize many exciting eCommerce modules and features. Such as cross-selling, promo codes, special offers, and so on. This is also a key reason behind the high cart abandonment rate.
According to Sleeknote, popular eCommerce brands lose around $18 billion in revenue annually due to cart abandonment. Therefore, today, it is a must to edit the WooCommerce cart page to make a website more distinguishable and ensure a better experience for the customers.
Why Coding is Not a Good Idea to Create a Custom WooCommerce Cart Page

Usually, HTML and CSS are used to edit website pages. But it is effective only for those who have professional coding skills. But since you are using the open-source solution, we can take that you are not a professional coder.
If this is true, there is a number of reasons why you should avoid coding to edit your cart page. For example:
- If you aren’t skilled enough, inapt coding may cause more damage to your website.
- Your website may crash or slow down unless your coding is properly optimized.
- Hiring professionals to code your cart page might be a costly project.
- You must update web coding every time your themes and plugin update.
Now, you might be wondering if there is any alternative solution to this? Yes, using drag-and-drop page builders, anyone can create or customize their cart pages right away, regardless of any coding knowledge. Even experienced developers can use a website builder plugin to deliver quick service to their clients.
Happy Addons powered by Elementor is a dynamic page builder. The next section will show you how to edit the WooCommerce cart page and add a mini cart using this plugin. Keep reading.
Related Resource: Essential WooCommerce Shortcodes to Customize Your Online Store on WordPress.
How to Edit WooCommerce Cart Page with Elementor
With 200,000+ active installations, Happy Addons is one of the best Elementor Addons. It has 98+ powerful widgets and many exciting features by which you can create or customize any web page.
Using its ‘WooCommerce Cart’ widget, you can give a creative look to your cart page. Here, we’re going to show you how to do it.
Prerequisites to Edit WooCommerce Cart Page
You must ensure the following requisites to enable the WooCommerce Cart widget:
Here is how to install Happy Addons Pro with a license. Right after you install and activate all the plugins, start following the below steps:
- Step 01: Open the Elementor Canvas Page
- Step 02: Drag and Drop WC Cart from the Elementor Widget Gallery
- Step 03: Enable Coupon and Cross-Sells
- Step 04: Update Your Table Contents From the Style Section
- Step 05: Make Your Table More Responsive from the Advanced Section
Step 01: Open the Elementor Canvas Page
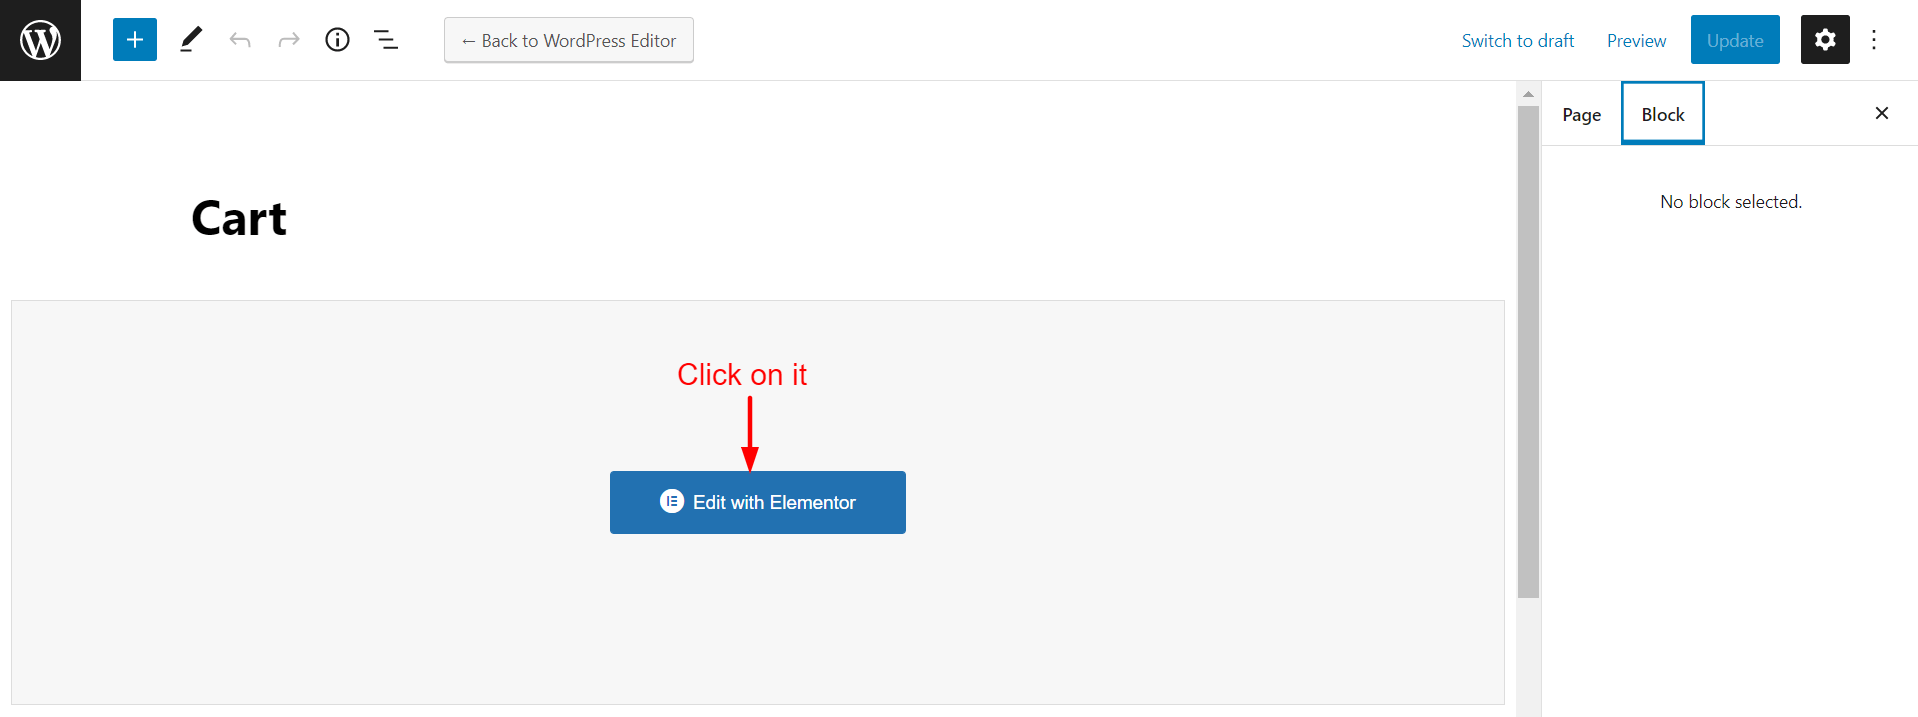
First, get into the Admin Dashboard of your website. Then, click on the Edit option of your cart page following the below image.

You will get a white page with a button Edit With Elementor. Click on the button.
It will take you to a new Elementor canvas page. On the left side, you will get the Elementor Widget Gallary. You will drag and drop the widgets to the right side over the Selected Area.
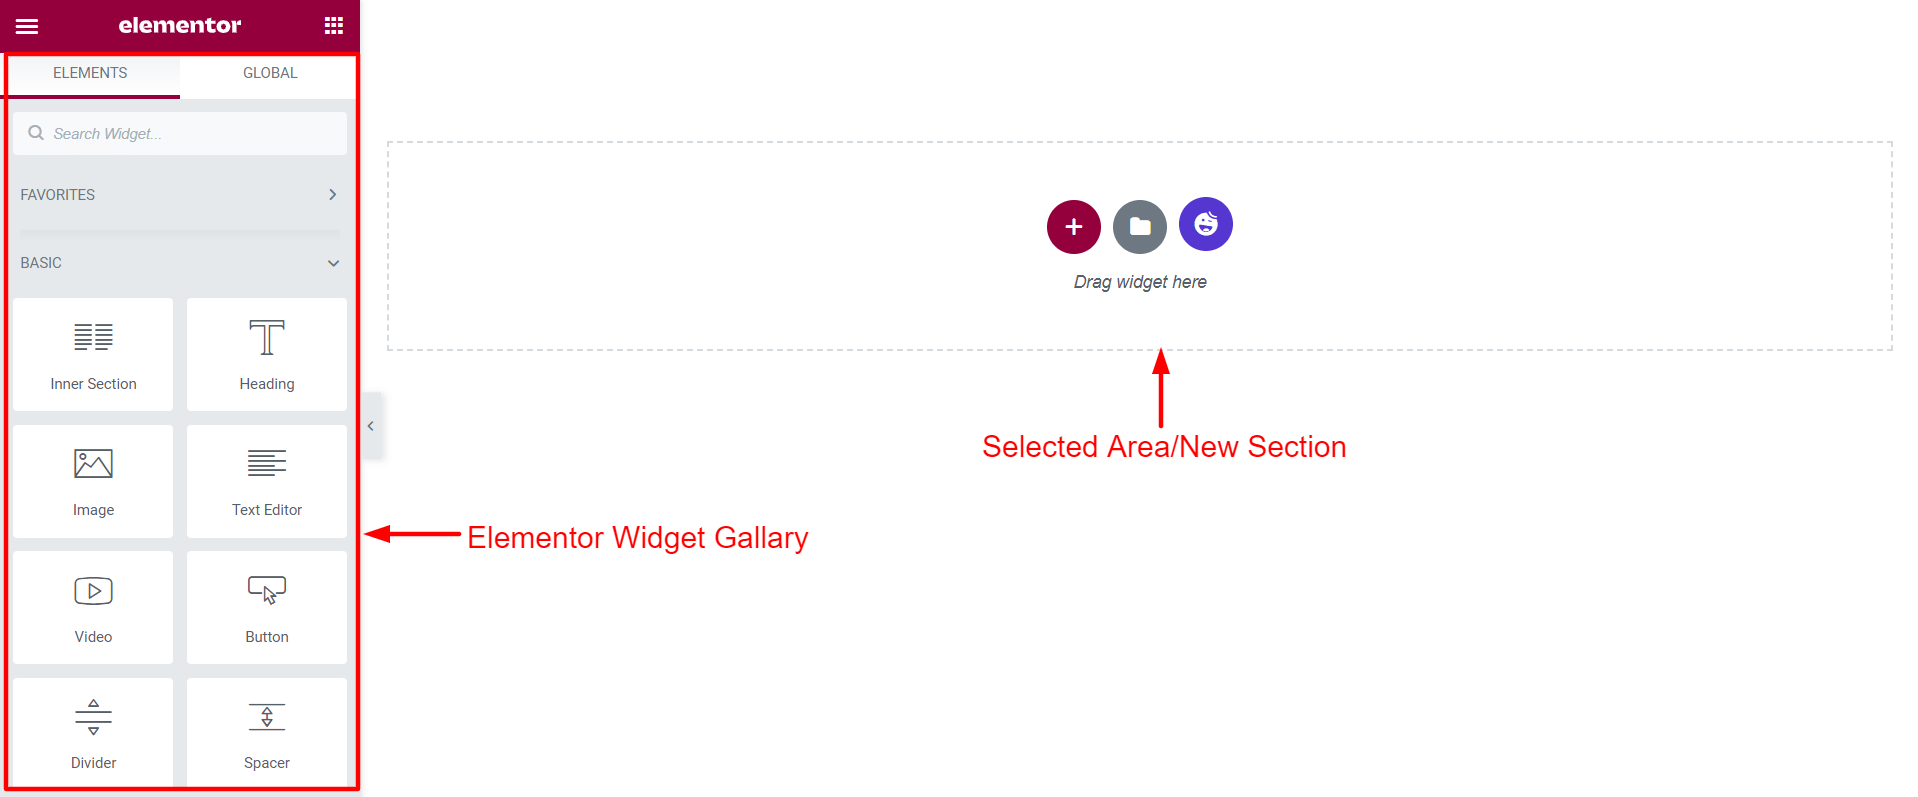
This is where you will add the WooCommerce Cart widget and design your cart page.
Step 02: Drag and Drop WC Cart from the Elementor Widget Gallery
Type ‘WooCommerce Cart’ on the left-side search bar. You will get the WC Cart icon. Drag and drop it over the select area.
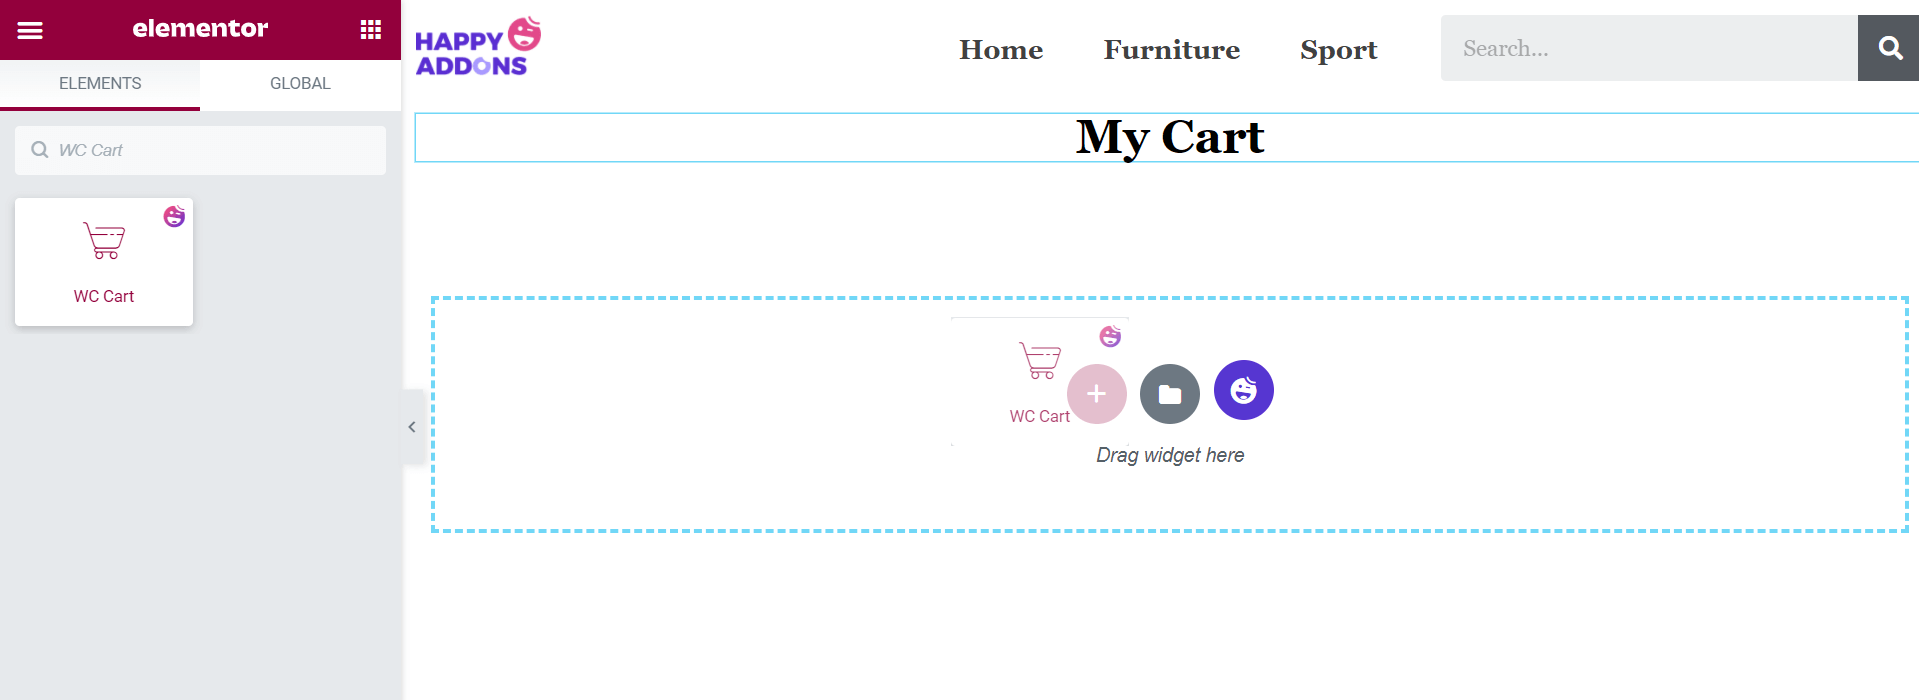
Note: Please, don’t feel bothered if you don’t find your web logo, product categories, and search form on top of your display. We have added these items to the above photo just to beautify the canvas.
Step 03: Enable Coupon and Cross-Sells
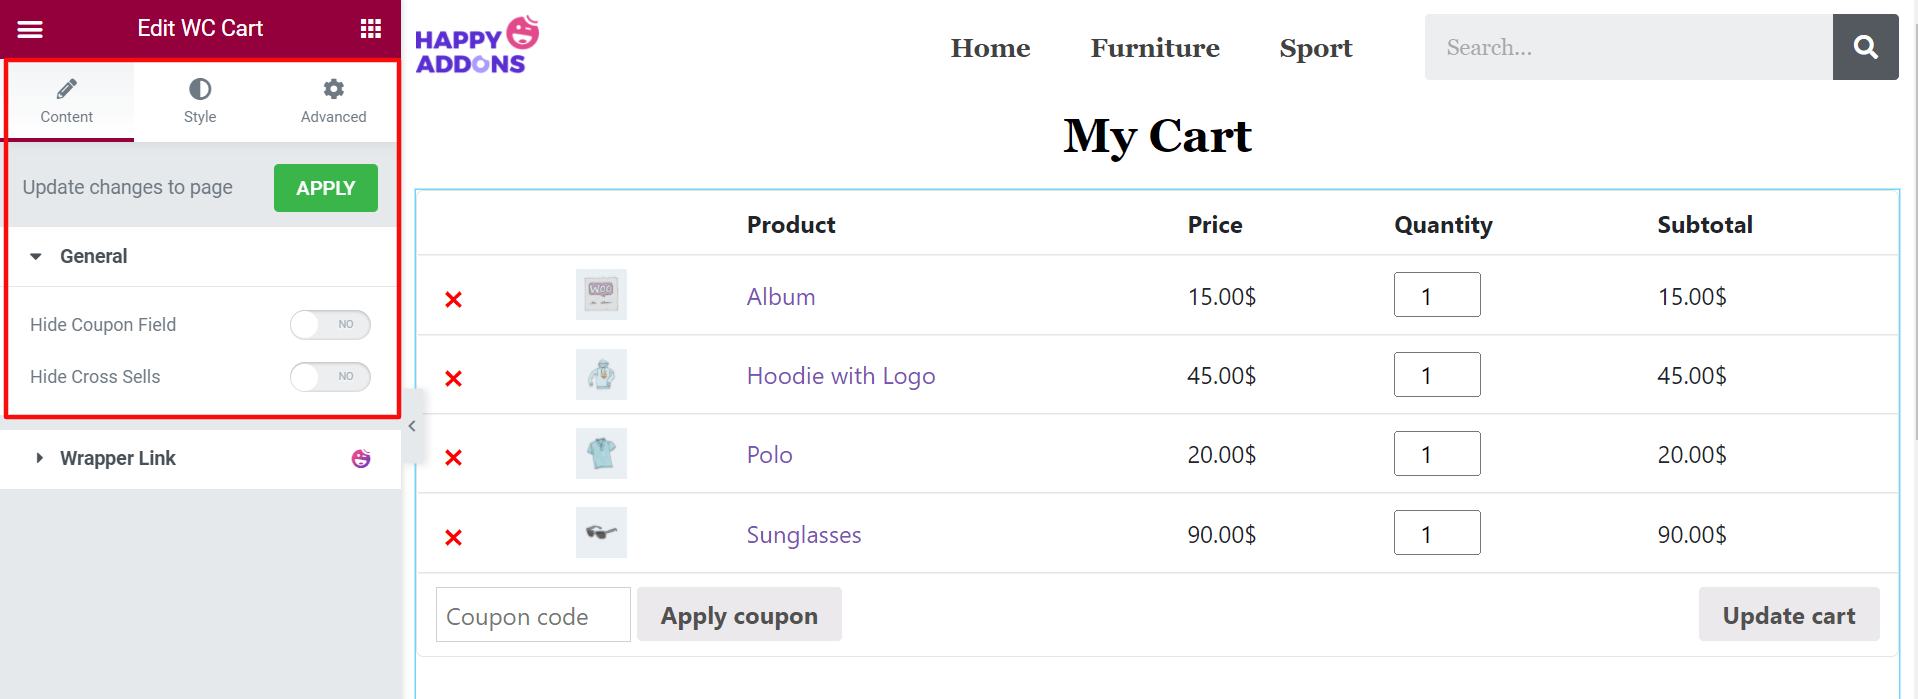
Now, from Content > General, you can hide or show the Coupon Field and Cross-Sell options on your cart page.
Step 04: Update Your Table Contents From the Style Section
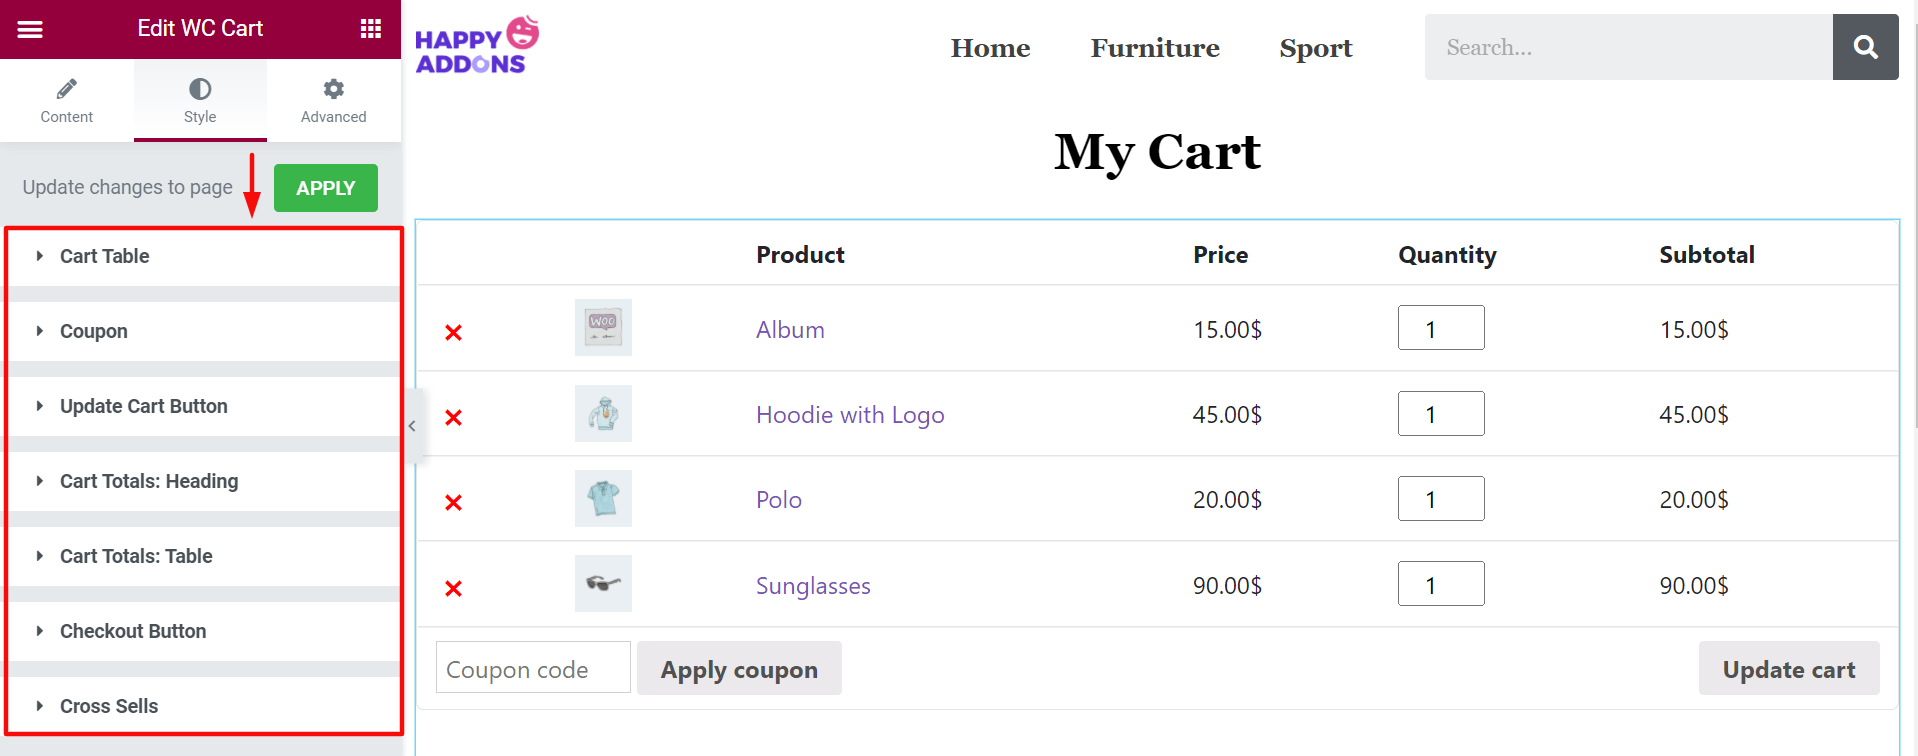
Go to the ‘Style’ section. Here, you will find seven more options to design your cart. They are:
- Cart Table
- Coupon
- Update Cart Button
- Cart Totals: Heading
- Cart Totals: Table
- Checkout Button
- Cross Sells
# Update Cart Table
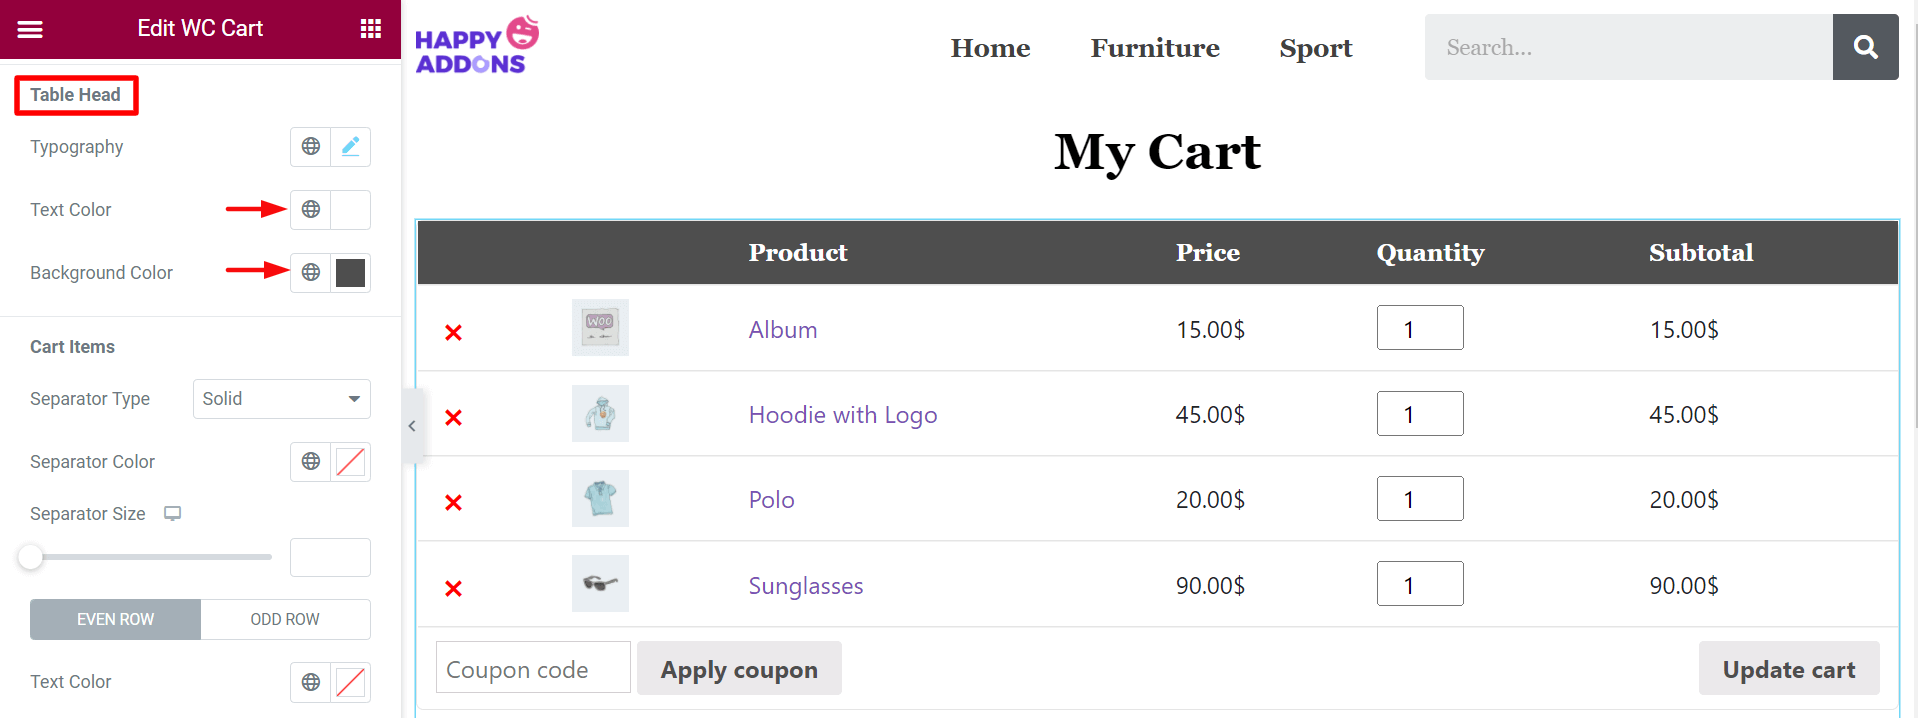
Click on Cart Table. You will get plenty of options to edit your cart table contents. They are Table, Table Head, Cart Image, Quality Input, Product Remove, and Update Car Row.
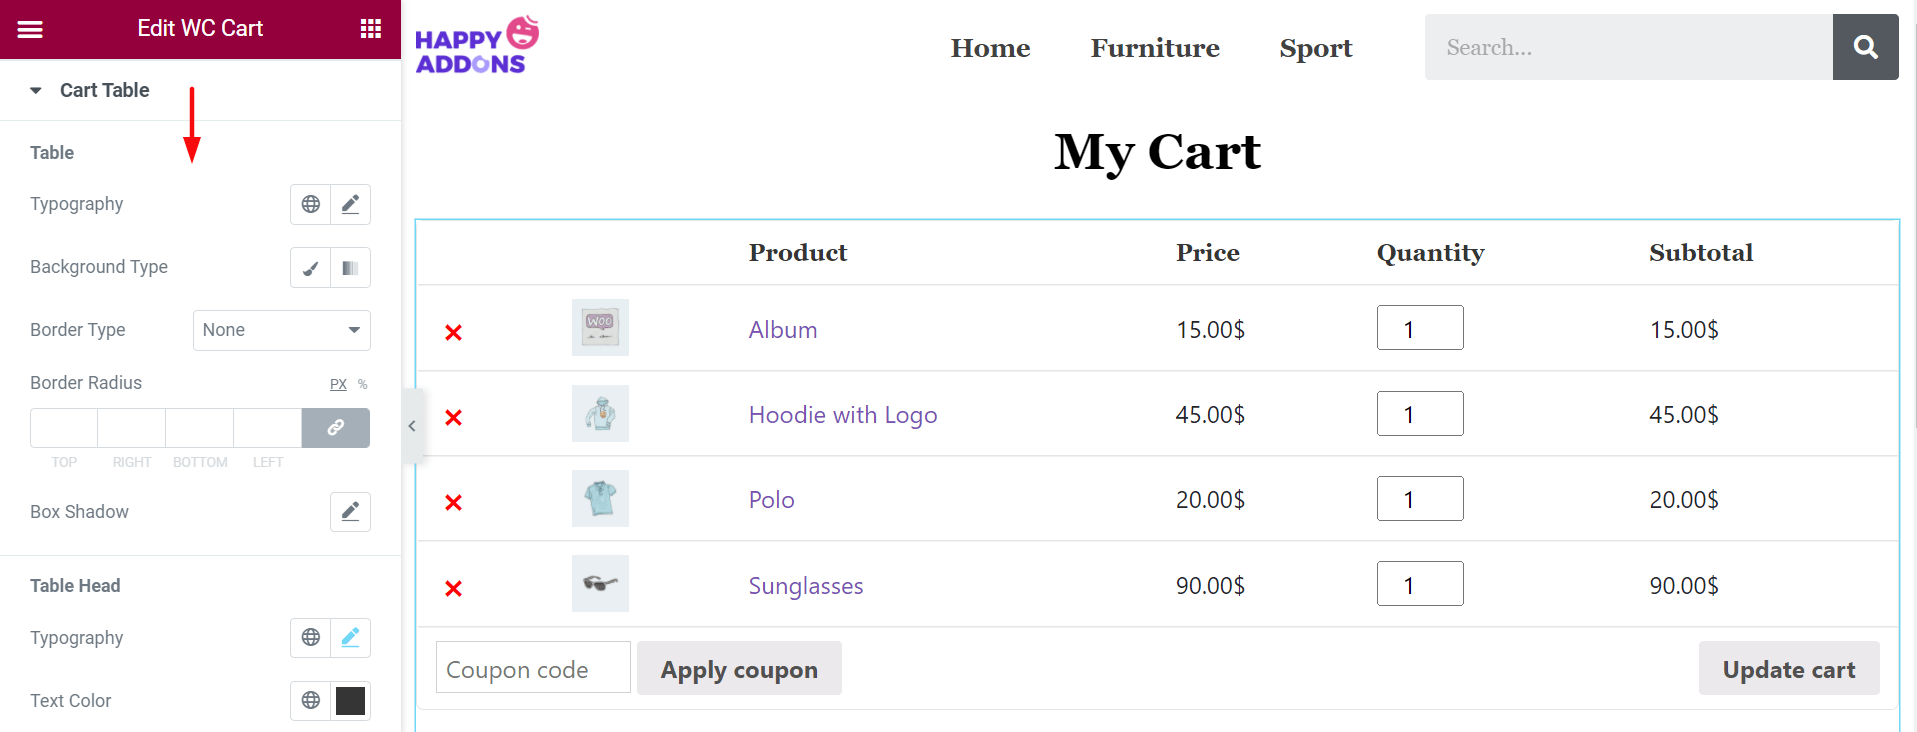
From the Table Head option, change the Text and Background color. Here, on the photo, we have set white color for Text and Black for the background.
# Apply Coupon Code
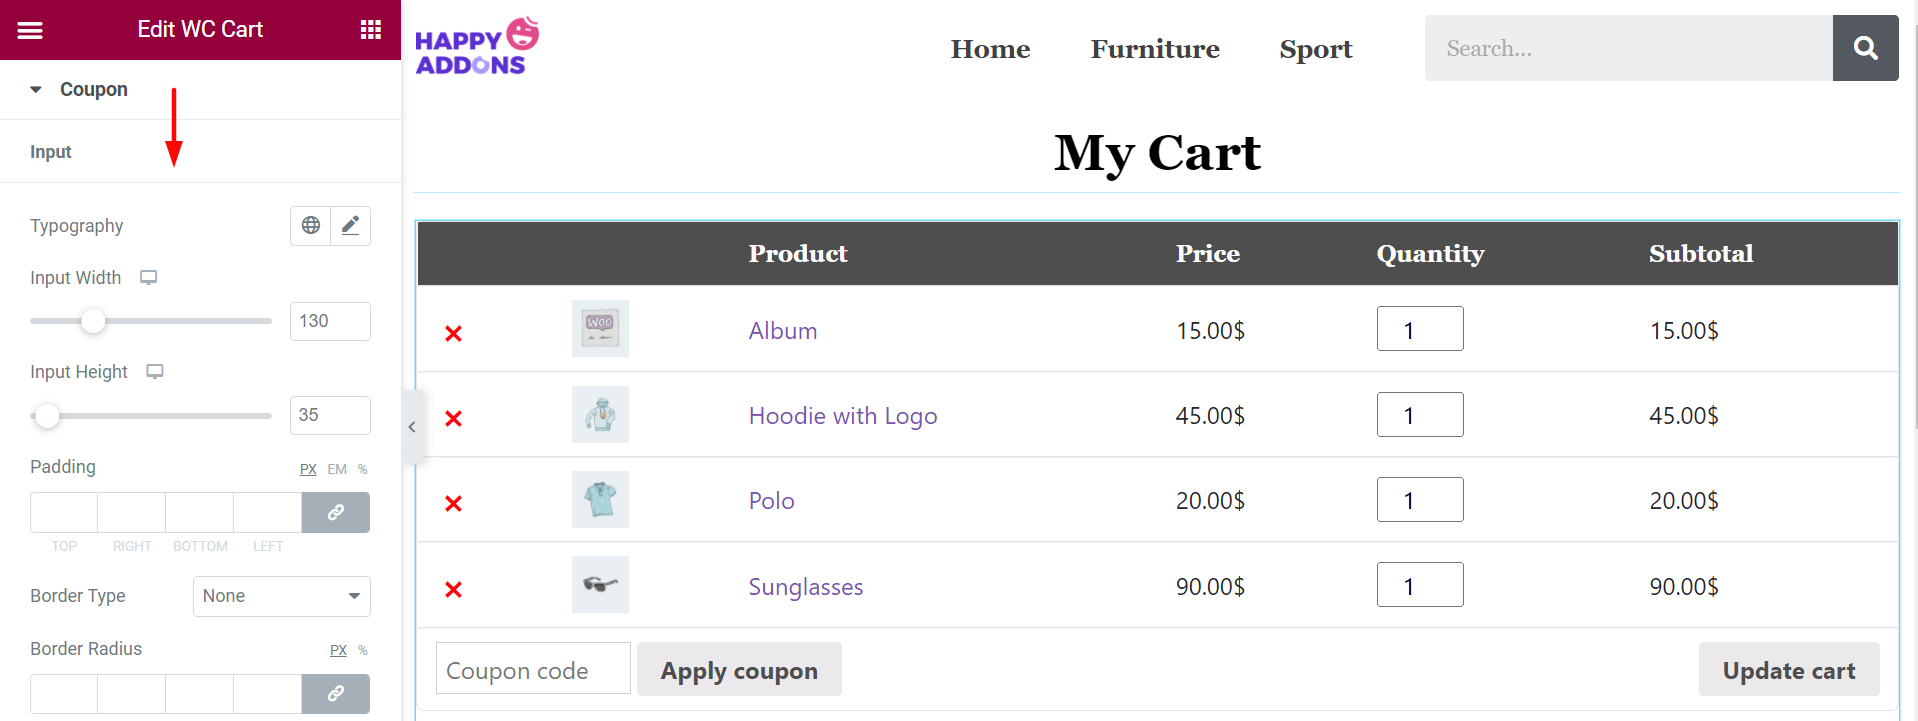
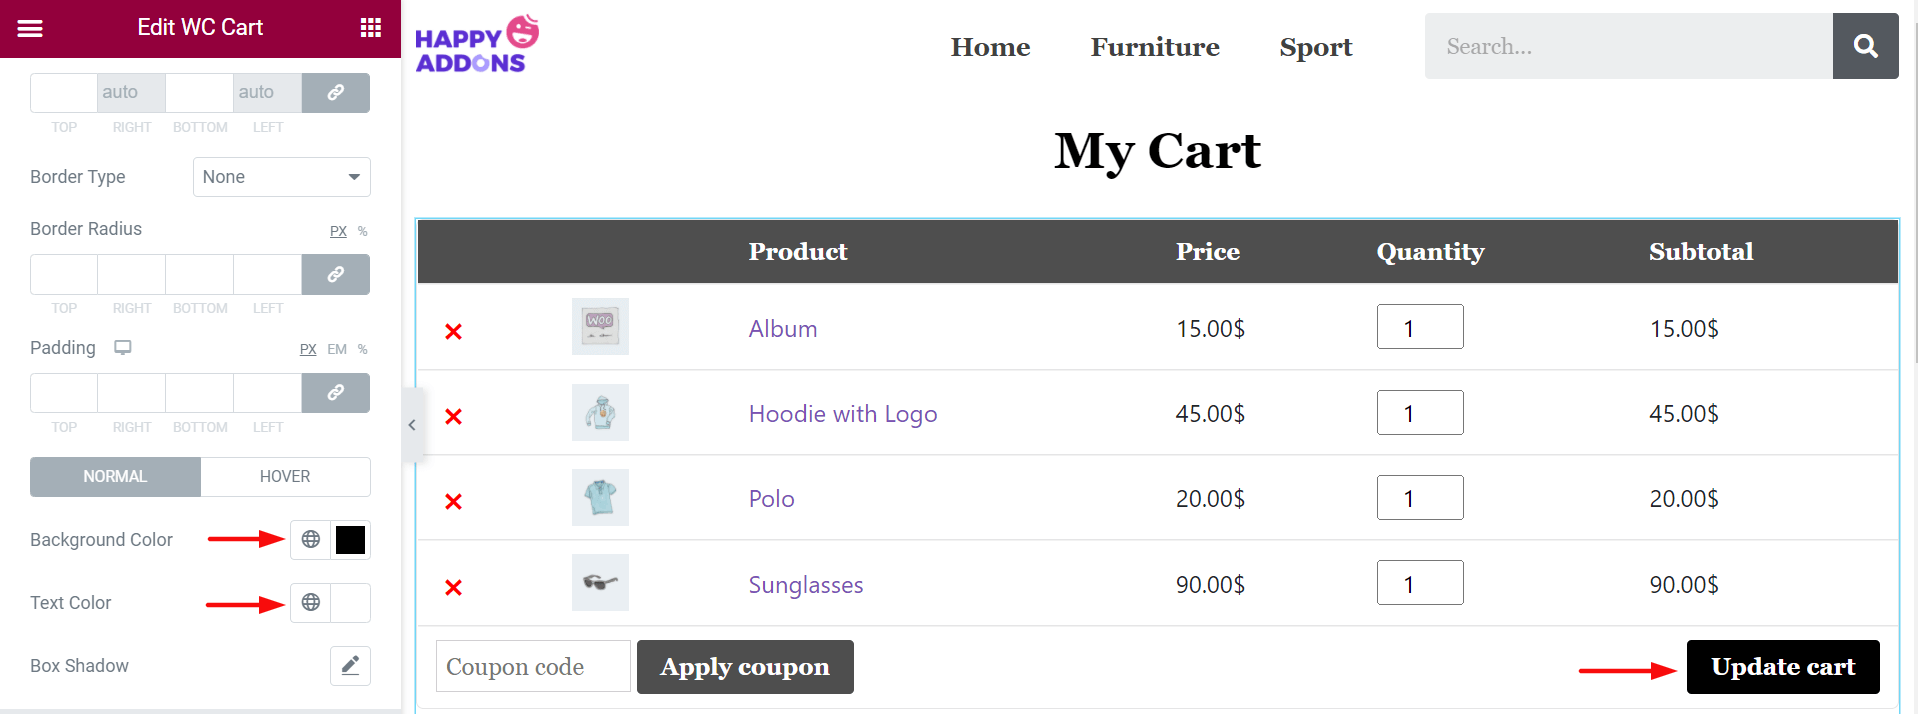
From the Coupon option, you can edit Input Height, Padding, Border Type, Border Radius, Box Shadow, Text Color, and Background Color.
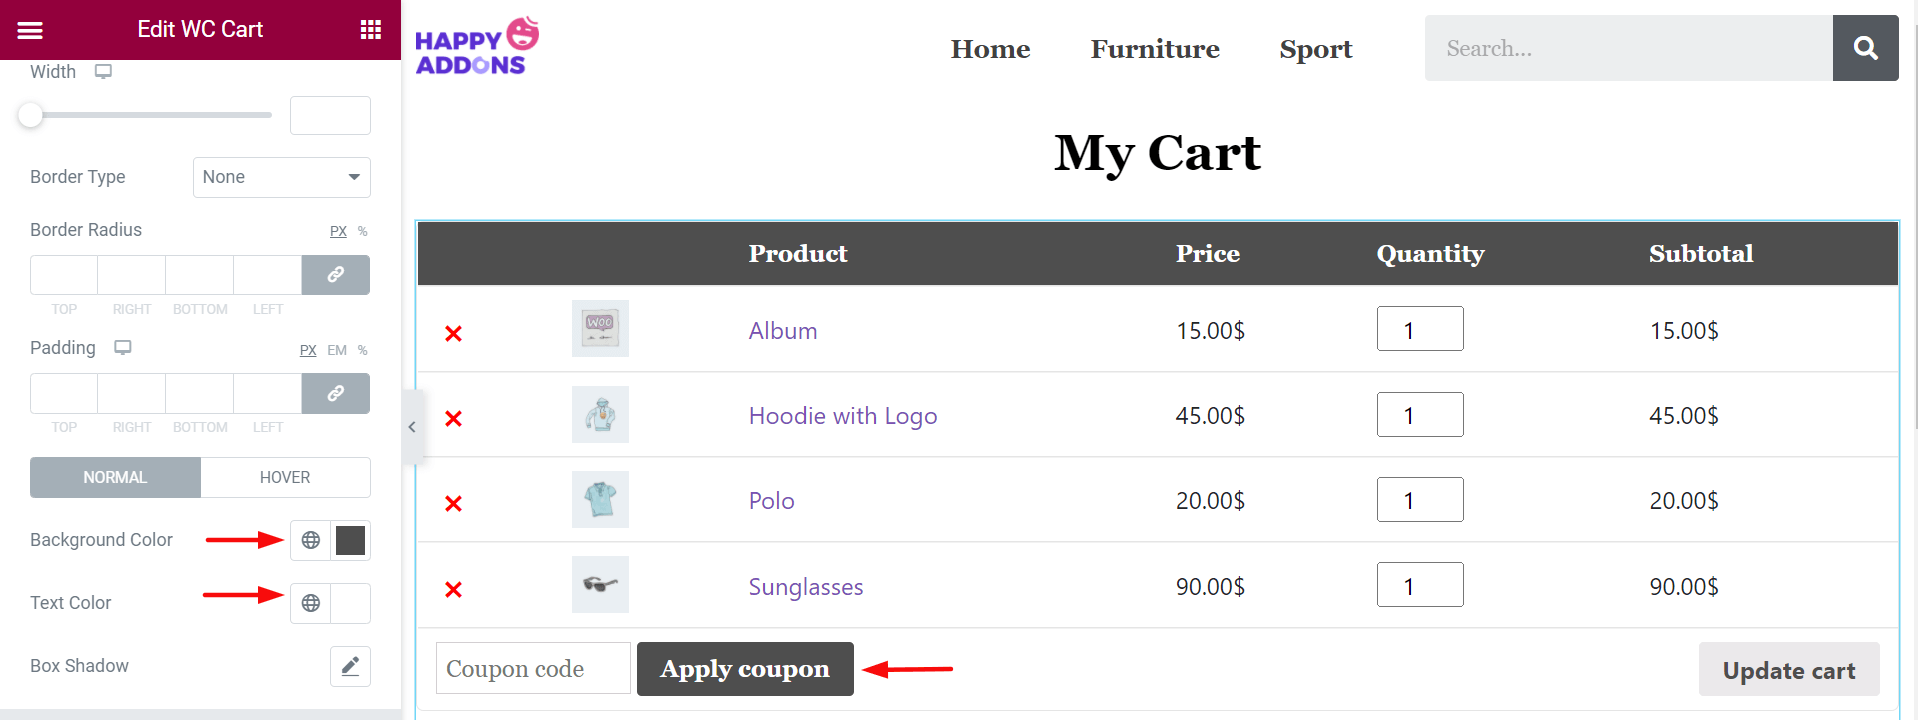
Going a bit down, you will find options to edit the Apply coupon button. Here again, we have set white color for the Text and black for the background.
# Update Cart Button
‘Update Cart Button’ will let you customize the Typography, Width, Margin, Border Type, Border Radius, Padding, Background Color, Text Color, and Box Shadow.
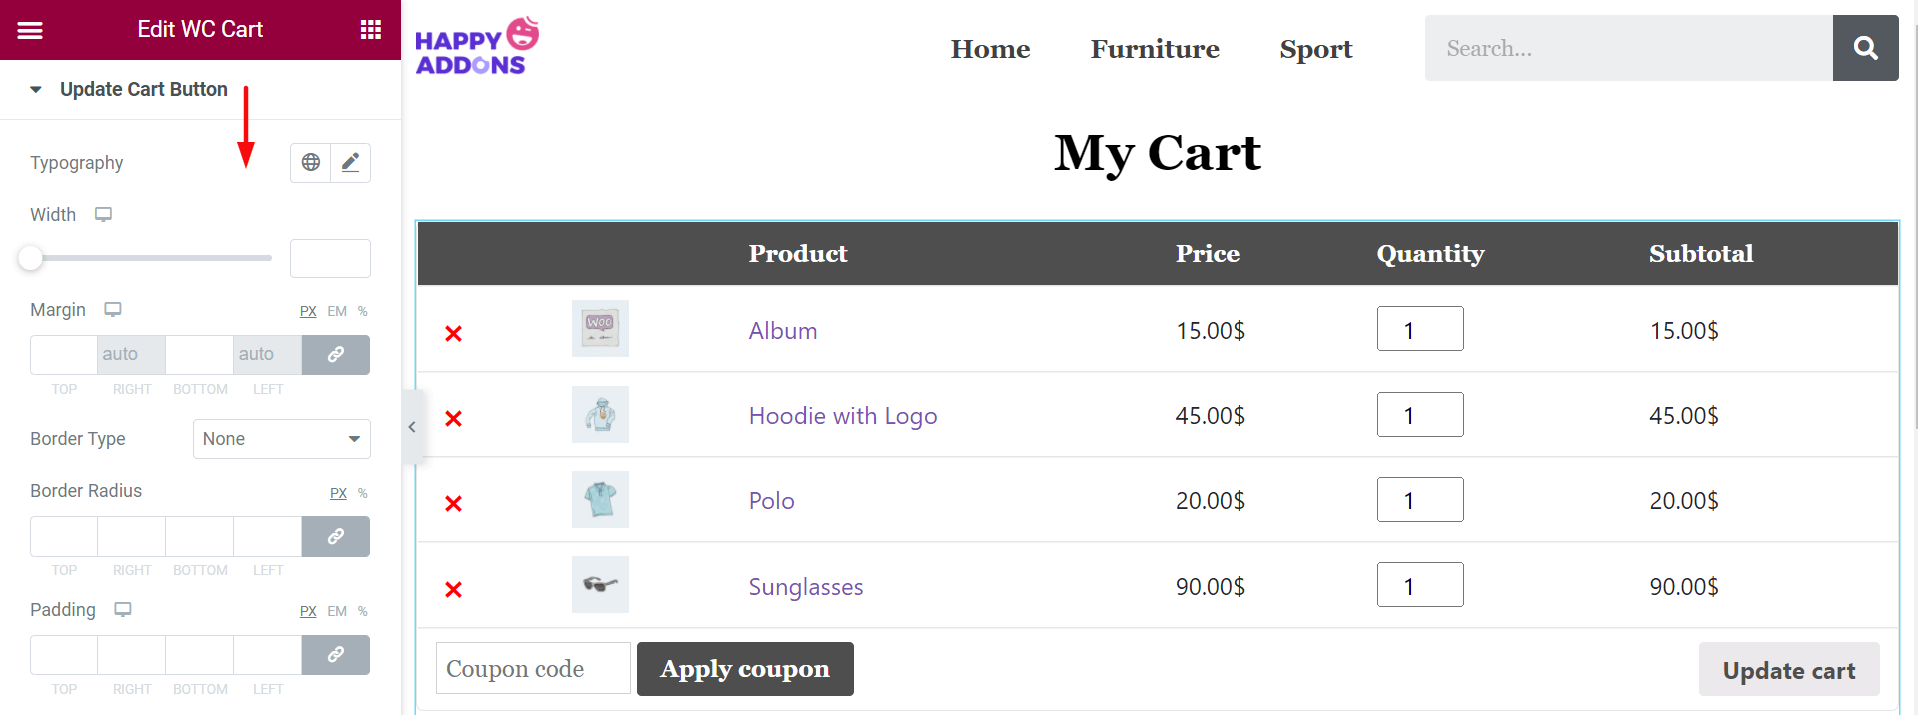
Once again, we have set white color for the text of the Update Cart button and black for the background.
# Cart Total: Heading
Now, come to the ‘Cart Total: Heading’ option. Here, you can customize the Color, Typography, and Spacing of your cart box.

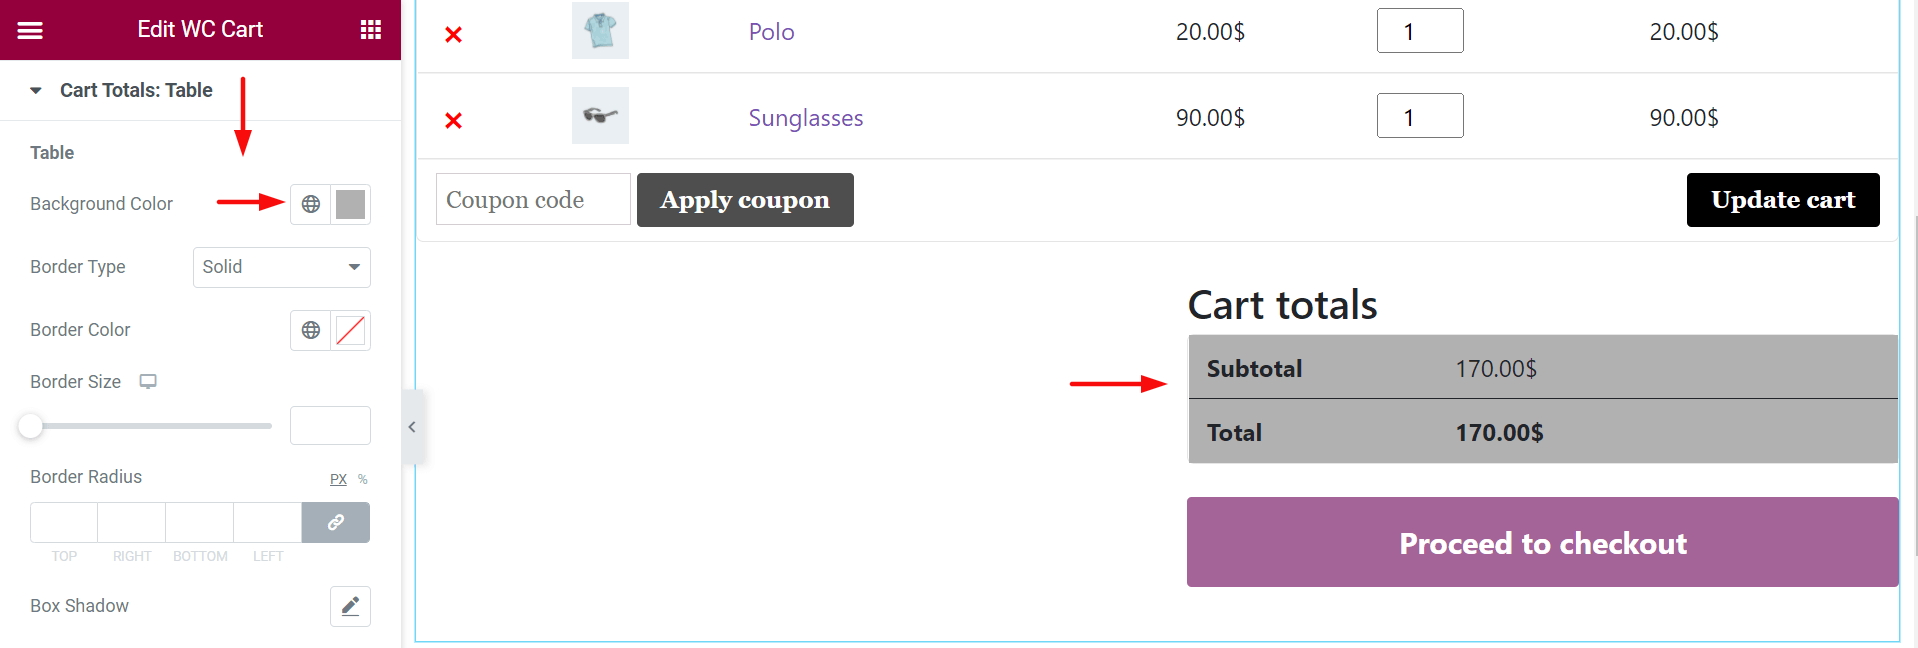
# Cart Totals: Table
From here, you can customize Table, Table Text, and Table Headings. Also, you can change the Background Color, Border Type, Border Radius, Box Shadow, Typography, and Color. We have set ash color on the Cart Total background.
# Checkout Button
From the ‘Checkout Button’, you can add more style in Typography, Width, Margin, Border Type, Border Radius, Padding, Background Color, Text Color, and Box Shadow.
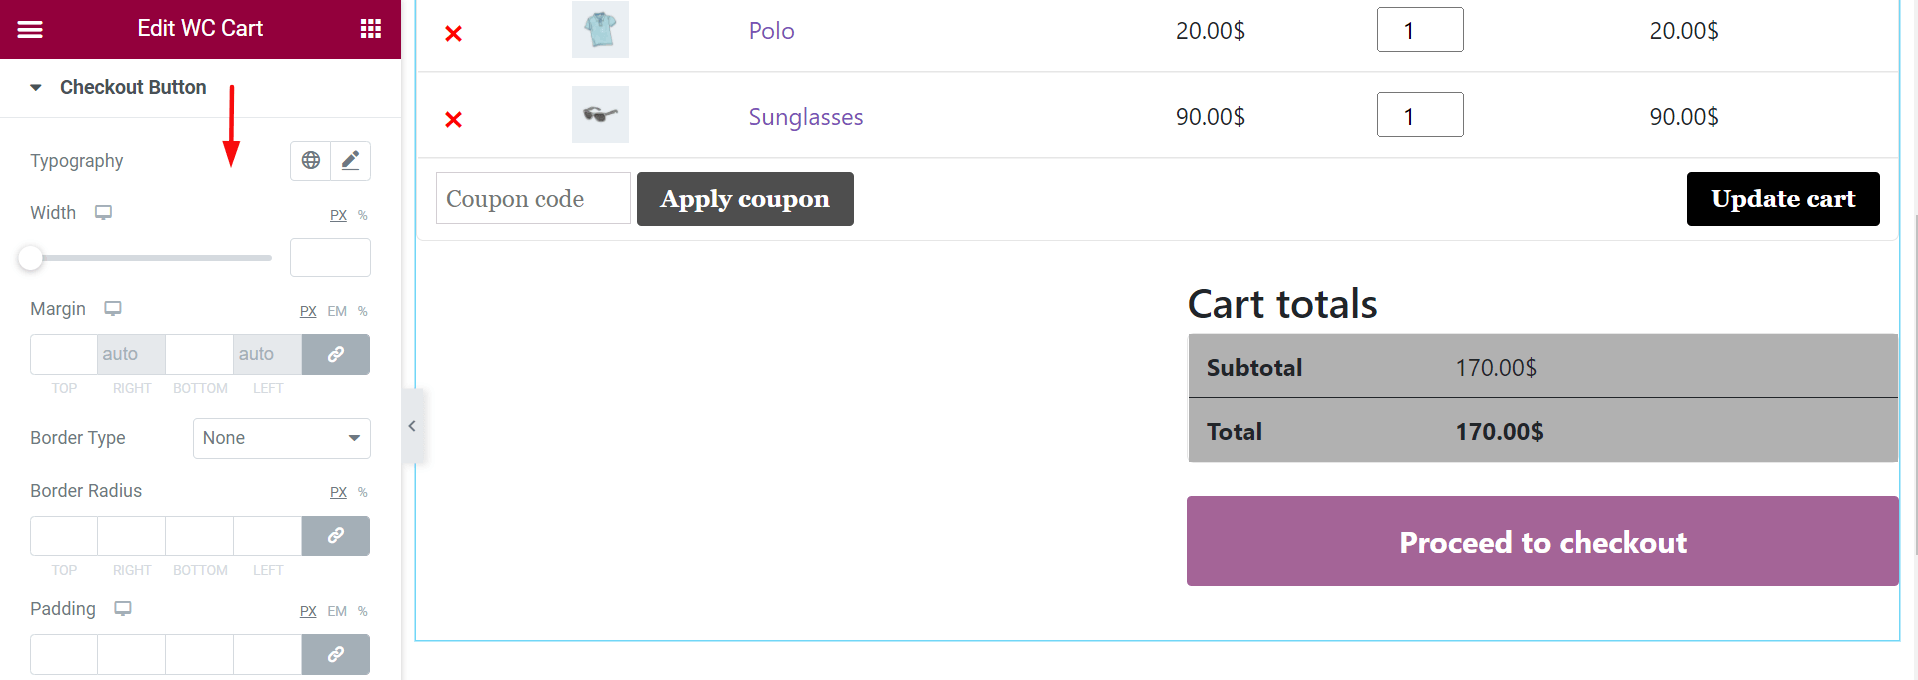
Here, we have set the blue color for the background of the Proceed to checkout button.

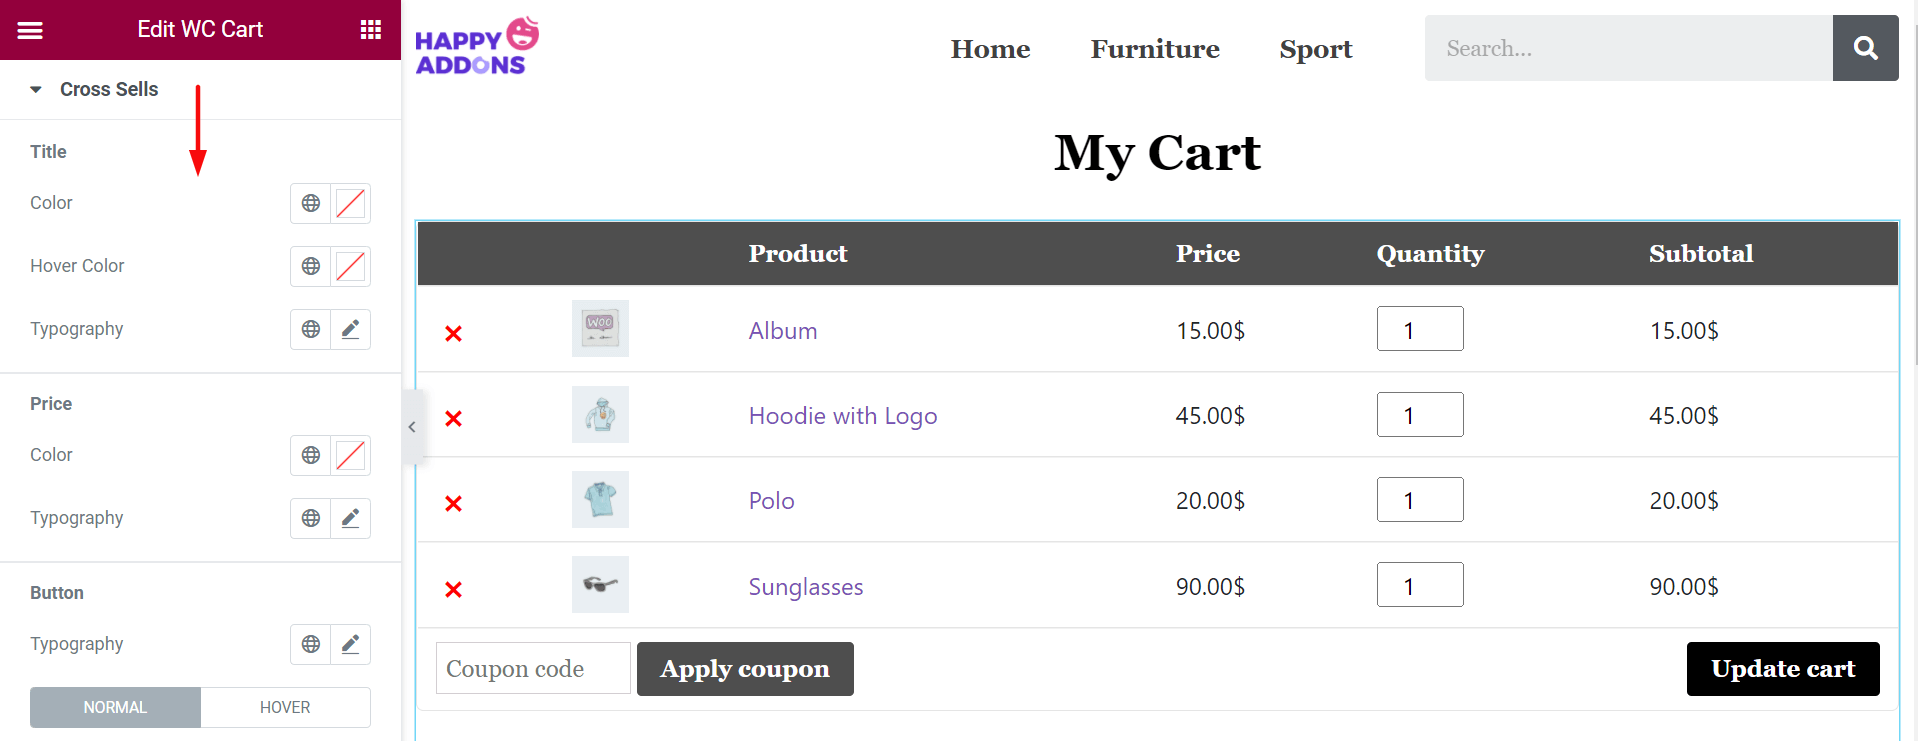
# Cross Sells
Finally, if you have integrated the cross-sell option, you can customize its Title, Price, Button, and Sales Badge from this option.
Step 05: Make Your Table More Responsive from the Advanced Section
However, you can further customize your cart page from the advanced option. From there, you can customize your cart page background, add happy effects, make it more responsive for the users.
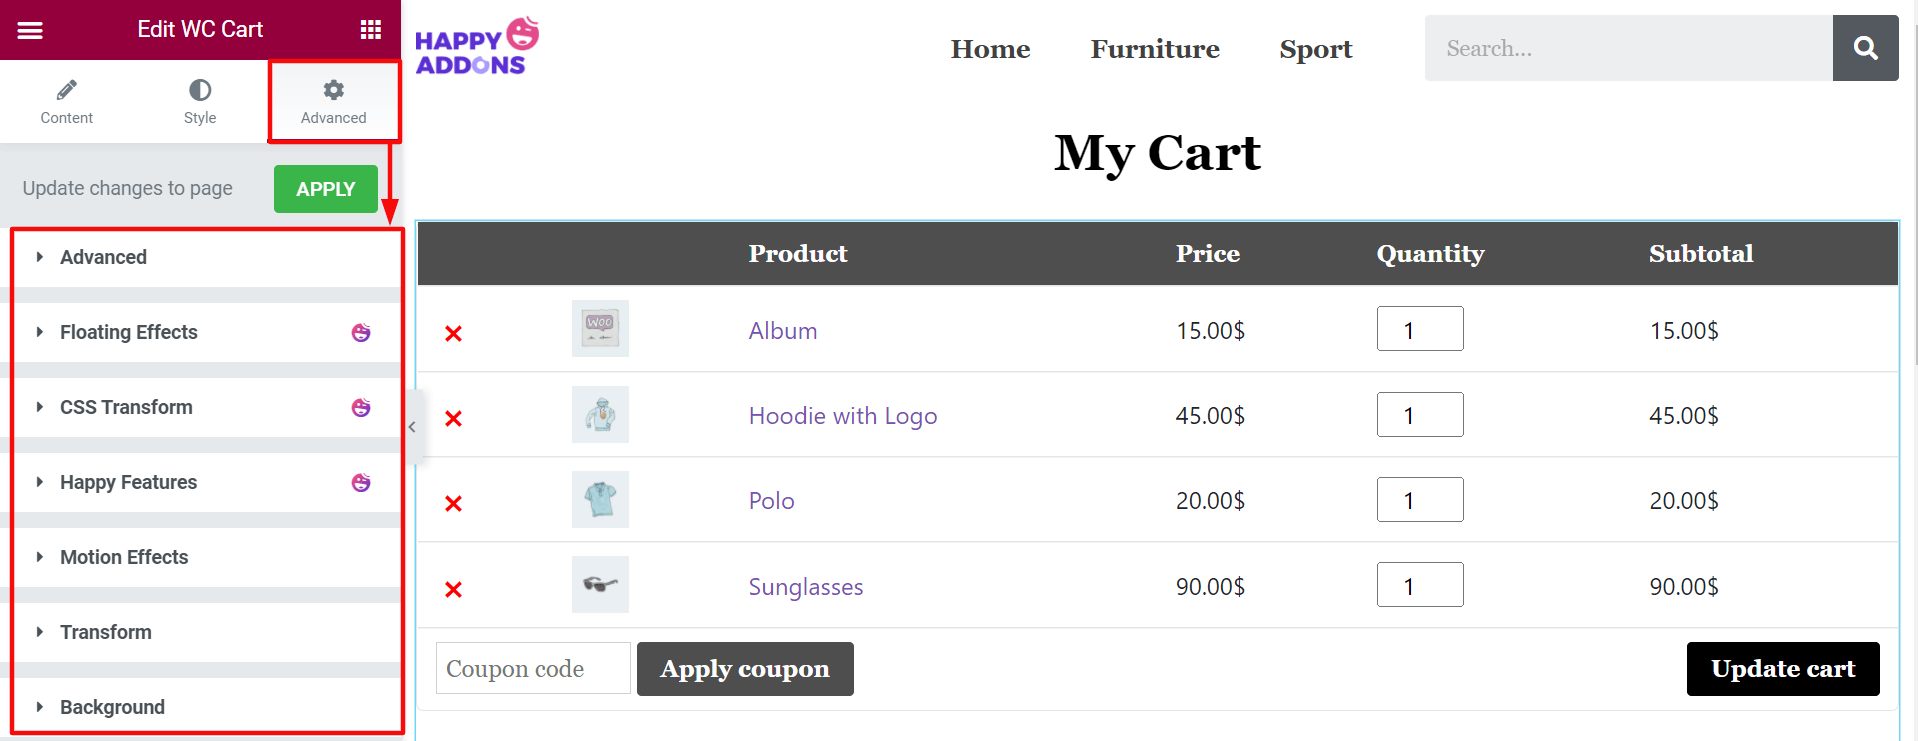
Now, let’s have a final preview of your newly edited WooCommerce cart page.
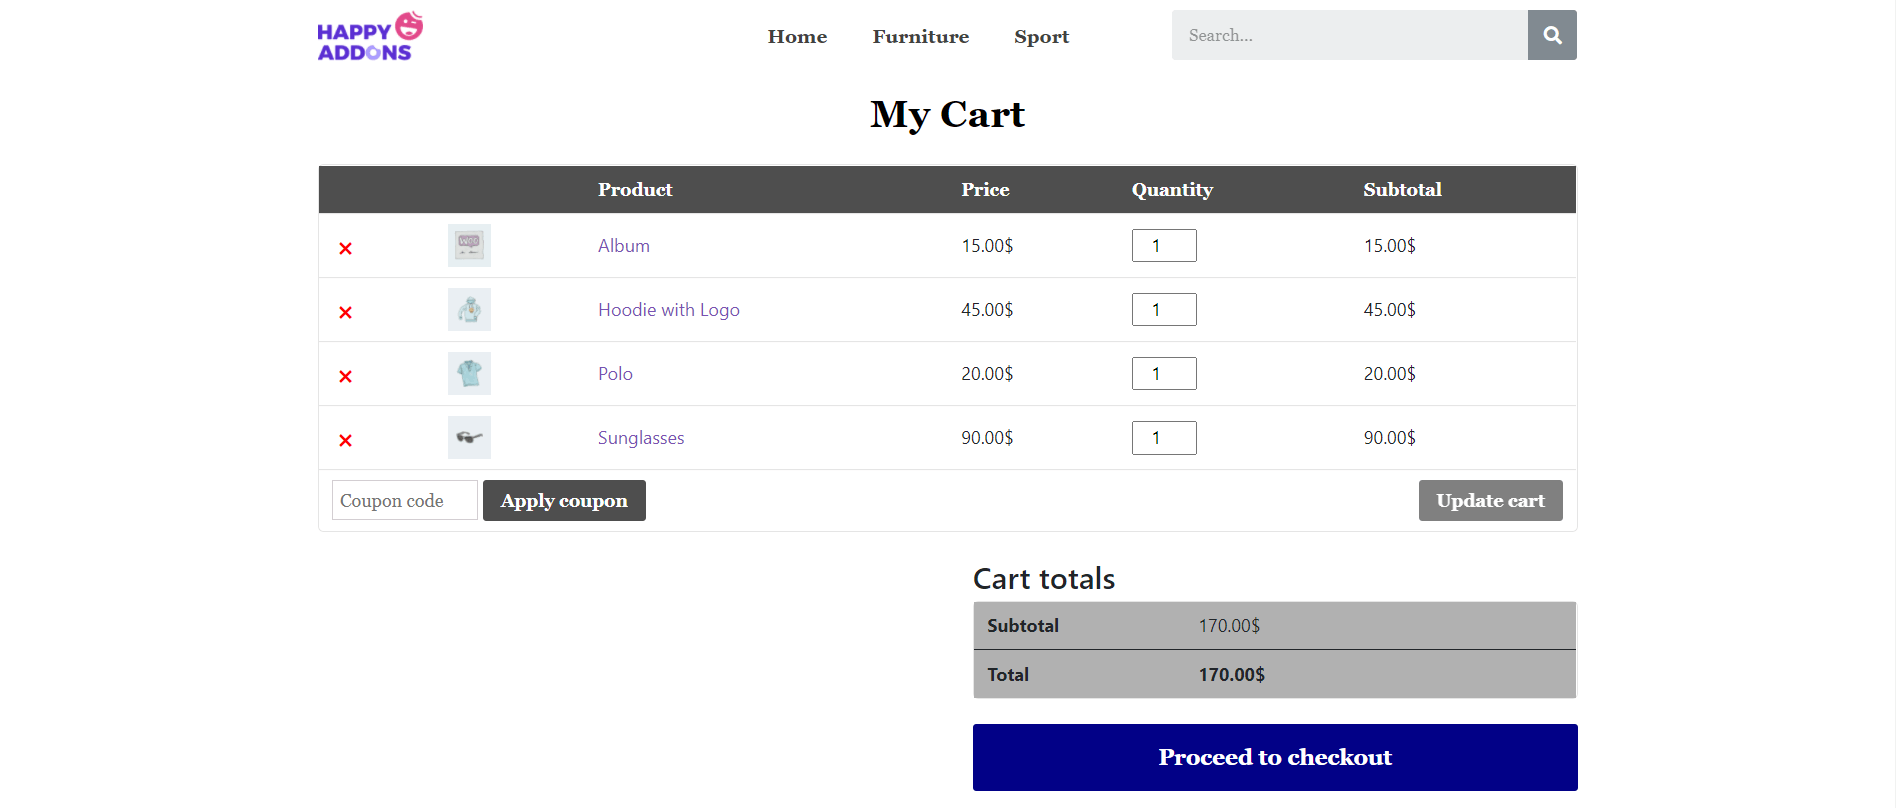
Thus, you can complete creating a new cart page for your eCommerce site.
How to Add Mini Cart to WooCommerce Website with Elementor
A mini cart holds the summary of the products that customers have added to their shopping cart. It is usually displayed as a shopping trolly icon on eCommerce websites.
Whenever a user hovers his cursor on the icon, it opens a pop-up containing a short summary of the products. It allows customers to add more quantities or remove an item without opening the shopping cart page.
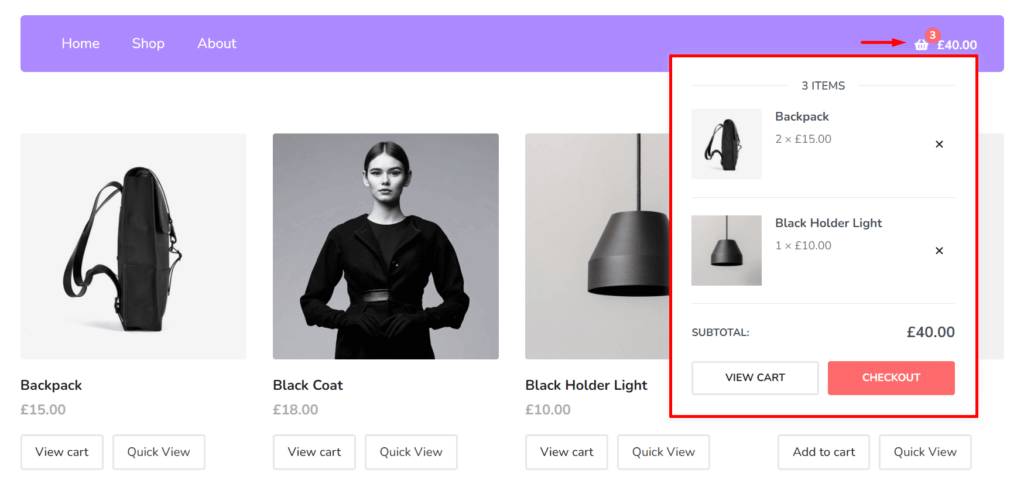
You can add a mini shopping cart to your website using the Mini Cart widget.
Prerequisites to Add Mini Cart to WooCommerce Website
Since you edited the cart page just a while ago, we hope your website is already meeting the above requisites. So, start following the below steps right away-
- Step 01: Add a New Section to Your Elementor Canvas
- Step 02: Drag and Drop Mini Cart from the Elementor Widget Gallery
- Step 03: Update Mini Cart Icon and Position from the Content Section
- Step 04: Change Your Popup Style
- Step 05: Update Your Mini Cart Body from the Style Section
Step 01: Add a New Section to Your Elementor Canvas
Click on the Add Section icon from the top of your Cart Table. It will add a new area to your canvas.
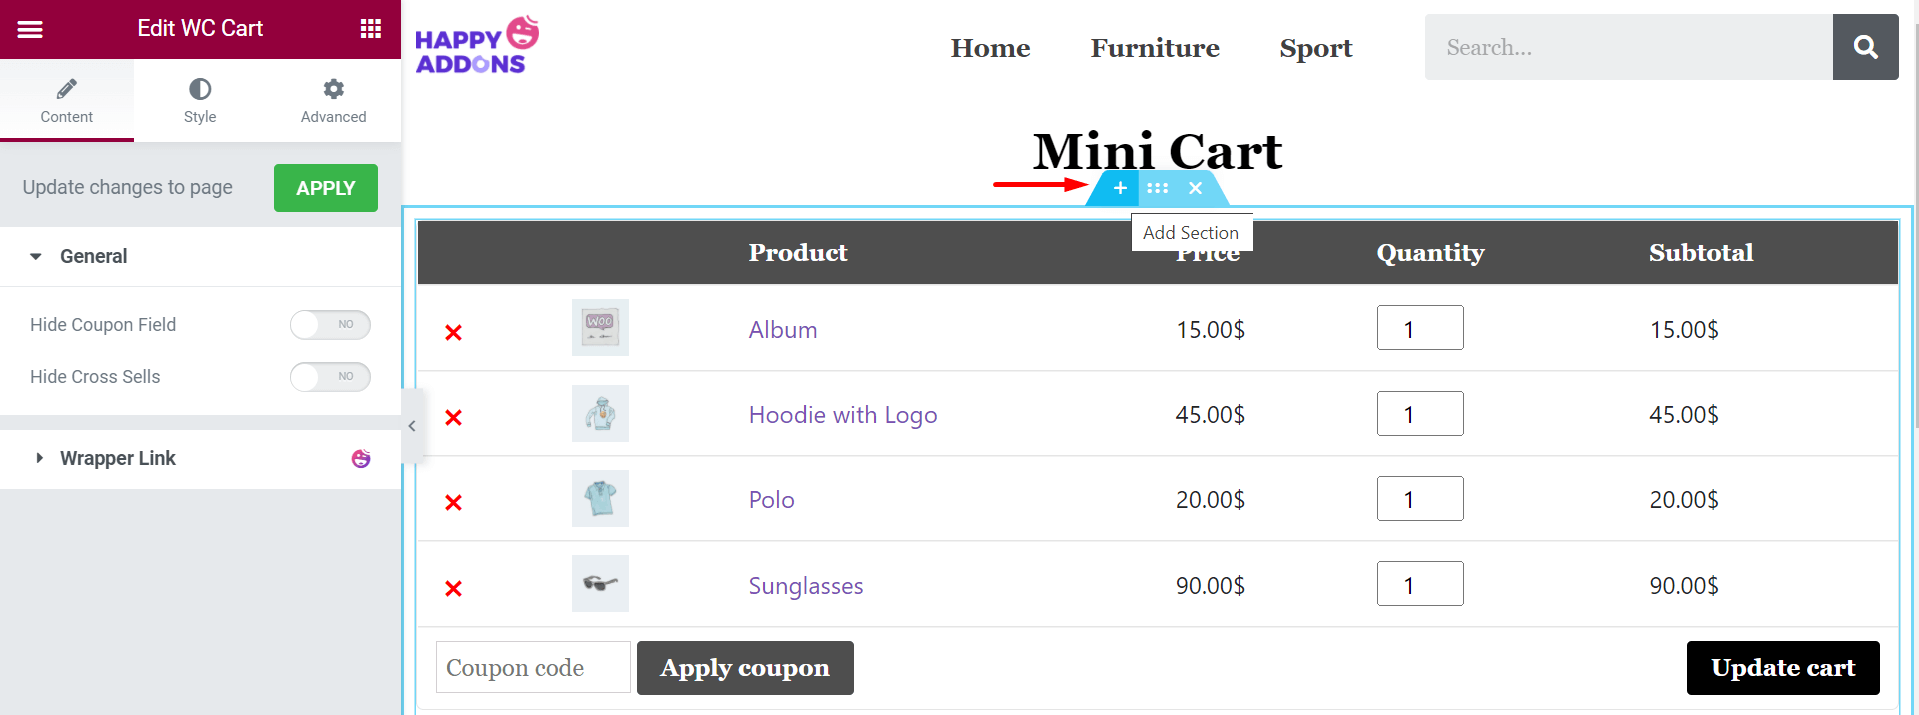
Step 02: Drag and Drop Mini Cart from the Elementor Widget Gallery
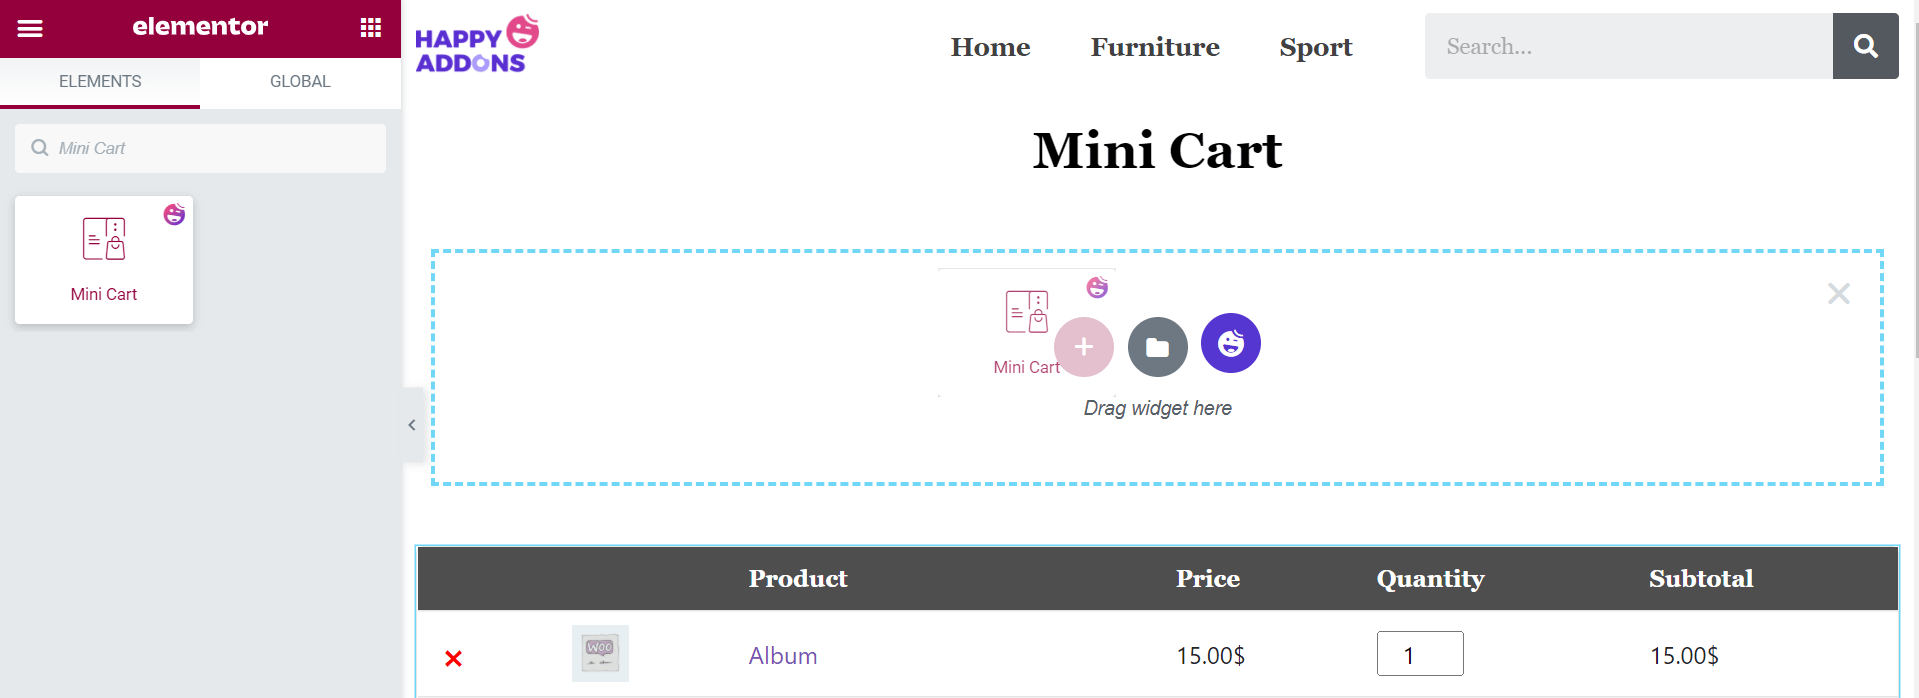
Type Mini Cart on the left-sided search bar. It will show you the Mini Cart icon. Drag and drop it on the newly added area.
Step 03: Update Mini Cart Icon and Position from the Content Section
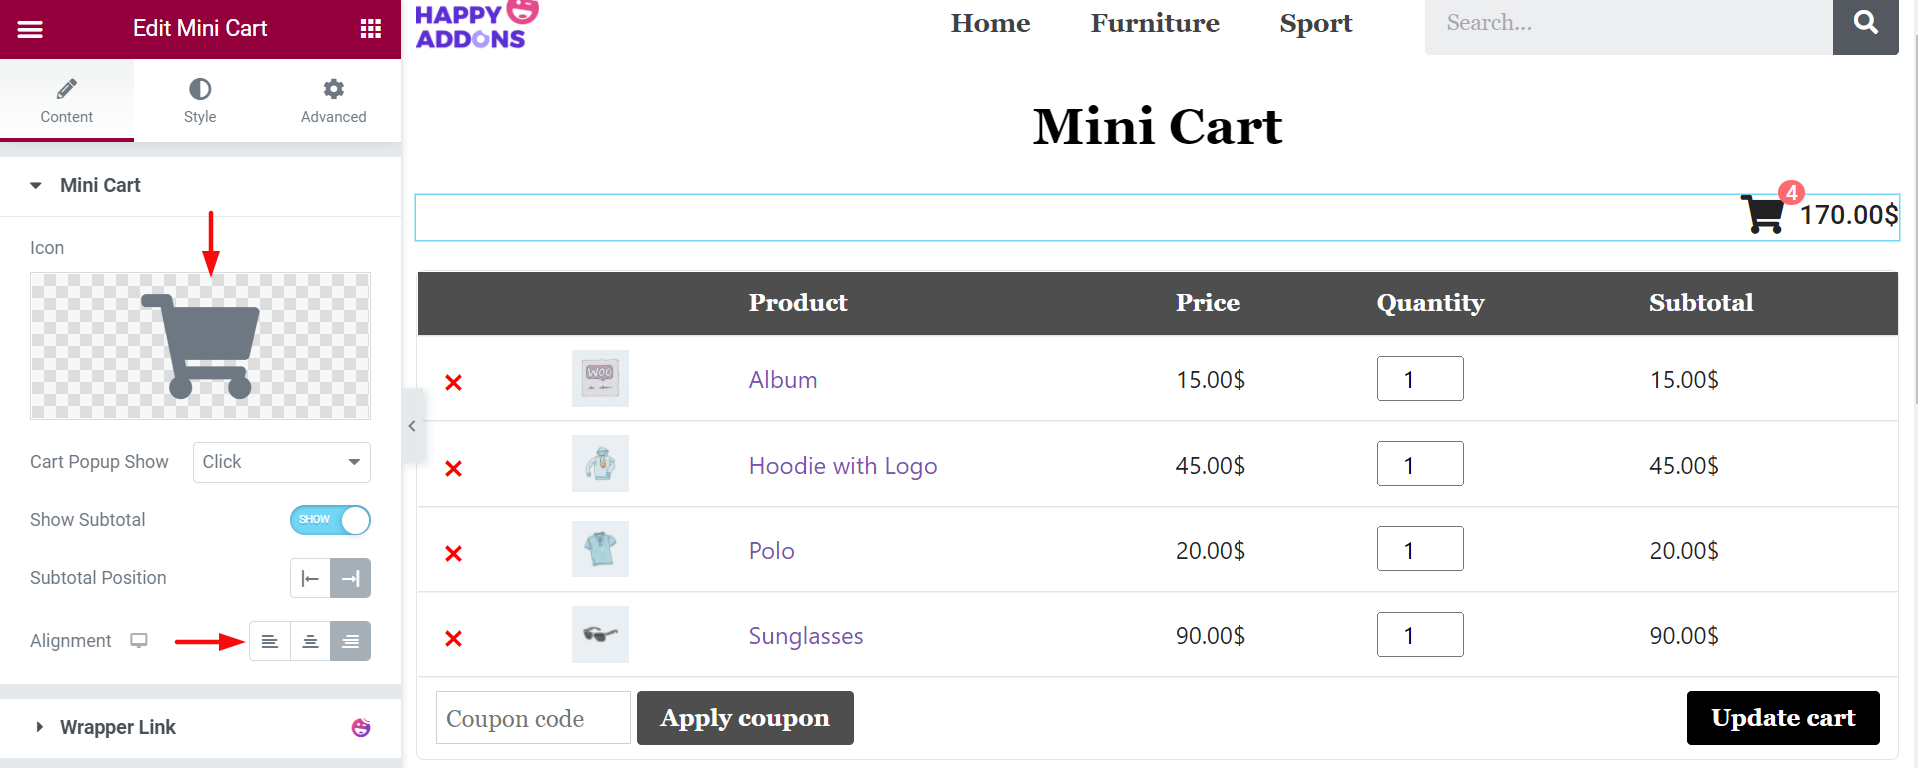
From the Content > Mini Cart, you can change the logo, make an alignment, and change position. Here, we have made the right alignment.
Step 04: Change Your Popup Style
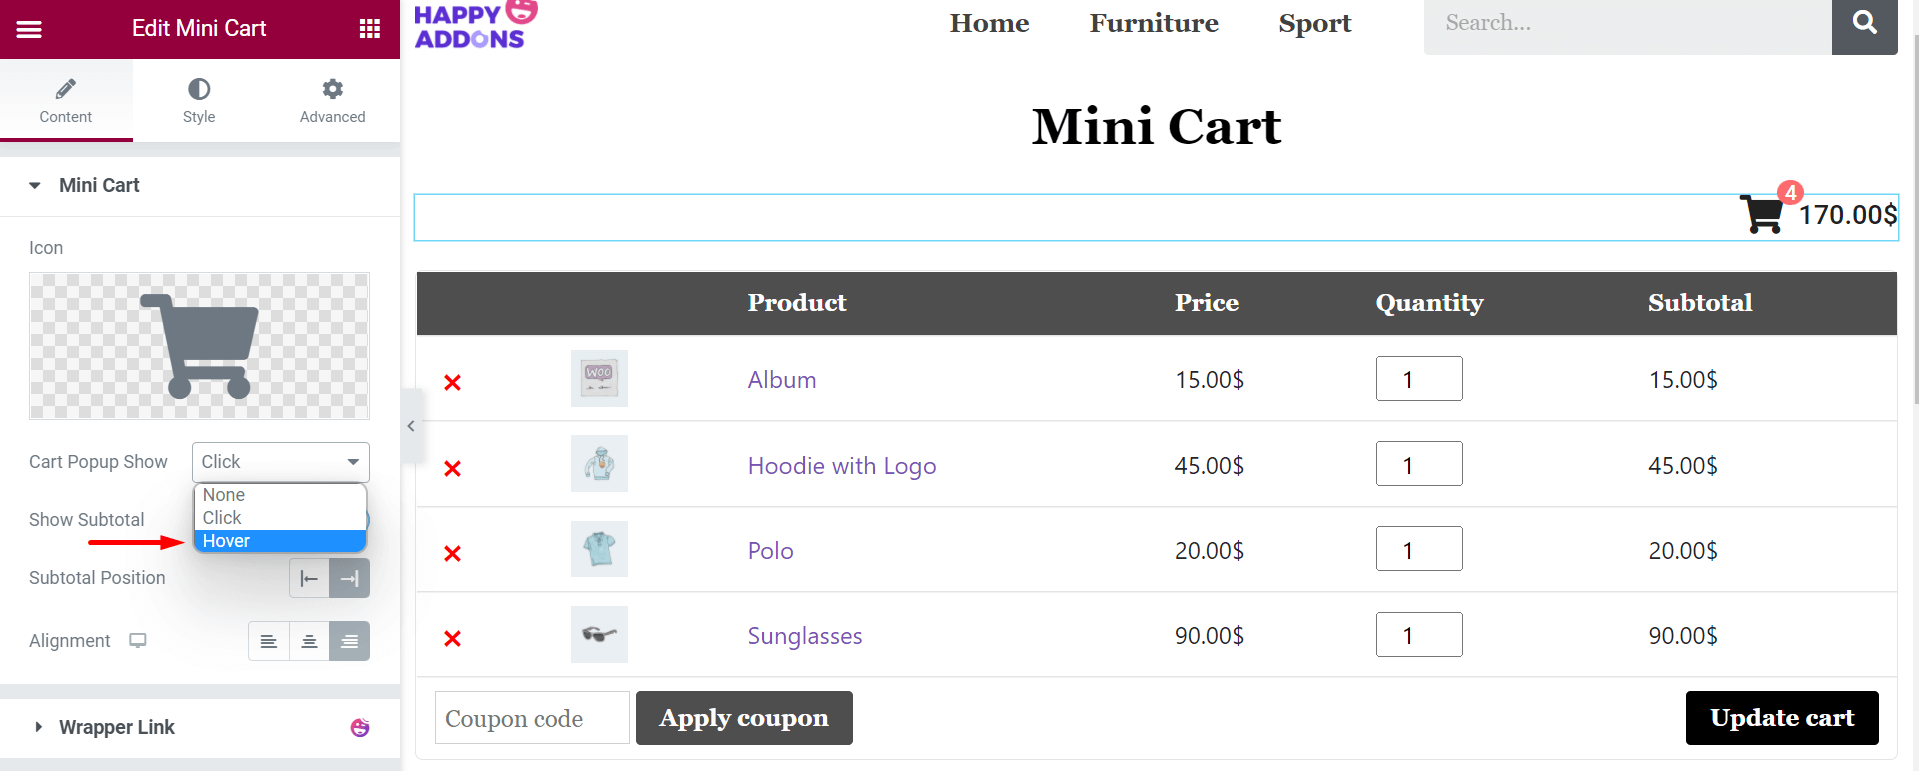
In popular marketplaces, a pop-up is specifically integrated with the Mini Cart. When someone takes his cursor or clicks on the cart icon, a pop-up automatically appears on your display. You can choose between Click or Hover from the ‘Cart Popup Show’ option. Here, we have selected the Hover option.
Now, hovering the cursor on the Mini Cart icon, you will get the popup right on your display.
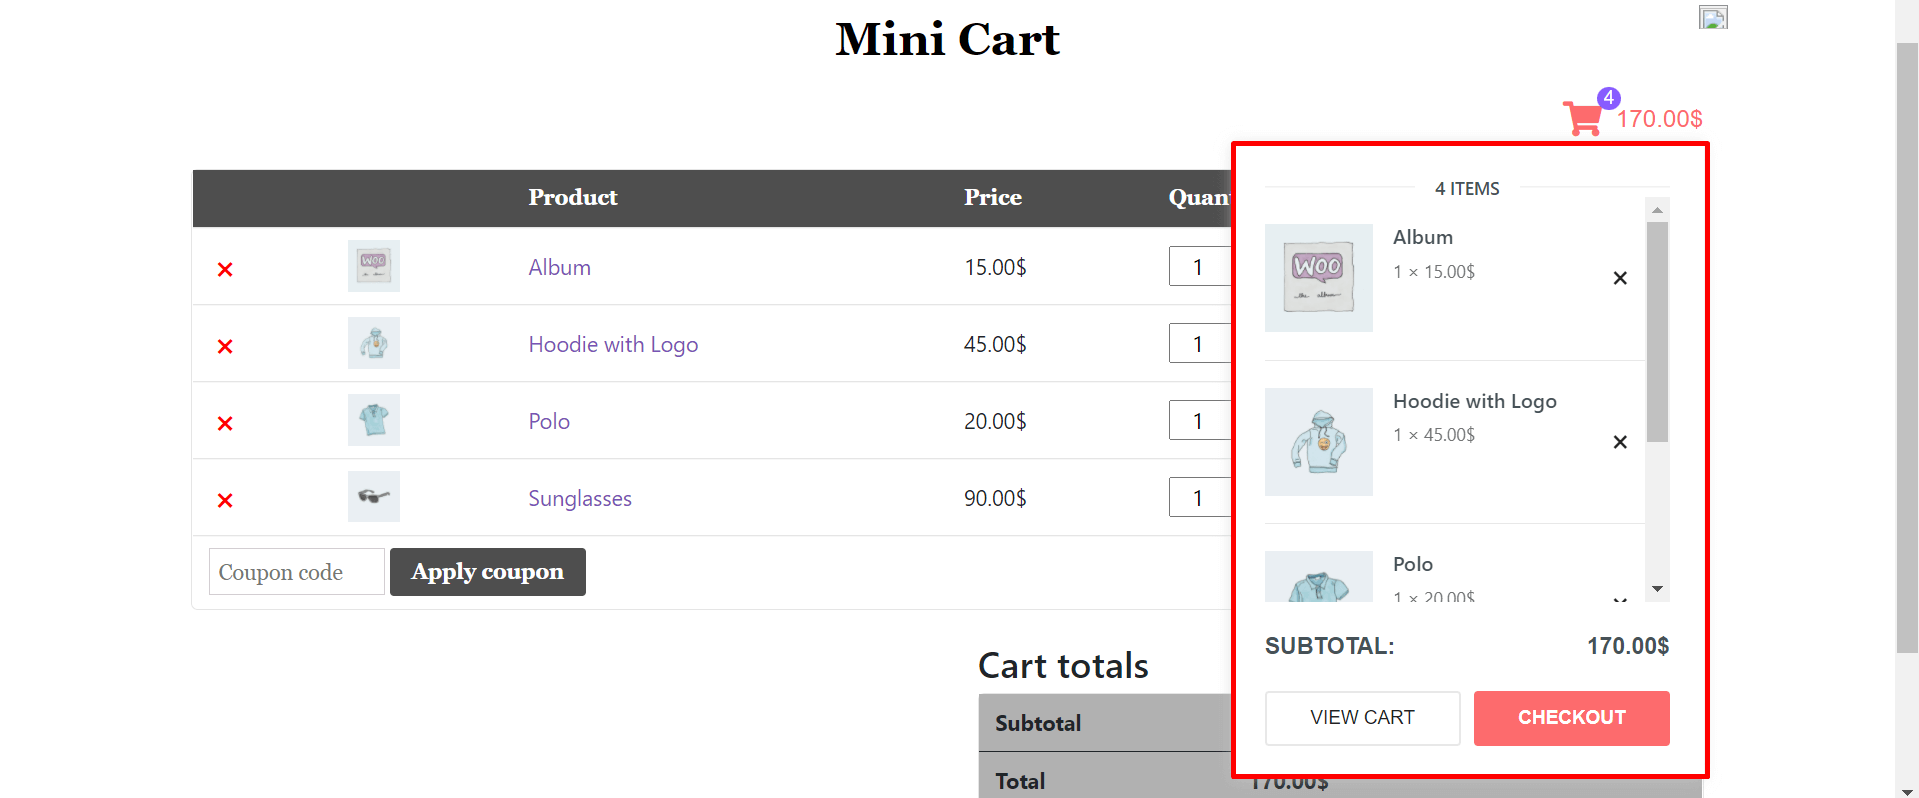
Note: Sometimes, due to a conflict with Elementor, your Mini Cart pop-up may not appear on your backend. Don’t worry about it. Just go to preview and check it.
Step 05: Update Your Mini Cart Body from the Style Section
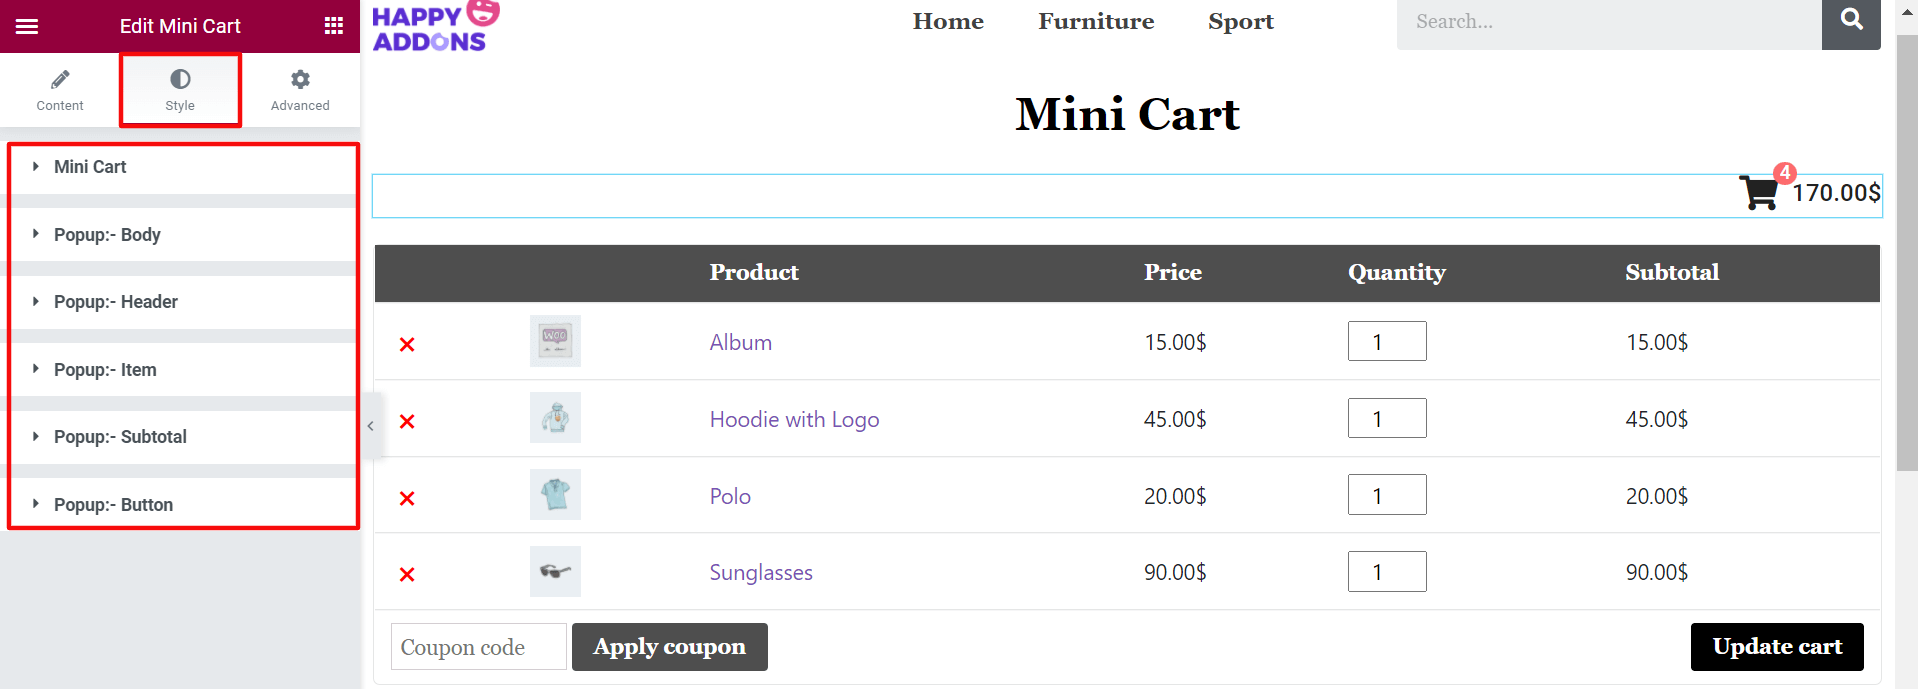
In the Style section, you will get six more options to customize your Mini Cart. They are
- Mini Cart
- Popup:- Body
- Popup:- Header
- Popup:- Item
- Popup:- Subtotal
- Popup:- Button
From Style > Mini Cart, you can customize the icon size, text color, background color, border, typography, and more. For example, here we have set red color for the Mini Cart icon.
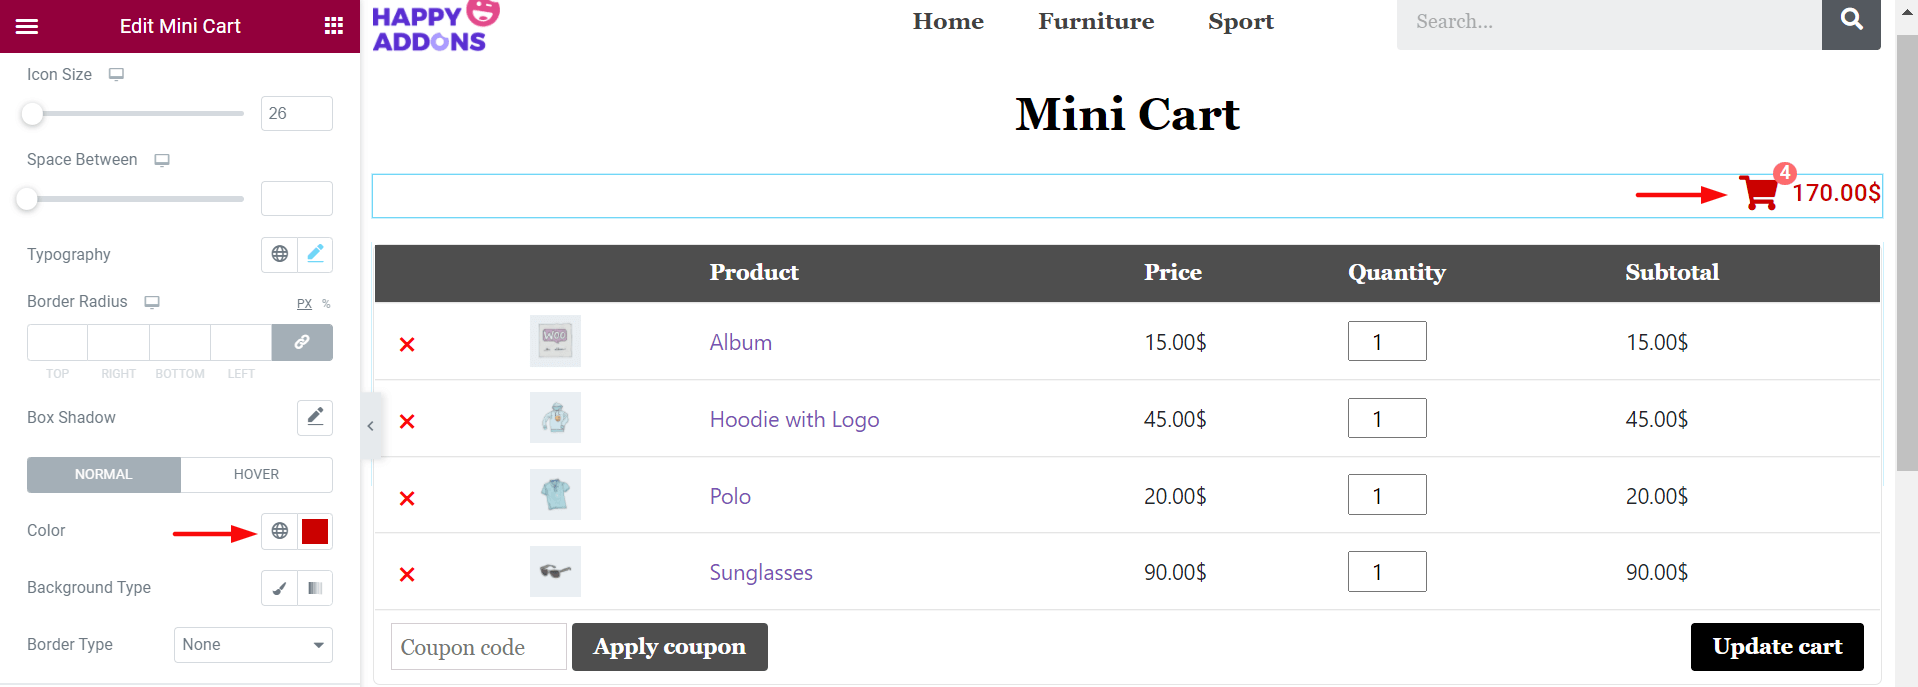
Thus, you can check the other options and complete your Mini Cart customization. However, if you have any issues, you’ll find most of your answers in this documentation. Besides, you can let us know your problem by commenting.
Now, you know all the steps on how to customize the WooCommerce cart page in a simple yet effective way.
Bonus Tips: How to Reduce WooCommerce Cart Abandonment Rate

When customers add products to the cart but don’t complete the order, it is termed cart abandonment. Until today, the average cart abandonment rate in all eCommerce industries is 65.23%.
This is a big headache for any eCommerce site owner today. Following some tried-and-tested approaches, you can bring a massive change in your cart abandonment rate by a fair margin. Let’s cover them below:
1. Keep No Hidden Cost
Hidden costs are the number one reason for the excessive cart abandonment rate. Baymard Institute reveals that 55% of potential customers leave the checkout pages uncompleted once they find additional costs there.
So, be clear about the total cost of each product, including shopping costs, packing charges, tax, and others in the product description.
2. Provide Multiple Payment Options
Unless you integrate multiple payment methods, it can shorten the number of potential customers. Today, there are numerous payment systems in the market. Hence, customers are no longer sticking only to the debit and credit card systems.
So, if possible, you must allow digital wallets, bank transfers, prepaid cards, cash-on-delivery, and other payment options.
3. Offer Multiple Shipping Options
Slow delivery causes 19% cart abandonment in the eCommerce world. Customers always want the fastest delivery at the lowest possible cost. But there are many products whose shipping charges rise if delivered fast.
Therefore, you must allow multiple shipping options. It will enable customers to choose the best courier option that matches their time and affordability.
Related Resource: 10+ Effective Ways to Reduce Shopping Cart Abandonment & Retarget Your Lost Customers.
4. Use Clear Call to Action (CTA) Buttons
Clear CTA buttons can create urgency, establish a strong commitment, and emotionally trigger the customers. But many eCommerce websites fail to weigh this value. Some most popular CTA buttons are:
- Buy Now
- Complete My Purchase
- Grab It Today
- Get My Discount
- Redeem My Voucher
So, you must learn how to make your CTA buttons so powerful and use them in which situations.
5. Remind Customers about Their Cart Contents
There are many customers who love to add products to their carts but forget to check them later on. In that case, you can send follow-up emails to the customers, including a short summary of the products after regular intervals. It will make them rethink the items to purchase or not.
6. Create Urgency to Grab Your Products
Urgency can push customers to complete their orders as soon as possible. But to create such a situation, you must offer them some extra value. Such as discounts, free shipping, 2-day delivery, free items, etc. Some high-converting ad copies to create urgency are:
- Don’t miss out
- Stock clearance sales
- Last chance
- Exclusive one-day sale!
- Limited stock
Email marketing is also a great way to spread urgency in the market. Learn how to write appealing email subjects and descriptions.
7. Ensure Return and Refund Policy
Today, customers are more meticulous in choosing online platforms to do their shopping. Each year 11% of online users drop eCommerce websites that don’t have a clear return and refund policy.
Because without them, customers can’t continue to shop with confidence. Therefore, to uphold the brand value of your business, you must include the return and refund policies on your website.
8. Keep the Checkout Page Easy and Simple
Once customers step into the checkout page, it means they are almost ready to complete the order. So, would it be wise to confuse them with too many form fields and complexity? According to Semrush, 27% of cart abandonment is caused due to complicated checkout processes.
So, you must keep the checkout page very simple. Just ask for the essential information, such as
- Name
- Shipping address
- Email address
- Payment details
Additionally, never ask for any personal or sensitive information here.
Get Ready to Edit WooCommerce Cart Page
Today, more than 22+ million eCommerce websites are actively working on the web. The WooCommerce cart page makes a bridge between the product detail and checkout pages. Any slightest error or difficulty in the page can cause your customers to move away somewhere else.
Never before had it been so easy to edit the WooCommerce cart page. But today, one can do this without any coding knowledge or hiring a professional. The drag-and-drop formula has made the thing so easy that you can even try it for yourself.
Apart from editing the WooCommerce cart page, this article also covers how to add a Mini Cart to your website. If you have found this article helpful, subscribe to us for more interesting content.
Do you have any further queries regarding the custom WooCommerce cart page? Do share your views in the comment section below!
Subscribe to our newsletter
Get latest news & updates on Elementor

