Making a custom single product page is one of the best ways for your eCommerce store to stand out, giving your customers more freedom while shopping.
And thanks to WordPress, creating a customized product page is easy. You can efficiently create a custom product page for your eCommerce store using the popular page builder Elementor’s drag-and-drop WooCommerce widgets.
In this guide, you are going to learn how to edit the WooCommerce product page as well as design a custom single product page from scratch. Before diving into the tutorial, we are going to take a look at why you should customize the WooCommerce product page.
Let’s get started:
Why You Need To Customize Your WooCommerce Product Page

WooCommerce offers a single product page that is minimal and simple by default. Using this product page, customers can easily view a product and able to purchase it. But, if you want to add more functionality such as product add-ons, size chart, 360º image, product video, and more to your single product page, then you need a custom single product page or edit the current one.
A custom product page helps in many ways. Here are some important facts about having a custom product page for your eCommerce store.
- Ensure better user experience
- Increase product sales
- Improve product page design
- Help customers to purchase product
- Grab customers attention
- Ensure better product view
How To Edit WooCommerce Product Page (Step-by-Step Guide )
In the following part of our blog, we’ll show you how to edit the WooCommerce product page in two easy ways.
- First Method: Create the Single Product Page Template
- Second Method: Create A New Single Product Page From Scratch
You need to Install and activate the following plugins to create a single product page:
- Elementor (Free)
- Elementor Pro
If you are new to Elementor read this Step By Step Guide For Beginners.
First Method: Create the Single Product Page Template
In this method, we are going to show you how to create and edit a single product page template using the Elementor premade templates.
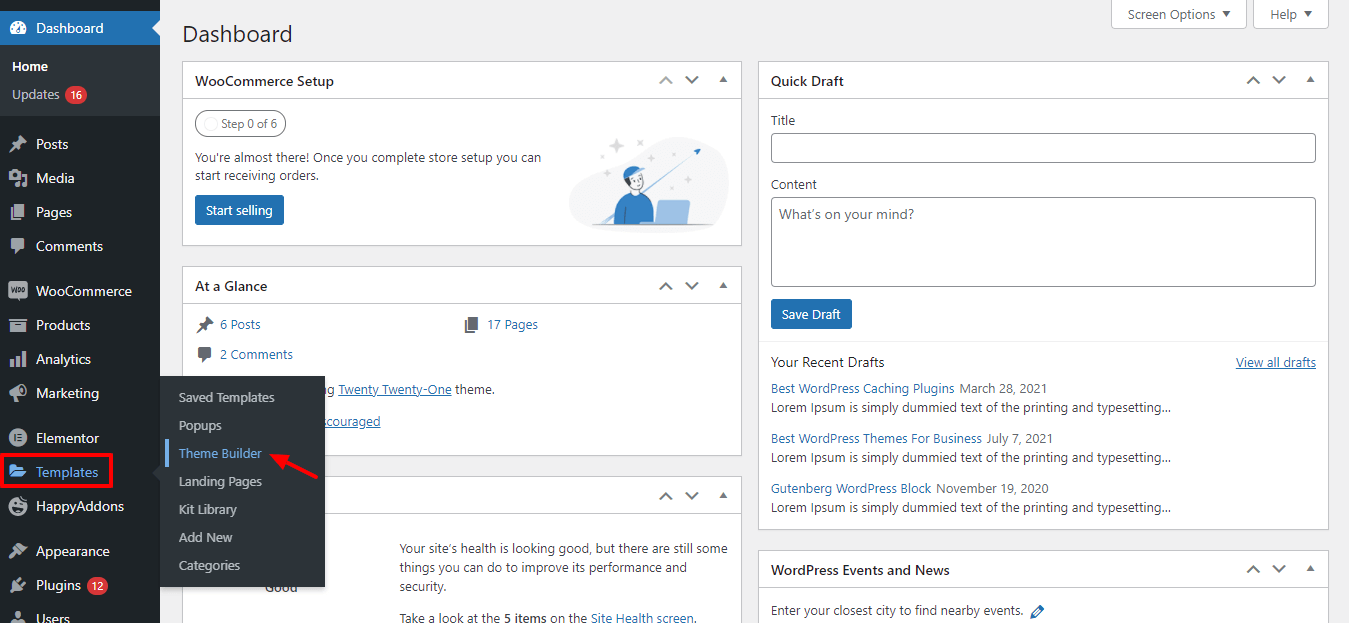
Step 1: Go To Template Theme Builder
To create a single product page template, you need to go to the Dashboard–>Template–>Theme Builder.
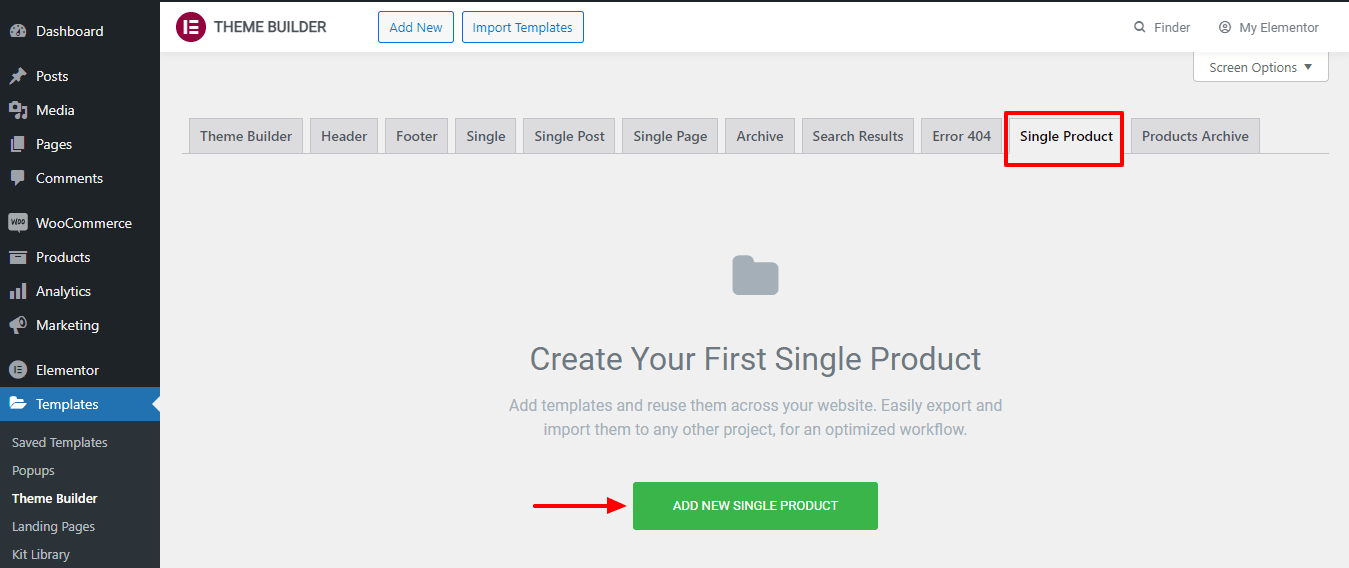
Step 2: Click on the Single Product Tab
You’ll get the Single Product page creation option on the next page. Click the Single Product tab first. Then, you need to click the Add New Single Product button.
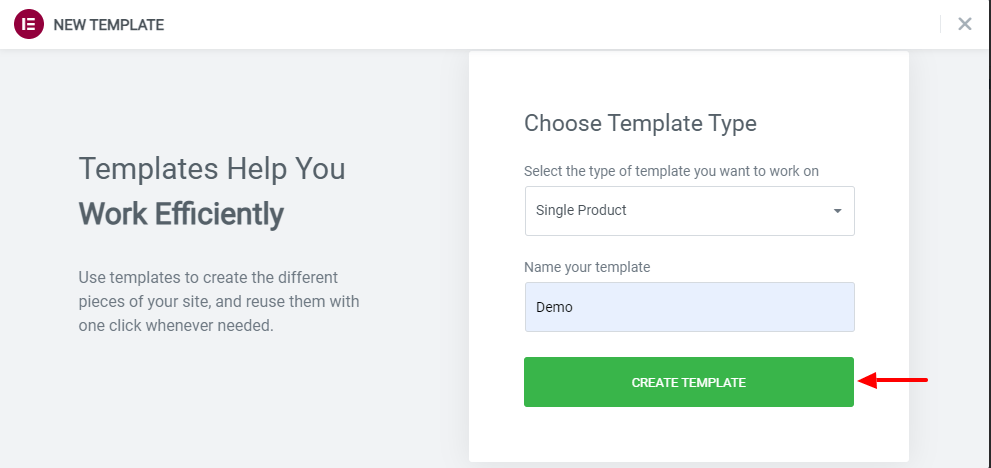
Step 3: Create a Template
After that, you’ll get the option to create your first-page template. You also write the name of your template here in this area. Then click the Create Template button.
Step 4: Choose a Suitable Pre-Designed Product Page Template
If you want to use the default Elementor template, you can choose them right here in the Elememtor Template Library. You can select and Install a suitable template based on your need.
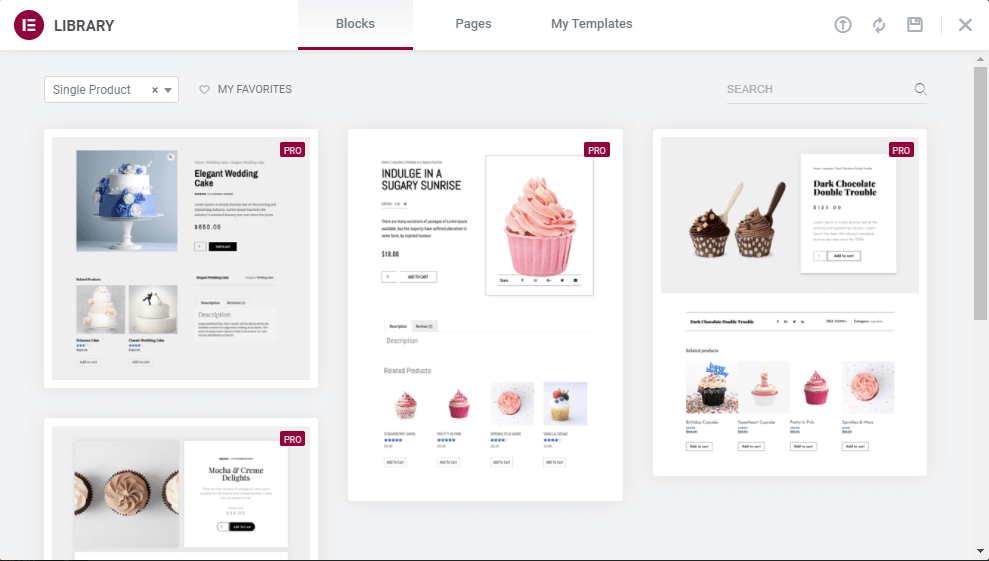
If you do not have enough time to design & customize your WooCommerce single product page, you can use the Elementor premade templates and block. But in this guide, we’ll show you to how to create a WooCommerce Product Page from scratch using Elementor.
Second Method: Create A New Single Product Page From Scratch
Now, it’s time to design a new product page from scratch. If you follow the below guide, you’ll be able to design your very first product page within a very short time.
Let’s get started:
Step 1: Open The Page To Elementor Editor Panel
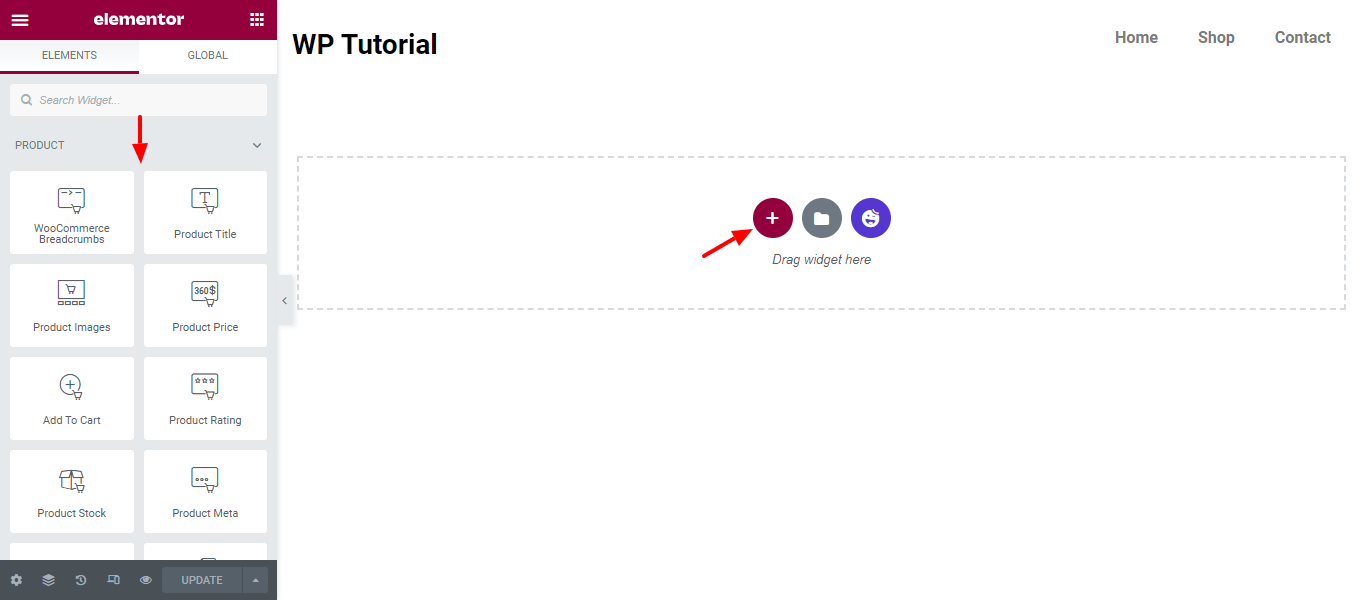
After creating the single product page template, you need to open the page in the Elementor editor panel. Here, you see all the WooCommerce widgets are available in the left-size widgets gallery. To use them, you need to make a solid structure for your product page. Click the red plus (+) icon to add columns.
Step 2: Add Two Columns
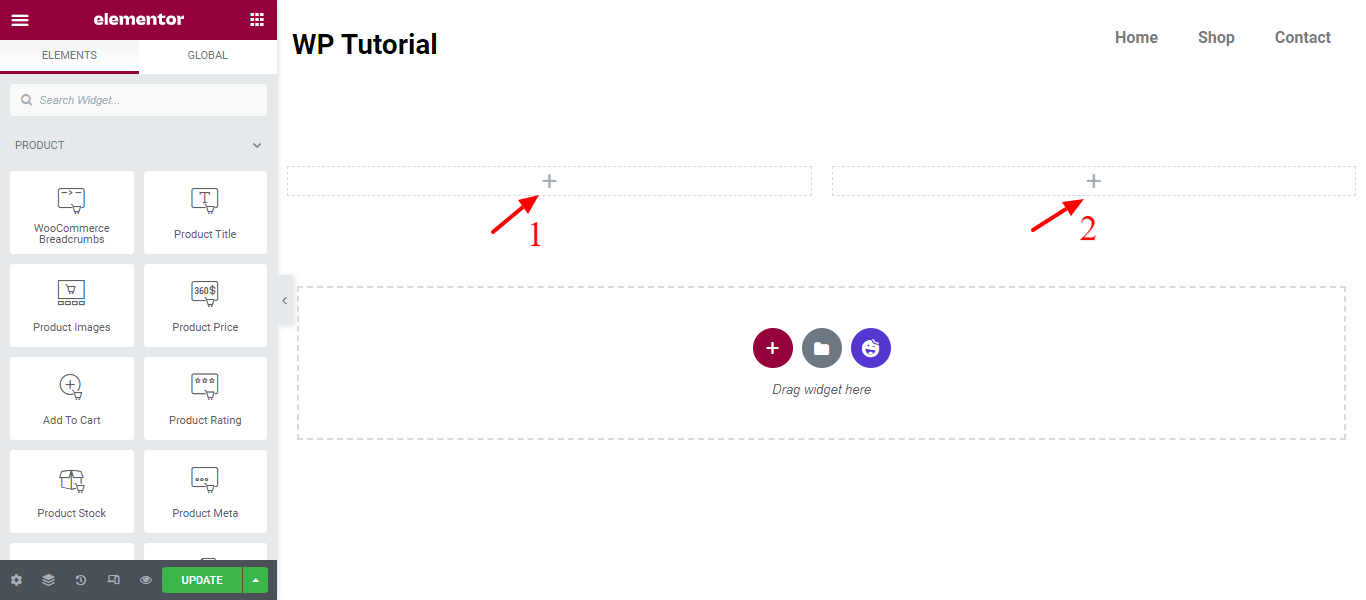
You can see from the screenshot below that we’ve added two columns to design our single product page.
Step 3: Add Necessary WooCommerce Widgets To Design Your Product Page
Now, it’s time to add essential WooCommerce widgets for designing the product page. Here, we’ve added these widgets to design our custom product page.
- Product Image Widget: You can set the image or gallery you wish to display
- Product Title Widget: This widget will help you customize the style and layout of your product title.
- WooCommerce Breadcrumbs Widget: Customize the colors and the layout for WooCommerce Breadcrumbs.
- Short Description Widget: Choose how you want to display the short description of your product.
- Product Price Widget: Control the layout and design of your product price.
- Product Rating Widget: Customize the ratings of your product. Make it more visible and make sure customers can easily know how users view your product.
- Product Meta Widget: Set the distance between the text, display it stacked or inline, and control the style of your Metadata
- Additional Information Widget: You can add additional information about your product with this widget.
- Add To Cart Widget: Customize the style and layout of the Add to Cart button.
- Product Data Tabs Widget: Control the layout of the product data tab.
- Upsells Widget: You can create your own style for the upsell products.
- Product Related Widget: If you have similar products on your site you must have a related product section. You can stylize your related product section with this widget.
Step 4: Add Product Images Widgets
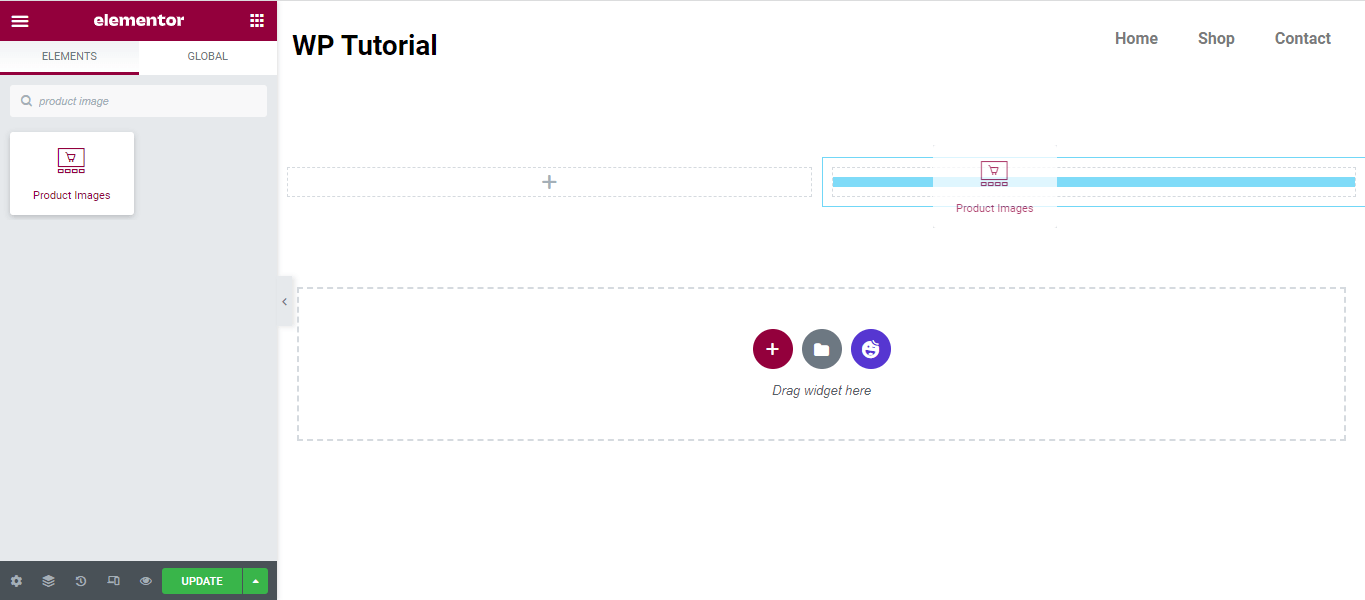
First, we add the Product Image widget to the right-side column. You can type ‘Product Image‘ into the search field and then drag & drop it into the column.
Step 5: Customize the Product Image Style
You can customize the product image style in your own way using the Style options of this widget. Here, you turn on & off the Sale Flash. You can add the Product Image and Thumbnails’ Border Type, Border Radius, and also manage the Spacing between the Product Image & Thumbnails.

Step 6: Add WooCommerce Breadcrumbs Widget
To ensure a better user experience you need to provide proper navigation on your page. That is why we need to add the WooCommerce Breadcrumbs widget to add the navigation of our product page.
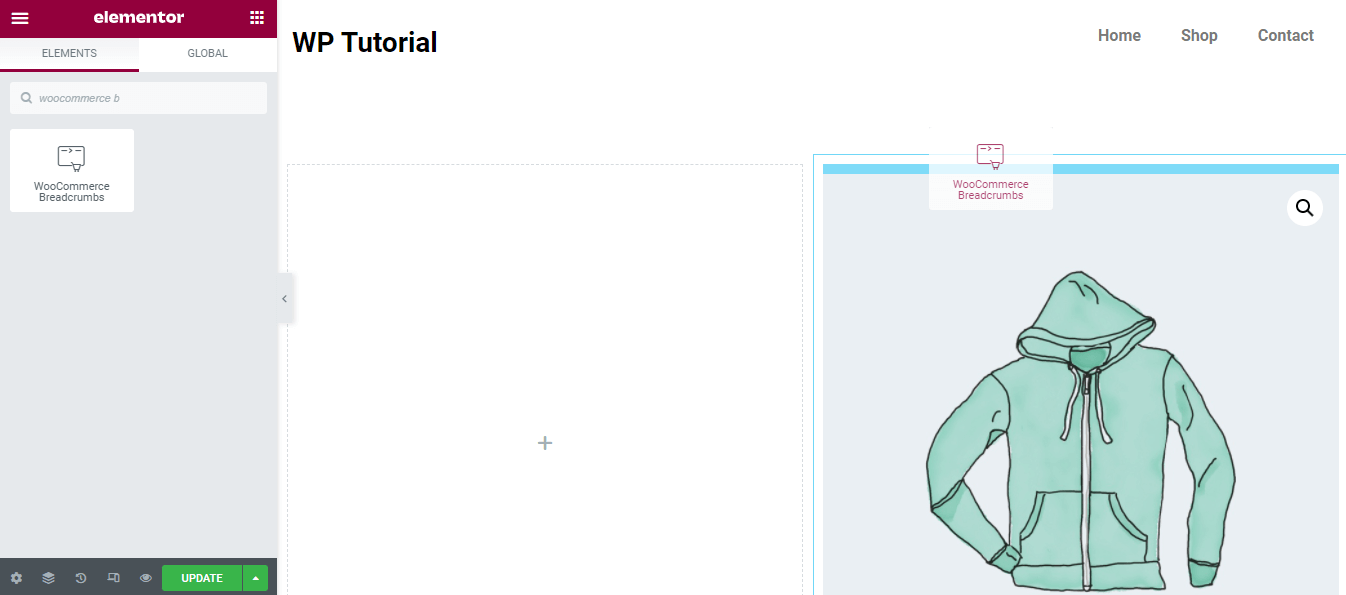
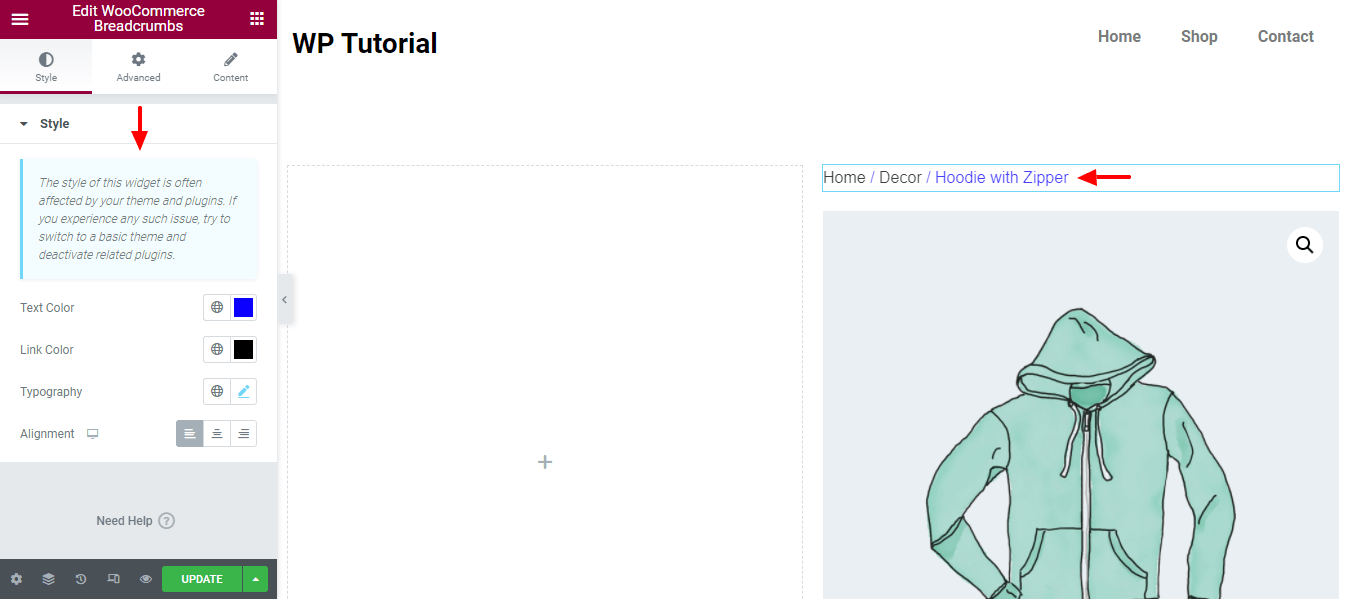
Step 7: Customize WooCommerce Breadcrumbs
Again, you can customize the Breadcrumbs design using the style options. Here, you can set the Text Color, Link Color, Topography, and Alignment of the Breadcrumbs.
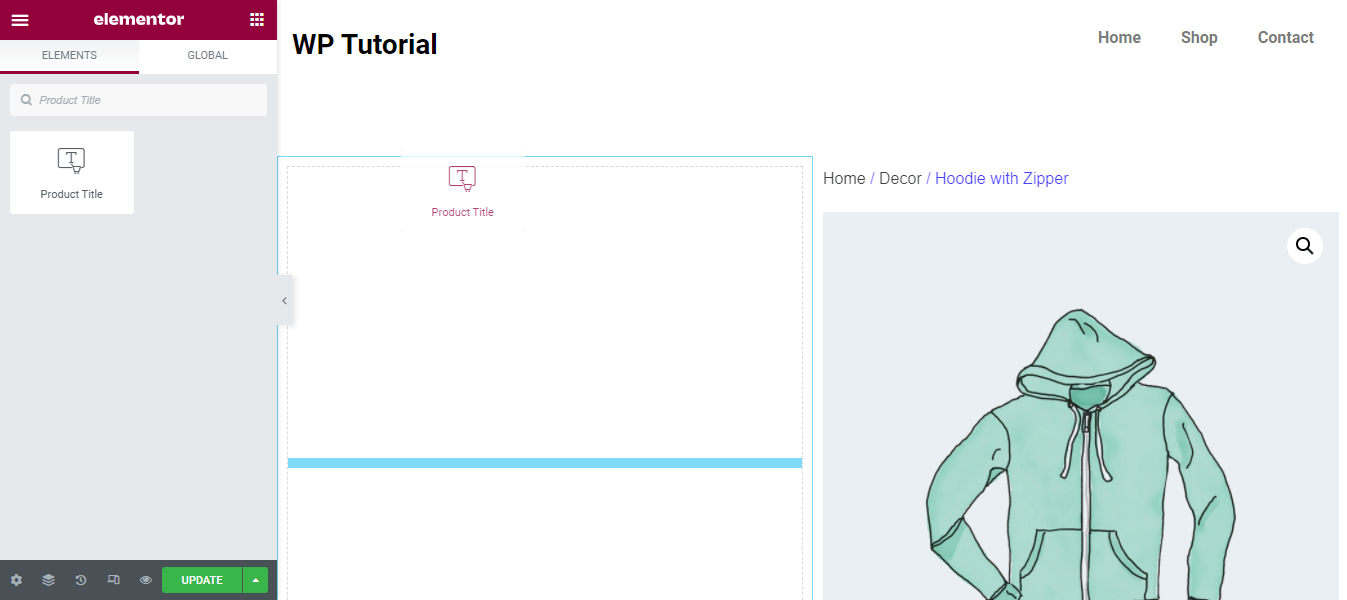
Step 8: Add Product Title Widget
You need to add a suitable product title so that users easily understand what your product is all about. So, let’s add the Product Title to the left-side column.
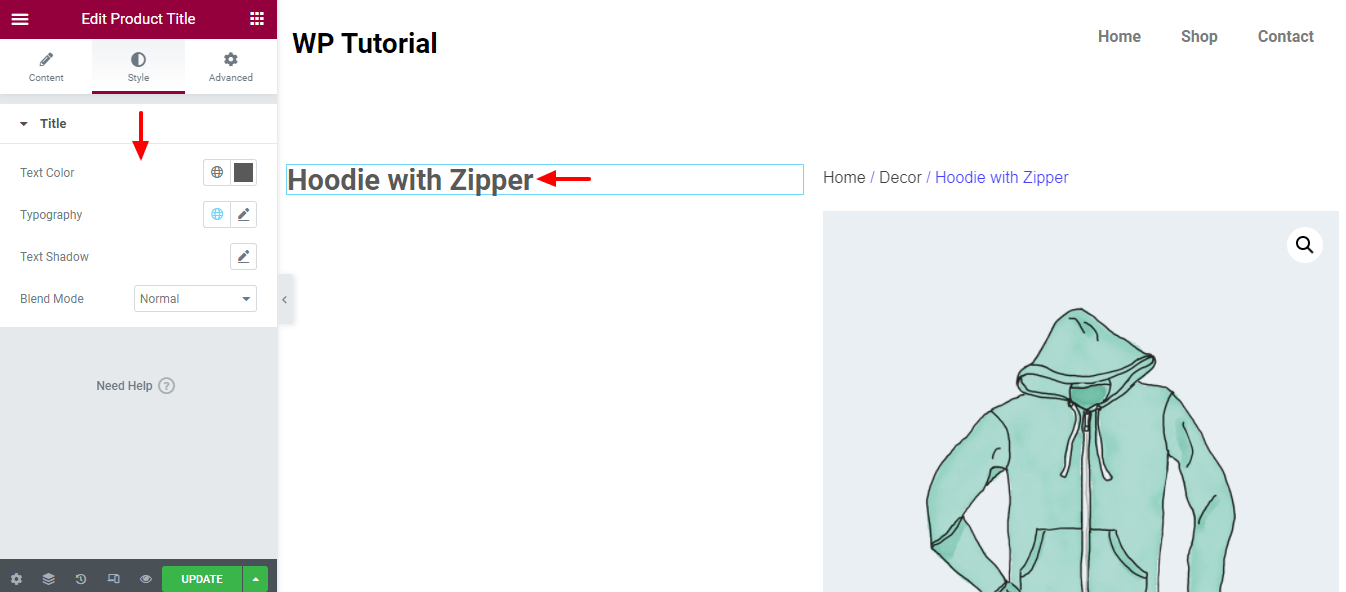
Step 9: Style Product Title Widget
In the Style section, you can change the Product Title designs and manage Text Color, Topography, Text Shadow, and choose a Blend Mode.
Step 10: Add the Short Description Widget
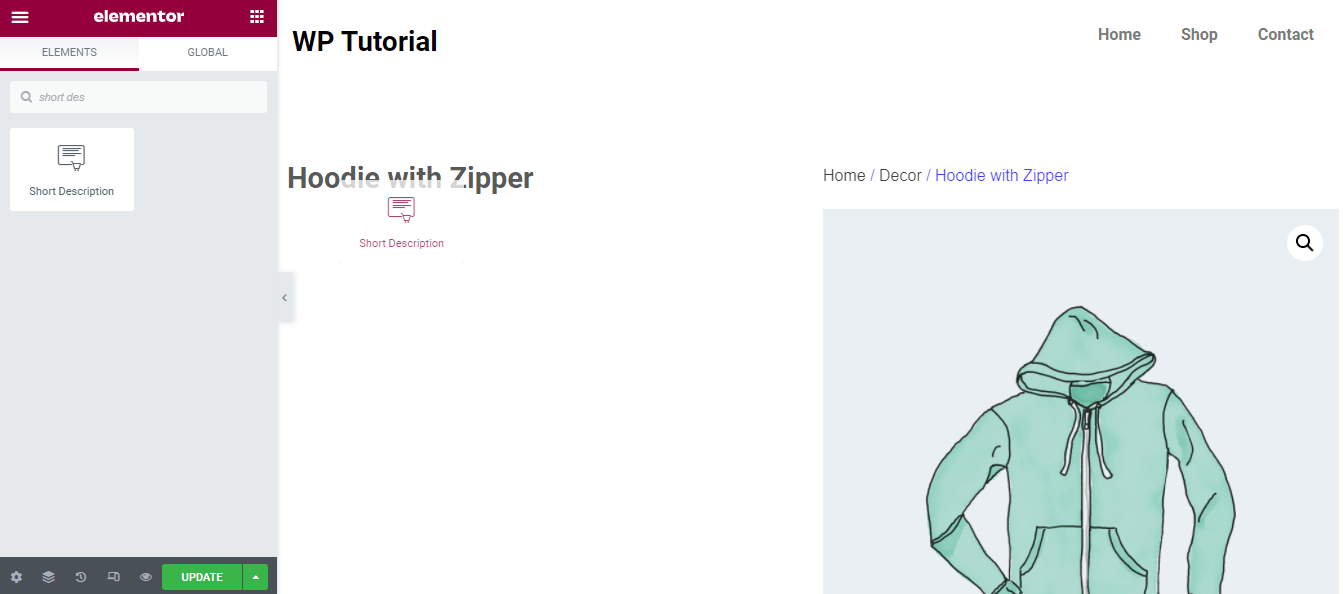
If you need, you can add the Short Description widget to show a brief product description. Like the other widgets, you can find it from the left-side widgets area. Just drag the widget and drop it into a suitable place for your product page.
Step 11: Style Short Description
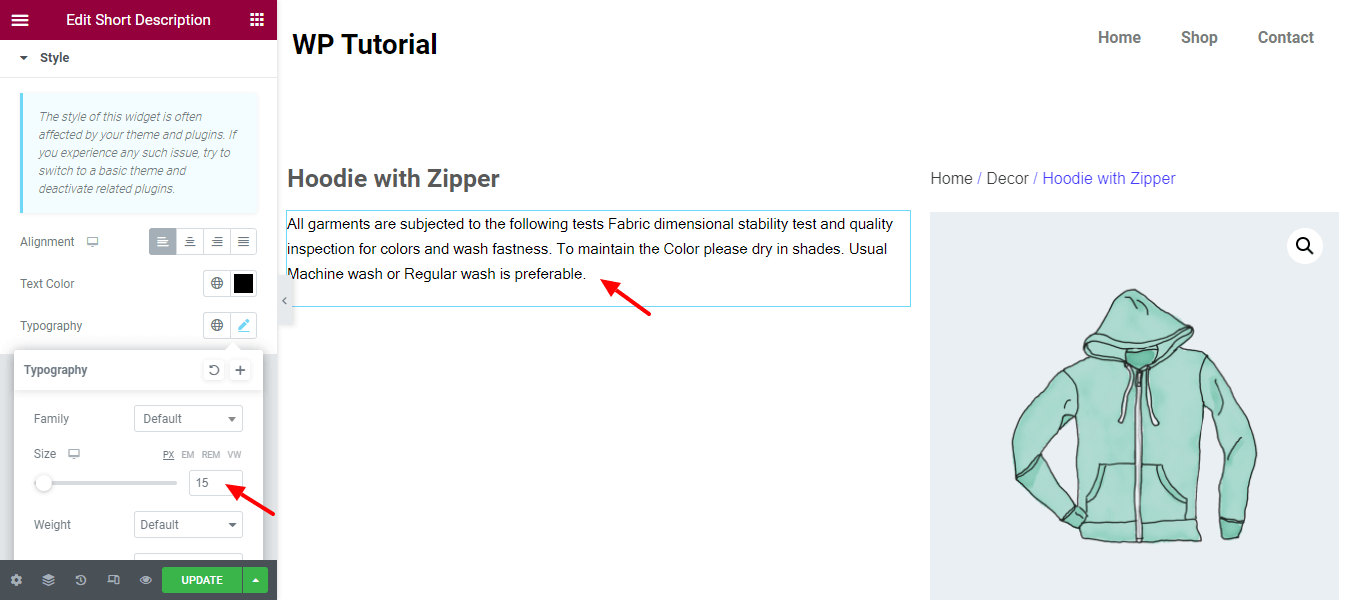
The Style area also allows you to change the default design of the widget. You notice that we’ve changed the Typography Size and set it as 15px.
Step 12: Remove Short Description Space
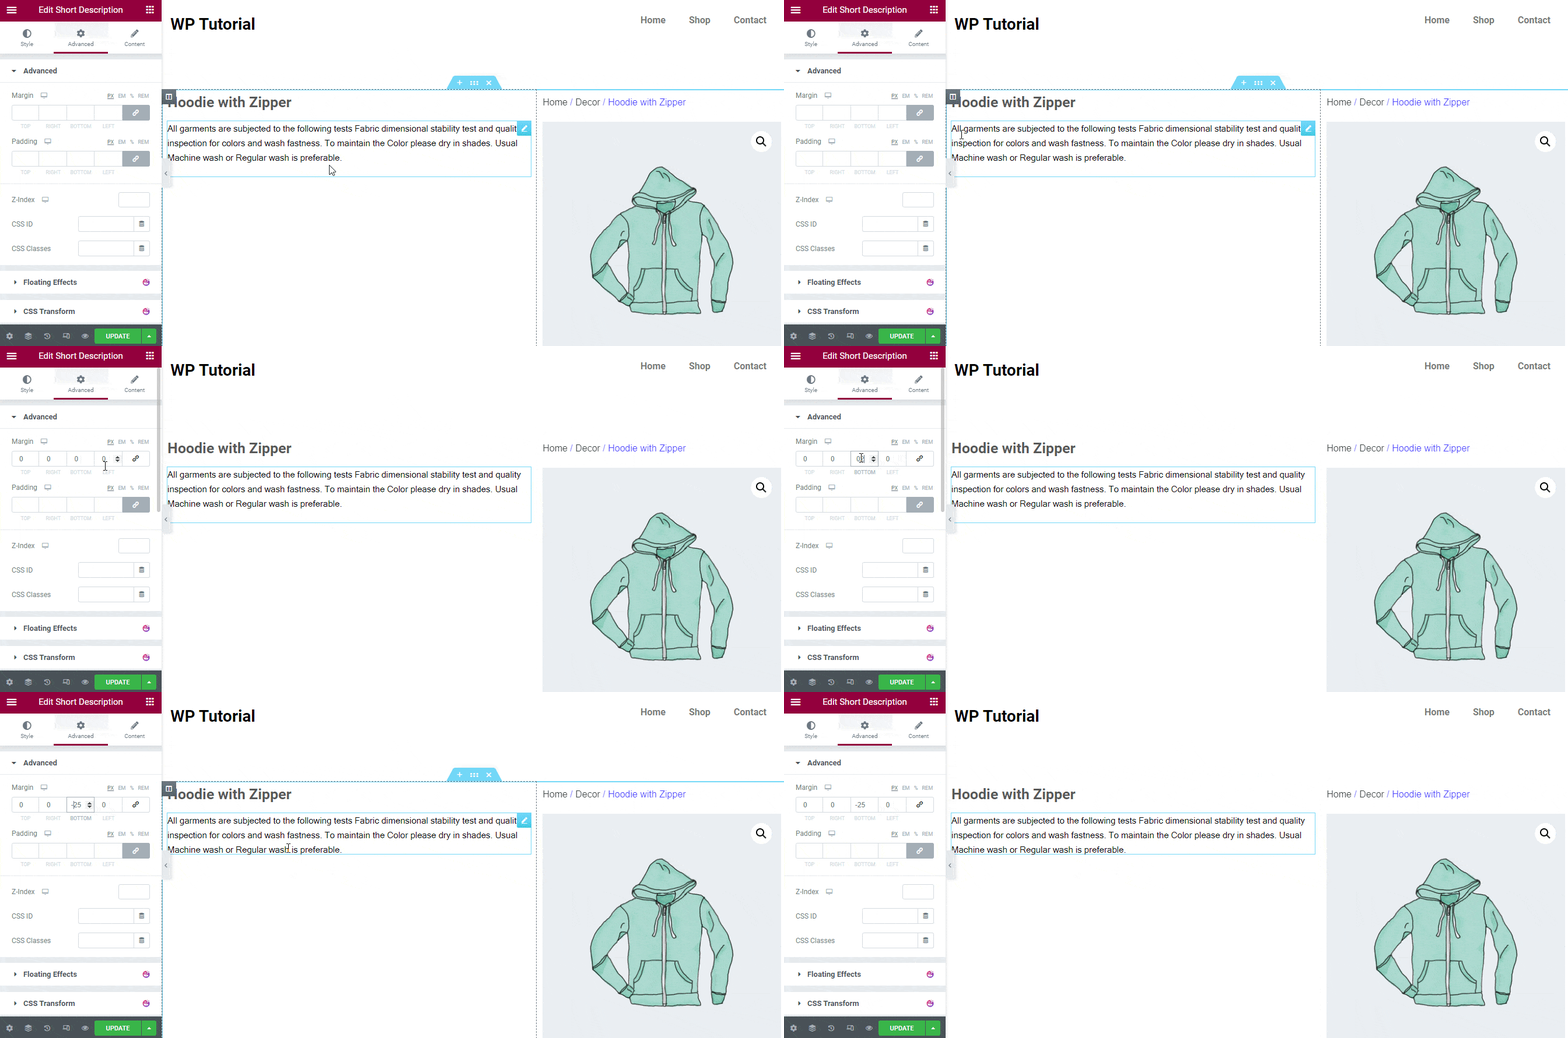
You see, here we remove the extra space of the Short Description widget. Go to the Advanced area. Then Unlink the Margin and add the required margin. Here, we’ve added -25px Margin to remove the additional space.
Step 13: Add and Style the Product Price Widget
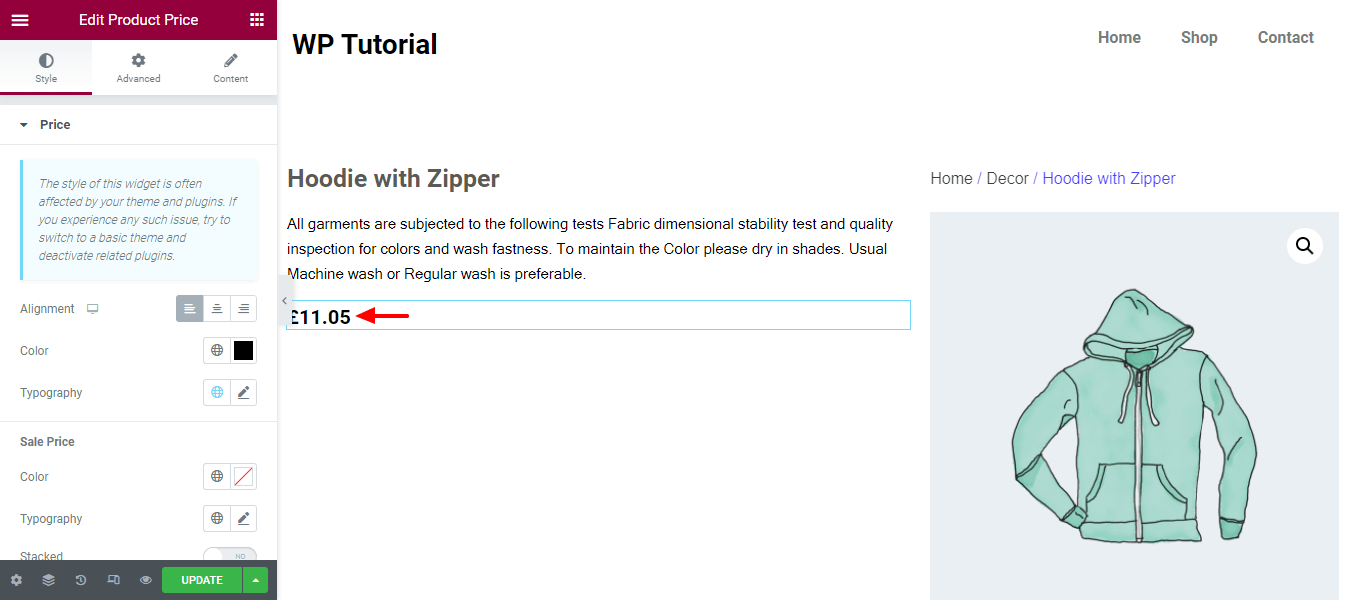
Let’s add the Product Price widget to display the product price. You can add your custom style in the Style section. Here, you see we’ve changed the Color of the product price.
Step 14: Add & Style Product Rating Widget
If you want to display the customer rating of your product, you need to add the Product Rating widget. You can also style your customer product rating in your own way using the styling options.
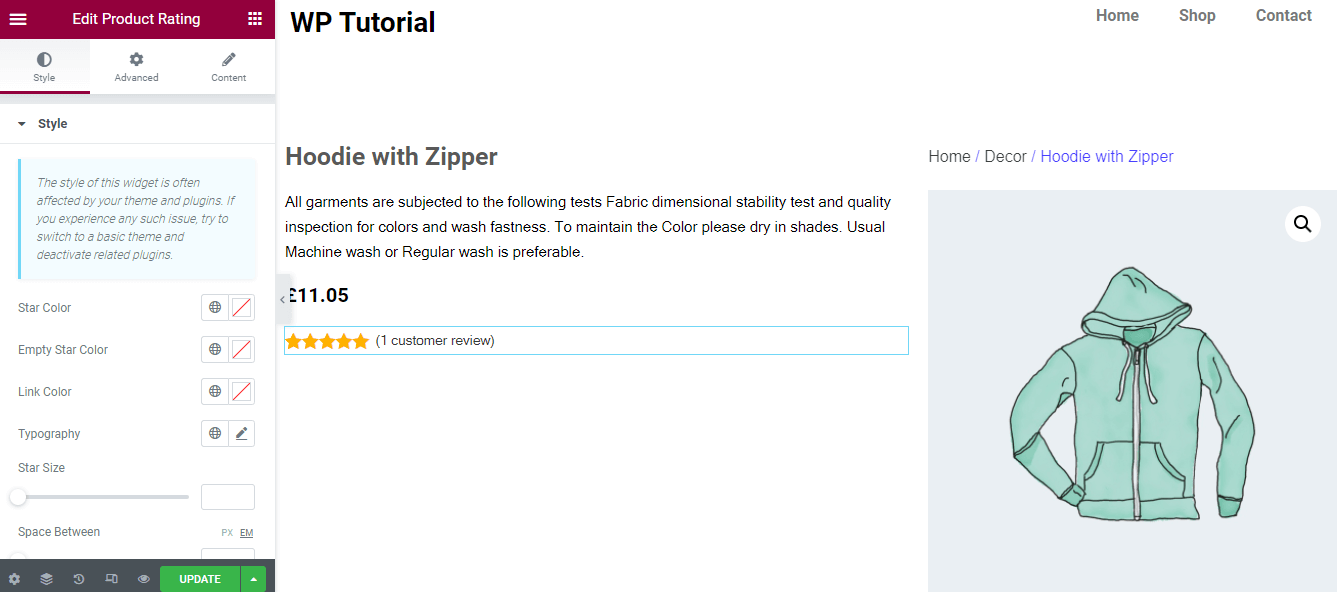
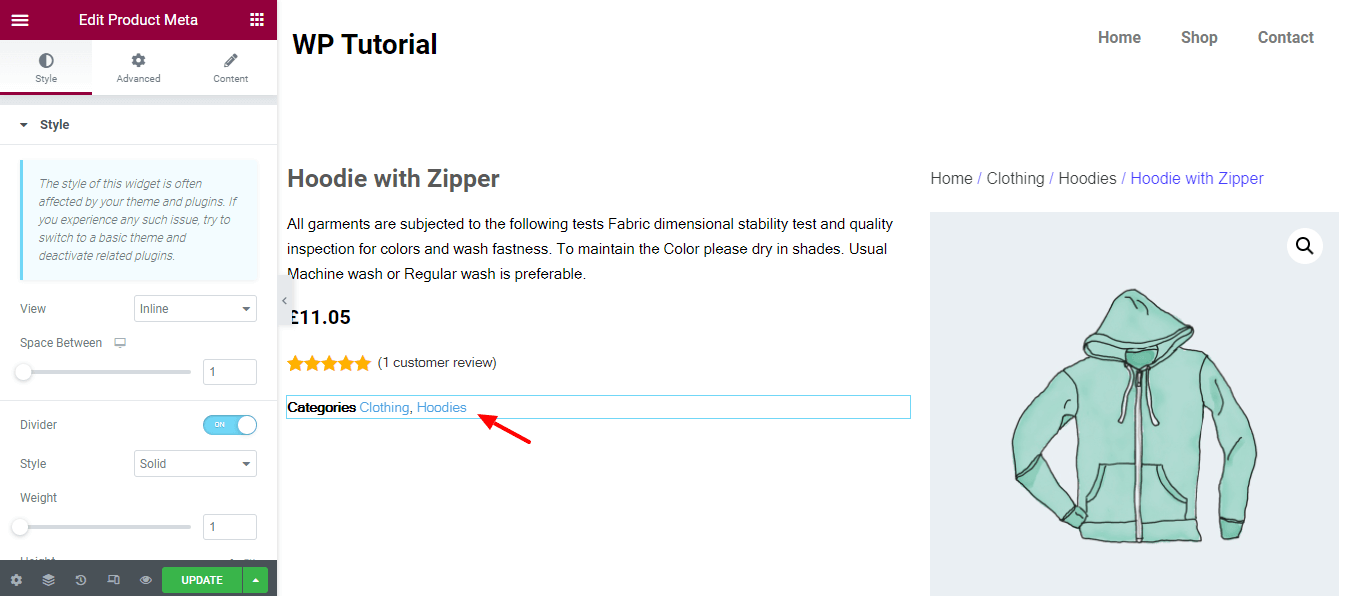
Step 15: Add & Style Product Meta Widget
You can show the product meta information such as product category, etc. To do this, you need to add the Product Mata widget. You are able to customize the widget using its styling option based on your needs.
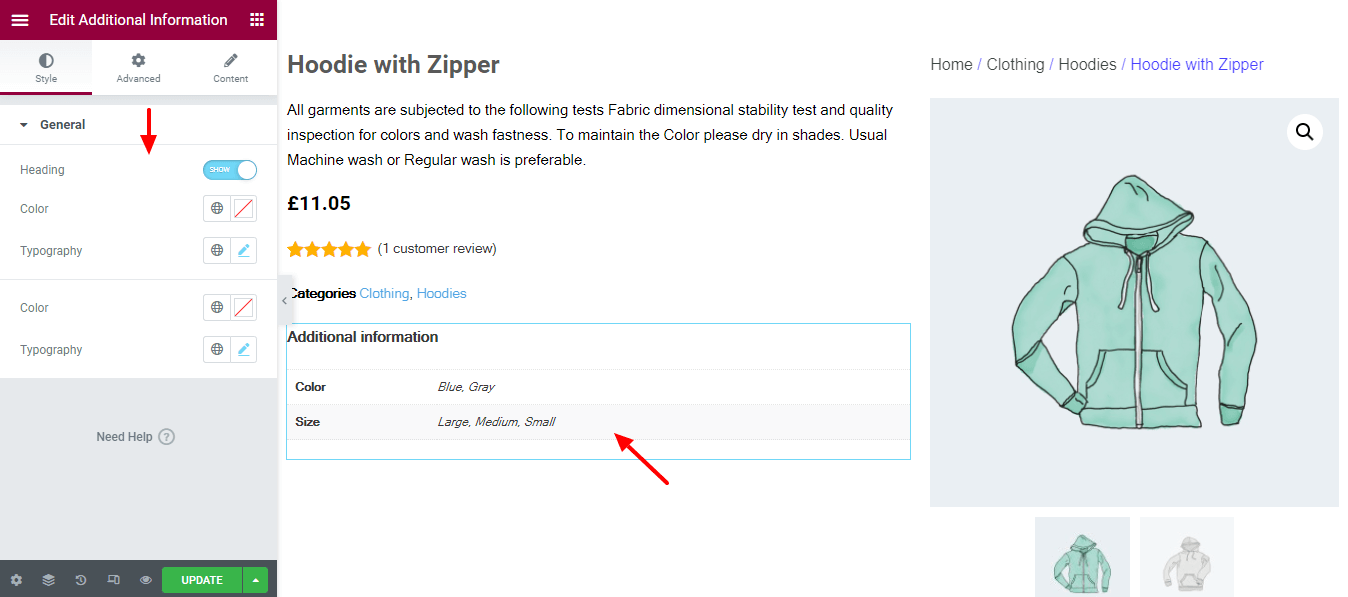
Step 16: Add and Style Additional Information Widget
If you need to display your product with additional information like product color and size, you should add the Additional Information widget. You are able to edit the style of the widget. To do so, click the Style section. Here, you’ll get the essential options to change the current style in your way.
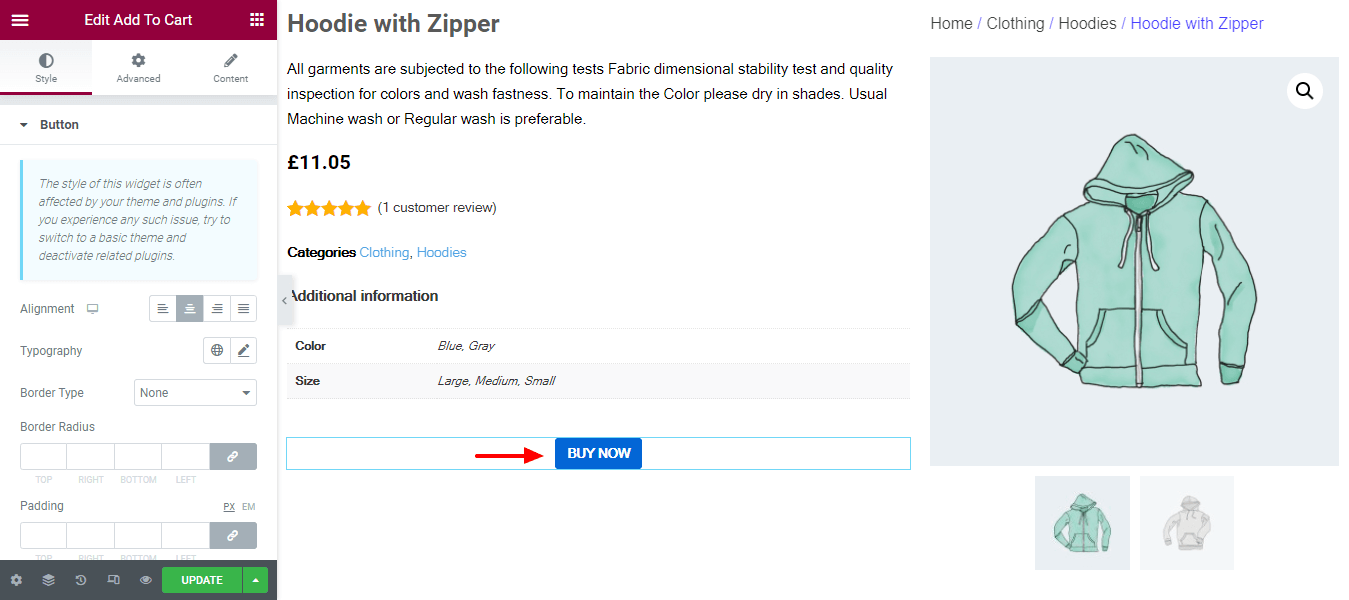
Step 17: Add & Style Add To Cart Button
It’s important to add the cart button so that your customer can buy the product. You can easily add a cart button to your single product page by adding the Add To Cart widget. You can also customize the cart button according to your choice using the style options.
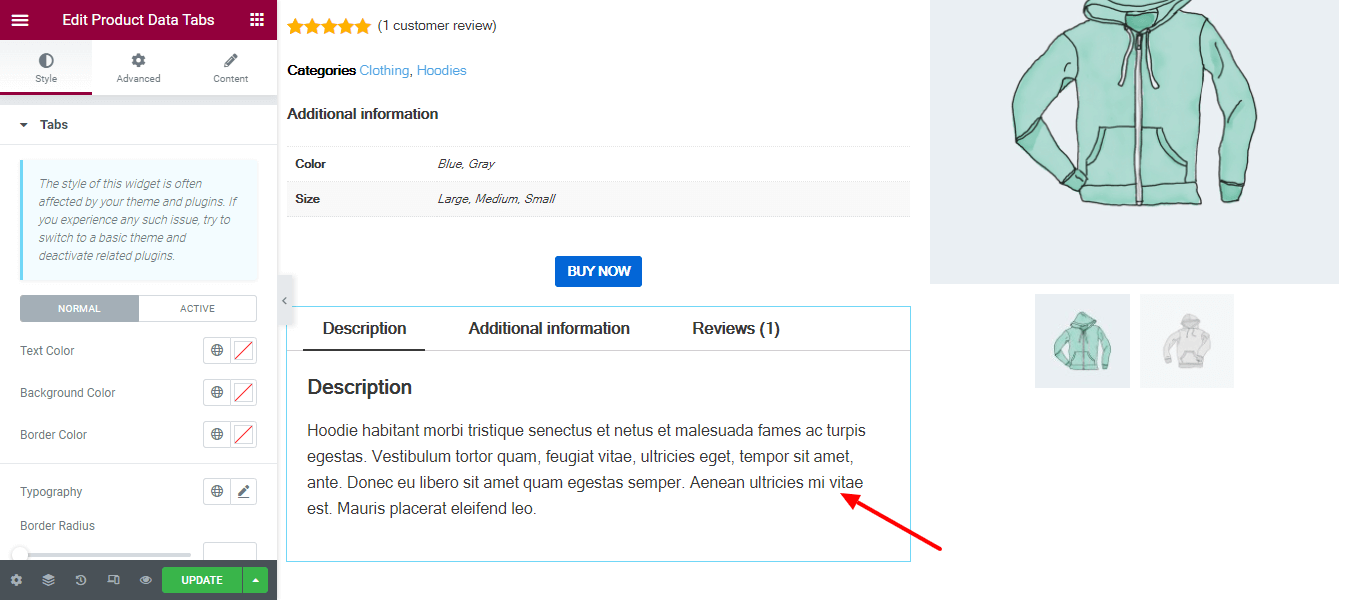
Step 18: Add and Style Product Data Tabs
If you want to show the product data tab, you can do it by adding the Product Data Tabs widget and using its style options for further customization.
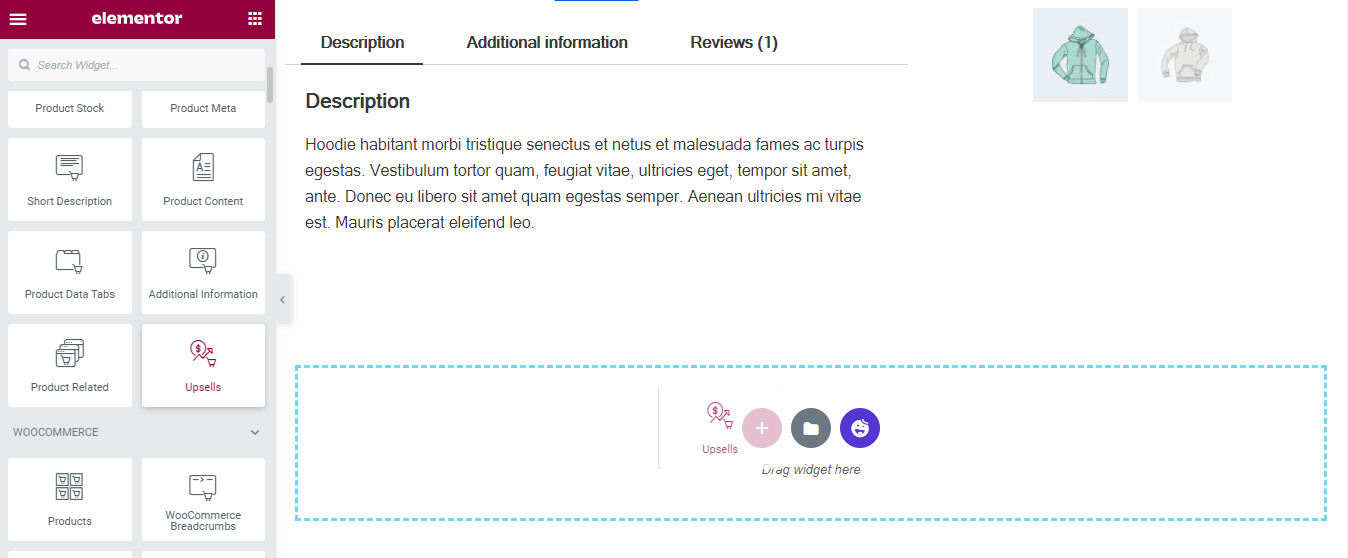
Step 19: Add Upsells Widget
You can add your upsell products by adding the Upsells widget to your single product page.
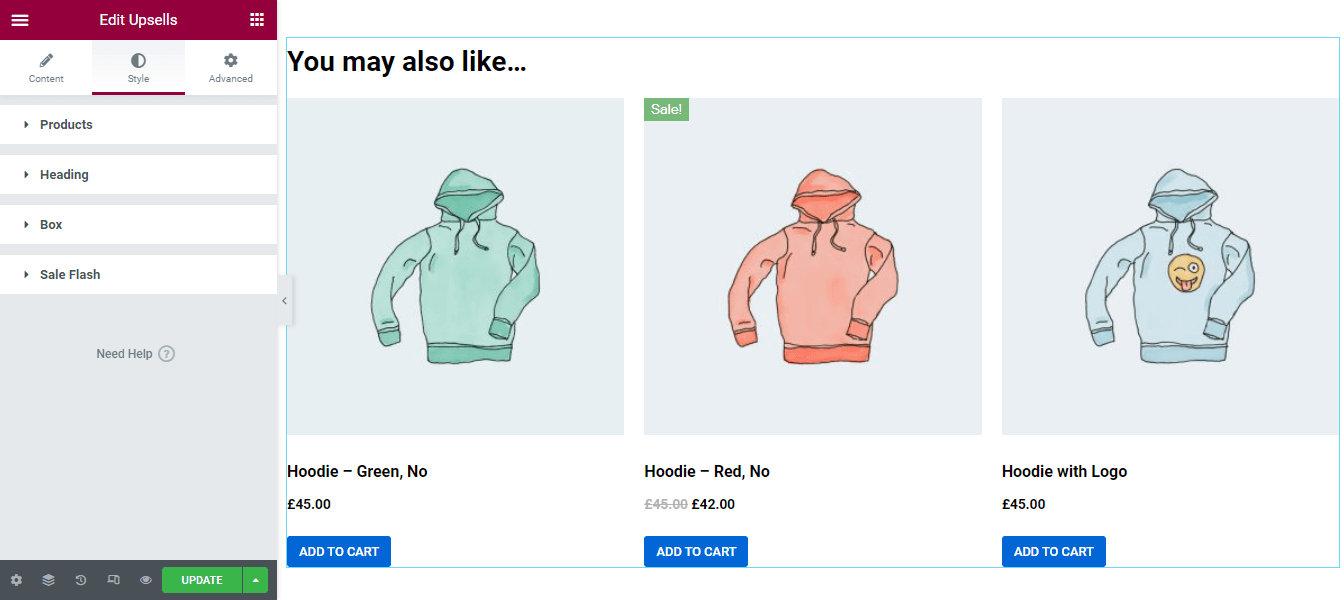
Step 20: Style Upsells Widget
You can change the design if you want. In the Style area, you’ll get the necessary settings to customize the upsell products. The options are.
- Product
- Heading
- Box
- Sale Flash
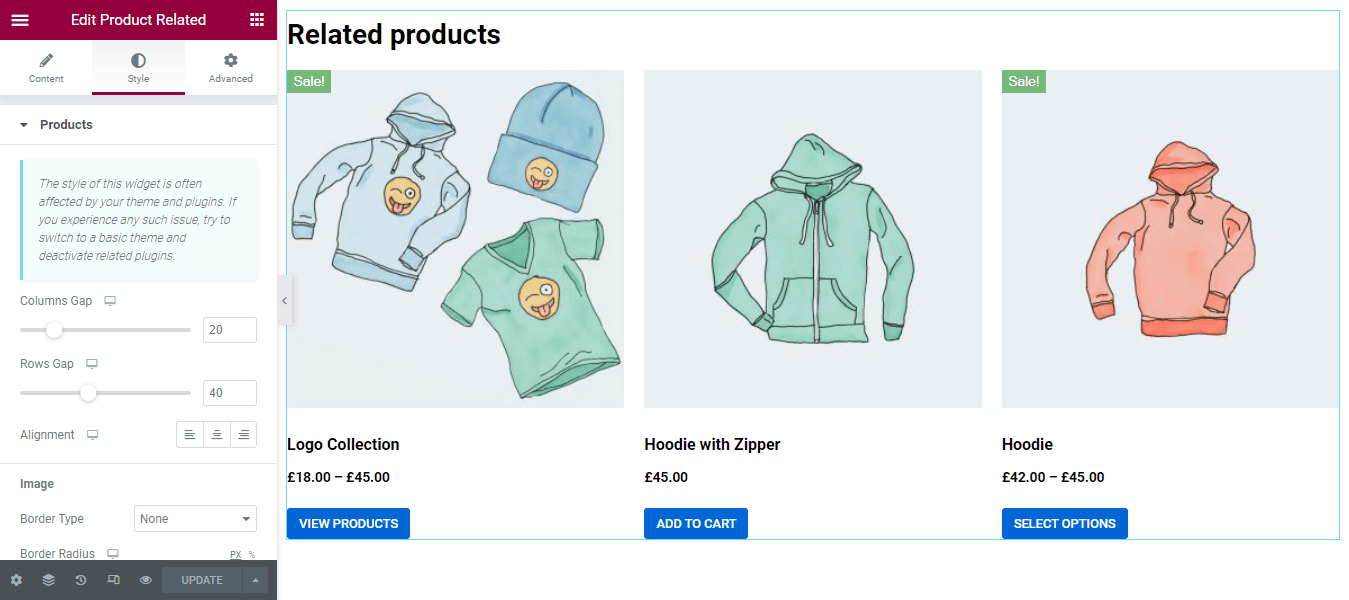
Step 21: Add and Style Related Products Widget
Like the Upsells products, you can also add your related products to your product page. You need to add the Product Related widget to your product page in a suitable area.
Final Preview of Our Custom WooCommerce Single Product Page
After finishing the single product page design, you see the final look of our WooCommerce product page below.
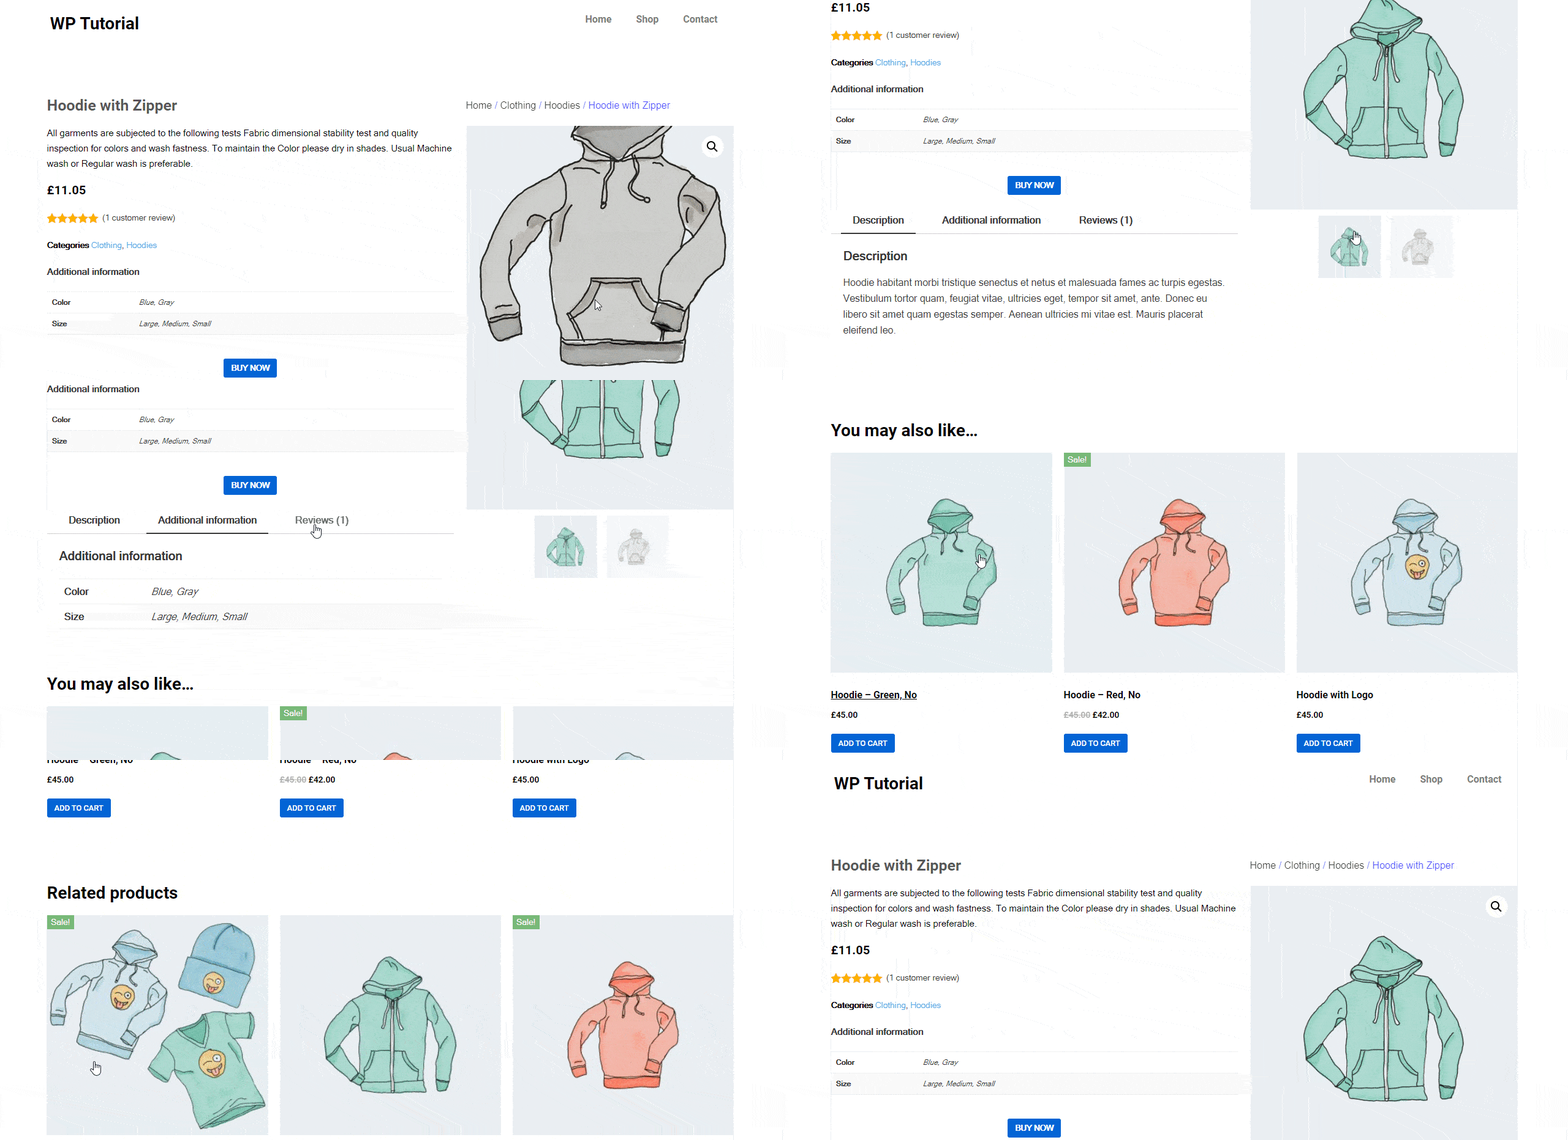
Designing ECommerce Website Using HappyAddons WooCommerce Widgets
Introducing Happy Addons’ WooCommerce Single Product Widget

Although you can easily create your unique product page with Elementor, many Elementor addons like Happy Addons give you more flexibility in designing and customizing a WooCommerce product page.
We will talk about Happy Addons’ new exclusive WooCoommerce Single Product widget, which is advanced, easy to use, and comes with modern premed product demo page layouts.
With this awesome widget, you can decorate your product page in a couple of minutes. Moreover, you’ll get some new settings that allow you to control the design efficiently. Moreover, you also get three beautiful design skins, Classic, Standard, and Landscape, to show your product.
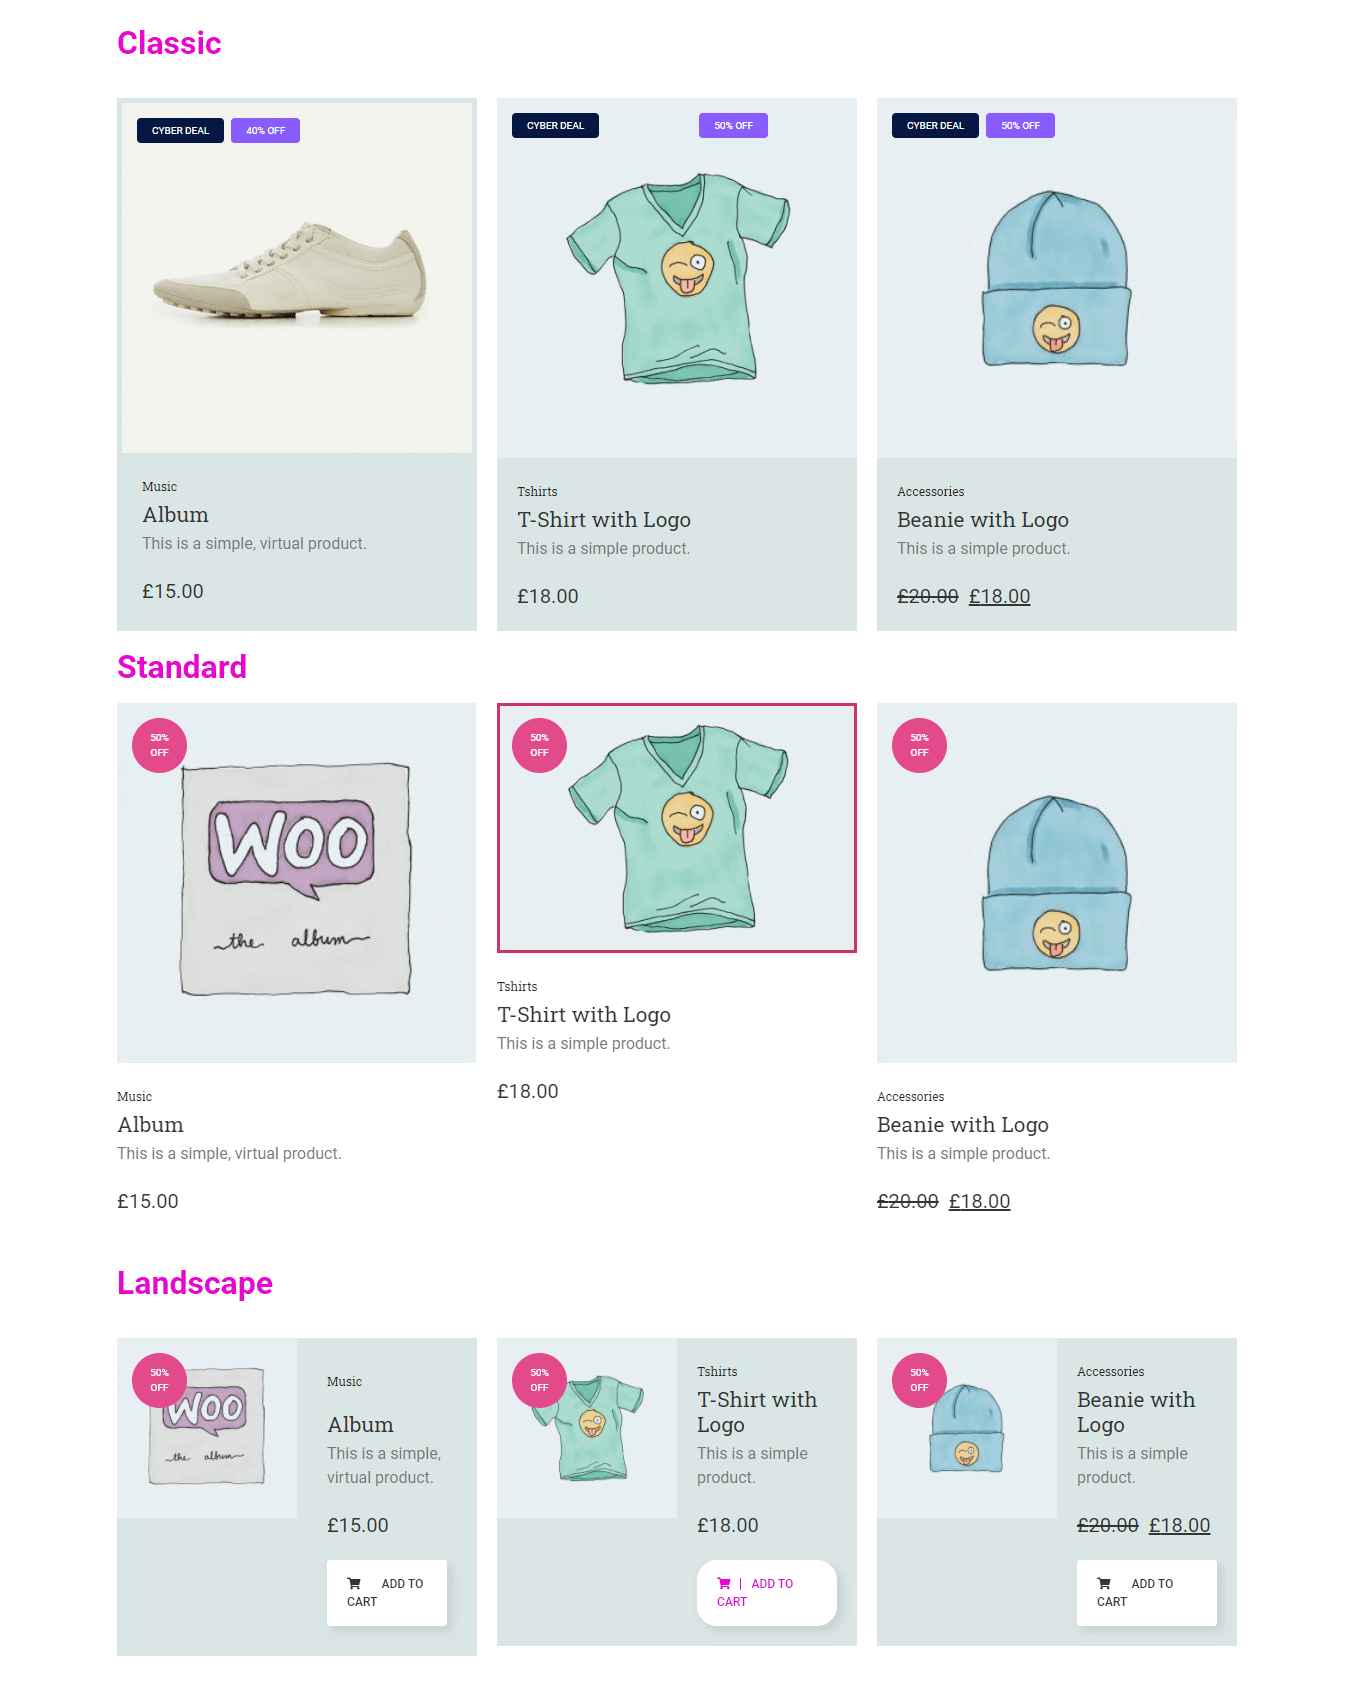
Check out the documentation to know how to work with this widget.
You can also watch this demo video of the Single Product widget.
Get Ready To Create Your Single Product Page
It’s necessary to have a well-design single product page to ensure a better user experience while online shopping.
In this blog, we’ve discussed how to edit the WooCommerce product page using premade Elementor templates. Additionally, we’ve shown how can create your own custom single product page using Elementor.
If you still have any queries regarding this blog, you can use the comment box to share your queries.
Don’t forget to subscribe to our newsletter to get more interesting articles regarding WordPress, Elementor, WooCommerce, and more.
Why HappyAddons Pro is your ideal Elementor companion!
HappyAddons vs. The Rest: Unmatched Features and Stellar Support for your design journey
-
150+ exclusive collection of customisable widgets
-
20+ feature set to unleash your potential
-
500+ premium templates for inspiring designs
-
Our expert support team is always at your service
-
14-Days Money back. Peace of Mind Guaranteed
Subscribe to our newsletter
Get latest news & updates on Elementor

