Visual marketing is one of the most powerful techniques to advertise and promote business globally. Using the right set of images could boost your effort and chances of getting new prospects. The reasons are simple, images can attract potential visitors, help users educate themselves, and visualize things the way they want.
60% of consumers are more willing to consider local search results that include images and another 23% are more likely to contact a business showcasing an image
Bright local
Apart from any other marketing elements, images constantly expand user experience & grow the website’s interaction by sharing the newest updates with an image gallery directly on your website.
You can add images to any of your web pages. For example, on a landing page, portfolio page, or on a dedicated gallery page. Following a manual process to do could kill your time and effort. For instance, WordPress & its available FREE page builder plugins like – Elementor makes this process easier in terms of creating any stunning design in a quick time.
So, if you are searching for a simple way to add an image gallery to your WordPress website, then don’t panic. Because it’s easier with the Elementor image gallery widget. It only requires a few steps to completely add an image gallery on your preferred web pages.
Before we show the process, let’s get introduced to the premium feature of Elementor – The image gallery widget!
Elementor Image Gallery Widget Explained
Elementor has provided lots of features & functions over the years. From creating web pages to in-built templates, it has helped users to create their first website without needing to apply any codes. Such as custom page layouts, headers-footers, and customizing any aspect of a website. Thus it has significantly reduced the amount of time and work required.
Like other features & widgets of Elementor, the image gallery widget is also a remarkable one that assists users allow to add & modify their website gallery page with ease.
Elementor has both the FREE and the pro version. There are two types of image gallery widgets are available in Elementor. Basic Gallery and Gallery Widget. The Basic Gallery widget is a free widget, whereas the Gallery widget is available in the premium version.
Let’s see what else you can produce on your website with the Elementor Image Gallery widget:
- Grid Layout
- Filterable Gallery
- Masonry Gallery Layout
- Gallery with Load More Button
- Styling and Customization Options
Elementor is popular for its drop-drag feature, you can improve your website design even better by blending all the design elements of Elementor with ease. Check out the guide to know the easiest process of improving website design in WordPress here.
How to Create an Image Gallery Using Elementor Image Gallery Widget
Now let’s get into the tutorial part to create an image gallery. Before it, you need to install and activate these required plugins below:
Create a New Page or Use Existing One
First, you can create a web page to implement the Elementor image gallery widget. Or, you can directly display a gallery on any of the existing pages.
By navigating to WordPress Dashboard> Pages> Add New Page, you can create or edit the page that you want to add this feature.

We already know that Elementor has two widgets for the image gallery. So first, we’ll see how to use the free widget, and then the second one that comes with the pro widget.
Add the Basic Image Gallery Widget (Free)
Now go to the Elementor design canvas where your design task will start. The page looks like the below one:

Type the widget name in the left sidebar’s search section – Basic Gallery. The widget will show up. Then select the widget and drag it to the design canvas.

Once you add the widget, all related options will be available in the left section of the page.
- Add images that you want to insert in the gallery
- Set the image size
- Determine how many columns you want
- Check lightbox yes or no
- Set the order

From your gallery, choose the images. Once you’re done, click on the Insert button.

But before you add them, you will have one step more to add Image caption and change their order. After you do that, click the final Insert gallery to see them on the gallery page.

For a better view, set the image size to Full.

Try out the columns from 1 to 10 to see which structure fits your website structure.
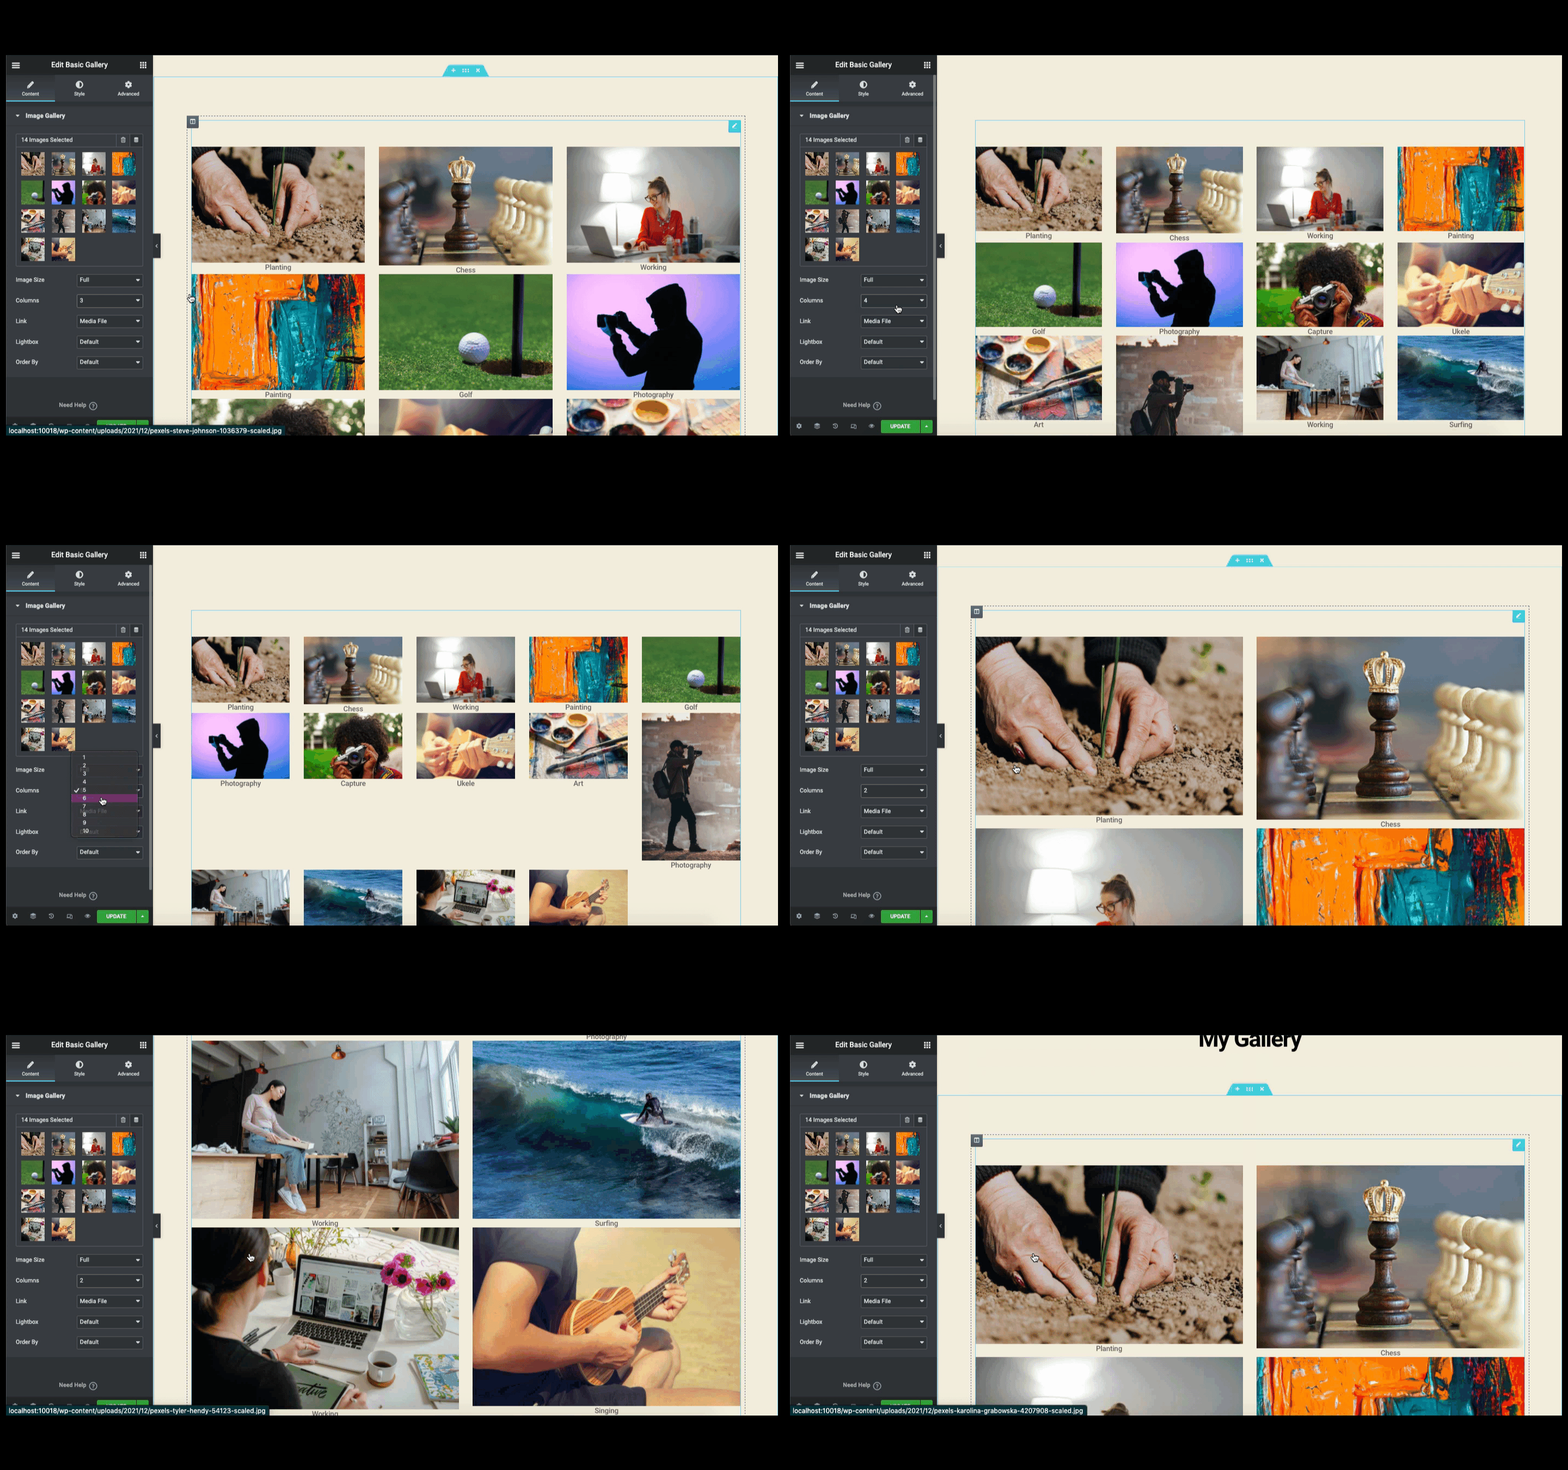
Continue your experiment with others options (Links, lightbox, and orders) on the left side of the screen.

Now it’s time to stylize your design. Click on the Style version to do that. Here you will get two options to stylize your design – Images & Caption.

On the Image settings, you can customize Image spacing, border type, and border radius.
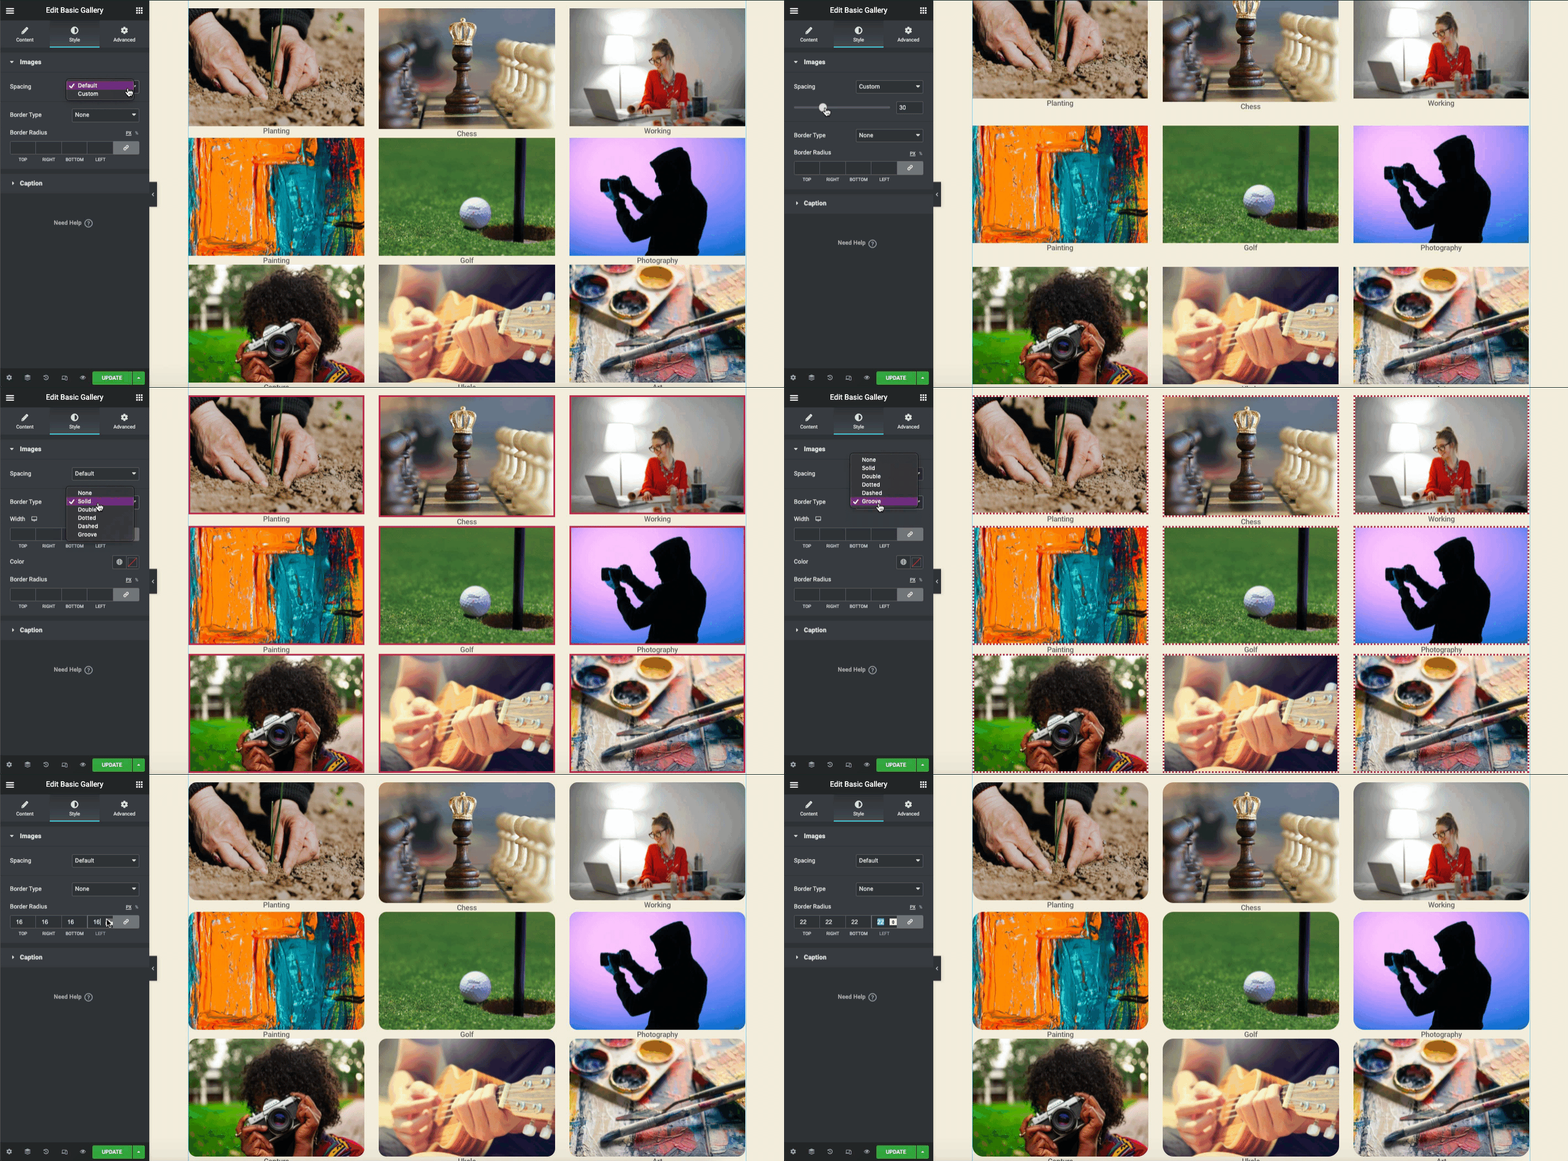
Repeat the same thing for Caption. Here you can display and hide the caption, align the caption where you want, change text color, typography and add a shadow.

In the advance section, you can add features to your design. For example, add motions, animations, parallax effects, and more.
However, for a better understanding, you can have a look at the following video tutorial that covers basic things about the image gallery widgets.
Add The Elementor Image Gallery Widget (Pro)
Before you use this widget, you need to activate the pro version of Elementor. Then it will be available on the screen.
Let’s learn what happens when Elementor pro expires. It will guide you through if your Elementor pro expires and what to do in this situation.
First, type Gallery in the search bar. Select it and drop-drag on the design canvas.

Once you add it, you will find two options – Settings and Overlay.
- Settings menu let you customize the gallery
- Overlay is a feature to add an effect on a certain image

If you click on the single image type, you can only create a single gallery. But multiple image types will allow you to add multiple galleries to your website.

Select the multiple images and they will appear after your selection. You can add a caption to each image so that your users can understand the image’s purpose. Once you’re done, click on the Insert gallery button.

Following the same way, you can add multiple Galleries on your page by clicking on the Add Item button.

Once you’re done, here is how it looks like. You can see images are appearing after you click on each category.
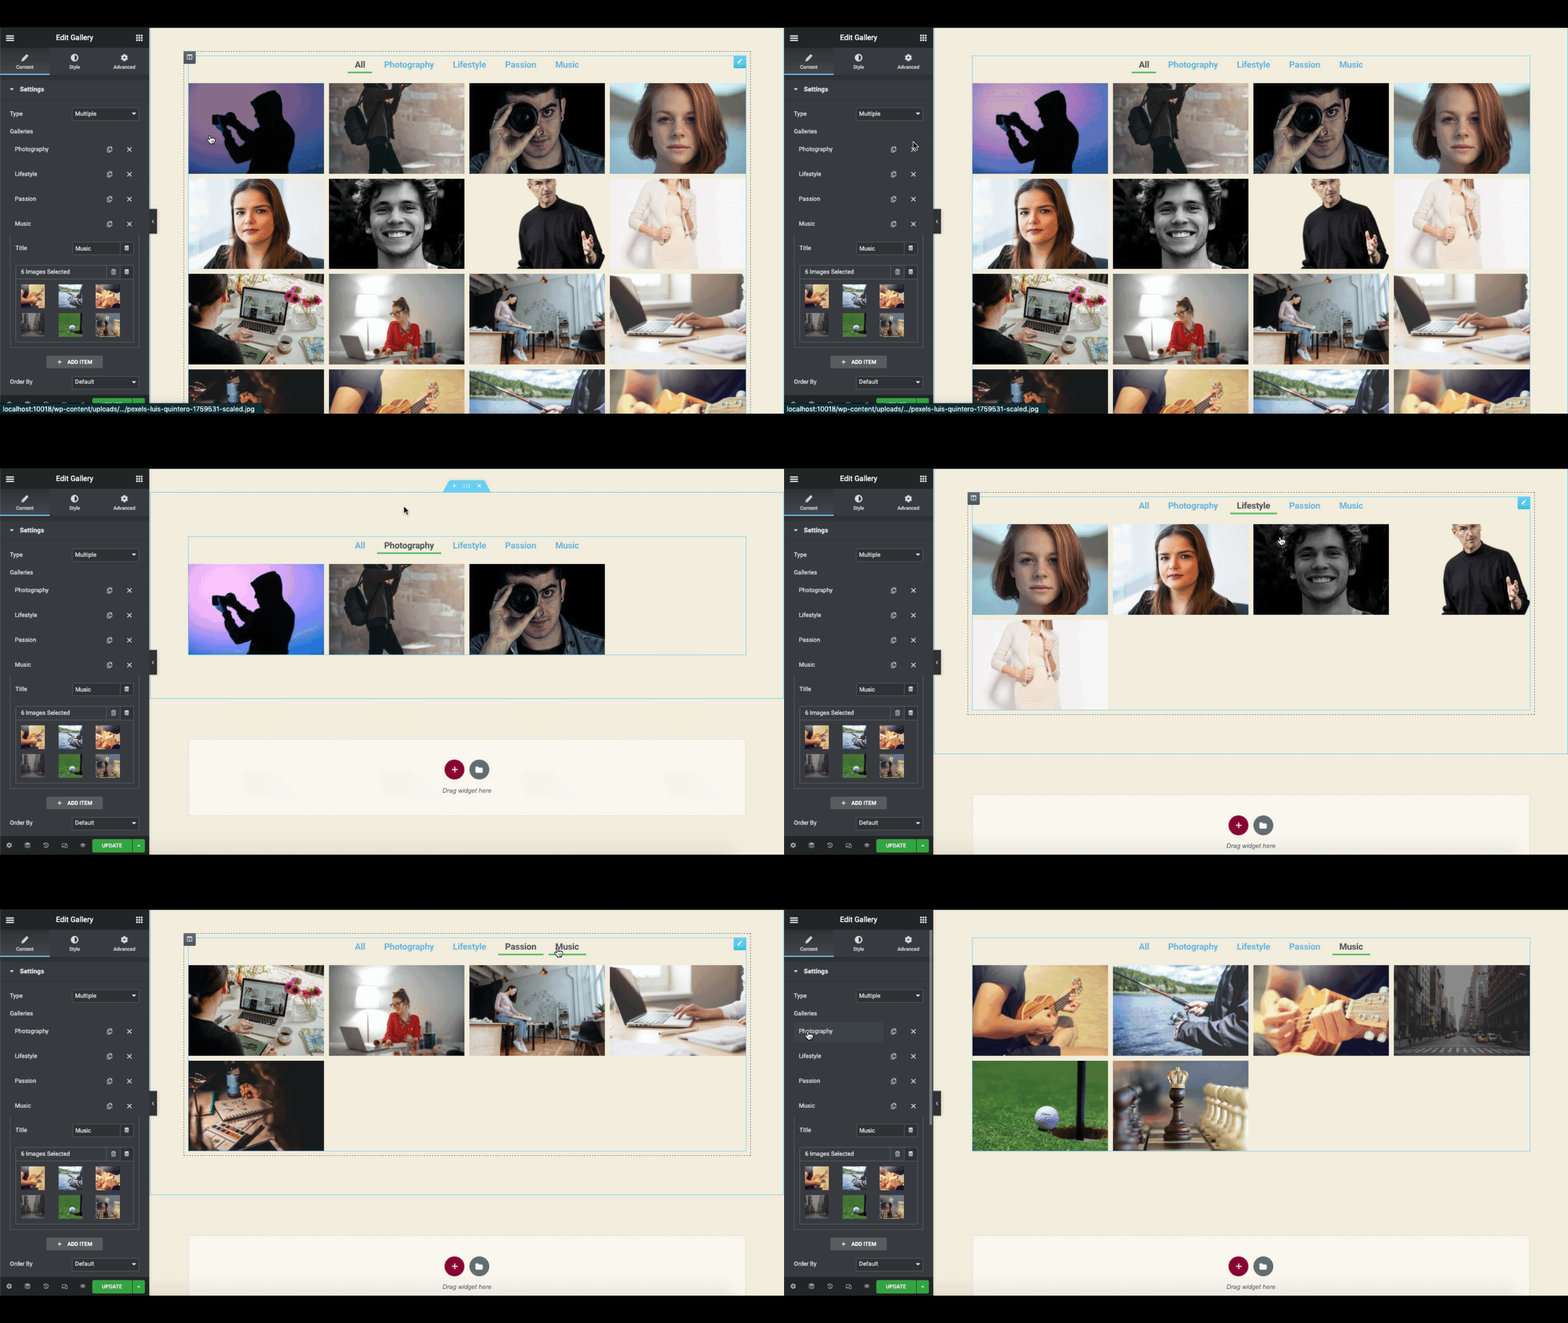
Do more experiments with the images options. Depending on your website structure & format, explore the options carefully. Such as image order, lazy load, columns, height, spacing, and image size.
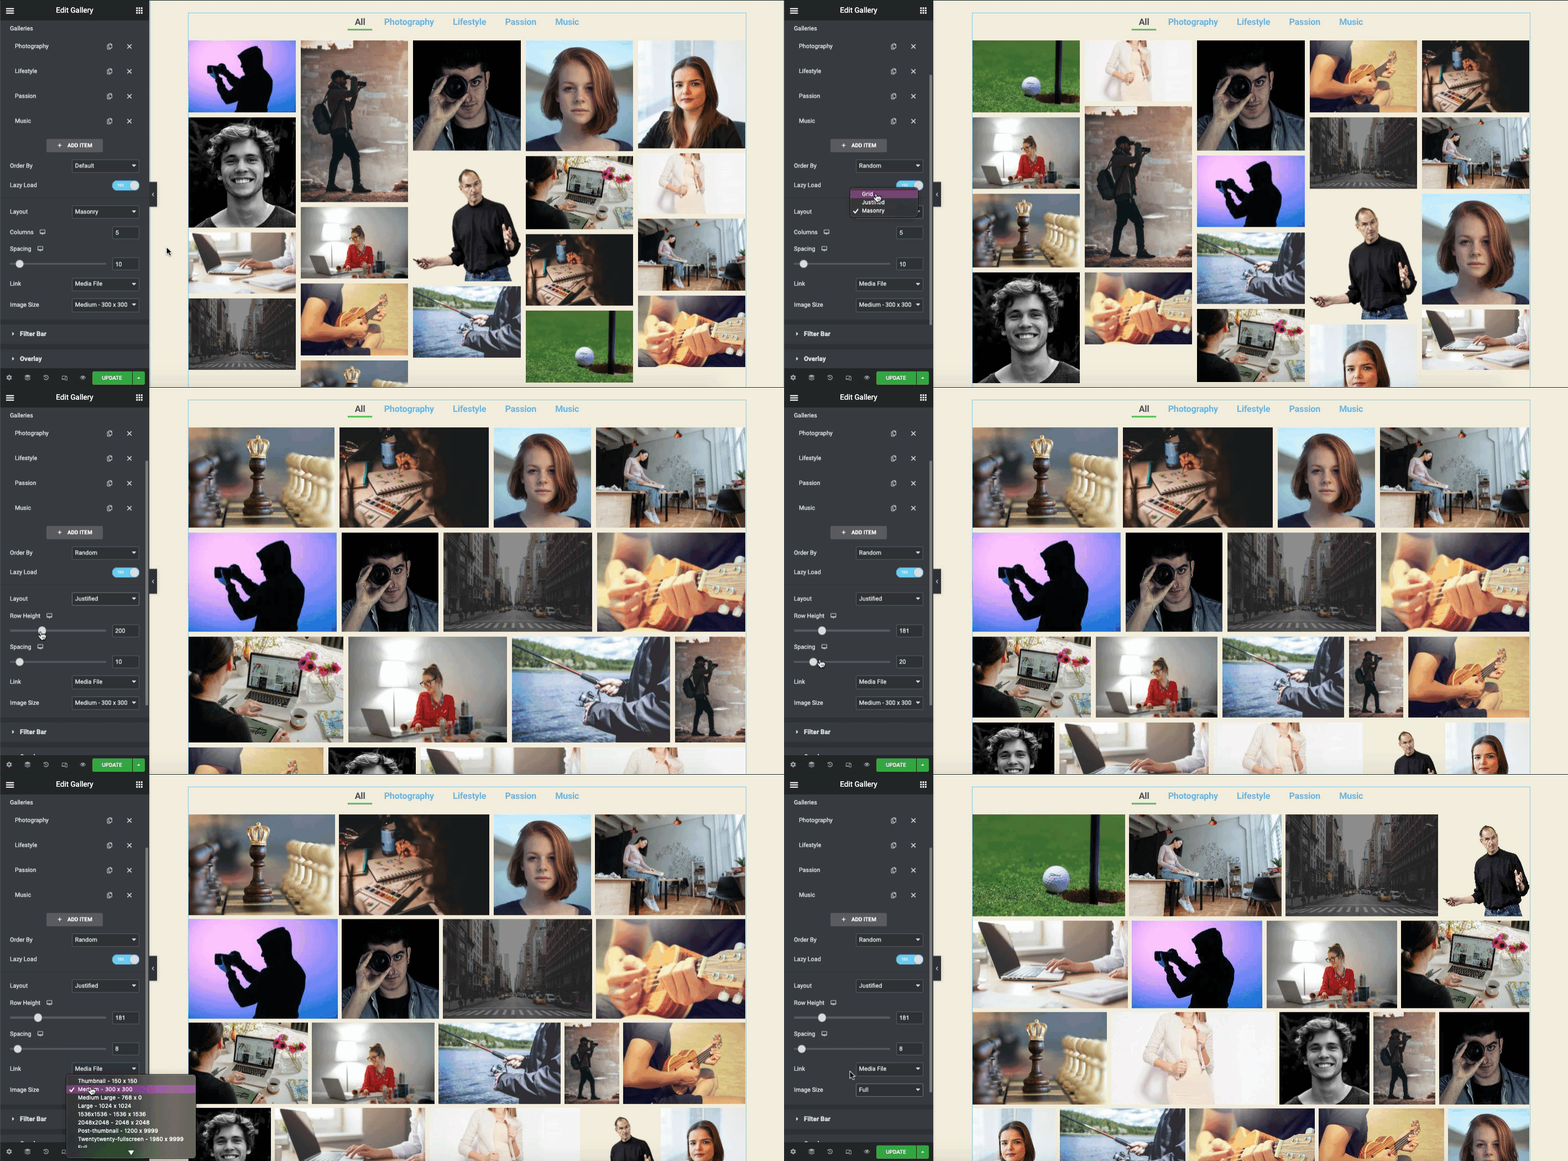
In the Filter Bar, you can change the name, add an underline on each category and animation.

In the Overlay section, you can add a background in each image, title, and description.

Now in the style section, you can add different elements to the design. For example, animations, colors, typography, custom CSS, and more.
For a complete guide, you can check out the link from the Gallery widget here. It will help you to understand the entire process with ease.

Or, you can get a comprehensive summary to learn how to effectively use the Elementor Gallery widget on your website by following the video tutorial!
Add More Advanced Features with Happy Addons Image Gallery Features
Sometimes these features are not enough if you think to add more advanced functions to your gallery page. For instance, you may need to use other third-party add-ons or plugins.
This is where you can consider using Happy Addons. It’s easy to use, flexible, and fully compatible with any WordPress site.
So before you add more functions to your existing Elementor image gallery widget, do make sure to install and activate these plugins:

Once you’re done with the initial installation, head to the design page. And you can find these widgets.
- Justified grid (Free)
- Image Grid (Free)
- Scrolling Image (Pro)
Justified Grid
Type the widget name in the search bar and similarly drag-drop on the design canvas.

Add the Images by clicking on the Add Item button. It works as the Elementor Image Gallery Widget. You can add multiple filters or groups by doing the same thing.

Once you added all the images, you can see the images automatically be added on the screen.

Click on the Advanced section to add more options to the design.
- Show the multiple groups name by enabling the show filter option
- Enable the caption option
- Customize the height and margins
- Add rows
- Do the same thing for the rest of the items
- And choose the image size

Don’t forget to enable the Show Filter option. Otherwise, it will not show the image categories on top of the images.
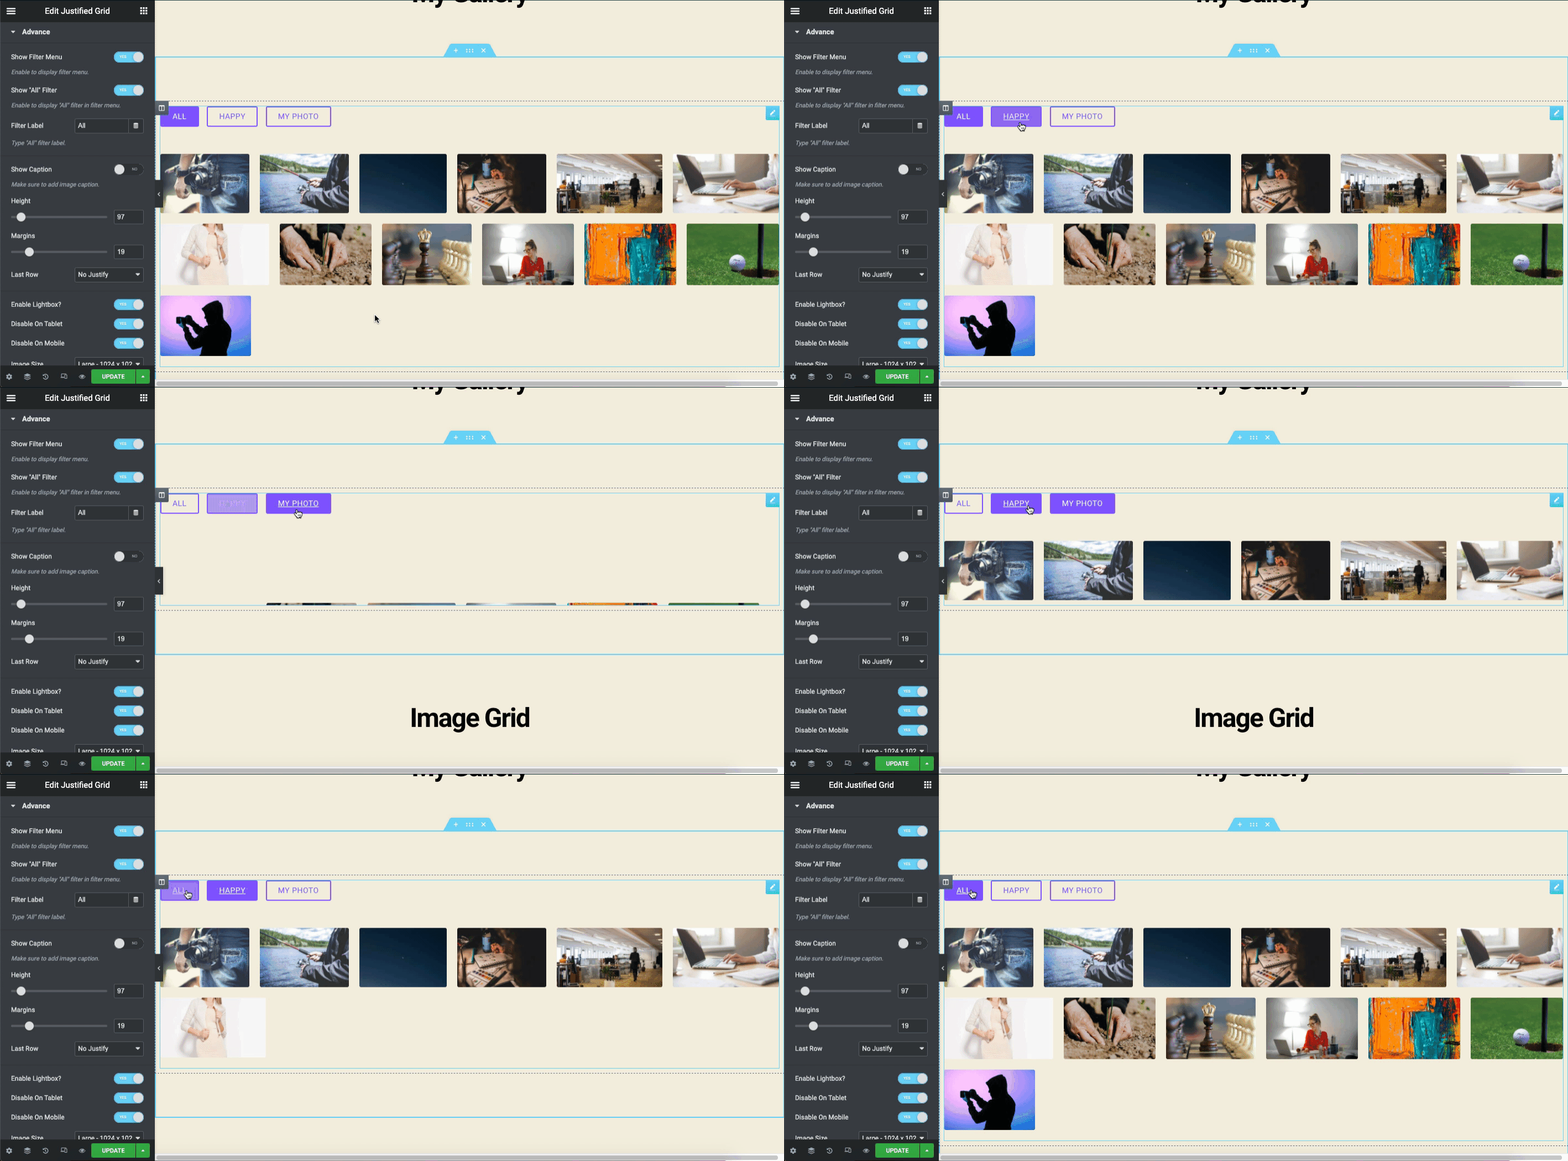
This is how you can customize the Justified image grid widget of Happy addons. To add style and advanced functions, you can check out the following video tutorial. It will give you a complete outline to use the widget effectively.
Image Grid
Type the widget name (Image Grid) in the search bar to use on the design canvas. And then drag-drop it.

By clicking on the plus button, you can add multiple groups or categories. The way you added images in the Justified Grid, the same way you need to follow the instructions here.

Next, move on to the Advanced Option to add more functions to the Image Grid widget.
Here you will find some important options for customizing the widget.
- Display the categories on top the images by activating show filter option
- Determine how many columns do you want to add
- Select the layouts
- Enable the lightbox, disable tablet and mobile view option (optional) and set the image size.

Here is how it looks on a web page after enabling all options.
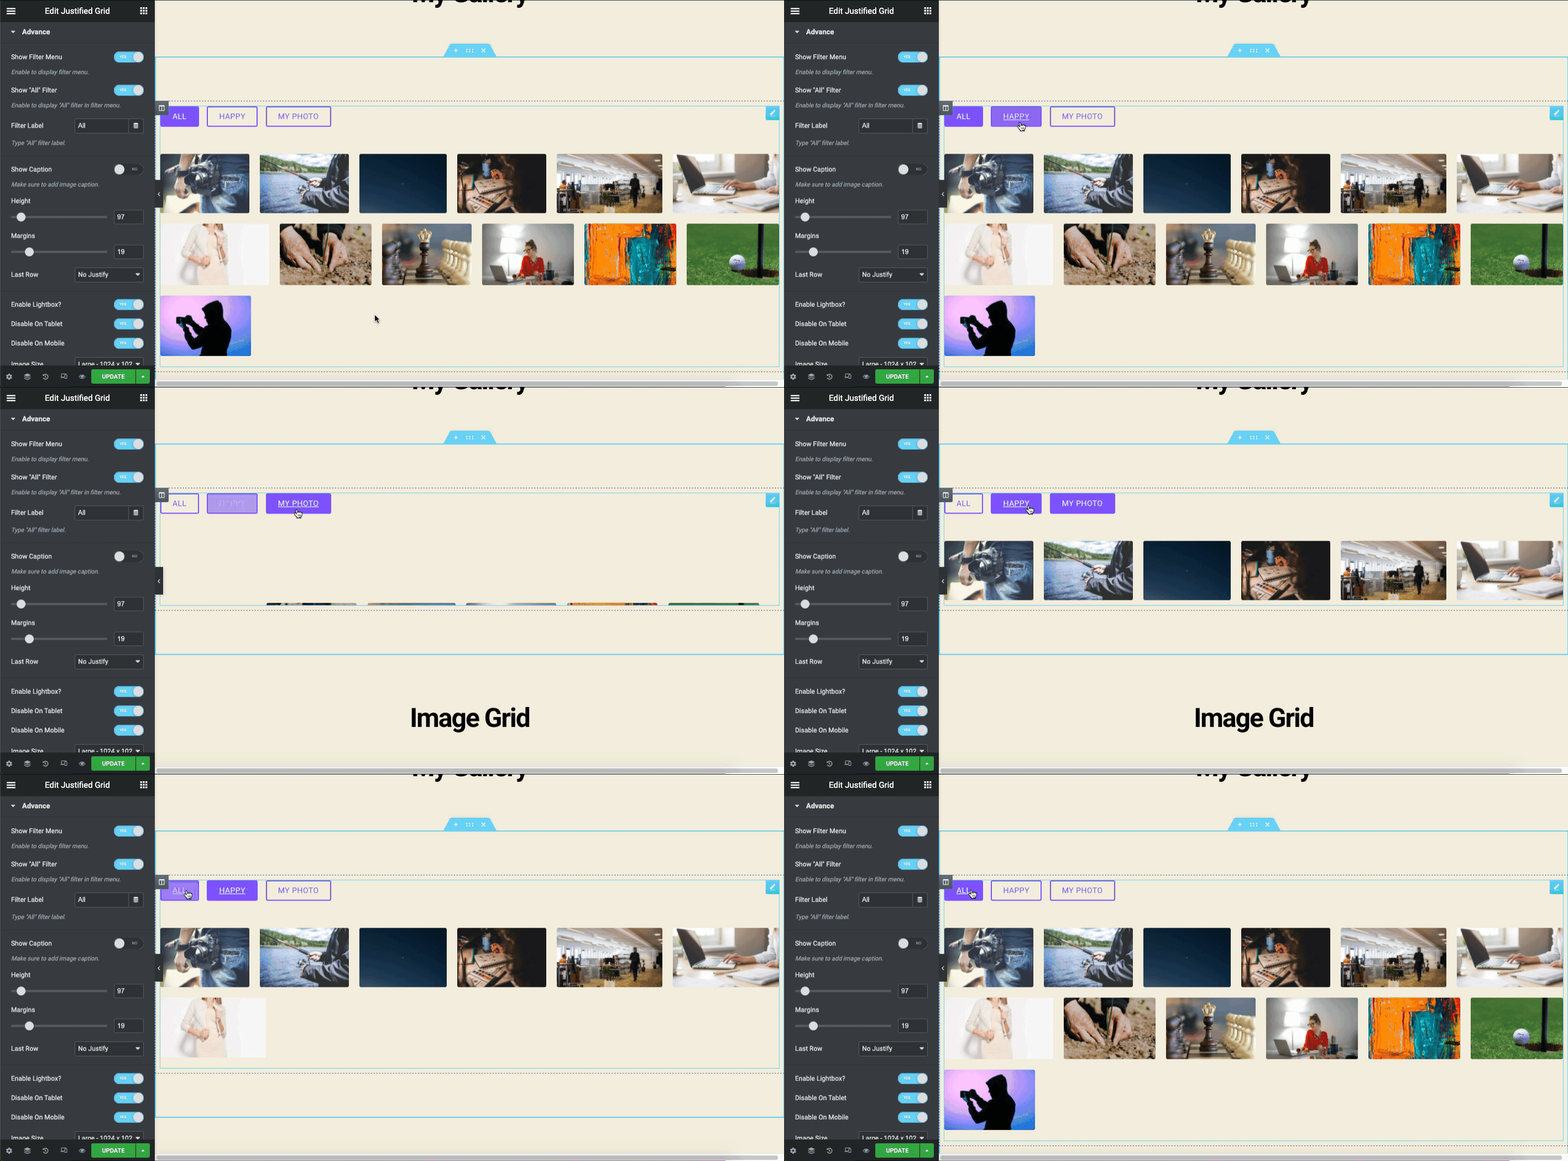
By the way, you can stylize your design element to get a better outlook. For instance, you can follow the official documentation of Image Grid. It will help you apply all the advanced functions to the design.
Or you can check out the video tutorial below to learn how to utilize the Image grid widget on a WordPress site.
Scrolling Image
The scrolling Image widget is another sophisticated feature of Happy Addons. It’s available in the premium version. Using this widget, you can design web pages by displaying your images with an animation effect. It automatically moves from the right side to the left side. Also, you can change the direction if you want.
Also, you can use some pre-built presets to reduce your precious time in designing or extra effort to manually add different formats.
Now, type the widget name in the search bar (scrolling image). And then drag-drop the widget on the design canvas.

You will get the widget details once you add them to the canvas.
- Presets: It has some in-built design layouts to reduce efforts & tasks
- Scrolling images: You will find the general settings for this widget
- Settings: It lets you customize certain settings of scrolling image
- And wrapper link

Now click on the Scrolling Image option and add an image, title, and a link if you want.

Doing the same process, add more images one by one. After you add the images, it will look like the following way.
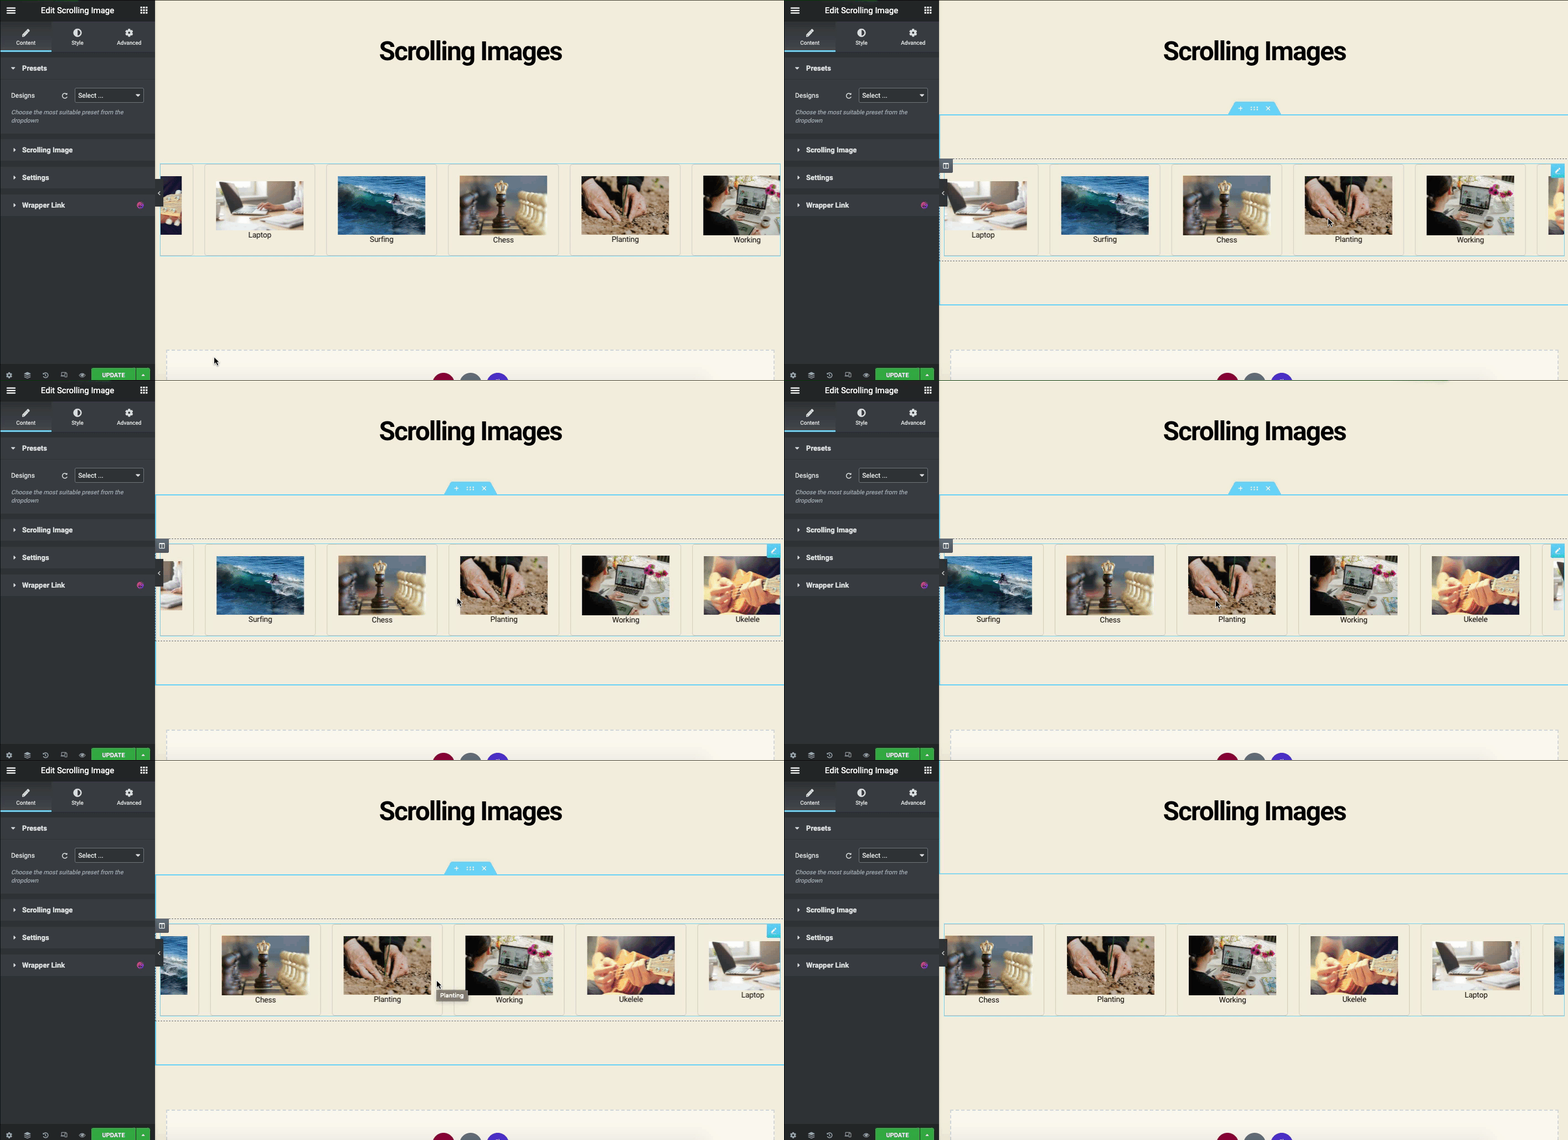
Now in the Settings tab, you’ll find some important settings. Here you can change animation direction, slide direction, space and slide speed, etc.

This is how you can add the Scrolling Image feature on your WordPress using Happy Addons. For a detailed guide, check out our official documentation from here.
More Advanced Resources of Happy Addons for Image Gallery
We have just shown some of the widgets of Happy Addons that you can use as an Elementor Image Gallery. But you may need more innovations for your website. Here we’ve given a list of widgets that you can try and check out.
- Slider widget (Free)
- Image carousel (Free)
- Image Accordion (Free)
- Advanced slider (Pro)
- Team carousel (Pro)
- Logo carousel (Pro)
Try to carefully implement these widgets on your site to get the best outlook on your website. Also, follow our official documentation for better navigation.
FAQs Related Elementor Image Gallery
01. How to add multiple images to an Elementor?
Ans: It’s simple to add any images in WordPress. For instance, you need to go to the Elementor design canvas.
01. Type: Select type of gallery, choosing from Single or Multiple. …
02. Add Images: Choose multiple images from the media library to insert into your gallery and type a title for the gallery.
03. Set the Order: Choose Default or Random order.
04. Lazy-Load: Set to Yes to use Lazy Load to improve loading speed.
02. Does Elementor have a video gallery?
Ans: Yes, Elementor has widgets for adding a video gallery to a website. They are video widget, playlist widget, and media carousel widget, etc.
Just open the Elementor design canvas and then type the widget name in the search bar. After that utilize the widget the way we have shown in the tutorial.
03. How to use image zoom in Elementor?
Ans: You can use Image zoom in Elementor in the following ways:
01. Navigate to the WP admin panel, click Plugins> and then Add new.
02. Then type WP Image Zoom
03. Install & Activate the plugin
04. And finally enjoy the features
04. What is masonry in Elementor?
Ans: The Masonry layout is a cascading grid style often used in web design, which looks more interesting and beautiful if compared with the basic Elementor Image Gallery.
05. How to use a masonry gallery?
Ans: To create a masonry image gallery in WordPress, you’ll need to follow these steps:
01. Install and activate Elementor Pro version
02. Create a blank design page
03. Type the Elementor Image Gallery in the search bar
04. Drag-drop the widget on the blank canvas
05. Go to config settings and change the number of gallery columns
06. Set the column width and margin below the images
07. Enable masonry image gallery layout
Final Words
Over the years, web design drills have evolved a lot. Marketers are trying their best to convey their brand messages to the target audiences. One of the effective mediums to do that is – utilizing the right Images with a better structure. Once you find the right layout for using the images, you can expect to get some splendid results.
Such as increasing SEO rankings, bringing more website visits, helping to get more social shares, and connecting with new prospects, etc.
The Elementor image gallery widget lets you do that quickly. Plus, Happy Addons will boost your effort with some cool web design materials like the Justified Grid, Image Grid, Scrolling Image, and so on.
So whether it’s a business website or just a portfolio site, it will always come to assist you with the best performance. Now it’s your turn to try Happy Addons along with Elementor!
Loved reading this tutorial? You can subscribe to our newsletter for more tutorials, news updates, upcoming features, and feature videos!
Why HappyAddons Pro is your ideal Elementor companion!
HappyAddons vs. The Rest: Unmatched Features and Stellar Support for your design journey
-
150+ exclusive collection of customisable widgets
-
20+ feature set to unleash your potential
-
500+ premium templates for inspiring designs
-
Our expert support team is always at your service
-
14-Days Money back. Peace of Mind Guaranteed

