You can’t imagine a website without forms. Most websites use single or multiple forms to serve their different purposes. So, it is essential to learn how to add forms to your Elementor site as well.
If you have the right tool in your hand, you can do the whole process in a couple of minutes without touching a line of code.
Today, we’ve shared how to add Gravity forms to the Elementor website using the Happy Addons free Gravity Forms widget.
We also shared the other Happy Addons form widgets that are compatible with popular form plugins.
How To Use Happy Addons’ Gravity Forms Widget To Create Forms For the Elementor Website
You can easily create different forms using the Gravity Forms widget.
In the following segment, we’ll show you how to use the Gravity Forms widget and create evergreen forms for your Elementor website for free.
Folllow these four simple steps–
- Install & Active Necessary Plugins
- Create a New Gravity Form
- Add Happy Addons’ Gravity Forms Widget
- Customize The Form in Your Own Style
Let’s get started:
Step One: Install & Active Necessary Plugins
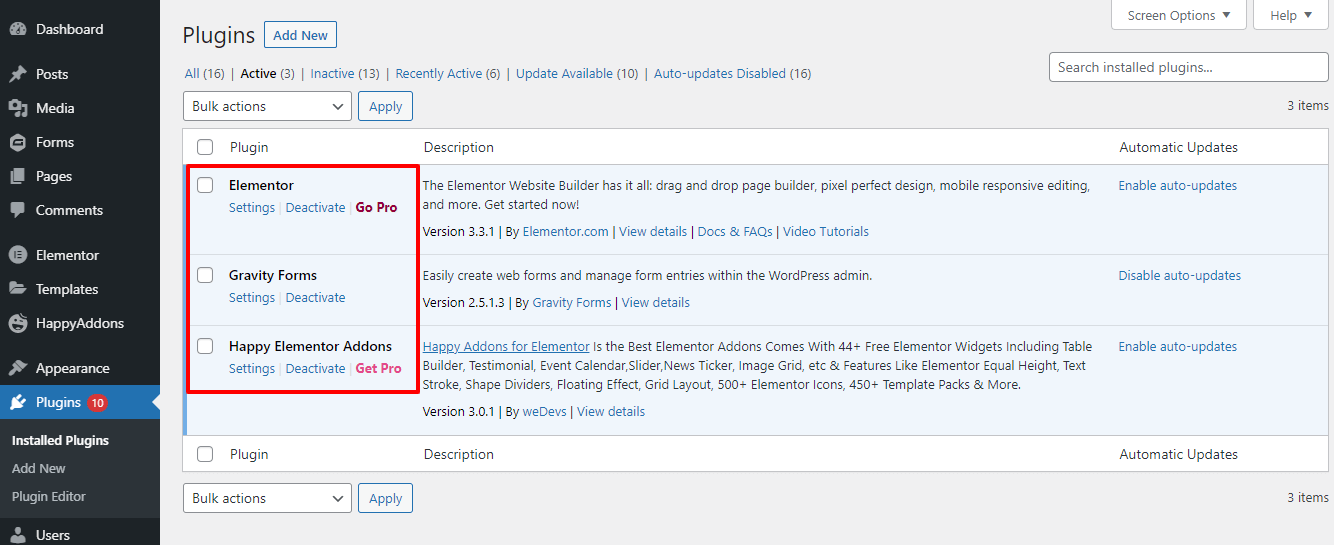
First, we need to install and activate the required plugins to our website. Here, we’ve already installed and activated the following plugins. You can use the following links to download the plugins.
- Elementor (Free)
- Happy Addons (Free)
- Gravity Forms (Pro)
Note: For your concern, the Gravity Forms plugin doesn’t offer a free version. You have to purchase its pro version.
Step Two: Create a New Gravity Form
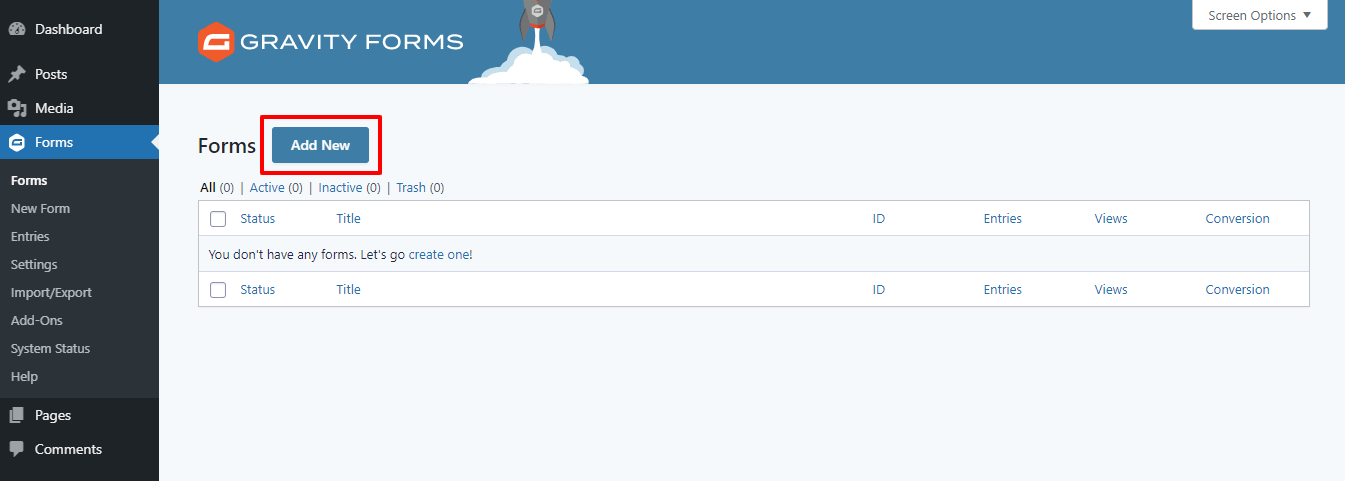
After installing the plugin, you need to go to the Forms or New Forms area. Then click the Add New button to create a new form.
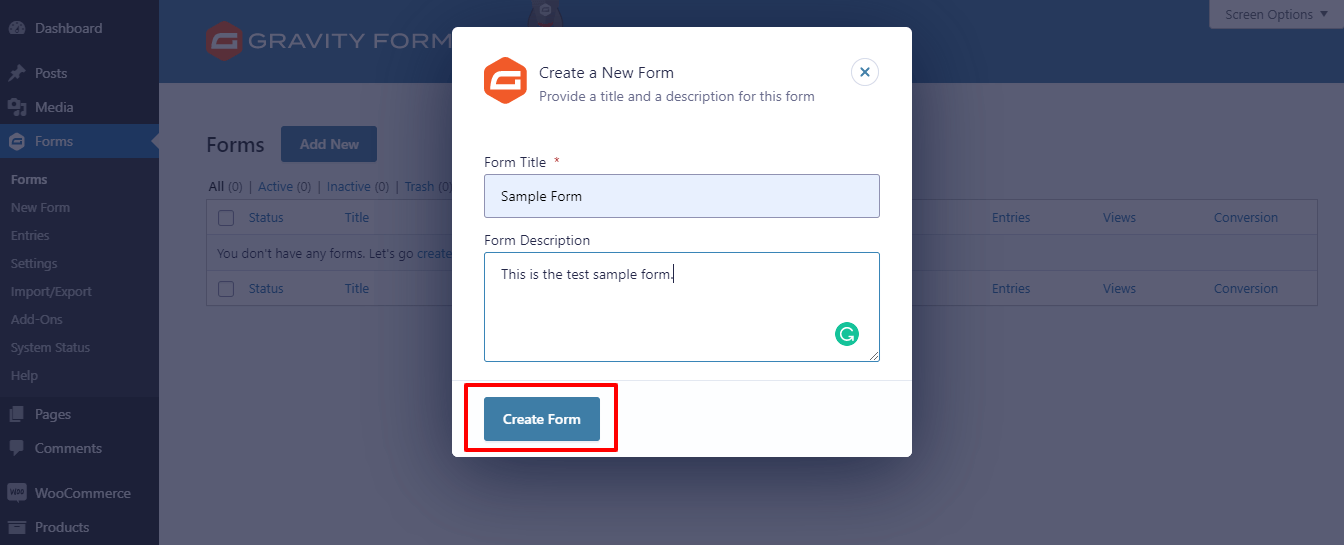
In the following modal popup, you’ll get the option to create the form. You add your Form Title and Form Description here. Finally, click the Create Form button to make a new form.
Well done! You have created a new form. Now, you need to add the necessary form fields to the form. In the Gravity Forms plugin, you can easily add required form fields using the drag & drop feature.
First, you need to type the field name into the search bar. Then drag and drop the field into the left side area.
Here, you see that we are looking for the Name form field from the search bar and drag it into the right place.
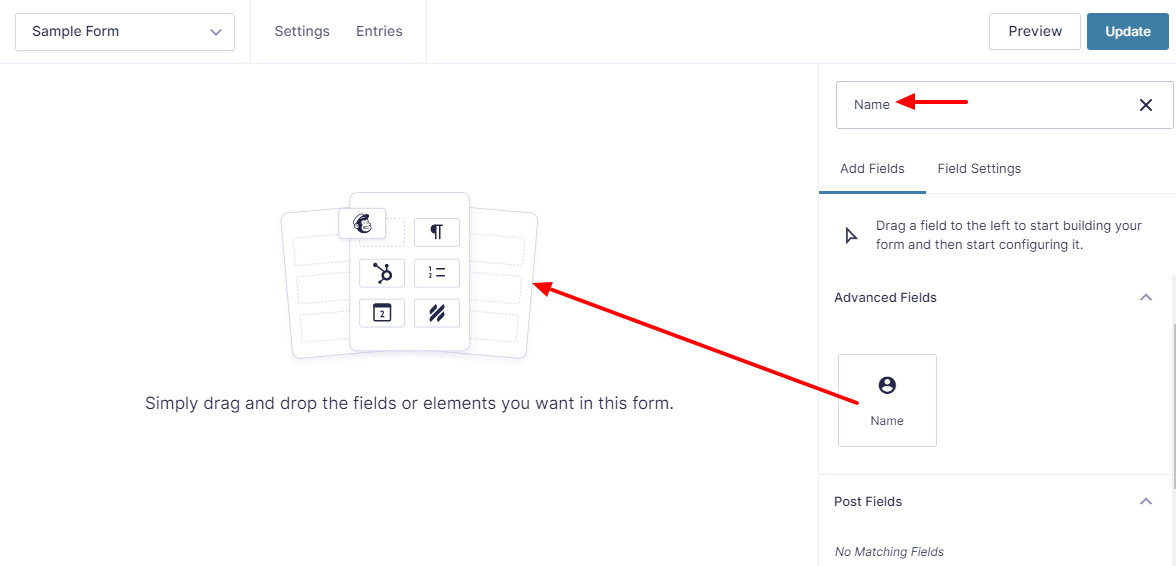
We’ve also added three other form fields in our forms, like Email, Website, and Message, to create a complete form. After adding the essential form fields, click the Update button to save the form.
Step Three: Add Happy Addons’ Gravity Forms Widget
It’s time to display the form on your Elementor website.
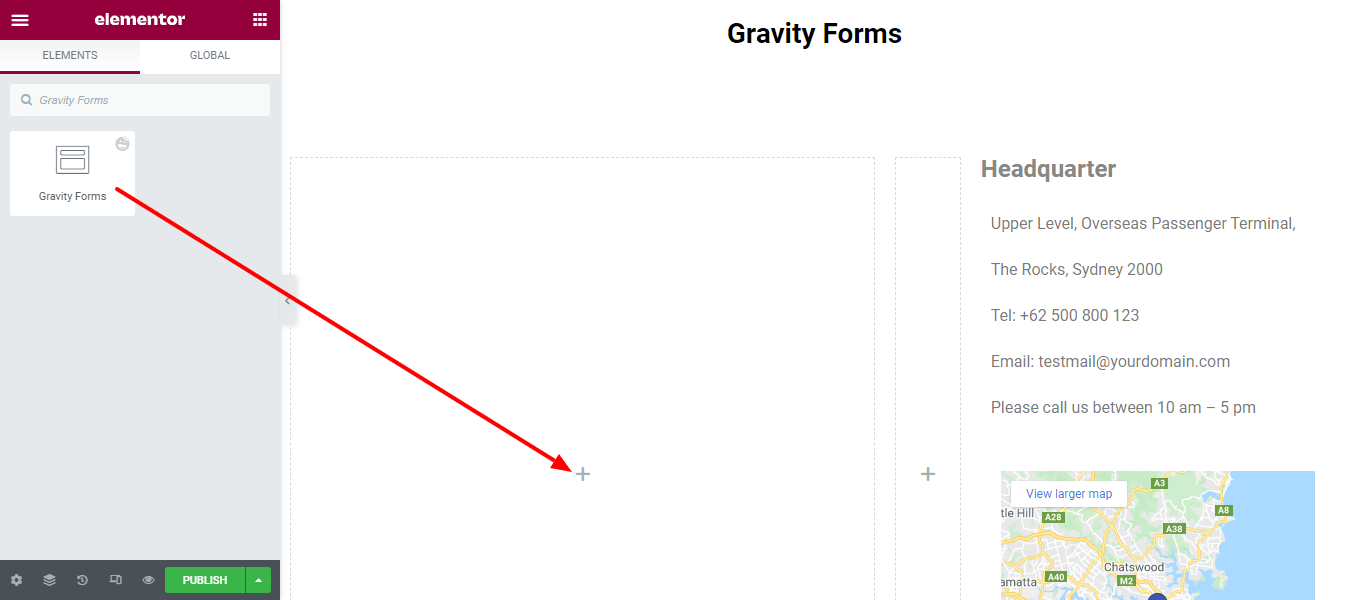
First, find the Happy Addons’ Gravity Forms widget from the left sidebar menu, then drag and drop it into the suitable place of your website.
Second, you choose the form name from the dropdown list. Here, we’ve selected the Sample Form that you’ve created before.
You can also show the Form Title and Enable Ajax Submit here in the Content section.
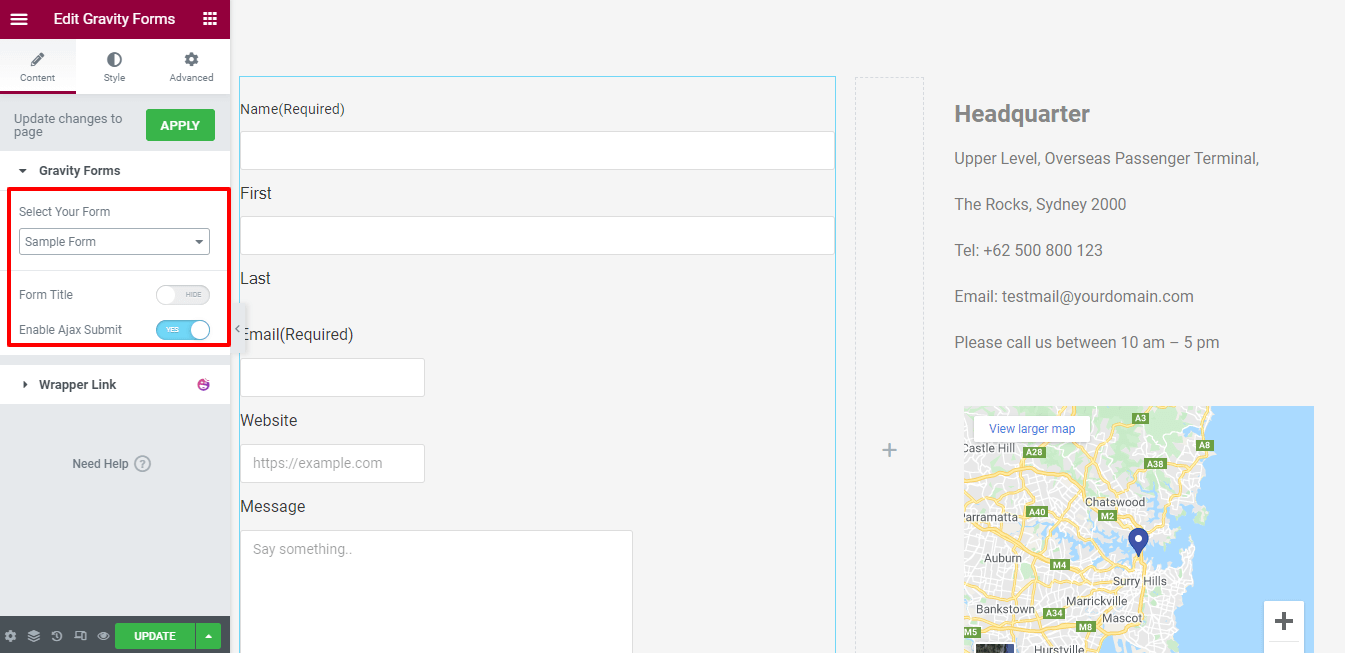
Note: When you make a change to the Elementor editor’s panel, you need to click the Apply button to update the changes to the frontend page.
Step Four: Customize The Form in Your Own Style
In the Style section, you will get the essential style options for better form customization.
Here are they.
- Forms Fields
- Forms Fields Label
- Submit Button
- Break
- List
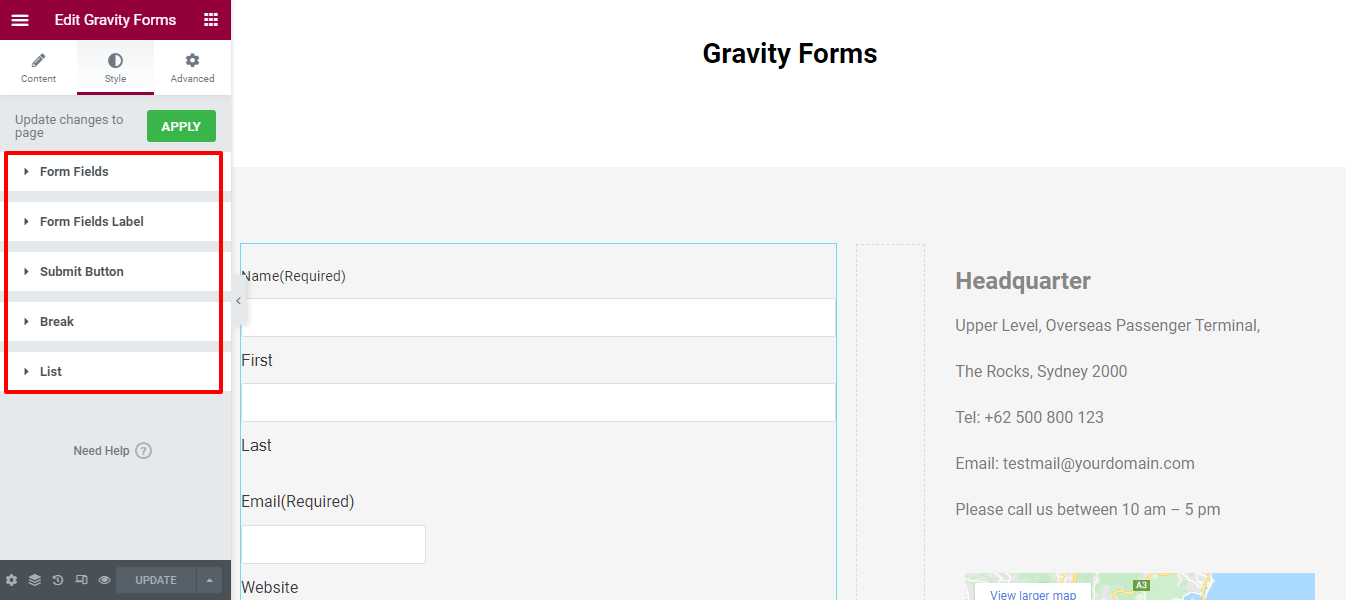
In this blog, we will use the first three Form Fields, Form Fields Label and Submit Button settings which are often used to design the form.
Form Fields
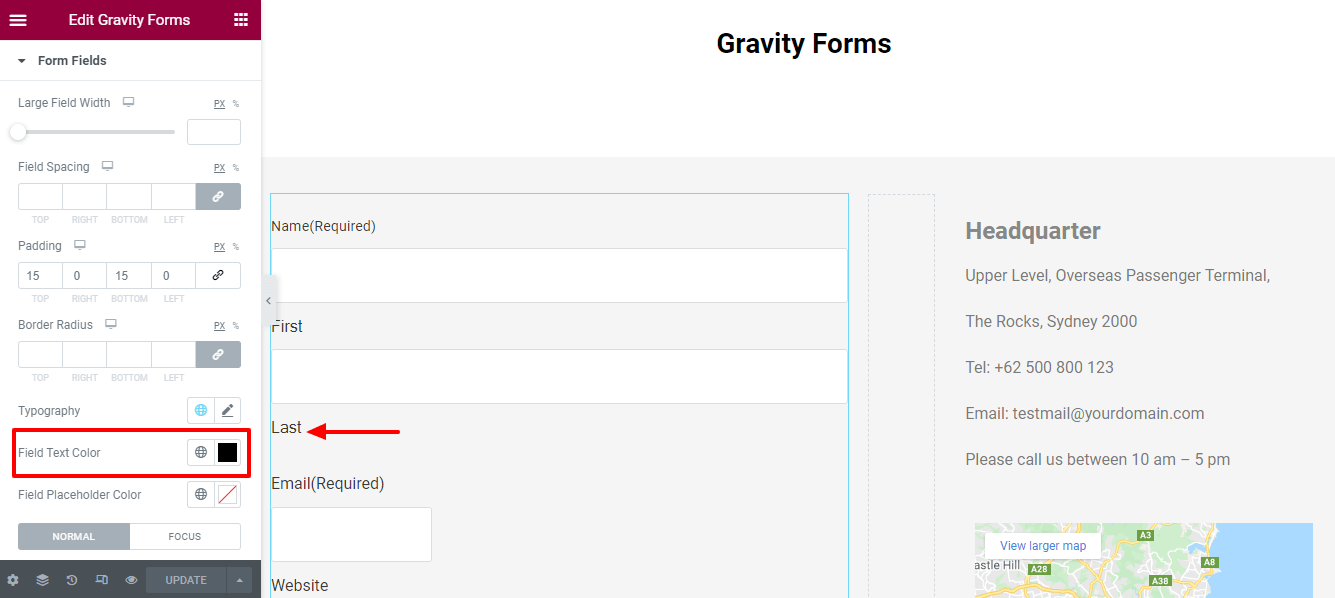
In the Style-> Form Fields area, you’ll find many styling options to change the default style of form fields. These are the options Large Field Width, Field Spacing, Padding, Border Radius, Typography, Field Text Color, Field Placeholder Color, Border Type, Box Shadow, and Background Color that you can use to customize the fields.
Lst’s increase the form fields Padding.
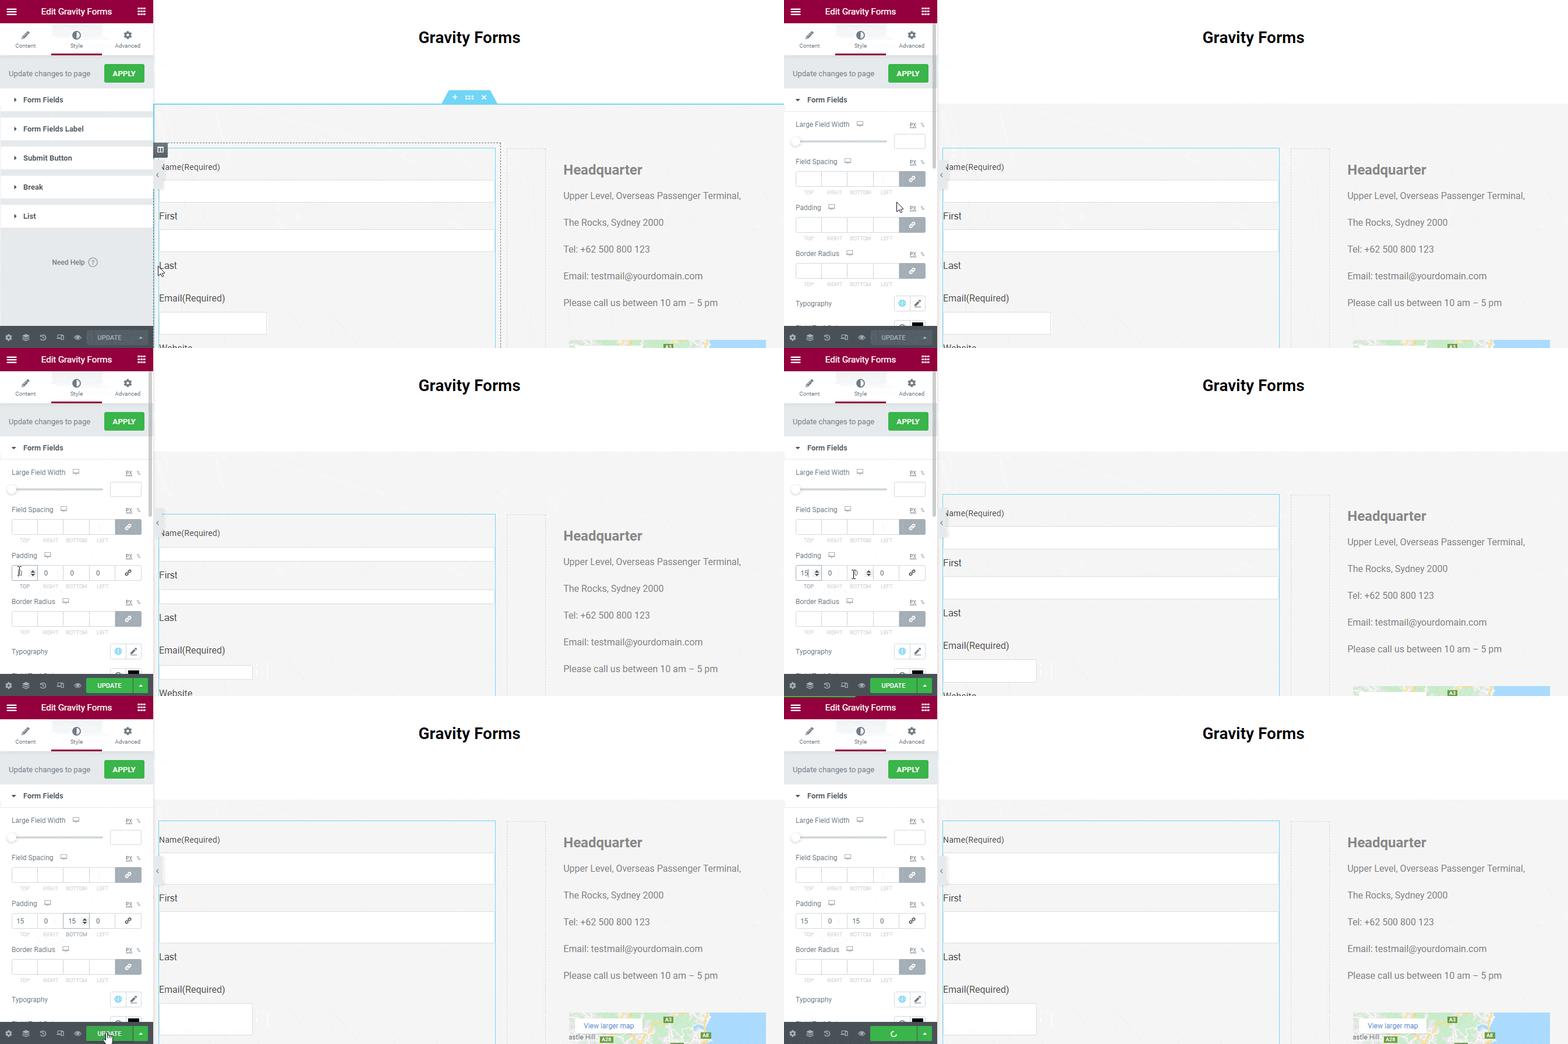
You can change the Field Text Color in your own way.
Form Fields Label
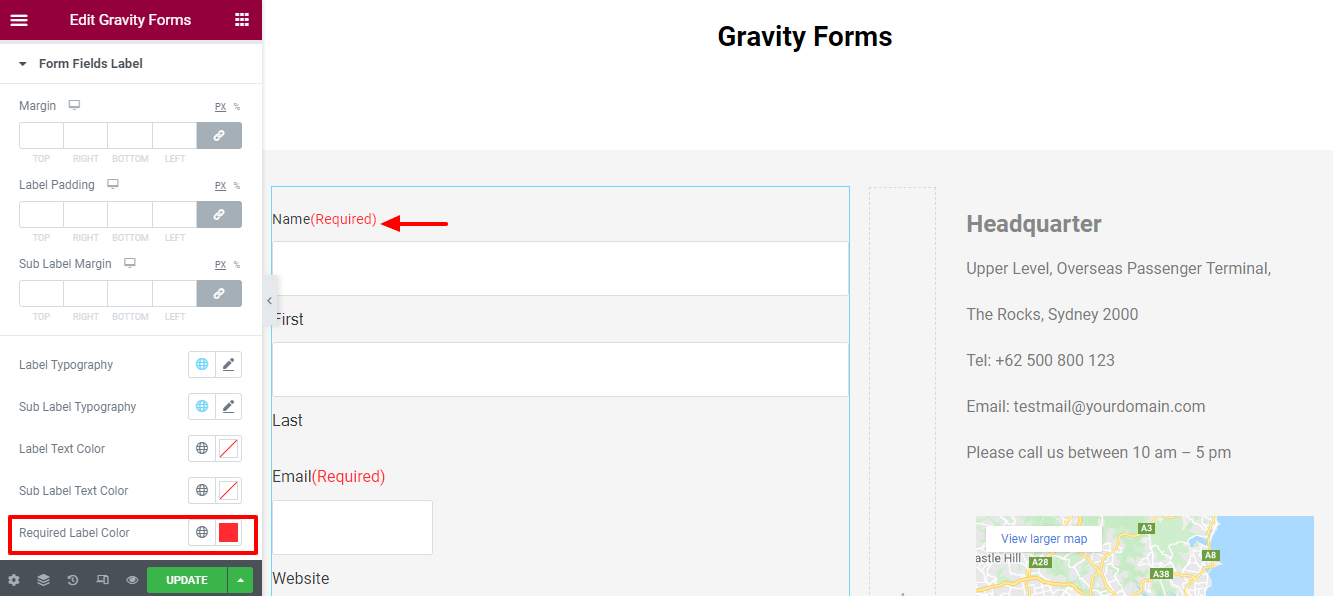
You can also reset the Margin, Label Padding, Sub Label Margin, Label Typography, Sub Label Typography, Label Text Color, Sub Label Text Color, and Required Label Color of the Form Fields Label style.
Here, we’ve changed the default Required Label Color and set the red color.
Submit Button
In the Style-> Submit Button area, you’ll get the possible design options like Button Full Width, Button Width, Margin, Padding, Typography, Border Type, Border Radius, Box Shadow, Text Color, and Background Color for styling the submit button.
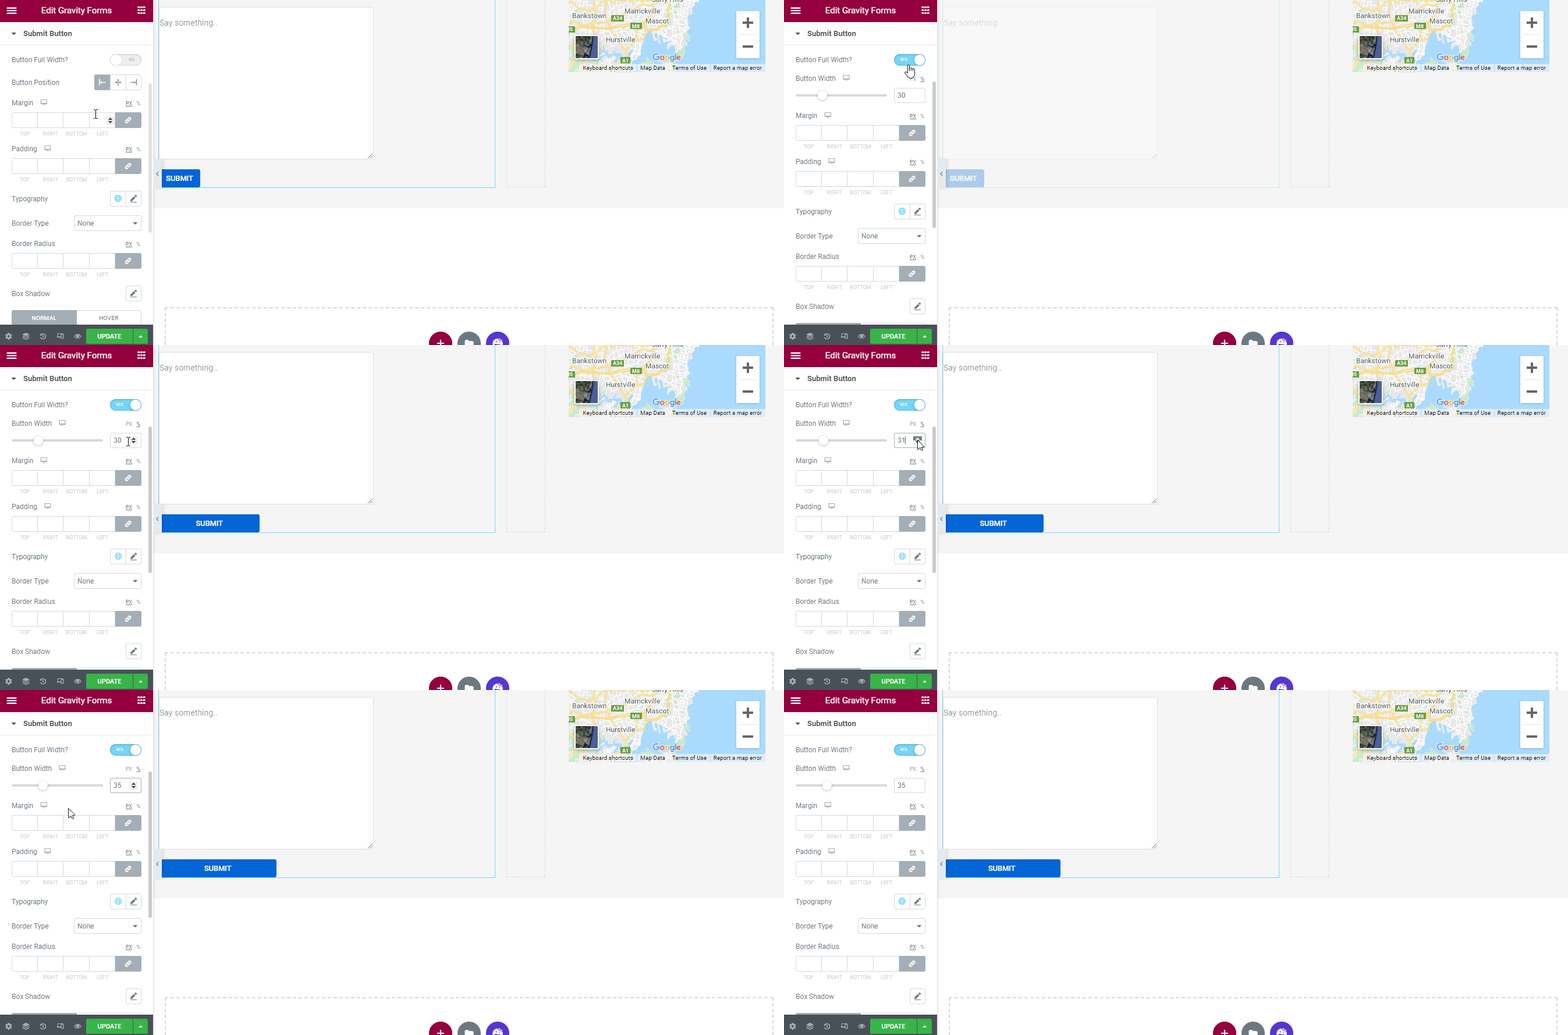
Enable Button Full Width and Set Button Width
If you need a full-width submit button, you can make it by enabling the Button Full Width. Then you can set the Button Width in your own way.
Set Margin, Padding, and Broder Radius
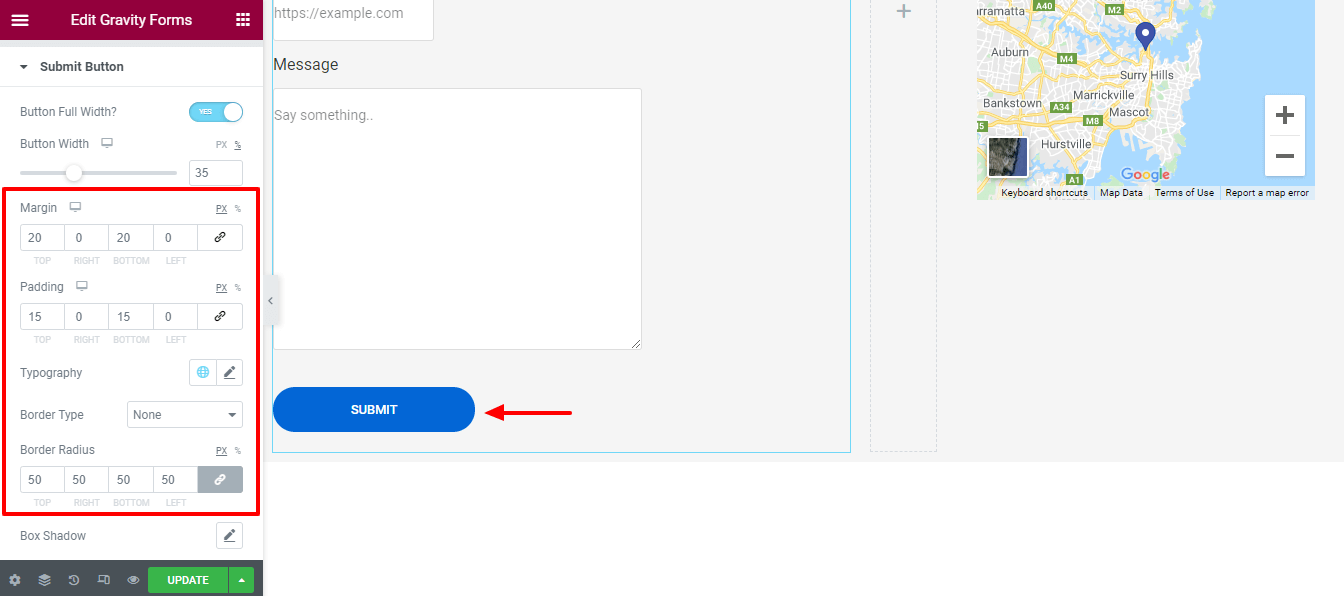
We also have defined the Margin, Padding, and Broder Radius of the Submit Button.
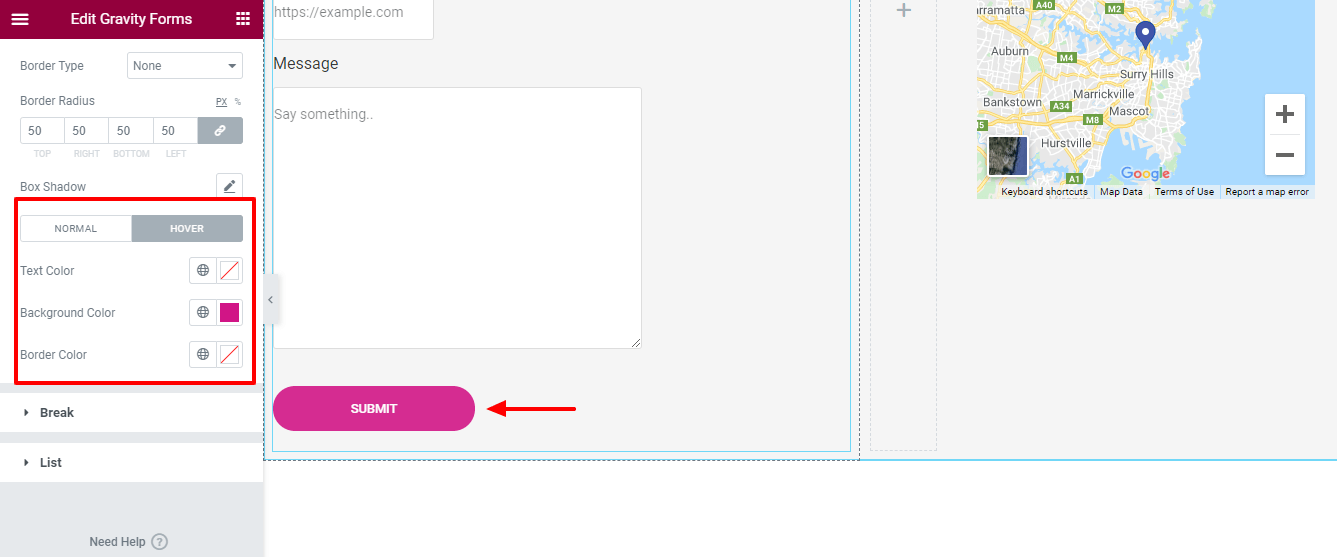
Change Button Hover Color
To make the button more visible, we’ve changed the Hover Color of the Submit Button.
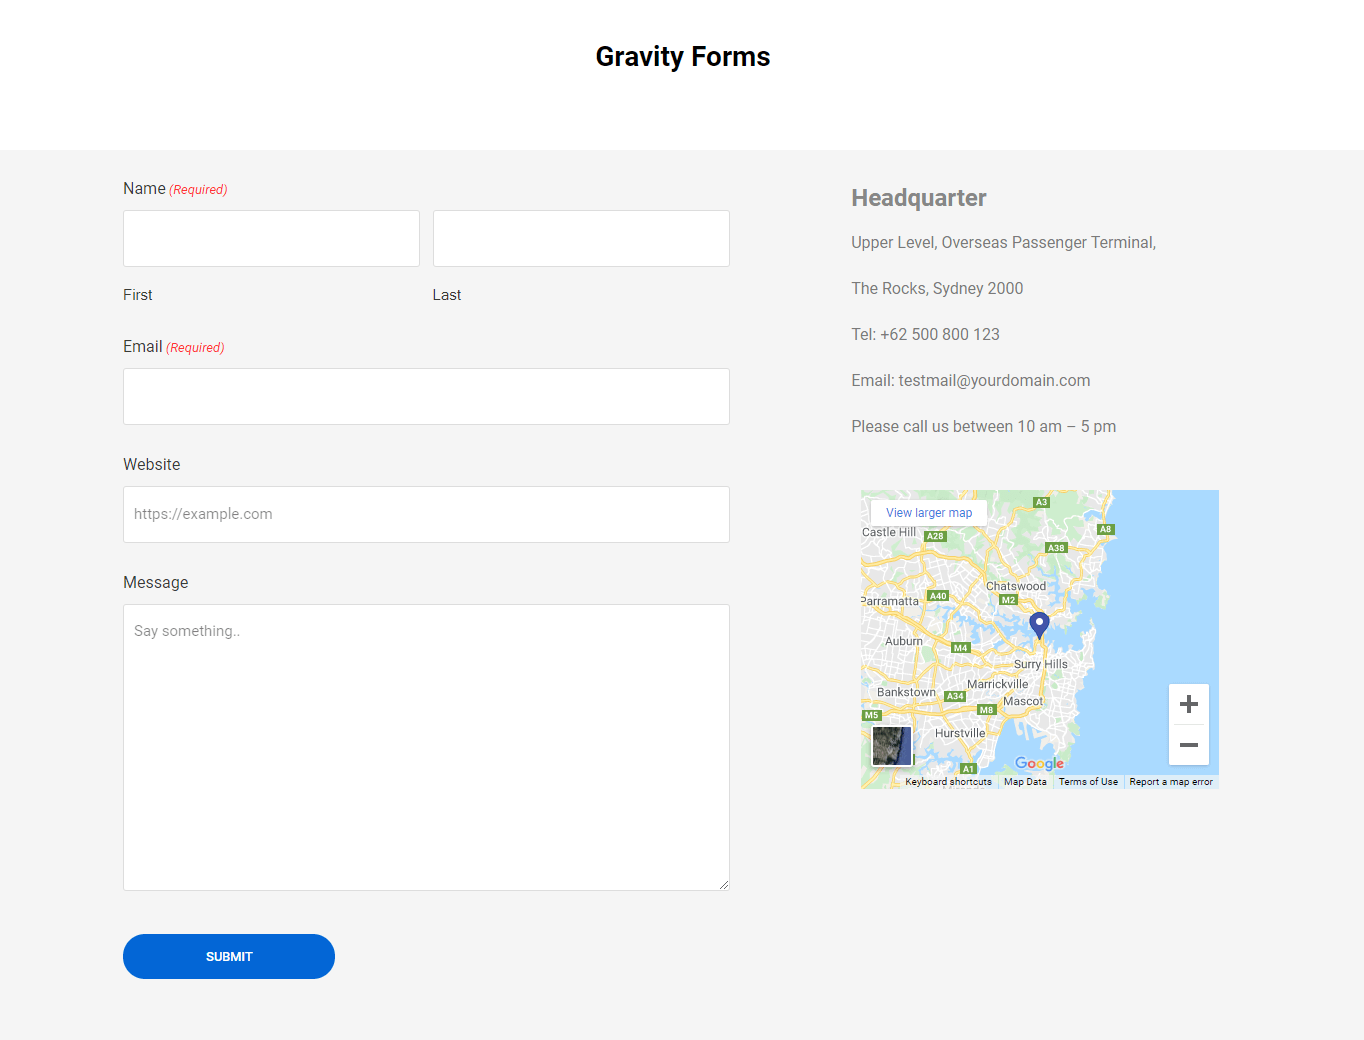
Final Preview of Happy Addons’ Gravity Forms Widget
The final appearance of our Elementor Gravity form is similar to the following image.
You can also check out the video.
6 more Happy Addons Form Widgets That You May Use
Like the Gravity Forms widget, Happy Addons offers 6 other form widgets. You can also use them to integrate forms into your Elementor website.
Let’s talk about these widgets one by one.
1. Contact Form 7
Contact Form 7 is one of the prominent form plugins for WordPress that most users use. For that reason, Happy Addons allow its users to add forms using Contact Form 7 free widget.
With this widget, you can easily add and customize different types of forms to your Elementor website.
Check out the documentation.
2. Ninja Forms
Now you’re also able to use your favorite Ninja Forms plugin. Using the Happy Addons Ninja Forms widget, you can insert your necessary forms to your Elementor site.
Read the step-by-step documentation of Ninja Forms.
3. weForms
With Happy Addons’ new and unique weForms widget, you can add pre-made forms to your website in a more organized way.
Give a quick check this documentation and learn how this widget work.
4. Caldera Forms
Try Happy Addons Caldera Forms free widget to add stunning forms to your Elementor site. Let’s have a look at the user guide.
5. WPForms
Want to add forms to your website using the popular WPForms plugin? In Happy Addons, you can easily add and customize the prebuilt forms using the WPForms widget. For more details, here is a quick guide for you.
Fluent Forms
Last but not least. You can also use the Happy Addons Fluent Forms widget to integrate forms into your website. Follow the full documentation of Fluent Forms.
Are You Ready to Use Happy Addons’ Gravity Forms Widget
You can make your form design process easier using the Happy Addons form widgets. We hope that you’ve followed all the above steps and learned the process of form integration.
Now, it’s your time to add Gravity Form to Elementor website.
Are you ready to go?
If you still have questions regarding this blog or Elementor Gravity forms, you can raise your voice in the comment box below.
Check out some other essential tutorials…
- How To Personalize Your Form Design In Elementor Using Happy Form Widgets For FREE!
- The Ultimate Guide To Creating An Elementor Contact Form
- 7 Best WordPress Form Builder Compared (Pros & Cons)
- Contact Form 7: Feature Review & Performance Checking (Compared with WPForms)
- Honest WPForms Review for Marketers
Don’t forget to join our newsletters. It’s also completely FREE!





2 Responses
Helpful! Very interesting, good job and thanks for sharing such a good information
Thanks for your kind words. Stay with us.