



An interactive website reacts when visitors do something. Cards flip when you hover, images open as you scroll, and a small tooltip explains an icon before anyone has to ask.
These small moments keep people on the page longer, help them understand your offer faster, and make your brand feel more modern. A static page simply can’t do that.
Elementor is one of the most user-friendly drag-and-drop page builders, and the right addons make it far more interactive. In this blog post, we’ll show you the best Elementor widgets for building interactive websites, what each one does, and where to find it, all without writing code. Let’s get started!
What Makes a Website Interactive?
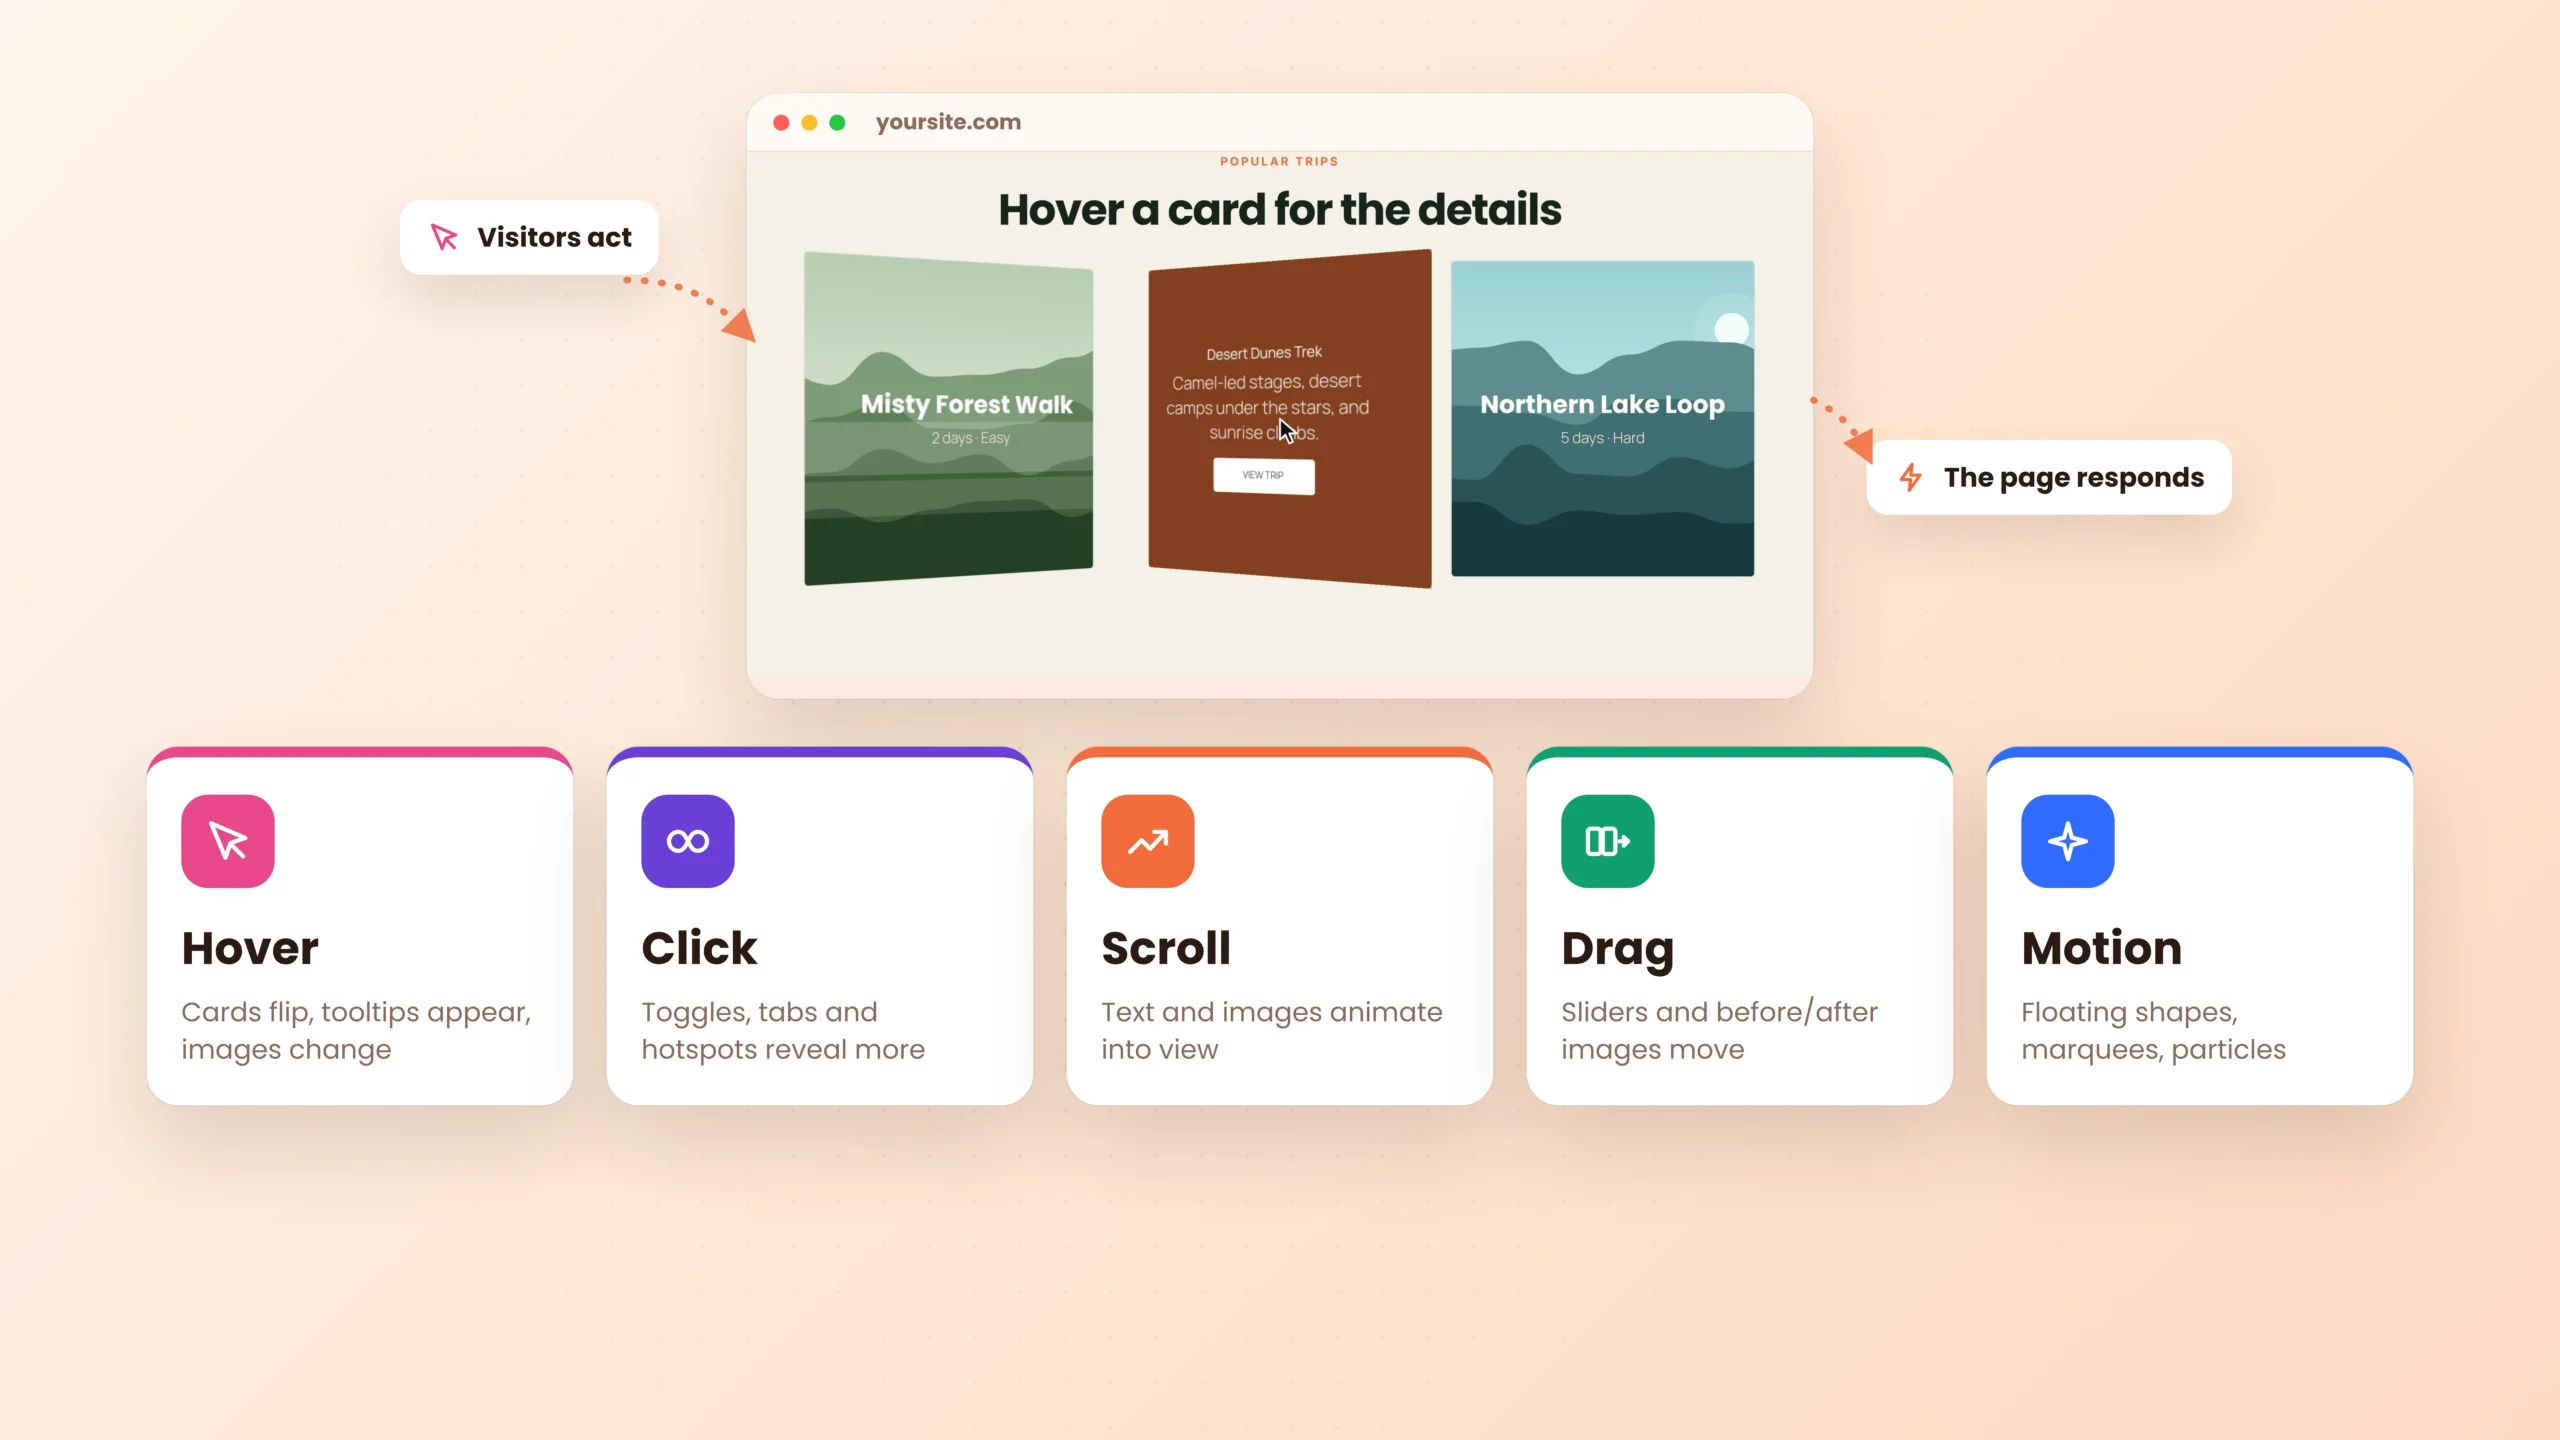
A website is interactive when it responds to what the visitor does. Instead of only reading, people hover, click, scroll, or drag, and the page answers with motion or new content.
Most interactive effects fall into five groups:
- Hover: Cards flip, tooltips appear, and images change when the mouse moves over them.
- Click: Toggles, tabs, and hotspots reveal more details on demand.
- Scroll: Text and images animate into view as the visitor moves down the page.
- Drag: Sliders and before-and-after images move with the visitor’s hand.
- Motion: Floating shapes, marquees, and particles add life even when nobody touches the page.
The best interactive sites mix a few of these, then keep everything else calm and readable.
Why Use Elementor Widgets for Interactive Websites?
Elementor’s free version gives you entrance animations and simple hover effects. For advanced motion, like scroll-based text reveals, image hotspots, or animated particles, you need Elementor Pro, custom code, or an addon.
An addon is the easiest route. It adds new widgets and features right into the Elementor panel, so you build interactive sections the same way you build everything else: drag, drop, and adjust a few options.
Here’s what a good addon gives you:
- No code: Every effect is set up from the Elementor panel.
- More effects: Widgets and features Elementor doesn’t include.
- Control over speed: Turn off the widgets you don’t use, so they don’t load on your site.
- Mobile control: Choose which effects run on phones and tablets.
How to Choose the Right Elementor Addon for Interactivity
Before installing an Elementor addon, check what it offers and how well it fits your website. The right addon should give you creative freedom without slowing down your site. Here are five things to consider before making your choice.
a. Free Features You Can Test First
Choose an addon that offers useful features in its free version. This lets you test different widgets and animation effects on your website before paying. You can check their quality, customization options, and performance to decide whether upgrading is worth it.
b. Performance Controls
Look for an addon that lets you enable or disable individual widgets and features. You probably won’t use everything it offers. Keeping unused modules inactive helps reduce unnecessary resource loading and keeps your website lighter.
c. Modern Animation Engine
Choose an addon that uses a reliable animation library like GSAP. It offers better control over timing, movement, and scroll-based effects. This makes it easier to create smooth text reveals, scroll animations, and complex motion effects without writing custom code.
d. Mobile Settings
Not every animation looks good on smaller screens. Some effects can affect readability and make navigation difficult. Choose an addon that lets you control animations by device type, so you can disable heavy effects on mobile while keeping suitable ones active.
e. Regular Updates and Support
Elementor receives regular updates, so your addon must keep up with its changes. Check whether the developers release updates, fix reported bugs, and maintain compatibility. Reliable customer support also helps you resolve technical issues without wasting time.
15 Best Elementor Widgets for Building Interactive Websites
All the addons below come from HappyAddons, a GSAP-powered Elementor addon with 160+ widgets and 40+ features. Some are widgets you drag onto the page. Others are features that add new options to the widgets and containers you already use.
To show them in action, we built a demo homepage for Trailhead Co., a made-up hiking tour brand, plus a few other demo pages. Every clip below is a real HappyAddons effect.
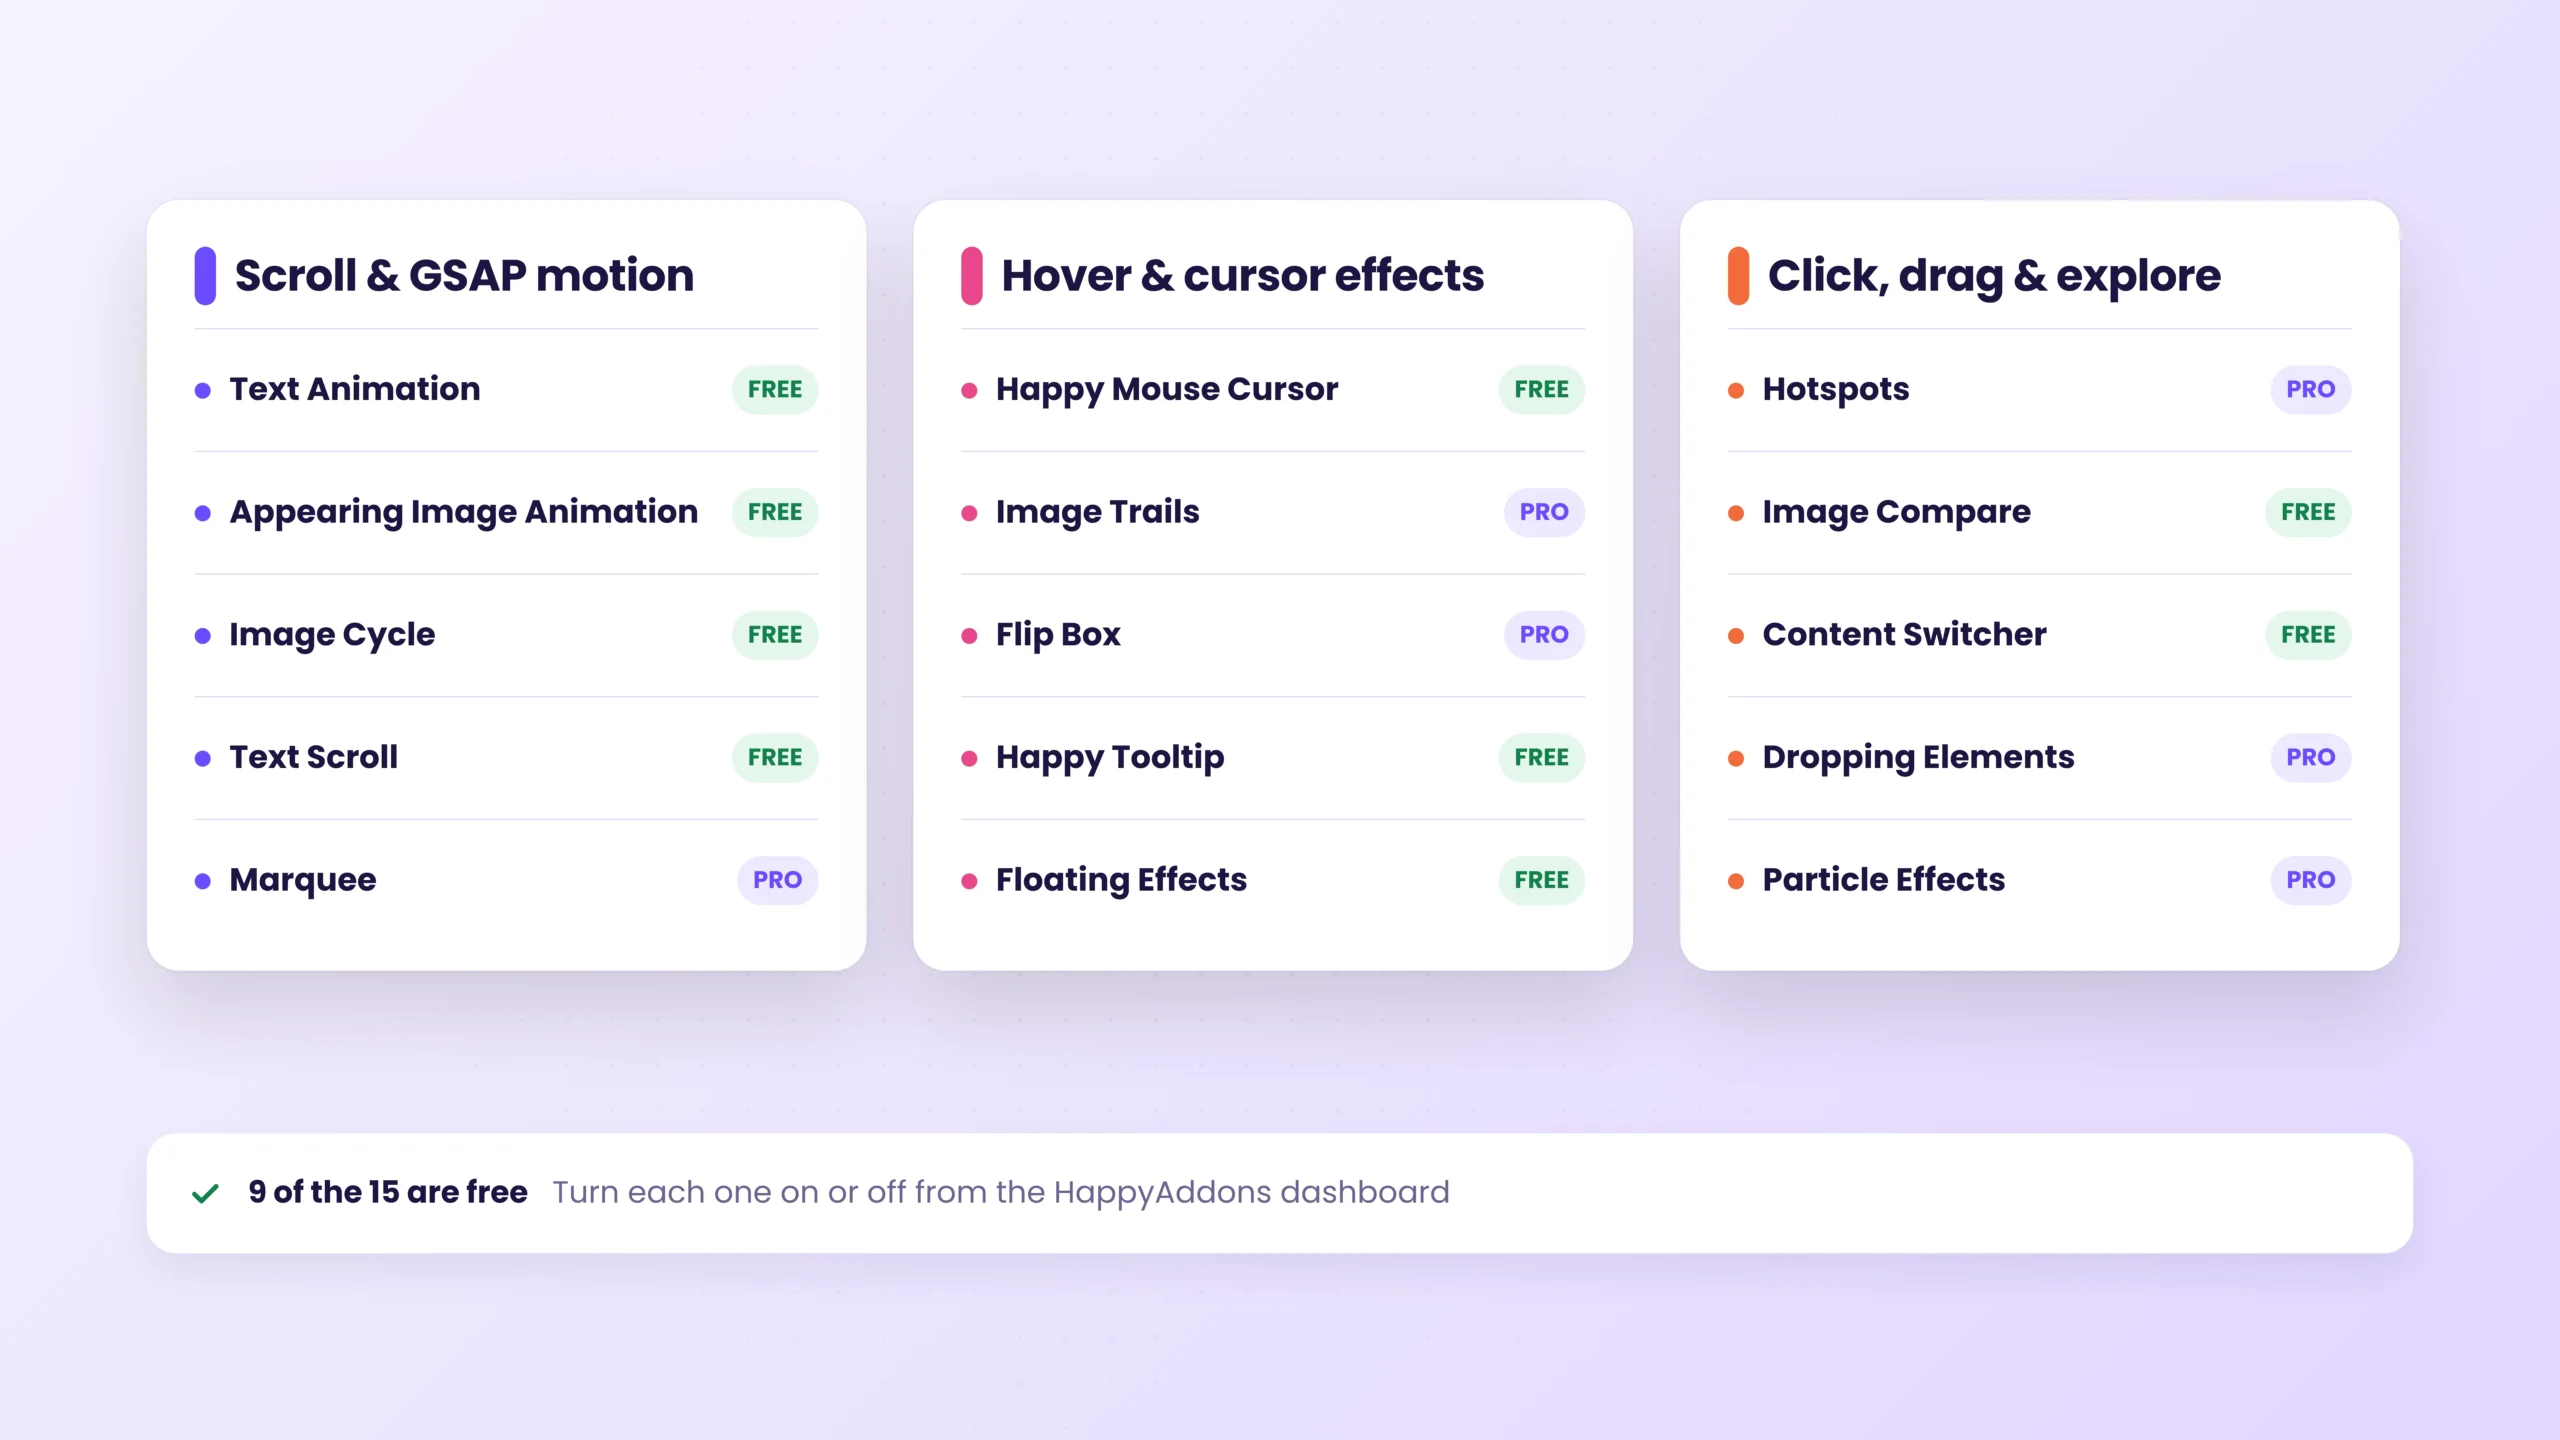
| # | Addon | Type | Interaction | Plan |
|---|---|---|---|---|
| 1 | Text Animation | Feature | Scroll | Free |
| 2 | Appearing Image Animation | Feature | Scroll | Free |
| 3 | Image Cycle | Widget | Scroll | Free |
| 4 | Text Scroll | Widget | Scroll | Free |
| 5 | Marquee | Feature | Motion | Pro |
| 6 | Happy Mouse Cursor | Feature | Hover | Free |
| 7 | Image Trails | Feature | Hover | Pro |
| 8 | Flip Box | Widget | Hover | Pro |
| 9 | Happy Tooltip | Feature | Hover | Free |
| 10 | Floating Effects | Feature | Motion | Free |
| 11 | Hotspots | Widget | Hover / click | Pro |
| 12 | Image Compare | Widget | Drag | Free |
| 13 | Content Switcher | Widget | Click | Free |
| 14 | Dropping Elements | Widget | Hover | Pro |
| 15 | Happy Particle Effects | Feature | Motion | Pro |
1. Text Animation (Free)
Text Animation turns any Heading widget into an animated headline. Letters, words, or lines can reveal, slide, pop up, or blur into place as the visitor scrolls, all powered by GSAP.
Best for: Hero headlines, section titles, and calls to action.
Where to find it: Select a Heading widget > Content tab > Text Animation section > toggle on Enable.
2. Appearing Image Animation (Free)
Appearing Image Animation reveals images as they scroll into view. You can open them in tiles, wipe them in from a corner, stretch them, or scale them up.
Best for: Portfolios, blog cards, galleries, and feature sections.
Where to find it: Select an Image widget > Content tab > Appearing Animation section > toggle on Enable.
3. Image Cycle (Free)
The Image Cycle widget moves a group of images, one by one, into a circle around a heading. It’s a bold way to show many brands or projects in one compact section.
Best for: Client logos, portfolio pieces, and product collections.
Where to find it: Search for Image Cycle in the Elements panel and drag it onto the canvas.
4. Text Scroll (Free)
The Text Scroll widget highlights a paragraph word by word as the visitor scrolls. It turns a long “About us” text into something people actually read.
Best for: About sections, mission statements, and big quotes.
Where to find it: Search for Text Scroll in the Elements panel and drag it onto the canvas.
5. Marquee (Pro)
Marquee turns a full-width container into an endless scrolling strip. Everything inside it, like text, logos, or images, keeps moving in a smooth loop, and it can pause on hover.
Best for: Destination lists, client logos, announcements, and testimonials.
Where to find it: Select a full-width container > Advanced tab > Marquee section > toggle on Enable.
6. Happy Mouse Cursor (Free)
Happy Mouse Cursor replaces the default arrow with a custom cursor on any container or widget. Use text, an icon, or an image, so visitors instantly know they can click something.
Best for: Portfolio grids, product cards, and creative agency sites.
Where to find it: Select a container > Layout tab (or a widget’s Content tab) > Happy Mouse Cursor section.
7. Image Trails (Pro)
Image Trails leaves a trail of images behind the mouse as it moves across a section. It’s playful, memorable, and great for showing off a lot of work at once.
Best for: Hero sections for agencies, photographers, and fashion brands.
Where to find it: Select a container > Advanced tab > Image Trails section.
8. Flip Box (Pro)
The Flip Box widget shows a front and a back side. Visitors see a photo and title first, then hover to flip the card and read the details with a button.
Best for: Tours, services, team members, and pricing teasers.
Where to find it: Search for Flip Box in the Elements panel and drag it onto the canvas.
9. Happy Tooltip (Free)
Happy Tooltip adds a tooltip to any widget. Visitors hover (or click) and get a short explanation without leaving the page or opening a popup.
Best for: Feature lists, icons, pricing tables, and form hints.
Where to find it: Select any widget > Advanced tab > Happy Tooltip section > toggle on Enable.
10. Floating Effects (Free)
Floating Effects make any widget move gently up and down, rotate, or scale in a loop. Badges, shapes, and icons look like they’re floating in the air.
Best for: Hero badges, decorative shapes, and product images.
Where to find it: Select any widget > Advanced tab > Floating Effects section > toggle it on.
11. Hotspots (Pro)
The Hotspots widget places clickable points on an image. Each point opens a tooltip, so one picture can explain a route, a product, or a room.
Best for: Product features, maps, floor plans, and tour routes.
Where to find it: Search for Hotspots in the Elements panel and drag it onto the canvas.
12. Image Compare (Free)
The Image Compare widget puts two images on top of each other with a slider between them. Visitors drag the handle to see the before and after.
Best for: Photo editing, renovations, design makeovers, and product upgrades.
Where to find it: Search for Image Compare in the Elements panel and drag it onto the canvas.
13. Content Switcher (Free)
The Content Switcher widget swaps between blocks of content with a toggle switch (round or square) or a row of buttons. Each block can be plain text or a saved Elementor container.
Best for: Monthly vs yearly pricing, plan comparisons, and before/after content.
Where to find it: Search for Content Switcher in the Elements panel and drag it onto the canvas.
14. Dropping Elements (Pro)
The Dropping Elements widget drops tags or shapes onto the page with real physics. Visitors can push them around with the mouse.
Best for: Service lists, skill tags, and fun “what we do” sections.
Where to find it: Search for Dropping Elements in the Elements panel and drag it onto the canvas.
15. Happy Particle Effects (Pro)
Happy Particle Effects fill a container’s background with moving particles. Choose a preset like Snow, NASA, or Polygon, or paste your own particles.js setup.
Best for: Hero sections, event pages, and seasonal landing pages.
Where to find it: Select a container > Style tab > Happy Particle Effects section > toggle on Enable.
Explore how to add GSAP animations in Elementor without coding.
How to Enable These Elementor Widgets in HappyAddons
All these widgets and features are on by default after you install HappyAddons. If you can’t find one in the Elementor panel, it was probably turned off. Here’s how to check.
Prerequisites
- Elementor (Free)
- HappyAddons (Free)
- HappyAddons Pro (for the Pro items)
Step 01: Enable the Widgets You Need
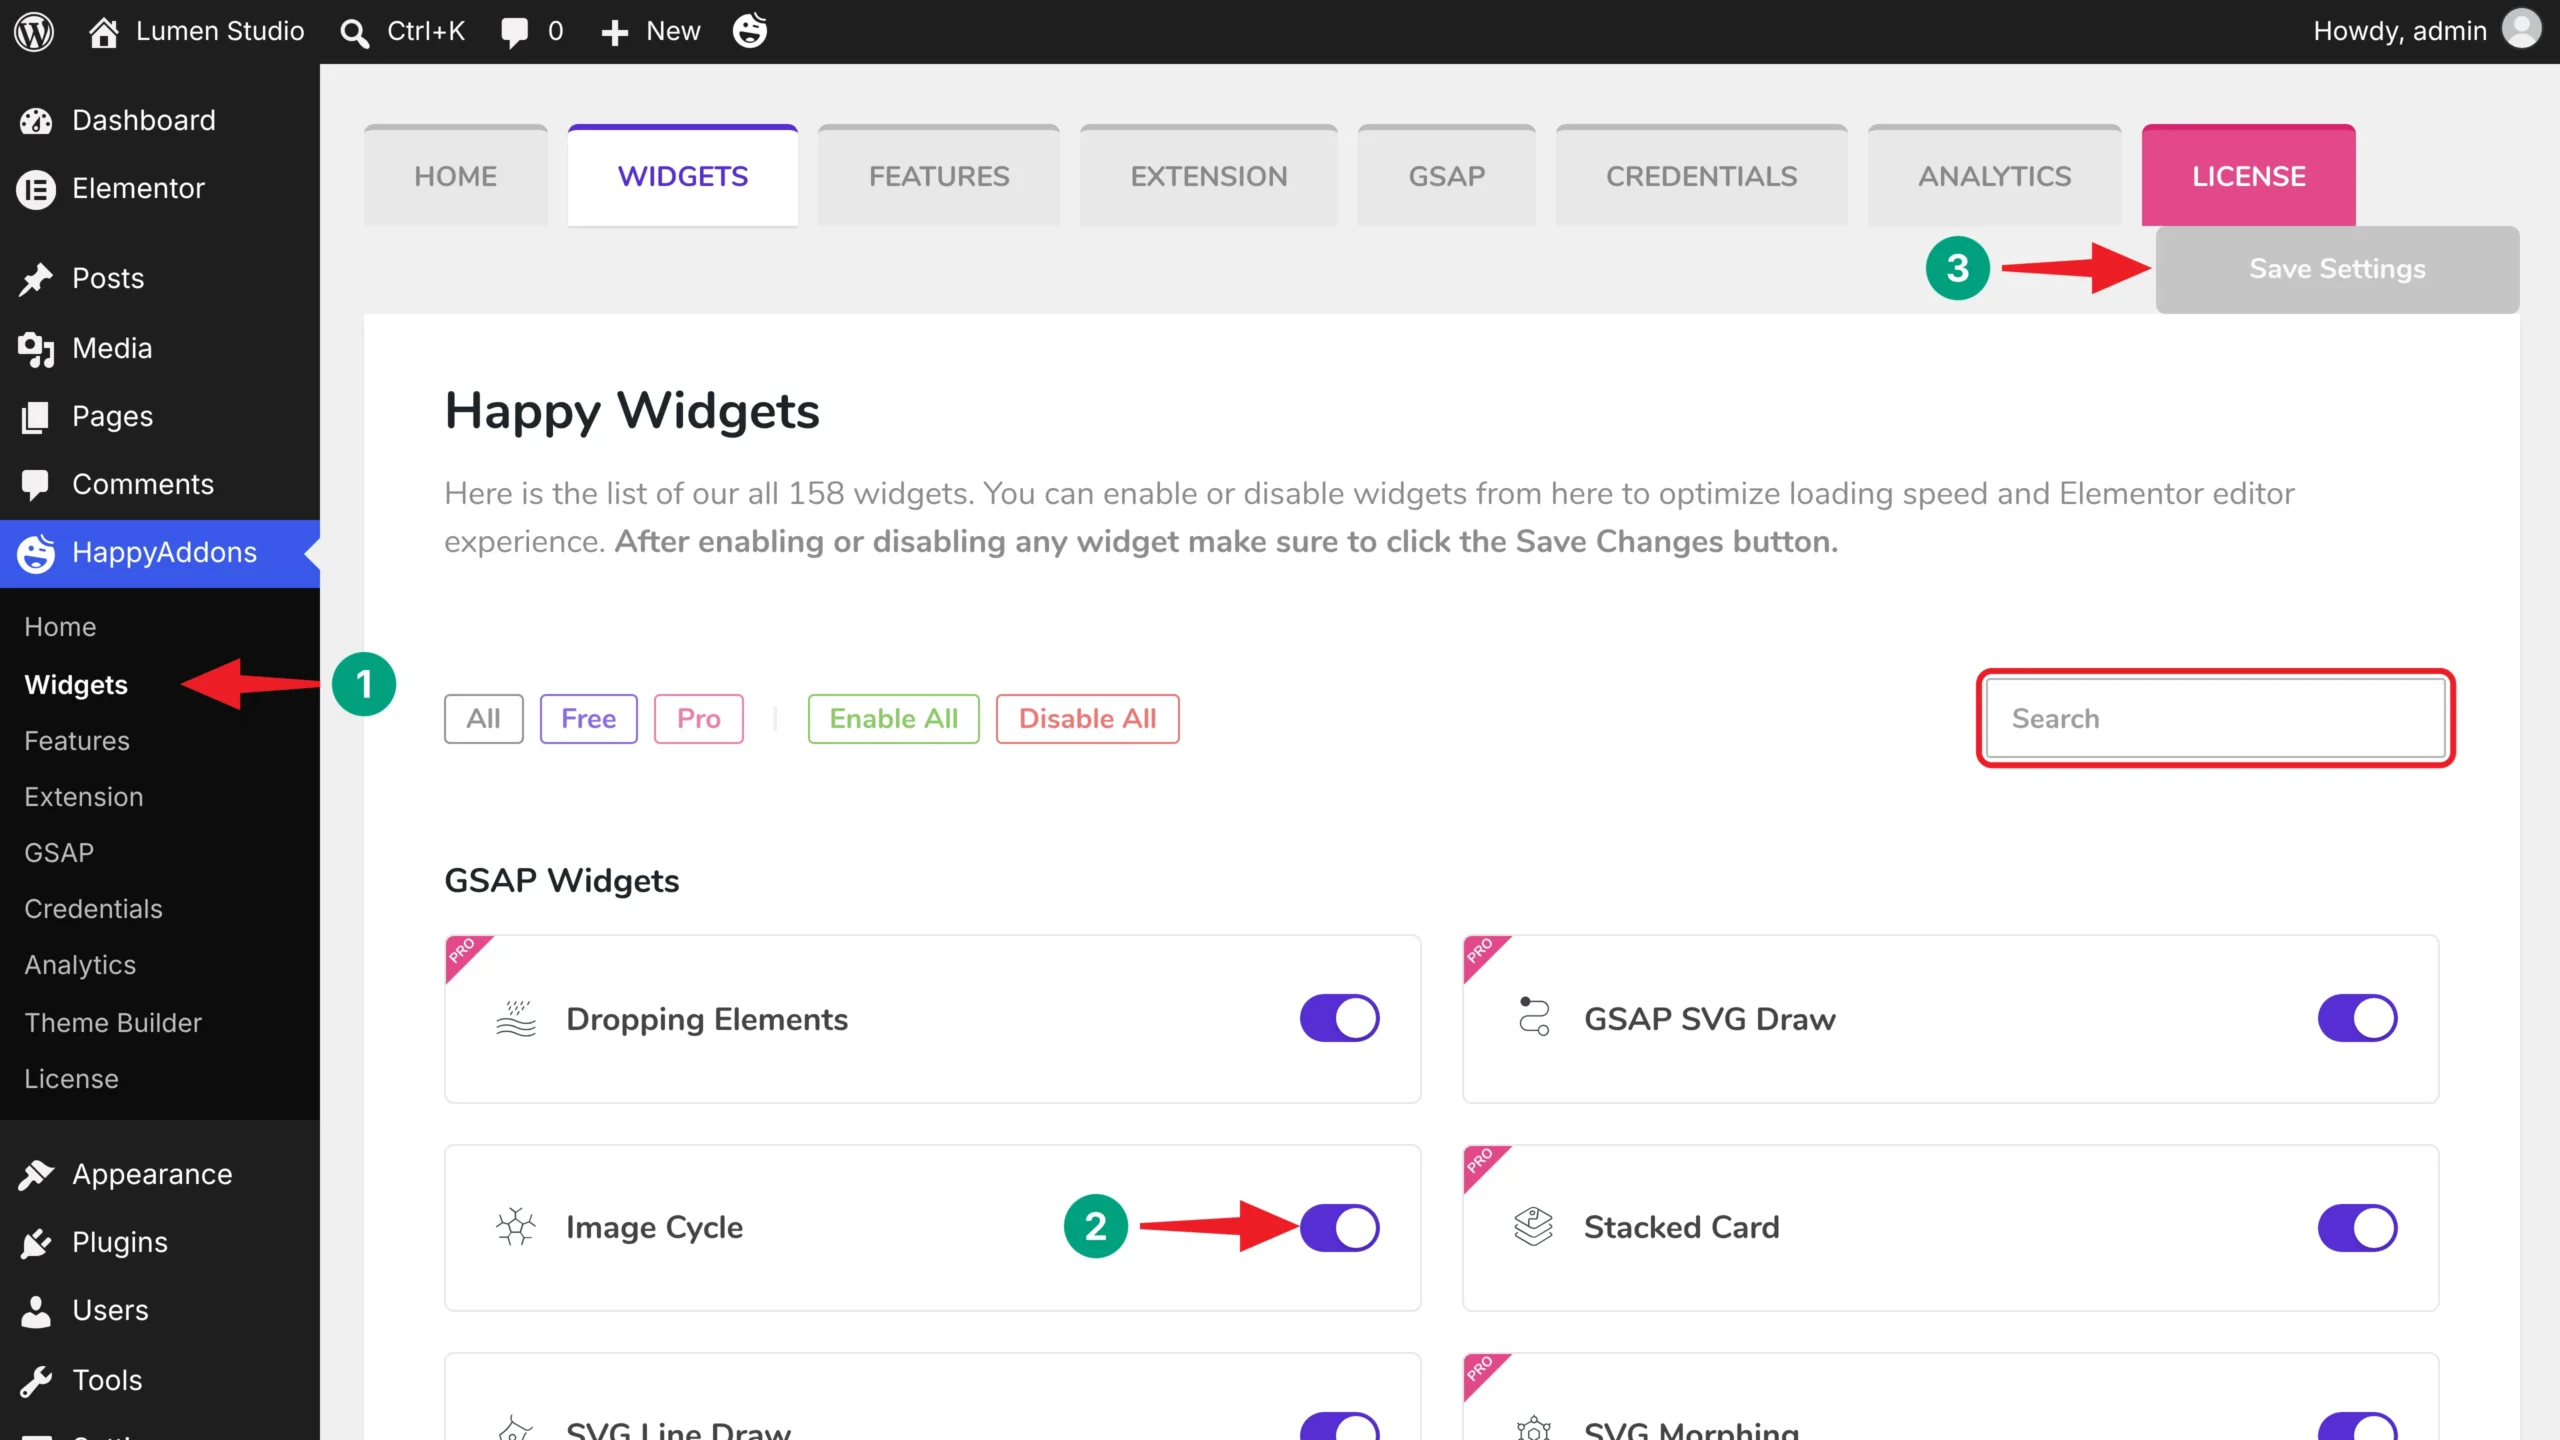
Navigate to HappyAddons > Widgets from your WordPress dashboard. Find the widget, or type its name in the Search box. Then toggle it on and click the Save Settings button.
Step 02: Enable the Features You Need
Go to HappyAddons > Features. Toggle on the features you want, like Text Animation, Happy Mouse Cursor, or Floating Effects, and click Save Settings.
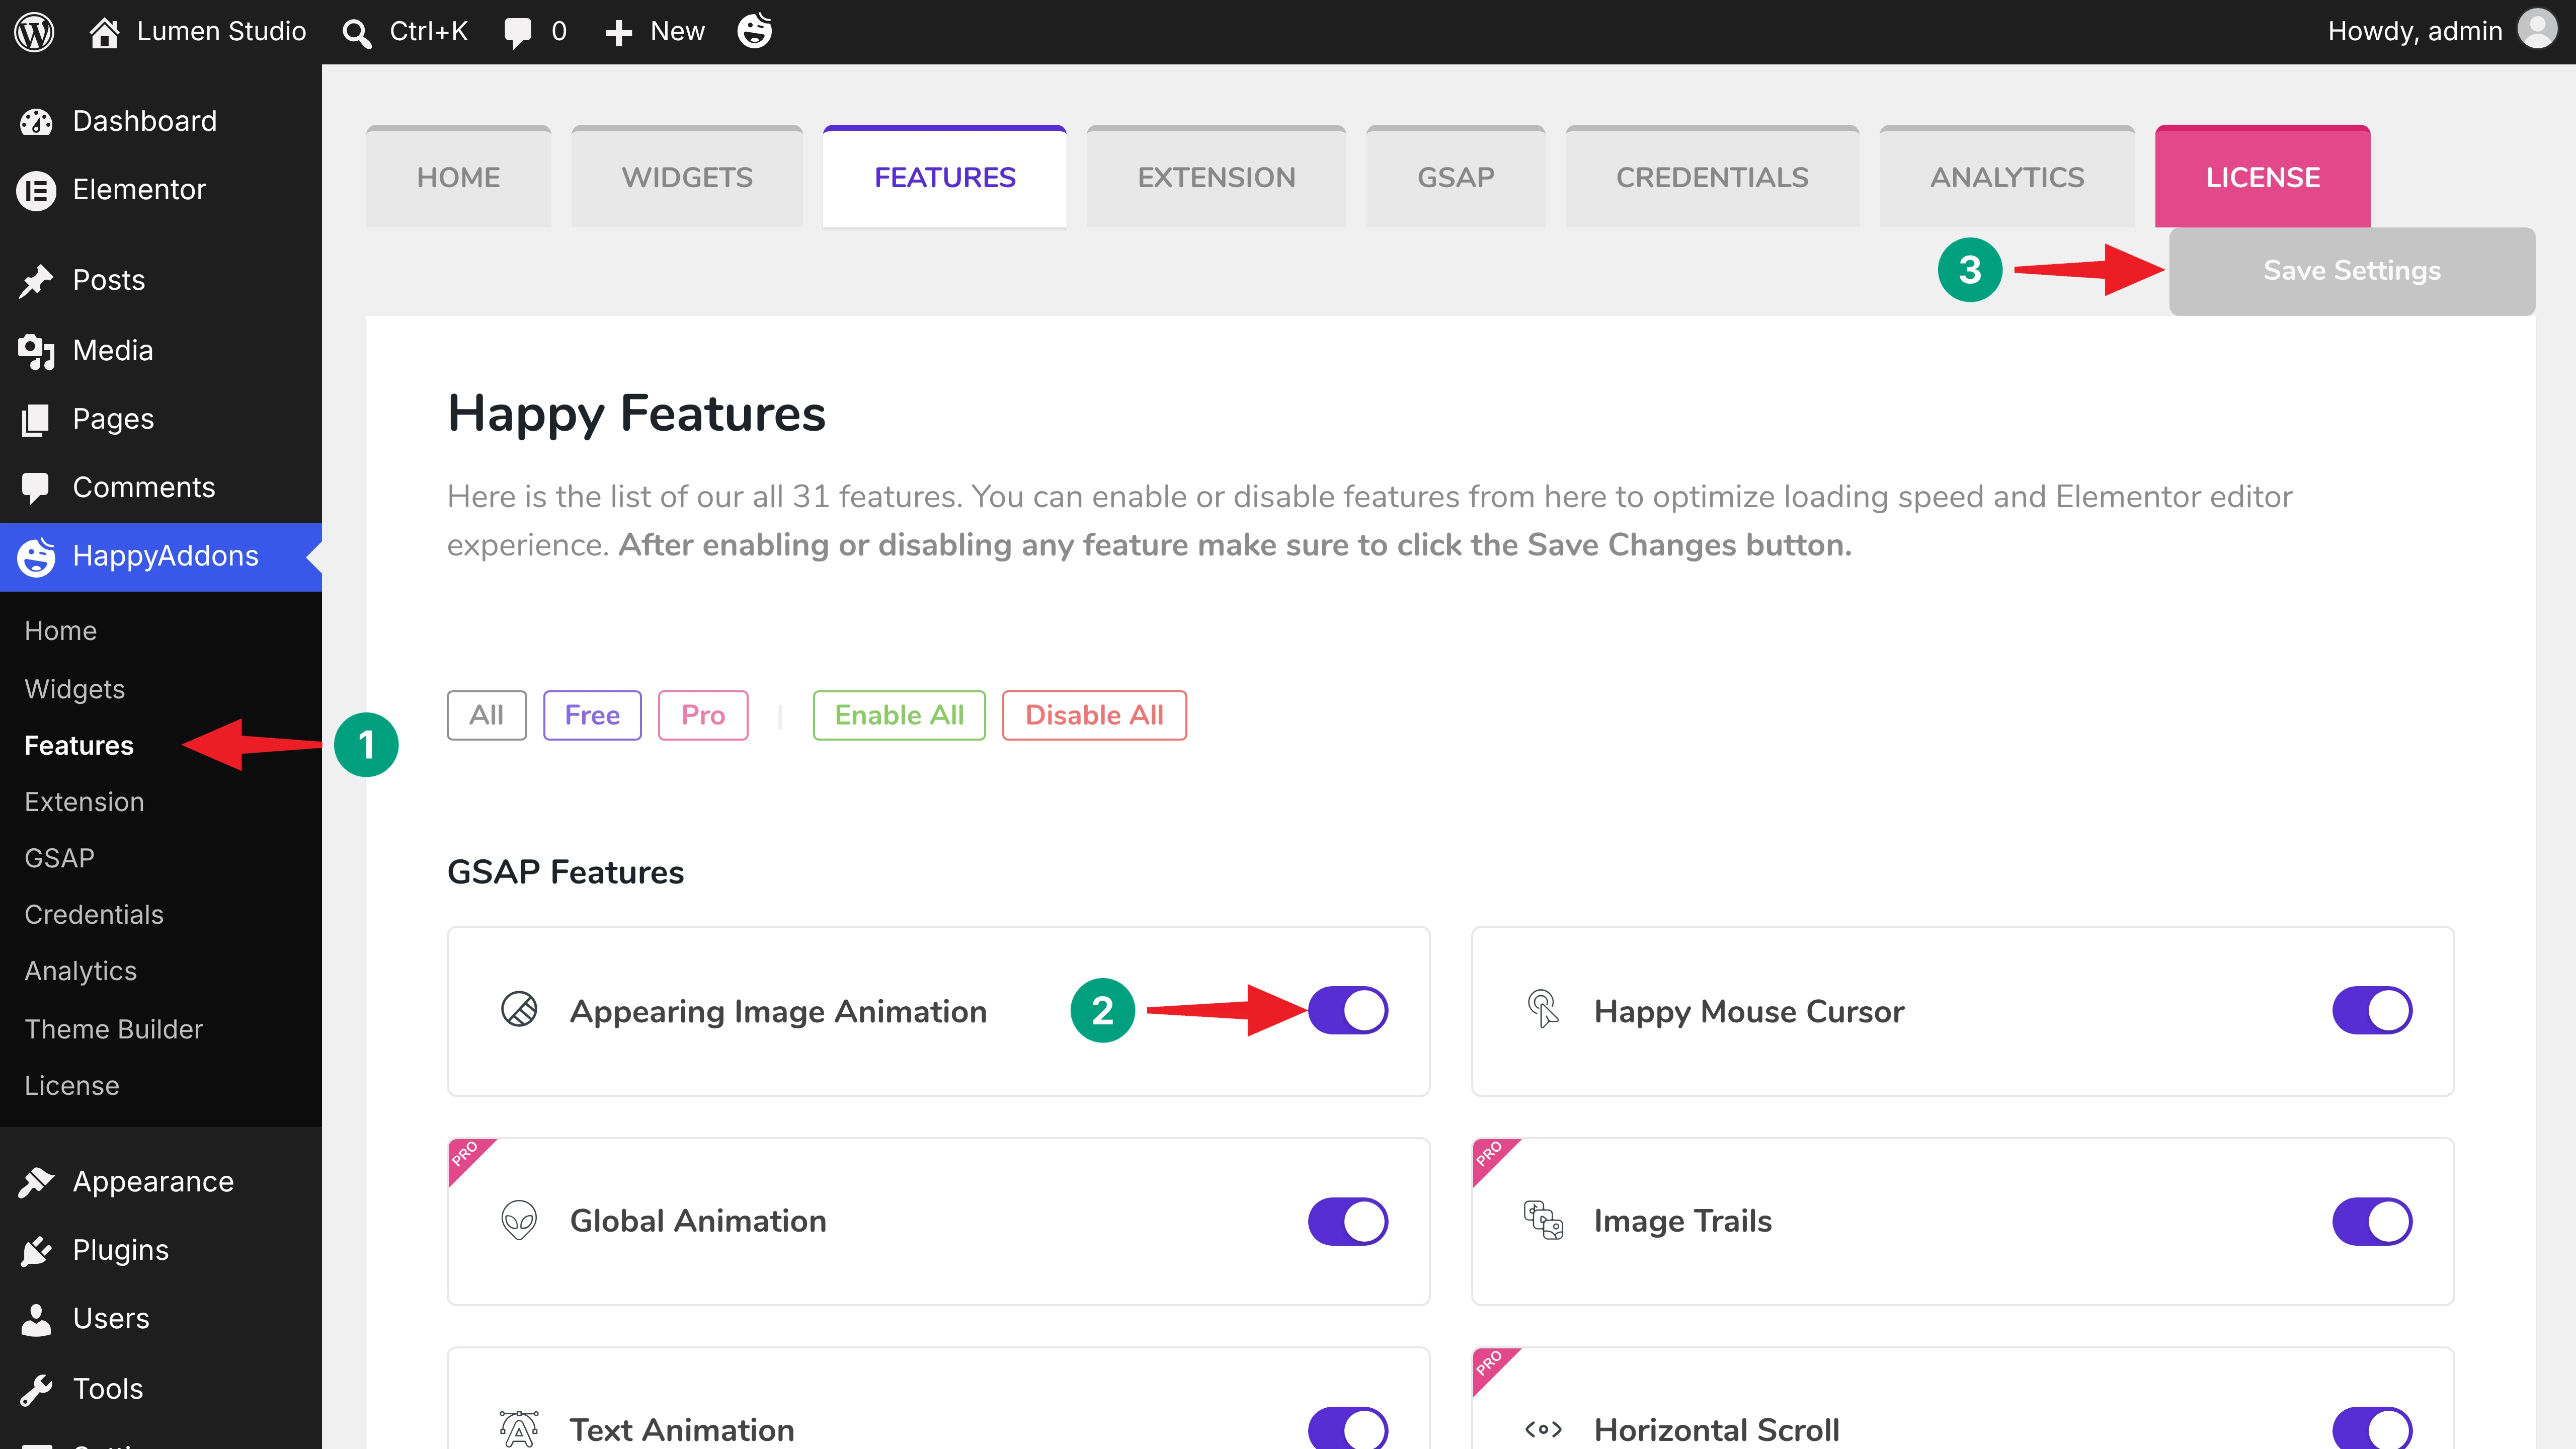
Note: Turn off the widgets and features you don’t use. They won’t load on your site, which keeps your pages fast.
Tips for Building Interactive Websites That Still Load Fast
Interactive effects can make your website more engaging, but too much animation can affect both performance and usability. Follow these tips to create an enjoyable browsing experience without making your pages feel heavy.
a. Use Two or Three Effects per Screen
Avoid adding too many animations to a single screen. They can distract visitors and make it harder to focus on important content. Choose one main effect for each section and keep the remaining elements simple.
b. Match the Effect to the Goal
Every animation should serve a purpose. Use hover effects to reveal extra details, scroll effects to guide visitors through a story, and click effects to save space. Avoid adding motion just for decoration.
c. Test on Mobile
Some interactions work differently on mobile devices. For example, phones don’t support traditional hover actions. Make sure hidden content remains accessible and disable heavy animations on smaller screens to provide a smooth browsing experience.
d. Keep Text Readable
Use animations to highlight important headlines instead of applying them to long paragraphs. Text should appear quickly so visitors can read it without waiting. Keep animation durations short to maintain a smooth reading experience.
e. Turn Off What You Don’t Use
Disable unused HappyAddons widgets and features from the dashboard. This prevents your website from loading unnecessary resources for features you don’t need. Keeping only the required modules active can help maintain better website performance.
FAQ on the Best Elementor Widgets for Interactive Websites

In this section, we have answered some frequently asked questions commonly found on Google, online forums, and social media.
Can I build an interactive website with Elementor for free?
Yes. With Elementor and the free HappyAddons plugin, you get Text Animation, Appearing Image Animation, Image Cycle, Text Scroll, Happy Mouse Cursor, Happy Tooltip, Floating Effects, Image Compare, and Content Switcher at no cost.
Do I need to write code to add these effects?
No. Every effect in this list is set up from the Elementor panel. HappyAddons loads GSAP and the other scripts for you.
Will interactive effects slow down my website?
Not if you use them wisely. Keep two or three effects per screen and disable unused widgets and features in the HappyAddons dashboard so they don’t load.
Do these effects work on mobile?
Yes, most of them do. Hover effects work as taps on phones, and many features, like Text Animation, let you choose whether to run on mobile.
Which HappyAddons items need the Pro version?
From this list, Marquee, Image Trails, Flip Box, Hotspots, Dropping Elements, and Happy Particle Effects need HappyAddons Pro.
Final Thoughts!
Interactive websites hold attention because they react to the visitor. With Elementor and HappyAddons, you can add scroll animations, hover effects, hotspots, before-and-after sliders, and much more, without touching code.
Start small. Add a text animation to your hero, a tooltip or flip box to your features, and one bold effect like a marquee or image cycle. Then test the page on desktop and mobile before you publish.
If you have any questions, mention them in the comment box below. You can also give a knock on our live chat box. Thanks for being with us till the end.