



Scroll is the one thing every visitor does on your website. GSAP ScrollTrigger turns that scroll into a timeline, so images can grow, text can slide in, and whole sections can pin in place as the page moves.
These scroll-based effects are what make product launch pages and award-winning portfolios feel so smooth. Until recently, building them meant writing JavaScript by hand, and that’s exactly what our users tell us they want to avoid.
Elementor is one of the most user-friendly drag-and-drop page builders, and HappyAddons brings ScrollTrigger right into its panel. In this blog post, we’ll show you how to use GSAP ScrollTrigger in Elementor for advanced animations, step by step and without code. Let’s get started!
What Is GSAP ScrollTrigger?
GSAP (GreenSock Animation Platform) is one of the most popular JavaScript animation libraries on the web. ScrollTrigger is its official plugin for scroll-based animation. It watches an element and plays, scrubs, or pins an animation when that element reaches a point in the viewport.
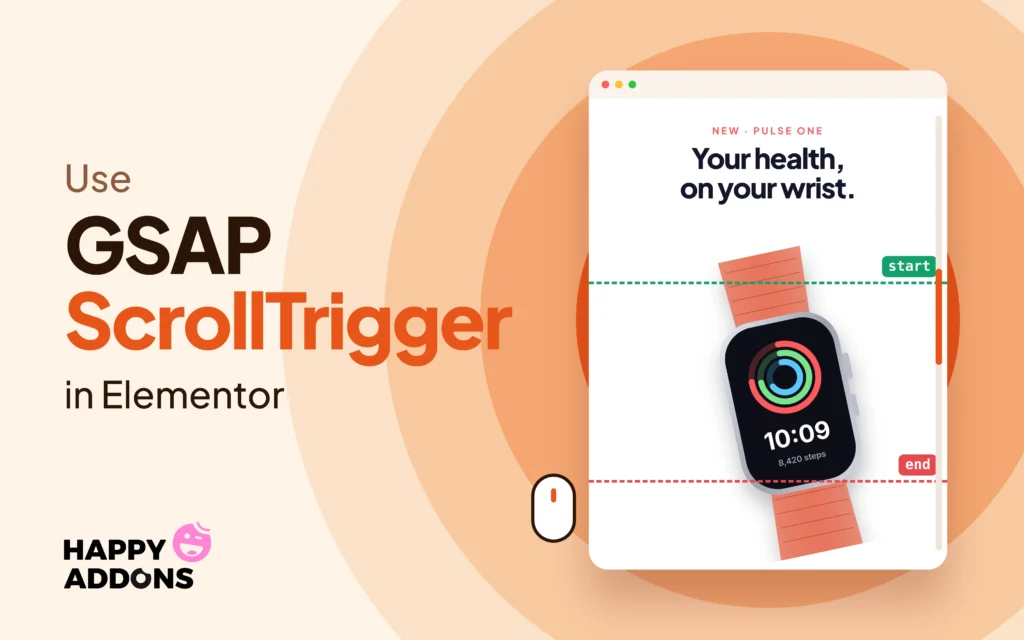
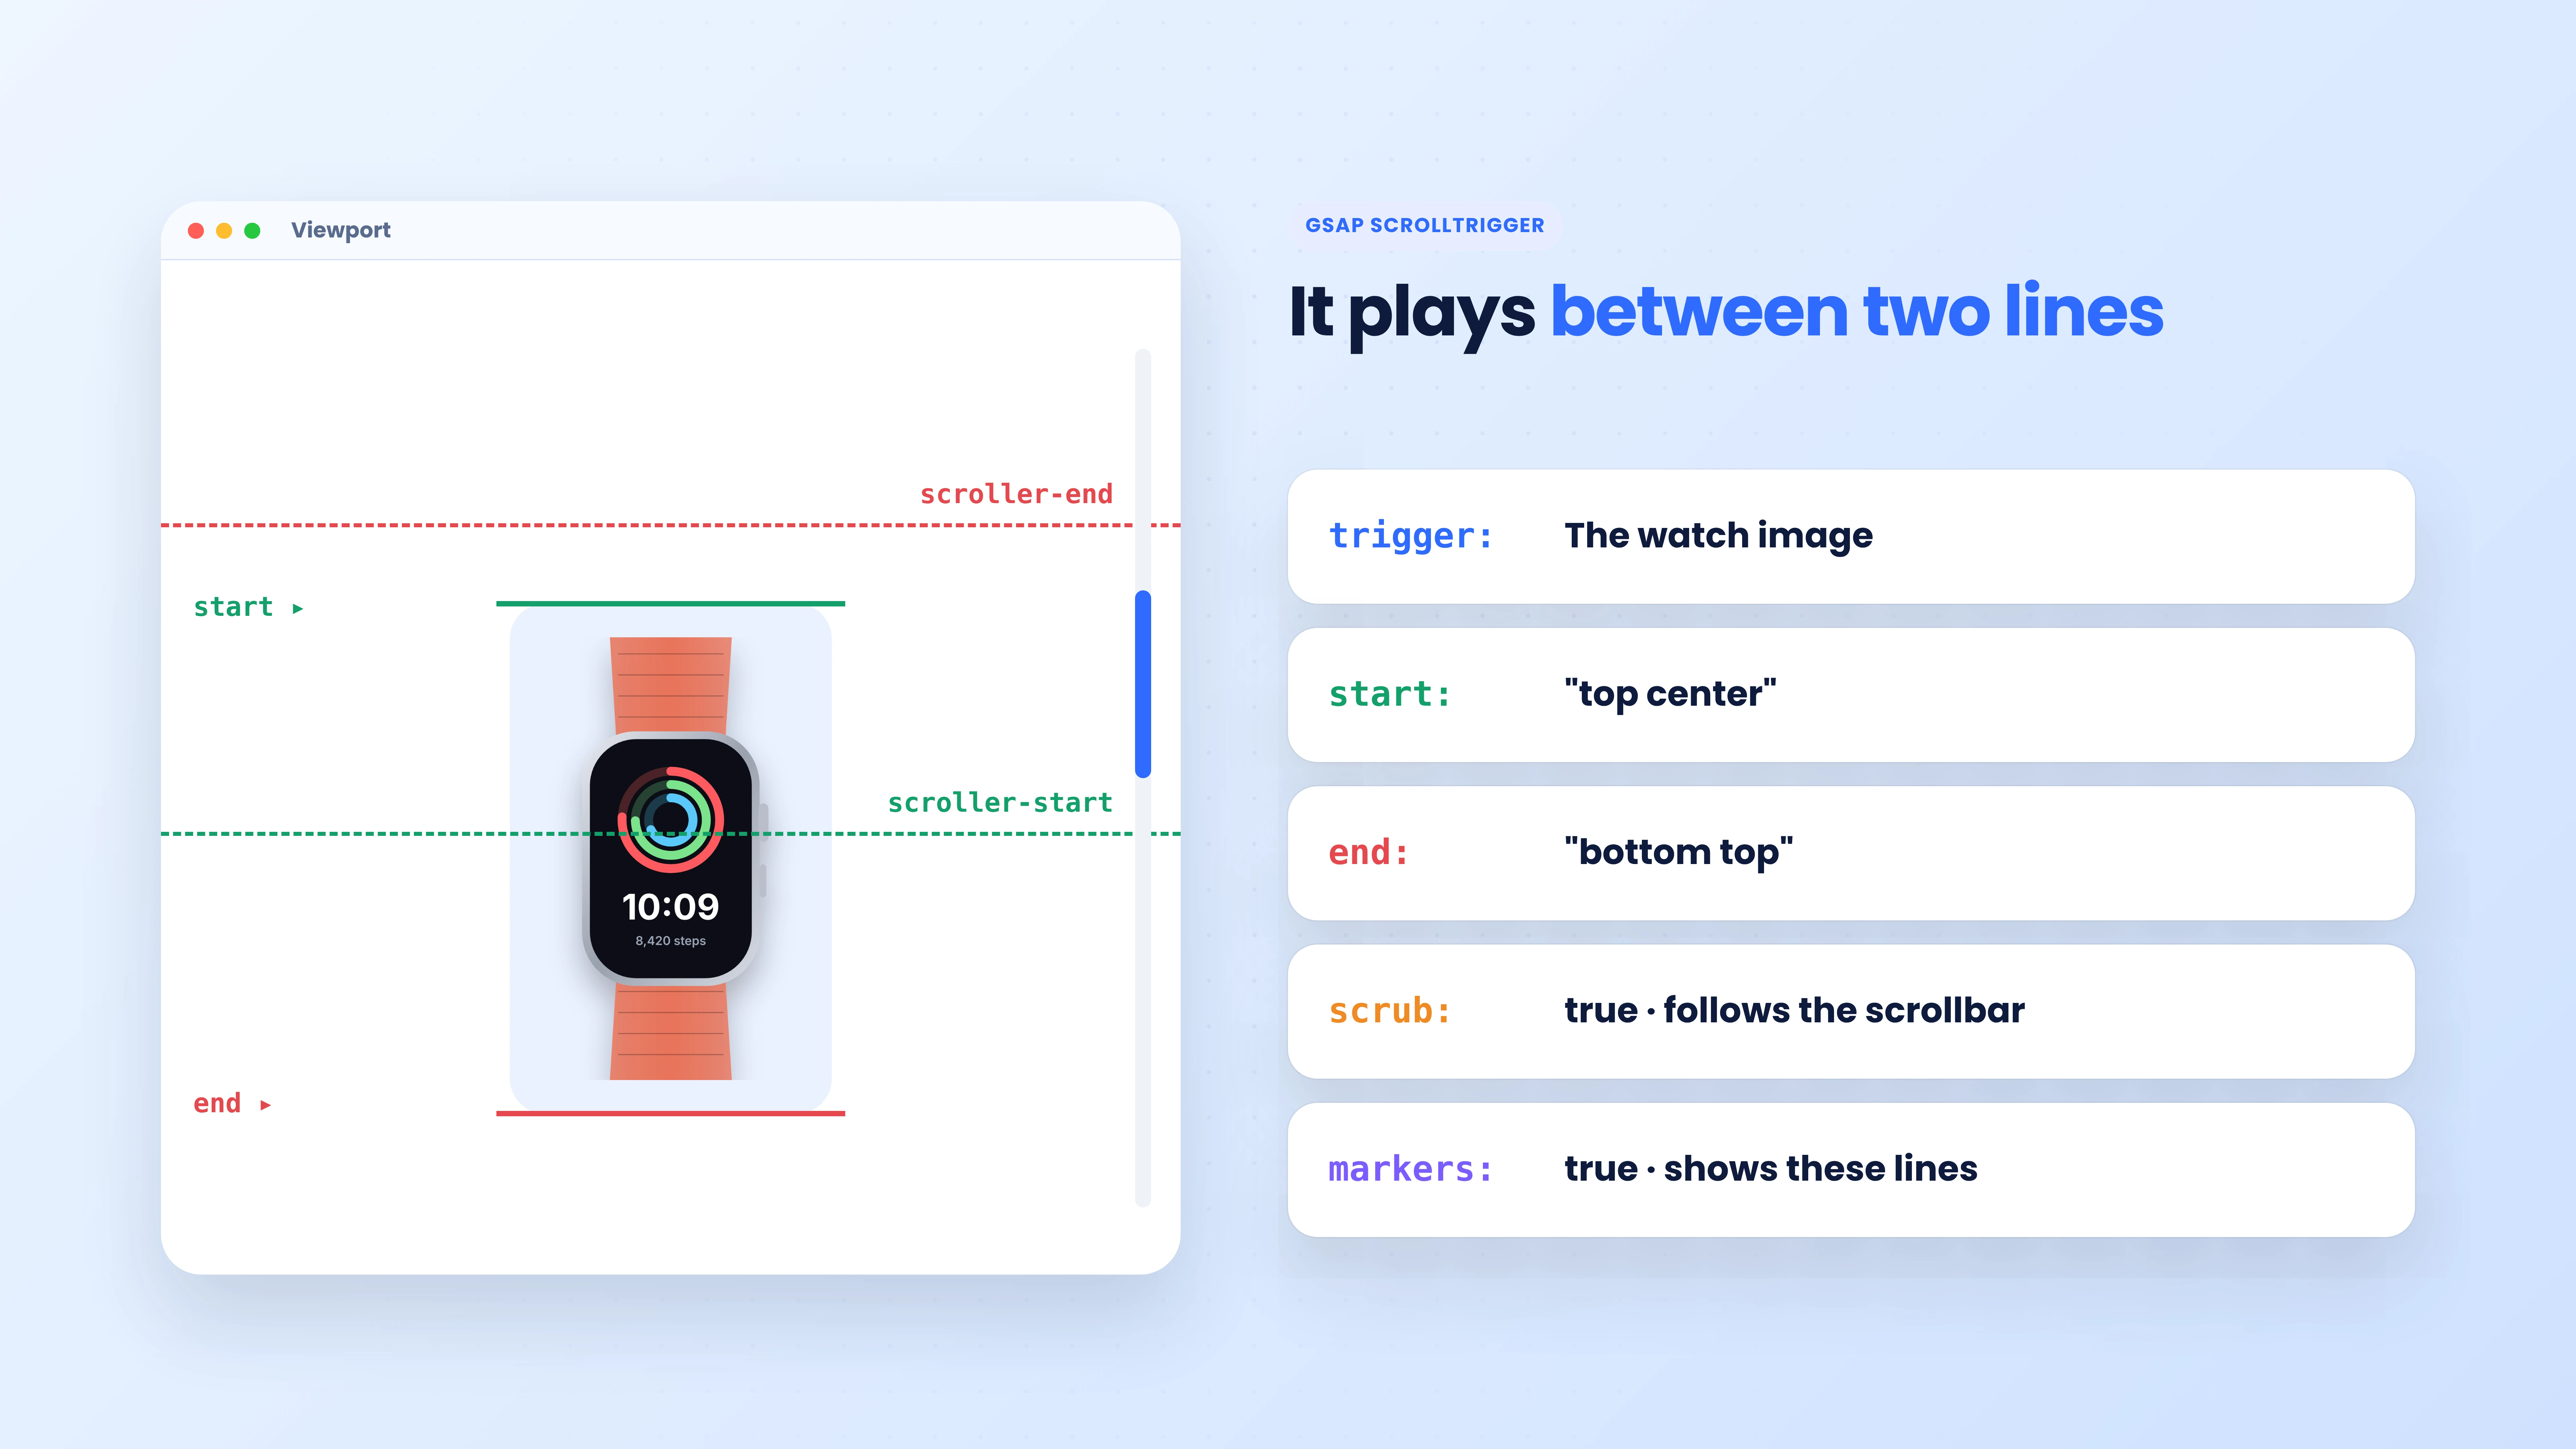
Every ScrollTrigger animation answers three questions: which element starts it, where it starts, and where it ends. The diagram below shows how those points work.
a. Trigger Element
The trigger is the element ScrollTrigger watches, usually the widget or container you are animating. When this element moves into the zone you set, the animation reacts to the visitor’s scroll.
b. Start and End Points
A start like “top center” means the animation begins when the element’s top meets the center of the screen. The end point works the same way and decides where the animation finishes.
c. Scrub or Play Once
With scrub, the animation follows the scrollbar, moving forward and backward with the visitor. Without scrub, it plays once from start to finish as soon as the element enters the zone.
ScrollTrigger Settings Explained: GSAP vs HappyAddons
If you have seen ScrollTrigger code before, this table shows where each option lives in HappyAddons. If you haven’t, it is a handy cheat sheet for the steps below.
| ScrollTrigger option | What it does | Where to find it in HappyAddons |
|---|---|---|
| trigger | The element that starts the animation | The widget or container you select |
| start / end | Where the animation begins and finishes | Animation Start / Animation End (Wrapper: Custom) |
| scrub | Ties the animation to the scrollbar | Trigger Mode: On Scroll |
| toggleActions (play once) | Plays the animation when the element appears | Trigger Mode: On Appearing |
| markers | Shows start and end lines for debugging | Markers switch |
| ease | Controls the speed curve | Easing Functions |
| pin | Holds an element in place while the page scrolls | Sticky Pin Element feature |
| Horizontal pin + scrub | Moves a row sideways as you scroll down | Horizontal Scroll feature |
Advanced Scroll Animations You Can Build in Elementor
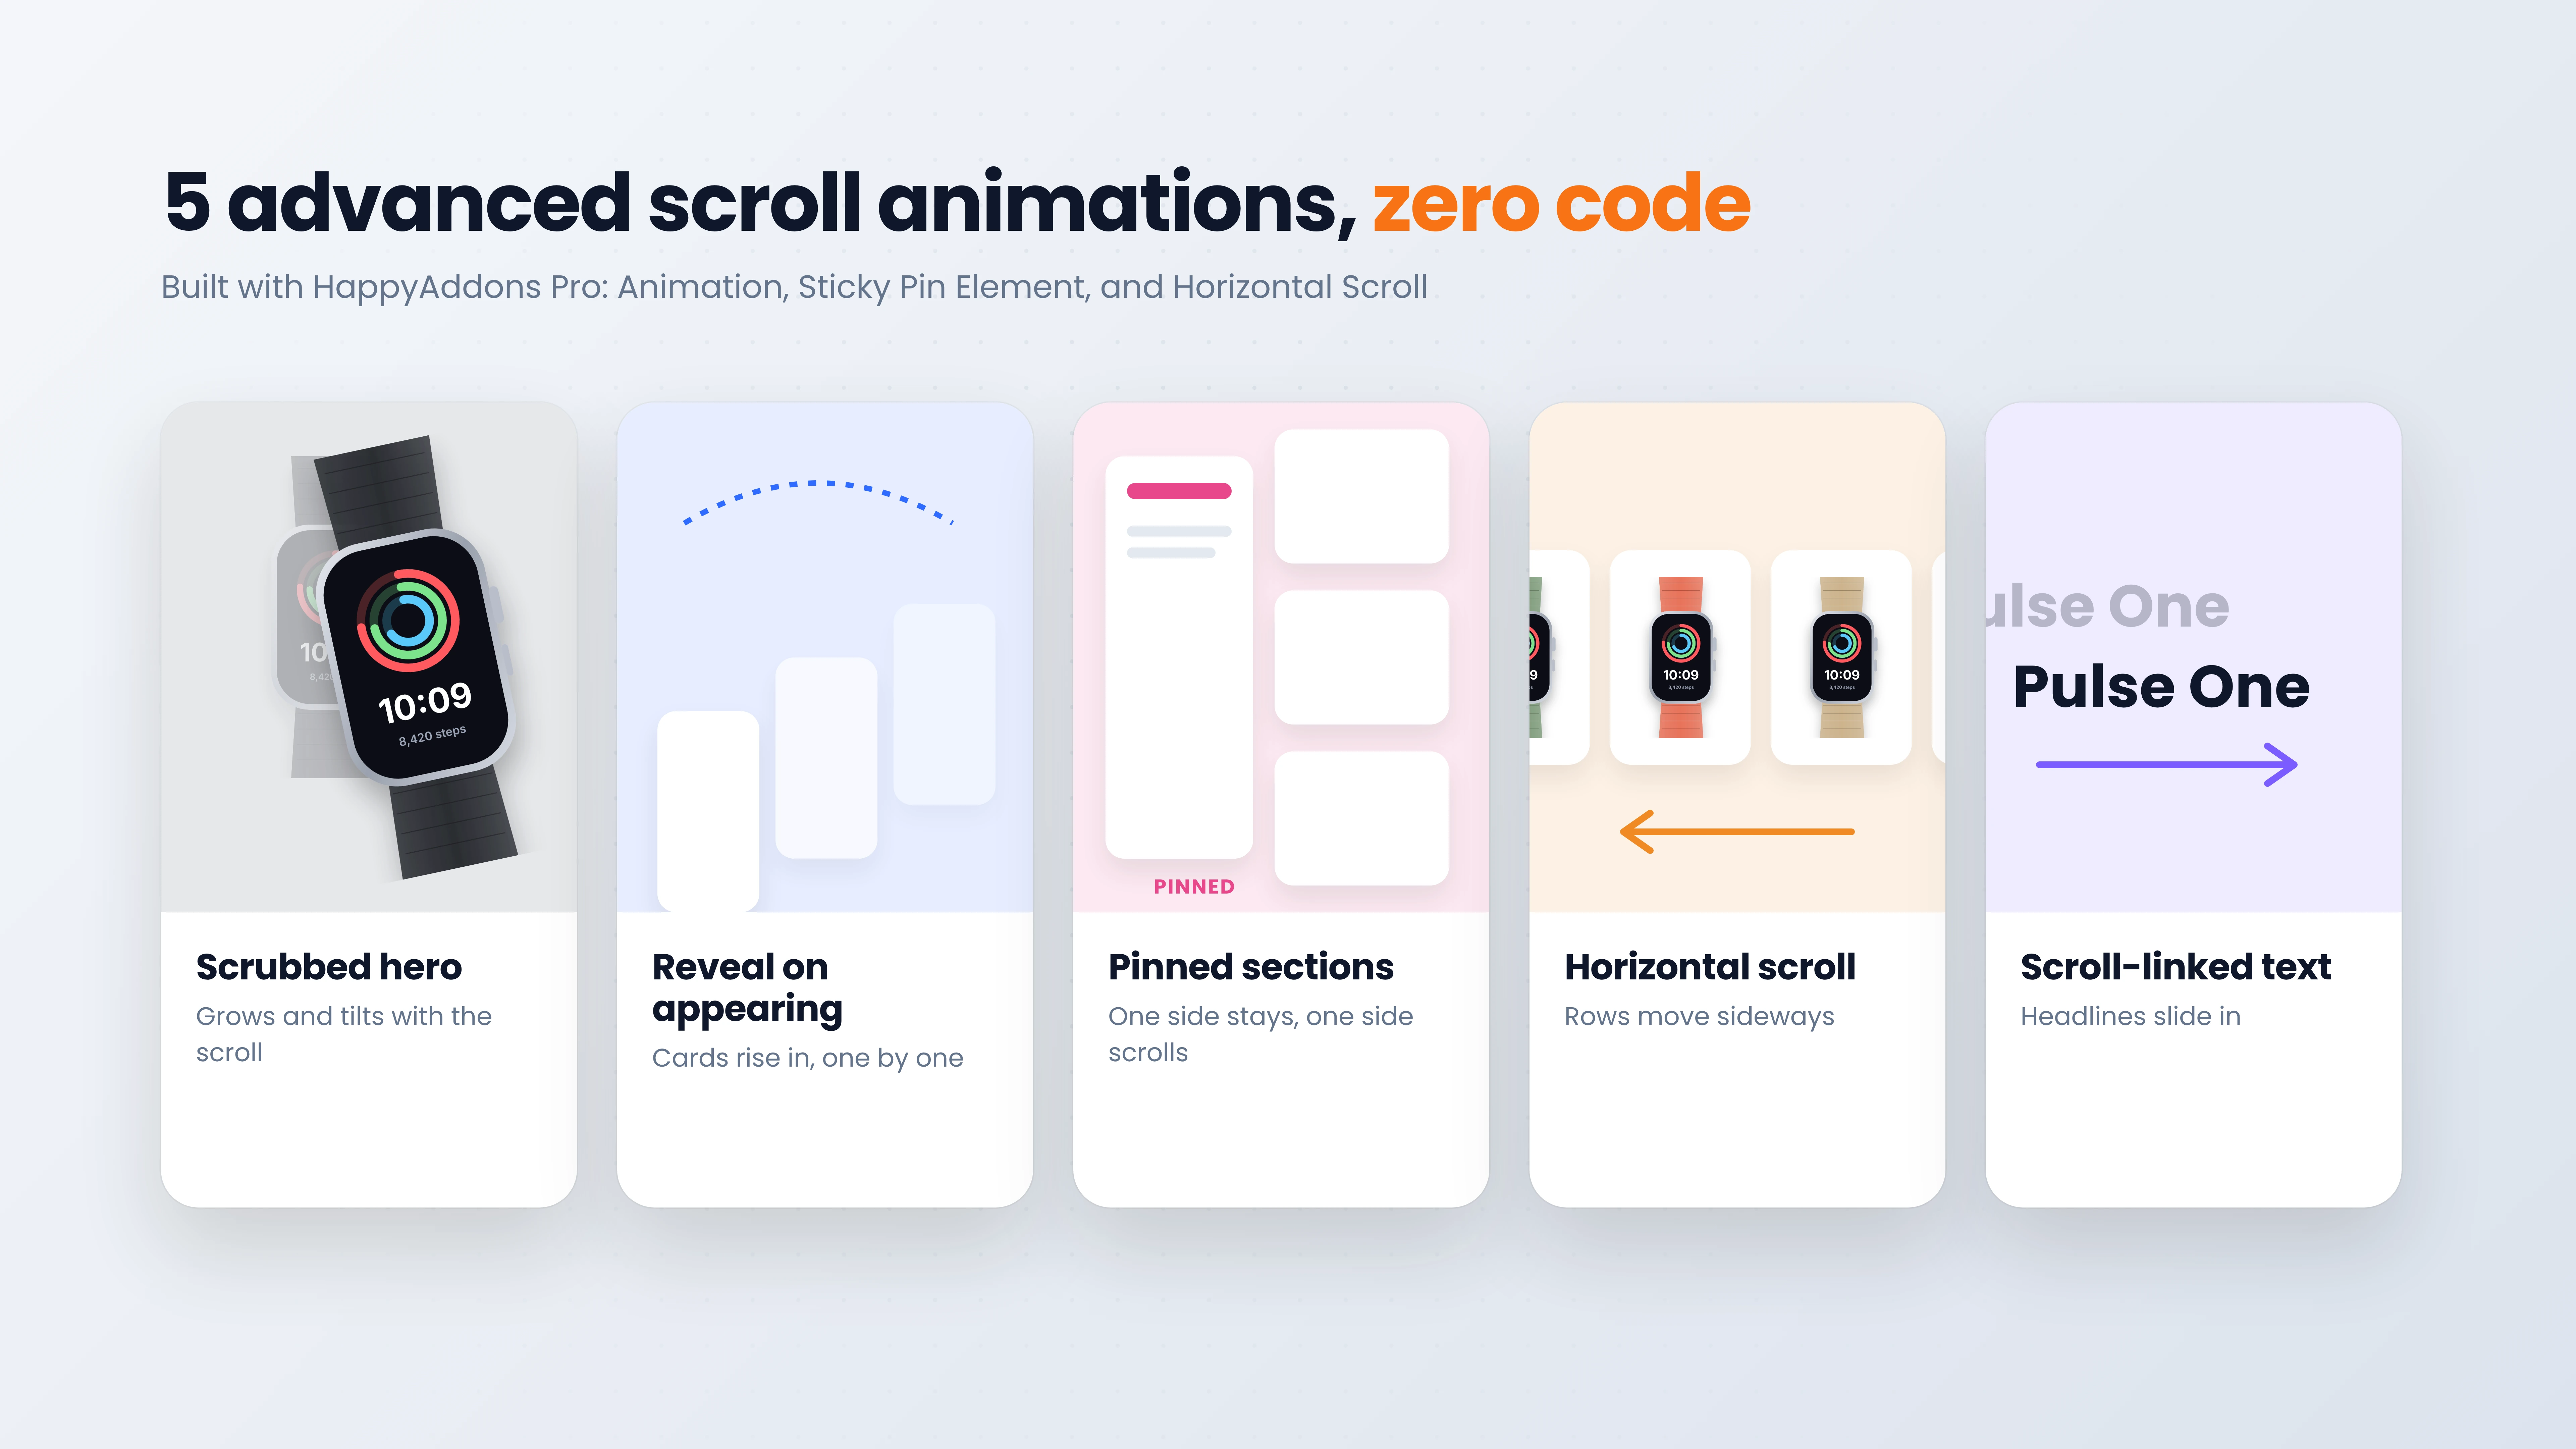
ScrollTrigger is not just for fading things in. Here are five advanced effects you can build with HappyAddons, all of which you’ll create in the tutorial.
a. Scrubbed Hero Animations
A product image grows, tilts, or moves as the visitor scrolls past the hero. Because it is tied to the scrollbar, visitors control the speed, and the effect feels natural instead of distracting.
b. Reveal on Appearing
Cards, images, and headings rise or fade in once when they enter the screen. Add a small delay to each card, and they appear one after another for a polished, staggered look.
c. Pinned Storytelling Sections
One column stays fixed while the other scrolls past it. This is perfect for feature lists, case studies, and step-by-step stories where the main message should stay in view.
d. Horizontal Scroll Galleries
A row of cards moves sideways while visitors keep scrolling down. It works great for product colors, portfolios, timelines, and team members without making the page any longer.
e. Scroll-Linked Text Effects
Headlines slide in from the sides, or fade and lift away, as the visitor scrolls. These effects add drama to calls to action and section intros while keeping the text easy to read.
How to Use GSAP ScrollTrigger in Elementor (Step by Step)
Elementor’s built-in motion effects don’t give you ScrollTrigger’s start and end points, scrub, markers, or pinning. HappyAddons Pro adds three GSAP features that do: Animation, Sticky Pin Element, and Horizontal Scroll. HappyAddons comes with 160+ widgets and 40+ features in total.
Prerequisites
- Elementor (Free)
- HappyAddons (Free)
- HappyAddons Pro
Note: You need HappyAddons Pro because the Animation, Sticky Pin Element, and Horizontal Scroll features are Pro features.
For the tutorial, we built a launch page for Pulse One, a made-up smartwatch. Once these plugins are ready on your site, start following the tutorial explained below.
Step 01: Enable the GSAP Scroll Features
Navigate to HappyAddons > Features from your WordPress dashboard. Under GSAP Features, toggle on Global Animation, Horizontal Scroll, and Sticky Pin Element. Then click the Save Settings button.
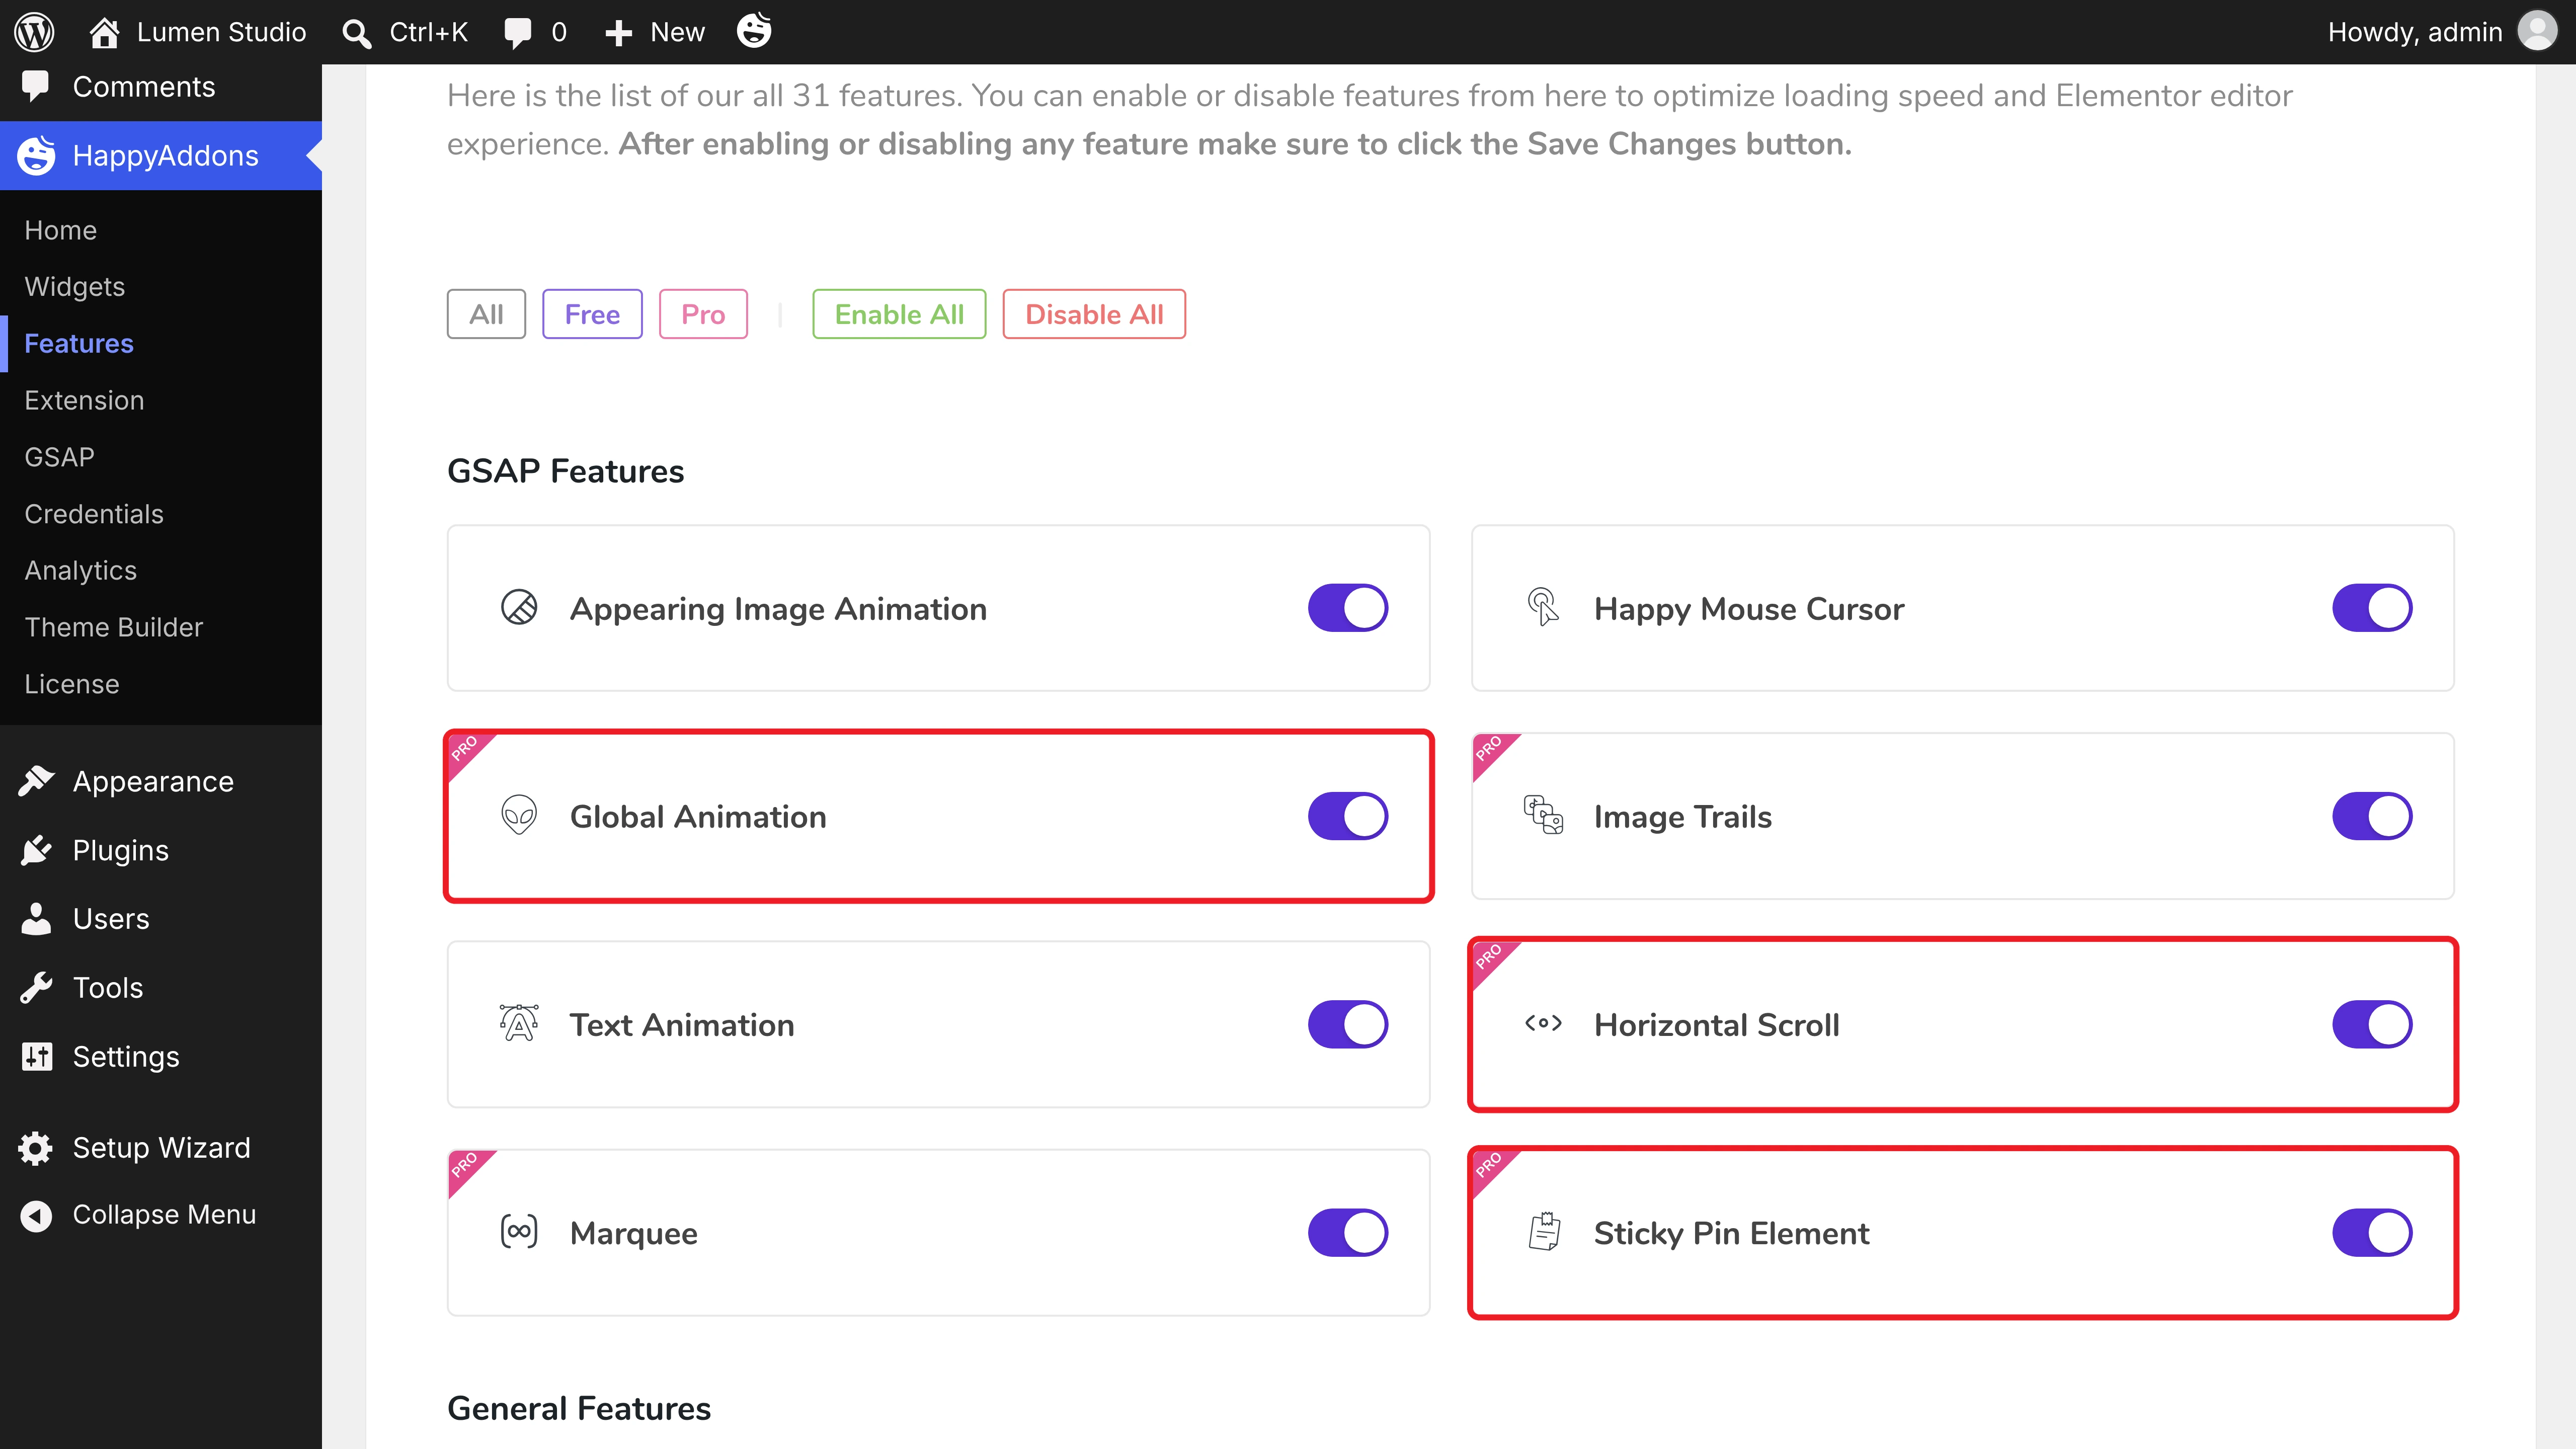
Note: In the Elementor panel, the Global Animation feature appears as the Animation section.
Step 02: Add a Scroll-Linked Animation to the Hero
Open your page with Elementor and select the element you want to animate. We selected the watch image in the hero. Go to Advanced > Animation and toggle on Enable.
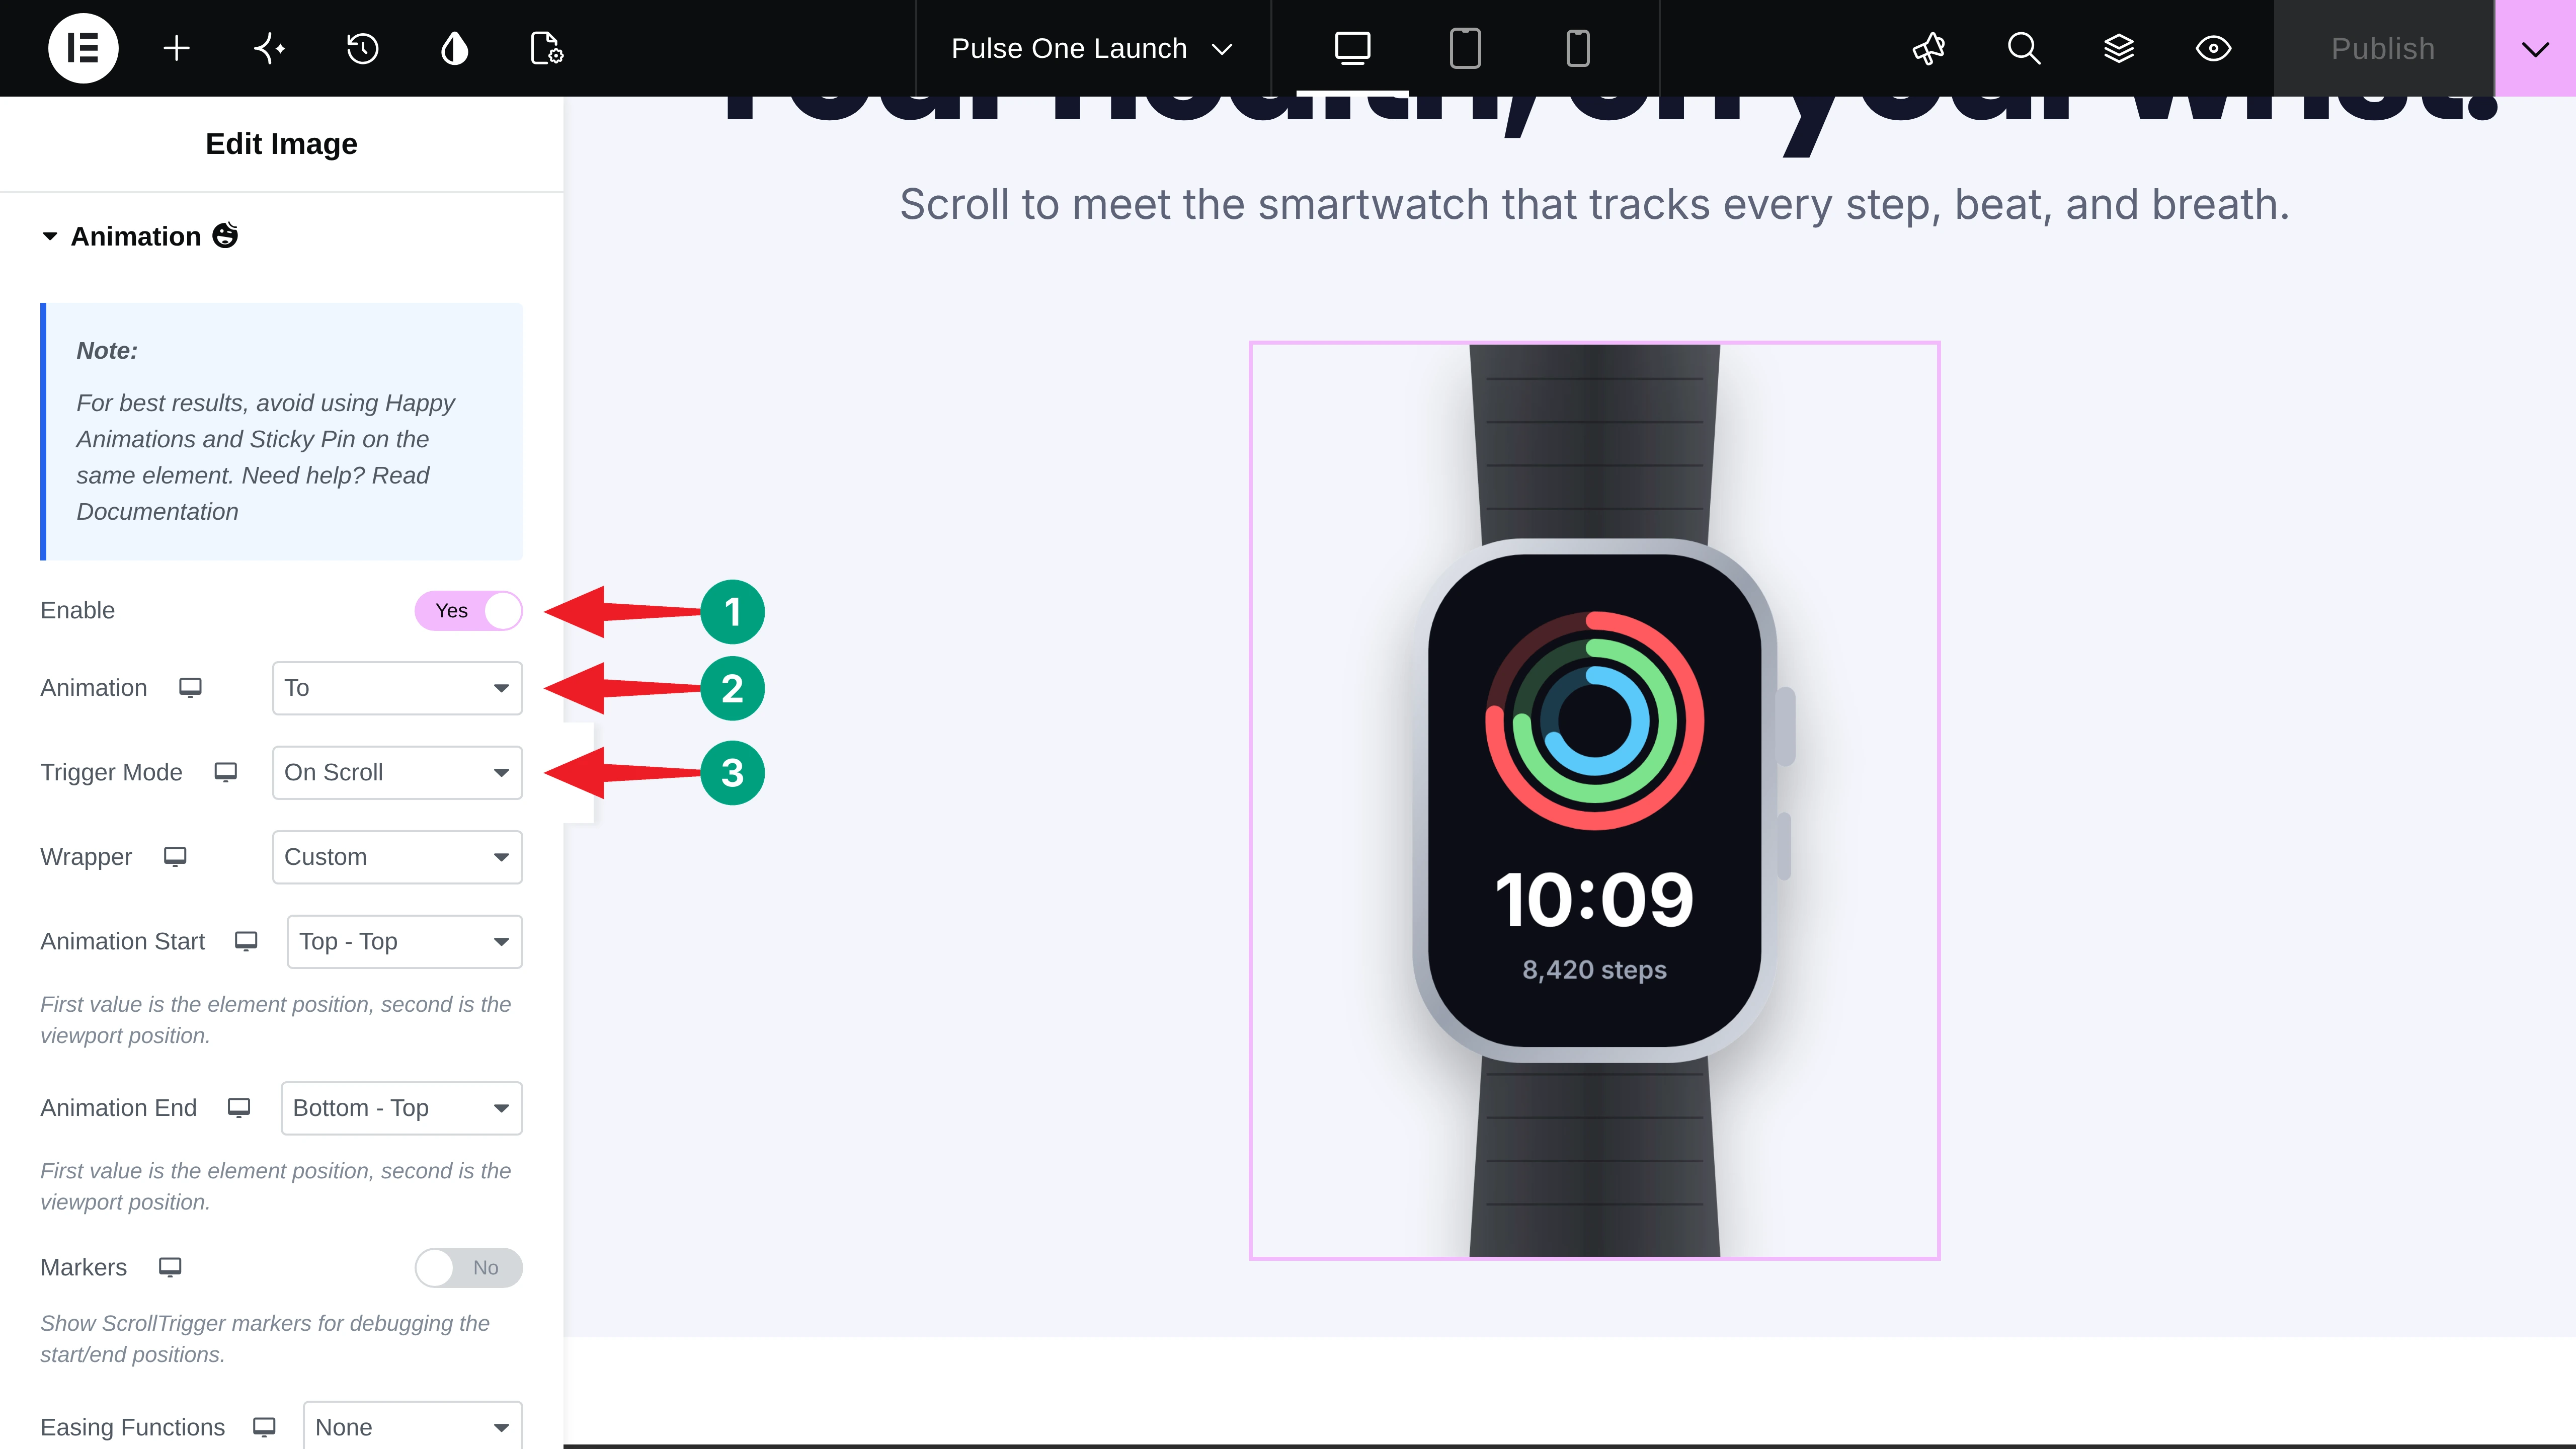
Set Animation to To, which animates the element from its normal state to the values you add. Choose On Scroll as the Trigger Mode. This is ScrollTrigger’s scrub mode, so the animation follows the scrollbar.
Note: From works the other way around. The element starts at your values and animates back to its normal state.
Step 03: Choose What to Animate with Custom Properties
Scroll down to Custom Properties. Click + Add Item, pick a Property, and set its Value. You can animate opacity, position, scale, rotation, blur, colors, and more.
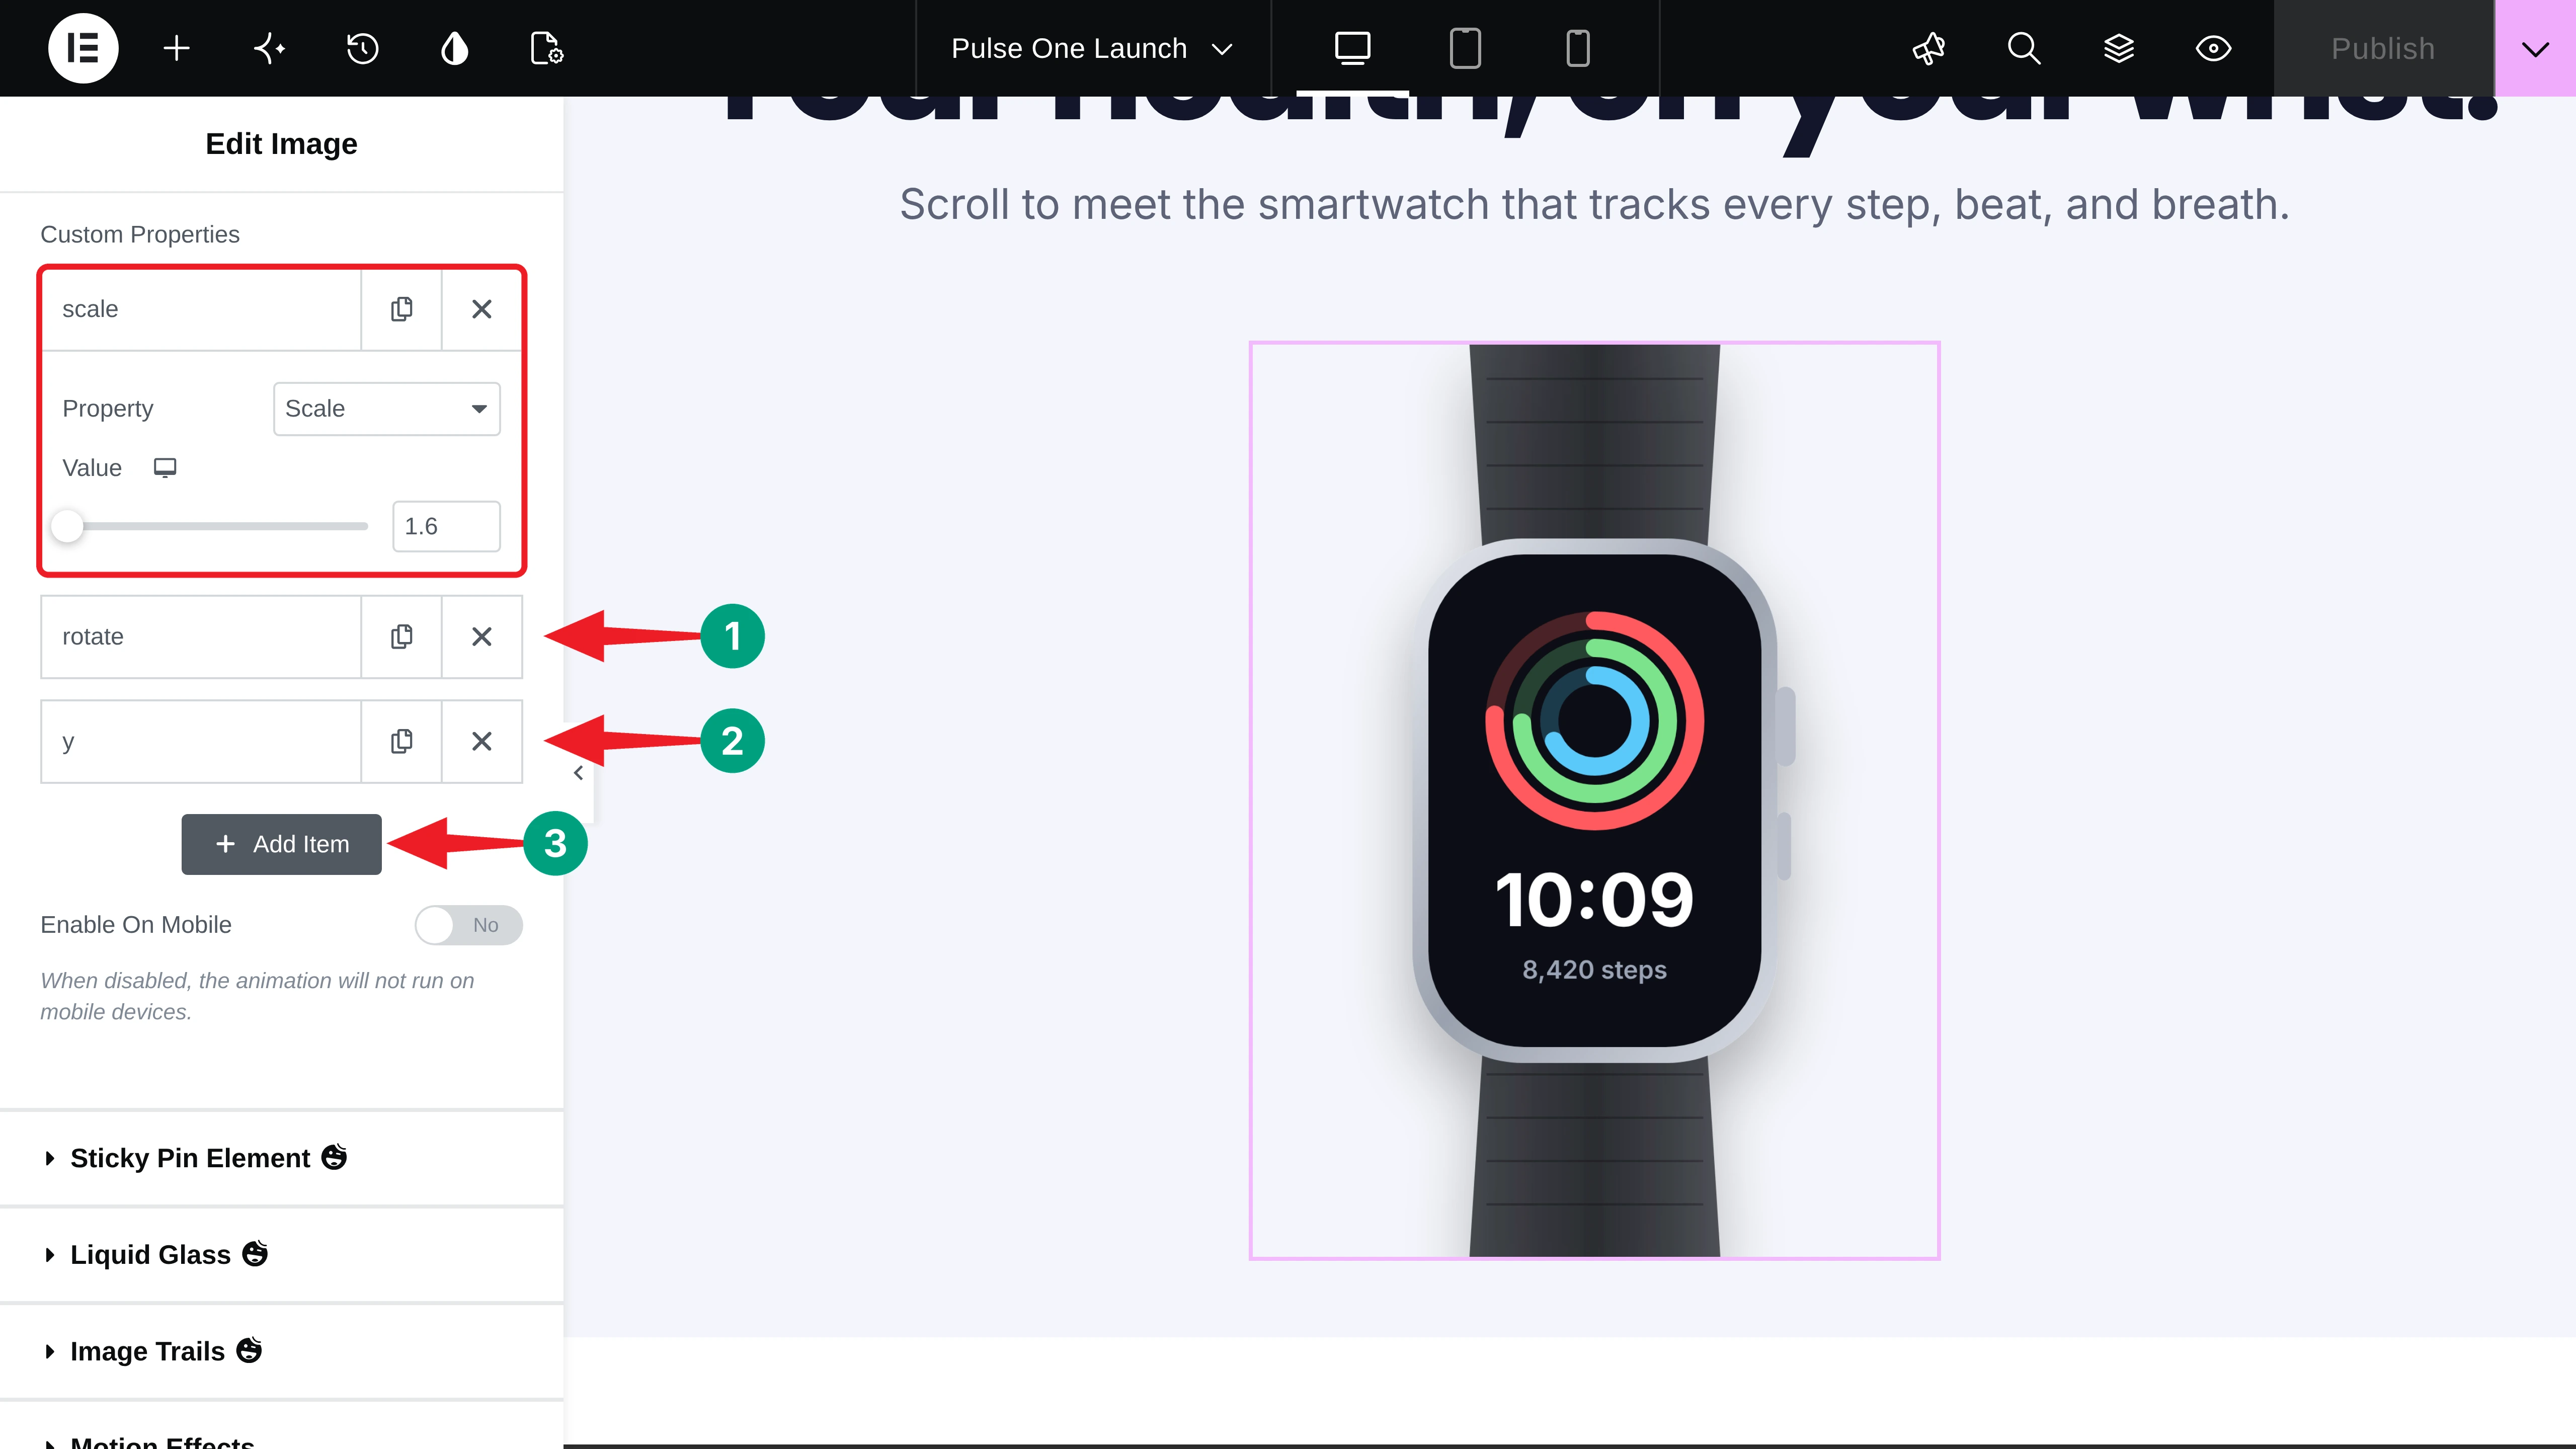
We added three properties: scale at 1.6, rotate at -14, and y at 260 pixels. As the visitor scrolls, the watch grows, tilts, and drops toward the next section.
Step 04: Set the Start and End Points
By default, the animation starts when the element’s top reaches 85% of the way down the screen. To control it yourself, set Wrapper to Custom. Now choose the Animation Start and Animation End positions.
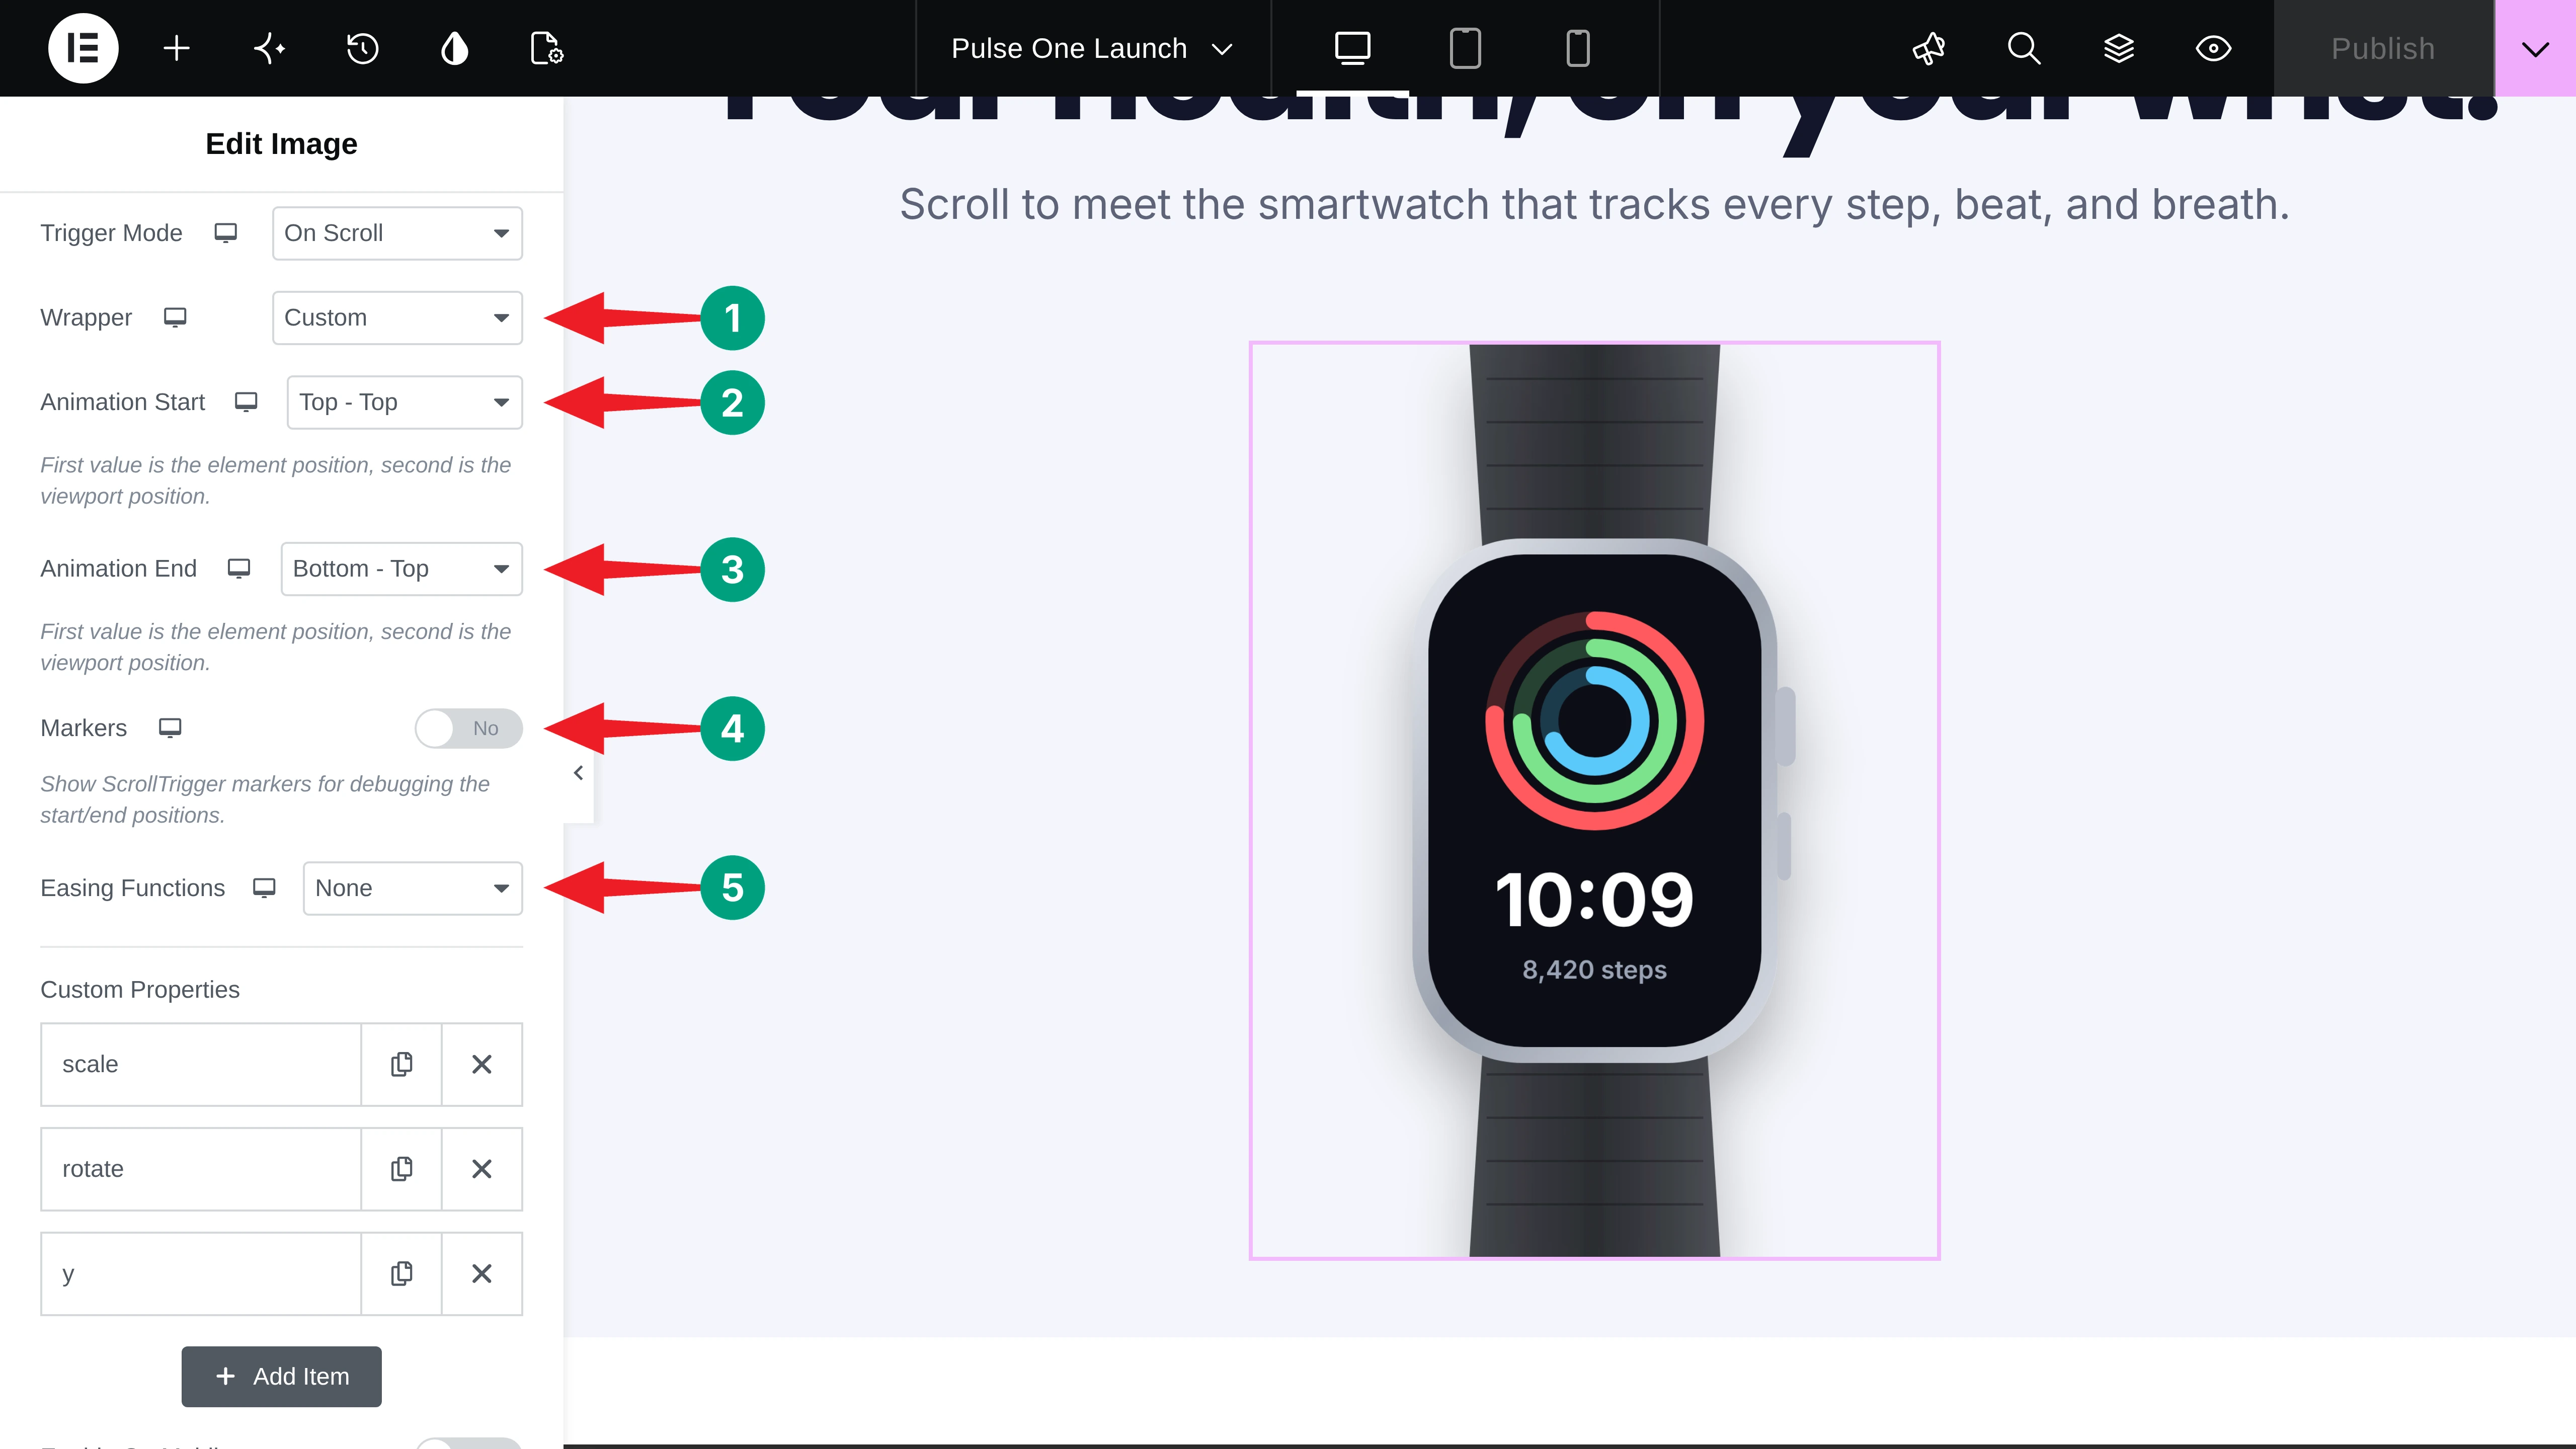
Each option has two words. The first is a point on the element, and the second is a point on the screen. We used Top – Top to start when the element’s top touches the top of the screen, and Bottom – Top to end when its bottom leaves the screen.
Toggle on Markers while you work. ScrollTrigger then draws the start and end lines on your page, so you can see exactly where the animation plays.
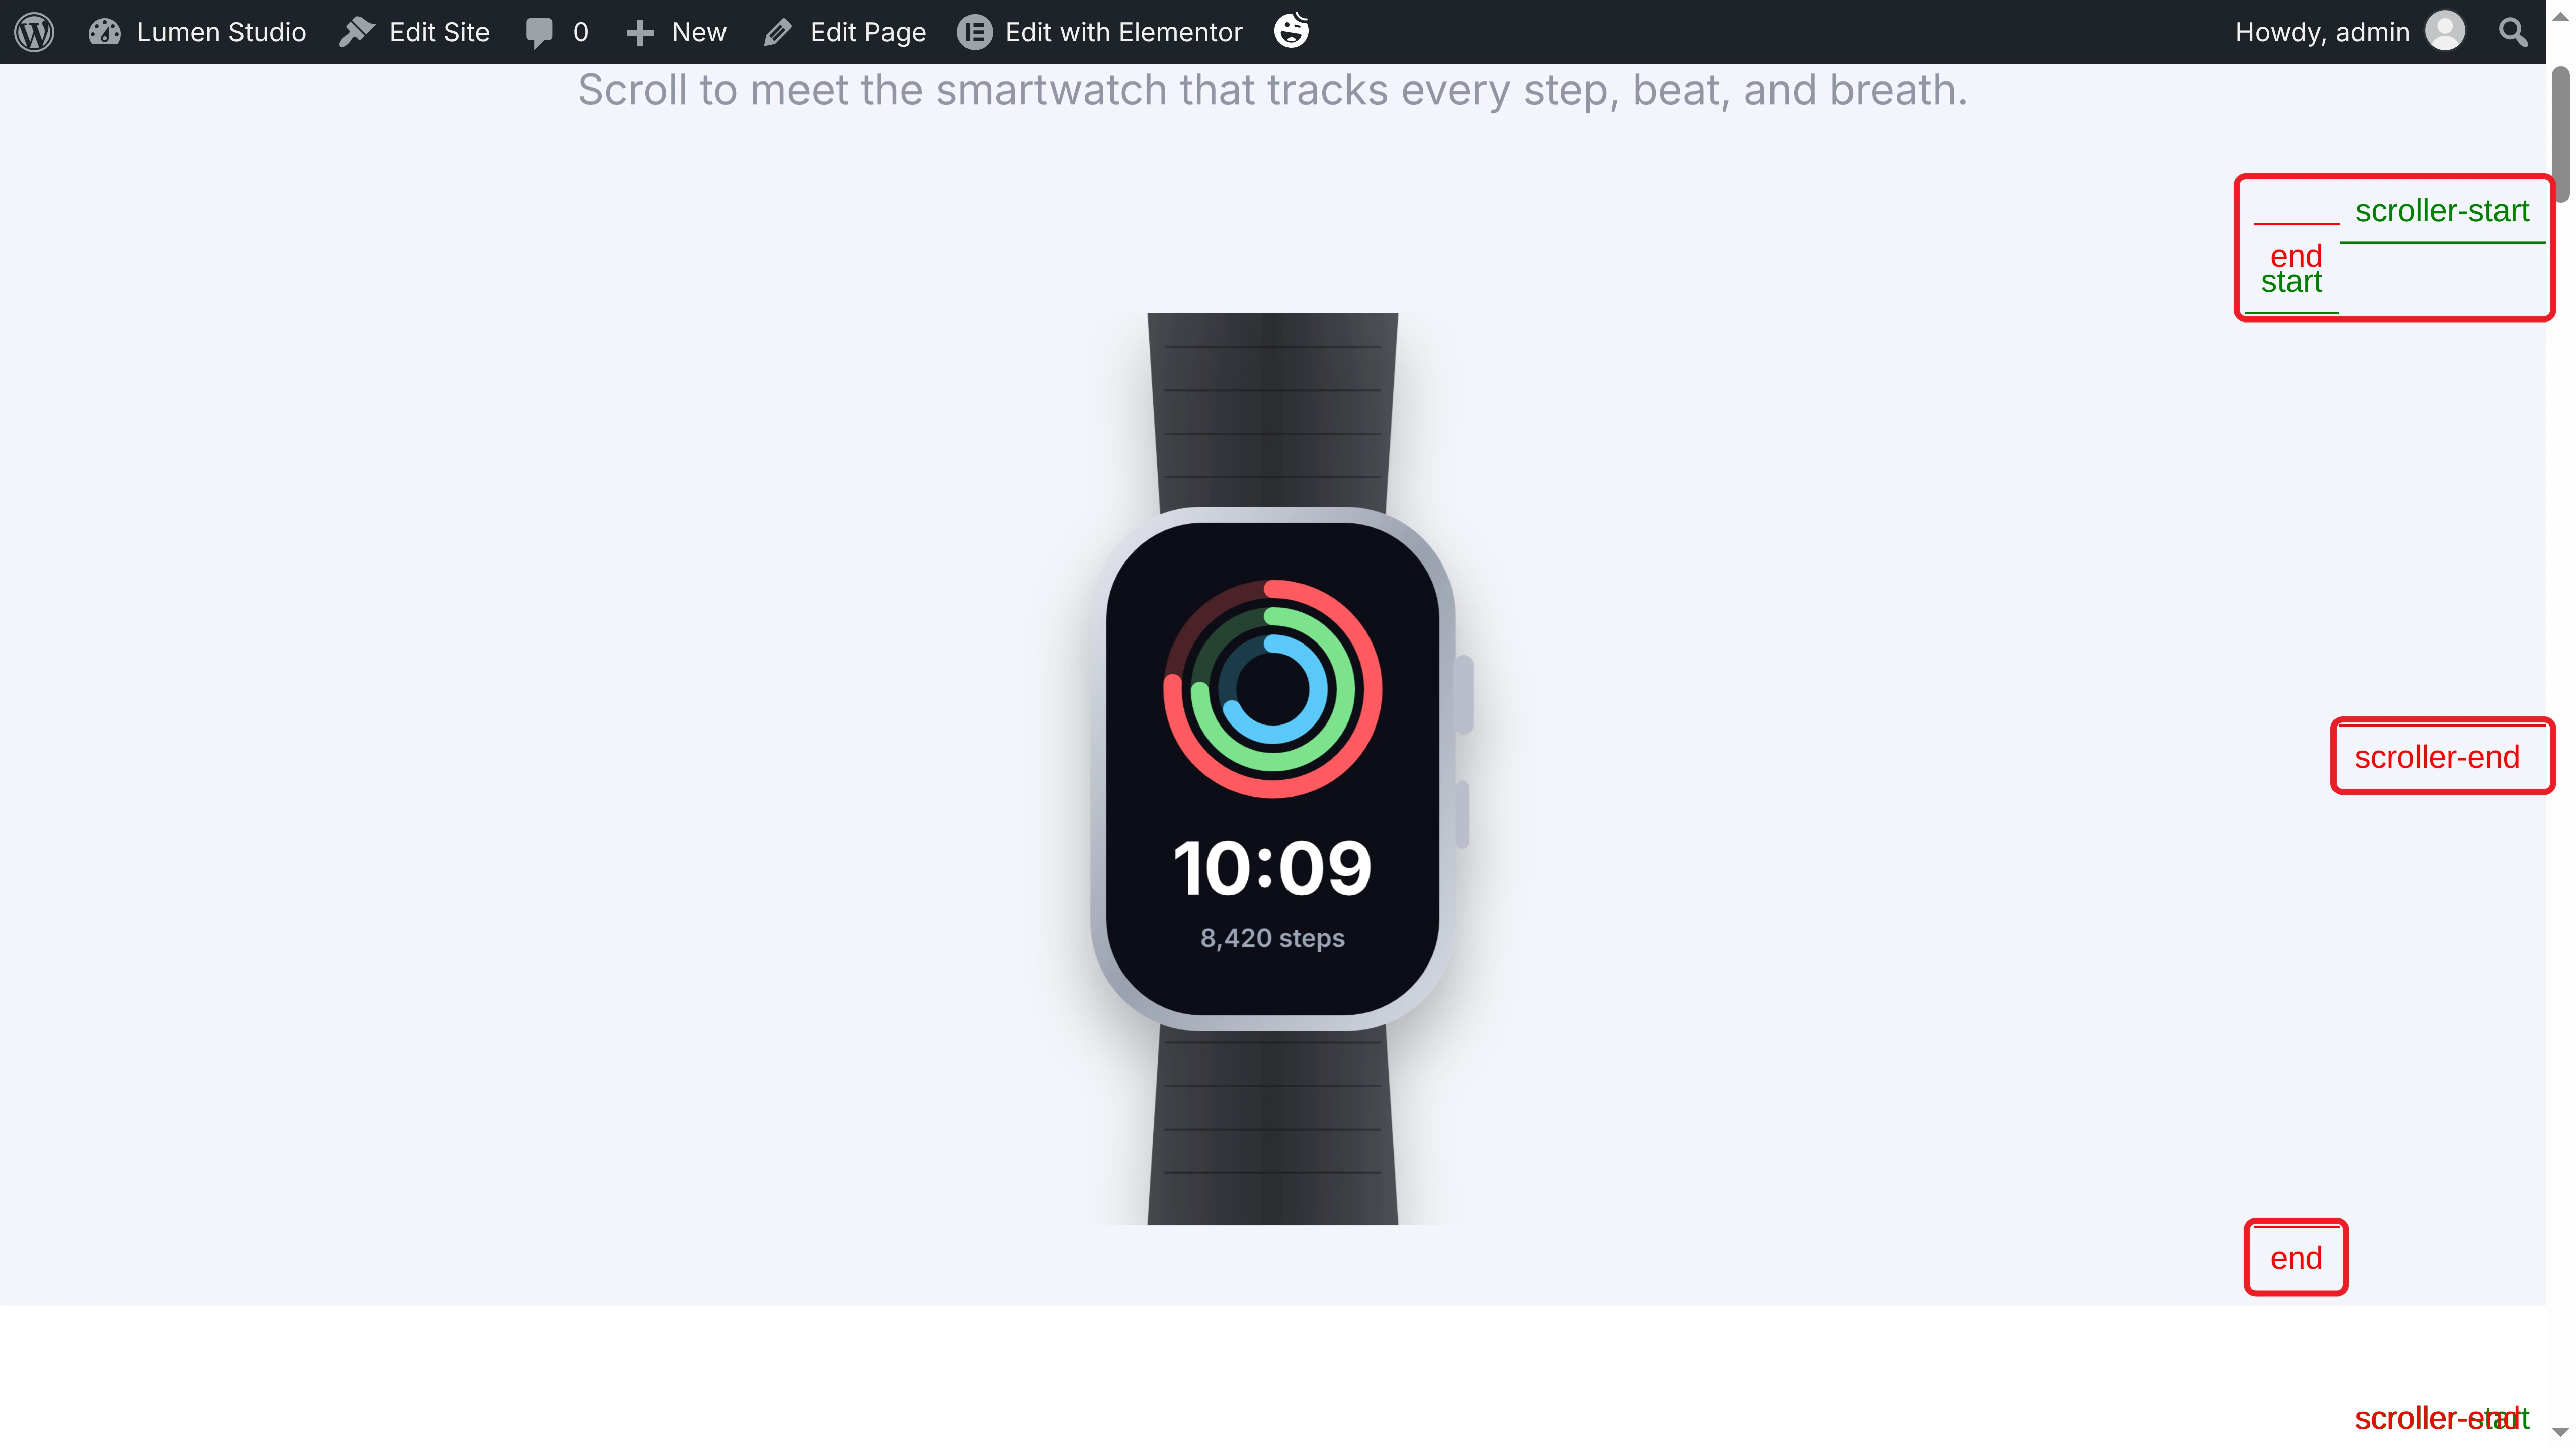
Turn markers off before you publish. Finally, select an Easing Function. For scrubbed animations, None keeps the movement in sync with the scroll. Here’s the result.
Step 05: Animate Cards When They Appear
Now let’s reveal the feature cards once, when they come into view. Select the first card and enable Animation. Set Animation to From and Trigger Mode to On Appearing.
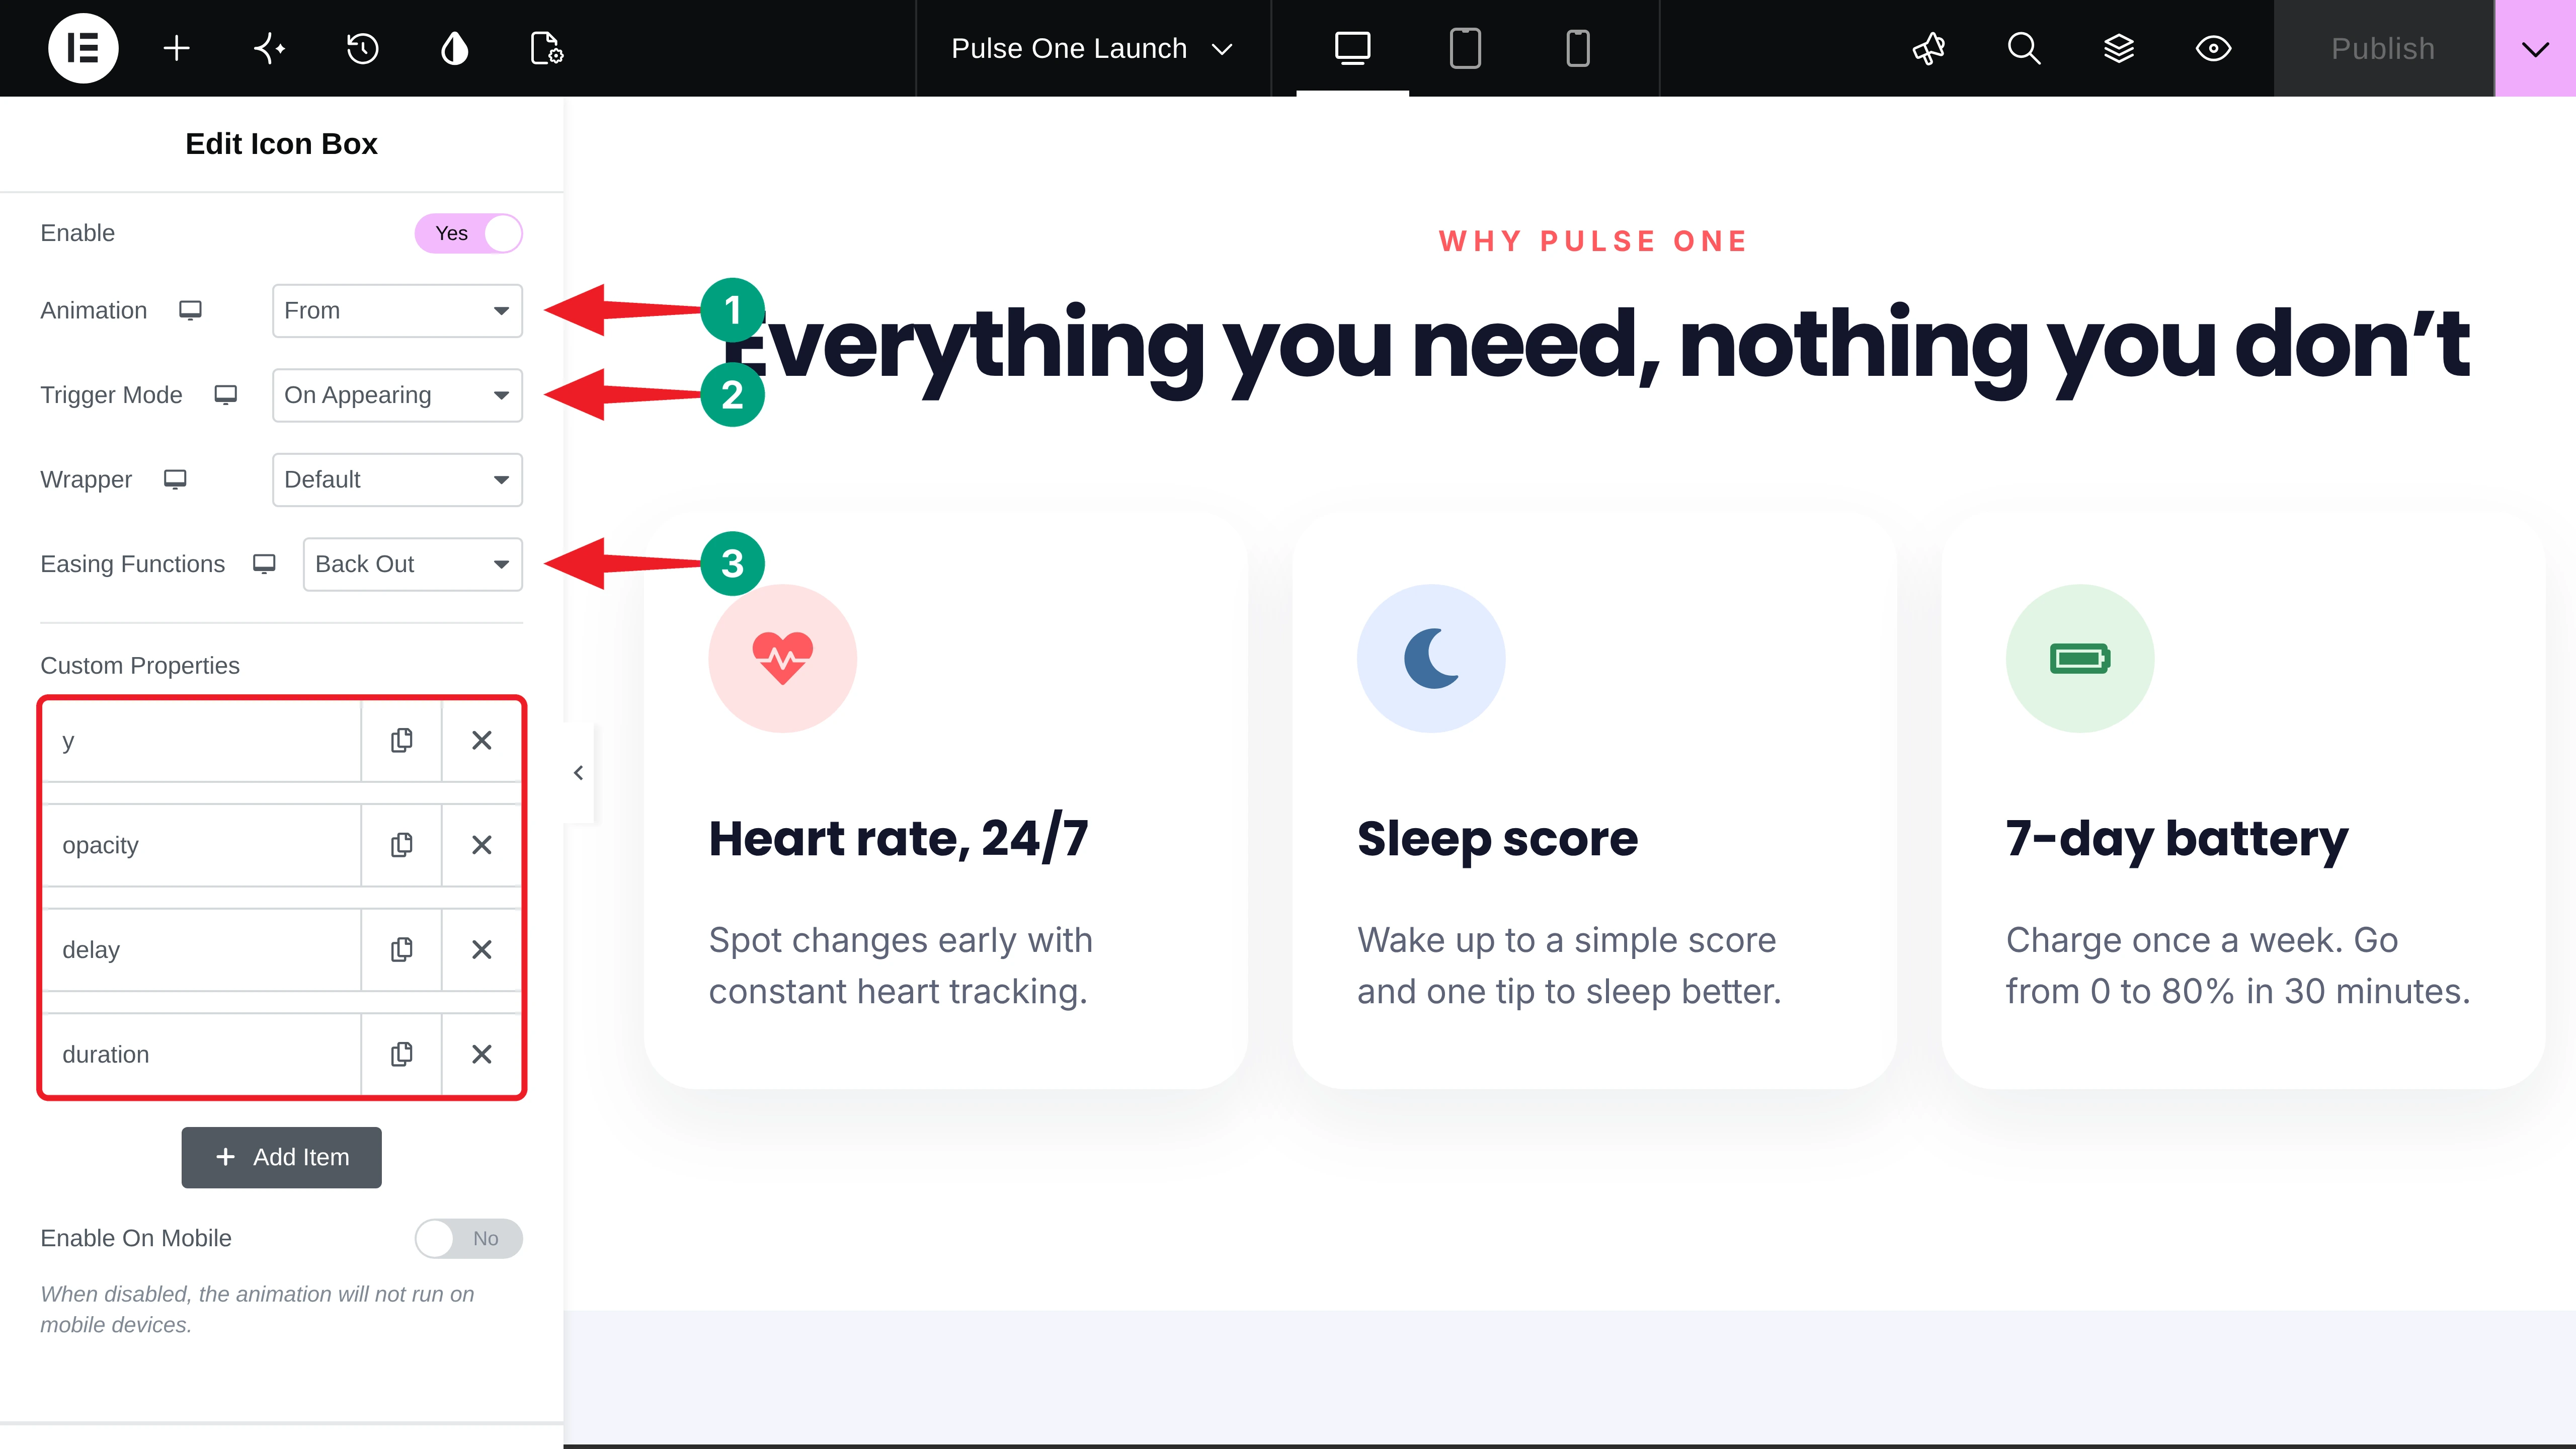
Add y at 90 and opacity at 0, so each card rises and fades in. Choose Back Out as the easing for a small bounce. For the second and third cards, add a delay of 0.15 and 0.3 seconds to create a staggered effect.
Step 06: Pin a Section with Sticky Pin Element
Pinning keeps a column in place while the rest of the section scrolls. Select the container you want to pin (our left text column) and go to Advanced > Sticky Pin Element. Toggle on Enable.
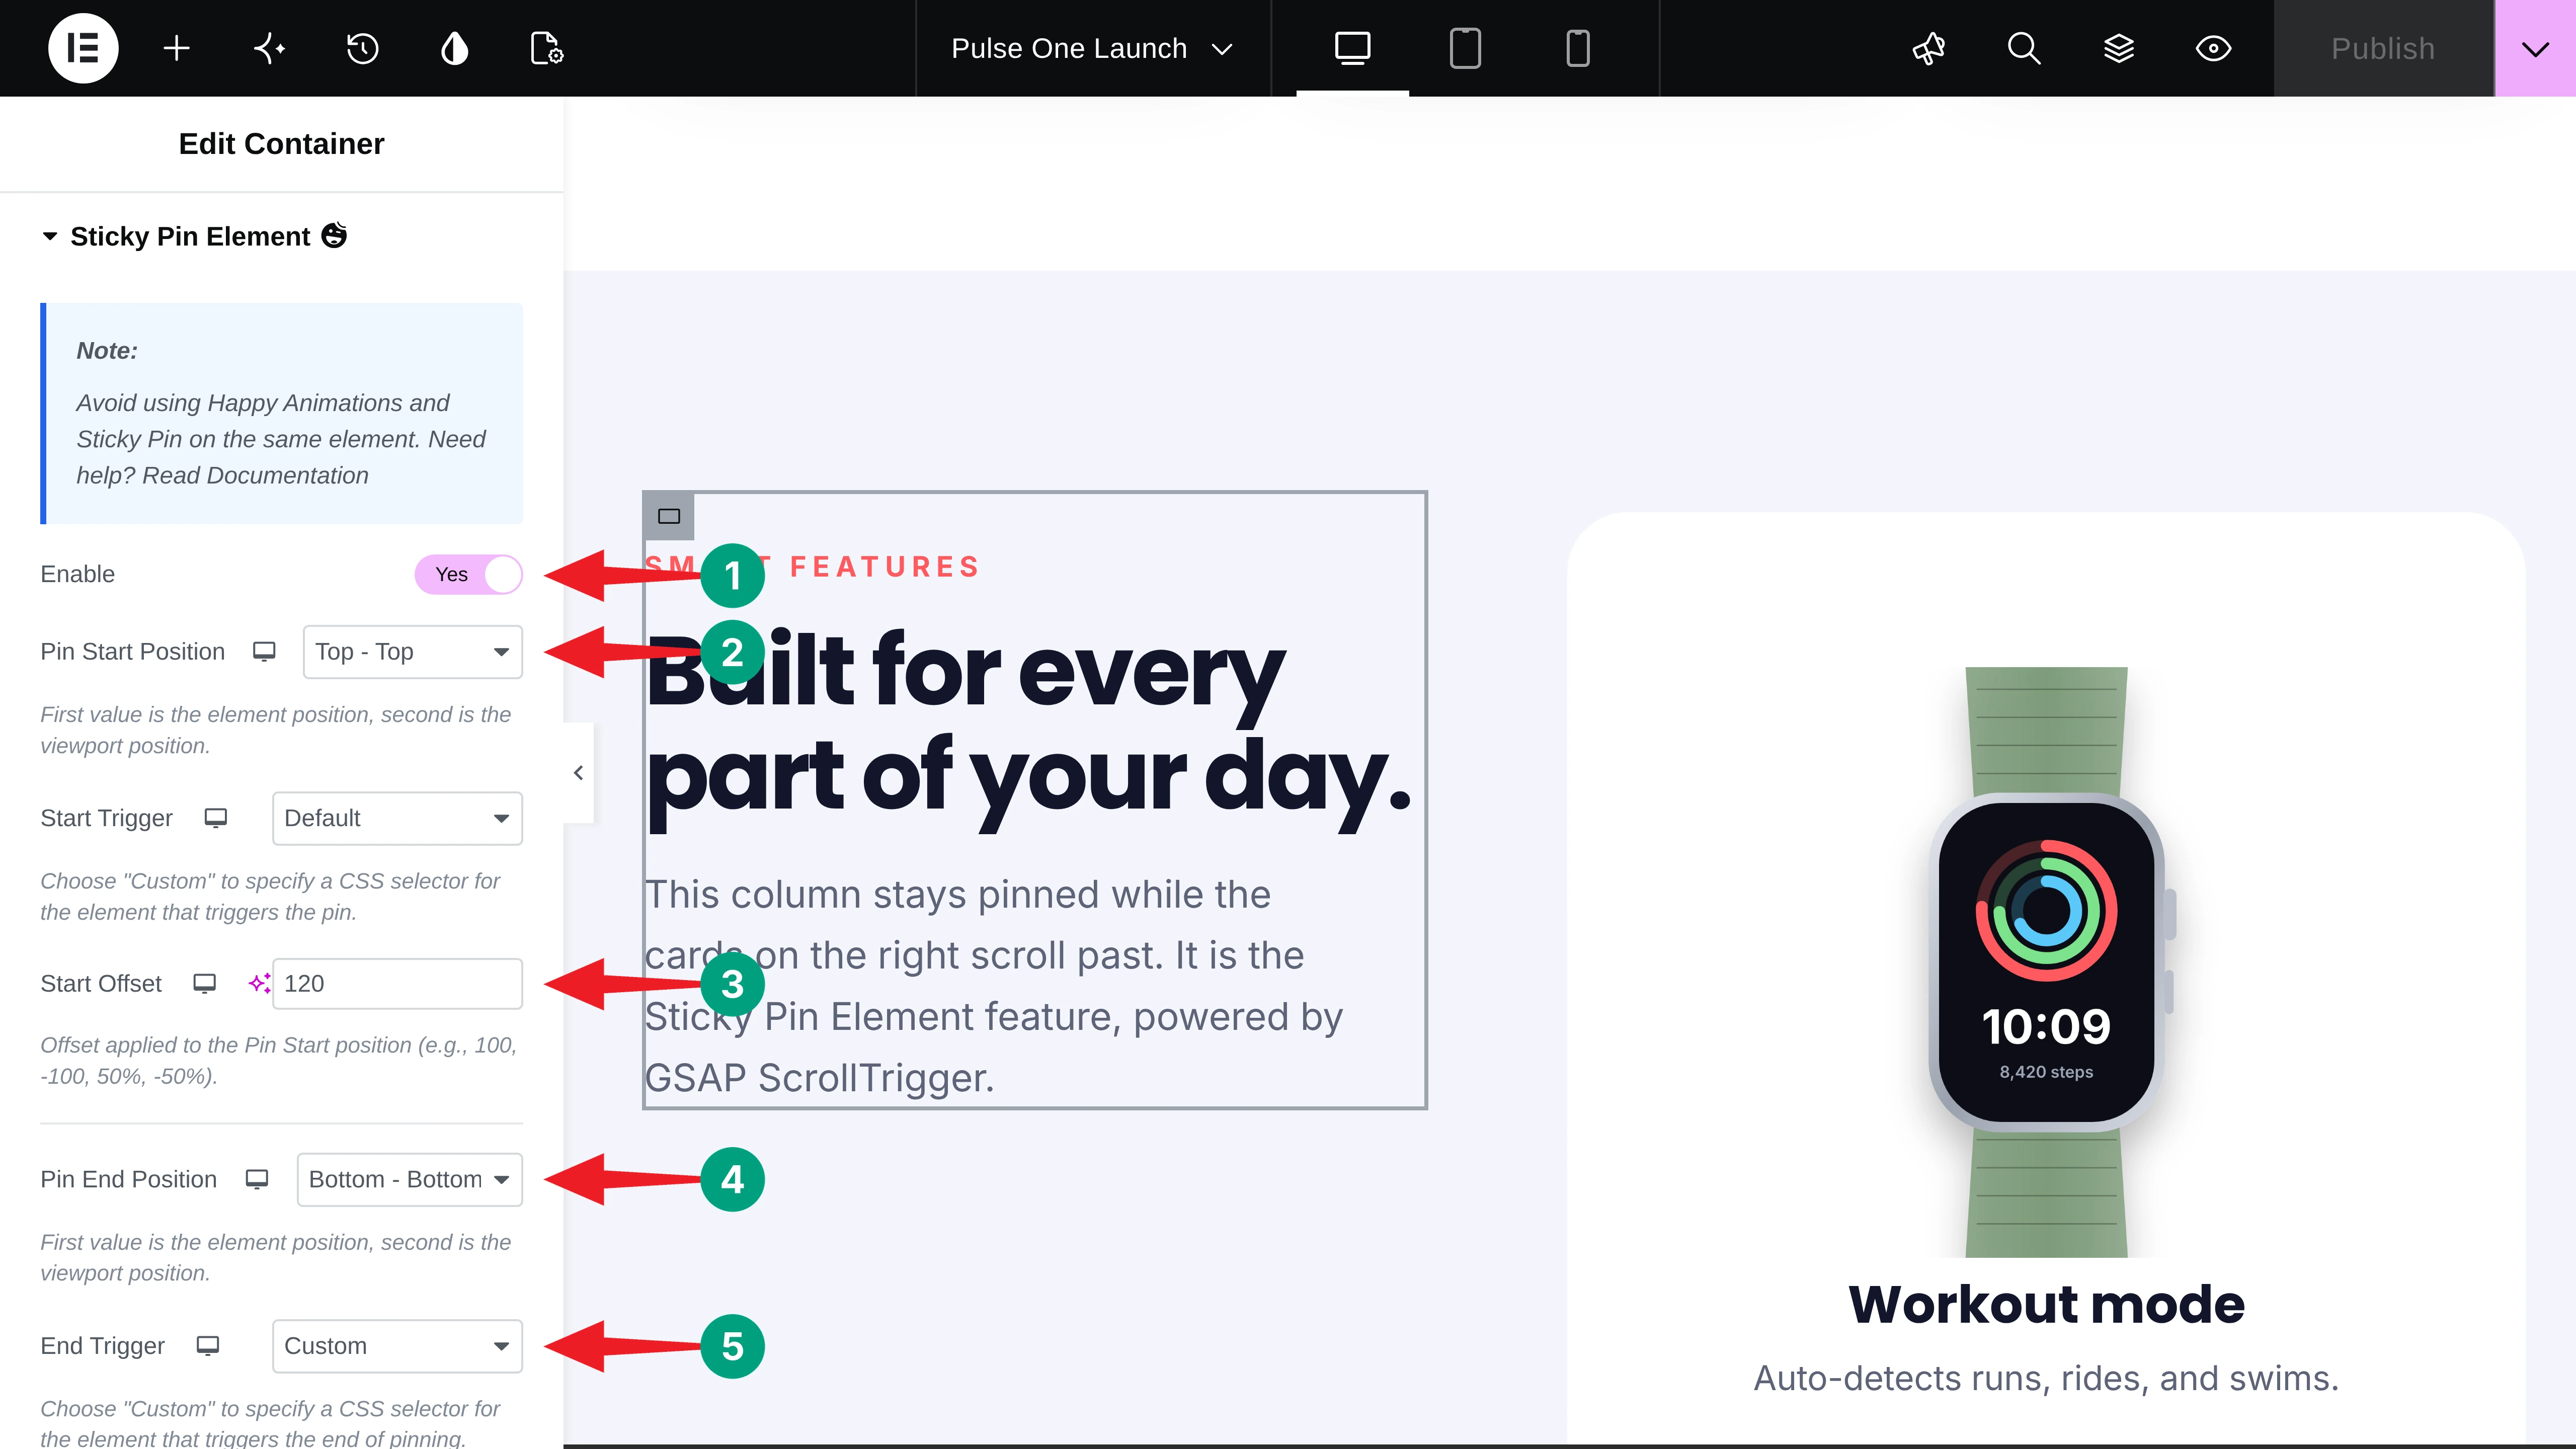
Set Pin Start Position to Top – Top and add a Start Offset (we used 120) so the column doesn’t stick to the very edge. To stop pinning at the end of the right column, set End Trigger to Custom and type that column’s CSS class in Custom End Area.
Note: Avoid using the Animation feature and Sticky Pin Element on the same element. Apply them to different elements instead.
Step 07: Create a Horizontal Scroll Section
Add a full-width container with its direction set to Row, and place your cards inside it. We added six color cards, each 420 pixels wide. Go to Advanced > Horizontal Scroll and toggle on Enable.
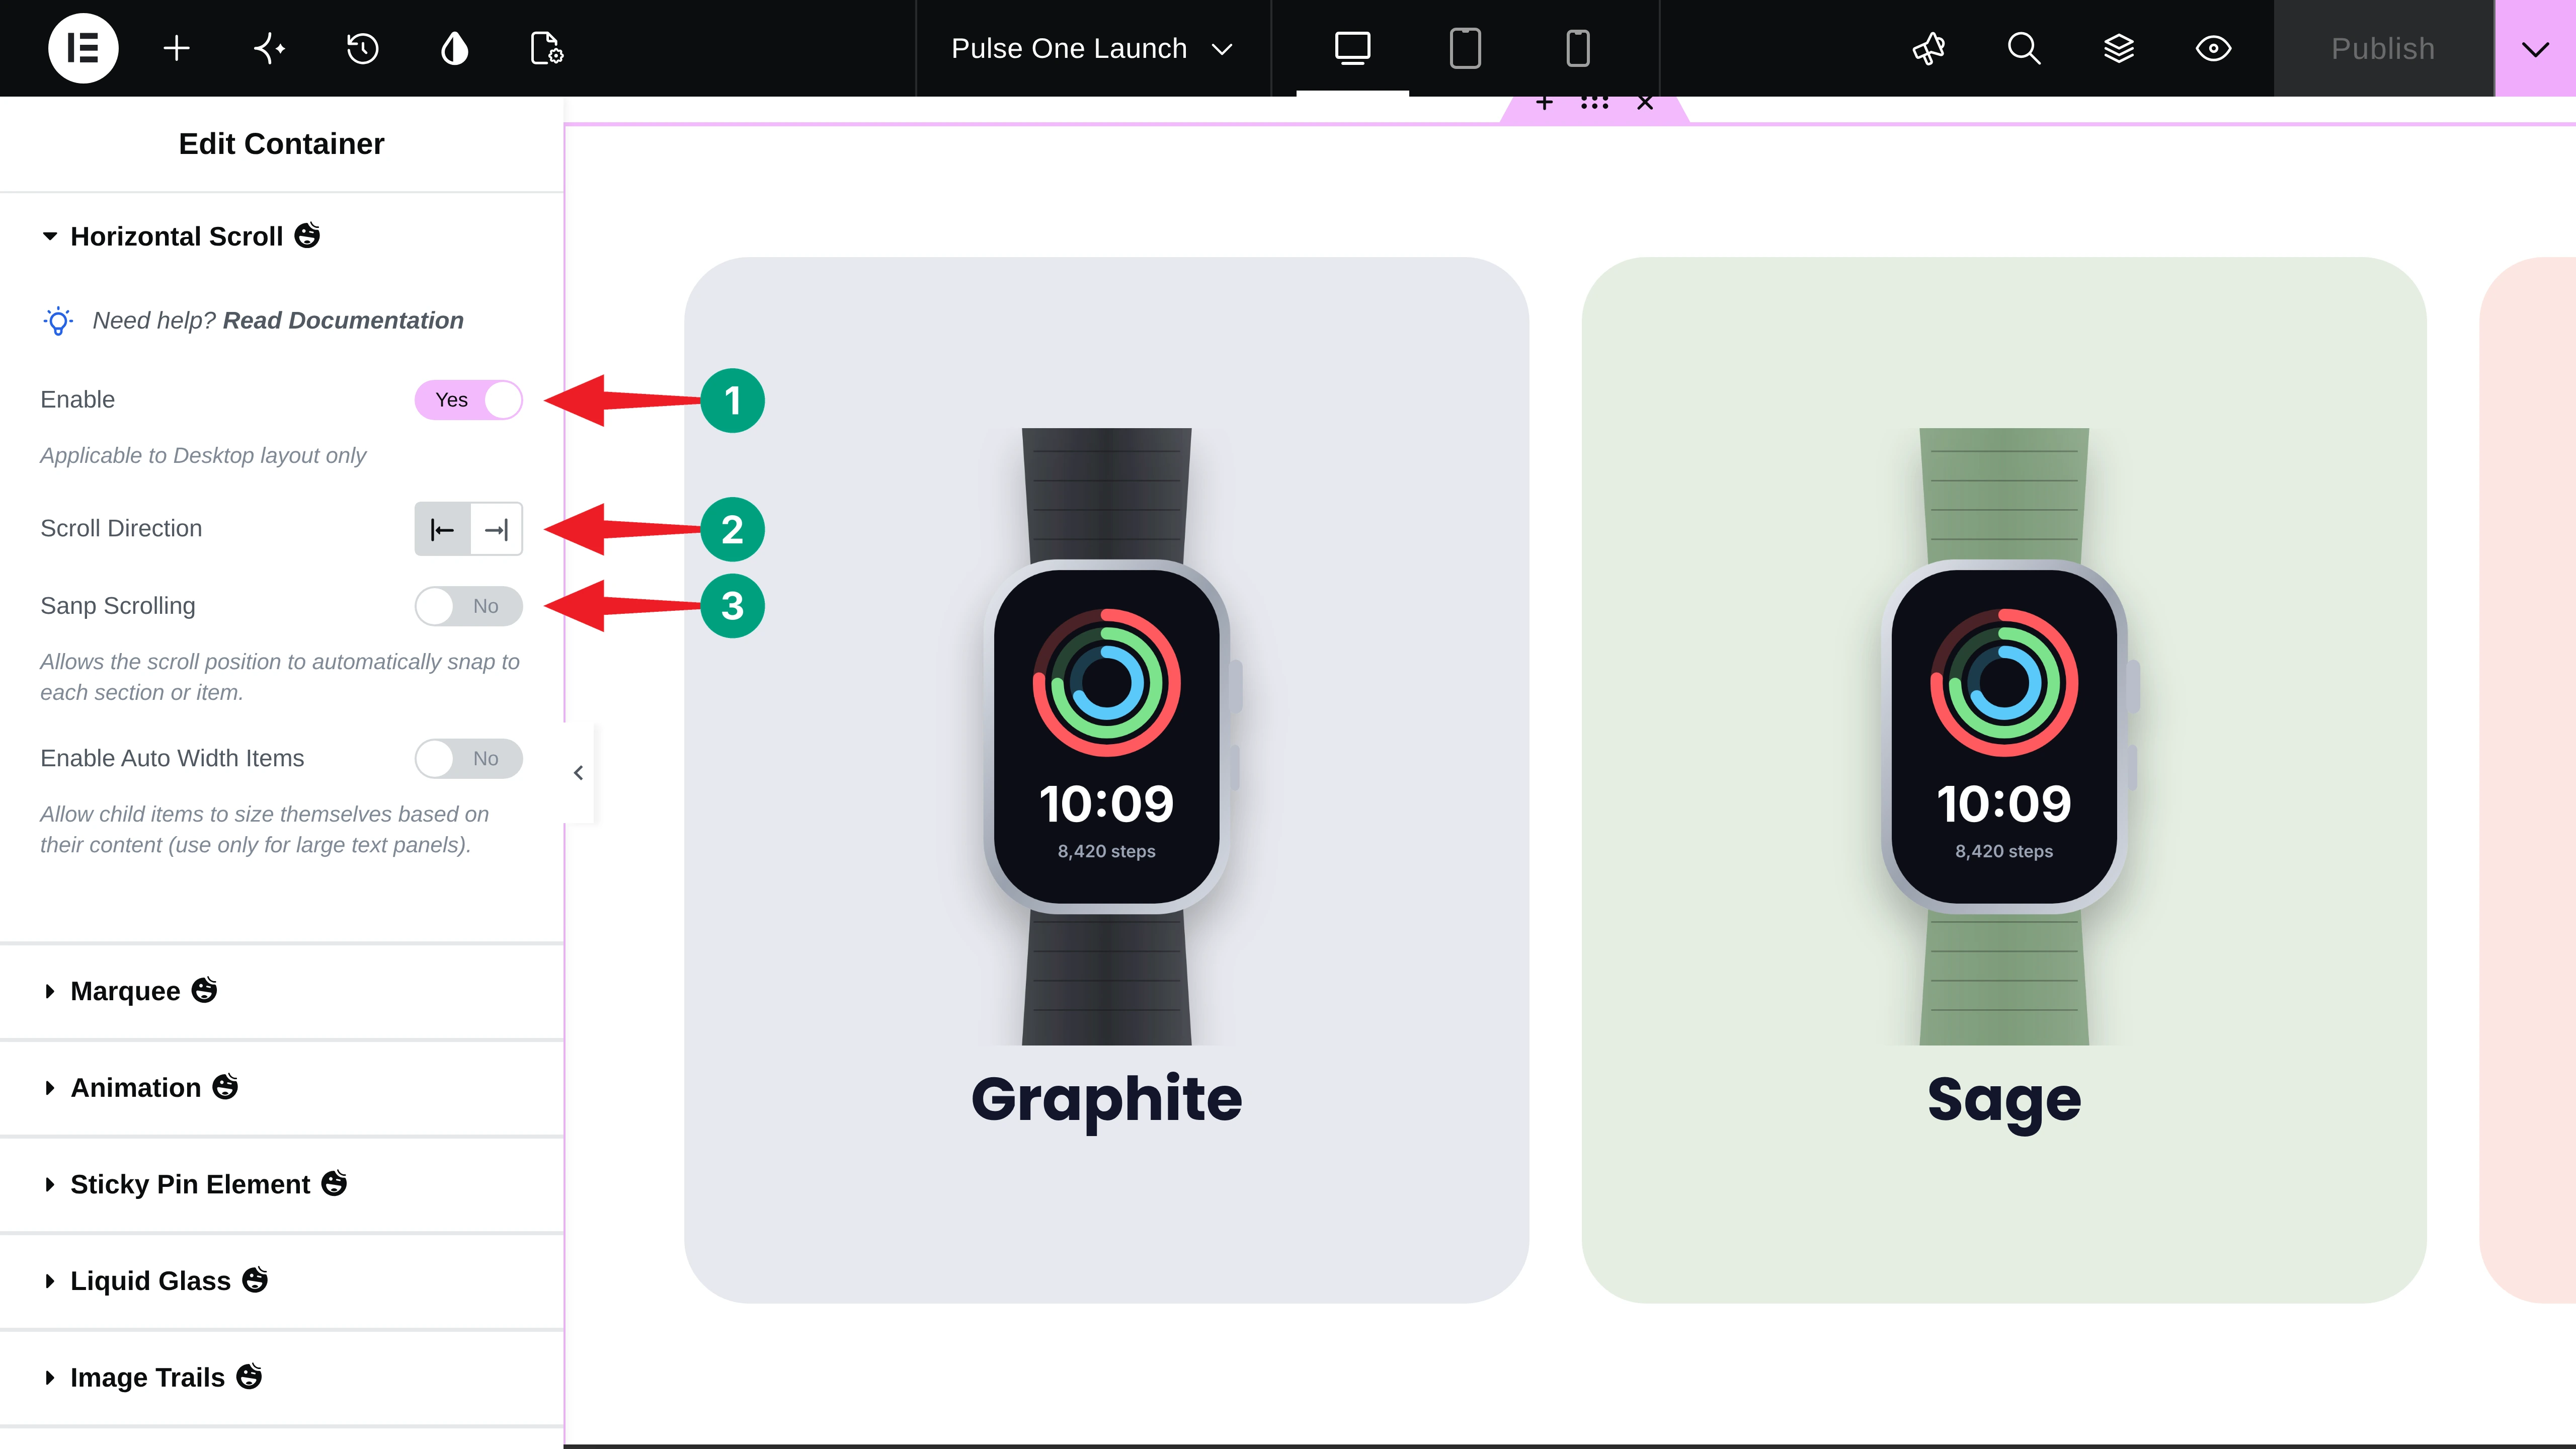
Choose the Scroll Direction and, if you like, turn on Snap Scrolling so each card settles into place. As the description says, horizontal scroll applies to the desktop layout only.
Step 08: Slide In Text as You Scroll
For the call to action, select the heading and enable Animation. Choose From and On Scroll, then add x at -260 and opacity at 0. Set Wrapper to Custom, Animation Start to Top – Bottom, and Animation End to Center – Center.
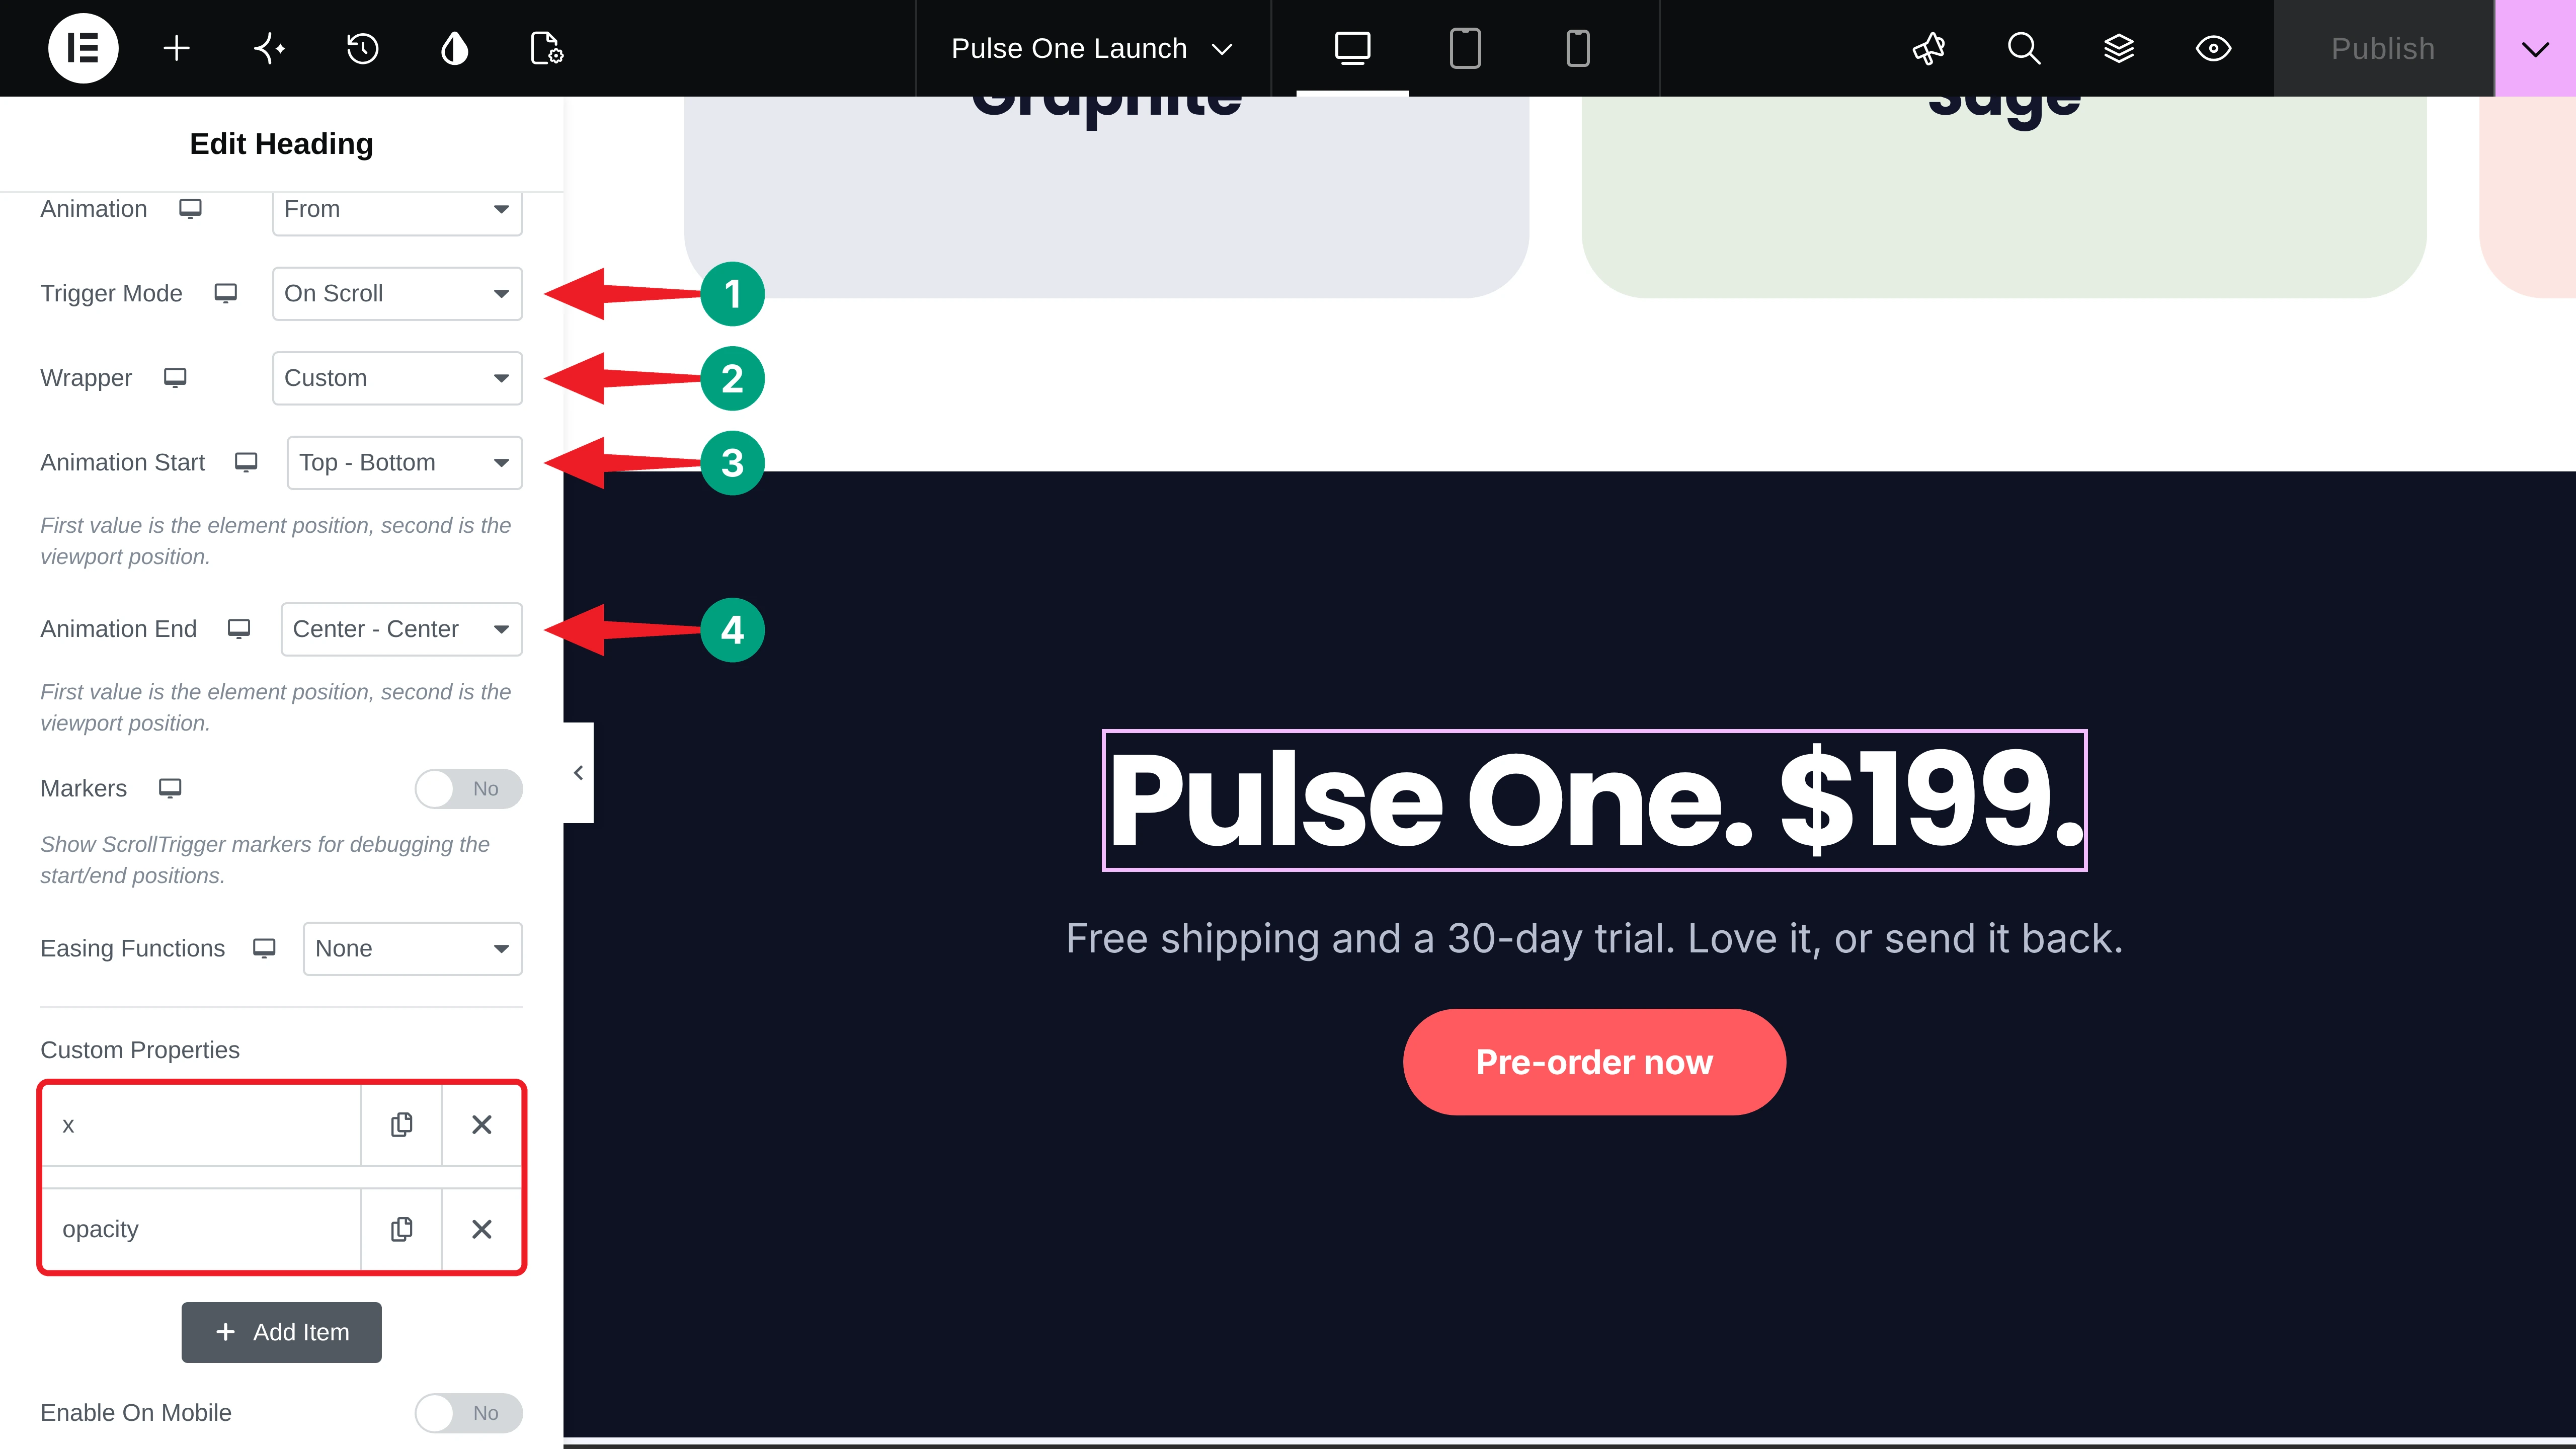
In the same way, slide the paragraph in from the right with x at 260. We also made the button pop in On Appearing with an Elastic Out ease.
Step 09: Preview the ScrollTrigger Animations
Publish or update the page, and open it in a new tab. Scroll slowly from top to bottom to check every effect.
Thus, you can use GSAP ScrollTrigger in Elementor for advanced animations with HappyAddons. Hope it will work well on your end as well.
Explore how to add GSAP animations in Elementor without coding.
Tips for Smooth ScrollTrigger Animations in Elementor
Scroll animations look impressive when they are smooth and easy to follow. These tips keep yours fast and comfortable to watch.
a. Animate Transform and Opacity
Scale, rotate, x, y, and opacity are the cheapest properties for the browser to animate. Width, height, and padding force the page to recalculate its layout, which can make scrolling feel heavy.
b. Use Markers, Then Turn Them Off
Markers make start and end points easy to fine-tune. Keep them on while you build, and switch them off before publishing so visitors never see the debugging lines.
c. Keep One Big Effect per Screen
Several scrubbed animations fighting for attention feel chaotic. Give each screen one main scroll effect, and let smaller on-appearing reveals support it in the background.
d. Plan for Mobile
The Animation feature has an Enable On Mobile switch that is off by default, and horizontal scroll works on desktop only. Check that your layout still looks good when these effects don’t run.
e. Give Pinned Sections Enough Content
A pin only feels meaningful if there is something to scroll past. Pair a pinned column with at least two or three tall cards, images, or steps on the other side.
FAQ on GSAP ScrollTrigger in Elementor
In this section, we have answered some frequently asked questions we get from our users in support chats, forums, and social media.
Can I use GSAP ScrollTrigger in Elementor without coding?
Yes. With HappyAddons Pro, you set the trigger mode, start and end points, markers, easing, and animated properties right from the Elementor panel. HappyAddons loads GSAP and ScrollTrigger for you.
What is the difference between On Scroll and On Appearing?
On Scroll ties the animation to the scrollbar (ScrollTrigger’s scrub), so it moves forward and backward with the visitor. On Appearing plays the animation once when the element enters the screen.
Why doesn’t my scroll animation play inside the Elementor editor?
Scroll-based animations run on the live page, not inside the editor. Save your changes and preview the page in a new tab to see the result.
Do ScrollTrigger animations work on mobile?
Yes, if you turn on Enable On Mobile in the Animation settings. It is off by default to keep phones fast. The Horizontal Scroll feature applies to the desktop layout only.
Will ScrollTrigger animations slow down my website?
Not if you use them wisely. HappyAddons only loads GSAP on pages that use these features. Stick to transform and opacity properties, and avoid stacking many scrubbed animations on one screen.
Final Thoughts!
GSAP ScrollTrigger is the secret behind many of the smoothest scroll experiences on the web. With HappyAddons Pro, you can use it in Elementor to scrub hero animations, reveal cards, pin sections, and scroll rows sideways, all without writing a single line of code.
Start with one scrubbed effect in your hero, fine-tune it with markers, and then add reveals and pins where they help tell your story. Always preview the page on desktop and mobile before you publish.
If you have any questions, mention them in the comment box below. You can also give a knock on our live chat box. Thanks for being with us till the end.