The trend in web design is evolving almost daily. To stay relevant and competitive in the market, constantly adapting to these changes is mandatory for all website owners. Even a few years back, static web elements were enough to grab user and visitor attention.
But now, most designers build their sites using interactive elements to boost engagement. Interactive web elements are designed in a way that responds to user actions, like clicks, hovers, moves, and scrolls, to create an engaging experience. Flip box is such an interactive element.
In this tutorial post, we’ll cover a step-by-step guide on how to add flip boxes to WordPress with Elementor. Hope you’ll find this post really helpful and worth your time. Get started!
What Is a Flip Box? Its Use Cases in Web Design
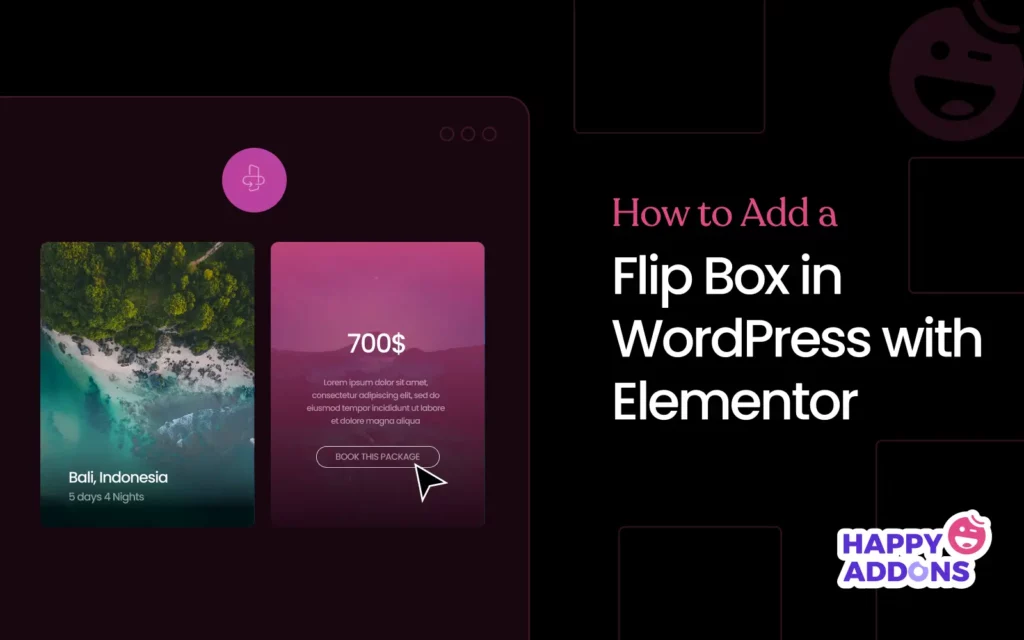
A flip box is an interactive Elementor widget that allows you to display content on both the front and back sides of a box, which flips when hovered or clicked. It combines visual appeal with dynamic motion to grab the user’s attention while presenting two layers of information.
This widget is extremely helpful when you have to cover lots of information in a limited space. The widget offers lots of customization options so you can align its design with your site’s branding. Let’s take a look at how flip boxes work in the short video attached below.
Use Cases of Flip Box in Web Design
- Service or Feature Highlights with icons on the front and descriptions on the back
- Team Member Showcases with a photo on the front and bio/contact info on the back
- Product Feature Comparison in a compact and interactive format
- Call-to-Actions that reveal buttons or links when flipped
- Portfolio Displays with project thumbnails on the front and summaries on the back
- Pricing Plans with plan names up front and feature lists on the flip side
How to Add a Flip Box in WordPress with Elementor
To start the process, you must have the following plugins on your site. Get them by clicking the links attached below.
Once they are installed and activated on your site, start following the tutorial described below on how to use the flip box widget.
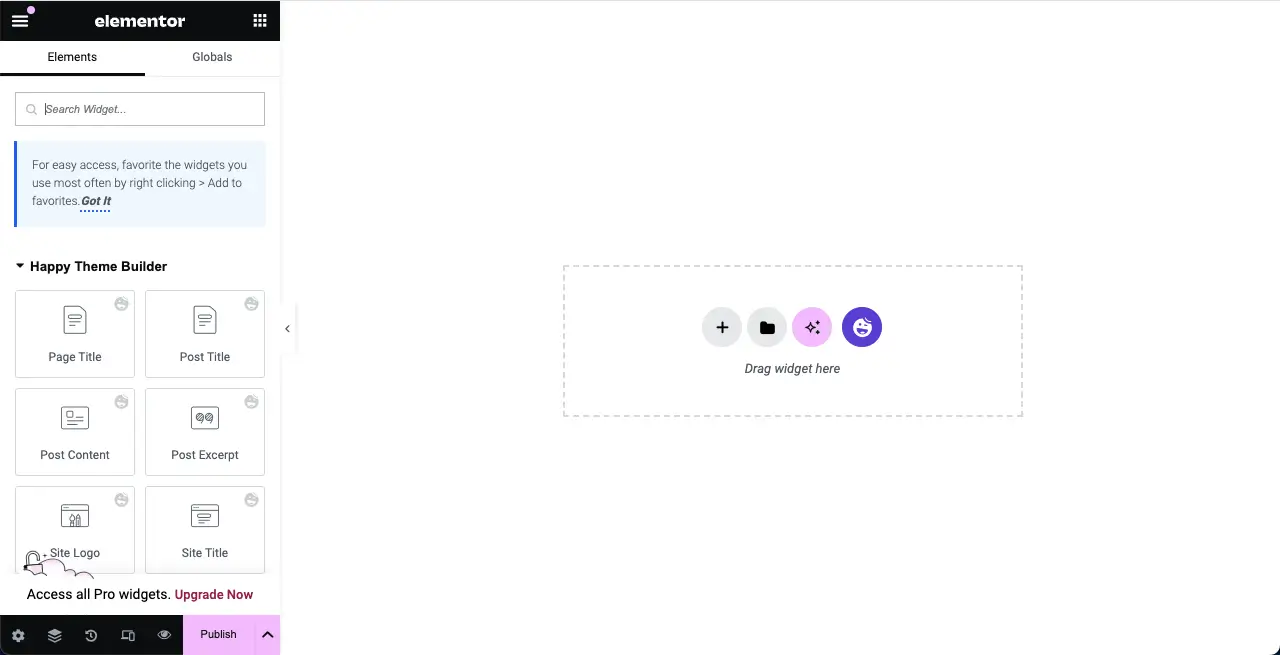
Step 01: Open the Elementor Canvas
Open the post or page with Elementor Canvas where you want to add the flip box widget.
Step 02: Select a Section for Adding the Flip Box Widget
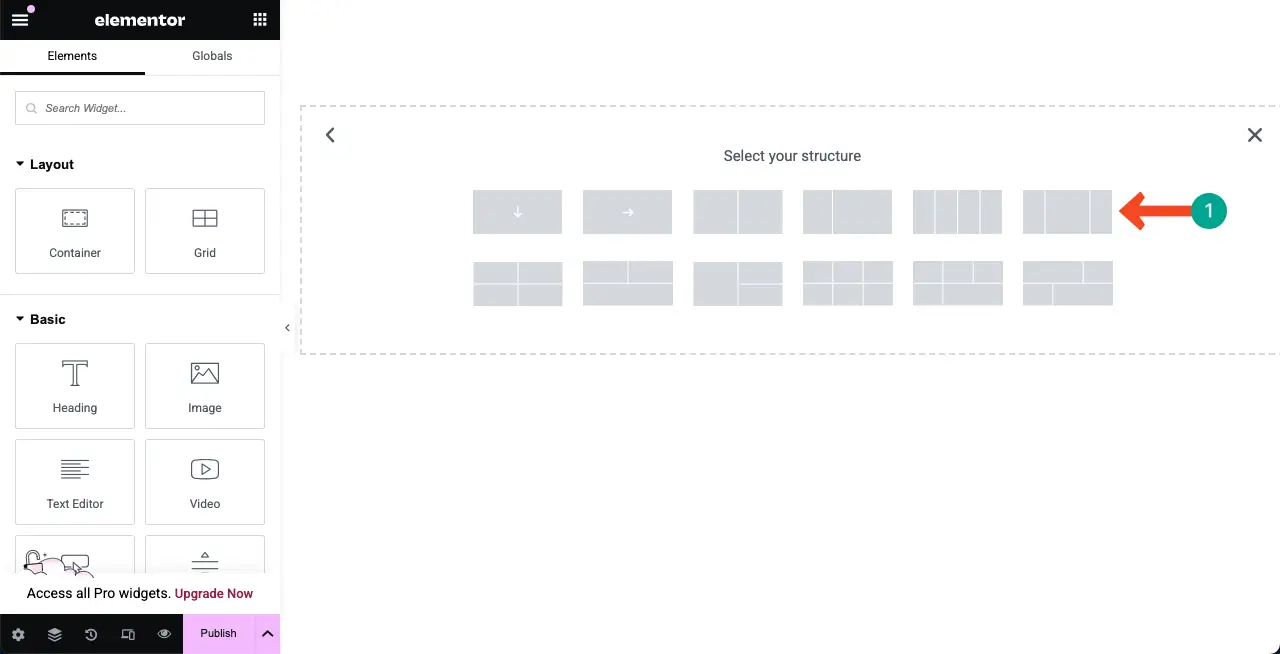
Create a section, defining the number of columns so you can add the flip box widget over them.
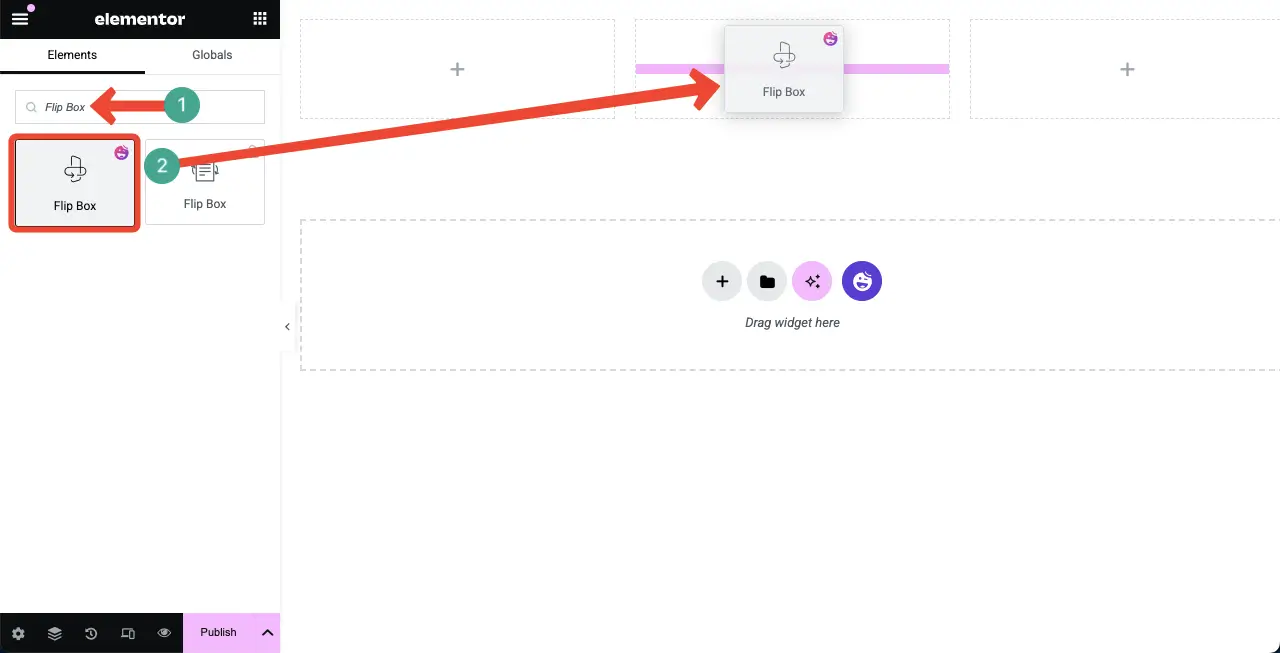
Find the flip box widget on the Elementor panel. Drag and drop it to the respective section on the Elementor canvas.
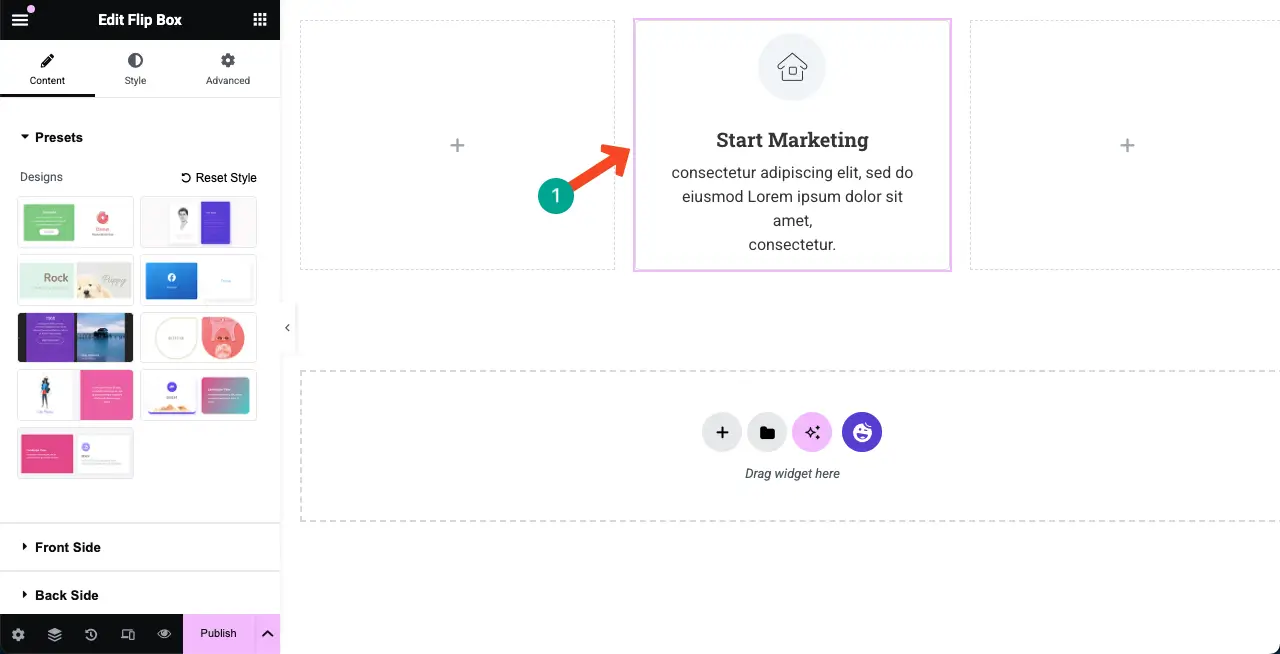
You’ll see the flip box widget is added to the canvas with some dummy content.
Step 03: Select a Preset for the Flip Box
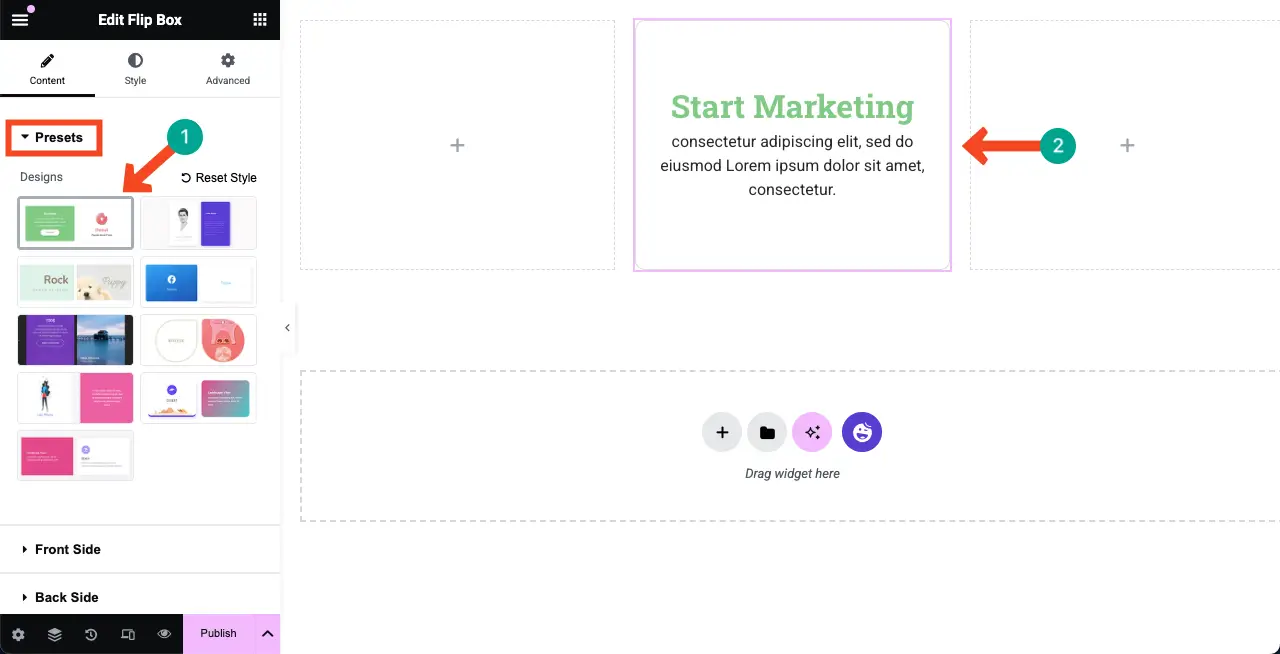
A preset is a saved design style that you can quickly apply to widgets. The flip box widget comes with several presets that you’ll see on the right sidebar.
Select any preset you want. You’ll see the style is instantly applied to your widget.
Step 04: Add Content to the Front Side of the Widget
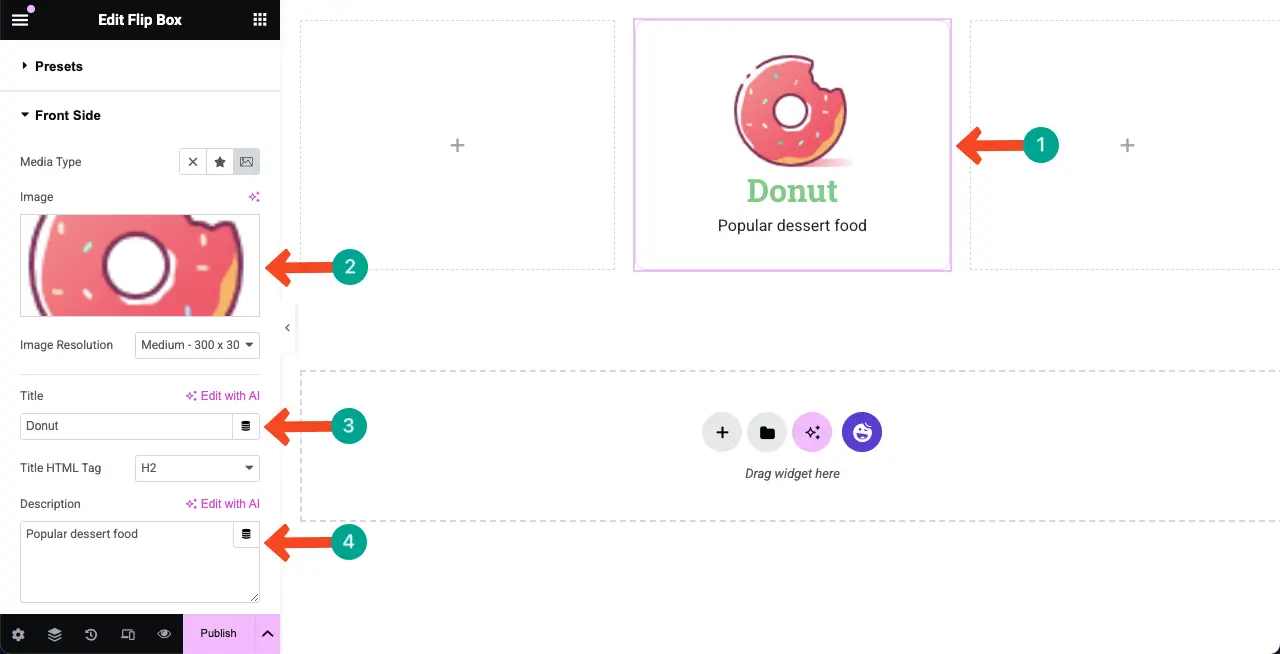
As already said, the flip box widget allows you to add content to both sides. Let’s now add content to the front side. Expand the Front Side section.
You can set an image, image resolution, title, HTML tag for the title, description, and alignment for the widget. Do it yourself.
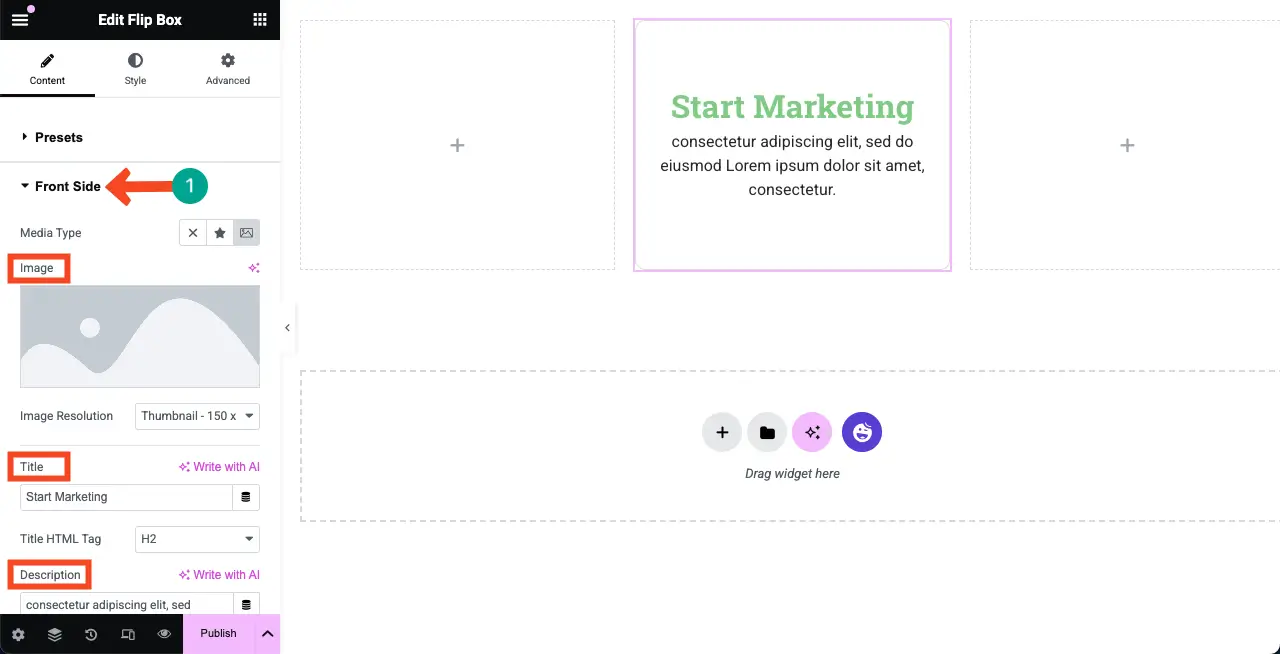
You can see that we have added some content (an image, a title, and a description) to the front side of the flip box.
Step 05: Add Content to the Back Side of the Widget
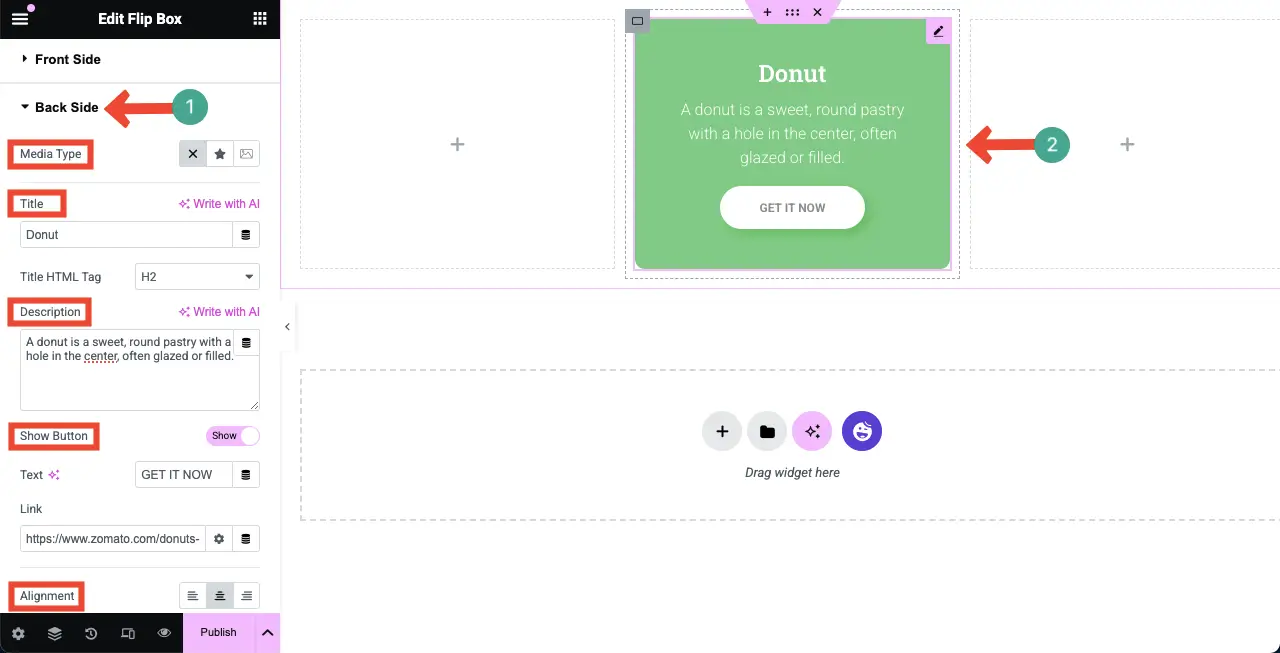
In the same way, expand the Back Side section of the widget. You can add a media, title, description, and button, defining their alignment. Do the needful things as you want.
You can see that we have added some content here as well.
Step 06: Configure Settings for the Flip Box Widget
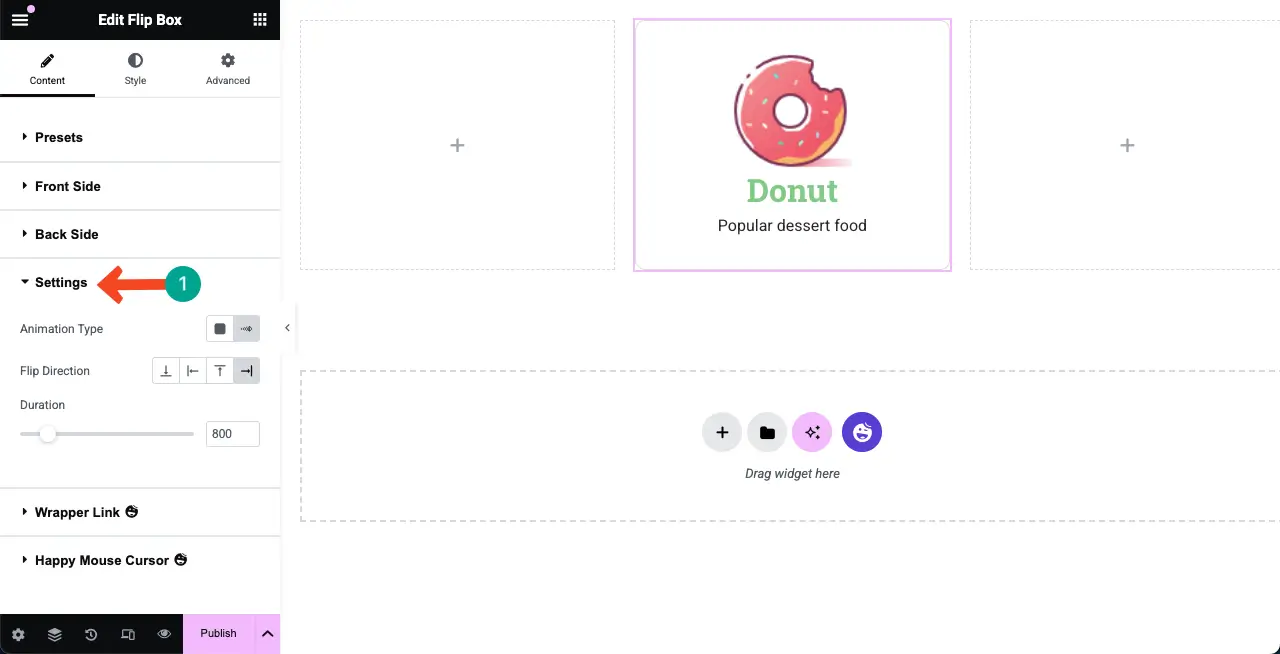
Next, expand the Settings section. You’ll get options to configure animation type, flip direction, and duration.
Step 07: Stylize the Flip Box
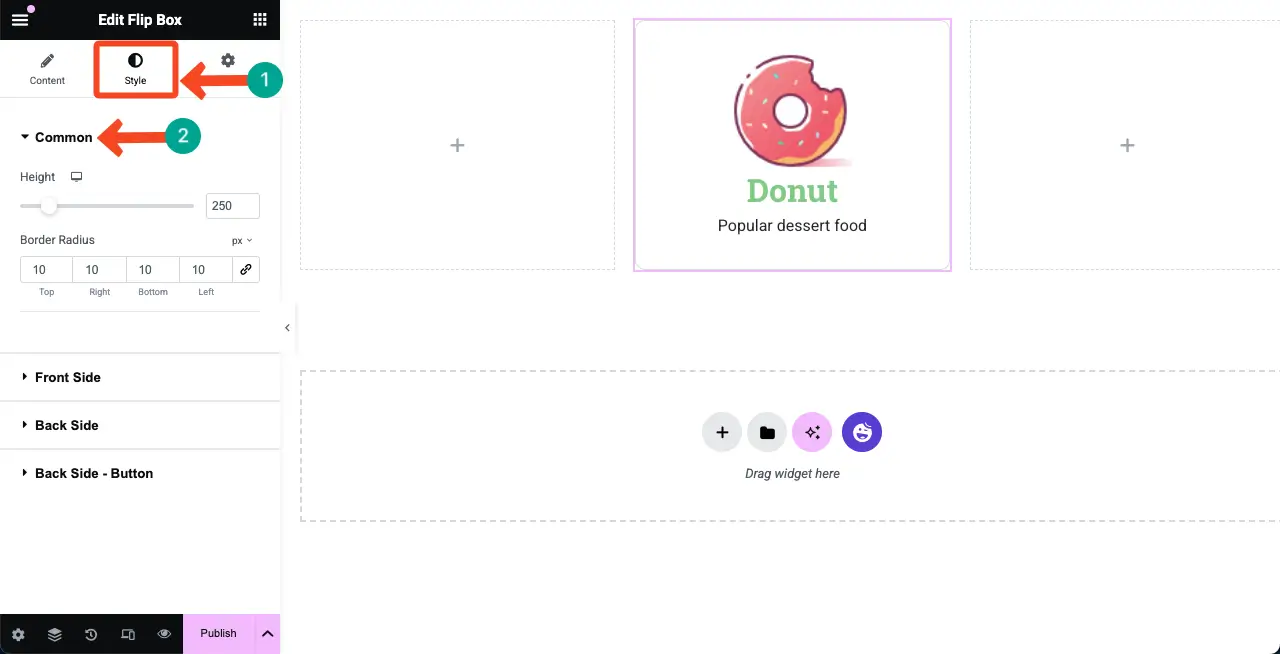
Come to the Style tab. You’ll get four sections here. The first section is Common.
You can set a height and border radius for the flip box widget from the common section.
Next, expand the Front Side section. You can customize the padding, border type, box shadow, background type, spacing, and image resize from this section.
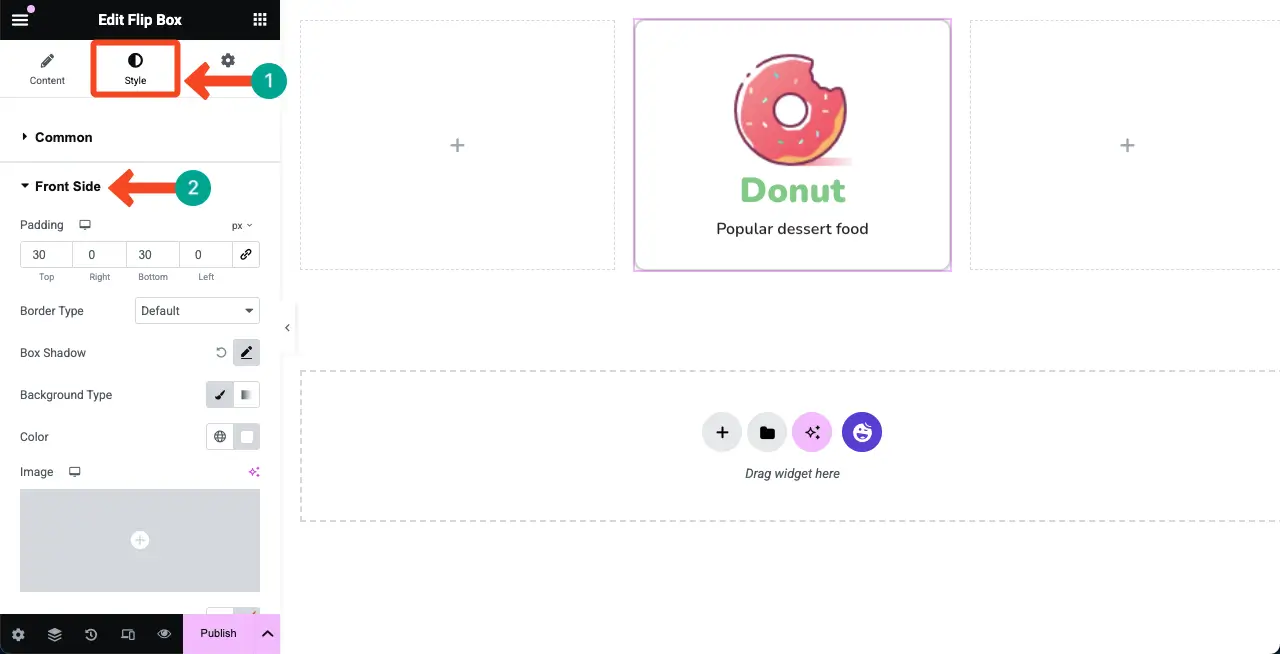
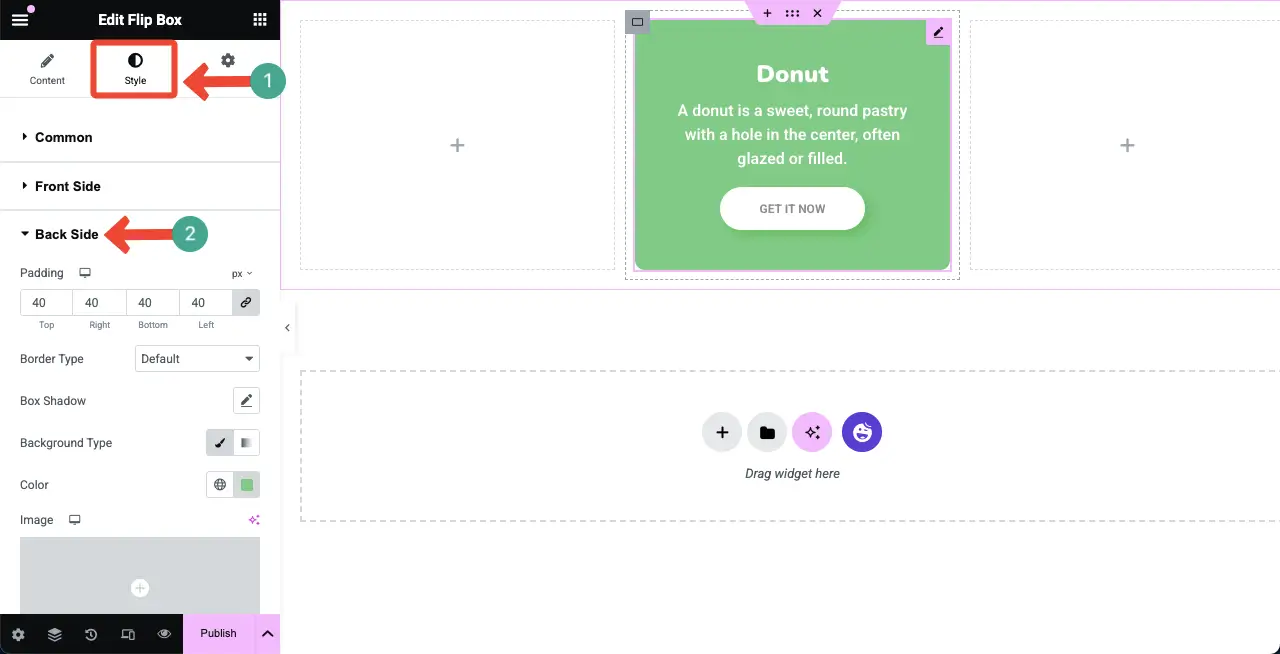
In the same way, by expanding the Back Side section, you can stylize its padding, border type, box shadow, background type, color, and typography.
Hope you can do them alone. We have changed the typography and text weight for our widget to explain this tutorial.
Step 08: Customize the Button
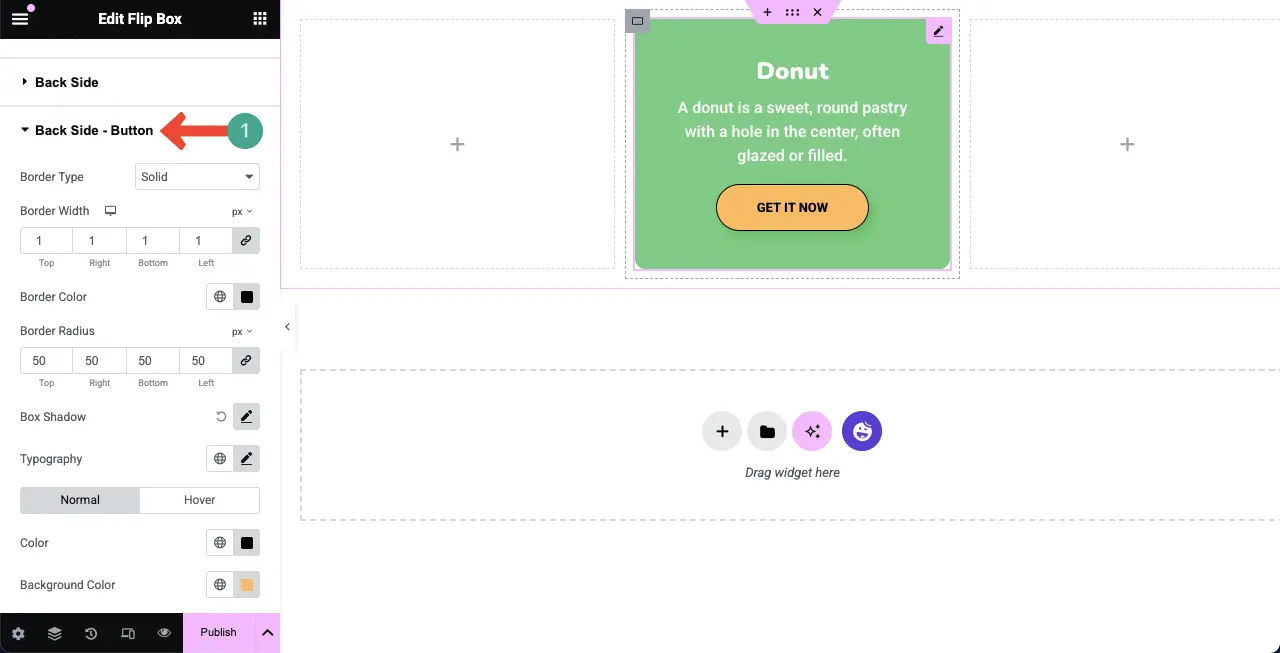
The button is displayed on the back side of the flip box. By expanding the Back Side – Button section, you can configure the border width, border color, border radius, box shadow, typography, color, and background color of the button.
Do it yourself.
Step 09: Make the Flip Box Widget Mobile Responsive
Unless your Elementor widgets are optimized for tablets and mobile devices, your site may get broken on smaller screens, leading to poor user experience and higher bounce rates.
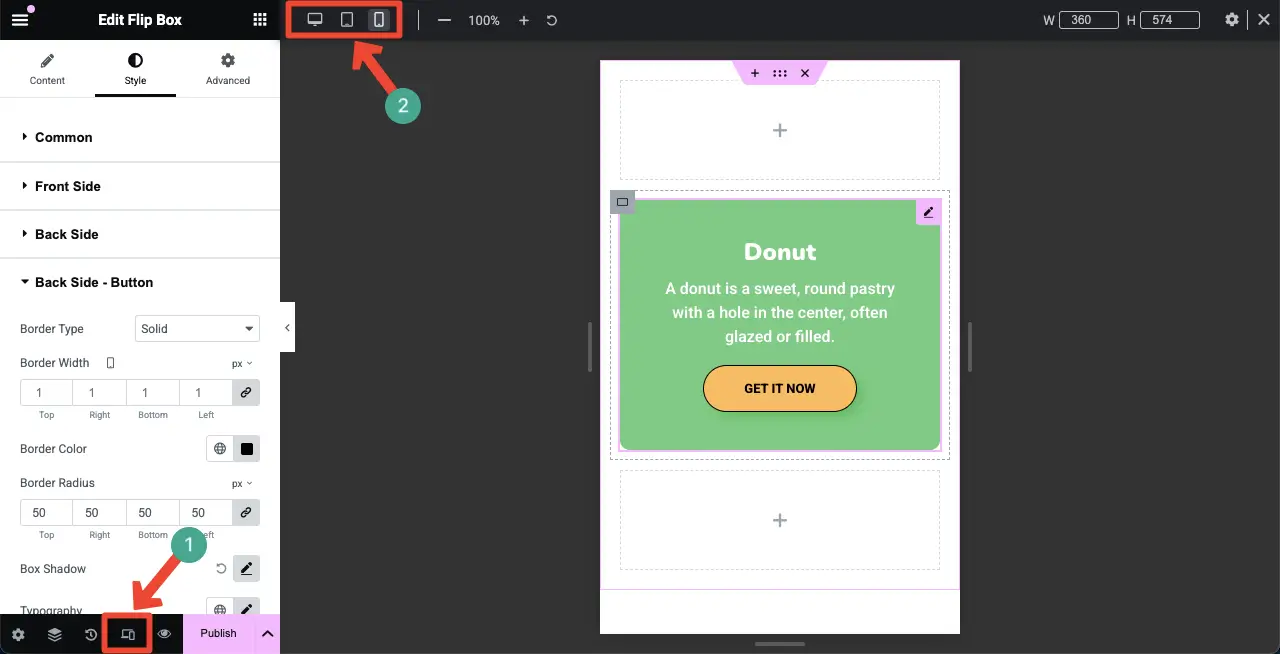
Click the Responsive Mode option on the bottom of the Elementor panel. It will show up the options swtich beteen different screen sizes (desktop, tablet, and mobile).
Select the mobile screen size. Then, customize the layout and elements on the flip box in such a way that fit for the screen size. Do it for the tablet screen as well.
Thus, in the same way, create as many flip boxes as you want for your Elementor website.
Bonus: What More Can You Do with HappyAddons
In addition to creating flip box, you can do many more things with the HappyAddons plugin. Let’s take a quick look at what’s more you can do with the plugin for why you must consider it in your shortlist.
- Theme Building
Theme Building is a free feature of HappyAddons, which is premium in Elementor. With the HappyAddons Theme Builder, you can create headers, footers, blog post templates, archive pages, and a condition setting.
- WooCommerce Integration
It has nine widgets for WooCommerce. They are Product Grid, Product Carousel, Product Category Grid, Product Category Carousel, Single Product, Mini Cart, Cart, Checkout, and Shipping Bar. With them, you can further extend the power of your eCommerce websites.
- Social Media Integration
HappyAddons offers you these social media widgets – Social Icon, Social Share, Twitter Feed, Facebook Feed, Twitter Feed Carousel, and Instagram Feed. With them, you can link your website to the popular social platforms for content distribution.
- Infographic Page Design
HappyAddons includes various widgets, like Bar Chart, Line Chart, Pie & Doughnut Chart, Polar Area Chart, and Radar Chart. By using them well, you can create stunning infographic posts and pages on your WordPress website.
- Creatives
HappyAddons currently has 25+ creative widgets that are helpful in creating eye-catching websites. Some of the most popular creative widgets are Card, Image Hover Effect, Fun Factor, Image Stack Group, Justified Grid, Creative Button, Liquid Hover Image, Text Scroll, and One Page Nav.
So, once you have the HappyAddons plugin, not only can you add flip boxes but also various other elements as mentioned above. So, definitely HappyAddons could be really worth your money.
Closing Up!
Hope you enjoyed this tutorial. Although it’s a simple widget and easy to use, it really can enhance the appeal and aesthetics of your website. However, to get the best result, there are several best practices you must keep in mind while using this widget.
Don’t overcrowd the front or back. Use clear icons, concise text, and enough spacing. Test and adjust for tablet and mobile views to avoid layout breaks. If the back has a button or link, make sure it stands out and is easy to tap. Match the flip box style with your site’s colors, fonts, and branding.
If you face any trouble while using this plugin, don’t hesitate to contact us with the chat box or support system.

