Are you looking for a guide on how to make a WordPress website private? You’re at the right place!
Some websites show a message that tells us the website is private or password protected when we’re trying to get in. These websites are protected for limited users. You will only access the site after login in with your credentials.
Usually, website owners keep their entire website or specific pages/posts of their website private for special visitors. Alternatively, it could happen because the website is not ready to launch or due to prevent hackers.
In the following guide, we’ll share 3 possible methods to make your private website. You’ll also learn how to keep a specific post or a page private on your WordPress site.
Before diving into the demonstration, let’s explore when you need to private your website.
When You Need to Private Your WordPress Website
Your users will become bored or frustrated when they visit your incomplete website. That’s why most experienced website masters make their websites private while they are building their websites.
In the meantime, you can finish the website design and put all the essential contents. Also, you can test your website and troubleshoot all issues. Then you can launch your WordPress website to the public.
Well, you are able to private a specific post or a page of your website. Like you are the admin or editor of your website and an author write a post that you need to edit before publishing so you make this post private.
Or you have some special posts that only share with your logged-in users that’s why you make those pots password protected or private.
Similarly, you can hide/private your website’s individual pages from the other users and make them available only for your authorized users.
How to Make a Website Private on WordPress (3 Methods)

In this part of our tutorial, we’ll show 3 simple ways to make a website private on WordPress. You can try any of the following methods that will suitable for you.
Method 1: Hide Your Website From Search Engines
Method 2: Make WordPress Site Private Using a Plugin
Method 3: Make Your Website Private Without a Plugin
Let’s get started:
Method 1: Hide Your Website From Search Engines
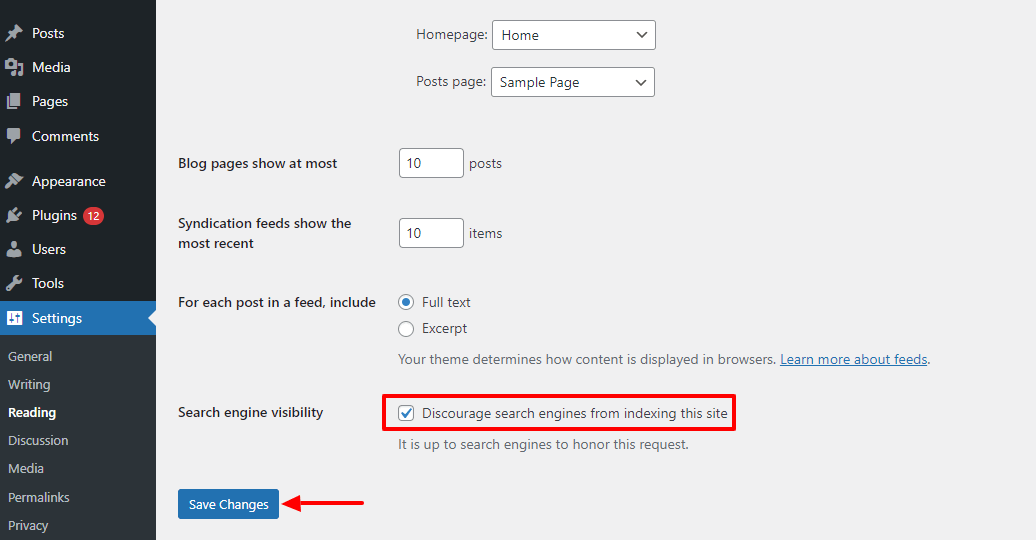
Hiding a website from the search engines like Google means your website won’t be visible in the search results (SERPs). Generally, you can enable this option in the early stage of your WordPress website. If your website is under development and you don’t want to show your website in the SERPs then you should activate this option.
To do this, you need to go to the Dashboard->Settings->Reading area. Then check the Search Engine Visibility option to discourage the search engines from indexing your website.
Method 2: Make WordPress Site Private Using a Plugin
This time we’ll show you how you are able to make your entire website private using a plugin named My Private Site.
First, you need to install and activate the plugin on your website.
Check this guide on how to install a WordPress plugin.
After successfully activating the plugin on your site, you need to update the default settings of the plugin.
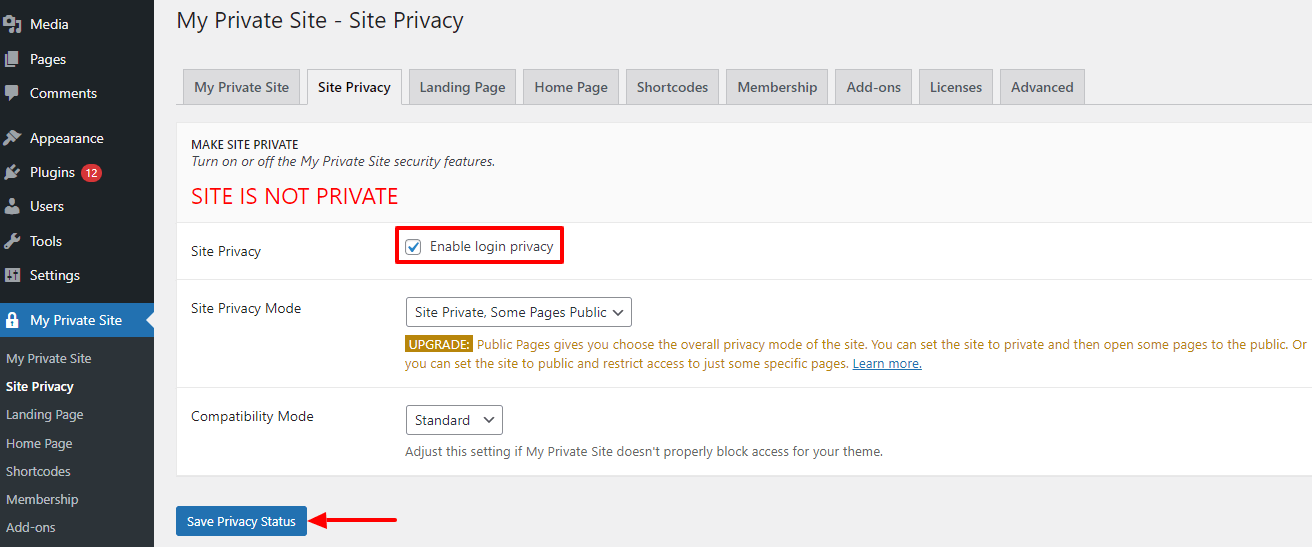
Go to the My Private Site->Site Privacy area. here, you see that our website is not private yet. Let’s make it private. Checkmark the Site Privacy option and click the Save Privacy Status to update the setting.
Now you successfully enable the login privacy for your website.
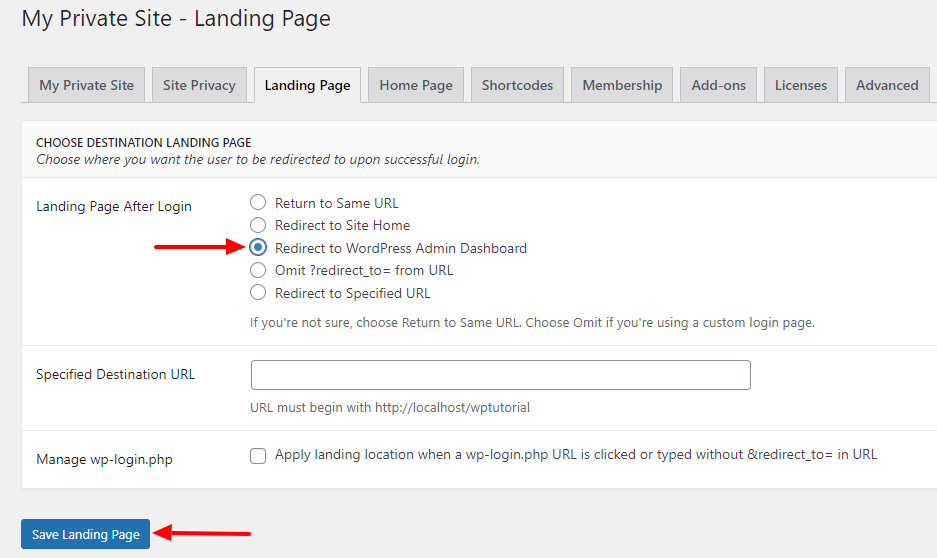
Then go to the next Landing Page tab. Here, you need to checkmark the third option Redirect to WordPress Admin Dashboard.
Now whenever visitors come to your website they will redirect to the login page of your website.
If you want to return a custom page then you should choose the Redirect to Specified URL and insert the custom URL into the Specified Destination URL area.
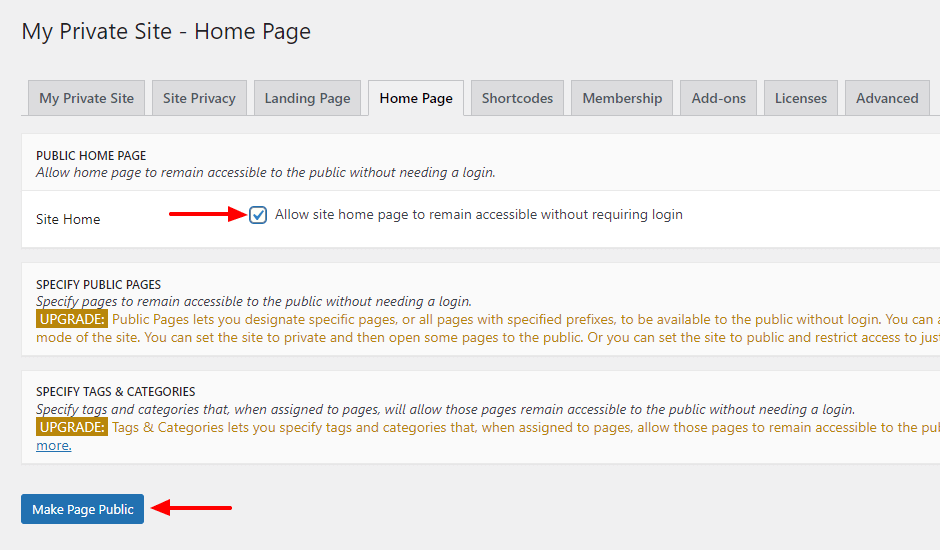
You can still show your Home page to the visitor. Just click the Home Page tab area and checkmark the Site Home, Now your visitor easily visits your website home page.
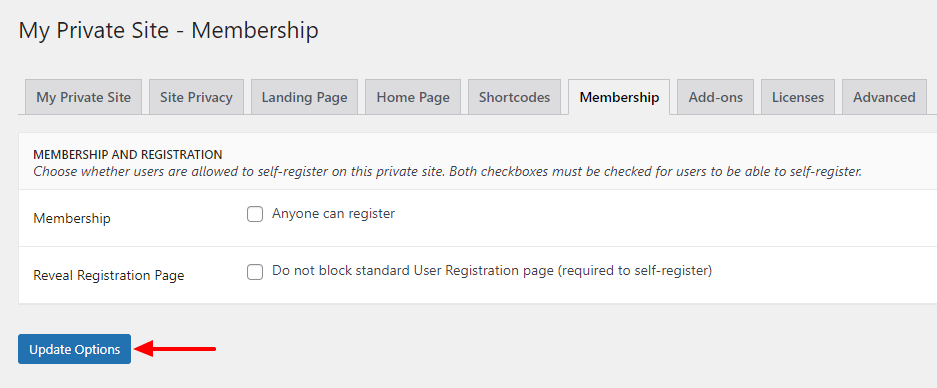
This is optional for those who do not allow members to log into their website. If you allow other users to be a member and allow them to sign up on your site backend area then you can update this setting.
Go to the Membership tab a checkmark the two options Membership and Revel Registration Page to allow users to self-register on the private page.
Finally, check the Update Options to save the setting.
That’s all.
Method 3: Make Your Website Private Without a Plugin
If you don’t want to use a third-party plugin to make your website private, you can do it manually. For doing this manual process, you have to write custom code or hire an expert who will help you to get the job done.
Let’s see how you can use the below custom code to make your WordPress website private.
function make_private_website(){
  global $wp;
  if (!is_user_logged_in() && $GLOBALS['pagenow'] !== 'wp-login.php'){
    wp_redirect(wp_login_url($wp -> request));
    exit;
  }
}
add_action('wp', 'make_private_website');
Copy the code first then you need to go to the Appearance->Theme Editor area.
Then click on the Themes Function and open the function.php file. Finally, you need to paste the code snippet and click on the Update File button to save the file.
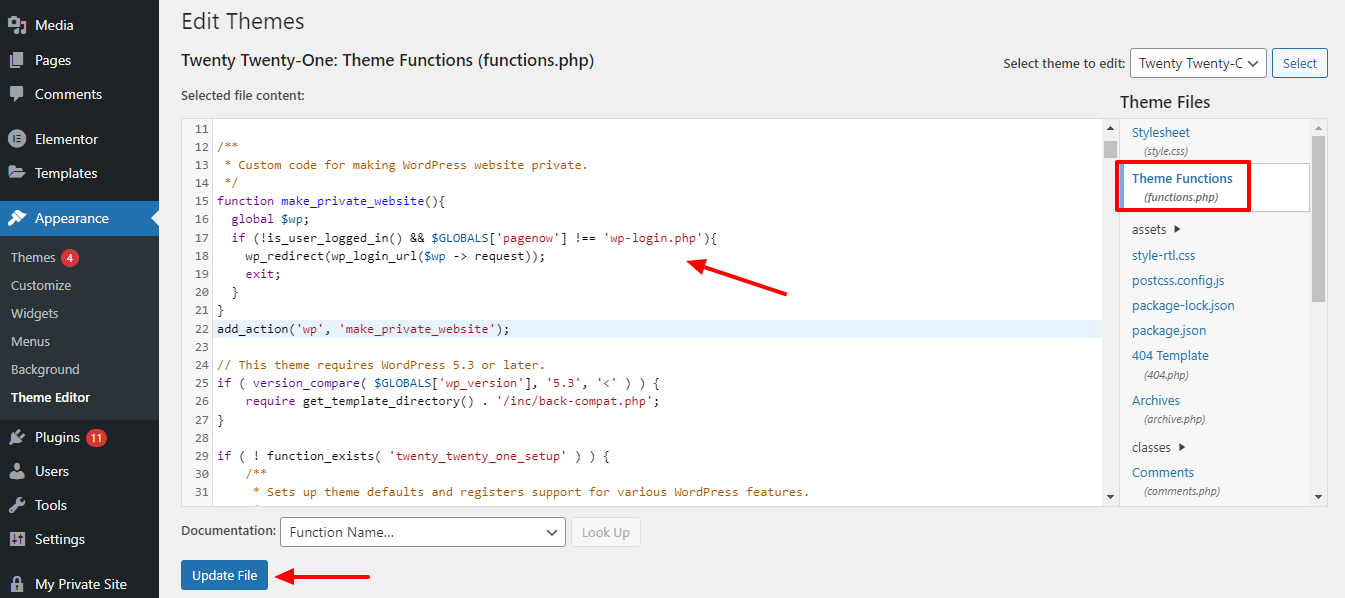
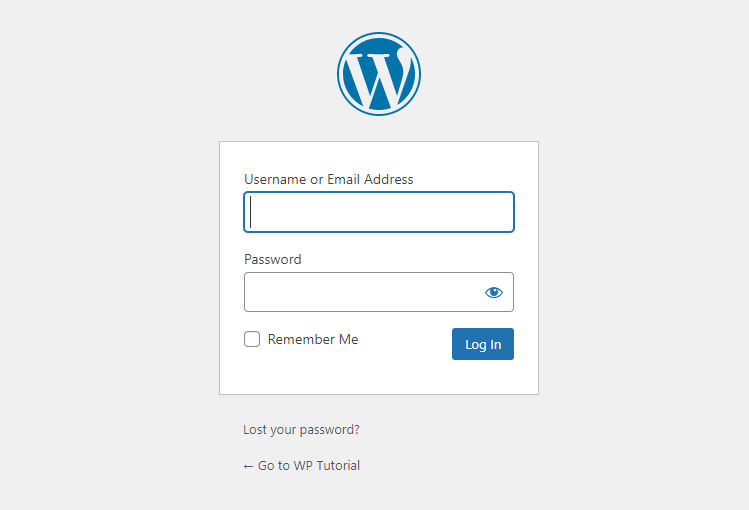
Now whenever someone tries to visit your website then he/she will be redirected to the login page. If there are logged-in users then they will only access your website.
That’s it.
How to Make a Private Blog Post on WordPress
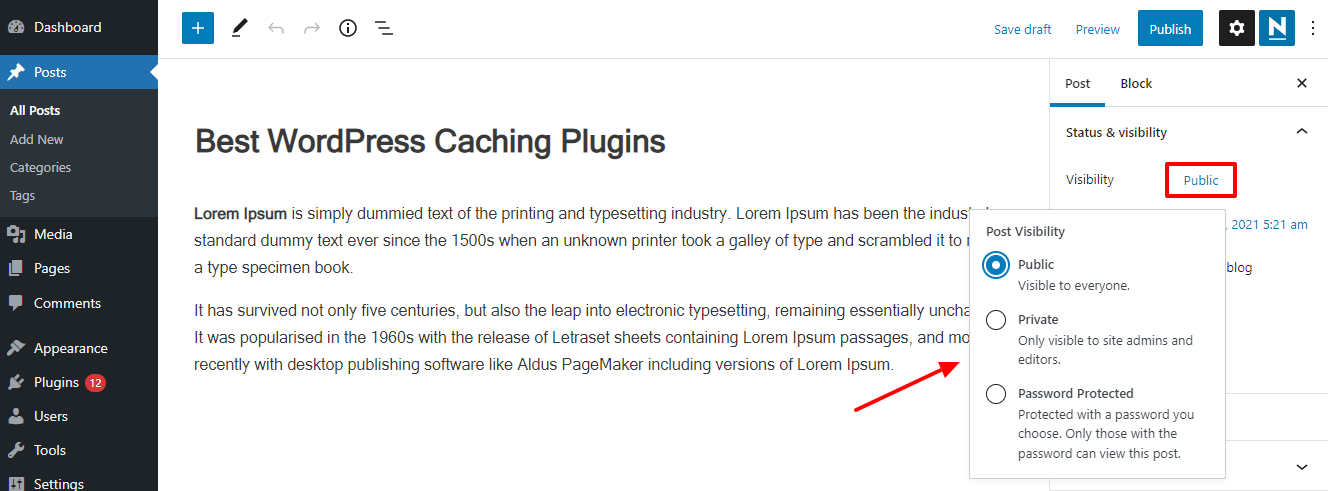
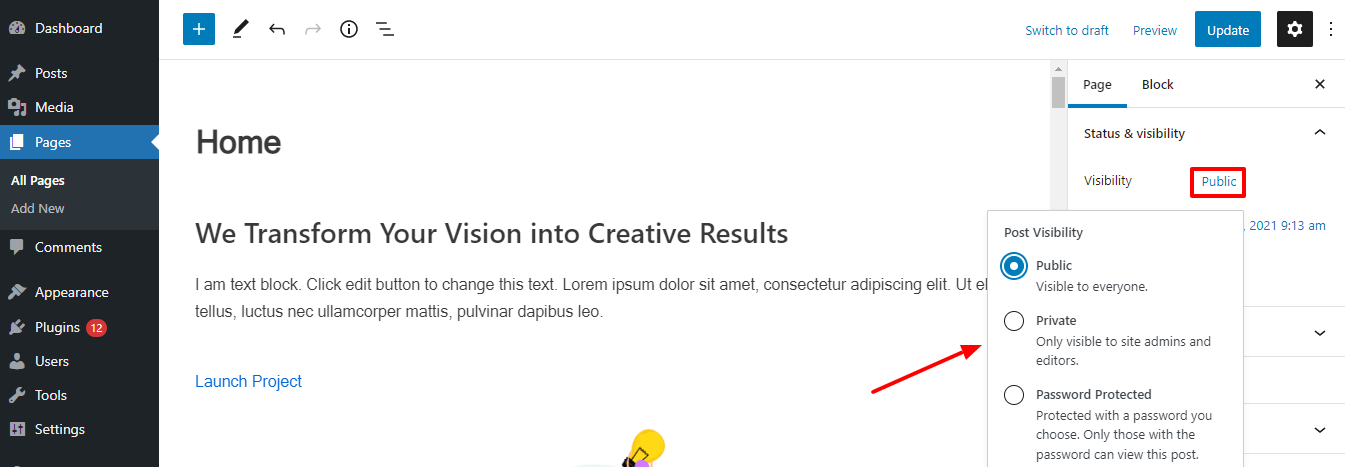
It’s very easy to make a private blog post in WordPress. To do this, you need to open the post in the Gutenberg or Classic editor. Go to the Post-> Status & visibility area. Then click on the Public link. Finally, choose the suitable option based on your purposes.
If you want to display the post only to your admin and editor then you should select the Private option. You can also choose the Password Protected option. By choosing this, the post will only be visible to those who have the password.
How to Make a Private Page on WordPress
Like making a private blog post, you are able to make your private page in WordPress. Just open the page into the default Gutenberg page editor.
Then do the same steps that we’ve shown while making a private post.
That’s it.
FAQs on How to Make WordPress Website Private
Here, we’ve answered some mostly asked questions regarding on make a WordPress website private.
1. Who can see private pages in WordPress?
Only the admin/editor and authorized logged-in users into the WordPress Dashboard can see the private page/post.
2. How to Make Your Whole Site Private (on WordPress.com)
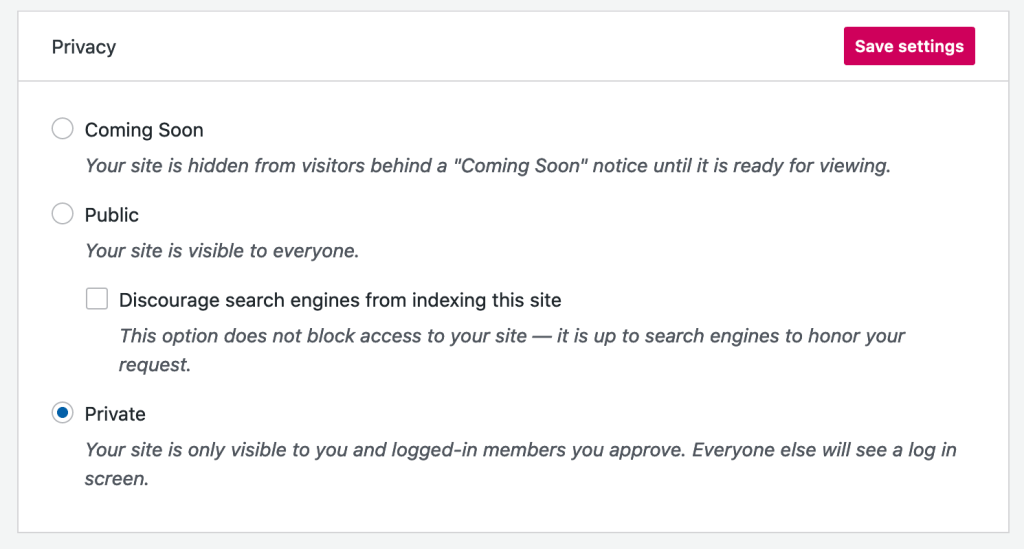
First, log in to your (WordPress.com) account.
Second, go to the Settings->General area.
Third, find the Privacy option and checkmark the Private option to make your site private.
3. How do I stop Google from indexing my WordPress site?
We’ve already mentioned how you can hide your WordPress website from search engines like Google. Check method 1.
Are You Ready to Make Your Website Private
In this article, we have shared three different ways to make a WordPress website private. We’ve shown how to make a single post/page private or password protected. You have learned how to write the custom function into the theme function file for making your website private.
Now you are ready to make your WordPress website private. Let us know in the comment section which method you’ll try to get your site private.
Don’t forget to join our newsletter for getting fresh content regarding WordPress and Elementor.


