

A single image can explain a complex idea more effectively than a hundred-word description. Because you can zoom into the image to inspect every detail of the particular products and items. But by adding the right informative hotspots, you can make all your product images more alive.
The idea of hotspots is an impressive way to display valuable information with images. This can engage users with your products and trigger them to purchase. The Elementor image hotspot widget provides an easy way to create and add hotspots to your images.
This article will show you how to create image hotspots with the Elementor hotspot widget. Before that, take a quick look at what the image hotspot is.
What Is an Image Hotspot?
An image hotspot is a clickable area within an image that displays additional information or guide about specific actions to the users. You can create it by overlaying clickable shapes or buttons on top of an image by defining specific areas.
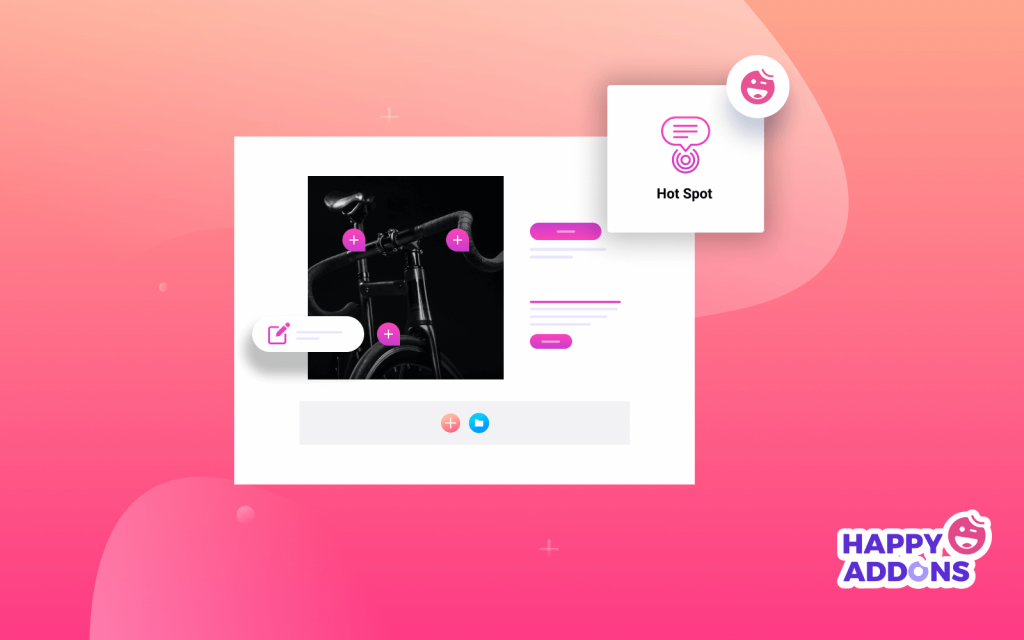
When users click on hotspots, the information appears. Below is an example of how the image hotspot looks. You can see the plus marks on the image. You can replace it with product details, pricing, or links to other related content.

How to Create Hotspots on Images Using the Happy Addons Hotspot Widget
Creating hotspots on images becomes extremely easy if your site is built on WordPress. You just have to install the Elementor and HappyAddons plugins. Wondering why HappyAddons? This is a powerful addon to Elementor with over a hundred versatile widgets and two dozen features.
Step 01: Install the Elementor and HappyAddons Plugin
As HappyAddons is an addon of Elementor, all of its widgets are also called Elementor widgets. So, don’t get confused. Hotspots is a premium widget of HappyAddons. Make sure the following plugins are installed on your site.
Note: You may not need to depend on Elementor Pro once you have the HappyAddons Pro plugin.
Step 02: Drag and Drop the Hotspots Widget to the Elementor Canvas
Find the HappyAddons Hotspots widget on the Elementor panel. Drag and drop it on the suitable area on your Elementor canvas.

Step 03: Choose the Image You Want to Add
You need to add an image. Click on the marked area and choose the image. You can either select an existing image or upload new images.

Step 4: Add Hotspots to the Image
After adding the image, you will see a spot in the image. Next, go to the Spot option on the Elementor panel under the Content tab. The first hotspot will be named item #1 by default. Click it to customize the hotspot options.
Click the + ADD ITEM button to add more hotspots to the image.

The reason to add more hotspots to the image is that you don’t fail to mark the important parts of the image.
After that, you can customize the spots individually. You will find options to add text, icons, and also images. But this decision totally depends on your background image.
Using the X Position and Y Position options, you can move the hotspots on the image to a suitable place as you want.

Come to the TOOLTIP tab to add information to the hotspot. You can write your desired information into the Paragraph box. After that, you can stylize the text by bolding, italicizing, underlining, and linking.
Follow the same process for all the other hotspots.

Step 05: Stylize the Hotspots
As we said earlier, you can customize the hotspots individually. You will find all the customization options in the Style tab on the Elementor panel.

There, you can edit various elements of the hotspot, like
- Width
- Height
- Padding
- Border
- Color
- Text color
- And tooltip background color
You can adjust these options according to your design or layout. You will get the result you desire.

If you want, you can customize the tooltip. Click on the Tooltip option and just adjust until you find the right combination according to your layout.

Step 06: Use the Advanced Section to Add More Effects
If you want to add motion effects, Happy Effects, background, or make the page responsive, click on ‘Advanced‘ to explore those options. The ‘Advanced’ is a default feature of Elementor. Read this Document to learn more about advanced features and their uses.

That’s it.
Note: There is no limit to the number of hotspots one can add to an image map.
Also, using the Elementor Responsive Mode you can easily determine whether the image is perfectly aligned across all the platforms.

Hotspot Images: Use Cases and Importance
‘A picture is worth a thousand words’ is a well-known English phrase. But that doesn’t mean you can say everything with a single image. That is where hotspot images make the difference. Because this feature provides additional context to your images. Also, it makes the images user-friendly and interactive.
When you combine images with text, you will get a great response. Here are some of the examples of where image hotspots will come in handy.
Product Marketing
In 2021, there are anywhere between 12 to 24 million online shops.
digital intheround
This is an obvious choice. There are millions of online stores globally. So, why would users choose your store? What are you doing differently than other stores? – Hotspot in product images.
In order to stand out from the rest, using hotspots in product images is a great idea. It will reveal extra pieces of information about the product. But the main attraction is that customers will be able to grasp the concept of your product just by clicking on the product image.
Also, you can easily bring out the unique points rather than describing them in the text. Because there is a possibility that the user might miss the description.
Infographics
Infographics are a great way to convey information to your users. You will find that many infographics contain tutorials, stats, guides, etc. In other words, infographics are very interactive.
However, if you can apply the hotspot feature to these infographics, then it will become more responsive. You can add extra information without altering the design of the infographic.
Learning
Image hotspots are a great way to show interactive images in class. Here are some examples,
Biology
Well, we don’t have to tell you that the best way to learn about the human body is through images. And with image hotspots, you can add all body part names by marking the right spots. Here is a short example,

Geography
Well, if you ask students which class they find most boring and hard, Geography will make the list. Because it is hard to remember the name of any country and continent by reading. So, how about just showing them on the map? Yes, with hotspots, you can mark the country on the map. That way, students will remember all the countries easily.

History
Well, it is unusual to use the hotspot feature in history classes. But, it can be used. When explaining a historical event involving famous people, you can mark who it is using the hotspot. This way students will easily identify famous legends and also remember any historic event.
FAQs Regarding How to Create Image Hotspots with the Elementor Hotspot Widget
-
What is a Hotspot Image?
Hotspots are points of areas in the image that when clicked, pop-up a window. That pop-up can contain tooltips, text, videos or an URL link.
-
Which Are the Different Types of Image Hotspots?
There are different types available. Like,
1. Image-Based Content Types.
2. Collage.
3. Drag & Drop.
4. Image Hotspots.
5. Image Slider. -
What Are the Possible Shapes When Creating a Hotspot?
When you are designing a hotspot, you can use rectangular, circular, and polygonal hotspots.
-
How Do I Use Image Activity Hotspot?
If you want to make the image interactive then you need to use Image Hotspots. When the user clicks on a hotspot, a pop-up containing texts, images or video is displayed. You can configure,
1. The number of hotspots in an image
2. The placement of each hotspots
3. The customization of the hotspots
Drive More Conversion with Interactive Image Hotspots
When you design a website, you should always look for ways to drive more users and engage them. Hotspot images can be a viable option. You can make your images more interactive and engaging. But more so, it will add value to your website and its content.
And you can see from our article that creating image hotspots with HappyAddons Hotspot Widget is very easy. With Elementor’s responsiveness feature, you can easily check how the image will display across all devices and screen sizes.
If you have any queries, don’t forget to reach out to us.


