



Adding floating elements to your WordPress website can make your design more dynamic and eye-catching. These moving objects, like floating shapes, icons, or images, create a modern and interactive look that instantly grabs visitors’ attention.
If you’re using Elementor, you can create these floating effects without touching a single line of code. You can make text, buttons, images, or even sections float in different directions with custom speed and transparency. Once you learn how to do this, you’ll feel like a powerful web designer.
In this step-by-step guide, we’ll show you how to add Elementor floating elements to your WordPress site with ease. You’ll learn how to use Elementor’s built-in motion and floating controls to create stunning visual effects that enhance user experience. Let’s get started!
Which Is Better for Floating Elements: Elementor or HappyAddons?
Elementor itself has an option to create floating elements. Besides, HappyAddons, which is a well-known addon of the Elementor page builder plugin, also has an option to create floating elements. But they approach this feature with different goals and styles.
Elementor’s native motion effects focus on simple, elegant animations that enhance the overall design without adding too much complexity. On the other hand, HappyAddons provides more advanced floating controls for designers who want fine-tuned, multi-dimensional motion effects that stand out.
The following table compares the differences between Elementor and HappyAddons in terms of floating effects. Please take a look at them.
| Aspects | Elementor | HappyAddons |
| Animations | Includes basic motion options like Translate, Rotate, and Scale effects | Offers advanced controls with X, Y, and Z axis animations for 3D-like floating effects |
| Best For | Clean and subtle movements | Complex, multi-layered animations where elements can bounce, spin, and float simultaneously |
| Combination of Effects | Can integrate with Elementor’s other motion and scrolling effects | Allows combining Translate, Rotate, and Scale together for more dynamic, custom results |
| Control Options | Provides standard controls like duration and delay | Includes advanced controls for speed, direction, and range |
In this tutorial post, we’ll show you how to create Elementor floating elements using both these tools. Keep reading!
How to Create Floating Elements and Effects with Elementor
To get started with the process, you need the following plugins installed and activated on your site.
Once they are ready on your site, start following the tutorial as explained below.
Step 01: Go to Floating Elements
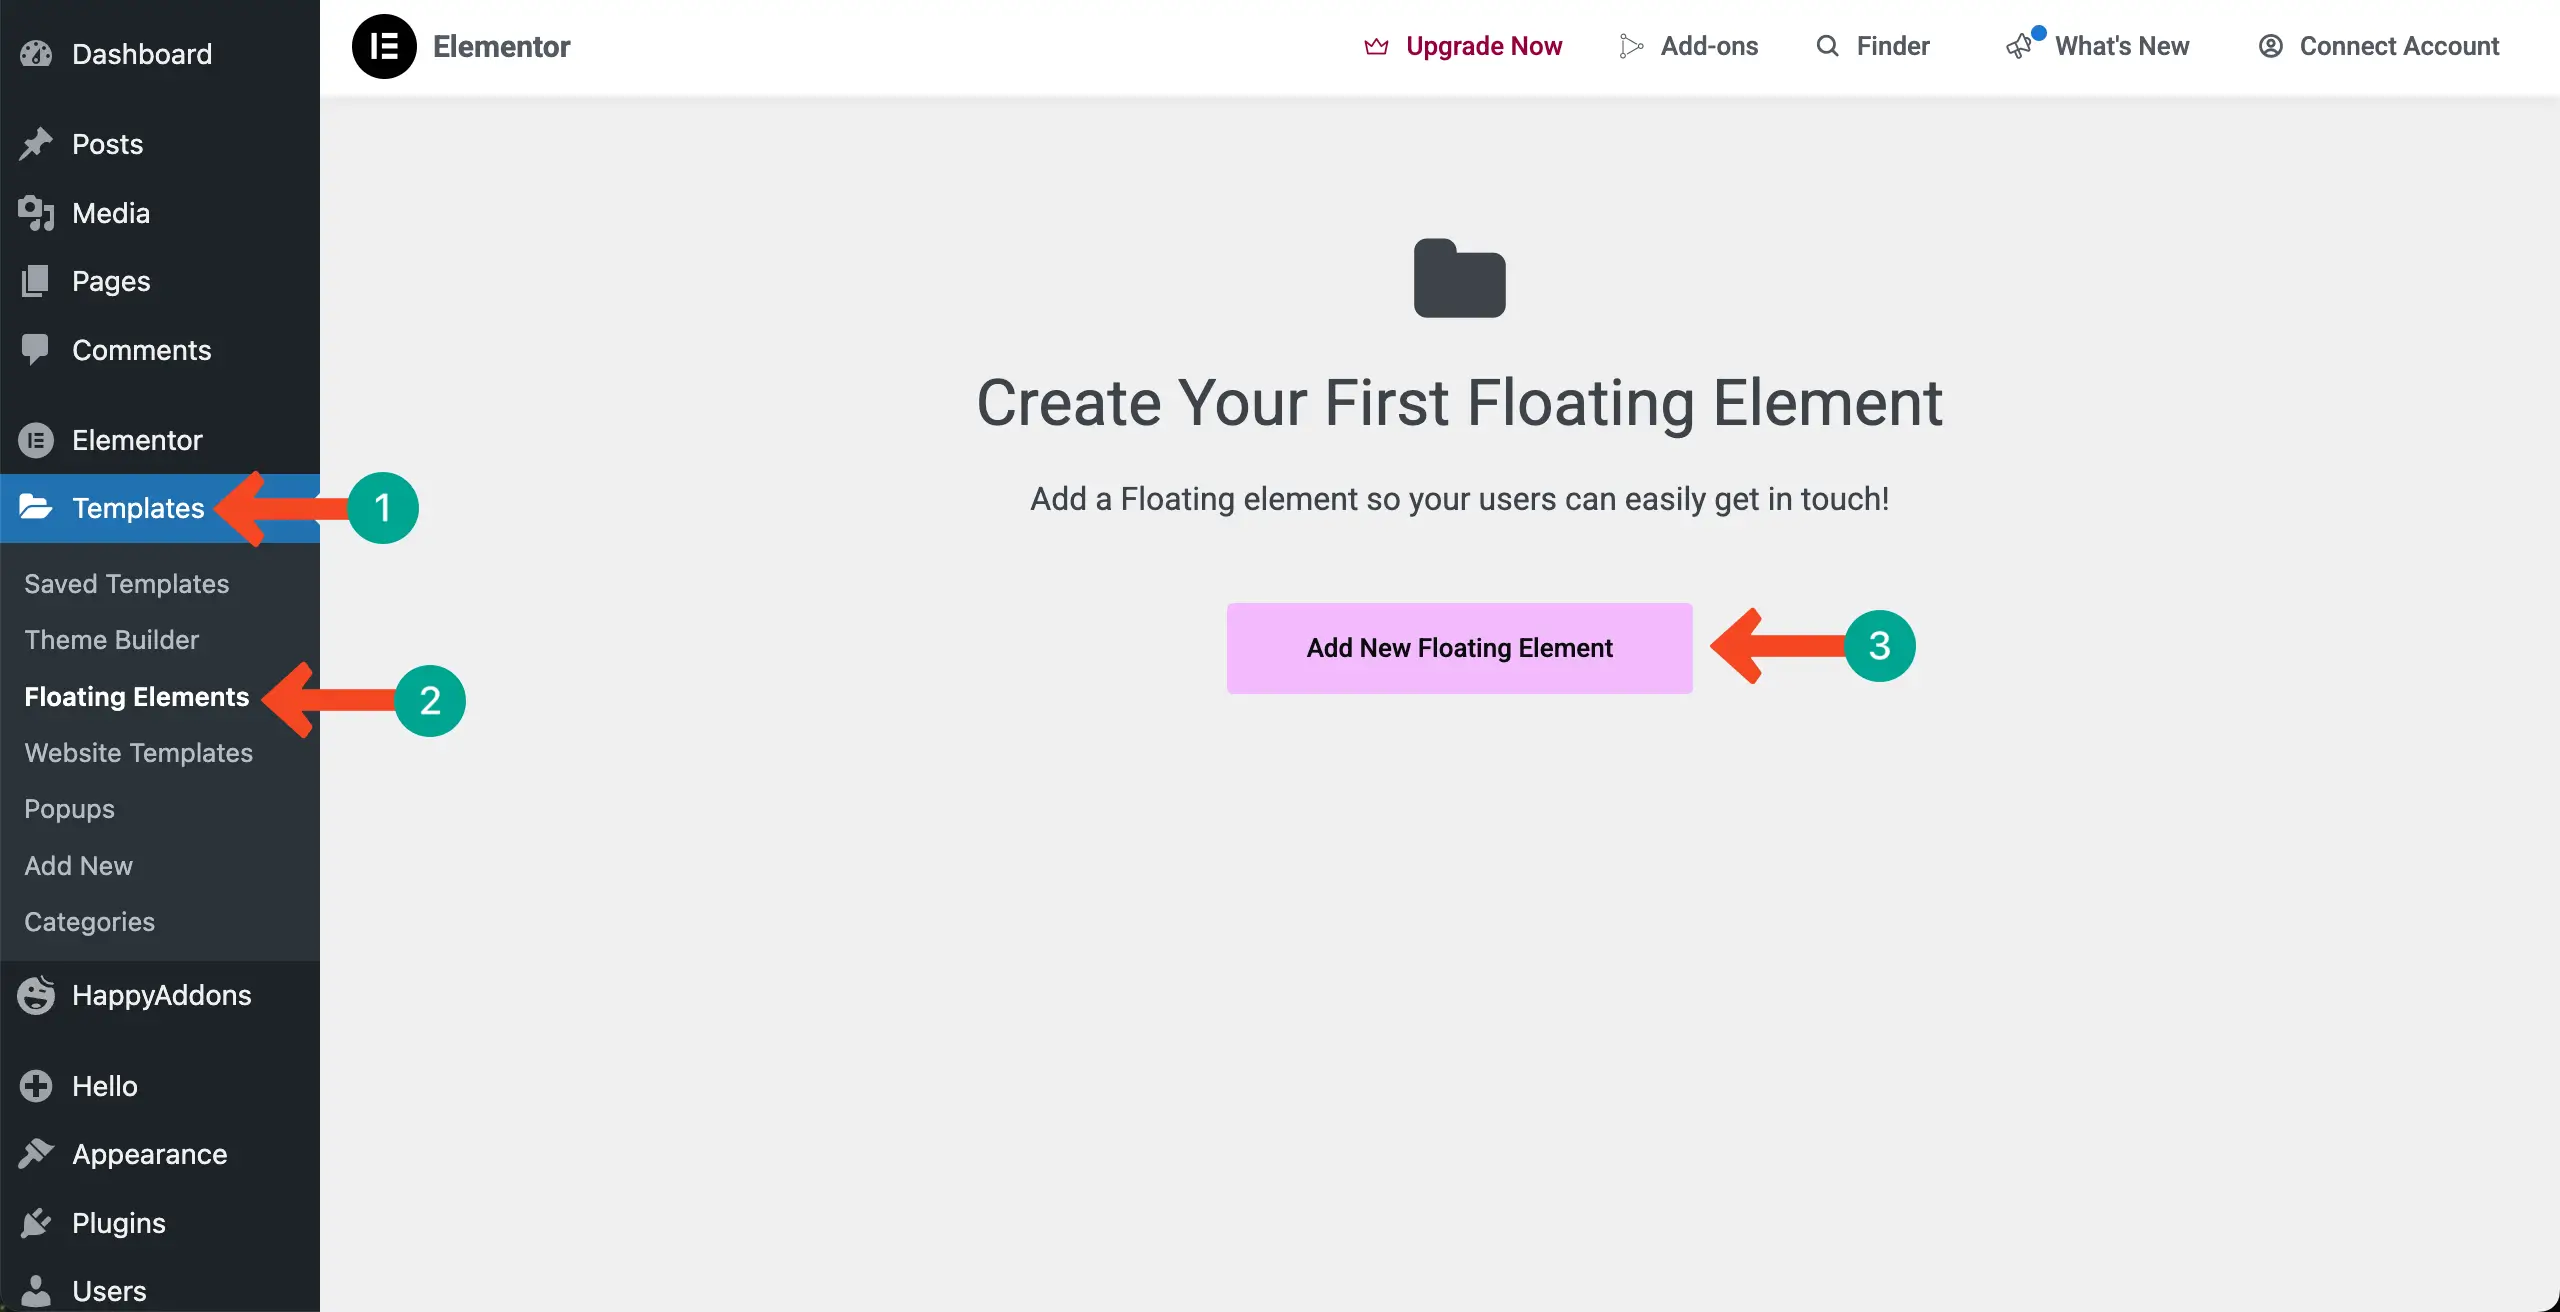
After logging into the WordPress dashboard, navigate to Templates > Floating Elements. Then, click the Add New Floating Element button.
Step 02: Select a Floating Element
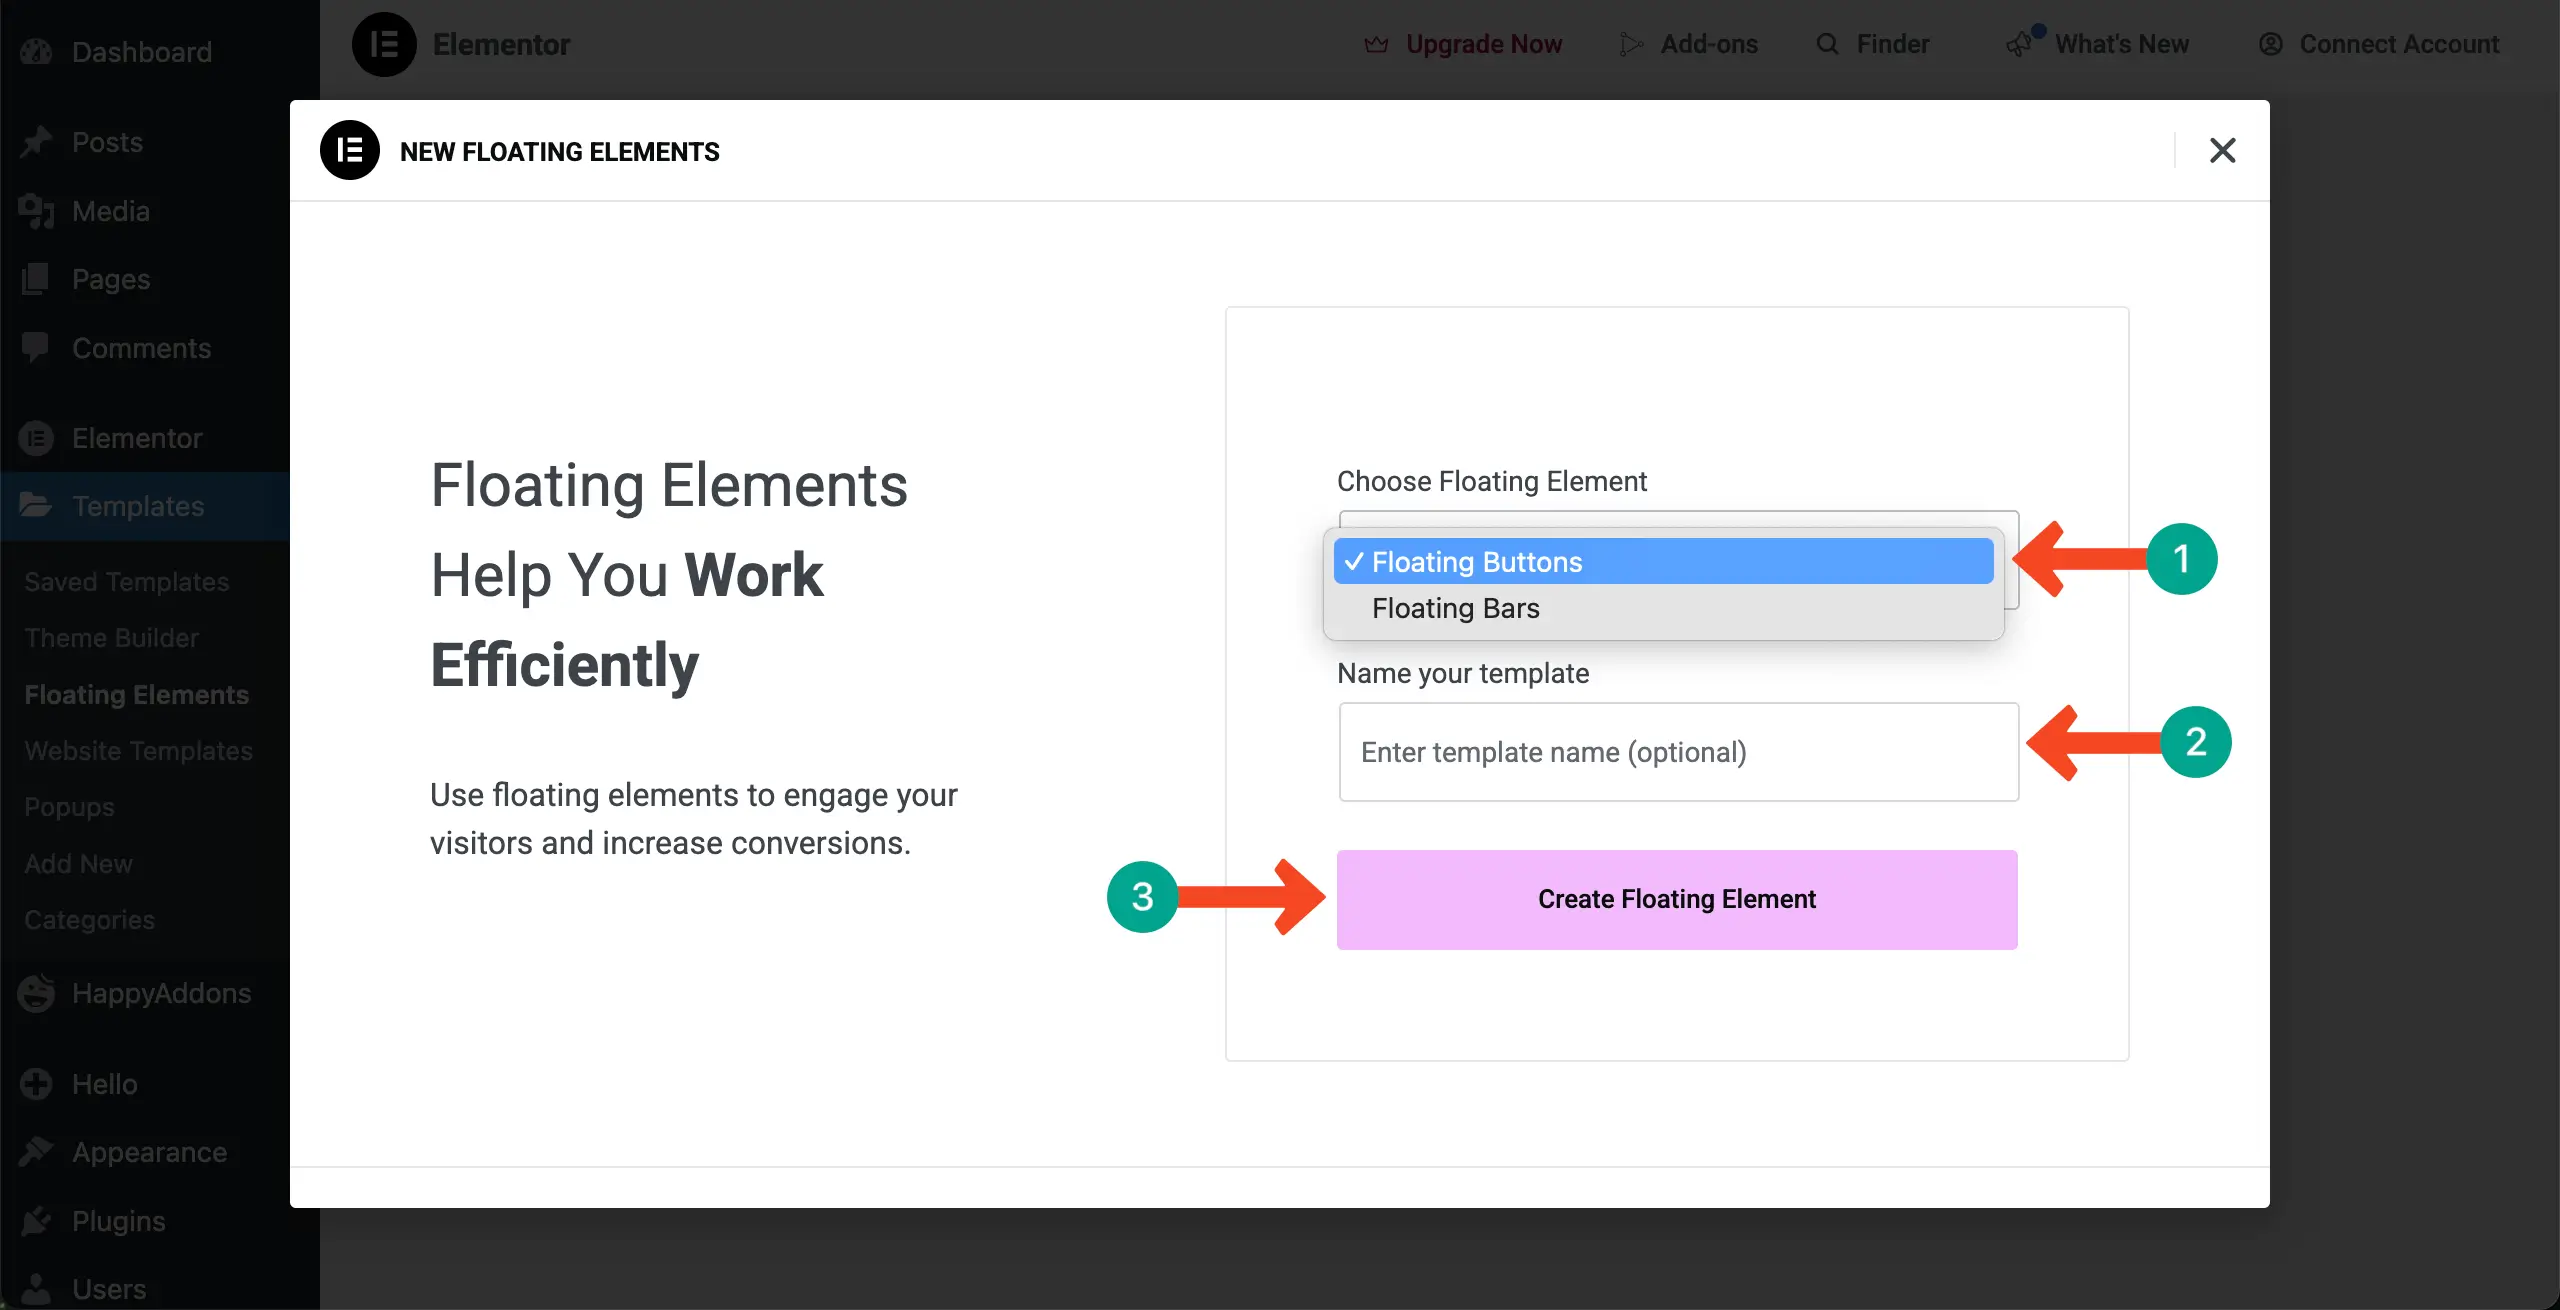
A popup will show up. You’ll be allowed to choose a floating element – whether buttons or bars. Choose an element type you like. For this tutorial, we’ll select Floating Bars.
Then, give your template a name you like. Finally, hit the Create Floating Element button.
Step 03: Choose a Template for the Floating Button
The template library will appear on your screen. Explore the library and hover over the one you finally like. You will see the Insert button. By clicking the Insert button, you can add the template to your website.
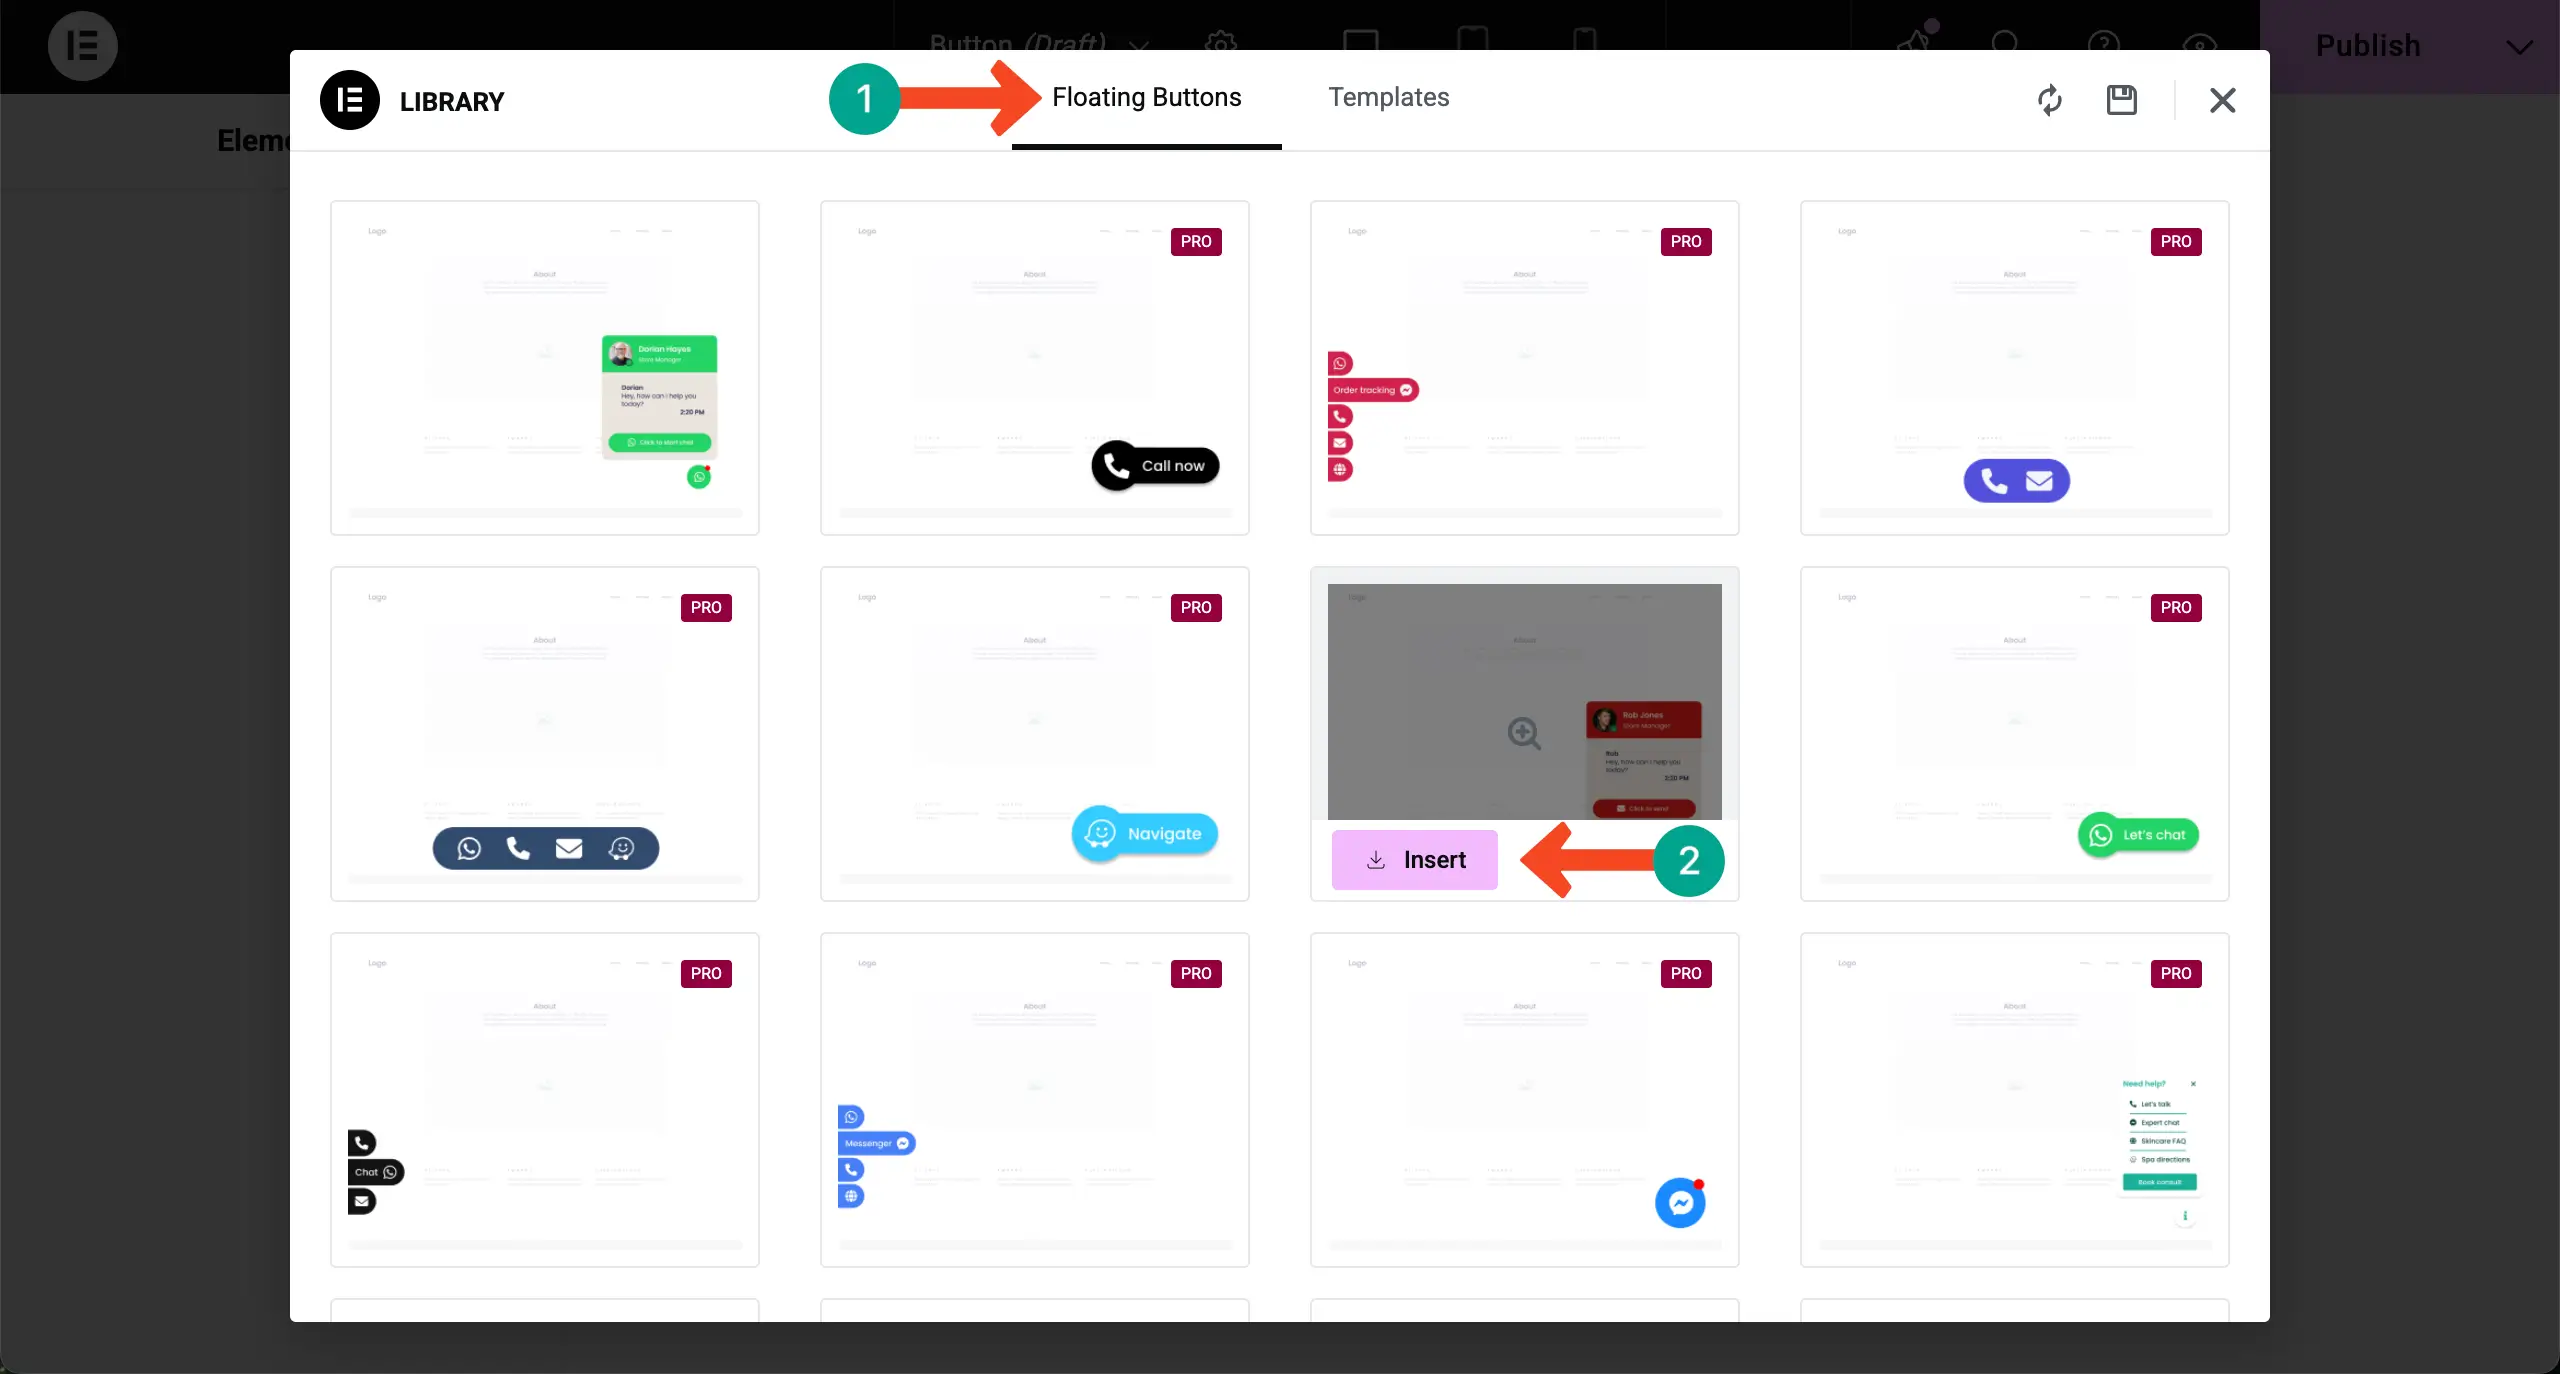
Step 04: Customize the Floating Button
Now the process of editing and customizing the button is completely similar to any Elementor widget. The interface is also the same. So, we don’t have to guide much in this case.
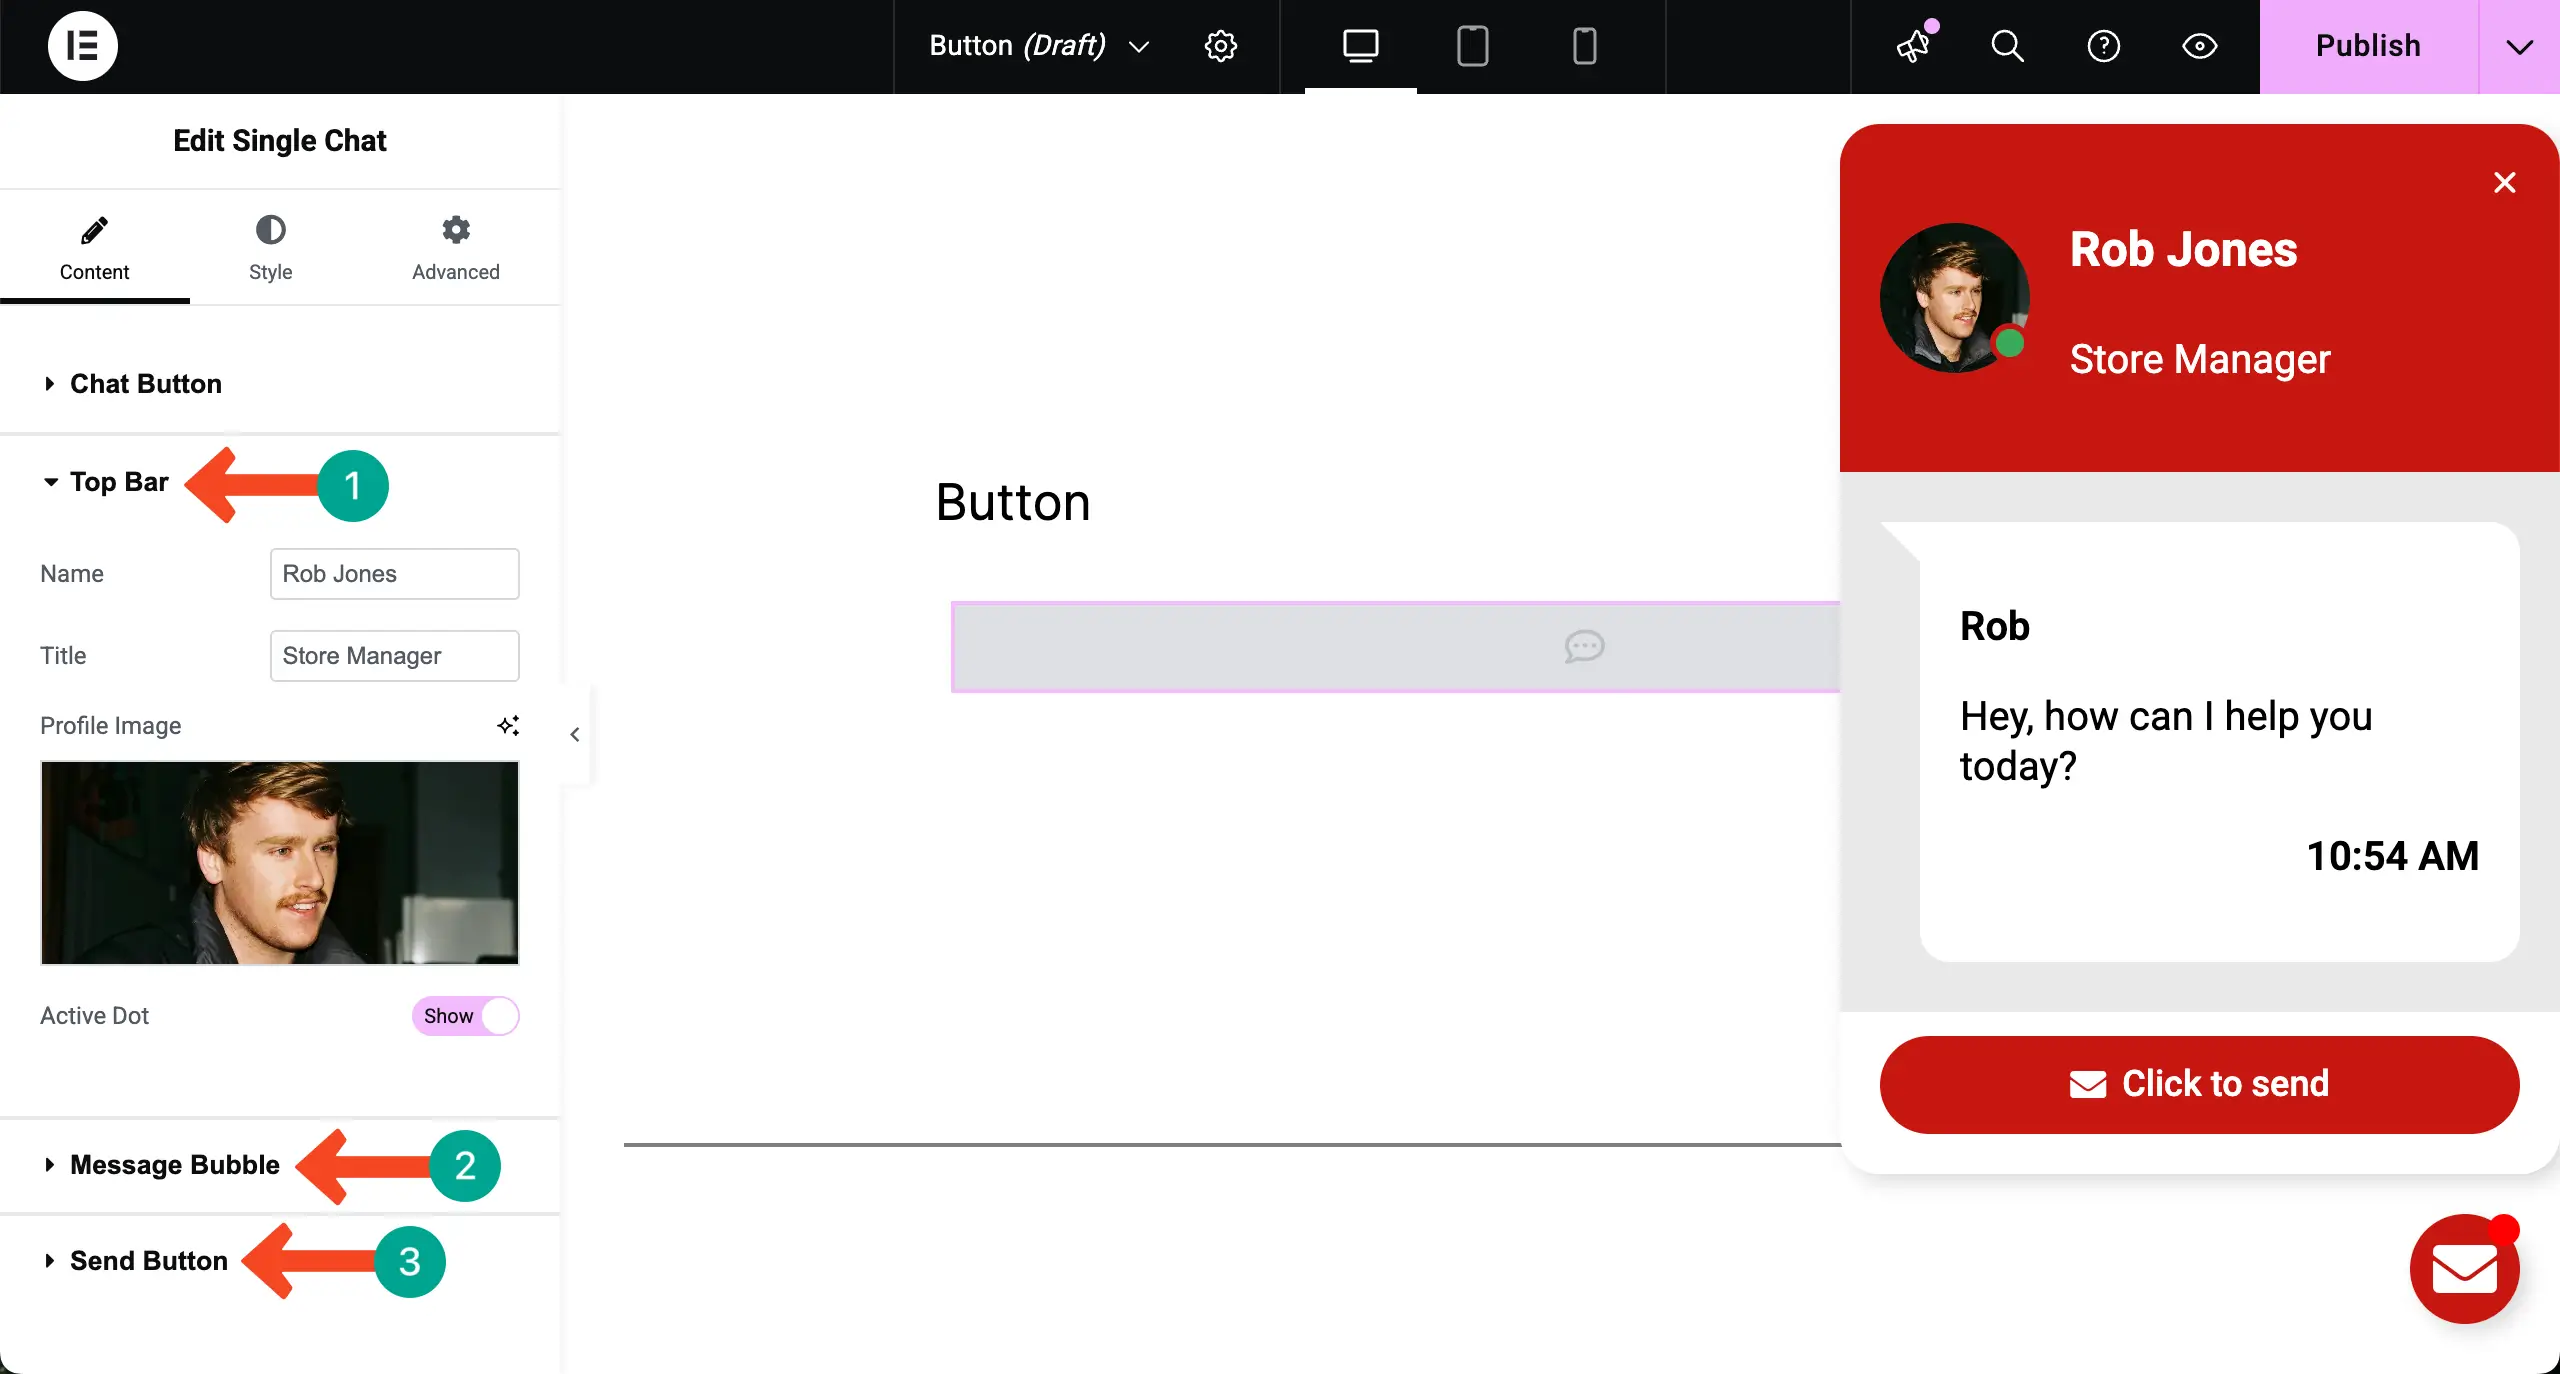
From the Content tab, you can
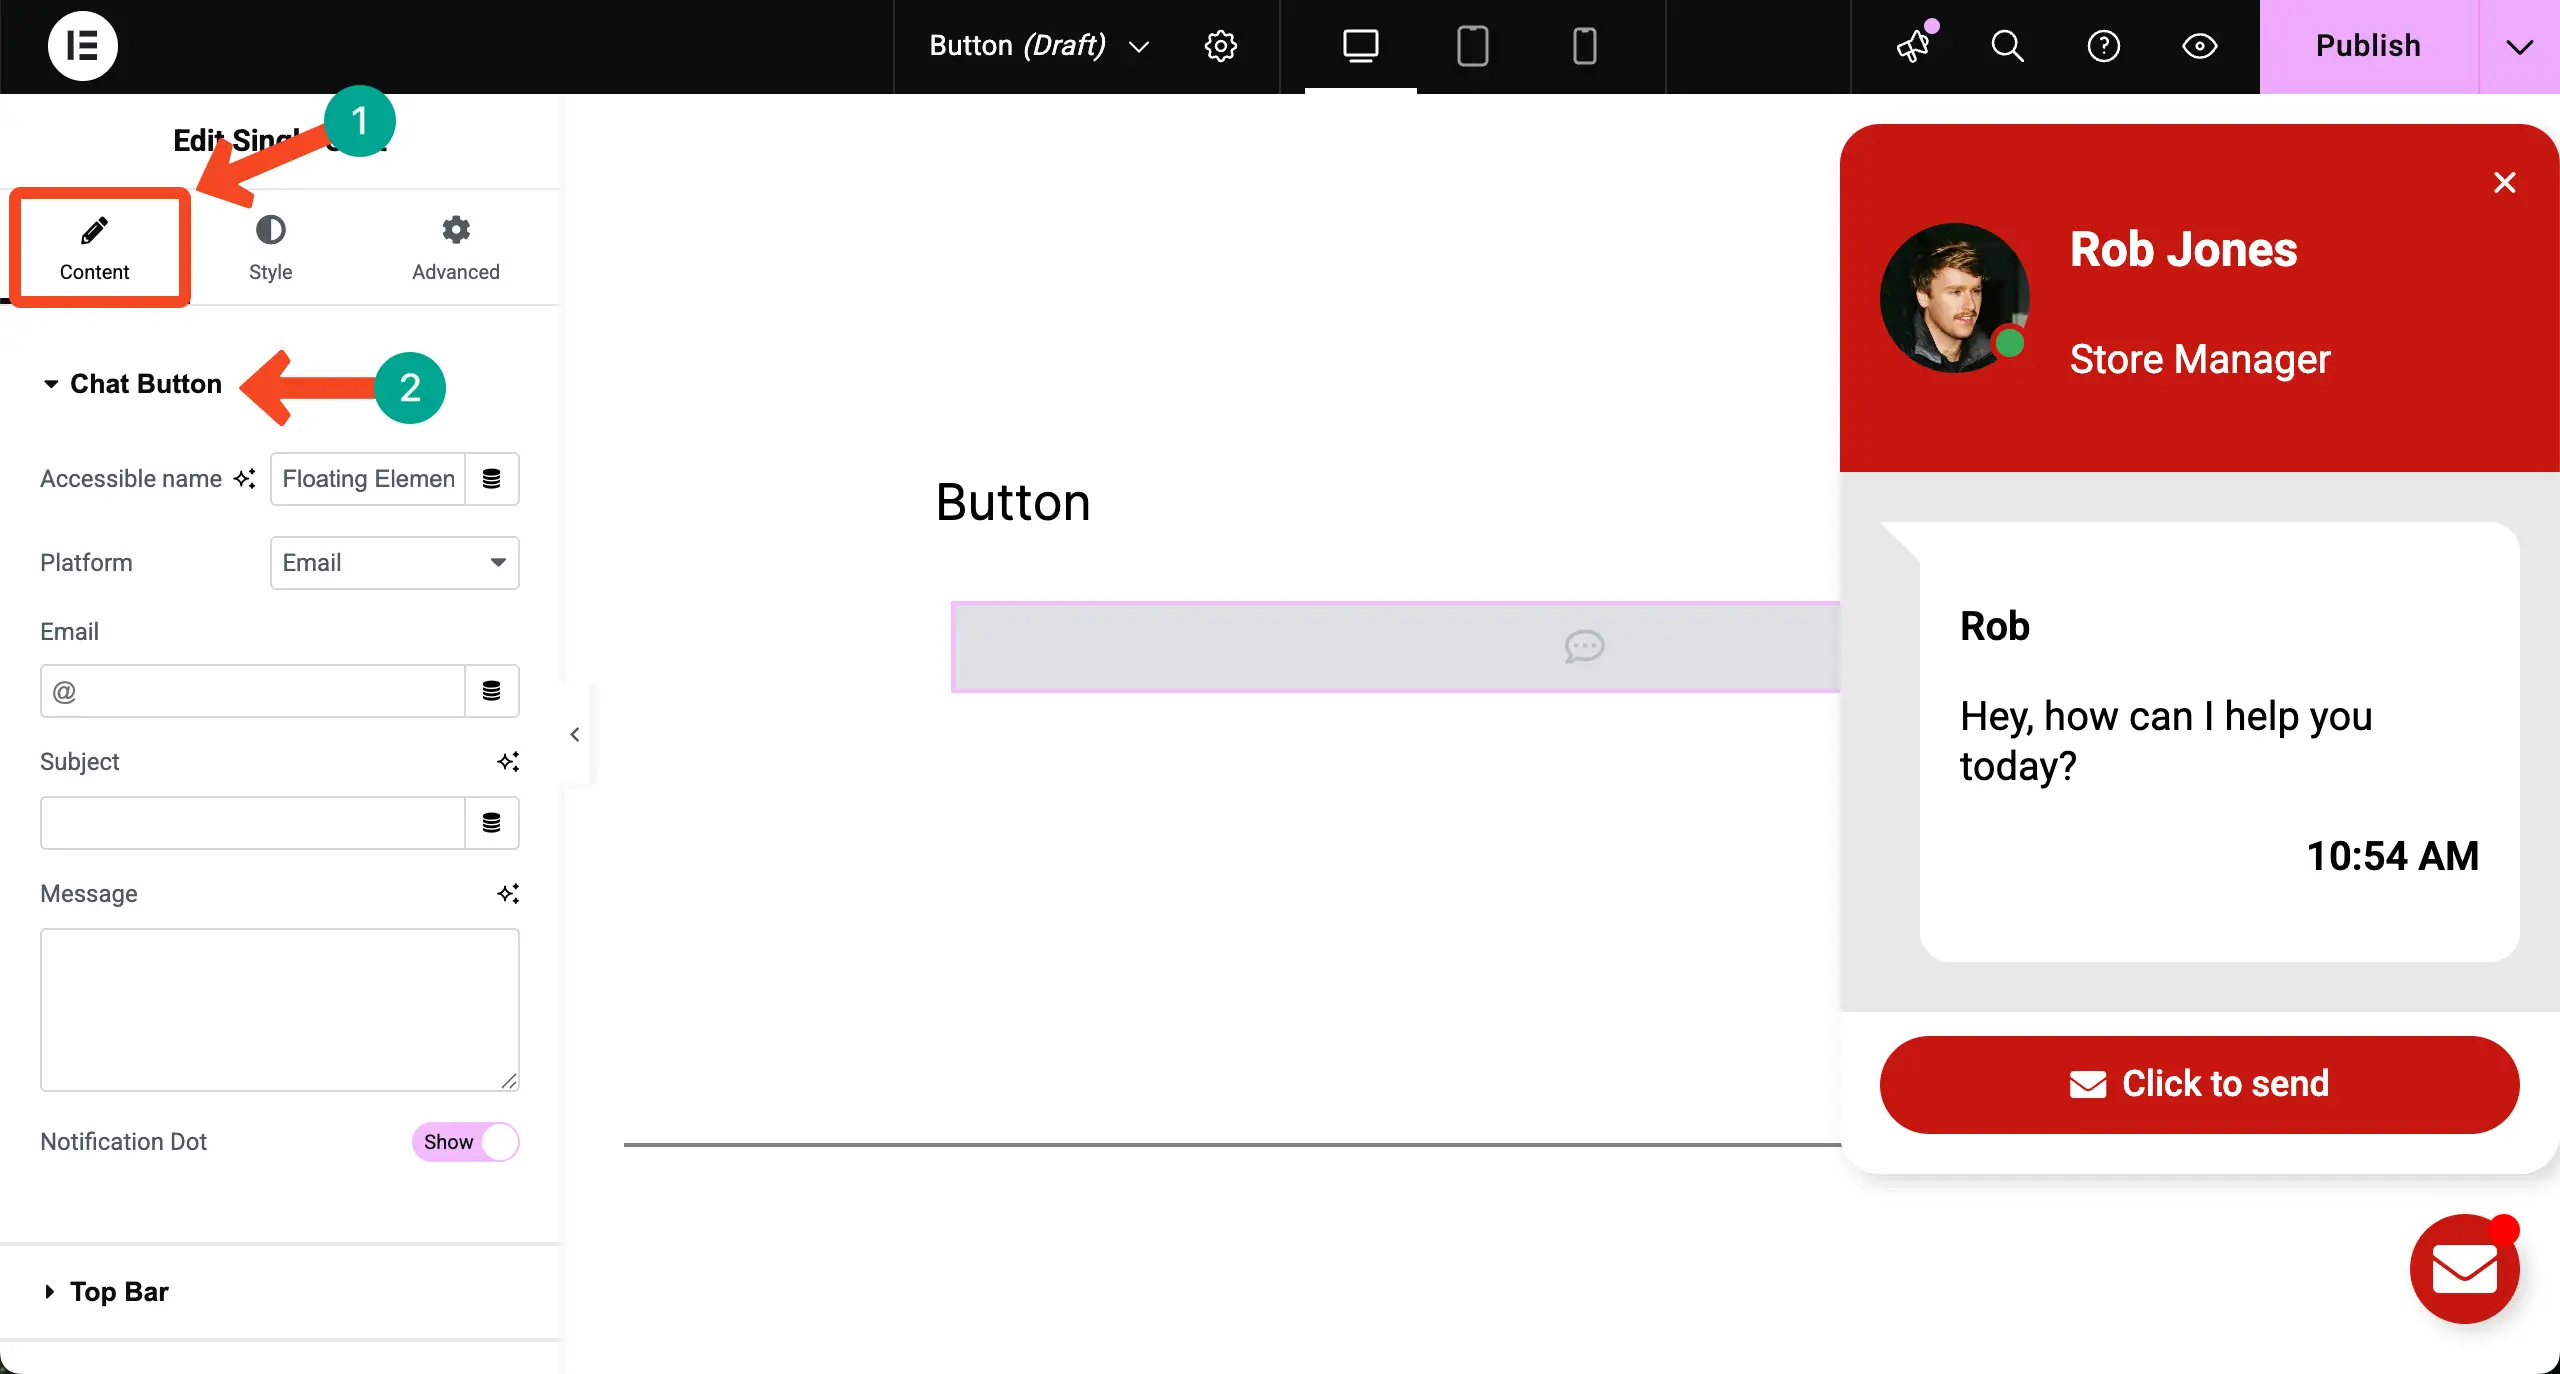
In the same way, expand all the other sections under the tab and customize content for the chat box.
When the content part is done, come to the Style tab. From here, you can do everything to adjust the appearance of the floating button and the chat box as you want by expanding all the sections.
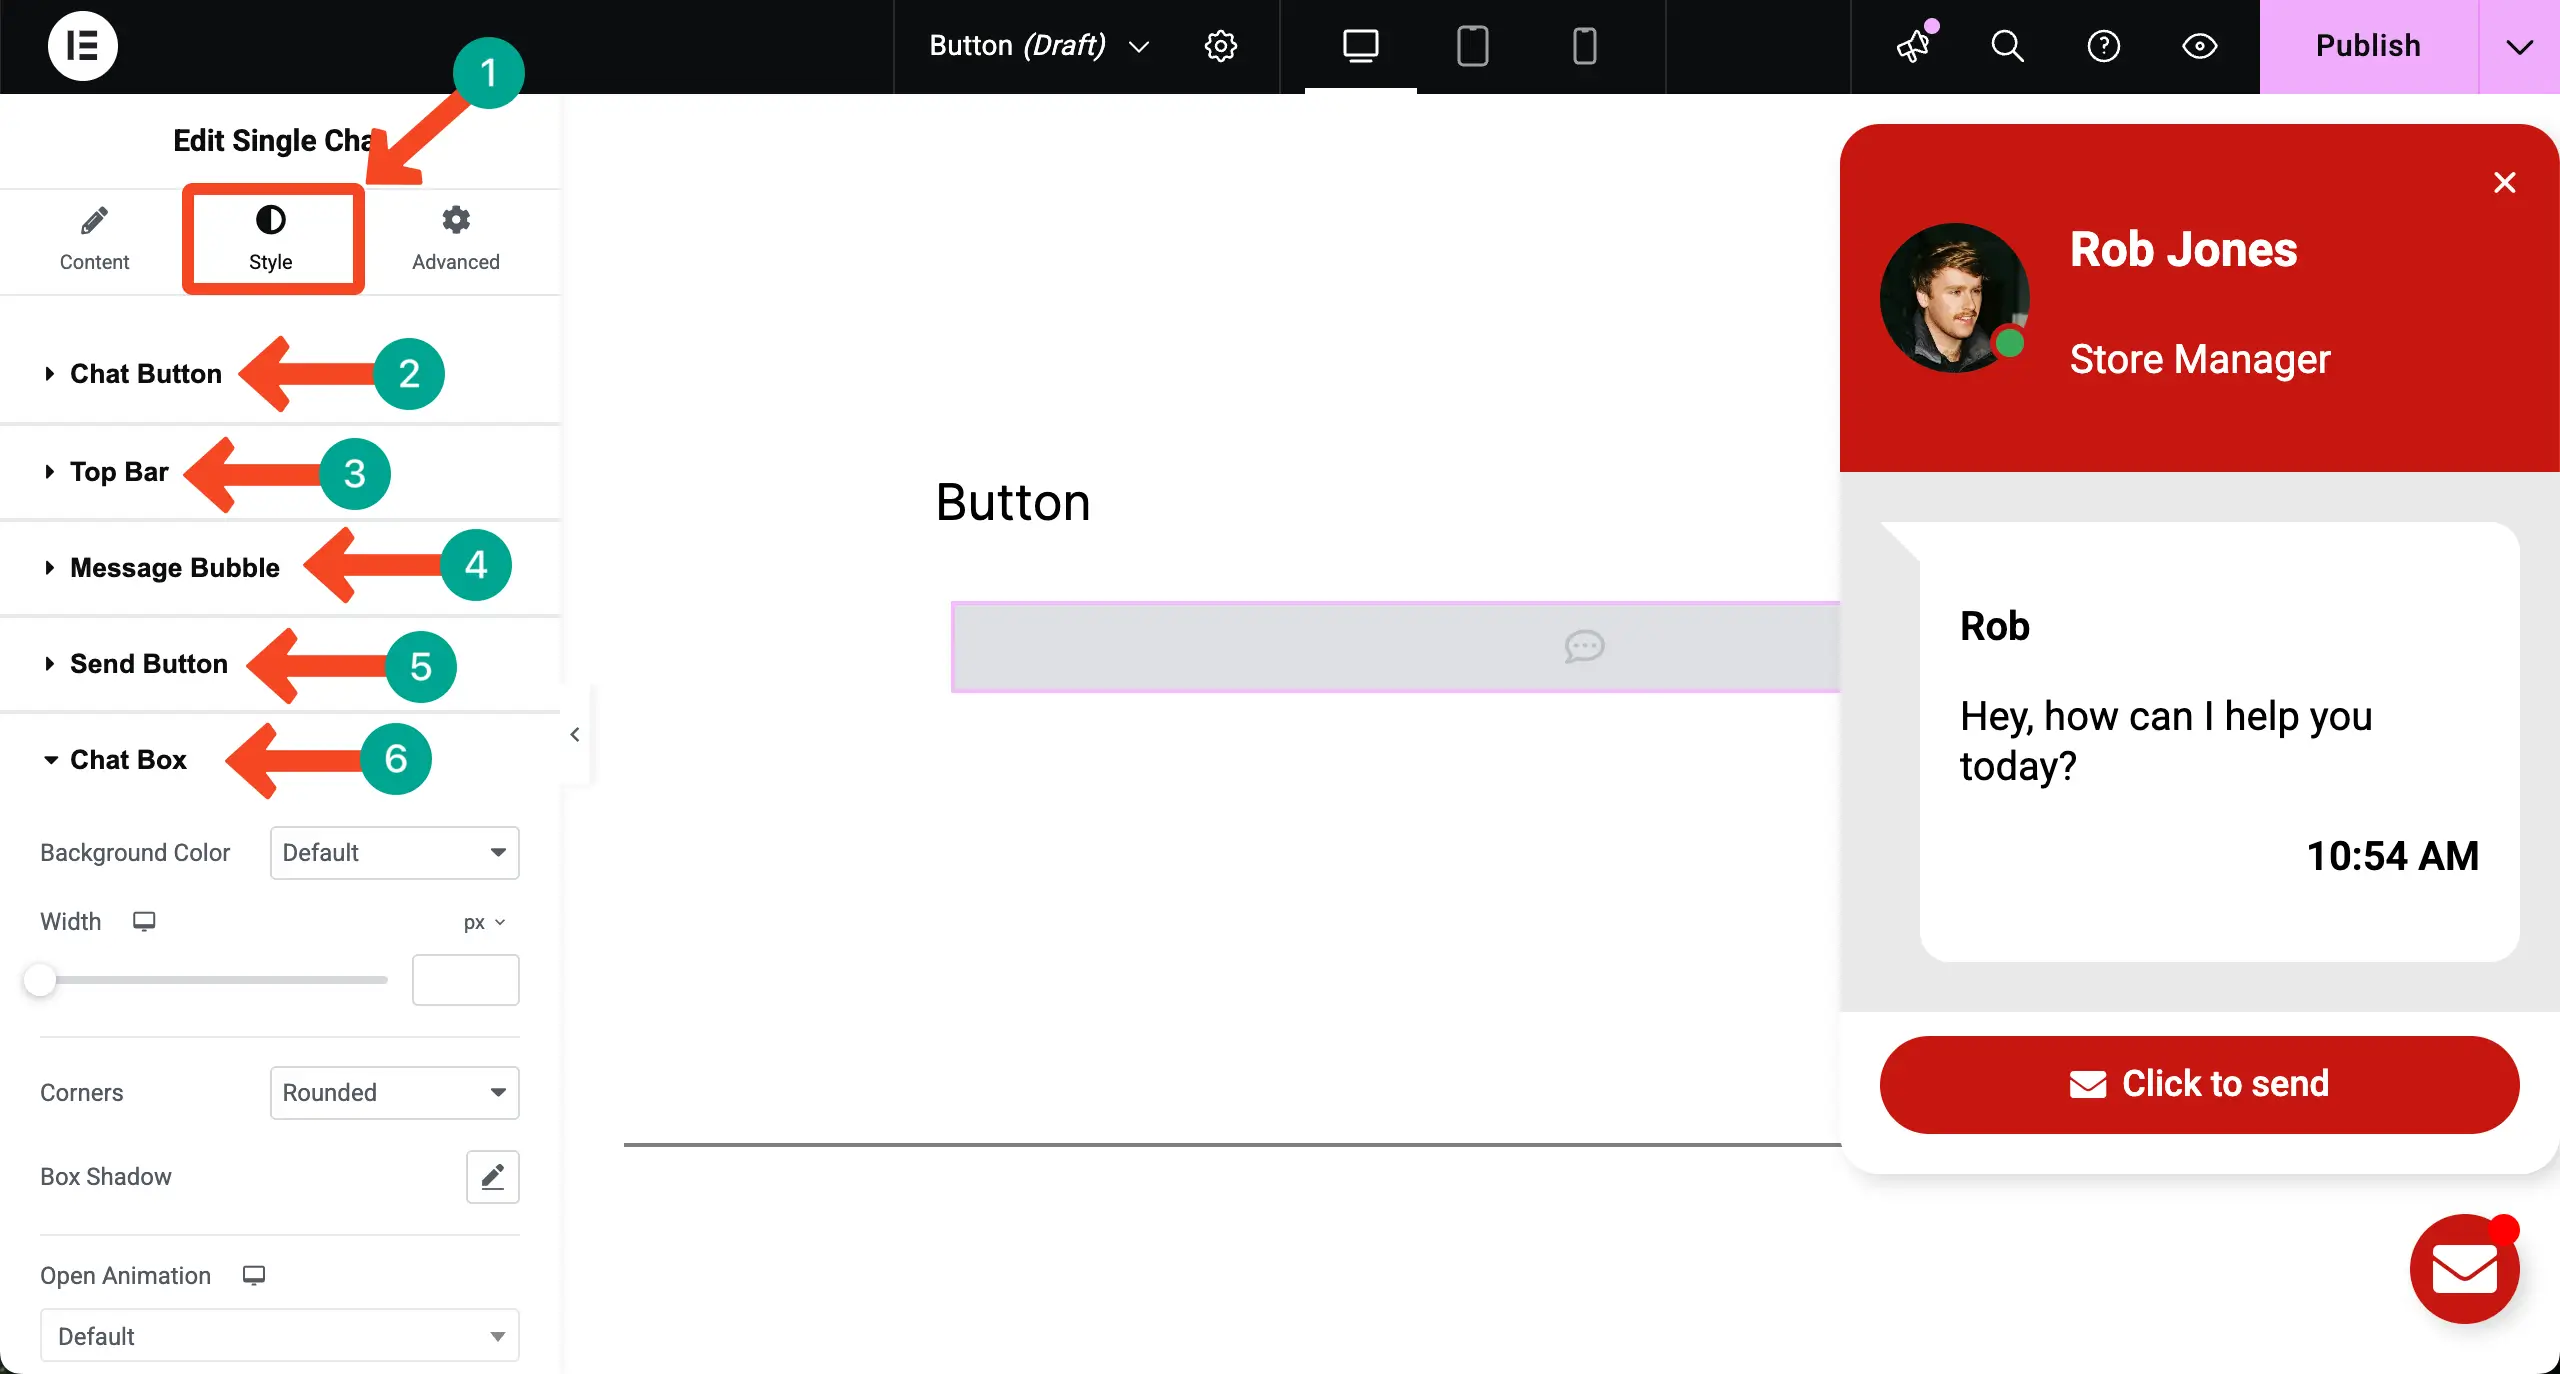
Step 05: Publish and Add Conditions
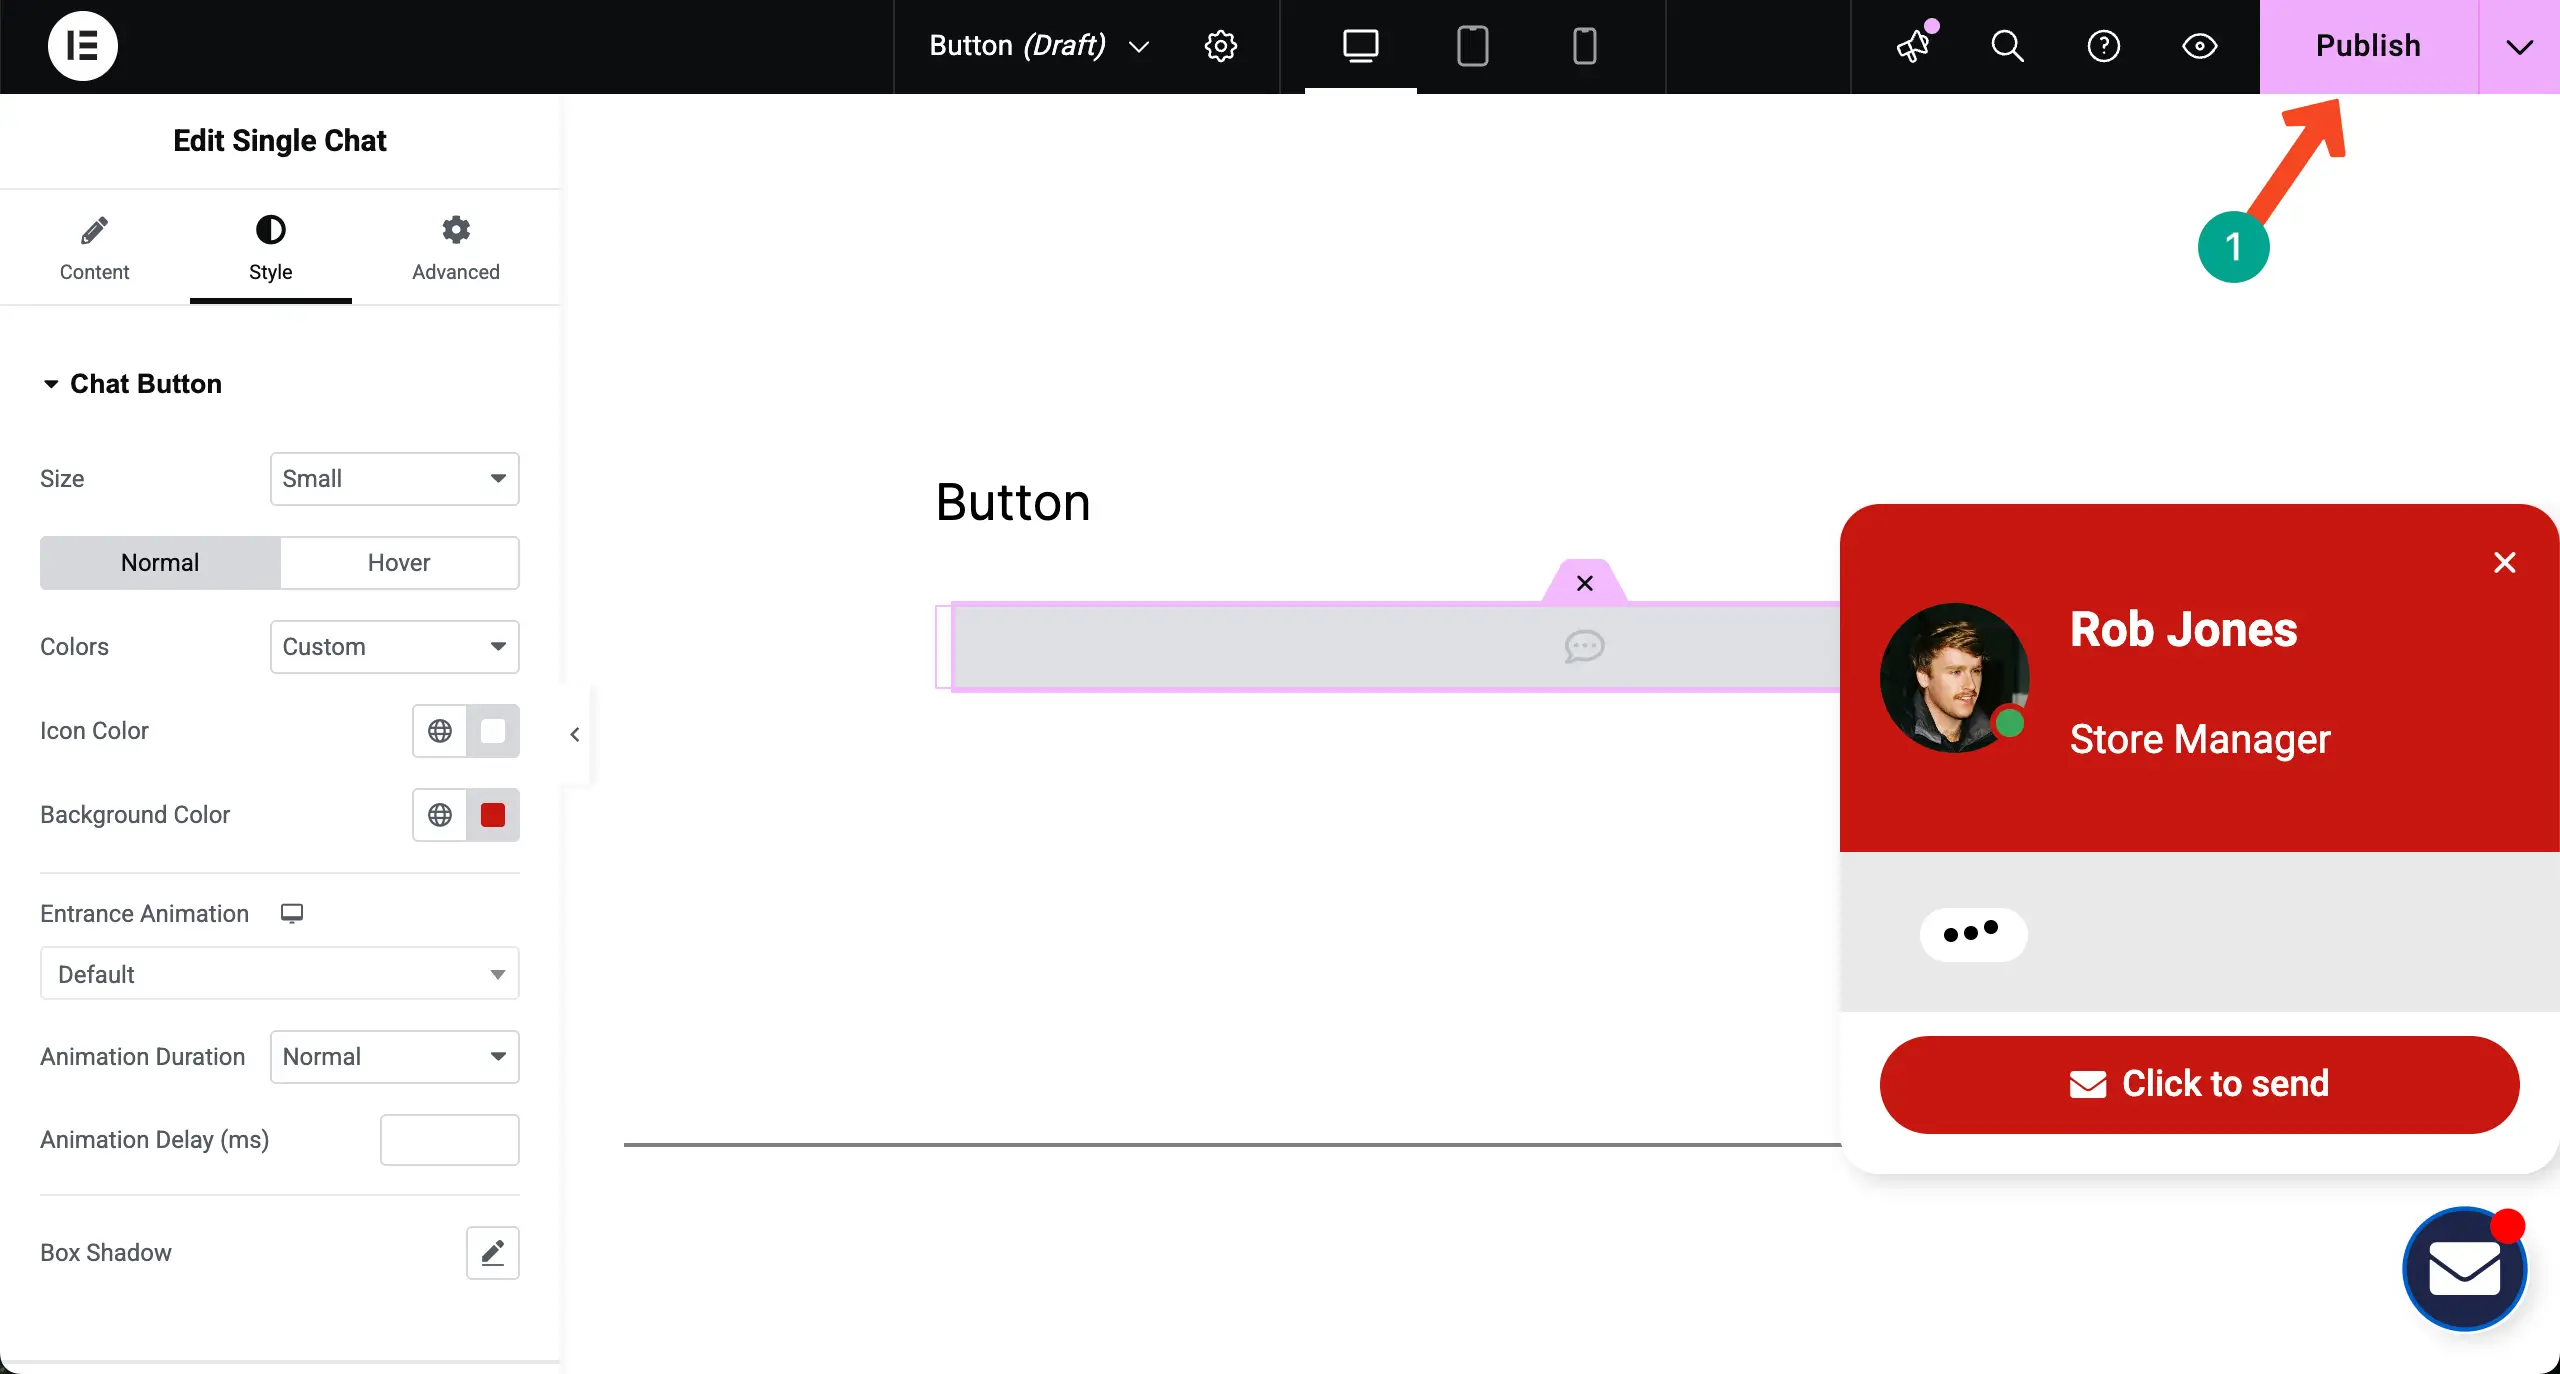
When the Elementor floating button is ready, click the Publish button in the top-right corner.
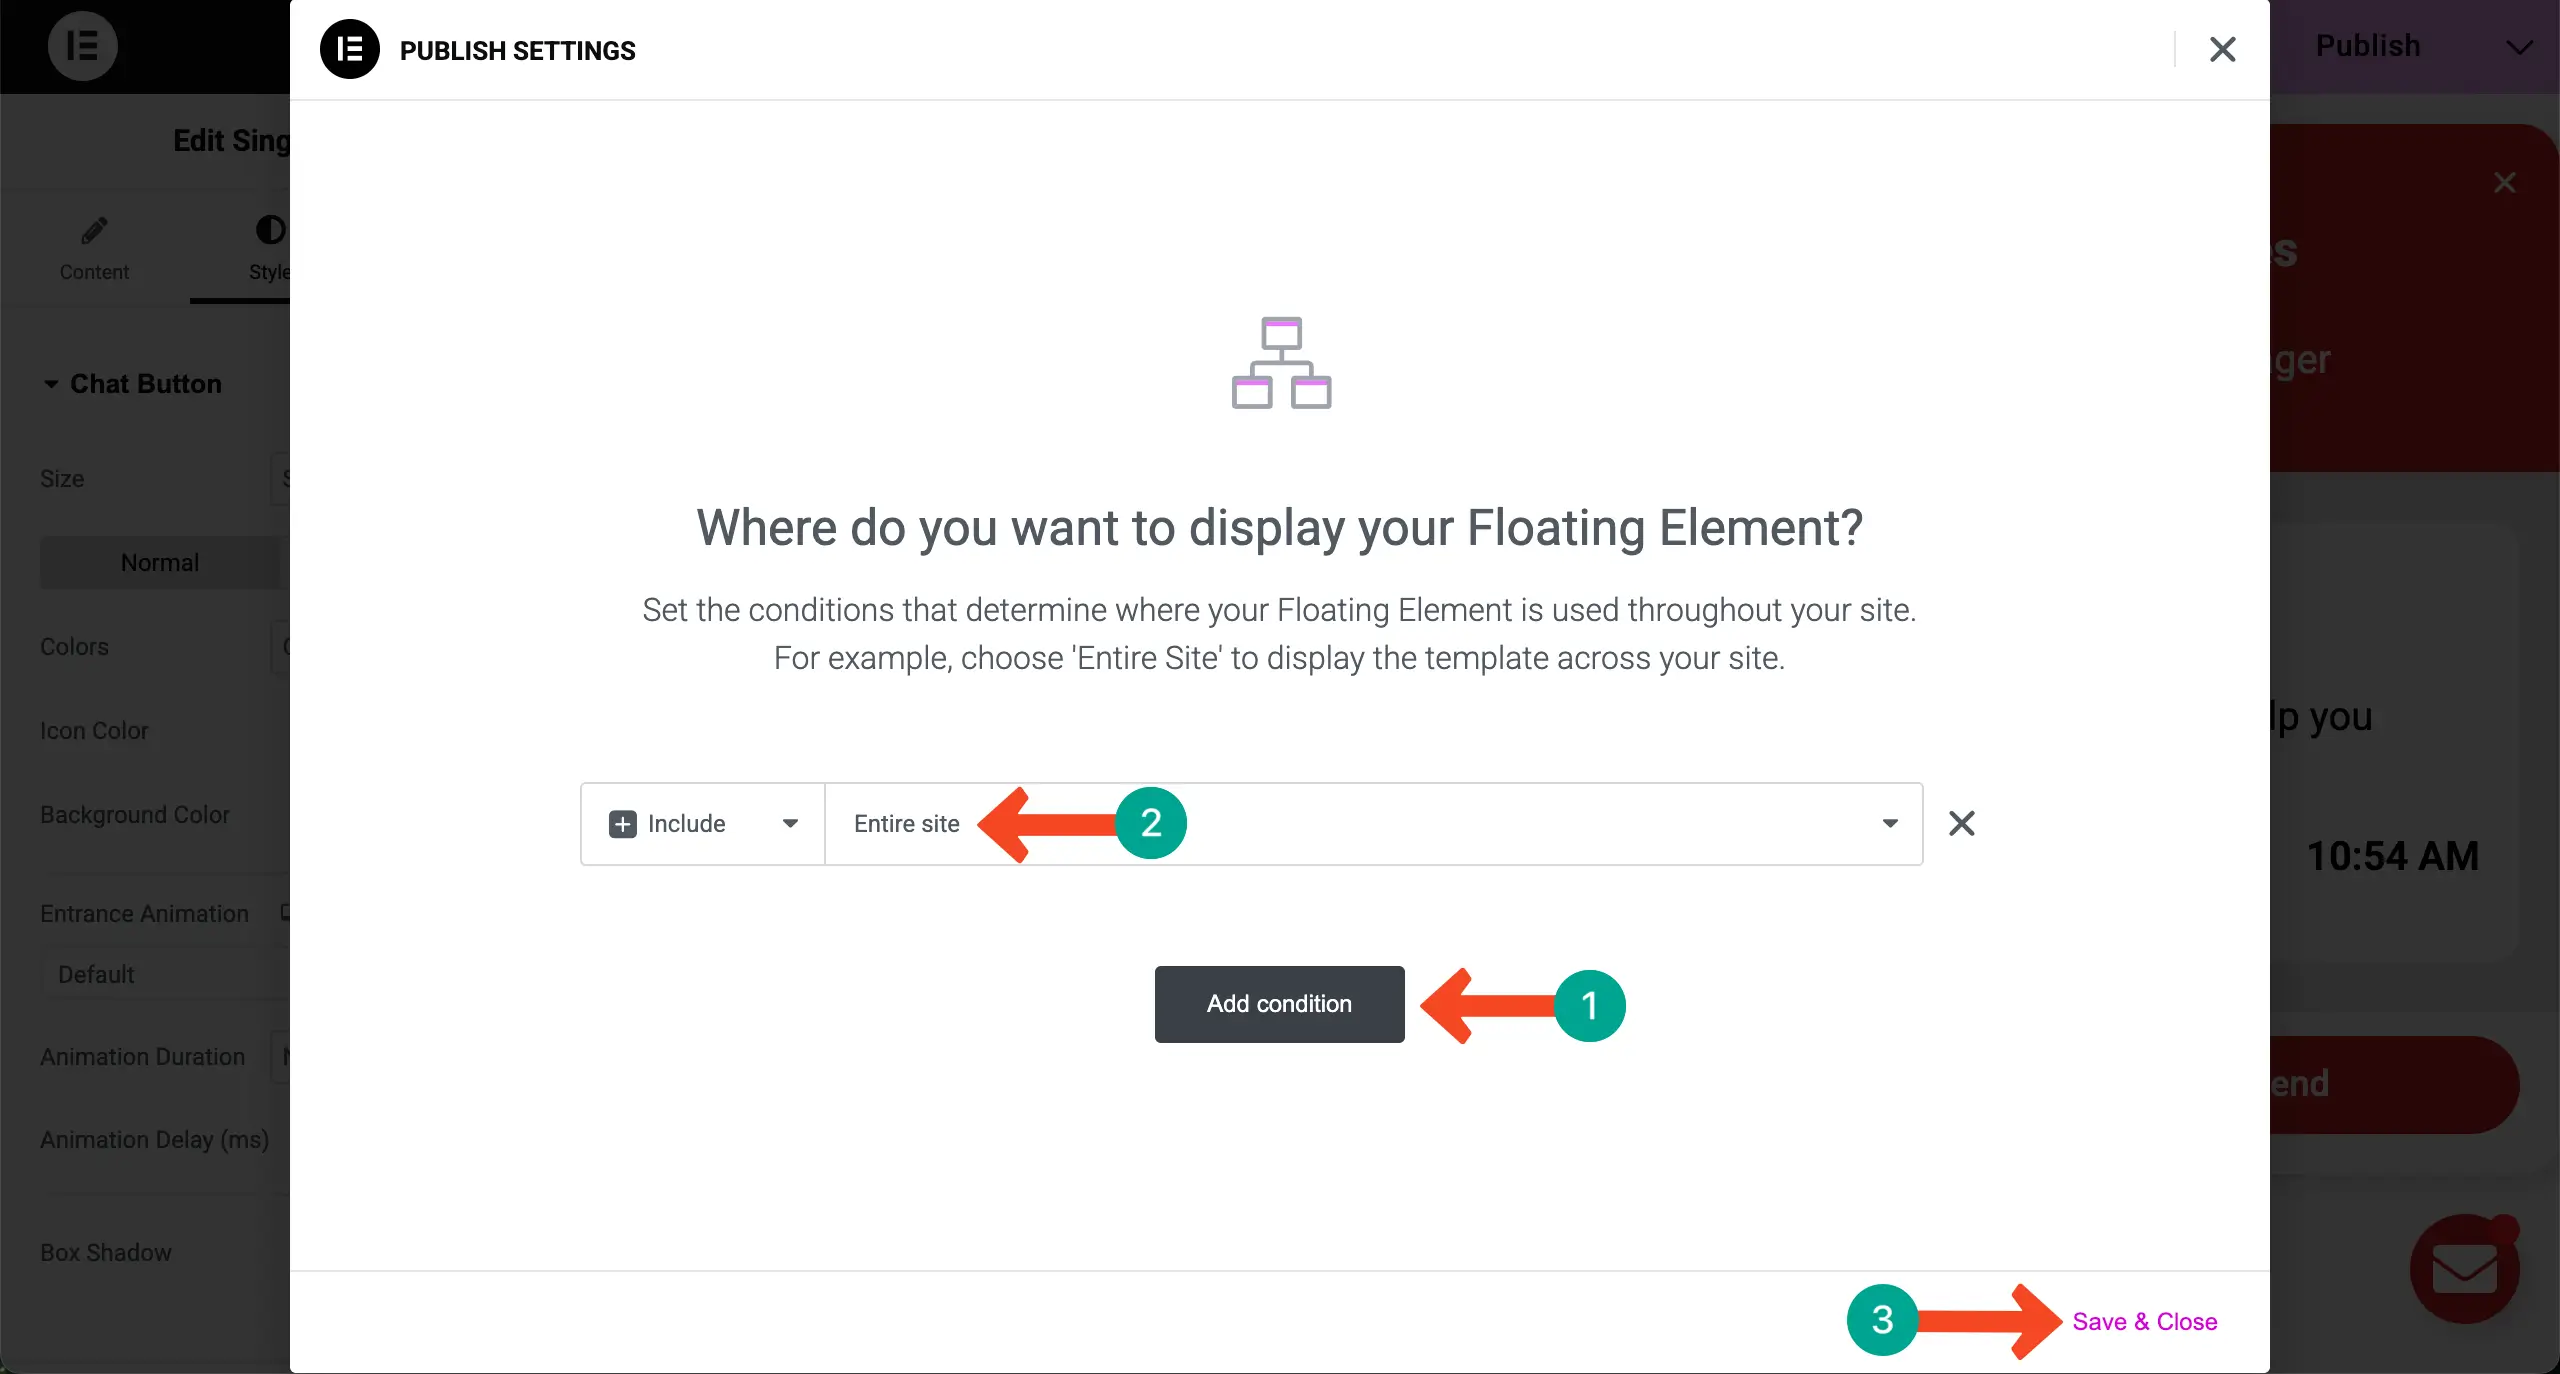
You’ll be asked to add condition(s) for the floating button. Do it by clicking the Add condition button. When it’s done, hit the Save & Close button in the bottom-right corner.
Step 06: Preview the Elementor Floating Button on the Frontend
If all your configurations have been accurately executed, you’ll see the Elementor floating button on the frontend right away.

Thus, you can add floating buttons and floating bars to your WordPress site using the Elementor plugin.
How to Create Floating Elements and Effects with HappyAddons
To get started with the process, you need the following plugins on your website:
Once these plugins are ready on your site, start following the tutorial as explained below:
Step 01: Open a Page and Select an Element
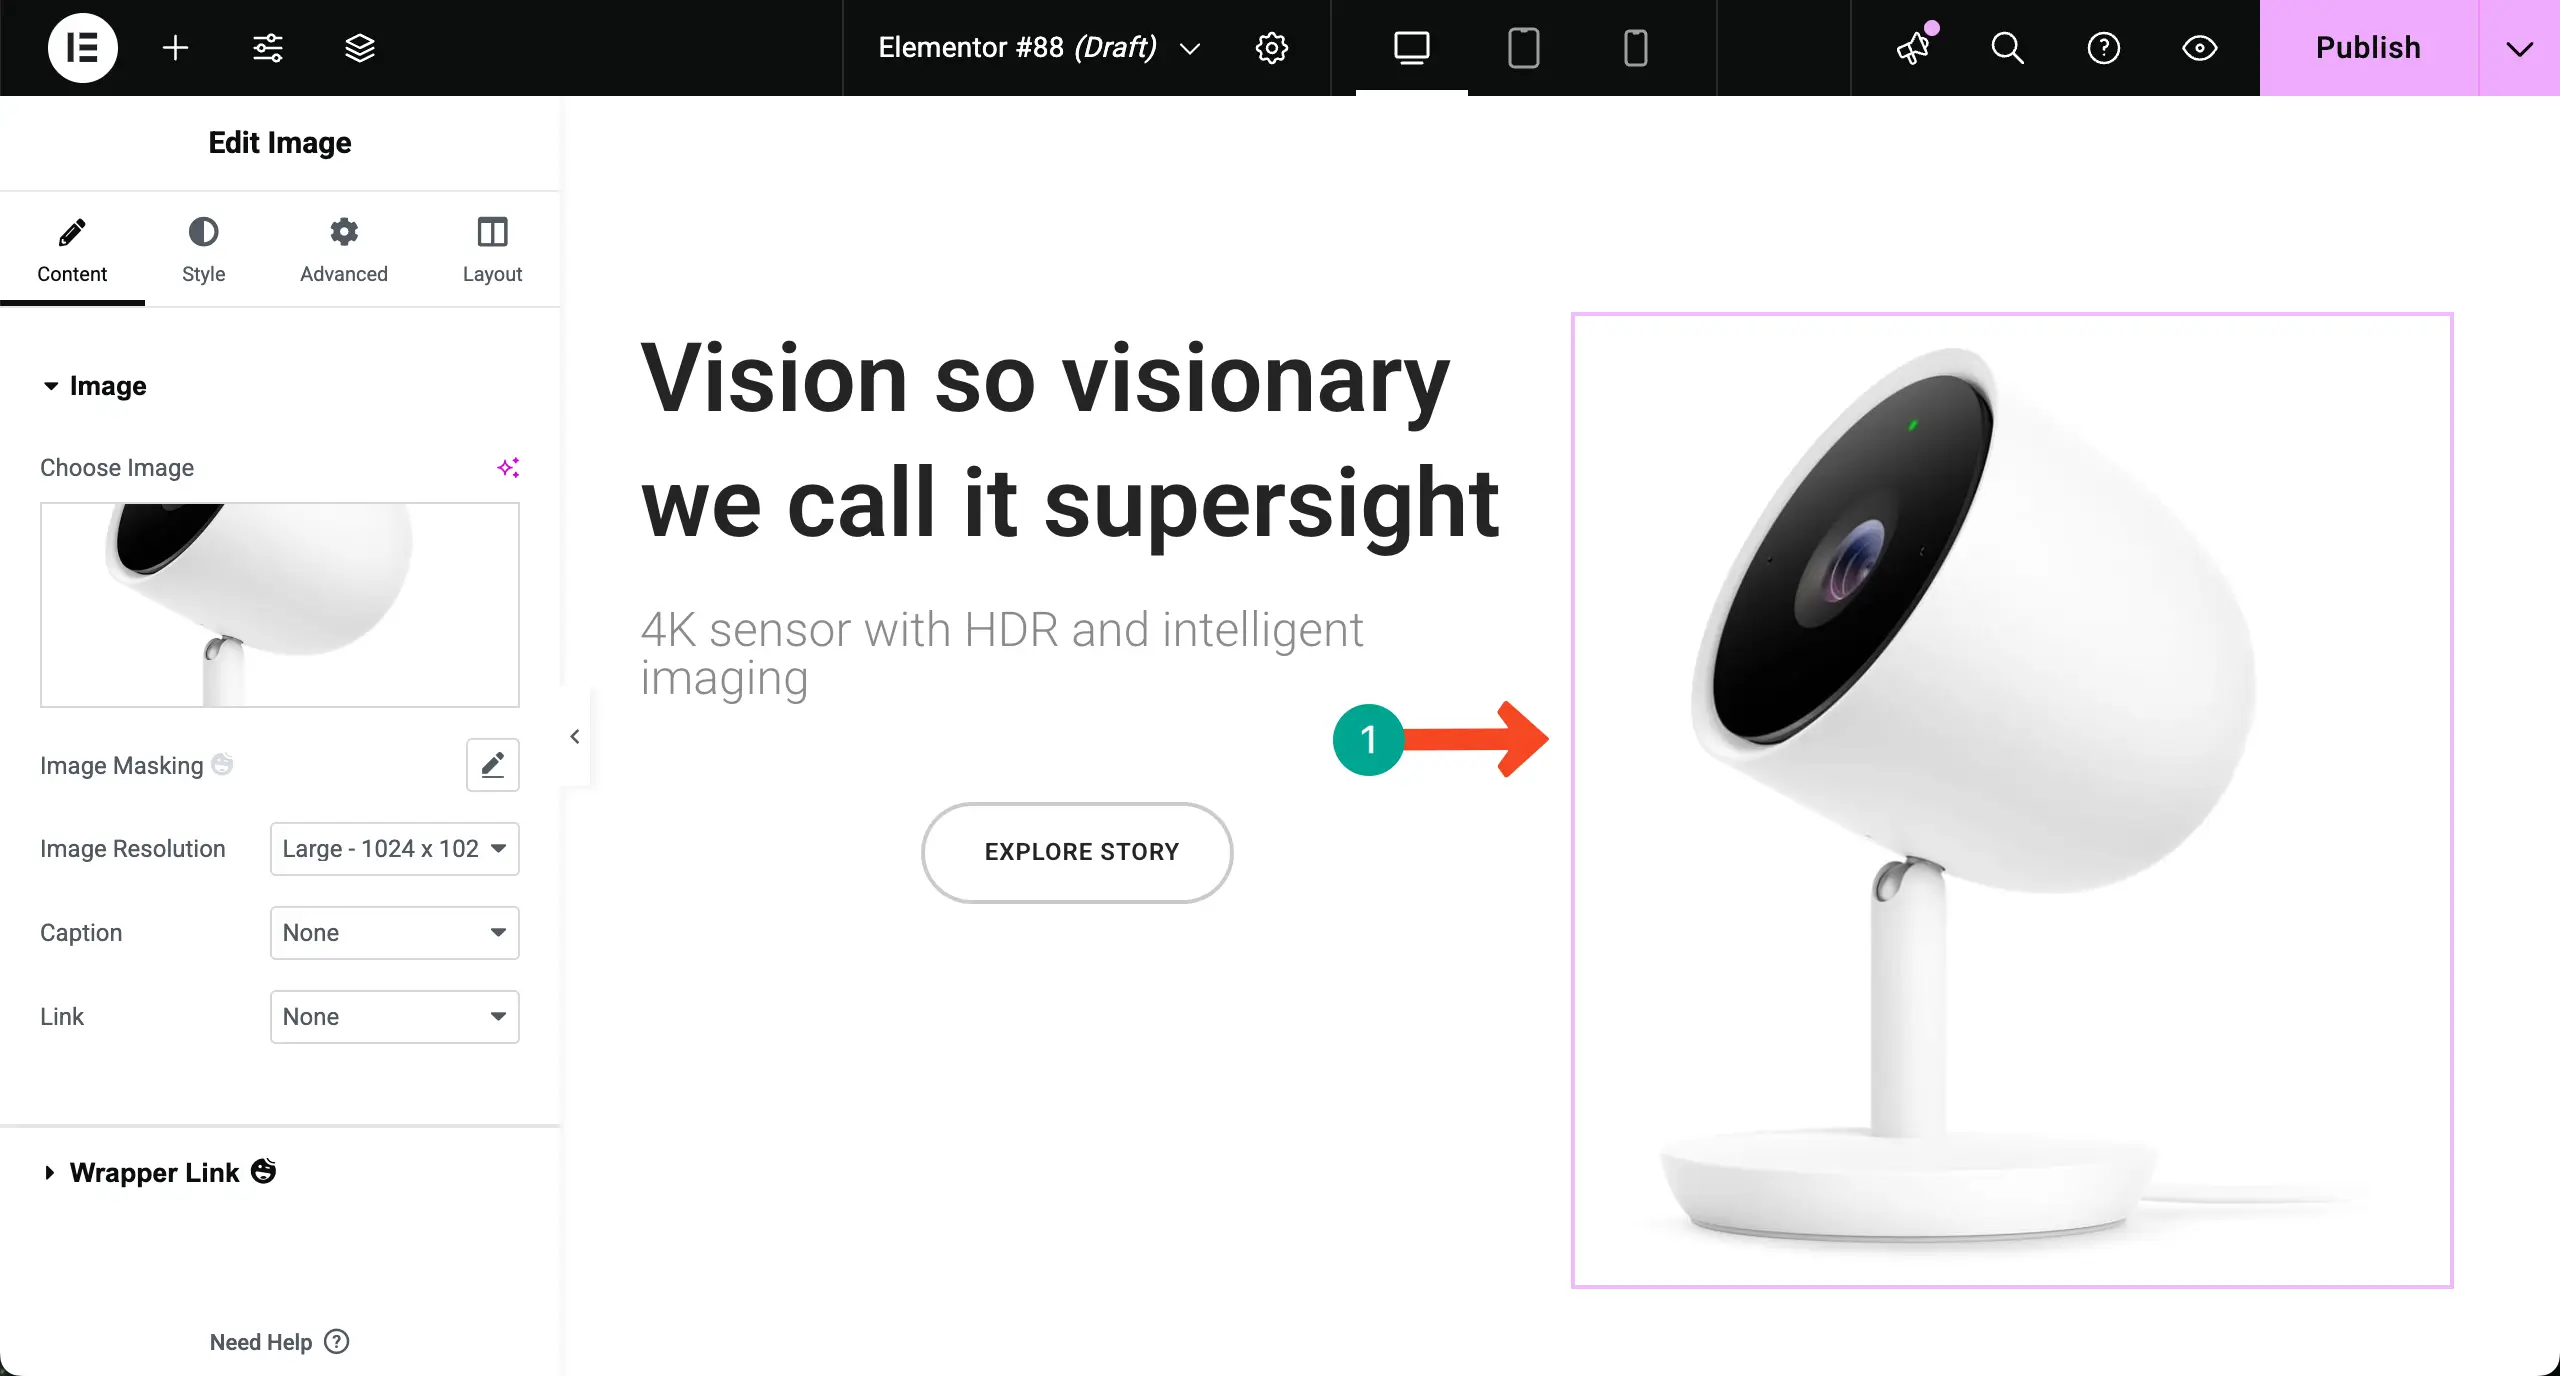
Open your desired page. Add the element you want to the page or select an exisiting element to which you want to add the floating effect.
Step 02: Enable Floating Effects for the Element
Come to the Advanced tab. Expand the Floating Effects section. Enable the feature.
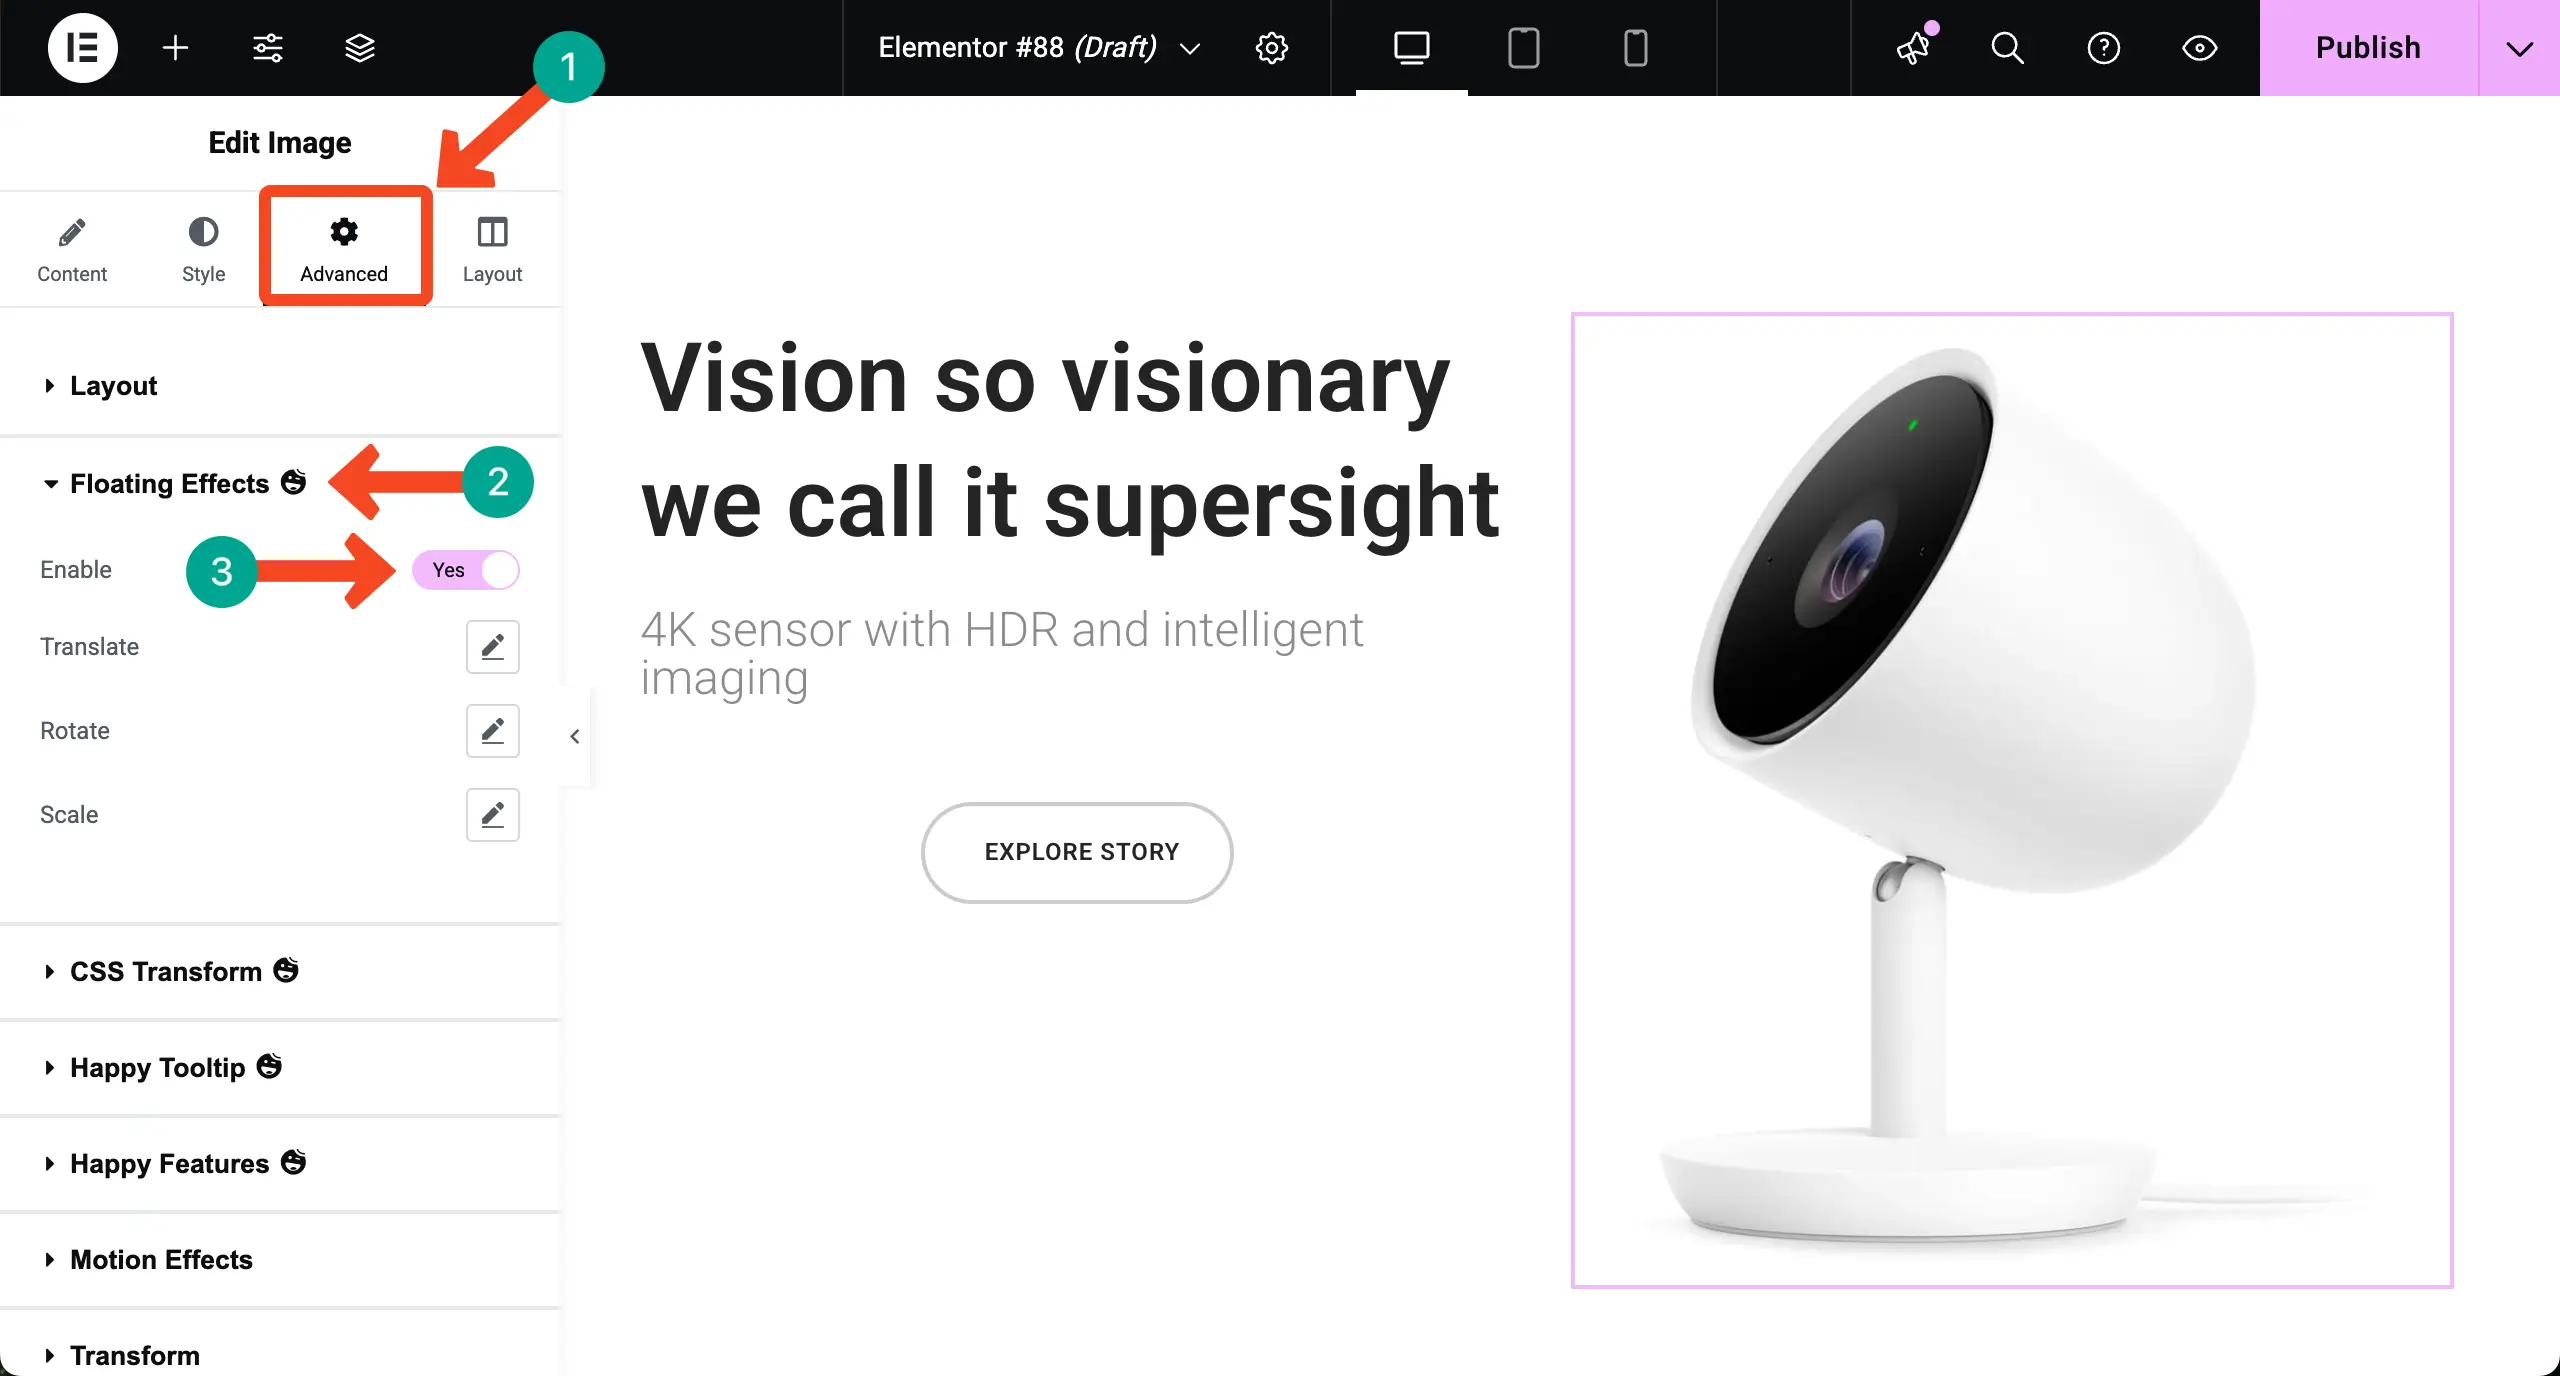
Once the floating effects have been enabled, the selected item will start floating. But unless you add other types of effects, this element won’t look good.
HappyAddons allows you to add rotate and scale effects to the selected element.
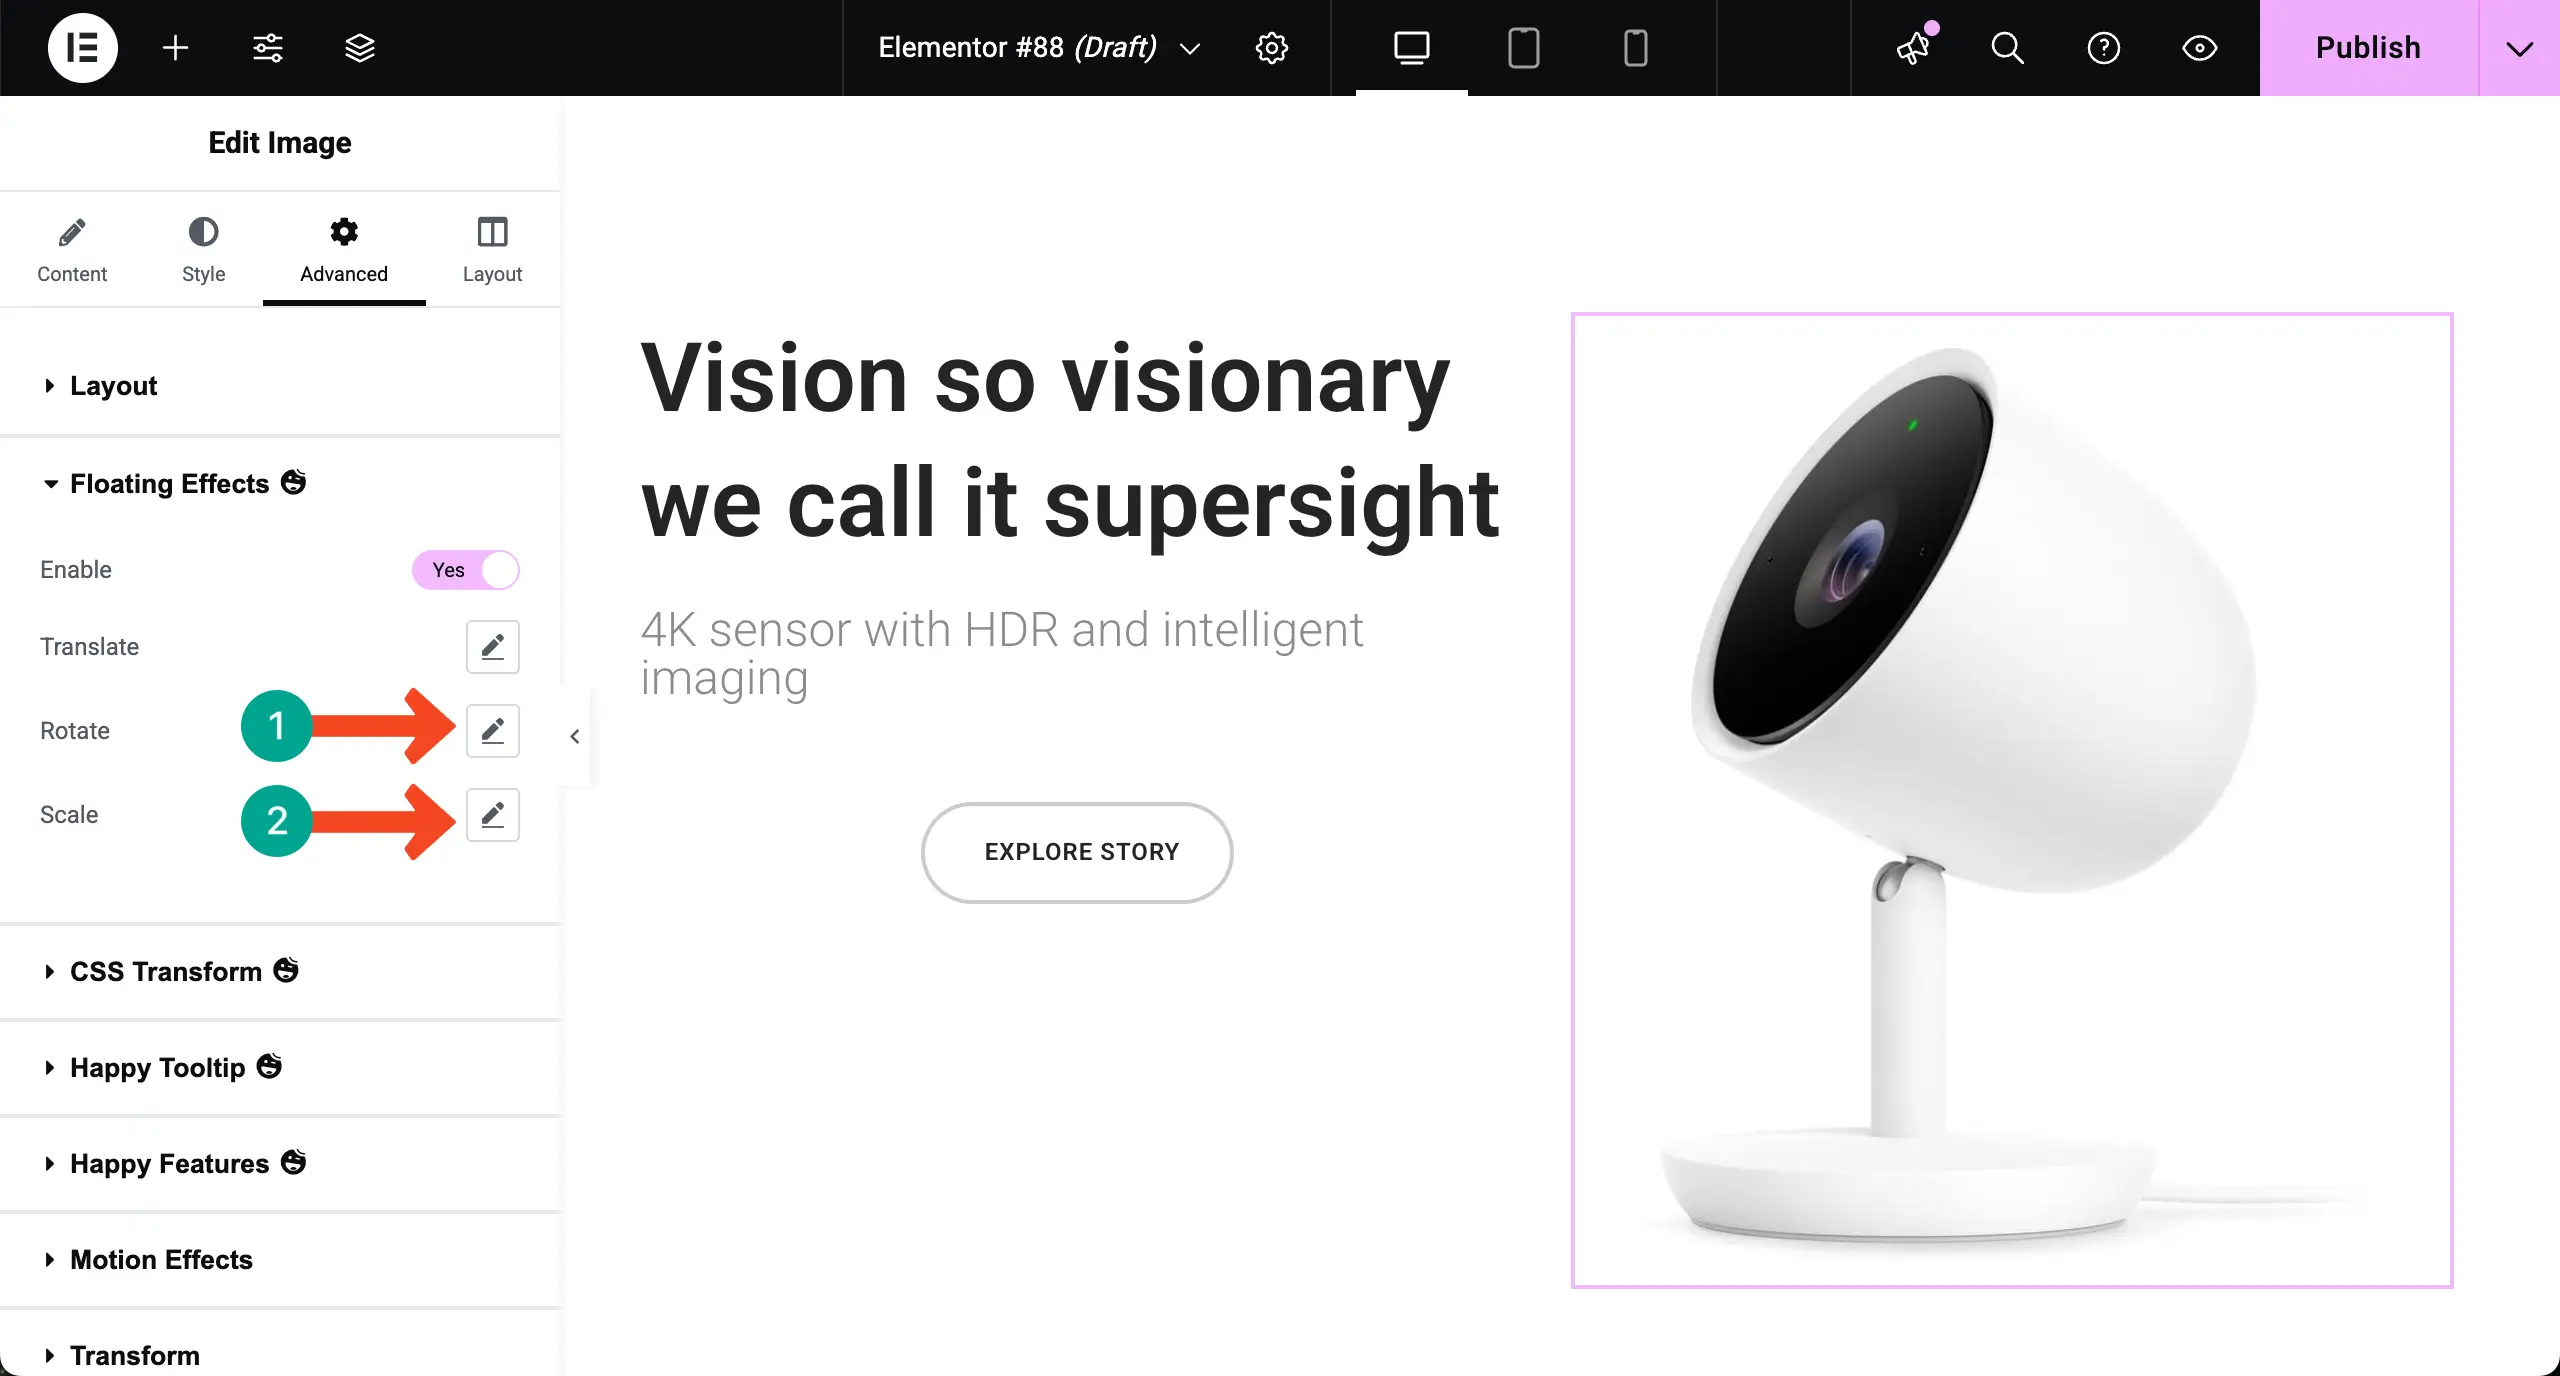
Step 03: Add Rotating Effect
Click the pencil icon next to the Rotate option. You can set various values to define how the element will move and rotate.
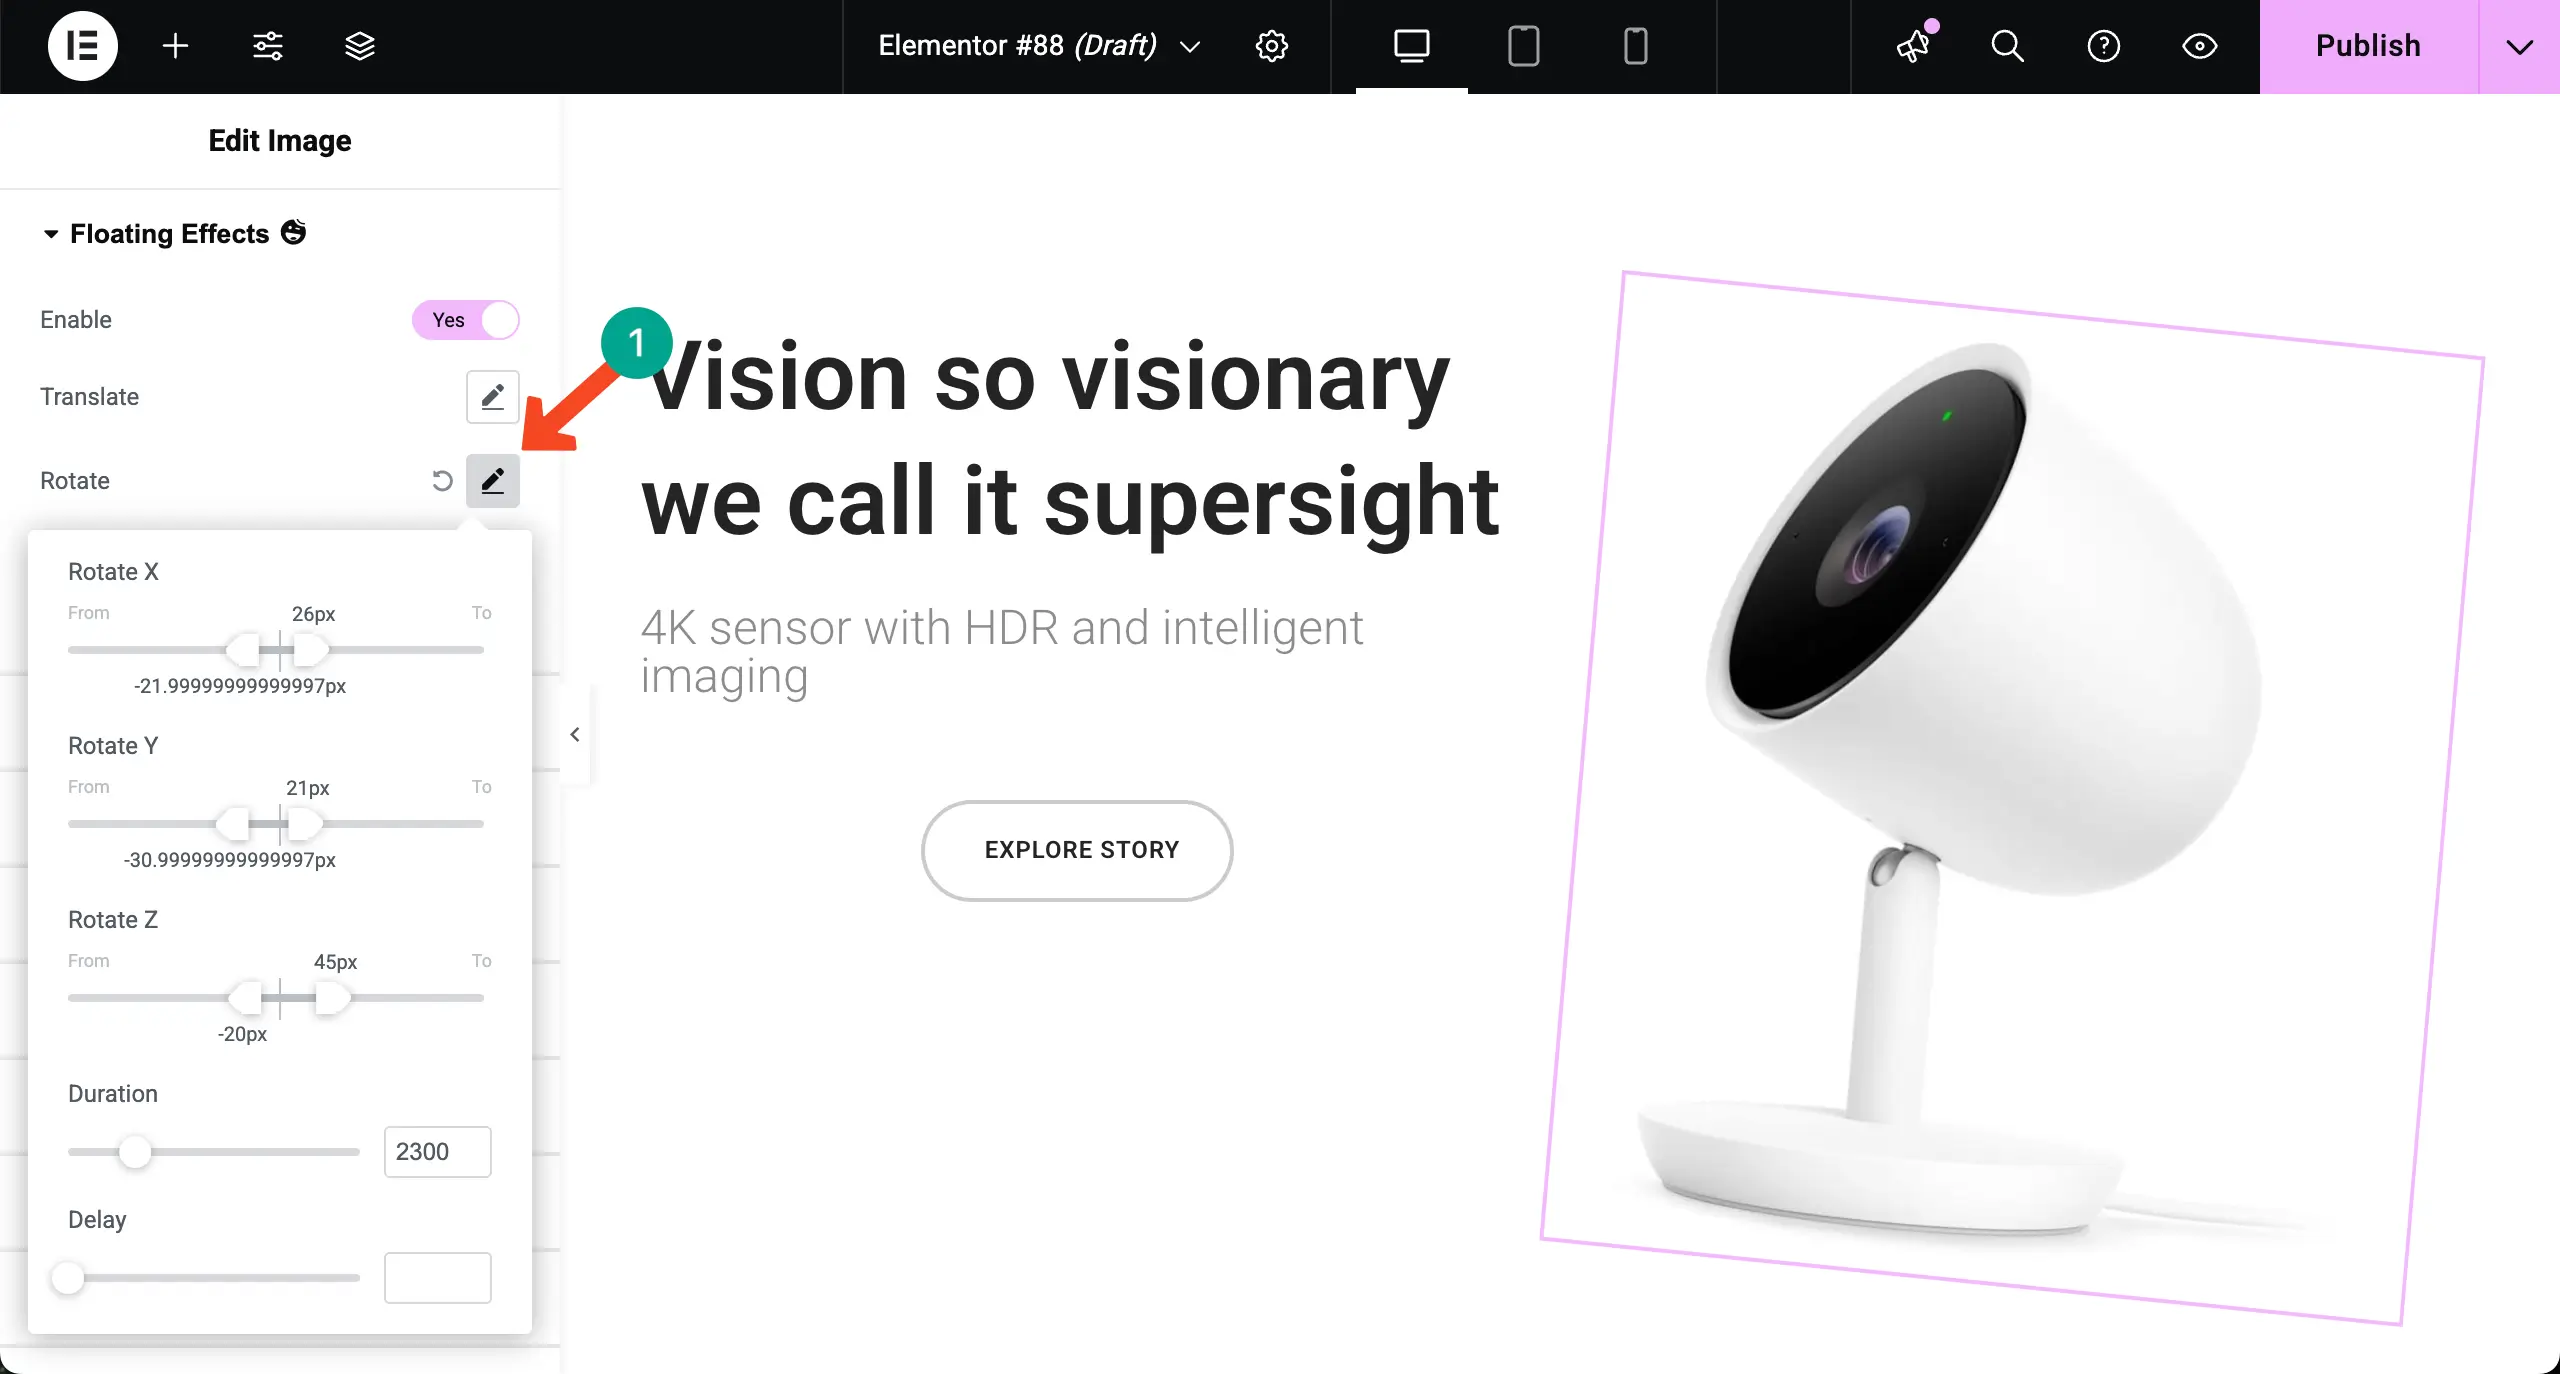
You can see the video clip attached below showing how the element is rotating according to the settings defined above.
Step 04: Adding Scaling Floating Effect
In the same way, hit the pencil icon next to the Scale option. Here also, you’ll get options to set values for showcasing how the selected element will scale up and down on the frontend.
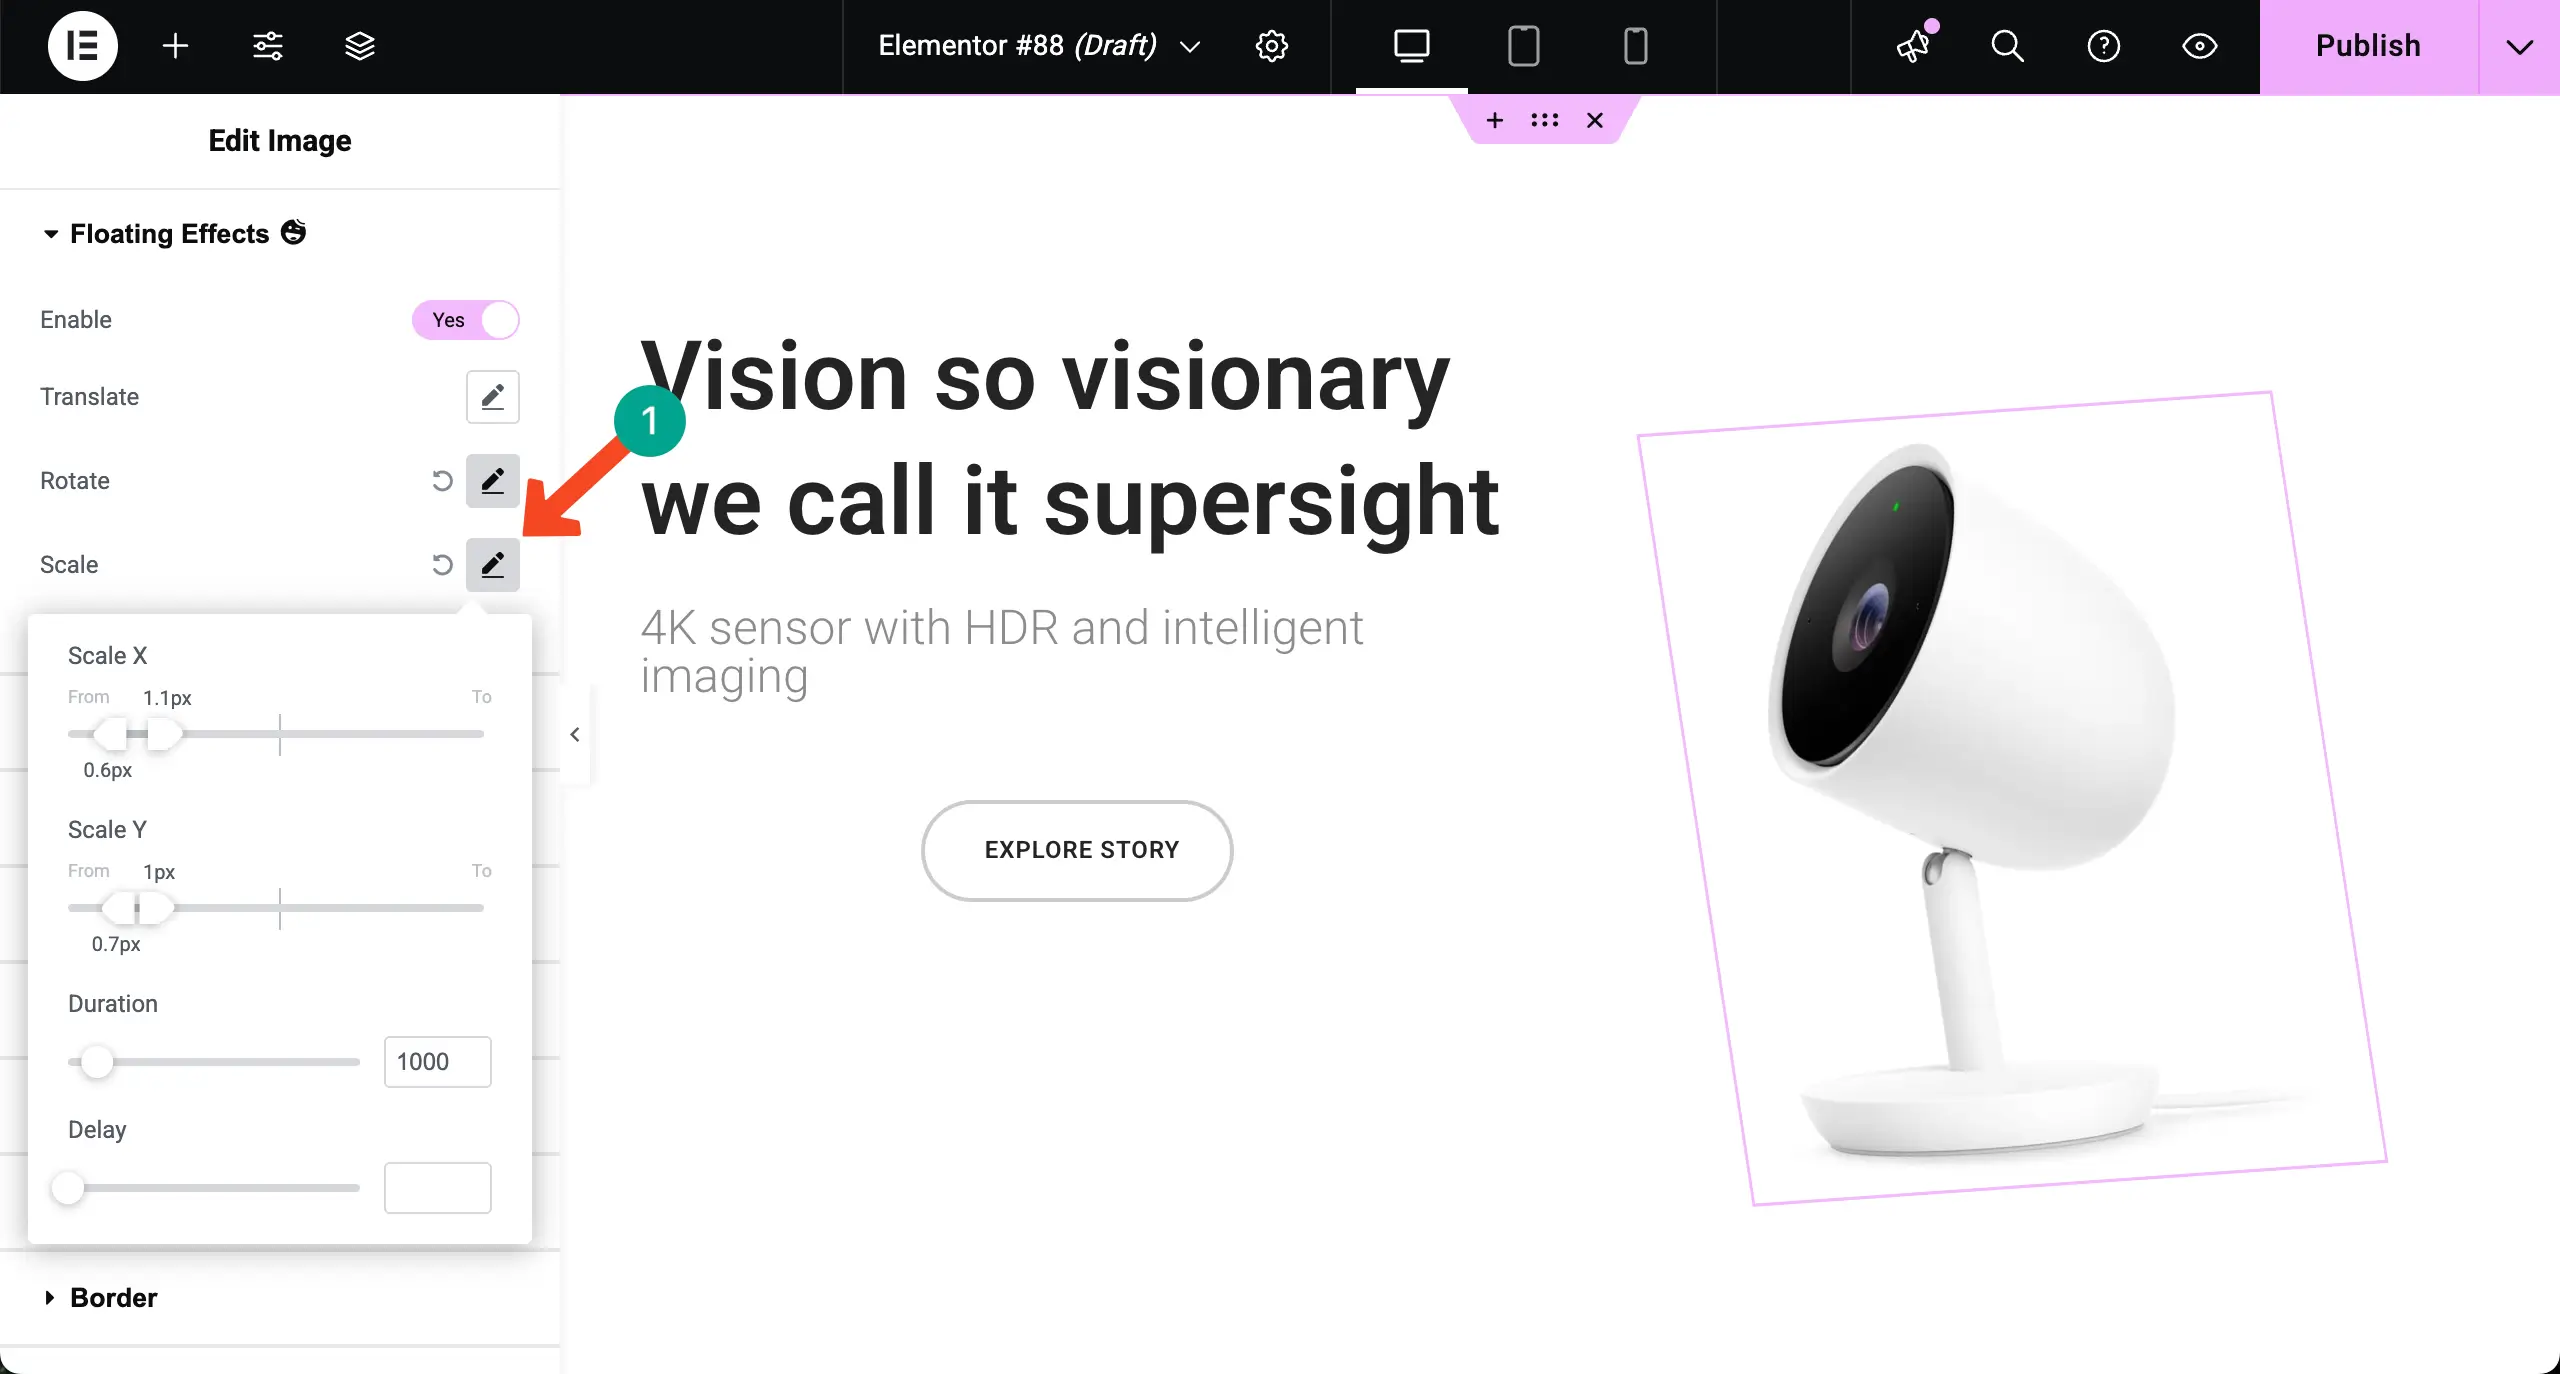
You can even configure both these options together – rotate and scale. You can see the video clip attached below.
Thus, you can add the Elementor floating effect to any elements on your web pages using the HappyAddons plugin. We have just shown you an idea of how to use the tool. Hope you can do the rest yourself.
Explore Some Video Tutorials on How to Add Elementor Floating Elements
Above, we have tried to cover two tutorials on texts and screenshots. But to further help you out, we have created some video tutorials as well, so you can understand the process better. Hope you will enjoy them. Explore those video tutorials below.
The following video tutorial explains how to add floating effects to textual elements using the HappyAddons plugin. Take a look.
The following video tutorial explains how to custom position and add a floating effect to an element.
The following tutorial showcases how to add Elementor floating elements to a web section and make it extremely beautiful to watch.
Final Takeaways!
Hope you enjoyed this tutorial. Now, you know how to add Elementor floating elements to your WordPress sites both in free and paid ways. If you think of adding simple floating elements to your Elementor site, the core Elementor plugin is good enough. But for advanced design options, you must try the HappyAddons plugin.
However, while using floating effects, always follow a few best practices. Keep animations smooth and subtle so they don’t distract users or slow down your site. Avoid using too many floating elements on a single page, as it can make your layout look messy. Also, test your design on different devices to ensure the animations work well on both desktop and mobile.
If there is any more question left in your mind, mention it in the comment box below. Also, you can knock at our support team. Our professionals are ready to help you round the clock.

![Black Friday and Cyber Monday are around the corner, and people are waiting for these festivals to grab the best product deals. That is why giving an attractive look to your website during this festive season is very necessary. But, creating a whole new landing page might be difficult in a short period of time. Don't worry. By using Happy Elementor Addons Black Friday and Cyber Monday Landing Page templates, you can easily develop a whole new landing page in a few minutes. In this today's blog, we are going to show how to boost your website design using HappyAddons templates during this festival season. Before that, we'll talk a bit about these two festivals and why they are important to online business communities. What are Black Friday and Cyber Monday? Black Friday is the immediate following of the famous Thanksgiving day. This is when people start shopping to celebrate the Christmas festival. Since the late 1980s, retail sales on this day have constantly been suppressing the past volumes. See the graph below. Source: Salecycle.com The first Monday following Thanksgiving day each year is called Cyber Monday. It was first introduced in 2005 by the USA National Retail Federation to encourage people to buy online. Though this festival originated in the USA, it is celebrated globally today. See the stats below. Source: Salecycle.com It indicates customers' buying behavior around this day is growing up over time. Many customers today keep a budget to buy products on these two days. So, why won’t you prepare a Cyber Monday landing page if you have an online store? Importance of Designing Landing Pages for Black Friday and Cyber Monday Festival Having a well-design website is one of the major checklists if you are running an online business. Most importantly, you have to make sure that your website remains up-to-date to boost your sales. That is why you need to redesign your website or make a new landing page during the Black Friday and Cyber Monday festivals. Because most online product & service-based businesses promote special deals during these two festivals. Here are some remarkable ways dedicated landing pages during these festivals can positively impact the performance of your online business. Boosts your product salesIncreases conversion rateOpportunity to collect potential email leadsGrabs users' attention toward your siteReduces bounce rateIncreases website visitors. Elementor Black Friday New Seasonal Kit is Already Here! Source: Elementor To make this Black Friday more enjoyable, Elementor has launched a New Seasonal Kit that includes landing pages, sections, pop-ups, and vector assets. All these design elements are made by the Elementor team so that one can easily use them on their website to ensure more sales and conversions. New Elementor Black Friday Seasonal Kit offers: 3 Landing pages6 Sections 6 Popups A collection of stickers & animations You can only get these ready-made Black Friday landing pages and sections if you have Installed Elementor Pro on your site. However, if you are looking for templates that are outside of the box, you can go with Happy Addons, the fastest Elementor Addons on the market. It's very easy to use, flexible and has tons of advanced features and widgets that can ease your website design journey. Also, you'll get several festival landing page templates & blocks. Moreover, you can use free Black Friday and Cyber Monday design blocks and templates to decorate your site. Most importantly, these templates and blocks are easy to customize and can be used for multiple purposes. Now let's see how you can use the Happy Addons templates to design your website according to the Black Friday theme. Pre-Requisites to Use HappyAddons Templates to Design Black Friday and Cyber Monday Landing Pages You must have the following plugins installed on your site to get access to the HappyAddons Template library. Make sure you’ve installed and activated the Happy Addons Free & Premium version of your website. Elementor (Free)Happy Addons (Free)Happy Addons Pro If you are new to Elementor, check this Step By Step Guide For Beginners. If you want to explore the readymade templates of HappyAddons before installing these plugins, you may visit by clicking on the button below. Check out Happy Addons Templates How to Design Black Friday Landing Page on Your Website Once you have the plugins (mentioned above) installed, your website is ready to follow the tutorial guide explained in this section. Get ready now! Step 1: Open a New Page with Elementor Create a new page or open the existing page with Elementor. Next, you have to select the Elementor Canvas option.Unless you select Elementor Canvas, you may watch the header, footer, and unnecessary other texts on the page. These might be irritating to you.Once you open the page with Elementor Canvas, your page will be completely clean. Watch the video below on how to do it. Step 02: Go to HappyAddons Library Click on the HappyAddons Library Icon. It will open up a modal popup. Here you'll find numerous stunning premade Blocks and Pages created by the Happy Addons team. Kindly explore them to create a list of your favorite items. Step 03: Import a HappyAddons Black Friday Template Go to the Page tab on the modal popup.Select Black Friday from the left-side filter option.You will several good-looking templates on your screen.Take your cursor on the one you like and hit on the INSERT button. Wait for a while to finish the installation process. You will get the template on your screen with editable sections and options. Step 04: Set the Black Friday Campaign Deadline A deadline creates a sense of urgency in customers' minds. So, better if you add a deadline section on the page to show your Black Friday deals. The good thing is that if you select the template as we did, you will automatically get a deadline or countdown option. You have to customize it as you want. Step 05: Show Image Carousel Slider on Your Black Friday Landing Page Using the Image Carousel, you can slide show demonstrating discounts on your product categories. Drag and drop the Image Carousel widget on any landing page section. Next, from the Elementor panel, you can add photos and text to the widget. Do it accordingly. Thus, you can add more sections and options on the landing page. Hope you can do it yourself. Step 06: Make the Black Friday Landing Page Mobile Responsive Making a web page mobile responsive with Elementor is super easy. You'll get the mobile responsive option on the Elementor footer section. Clicking on it will open up the option to view your landing page on different device screens. We have explained the process in the video below. Note: Don't delete any widget or section while customizing your landing page for any particular device. Because if you delete a widget or section on any device screen, it will also be applied on other devices. However, you may change their position or alignment or hide them. It won't make any impact on other devices. Step 07: Final Preview of Our Landing Page Here is the final interface of our Elementor Black Friday landing page that we've designed using the Happy Addons' ready-made Template. Get Happy Addons to Add a Black Friday Theme Landing Page on Your Website How to Design Cyber Monday Landing Page on Your Website You will require the same prerequisites (Elementor and HappyAddons Plugins) to design the Cyber Monday landing page on your website. Hope you have them ready on your website. Now, let's get into the tutorial part. Step 01: Import a Cyber Monday Readymade Landing Page Template Go to the HappyAddons Template library.Choose the Cyber Monday template you like.Click on the INSERT button. Wait for a while to finish the installation process. You'll get a page design like the following image below. Step 02: Edit Different Sections of the Page In the first tutorial, you saw the deadline/countdown option was already embedded in the template. But this template doesn't have it. So, you can bring it to your page? Very simple. Create a new section by clicking on the plus icon.Type Countdown on the Elementor search bar.Drag and drop the widget on the section. Customize the Countdown section from the Content and Style tabs of the Elementor panel. Using the Heading widget, we have added the FLASH DEALS text next to the countdown to make it more meaningful. Thus, you can use other exciting widgets on the template to make your landing page super gorgeous. Step 03: Promote Products on the Landing Page Promotional landing pages usually include a section to showcase some hot-selling products to generate instant sales. Using the Image and Button widgets, we have created this section under the FLASH DEALS.You may customize it more as you wish. Step 04: Make it Mobile Responsive We already showed you the process in the first tutorial on making a mobile web landing page responsive. Hope you can do it here as well, following the same guideline. Click on the Responsive Mode icon and do the rest yourself. Bonus: Black Friday and Cyber Monday Landing Page Design Key Considerations Whenever you design a landing page, you need to consider why you need to design this page and what elements they should keep on the page. Because if you are not adding all the necessary features to your page, it will not serve its purpose. This is why you need to focus on a few things before designing your Black Friday landing page. Here are some points you must consider in designing Black Friday and Cyber Monday landing pages. Add Black Friday textSet deals deadlineShow your best-discounted productsAdd coupon code Focus on responsive page designMake your page visually appealingImprove your page user experience or page structureSet a proper website navigation FAQ on Black Friday and Cyber Monday Landing Page Design Now, we'll answer some common questions on Black Friday and Cyber Monday Landing page designs commonly found online. How much does it cost to design a landing page?The cost of designing a landing page varies depending on the complexity of the design, the level of customization required, and whom to hire for the page. A simple landing page can be designed for as little as $25, while a more complex design with multiple customizations can cost upwards of $2,00.However, if you have Elementor and HappyAddons installed, you can design unlimited landing pages at a minimal cost. But like any other tool, you must have a kind of enterprise on them. As they are drag-and-drop builders and their numerous tutorials and documentation are available, they won't take you more than a month to be used to. Check out some wonderful YouTube tutorials on these two plugins. Hope you will enjoy them.How many hours does it take to design a landing page?It mainly depends on the level of design complexity and your web design skill. However, both in Elementor and HappyAddons, you will get countless readymade templates and block sections. You can design a beautiful landing page in 3-5 hours by making a proper combination of them.Can I design Black Friday and Cyber Monday Landing pages with Elementor and HappyAddons free versions?Surely, you can design Black Friday and Cyber Monday Landing pages with Elementor and HappyAddons free versions. But only with the pro versions, you can't add too many exciting features to your pages. For example, free versions will give you access to only a limited number of readymade templates.If you are just a beginner-level designer, free versions are enough. But if you are a professional designer or have a web designing agency, pro versions are a must. Are You Ready To Design Your Black Friday and Cyber Monday Landing Page? Customers look forward to this kind of occasion to buy their favorite products at a minimum price. Naturally, they are drawn to websites that look good and give a festive vibe. That is why adding a Black Friday and Cyber Monday landing page during the festival season will give you an extra edge over the competitors. The above guide shows how to design your Elementor Black Friday Landing page using the Happy Addons' Black Friday Templates and how it can help boost your holiday sales. So if you have any queries regarding this blog, you can comment on us in the below box. If you like this post, then share it on your social channel. Don't forget to subscribe to our newsletter. Also, follow our Facebook and Twitter channels for regular updates. Subscribe to our newsletter Get latest news & updates on Elementor [yikes-mailchimp form="1"] ":36560} /--](https://happyaddons.com/wp-content/uploads/2021/11/How-to-Design-Black-Friday-and-Cyber-Monday-Landing-Page-300x188.png)
9 Responses
Wonderful beat ! I would like to apprentice even as you amend your site, how could i subscribe for a blog website? The account aided me a applicable deal. I were a little bit familiar of this your broadcast offered brilliant clear idea
Hi Leila,
Thanks for stopping by and sharing your kind words with us. You can subscribe to our newsletters from our footer section as well. We have started to share newsletters to our respected users. Stay connected. ?
Great video, we are also developing webpages with Elementor, and maybe Happy Addons we be part of it. Interesting blog, and interesting product.
Regards
Hello Morten,
Thanks, man. It’s really means a lot to us. If you need any sort of help you can discuss in our Live Chat regarding HappyAddons anytime.
Stay connected.
How to move objects with the mouse
Hi Updesire,
Thanks for stopping by.
Here is the detailed tutorial by Elementor on How to Add Mouse Track Animations to Your Hero Section in Elementor ?
https://www.youtube.com/watch?v=FAqAsEEwu0M
Or if you want to create Mouse track animation without page builder then you can have a look here, https://gtarafdar.com/wordpress-tutorials/how-to-create-parallax-effect/
Have a nice day.
Regards,
Gobinda.
Is it possible to create floating forms with Elementor?
Hi Mike,
Good day,
Thanks for stopping by,
If I’m not wrong, you are asking for a sticky form for your website, right? If your answer is positive, then you can do it by using the motion effect of Elementor Pro. Here is the simple setup,
https://prnt.sc/10g0anq
It will help you to create the sticky/floating form with Elementor.
Let me know if you find this helpful.
Regards,
Gobinda Tarafdar,
Product Co-Ordinator of HappyAddons.