A well-designed search result page plays a crucial role in enhancing user experience. It enables visitors to quickly navigate to the relevant content they are looking for. It not only saves time in navigating content but also encourages them to explore further.
Elementor is a go-to page builder for millions of WordPress websites. It provides a theme builder and useful widgets by which you can easily create a search results page. In this tutorial post, we’ll explain to you how to create a custom search result page in Elementor.
Remember, the search box is the main element of any search results page. It’s where people type their keywords to find relevant posts and products. So, we’ll first create a dynamic search box using Elementor. Then, we’ll finish the page by adding an archive widget, making it a blog archive page.
What Is a Custom Search Result Page in Elementor?
A search result page is a dedicated web page that enables users and visitors to quickly navigate to specific types of content, such as blog posts, eCommerce products, and portfolio items. Such pages are mandatory for heavy content-based websites.
A custom search results page allows you to incorporate various elements like featured images, custom headings, filters, etc., as you want so the page looks good. This not only improves user experience but also helps shoot up conversions.
Use Cases of the Custom Search Result Pages in WordPress
Before jumping into the tutorial, let’s take a look at some use cases of the custom search result pages in WordPress. Skim through the list below.
- eCommerce Websites
Display product search results page with filters. Visitors can use the search bar to find the exact product or filters to sort them by prices, ratings, and categories.
- Blog Sites
Blog posts and articles are displayed based on tags and categories. Users can sort them by author, date, and other queries.
- Knowledge Base Page
Knowledge base pages usually cover DIY documentation guides and helpful resources. The search feature is a must on these pages to quickly explore the helpful content.
- Service-Based Businesses
Users can sort their desired services based on ratings, price ranges, offerings, and other relevant details before booking or filling out a contact form.
- Educational Websites
Advanced search and filtering options let you search for courses, lessons, and study materials so students and learners can easily find the content they need.
How to Create a Custom Search Result Page in Elementor
The theoretical part is over. In this section, we’ll now cover the tutorial part on how to create a custom search result page in Elementor. Make sure you have the following plugins available on your site.
Once you have them on your site, follow the tutorial explained below.
Step 01: Go to Elementor Theme Builder
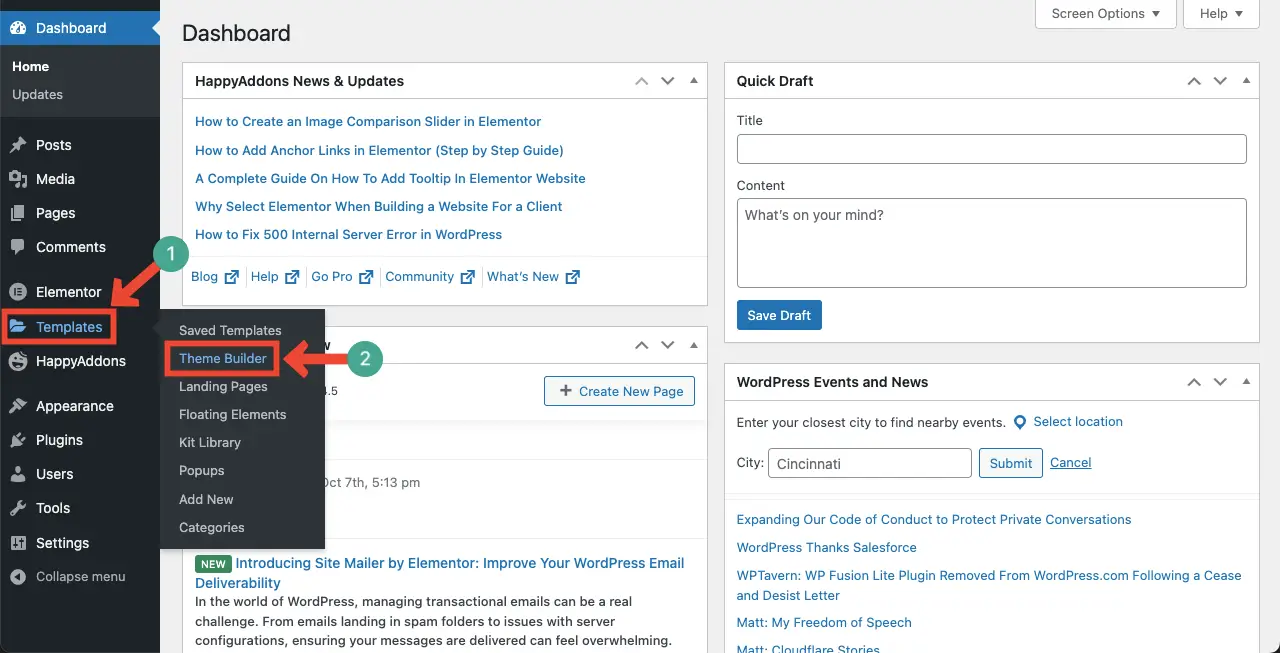
Log into your WordPress dashboard. Then, navigate to Templates > Theme Builder.
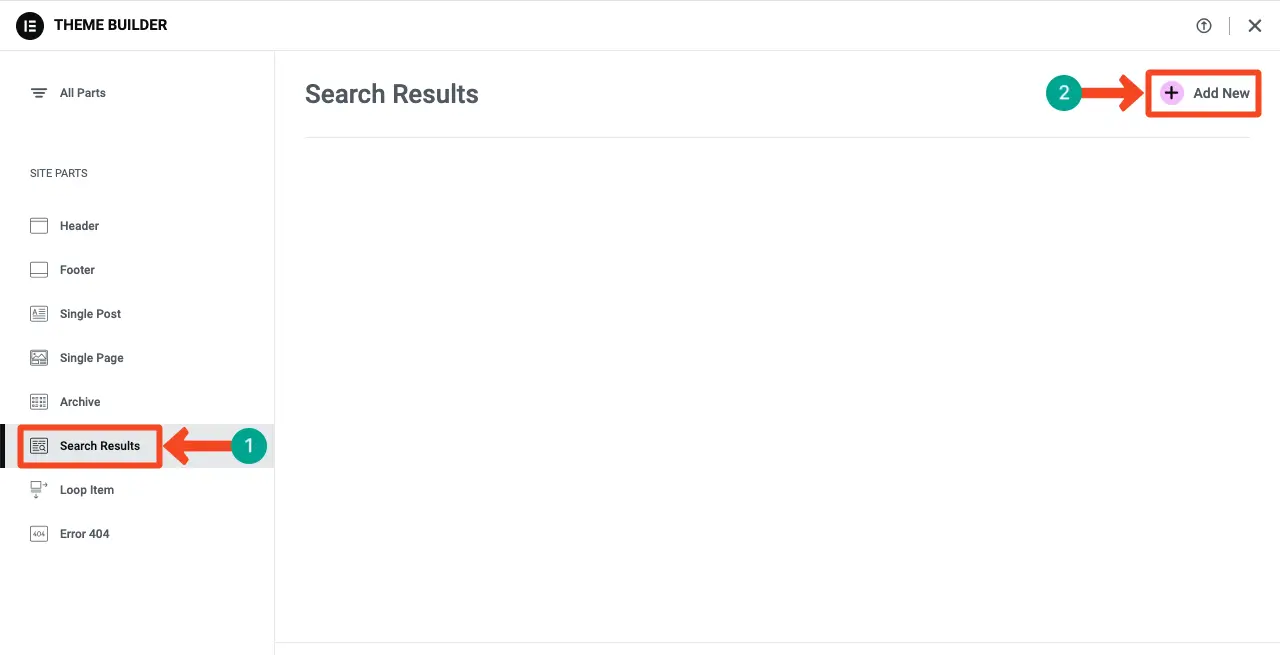
Select the Search Results option under Site Parts. Then, click the + Add New button.
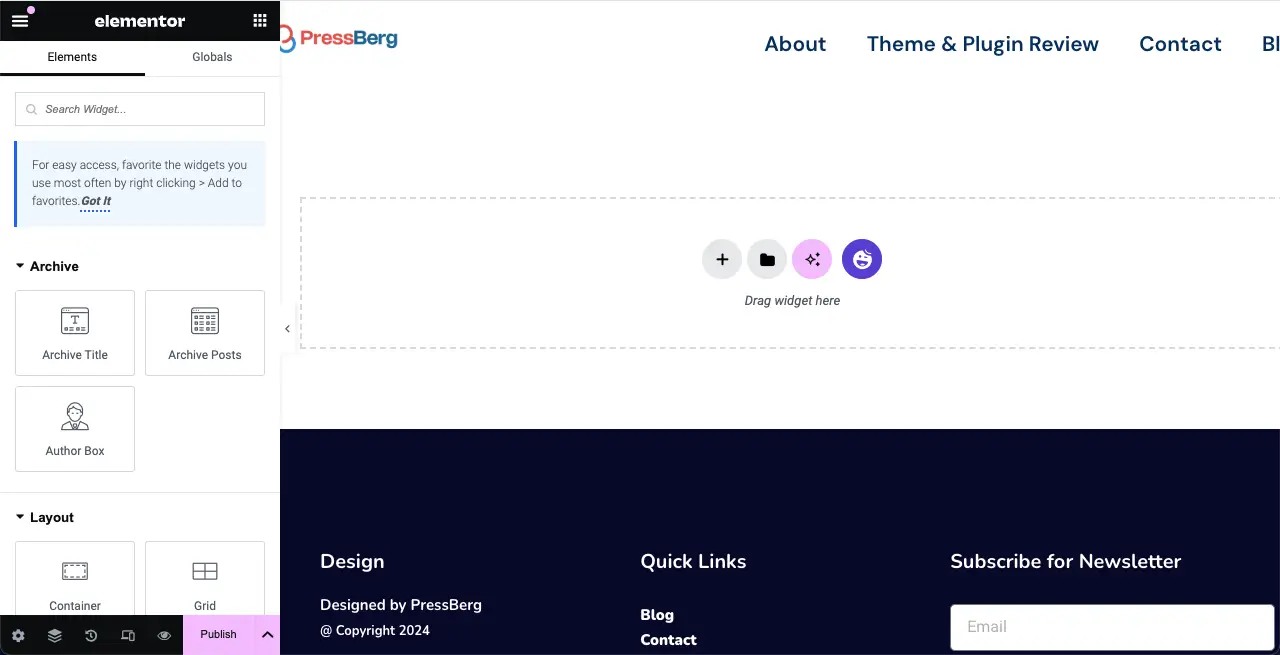
This will open up the Elementor canvas, where you will be able to add any widget you want to create the custom search result page.
Step 02: Create a New Section for Adding the Search Widget
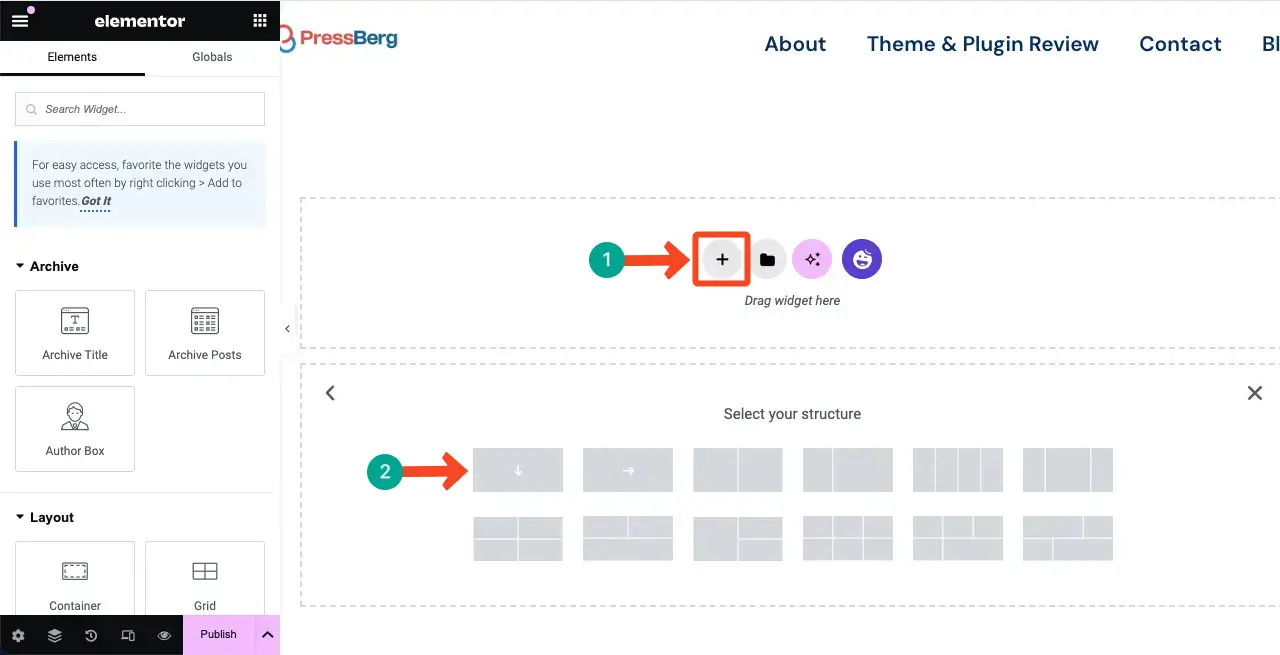
Click the plus (+) icon on the canvas. Then, select a column structure you want.
You must write a title for the section. This is helpful for SEO.
So, drag and drop the Heading widget in the section. This will allow you to write a title for the section.
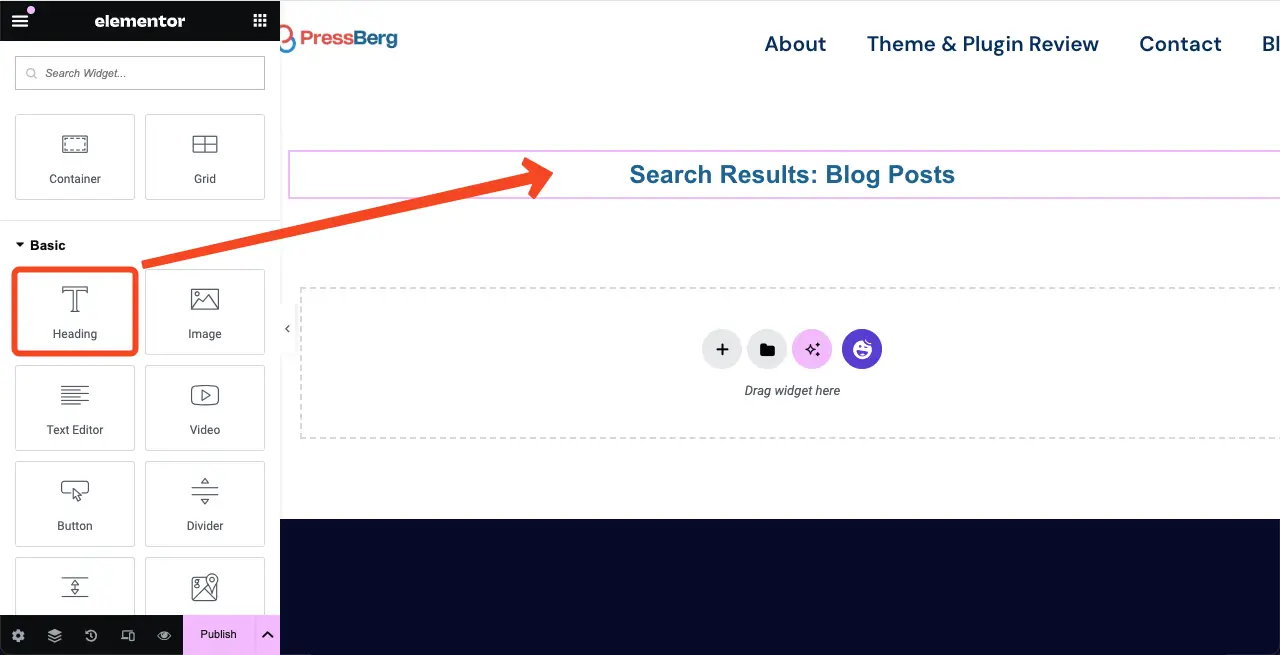
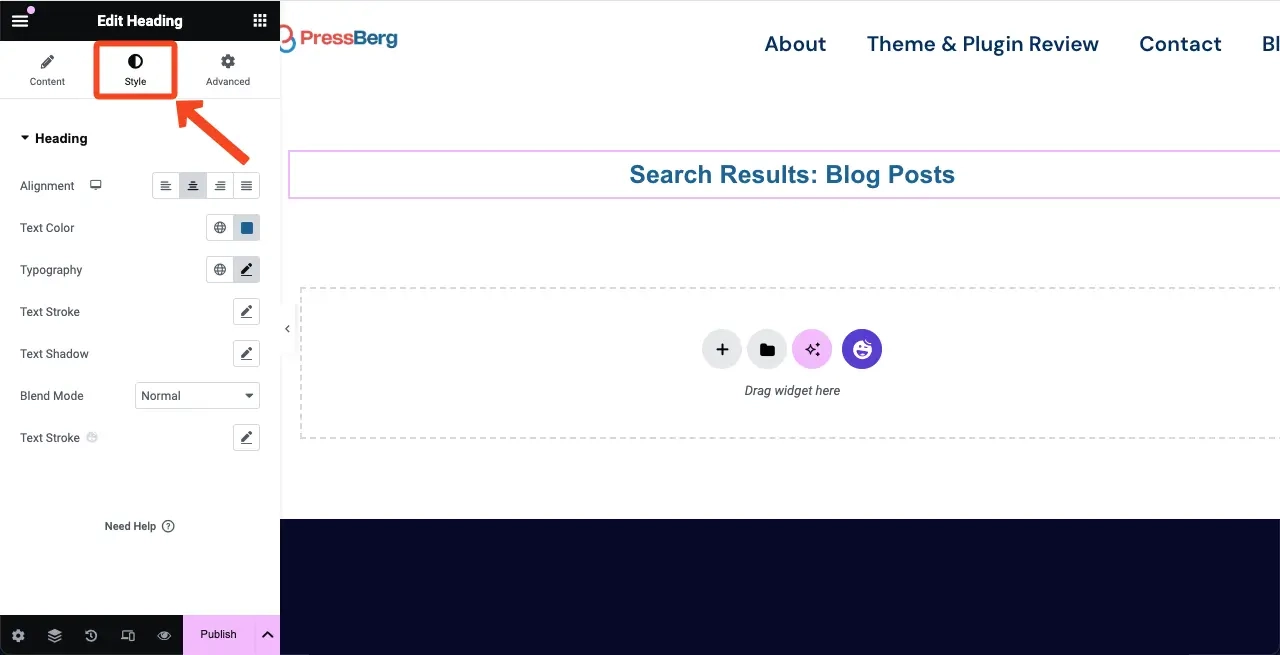
Come to the Styles tab. You’ll get options to change the color, typography, font size, alignment, and more of the heading text. Do it yourself.
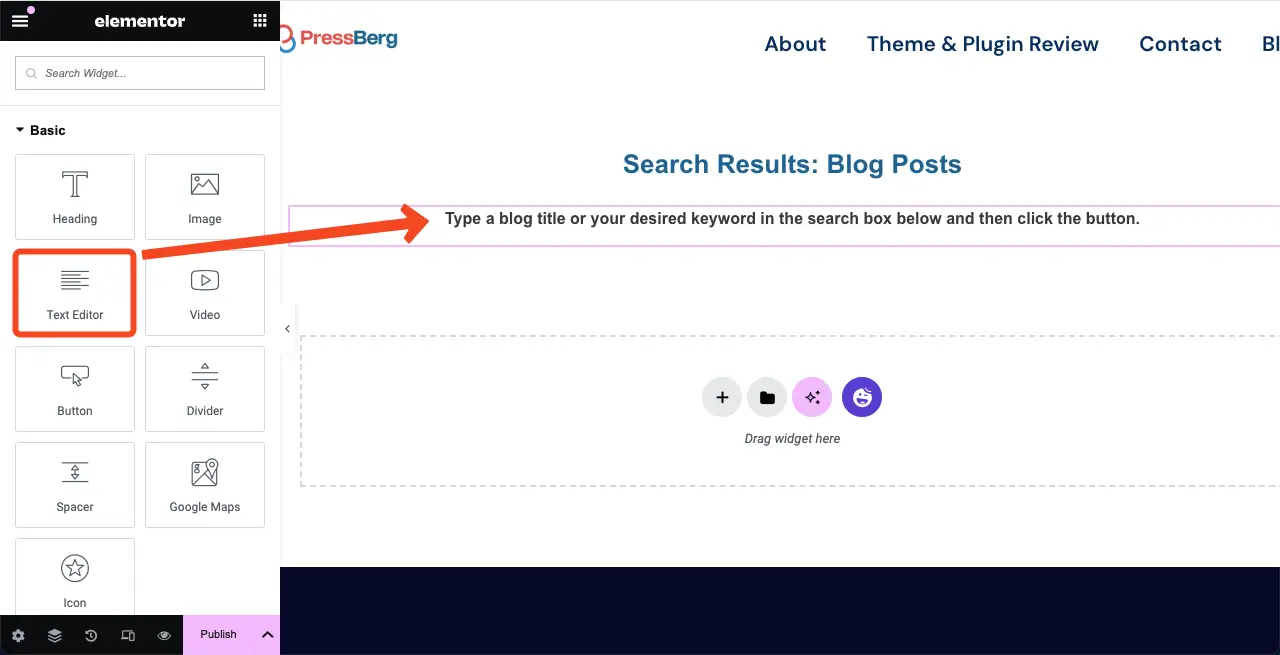
Similarly, drag and drop the Text Editor widget in the section under the heading text. Then, write your desired text and customize it as shown above.
Step 03: Add the Search Widget in the Section
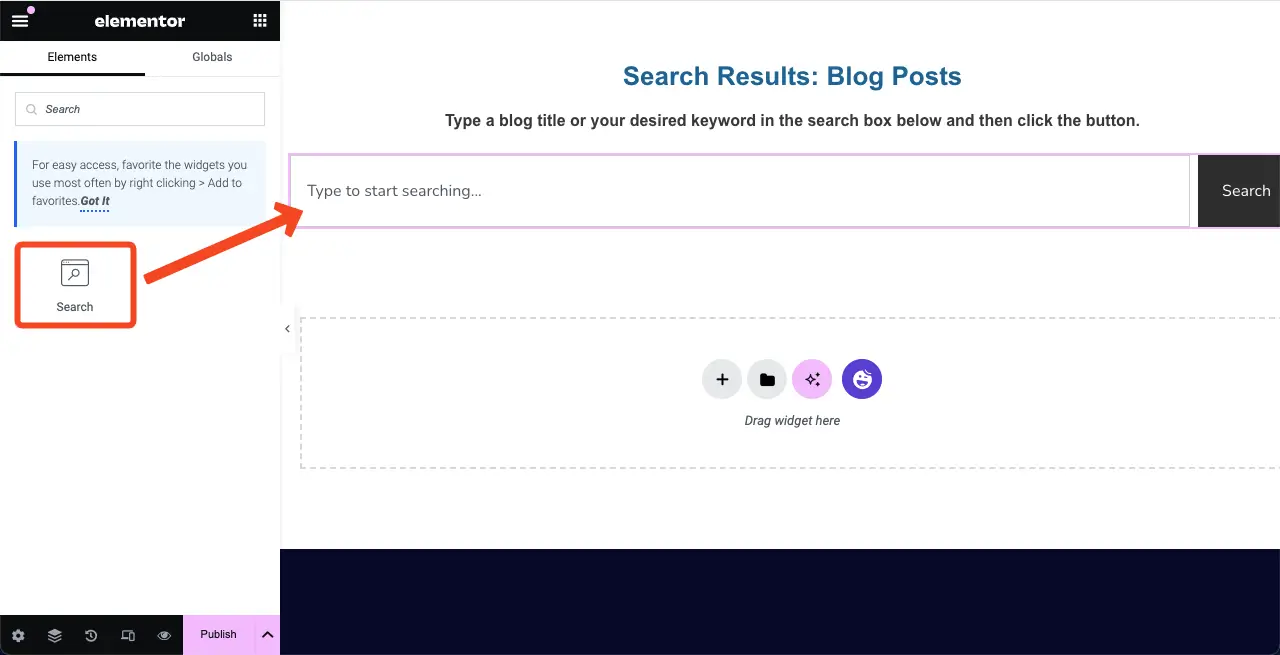
Find the Search widget. Drag and drop it in the section under the Text Editor widget in the same way as displayed above.
Step 04: Customize the Search Widget
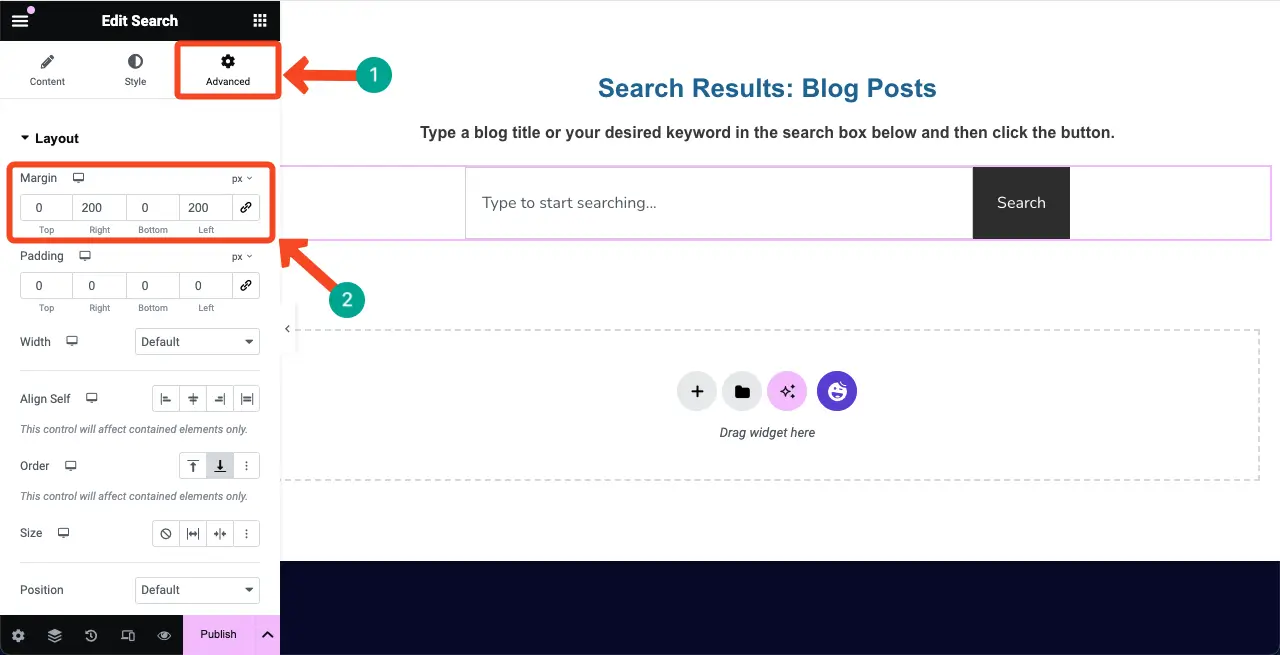
By default, the search widget will be displayed across the entire width of the canvas. Come to the Advanced tab to reduce its width.
You’ll see the Margin section. Place your desired values in the section boxes on the right and left. You’ll see the width of the search widget has been reduced.
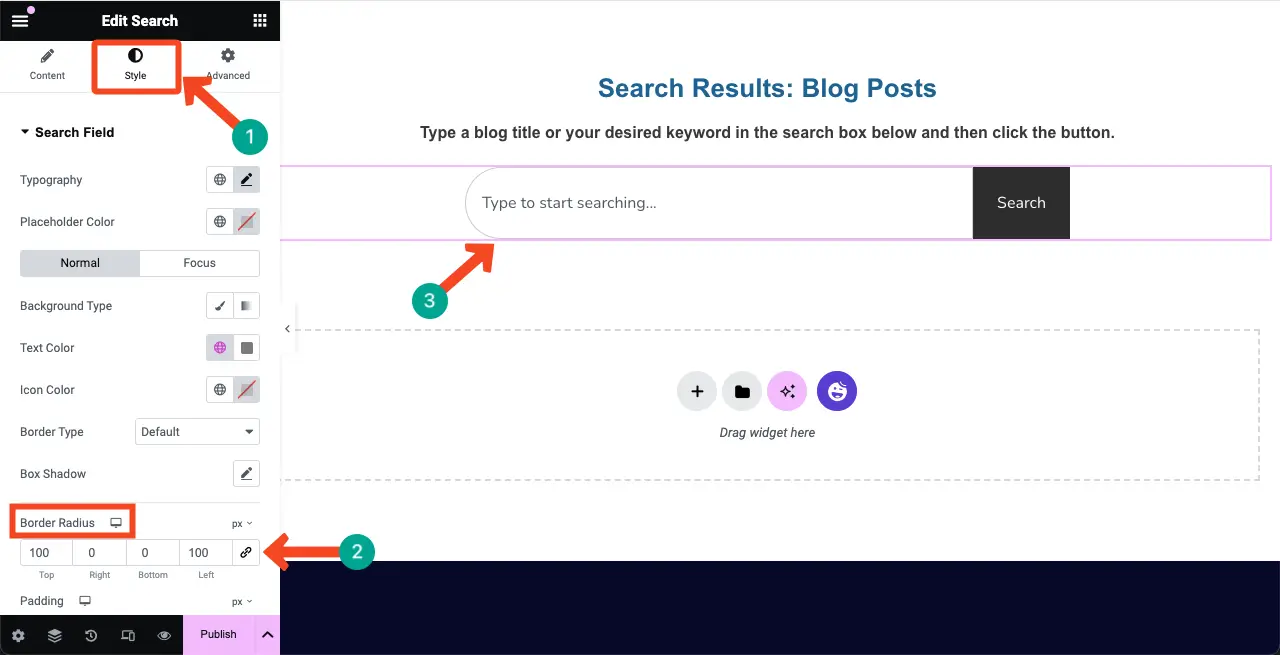
Next, come to the Style tab. You’ll get options to change the placeholder text typography, search box background color, border type, and more. Do this yourself according to the requirements of your website design.
What we have done here is added a radius value to the search box. We have placed value in the Top and Left boxes under the Border Radius.
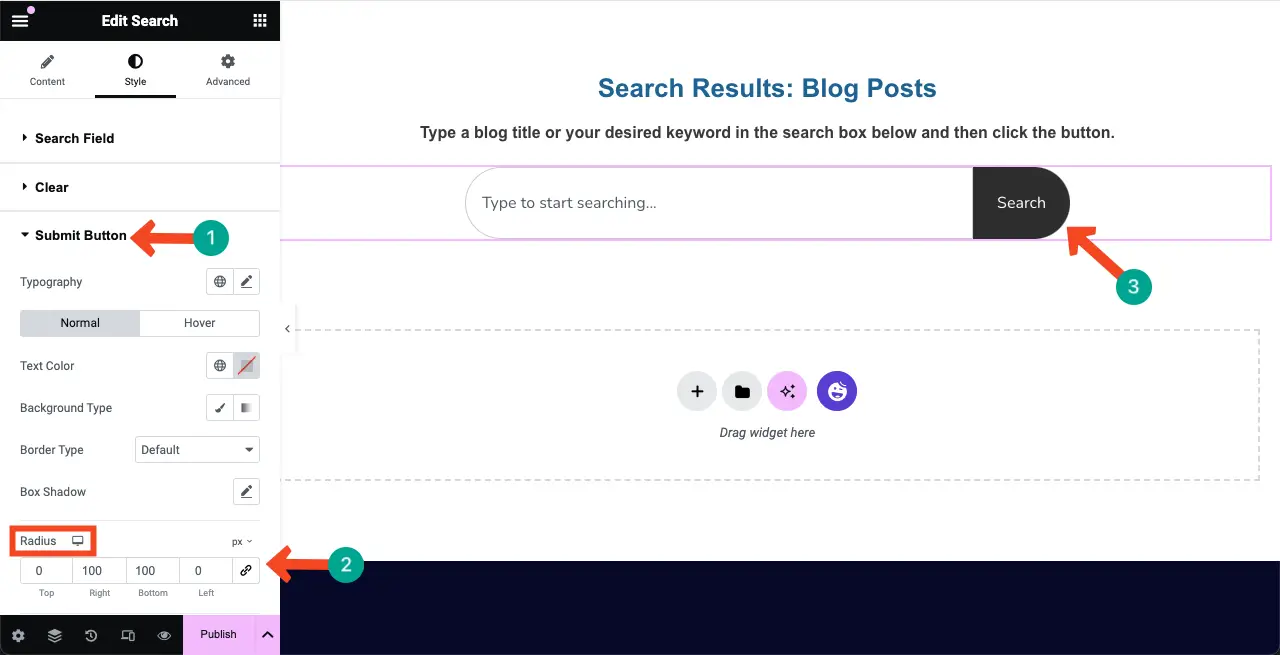
Similarly, we have added a radius to the search button. To do this, expand the Submit Button section under the Style tab. Place values in the Right and Bottom boxes under Radius.
You’ll see the changes instantly. If you want to add a hover effect, background color, box-shadow, etc., explore the options there.
Explore how to create a blog post template with Elementor.
Step 05: Configure the Results Option
We hope you have an idea about the Ajax search feature. Whenever a user starts typing something into it, several results instantly display right under the search box.
The Results option of the search widget allows you to enable this feature and configure the total number of instant results you want to display under the search box.
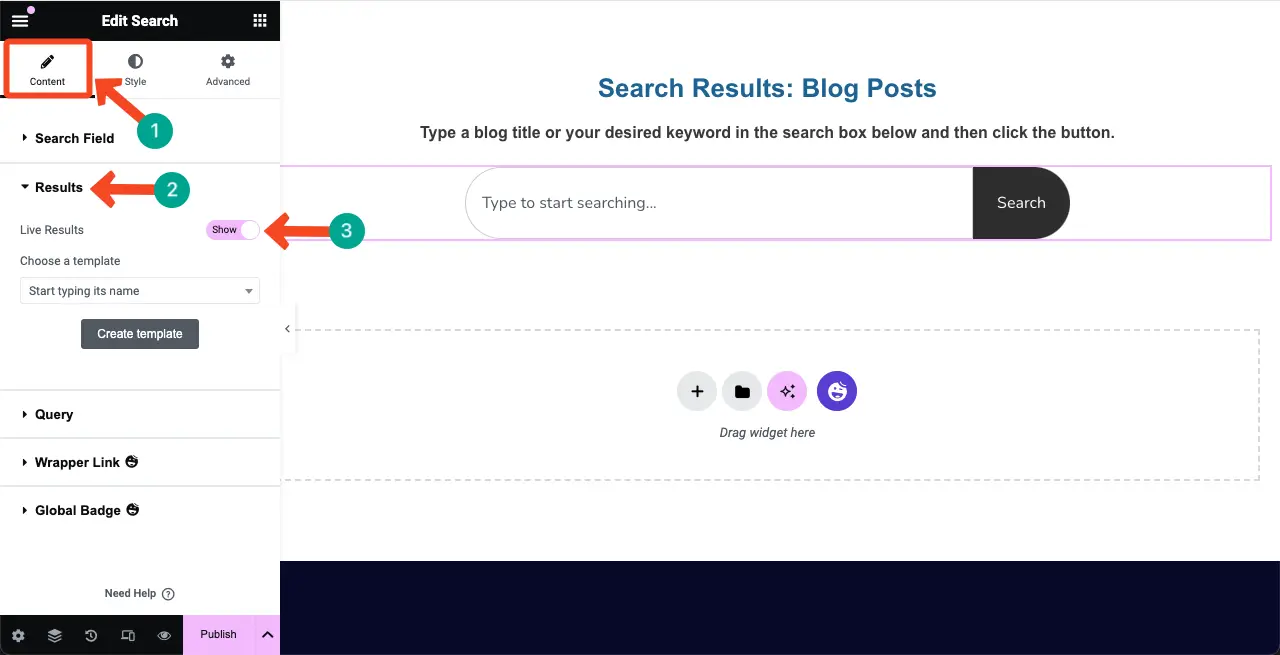
Go to the Content Tab. Then, expand the Results section.
Toggle on the Live Results option. The feature is now enabled.
Step 06: Create a Template for Live Results
Elementor allows you to create a live results template through which you can specify how the content will be displayed whenever the user types in the search box.
Click the Create template button under the Results section.
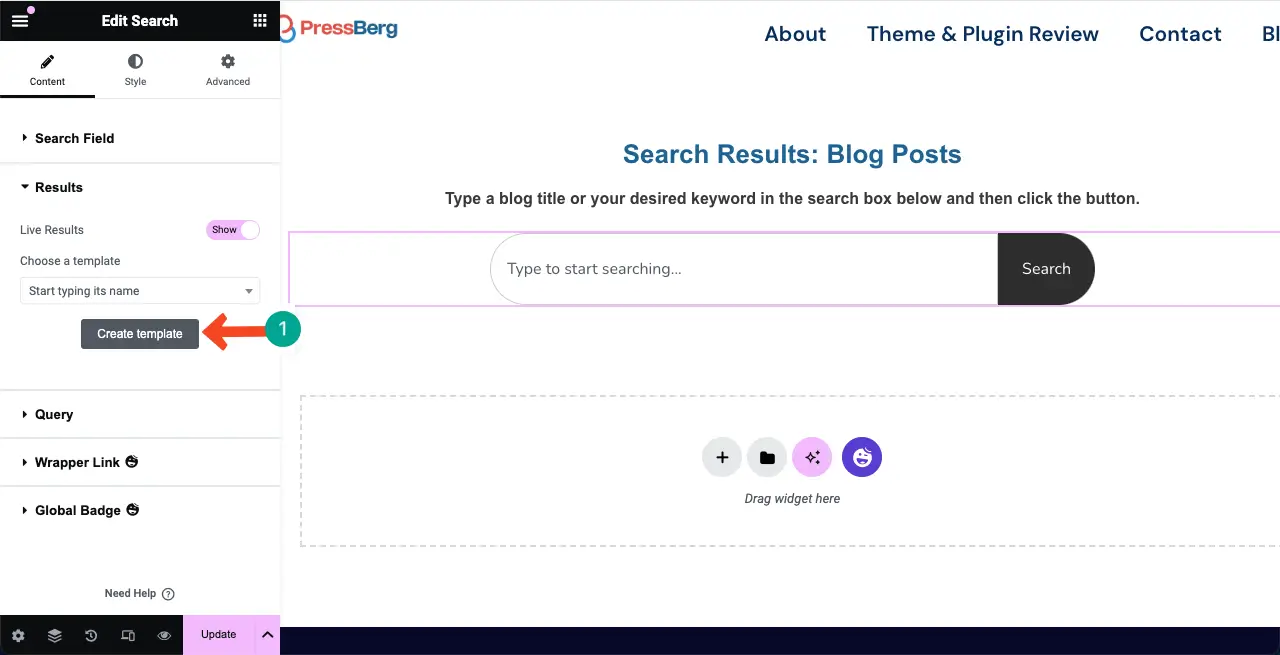
This will take you to a new canvas. Here, you have to create a layout for the live search results and save it as a template.
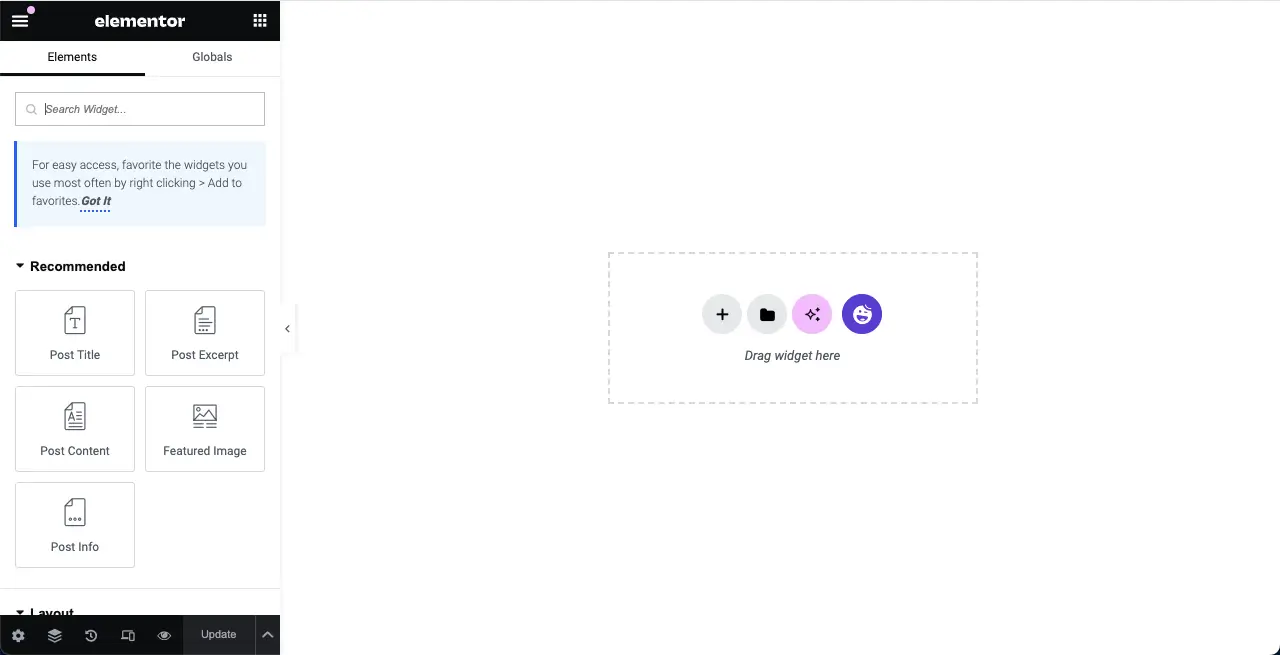
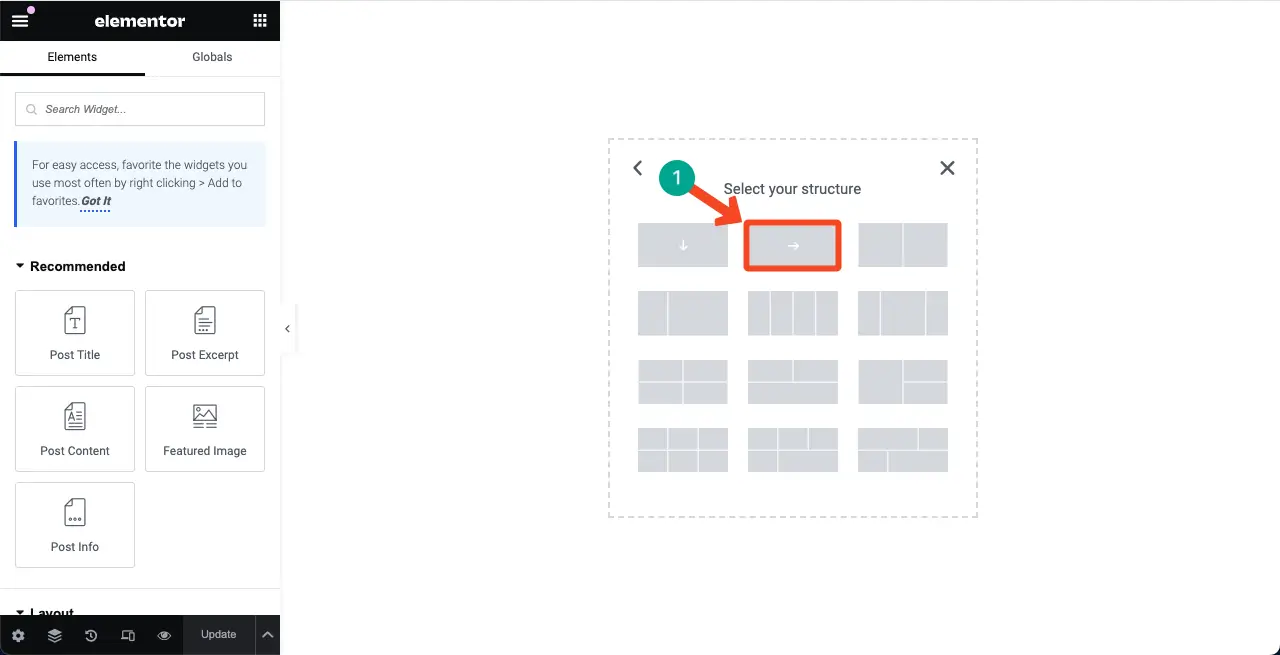
Select a column structure as you want. We have selected the Directional Row. It will continue to show on the right side as you add to this section.
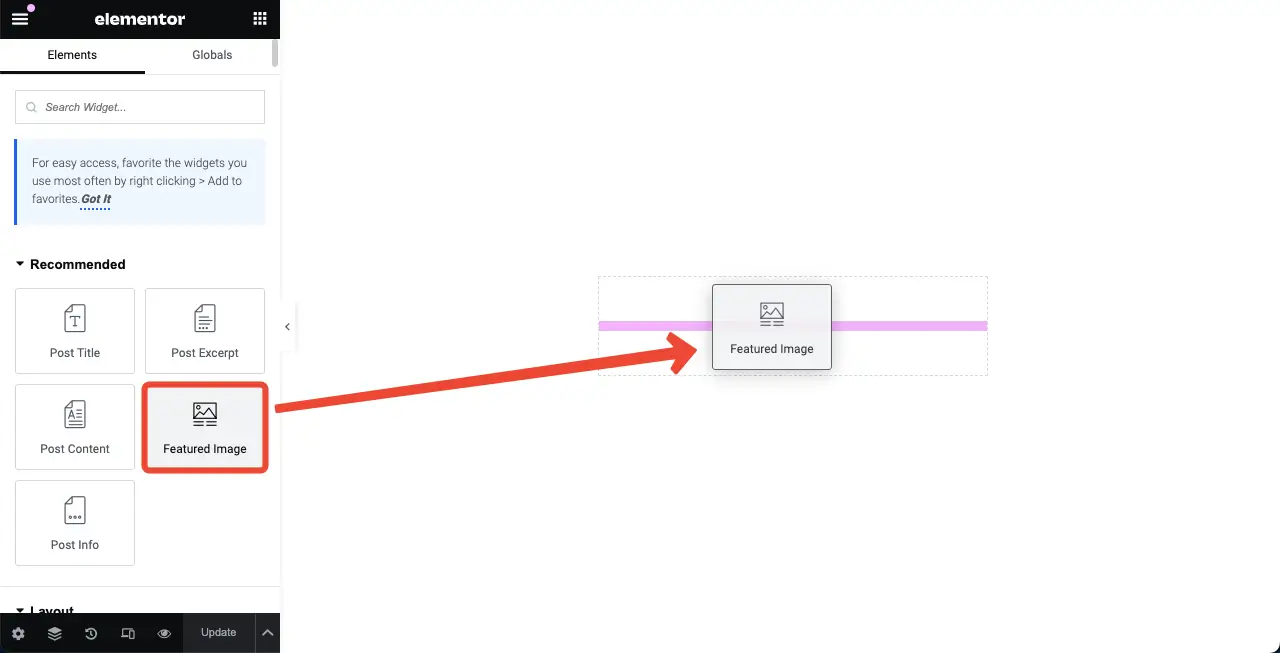
We want to use this search box to showcase blog posts. So, whenever someone types a blog topic, the search box must show a list of relevant blog posts. To do this, we have to add recommended post widgets.
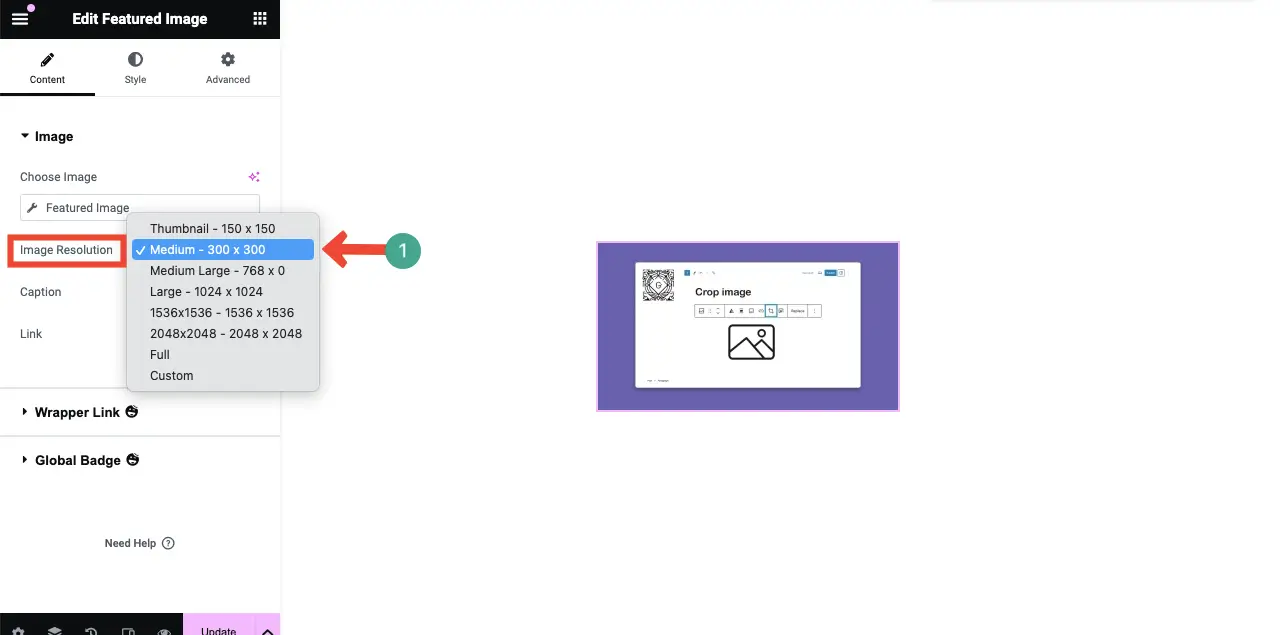
Drag and drop the Featured Image widget to the section.
By default, the featured image will be large in size. First, from the Image Resolution option, select the Medium size.
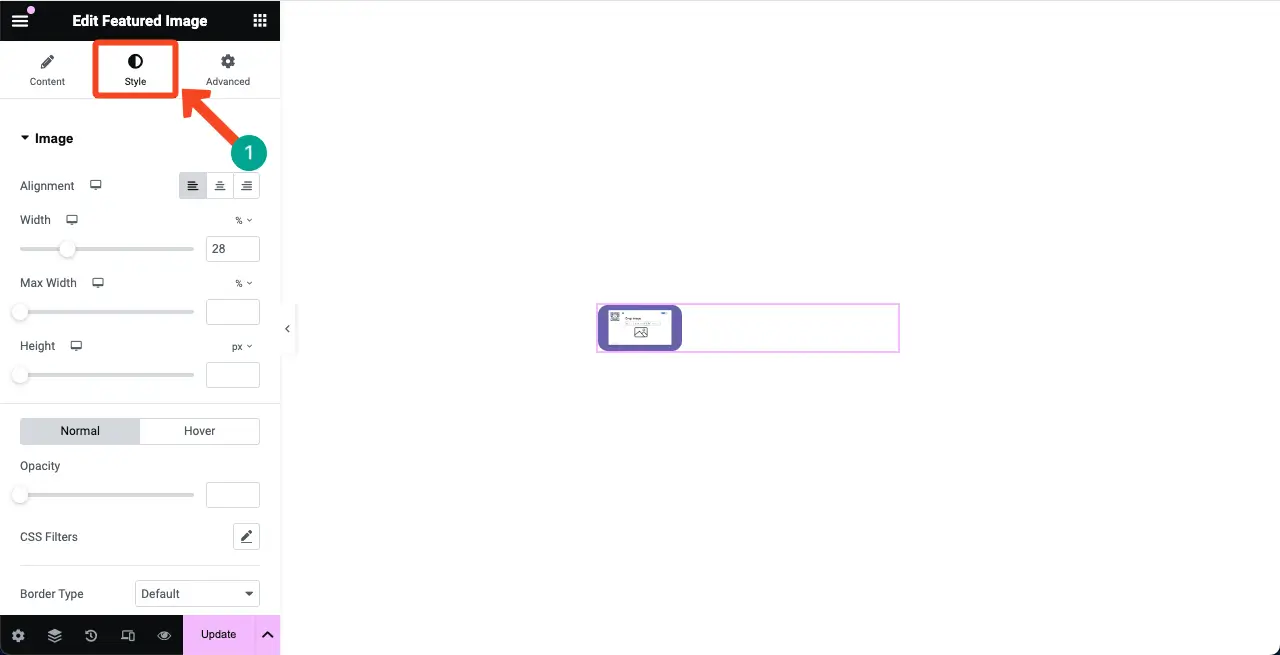
Then, come to the Style tab. Use options like alignment, width, and radius, you can further reduce the featured image size, as seen in the screenshot attached below.
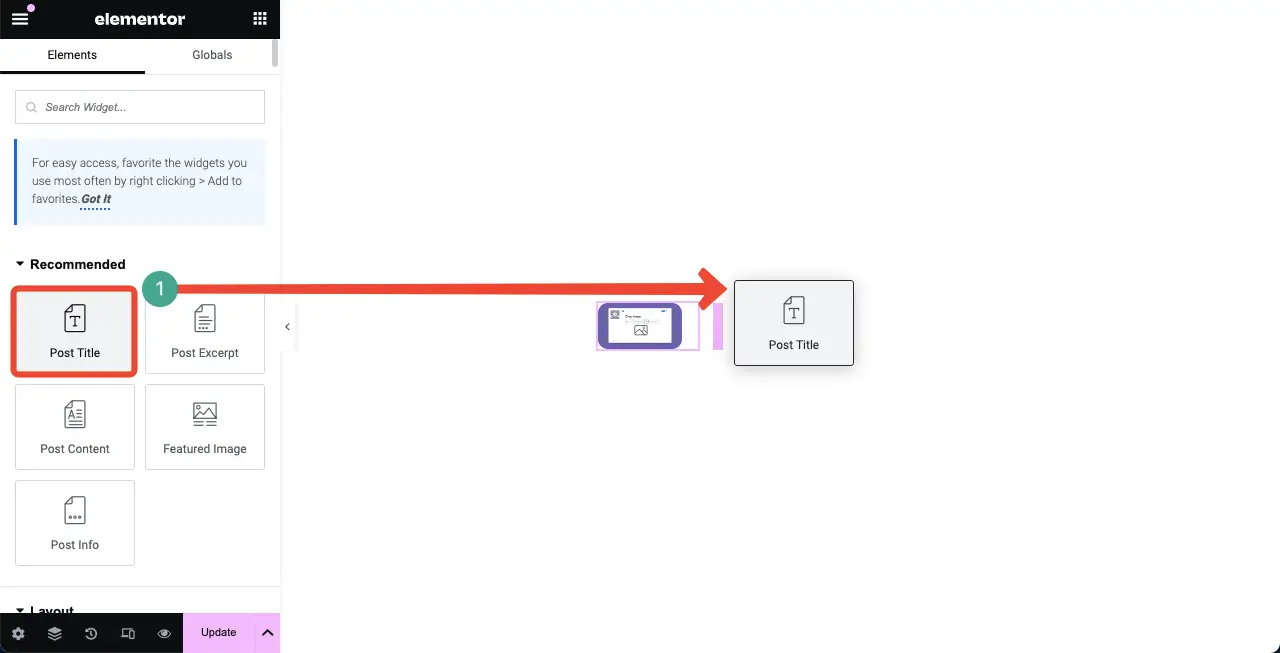
In the same way, place the Post Title widget next to the featured image.
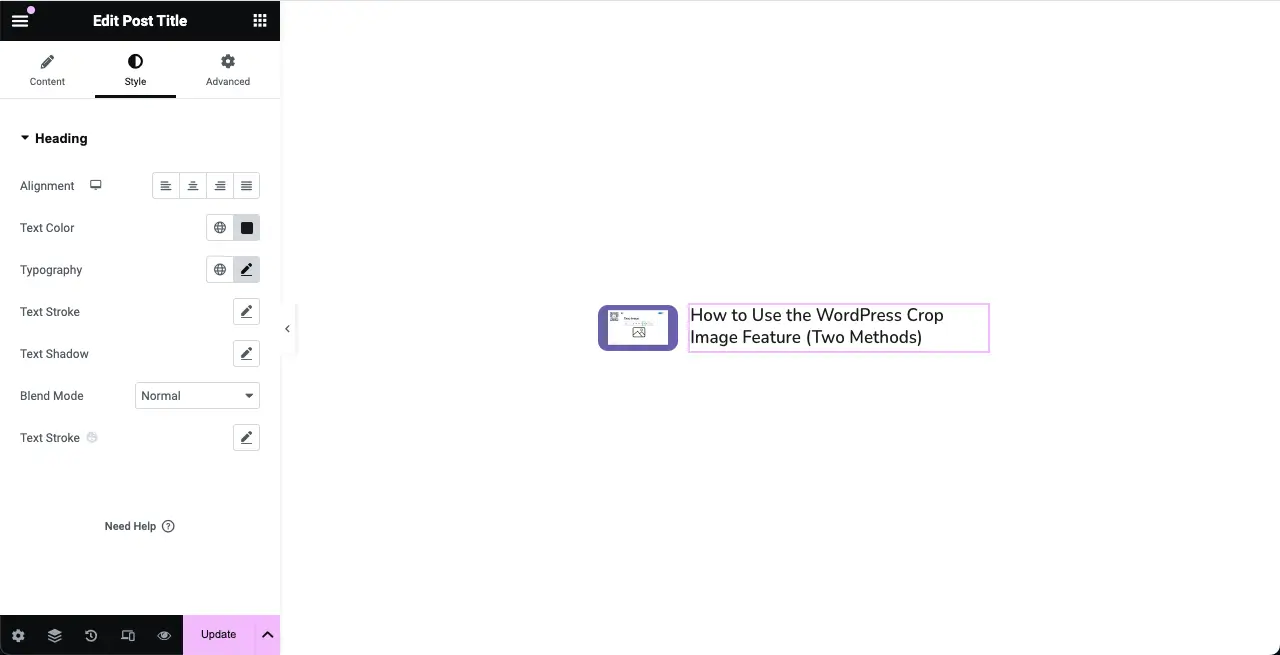
You can see that we have reduced the font size and changed its color.
Note: At this stage, save the template. You may add more elements to it if wished.
Learn how to create a resume website with Elementor.
Step 07: Add the Template to the Result
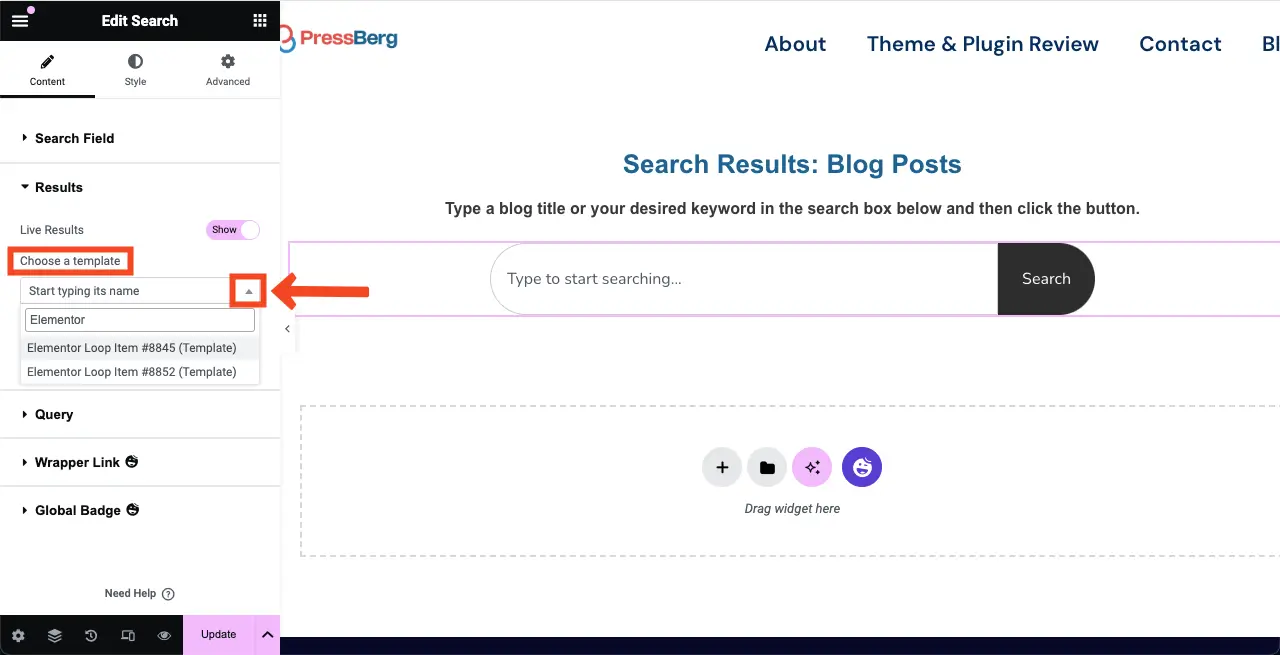
Come to the main page of what we were designing. By clicking the dropdown icon under the Results section, choose a template you designed just a while ago.
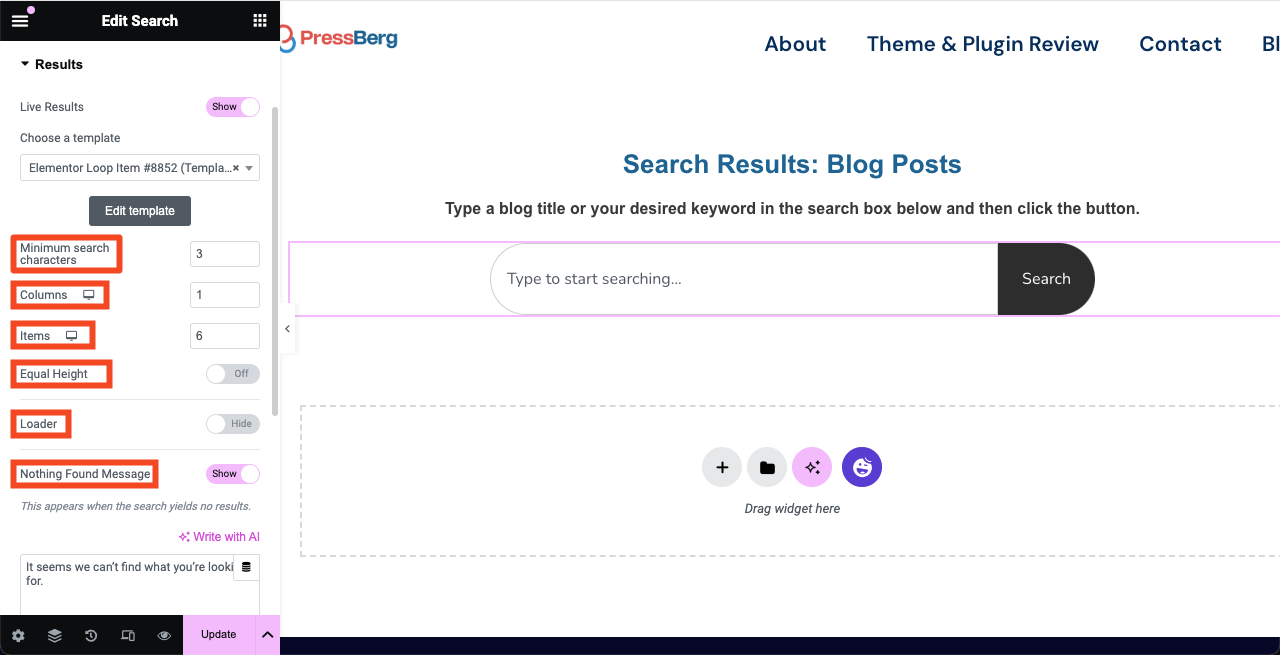
Once a template is selected, several new options will appear underneath it. Using them, you can configure the total number of items that will be displayed under the search box.
Step 08: Stylize the Live Results Layout
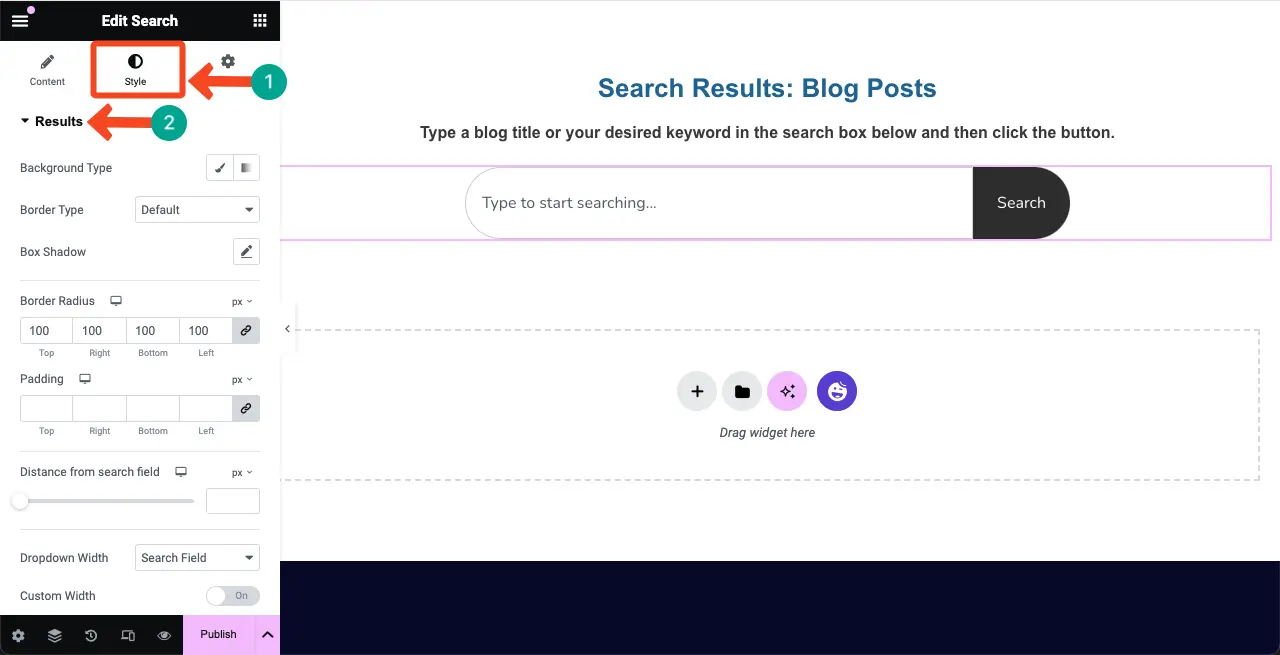
Come to the Style tab again and expand the Results section. You can stylize the background type, border type, radius, padding, distance from the search field, column height, width, and the gap between rows & columns.
Preview Live Results
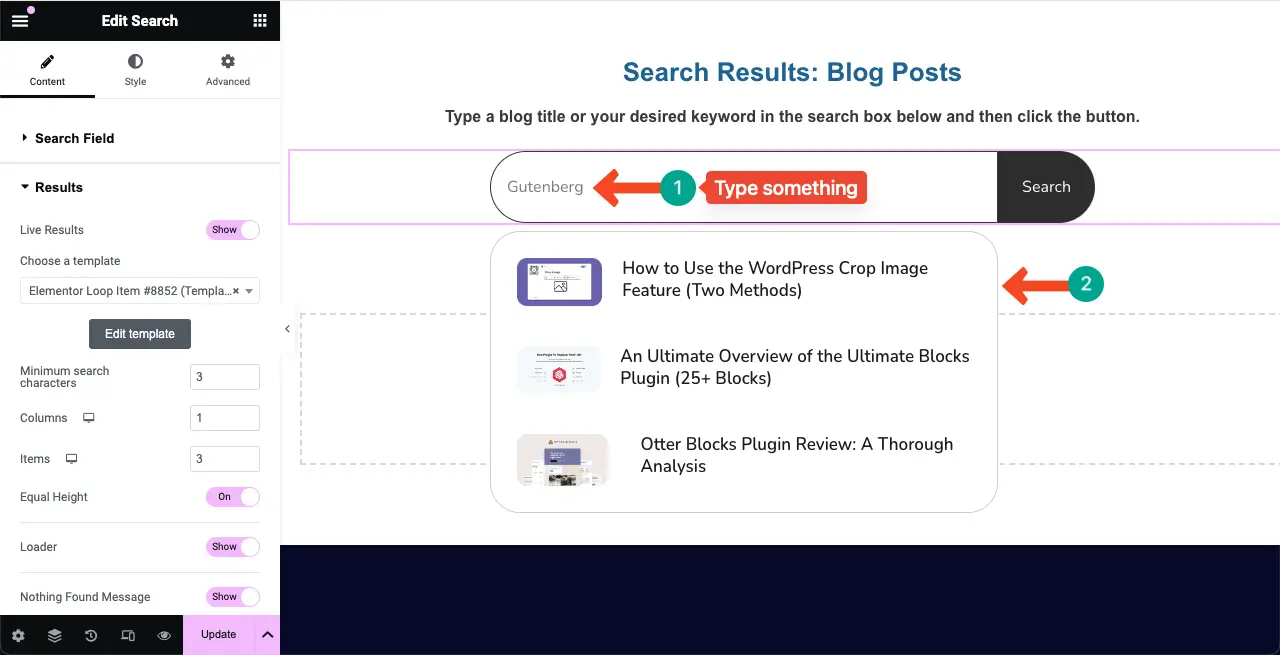
Now, type something in the search box. You’ll see a list of three items relevant to the typed topic will appear beneath below.
This ensures the search widget is working perfectly.
Note: Your search widget is ready and fully functional. You can create search boxes anywhere on your website, such as in the header, footer, and pages in the same way. Such search boxes are usually placed in the header and archive post pages.
Step 09: Add the Archive Posts Widget
Create a new section under the search box section. Then, drag and drop the Archive Posts widget to the new section.
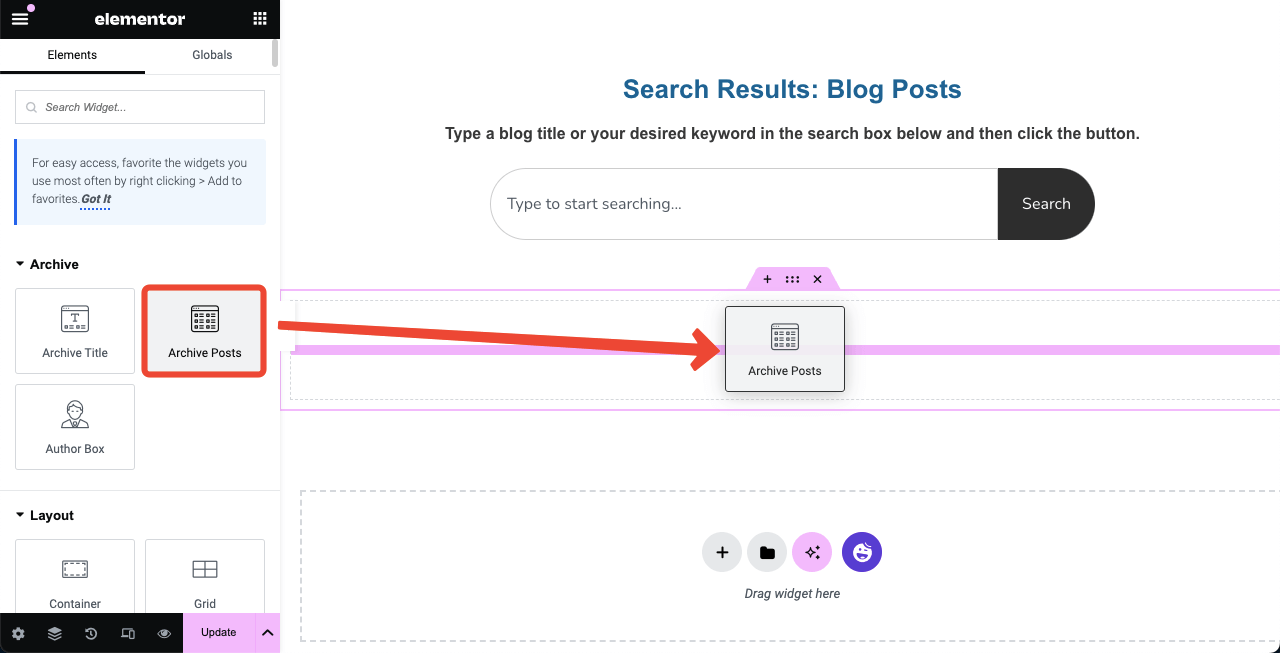
This will show up all the blog posts in the grid format you have published on your website.
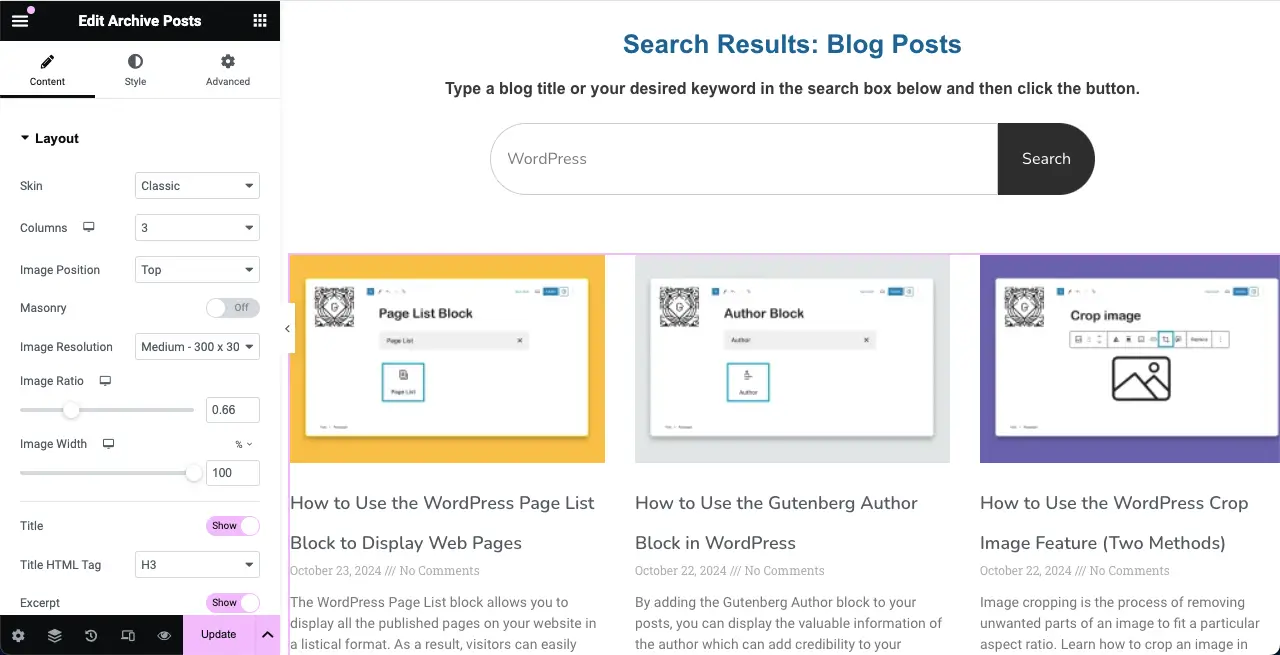
Step 10: Configure Settings of the Archive Posts Widget
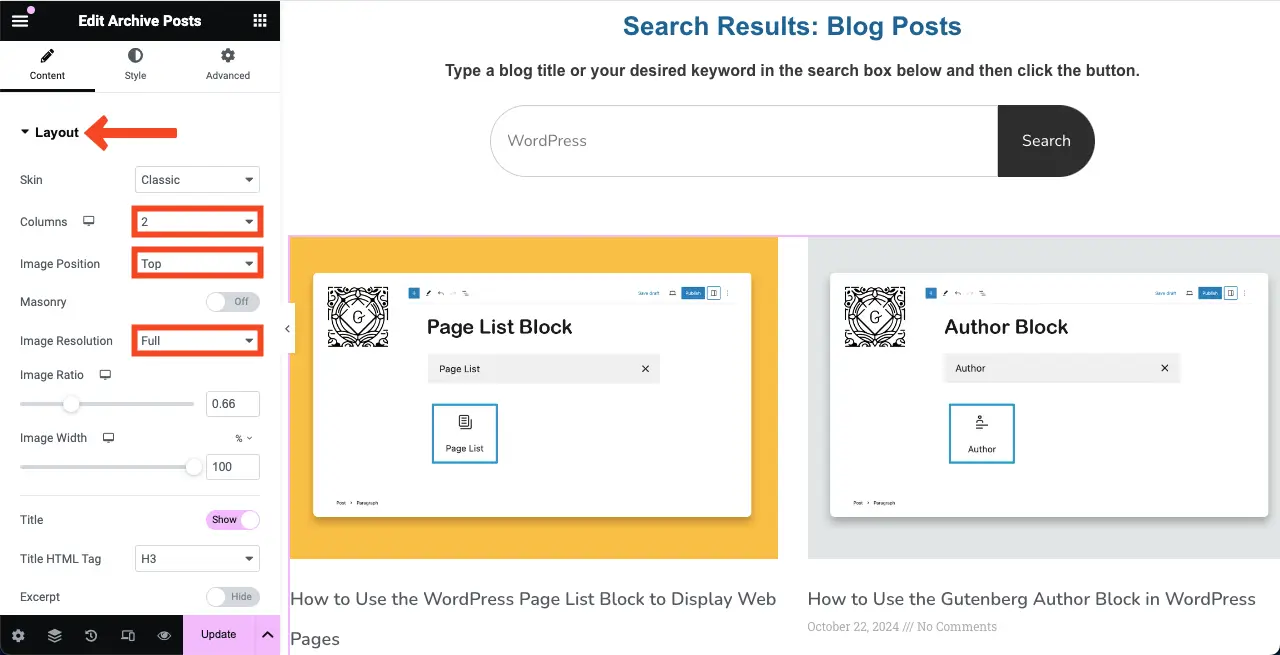
Now is the time to customize the Archive Posts widget and make its layout as you want it. The widget has numerous customization options. First, configure the basic settings. Come to the Content tab and expand the Layout section.
Choose the number of columns, image position, and image resolution. We have selected 2 columns, set image position top, and resolution full.
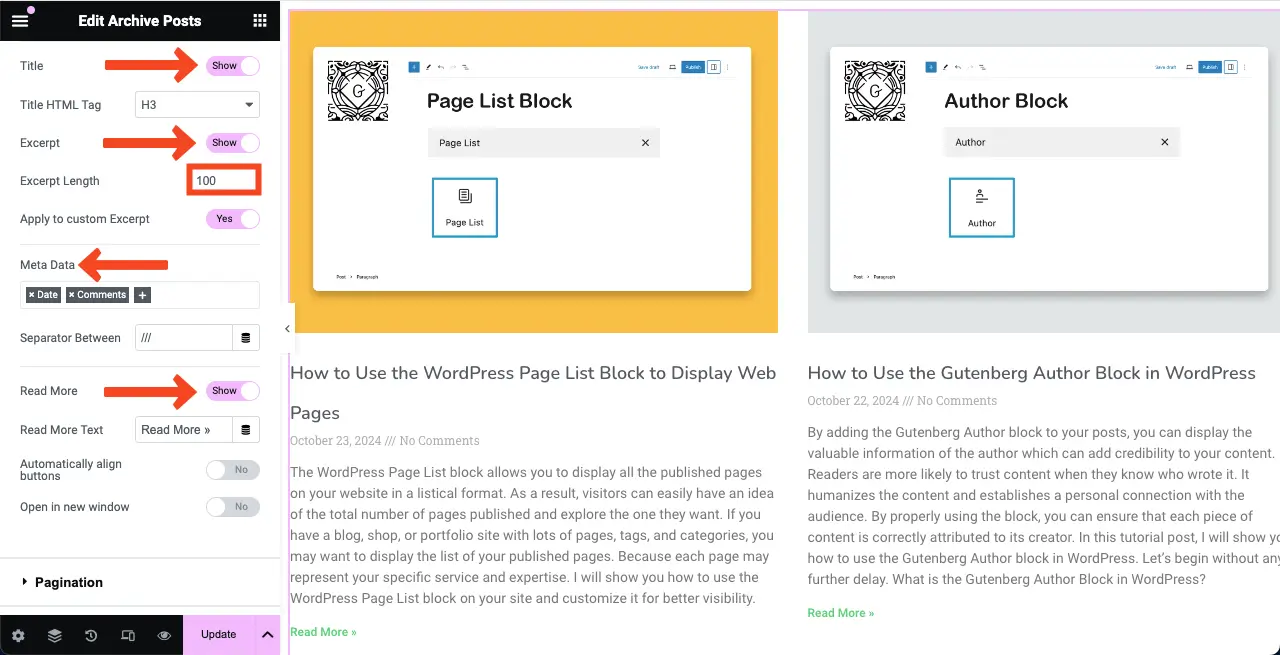
After that, toggle on the Title, Excerpt, Meta Data, and Read More options. But if you don’t want any option, keep it toggled off.
To define the excerpt length, set the number of characters next to it. Besides, specify the type of meta data you want to display. We have selected Data and Comments meta data options for the widget.
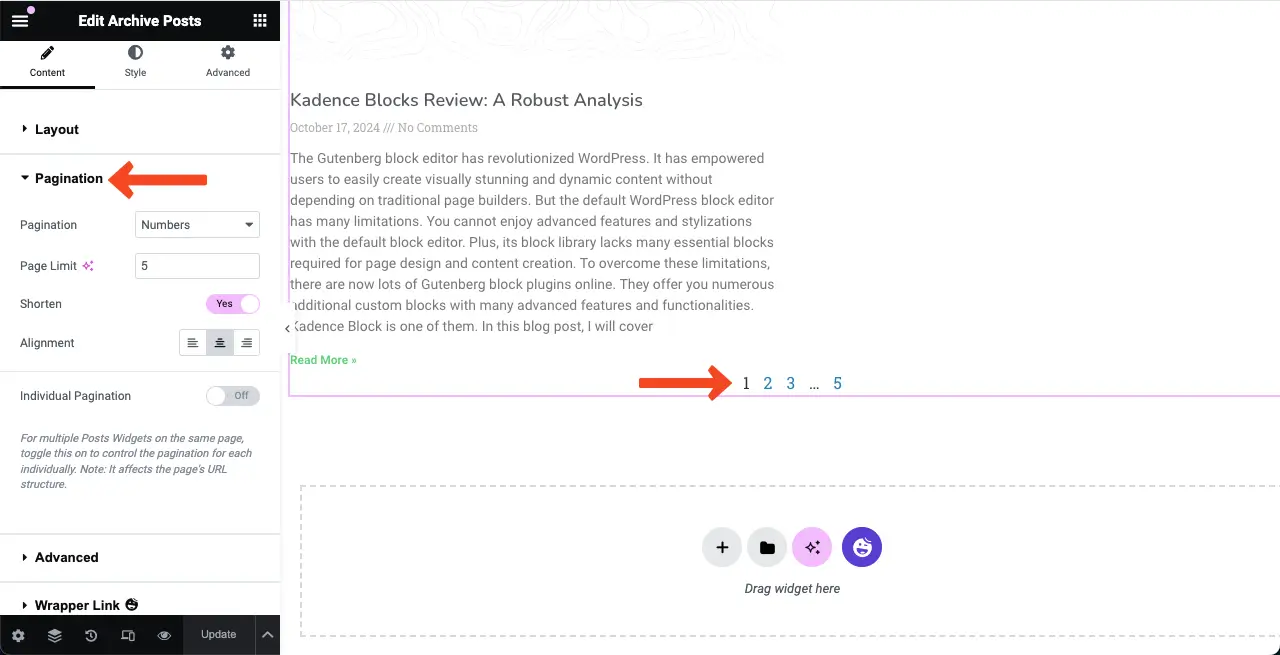
Pagination divides your posts into multiple pages. Expanding the pagination section allows you to configure the pagination type, alignment, page limit, and shorten.
Learn how to create a contact form with Elementor.
Step 11: Stylize the Archive Posts Widget
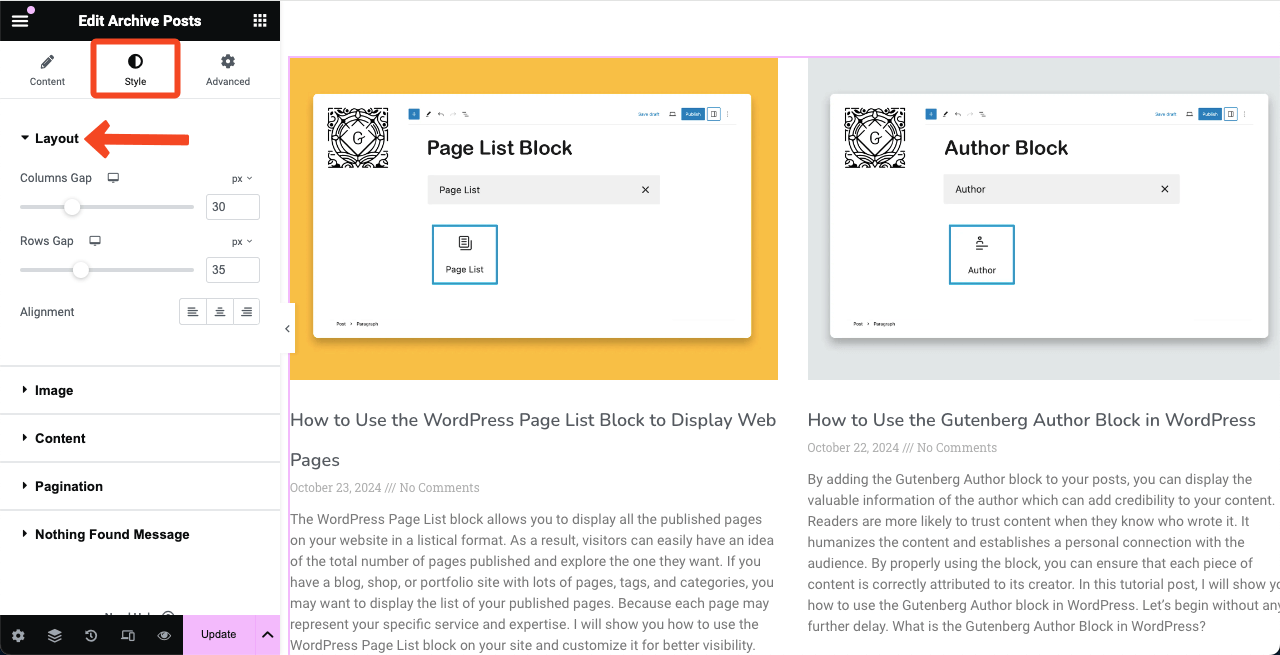
Come to the Styles tab. Here, you’ll find several options. First, expand the Layout section.
You can customize the Columns Gap, Rows Gap, and Alignment.
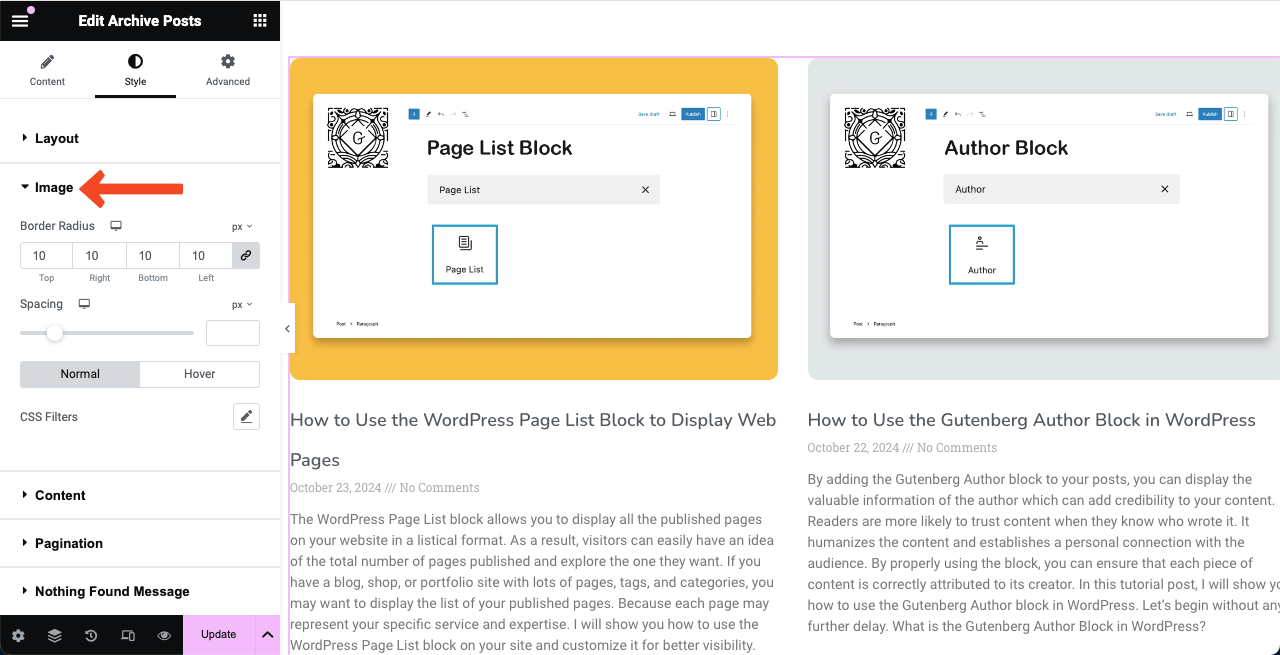
Expanding the Image section will let you set the border-radius and spacing between images and other elements.
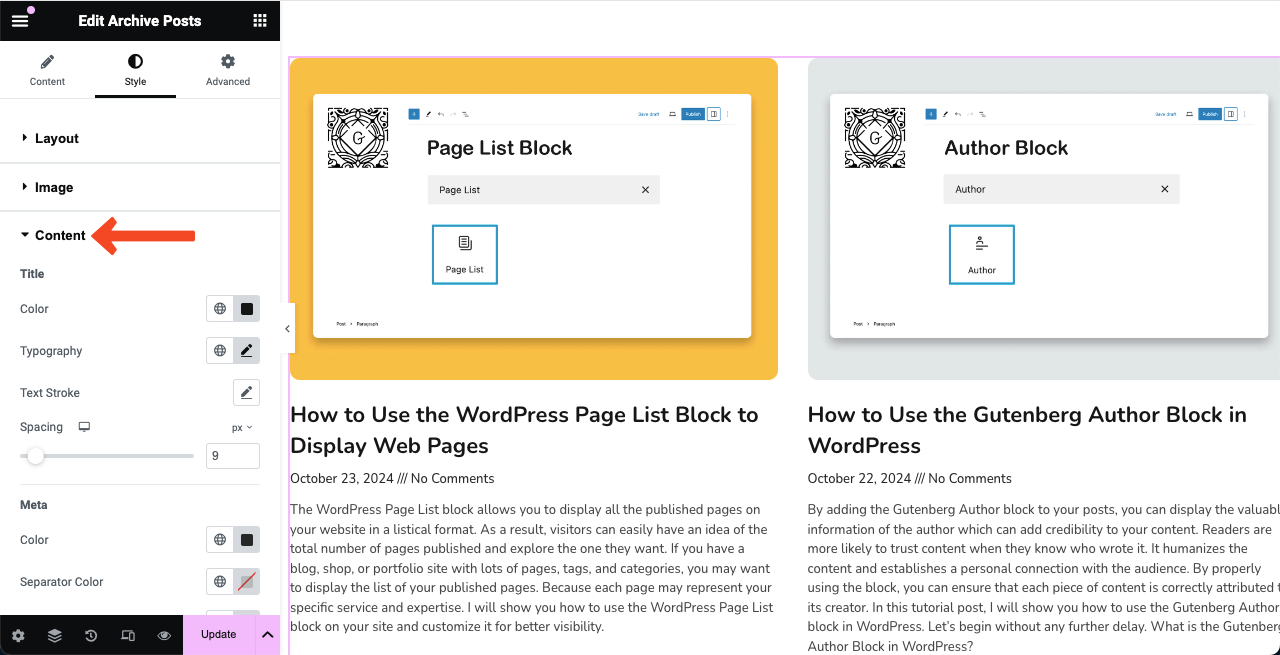
In the same way, by expanding the Content section, you can stylize the typography, color, and spacing for the Title, Meta, Excerpt, and Read More texts.
Finally, expand the Pagination section. This will allow you to customize the typography, colors, hover effects, and spaces for the pagination items.
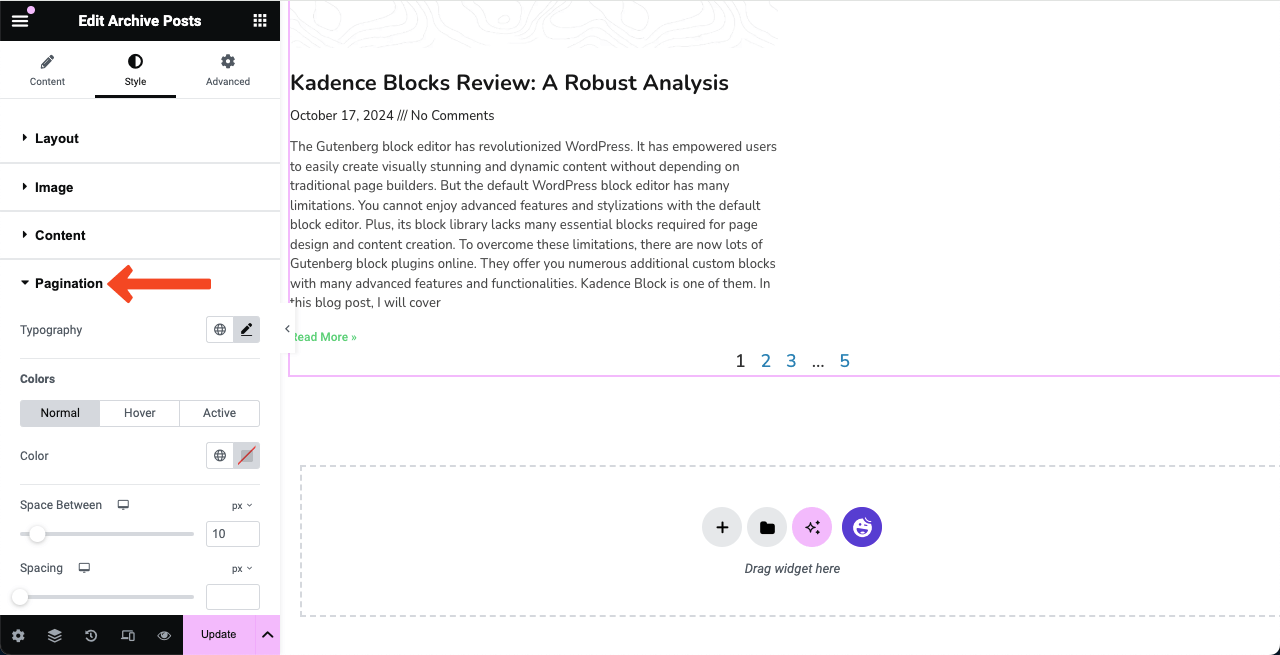
Note: Indeed, there are many more options for each Elementor widget, including the Archive Posts widget. In the above tutorial, we have tried to give you a basic idea of the customizations you can do for the Archive Posts widget. Hope you can explore and use the options other than these.
Step 12: Save and Preview the Search Results Page
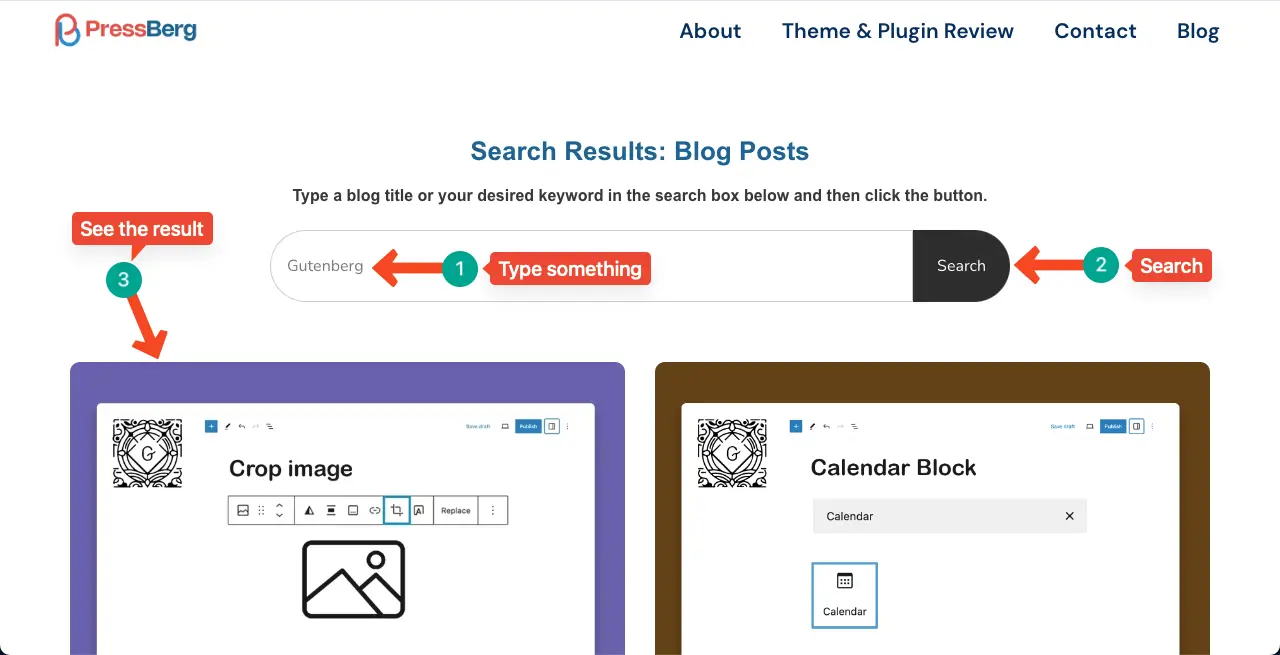
Now, come to the preview mode of the page. Type something in the box and hit the Search button. You’ll see the related blog posts appearing below in the grid format.
Any Error? Search Results Page Seems Broken!
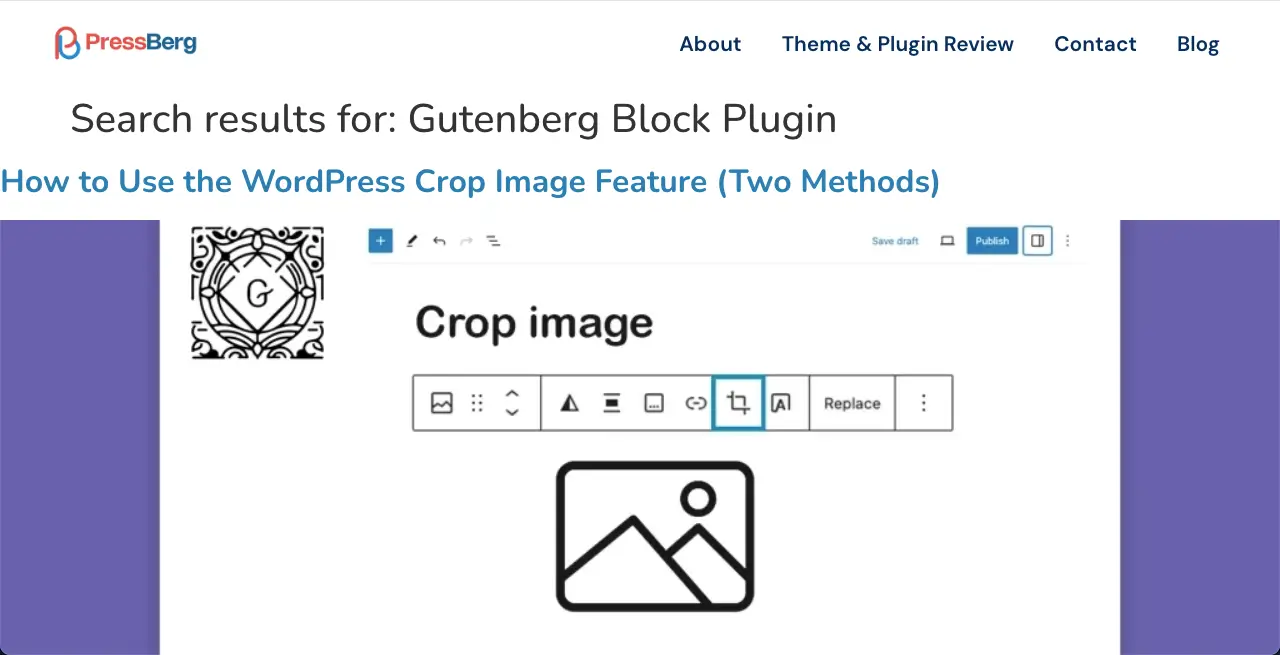
After hitting the search button, you may get scared if you see the related blog posts appearing like the image below. You may feel like the page is broken.
Don’t worry! It’s very easy to solve the problem.
You just have to create an Archive page in the Elementor theme builder. The way you design the Archive Page will affect how the related blog posts are displayed after clicking the Search button.
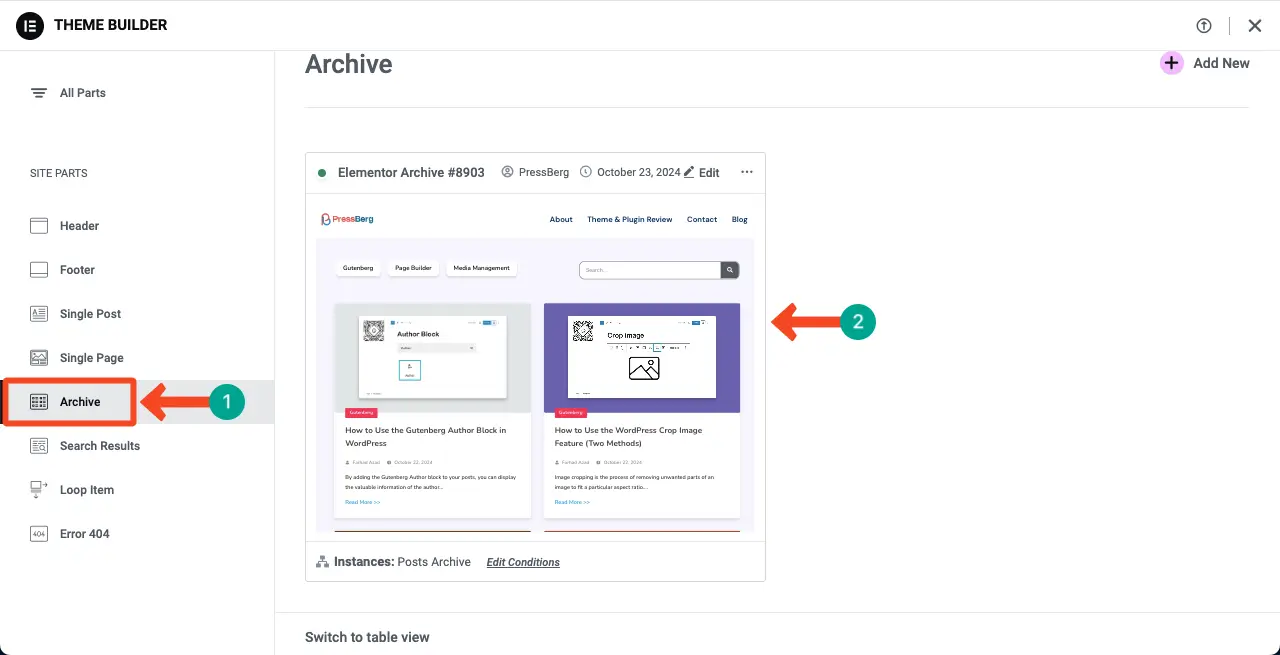
If you want us to create a separate tutorial post on how to create an archive page with Elementor, let us know through the comment section. We will consider designing such a page based on your expectations.
So, this is the end of the tutorial part of the post. Thus, you can create a search results page using Elementor on WordPress.
Bonus Point: Use HappyAddons to Get More Widgets for Elementor
HappyAddons is a prominent addon with a great collection of powerful widgets for Elementor. If you ever feel the available Elementor widgets aren’t enough and are in search of more, you can try the HappyAddons plugin.
HappyAddons comes with 120+ widgets and dozens of features that can take your Elementor site to a new level. The plugin has both a free and premium version. You can first try with the free version. If satisfied, you can upgrade to the premium version anytime and do something great.
Get the plugin by clicking the buttons attached below.
Conclusion
Creating a search result page is not a luxury today but is mandatory to enhance the user experience. It helps you uphold the appeal and brand value of your website. If your site is mainly for eCommerce products, affiliate marketing, and blogging, it’s never sufficient without a search result page.
Hopefully, by following the tutorial explained above, you can create stunning search result pages on your Elementor site. However, don’t forget to optimize the search widget for tablets and mobile devices so all types of people can use this element.





2 Responses
i have tried this but the pagination is not working properly , when i am searching it is showing all the data related to the search.
Please reach out to our support team and submit a ticket detailing your issue.