If you are a professional web developer who has to create and maintain a large number of websites frequently, the ability to clone WordPress sites cloud be a game-changer. Because this can make you efficient in duplicating a well-performing website, maintaining consistency while saving time and effort.
However, our experience shows cloning websites is daunting and intimidating to numerous users, especially those who aren’t tech-savvy. But today, there are many easy ways by which even non-technical users can clone their WordPress sites without committing any mistakes.
In this article, we will show you multiple methods of how to clone a WordPress site with and without plugins. Plus, if you want to create an exact copy of your website to a different domain, we’ll show you the process at the end. Let’s get started!
Table of Contents
- What Is Cloning a Website
- Why You May Need to Clone Your Website
- How to Clone a WordPress Website: Step-by-Step Guide
- Bonus Point: How to Copy a Page from One WordPress Site to Another
- FAQ on How to Clone a WordPress Site
- Final Words on How to Clone a WordPress Site
What Is Cloning a Website
Cloning a website is the process of creating an exact copy of a website in a different domain. It copies the overall structure, design, content, and functionalities to create an identical version of the original website. You can clone a website manually or using different plugins.
But cloning someone else’s website without permission may violate copyright laws and lead to legal penalties. Google and other search engines may blacklist such a site whenever they find it.
Cloning vs Copying a Website
Though cloning and copying seem closely related, the two have slight differences. Take a quick look at them in the table below.
| Topic | Cloning a Website | Copying a Website |
| Definition | Creates a replica or an exact version of a running website. | Copies some or all content of a running website. |
| Objective | To imitate the design and functionalities. | To reuse some or all content through modification. |
| Legal | Mostly illegal and violates intellectual and copyright laws. | It may be illegal if not the content is modified before publishing. |
Why You May Need to Clone Your Website

Website cloning is illegal if you do it without permission. But if you do it on your own website, there is no problem. People often clone their own websites due to several reasons. Let’s know why you may want to clone your website someday.
1. Create a Backup Copy
Cloning a website can help you quickly recover your original site if it ever experiences a crash. Though numerous backup plugins are available online, cloning will help you keep a running copy of your site in a new location, including the entire database and web content.
2. Test New Features, Designs, and Functionalities
Before installing a new application to your original website, you may want to check how it reacts in a web environment. A cloned website will allow you to test whether the application has bugs or compatibility issues that could be harmful in the end.
3. Analyze the Code and Frameworks of the Original Website
If you have a headless WordPress site, you must check its front-end codes and frameworks regularly. This will save your website from experiencing any potential downtime by identifying technical issues and ways to resolve them.
4. Create a Staging Environment
You can use the cloned website as a staging environment. If you are a theme or plugin developer, the cloned website will let you test their changes and updates on the staging platform before releasing them to the market.
5. Migrate to a New Hosting Server
Before migrating your website to a new server, you can host its cloned version there to check its support, performance, and other issues. If satisfied with their services, you can finally decide to move there with all your web content and the database.
How to Clone a WordPress Website: Step-by-Step Guide
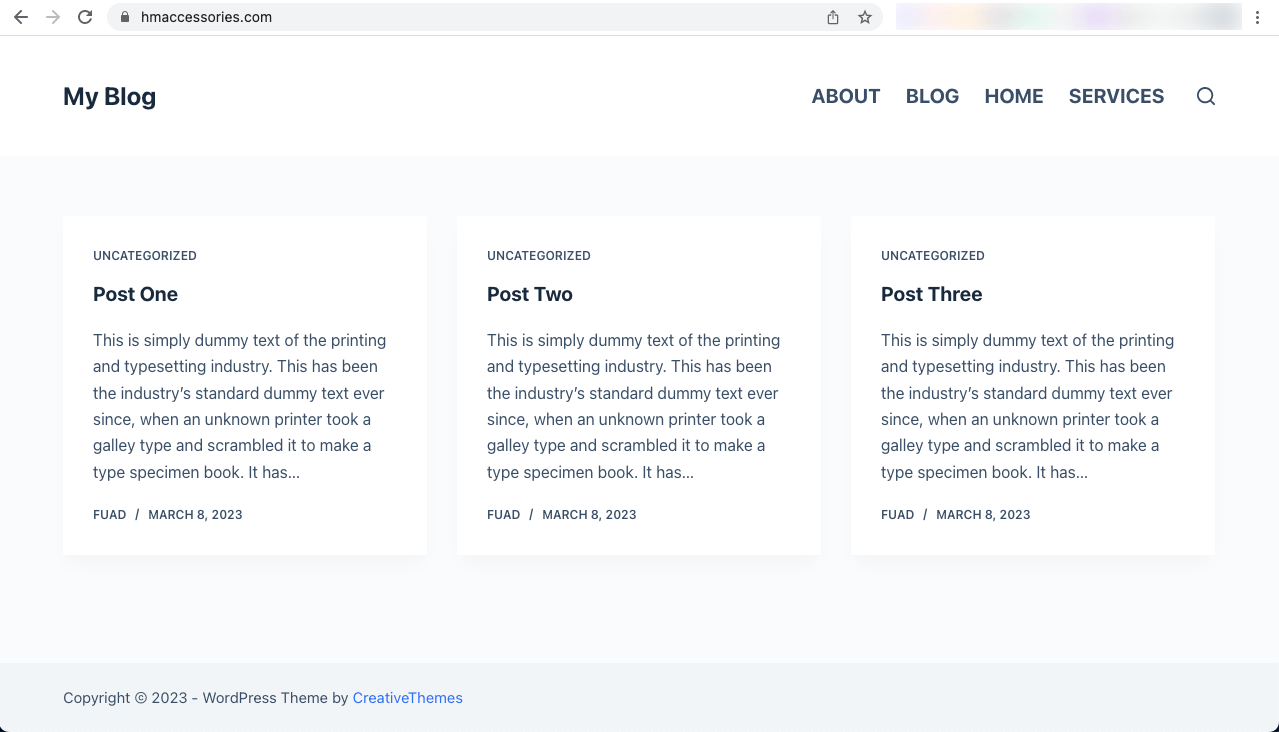
You can clone a WordPress website in several methods. Most popular of them are manual, using a plugin, and from the Softaculous app installer. Below is the frontend view of the website that we’ll clone in all these methods one by one. Let’s get started!
Method One: How to Clone a WordPress Site Without Plugin
There are a few prerequisites you must get ready before jumping into the process of cloning a WordPress site. They are:
- A domain/subdomain
- A hosting server
You may host your cloned website on a different server or on the same server where your original website is already hosted. We’ll explain this method using a subdomain.
Step 01: Create a Subdomain
Log in to your cPanel. Go to the Domains section. Click on the Domains option in it.
Note: Based on the cPanel theme, you may or may not get the Subdomains option in the Domains section. The below cPanel uses the Jupiter theme, which doesn’t show the subdomains option on the home page. But other themes like paper_lantern show it.
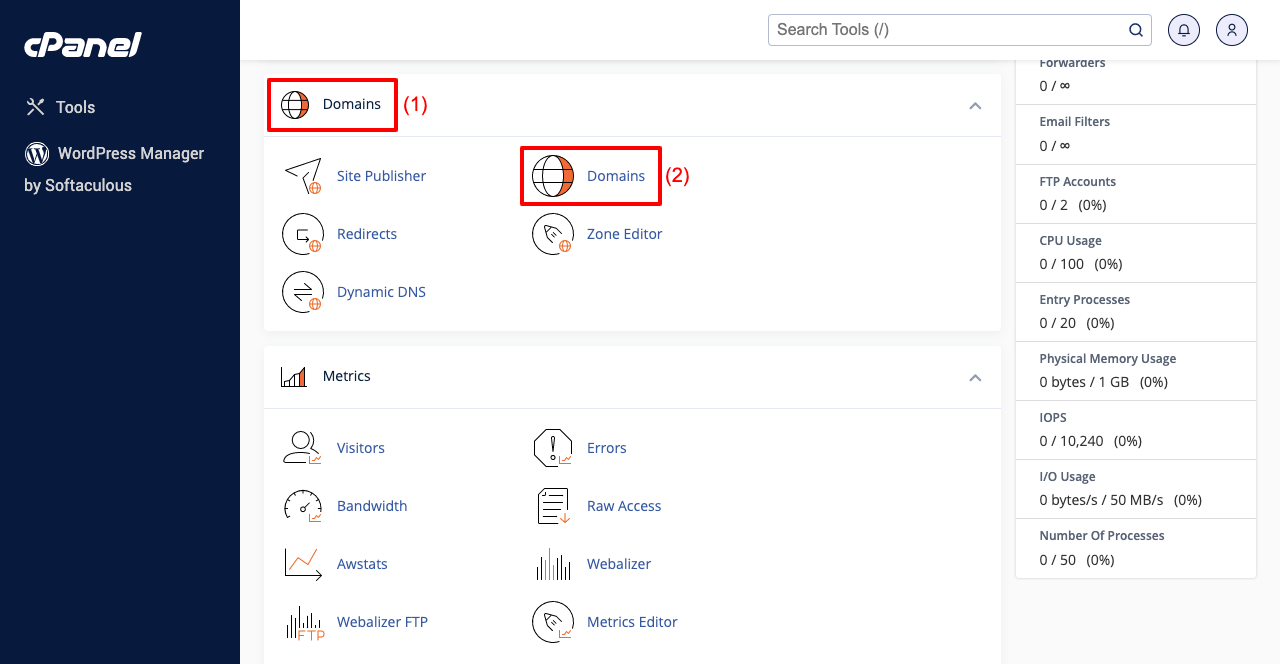
Click the Create A New Domain button. It will take you to a new page and give fields where you can type your subdomain.
Type your subdomain in the first field. The root field will automatically adopt it. Press the Submit button at the end.
Note: The formula to write subdomain is initial word+dot+your domain. For example, hmaccessories.com is the original domain, and test.hmaccessories.com is the subdomain. You may add anything as the initial words.
Go to the cPanel home page. Click on File Manager. Visit the subdomain directory file you created.
You’ll see it’s (test.hmaccessories.com) completely empty. We’ll copy everything from the directory (public_html) of the original domain.
Step 02: Copy Files from the Original Domain Directory to the Subdomain
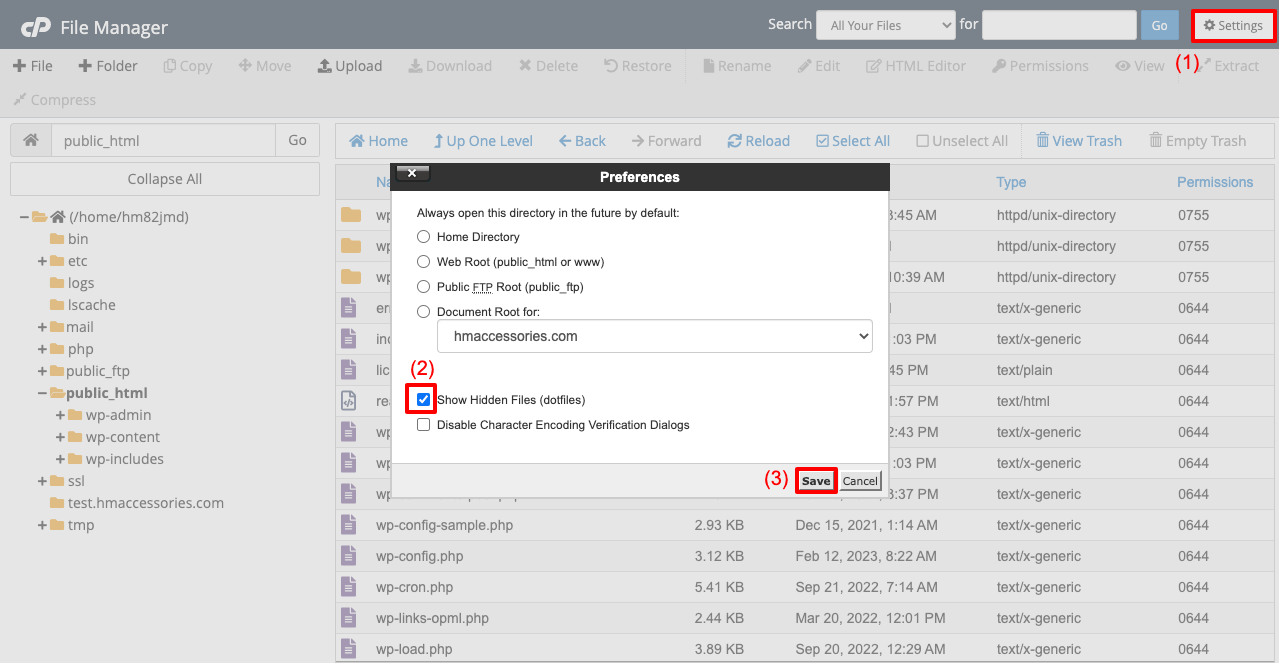
Go to public_html. Click on Settings.
A pop-up will appear on your screen. Tick mark the check box next to Show Hidden Files (dotfiles) and Save it.
It will make all the hidden files visible on the list.
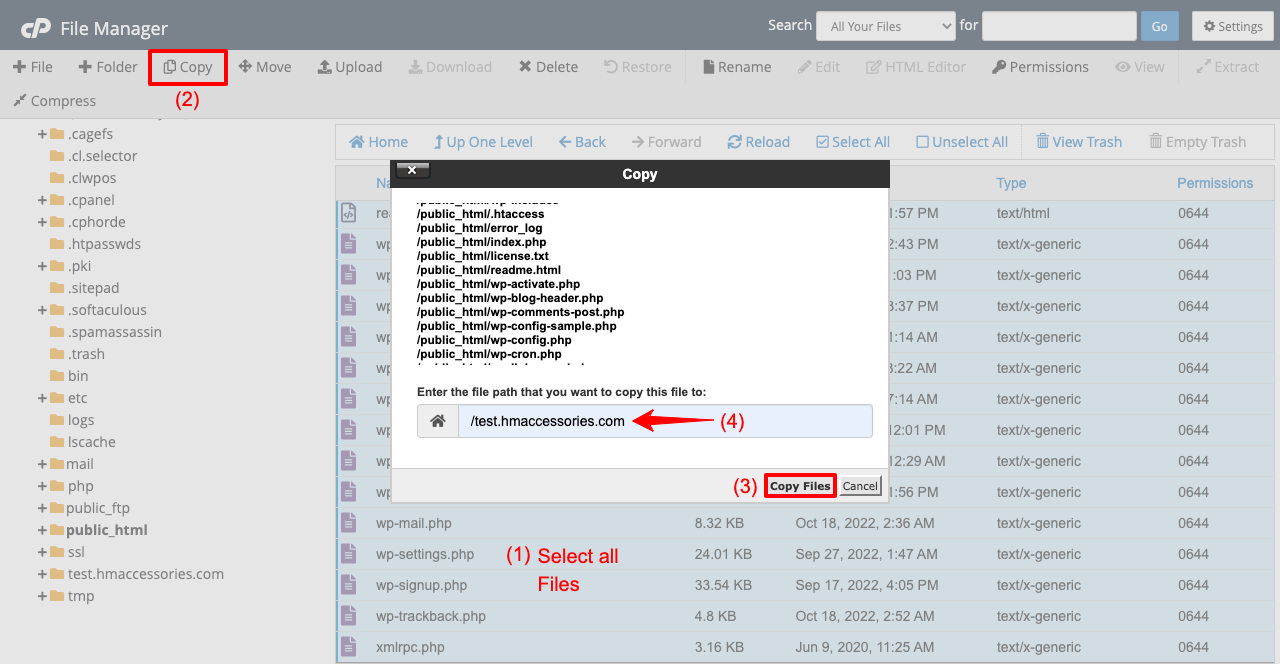
Select all the files on the list using the keyboard+mouse shortcut keys. Click on the Copy button.
A new pop-up will open. Enter the name of your subdomain directory file.
Hit the Copy Files button afterward. It will copy and save all these files to your subdomain directory folder.
*** Special Note: This post shows you how to clone a website on the same hosting server. But if you want to clone it on a different server, you must download and upload these files to your hosting server. The download process is explained below.
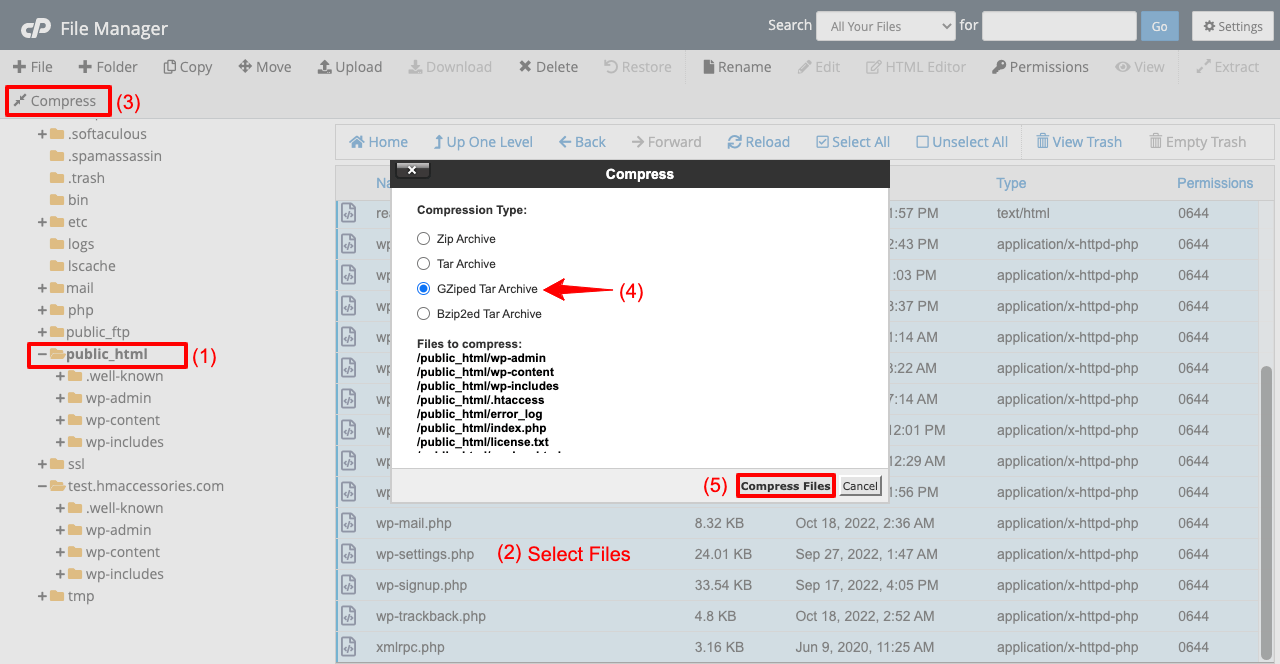
Go to public_html. Select the files again. Hit the Compress button.
Choose the GZiped Tar Archive option. Click on the Compress Files button.
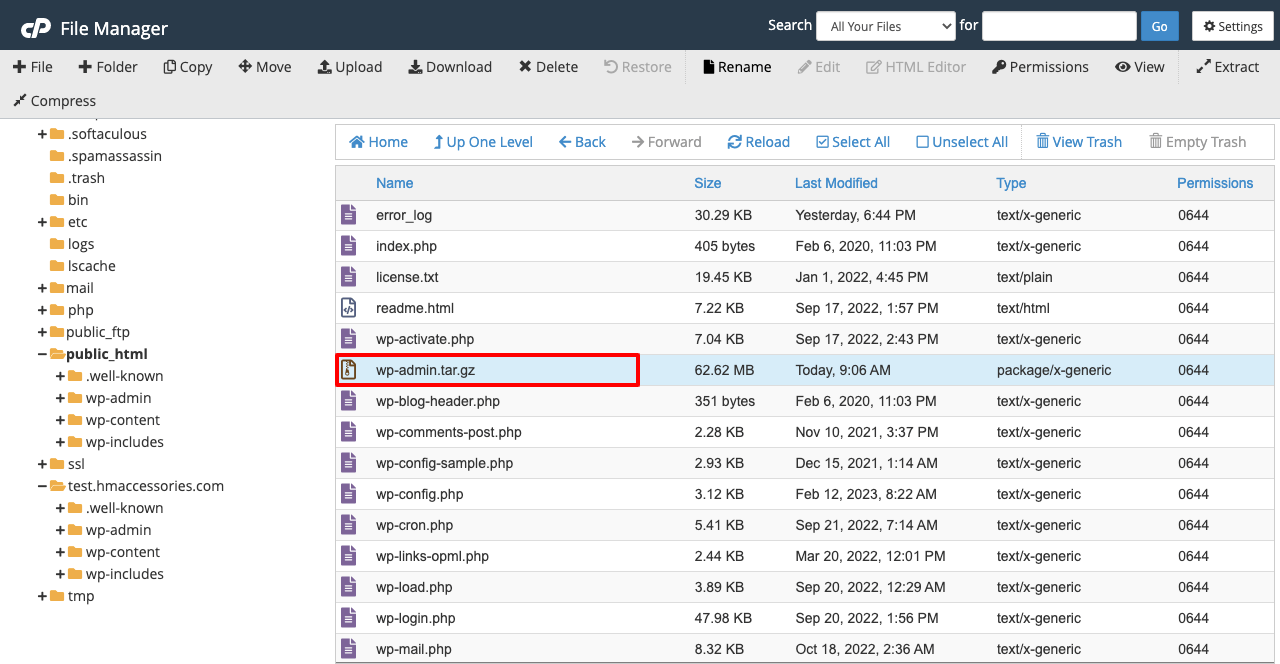
You’ll see the files have been zipped. You have to download an FTP, connect it to this server, send the zipped file to your new server through the FTP, and then extract the file there. Hope you can do it yourself. Explore the best FTP clients.
Step 03: Create a Database for the Clone Site
Navigate to cPanel > MySQL Database. Type your clone website name in the field of Create New Database.
Hit the button Create Database at the end. Your new database will be created.
But your new database will be completely empty. You need to copy files from your old database and paste them into the new one.
Navigate to cPanel > phpMyAdmin.
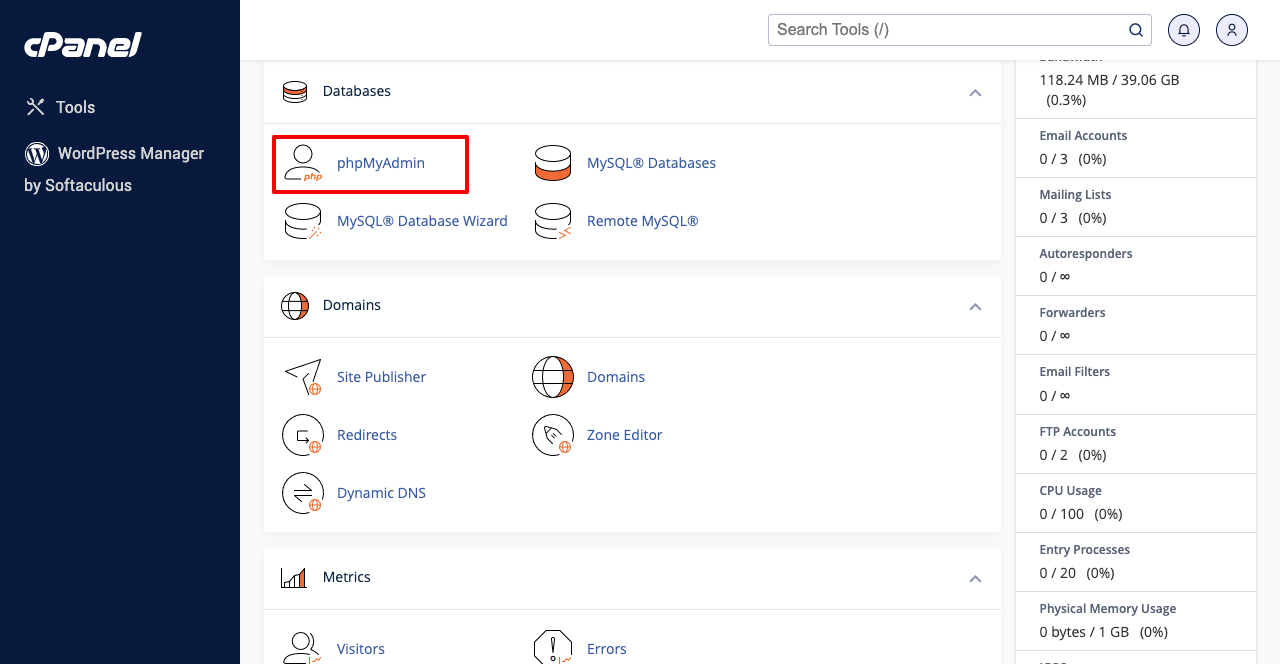
First, click on the new database (test.hmaccessories.com). You’ll see it’s completely empty.
Go to your old database and click the Export button from the top. You’ll be taken to a new page.
Hit the Go button under the format section. The database files will be downloaded.
*** Special Note: If your database is so big and you want them to compress while downloading-
Select Custom under the Export Method. Choose gzipped from the Compression option.
Scroll down the page to the end and hit the Go button.
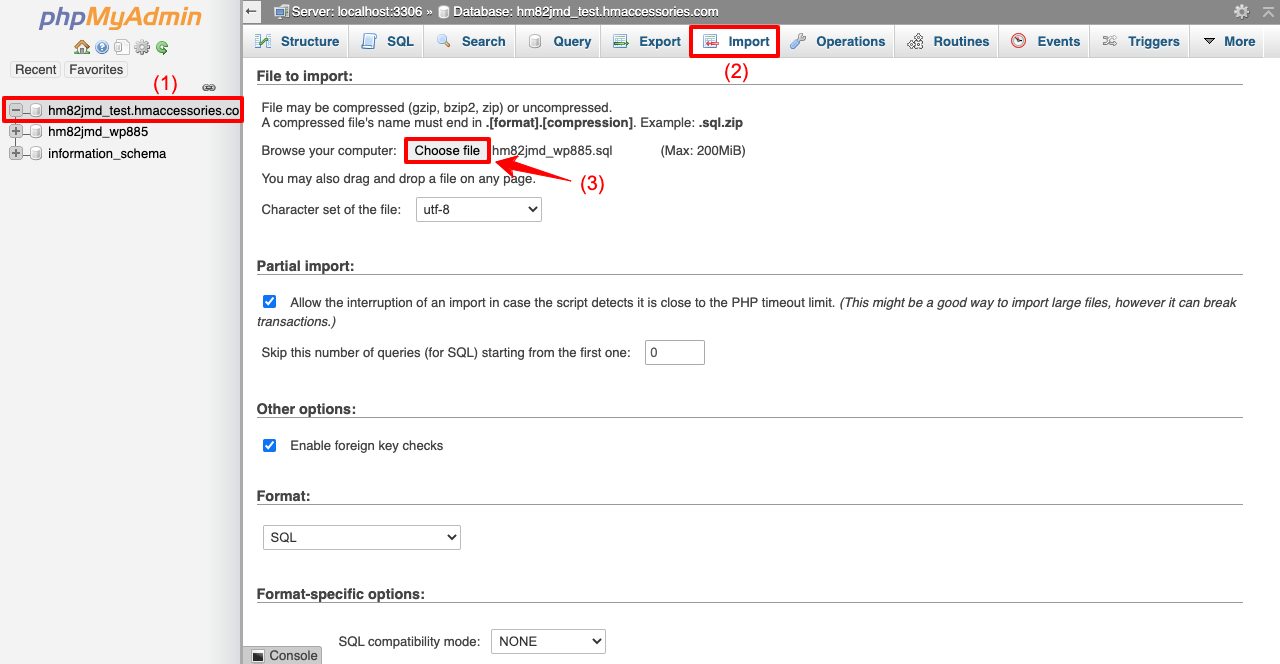
Go to the database of your cloned website. Hit the Import button. Upload your old database by clicking Choose file.
Scroll down the page and click the Go button at the end. Your cloned website’s database will be filled with the files of your old database.
Step 04: Edit wp-config.php File
Navigate to cPanel > File Manager > your subdomain. Select wp-config.php
Hit the Edit button from the top.
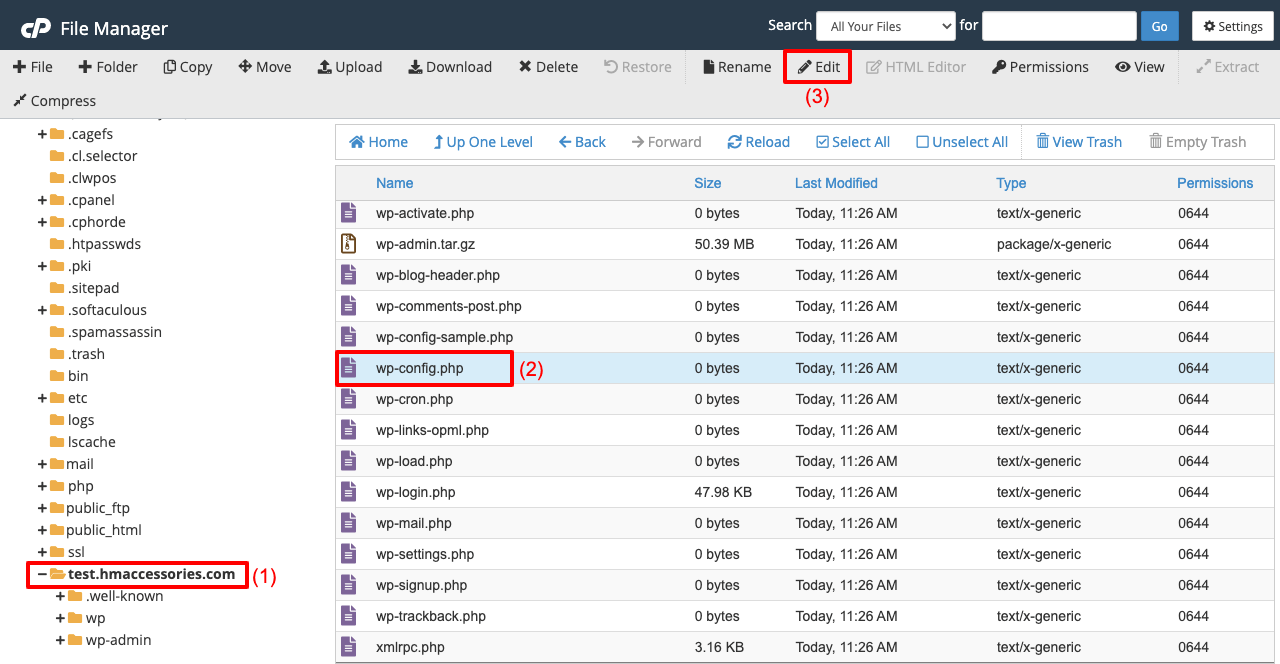
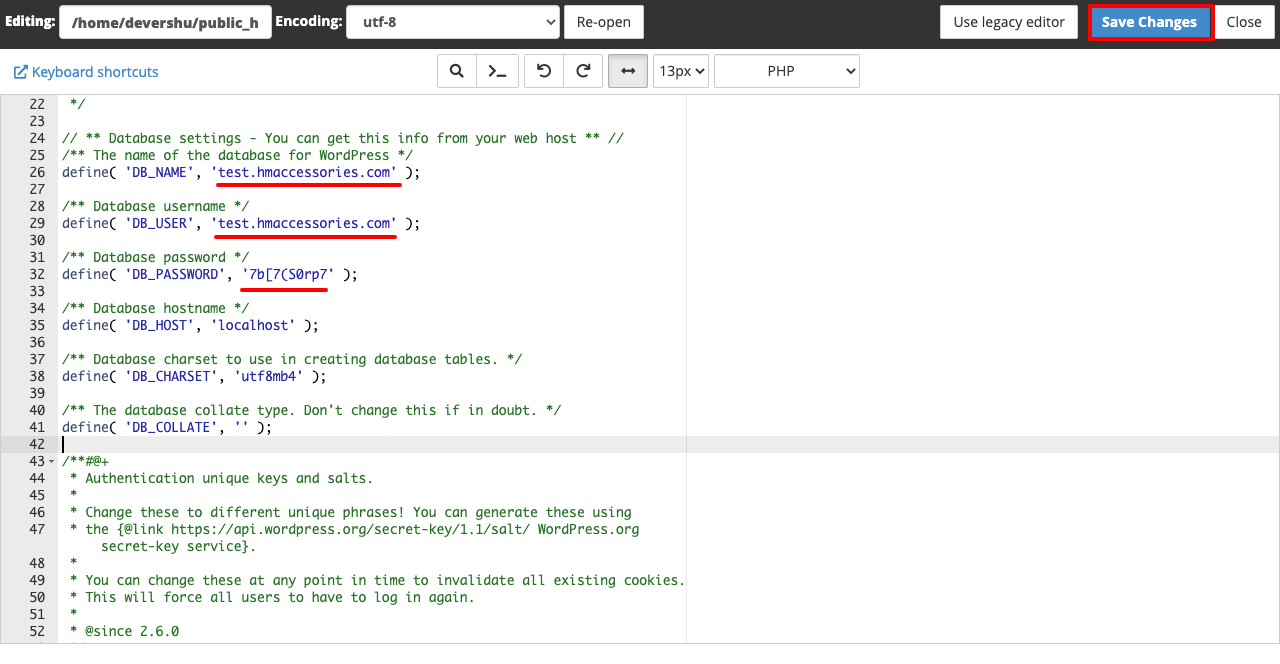
Scroll down the page a bit. Set your cloned website name next to DB_NAME and DB_USER.
You may change the login password from here as well.
Step 05: Add the New User to the Database
Go to cPanel > MySQL Database. You can set or change the user password from here as well. Scroll down to the Add User to Database section.
Select your database and click the Add button. Tick the checkbox next to ALL PRIVILEGES. Click the Make Changes button at the end.
Step 06: Add a DNS Record to the Cloned Site
Without adding a DNS record, your cloned website may not come live. The process is simple.
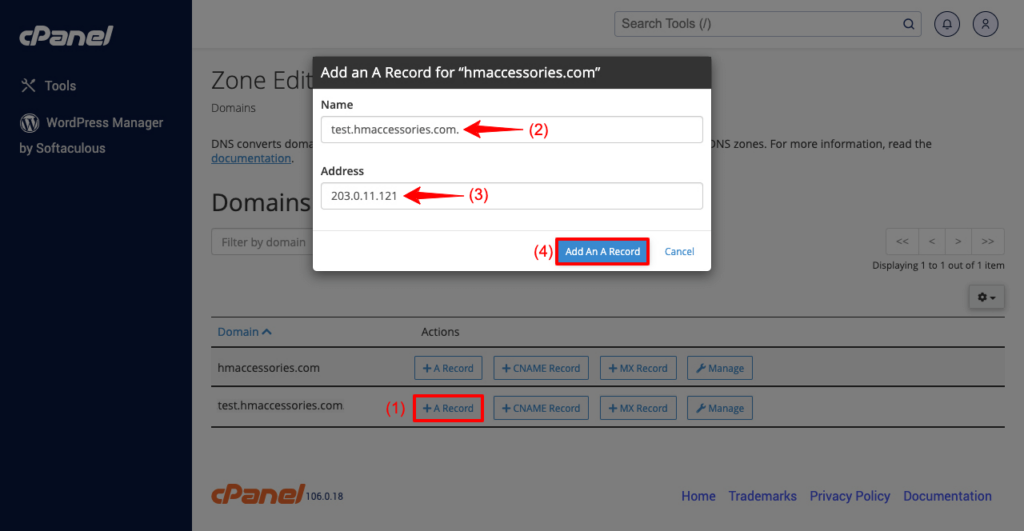
Navigate to cPanel > Domains > Zone Editor. Click the + Record button next to your cloned site.
Add a name and IP address. Hit the Add An A Record button at the end.
Preview
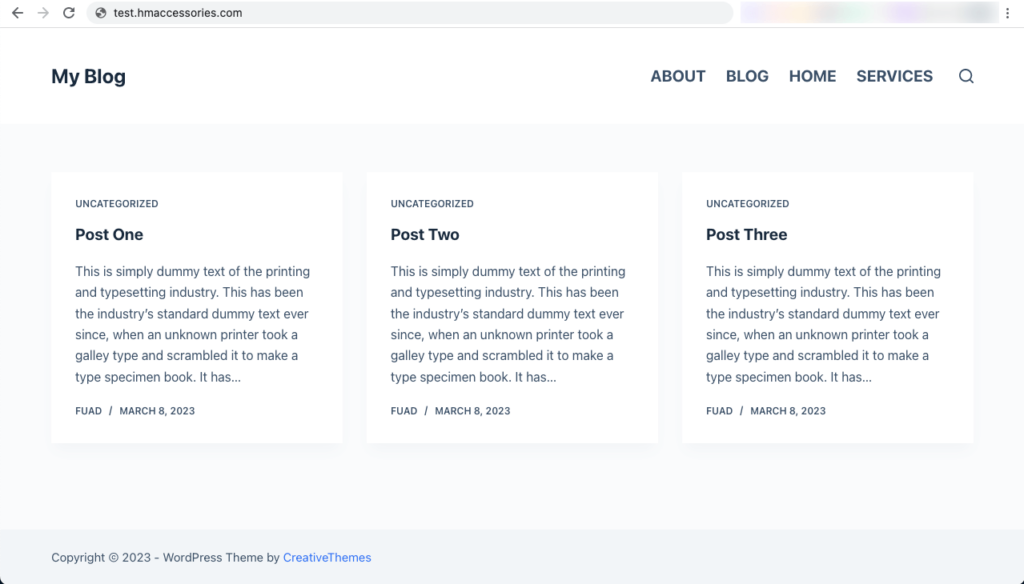
Now, preview the cloned website from the front end. You’ll see it’s working perfectly.
Method Two: How to Clone a WordPress Site With Plugin
You can clone your WordPress site using a plugin if you don’t want to take all the hassles involved in the manual process. There are numerous online plugins that you can use to do it easily. Some of the most used plugins are FastDup, WPVivid, Updraft Plus, Duplicator, and ManageWP.
We’ll explain the process using the WPVivid plugin, which is a popular backup plugin. The logic behind choosing a backup plugin is that the basic steps to clone any website are the same as backing up a website.
If you don’t have an additional live domain and want to clone your original site into a local website, this method will be the best for you. Let’s jump into the steps below.
Step 01: Install and Activate the WPVivid Plugin
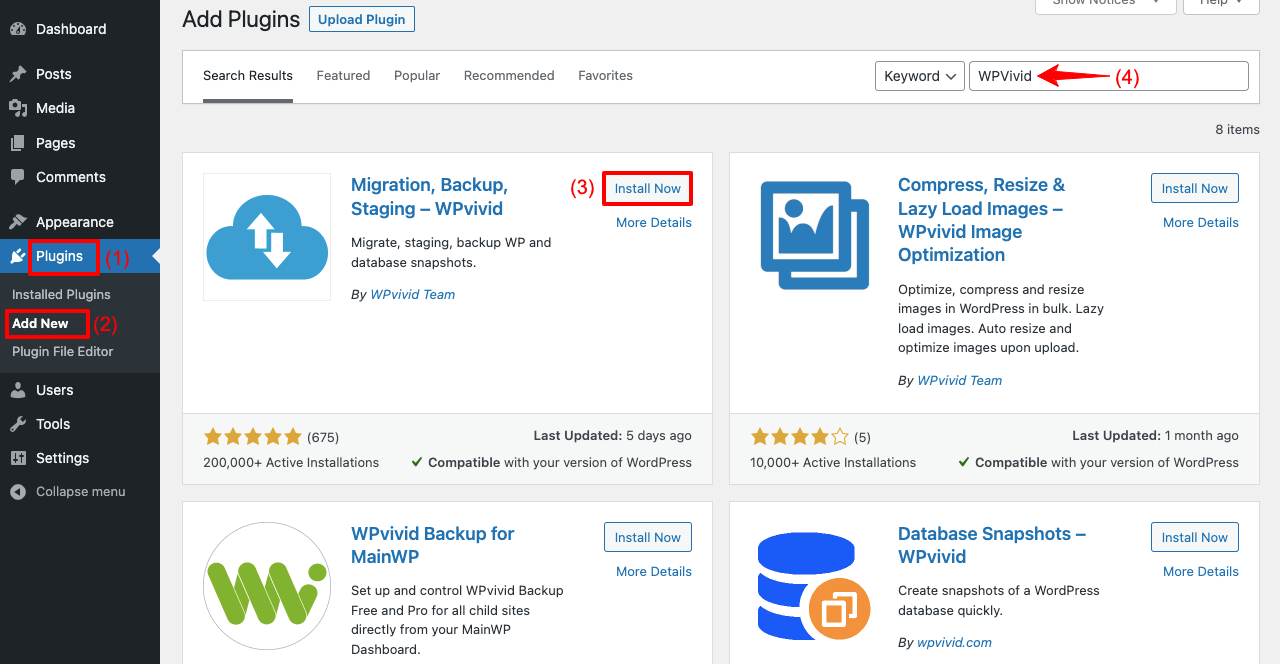
Navigate to Plugins > Add New. Type WPVivid in the search box.
You’ll get the plugin on top. Install and activate it.
Step 02: Backup Your Website and Download the Backup File
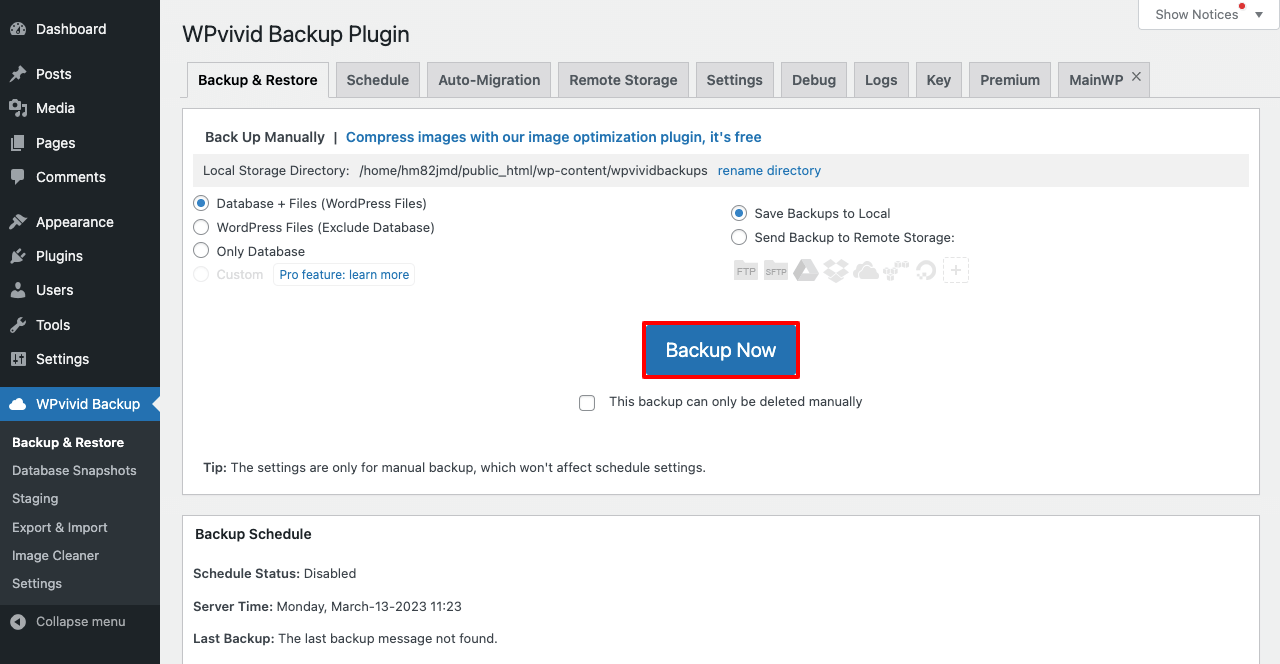
Go to the WPvivid Backup option from the admin menu bar. You will see several options on the plugin dashboard.
We recommend you select Database+Files and Save Backups to Local. Hit the Backup Now button at the end.
It will create a backup of your original website.
Scroll down the page a bit. You’ll get the backup copy file. Click the Download button on the row.
It will make your files ready to be downloaded in a zip file. Click the Download option again, which will start downloading your backup file.
Step 03: Upload the Backup File to a New Website
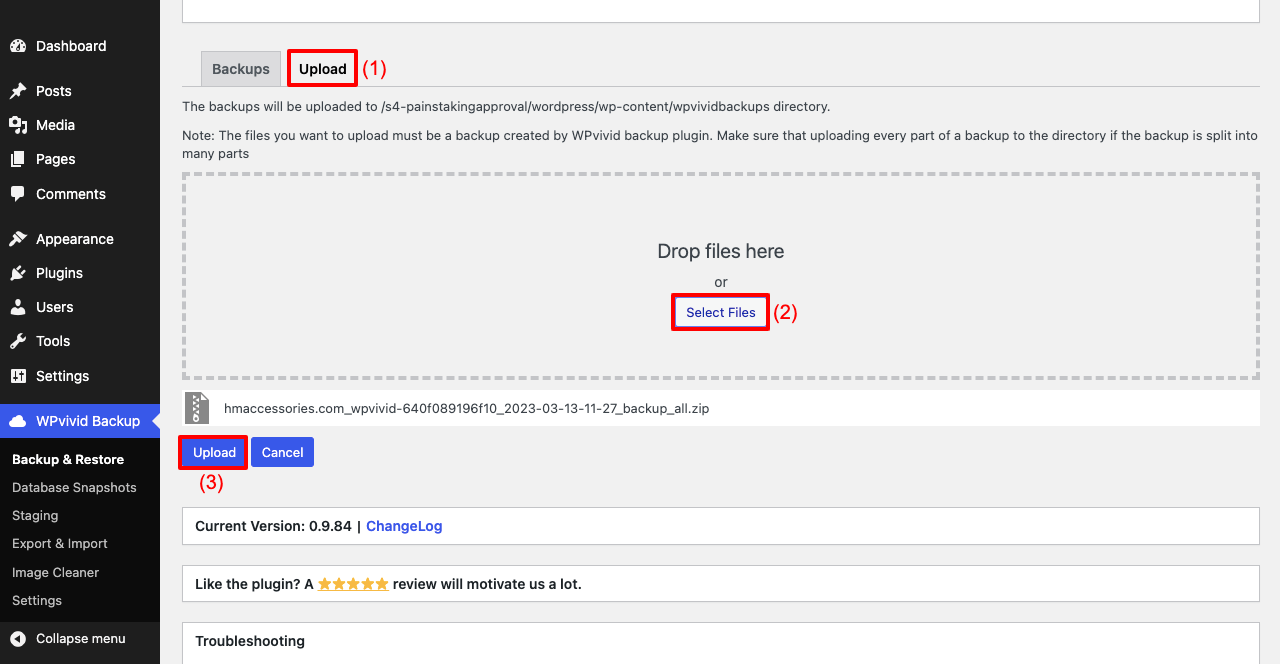
Go to the dashboard of your new website. Ensure the WPVivid plugin is also installed there. Scroll down a bit. You will get the Upload option.
Click the Select Files button and add the file you downloaded just a bit ago. Finally, click on the Upload button below.
The downloaded files will be uploaded to the new website.
Once the backup files are uploaded, you need to restore them. Under the Backups tab, you will see the Restore option. Click it.
Afterward, you’ll see another Restore button. Hit it again. The process will take several minutes to complete.
Step 04: Log in to Your Cloned Website
Most people make a mistake here. They use the same username and password that they already had on this new website. But since you’ve uploaded the files and database of another website to this one, its username and password will be the same as the website (original) you have cloned.
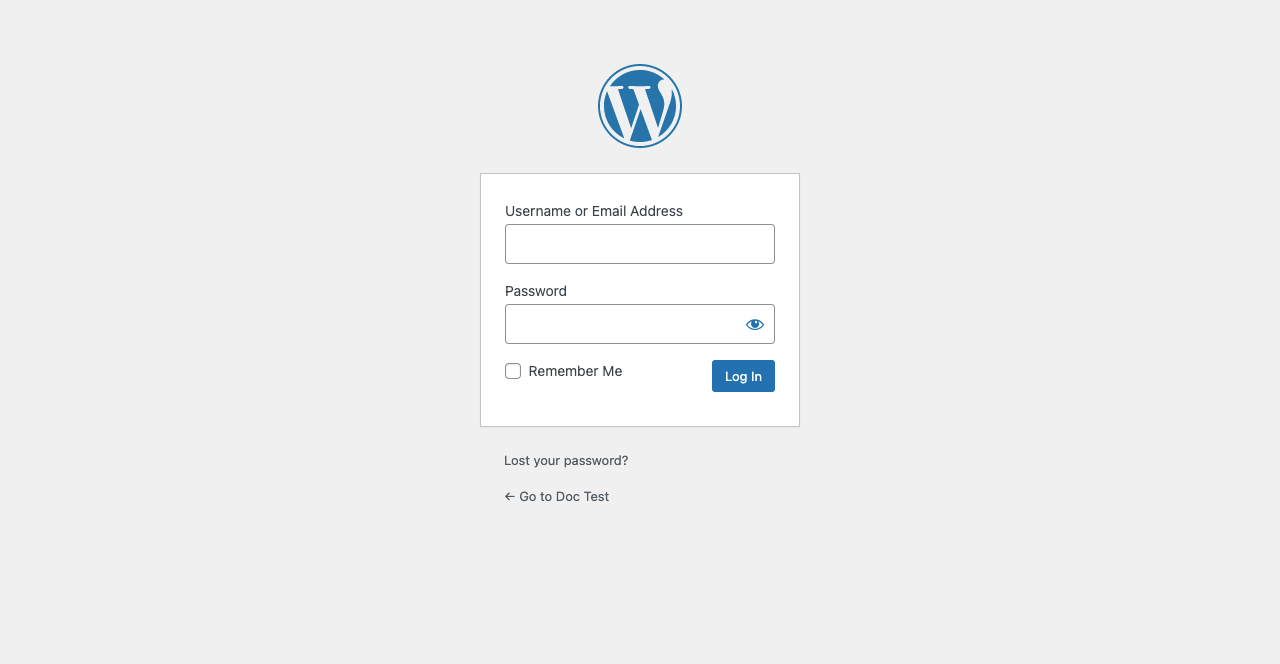
Place the username and password of the original website. Click the Login Button.
Go to the front end. You’ll see the website is working fine.
There are many other plugins online you can use to clone your WordPress website. Below is a list of some popular WordPress plugins you can try as alternatives to the WPVivid plugin.
- Migrate Guru: Migrate & Clone WordPress Free
- All-in-One Wp Migration
- BlogValut
- Duplicator
Method Three: How to Clone a WordPress Site from Softaculous
Almost every web hosting server, big or small, nowadays provides free cPanel access to its users. You’ll get a Softaculous option on every cPanel, which will allow you to clone your original website. But using this method, you can’t clone your website on a different hosting server.
You must clone your desired website on the same server where it’s already hosted. You must also complete some prerequisites before starting this method.
Pre-requisites
- Ensure a new domain is added or a sub-domain is ready on your cPanel.
- Have an SSL certificate installed if you want HTTPS protocol for the domain.
Once you have everything ready, start following the steps explained below.
Step 01: Go to Softaculous from cPanel
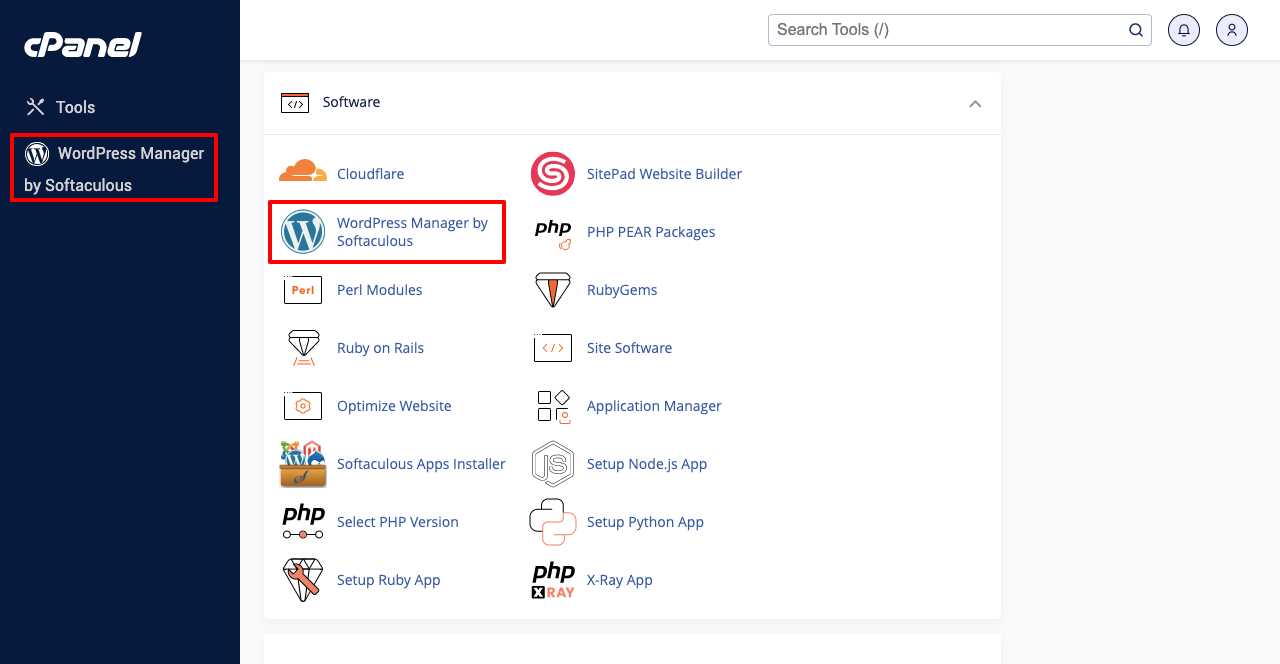
Log in to your cPanel. Navigate to Software > WordPress Manager by Softaculous.
Step 02: Install the Cloned Website
You’ll get a list of all the domains added to this cPanel. As we have only one domain on this cPanel, you can see the list is short. Click on the arrow icon.
Scrolling down a bit, click the Clone button. You’ll be taken to a new page. Select the domain where you want to clone this original website.
Finally, click Clone Installation.
Step 03: Log in to Your Website and Preview It
Log in to the clone website following the instructions described in method two. Go to the front end and preview it. You’ll see everything is working fine.
These are all the best three methods of creating a cloned version of your original website.
Bonus Point: How to Copy a Page from One WordPress Site to Another

Have you ever dreamt of copy-pasting the same web design to multiple domains without coding anything? Designing a brand-new website is always time-consuming and requires a lot of hard work. So, if you already have a beautiful web design, it is better to copy-paste it onto other domains and customize certain areas to look unique.
If your website is designed with Elementor, you can enable this on your website by the Cross Domain Copy Paste feature of HappyAddons.
HappyAddons is actually an addon to the Elementor plugin. It comes with numerous additional features and widgets to power up your Elementor-built website. Cross Domain Copy Paste is a premium and professional feature of this addon.
How the Cross Domain Copy Paste Feature Works
Make sure your website is designed with Elementor. Next, follow the steps and explore the sources shown below.
Step 01: Install and activate the below plugins on your website.
- HappyAddons
- HappyAddons Pro (professional)
Step 02: Copy-Paste Widgets or Sections from One Domain to Another
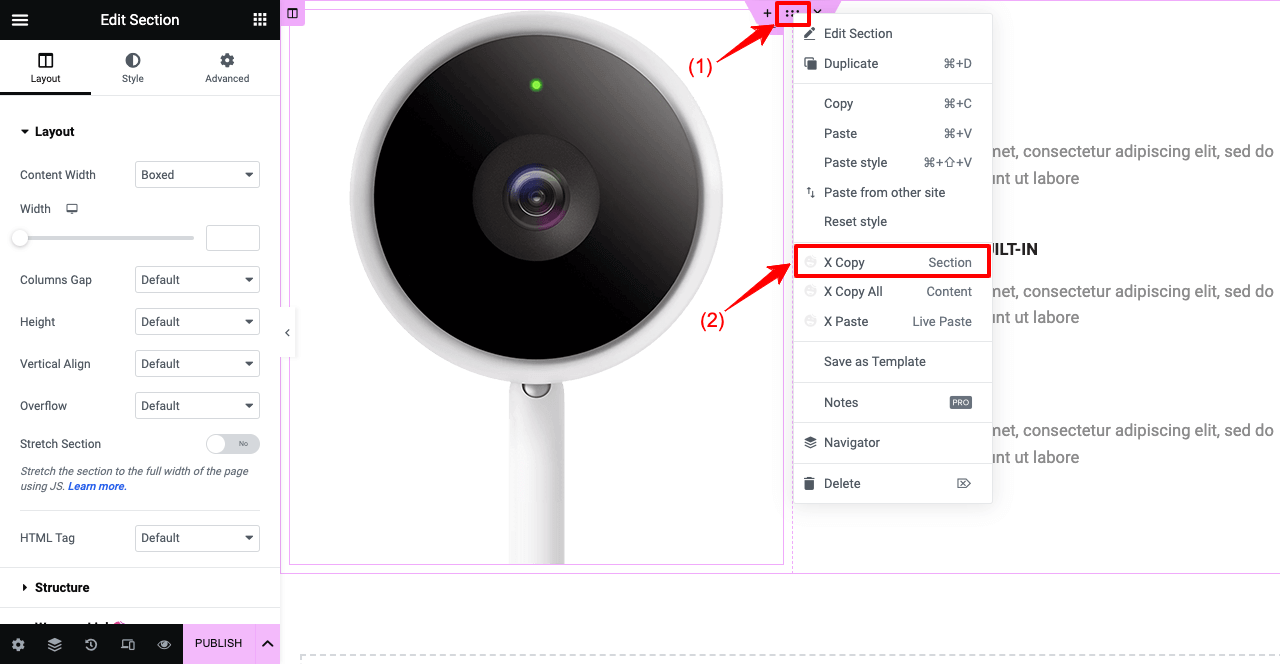
Open the web page of your desired website with Elementor Canvas. Select the section by clicking the six-dotted icon or the column by right-clicking it.
Hit the X Copy Section on the pop-up menu list.
Open a page of your new domain website. Go to the section where you want to paste the design elements.
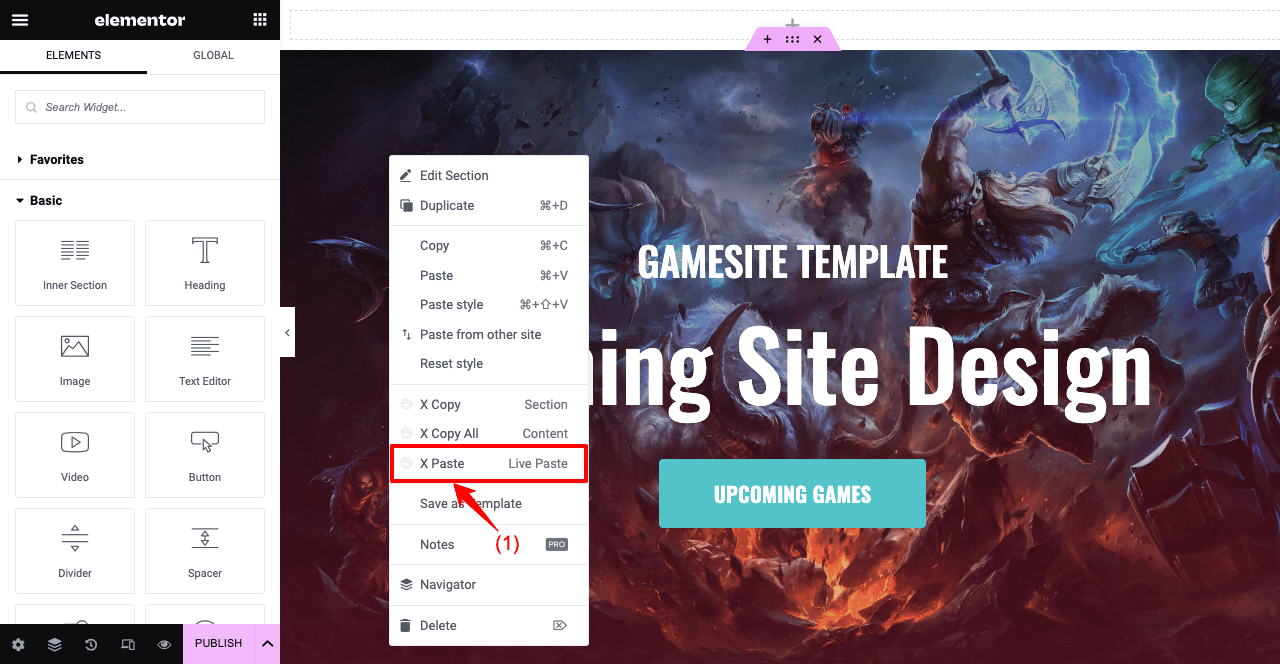
Click the right button on your mouse. Hit the option X Paste Live Paste.
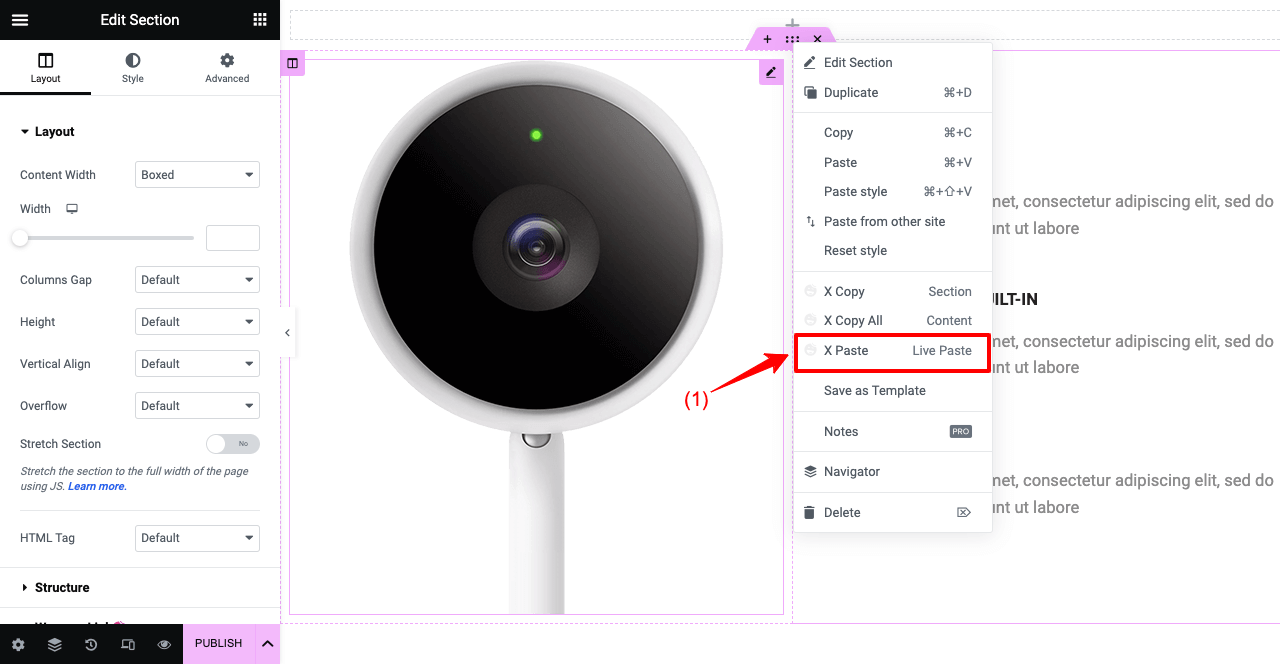
Similarly, you can copy-paste particular widgets and columns. Take your cursor on the widget or column and right-click the mouse. Hit X Copy Widget or X Copy Column. Paste it on the new domain web page following the above guide.
Step 03: Copy-Paste an Entire Web Page from One Domain to Another
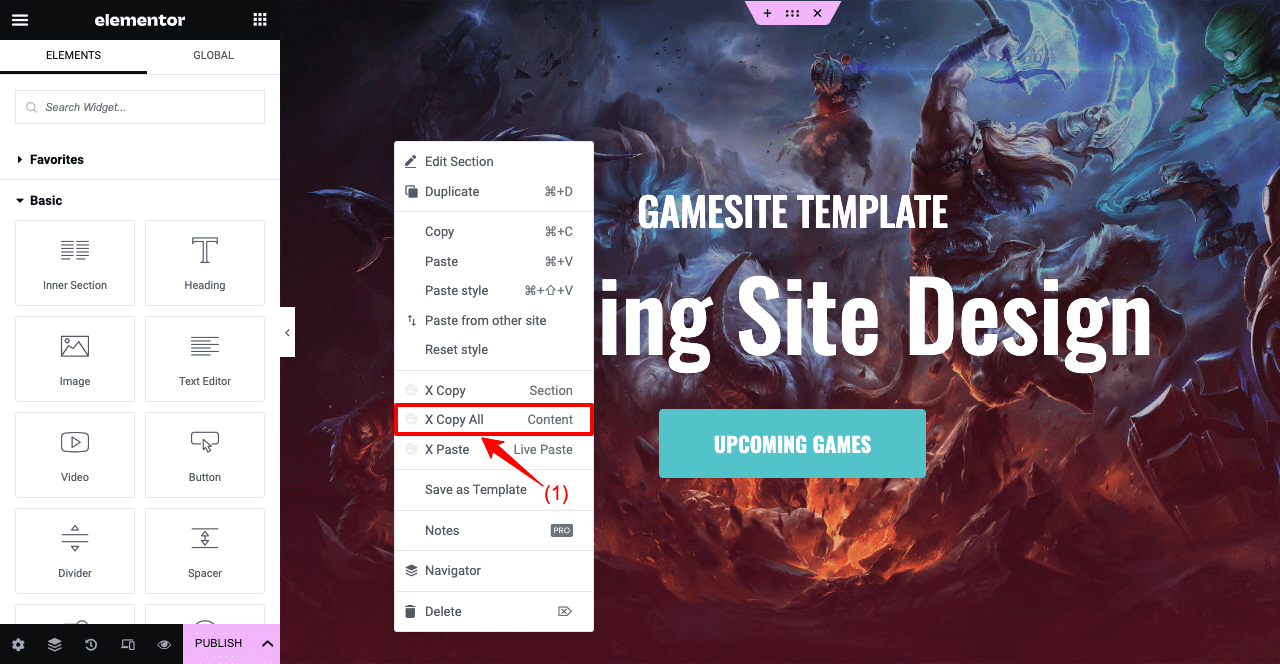
Open the page you want to copy. Place your cursor anywhere on the page and right-click the mouse.
Hit the X Copy All Content option.
Go to your other domain and open a page with Elementor Canvas. Right-click your mouse.
Hit the X Paste Live Paste option on the list. Within a few seconds, the entire page will appear on your screen.
Now, you can customize it slightly or more to give it a unique look.
Please watch our YouTube video, which is attached below, for more explanation.
Thus, you can easily copy and paste the same web design to as many websites as you want. This feature is highly beneficial for web design and development agencies.
FAQ on How to Clone a WordPress Site
Hope you are satisfied with the methods described above. But apart from these tutorial methods, you may still have some poking questions in mind. So, we have compiled a list of some basic questions commonly found online and answered them in this section.
Is it legal to clone a website?
If you clone a website for testing and non-commercial purposes, there are no problem legal issues. But if you plan it for monetization, the cloned website may breach the original website’s IPs, trademarks, and copyrights.
Can I download a whole website?
Several backup plugins will help you download a whole website. Some of the most popular are FastDup, WPVivid, Updraft Plus, Duplicator, and ManageWP.
Can another person clone my website without my consent?
Yes, there are many ways today to clone any website without the user’s consent. Some of the most followed techniques are:
1. Manual copying
2. Automated scripts
3. Using third-party software
How to check if your website has been cloned?
1. Search words from your website on Google to see if they appear on others.
2. Scrutinize their web design, layout, and media files.
3. Check their HTML source codes.
4. Set Google alerts to monitor if any new website uses your web name and key phrases.
5. Use tools like Copyscape, PlagSpotter, and Siteliner.
How can you protect your website from being cloned?
1. Have an SSL certificate to encrypt your web data so no one can copy them.
2. Use anti-scrapping tools like IP blocking and CAPTCHA to prevent automated scrapping.
3. Use a CDN to distribute site data on multiple servers so none can copy them at once.
4. Add a copyright notice on your footer or else so you can take legal action if someone copies your data.
Final Words on How to Clone a WordPress Site
Cloning a website is no longer a difficult task today. Though the manual method of doing it is a bit complicated, the other methods are comparatively easier. Whether you want to clone a site for testing, development, or practicing other skills, you can use any method described in this article.
The first method is best if you have advanced knowledge about cPanel. However, if you are a newbie or a semi-advanced user, the other two methods will be great. The method you choose should depend on your specific needs and preferences.
But remember always to keep a backup before you make any major changes. In the case of an accident, this backup will help restore your website as soon as possible.
Subscribe to our newsletter
Get latest news & updates on Elementor
[yikes-mailchimp form=”1″]


2 Responses
Using the manual method – how do you change all the references to the original site URL to be for the new site URL? I have followed your steps but when I try to access the cloned site I get redirected to the original site.
Hello Confused,
Sorry to hear that, If you failed to login to your newly migrated site, in this case you can follow this method, place
define('RELOCATE',true);in yourwp-config.phpfile. Then you can login to your website. Then reset your permalinks from the setting panels’s permalink setting page. If you see date wise link setup then set up post name wise or as it is your old domain.For further instruction you can follow this thread – https://wordpress.stackexchange.com/questions/187574/redirecting-to-old-domain-after-migration
Let us know is there anything else.
Regards,
Gobinda
Team HappyAddons