




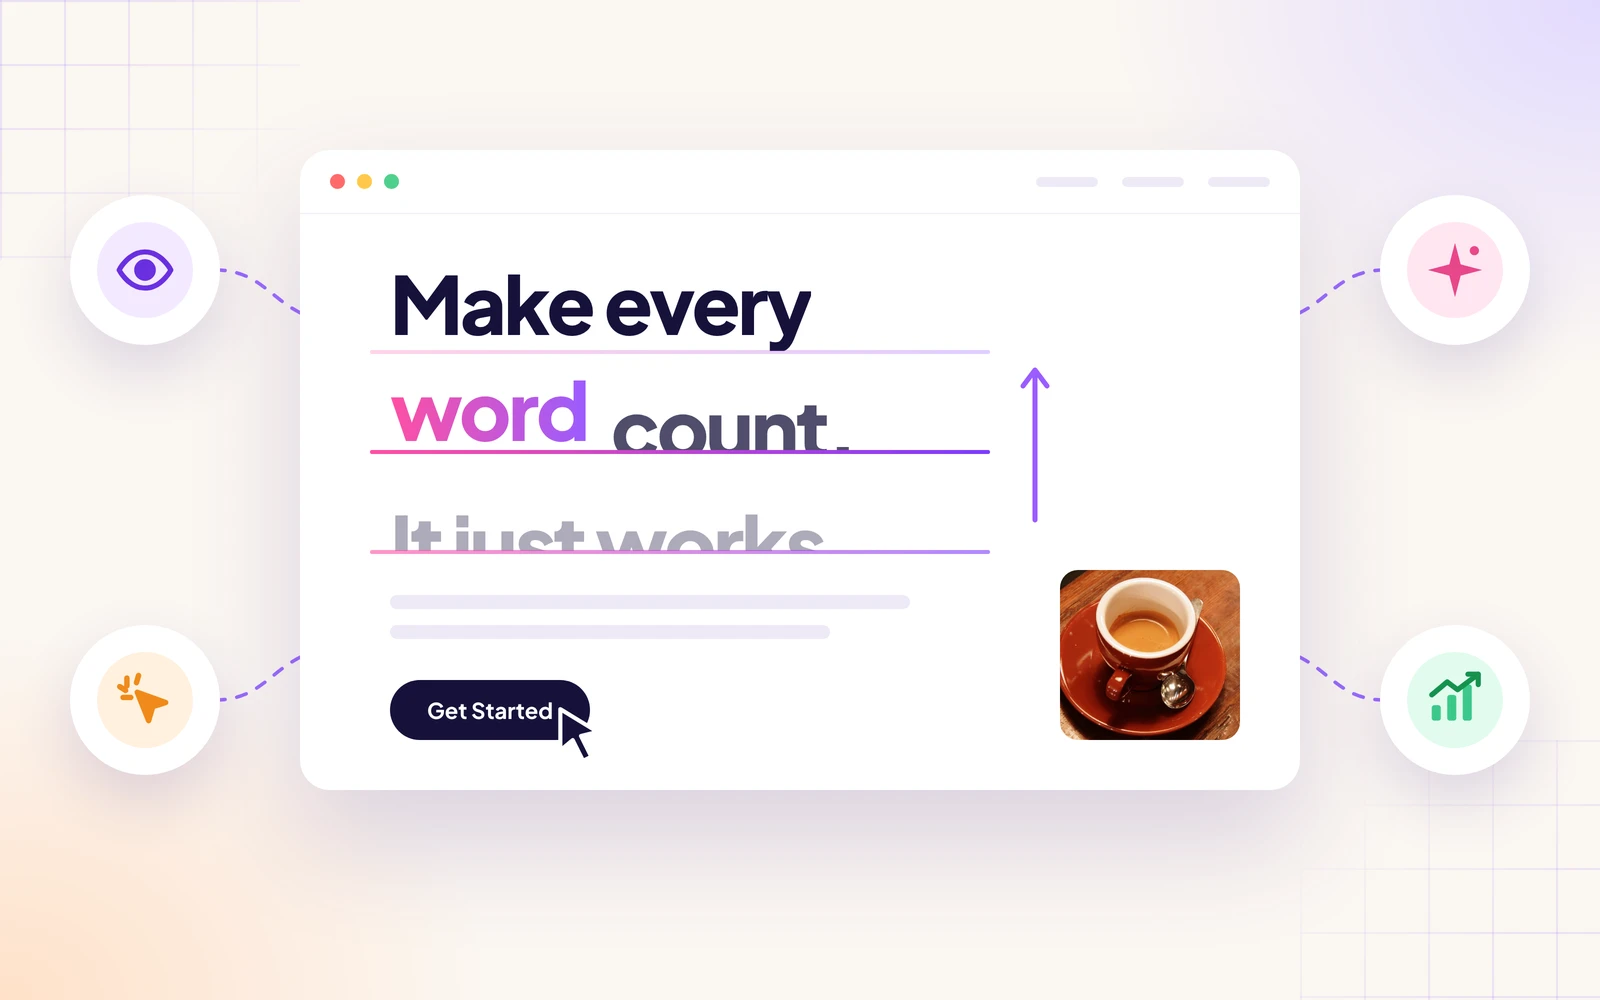
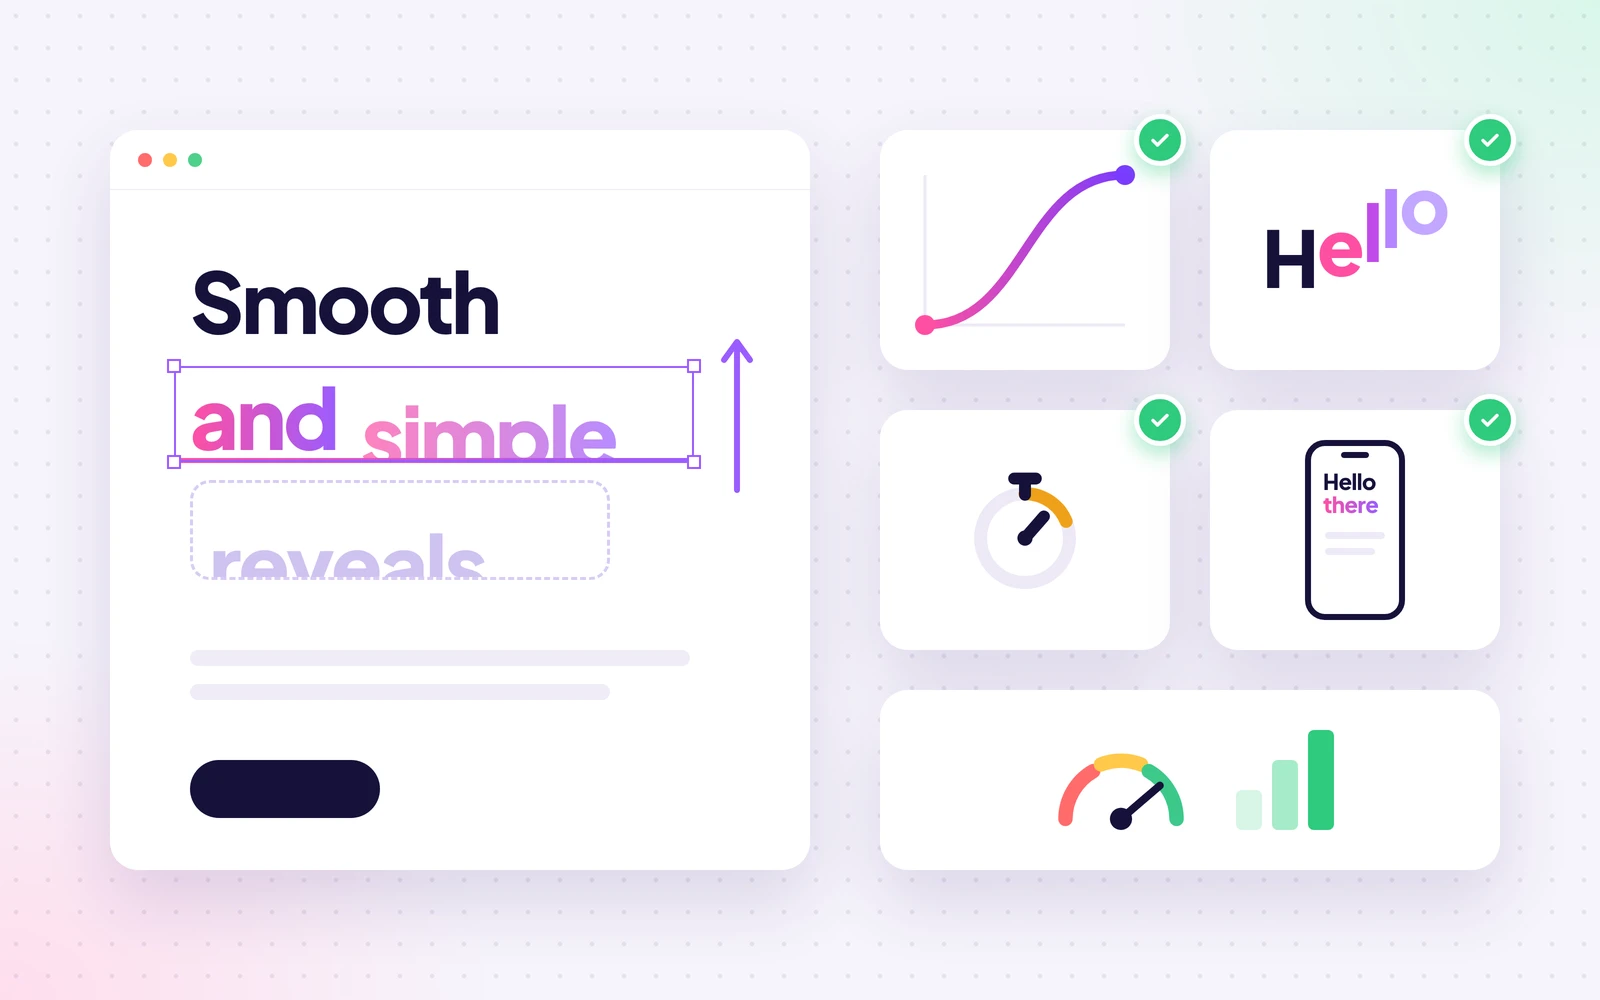
A text reveal animation shows a heading or paragraph piece by piece instead of all at once. Letters rise from below, words pop into place, or a line lights up as the visitor scrolls. It’s a small touch, but it makes a page feel designed rather than just filled in.
It also helps your message land. When text appears in order, people read it in order. That’s why big brands and award-winning studios use reveal effects on their hero headings, key statements, and calls to action.
Elementor is one of the most user-friendly drag-and-drop page builders, but it doesn’t come with GSAP text effects. In this blog post, we’ll show you how to create text reveal animations in Elementor with GSAP using the free HappyAddons plugin. No code needed. Let’s get started!
What Is a Text Reveal Animation?
A text reveal animation splits text into small parts, such as characters, words, or lines, and animates each part into view one after another. The delay between the parts is called the stagger, and it’s what creates the “typing” or “wave” feeling.
GSAP (GreenSock Animation Platform) is the JavaScript library that powers these effects on many modern websites. HappyAddons uses GSAP behind the scenes, so you only choose options from the Elementor panel.
Why Add Text Reveal Animations to Your Website?
Text reveal animations make your website more engaging by adding movement to your headings and other text elements. They help highlight important messages, guide visitors through your content, and give your website a more polished look.
a. Grab Attention in the First Few Seconds
Movement is the first thing the eye notices. A hero heading that reveals itself pulls visitors straight to your main message before they start scrolling away.
b. Guide People Through Your Story
When each section reveals its title as it scrolls into view, visitors get a clear signal that something new starts here. Long pages feel shorter and easier to follow.
c. Make Your Brand Feel Premium
Smooth typography motion is common on high-end agency and product sites. Adding it to your Elementor site gives the same polished feel without hiring a developer.
d. Highlight the Words That Matter
A scroll-based highlight, like the Text Invert effect, makes people read a statement line by line. It’s perfect for your mission, a key promise, or a short story about your brand.
Learn how to build an animated hero section with Elementor in WordPress.
Types of Text Reveal Animations in HappyAddons
The Text Animation feature in HappyAddons comes with nine animation modes. You can use a different one on every heading.
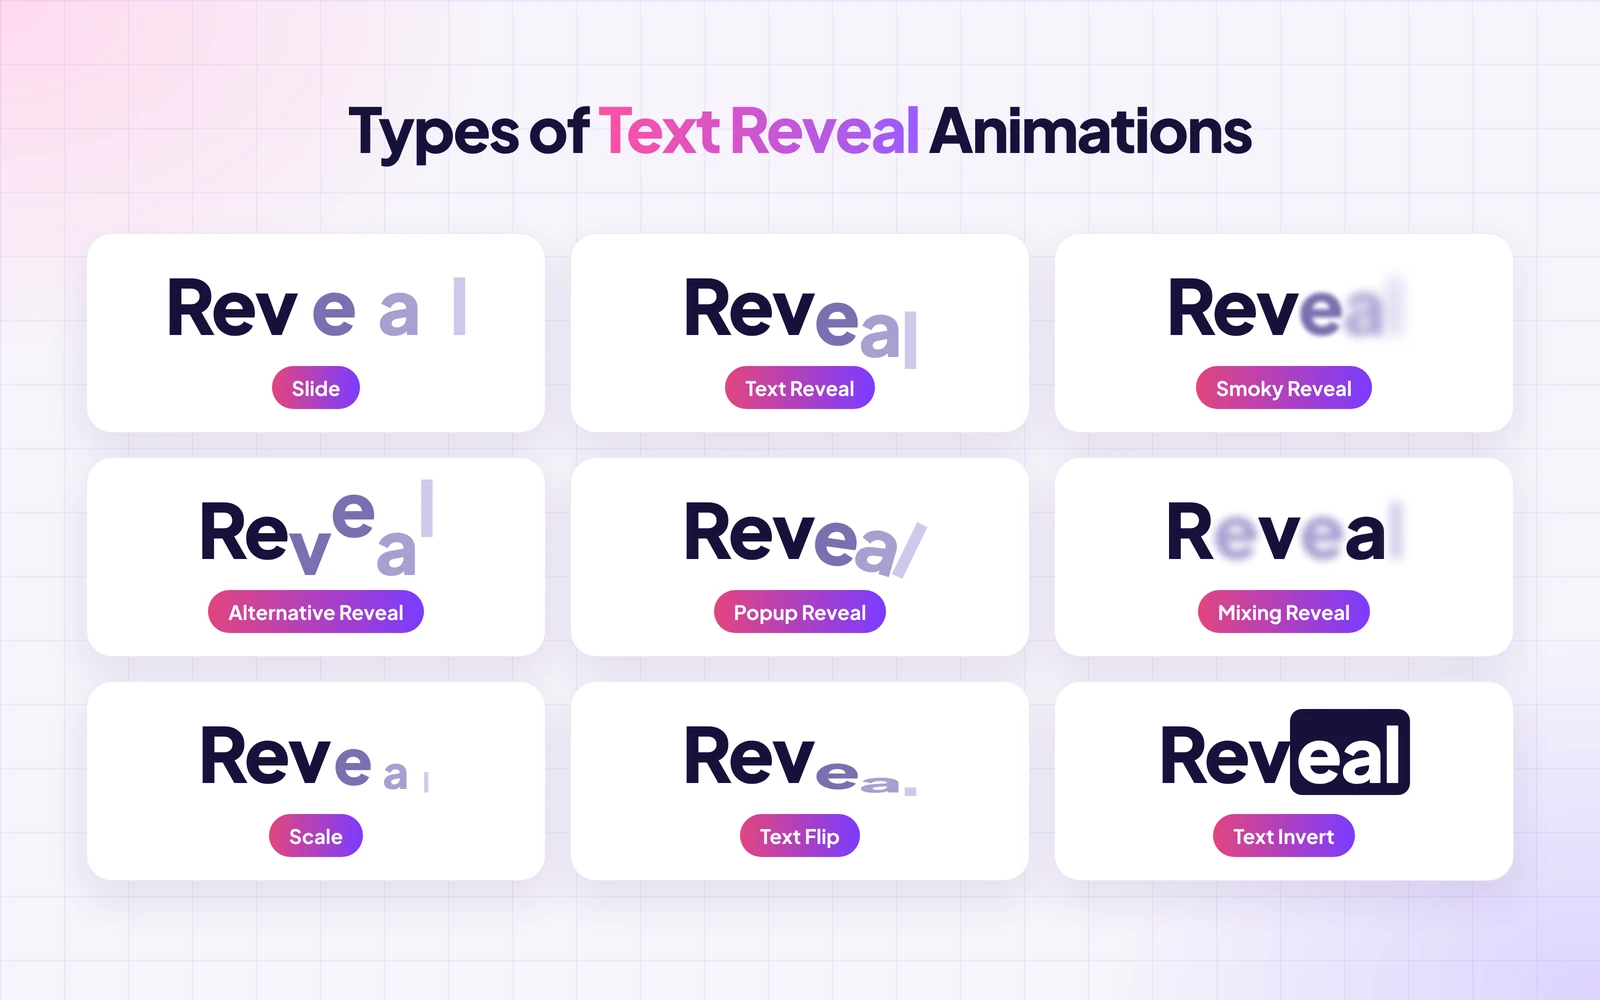
| Animation Mode | What it does |
|---|---|
| Slide | Characters or words slide in from the side (you set Transform X and Y) |
| Text Reveal | Characters rise into view from the bottom or drop in from the top |
| Smoky Reveal | Characters appear out of a blur, like smoke clearing |
| Alternative Reveal | Every other character comes in from the opposite direction |
| Popup Reveal | Characters pop up with a small rotation |
| Mixing Reveal | Characters fade in from a soft blur in a mixed order |
| Scale | Lines, words, or characters scale into place |
| Text Flip | Characters flip into view like a 3D card |
| Text Invert | Lines fill with color as you scroll, like a highlight |
Learn how to make Elementor websites feel more interactive with GSAP.
How to Create Text Reveal Animations in Elementor with GSAP: Step-by-Step Guide
As already said, HappyAddons adds GSAP text effects to Elementor. It comes with 160+ widgets and 40+ features, and the Text Animation feature is part of the free version.
For this tutorial, we’ll build the homepage of Northline, a demo product design studio. We’ll use six different animation modes on its headings.
Prerequisites
- Elementor (Free)
- HappyAddons (Free)
Note: You don’t need HappyAddons Pro for this tutorial. Text Animation is a free GSAP feature. Once these plugins are ready on your site, start following the tutorial explained below.
Step 01: Enable Text Animation in HappyAddons
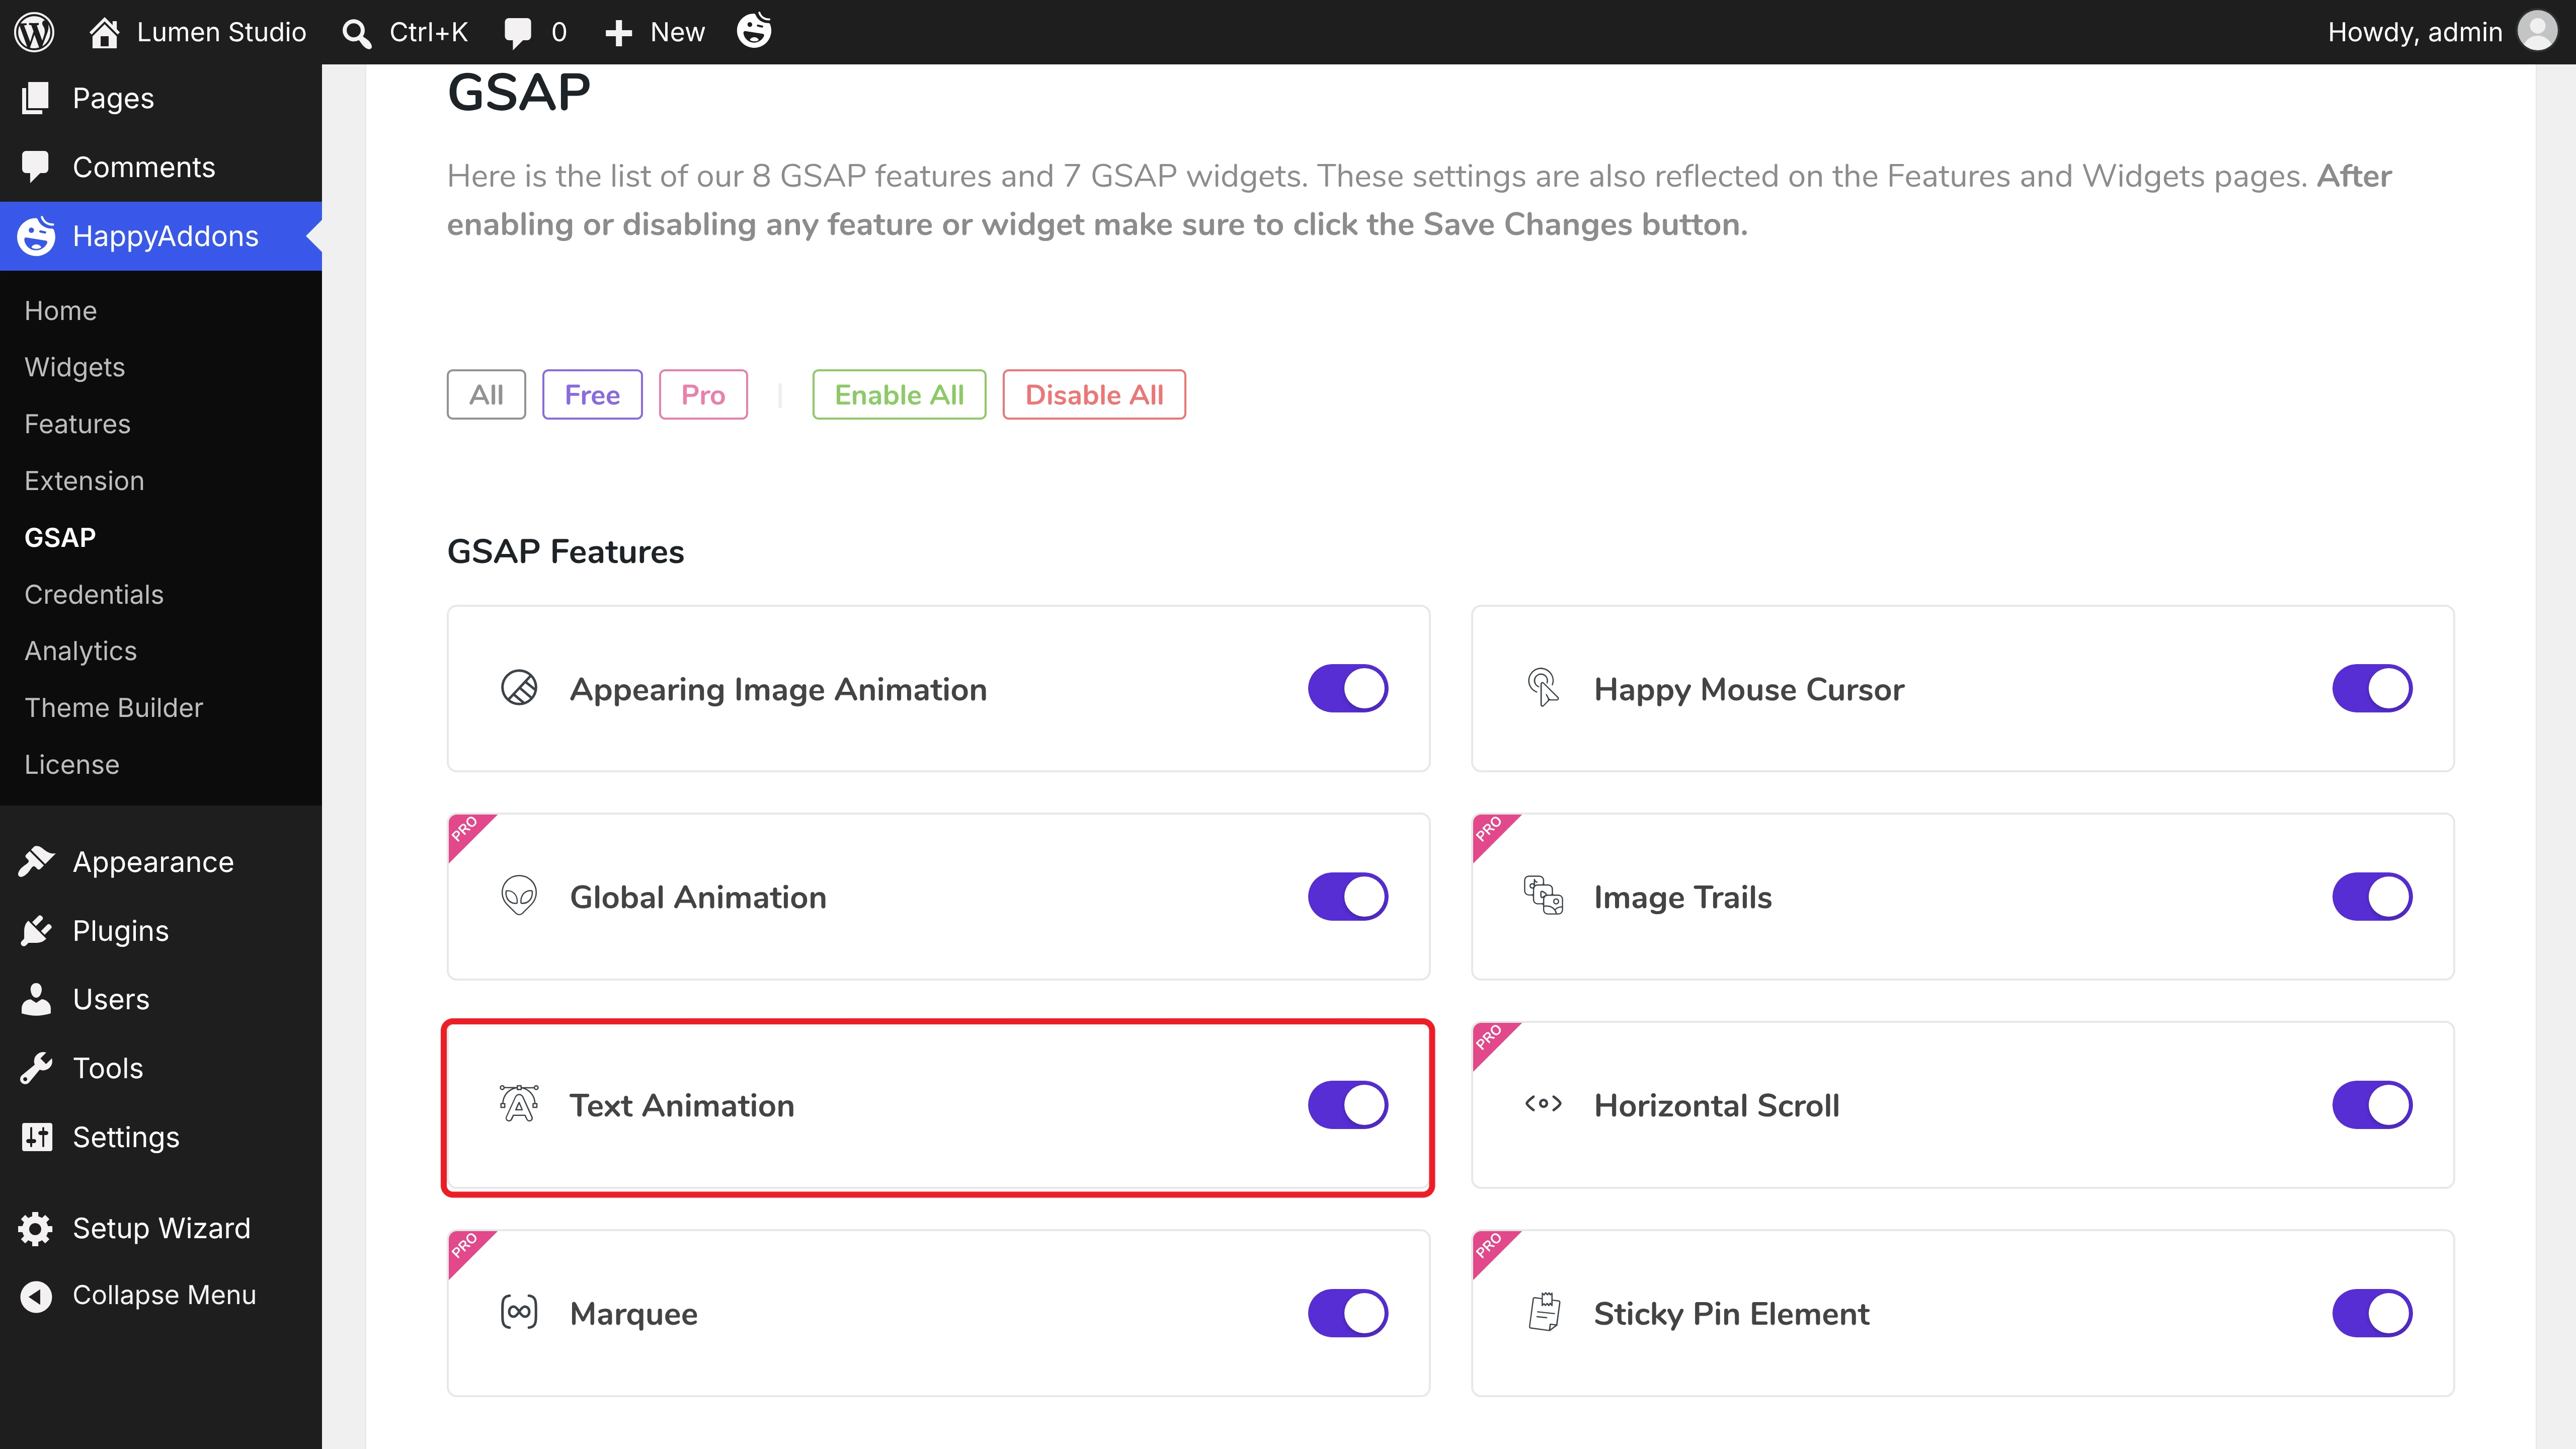
Navigate to HappyAddons > GSAP from your WordPress dashboard. Under GSAP Features, make sure Text Animation is toggled on. If you change anything, click the Save Settings button.
Step 02: Add a Heading and Turn On Text Animation
Open your page with Elementor and drag and drop a Heading widget onto the canvas. We used two headings for our hero: “Ideas that” and “move people.”
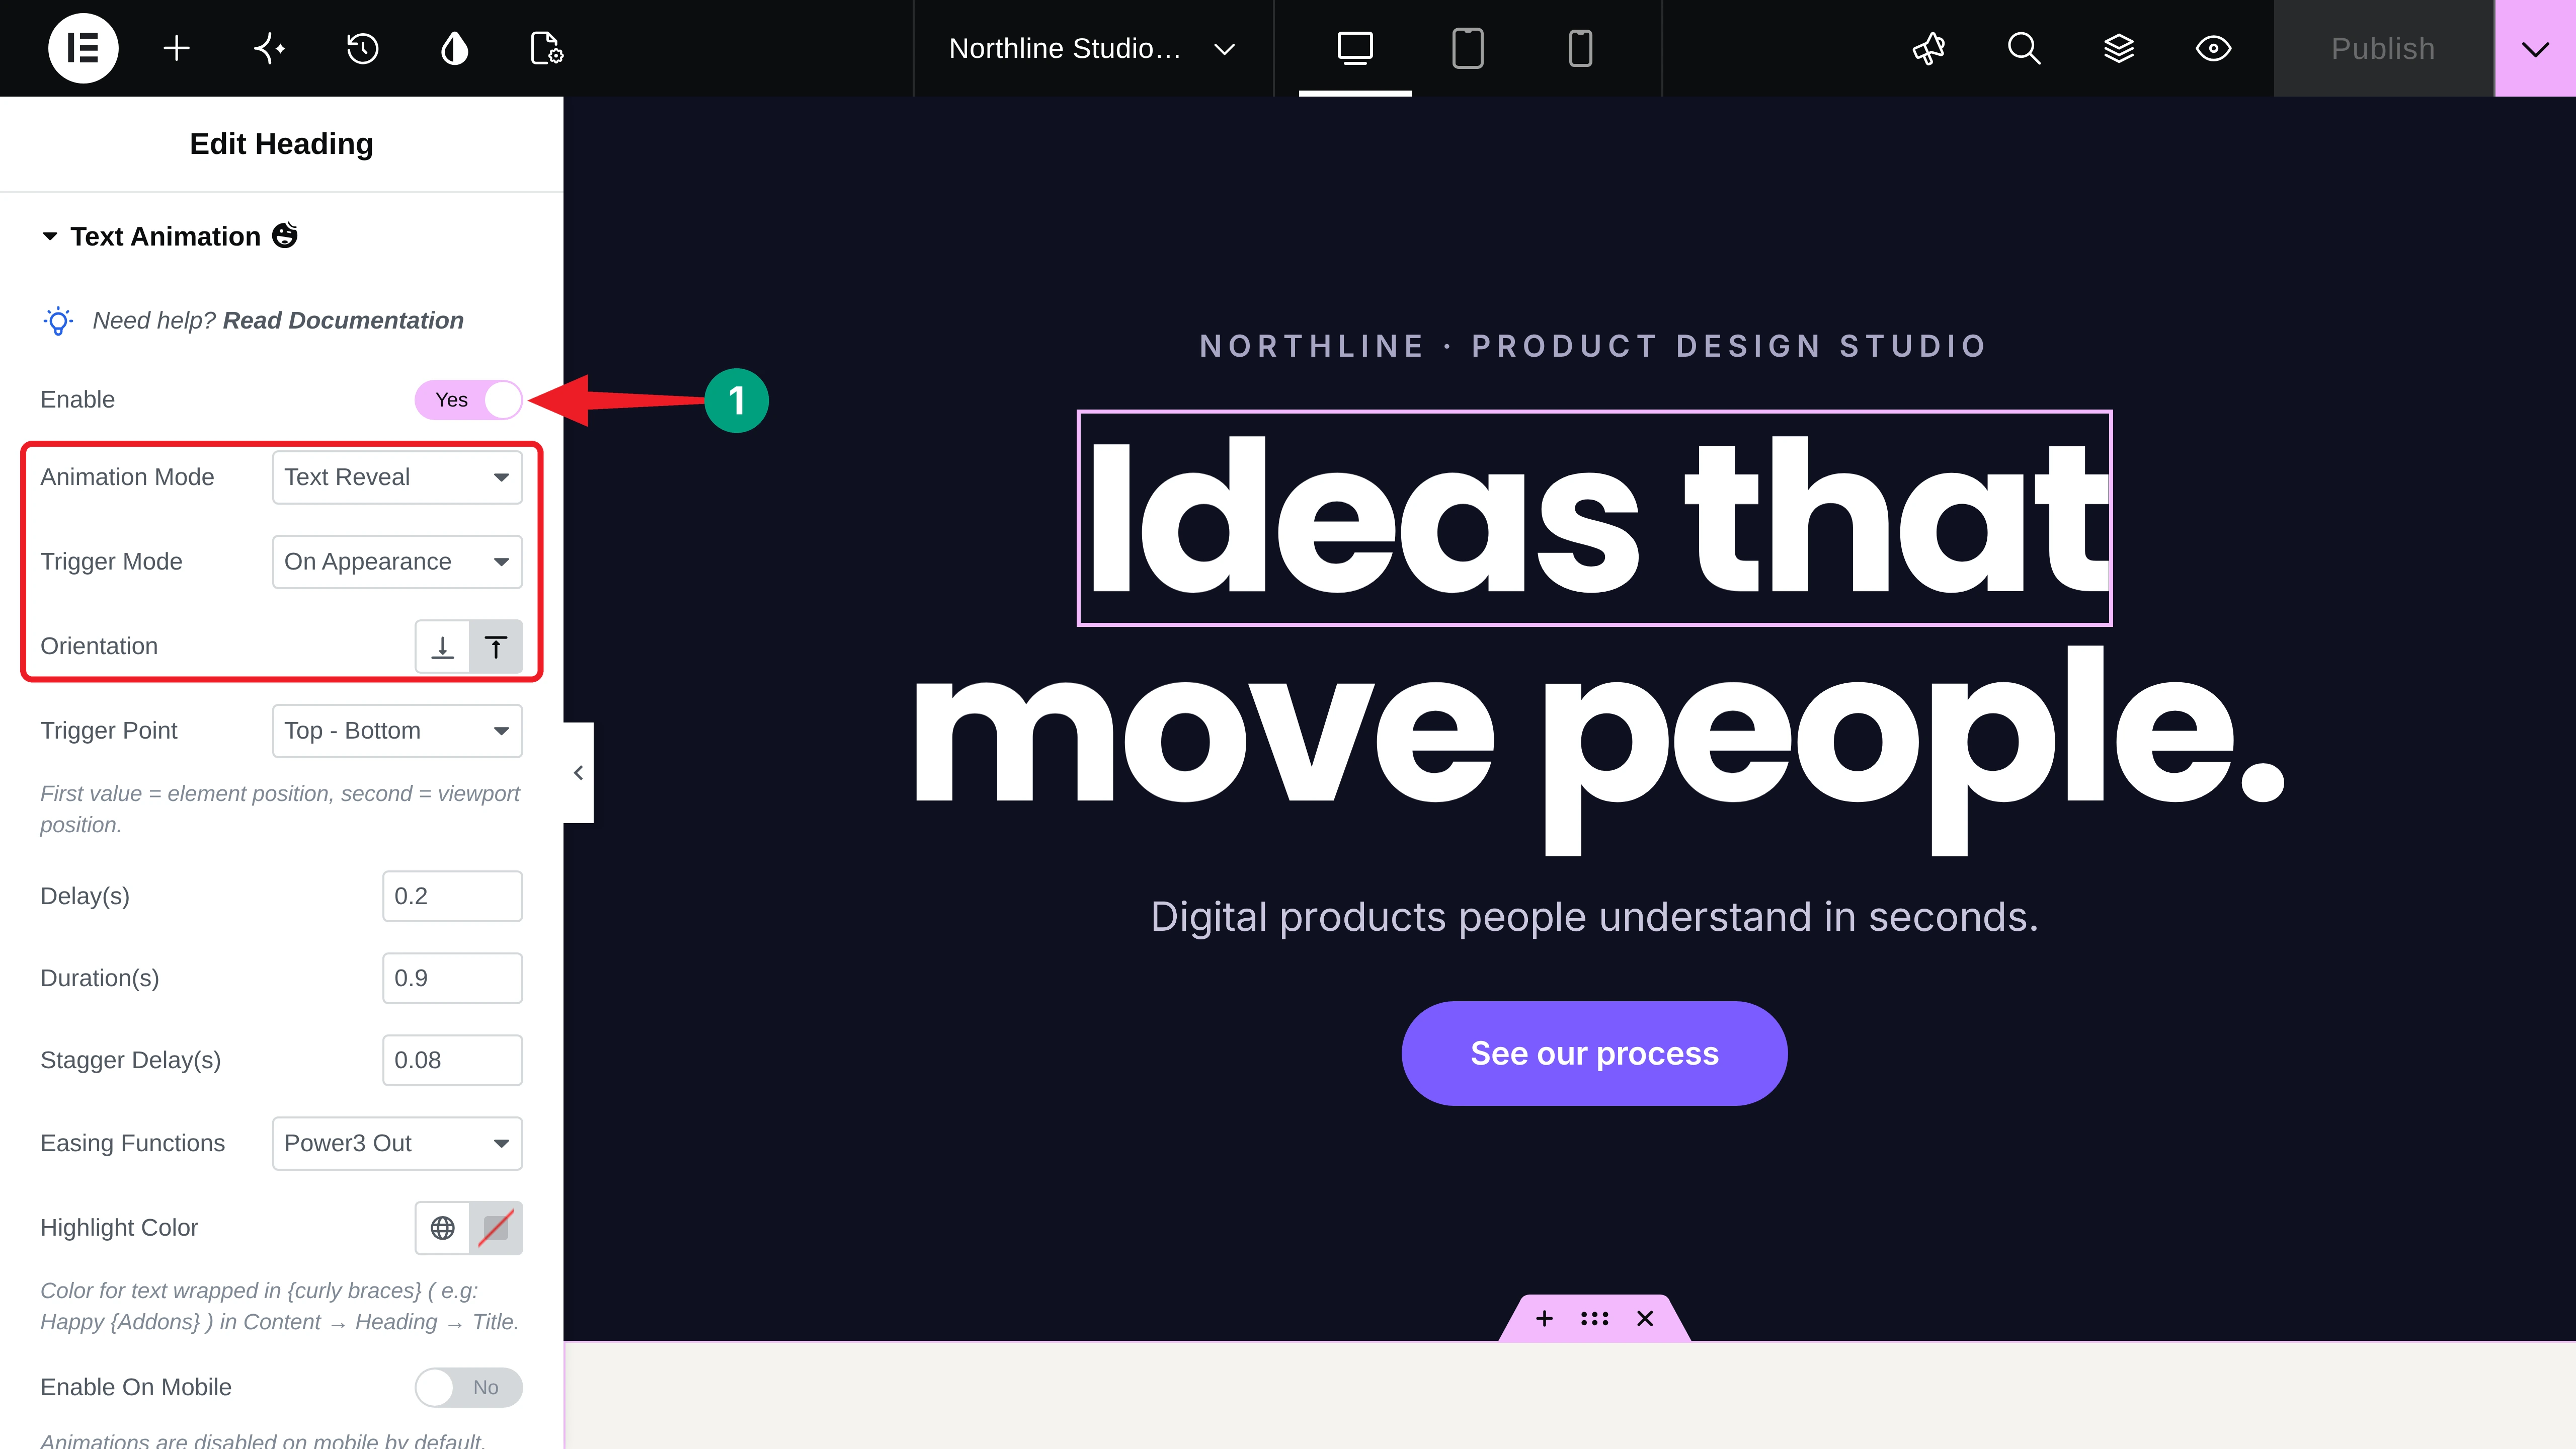
Select the first heading. In the Content tab, expand the Text Animation section and toggle on Enable. Then set these options:
- Animation Mode: Text Reveal
- Trigger Mode: On Appearance, so it plays once when the heading comes into view. On Scroll links the animation to the scrollbar instead.
- Orientation: From Bottom, so the letters rise up
Note: Text Animation works on the Heading widget. For a short paragraph, use a Heading widget and set its HTML Tag to p, like we did for the tagline.
Step 03: Set the Timing of the Animation
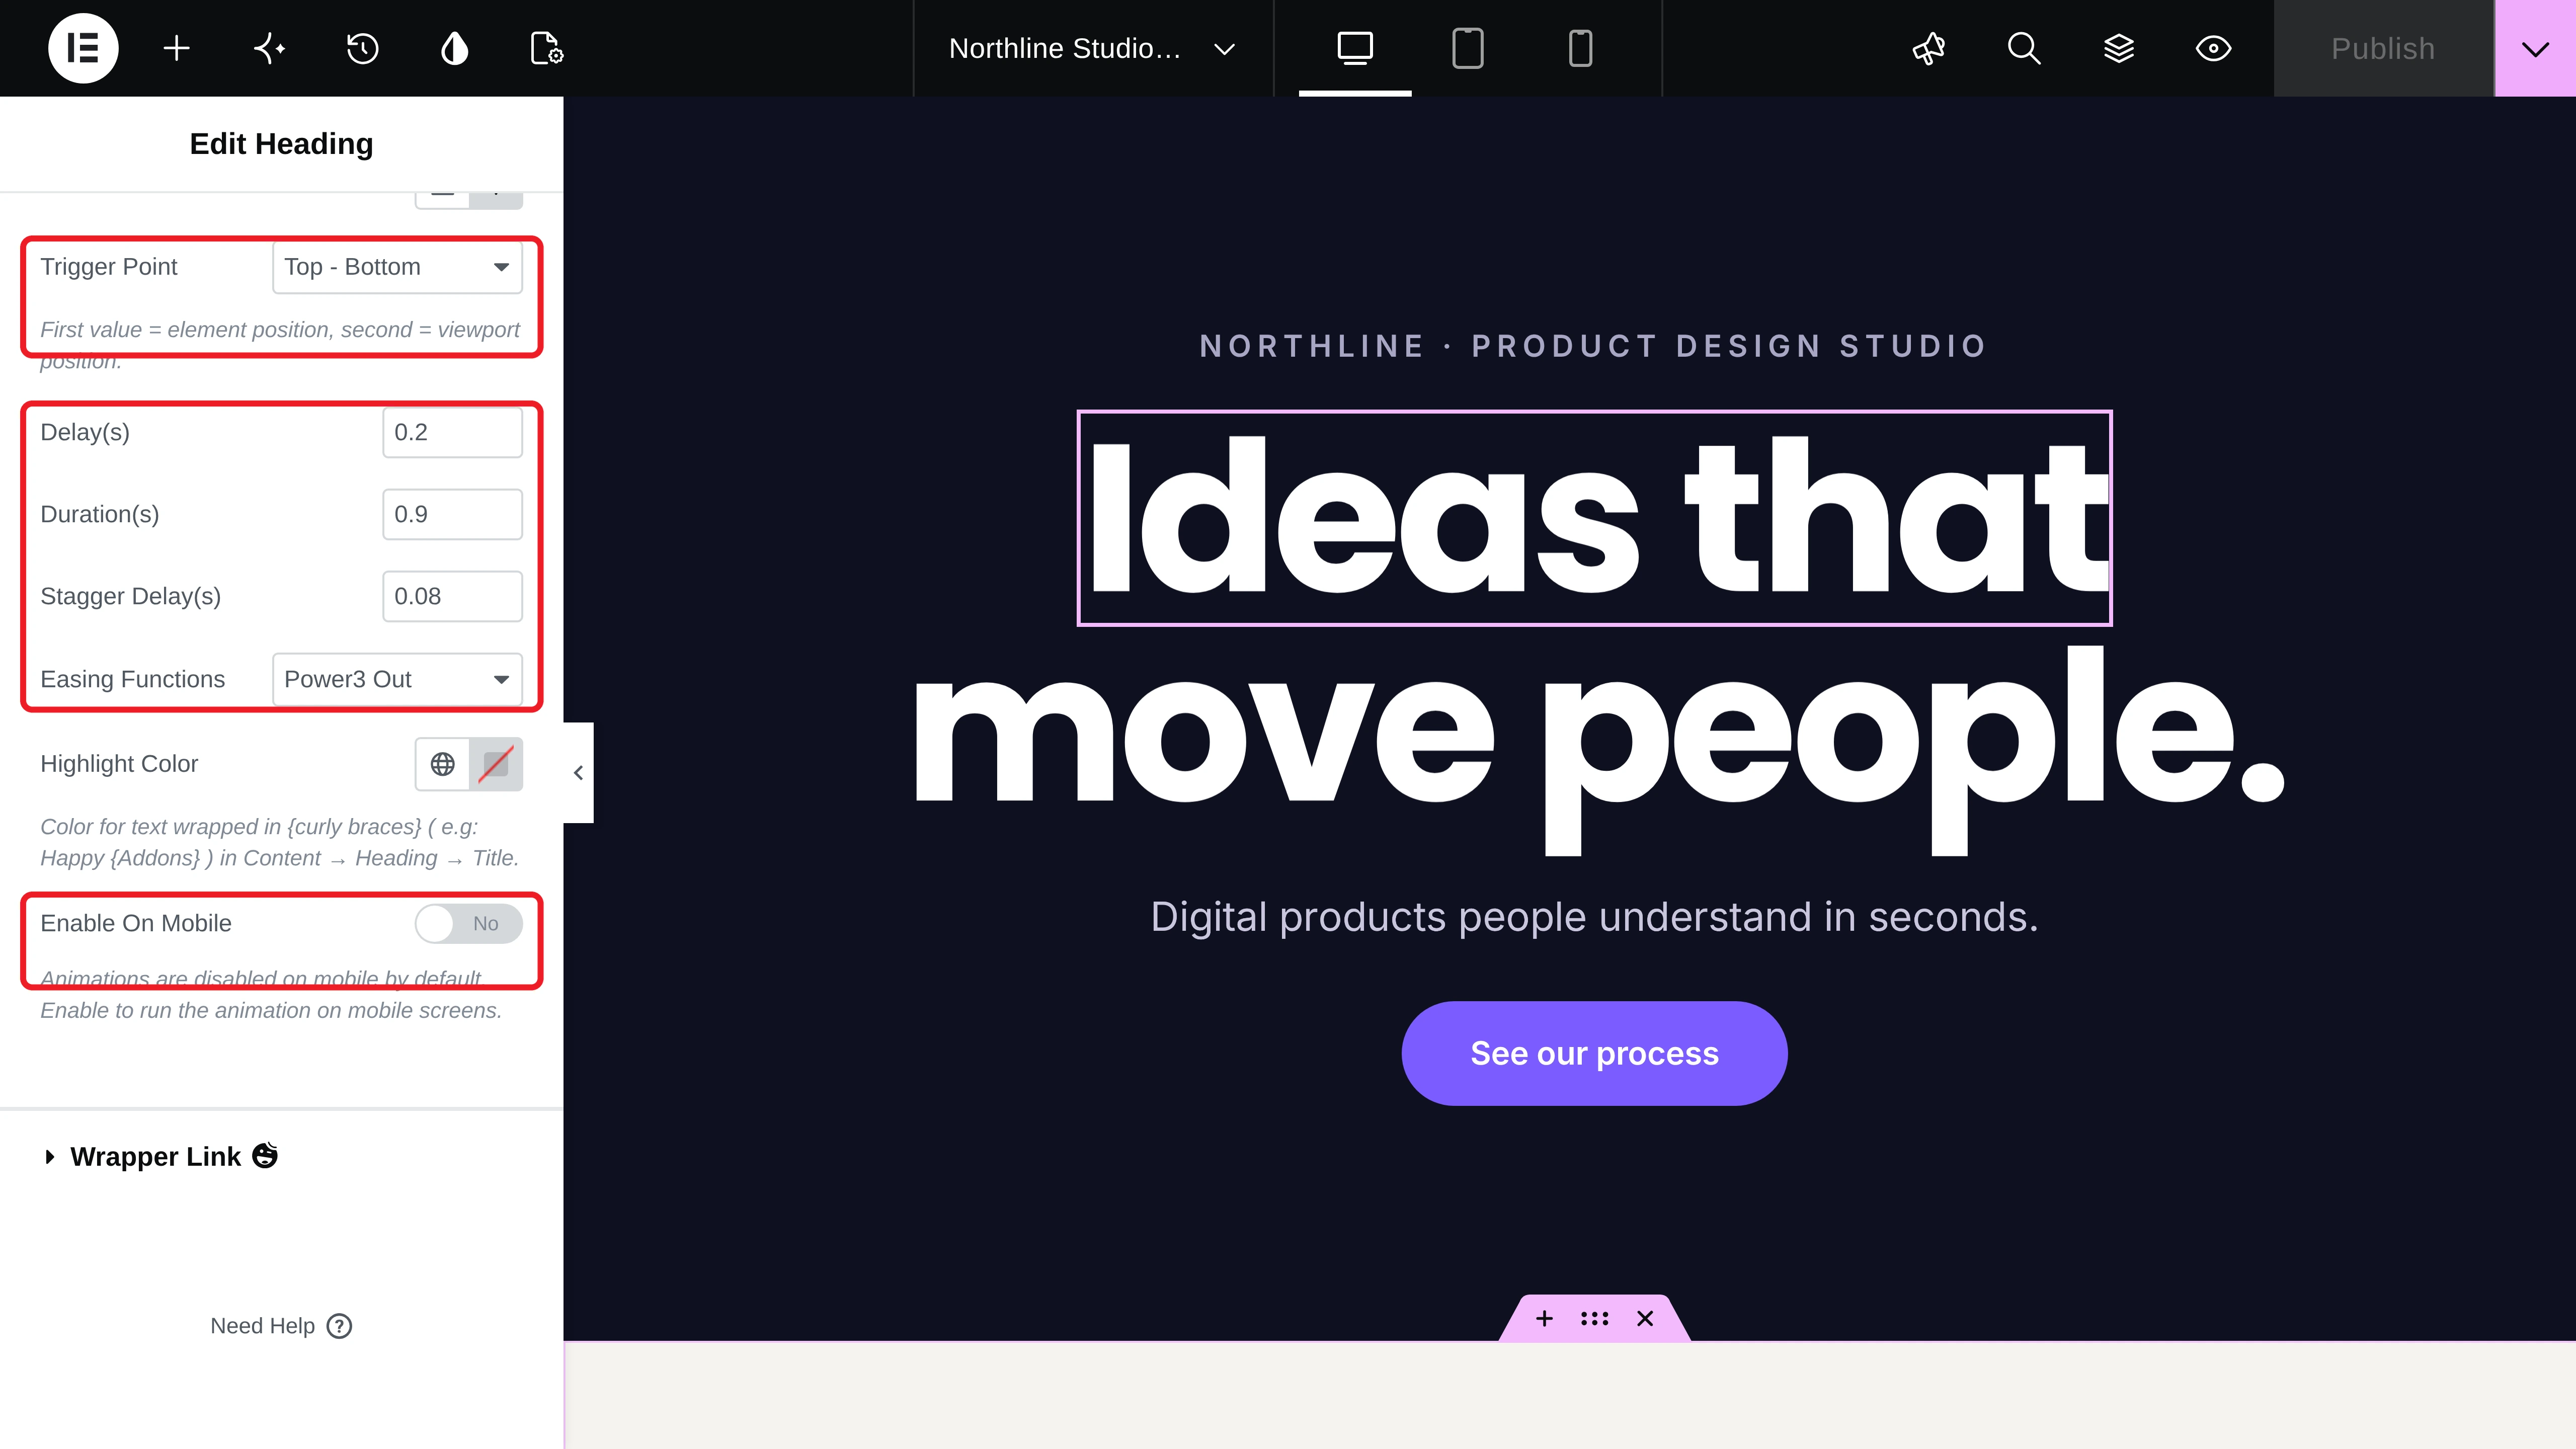
Scroll down in the same section. You’ll get options for the trigger point, delay, duration, stagger delay, easing functions, and highlight color. We used these values:
- Trigger Point: Top – Bottom, so the animation starts as soon as the heading enters the screen
- Delay(s): 0.2, Duration(s): 0.9, Stagger Delay(s): 0.08
- Easing Functions: Power3 Out, for a soft landing
In the same way, turn on Text Reveal for the second heading and give it a Delay of 0.7. The second line starts right after the first one. Here’s the result:
Note: Enable On Mobile is off by default, so the animations don’t run on phones. Turn it on if you want them on mobile too.
Step 04: Add a Smoky Reveal to the Tagline
Select the tagline below the hero heading and enable Text Animation. Choose Smoky Reveal from the Animation Mode dropdown. You’ll get options for the vertical offset, scale from, blur, and stagger from. We kept the defaults and set the Delay to 1.4 so the tagline appears after both heading lines.
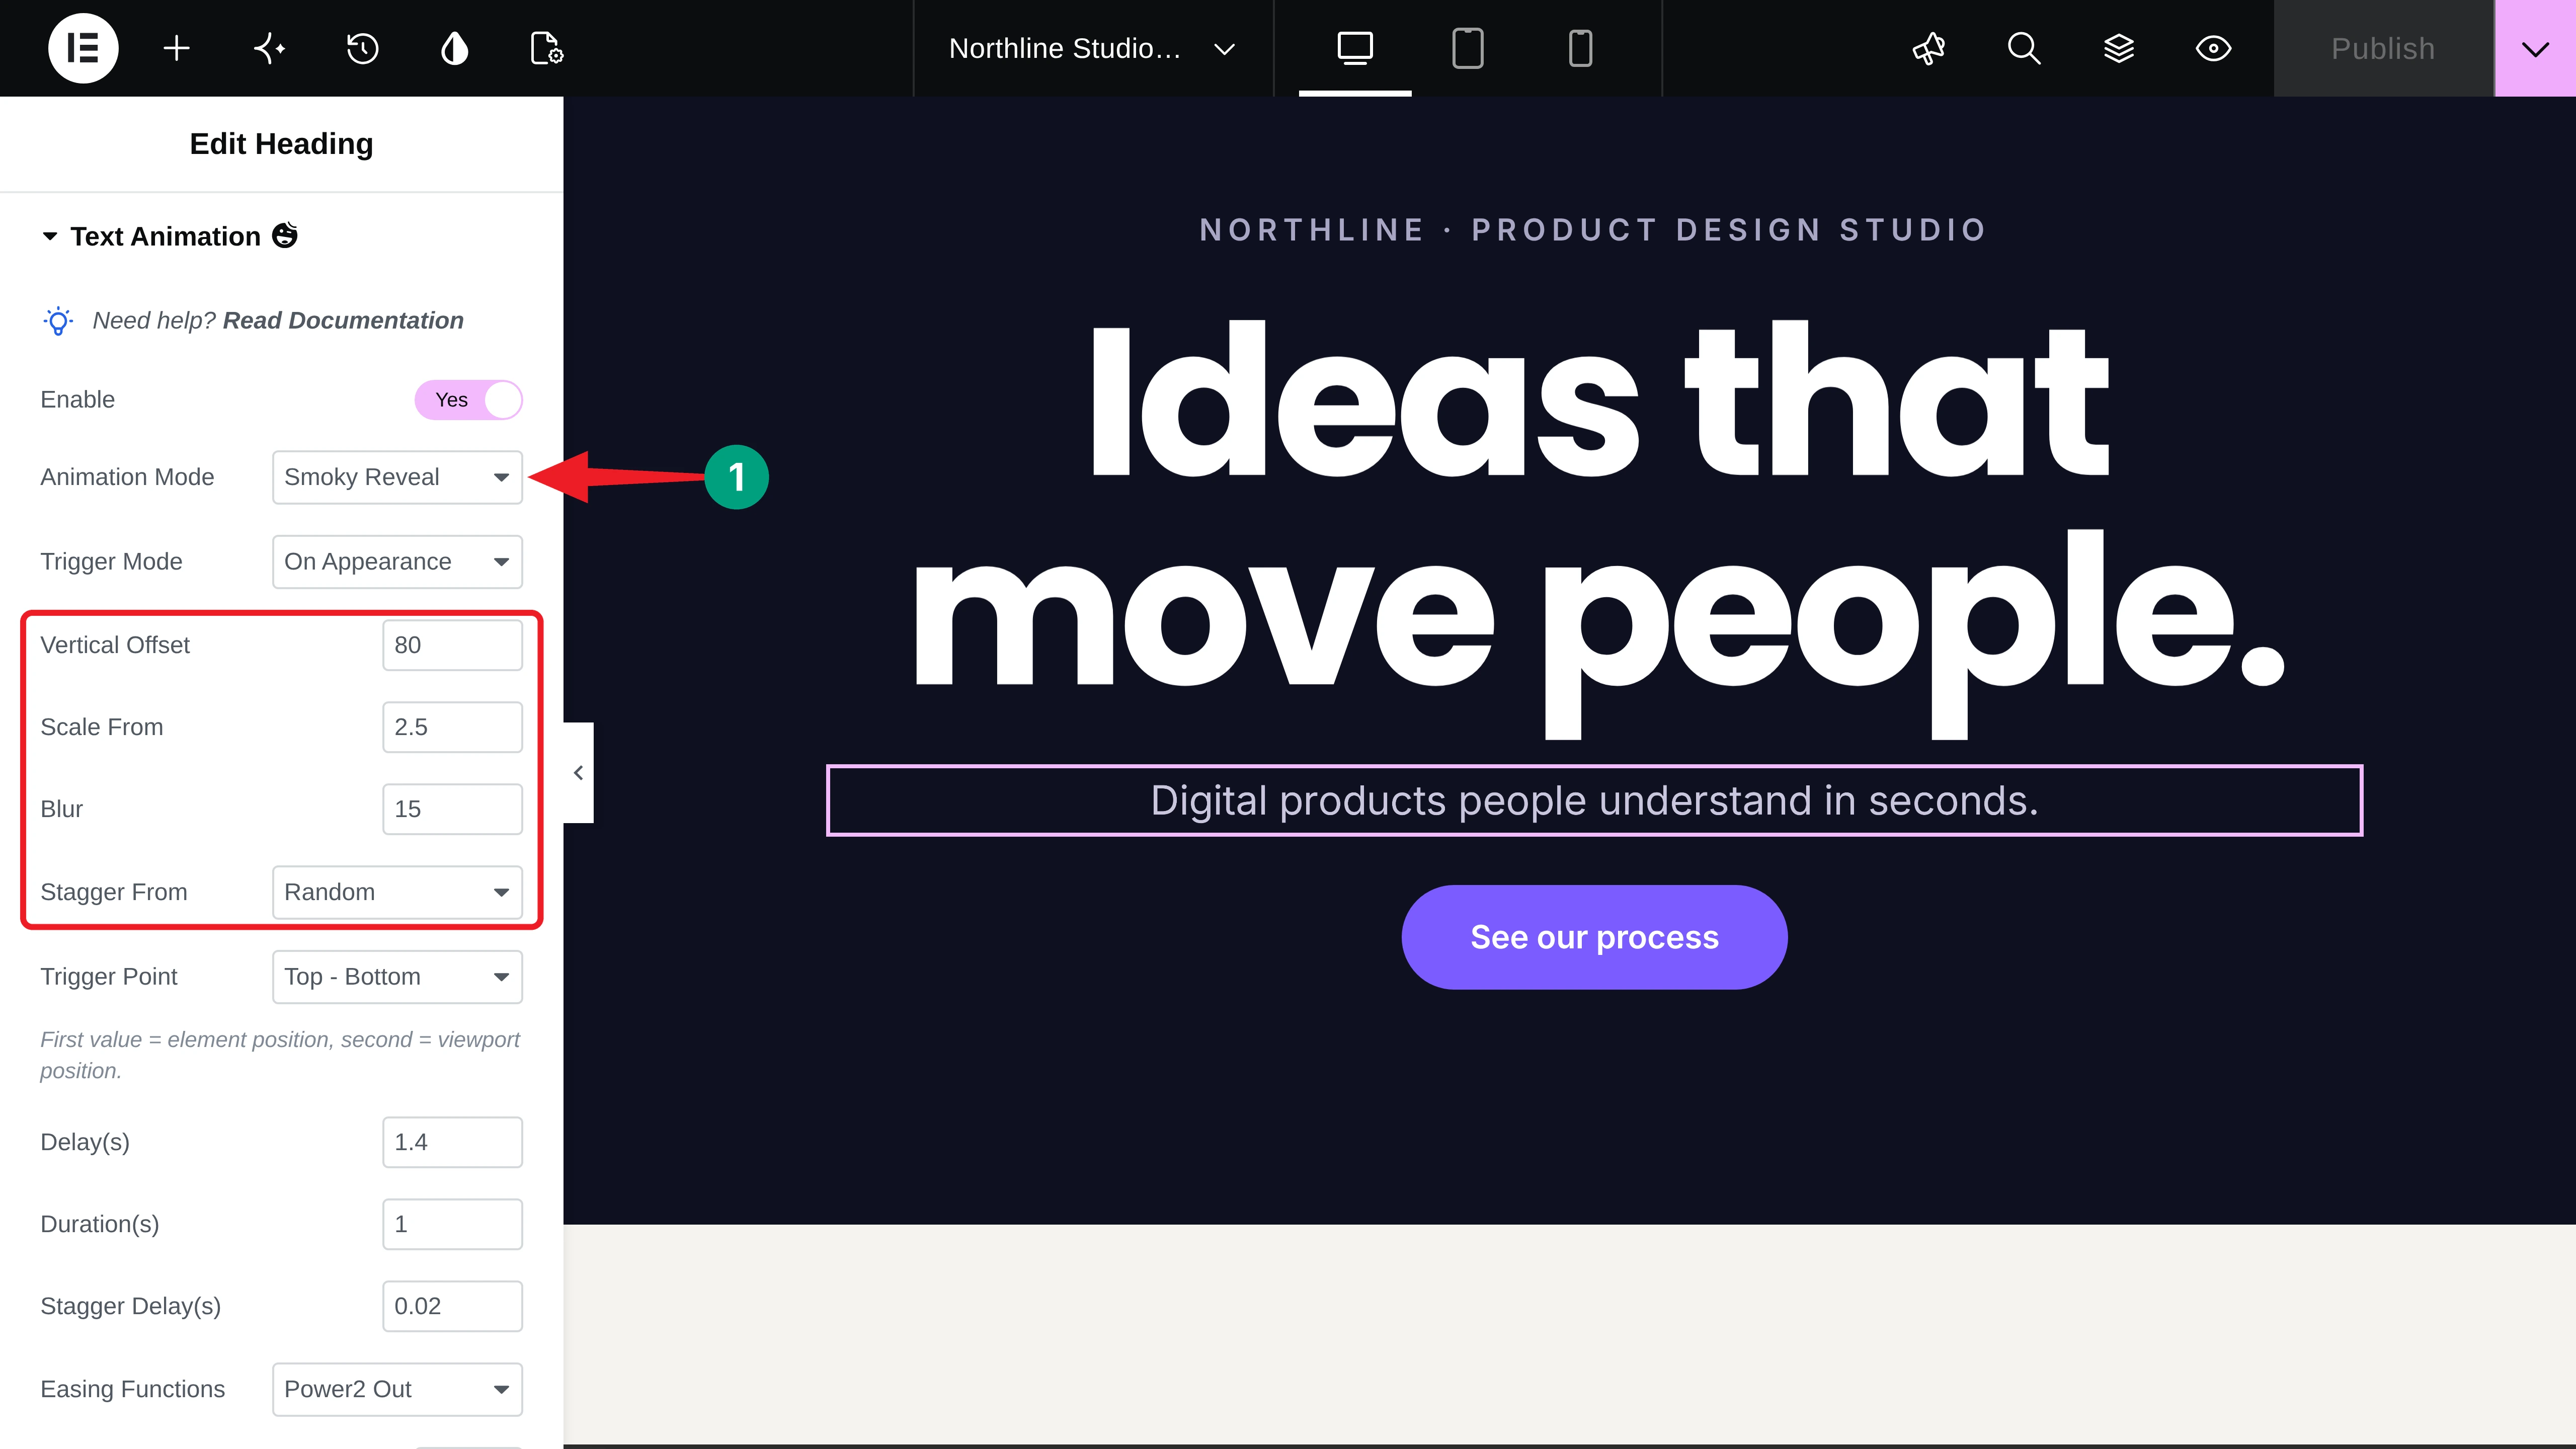
Stagger From decides the order of the letters. You can choose Start, End, Center, Random, or Edges.
Step 05: Highlight a Statement on Scroll with Text Invert
For the About section, we added a long statement as a heading. Select it, enable Text Animation, and choose Text Invert. Mask Opacity controls how faded the text is before it fills in. We set it to 0.2.
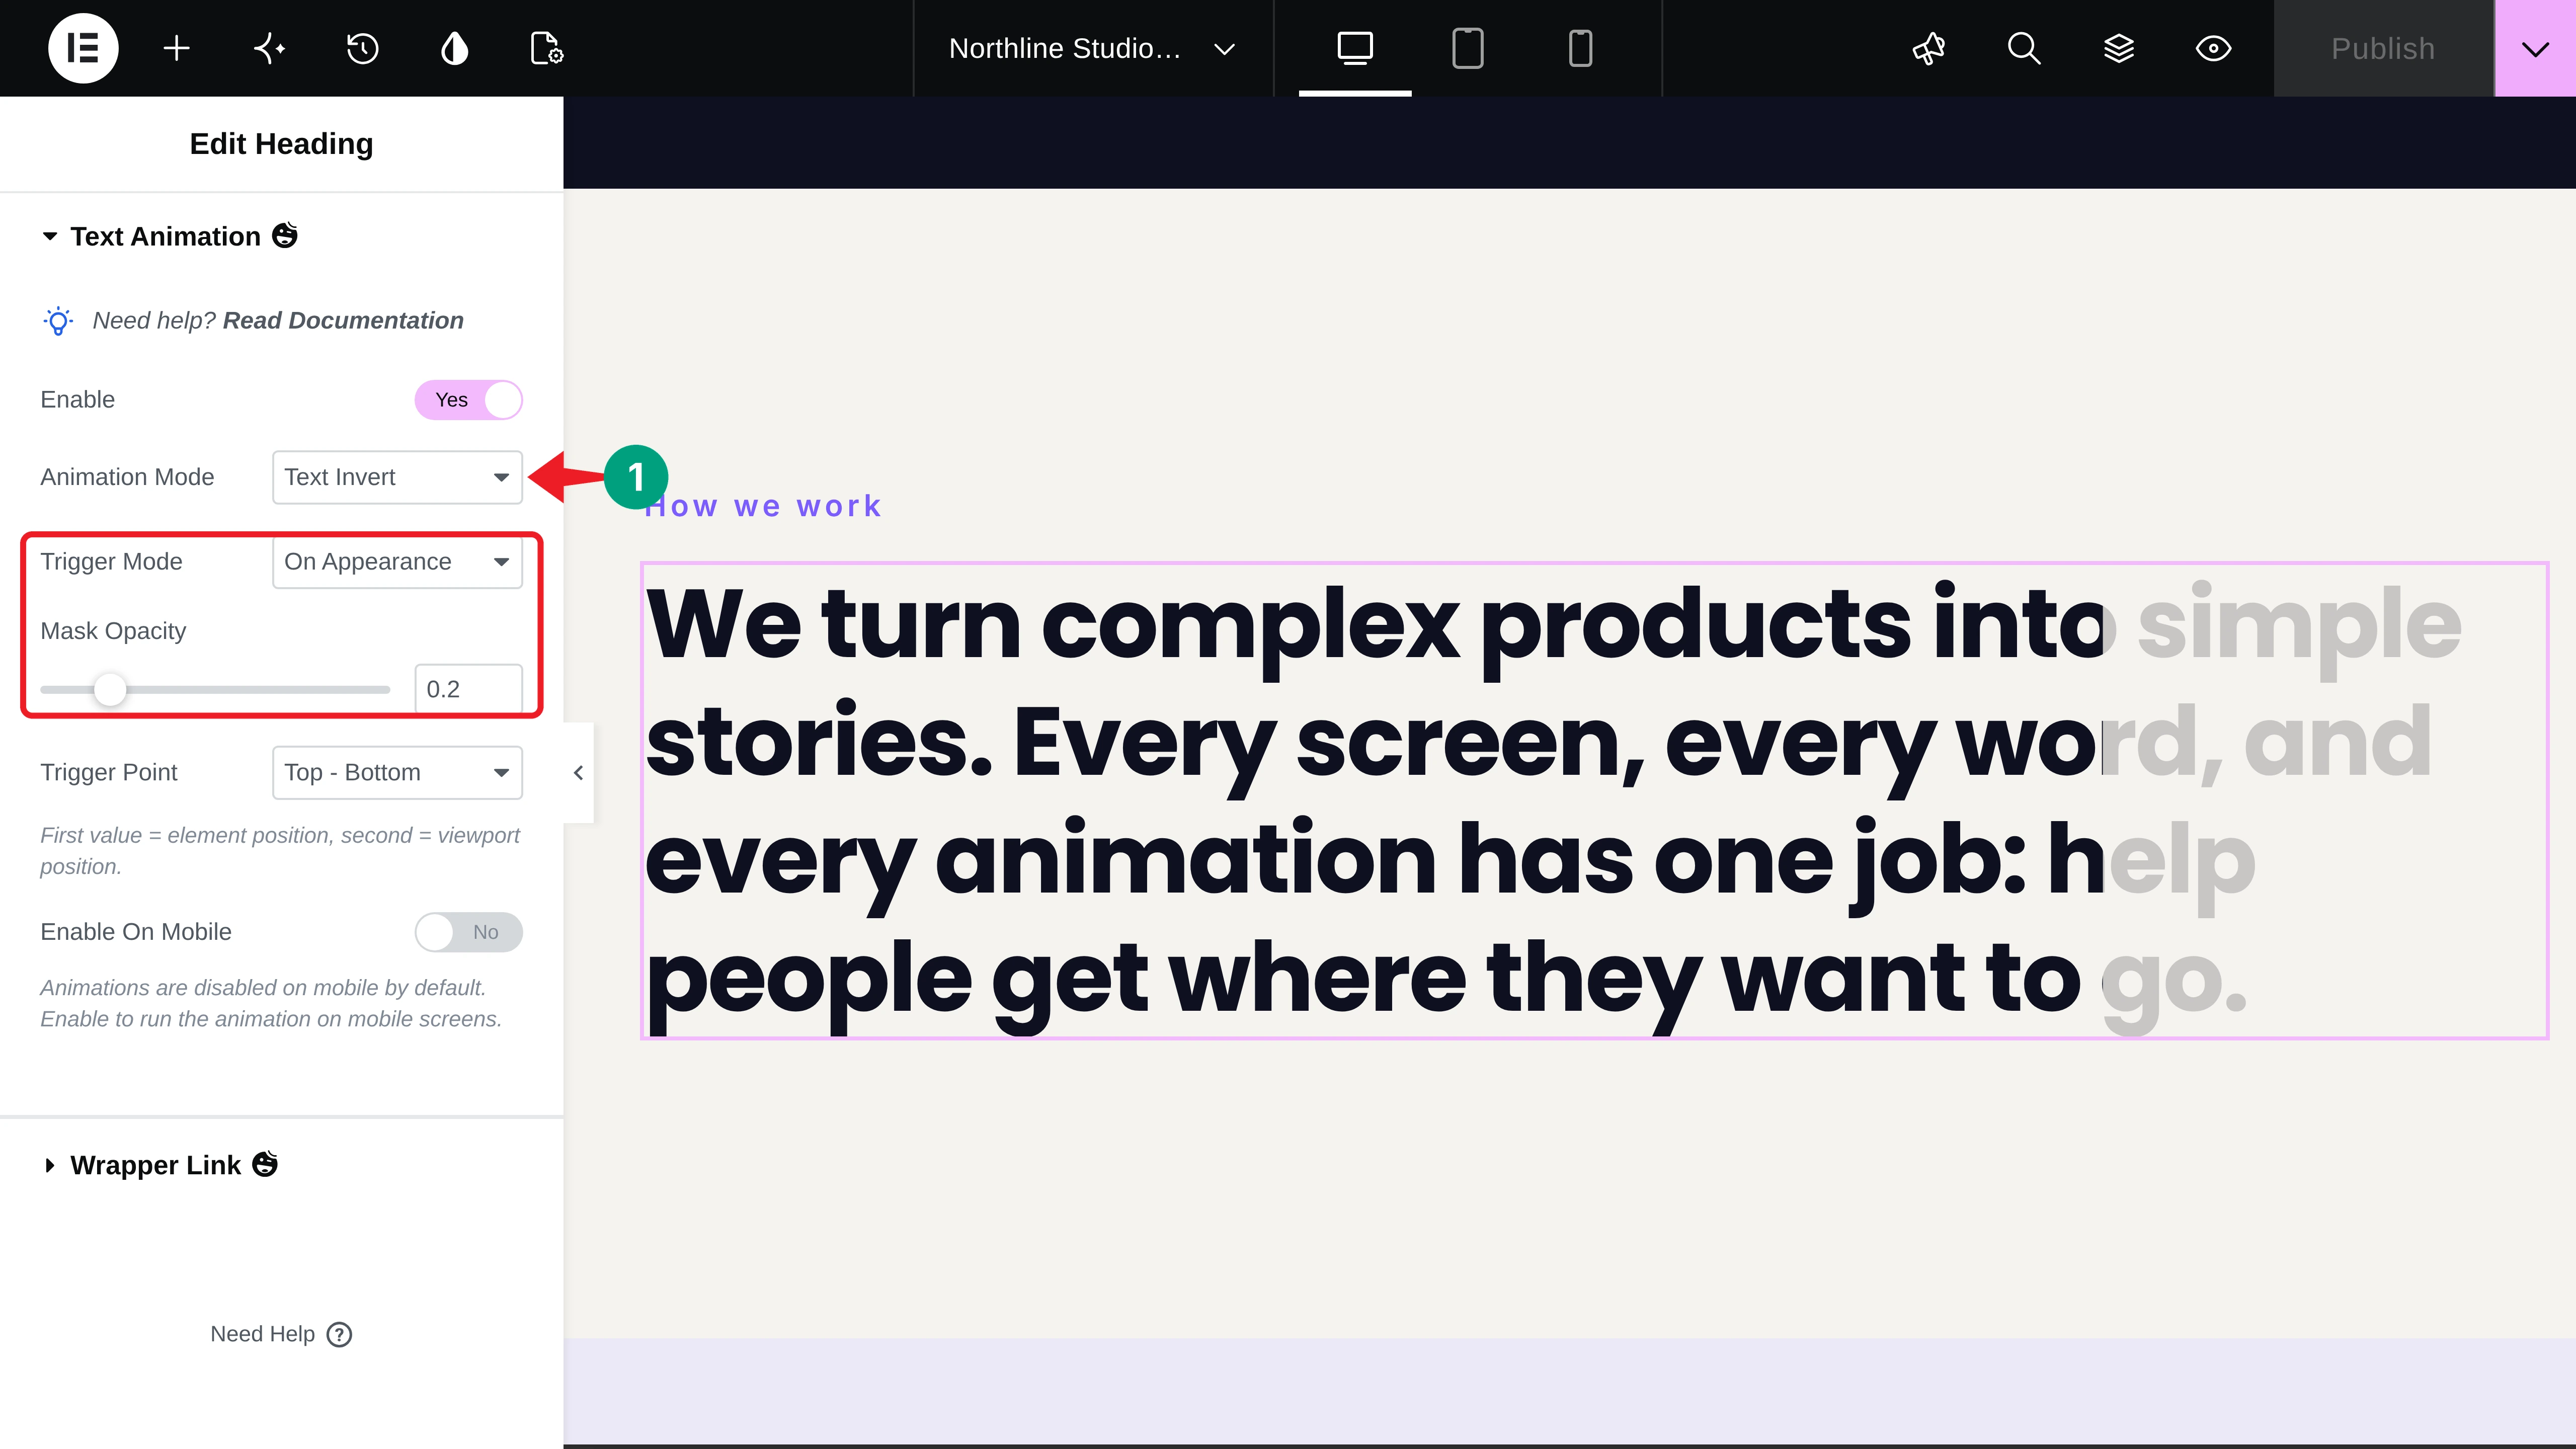
Text Invert follows the scrollbar. Each line fills with color as you scroll down and fades back when you scroll up:
Learn how to add scrolling text in WordPress [LINK].
Step 06: Add a Popup Reveal to a Section Title
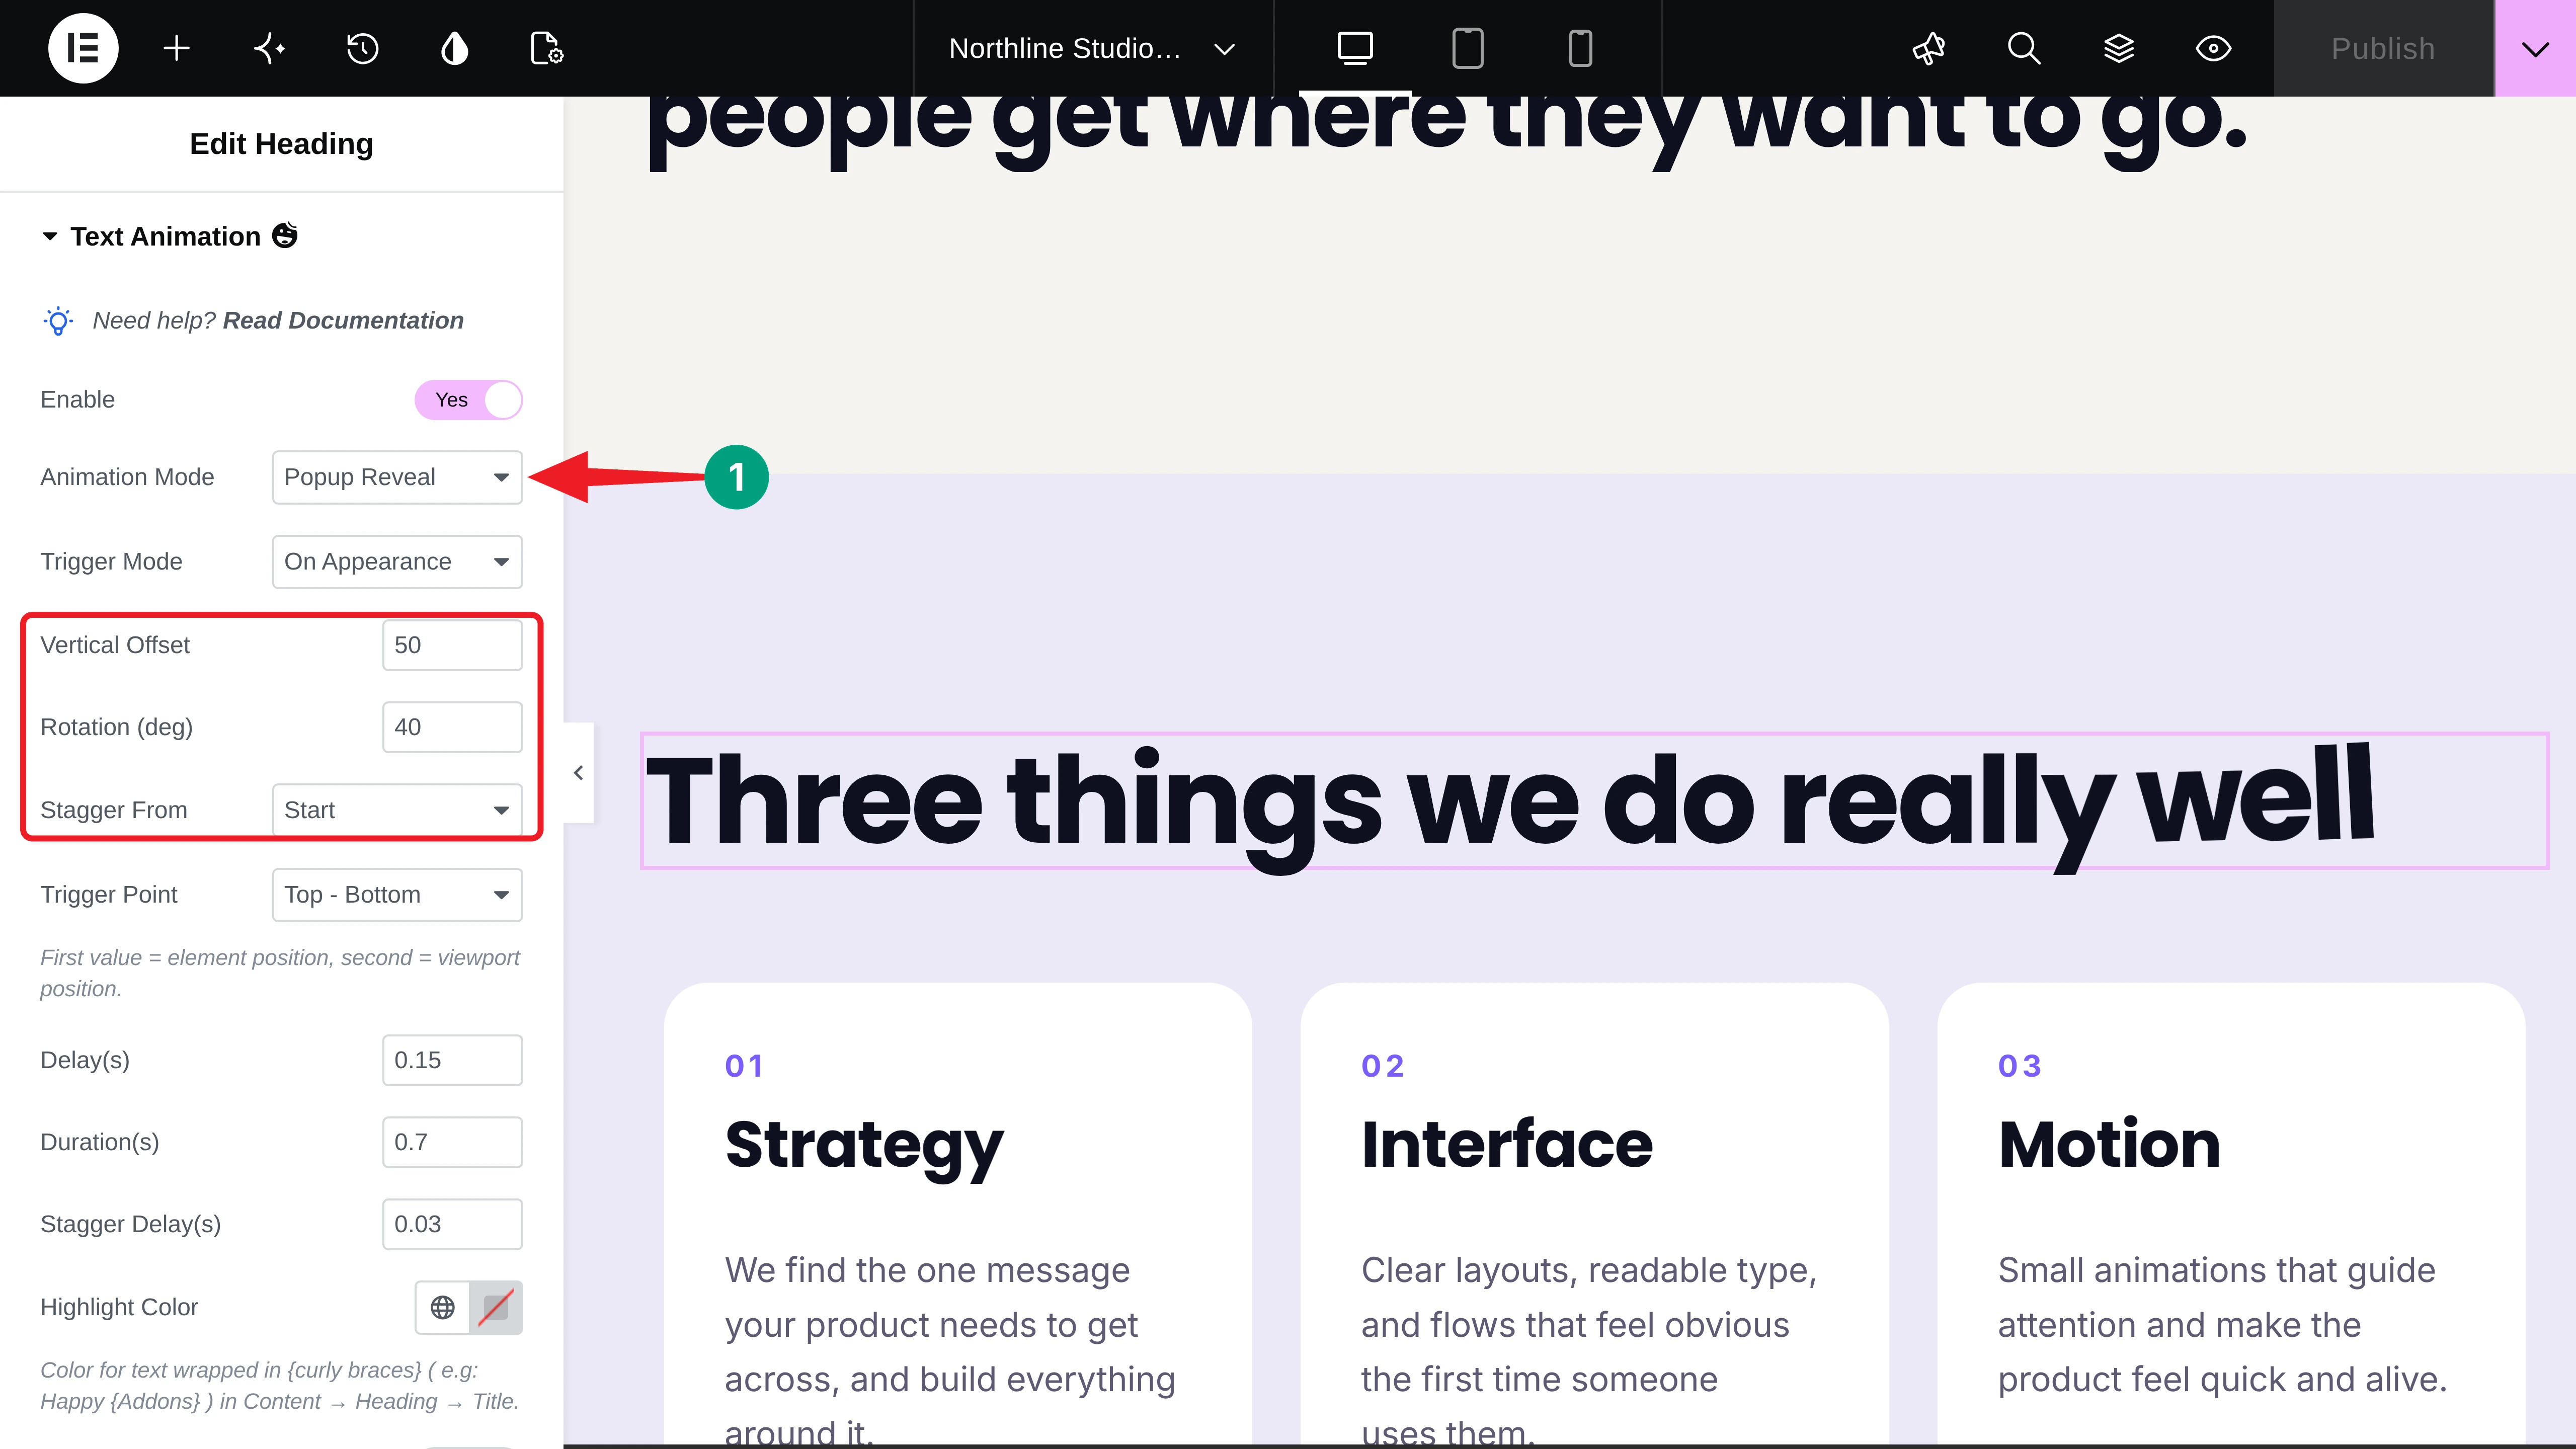
Next, select the Services section title and choose Popup Reveal. You can set the Vertical Offset, Rotation (deg), and Stagger From. We picked Start for Stagger From, so the letters pop up from left to right.
Step 07: Slide In the Card Titles Letter by Letter
For the three service cards, select each card title and choose Slide. Set the Slide Mode to Characters (or Words) and use Transform X and Transform Y to set where the letters come from. We used 25 and 0, so they slide in from the right.
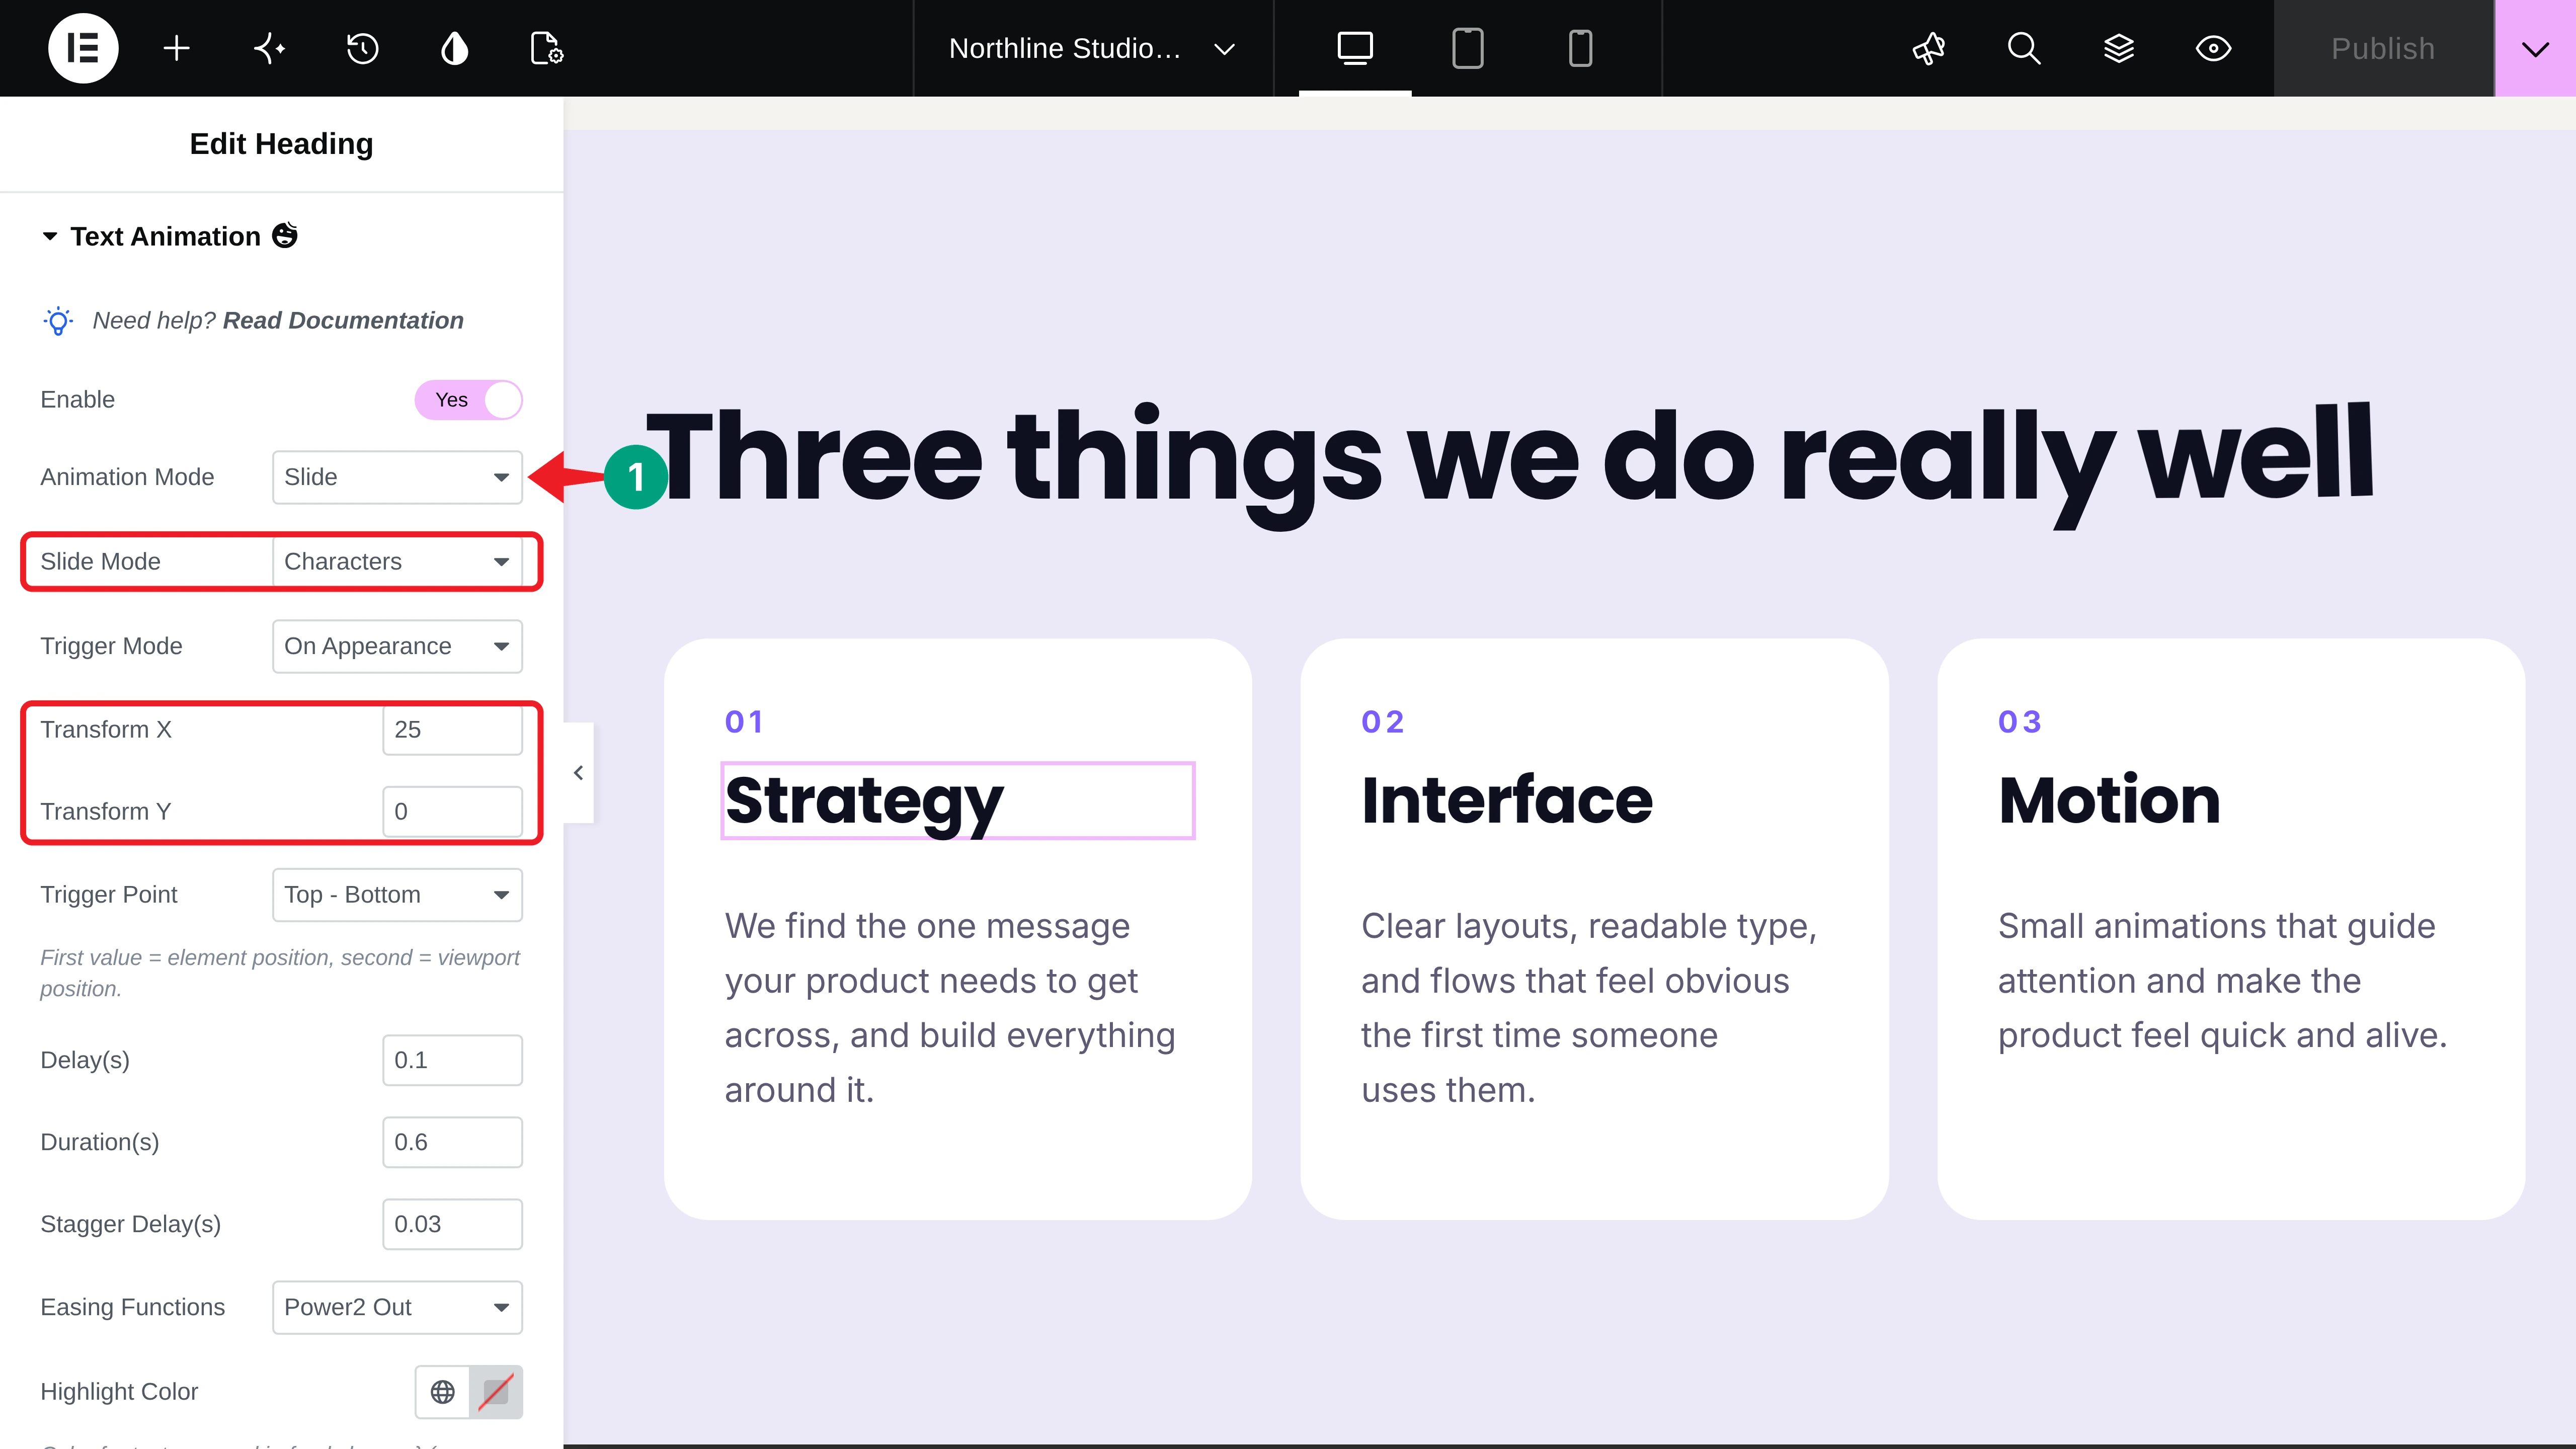
We also gave the three titles a growing Delay (0.1, 0.2, and 0.3), so the cards animate one after another:
Step 08: Flip the Call-to-Action Heading into View
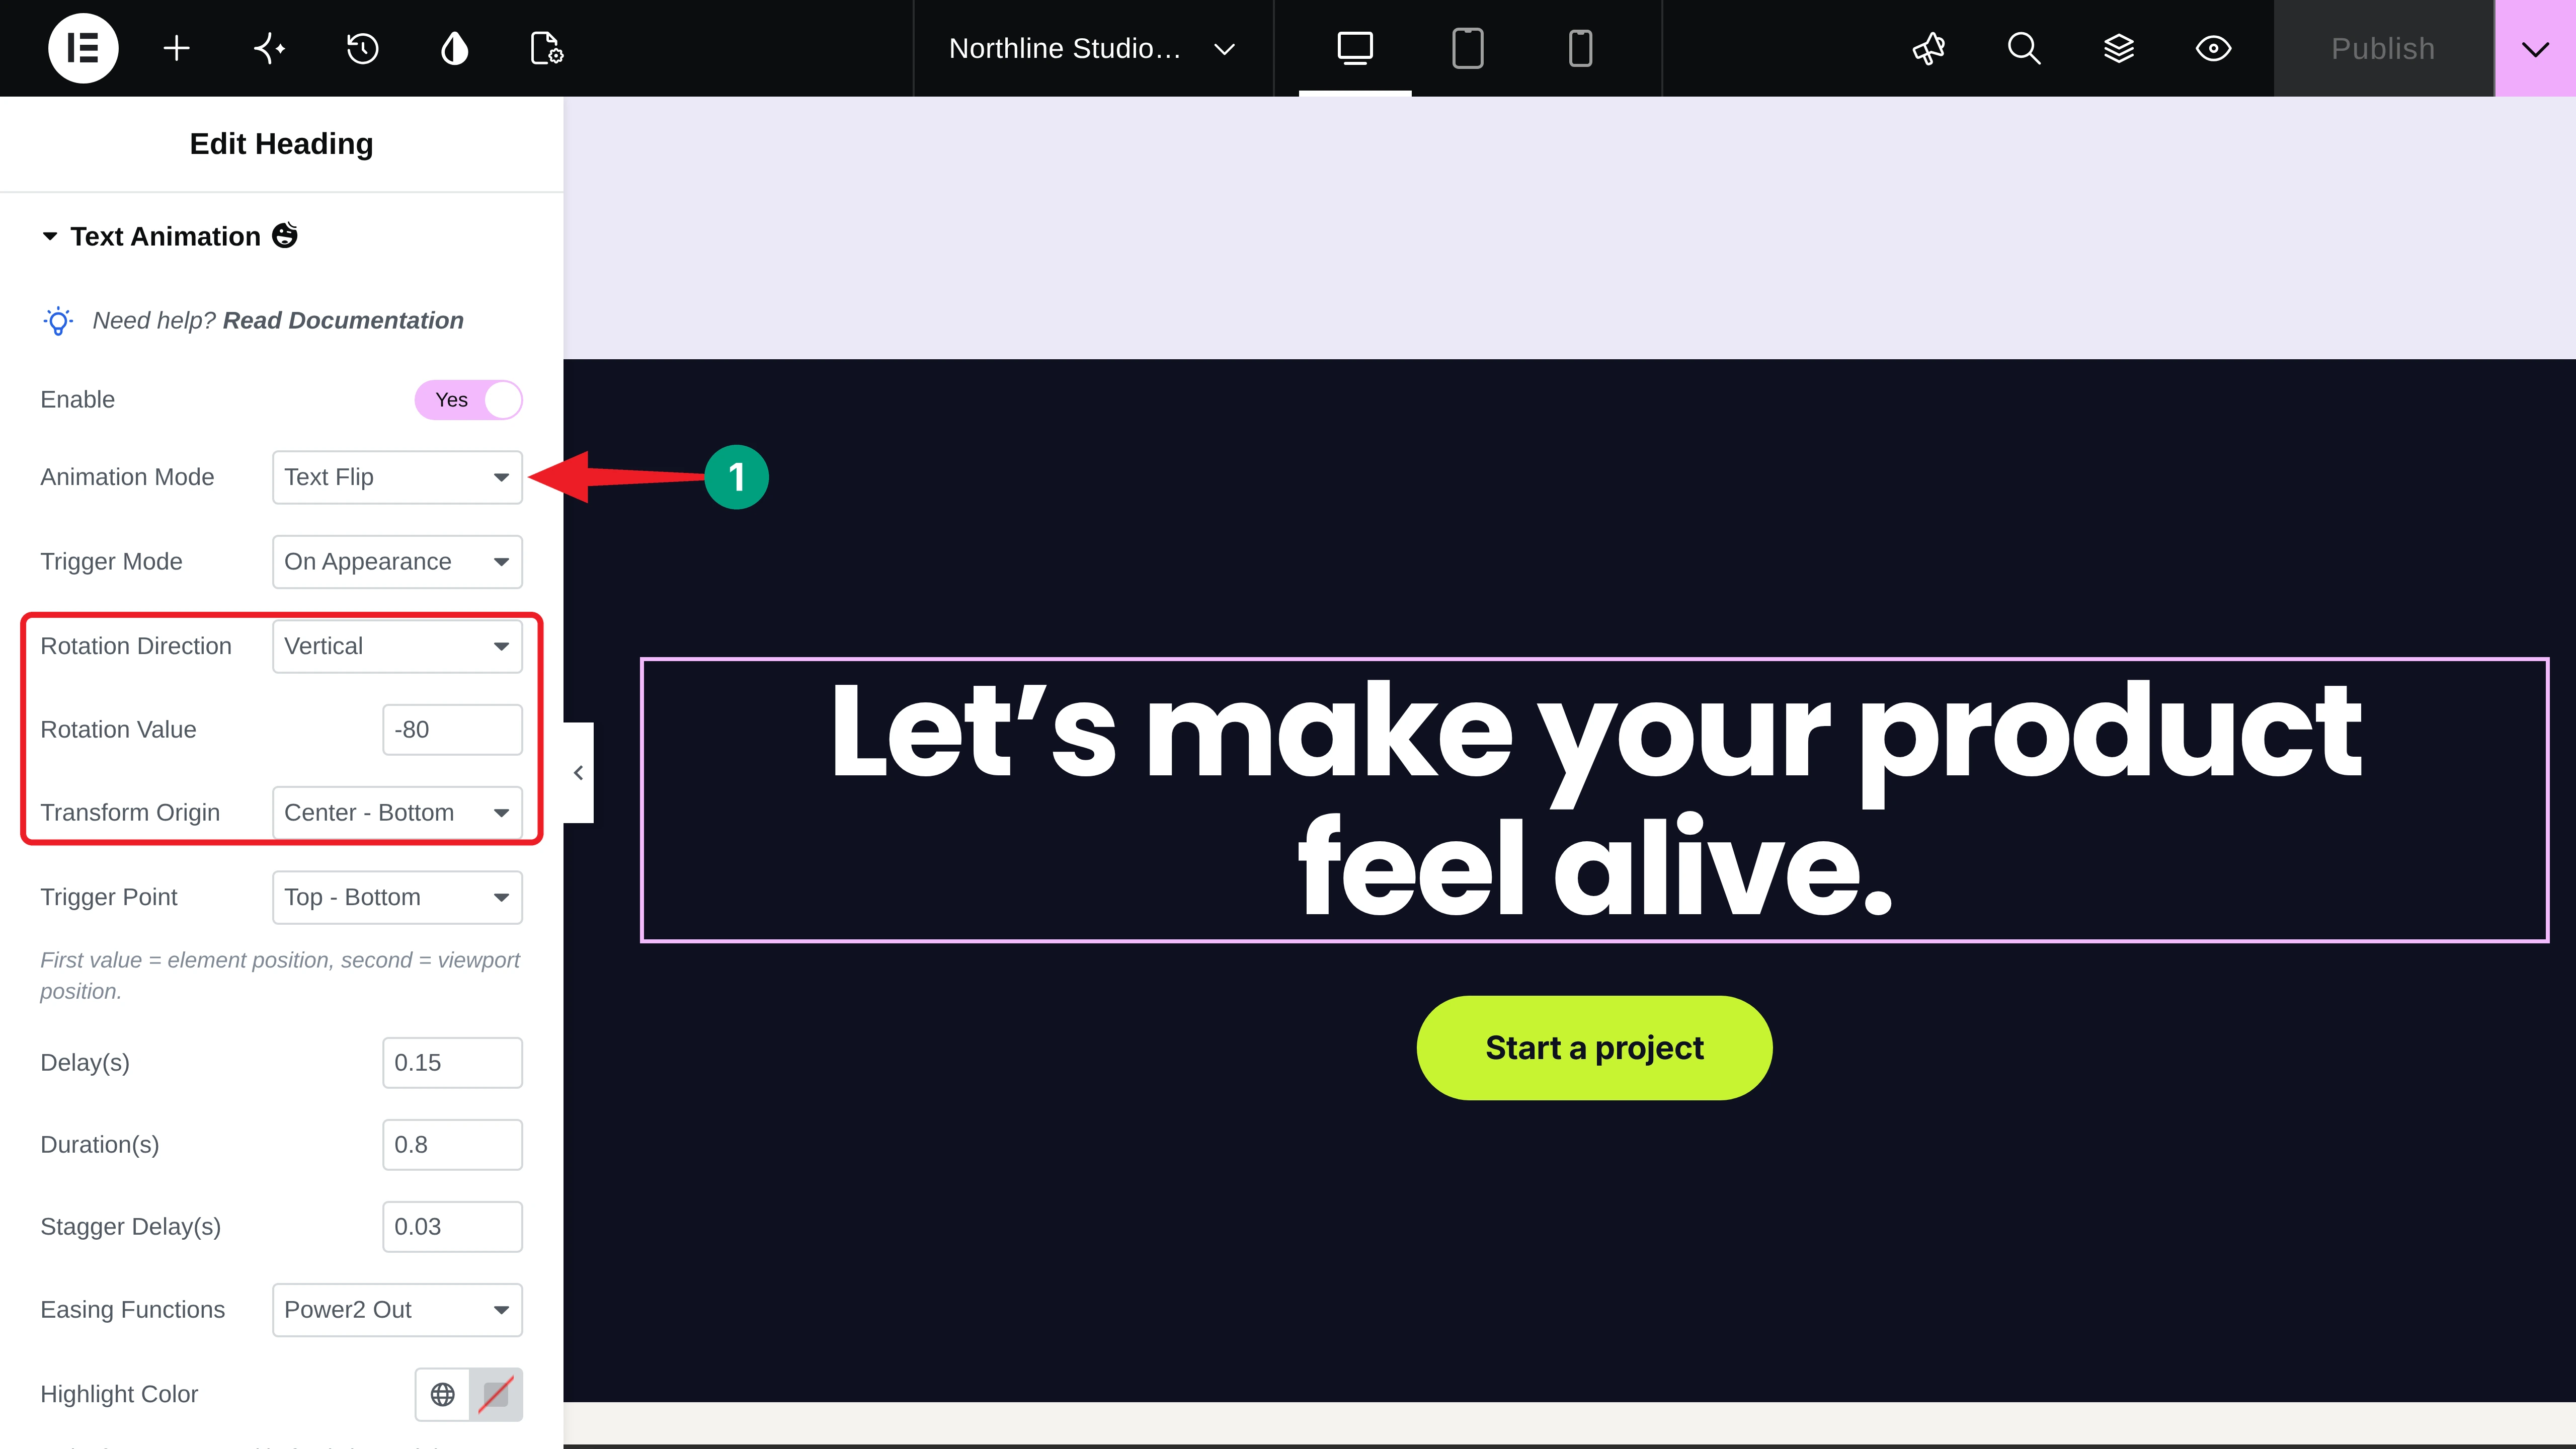
Finally, select the call-to-action heading and choose Text Flip. You’ll get options for the rotation direction, rotation value, and transform origin. We used Vertical, -80, and Center – Bottom, so the letters flip up like cards.
Step 09: Preview and Publish the Page
When you’re happy with the animations, click the Publish button.
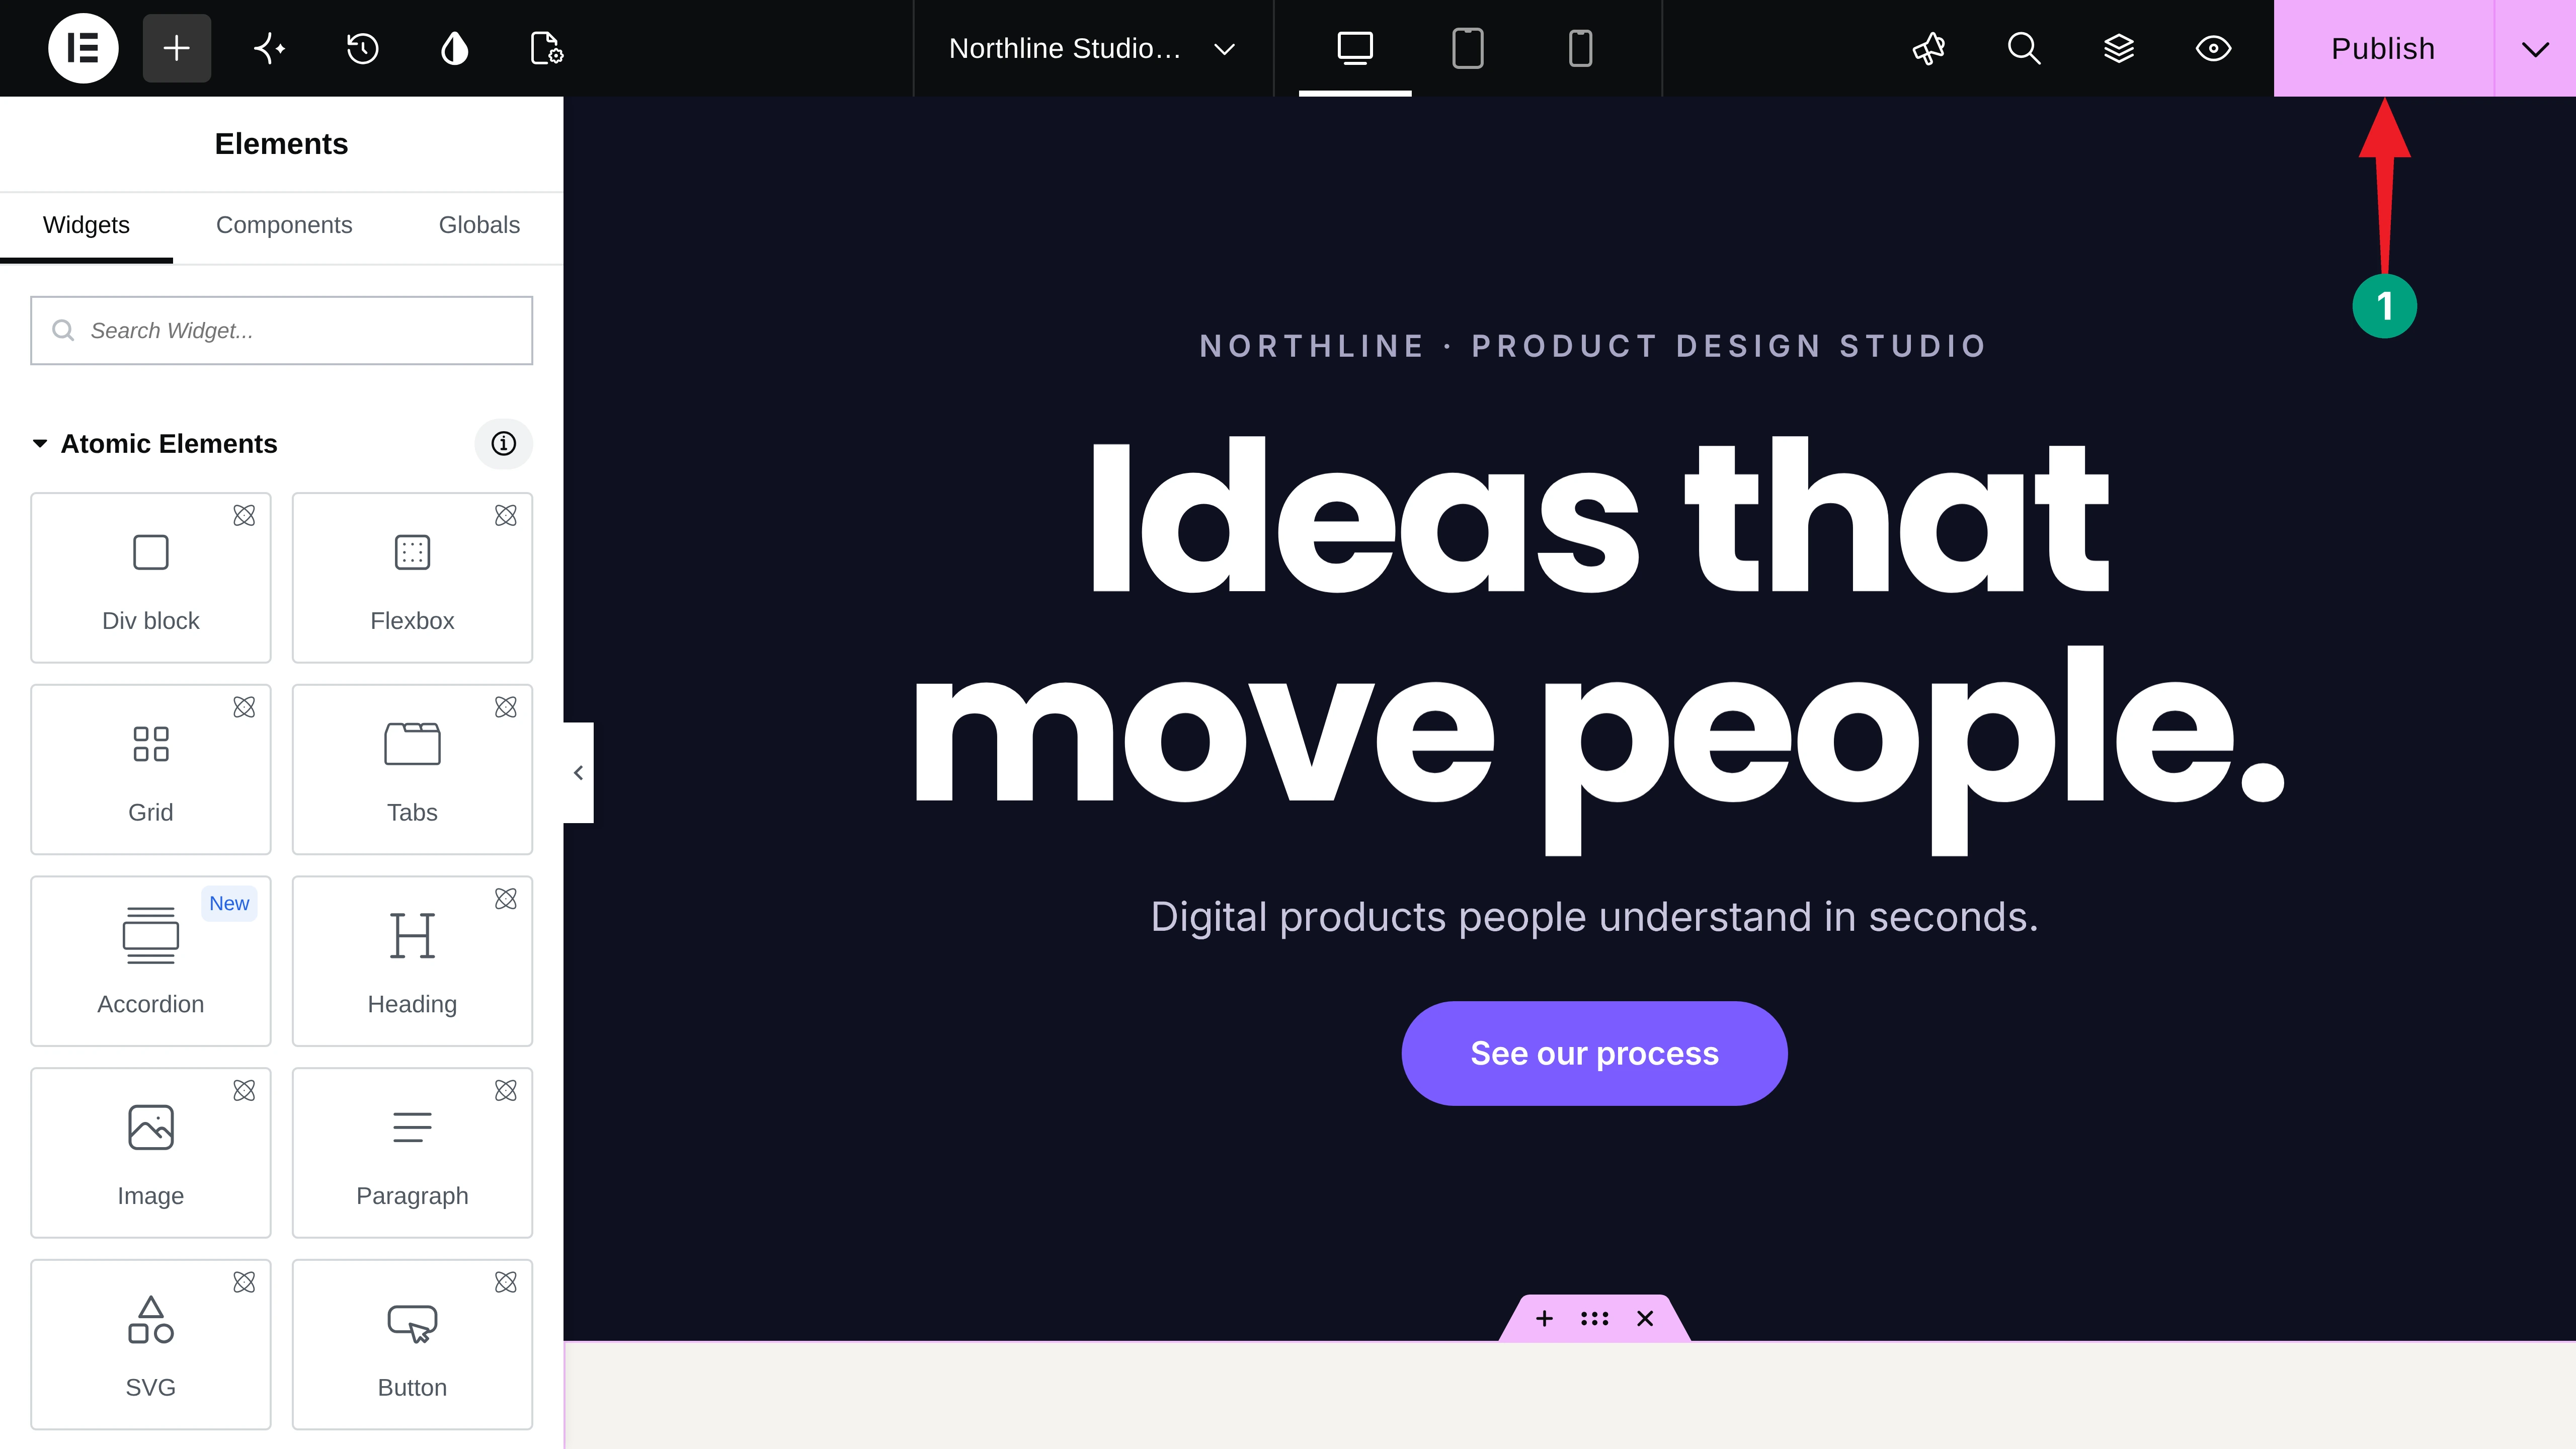
Now open the page and scroll through it. You can see that it’s working fine on our end. Hope it will work well on your end as well.
Thus, you can create text reveal animations in Elementor with GSAP and HappyAddons.
Tips for Better Text Reveal Animations
Good text reveal animations should make your content easier to notice and read. Follow these tips to keep the effects smooth without distracting visitors from your message.
a. Keep Animated Headings Short
Character-based animations work best with short headings that fit on a single line. If you need a two-line hero heading, use two separate Heading widgets and add a longer delay to the second one.
b. Use One Effect per Screen
Give each screen one main text animation to keep the design clean and focused. If multiple headings move at the same time, visitors may find it difficult to know where to look.
c. Keep It Quick
Use a duration of less than one second with a small stagger to create a smooth reveal effect. Avoid long animations, as they can make visitors wait before they can read your content.
d. Check Mobile Before Publishing
Text animations are disabled on mobile devices by default, which helps prevent issues with long headings on small screens. Enable on mobile only for short headings that remain easy to read on smaller devices.
Check how to create SVG morphing animations in Elementor.
FAQ on How to Create Text Reveal Animations in Elementor
In this section, we have answered some frequently asked questions commonly found on Google, online forums, and social media.
Is the HappyAddons Text Animation feature free?
Yes. Text Animation is part of the free HappyAddons plugin, and all nine animation modes are included.
Do I need to write any code?
No. You choose the Animation Mode, timing, and trigger from the Elementor panel, and HappyAddons builds the GSAP animation for you.
Which widgets support Text Animation?
Use the Elementor Heading widget. You can change its HTML Tag to p when you want to animate a short paragraph.
Can I play the animation while scrolling instead of once?
Yes. Set the Trigger Mode to On Scroll to link the animation to the scrollbar. Text Invert always follows the scroll.
Do text reveal animations work on mobile?
They’re off on mobile by default. Turn on Enable On Mobile in the Text Animation section to run them on phones too.
Final Thoughts!
Text reveal animations are one of the easiest ways to make an Elementor site feel alive. Now you know how to create text reveal animations in Elementor with GSAP, from a simple hero reveal to scroll-based highlights and flipping calls to action.
Start with your hero heading, keep the timing short, and add more effects only where they help your message.
If you have any questions, mention them in the comment box below. You can also give a knock on our live chat box. Thanks for being with us till the end.
Before moving away, have a few more minutes to explore the post on how to build advanced Elementor layouts without custom CSS.