Google Analytics lets you track and analyze the user activities of your website. That’s a simple definition of this free web analytic tool from Google. The core reasons for its popularity are these – it comes for free, and you can initiate the traffic analysis of your website. It helps you get detailed insights into your visitors’ behavior and many more.
The tool is superbly compatible with any type of website. The integration process is also simple. If you have a website designed with Elementor Pro, the job is way easier. In this tutorial, we will show you how to add Google Analytics to Elementor. There are two ways, and we will be covering both processes.
How Google Analytics Works with Elementor

Google Analytics works by the inclusion of a block of JavaScript code on pages in your website. When users to your website view a page, this JavaScript code references a JavaScript file which then executes the tracking operation for Analytics.
Google Developers
Maybe you are well aware of that already. Google Analytics works through a website with a javascript tracking code. You need to paste or add this code in the header.php or footer.php file of your Elementor theme. Then, whenever a visitor land on your website, the tracking code activated Elementor theme sends the user’s behavior data to your Google Analytics Dashboard.
Every time a user visits a page, the page takes time to load, and the tracking code marks these activities from the header or footer of your website theme. Yes, that simple it is. Well, let’s get to the “how-to” part below.
Adding Google Analytics in Elementor Without a Plugin

The easiest way to add Google Analytics in Elementor is to do the job with a plugin. There are lots of plugins you can find in the WordPress Repository. Most of them are free, and the advanced version costs you money. However, let us show you the best process that doesn’t need any plugins.
You will need one thing first. The Google Analytics tracking code for your website. Hence, if you already have a Google Analytics account, you are all set to go further.
Getting Your Google Analytics Tracing ID
We presume that you haven’t added your Elementor website to the GA account. If so, here’s what we need to do –
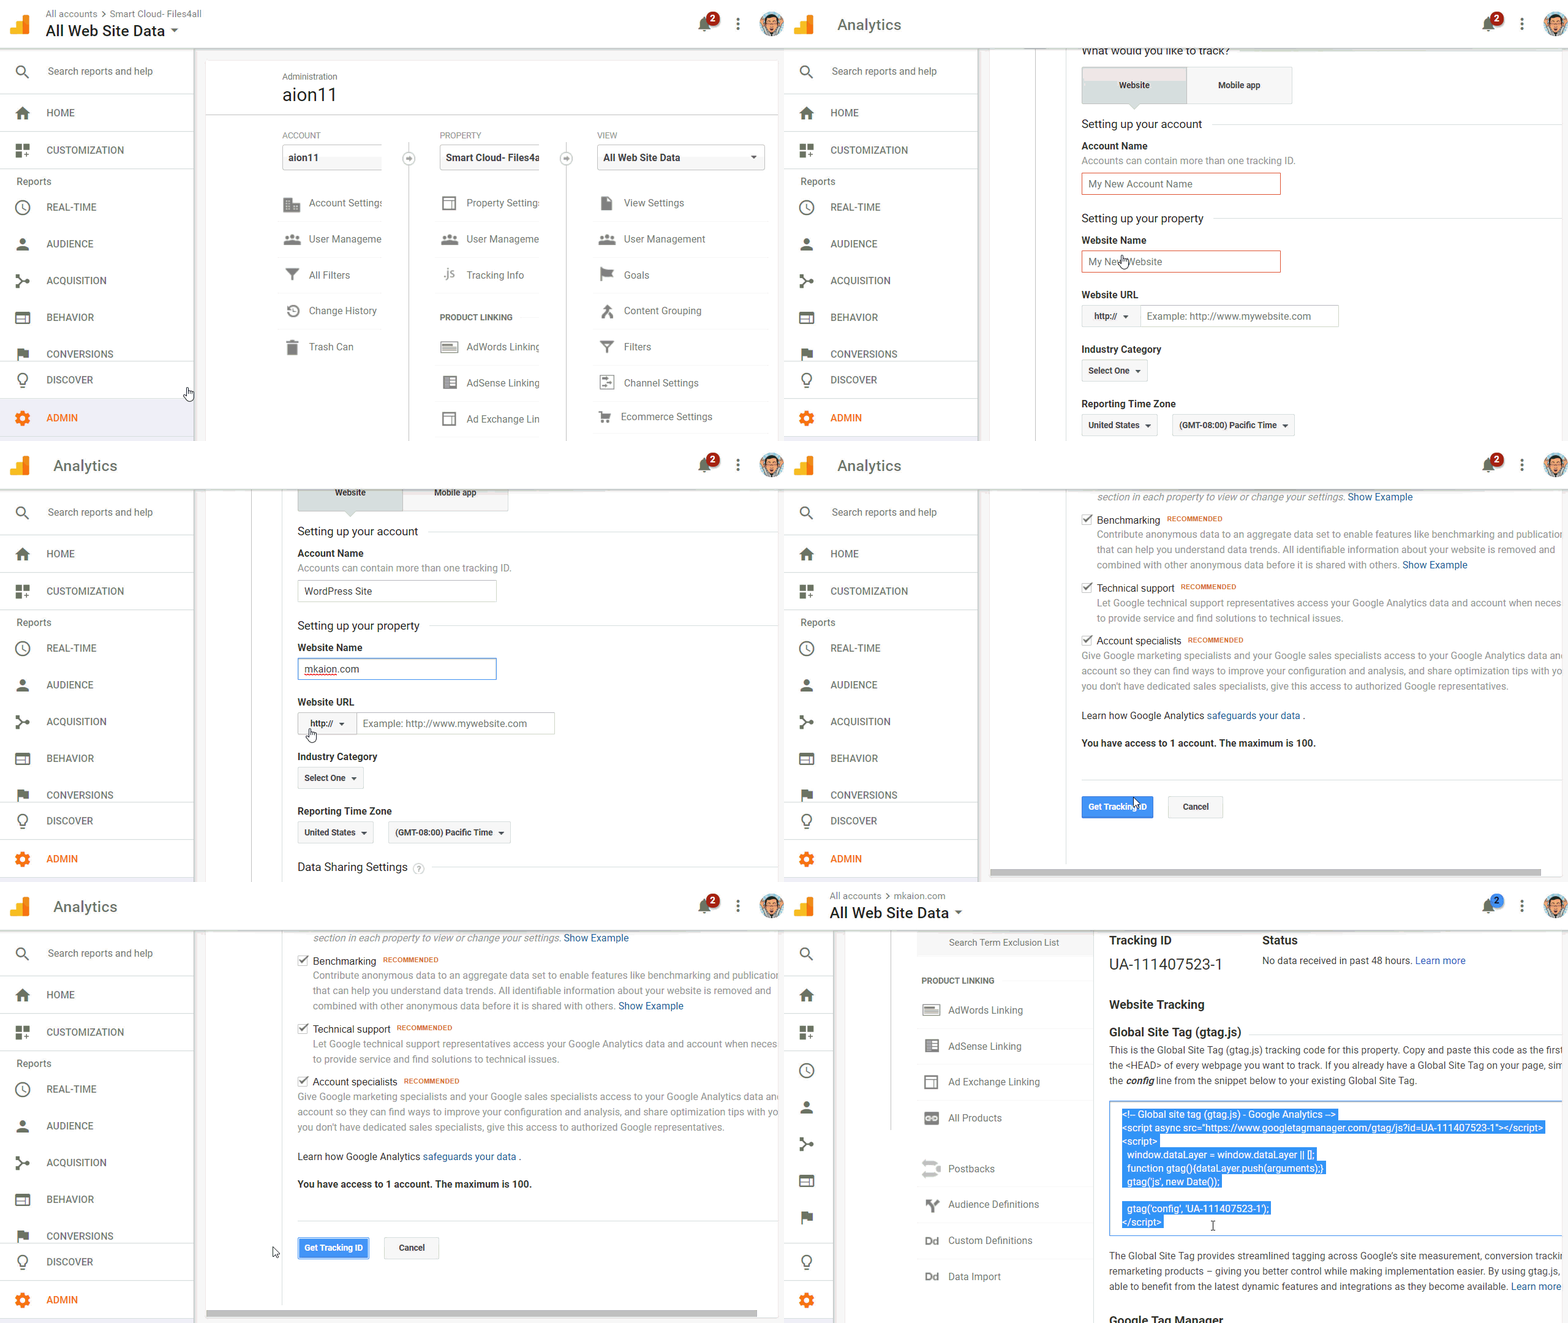
- Login to your Google Analytic page
- Click on the admin tab. Find the settings option, go there
- Click on the account name. Now, create a new account
- Enter all the necessary information
- Hit the “Get Tracking ID”
After you have agreed to the terms and conditions, you will get a script that contains your GA tracking code. Now copy the tracking code in a notepad if you like. You will be pasting this code to your Elementor theme’s header.php or footer.php file.

Add the GA Tracking ID into Your Elementor Theme’s Header or Footer
Well, let it be clear in the first place. You can add Google Analytics to your WordPress site if your current theme supports it. As most of the WordPress themes are highly customizable and open-source, it’s not a big deal.
If you have designed your website with the Elementor free plugin, you will find the HTML editor at the left flank of the widget panel. But the free version won’t let you edit all the things like the header and footer of a theme, you can only customize some part of your current theme with it.
So, when we are talking about adding Google Analytics in Elementor, it’s Elementor Pro nonetheless. Because only Elementor Pro let you use it’s huge free and premium template collections. Also, you can use the formidable feature “Theme Builder”.
So, if you already built your website with a theme builder, do the following –
Step 1: Insert the GA Tracking ID
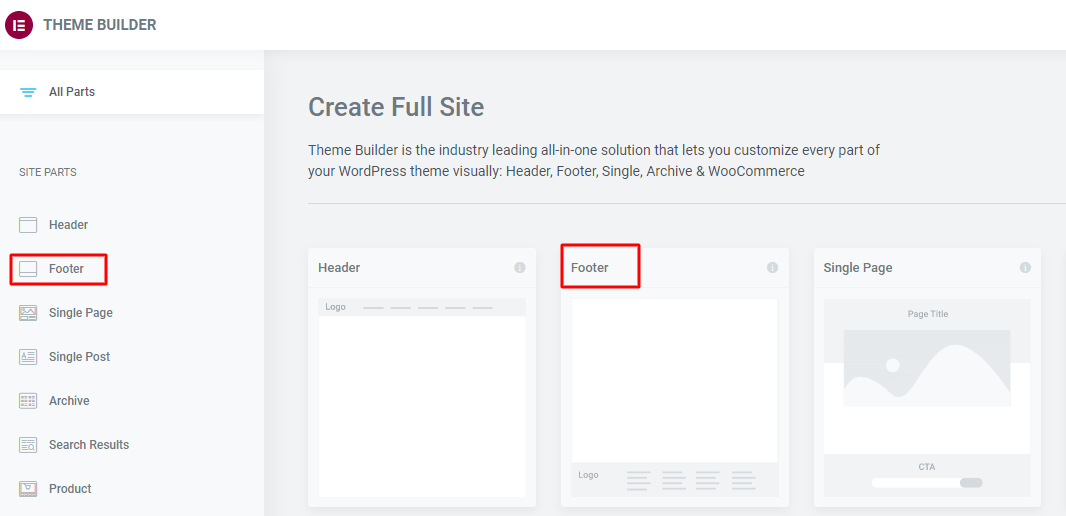
From your WordPress dashboard, hoover over Templates, and hit the Theme Builder option.

On the next page, you will find the different parts of your customized theme. Here we will add the GA tracking ID to your footer.php file. So, choose the Footer of your custom-built Elementor theme.

Step 2: Design the Page inside Elementor
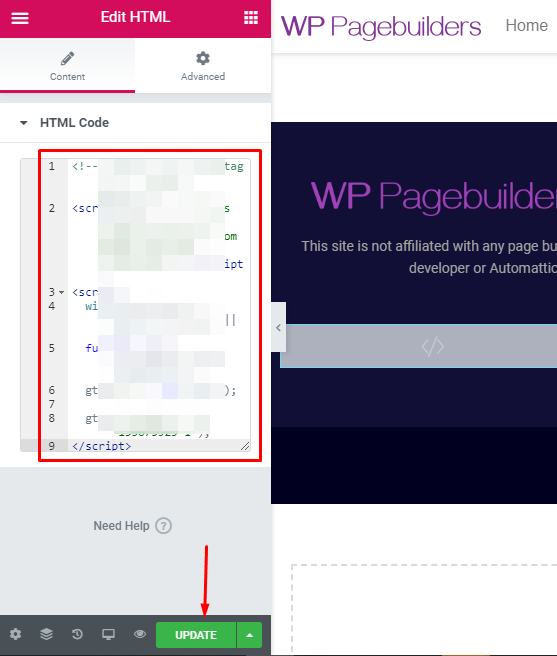
Now, the footer of your page will be open in the Elementor canvas. Find the Elementor HTML widget from the sidebar. Drag it and place it anywhere on the footer. Do the same as in the image below.

After you place the widget on your footer, you will see the HTML code field on the sidebar. This is literally a part of your footer.php file.
Paste the Google Analytics tracking code in this box, and hit the update button.

Ta-daa! You are done with adding Google Analytics in Elementor.
Using a WordPress Plugin to add Google Analytics in Elementor
Here comes the process that doesn’t need any coding from your site. You will find a lot of plugins in WordPress marketplace. Just install one of them on your site, add your GA tracking code in the specific area, and the plugin will do the rest. For example, it will collect all the data, generate reports, and give you suggestions and guidance for improvement.
According to Elementor, some of the top Google Analytics plugins are –
- MonsterInsight GA Dashboard
- Google Analytics Tag Manager
- GA Google Analytics
Well, to learn the detailed process of installing a WordPress plugin, check out our tutorial on how to install Happy Elementor Widgets in WordPress.
Closing Up
One last thing we want to mention. If you have activated Google Analytics in your WordPress site earlier, that would be well suited until you move to Elementor Theme Builder.
When you customize your theme with theme builder, the earlier GA activation won’t work. You need to add the tracking ID again with the header or footer of the newly customized theme of your website.
So, that’s all for right now. Have you found what you are looking for in this tutorial? Let us know in the comments section.


3 Responses
When someone writes an article he/she maintains the plan of a user in his/her brain that how a user can understand it.
Thus that’s why this piece of writing is great. Thanks!
thanks
You are welcome. Join our newsletter to get more valuable content from us.