Having a blog section on your website isn’t just for content sharing but also for building trust and sharing your guides and messages with audiences. Quality blog posts not only bring you traffic but also position your site on top with great authority in a particular niche.
But remember one thing — great content needs great design. Otherwise, you will fail to hook users’ eyes and keep them reading your content until they need it. This is why you must create a visually appealing blog post template that ensures consistency and readability.
Elementor is a no-code tool for designing websites. In this article, we’ll cover a step-by-step guide with necessary screenshots to show you how to create a blog post template in Elementor without any cost. So, let’s get into this post without further delay.
Difference Between Blog Page and Blog Post
A blog page is a static page including all the blog posts that have already been published. Posts are published on the blog page in chronological order, whether alphabetically or by date. The blog page usually shows the newest posts on top with an excerpt. It doesn’t include the author’s box, social sharing buttons, and comment area.
A blog post is an individual article covering a detailed analysis of a particular topic. It also includes several other elements like the table of content, author’s detail, social sharing buttons, call-to-actions, comment area, tag, related post, FAQ, subscription form, etc.
How to Create a Blog Post Template in Elementor Free
To create a custom blog post template with Elementor, you must have access to its Theme Builder. But the feature isn’t free. You must upgrade to the premium version to gain access to the feature. However, you can still use this feature for free just by installing another plugin named HappyAddons.
HappyAddons is actually an Elementor addon. It comes with dozens of additional features and widgets to power up your Elementor site. HappyAddons also have a free and premium version. The free version includes a theme builder by which you can create custom blog post templates.
Download and install the plugins on your website using the link below.
Once activated on your site, jump into the steps below.
Step 01: Open a Single Template from HappyAddons Theme Builder
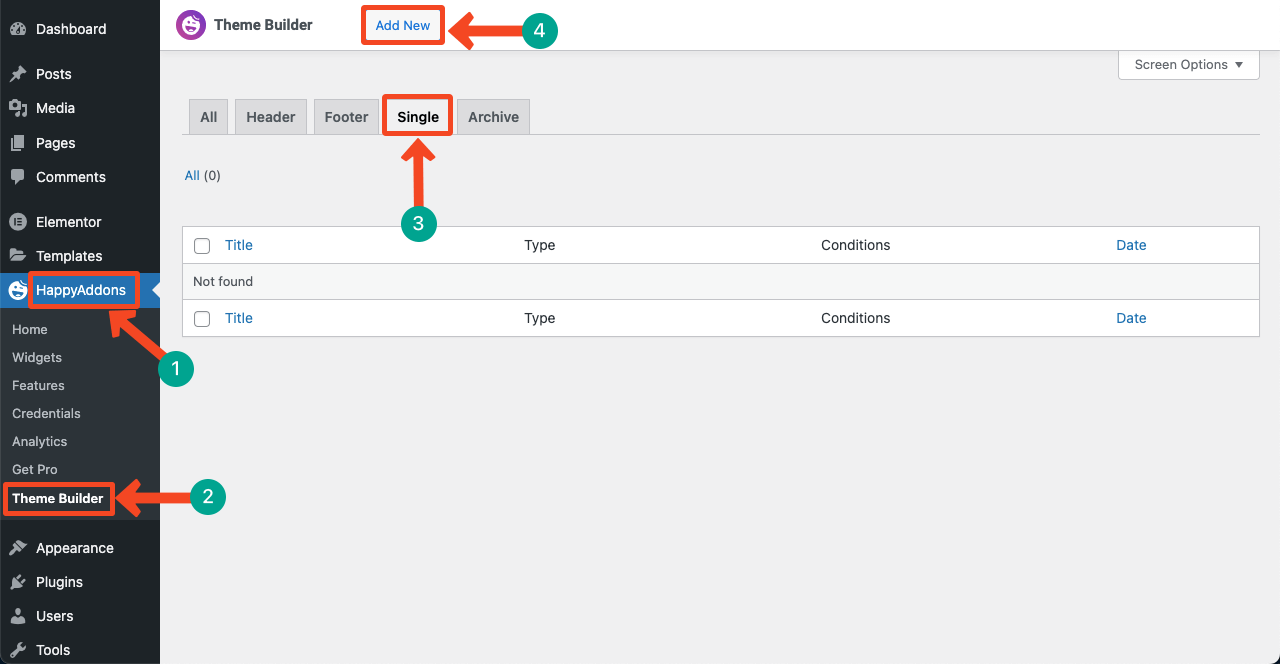
Navigate to HappyAddons > Theme Builder. Select the Single tab. Click the Add New button.
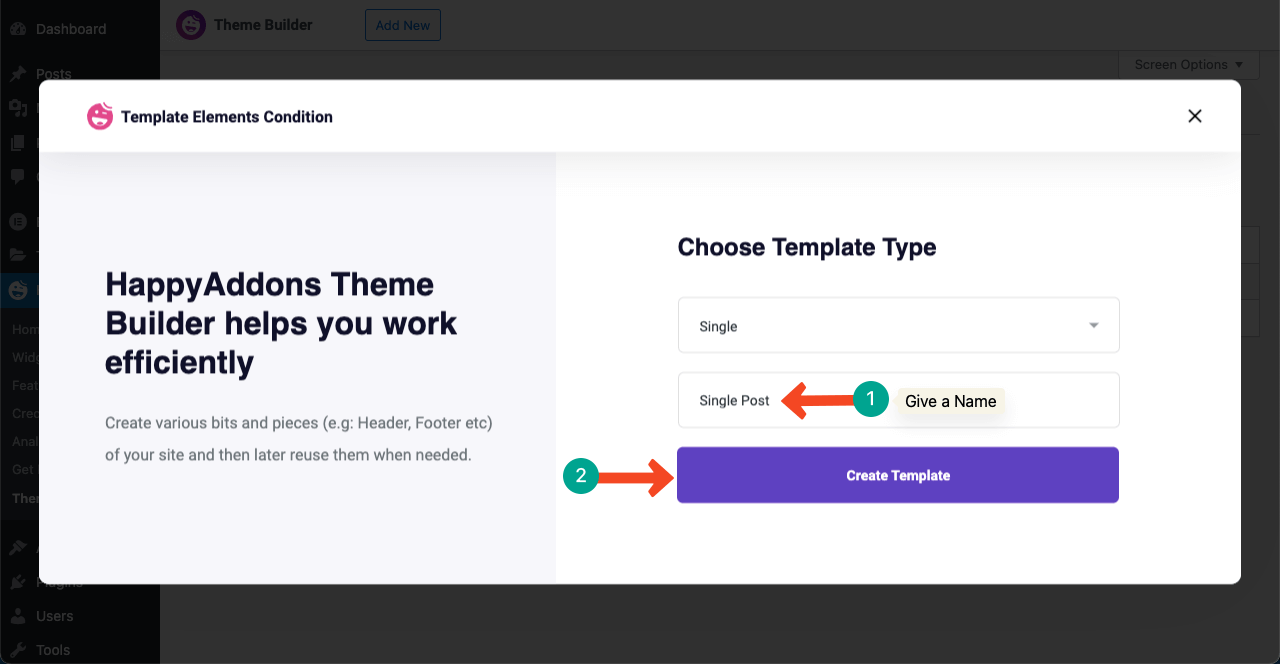
A pop-up will open. Give a name to the template. Press the Create Template button.
Step 02: Add Elements by Drag and Drop
Elements on a website usually vary based on the web design and content style. But any blog post has some must-have elements, regardless of their type. They are title, featured image, content body, author name, published date, author box, social share buttons, comment box, etc.
We recommend you create a wireframe. It will help you have an idea of which elements to include in your blog post template. We’ll now add them to the post one by one.
# Add Post Featured Image
Create a content area by clicking the plus (+) icon. Select the number of column that goes with your wireframe.
We have selected three columns for the tutorial.
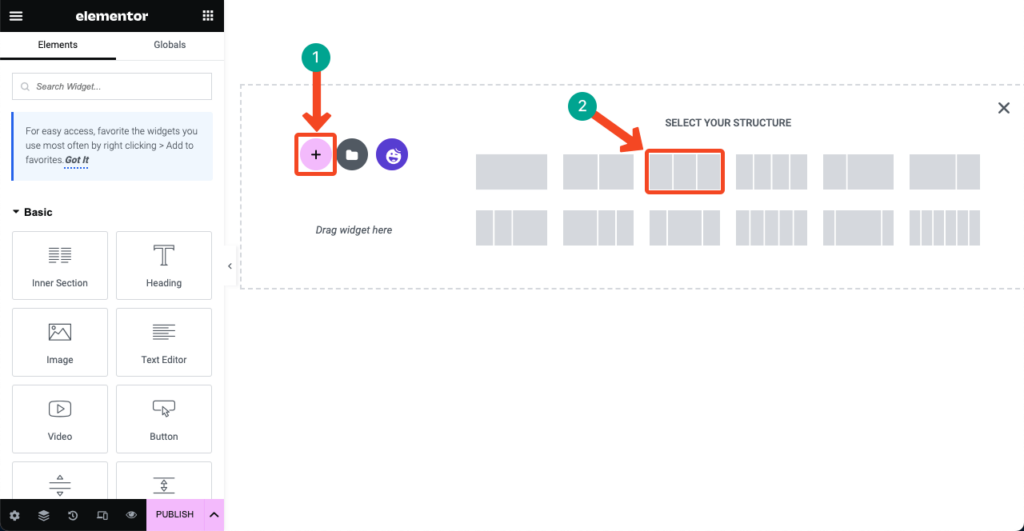
You can customize the size and width of the columns. We’ve made the middle column larger and the other two narrower.
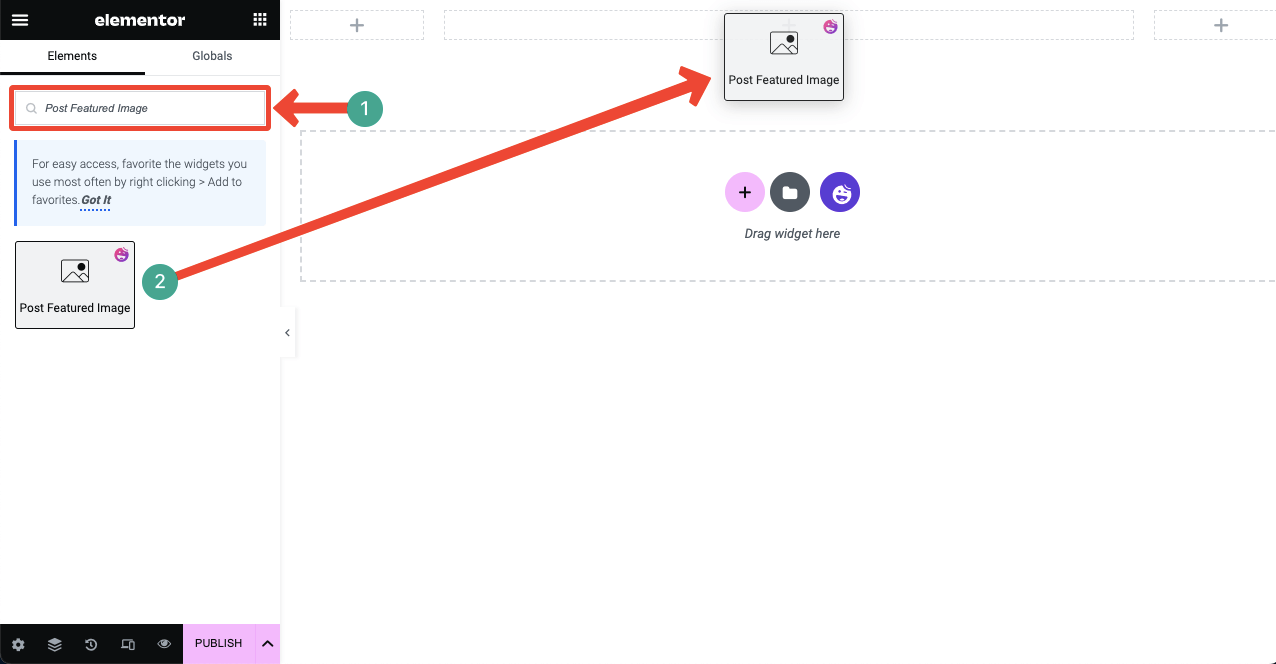
Type Post Featured Image in the search box. Drag and drop it into the content area.
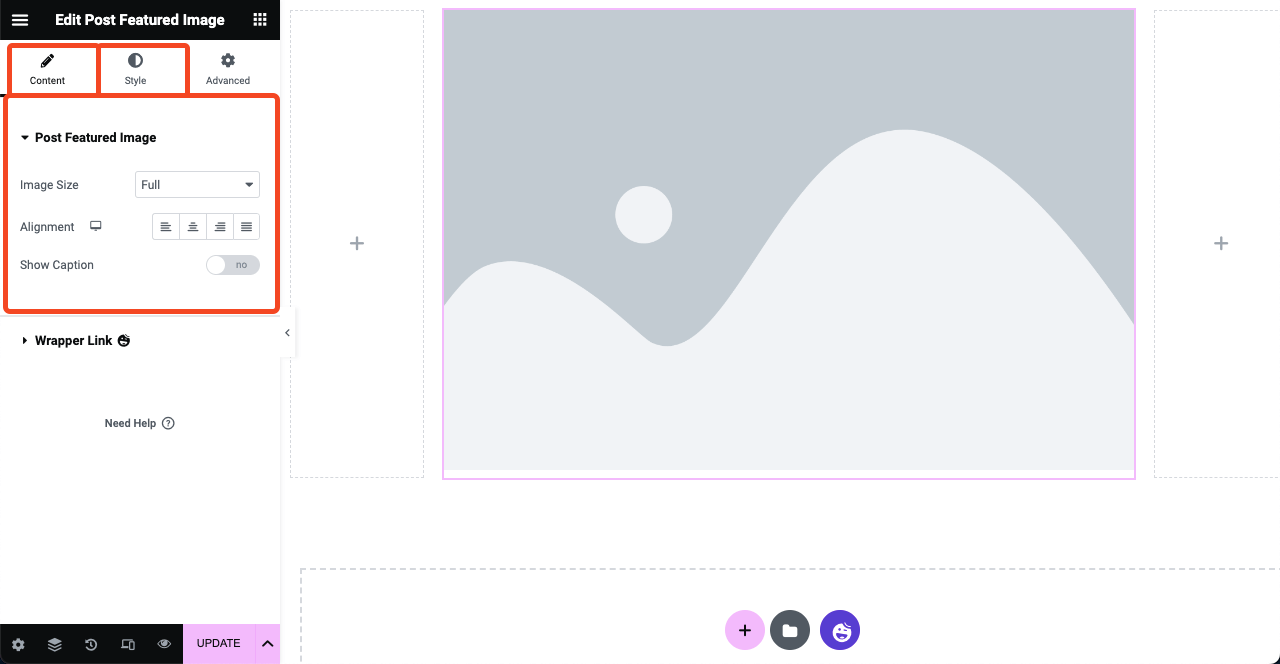
You can customize the featured image from the Content and Style tabs of the Elementor panel. You may modify its size, alignment, margin, padding, border type, etc.
Note: You’ll see just an image section without any content. No worries! You are just creating a layout. Once you publish the template, the layout will be applied to all blog posts. And you will see the changes on the frontend of your published blog posts.
# Add Post Title
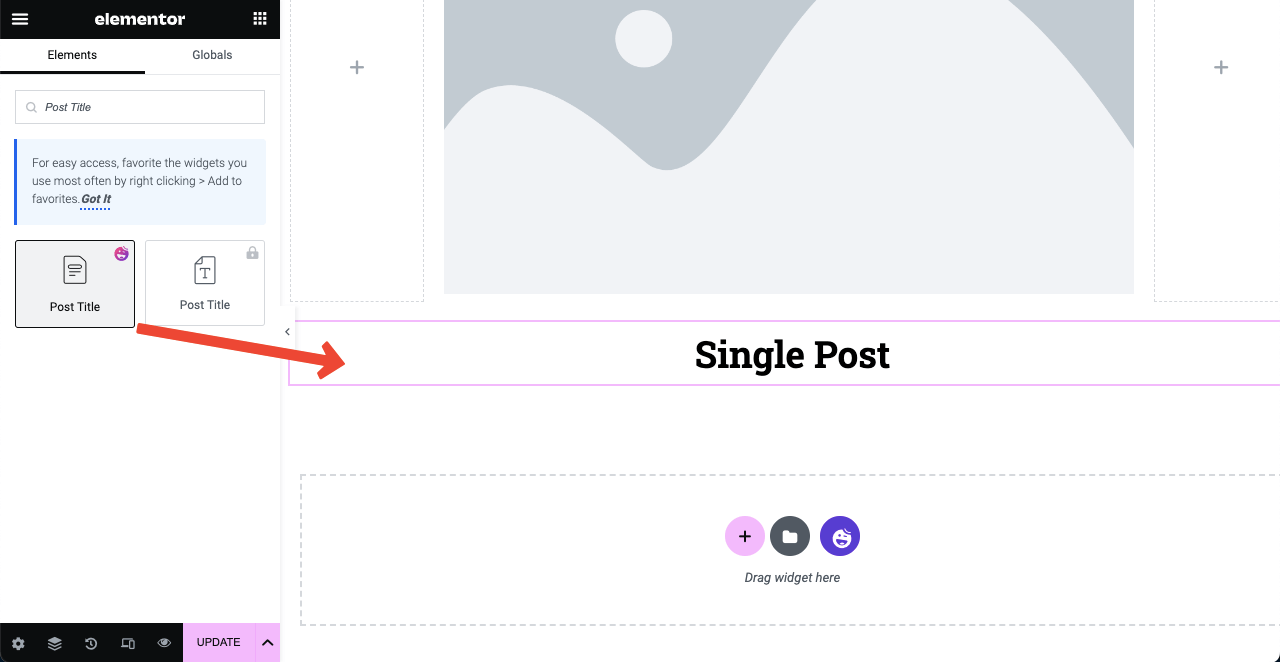
Drag and drop the Post Title widget below the featured image. But if you want, you can place the title above the feature image section.
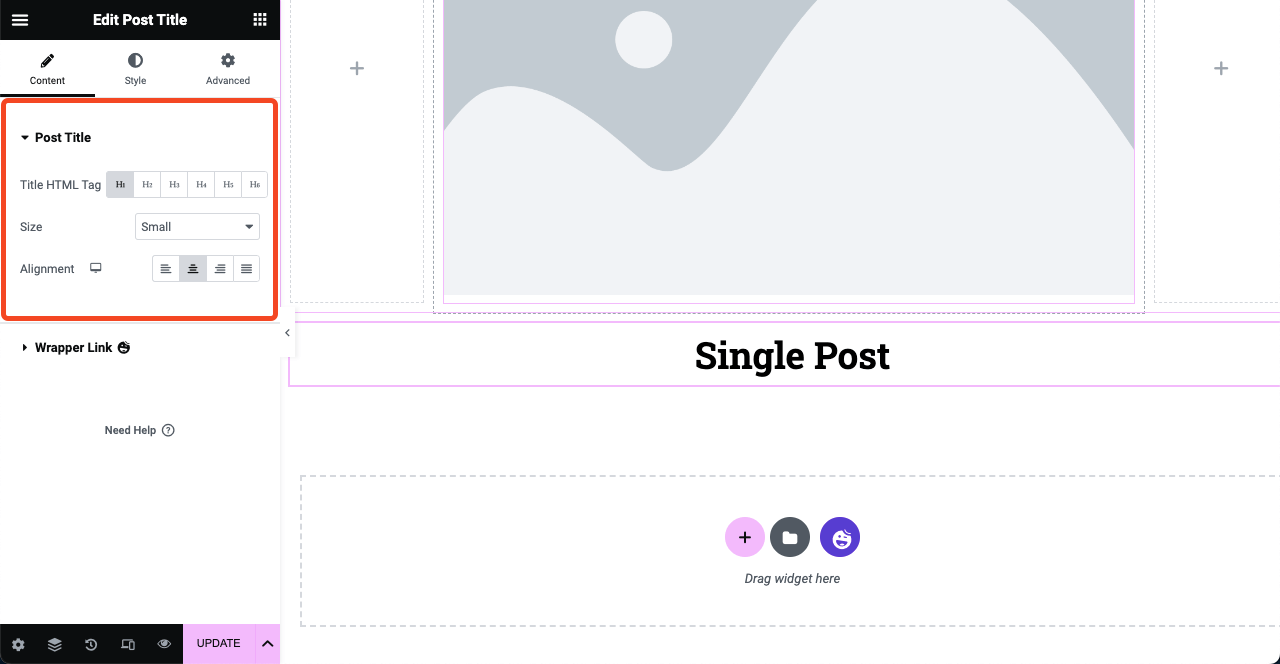
Next, customize and stylize the post title from the Elementor panel. Make sure to set H1 for the blog post title.
# Add Post Info
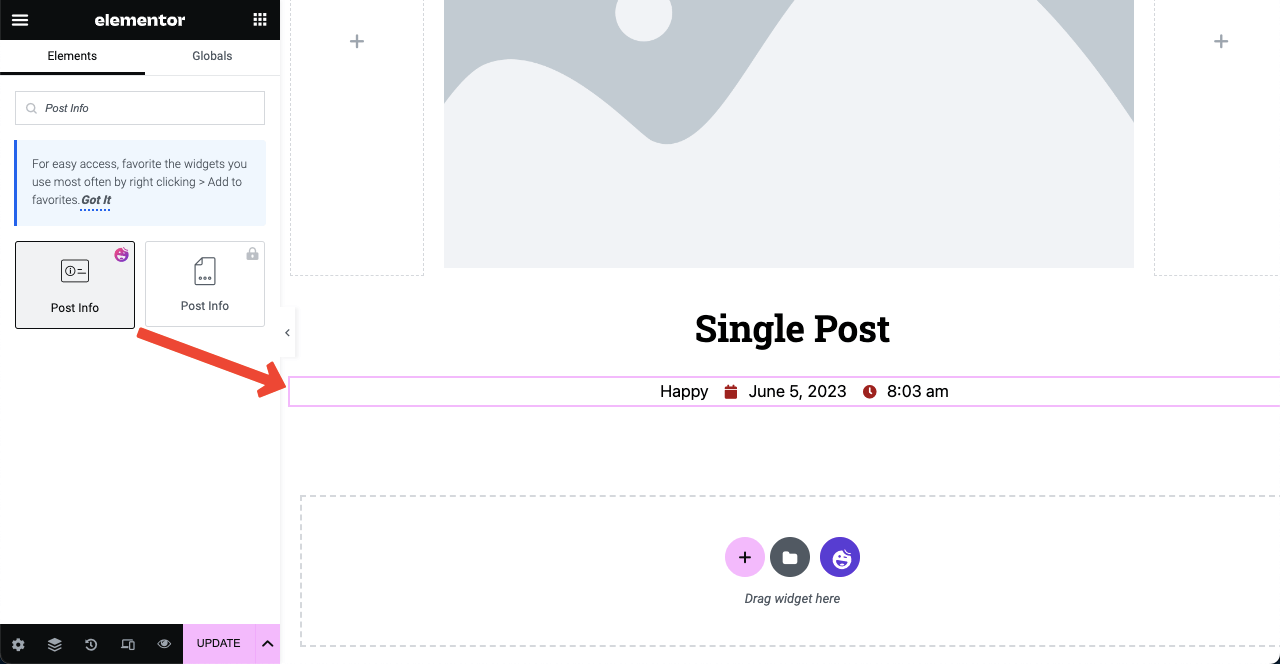
The Post Info widget will allow you to show the author name, post publishing time, date, comment, and more options.
Type the widget name in the Elementor search box. Once it appears below, drag and drop it below the title section.
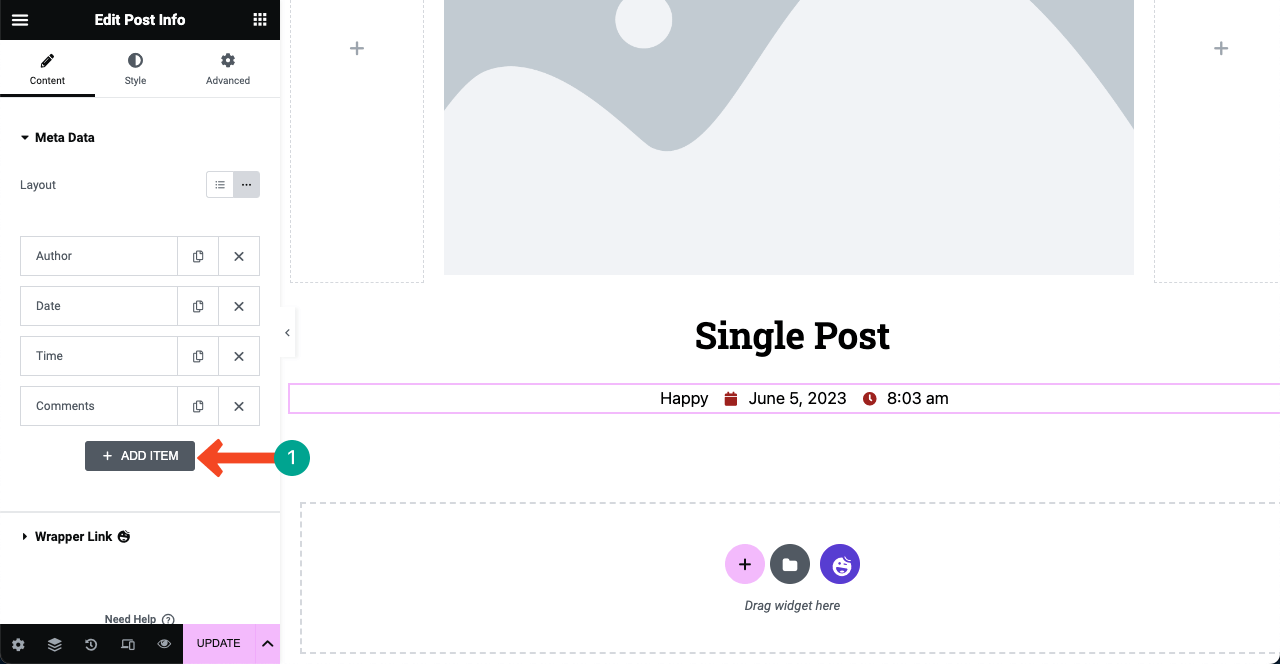
You can add more options to the section by clicking the ADD ITEM button. Go to the Style tab afterward to stylize the content.
Note: The Comment element will only appear if your blog post has received any comments.
# Add Post Content
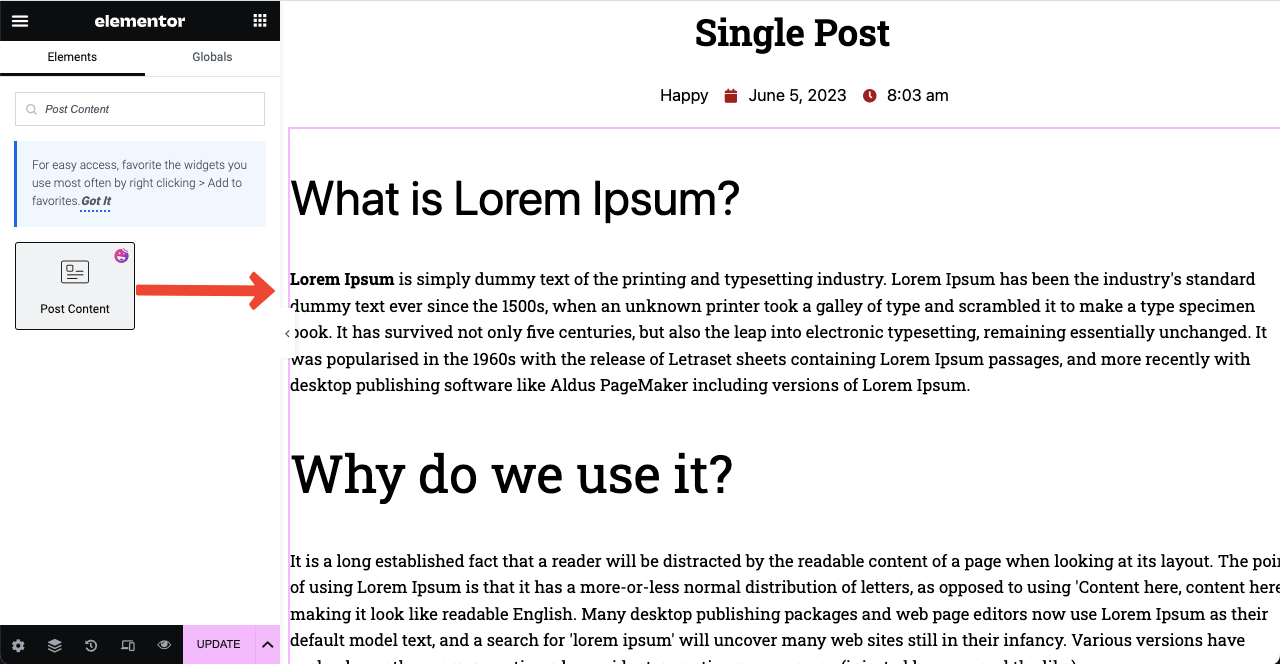
The Post Content widget covers the main content body. It allows you to include text, images, GIFs, and videos in the post.
Drag and drop the widget in a suitable position and customize it the same way.
# Add Contact Form
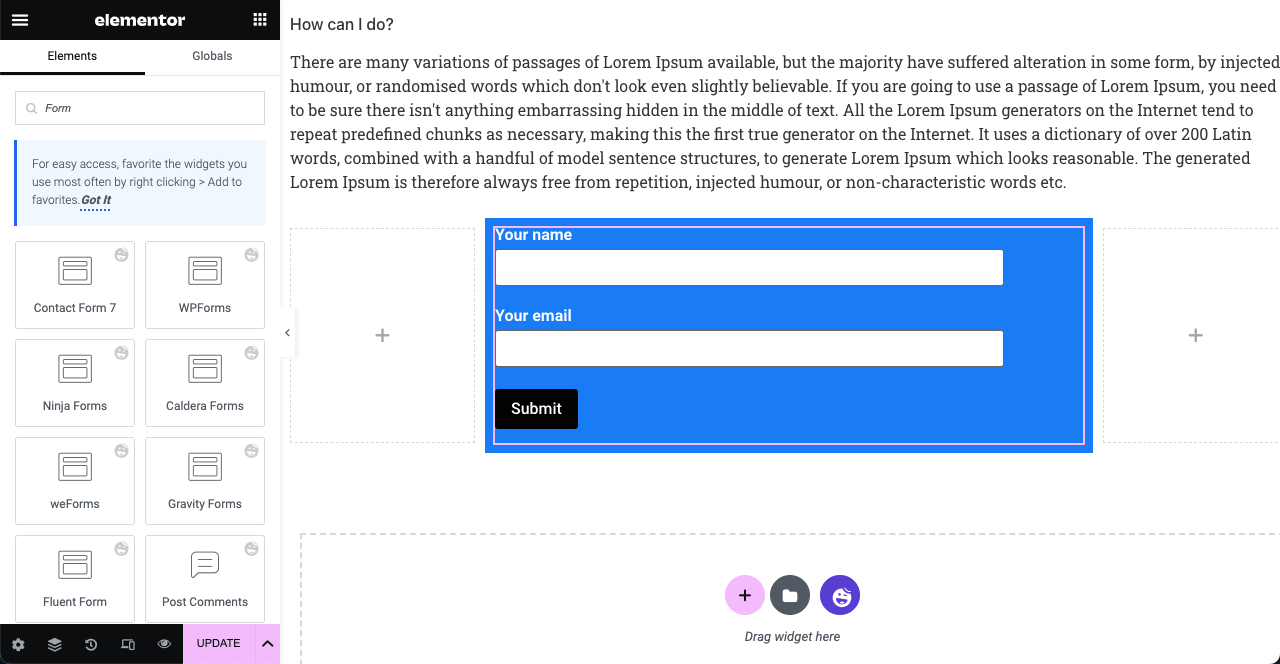
HappyAddons integrates the most popular contact forms. Just type the word ‘Form‘ in the search box, and all the popular form widgets will appear below.
Hopefully, you’ll find the widget of your contact form plugin in the list. Drag and drop it on your canvas.
Note: For example, if you use weForms in the backend, drag and drop the same widget on your canvas.
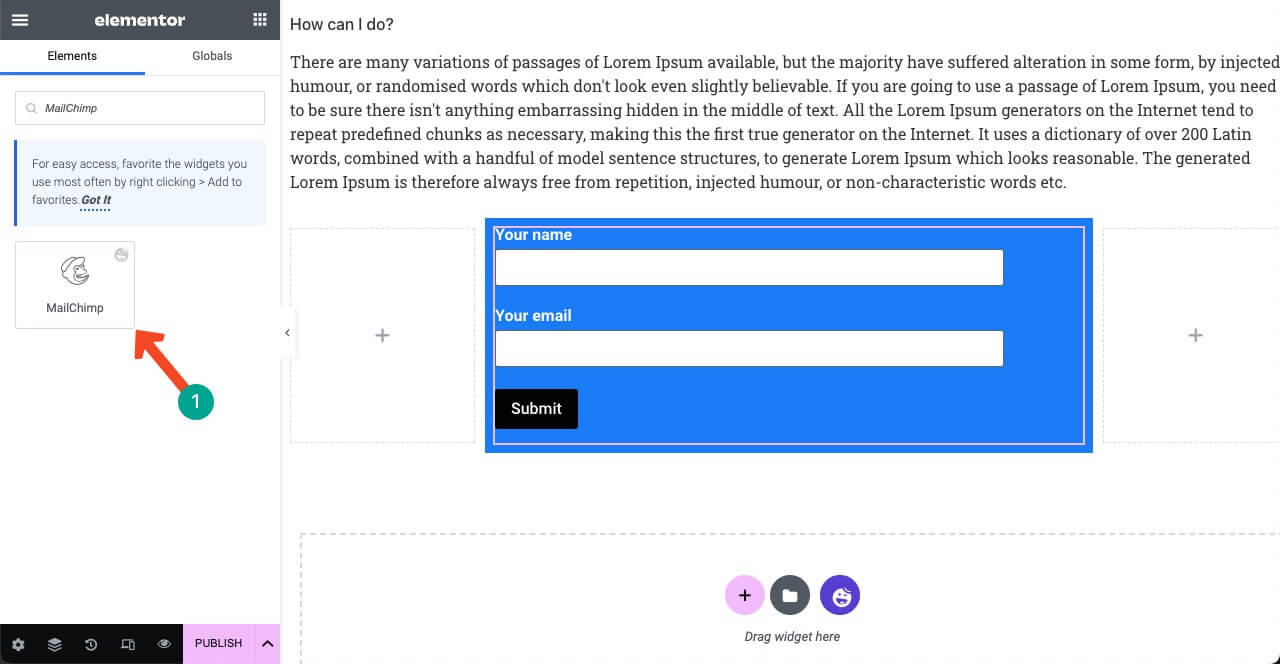
MailChimp is considered a great platform for growing a subscriber list. This is a popular email marketing service provider as well. The good news is that HappyAddons have a MailChimp widget. You can also use this widget instead of the contact form plugin if you want to grow your subscriber list.
Check this guide to learn how to embed the MailChimp form on your website using HappyAddons.
# Add Social Share Icons
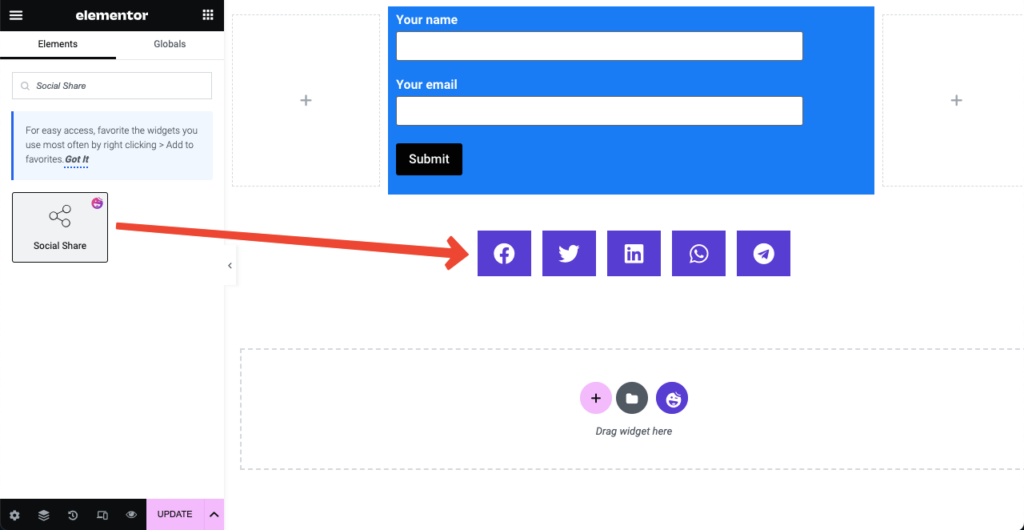
The Social Share widget will enable users to share the blog post to their social profiles. This can be a great way to boost engagement with readers and visitors.
Type Social Share in the Elementor search box. Drag and drop it below the subscription form.
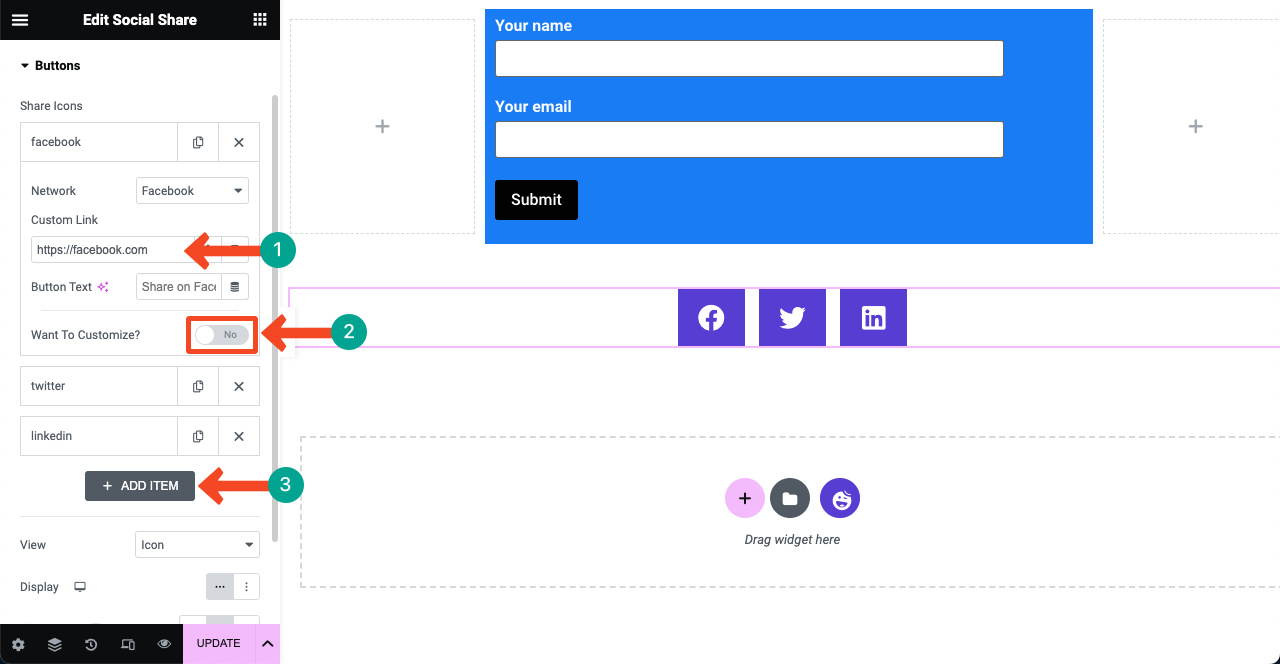
Press on any social tab. You’ll get options to paste your social links and customize them.
Do the same with other tabs one by one. Click on ADD ITEM to add more social share icons on the page.
# Add Author Box
People today love to know about authors while reading a post. The Author Meta widget will allow you to create an author section on the post template.
You can showcase the author’s name, avatar, short bio, and written posts. Add the widget below the social share icons.
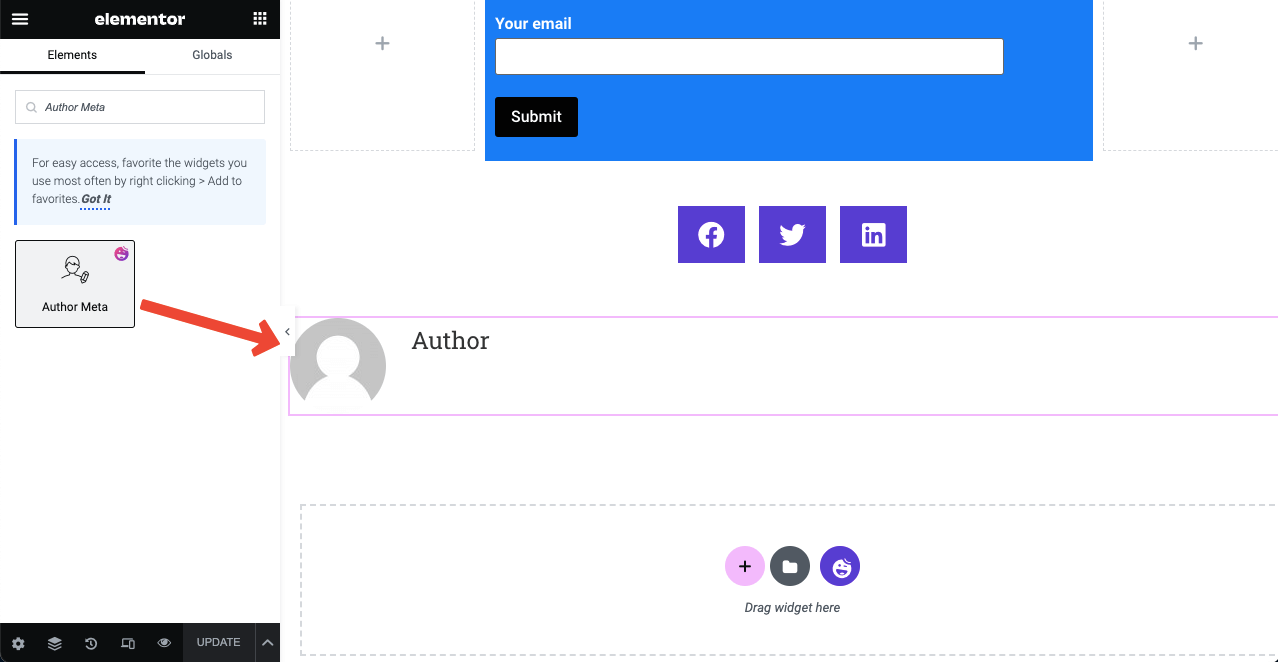
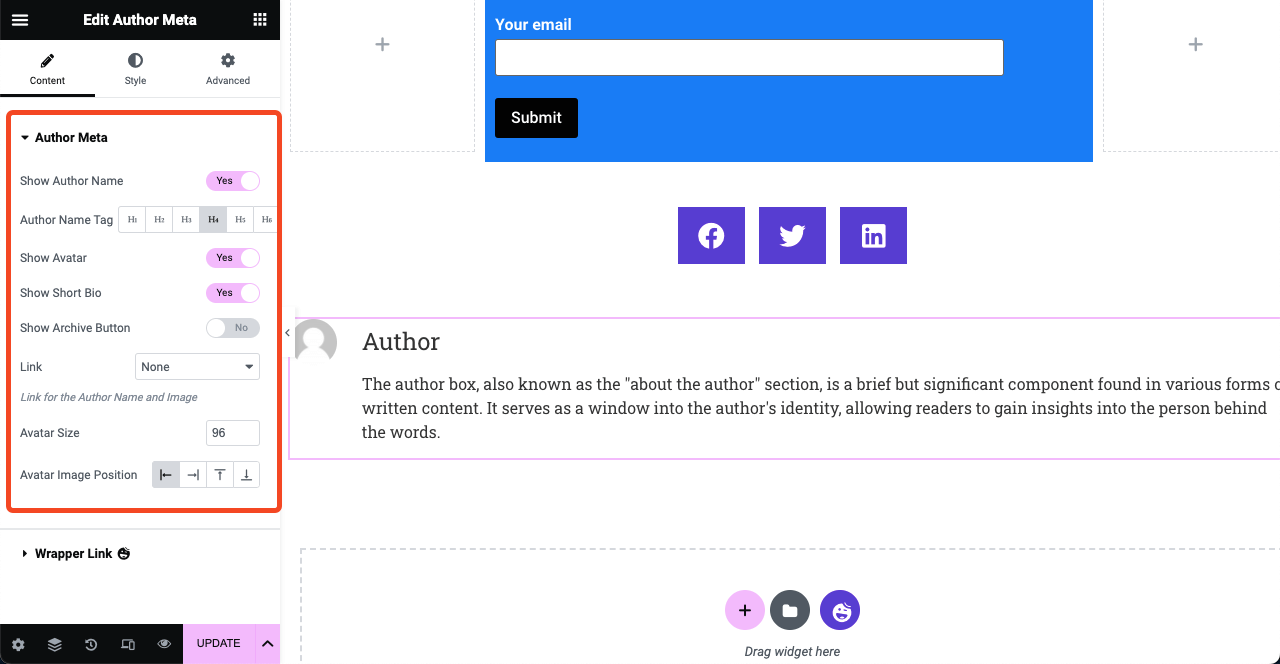
Expand the Author Meta section on the content tab. You can decide to showcase the author’s name, tags, avatar, and more.
You can also change the image position, avatar size, and stylize other things.
# Add Post Comment Box
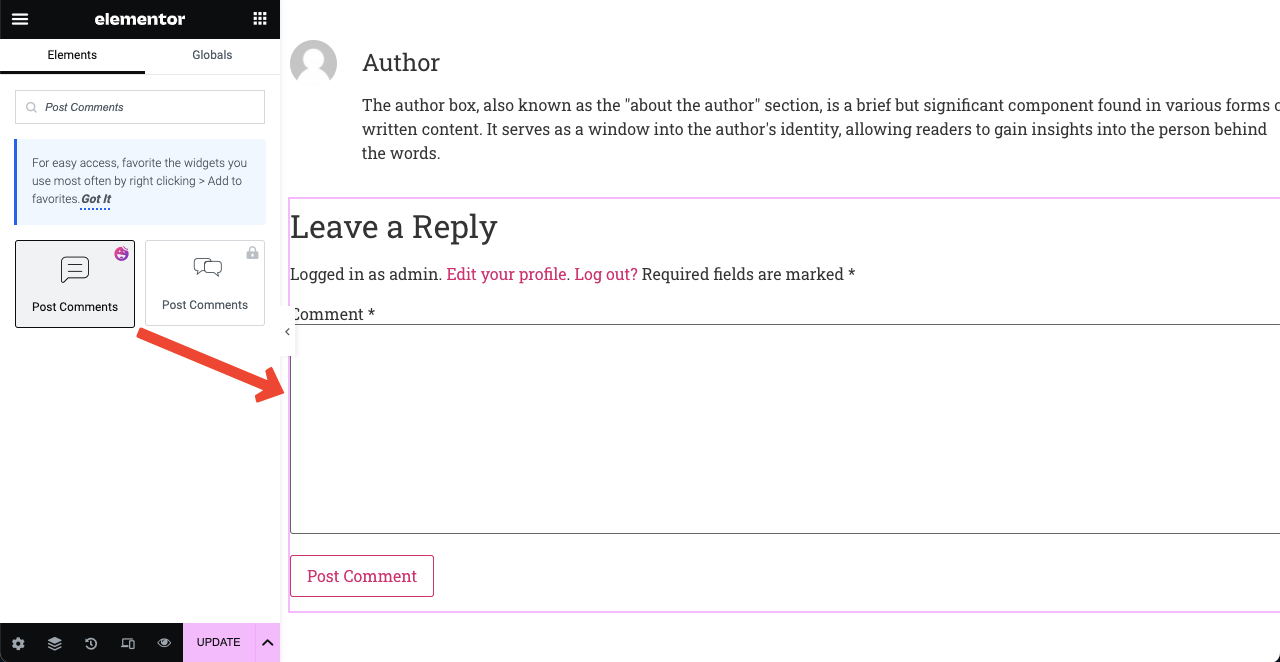
The comment section lets visitors submit their opinions regarding the blog post. Drag and drop the Post Comments widget at the end of the post template.
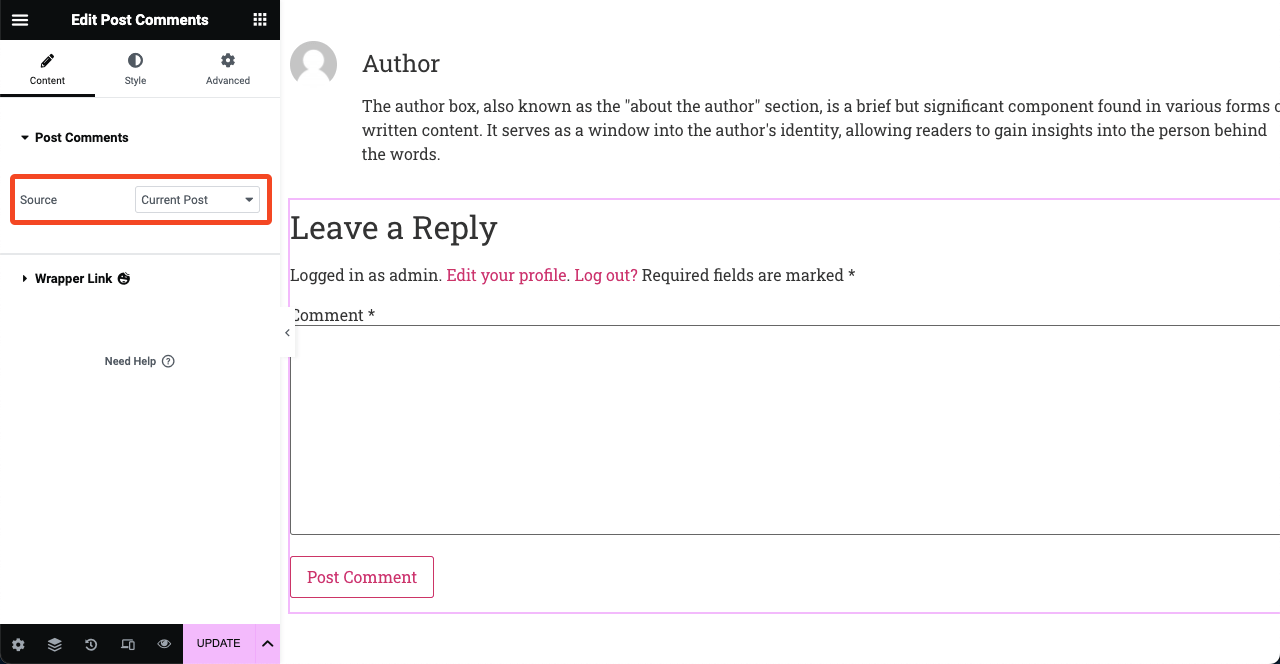
You may display the comment section on all posts or on selective ones. Go to the Source option and click the dropdown icon next to it.
The dropdown list includes two options: Current Post and Custom. Choosing the Custom option will let you display this comment box on selected posts.
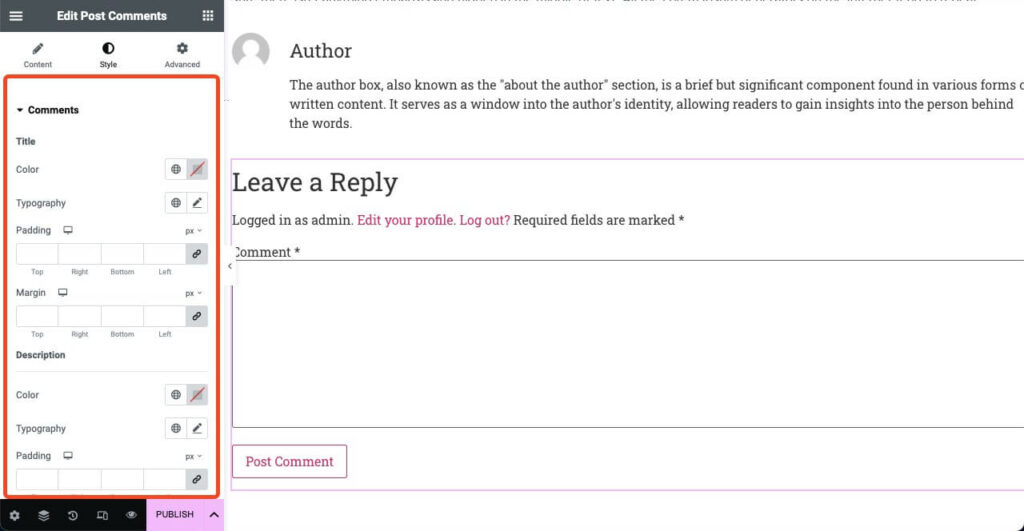
Post Comment of HappyAddons is a unique widget. Because it allows you to stylize the post-comment layout.
But this stylization option isn’t available in Elementor. So, with HappyAddons, you can enjoy more flexibility in customization.
# Display Related Posts
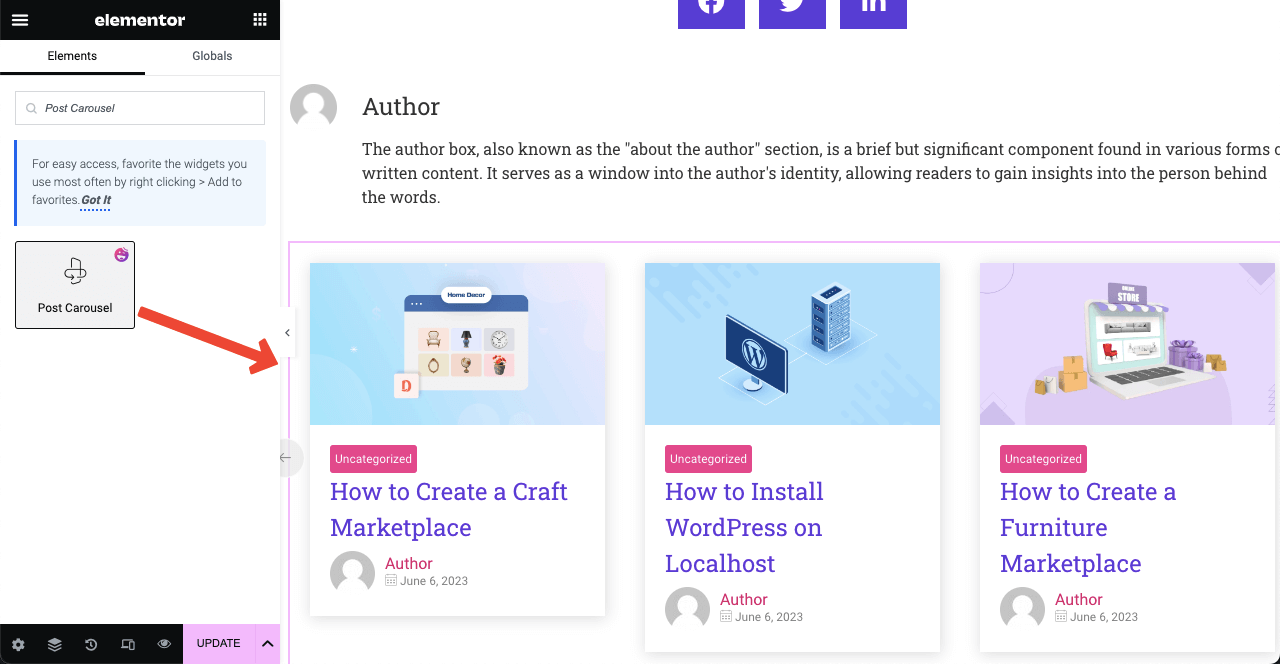
The related post section suggests other content and articles relevant to the current blog post. They are usually selected based on tags, keywords, and categories. You can use the Post Carousal widget to create this section. But for that, you need access to the HappyAddons’ Premium.
Once the premium plugin is installed, the Post Carousel widget will be unlocked. Drag and drop it on the Elementor canvas. Then, customize it from the content and style tab.
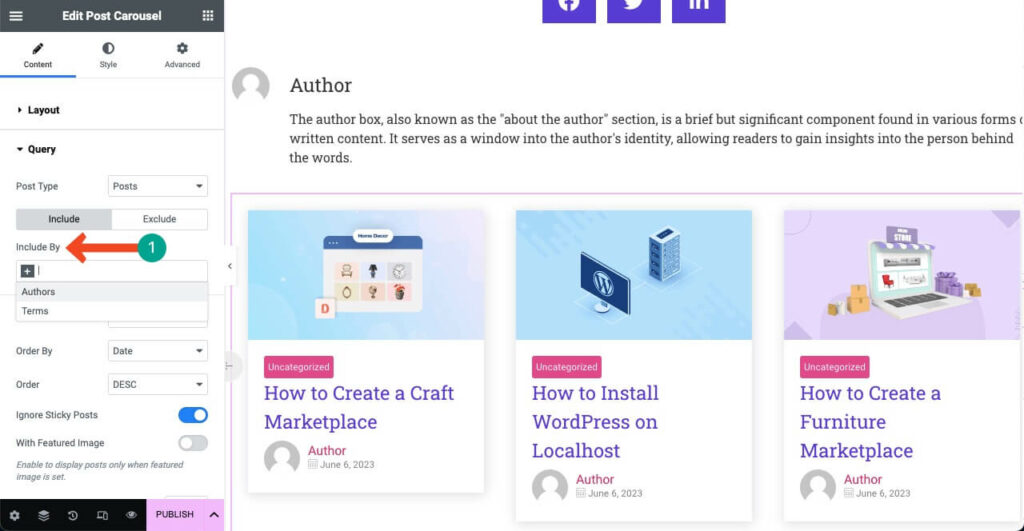
Go to Content > Query. Specify Authors, Terms, or Tags. Accordingly, relevant posts will be displayed on each blog post.
Step 03: Make The Template Mobile Responsive
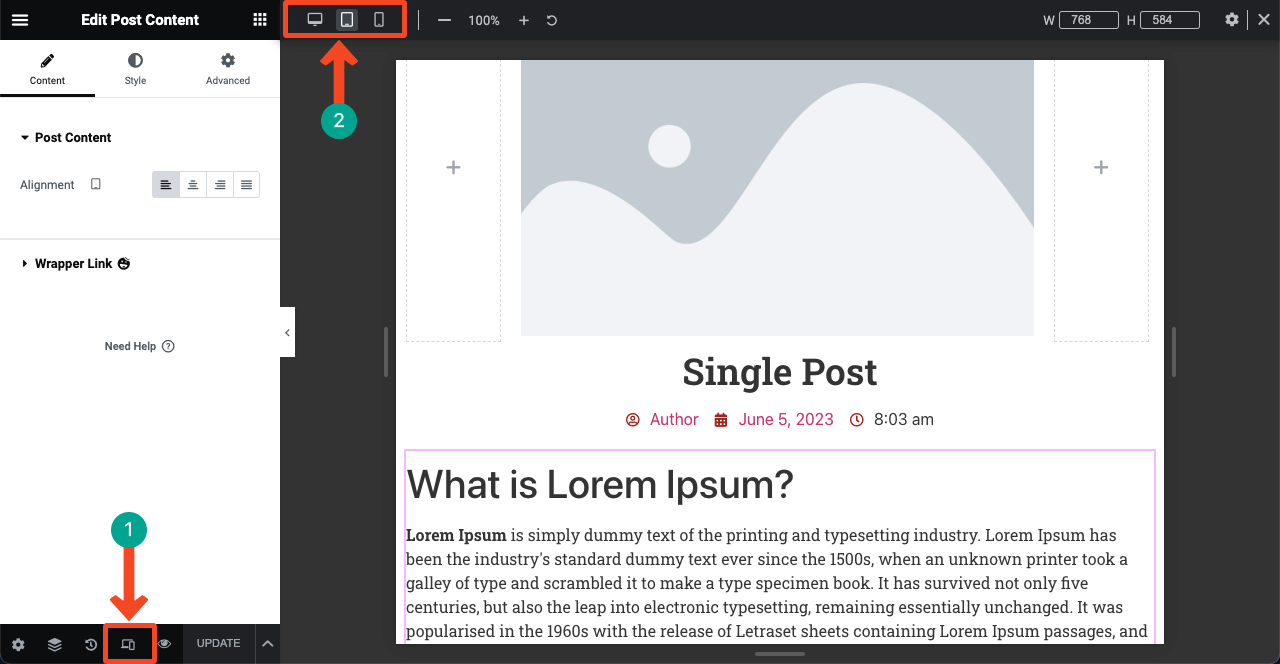
Over 50% of all web traffic today comes from mobile devices. So, once you have done adding the necessary elements to the canvas, you must check if they are perfectly aligned on other devices.
Click the Responsive Mode icon at the bottom of the Elementor panel. You’ll see the different device modes appear on top. Switching between them, you can check if the widgets are aligned perfectly.
Step 04: Publish the Post Template
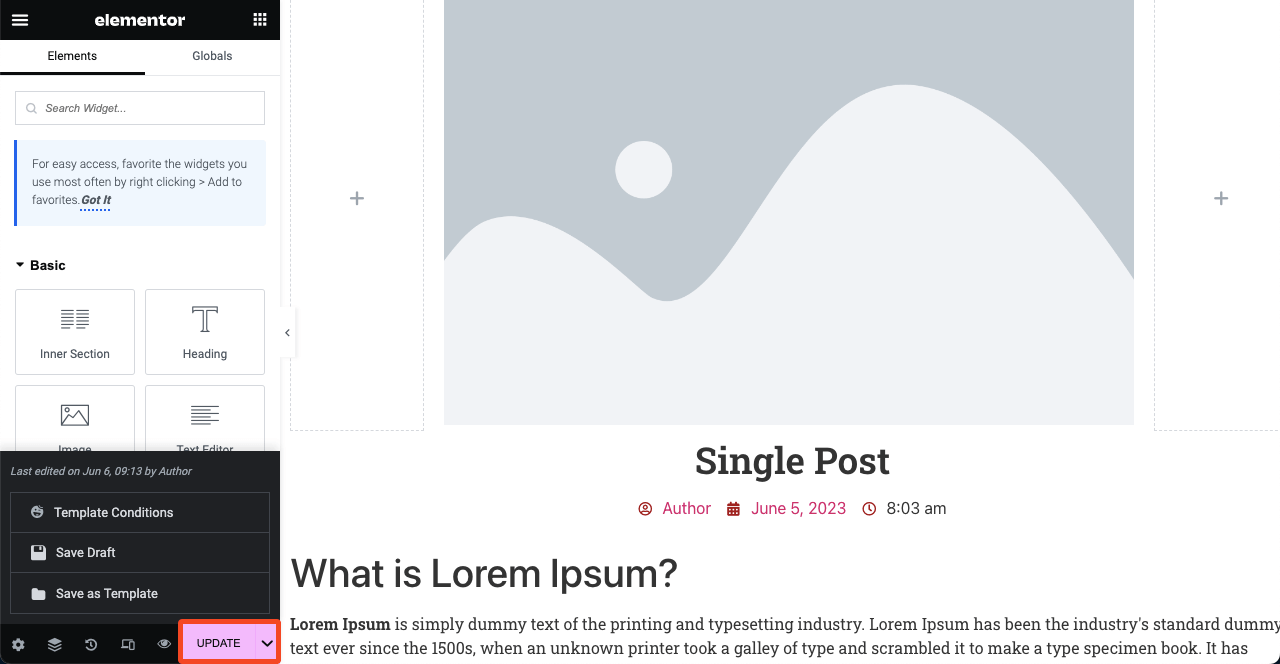
Press the PUBLISH/UPDATE button or the arrow sign. Click Save Draft to save this design as a draft.
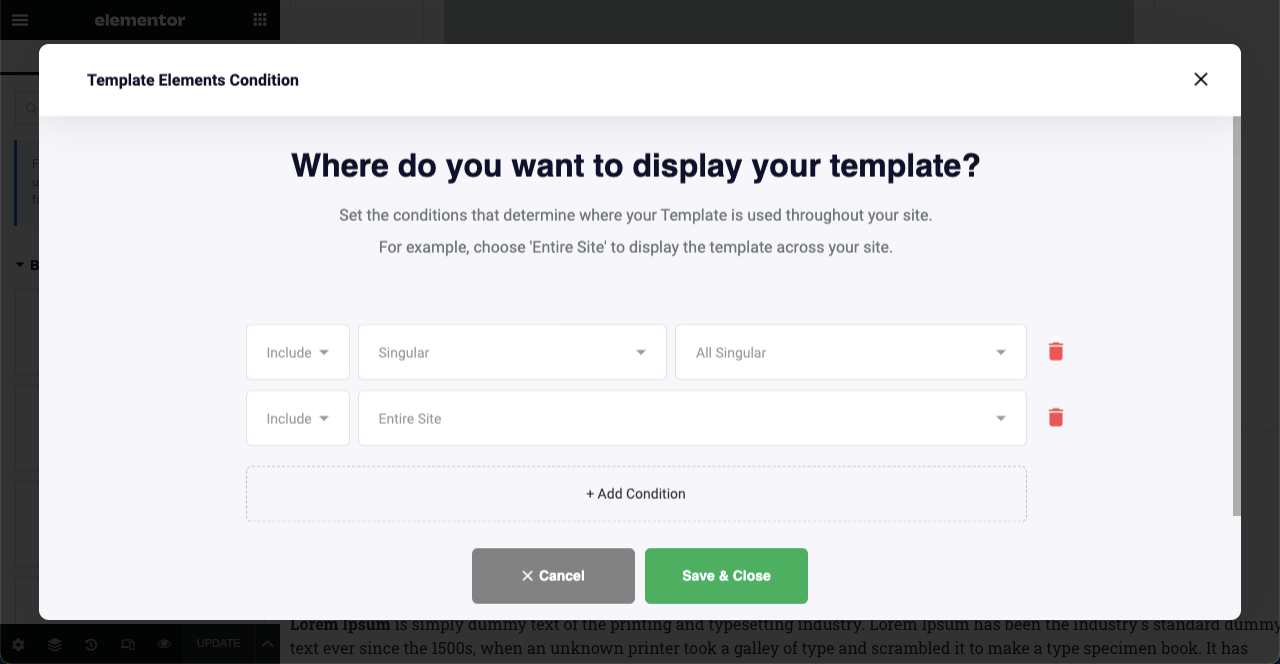
Click Save as Template if you want to use this design later as a readymade template. Click Template Conditions to publish the design.
What you see in the below image are the default conditions you can set using the free version of HappyAddons. You need premium access to set customized conditions.
Click the Save & Close button.
Step 04: Preview the Single Blog Post Template
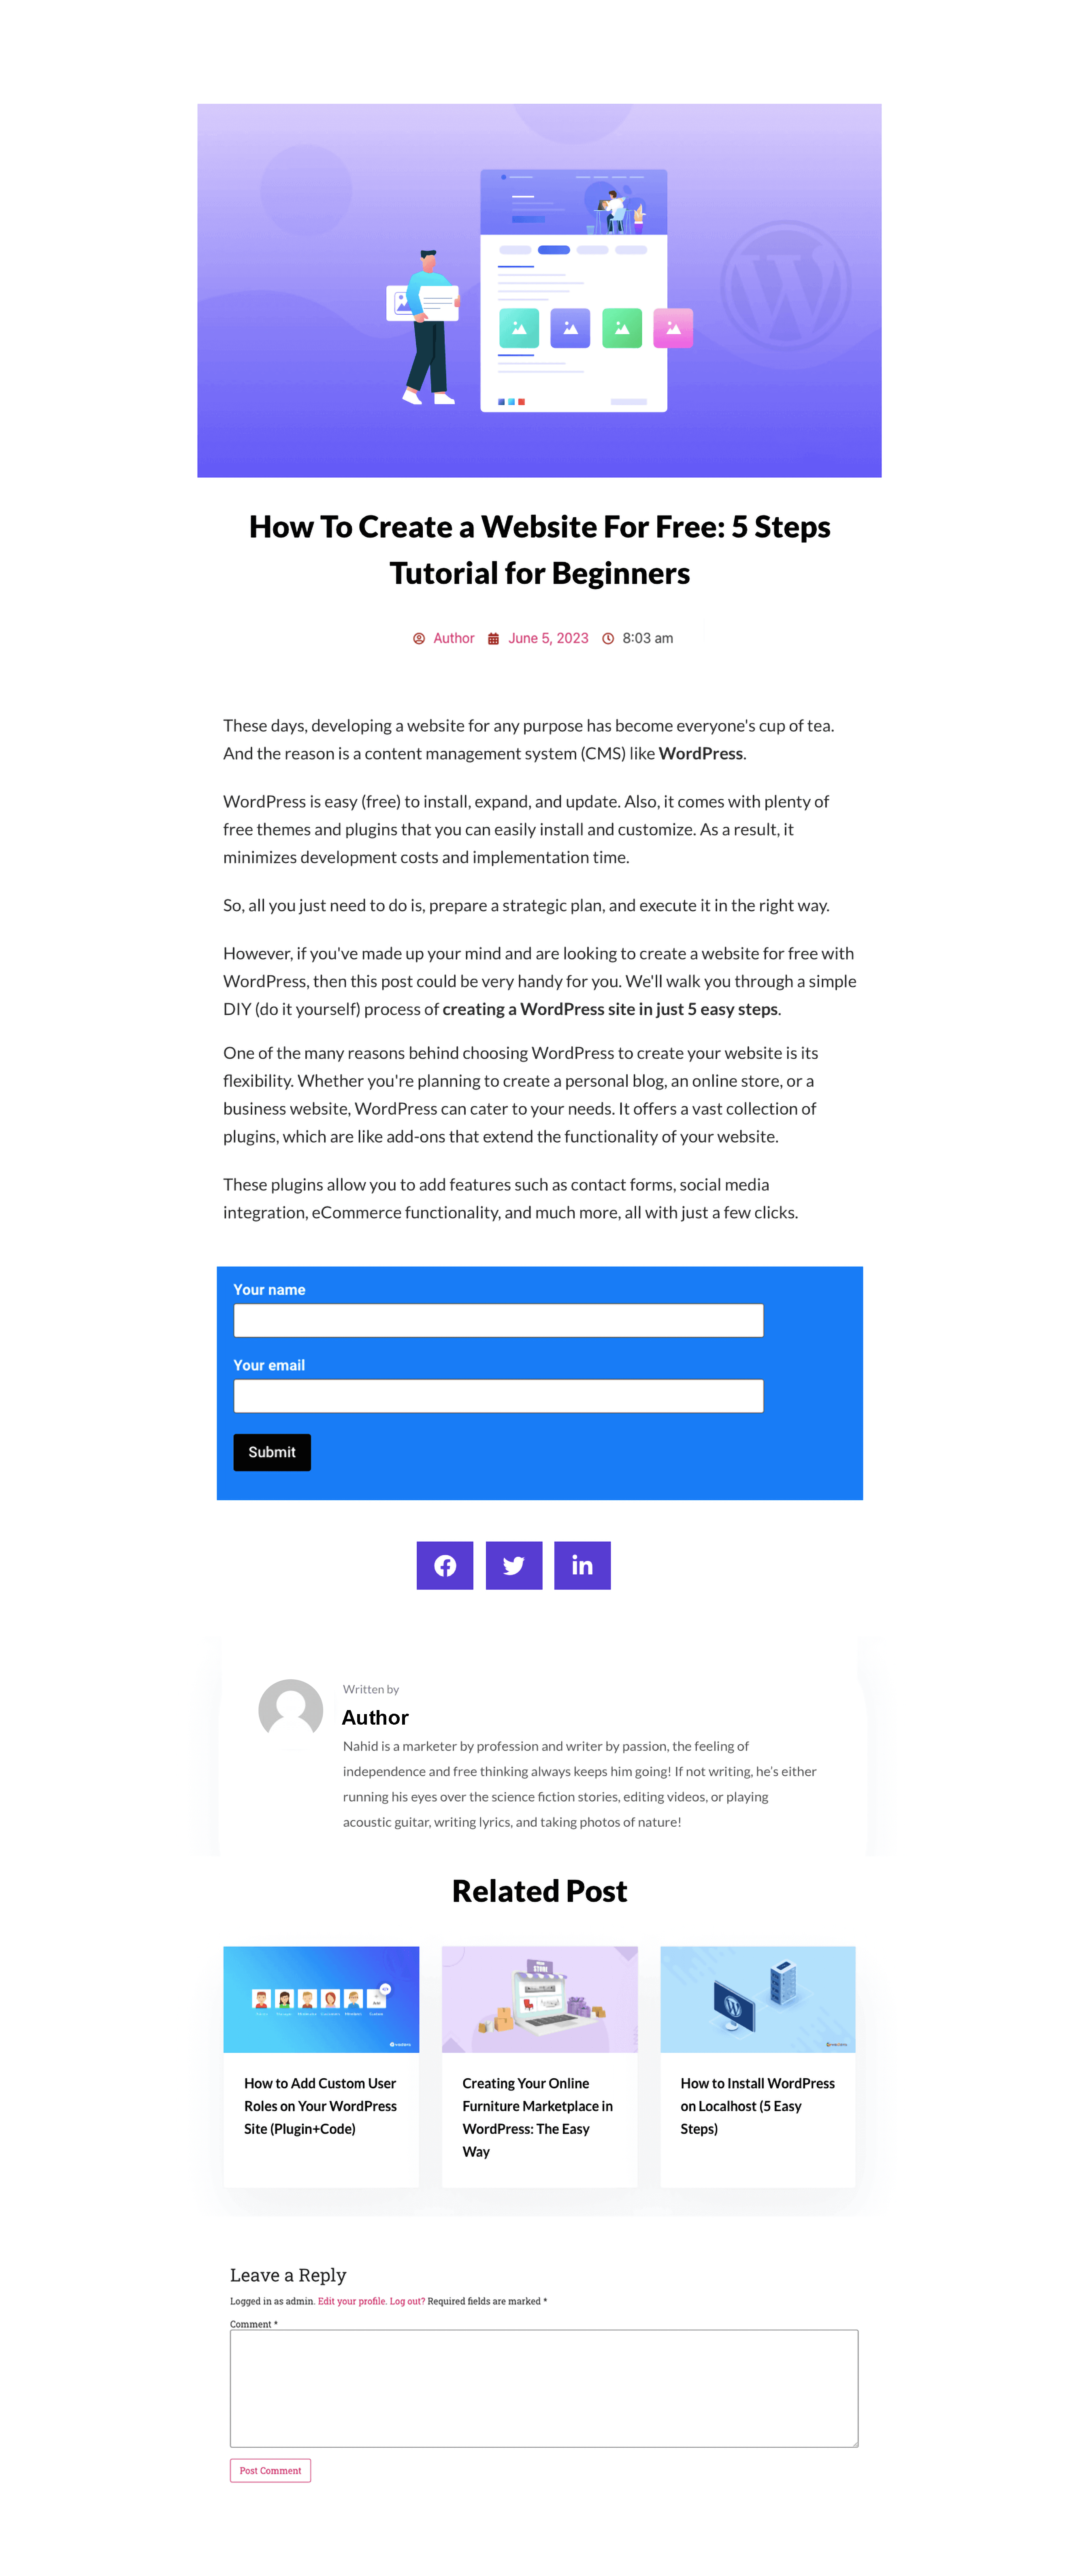
Now, go to the preview mode of any published blog post. You will see the template has been applied to them. If you don’t love the layout, open the template with Elementor again and customize it to your preferences.
FAQ on How to Create a Blog Post Template in Elementor
Hope you have enjoyed the tutorial part. Apart from this, you must know some more topics to grow your knowledge of blog post designing. We’ll cover them in the FAQ section.
What is the difference between a custom post type and a blog post?
A blog post is a traditional post or article covering a detailed write-up on any specific product, feature, topic, or information. It doesn’t showcase the main body content dynamically.
A custom post type allows you to modify the content structure, including custom fields, taxonomies, and functionalities. It gives users the flexibility to filter out their desired content dynamically.
What is the main difference between a blog post and a blog page?
A blog post is a write-up covering a detailed analysis of given topics. Some popular blog post types are how-to guides, listicles, reviews, case studies, news articles, personal stories, etc.
But a blog page showcases a collection of published blog posts with their titles, features, images, and excerpts.
What are the main parts of a blog post?
1. A compelling title
2. Engaging body content
3. Media files (images, video clips, and GIFs)
4. Call-to-actions
How to improve readability in a blog post?
1. Use clear and easy-to-understand text
2. Split the main content into multiple sections with headings
3. Add visuals to remove monotony
4. Incorporate tables and bullet points to break down
5. Follow the F or Z format in writing text
Is it possible to manage multiple single post templates in Elementor?
Yes, you can manage multiple single post templates. But for that, you need premium access, whether to Elementor or HappyAddons.
Can I stylize/customize the post comment section with Elementor?
Elementor, by default, doesn’t allow you to customize the post comments section. But by installing the HappyAddons plugin, you can enable Elementor to stylize and customize the post comment section.
Final Takeaways!
If you use the default blog post layout with any popular WordPress, you’ll see that hundreds and thousands of other web owners use the same layout. And this copy layout may lead to a boring user experience for your web readers and visitors.
Creating a customized blog post template can be a ground-breaking solution in this case. This can make your blogging section more professional and unique than others. With the HappyAddons Theme Builder, you can create almost a pro-like single post template for your website.
Hope you have enjoyed the article. It’s now your turn to try the plugin. For more guidance, explore the documentation about all the widgets we covered in the tutorial.




19 Responses
I found the article quite insightful and relevant to my WordPress blog. The mention of the HappyAddons Theme Builder as a tool to create a professional and unique single-post template caught my attention. It was a well-written piece, and I’m excited to see how the customization options can make my blog stand out and provide a better experience for my audience.
Hi ATop Digital,
Thanks for your wonderful feedback on our blog post! We’re glad you found it insightful and relevant to your WordPress blog. HappyAddons Theme Builder offers fantastic customization options to create a unique single-post template and elevate your audience’s experience. If you have any questions while using it, feel free to ask anytime. Enjoy happy blogging!
Would love to see this in a video tutorial and thank you for the clean emails.
Certainly! We’ve got you covered. Here’s the tutorial you’ve requested: https://www.youtube.com/watch?v=dn-1Eu1qnZc
Enjoy and thank you for your kind words!
Great article! Will check out elementor!
Thanks John, and share your experience with us.
Regards,
Gobinda
Team HappyAddons
These blog posting templates seem amazing.
Thanks John, feel free to share your thoughts, are you interested in getting post like this?
Thanks and regards,
Gobinda
Team HappyAddons
I was able to create my single post template but how do I use it? I only have 3 blog posts and the template finds the title but the content is Lorem Ipsum…. I’m confused how to apply to current posts as well as creating new posts with this template. Thank you.
Hi Miguel,
You have set the template conditions.
https://happyaddons.com/docs/happy-theme-builder/how-to-set-conditions-to-display-templates-pro/
In the free version you will get one template condition for all posts.
Thanks and regards,
Gobinda
Team HappyAddons
very fruitful content related this topic i am searching from long time ago.
Thanks prajjwal for stopping by and sharing your words.
Regards,
Team HappyAddons
I cannot change background color of single post 🙁
Hello Bao,
Sorry to hear that, can you please contact our support team here [email protected]!
We will investigate the issue.
Regards,
Gobinda
Team HappyAddons
I have the same problem as Miguel. The offered solution does not work though.
Hello Mike, sorry to hear that, please contact our support team [email protected]
We will look into your issue and try to find out solution.
Regards,
Gobinda
hi there , i think date and time of post are not Necessary
Thanks, Amir.
We appreciate your thoughts. It’s actually depends on user’s need.
Regards,
Gobinda
Team HappyAddons
Thanks to the HappyAddons Team!