A well-designed knowledge base is more than just a collection of articles. It’s a comprehensive online resource that provides various documentation posts, tips, and guides that enable users and visitors to find the information they need without depending on the support team.
Whether you are running an eCommerce store, selling SaaS/plugins, or running a service-based business, maintaining a knowledge base is a must where users can easily find all their common queries. WordPress has made it incredibly easy to create and design knowledge bases.
In the following parts of this article, we’ll cover a step-by-step guide on how to design a knowledge base in WordPress. Before that, we’ll cover some theoretical parts. Let’s get started!
What Is a Knowledge Base?
A knowledge base is an organized collection of long and short articles beyond the traditional blog archive. It answers all the potential questions that might arise in customers’ minds regarding your business, products, and services. The knowledge base doesn’t usually cover promotional or review content, which is unlike traditional blogging.
It serves as a self-service content repository organized by tags, categories, and sections. It enables users to navigate the answers and solutions to the problems they are facing. Thus, by making information easily accessible, knowledge bases enhance user experience, reduce customer support, and ensure response consistency.
Importance of Maintaining a Knowledge Base

Before jumping into the tutorial, we want to break down a few points, explaining the importance of maintaining a knowledge base for your business.
- Reduces Support Requests
As knowledge bases allow users to find solutions to their problems themselves, they don’t have to rely much on the support team. This brings efficiency and reduces support requests. As a result, your team can focus more on other work.
- Enhances Internal Communication and Collaboration
If you are a business owner and managing a team, you can describe the business mission, vision, and work policies in detail, creating an internal knowledge base. It can remove all the confusion and help all employees stay aligned with the business goals and objectives.
- Improves SEO Score and Online Visibility
By creating a knowledge base, you can add more content and information about your business, products, and services. If they are well-optimized, you can receive organic traffic from Google to the documentation posts. Check the common SEO mistakes you should avoid.
- Utilizes Analytics for Continuous Improvement
Most renowned knowledge base solutions include analytics, with integration with Google Analytics. Using them, you can track the traffic flow, their location, and user behavior on your site.
- Prevents Misinformation and Builds Trust
The knowledge base section is usually known as a source of official information about particular products, businesses, and services. So, by clearly providing information there, you can prevent the chances of any misinformation, building trust in the end.
Explore the best WordPress knowledge base plugins.
How to Design a Knowledge Base in WordPress

As said before, designing a knowledge base with WordPress is very easy today. In this section, we’ll cover a step-by-step guide on how to design a knowledge base in WordPress. Kindly be with us till the end.
Step 01: Install the weDocs Plugin
Without a knowledge base plugin, it’s impossible to create and design a knowledge base on WordPress. You’ll find various useful and beginner-friendly plugins online to do this. weDocs is such a feature-rich plugin you can use in this regard. Get the plugin by clicking the buttons below.
With the free version, you can create and design only a basic form of a knowledge base. For advanced features and functionalities, you need the premium version. So, it’s better if you install and activate both versions of the weDocs plugin.
After the plugin is installed, you’ll see the weDocs menu added to the WordPress admin panel.
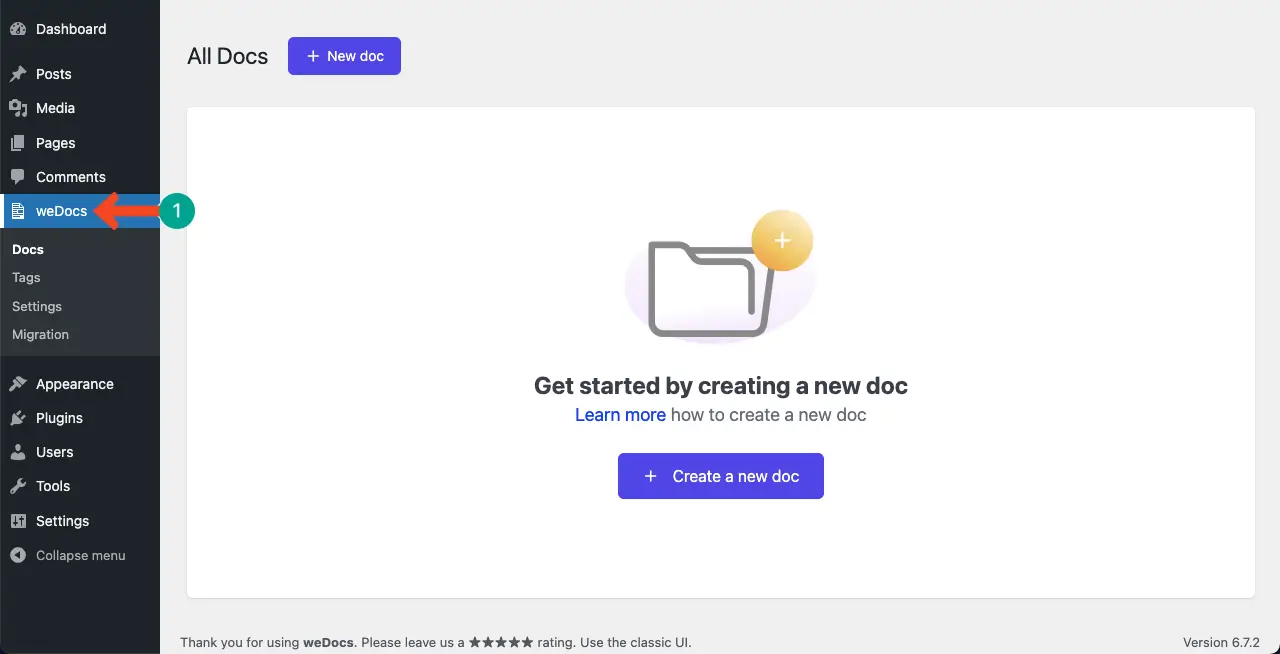
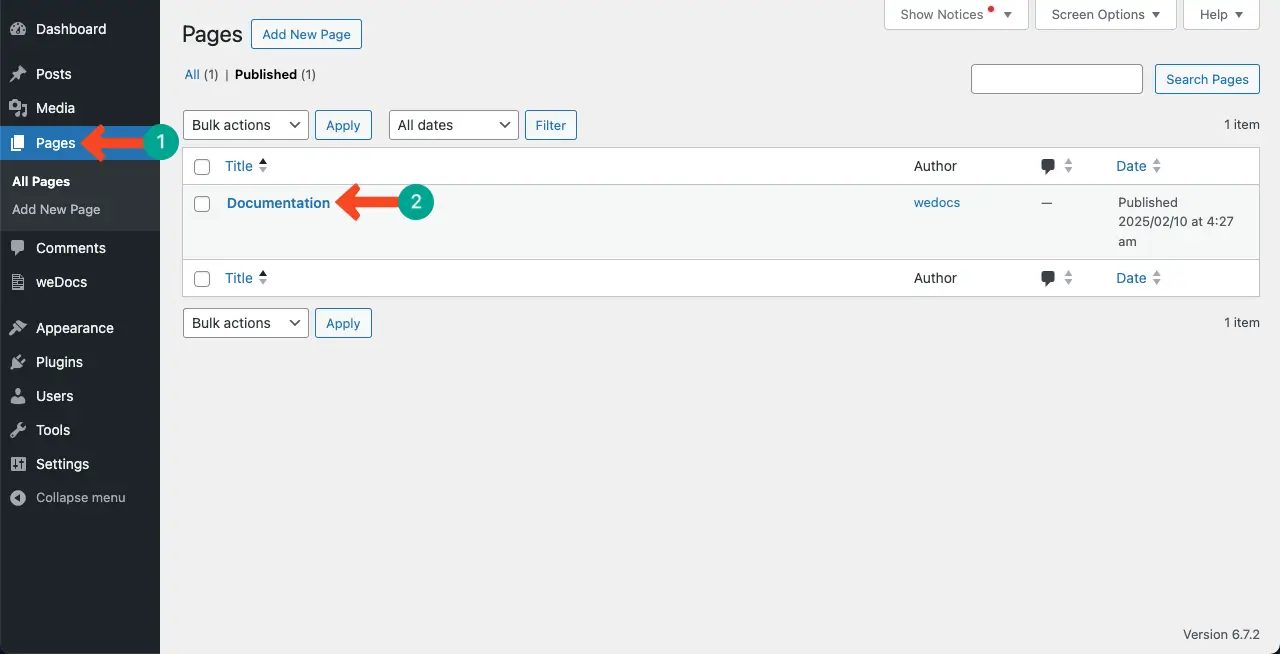
At the same time, a knowledge base page will also be created in the pages section. In the next steps, we’ll show you how to configure the weDocs settings to design the knowledge base page.
Step 02: Create and Add Several Documentation Posts
Before customizing the knowledge base page layout, add several dummy documentation posts. It will help you check how your documentation posts look on the knowledge base page.
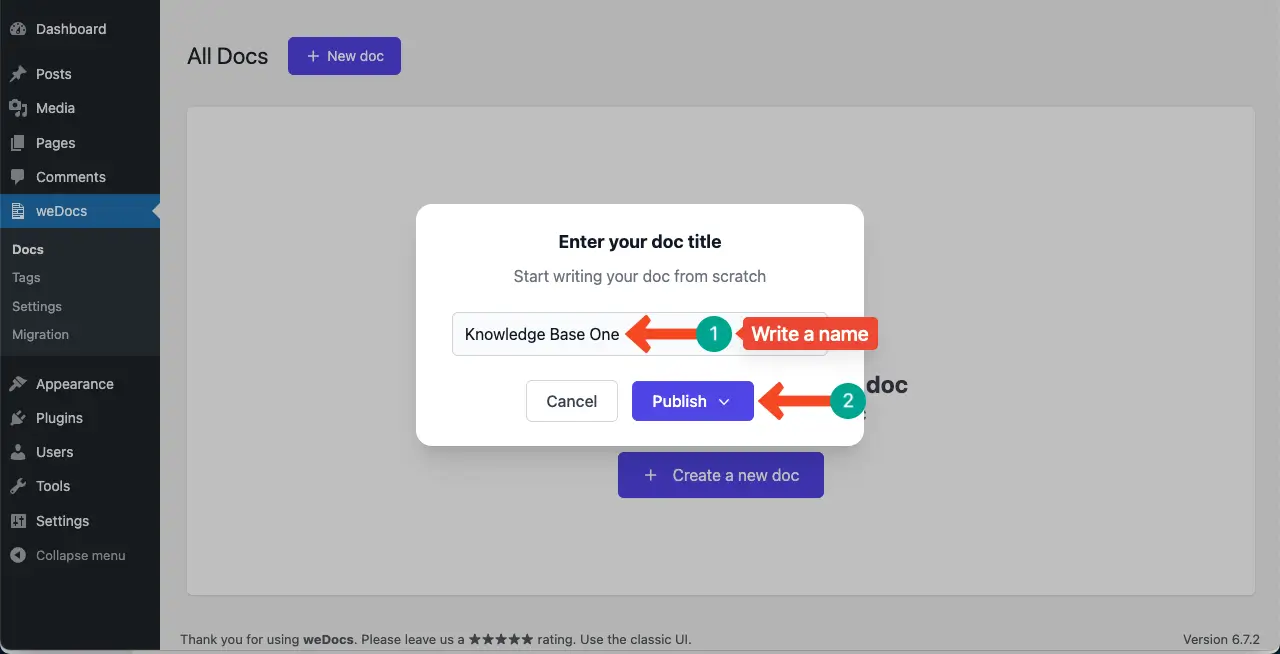
So, click the + New doc button.
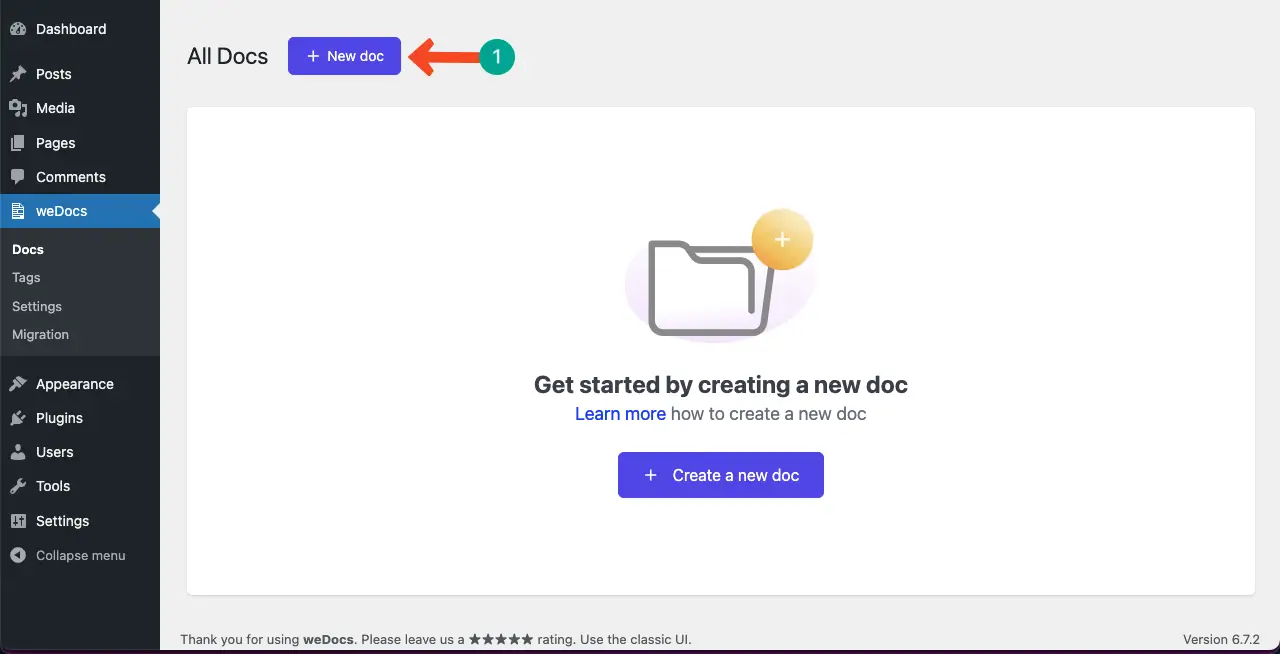
A popup will open up. Write a name in the box and click the Publish button.
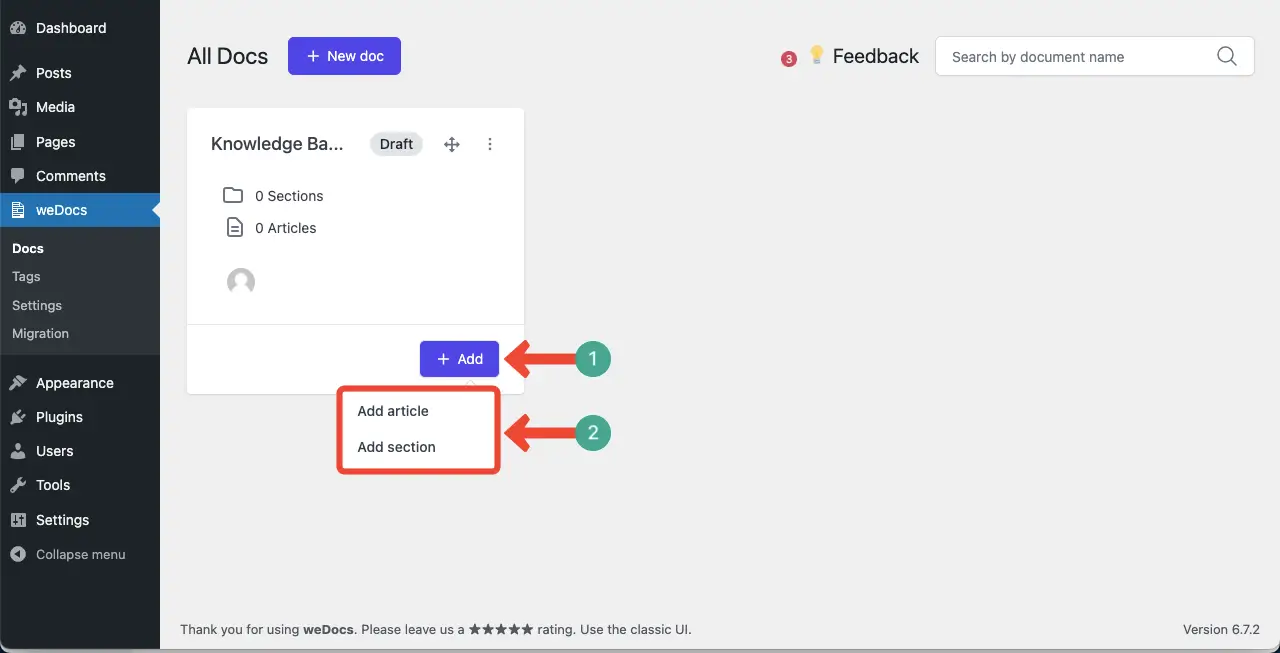
You’ll see a knowledge base card is added. Now, by clicking the + Add button, you can create and add new articles and sections to the card.
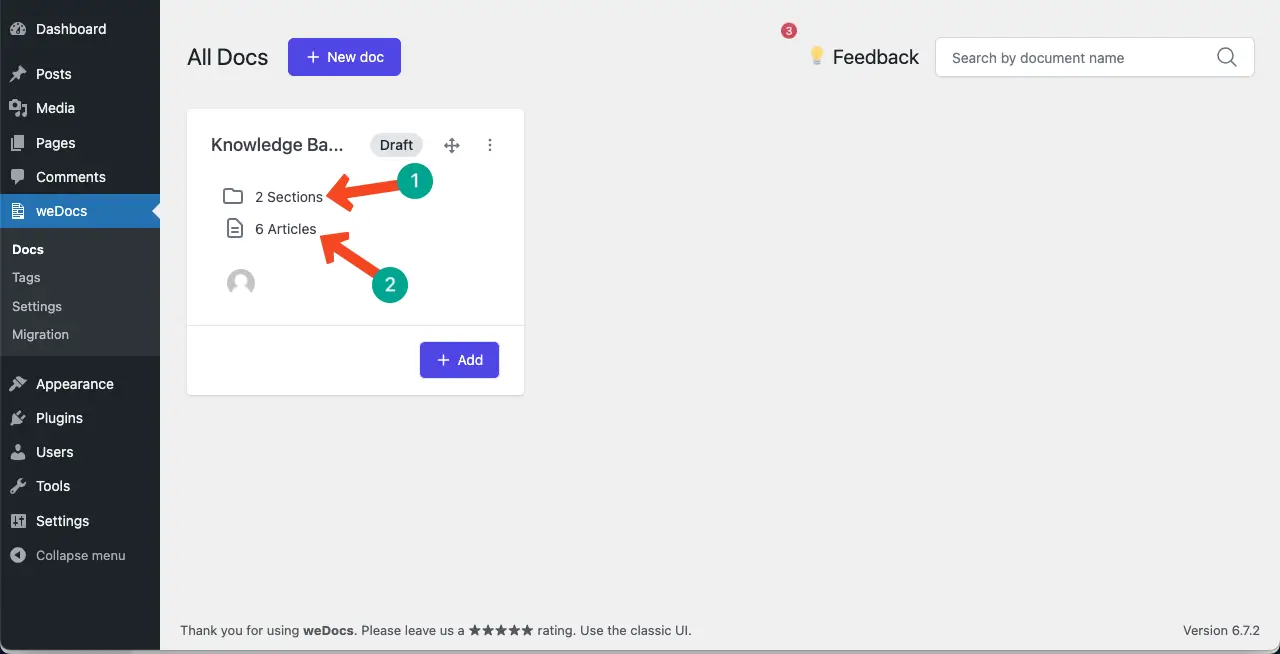
You’ll see the number of sections and articles created on the knowledge base card.
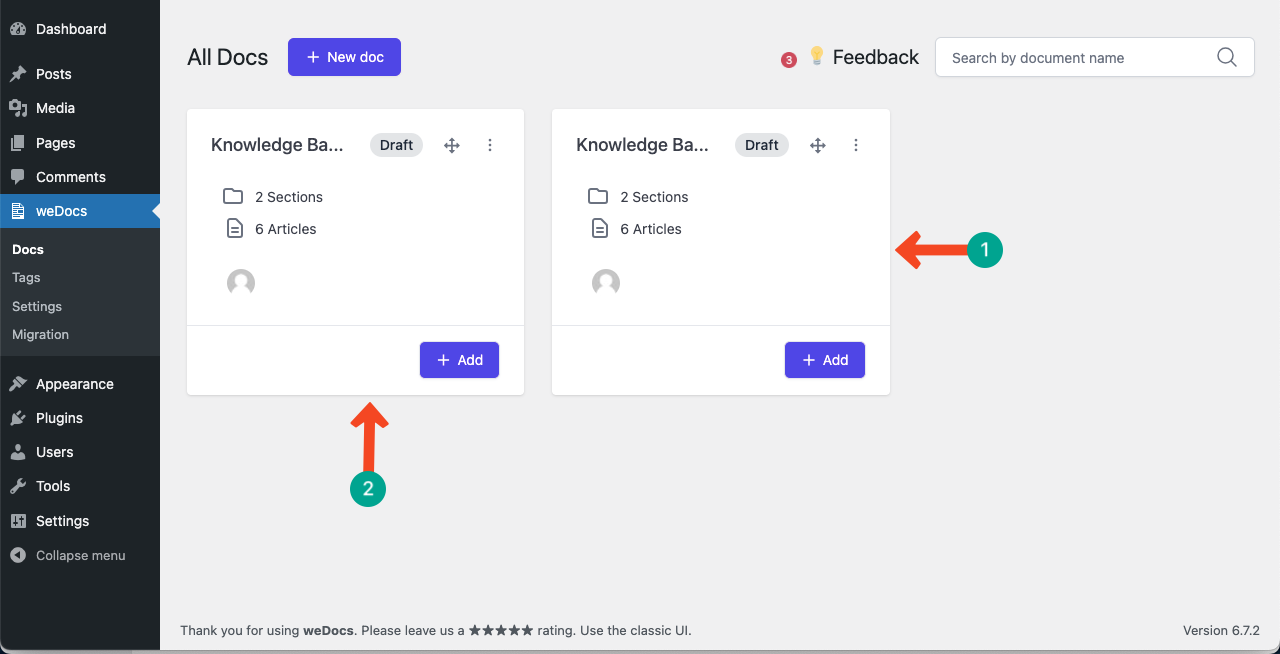
In the same way, add as many knowledge bases as you want using the plugin. You can see that we have created two dummy knowledge bases.
# Preview the Default Layout
Now, come to the frontend of the page. You’ll see a default layout of the documentation page. In the following steps, we’ll show you how to design this knowledge page using the available options of the weDocs plugin.

Step 03: Select a Layout for the Knowledge Base Page
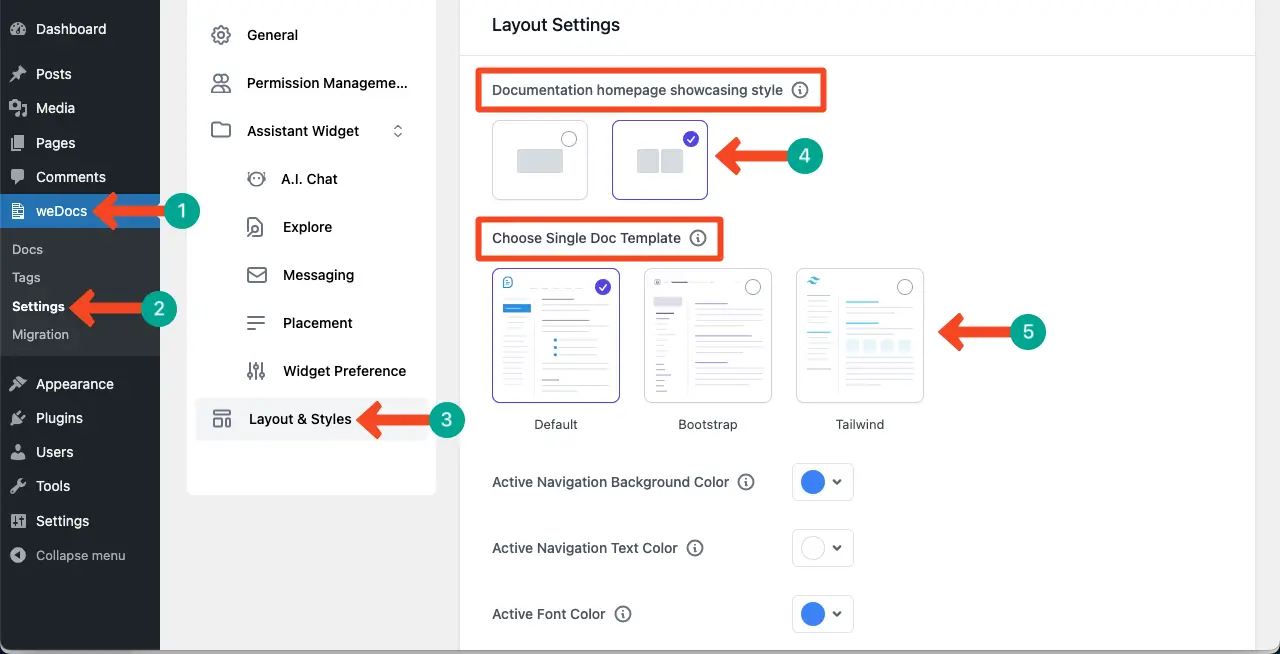
Come to your WordPress dashboard. Navigate to weDocs > Settings > Layout & Styles.
Select a layout for the documentation page. There are two layouts – single and two-column layouts. It’s better to use the two-column layout.
Then, choose a layout for the doc template from the three options. For this tutorial, we are going with the default one, as it also looks good.
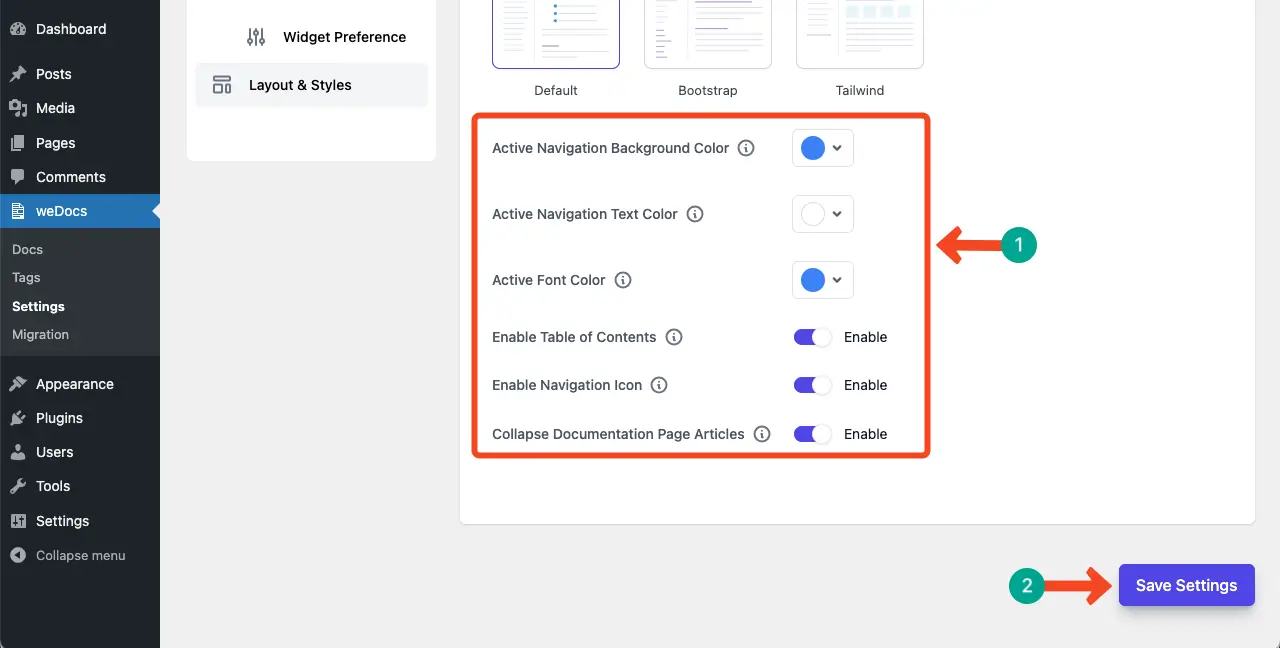
Scroll down the page a bit. You’ll get several more options. Customize the navigation background color, text color, and font color by clicking the dropdown icon.
You may enable several more options, like a table of contents, navigation icon, and collapse documentation page articles, by toggling on the options.
Finally, click the Save Settings button. Do the needful changes as you want in this way.
# Preview the Page and Doc Template Layout
Once the layout settings are configured, go to the preview page. You’ll surely see a different layout than the default page. Then, click on any article to check the doc template layout.
We are satisfied with the layout from our end. If you aren’t satisfied, go to the backend and do the customizations again.
Step 04: Enable the Assistant Widget
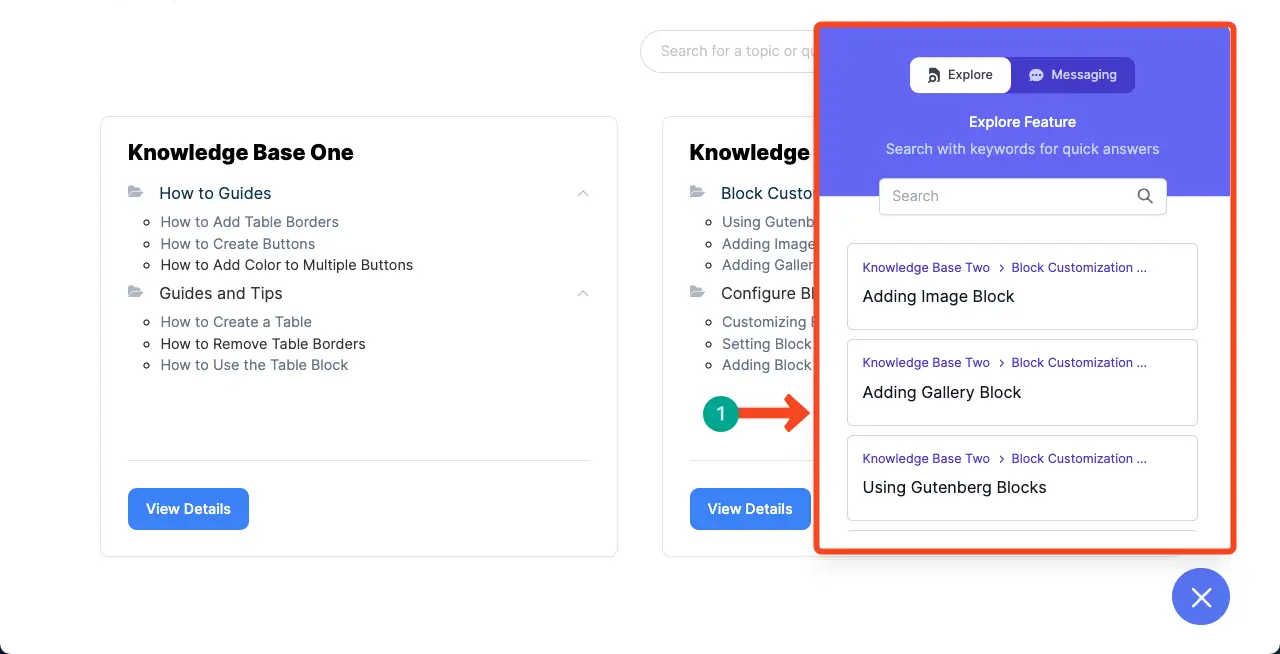
The weDocs plugin allows you to add an assistant widget to the page. It can help you quickly find the exact article once you type its keywords in the search box on the widget.
Go to the backend and navigate to Widget Preference. Then, toggle on the Enable option. Then, start customizing the widget by editing every signal part.
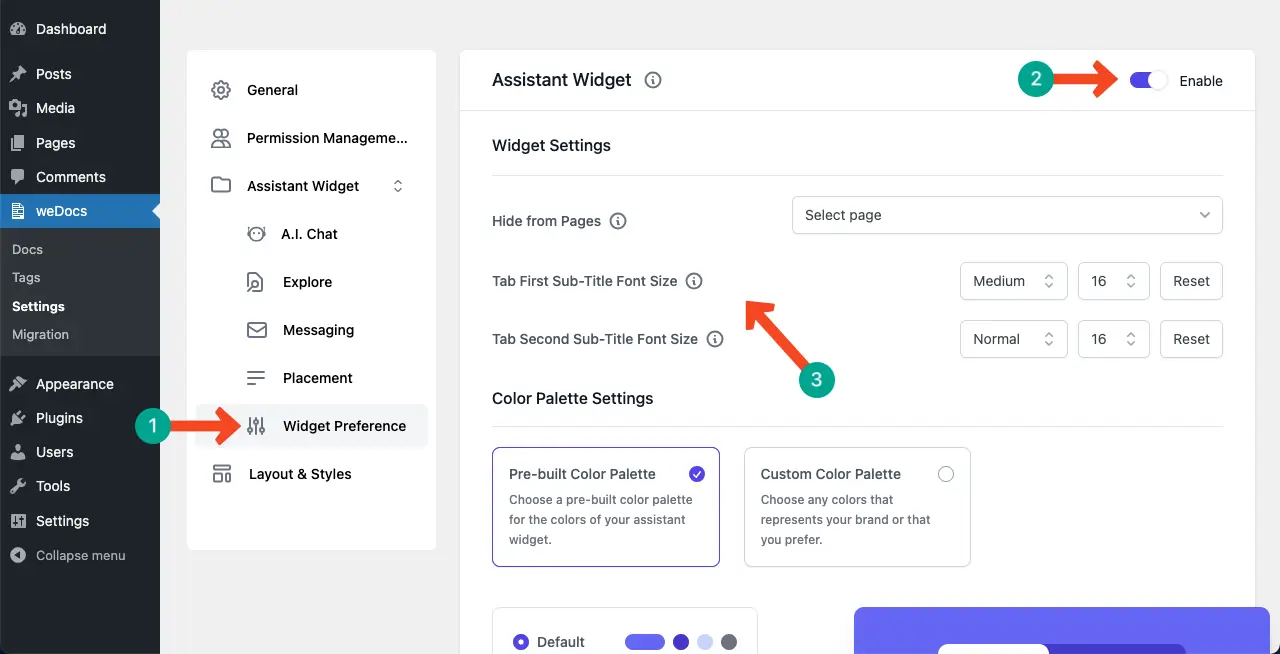
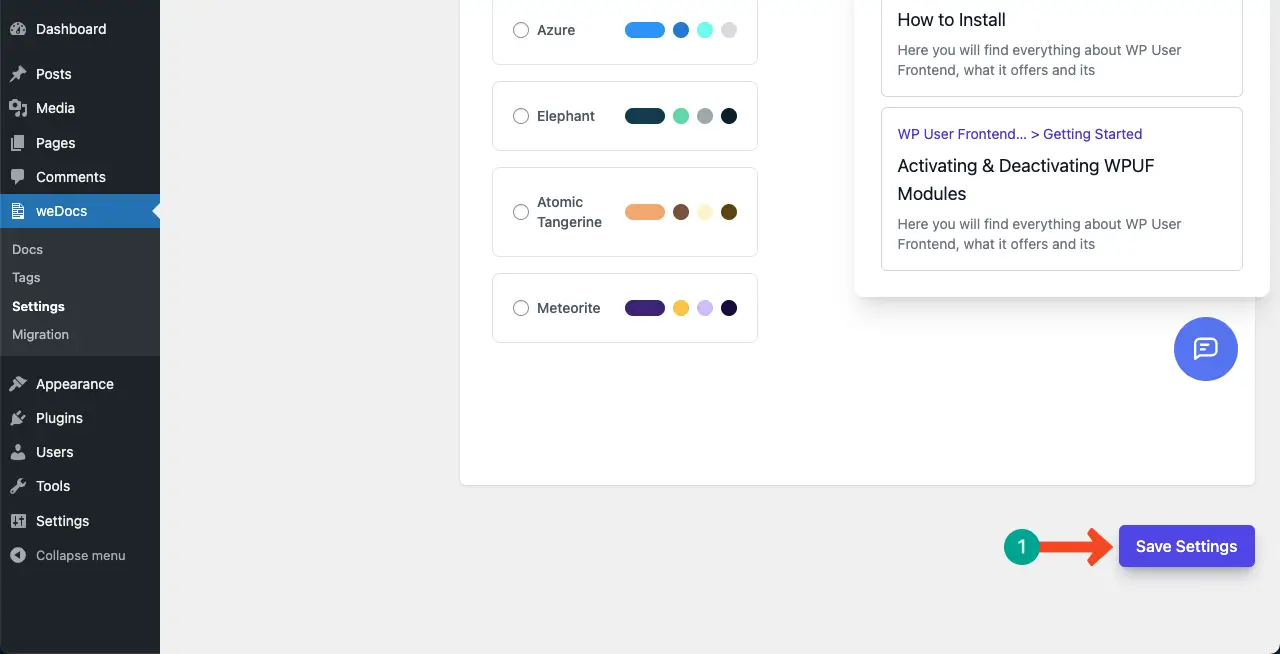
Scrolling down, come to the end of the page. Hit the Save Settings button.
Step 05: Customize the Messaging Layout
The weDocs plugin also allows you to enable the Messaging option. It allows users to submit their queries with their email addresses so the support team can reach them later with viable solutions.
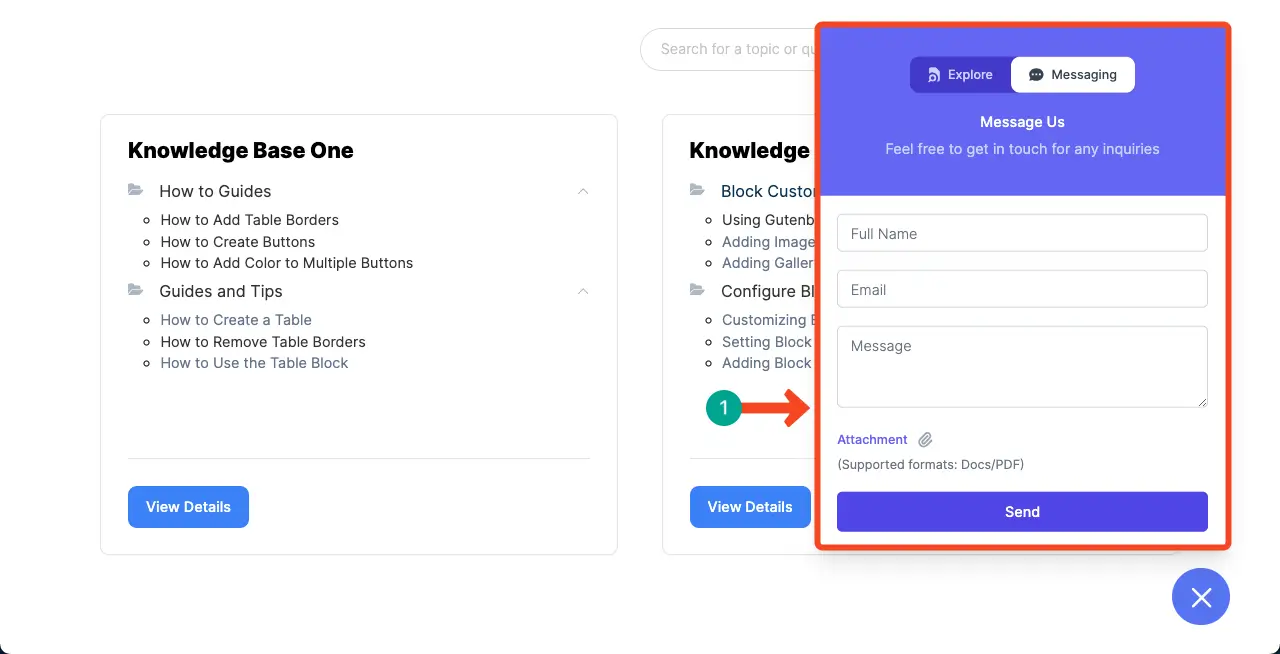
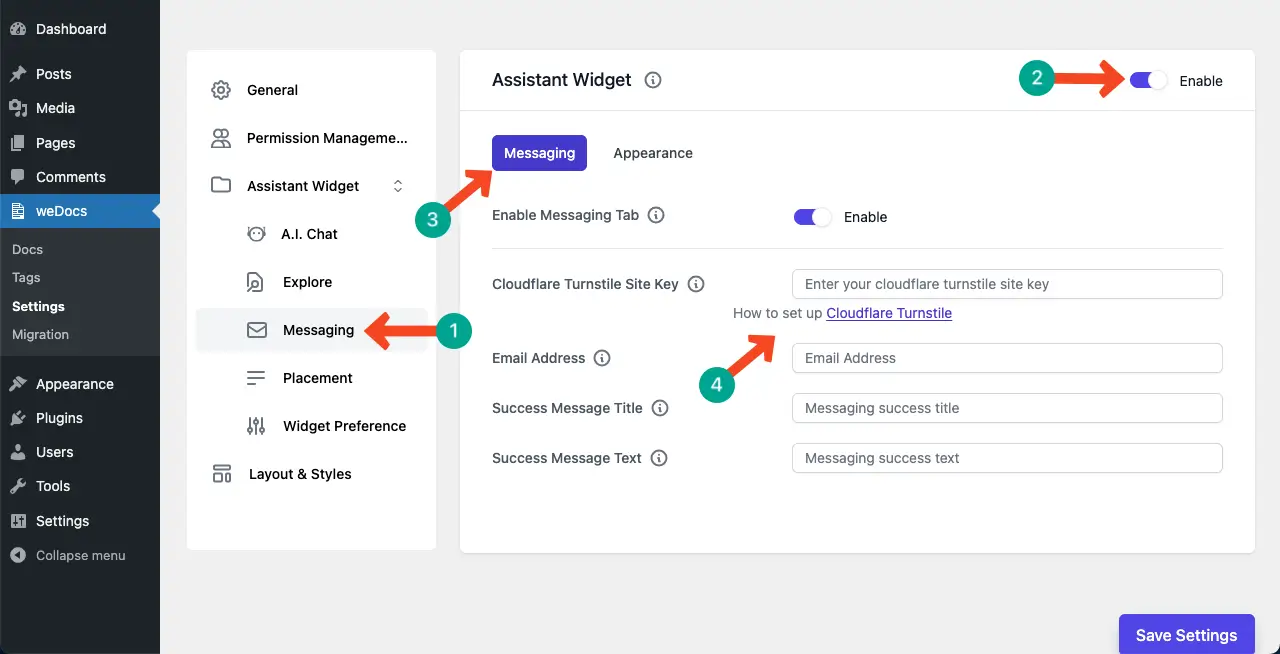
To enable it, navigate to the Messaging option under the Assistant Widget section. Then, toggle on the Enable option in the top-right corner.
After that, come to the Messaging tab and fill in the fields with the necessary information.
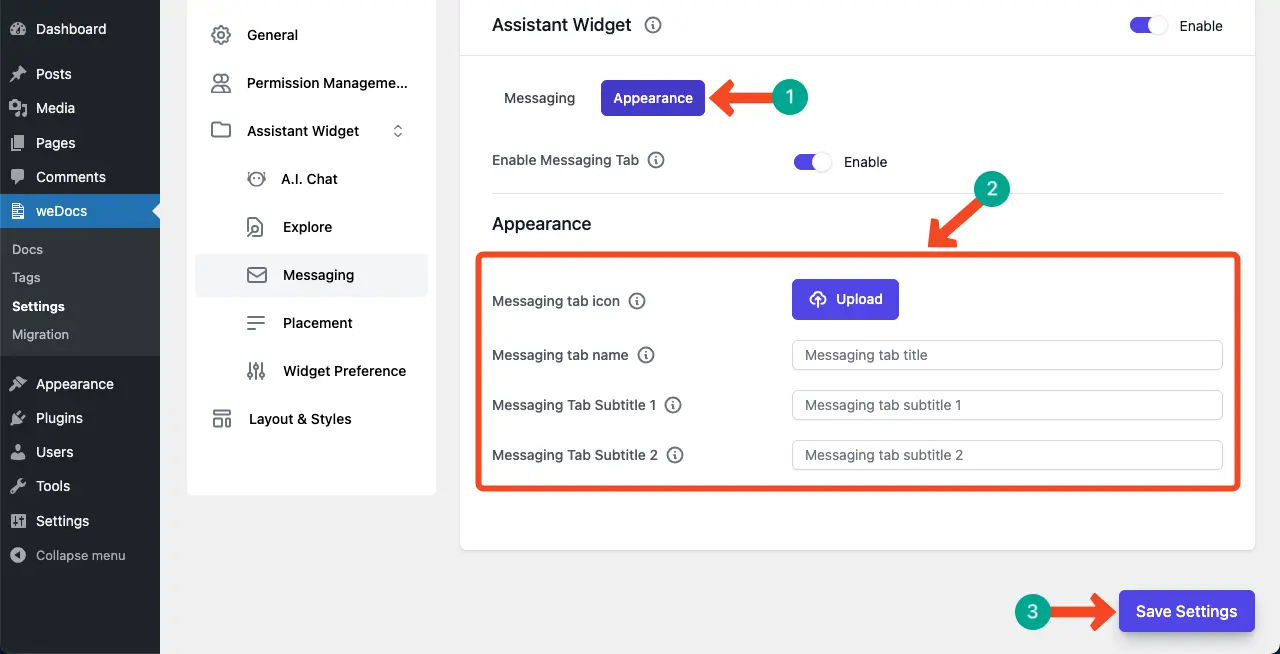
Come to the Appearance tab. You can add an icon and write the fields’ names. Finally, hit the Save Settings button.
Step 06: Enable and Configure the AI Chatbot
The AI Chatbot is a software program that uses artificial intelligence to create human-like user conversations. It can instantly provide solutions to users’ queries based on the information stored in the knowledge base. Thus, it can save users time as they don’t have to spend much time exploring the knowledge base to find the exact article.
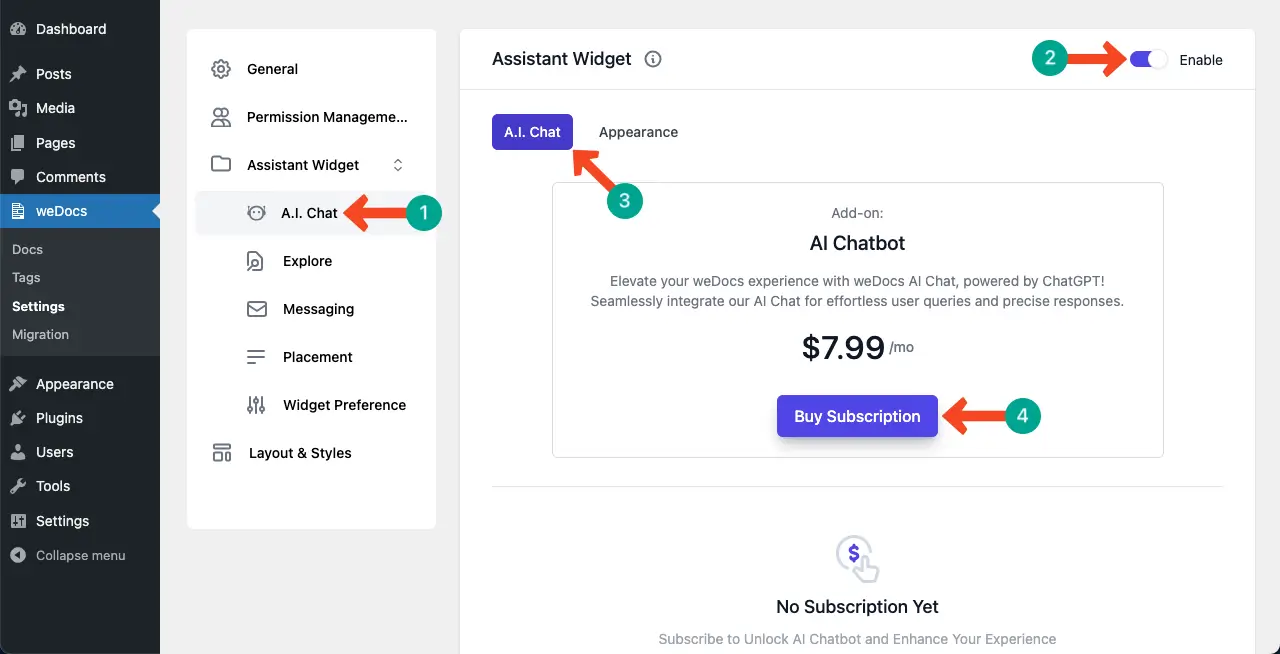
weDocs also has an AI Chatbot. Go to the A.I. Chat option, toggle on the Enable option, and come to the A.I. Chat tab.
As it’s a premium feature, you have to buy a package. Click the Buy Subscription button.
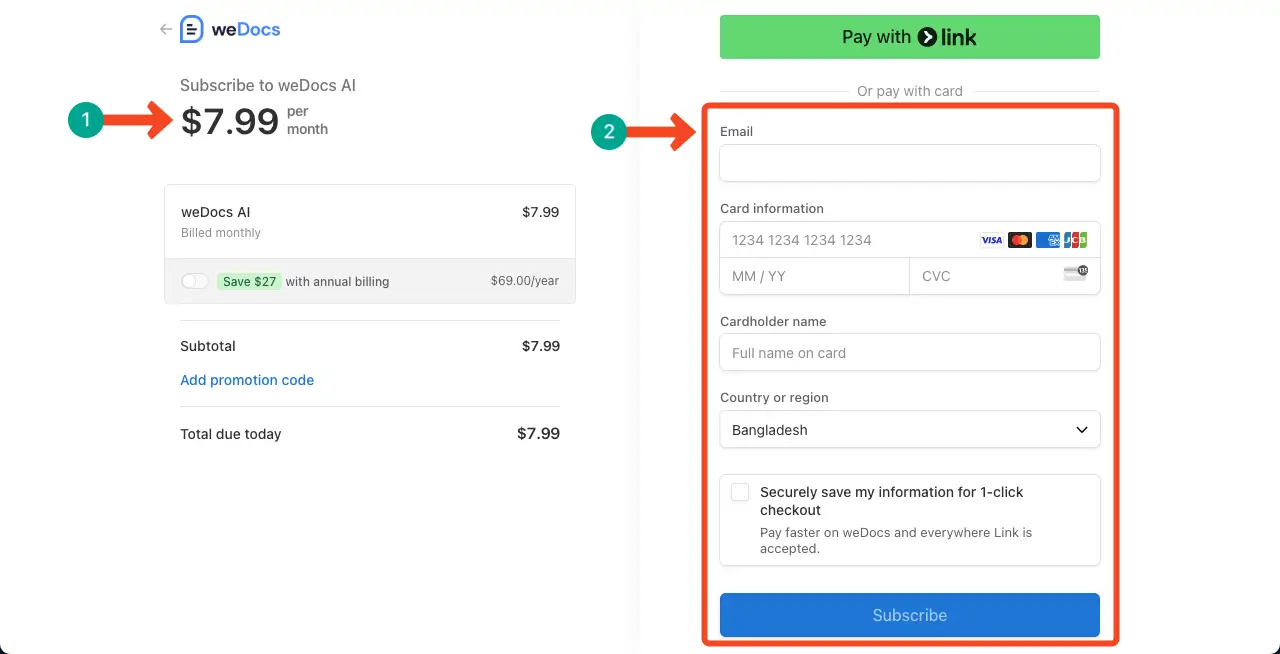
You’ll be redirected to the checkout page. Fill in the necessary information in the respective fields and subscribe to a package.
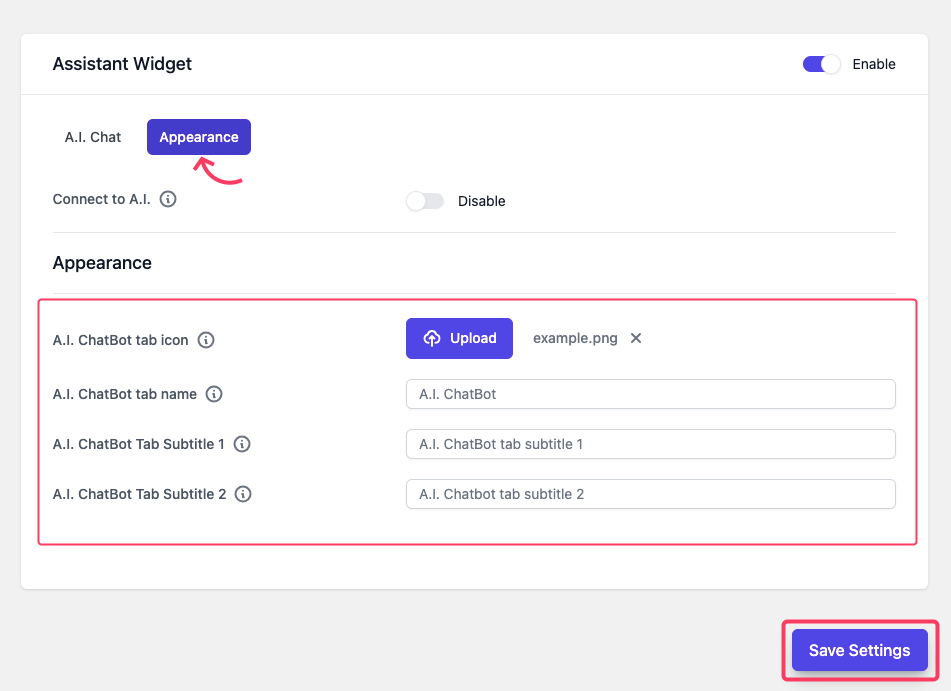
After the subscription is done, come to the AI Chatbot section in the backend again and go to the Appearance tab.
You can set a Chatbot tab icon and write names for the fields. Hope you can do them alone. Finally, hit the Save Settings button.
Now, come to the frontend and check if the AI Chatbot works or not. Just write a query. You’ll see the Chatbot instantly answer you with a viable solution.
Thus, you can create and design a knowledge base in WordPress using the weDocs plugin. It’s now your turn to design your desired knowledge base in WordPress.
If you face any difficulty at any stage, you can instantly reach out to our support team for help and guidance.
Best Practices in Designing a Knowledge Base
Before ending the post, let’s kindly spare some more minutes to explore a few points over the best practices you must consider when designing your knowledge base page. Take a look at them below.
- Structure and Organization
A well-structured and organized knowledge base allows users to locate the desired information quickly. Use easy-to-understand categories and arrange the content hierarchically. Besides, adding a powerful search bar could take content exploration one step ahead.
- Clear and Concise Content
The content must maintain clarity while remaining straightforward. Use simple language and avoid unnecessary technical terms that could be translated with easy words and phrases. When dealing with long articles, add a summary or key takeaways at the beginning.
- Readability and Accessibility
Readability is a crucial factor for any successful knowledge base. Break down long articles into sections and sub-sections. Add headings and subheadings, respectively, for the sections. Don’t use too many complex sentences. Keep them short as much as possible.
- Multimedia Integration
Screenshots, GIFs, and videos as multimedia elements can greatly improve the readability of the knowledge base articles. So, use relevant and interactive visuals and infographics to drive more engagement.
- Feedback and Continuous Improvement
You can keep your knowledge base articles effective by updating them regularly with the latest information. So, make sure there is a way for people to submit their feedback, which you can analyze to understand how the knowledge base posts should be optimized.
Conclusion
Creating a knowledge base is no longer a difficult task, as so many solutions are available in the market. Even their prices aren’t so high. As a result, no matter if you are a small business owner, you can easily afford such a solution and create a comprehensive knowledge base for your business.
If you are looking for a free solution, you can try the weDocs plugin. Because it has a free anda premium version. If you are just starting a business, the free version can provide huge support. Once you grow and scale up, you may upgrade to the premium version if needed.

