A reading progress bar is a visual indicator on a website that shows readers how far they have scrolled through the page or post on the screen. This typically displays a thin bar that fills up as readers progress, scrolling through the page. It’s a simple but effective tool for blogs and content-heavy websites.
A recent study on user engagement suggests that visual cues can increase time spent on a page by up to 20% by making content feel more manageable. In the same way, the progress bar can help users track their reading journey, which can boost satisfaction and encourage them to explore more.
With Elementor, it’s easy to add a reading progress bar to WordPress. So, in this article, we’ll cover a step-by-step guide on how to display reading progress bar in WordPress with Elementor.
Benefits of Displaying the Reader Progress Bar in WordPress
Adding a reading progress bar to a WordPress site offers several benefits. This not only enhances user experience but also engagement. Take a look at some key benefits of adding the reading progress bar in WordPress below.
- Improves User Engagement
A reading progress bar can keep readers motivated by visually showing how far they’ve progressed through a post. This encourages users to continue reading, especially for long-form content. Take a look at some quick points on how to improve user engagement on your website.
- Enhances Navigation Clarity
For lengthy articles or tutorials, a progress bar provides a clear indication of how much content remains. This helps users guess whether they have time to finish or not.
- Reduces Bounce Rates
By offering a visual cue that breaks down content into a trackable journey, a progress bar can make long posts seem less overwhelming. This can remarkably lower bounce rates. Here’s a guide on how to reduce bounce rate on WordPress.
- Enhances Aesthetic Appeal
A well-designed progress bar adds a modern appeal to your site. You can customize the reading progress bar’s appearance to match your site’s branding to create a polished look.
- Supports Mobile Usability
On mobile devices, where scrolling can feel endless, a progress bar provides a sense of control and context. It reassures users they’re making progress through the post or page.
How to Display Reading Progress Bar in WordPress with Elementor
In this step-by-step tutorial, we’ll guide you through the process of adding and customizing a reading progress bar on your WordPress site using Elementor and the free version of HappyAddons. But you may ask – why HappyAddons and what is this?
Actually, HappyAddons is a well-known addon of the Elementor plugin. It comes with many resourceful features and widgets to overcome the limitations of Elementor. Reading Progress Bar is one of the. And the good news is that the Reading Progress Bar feature is completely free to use.
Pre-requisites for Adding Reading Progress Bar
Make sure the plugins are installed and activated on your site. Once they are ready on your site, start following the steps explained in the tutorial below.
Step 01: Enable the Reading Progress Bar Feature
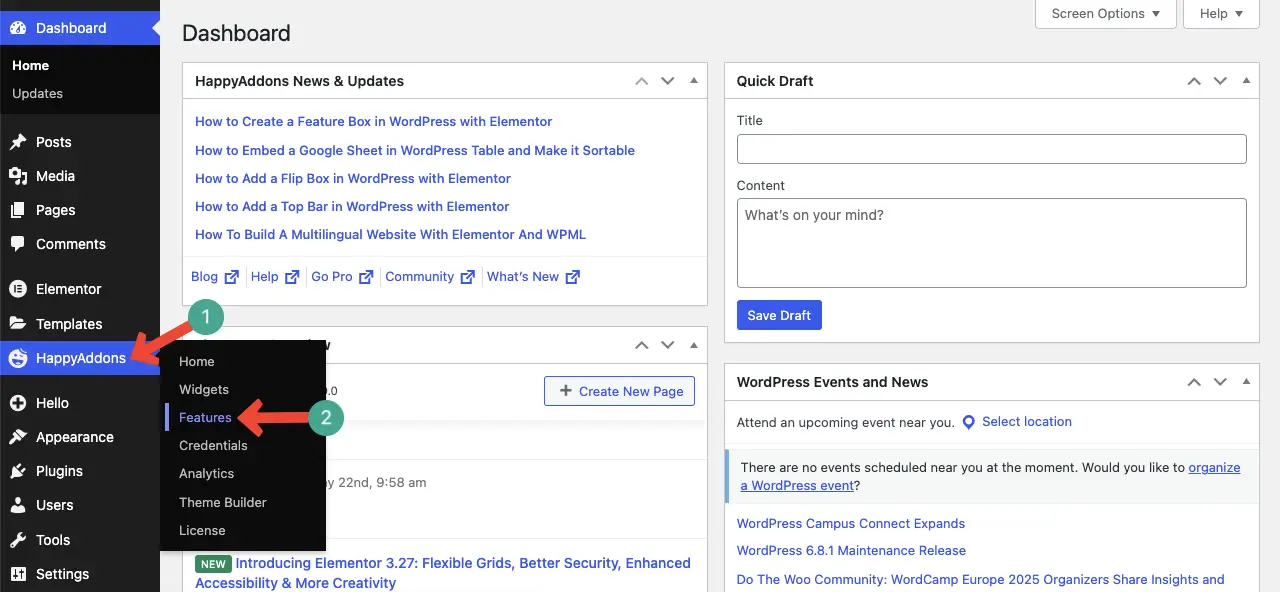
Go to your WordPress dashboard and navigate to HappyAddons > Features.
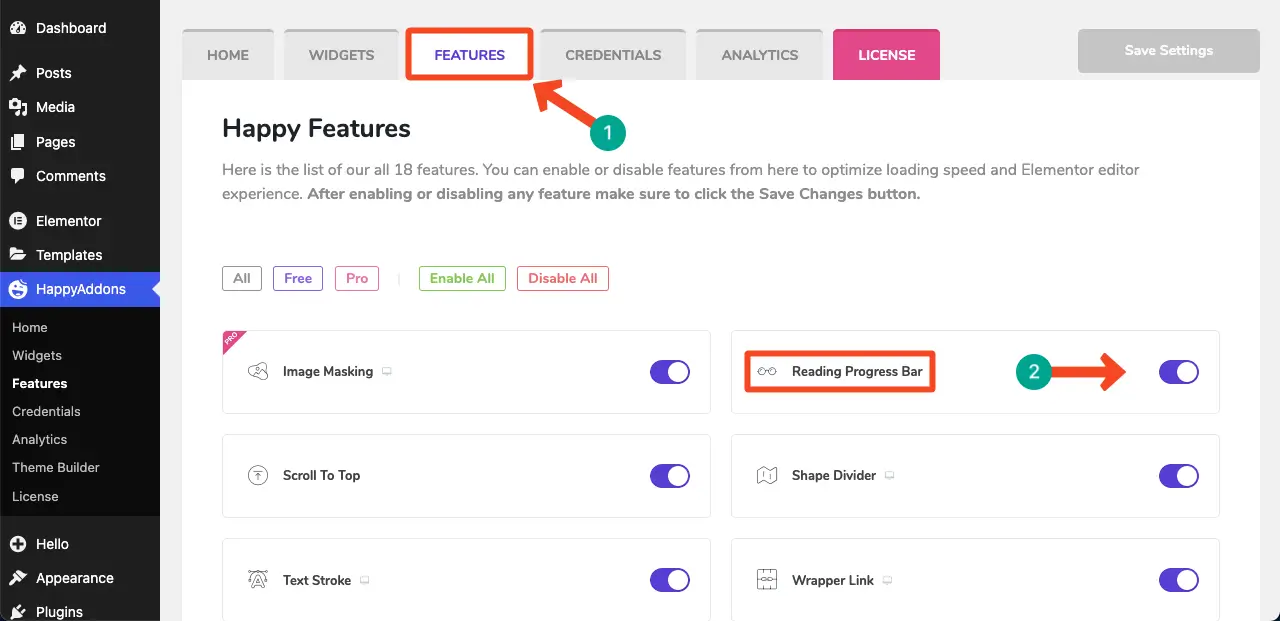
When you come to the Features page, locate the Reading Progress Bar option. Toggle on to enable the feature.
Step 02: Open a Page with Elementor
Now, to configure the reading progress bar feature, open a page with Elementor.
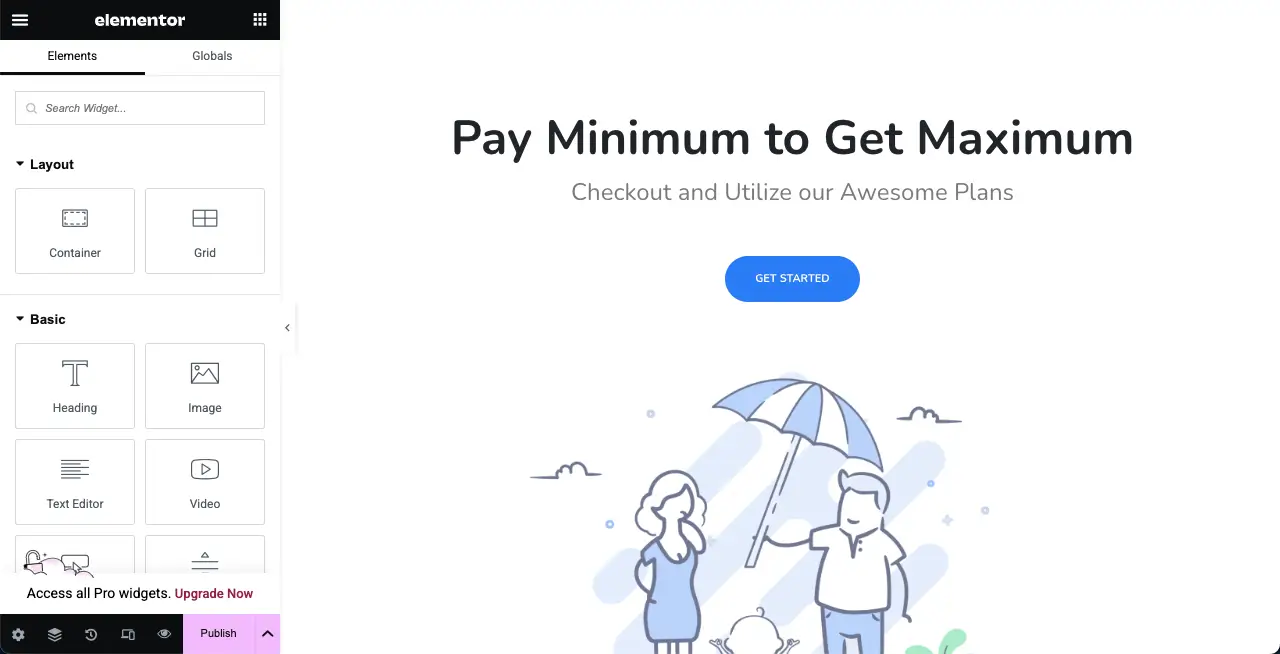
Step 03: Go to Elementor’s Site Settings
Click the hamburger icon in the top-left corner of the Elementor panel.
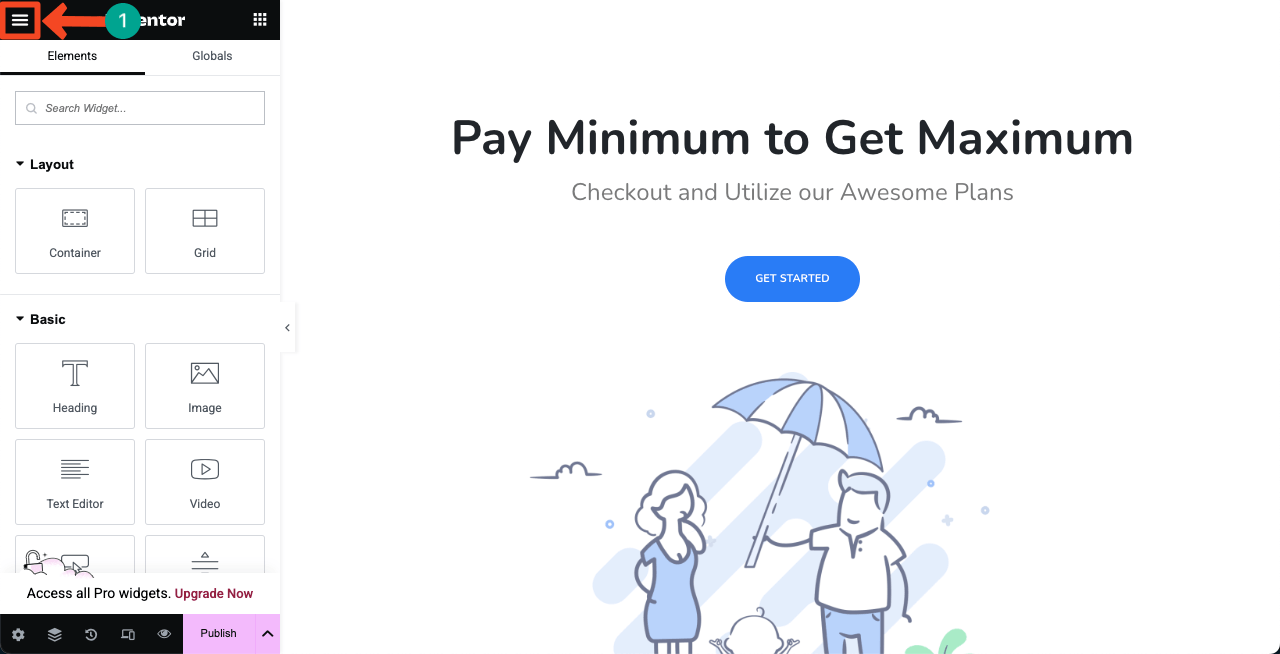
Go to the Site Settings option by clicking it.
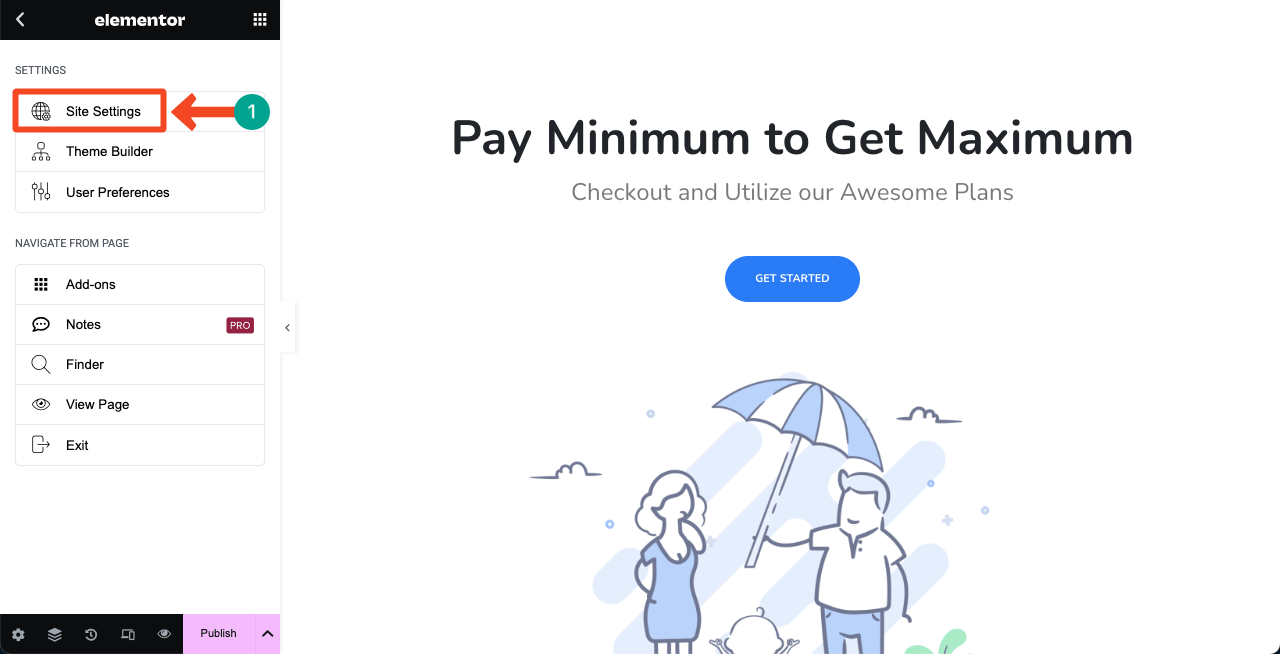
By scrolling the Elementor panel, locate the Reading Progress Bar and click it.
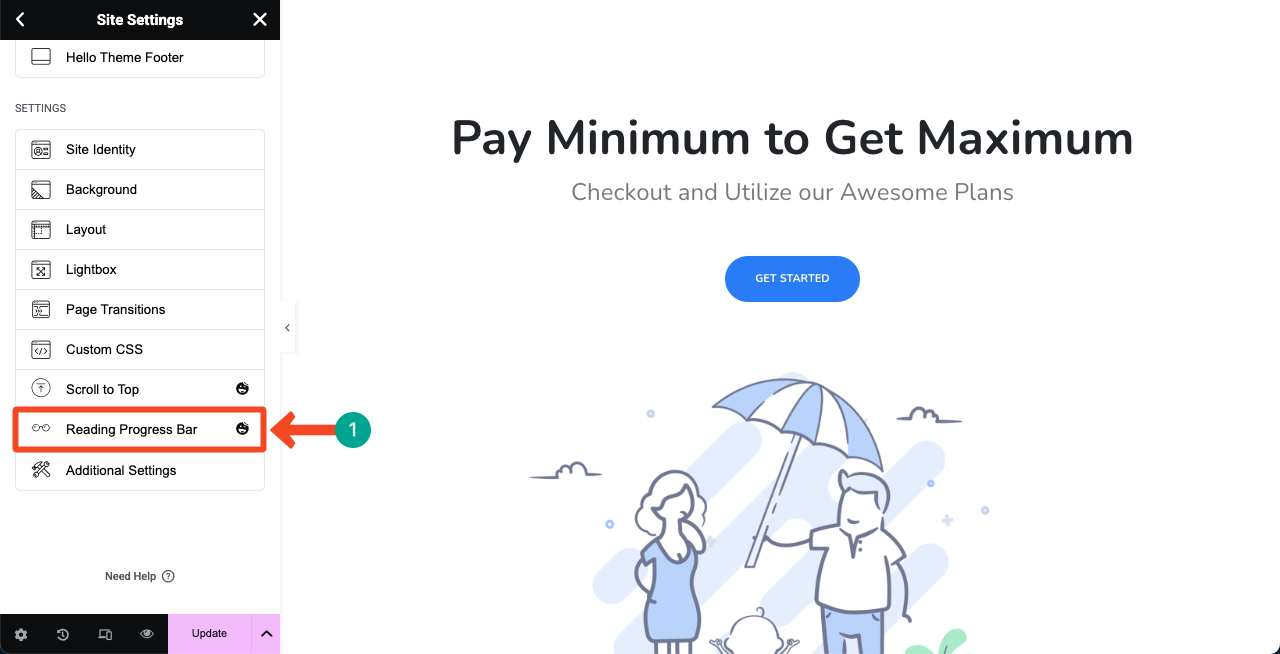
Toggle on to enable the Reading Progress Bar option.
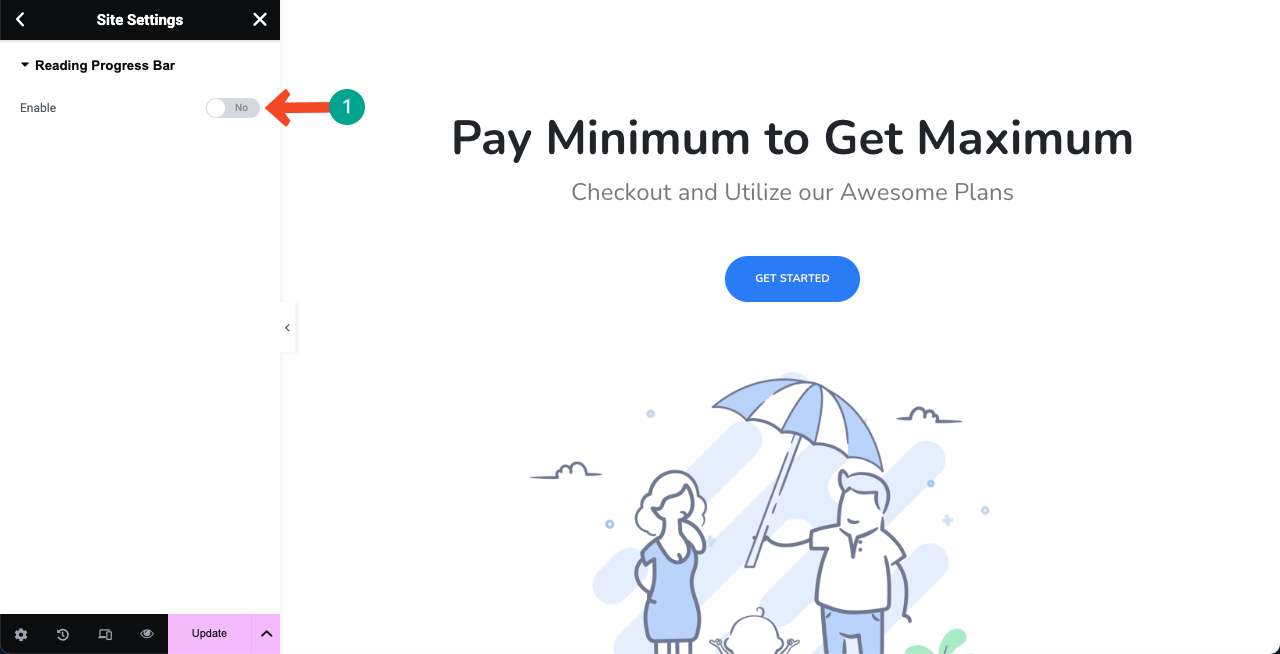
Step 04: Configure the Reading Progress Bar Option
Once you have enabled the Reading Progress Bar option, you’ll get numerous options to configure the feature.
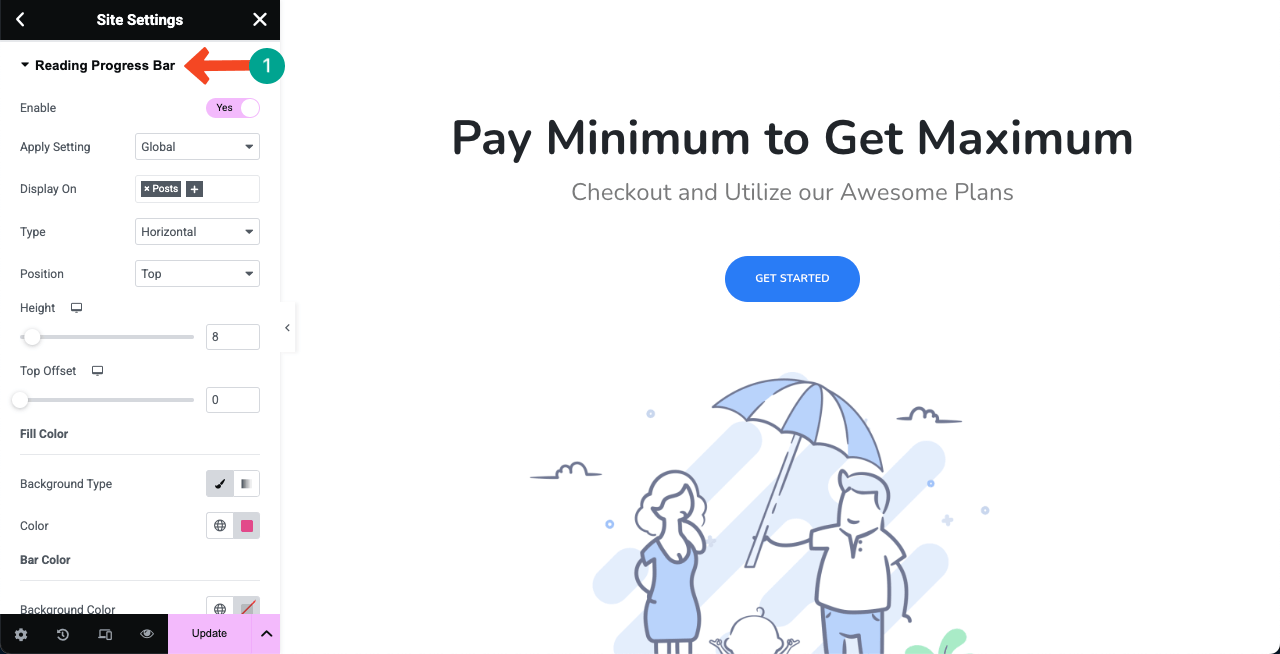
# Select Where to Display The Progress Bar
You may choose to display the progress bar throughout your site, meaning over all posts and pages. Or, you may choose to display it selectively.
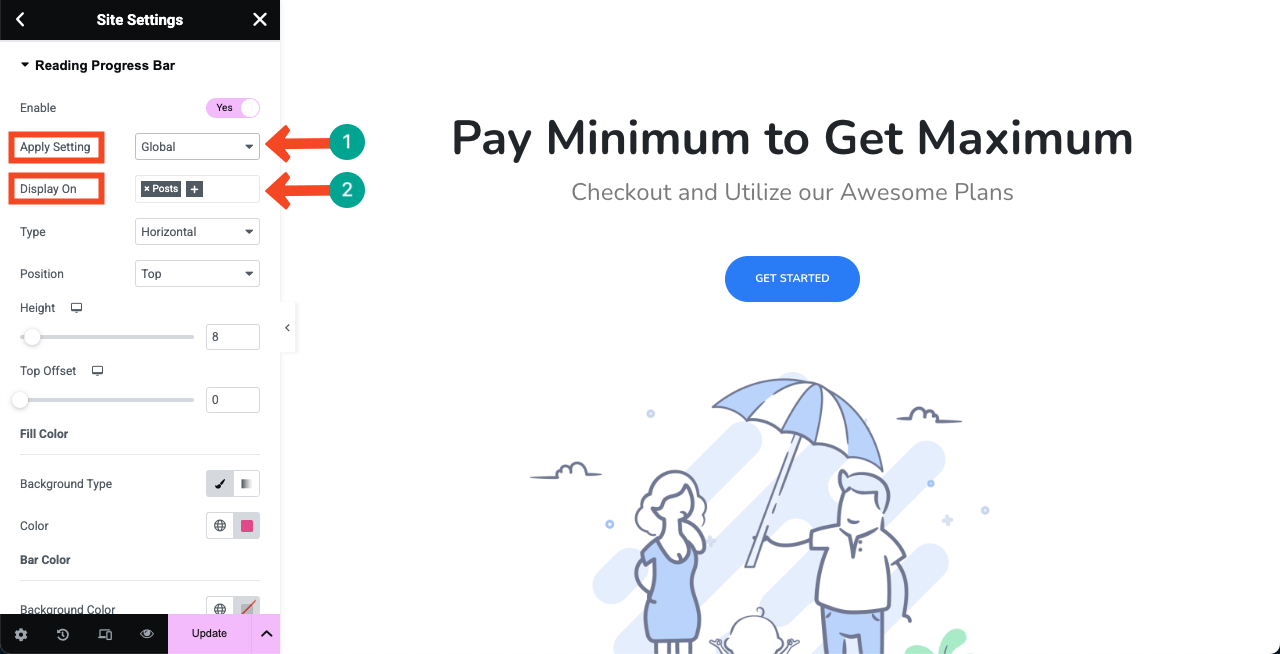
If you want to display it both on posts and pages, select them in the box next to Display On.
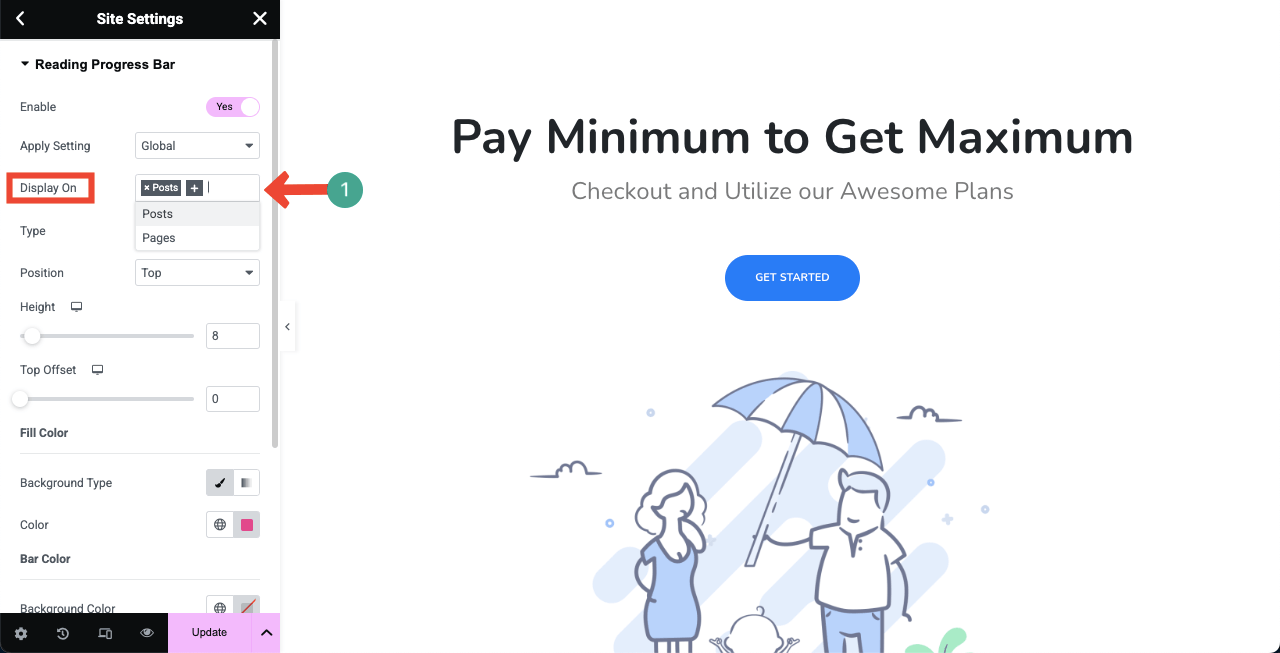
# Select a Progress Bar Type
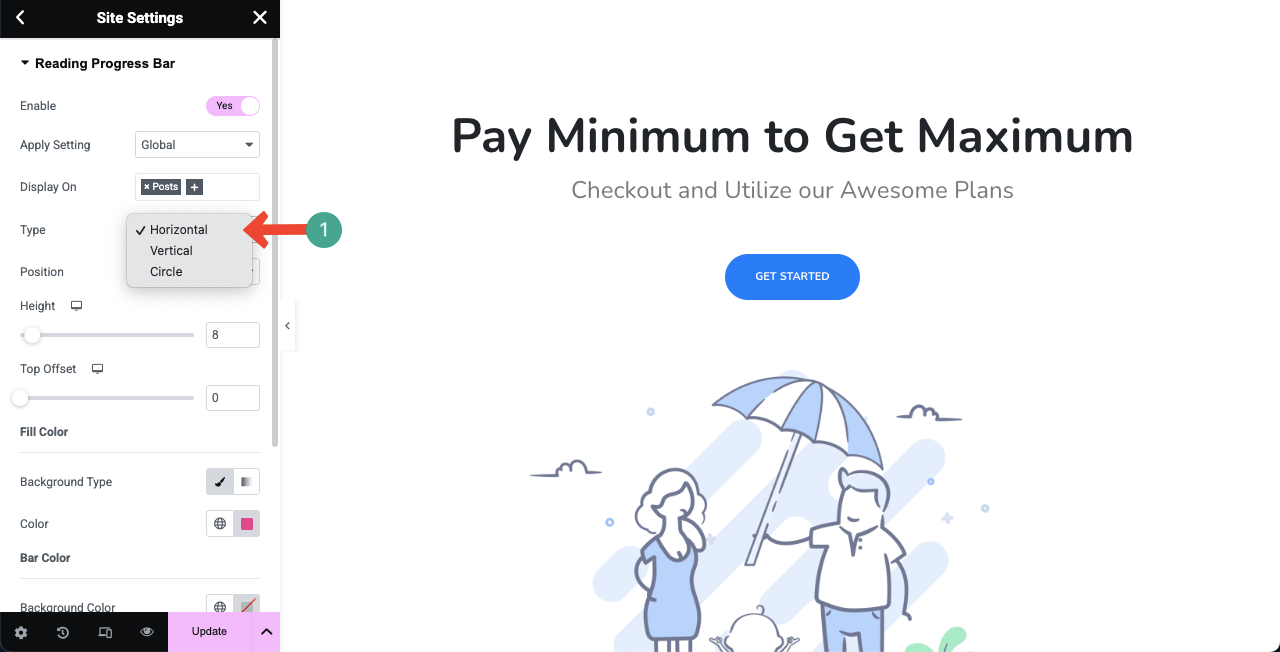
HappyAddons allows you to choose from three types of progress bars – horizontal, vertical, and circle. So, choose any of them, click the dropdown option next to Type.
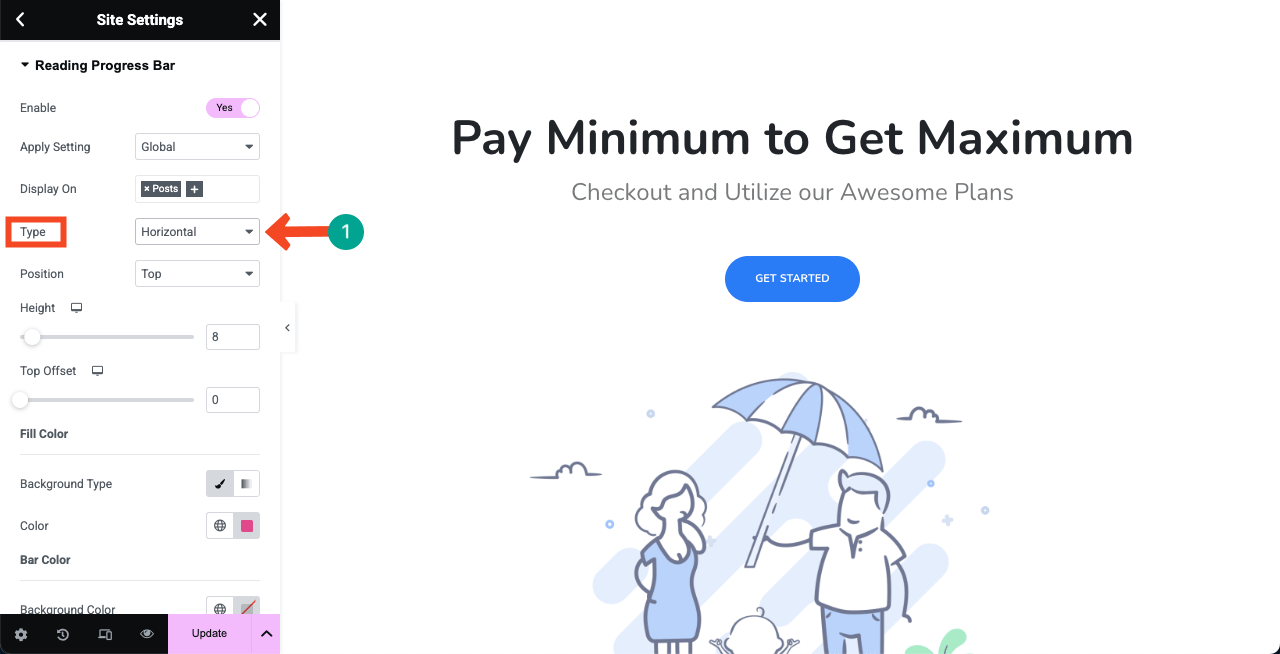
You’ll see the options. Choose a type you want. For the tutorial, we’ll go with the Horizontal type.
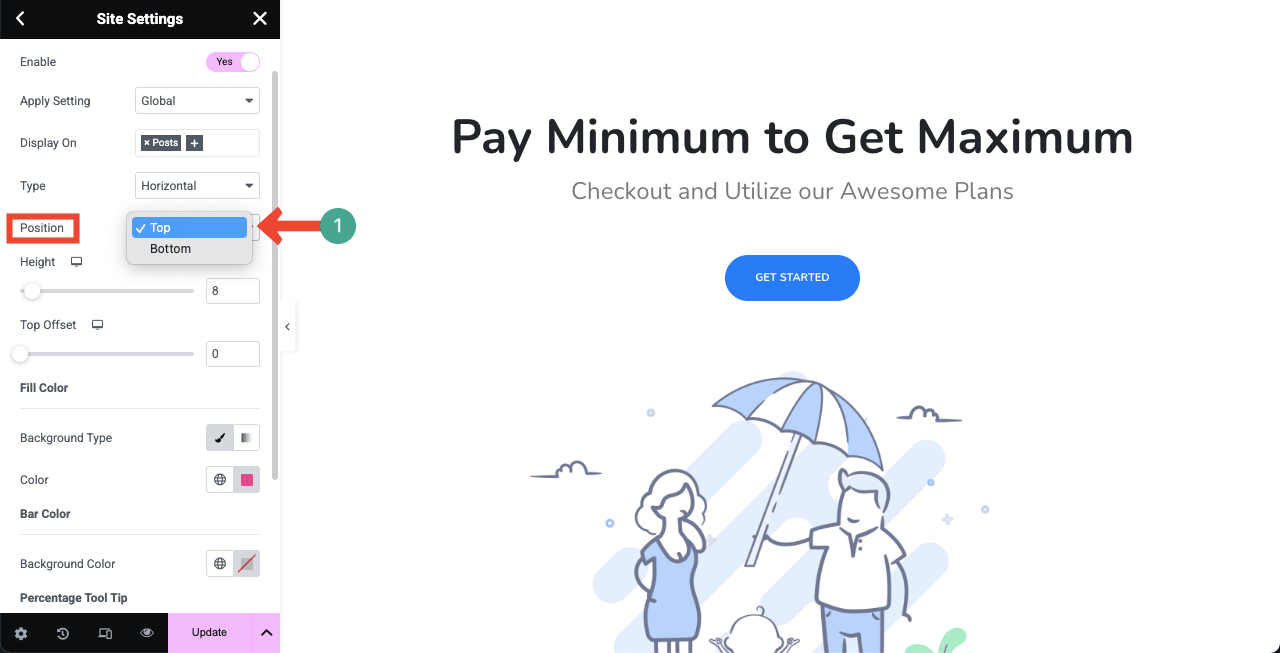
# Select a Position for the Progress Bar
You can display the progress bar either on top or at the bottom. So, choose where you want to display it from the Position option next to it.
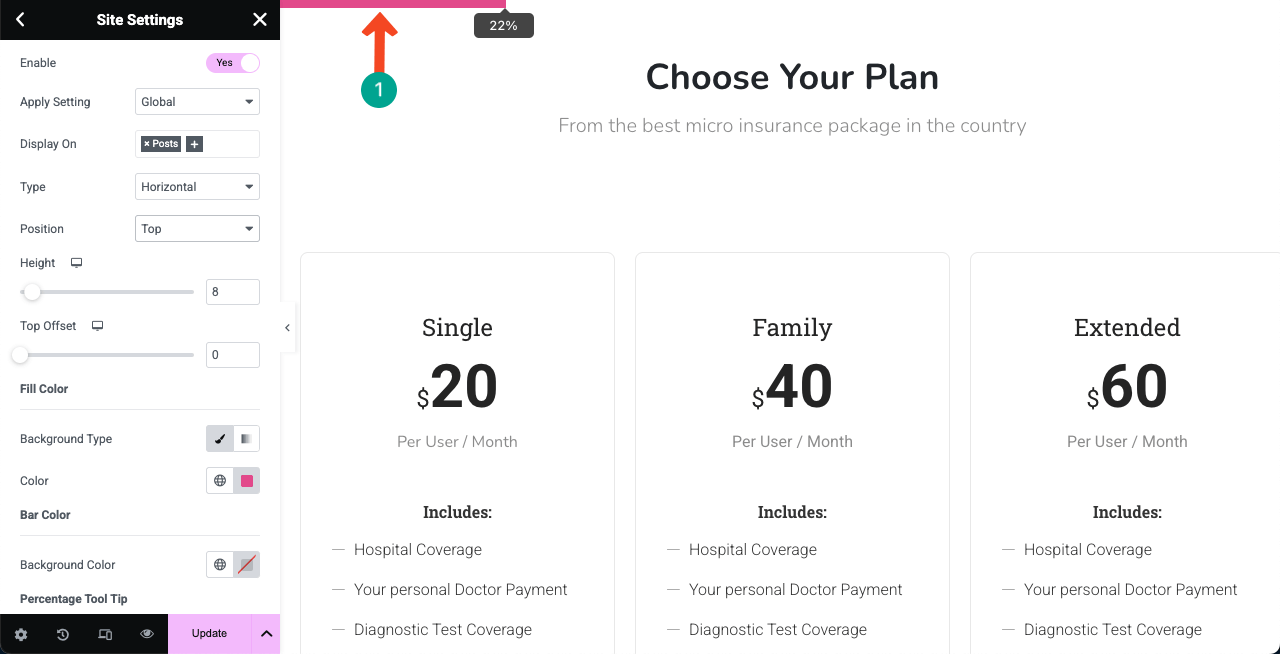
As we have scrolled the page, you can see a progress bar appears on top of the page.
# Stylize the Progress Bar
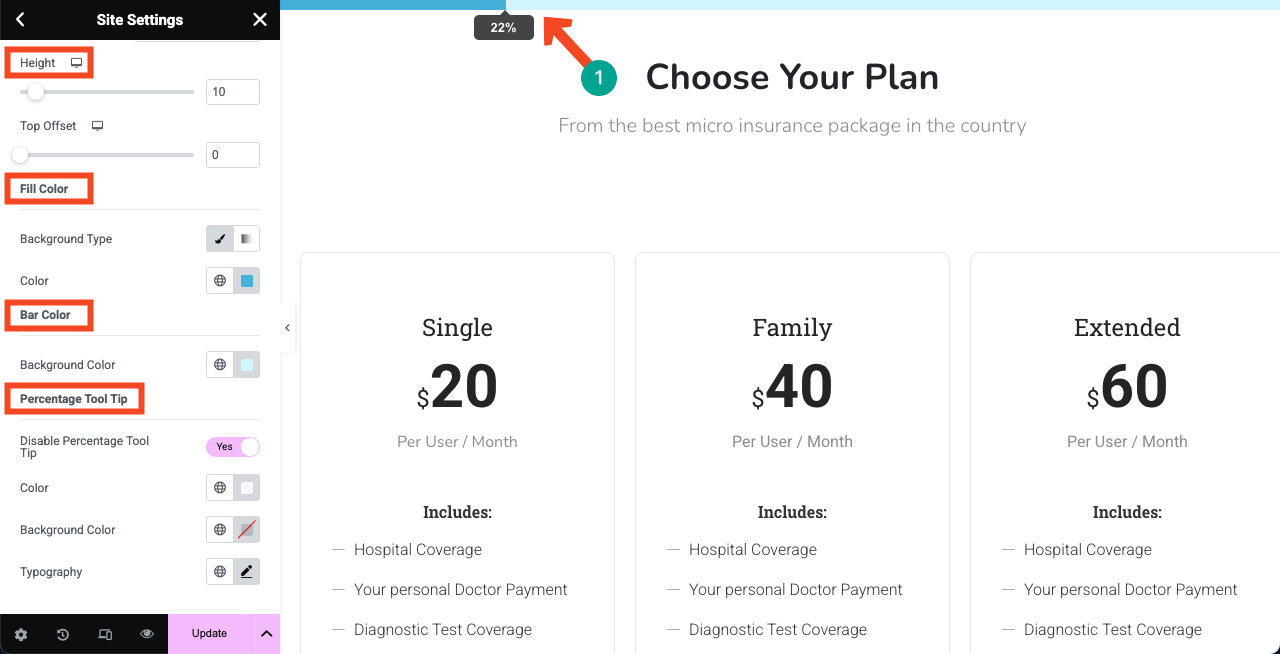
From the same Elementor panel, you can customize the height, progress bar color, background color, and percentage tooltip of the progress bar feature.
Hope you can do this customization yourself.
Step 05: Preview the Progress Bar
Once you are done, go to the frontend of your site. Check if the progress bar works well or not by scrolling your screen.
Thus, you can easily add the reading progress bar to WordPress using the Elementor and HappyAddons plugins.
How the Vertical Progress Bar Looks
Above, we have shown you the process of creating a horizontal progress bar. In the same way, you can enable and display the vertical progress bar on your site. Once you enable it, the progress bar will look like the one shown in the video attached below.
How the Circle Progress Bar Looks
Here again, following the same process, you can display the circle progress bar on your WordPress site, configuring its stylization and settings. You can watch how it looks on the frontend from the video attached below. The circle progress bar appears on the top-right corner.
What Else Can You Do with HappyAddons?
Once you have HappyAddons, not only can you overcome the shortcomings of Elementor but also enjoy many more exciting features and widgets. Take a look at what more you can do with the HappyAddons plugin.
a. Use a Theme Builder
HappyAddons’ Theme Builder allows you to customize every aspect of your WordPress site’s template parts, including headers, footers, single pages, single posts, and archive pages. The great news is that the Theme Builder feature is completely free to use, which is a premium feature in Elementor. Check how to access HappyAddons theme builder.
b. Enhance WooCommerce Sites
HappyAddons Pro offers a powerful suite of WooCommerce widgets to enhance your eCommerce store’s design and functionality. WooCommerce widgets that HappyAddons offer are Product Grid, Product Carousel, Product Category Grid, Product Category Carousel, Single Product, Mini Cart, Cart, Checkout, and Shipping Bar.
c. Craft Creative Content
HappyAddons provides over 130 widgets and two dozen exciting features to make a website highly exciting. Using them, you can highlight valuable information on your site in an extremely creative way that looks both good and appealing to the users.
d. Create Infographic Posts/Pages
HappyAddons enables the creation of visually appealing infographic-style posts and pages using widgets like Bar Chart, Skill Bar, Interactive Charts, and Post Grid. As a result, you can display comparisons like sales or survey results with customizable colors and labels. Learn how to create an infographic web page with Elementor.
e. Cross-Domain Copy Paste
The Cross-Domain Copy Paste feature in HappyAddons Pro lets you copy widgets, sections, or entire pages from one domain and paste them to another, retaining all styles and settings. This is a time-saver for developers or agencies managing multiple sites.
In addition to all these, you’ll have a resourceful template library, live chat, comprehensive documentation, and a YouTube tutorial playlist to make your web design journey with HappyAddons extremely enjoyable.
Final Thoughts!
Hope you enjoyed this tutorial. We have been constantly writing more and more tutorial-based blog posts on our website to make your no-code web design journey more helpful and efficient. As you have read the entire post, you obviously have an idea of what more you can do with the HappyAddons plugin.
If you have both Elementor and HappyAddons on your site, you can do real magic. You can check reviews about HappyAddons on WordPress.org and other review sites to explore how much our users are satisfied. After all these, if you have any questions in mind, you can leave a comment below or give a knock on our support chat box.

