The 500 Internal Server Error can be frustrating for both website owners and visitors. Because, when this error occurs, it affects the entire website or specific pages which make them inaccessible from the frontend. The error indicates that something has really gone wrong on your web server.
Various factors can cause the 500 Internal Server Error. As a result, there is no single-step method to trace it. You have to go through several trial-and-error efforts to find the exact cause behind the error. In this article, we’ll explain all the possible steps of how to fix 500 internal server error in WordPress.
Let’s begin. Before diving deep, we’ll cover some theoretical parts.
What Is a 500 Internal Server Error?
A 500 Internal Server Error is an HTTP status code that indicates some problem(s) might have occurred on the server where the website is hosted. While most other error codes specify the nature of the problem, 500 Server Error doesn’t specify anything.
For example, 404 error indicates a missing page, 401 error requires user authentication, 502 hints about a bad gateway, and 504 refers to gateway timeout.
But in the case of the 500 Internal Server Error, you have to find out the nature of the problem yourself. This might be challenging for website owners and developers.
What Causes the 500 Internal Server Error?
As already said there are several factors that cause the 500 internal server error. Let’s take a quick look at the factors in the list added below.
- Corrupted or broken .htaccess file
- PHP memory limit exhaustion
- Conflicting or faulty plugins
- Incompatible or corrupted theme
- Incorrect file and folder permissions
- Server misconfiguration
- Corrupt core WordPress files
- PHP version incompatibility
- Exceeded server resources (e.g., CPU, RAM)
- Database connection issues or corruption
- Syntax errors in custom code (PHP, functions.php, etc.)
- Misconfigured third-party services (like CDN or caching)
- Timeout errors in the server
How to Fix 500 Internal Server Error
So far, we have covered the theoretical part of today’s topic. We will now discuss all the possible steps by which you can detect and solve the main cause behind the 500 Internal Server Error on your WordPress website. Keep reading till the end!
Note: Before starting the following tutorial, make sure your website is backed up. If your site crashes for any reason, the backup will help you recover it without losing any files. We’ve briefly explained how to back up a WordPress website at the end of this tutorial.
Step 01: Clear the Browser Cache
Browser cache is a temporary storage within your web browser that stores copies of the web pages, images, and other resources you frequently visit. This lets you quickly load the page whenever you visit it next time, as the browser can instantly pull the resources from your local storage.
If the browser cache keeps storing corrupted or outdated files, this can create a conflict with the server-side code, which may trigger a 500 Internal Server Error. This is why clearing the browser cache is highly recommended when you face the problem.
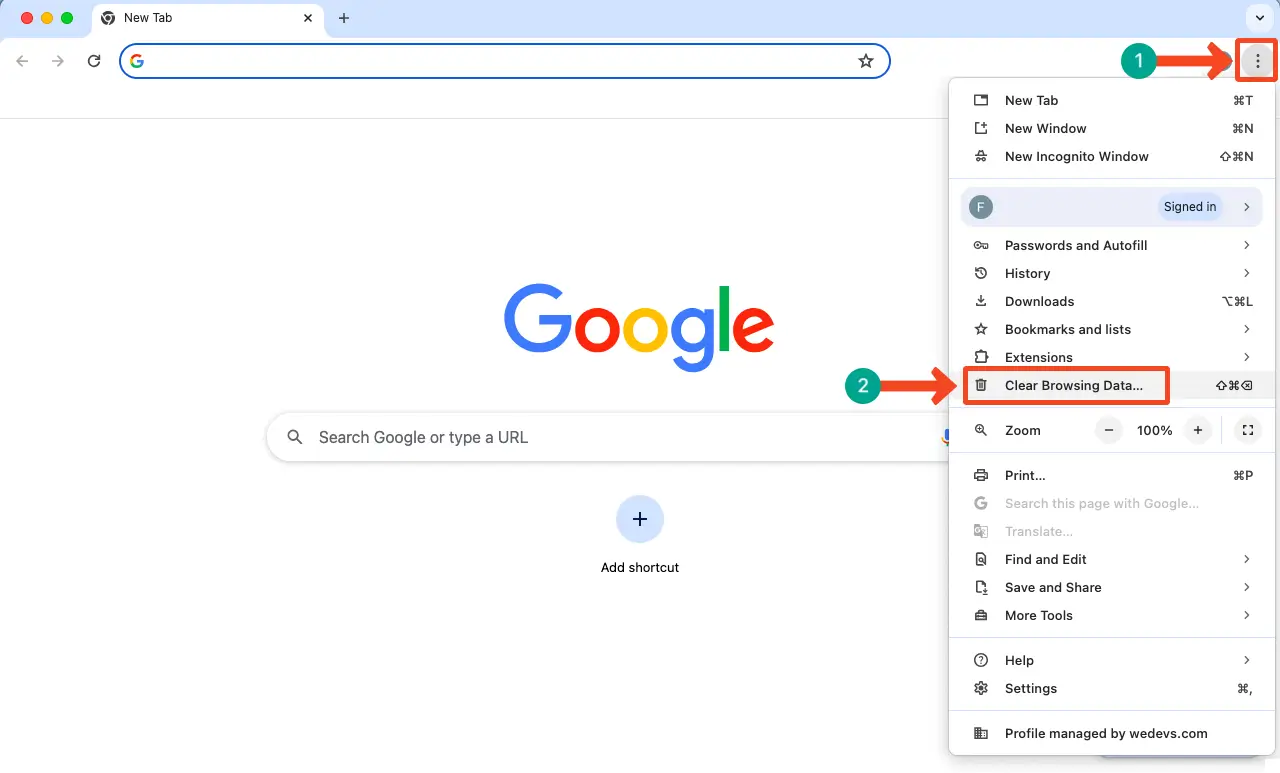
** For Google Chrome
Click the three-dot icon on the top-right corner. Find and hit the option Clear Browsing Data…
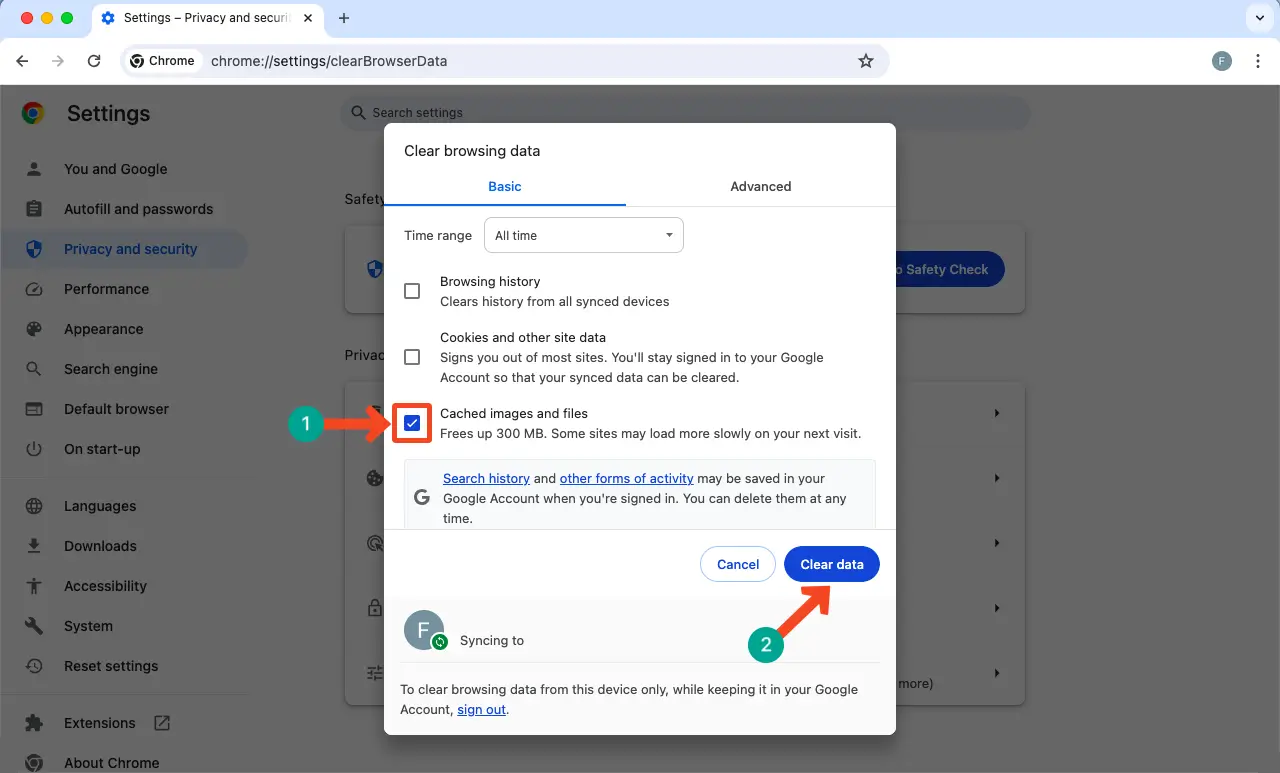
Tick mark the option Cached images and files.
Then, click the Clear data button.
We hope the problem will be resolved. The process is almost the same in other top browsers as well. Hope you can do them alone yourself.
Step 02: Clear WordPress Cache
Like the browser, the WordPress Cached files might also cause a 500 Internal Server Error. The reasons might be the same – corrupted and outdated files conflict with the server-side code. Besides, the corrupted cached files might conflict with the installed themes and plugins.
You must have a caching plugin to clear cached WordPress files. For example, we have WPRocket on one of your websites. It offers an intuitive interface. You can instantly remove all the cached files in your WordPress site by clicking the CLEAR AND PRELOAD CACHE button.
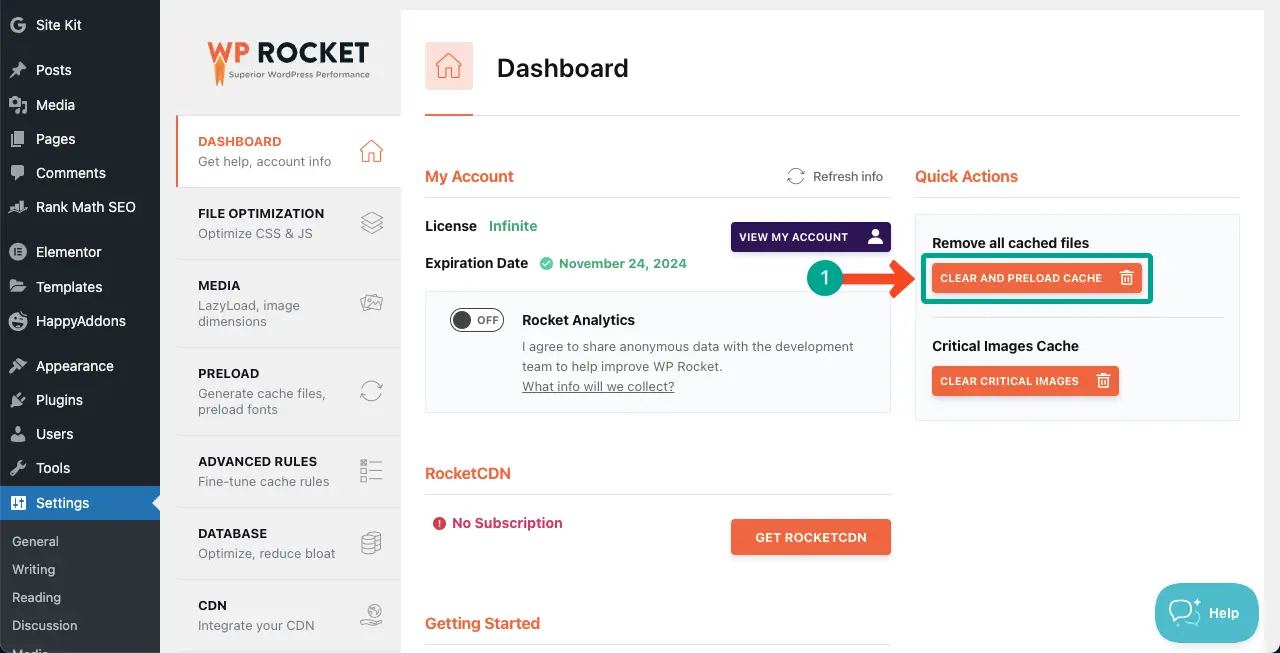
Explore the best WordPress caching plugins so you can choose one for your site.
Step 03: Check and Update the .htaccess File
.htaccess file holds and controls various server settings for a WordPress website. If it contains incorrect directives, syntax errors, and incompatible rules, your site will surely face server malfunctions, including 500 Internal Server Error.
You must check the file and ensure that all rules on the file are correct and appropriate for your server configuration.
How to Check Error in .htaccess File
There are many syntax checkers online that you can use to validate if your .htaccess file is correct or has any errors. For example:
- Syntax validator
- PHP Code Checker – Syntax Check for Common PHP Mistakes
Just copy and paste the .htaccess file code on the validator. If there is any error, they will show it to you. See the image slider below. Then, fix the error as you can.

But if you are a no-code user, it’s better not to edit the file but regenerate a new one. Below we have explained the process.
How to Regenerate a .htaccess File
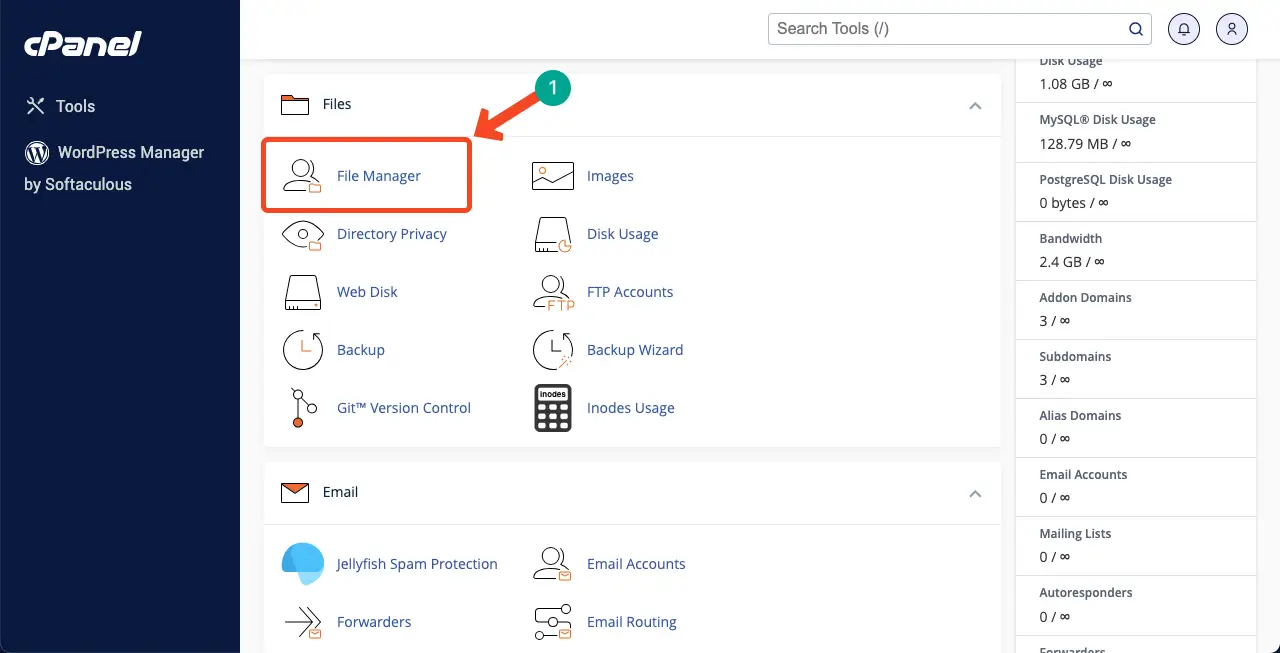
Log into your cPanel. Then, go to File Manager.
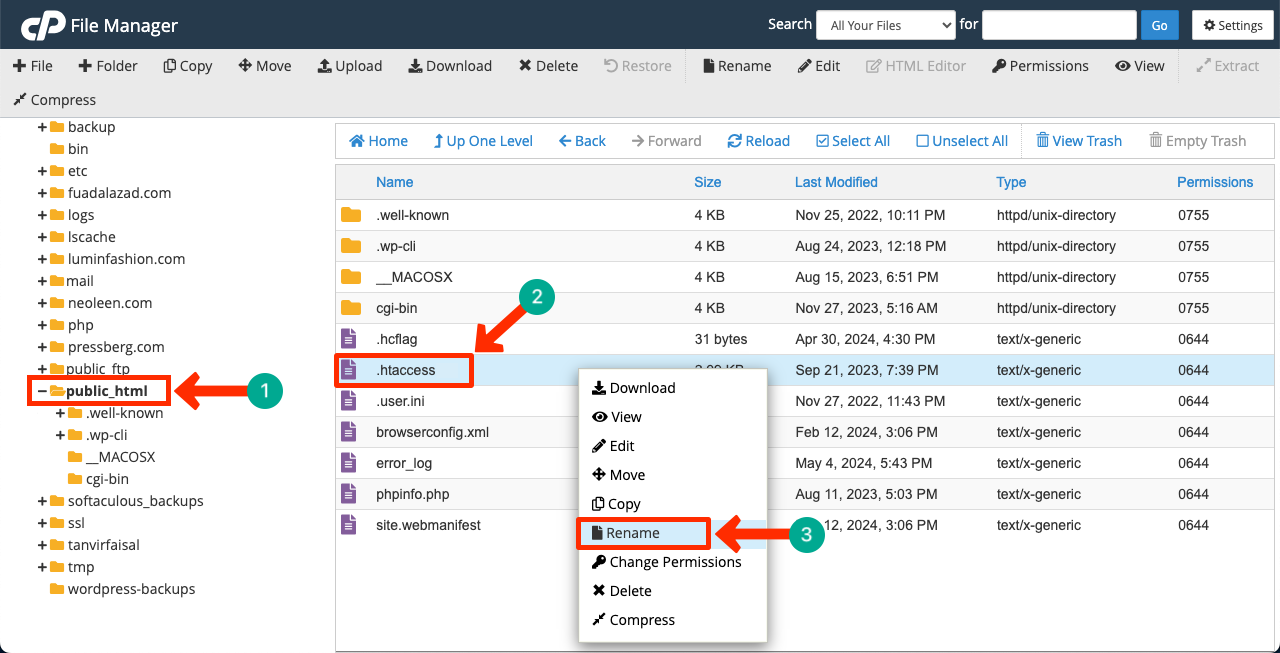
Click public_html to extend the folder. You’ll see the .htaccess file on the right side.
Right-click your mouse. Select the Rename option on the list.
Rename the file .htaccess_old.
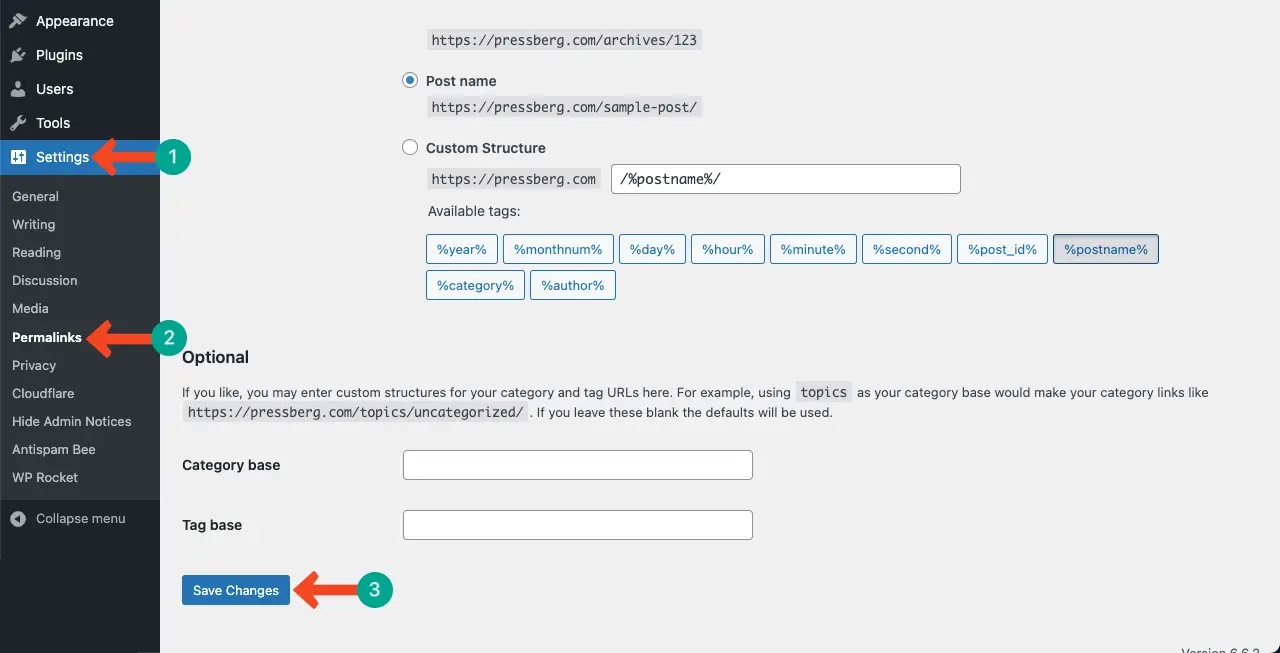
Now, come to your WordPress dashboard. Navigate to Settings > Permalinks.
Click the Save Changes button.
A new .htaccess file will be generated in your file manager.
Hope the error is resolved. If not, keep implementing the following guides.
Step 04: Deactivate All WordPress Plugins
This step is very simple. Many times, a bug in one of your installed plugins can be one of the reasons for a 500 internal server error. In such a situation, the immediate thing to do is to identify and deactivate the plugin and notify the respective developers. But how to detect the faulty plugin?
Then, start activating each plugin one by one. If the problem reoccurs after activating the last plugin, You must note that the bug is within it. Ask developers to resolve the bug as soon as possible and release a new update.
This usually happens when you use null themes or plugins. This is why we highly recommend you avoid using such tools. Explore our post on why you should avoid using null plugins.
Step 05: Switch to a Default WordPress Theme
This step is almost similar to the immediate last step. Like plugins, a bug(s) might be created in your activated theme. To check it, switch your site to a default WordPress theme. If the error is resolved, take note that the problem is within your theme.
Again, in this case, ask the respected developers to fix the bug and release a new update as soon as possible. Take a look at what default WordPress is and how to change it.
Step 06: Remove and Re-Upload Core WordPress Files
As already said before, your core WordPress files might get corrupted. It may happen for numerous reasons. If the error is not resolved even after executing all the above steps, you can try removing and reuploading your core WordPress files.
Remove the Old Core WordPress Files
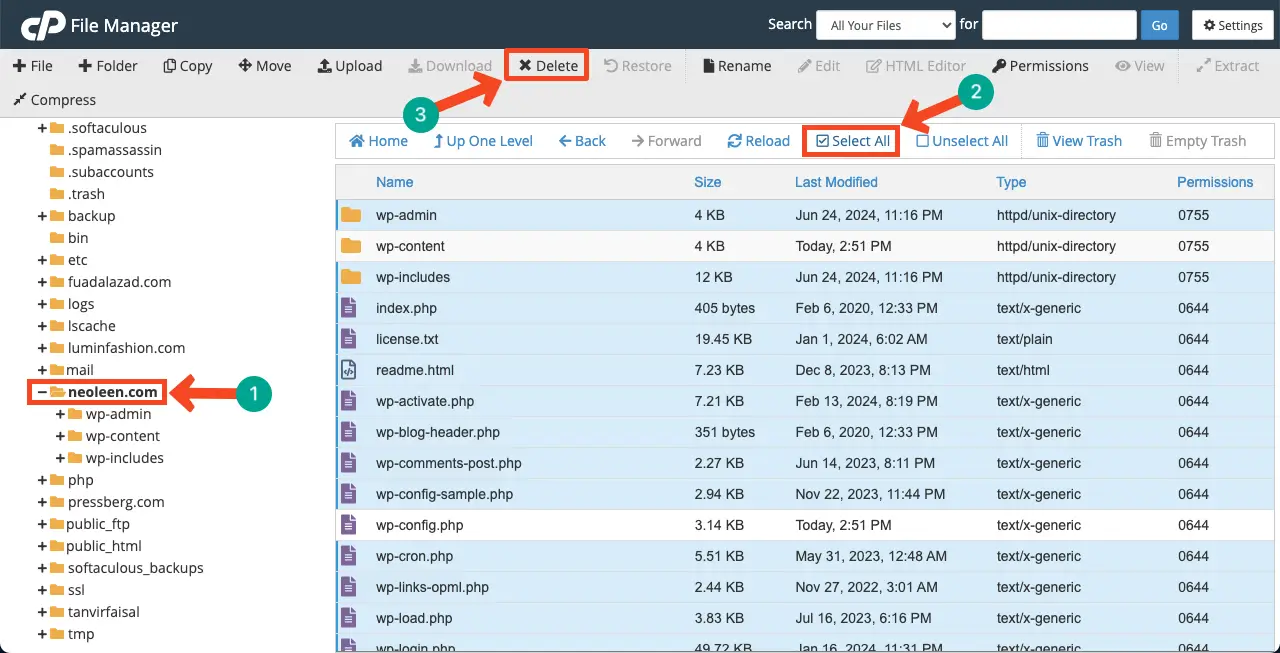
Go to File Manager on your cPanel.

Your hosting panel may host multiple sites. In that case, click the particular domain whose core WordPress files you want to delete.
Select all files except wp-content and wp-config.php files. Once they are selected, hit the Delete button.
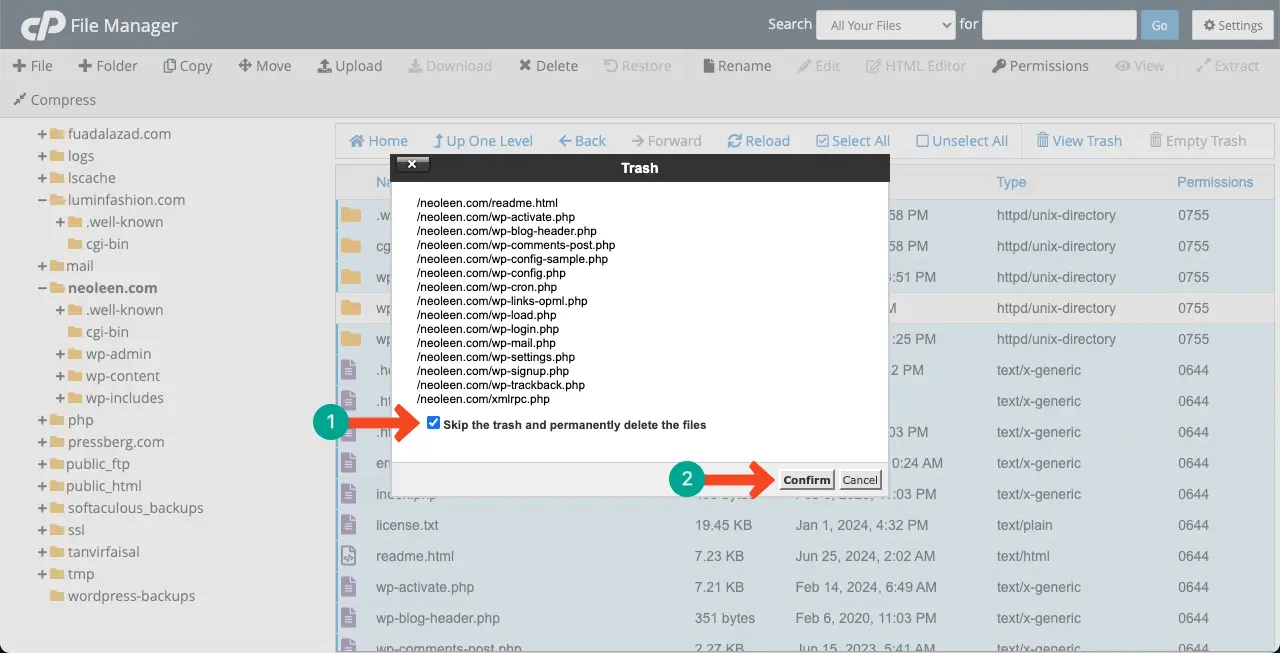
A popup will open up. To permanently delete these files, check the box coming with the popup.
Click the Confirm button at the end.
Re-Upload Core WordPress Files
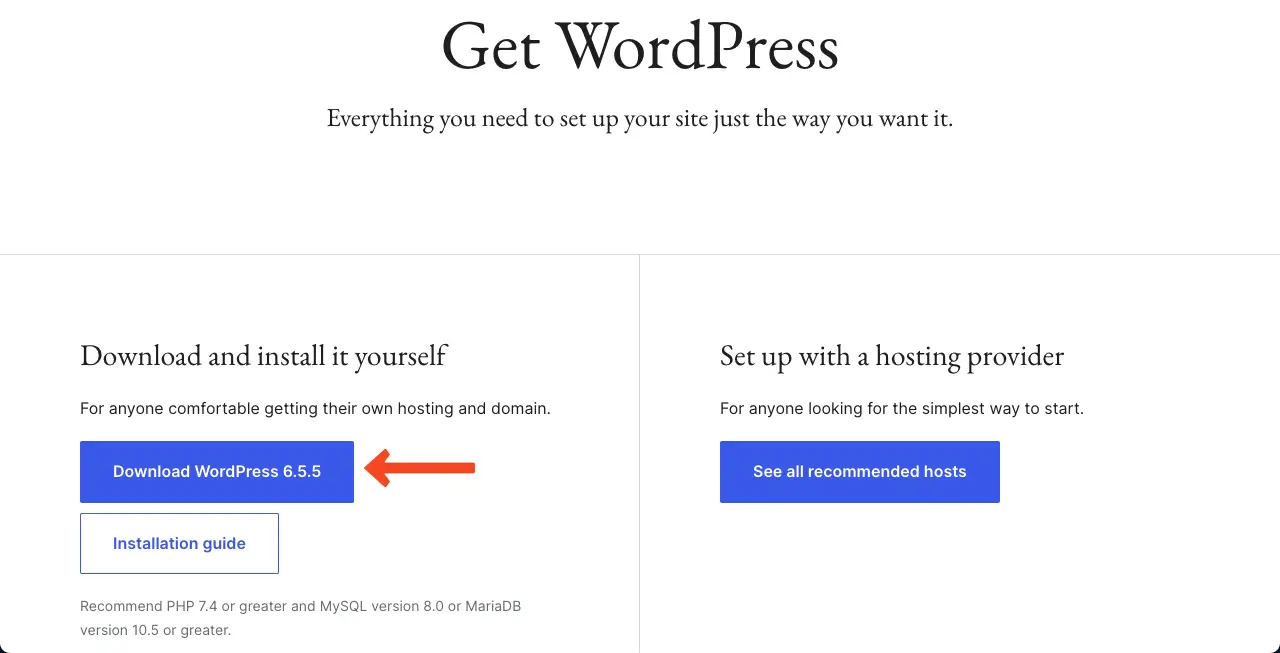
Go to download WordPress. Download the WordPress files by clicking the button on the left side. Always try to download the latest version of WordPress files.
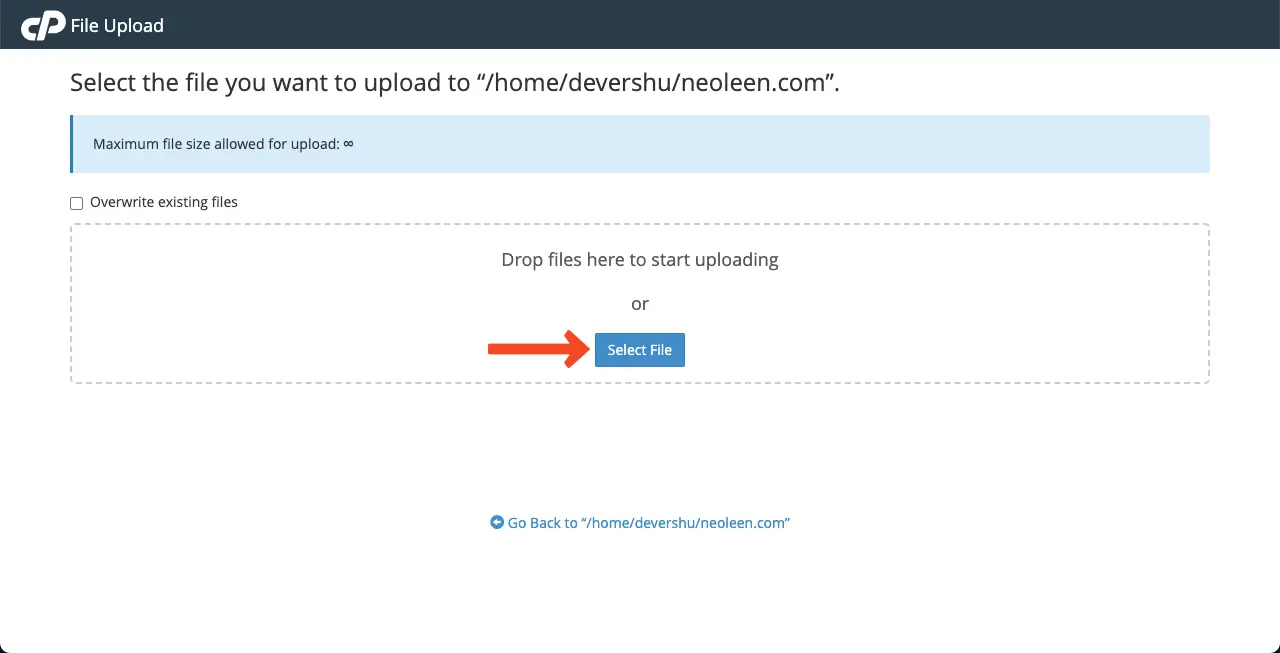
Come to the file manage again. Click the Upload button.
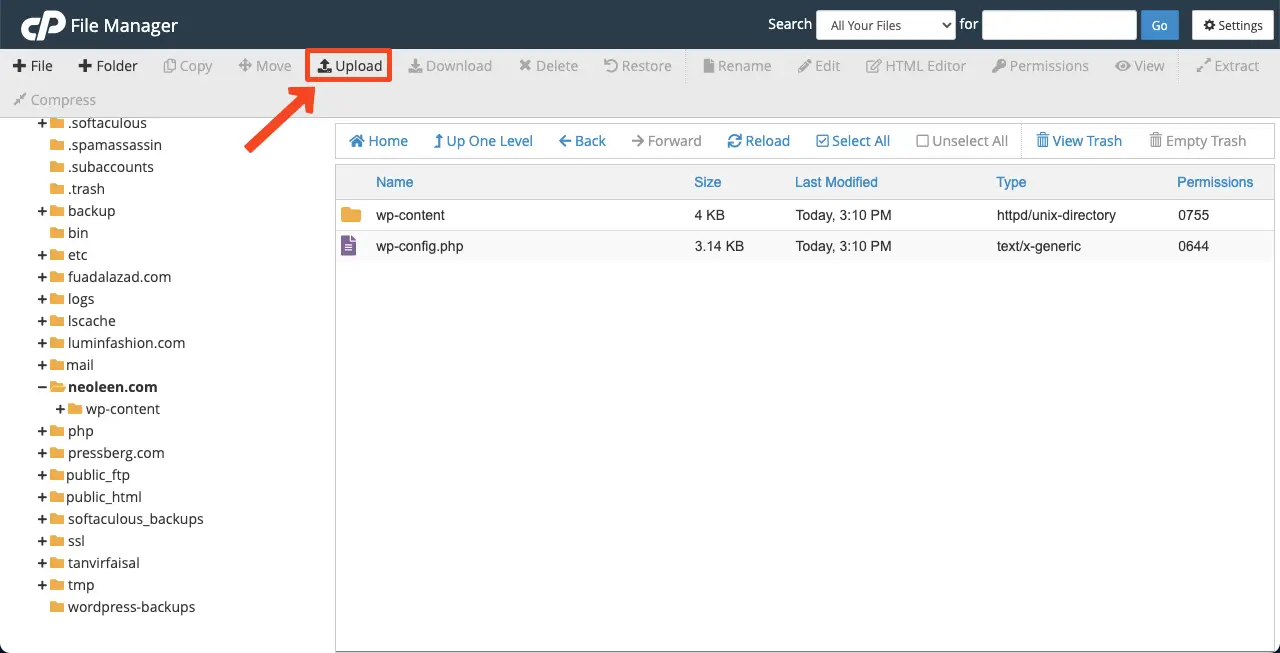
By clicking the Select File button, you can initiate uploading the file you downloaded just a minute ago.
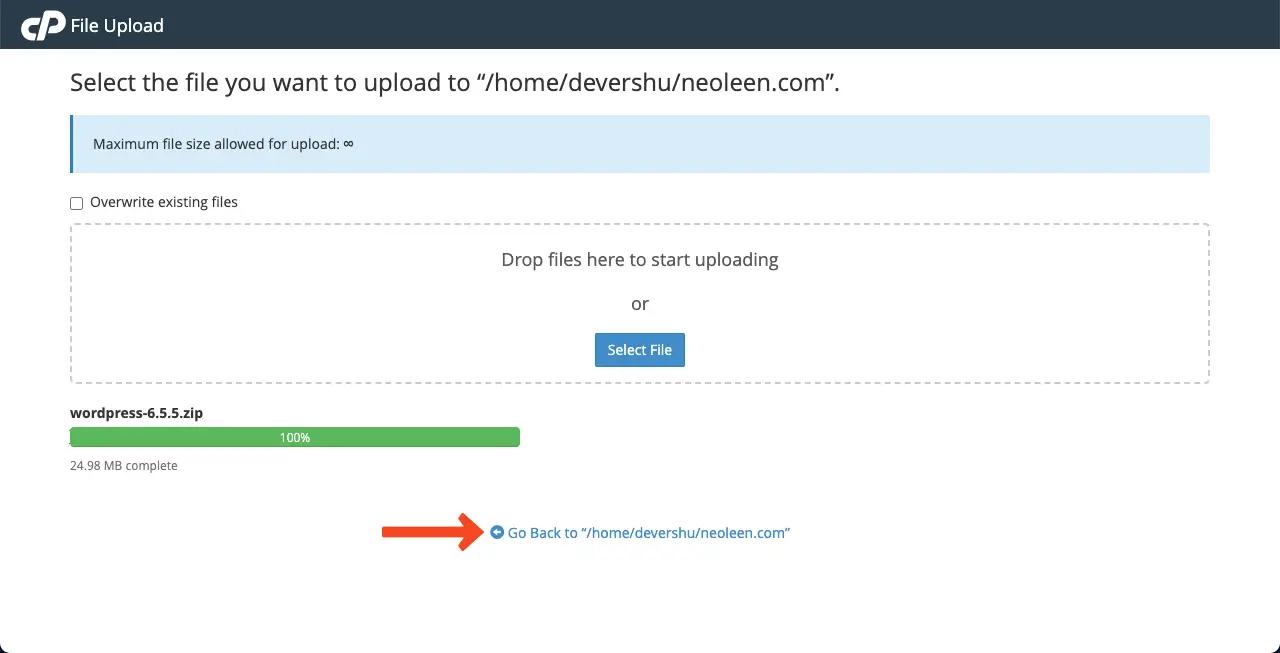
After completing the upload, go to your file manager again by clicking the link in the image below.
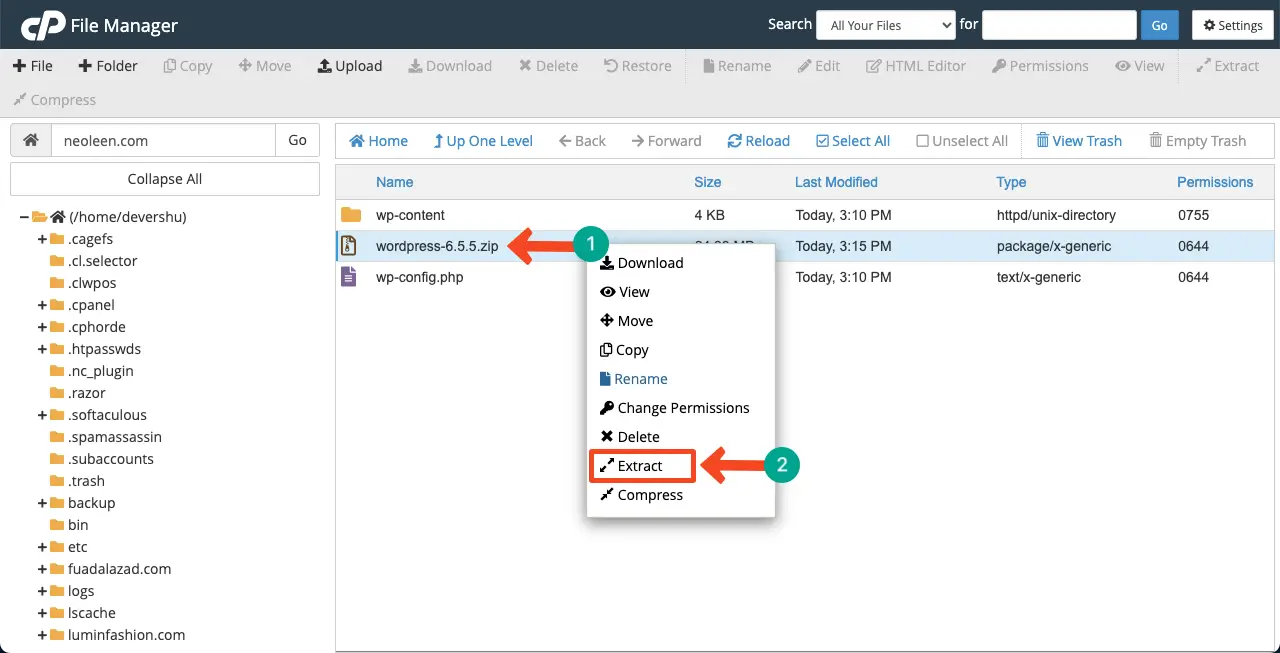
You’ll see the core WordPress file as ZIP in the file manager. Right-click on the file and select the extract option.
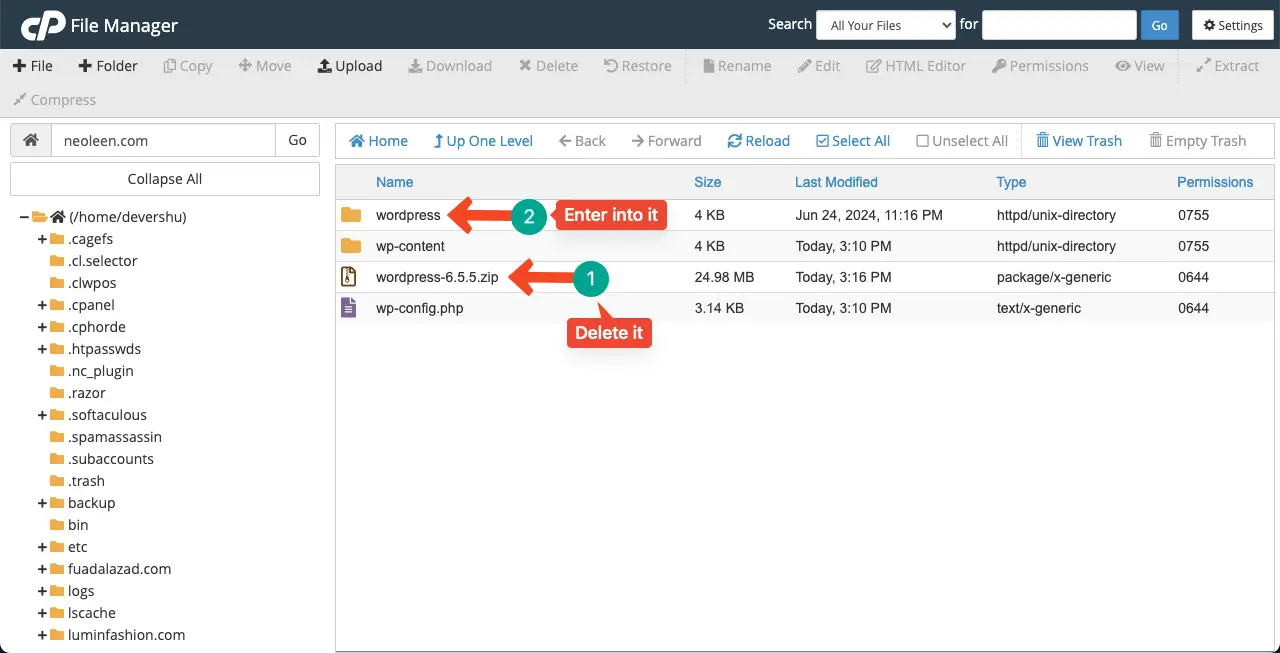
Delete the ZIP file. Then, enter into the WordPress file.
Select all the extracted files except wp-content and wp-config.php. Because these two files are already present in the main folder.
Click the Move button on top. Type your domain’s name into the Enter the file path box.
Finally, click the Move Files button on the popup.
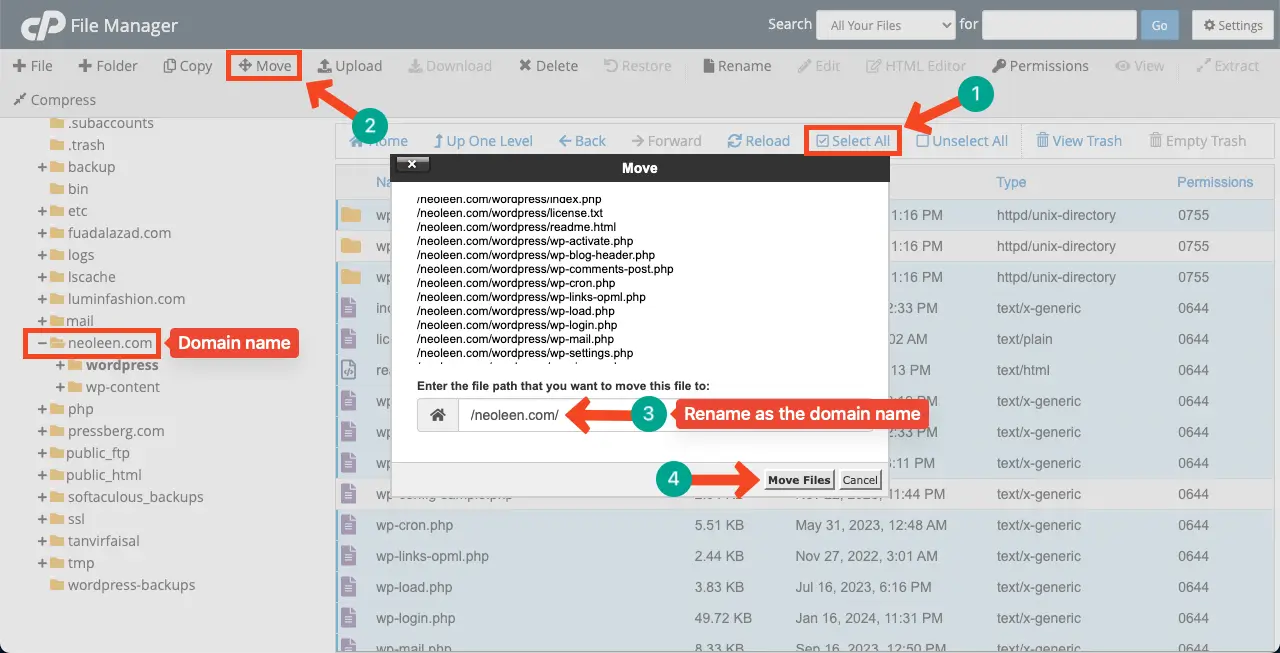
After the files are moved, the WordPress folder will be empty and useless. So, delete it.
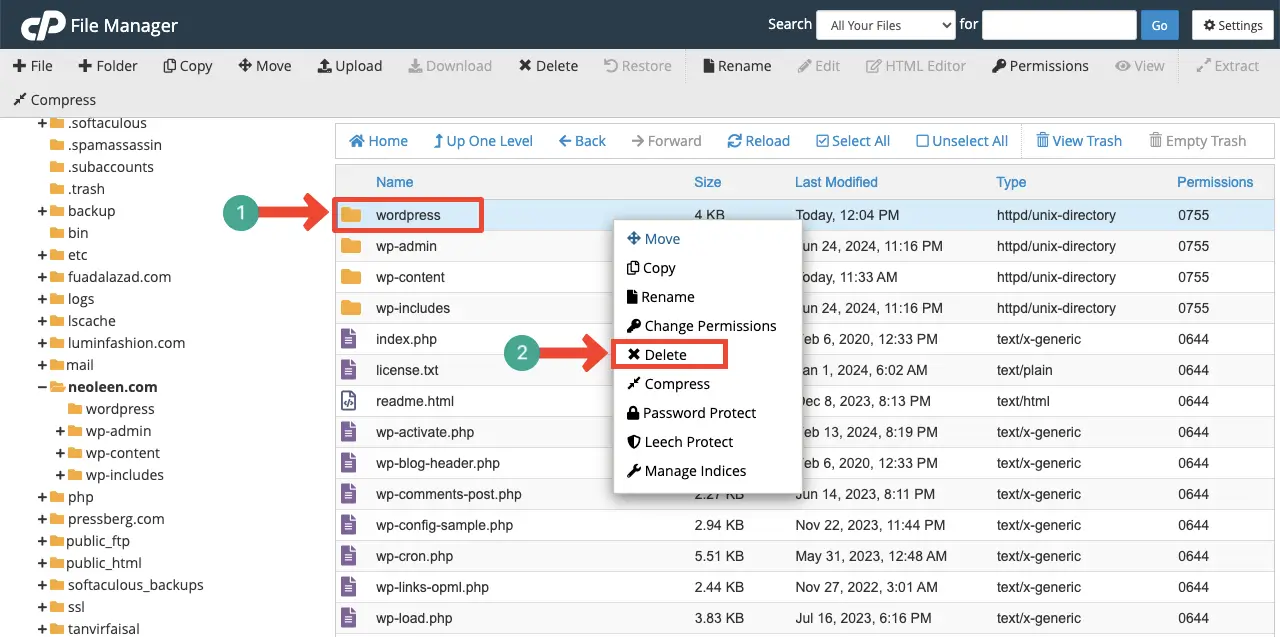
Thus, you can remove and re-upload the core WordPress files on your cPanel. Hope the error is fixed.
If not, keep following the below steps as well.
Step 07: Increase PHP Memory Limit
Insufficient PHP memory limit may often prevent PHP scripts from properly executing. When a script faces limitations in the available memory, it can lead to various fatal errors, including the 500 Internal Server Error. You can solve this problem by increasing the memory limit.
Go to your cPanel. From under the Software section, open the MultiPHP INI Editor.
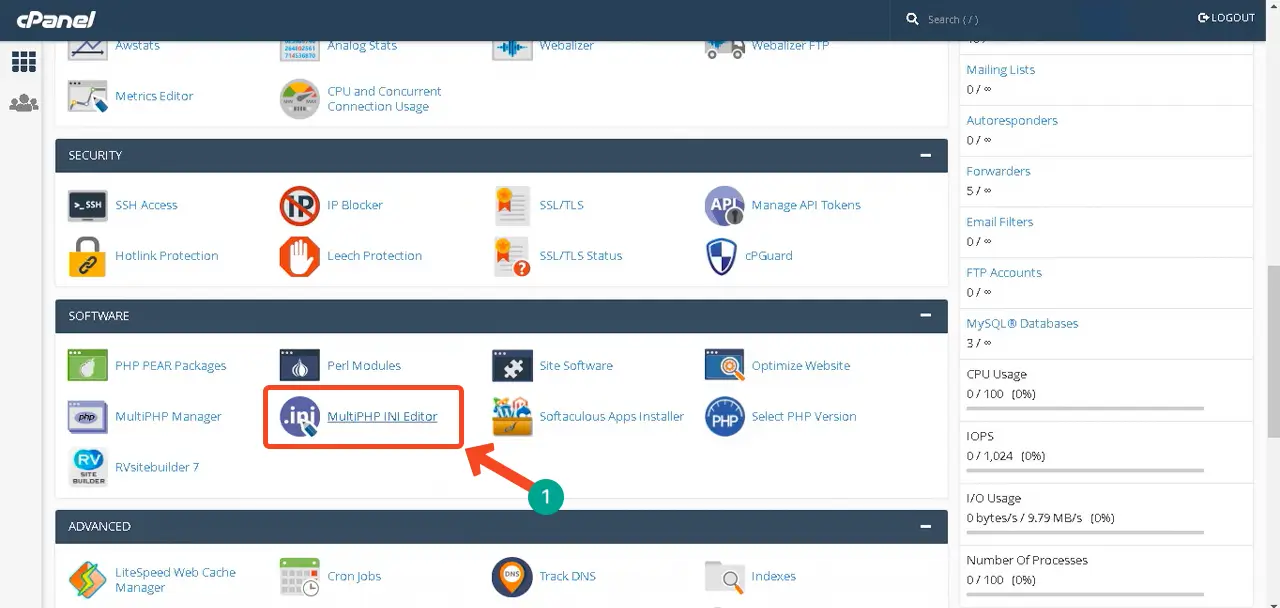
Select the domain whose PHP Memory Limit you want to increase.
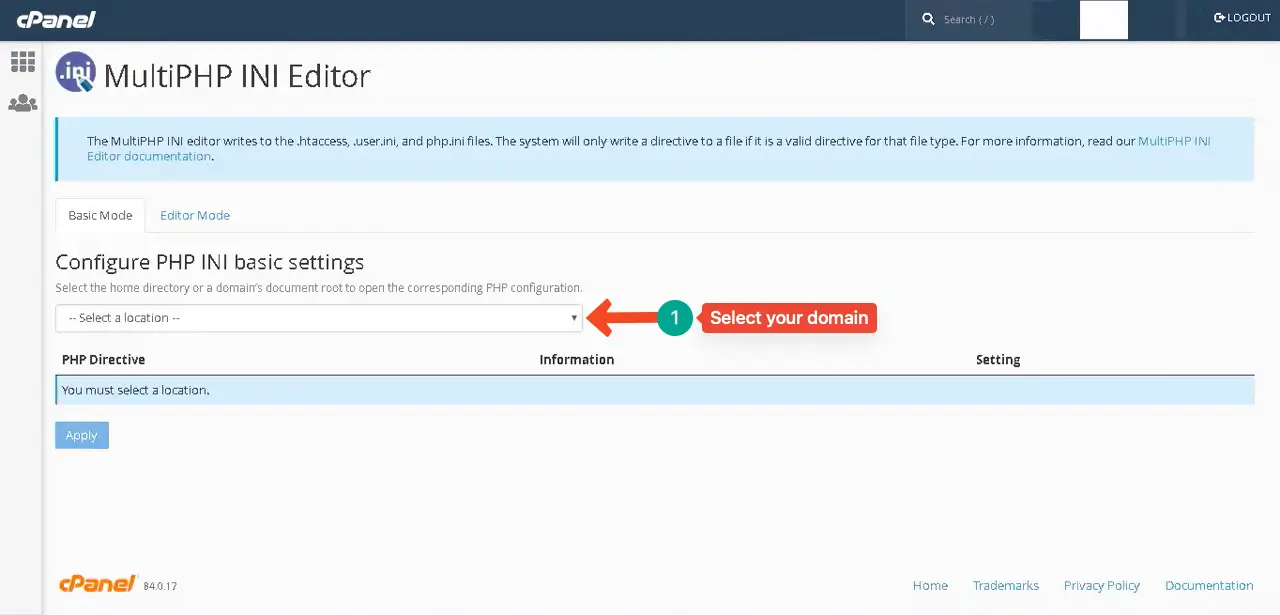
Come to the upload_max_filesize option. Here, you can set the maximum file upload size you need.By scrolling, come to the end of the page.
Press the Apply button to save the changes.
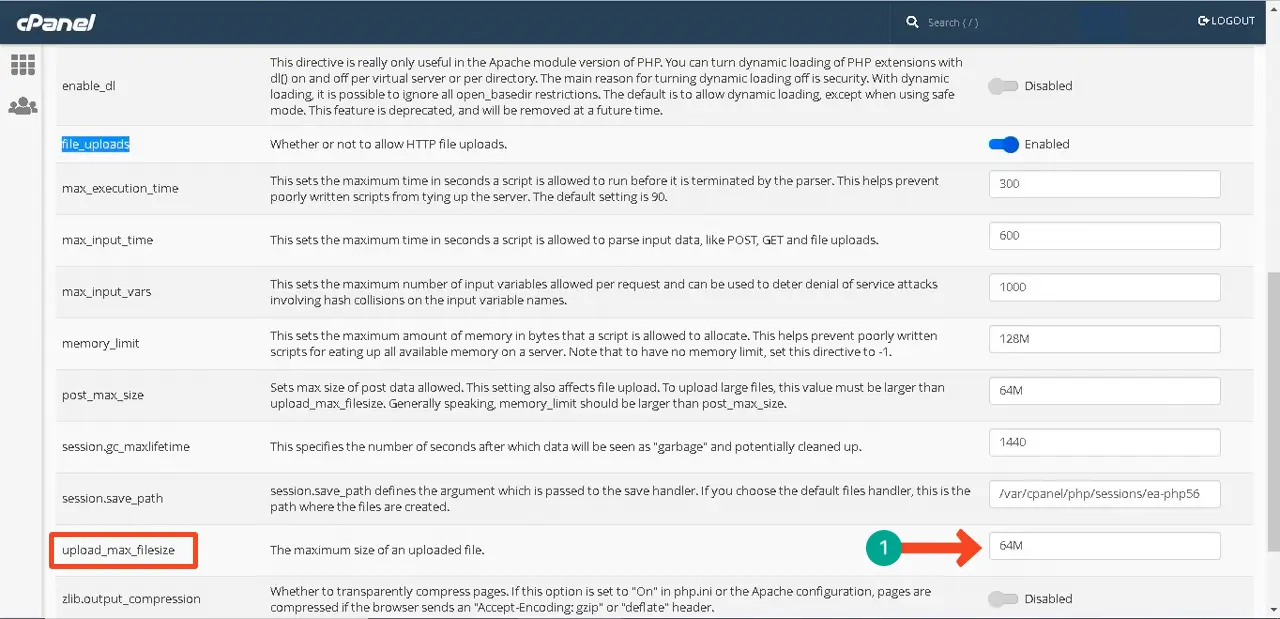
There are several other ways to increase the PHP memory limit. Explore them in this post on how to increase the PHP memory limit (3 methods).
Step 08: Switch to a Compatible PHP Version
As your core WordPress files, plugins, and themes depend on PHP, your site must have a compatible PHP version enabled. Otherwise, you may face the error. Changing the PHP version is very easy. Let’s follow the guide.
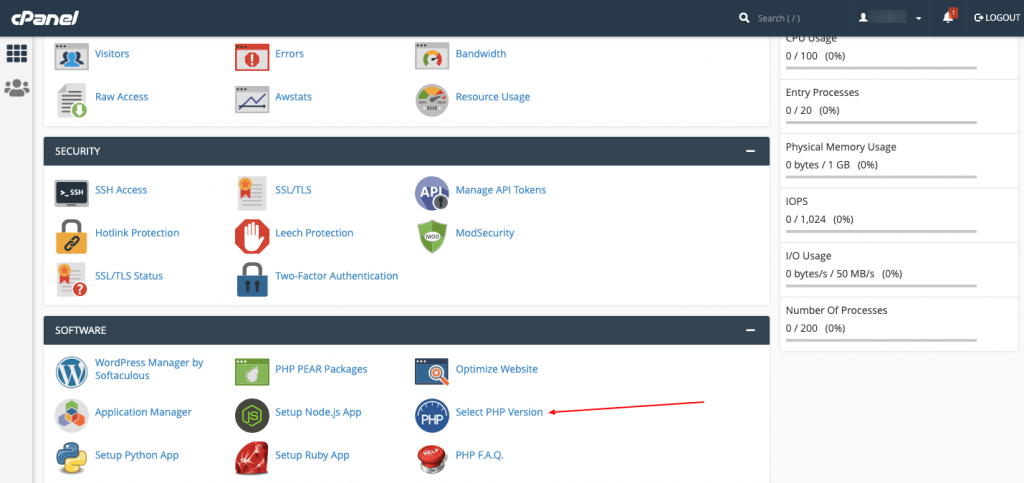
Go to your cPanel. From under the Software section, click the Select PHP Version option.
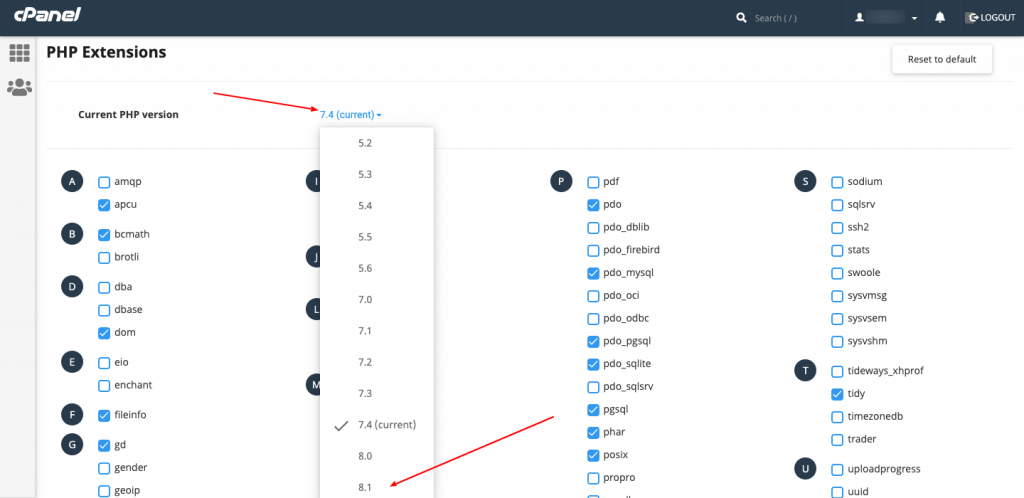
Next to the Current PHP version, you’ll get a dropdown icon. Clicking the icon will open up a list of PHP versions. Select a version you want.
Usually, most WordPress themes and plugins are compatible with the latest PHP version. So, if you were using an old version, it’s better to switch to a newer, latest version.
Step 09: Check For Error Establishing a Database Connection
When WordPress fails to connect to the MySQL database, it’s termed as Error Establishing a Database Connection. In this situation, WordPress fails to retrieve and display your website content to the users, triggering 500 Internal Server Error.
There are several methods of fixing this problem. They are:
- Checking the database login credentials
- Repairing the corrupted database
- Resolving server issues via the web host
- Troubleshooting WordPress files
We have already covered a long and detailed blog post on this topic. So, it’s better if you explore the post on how to fix Error Establishing a Database Connection.
Step 10: Fix Permission Errors
Permission Errors take place when the server cannot access or execute certain files due to incorrect folder or file permissions. This can be another reason for the 500 Internal Server Error.
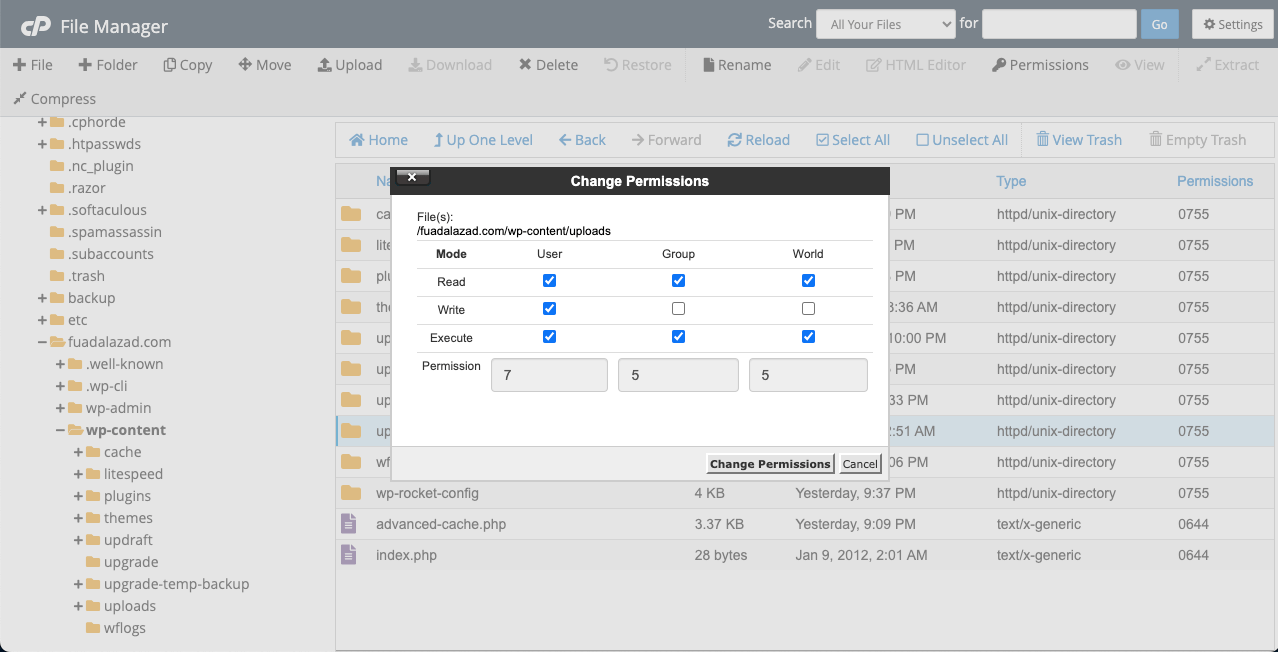
To fix this, go to your File Manager. Navigate to wp-content > uploads.
Then, right-click the Uploads folder. Select the Change Permissions option.
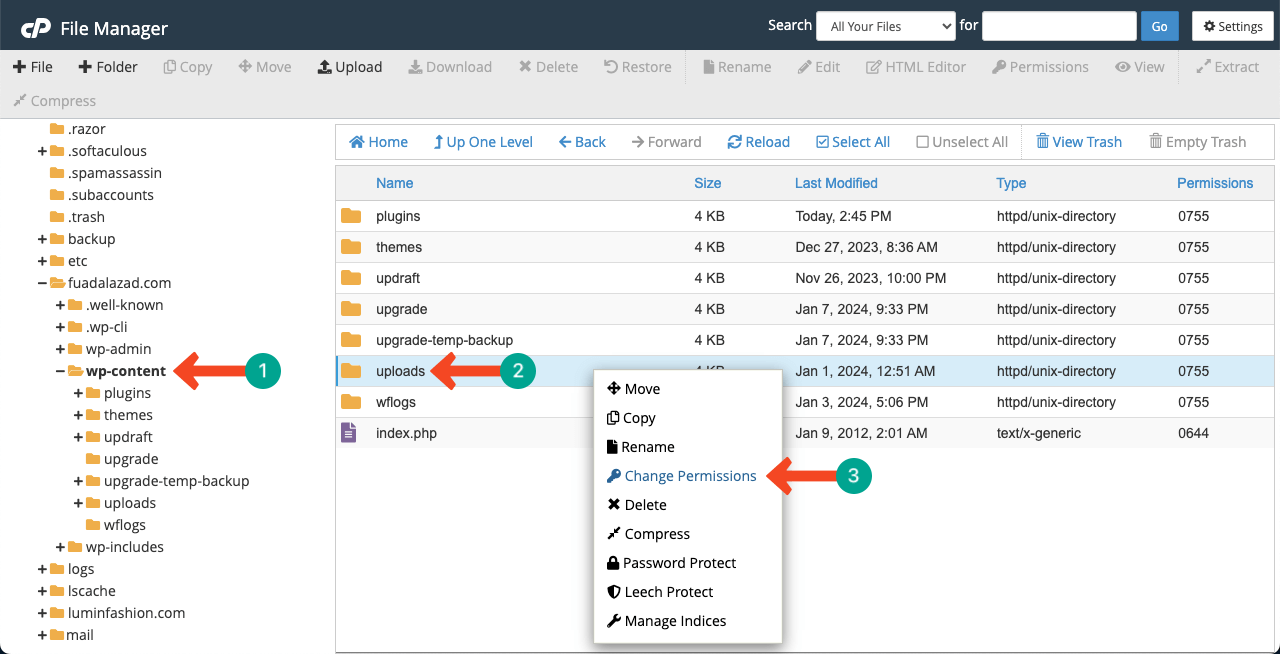
Our recommended values are 755 and 644. These permissions ensure that the website owner can access the files and folders.
You can change these numbers by typing or ticking marks on the respective boxes.
Step 11: Contact Your Hosting Provider
What you have done so far, your 500 Internal Server Error should be solved. But if it’s not resolved yet, even after doing all these, you should finally contact your hosting provider. Because you have done enough. And there is nothing left for you to do.
If your site is hosted on a reputed hosting platform, you’ll provided with real-time live chat support. But you may miss this facility if your site is hosted on a local and less popular server. So, check some of the best managed hosting providers for WordPress.
Bonus Point: How to Backup Your WordPress Website
We don’t need to describe again the importance of keeping a backup of your website. Let’s jump into the quick tutorial below.
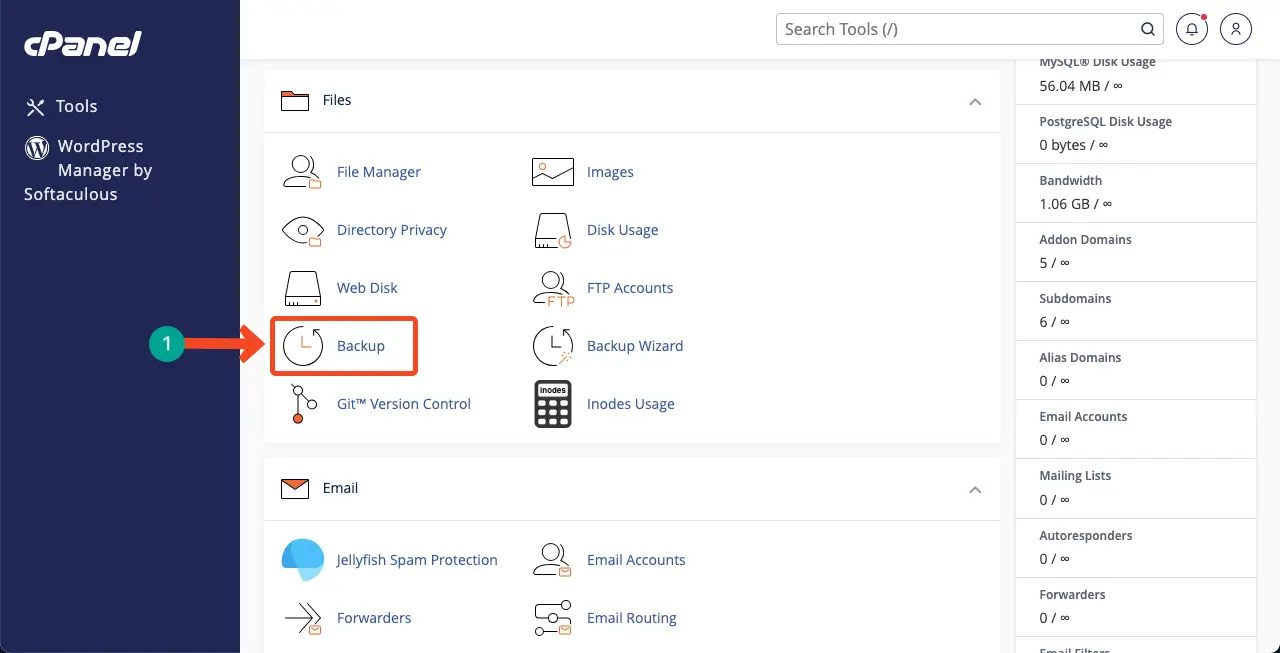
Log into your cPanel. Then, click the Backup option.
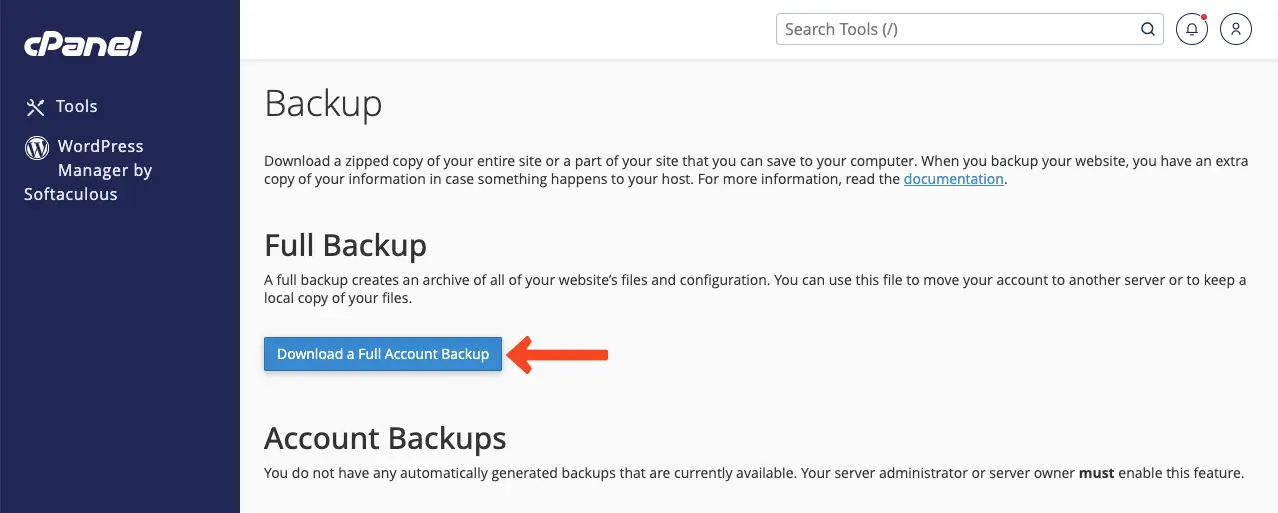
Click the Download a Full Account Backup button. It will take only a few minutes to download the backup of your website.
You can regularly keep a backup of your site using a backup plugin. So, explore the best WordPress backup plugins.
Closing Remarks!
Errors can happen on any website. This even happens on many globally famous websites. However, successful people are only those who can overcome problems within a short period. So, you must have enough training and knowledge on how to handle this.
All the steps explained in the above discussion will help you recover your site not only from the 500 Internal Server Error but also from numerous other errors. As you have read this post, we hope it will be a life-long lesson for you.
If you love to receive newsletters about more interesting articles like this one, subscribe and stay with us.

