Designing visually appealing and well-functional websites is a must for anyone to create engagement, hook audiences, and drive sales. To simplify this process, web design tools like Elementor and its addons are continually introducing innovative features and modules.
The Loop Grid is such a new widget that Elementor and its addons have developed and released for us very recently. The innovative widget lets you create and display your content in beautifully organized grid layouts.
No worries if you don’t know much about this widget in detail. In this tutorial post, we’ll cover a step-by-step guide on how to use the Elementor Loop Grid widget on WordPress with HappyAddons. Hope you will find this tutorial both helpful and interesting.
What Is a Loop Grid in Elementor?
The Loop Grid is a multifunctional Elementor widget that allows you to create dynamic layouts to display different types of content on your website and customize them at any time. This widget is particularly useful in displaying blog posts, products, and portfolio content in the grid format.
This widget is highly useful for displaying dynamic content. As soon as new posts, products, or desired content are published, they are automatically displayed through the widget without manual input. You can create unique templates to show the content as you wish.
In the next section, we’ll explain how to use the widget on WordPress. Keep reading!
How to Use Elementor Loop Grid Widget
You must have the following plugins installed to use this widget on your website. Get them by clicking the links attached below.
Once they are ready, start following the steps of the tutorial as described.
Step 01: Drag-and-Drop the Loop Grid Widget to Your Page
Open the page where you want to add the widget. Then, decide on a section to add the widget.
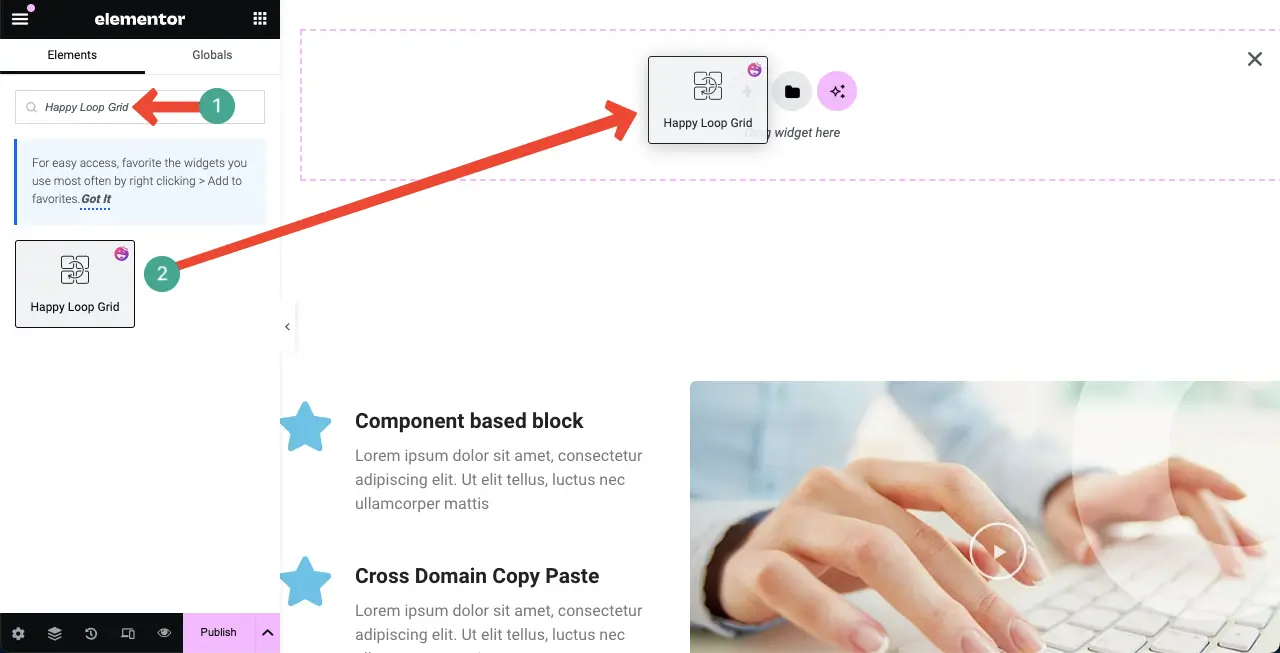
Type Happy Loop Grid in the Elementor panel search box. Once the widget appears, drag and drop it into your desired area of the canvas.
Step 02: Create a Loop Grid Template
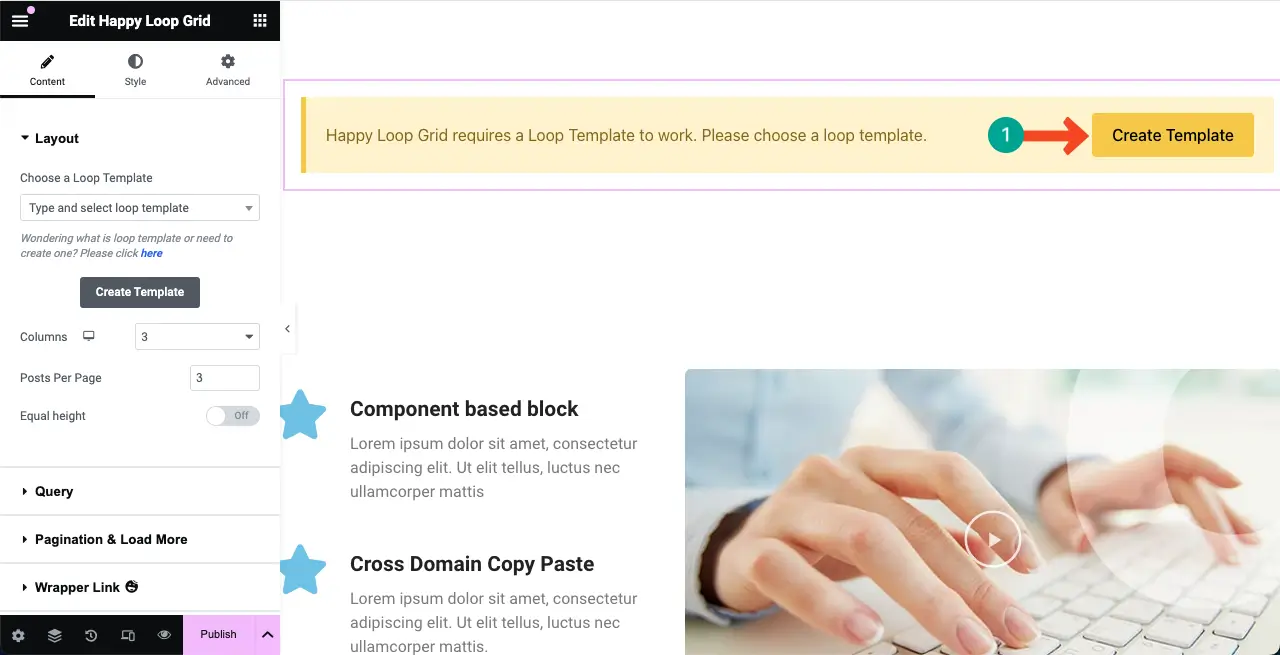
After adding the widget, you’ll be asked to select a loop template. If you already have a ready-made template, you can select it. Otherwise, you must create one from scratch.
So, to create from scratch, click the Create Template button.
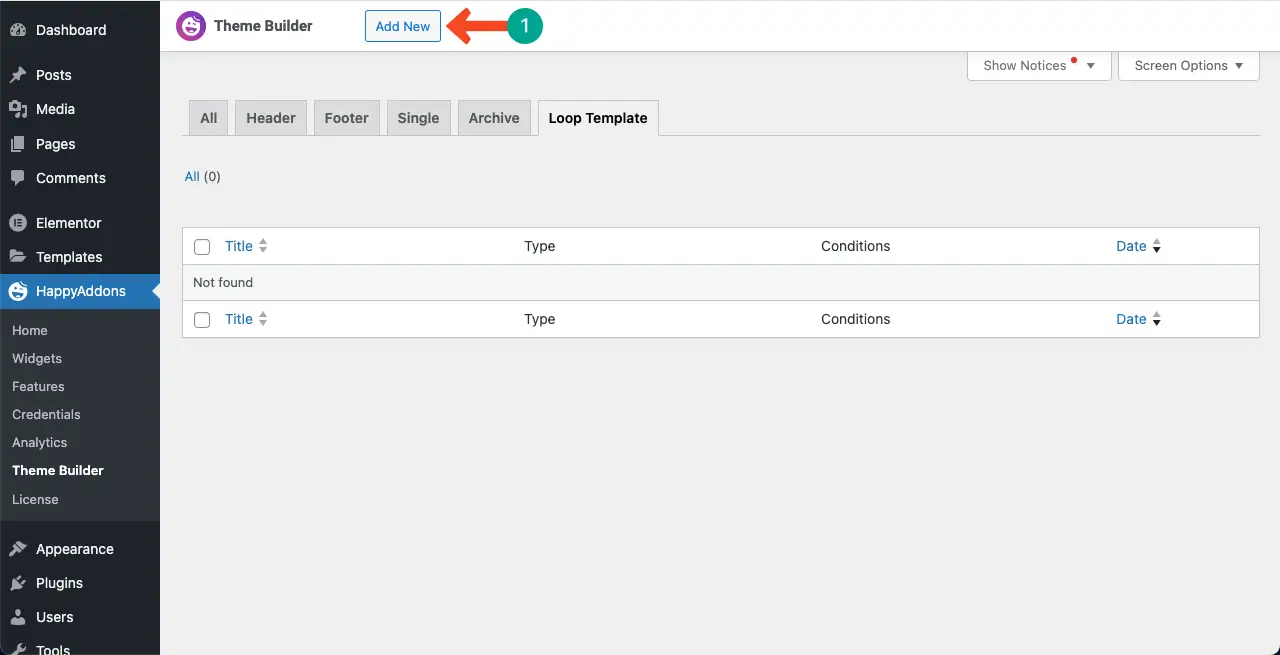
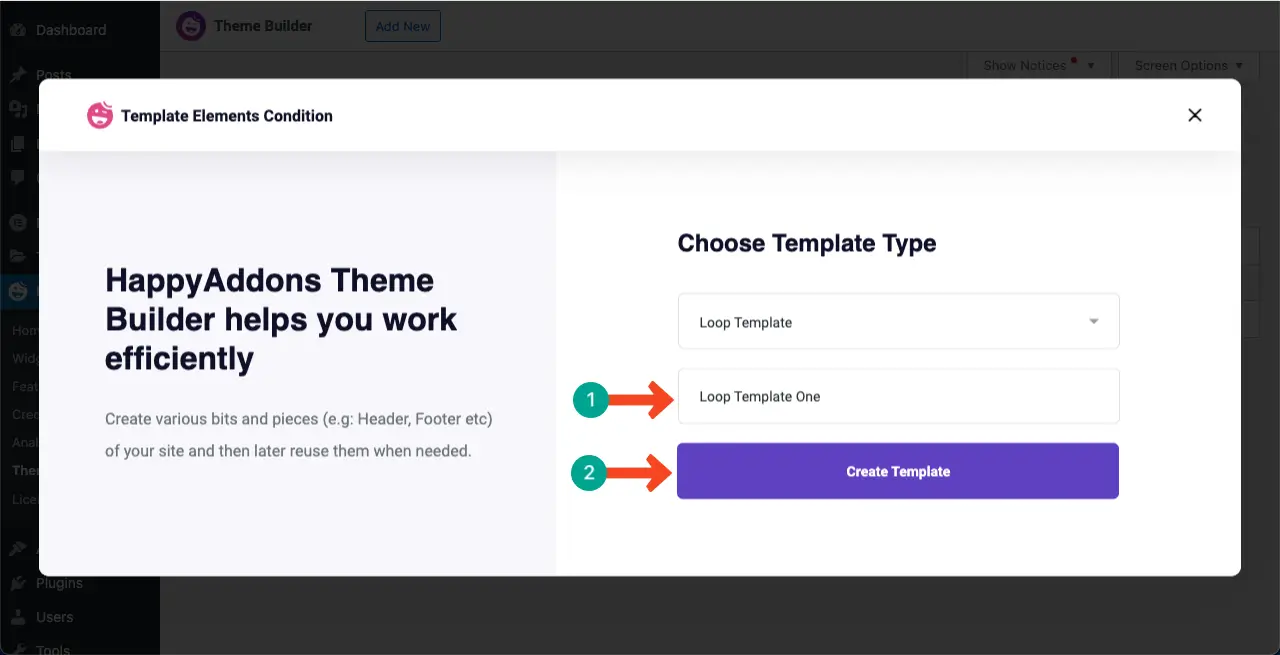
You’ll be taken to a new page. Click the Add New button while the Loop Template tab is selected.
Give the template a name. For example, we have named it ‘Loop Template One.’ Then, hit the Create Template button.
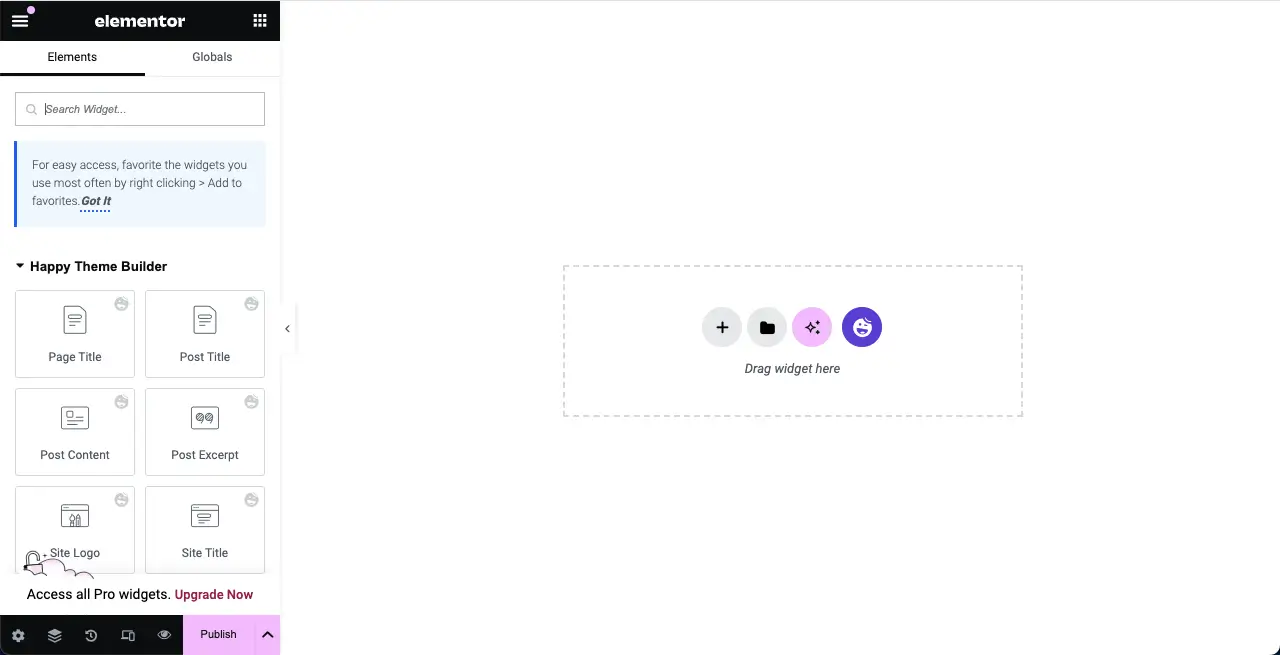
A new canvas will be opened up. Here again, you can drag and drop the widgets you want to design the layout of your Loop Grid template.
Check this guide on how to create a popup on Elementor websites.
Step 03: Design a Layout for the Loop Grid Template
Suppose we’ll create this loop grid to showcase our blog posts dynamically. So, we’ll use the post widgets to create the template.
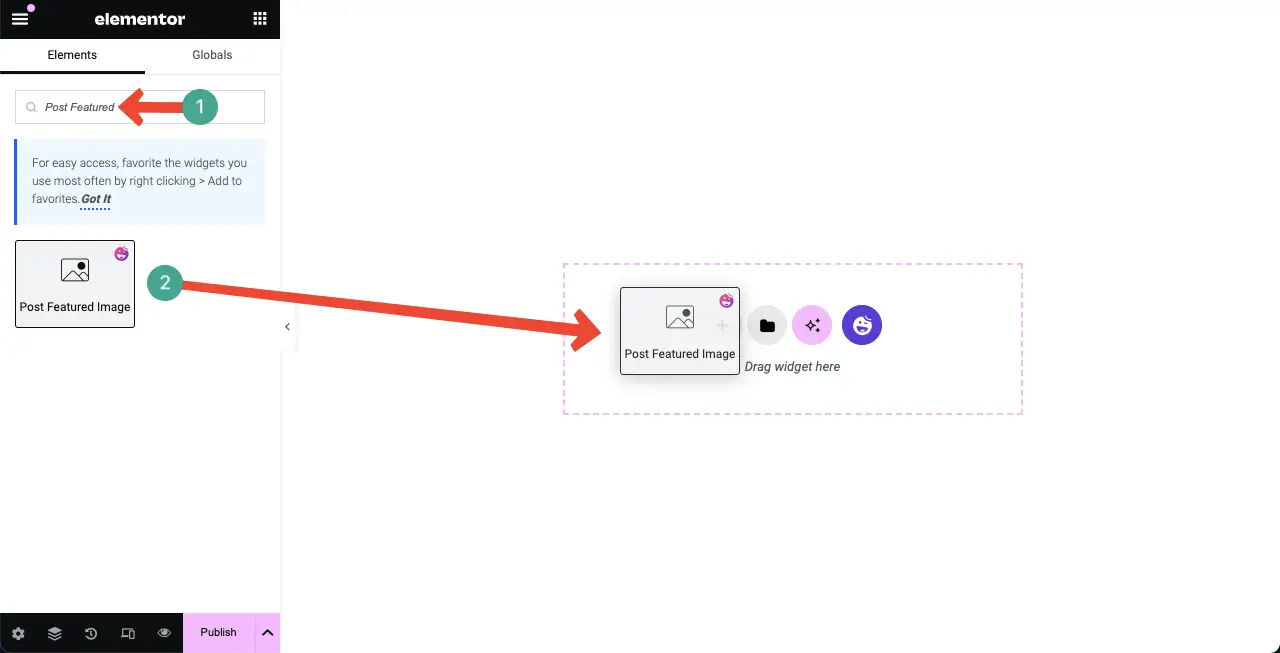
# Post Featured Image
Displaying post feature images is a must in the post grid section. To do so, find the widget and drop it on the canvas.
# Post Info
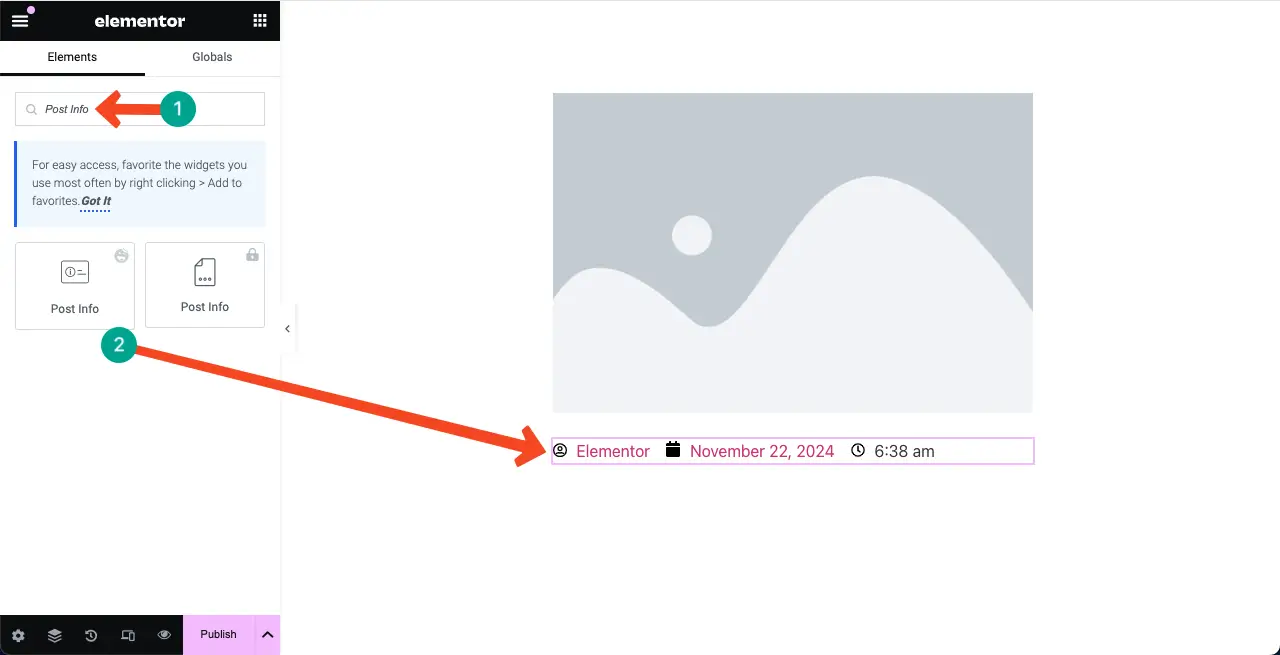
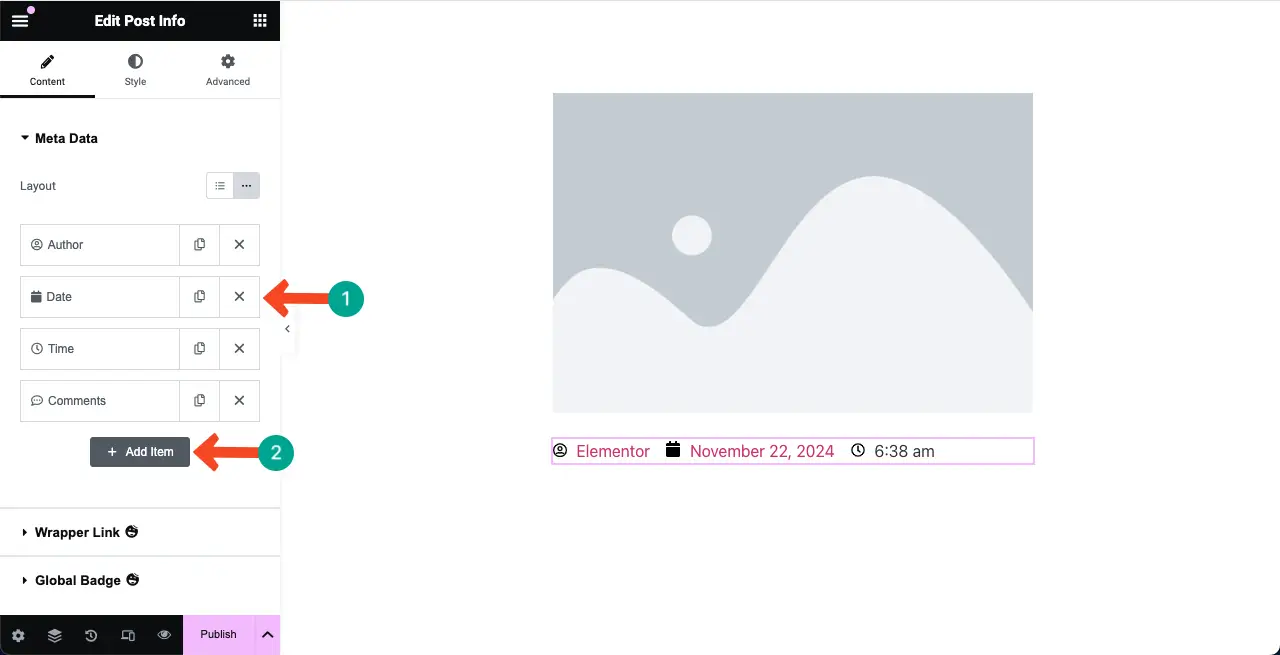
By adding the Post Info widget, you can show the post’s author, publication date, and when it was published. It’s better to add the widget under featured image.
If you want to remove any element of the widget, just click the cross (x) icon next to it. Similarly, to add a new element, click the + Add Item button.
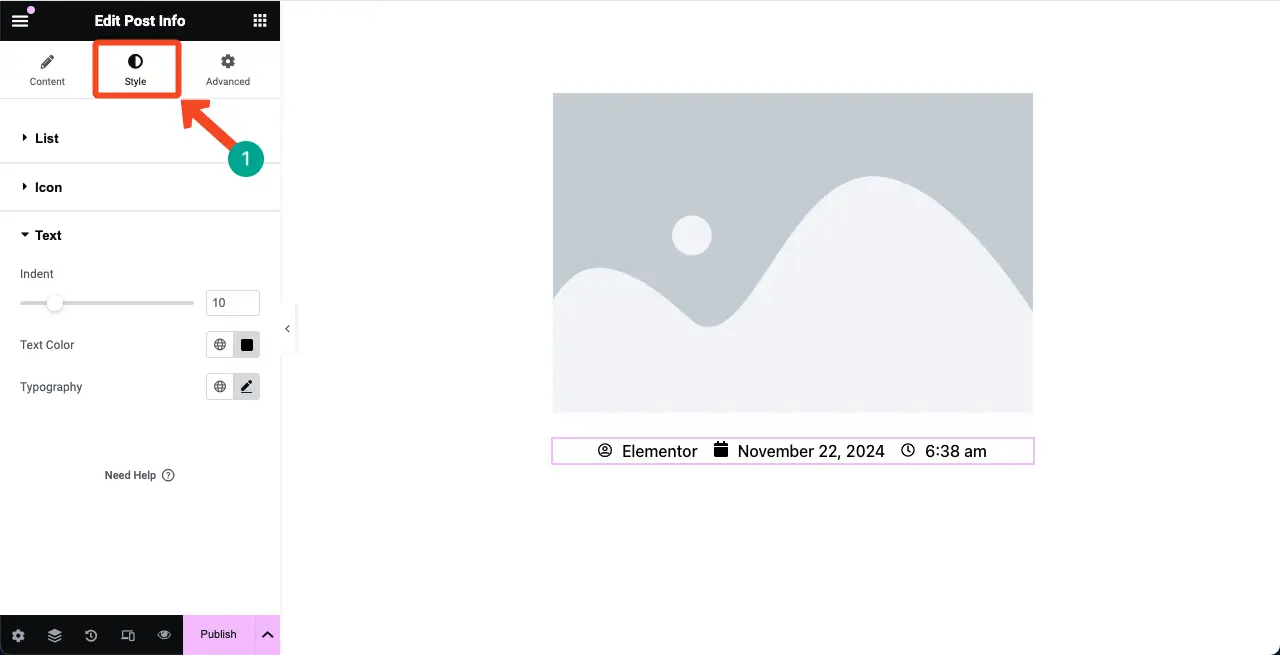
Come to the Style tab. You’ll get options in this tab to change the color, thickness, and alignment of the texts and icons of the widget.
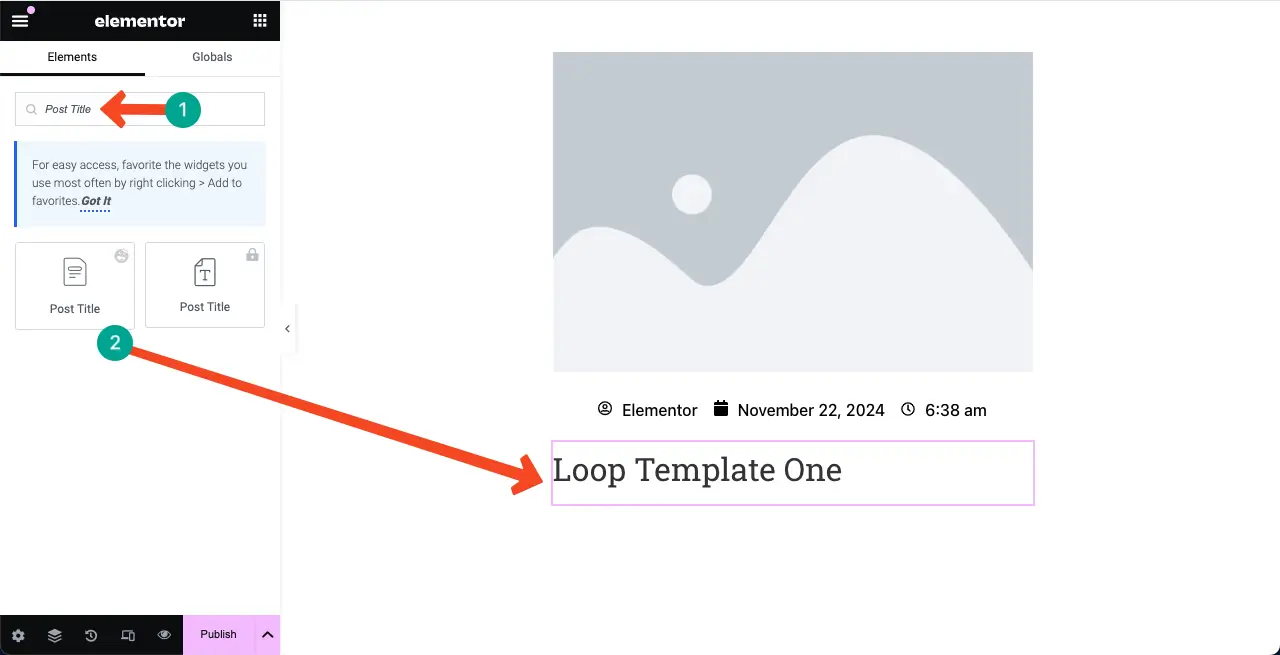
# Post Title
Drag and drop the Post Title widget below the Post Information widget.
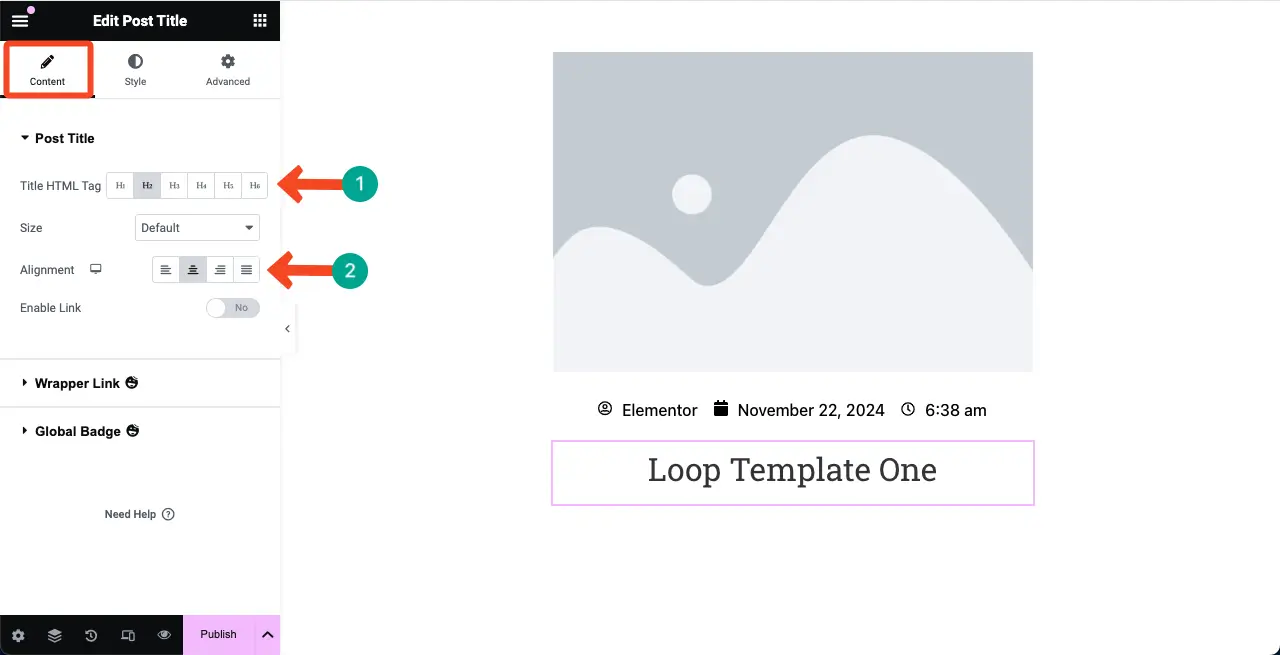
Under the Content tab, you’ll get options to customize the HTML tag, size, and alignment. Do the necessary changes as required.
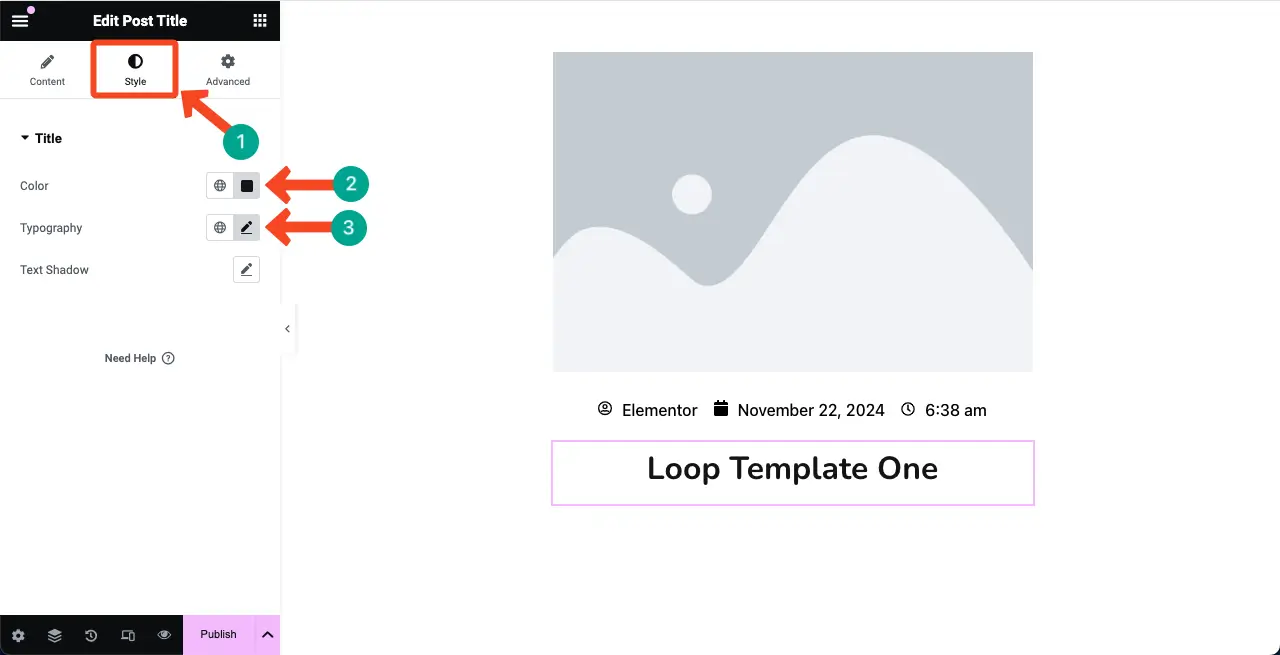
Come to the Style tab. You can stylize the title color and typography as you want.
# Post Excerpt
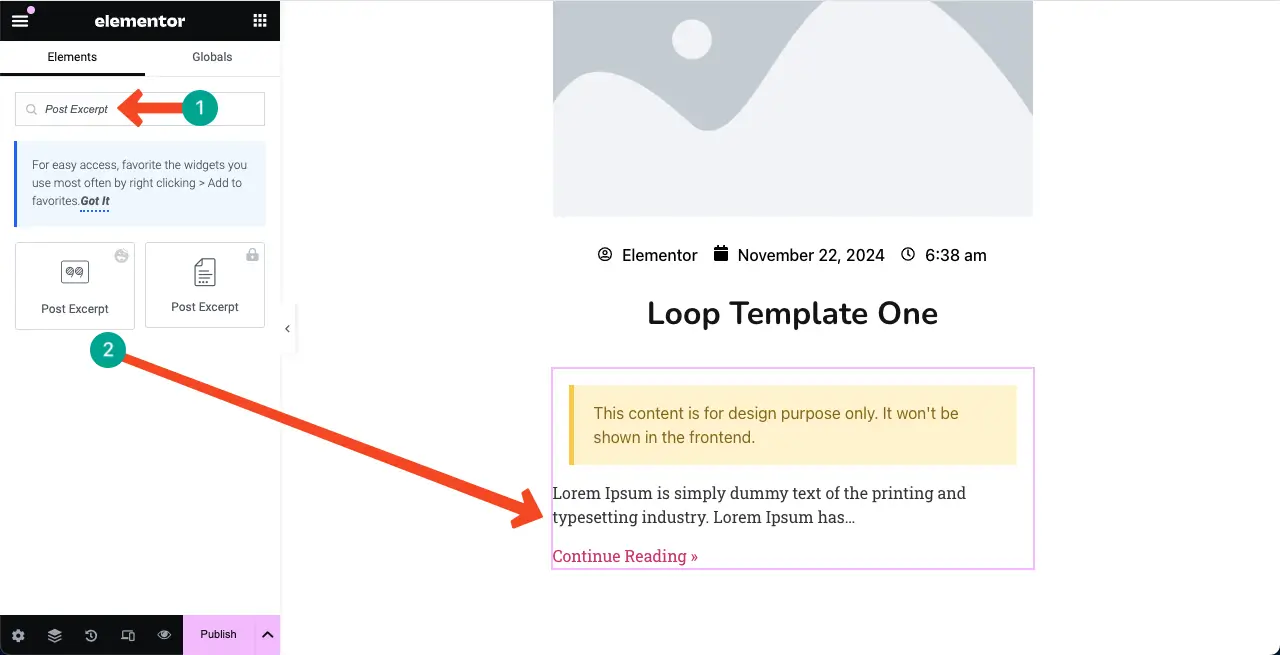
By adding the Post Excerpt widget in the template, you can display the summary or excerpt of respective posts within the Loop Grid section. Find and add the Post Excerpt widget under the title.
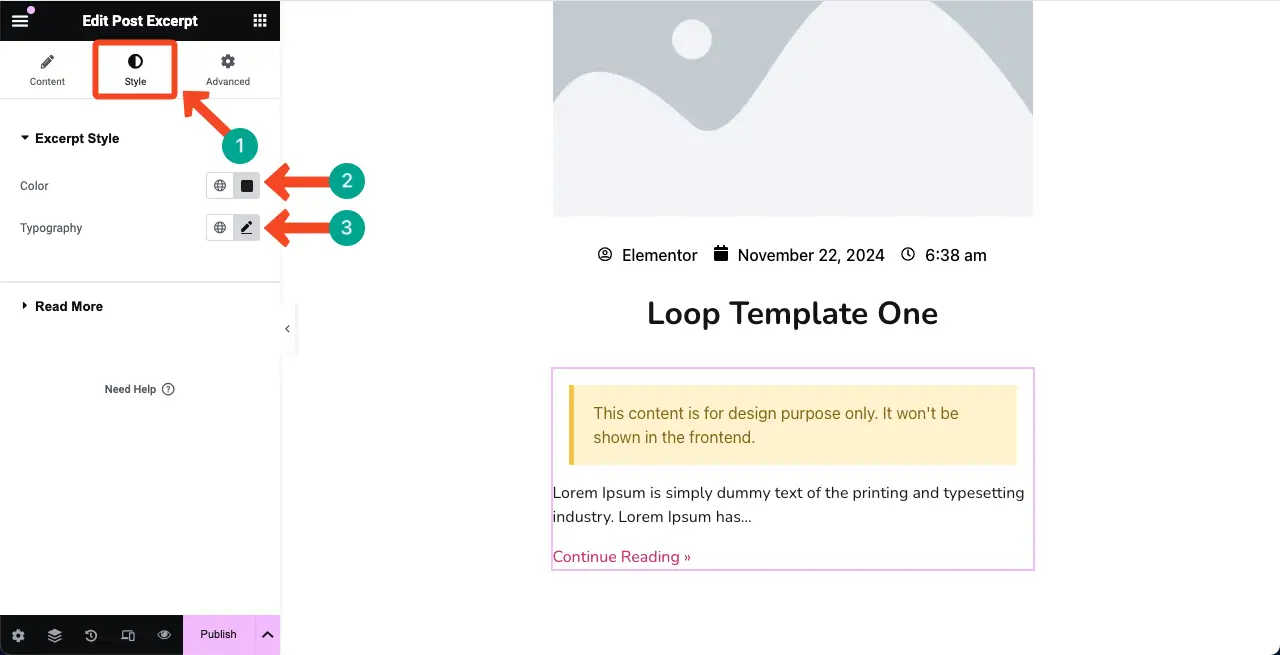
In the same way, as shown above, you can customize the text color and typography from the Style tab.
Step 04: Optimize the Template Layout for Mobile Devices
You must optimize your template layout for all the device types (tablets and mobile phones) alongside desktops. Otherwise, users from other devices won’t have a good experience when exploring this widget from mobile and tablet devices.
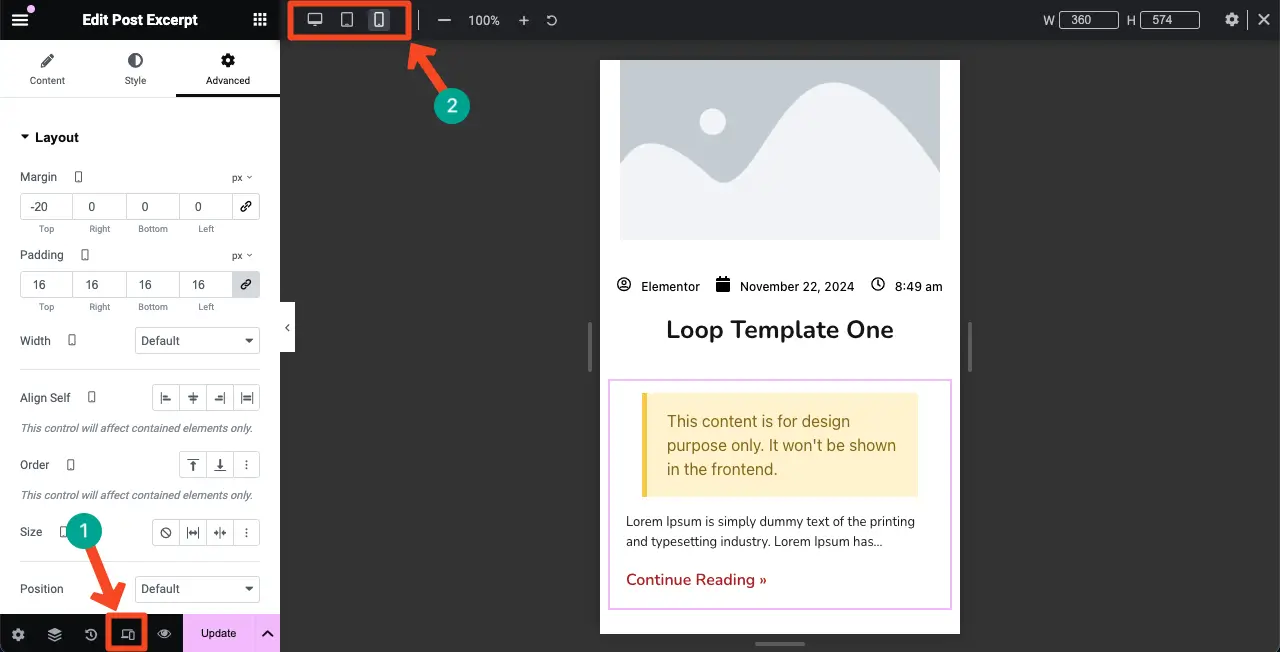
So, to optimize the template layout, click the Responsive Mode option on the footer of the Elementor panel. A top bar will appear on the template, including the option to switch between different device modes (desktop, tablet, and mobile phone).
Now, switch to different device modes and see if the template layout is perfect for different particular devices. If not perfect, resize and customize the template elements as needed.
Hopefully, by doing this, you can make the template responsive for all screen sizes.
Here’s a guide on the things to consider while making a site mobile responsive.
# Publish the Template
Once done, publish the template by clicking the Publish button on the Elementor panel.
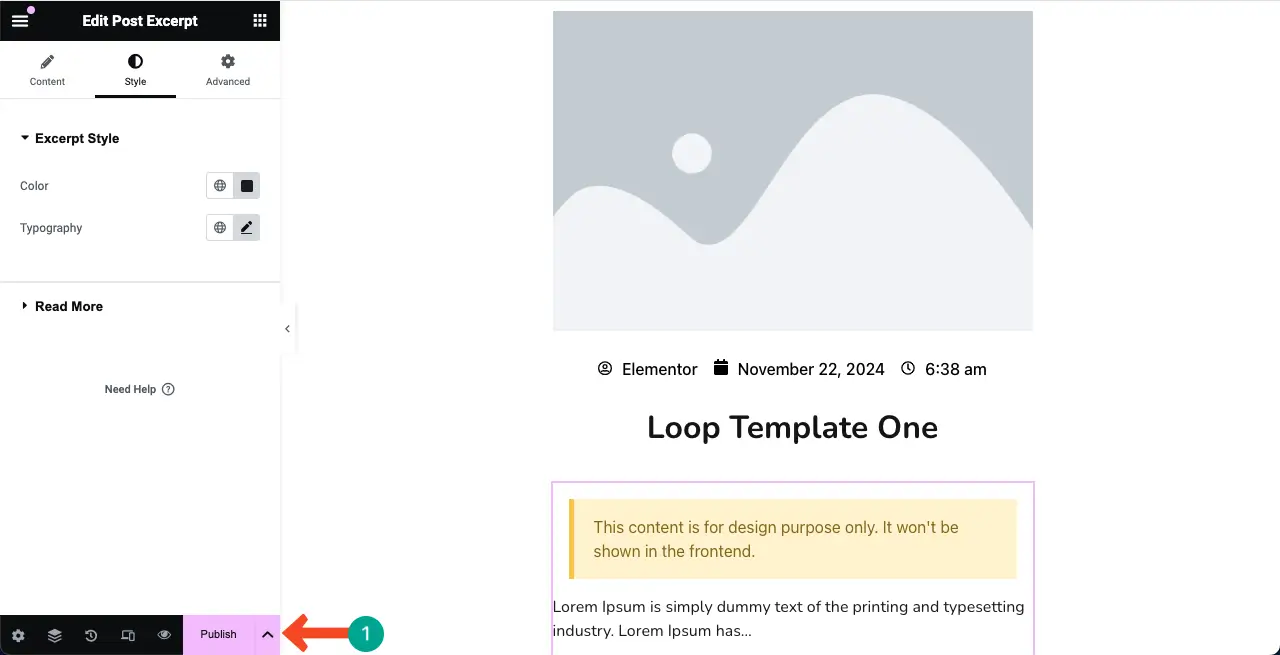
Step 04: Come to the Main Canvas and Select the Loop Template
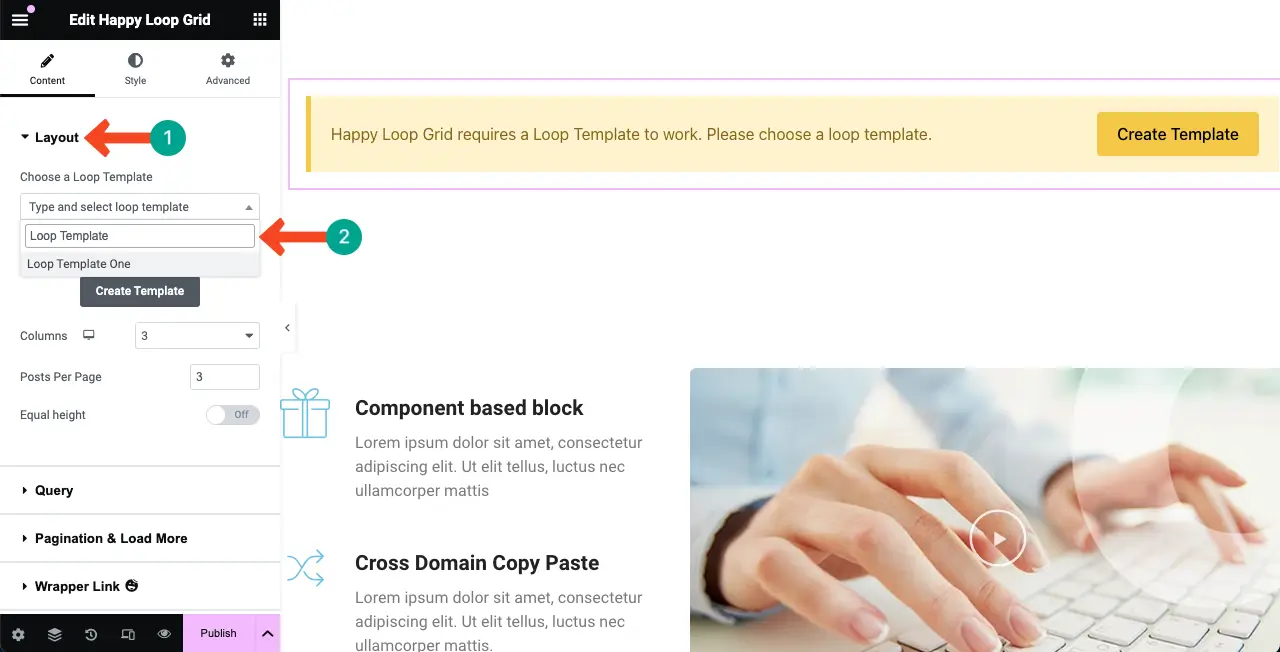
Come to the main Elementor canvas. Select the Loop Grid section. Under the Layout section, you’ll find the option to Choose a Loop Template.
Type the name by which you save the template. Once typed, the template will appear in real-time. Click the template to display it on the canvas.
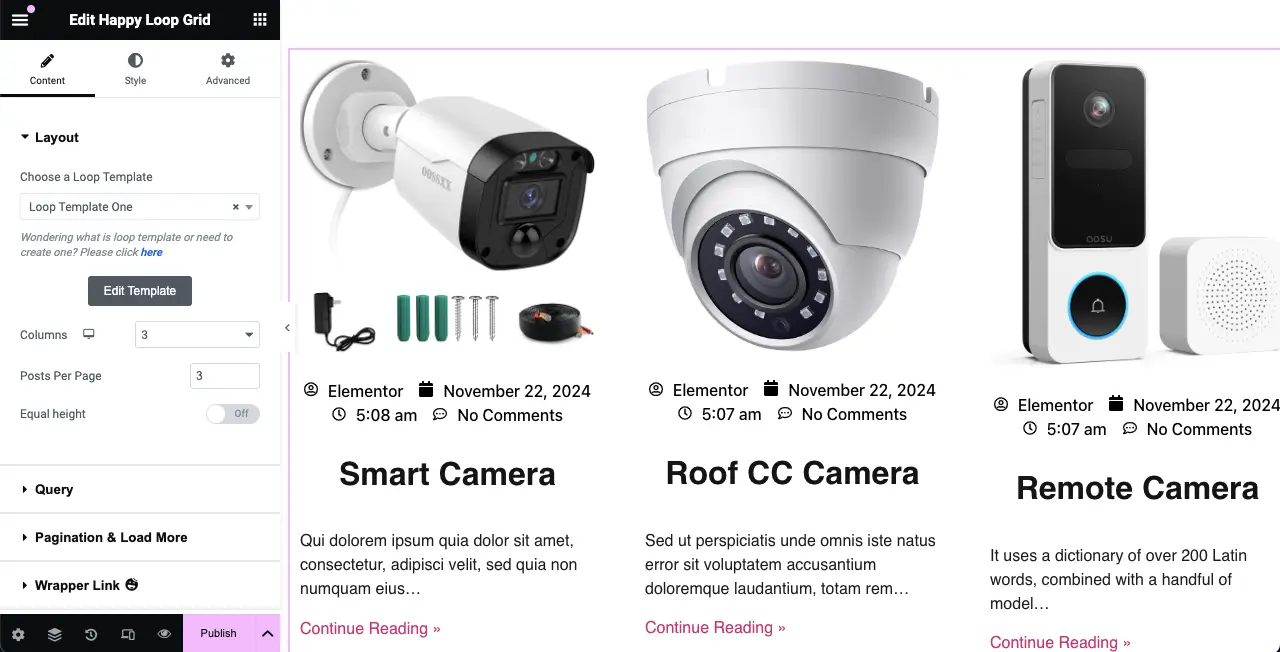
Once the Loop Grid template is selected, it will display your published posts in a grid format like the image below.
The grid may look awkward since it comes with default settings. You can now further customize its layout.
Step 05: Customize and Stylize the Loop Grid Section
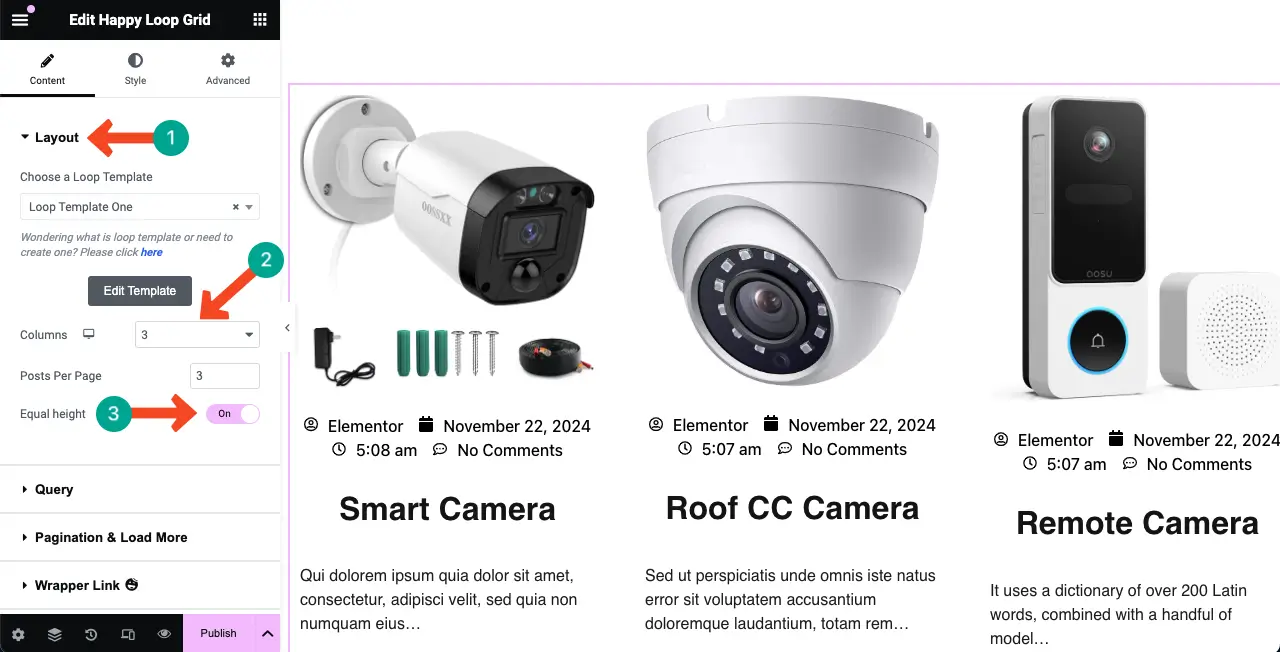
From the Layout section, you select the column number, post per page, and equal height. Do the necessary configuration as needed.
We have kept three columns and three posts per page for this tutorial.
# Configure Query
After that, come to the Query section.
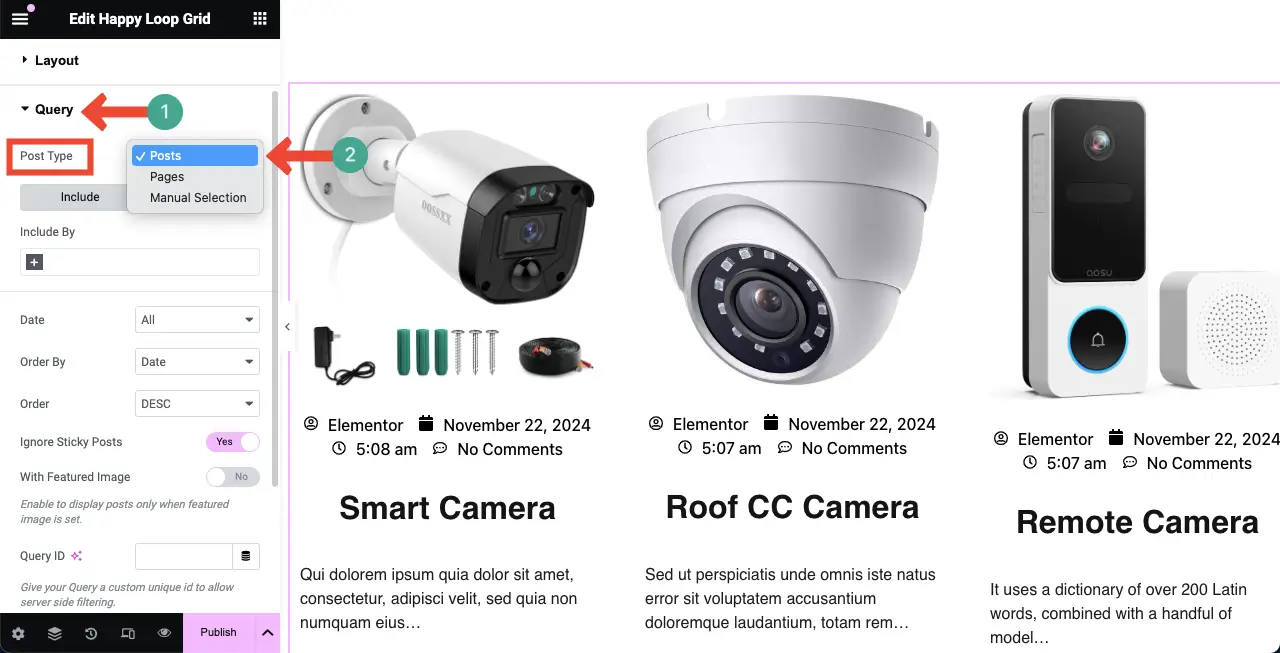
You can display content from a variety of sources in the Loop Grid widget. By default, posts are displayed in grid format. But You can display pages or landing pages if you want.
Click the drop-down icon next to the Post Type option. Select the content type you want.
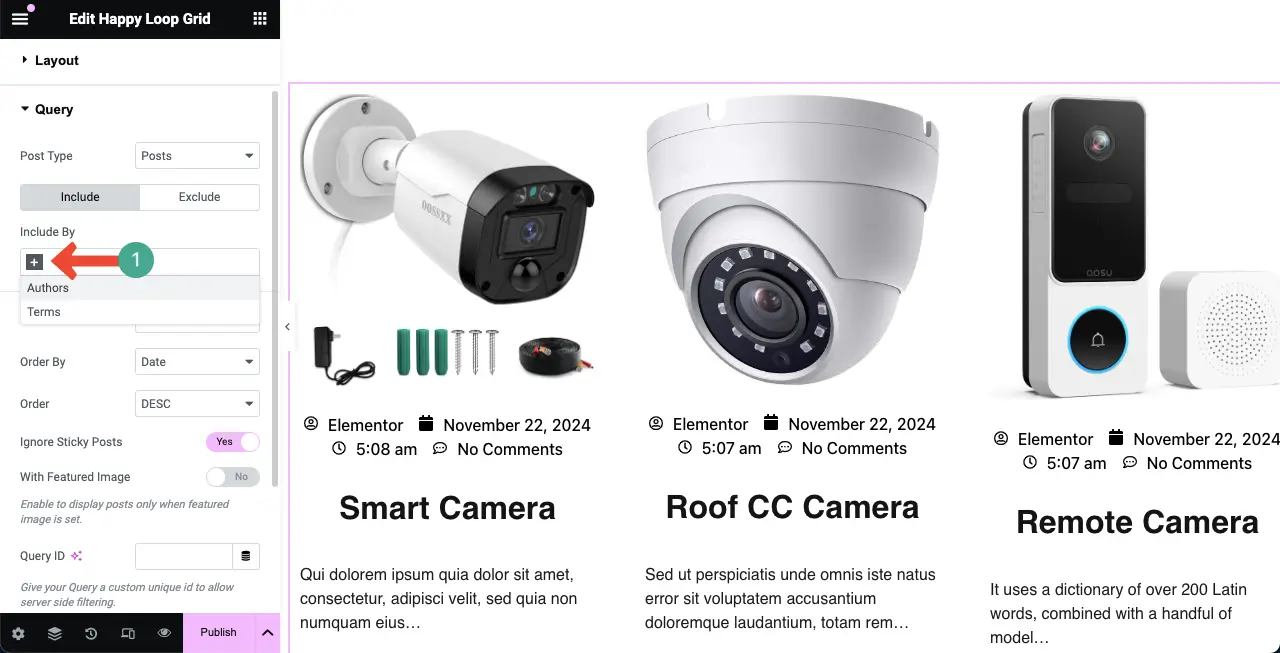
You must save each post with a tag or category. If you only want to display content from a specific author, tag, or category, click the + plus icon below Include By.
Select Authors or Terms. You may choose both as well.
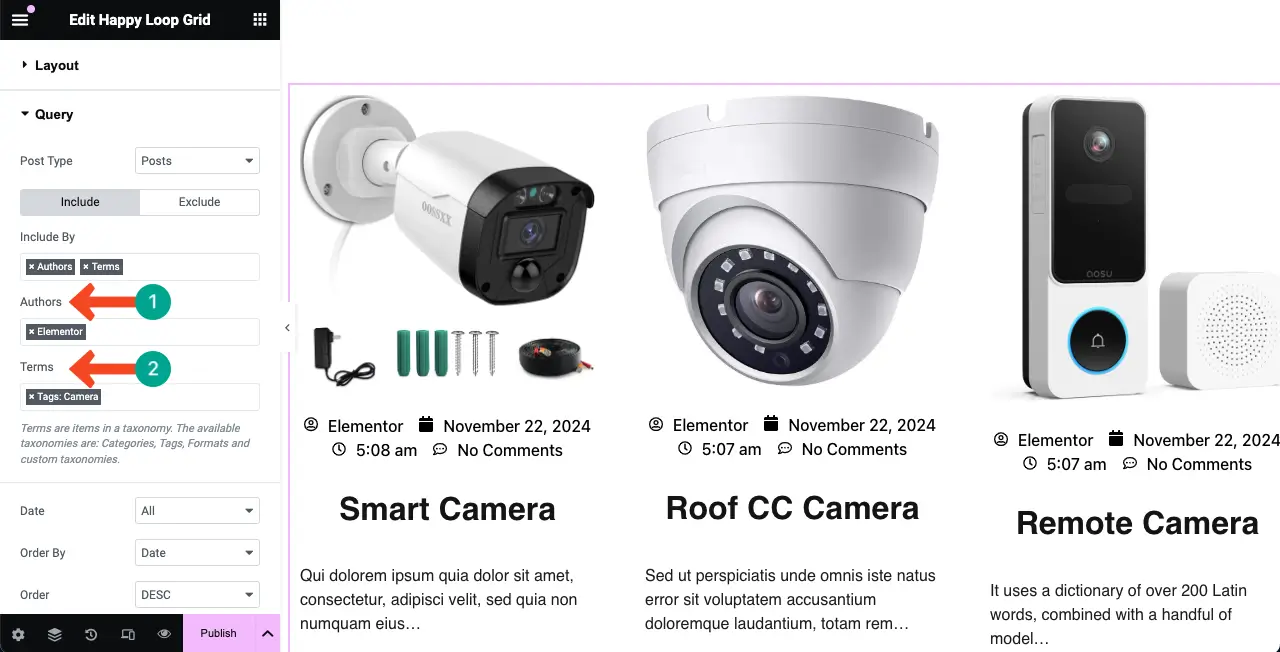
Once the Include by options are selected, type the author names and terms in the respective fields. Instantly, the content will be filtered, and only the contents of this specific author and term will be displayed in the loop grid.
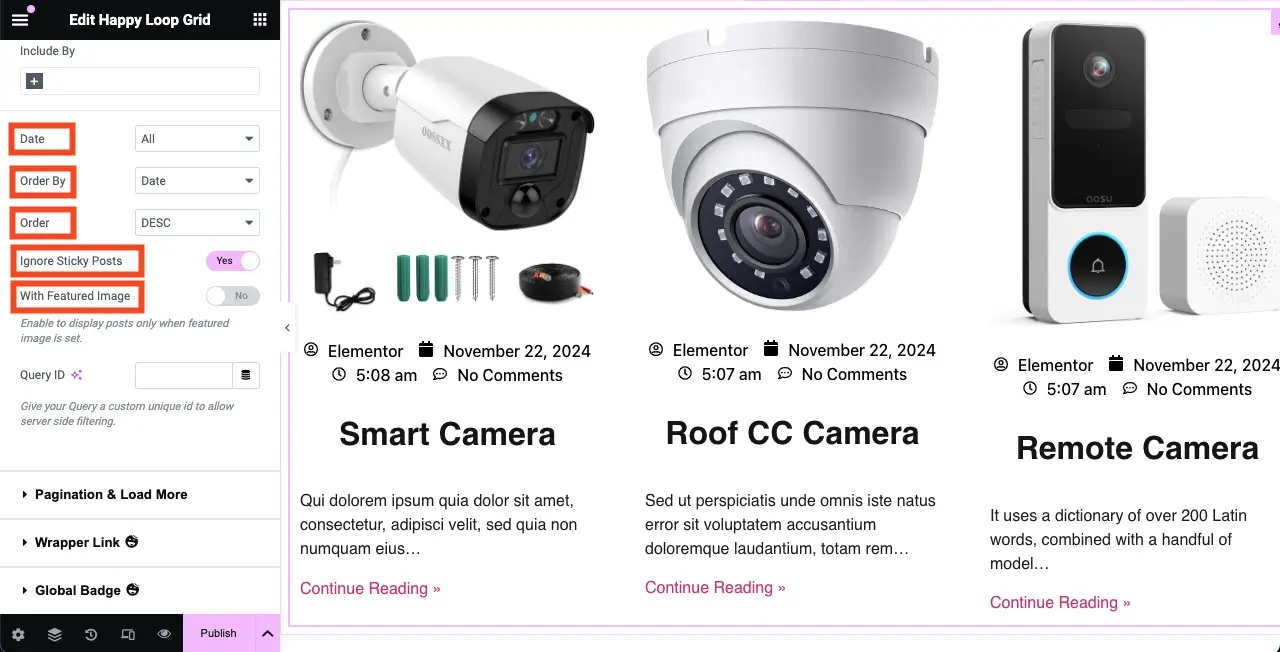
Configure the other query options as you want. Hope you can do them yourself.
Step 06: Configure the Pagination Option for the Loop Grid Section
Expand the Pagination & Load More section.
Click the drop-down icon next to Pagination. Select the option you want.
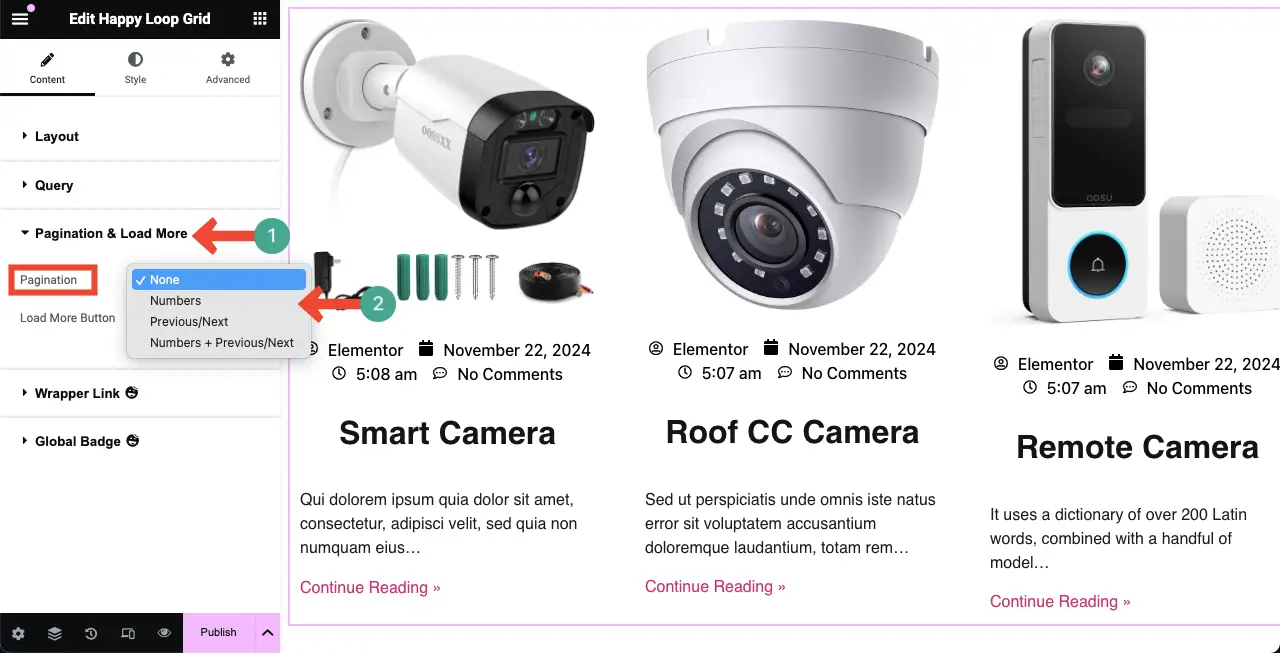
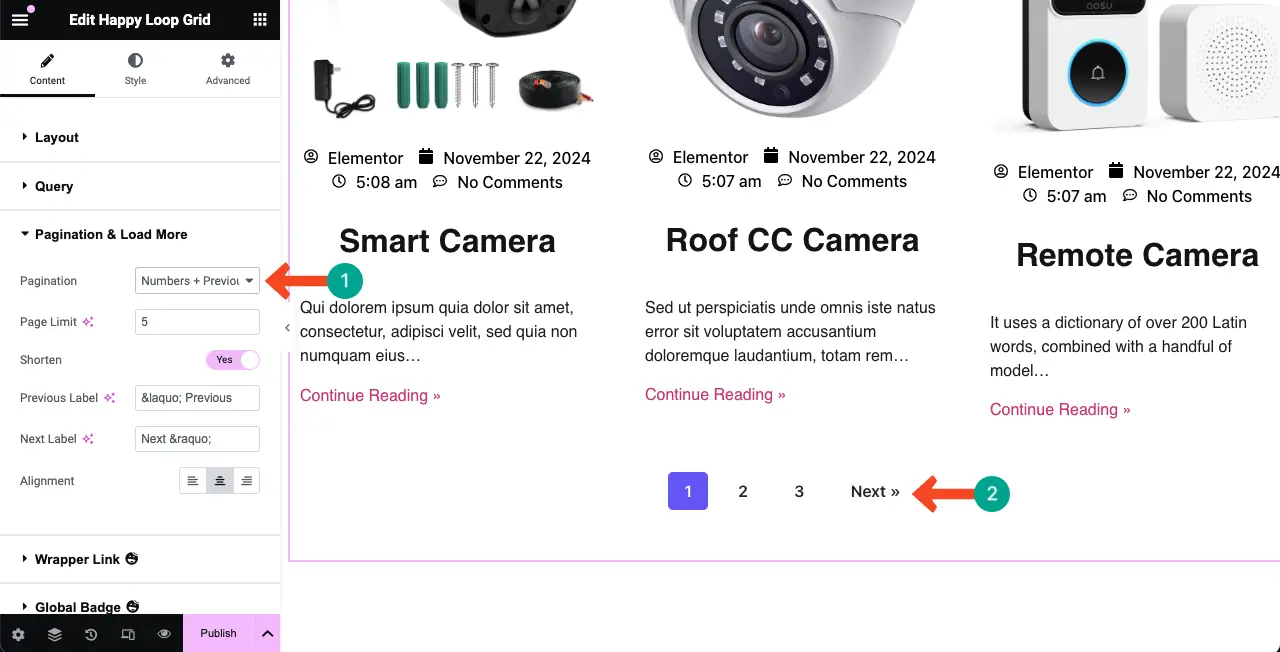
We’ve selected Numbers + Previous/Next. You can see in the image that this pagination option has been displayed under the widget.
Step 07: Stylize the Layout of the Loop Grid Widget
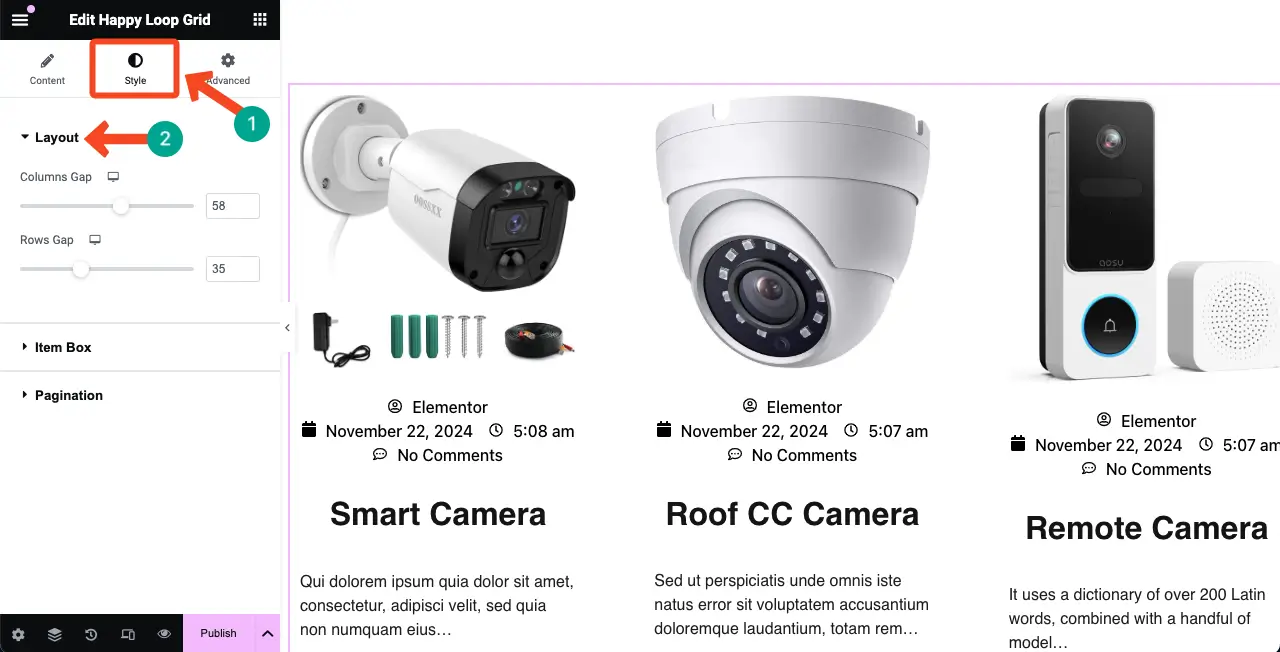
Go to the Styles tab. You’ll find options to customize and stylize the Layout, Item Box, and Pagination of the widget.
Let’s first expand the Layout section. It will allow you to configure the Column Gap and Row Gap. Do this as necessary.
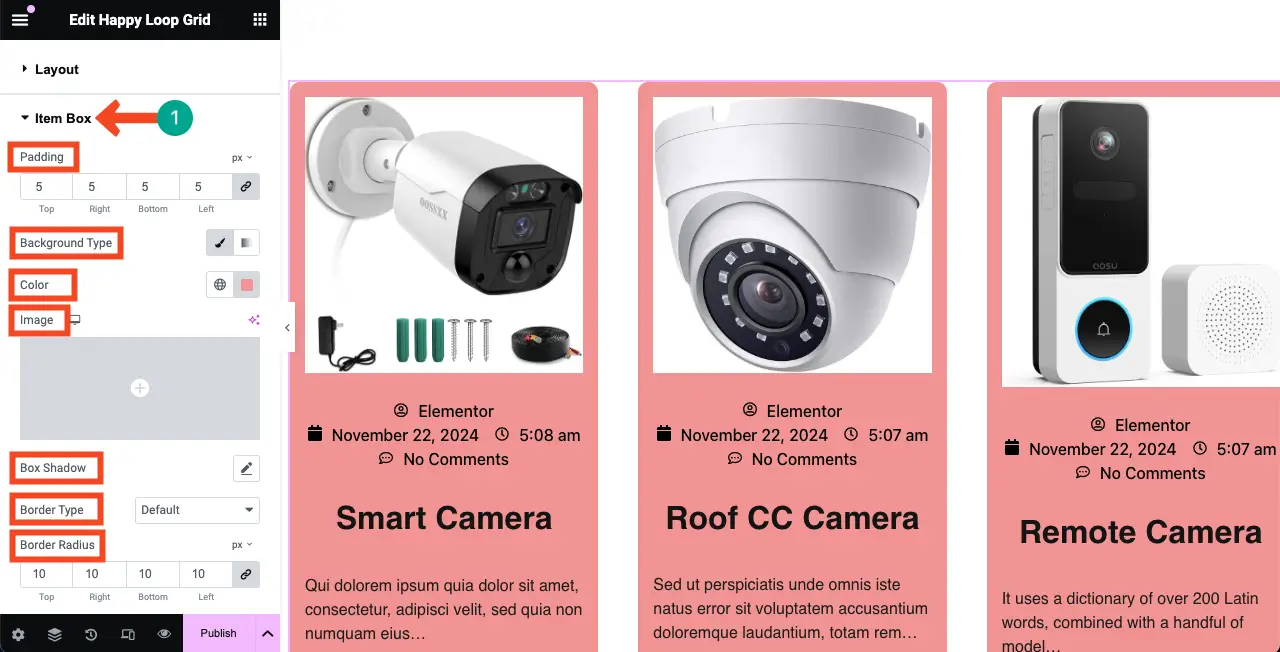
Similarly, expand the Item Box section. You can add Padding, Background Type (color or image), Box Shadow, Border Types, and Border Radius.
For this tutorial, we have added padding, a radius, and a background color. Do the same yourself.
In the same way, you can stylize the color, typography, padding, radius, space, and pagination options of the widget.
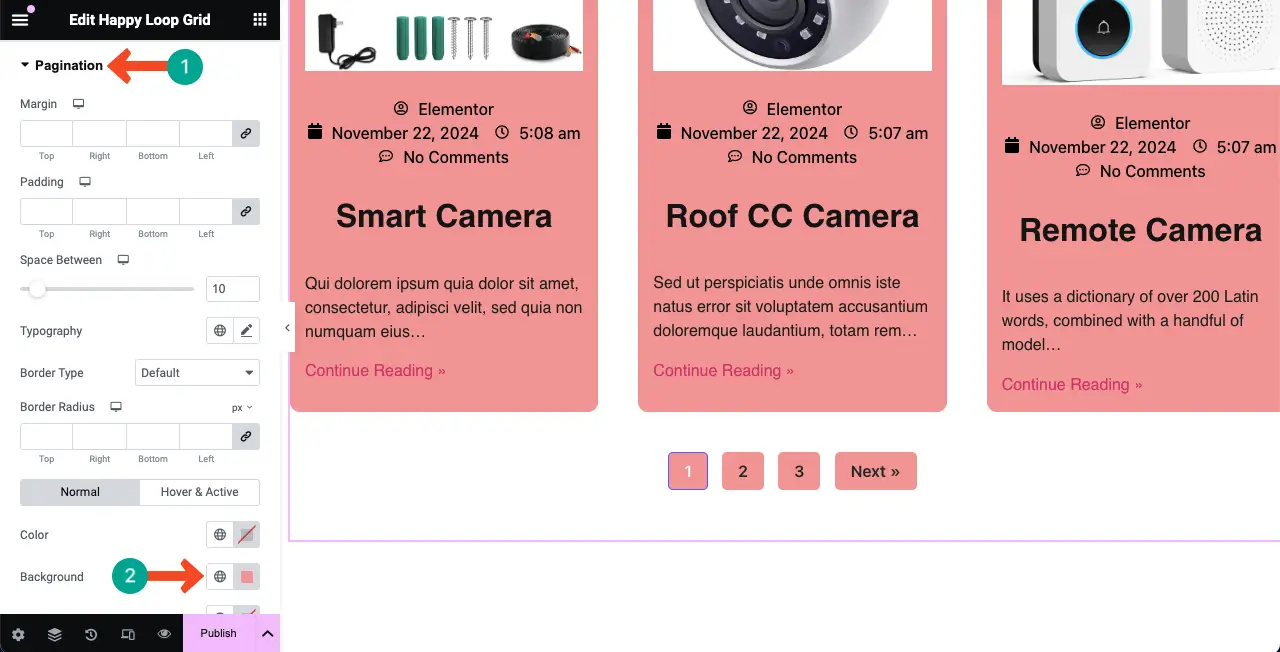
Note: Looks a bit eye-screaming, right? At this stage of the design, you may find that the loop grid template needs to be stylized and customized a bit more. But how to do? It’s shown in the next step.
Step 08: Re-Customize the Loop Grid Template
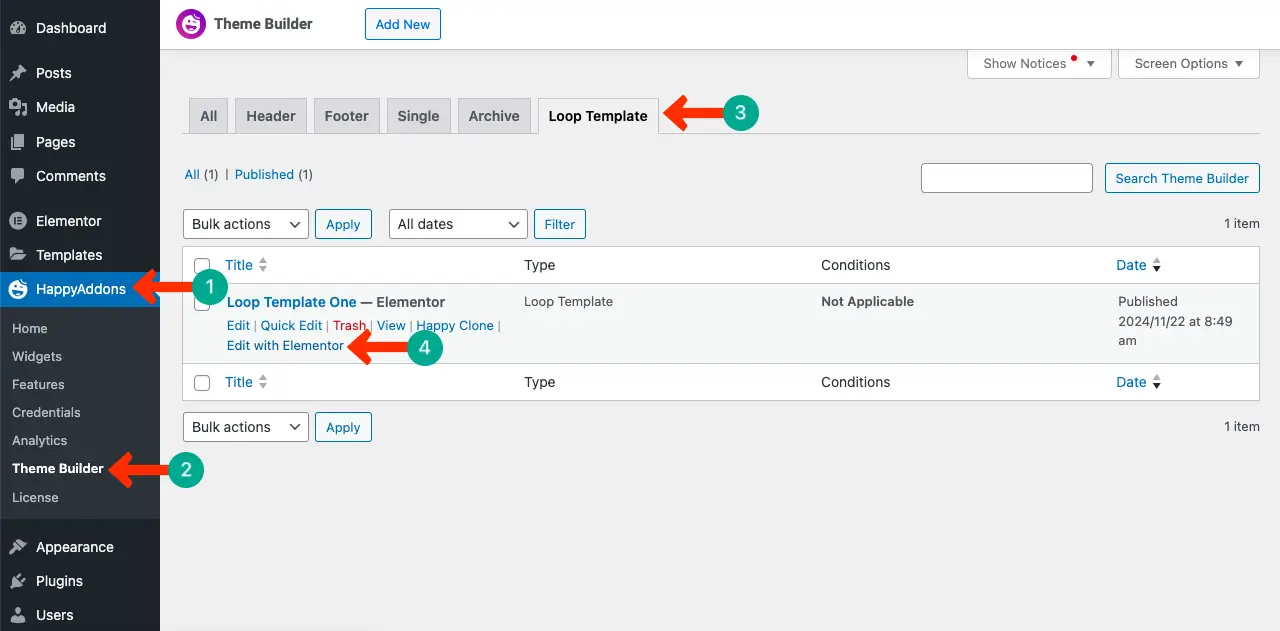
First, you have to find the template. As you have designed with HappyAddons, go to your WordPress Dashboard. Then, navigate to HappyAddons > Theme Builder > Loop Template.
Find the template and open it with the option Edit with Elementor.
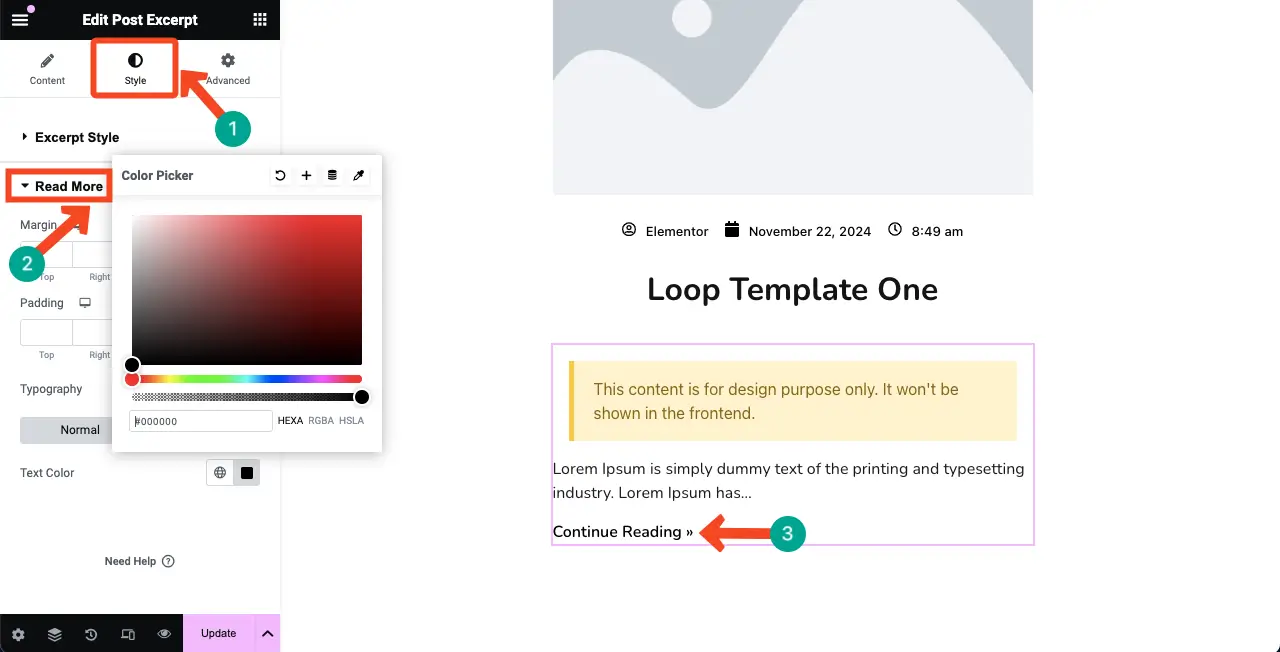
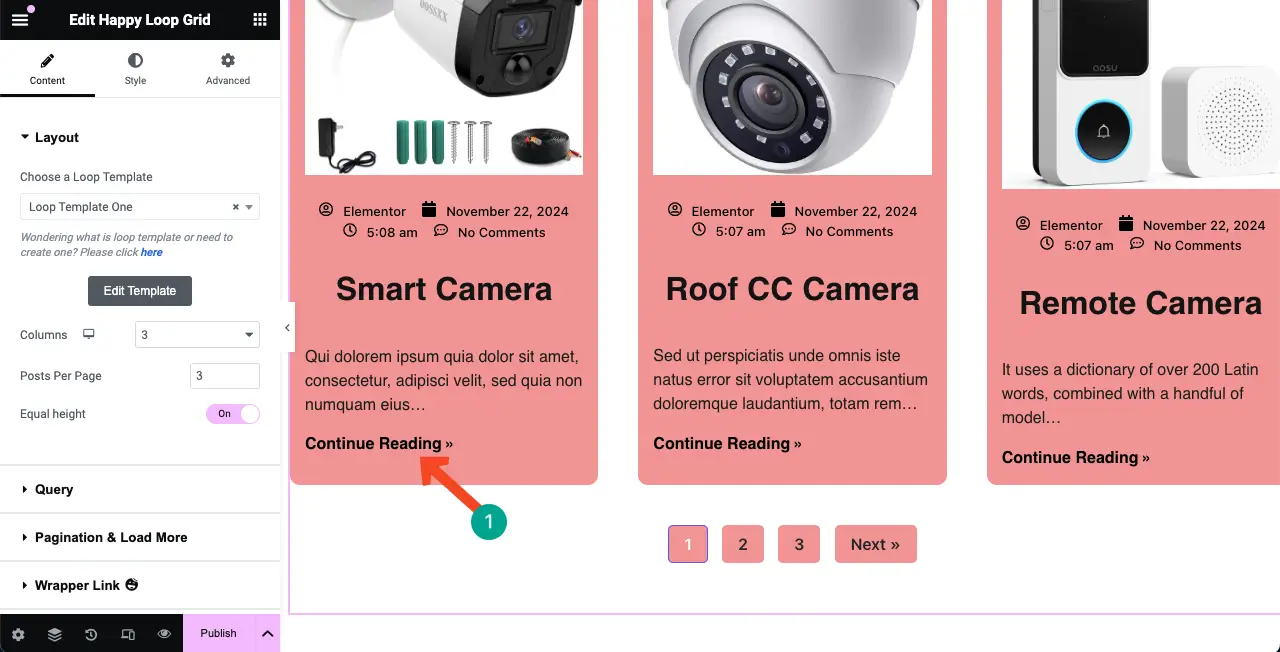
For example, we have changed the typography of the Continue Reading >> text.
Once done, Update the changes.
Step 09: Preview the Changes
Go to the main canvas again. Select the drop-down icon. Then, click the Save Draft option.
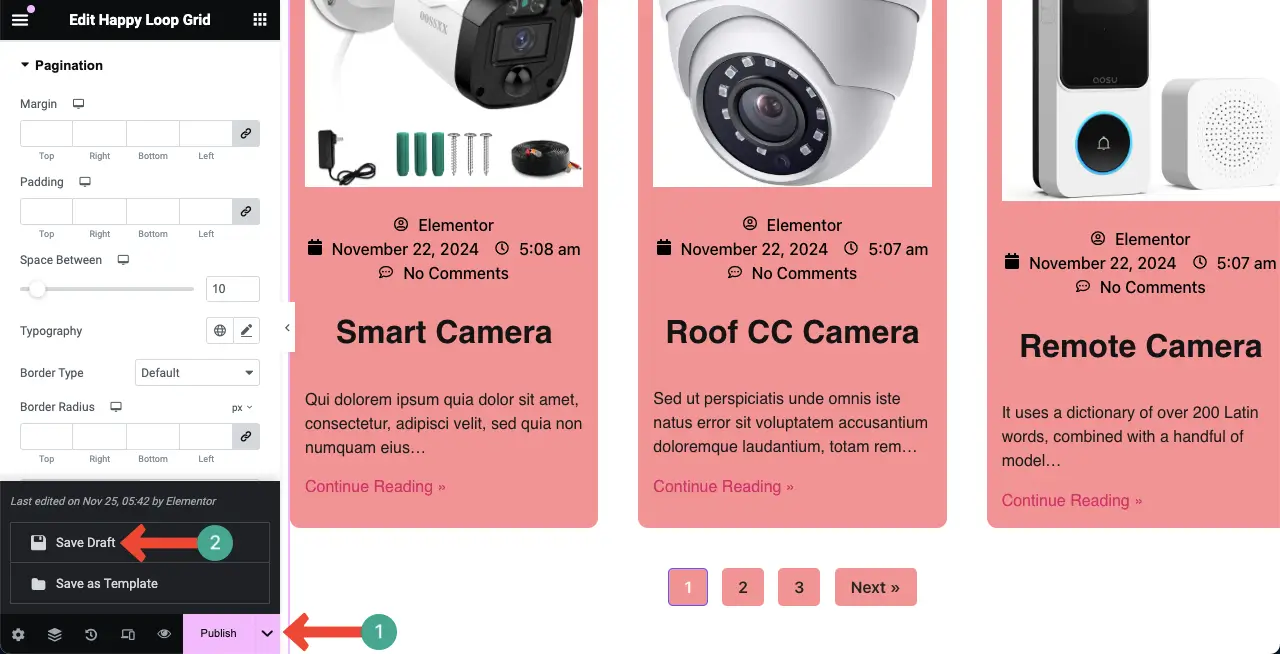
Once the draft is saved, reload the canvas. You will see the changes on the page as you made on the template.
Thus, you can customize the Loop Grid template anytime.
Step 10: Publish the Loop Grid Design
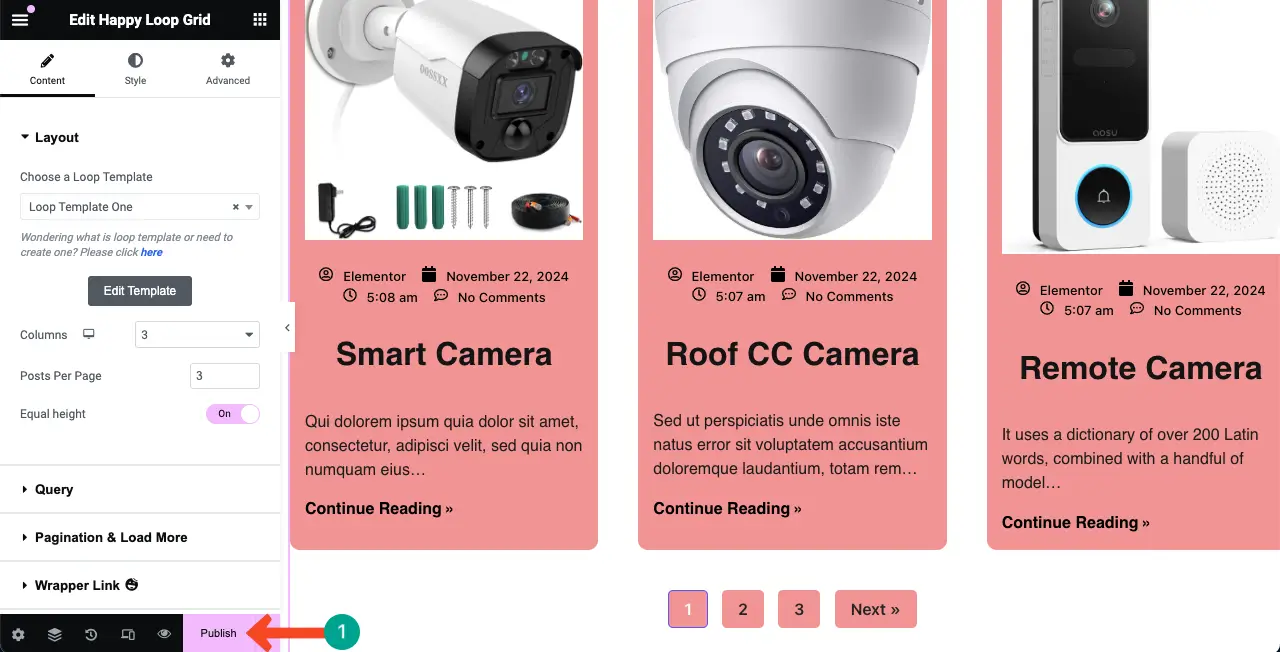
Hopefully, your Loop Grid section is already ready to publish. Click the Publish button at the bottom of the Elementor panel.
Note: Make sure you have optimized the widget perfectly for mobile responsiveness, as we showed you above in optimizing the Loop Grid template. The process will be the same here as well.
Common Use Cases of the Elementor Loop Grid Widget
So far, we have described what the Loop Grid widget is and how to use it on your Elementor websites. Let’s now take a quick look at some crucial use cases of the widget where it can make an invaluable impression.
1. Blog Layouts
Elementor Loop Grid makes blog layouts simple as it allows you to render posts in a dynamic and pleasing grid. You can customize how the content (posts or pages) will appear including the post titles, excerpts, images, metadata, and else to ensure a cohesive look.
Learn how to design a blog post template with Elementor.
2. Product Grids
The Loop Grid is invaluable on eCommerce sites to display products on a neat and tidy grid. It allows you to show product pictures, prices, and descriptions so customers can enjoy a good experience while exploring products on your site.
3. Portfolio Showcase
The Loop Grid widget allows you to arrange your drawings, articles, case studies, and portfolio pieces in a compelling layout. You can even change the grid to match your branding so your portfolio can be highlighted for your clients and employees.
Learn how to create a portfolio site.
4. Event Listings
You can organize your events in a graphical form with Loop Grid. It allows you to visually list event information such as dates, places, and descriptions so people can quickly find out what’s coming up.
5. Service Listings
You can also offer your services in a grid format with styling options. You can show key elements such as service titles, descriptions, and photos so that customers can easily see what you have to offer at a glance.
Closing Up
We hope you now know the ins and outs of the Elementor Loop Grid widget. Once you know how to use the widget well, you can create endless design possibilities for your website. With its intuitive features and user-friendliness, you can leave a professional impact on your website to captive visitors.
We have tried our best to cover everything that you might be looking for in this post. If you find we have missed anything, let us know through the comment box below. You can also leave a chat in the support box if you wish to learn more about our product.
In the end, thanks for your time and for being with us till the end. Enjoy, happy reading!

