



An interactive website reacts when visitors move the mouse, scroll, or hover over something. A cursor that follows the pointer, images that trail behind it, or text that lights up line by line as you scroll. These small moments make a page feel alive instead of flat.
They also do real work. Motion guides the eye to what matters, invites people to keep exploring, and makes your brand easier to remember. That’s why so many award-winning sites use GSAP (GreenSock Animation Platform), the JavaScript library behind smooth, high-performance web animations.
The good news is that you don’t need to write a single line of JavaScript to use it. In this blog post, we’ll show you how to make Elementor websites feel more interactive with GSAP using HappyAddons. We’ll build a homepage for a demo design studio and add five interactions step by step. Let’s get started!
What Makes a Website Feel Interactive?
A website feels interactive when it responds to the visitor. Every action, such as moving the mouse or scrolling down, gets a small visual reply. This feedback tells people the page is listening and nudges them to the next section.
Most interactions come from four triggers: mouse movement, scrolling, hovering, and page load. In this tutorial, we’ll use the first three. The page load trigger is also available in HappyAddons if you want an animation to play as soon as the page opens.
Why Use GSAP to Make Your Elementor Website Interactive?

Elementor’s built-in Motion Effects are fine for simple fade-ins. GSAP goes much further. Here’s why it’s worth using.
a. Smooth Animations on Every Browser
GSAP is built for speed. It animates position, scale, rotation, and opacity in a way that stays smooth, and it behaves the same in Chrome, Safari, Firefox, and Edge. You don’t have to fix animations browser by browser.
b. Animations That Follow the Scroll
With GSAP’s ScrollTrigger, an animation can be tied to the scrollbar. Scroll down, and it moves forward; scroll back up, and it plays in reverse. This makes long pages feel like a story instead of a wall of content.
c. Effects That React to the Mouse
Custom cursors, image trails, and elements that chase the pointer all need precise, frame-by-frame motion. GSAP handles this smoothly, so the effect feels natural instead of jumpy.
d. Full Control over Timing and Easing
You decide where an animation starts and ends, how long it runs, and how it speeds up or slows down. Small changes in easing can make the same movement feel playful, calm, or premium.
e. No Code Needed with HappyAddons
HappyAddons turns GSAP into simple Elementor controls. It comes with 8 GSAP features and 7 GSAP widgets, and the GSAP library is already included. You pick options from dropdowns and sliders, and HappyAddons writes the animation for you.
Learn how to add SVG Morphing animations in Elementor.
How to Make Elementor Websites Feel More Interactive with GSAP: Step-by-Step Guide
As already said, Elementor alone doesn’t give you GSAP controls. That’s where HappyAddons comes in. It comes with 160+ widgets and 40+ features, including a full set of GSAP features and widgets. Some of them are free, and some need HappyAddons Pro.
For this tutorial, we’ll build the homepage of Lumen Studio, a demo design agency. Here’s what each section will do:
| Section | GSAP feature or widget | Plan | What visitors see |
|---|---|---|---|
| Whole page | Happy Mouse Cursor | Free | A small round cursor that follows the mouse with a soft delay |
| Hero | Image Trails | Pro | Project covers appear and trail behind the mouse |
| About | Text Scroll widget | Free | The paragraph lights up line by line as you scroll |
| Selected work | Global Animation + Happy Mouse Cursor | Pro + Free | Project images rise and turn into place, with a “View project” cursor on hover |
| Services | Dropping Elements widget | Pro | Service tags fall into the section and follow the mouse |
Prerequisites
- Elementor (Free)
- HappyAddons (Free)
- HappyAddons Pro
Note: You need HappyAddons Pro because Image Trails, Global Animation, and Dropping Elements are Pro features. Happy Mouse Cursor and the Text Scroll widget are free, so you can try those two right away with the free version.
Once these plugins are ready on your site, start following the tutorial explained below.
Step 01: Enable the GSAP Features and Widgets
First, make sure the GSAP tools you need are turned on. Navigate to HappyAddons > GSAP from your WordPress dashboard. Under GSAP Features, toggle on Happy Mouse Cursor, Global Animation, and Image Trails.
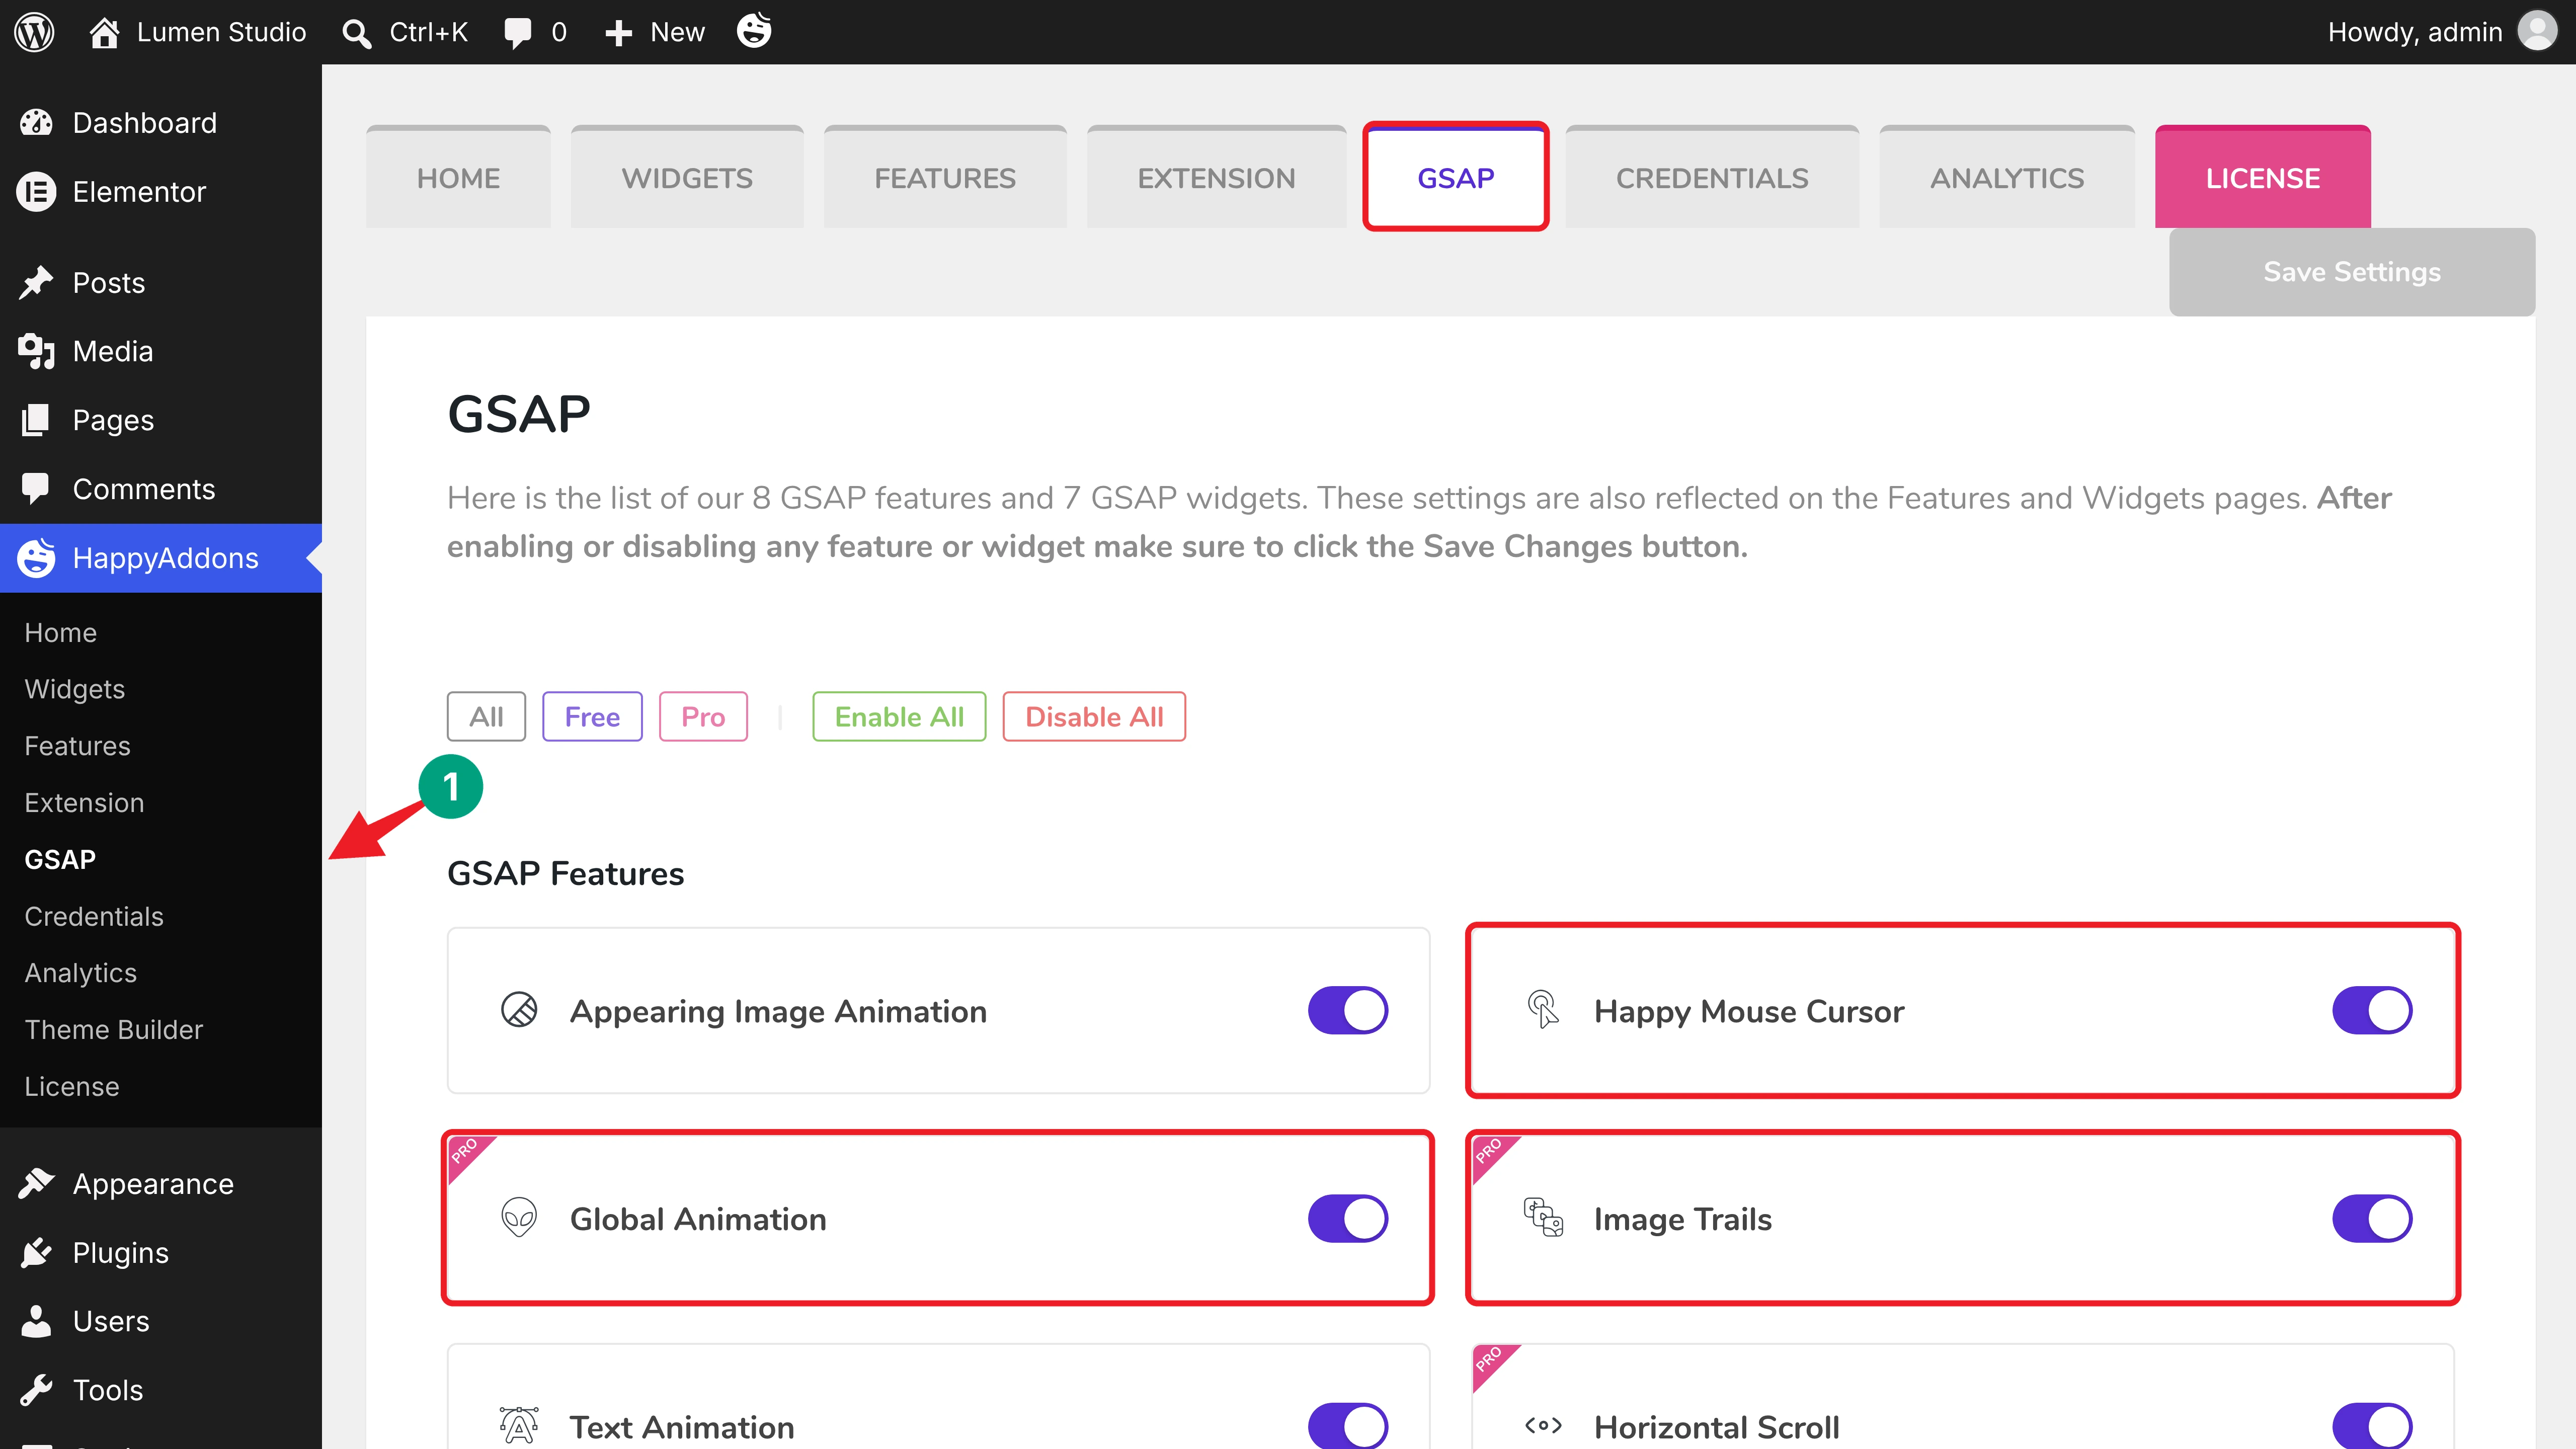
Scroll down to GSAP Widgets and toggle on Dropping Elements and Text Scroll. Then click the Save Settings button.
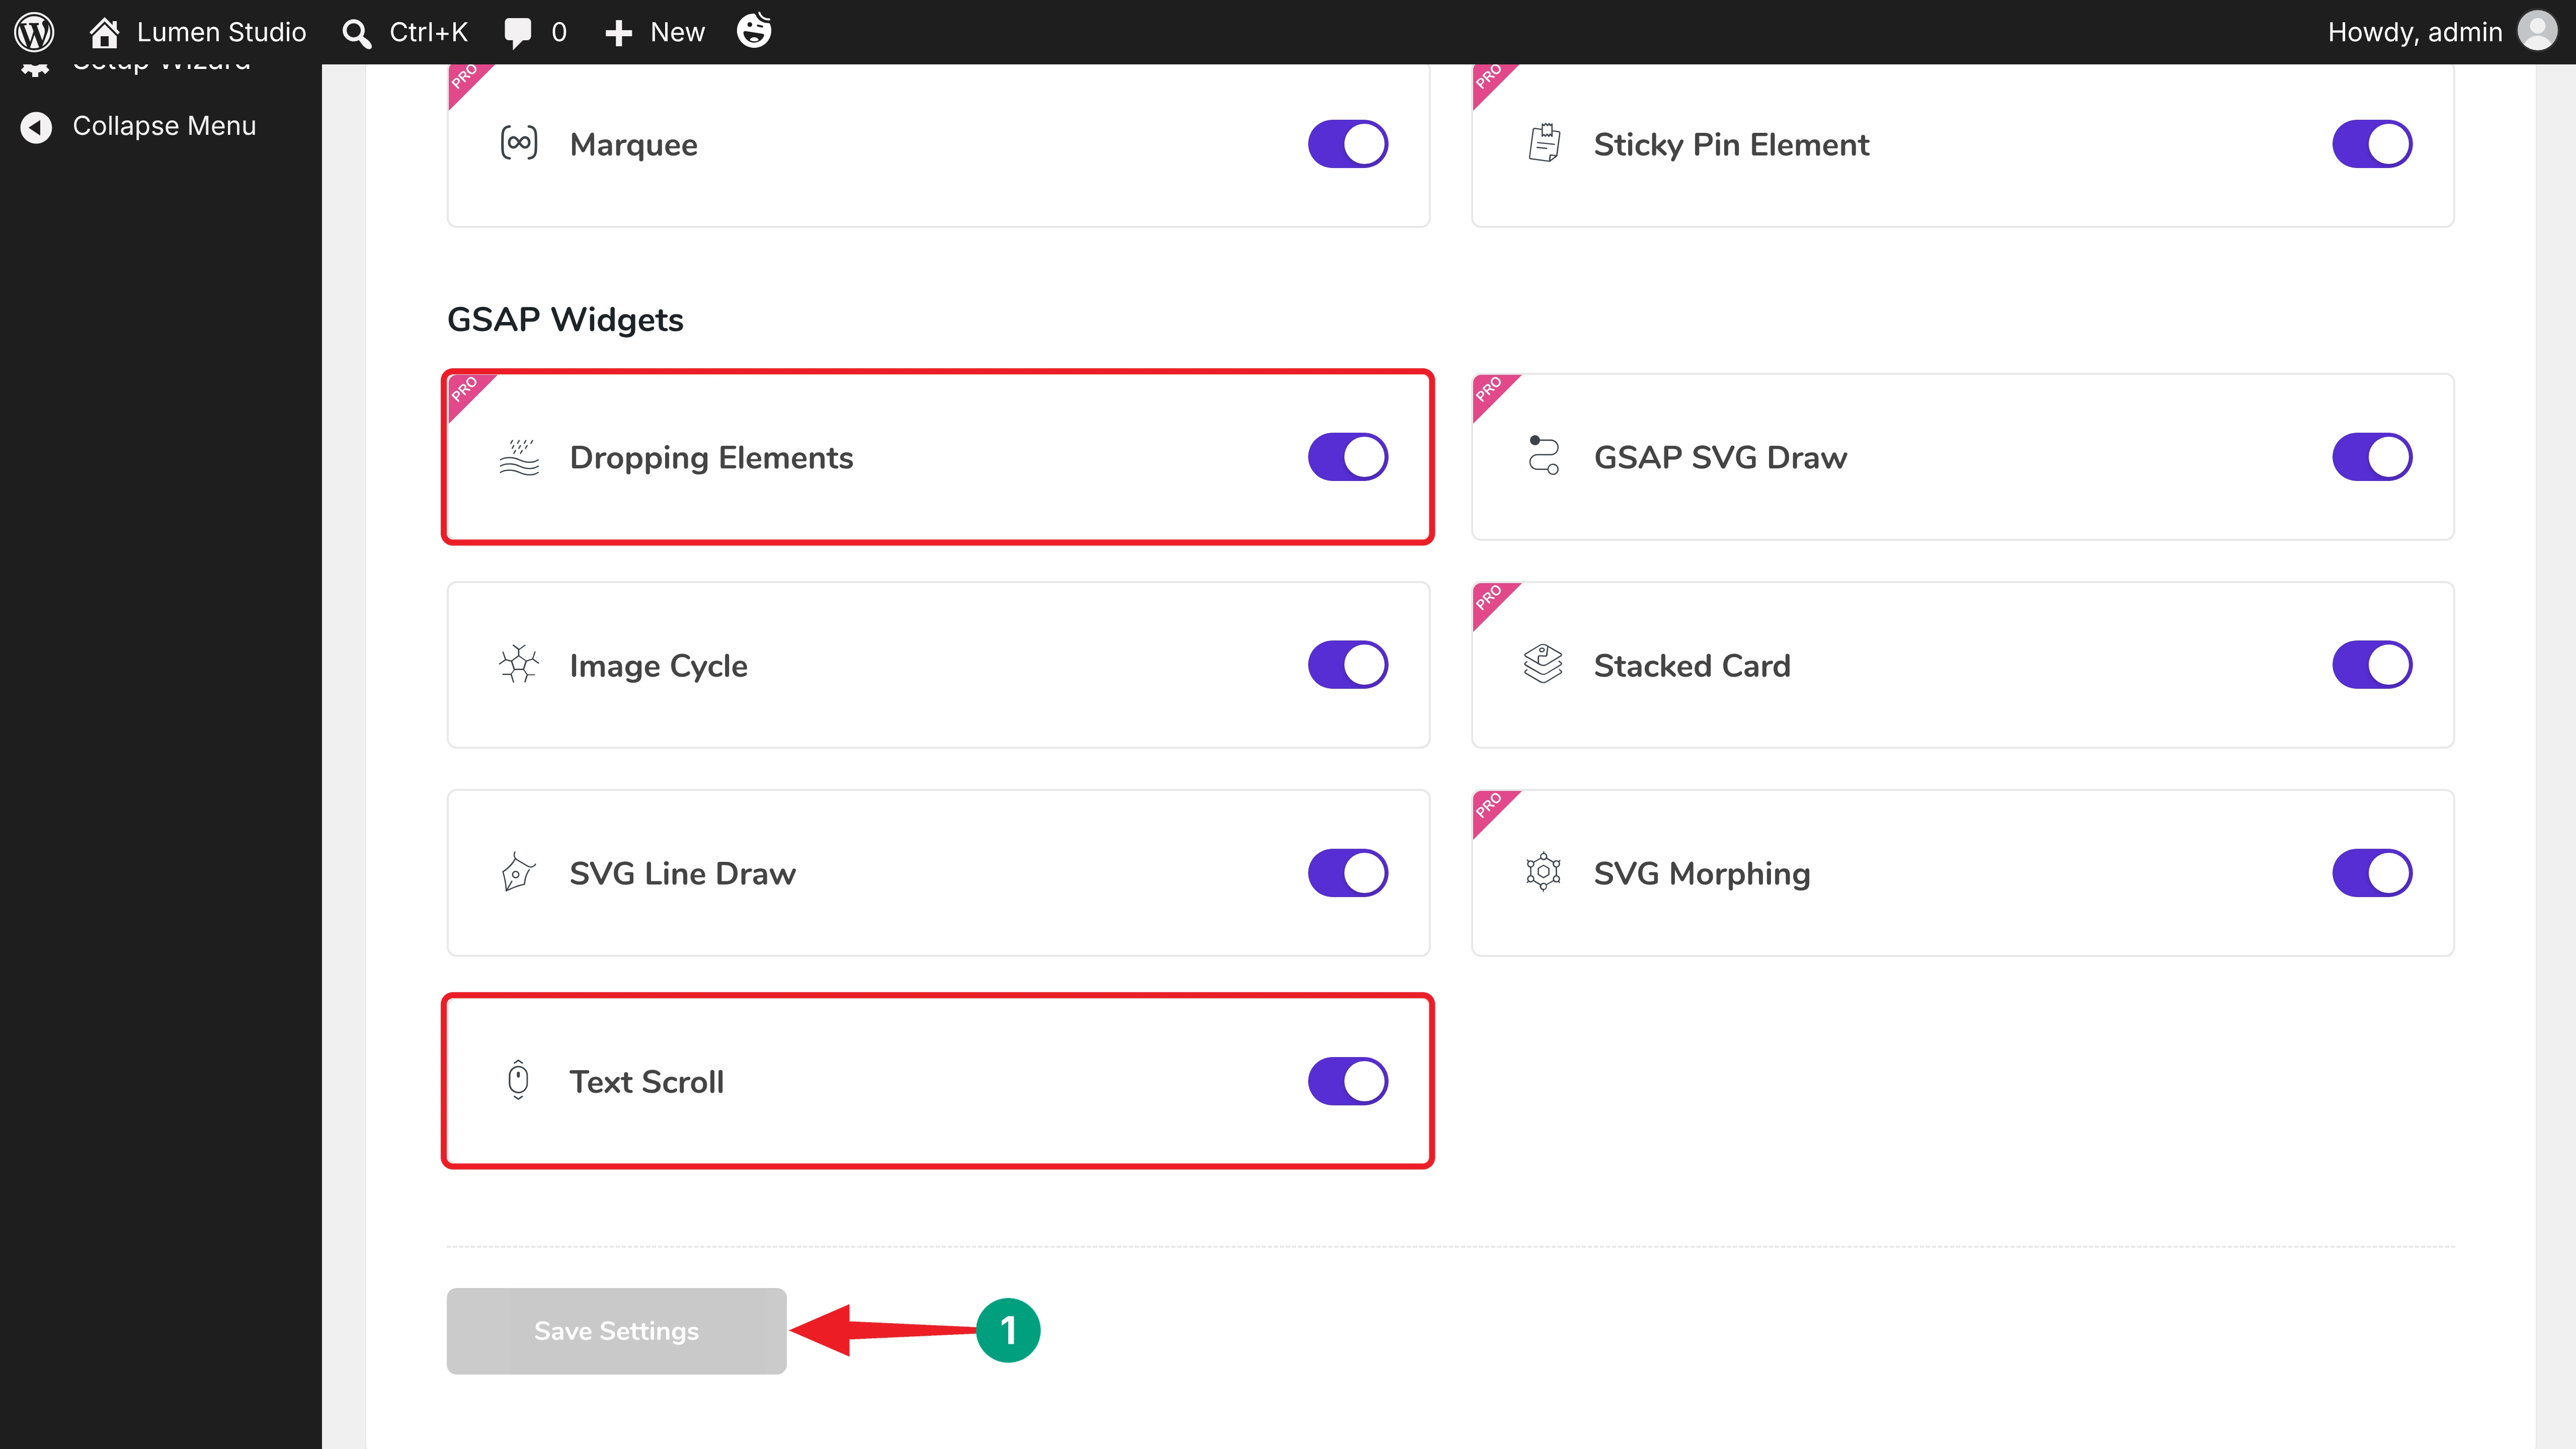
Note: These settings are also reflected on the Features and Widgets tabs. You can use the Free and Pro filters at the top to see which tools come with each plan.
Step 02: Open a Page with Elementor Canvas
Create a new page from Pages > Add New and click Edit with Elementor. Then click the Page Settings icon in the top bar. Under General Settings, toggle on Hide Title and select Elementor Canvas from the Page Layout dropdown. This gives you a blank page without the theme’s header and footer.
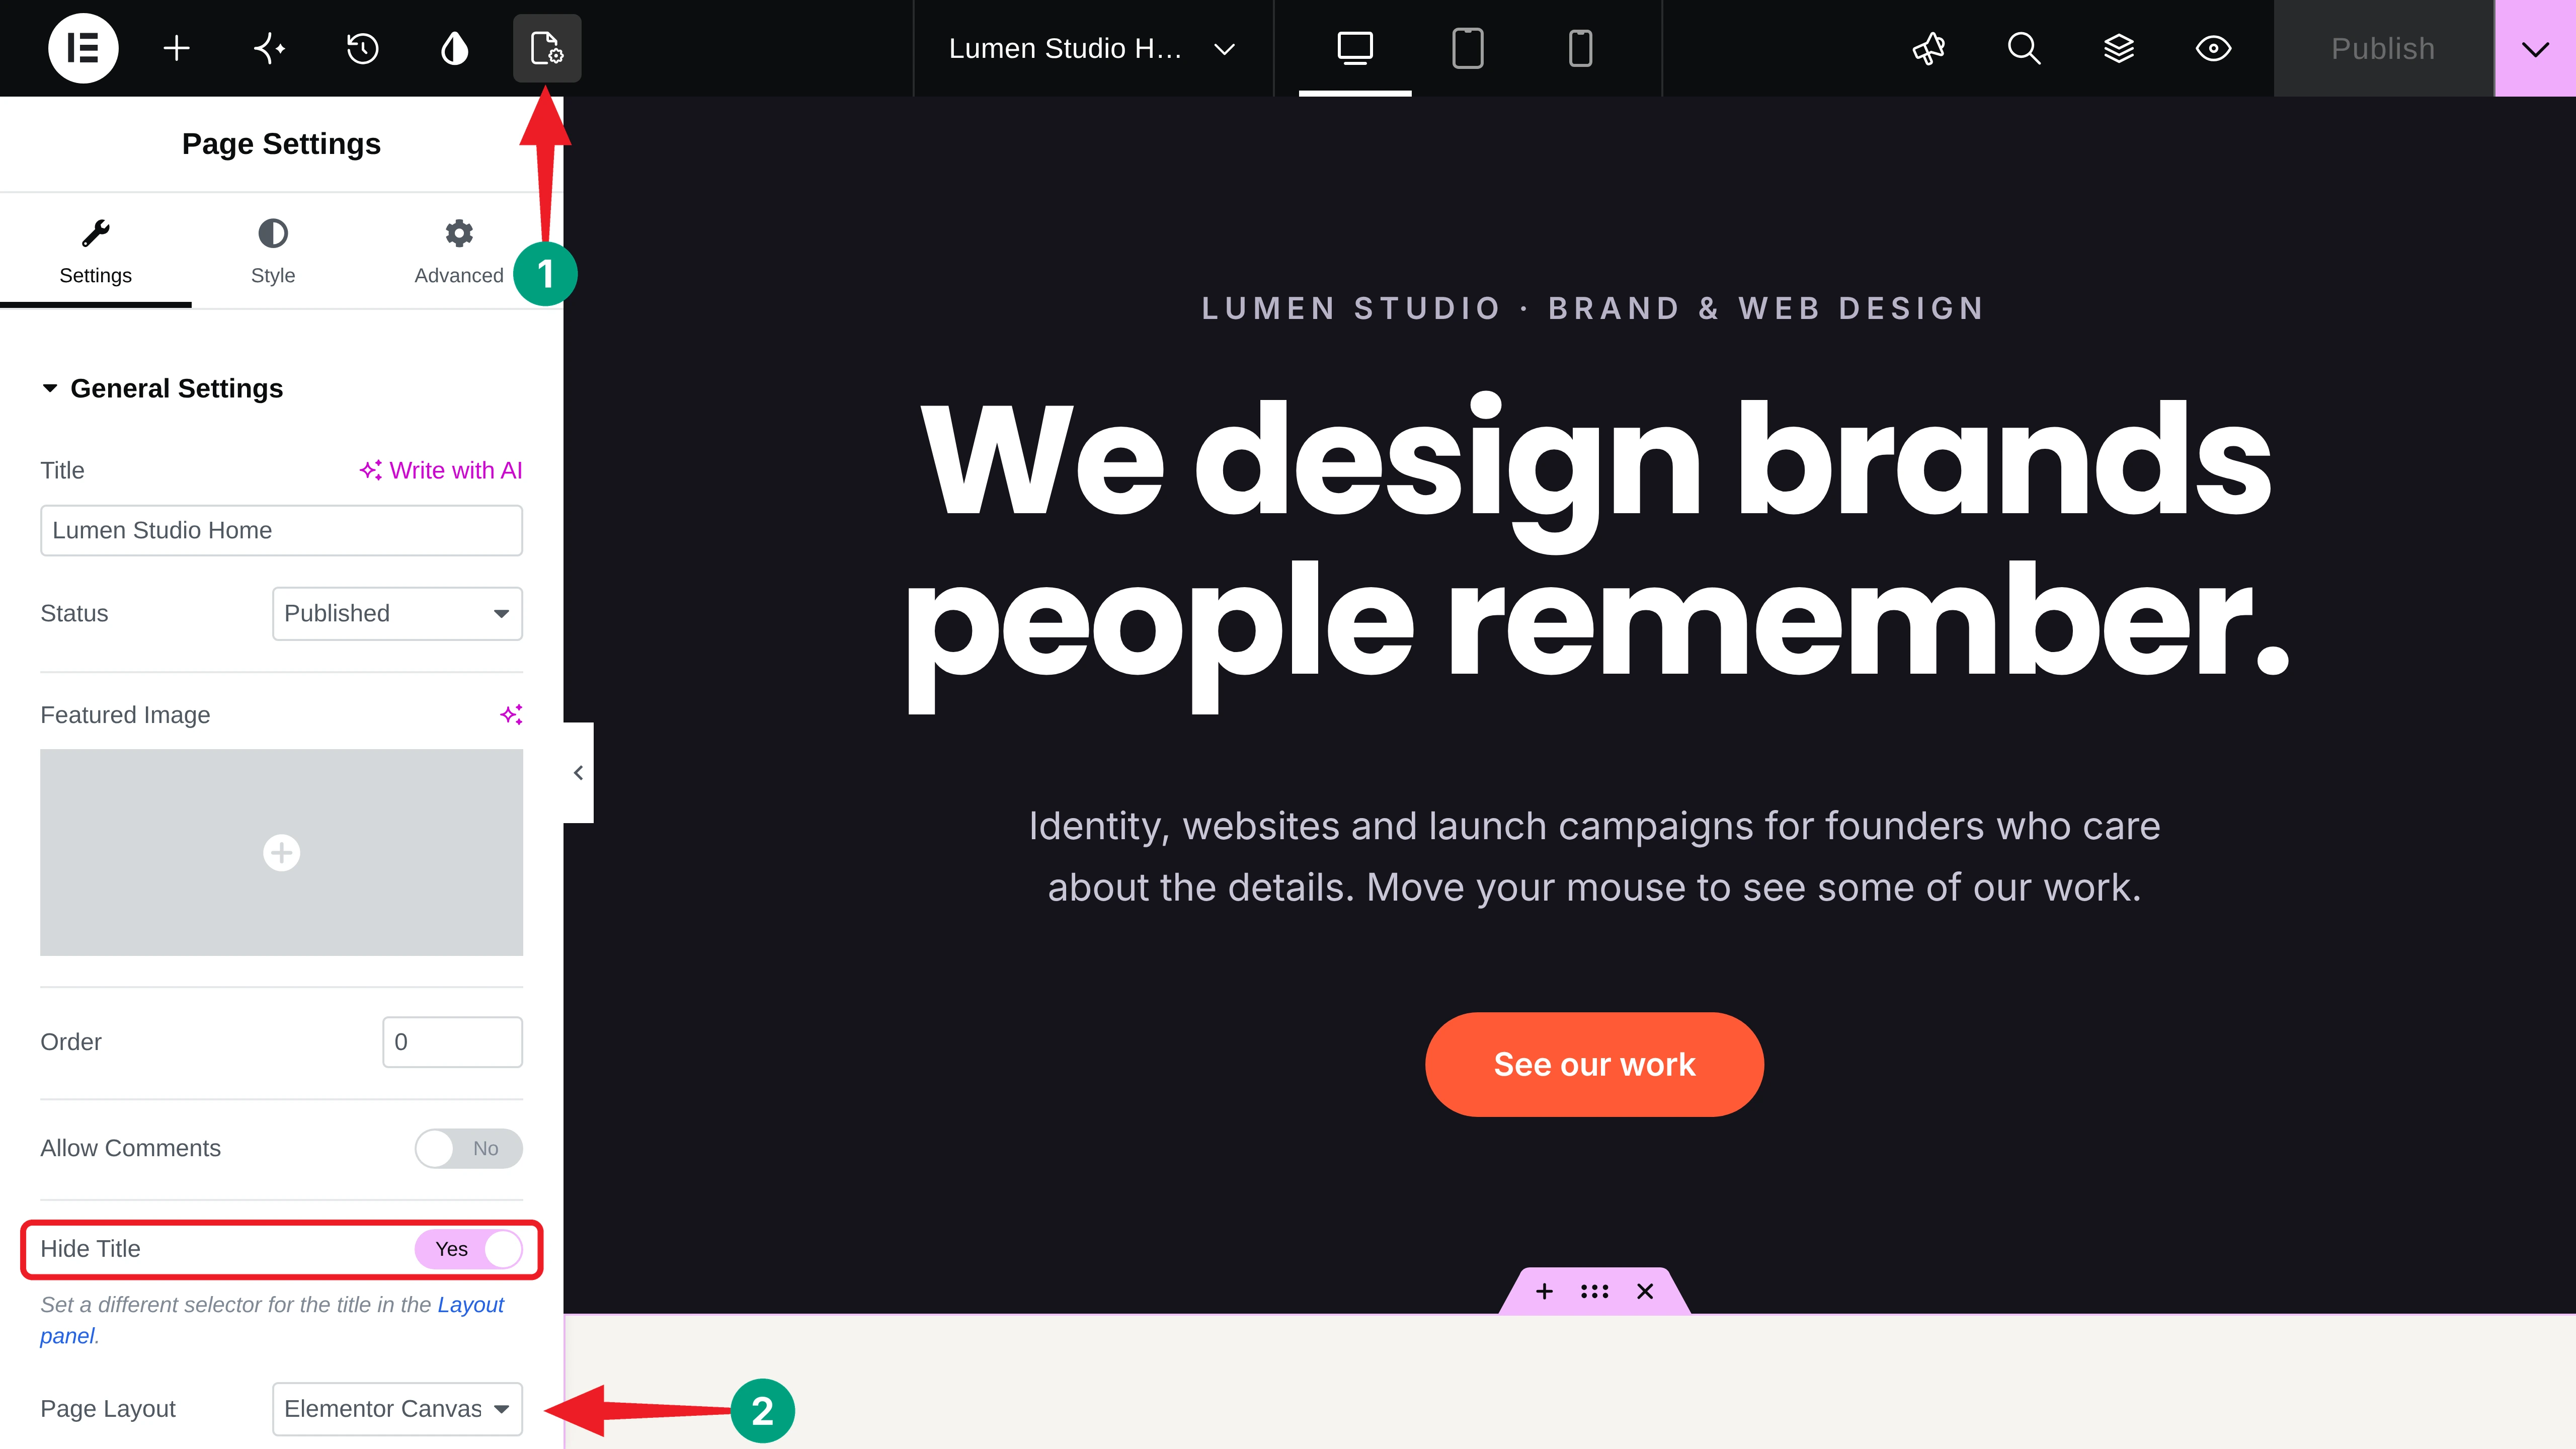
For the tutorial, we have already built the layout with containers: a dark Hero, an About section, a Selected work grid with three project images, a Services section, and a call to action at the end. Now let’s make them interactive one by one.
Step 03: Add a Custom Mouse Cursor with Happy Mouse Cursor
A custom cursor is the easiest way to make the whole page feel different. HappyAddons lets you set one for the full page and a special one for individual elements.
# Turn On the Cursor for the Whole Page
Stay in Page Settings and expand the Happy Mouse Cursor section. Toggle on Enable Happy Mouse Cursor. We have also turned on Enable Lazy Move, so the cursor follows the mouse with a soft delay, and Enable Mix Blend, so it inverts the colors behind it and stays visible on both dark and light sections.
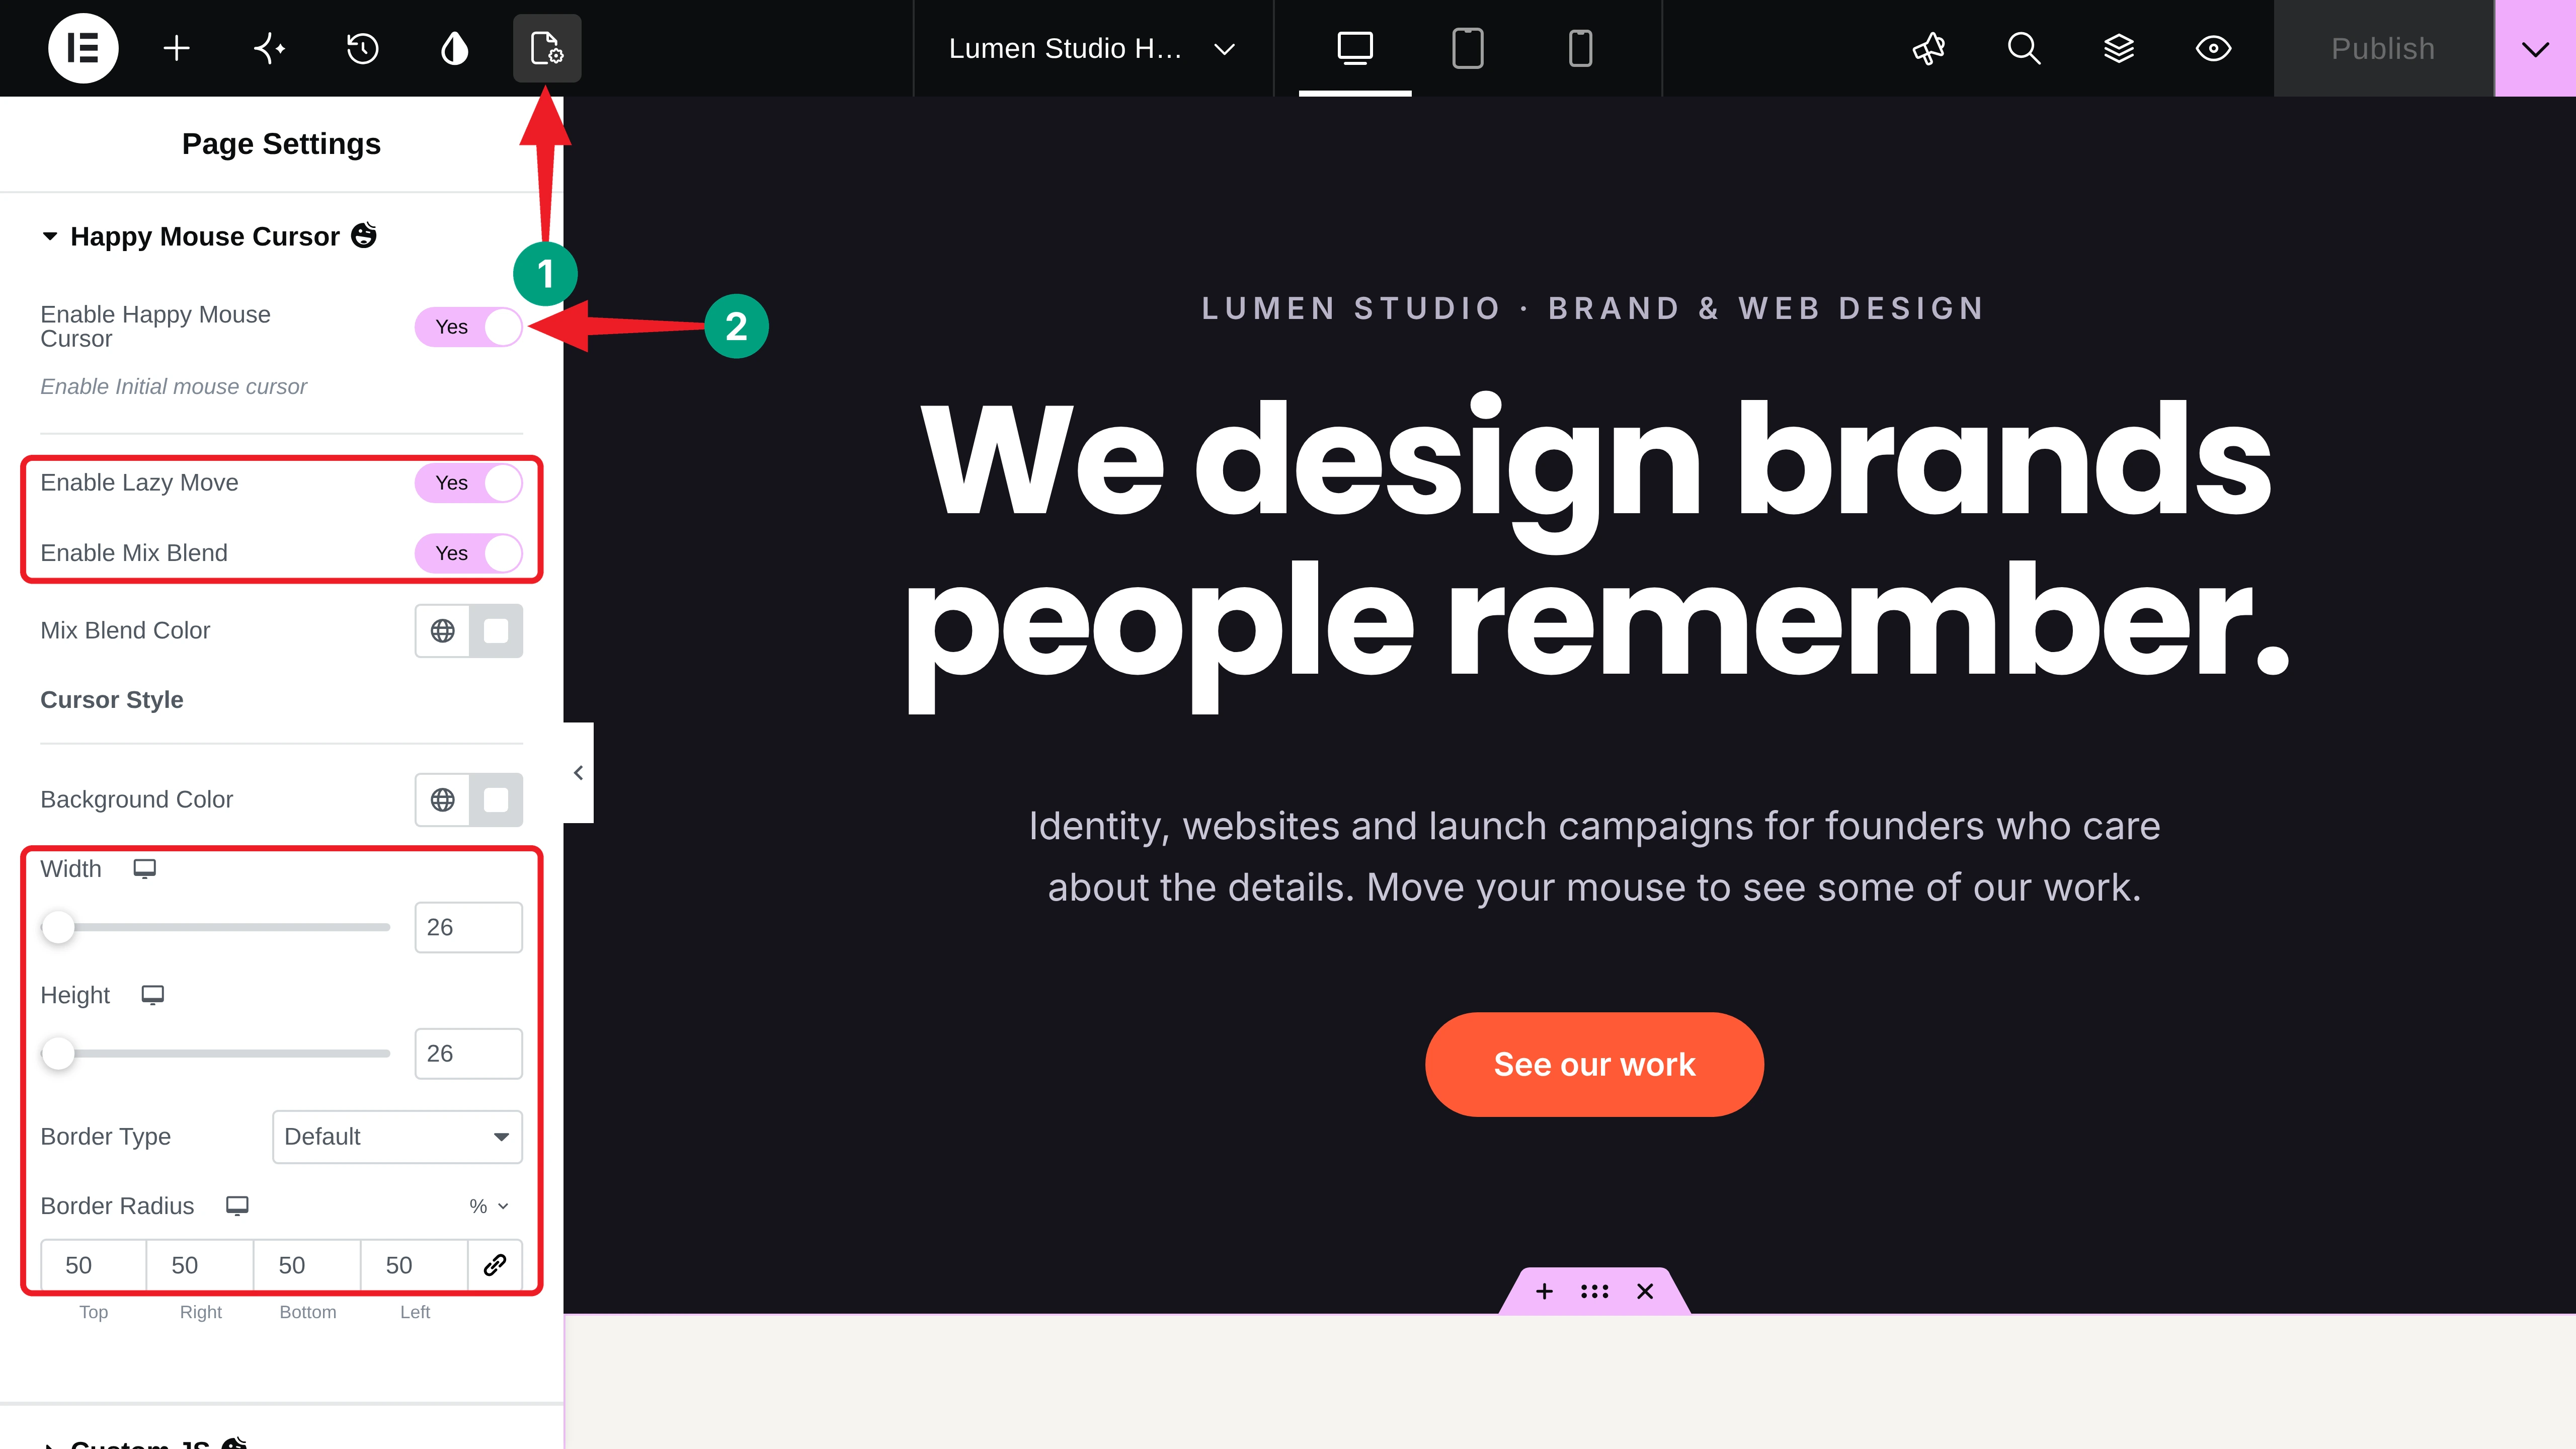
Under Cursor Style, you’ll get options for the background color, width, height, border type, and border radius. We have set the Width and Height to 26 and the Border Radius to 50% to get a small circle.
# Show a “View Project” Cursor on the Work Cards
Now select the container of the first project card and go to the Layout tab. Expand Happy Mouse Cursor and toggle on Enable Happy Mouse Cursor. Select Text as the Cursor Type and type View project in the Cursor Text field. Then set a Background Color for the cursor. We used our brand orange.
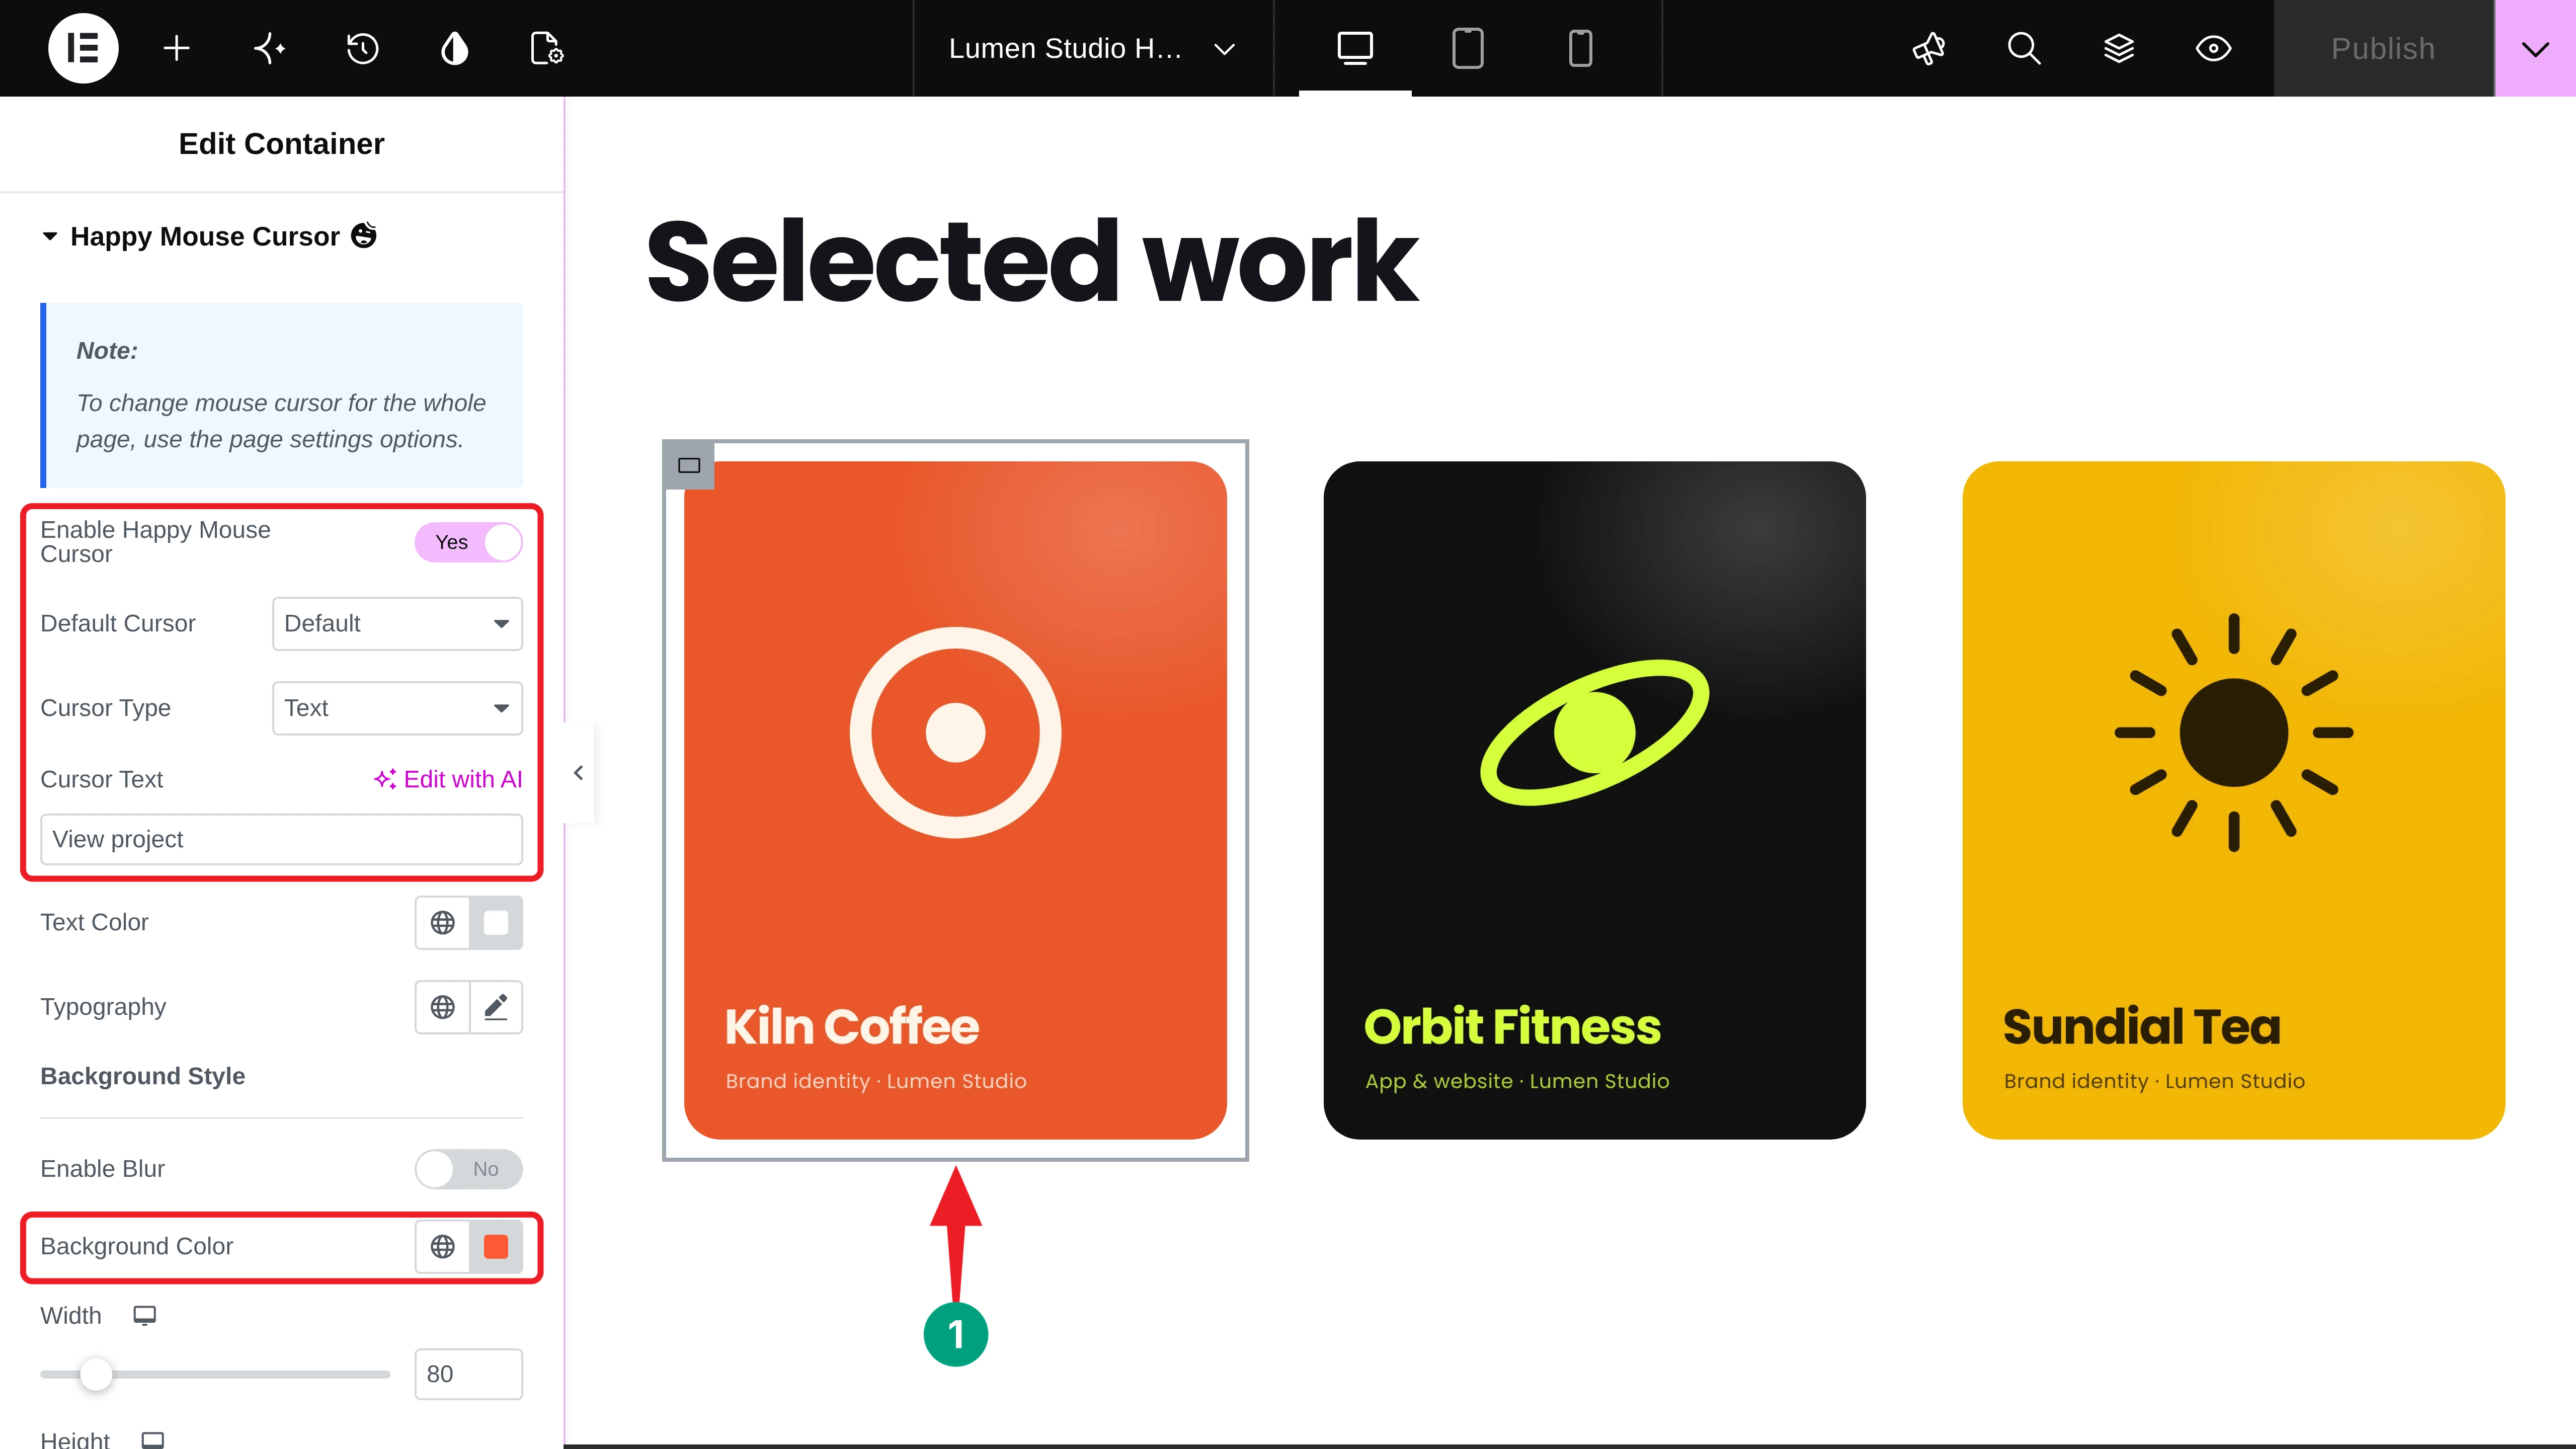
Besides Text, the Cursor Type dropdown also offers Color, Icon, Image, and Video. Do the same for the other two project cards. When visitors hover over a card, the round cursor turns into a “View project” label.
Explore how to add cursor hover effects in Elementor.
Step 04: Add Image Trails to the Hero Section
Image Trails shows a stream of images that follows the mouse. It’s perfect for a portfolio hero because visitors see your work the moment they move the mouse.
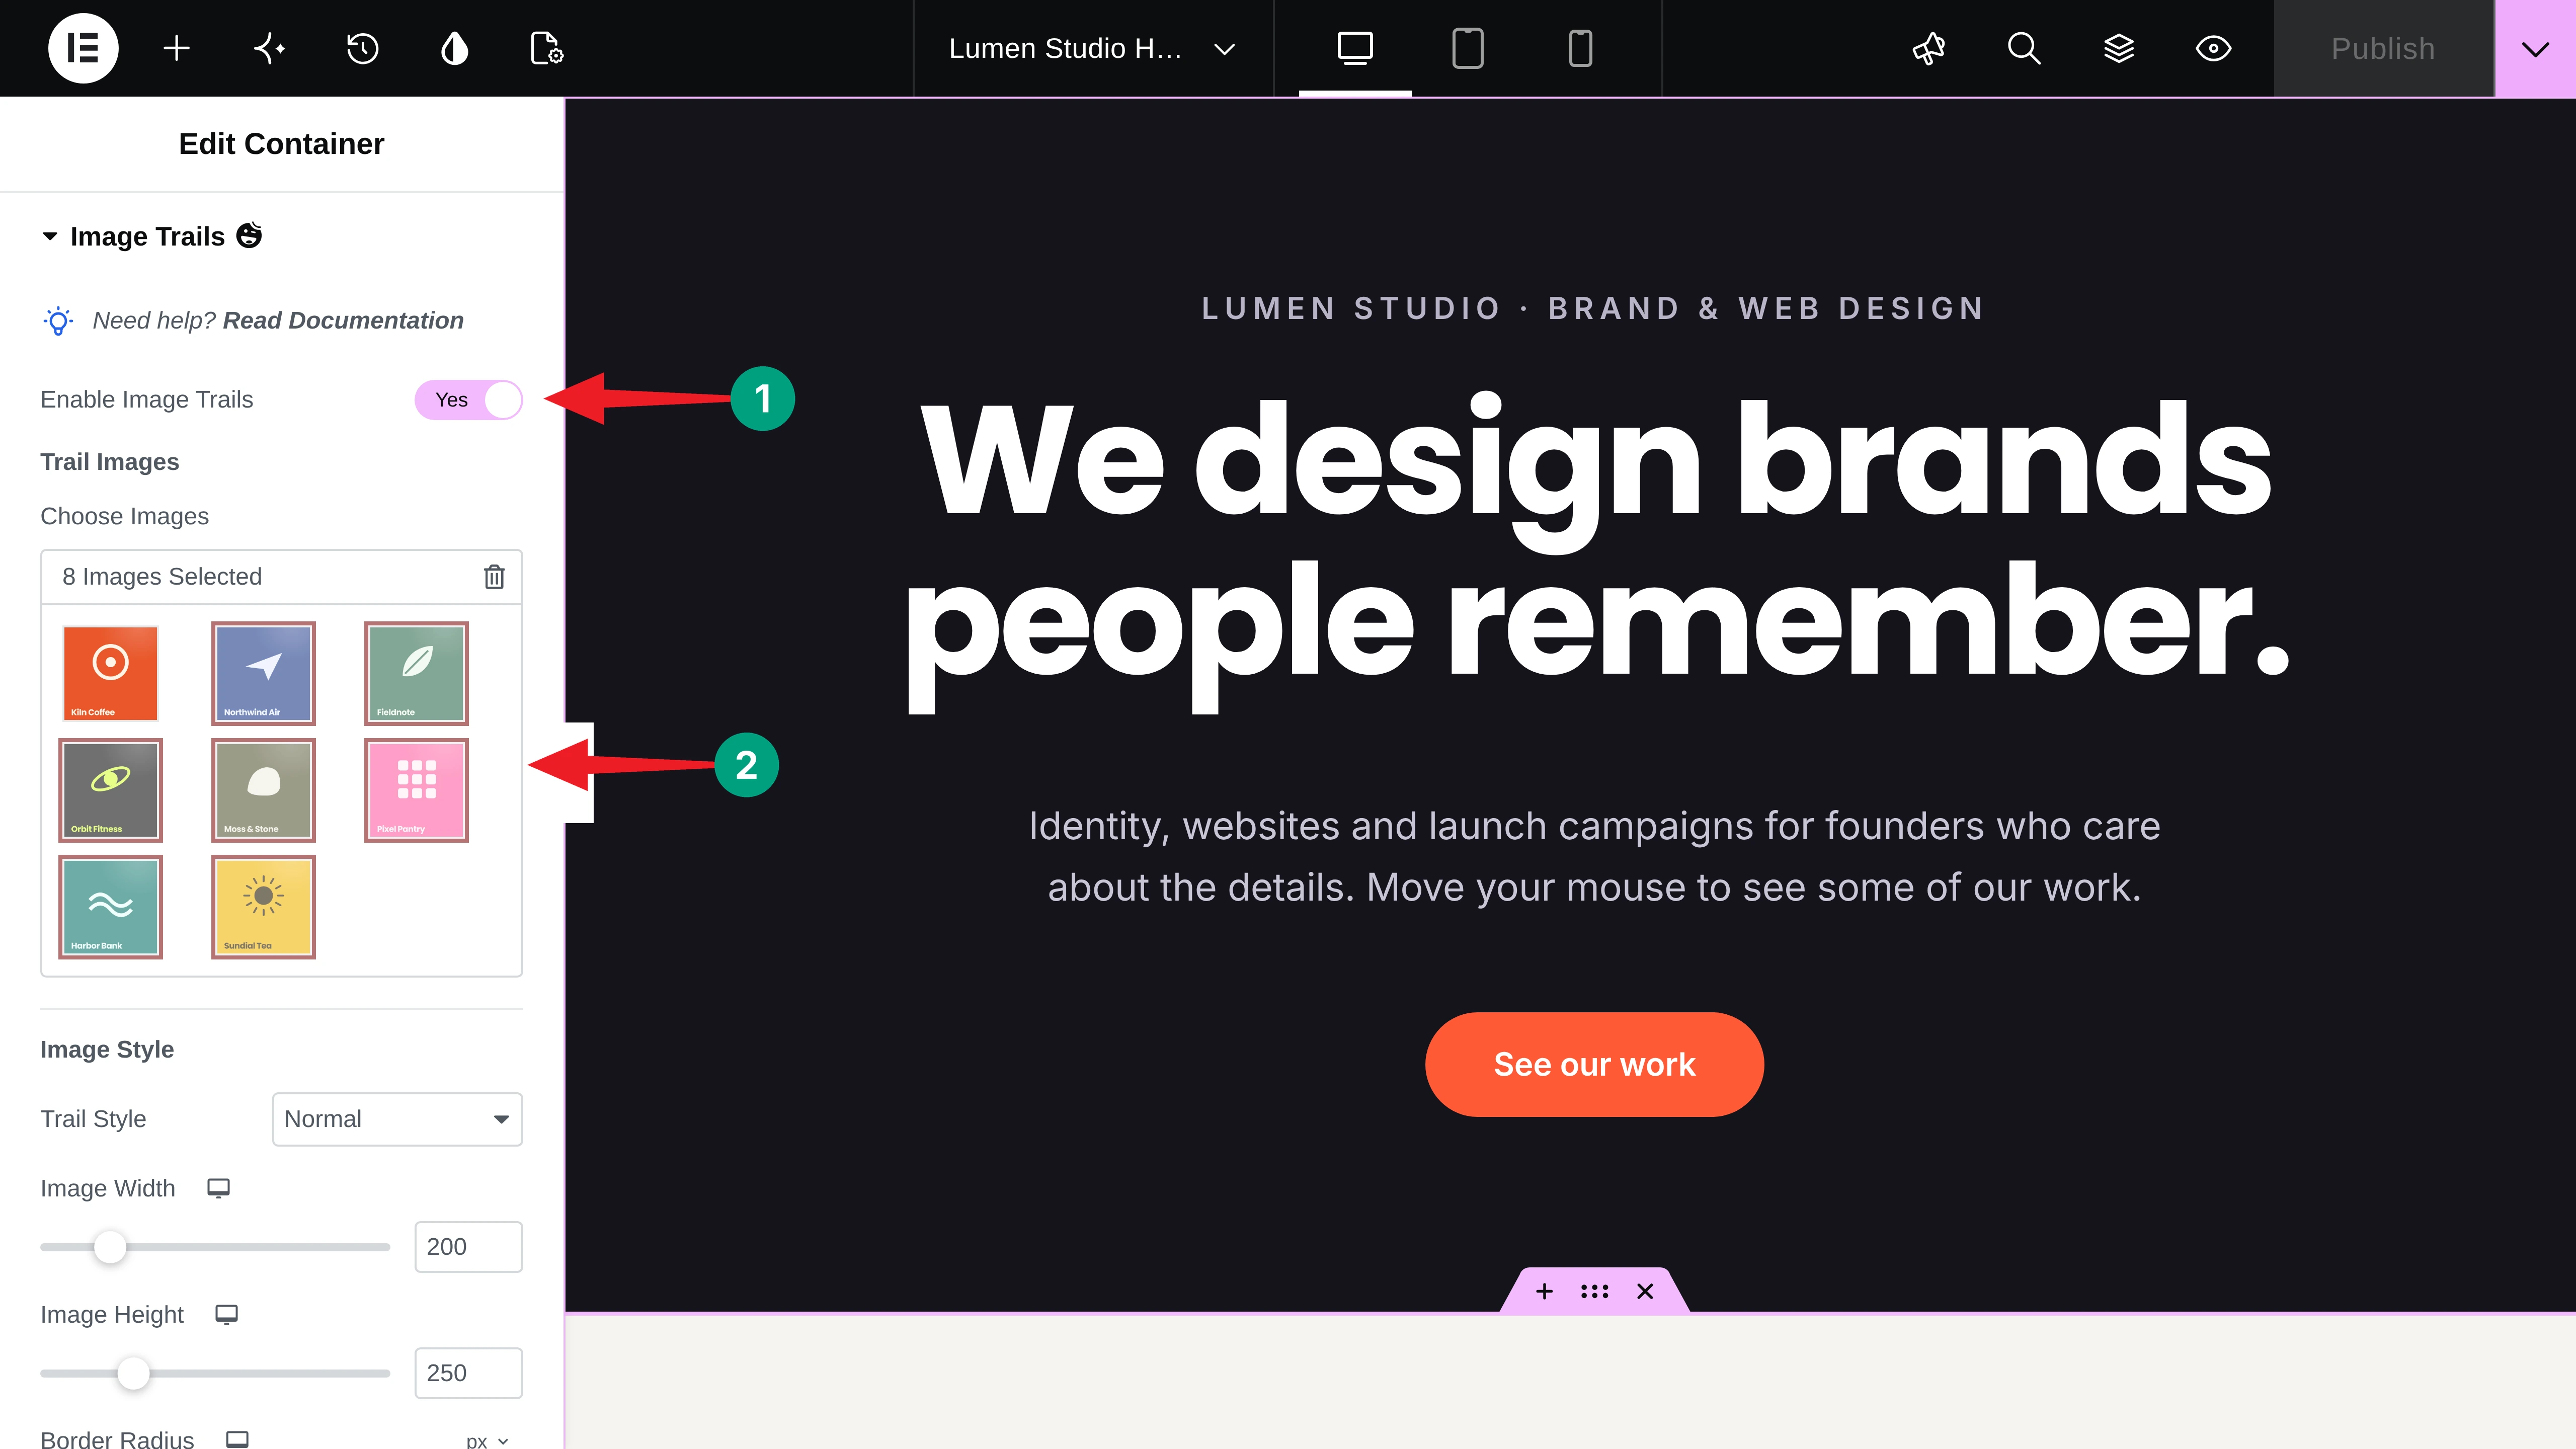
Select the hero container and go to the Advanced tab. Expand the Image Trails section and toggle on Enable Image Trails. Then click the Choose Images area and add the images you want to show. We have added eight project covers.
Under Image Style, you can set the Trail Style (Normal or Falling), image width, image height, border radius, opacity, z-index, trail distance, animation duration, and rotation duration. Here are the values we used:
- Trail Style: Normal
- Image Width / Height: 200 / 250 px
- Border Radius: 14 px
- Trail Distance: 90 (the minimum mouse distance before the next image shows)
- Show in Editor: Yes, so you can test the effect inside Elementor
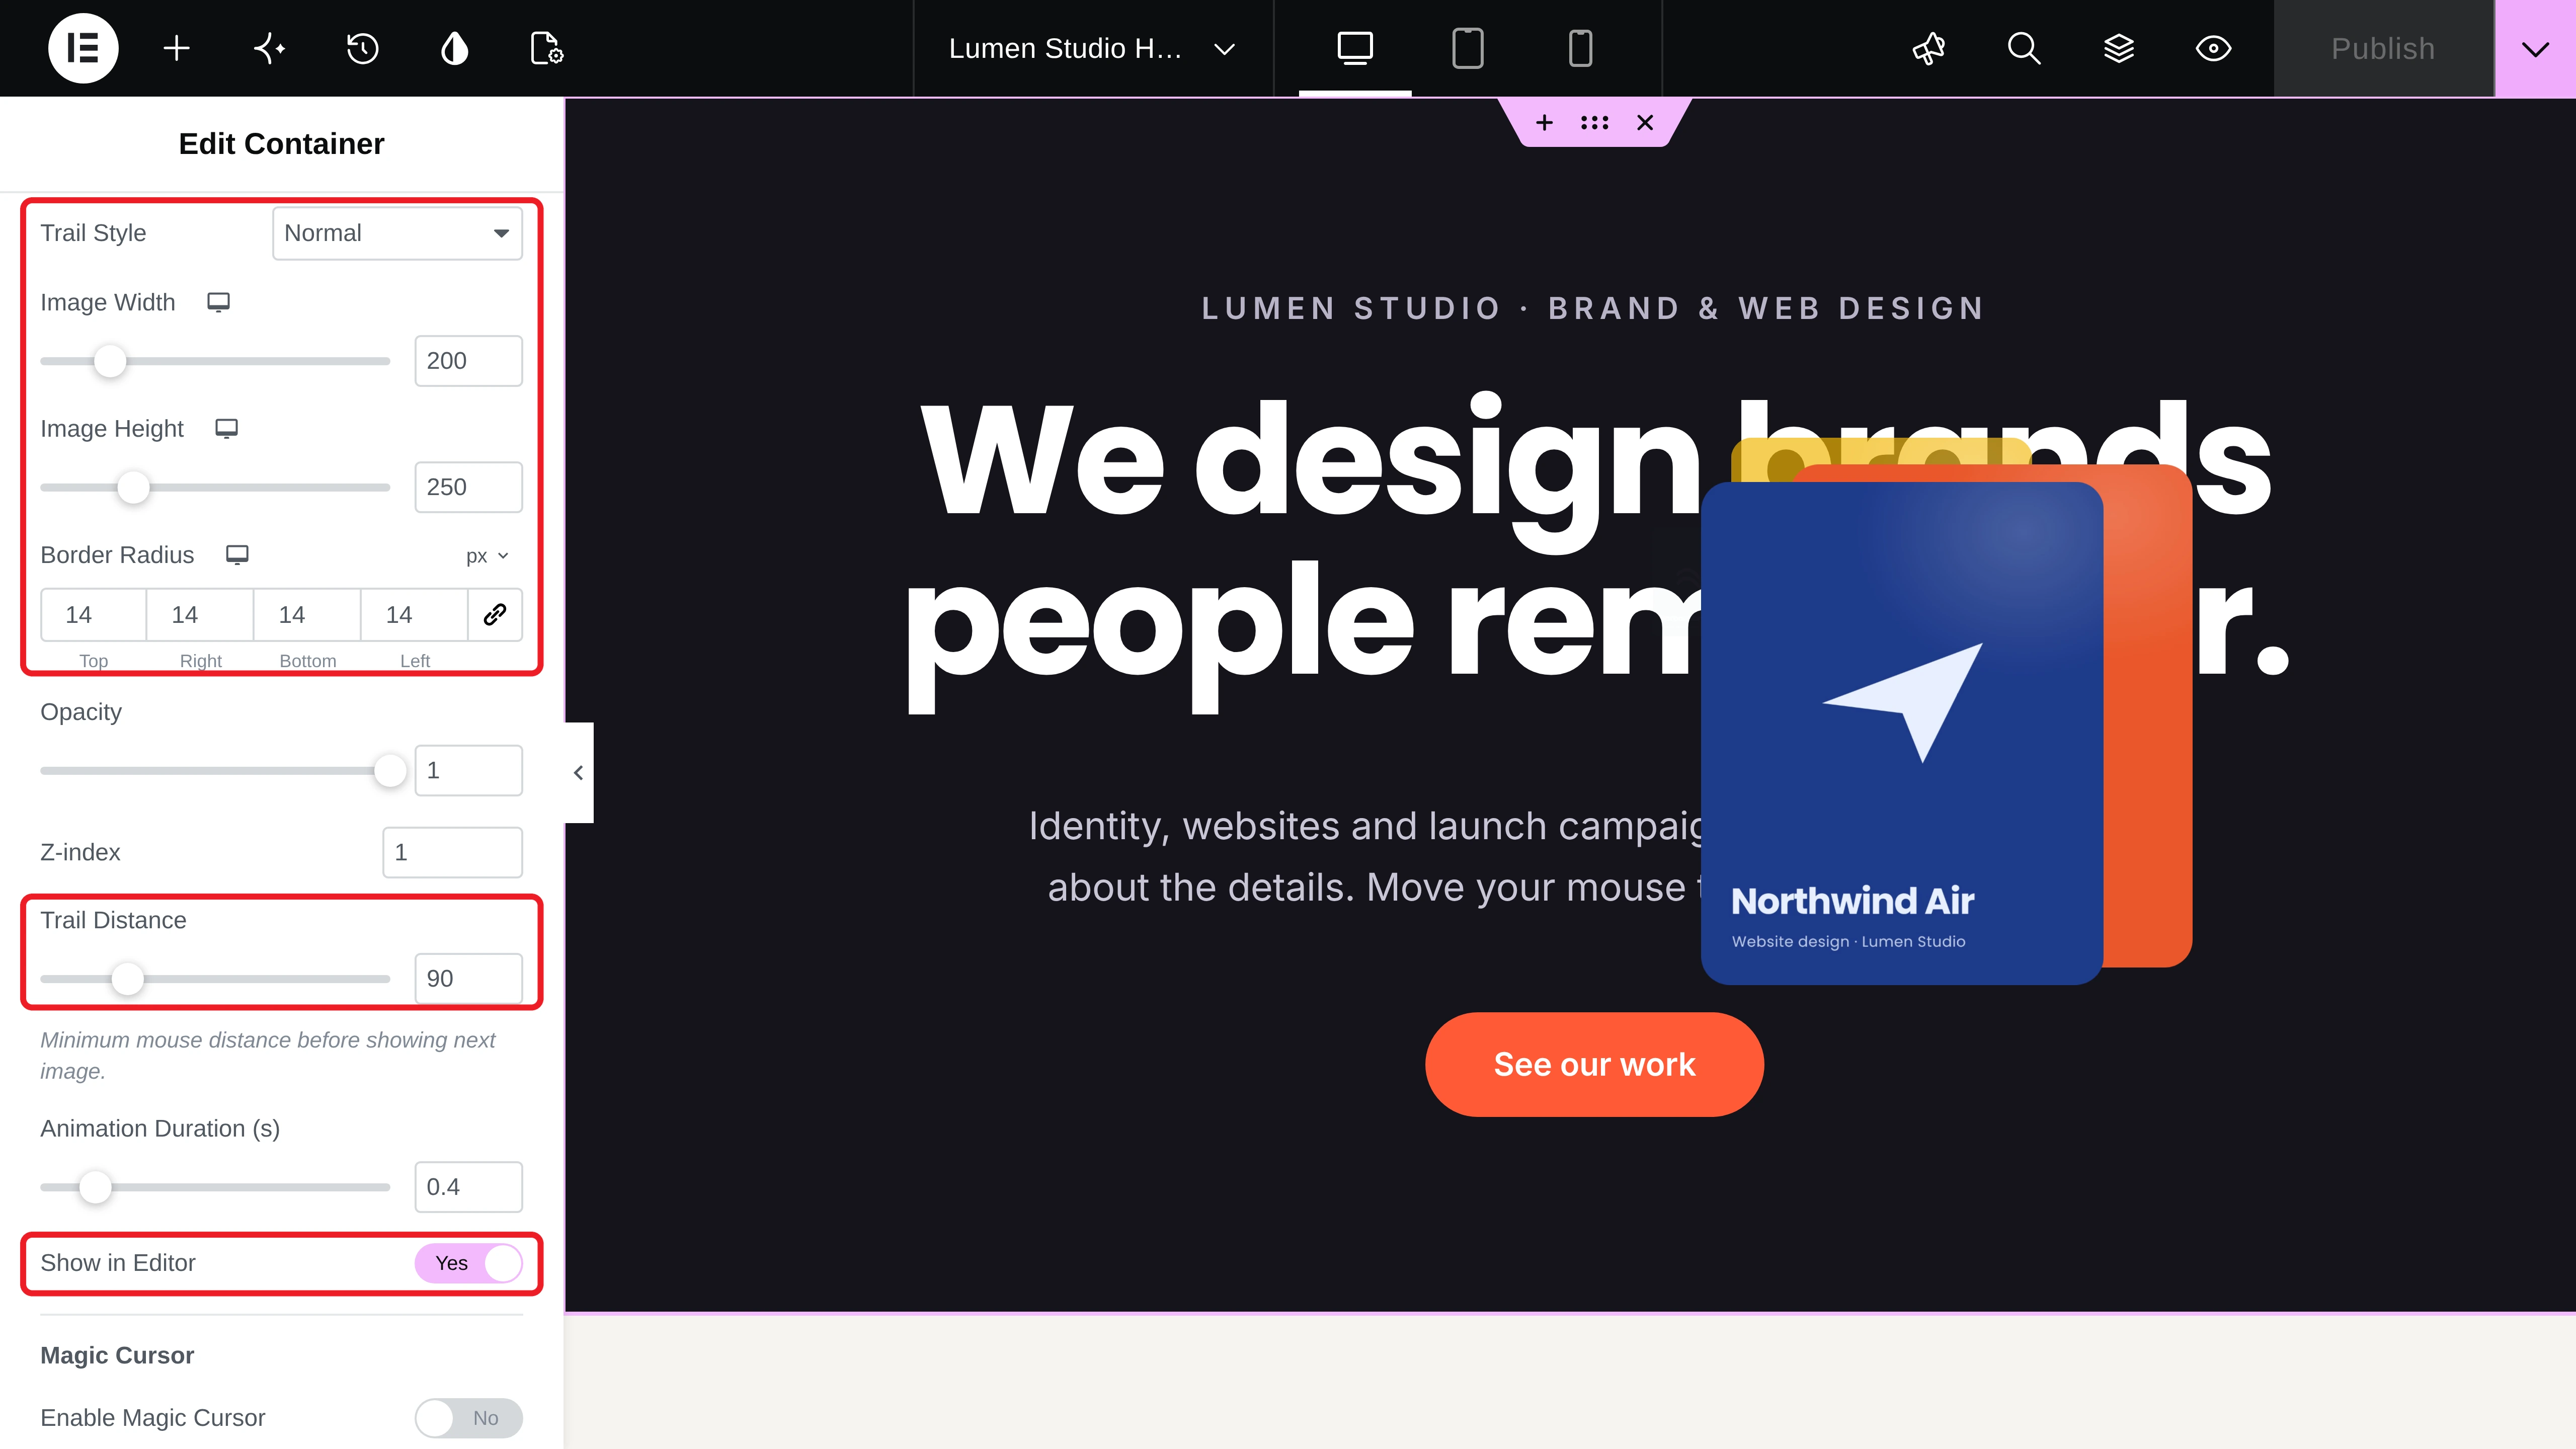
You can see that the trail is already working in the editor. There’s also a Magic Cursor option at the bottom of the section if you want a separate cursor only for this area. We left it off because we already have a page cursor. Here’s the result on the live page:
Step 05: Highlight Text as Visitors Scroll with Text Scroll
The About section has a long paragraph. Instead of a plain block of text, we’ll make it light up line by line as people scroll. Search for the Text Scroll widget and drag and drop it into the About container.
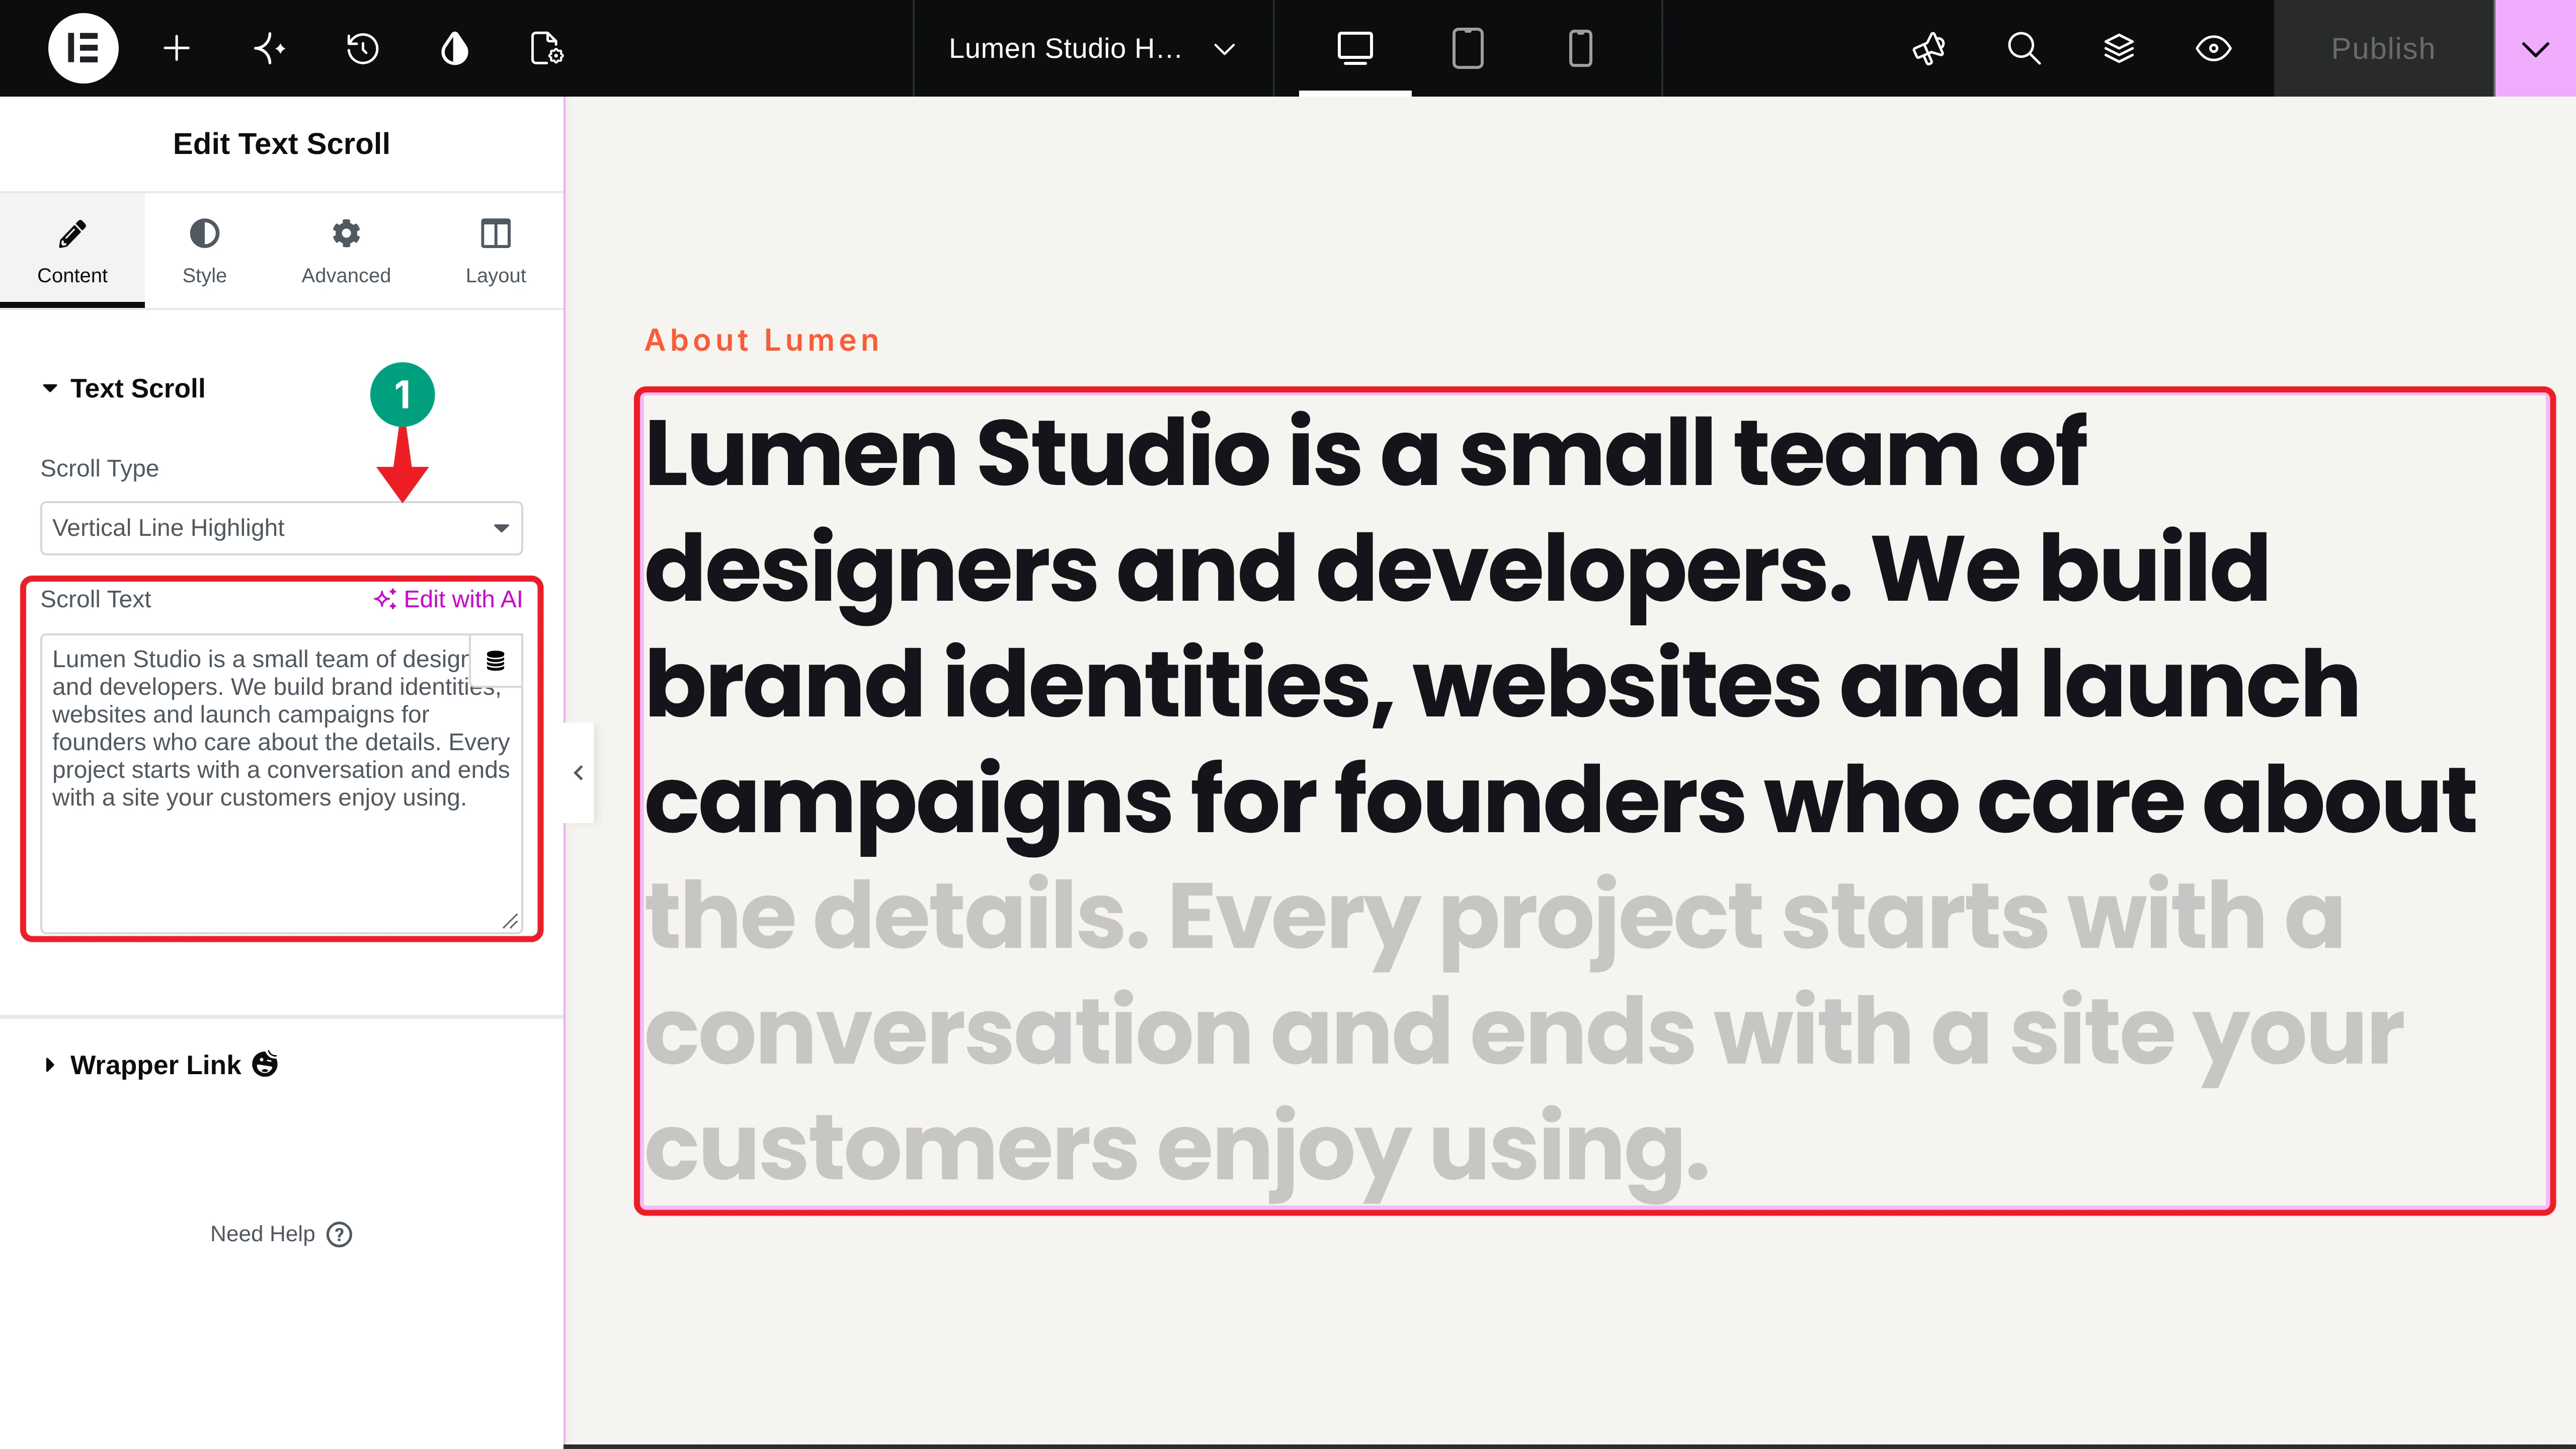
In the Content tab, select a Scroll Type. You can choose Vertical Line Highlight, Horizontal Line Highlight, Vertical Line Mask, or Horizontal Line Mask. We picked Vertical Line Highlight. Then type or paste your paragraph in the Scroll Text field.
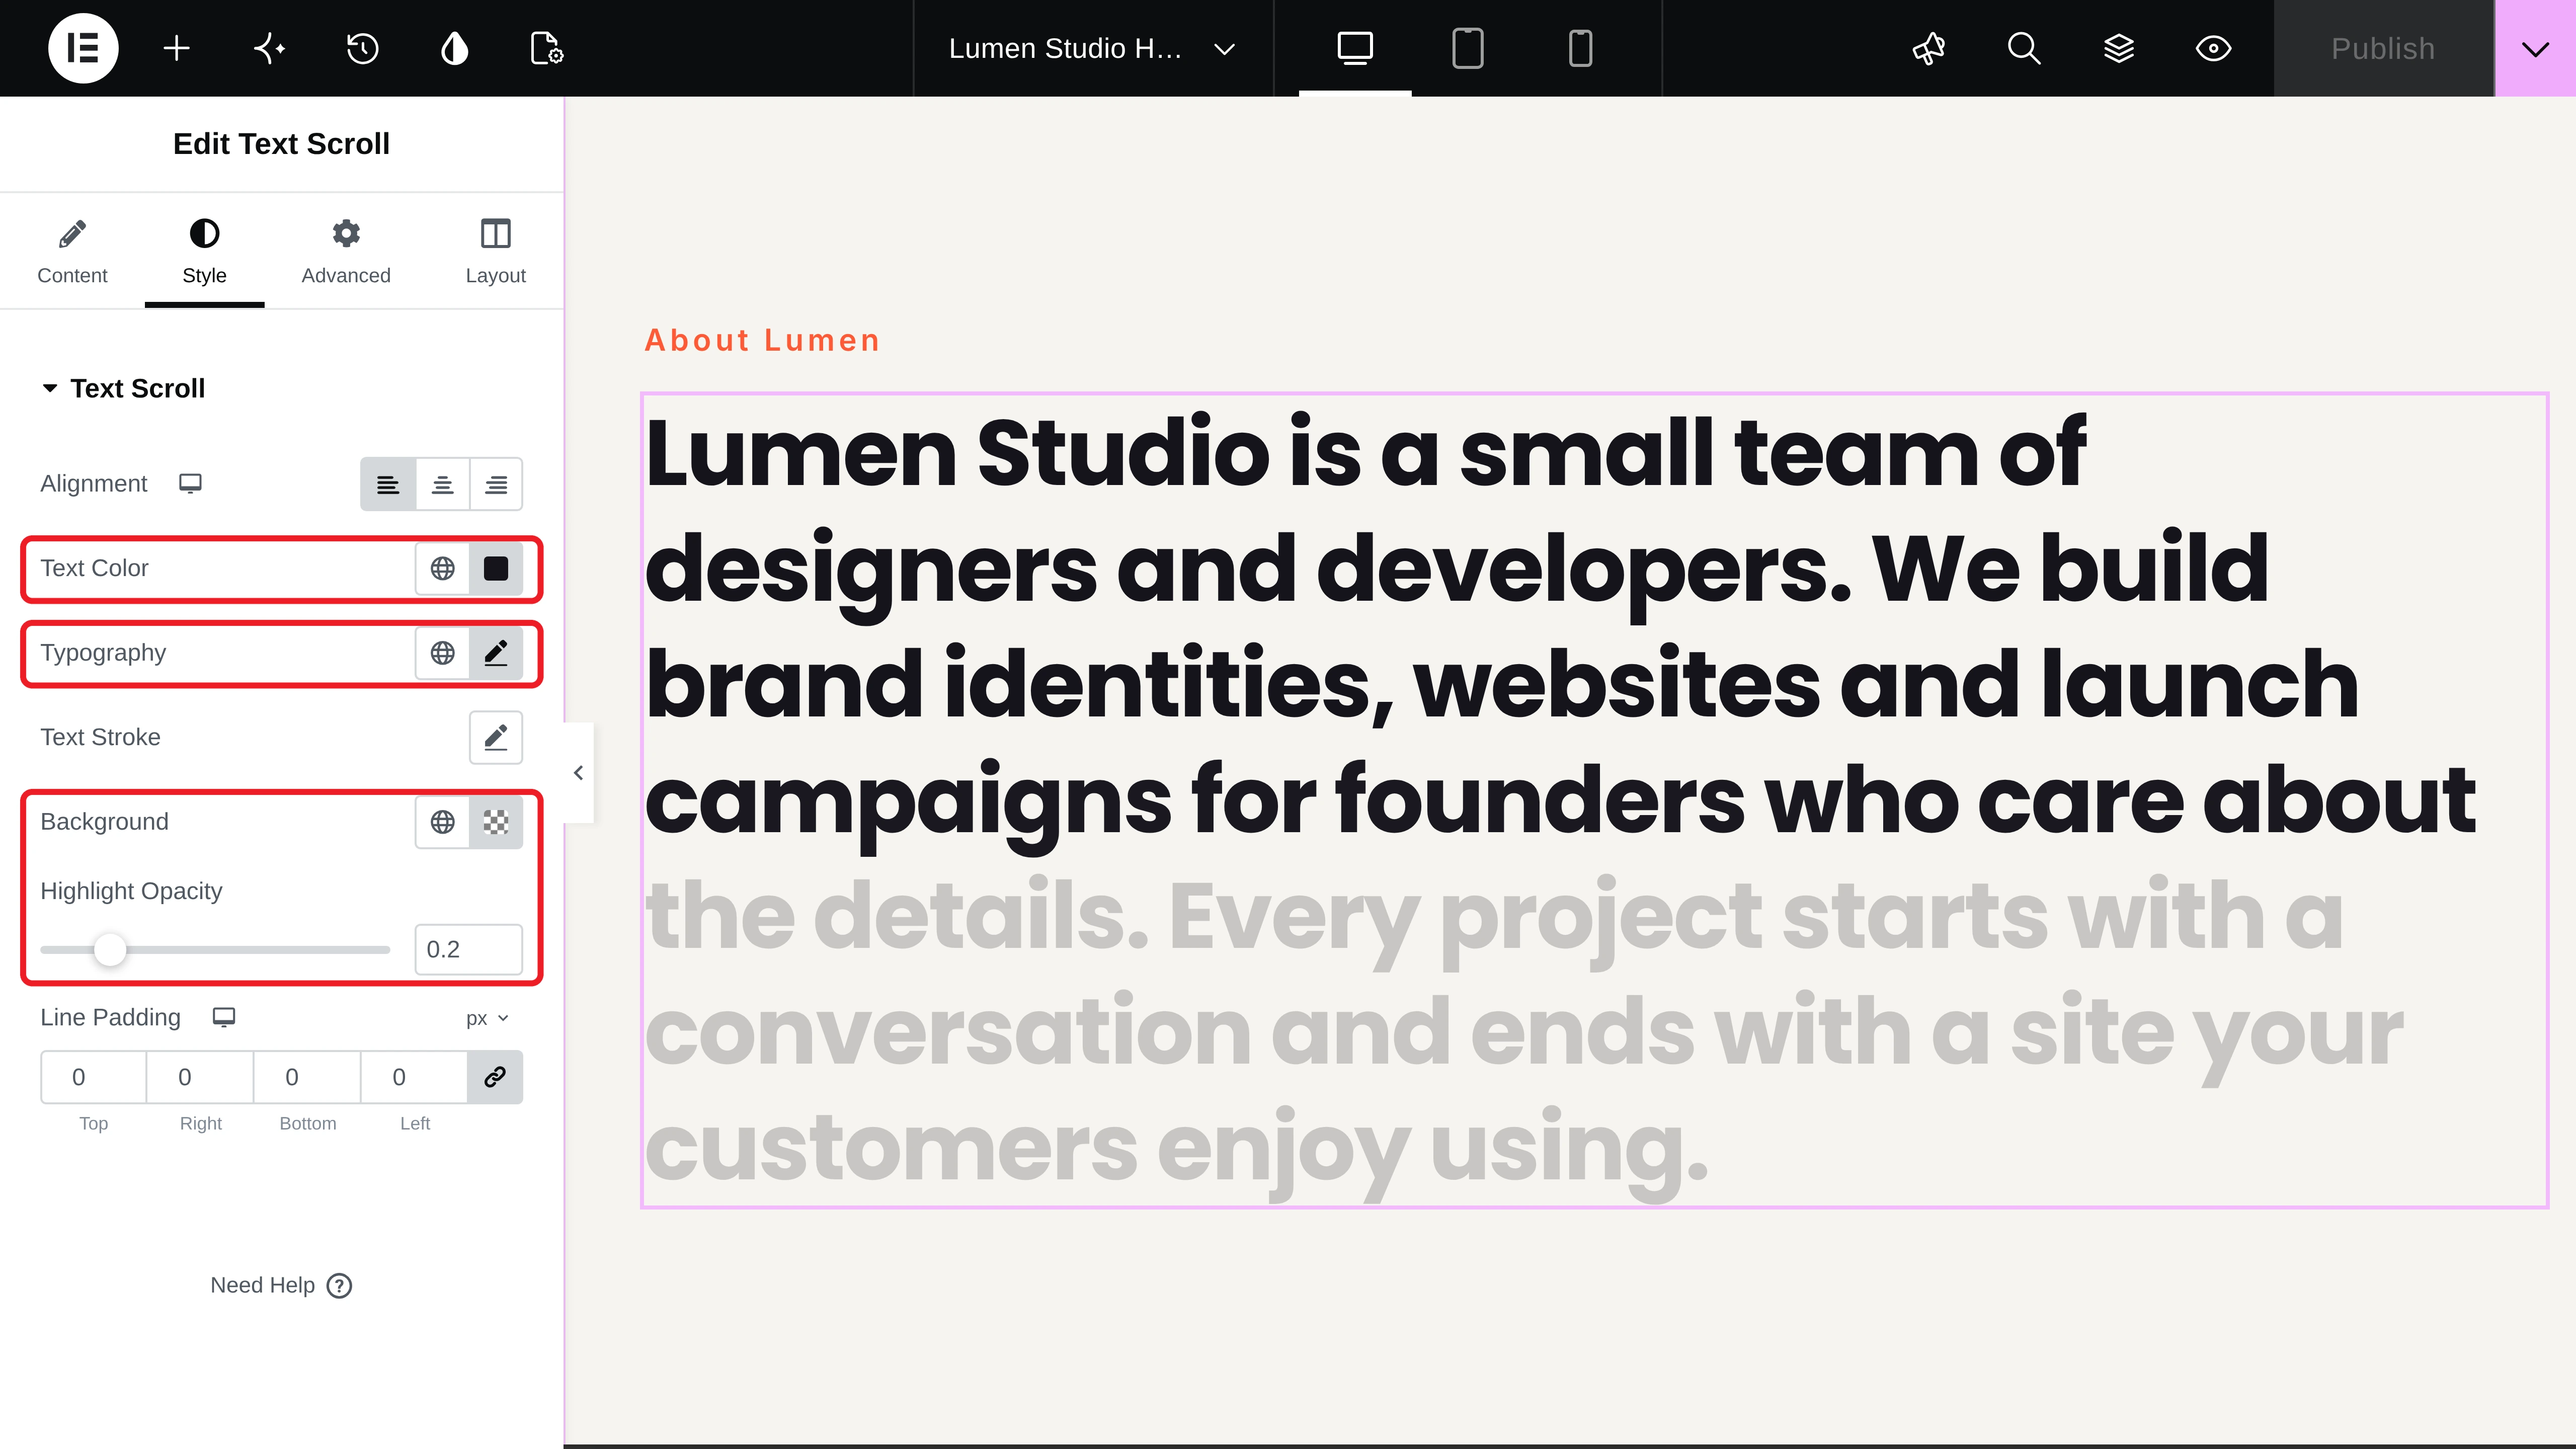
Now move to the Style tab. You’ll get options to customize the alignment, text color, typography, text stroke, background, highlight opacity, and line padding. We used a dark text color, Poppins at 46 px, and a transparent background. Highlight Opacity controls how faded the lines are before they light up. We kept it at 0.2.
Let’s see how it looks when you scroll through the section:
Learn how to build an animated hero section in Elementor.
Step 06: Animate the Project Images on Scroll with Global Animation
Global Animation lets you add a GSAP animation to almost any element. We’ll use it to make the project images rise, grow, and straighten as they scroll into view.
Select the first project image and go to the Advanced tab. Expand the Animation section and toggle on Enable. Then set these options:
- Animation: From. The image starts from the values you add below and moves to its normal position.
- Trigger Mode: On Scroll. The animation follows the scrollbar. The other options are On Appearing (plays once when the element comes into view) and On Page Load.
- Wrapper: Custom. This shows the Animation Start and Animation End options.
- Animation Start: Top – Bottom, so it starts when the top of the image reaches the bottom of the screen.
- Animation End: Top – Center, so it finishes when the top of the image reaches the middle of the screen.
- Easing Functions: None, so the movement matches the scroll speed exactly.
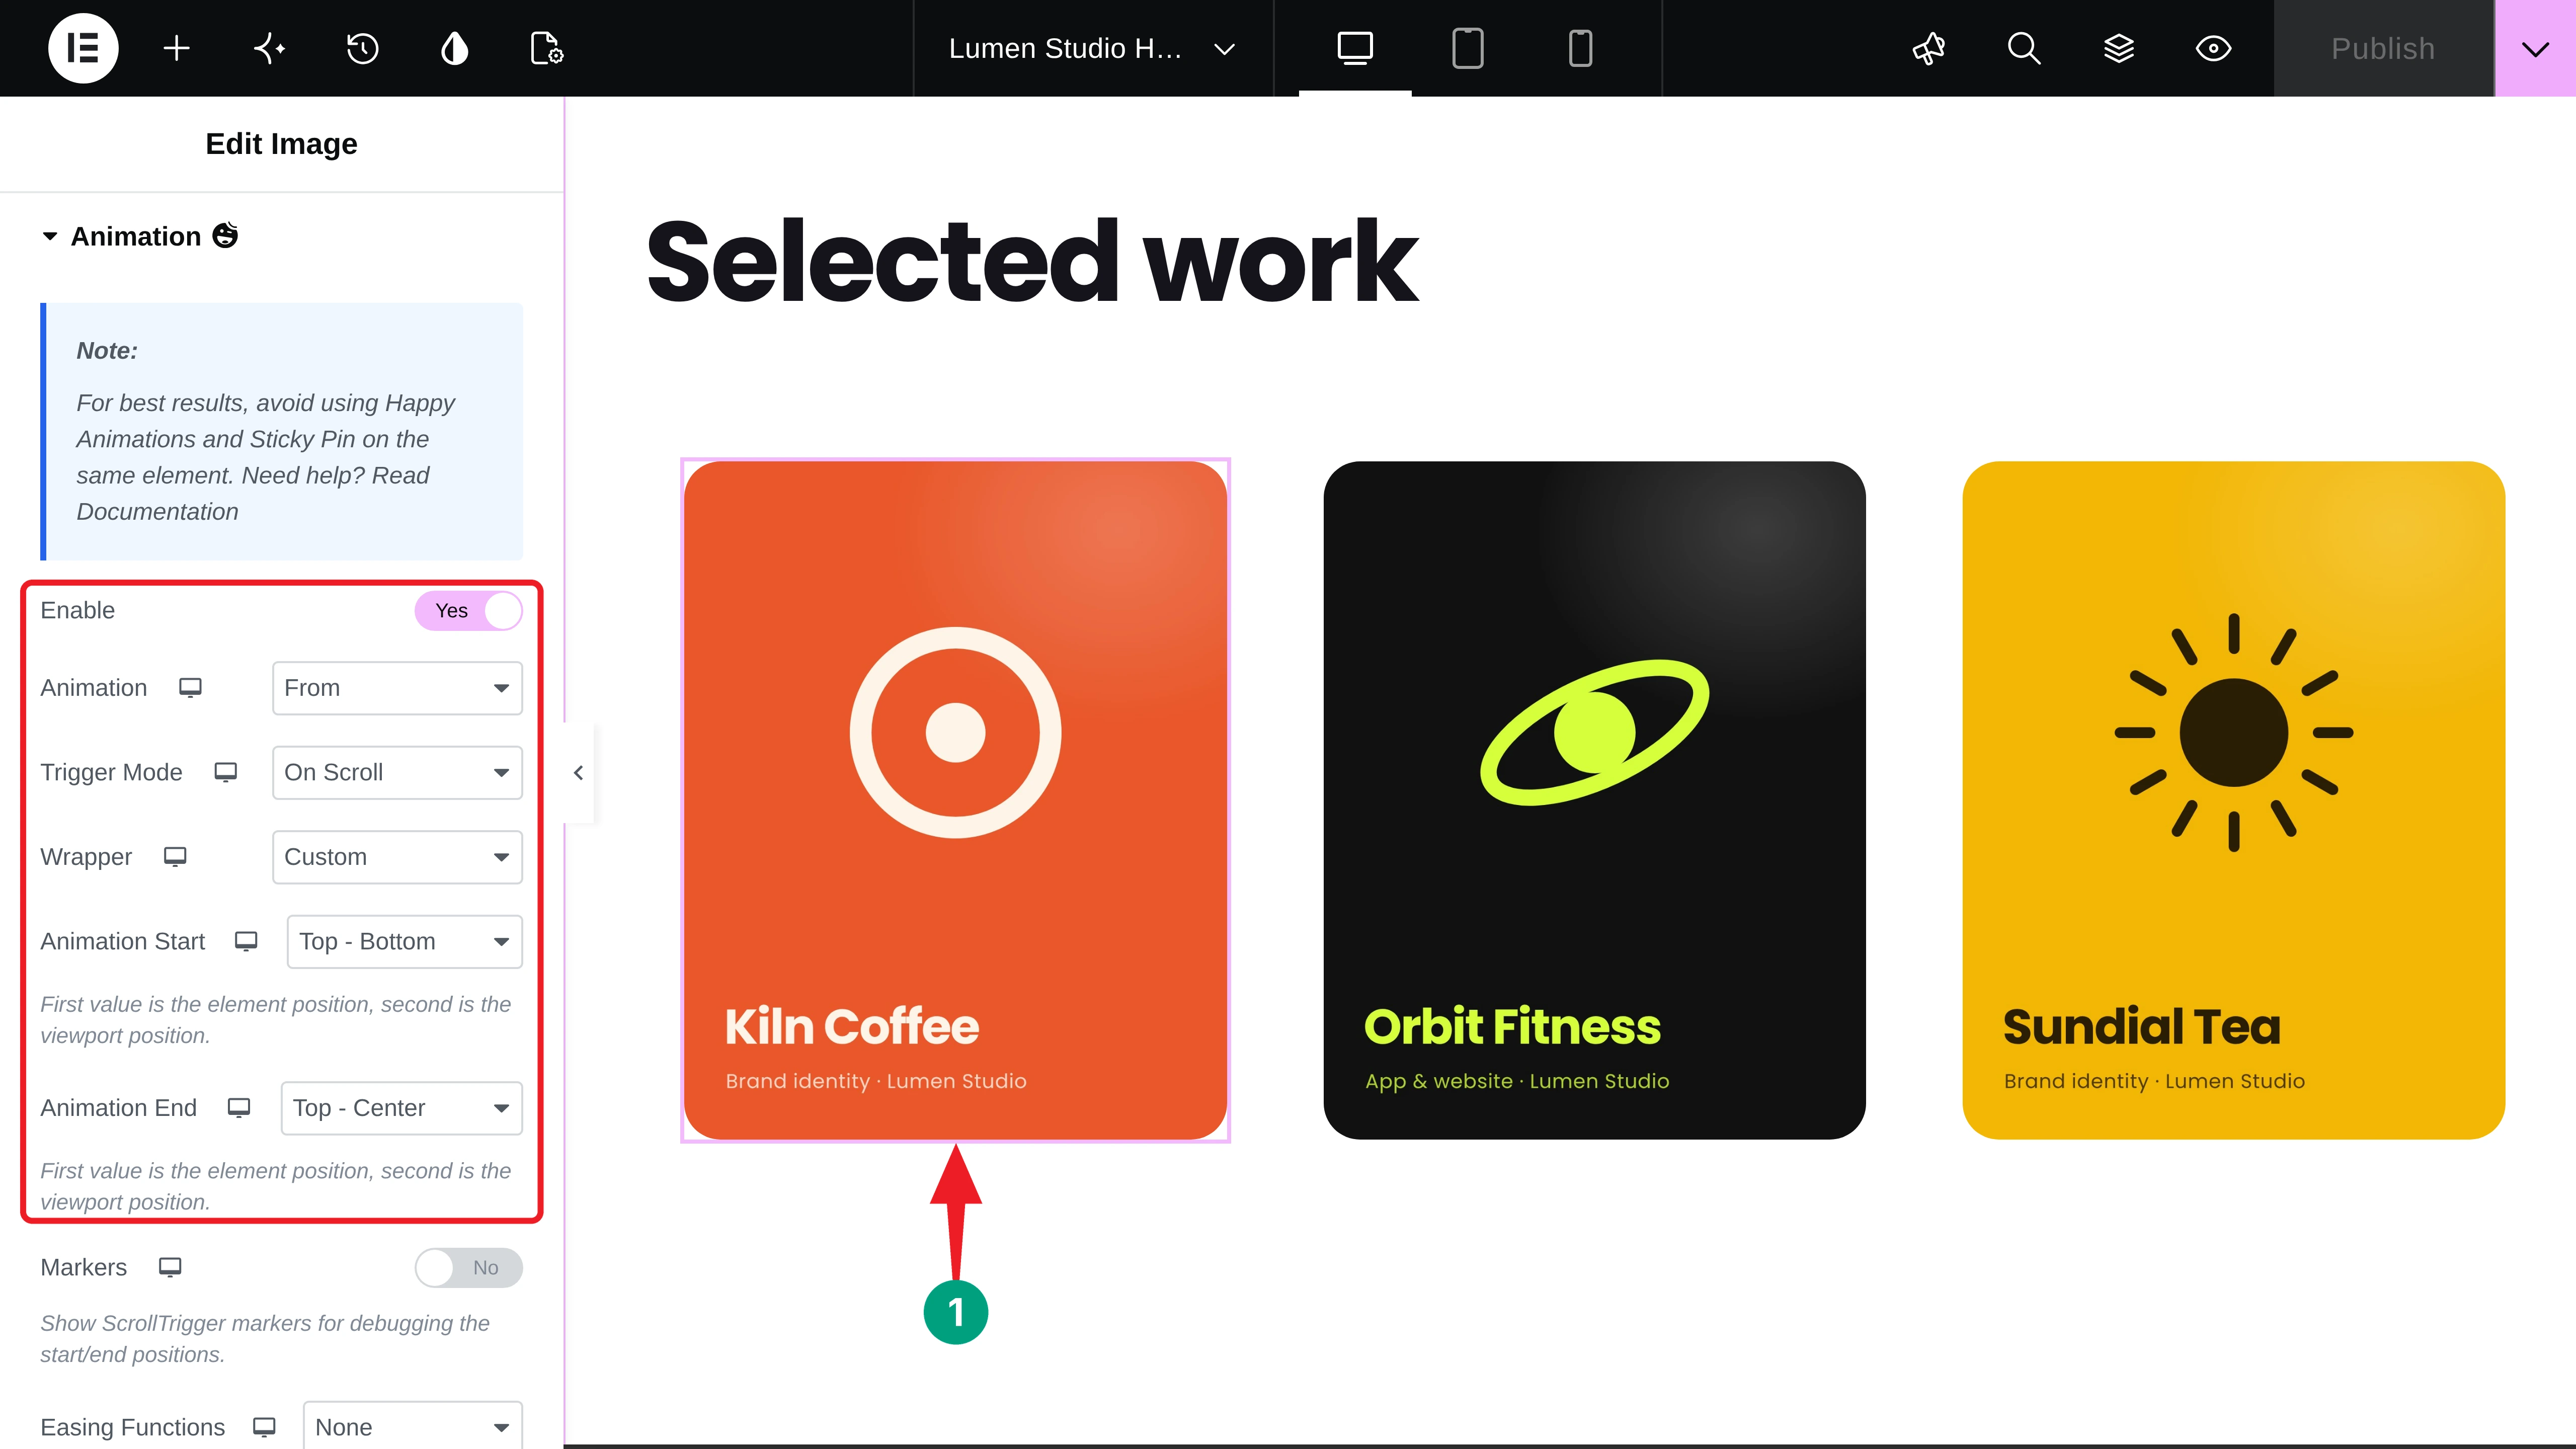
Note: Turn on Markers while you set the start and end points. It shows the trigger lines on the live page, so you can see exactly where the animation begins and ends. Turn it off before publishing.
Next, scroll down to Custom Properties and click + Add Item to add the values to animate. We added three properties: Y at 100 px, Scale at 0.85, and Rotate at -6 deg.
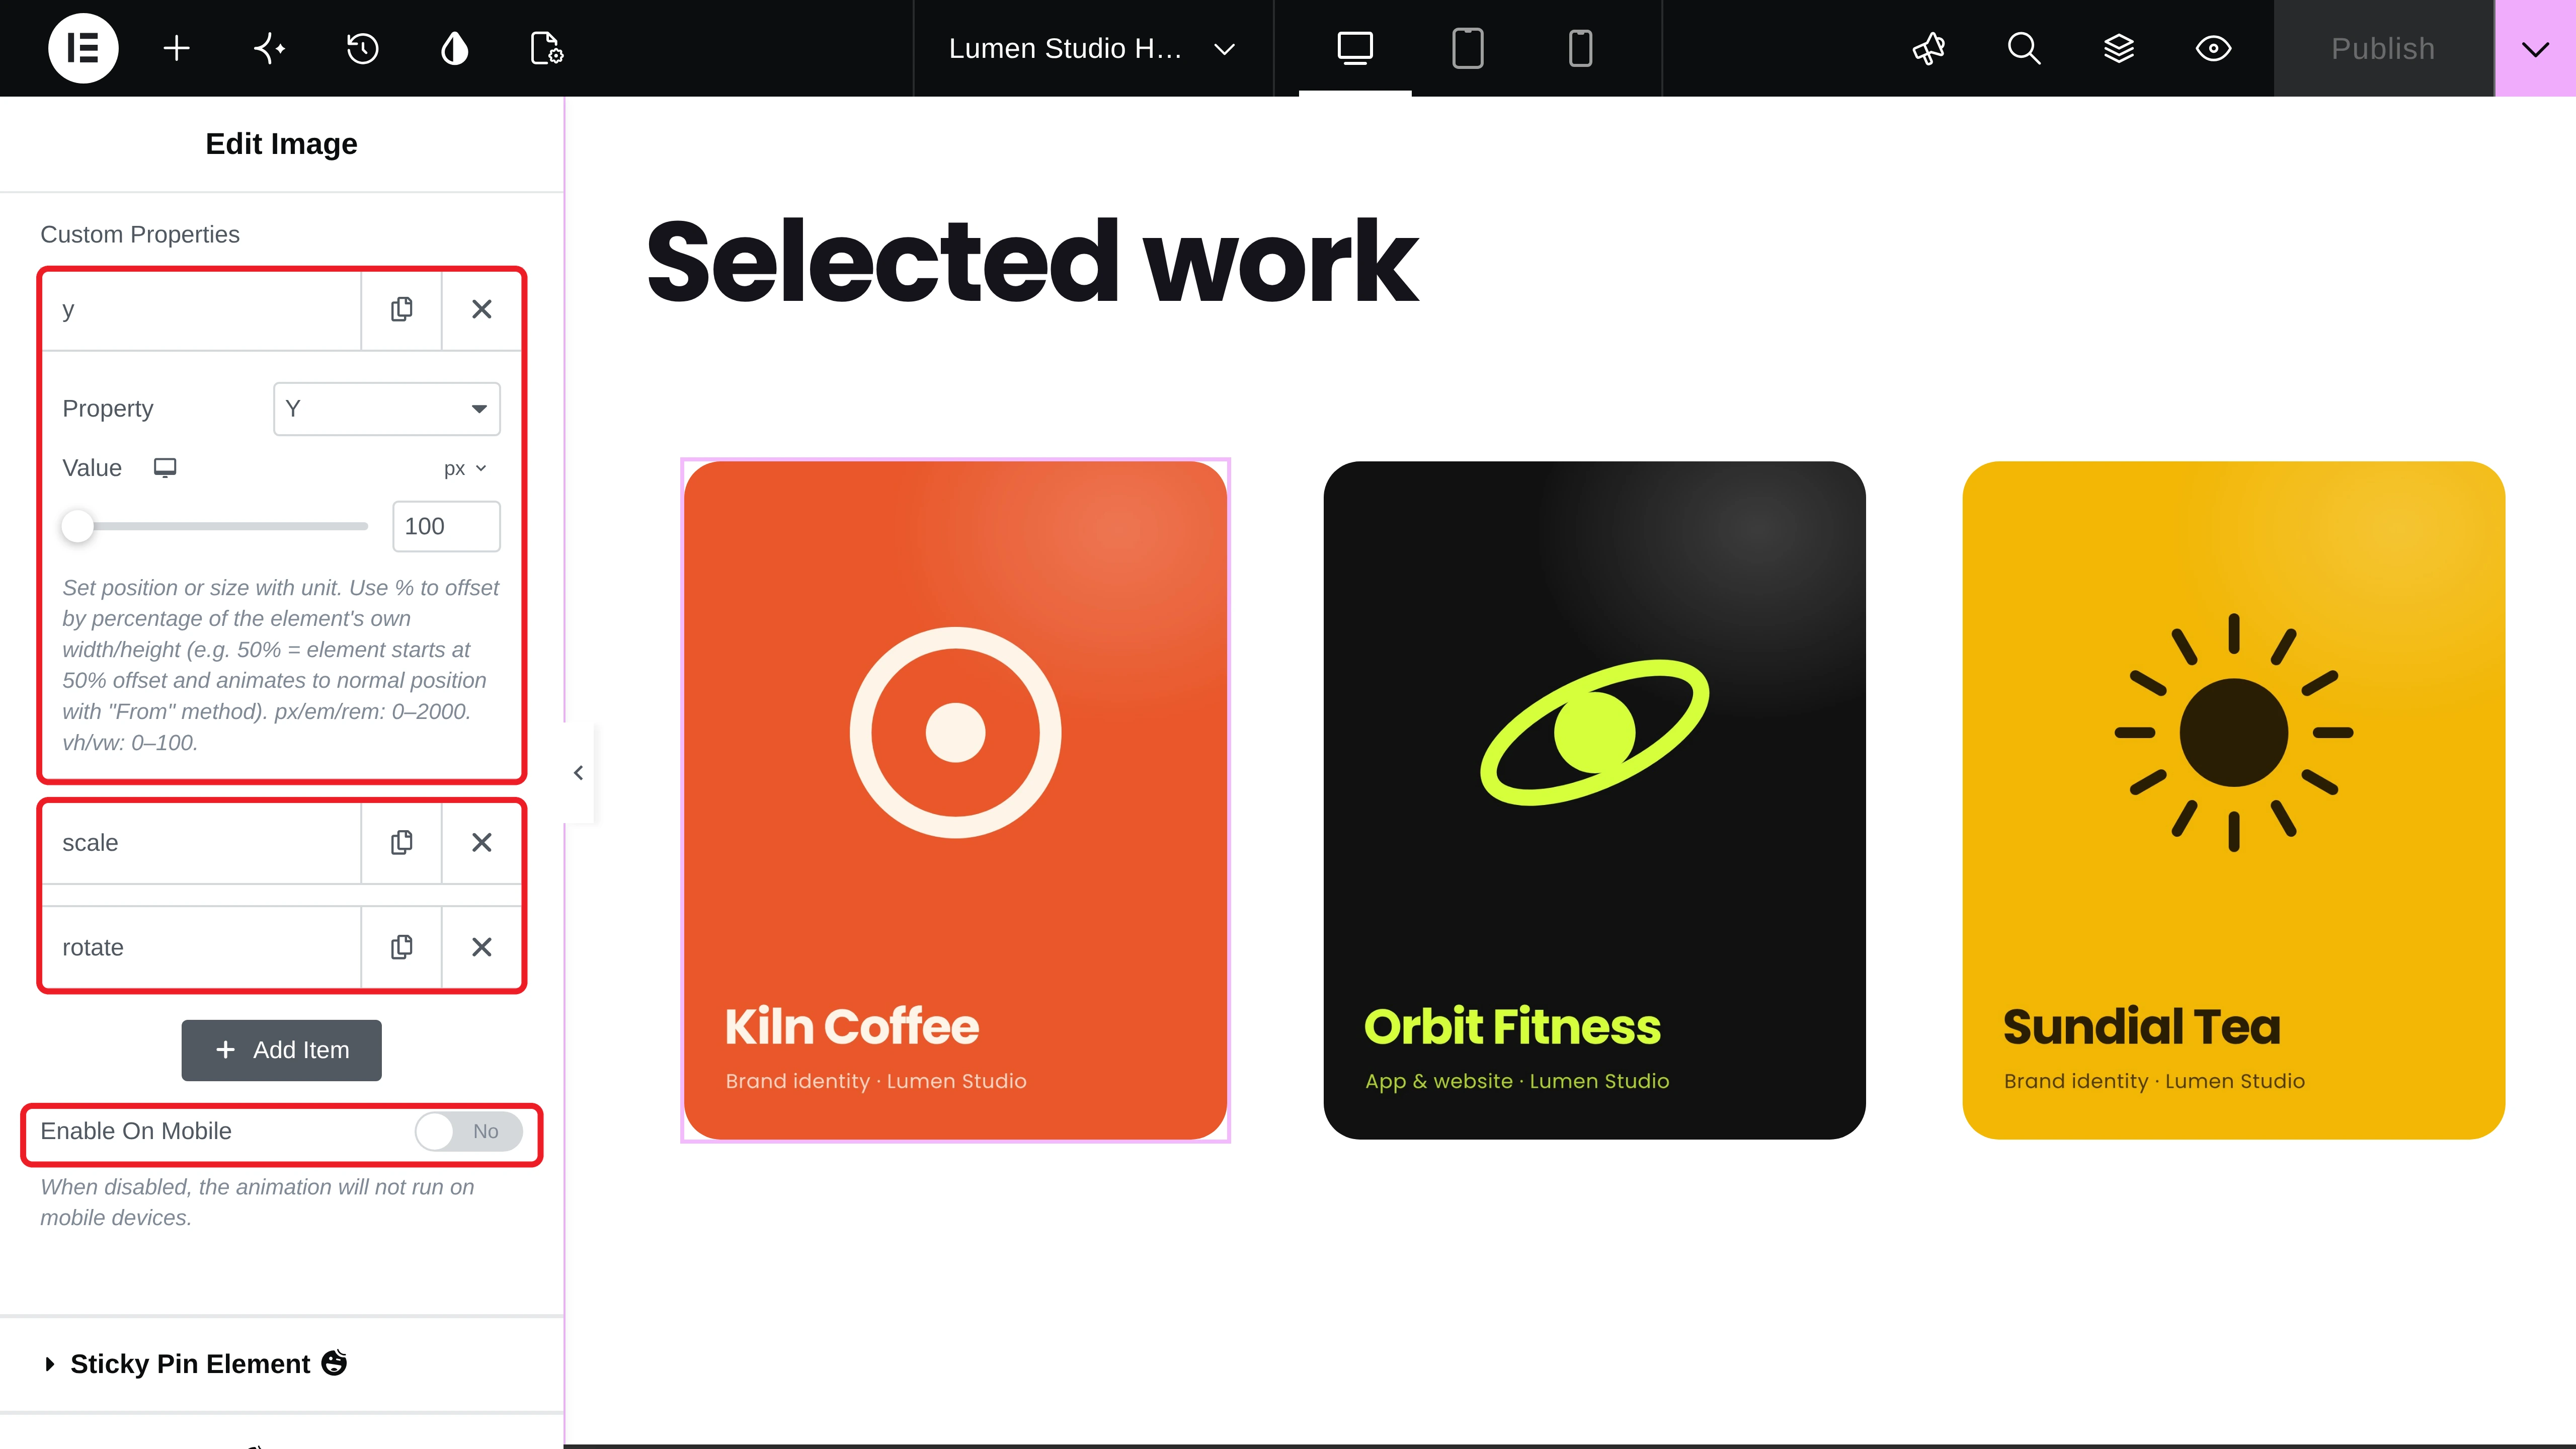
In the same way, add the animation to the other two images. We used a bigger Y value for each one (140 px and 180 px) and turned the middle one the other way (6 deg). This creates a staggered effect where the images arrive one after another.
Global Animation doesn’t play inside the editor, so open the page preview to test it. Here’s how the images and the “View project” cursor work together:
Step 07: Add Dropping Elements with Mouse Follow
For the Services section, we’ll turn a boring list into a playful one. The Dropping Elements widget drops labels into the section like real objects, and they can even follow the mouse.
Search for the Dropping Elements widget and drag and drop it into the Services container. In the Dropping Elements section, click an item to open it. You can set its Label, Width, Height, Horizontal Position, Vertical Position, Rotation, Padding, Background Color, and Follow Background Color. We added nine services, each with its own color.
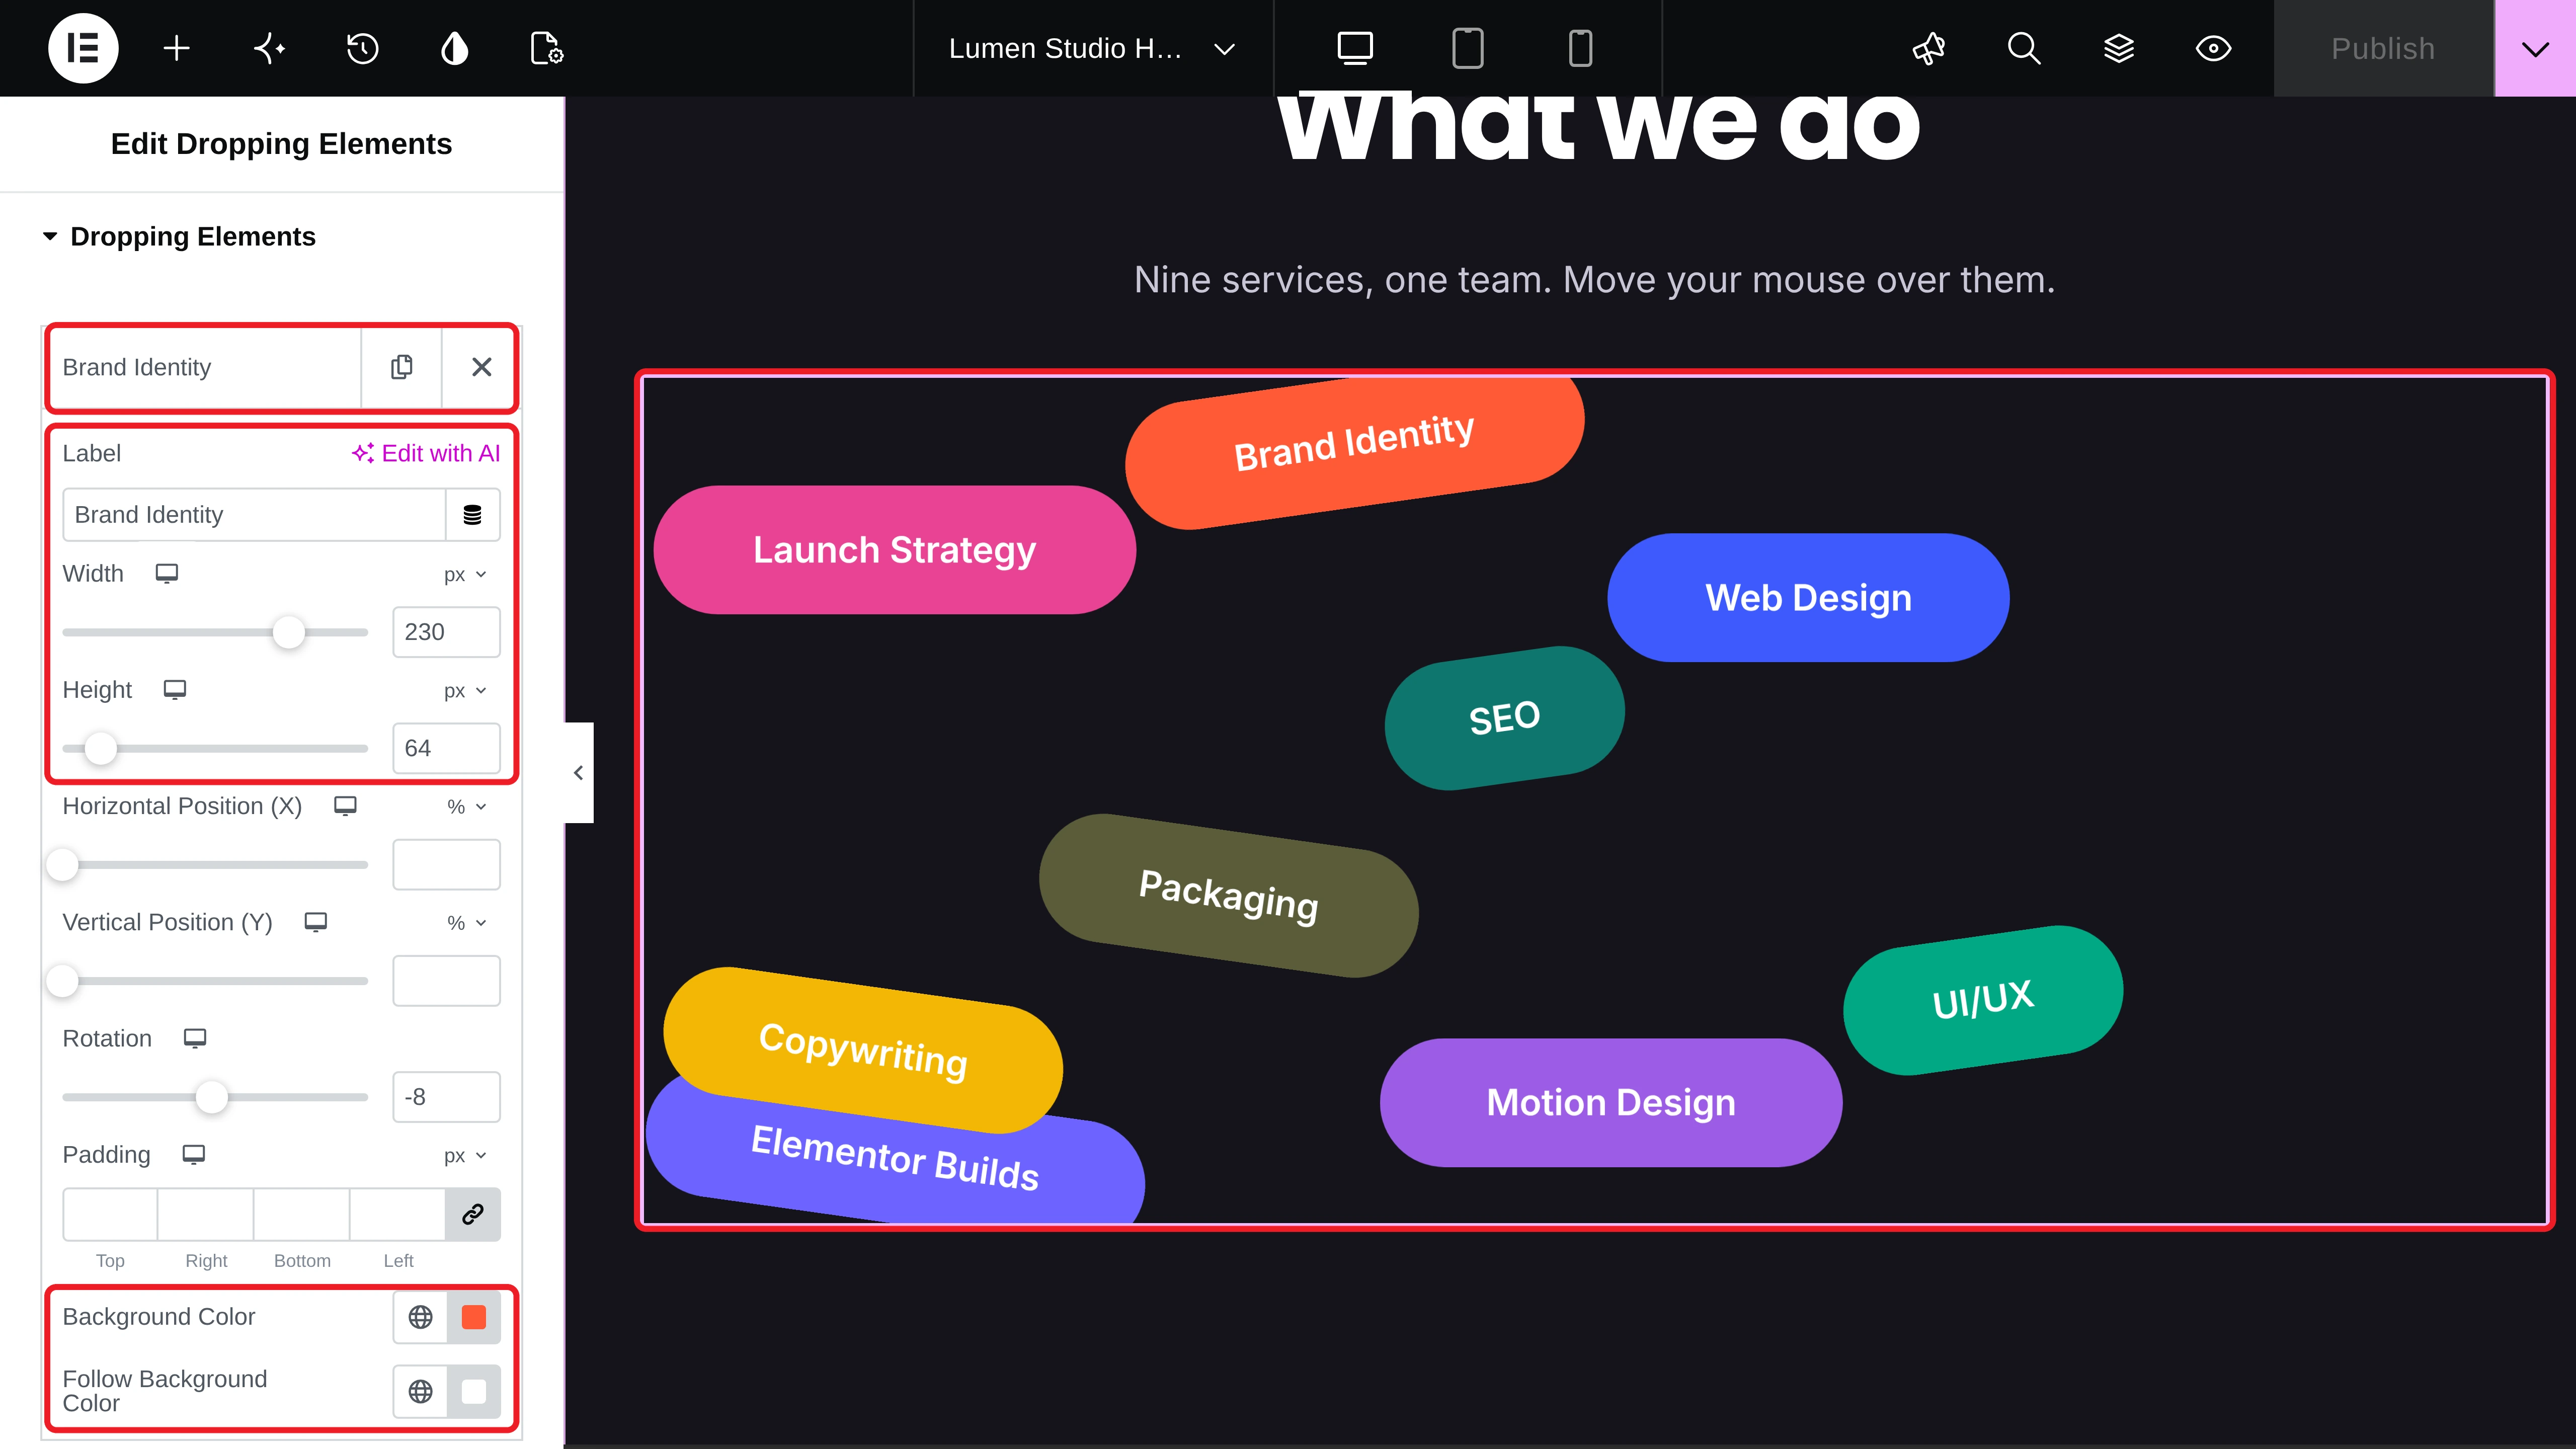
# Choose When the Elements Drop
Expand Animation Mode. Set the Trigger Mode to On Scrolling and the Trigger Position to Custom. Then type 520 in the Custom Offset (px) field. This starts the drop a little earlier, so the tags are already falling when the section comes into view.
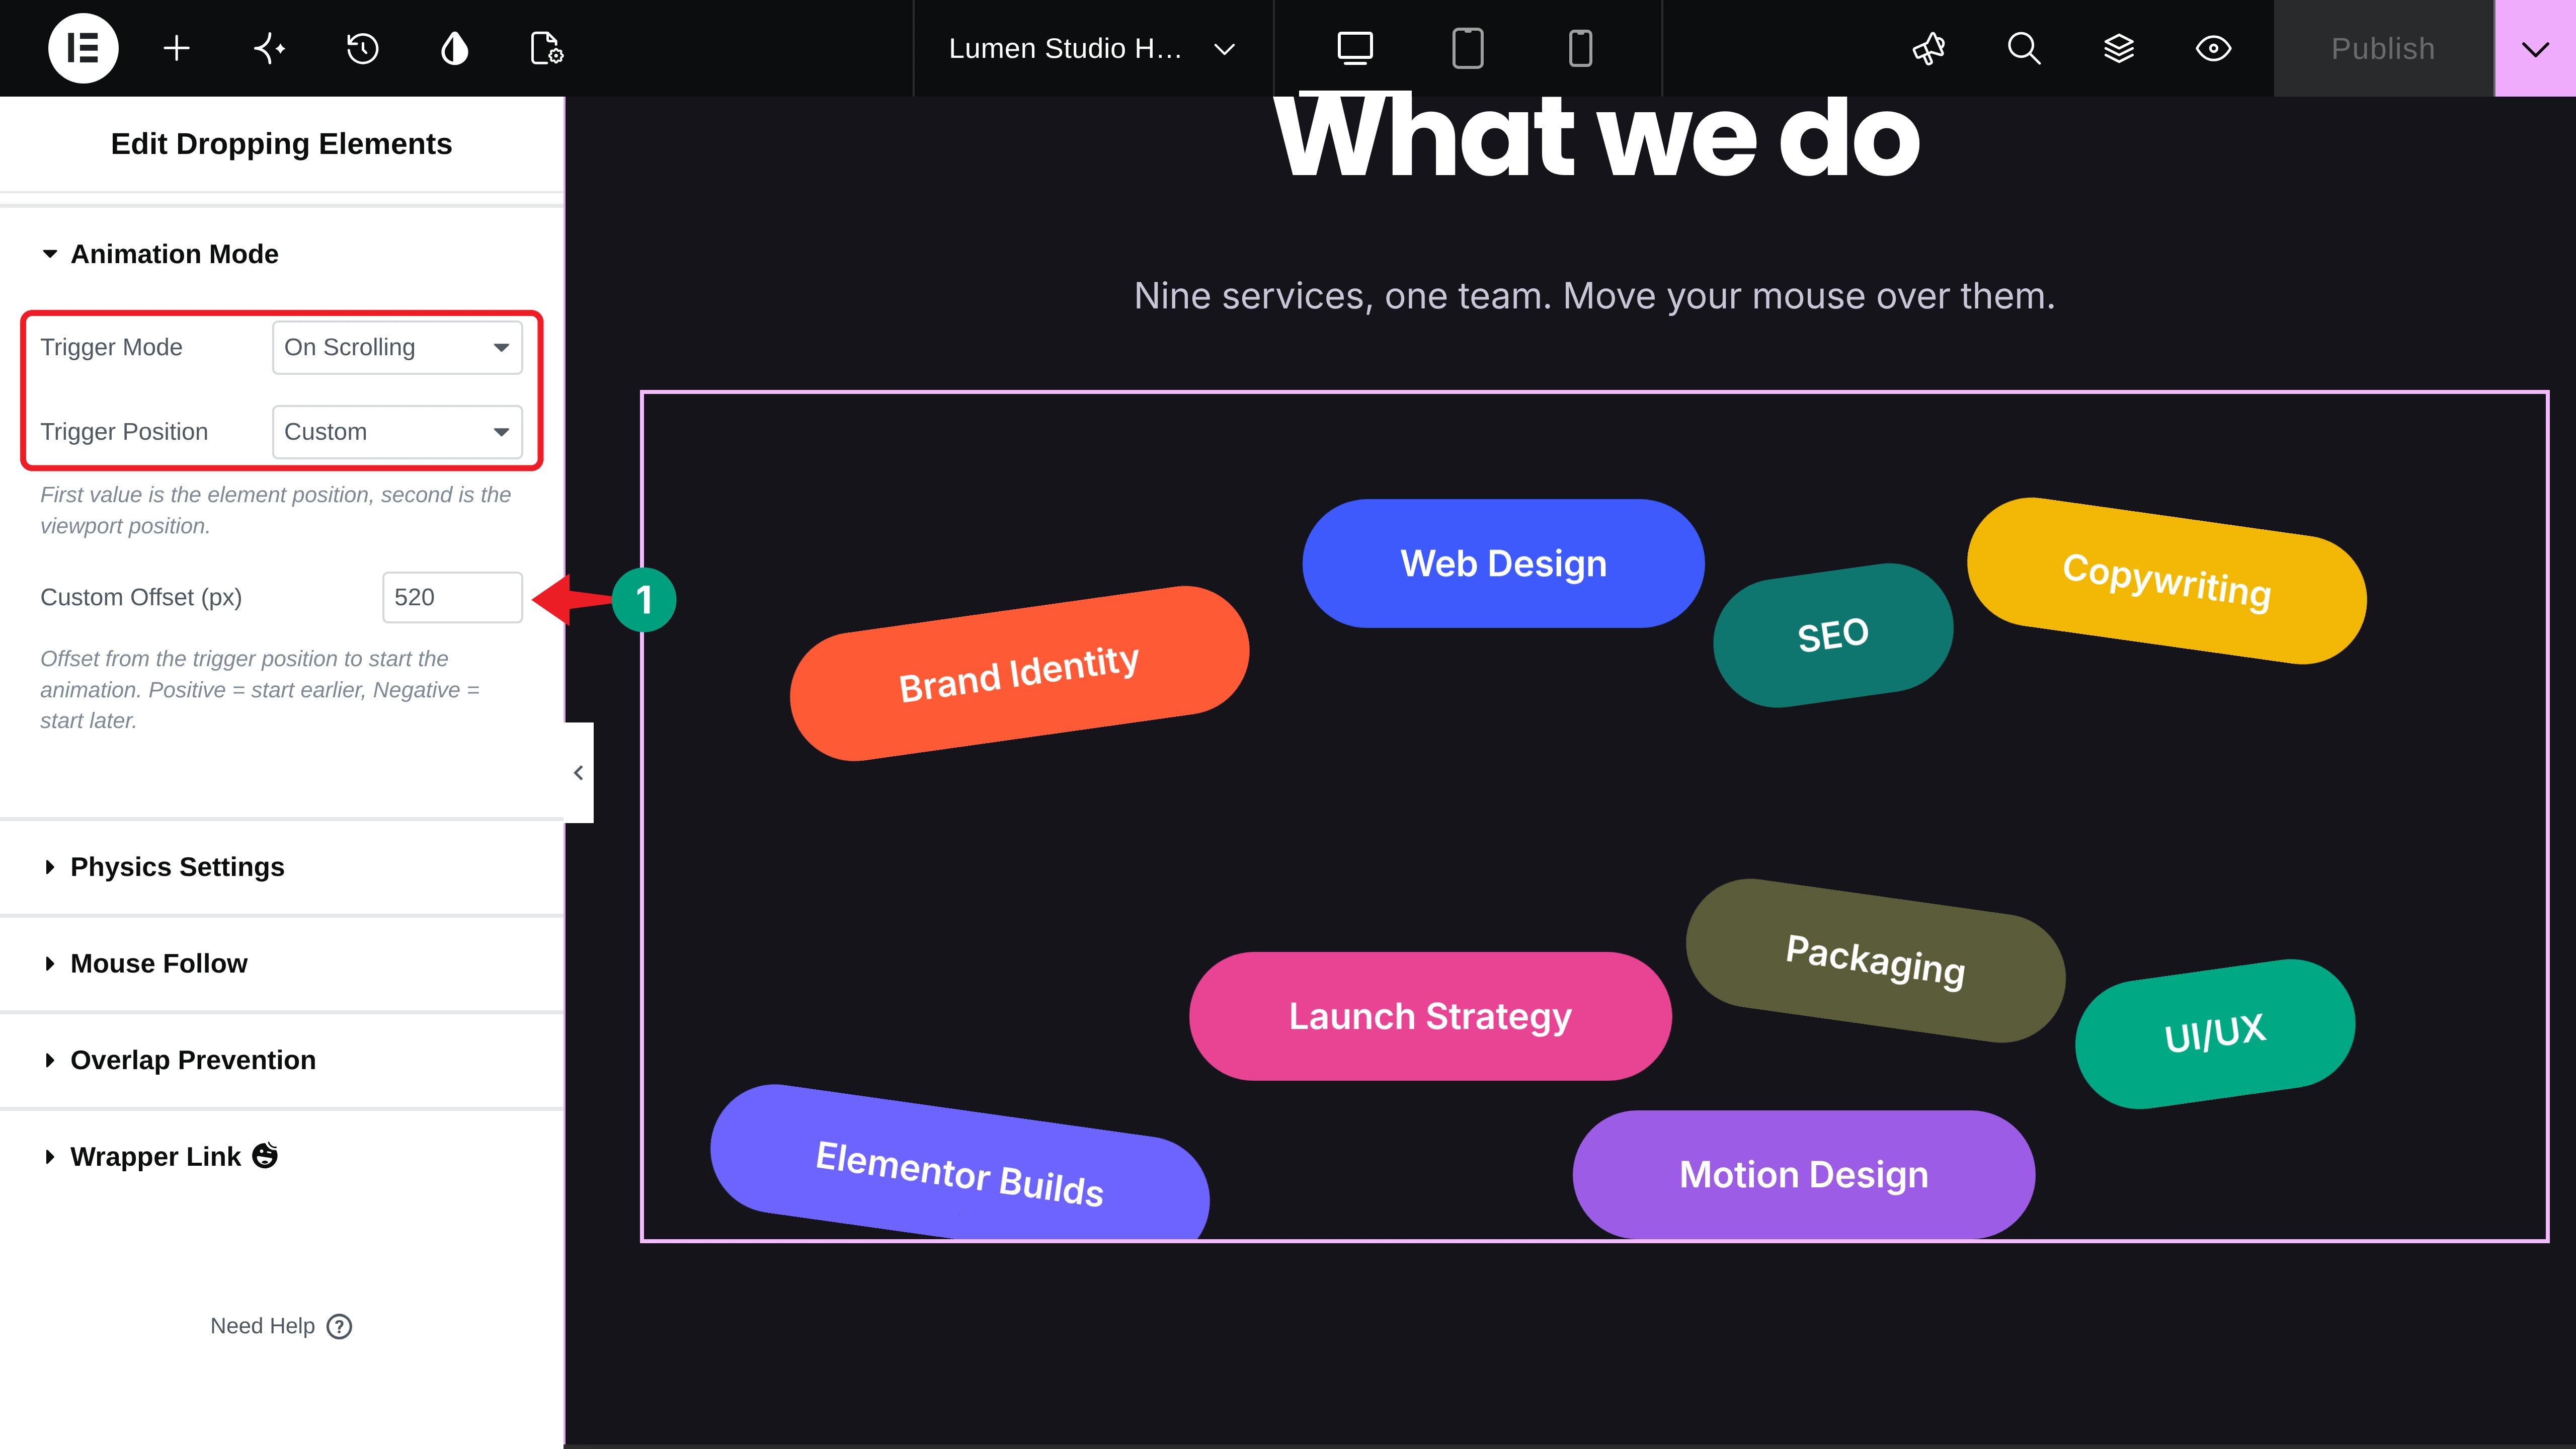
Note: In our tests, the Custom Offset only took effect with the On Scrolling trigger mode. If your elements drop too late or too early, adjust the offset and preview again.
# Turn On Mouse Follow
Expand Mouse Follow and toggle on Enable Mouse Follow. You’ll get options for follow strength, strength variance, follow damping, damping variance, nearest count, and max distance. Lower Follow Strength means more lag, and Nearest Count decides how many elements follow the cursor at once. We kept the default values.
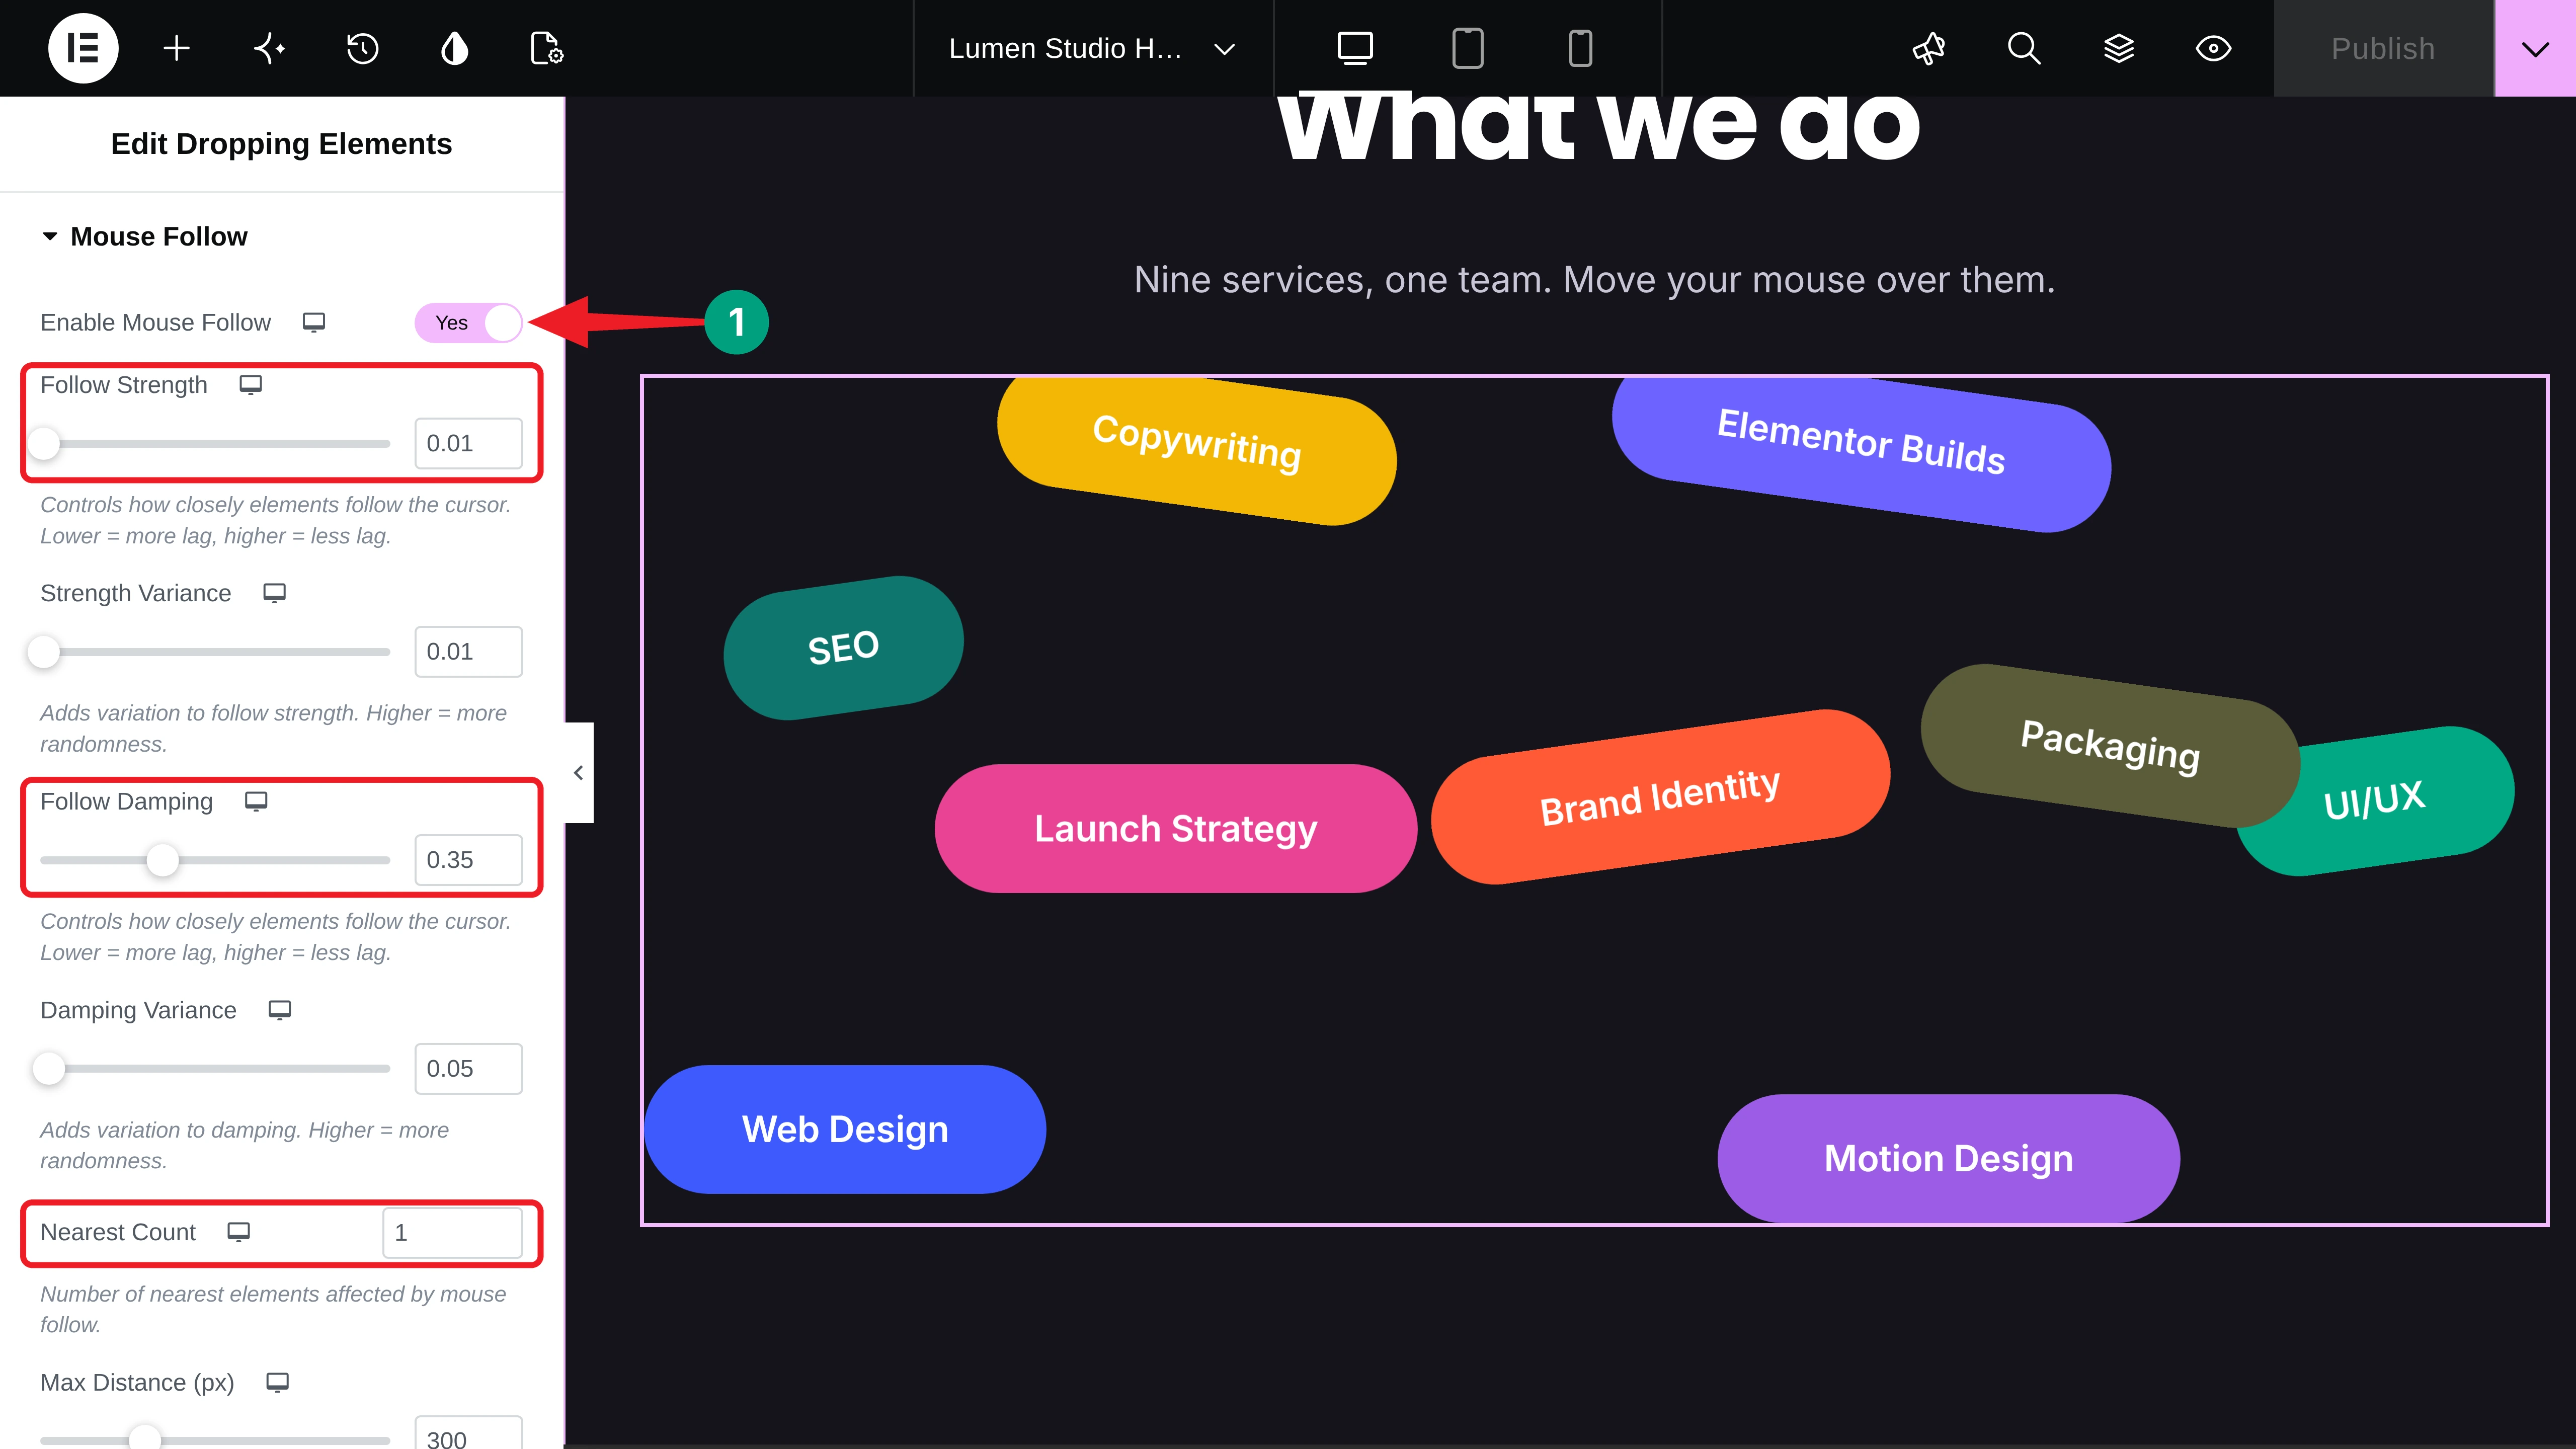
You can also fine-tune the fall in Physics Settings and keep the tags apart with Overlap Prevention. Here’s the result:
Step 08: Make the Animations Mobile-Friendly
Phones don’t have a mouse, so mouse-based effects like the custom cursor have nothing to follow there. Scroll-based effects still work, but heavy movement on a small screen can feel too much. So it’s worth checking the mobile view before you publish.
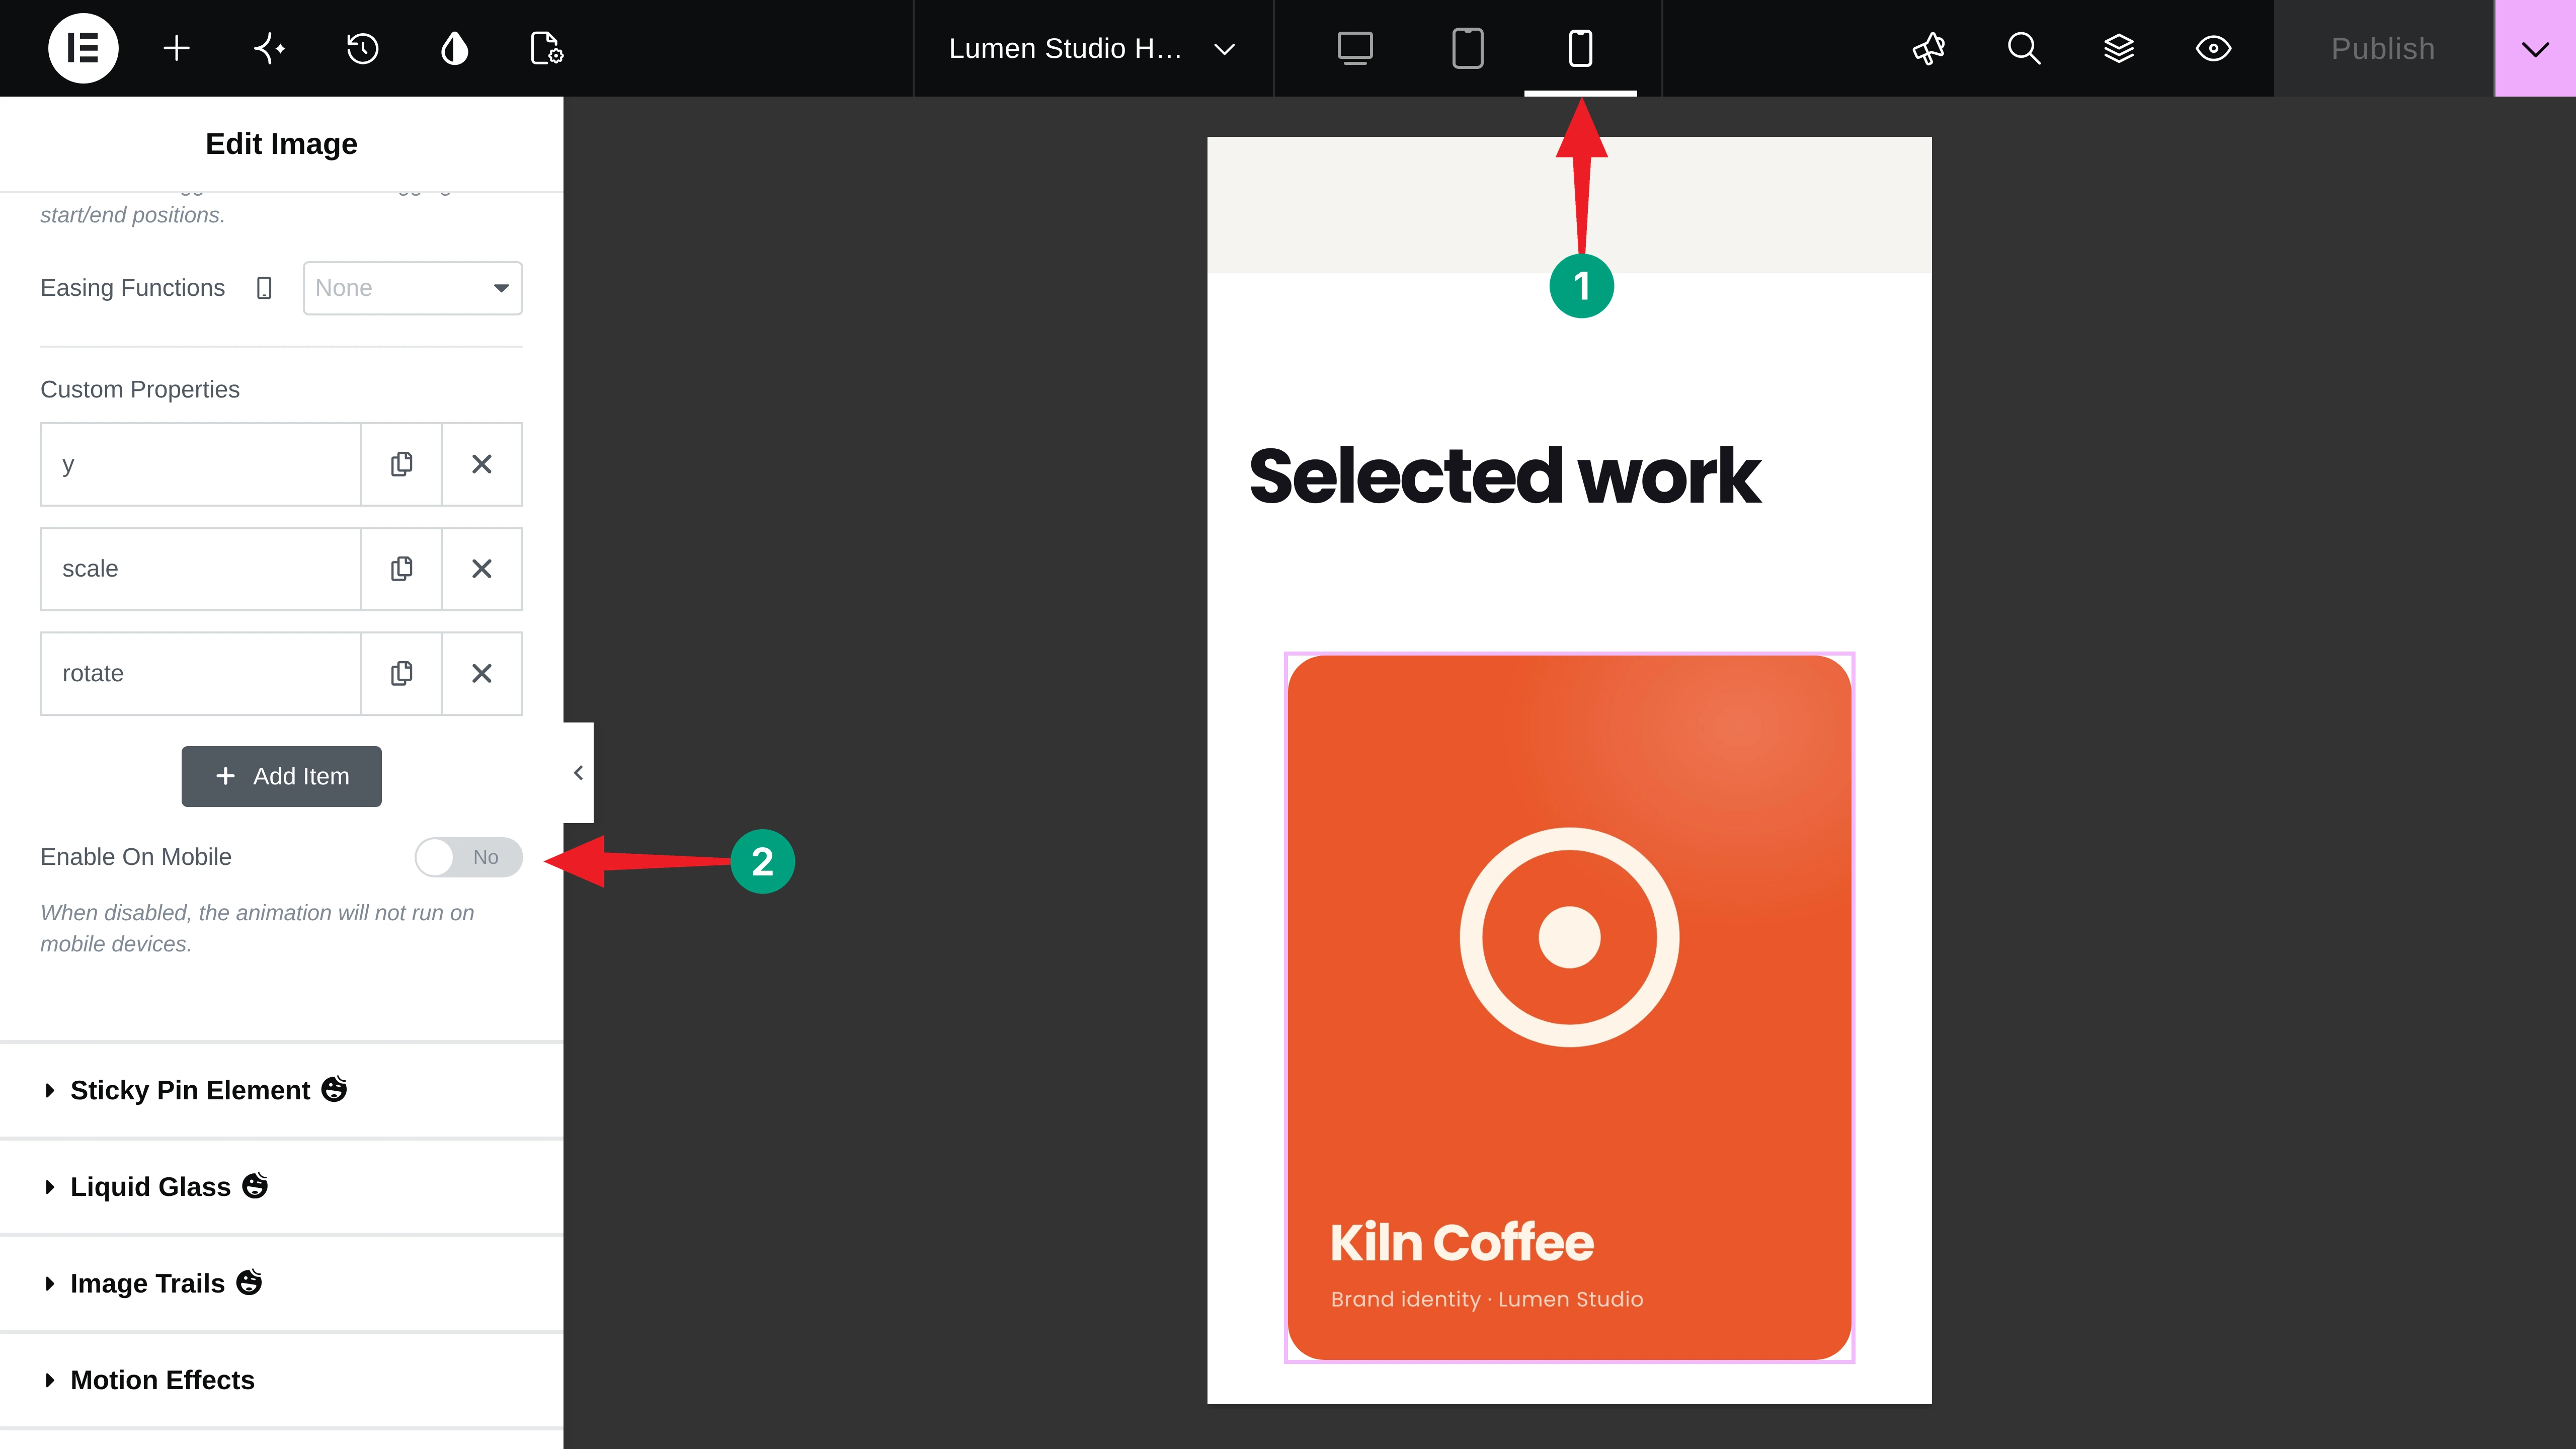
Click the mobile icon in the top bar to switch to the mobile view. Then select a project image and check Enable On Mobile in its Animation section. It’s off by default, which means the Global Animation won’t run on phones. We kept it off so the images simply stay in place on mobile.
While you’re in the mobile view, adjust the layout too. We stacked the project cards in one column and reduced the font sizes of the headings and the Text Scroll widget.
Step 09: Publish and Preview the Interactive Page
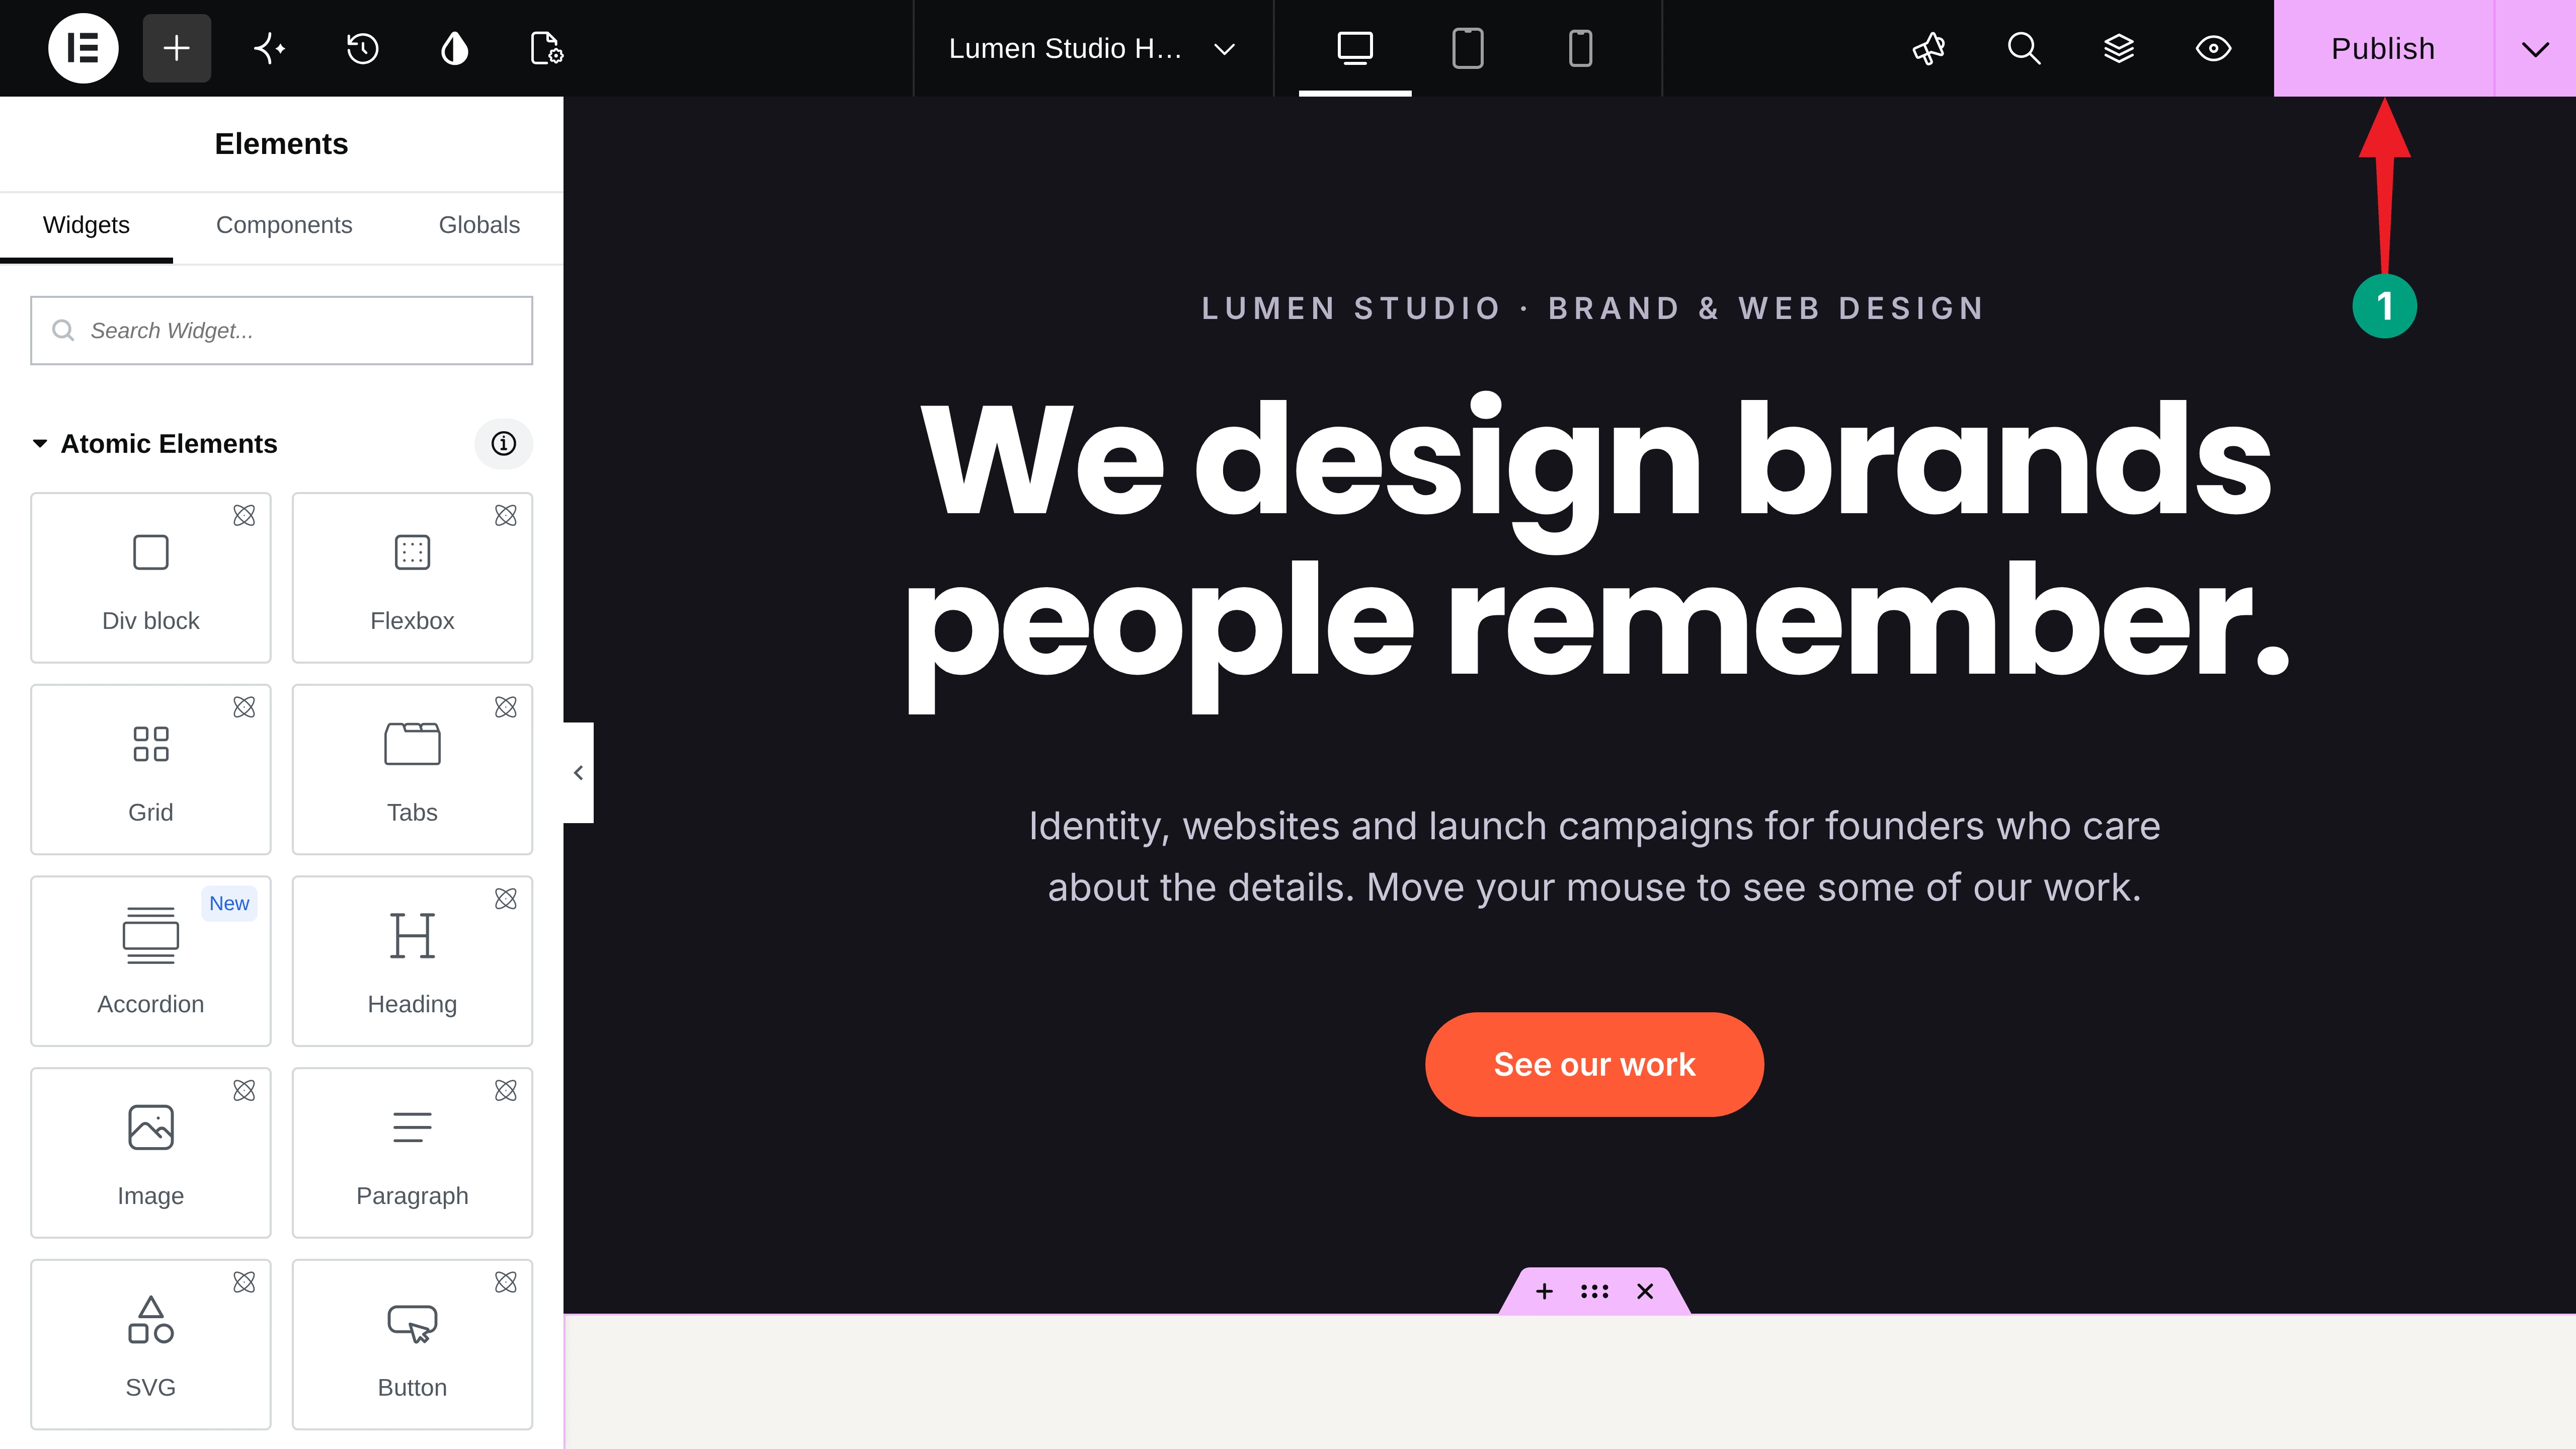
When everything looks good, click the Publish button in the top-right corner.
Now open the page in a new tab and try it out. Move the mouse, scroll down, and hover over the projects. You can see that it’s working fine on our end. Hope it will work well on your end as well.
Thus, you can make Elementor websites feel more interactive with GSAP and HappyAddons.
Tips to Keep Your GSAP Animations Smooth and User-Friendly
Motion is powerful, but too much of it can tire your visitors. Keep these tips in mind.
a. Give Each Section One Main Effect
Notice that every section in our demo has one star: trails in the hero, the text highlight in About, and the dropping tags in Services. When everything moves at once, nothing stands out.
b. Animate Position, Scale, Rotation, and Opacity
These properties are the easiest for browsers to animate smoothly. That’s why we used Y, Scale, and Rotate in the Global Animation step instead of changing widths or margins.
c. Keep Your Content Readable
Your message should still make sense if someone never moves the mouse. Make sure faded text has enough contrast and important information isn’t hidden behind an effect.
d. Test on Real Devices
Check the page on a phone, a tablet, and a slower laptop. If an effect feels heavy, shorten it, reduce the number of images, or turn it off for that device.
e. Only Enable What You Use
Keep the GSAP features and widgets you don’t use turned off in HappyAddons > GSAP. It keeps your editor tidy and your site lean.
FAQ on How to Make Elementor Websites Interactive with GSAP

In this section, we have answered some frequently asked questions commonly found on Google, online forums, and social media.
Do I need to know JavaScript to use GSAP in Elementor?
No, you don’t. HappyAddons turns GSAP into Elementor controls like dropdowns, toggles, and sliders. You set the options, and HappyAddons builds the animation for you.
Do I need to install GSAP separately?
No. HappyAddons already includes the GSAP library, so you only need Elementor and HappyAddons. GSAP itself is free to use, including on commercial websites.
Which GSAP features are free in HappyAddons?
In the free version, you get Happy Mouse Cursor, Text Animation, Appearing Image Animation, and the Text Scroll, SVG Line Draw, and Image Cycle widgets. Image Trails, Global Animation, Dropping Elements, Horizontal Scroll, Marquee, Sticky Pin Element, Stacked Card, GSAP SVG Draw, and SVG Morphing need HappyAddons Pro.
Do GSAP animations work on mobile?
Yes, scroll-based effects work on phones. Mouse-based effects, like the custom cursor, need a mouse, so visitors won’t see them on touch screens. For Global Animation, you can decide yourself with the Enable On Mobile toggle.
Will GSAP animations slow down my website?
Not if you use them wisely. GSAP is built for performance. Keep one main effect per section, use optimized images in effects like Image Trails, and turn off the GSAP tools you don’t use.
Final Thoughts!
A few well-placed interactions can turn a good-looking Elementor site into one that people remember. Now you know how to make Elementor websites interactive with GSAP: custom cursors, image trails, scroll effects, and playful elements, all without touching code.
Start small. Pick one effect for your hero, preview it on desktop and mobile, then add more only where they help your message. Keep your text readable and test on real devices before you publish.
If you have any questions, mention them in the comment box below. You can also give a knock on our live chat box. Thanks for being with us till the end.
Before moving away, have a few more minutes to explore the post on how to add parallax effects in Elementor.