CSS Code Snippets are small pieces of code that help you customize how your website looks. They control styles like colors, fonts, spacing, borders, and more. With CSS, you can easily change the design of your site without touching its main structure or content.
When you use Elementor CSS code, you can go beyond the default design settings. It allows you to make unique adjustments that aren’t available through Elementor’s regular options. You can style specific sections, widgets, or even entire pages exactly how you want.
In this post, we’ll show you how to add CSS code in WordPress and use it inside Elementor. No matter if you want to fix a small design issue or give your website a custom touch, you can easily do this by adding CSS code snippets and improving your design with full creative control. Keep reading!
Why Should You Add CSS Code Snippets?

While Elementor offers powerful visual tools, sometimes you need extra styling that isn’t available in the panel. By adding CSS code snippets, you can overcome this limitation and fine-tune your layout. You can also fix style issues and make your site stand out with a unique design touch.
Let’s take a look at why you should consider adding CSS code snippets to your Elementor website.
a. Greater Design Flexibility
CSS code snippets let you design beyond Elementor’s built-in options. You can adjust margins, padding, colors, or animations exactly as you want. This flexibility helps you achieve a truly custom look that fits your brand style.
b. Improve Website Consistency
Using CSS allows you to apply the same style to multiple elements across your site. Instead of manually changing each widget, one snippet can control them all. This keeps your design clean, balanced, and consistent.
c. Fix Design Limitations
Sometimes Elementor widgets have limited styling controls. CSS snippets help you fix those limitations by giving you full access to every element’s style. You can easily override default designs and add your preferred visual details.
d. Enhance Website Performance

Instead of using multiple heavy plugins for simple style changes, CSS snippets let you make direct changes through lightweight code. This reduces plugin load and helps your site run faster. A cleaner site structure also improves user experience.
e. Create Unique Visual Effects
With custom CSS, you can add hover effects, transitions, animations, and creative layouts. These effects make your website more engaging and modern. It’s an easy way to give your design a professional and interactive look.
f. Easy Maintenance and Control
Once you organize your CSS snippets properly, managing your design becomes easier. You can quickly edit or update any section without disturbing the whole layout. This gives you full control over your site’s style from one place.
Prerequisite to Add Custom CSS Code in Elementor
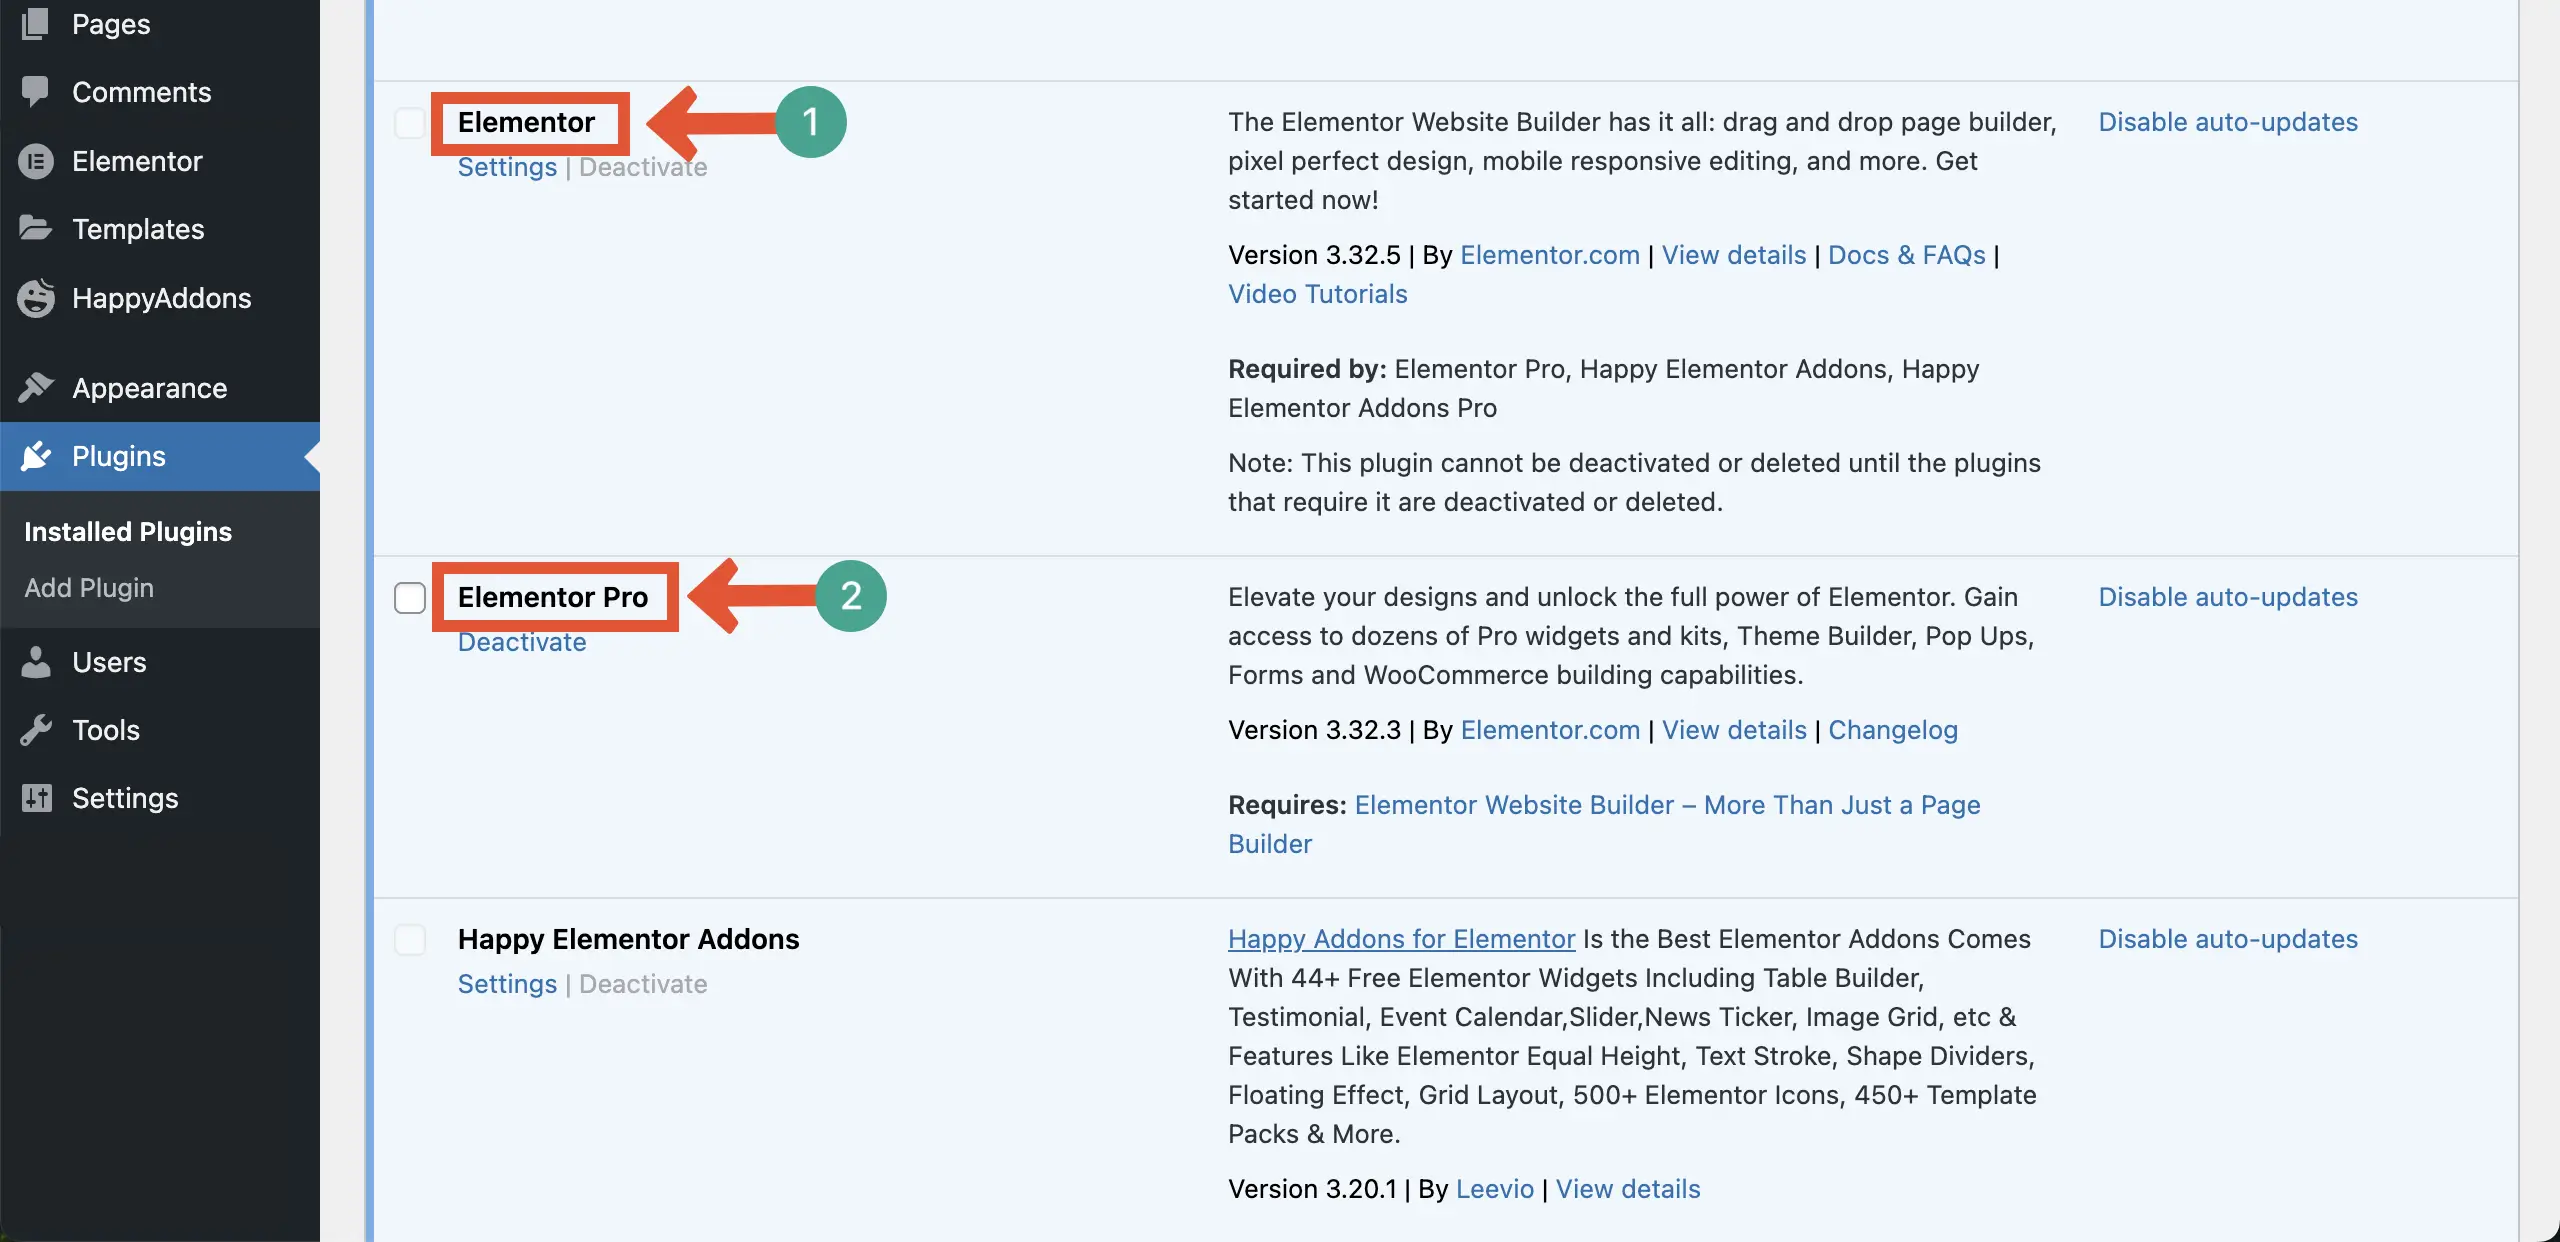
Like most plugins, Elementor also has free and premium versions. But to be able to add Custom CSS code, you definitely need the premium version along with the free one. You will find the destination links of the plugins from the list below.
Make sure you have the above-mentioned plugins installed and activated on your site. You can see that we have already installed both Elementor plugins on our site.
How to Add CSS Code in WordPress Using Elementor
Since the necessary plugins are ready, it’s time to add custom CSS code snippets to WordPress. You’ll find the process very easy. Let’s follow the steps as explained below.
Step 01: Open a Page
Open a post or page that you have already designed with Elementor. Then, come to the widget or element to which you want to add a CSS code snippet.
Step 02: Select a Widget or Item
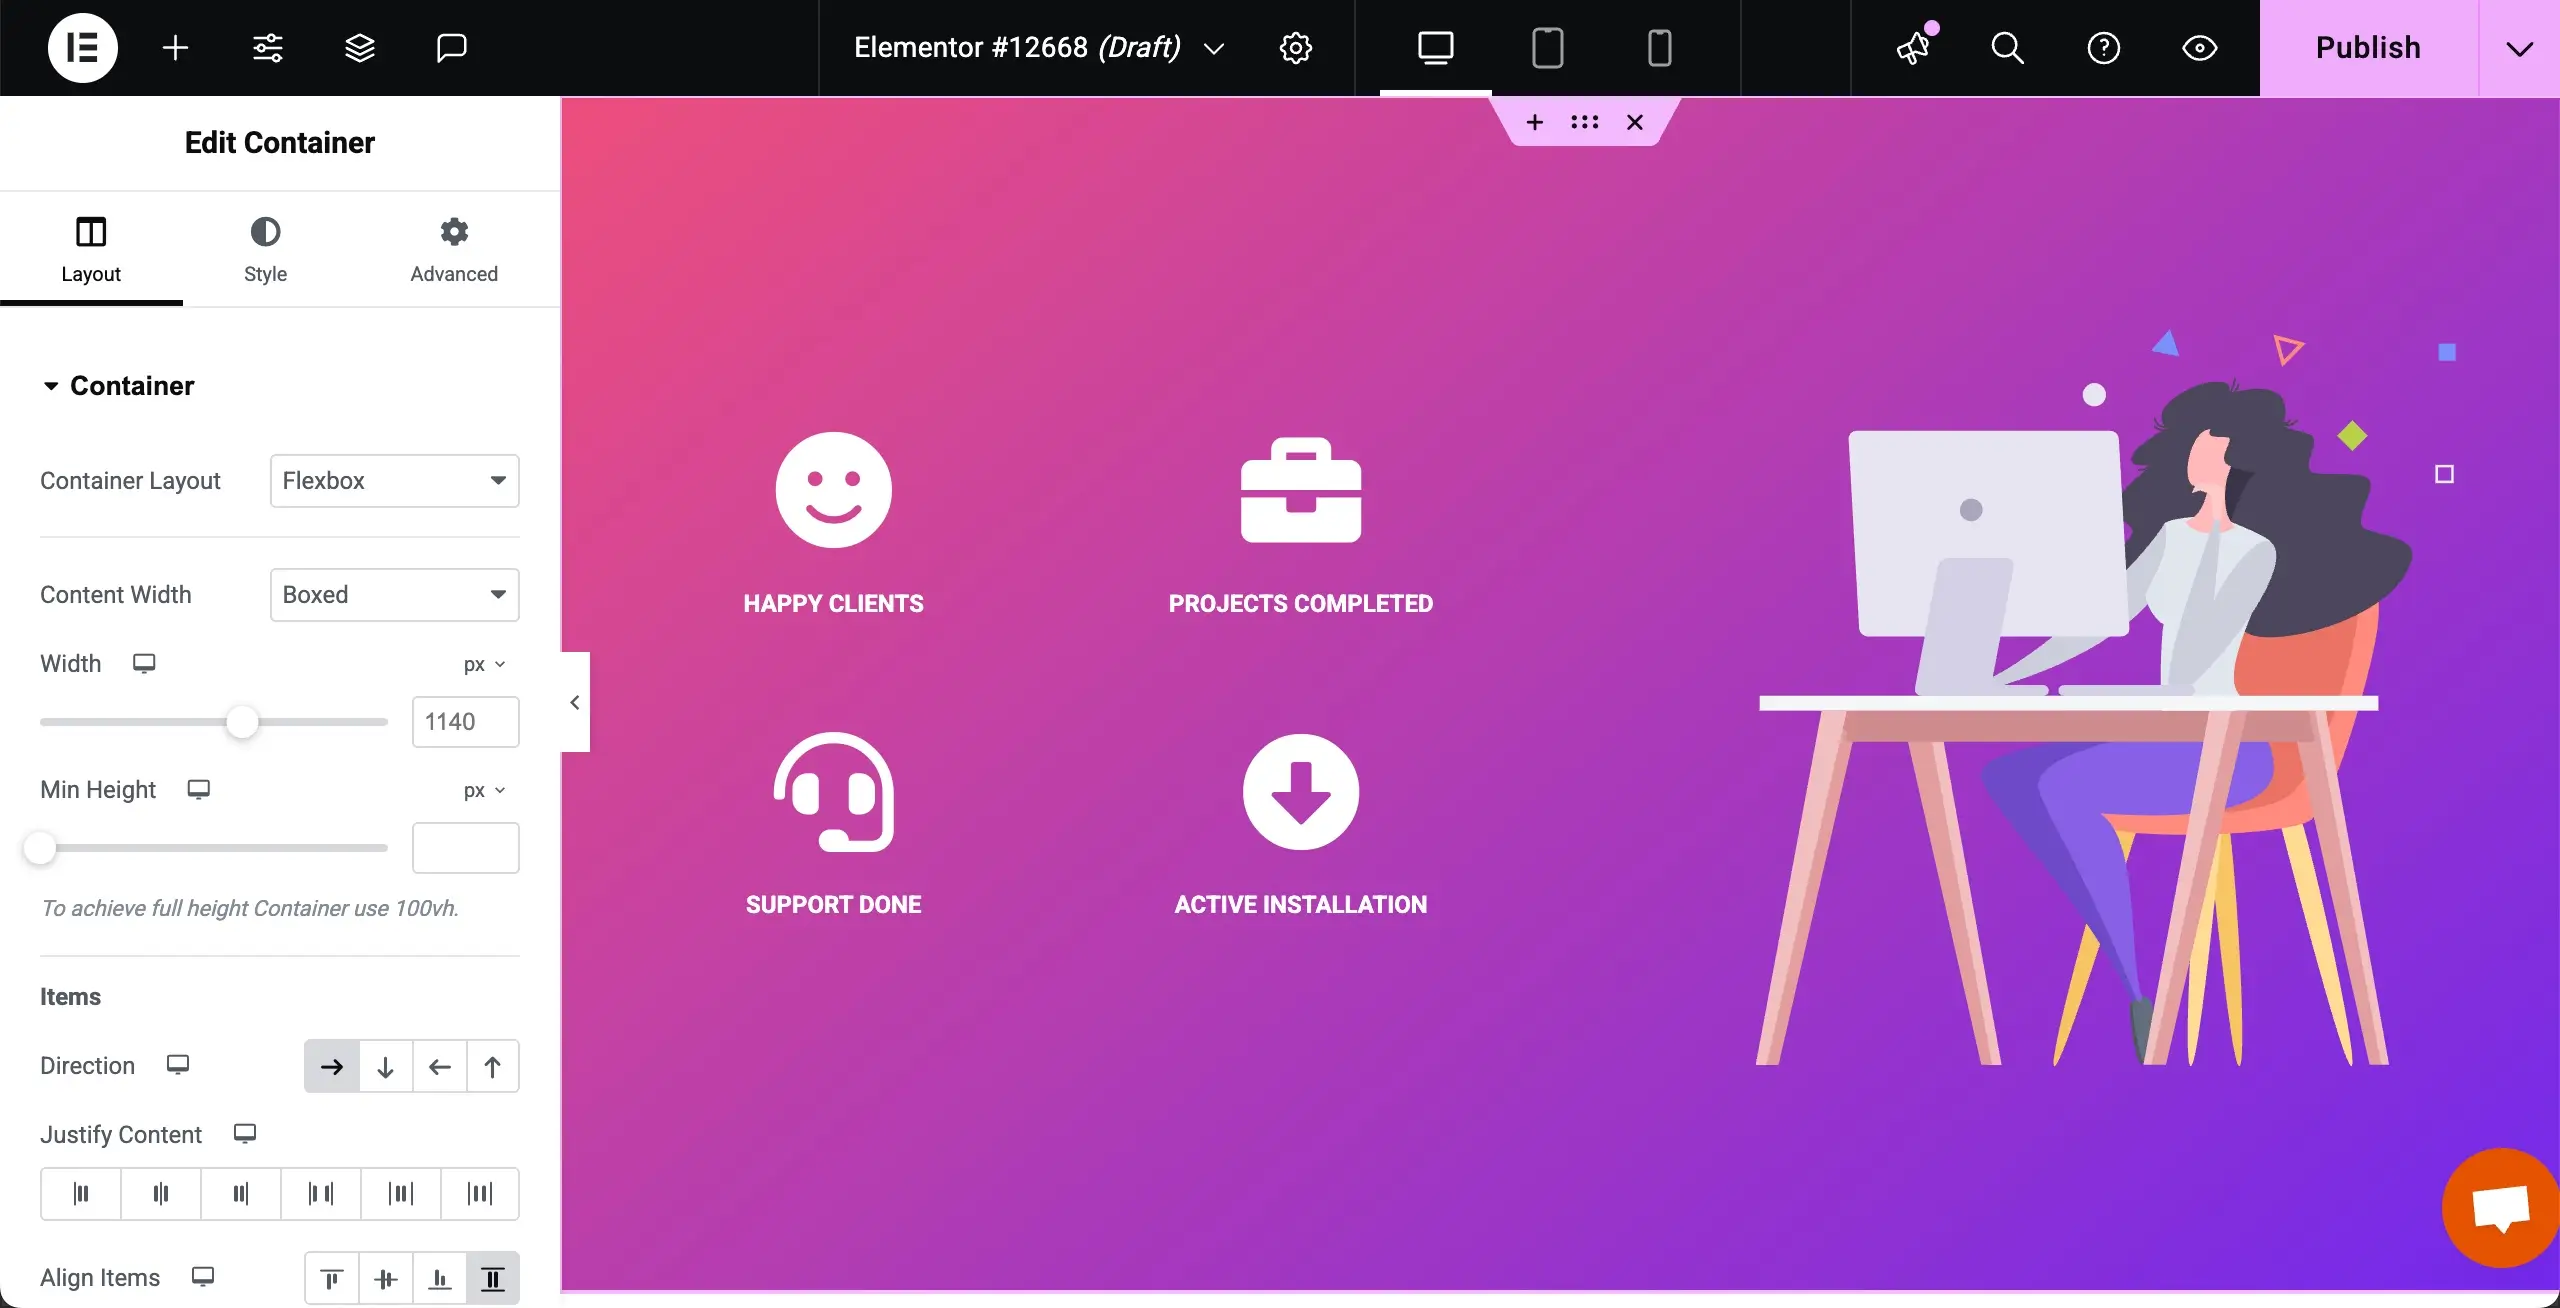
Click the element or widget to which you want to add the custom CSS code snippet, as said above. For this tutorial, we will add this code to the icons one by one, as you can see in the image below.
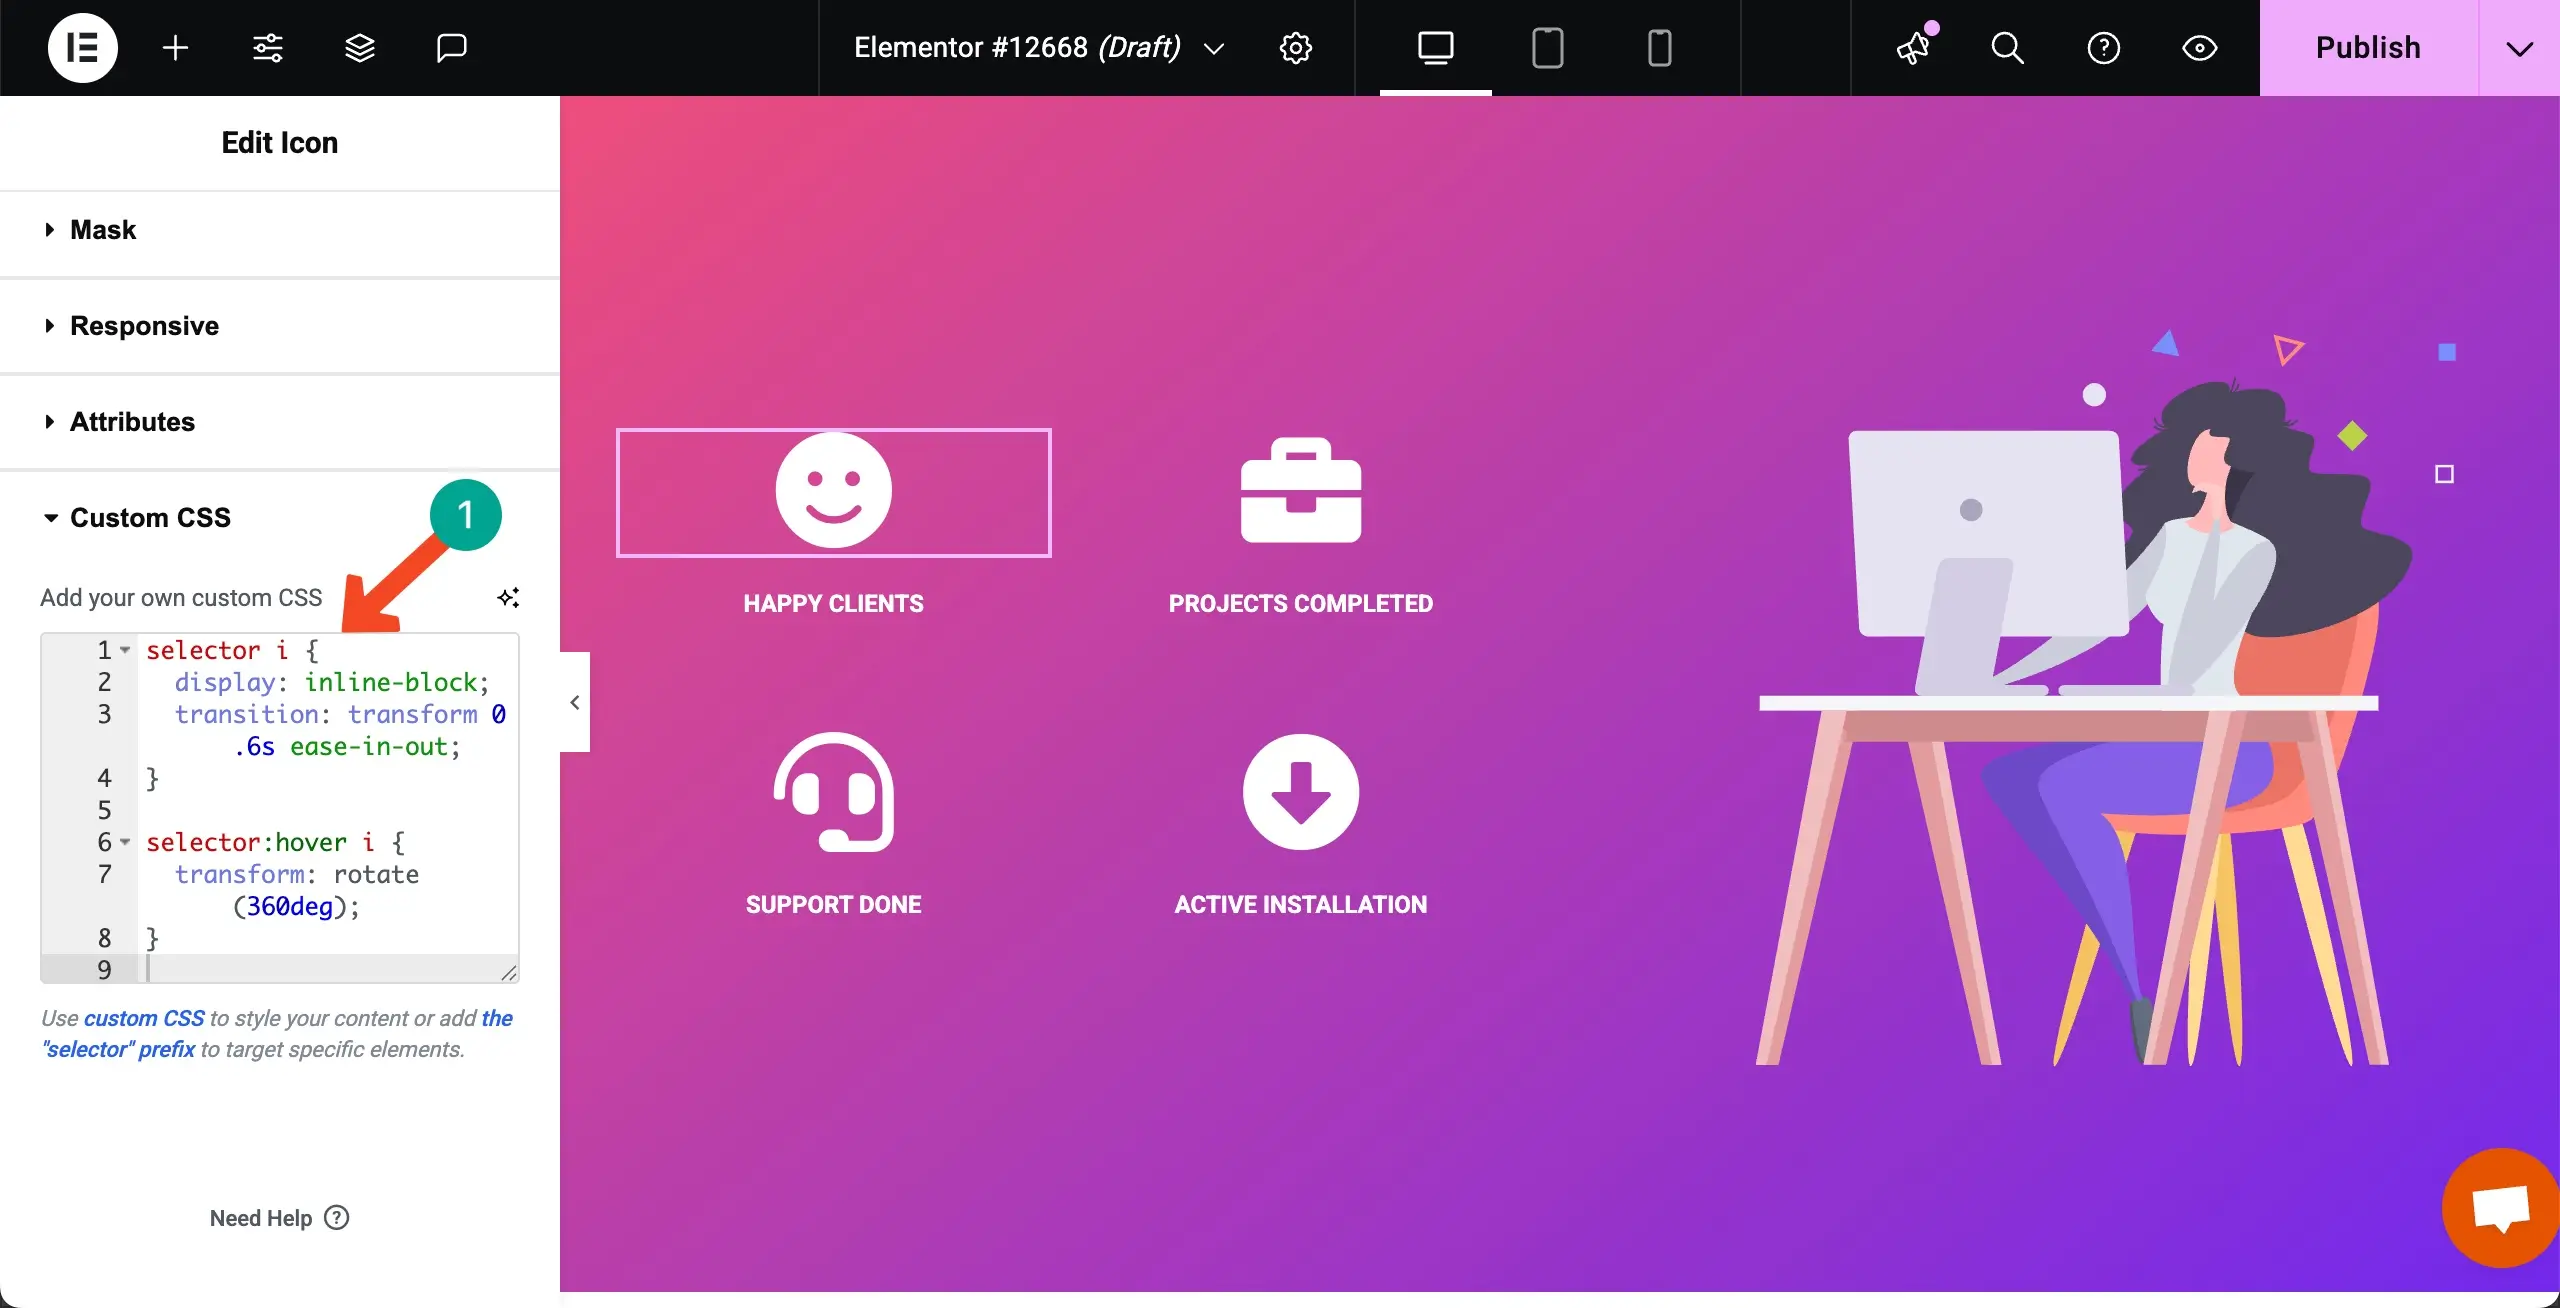
Let’s first select the happy emoji icon by clicking it. Then, come to the Advanced tab on the Elementor panel on the left sidebar.
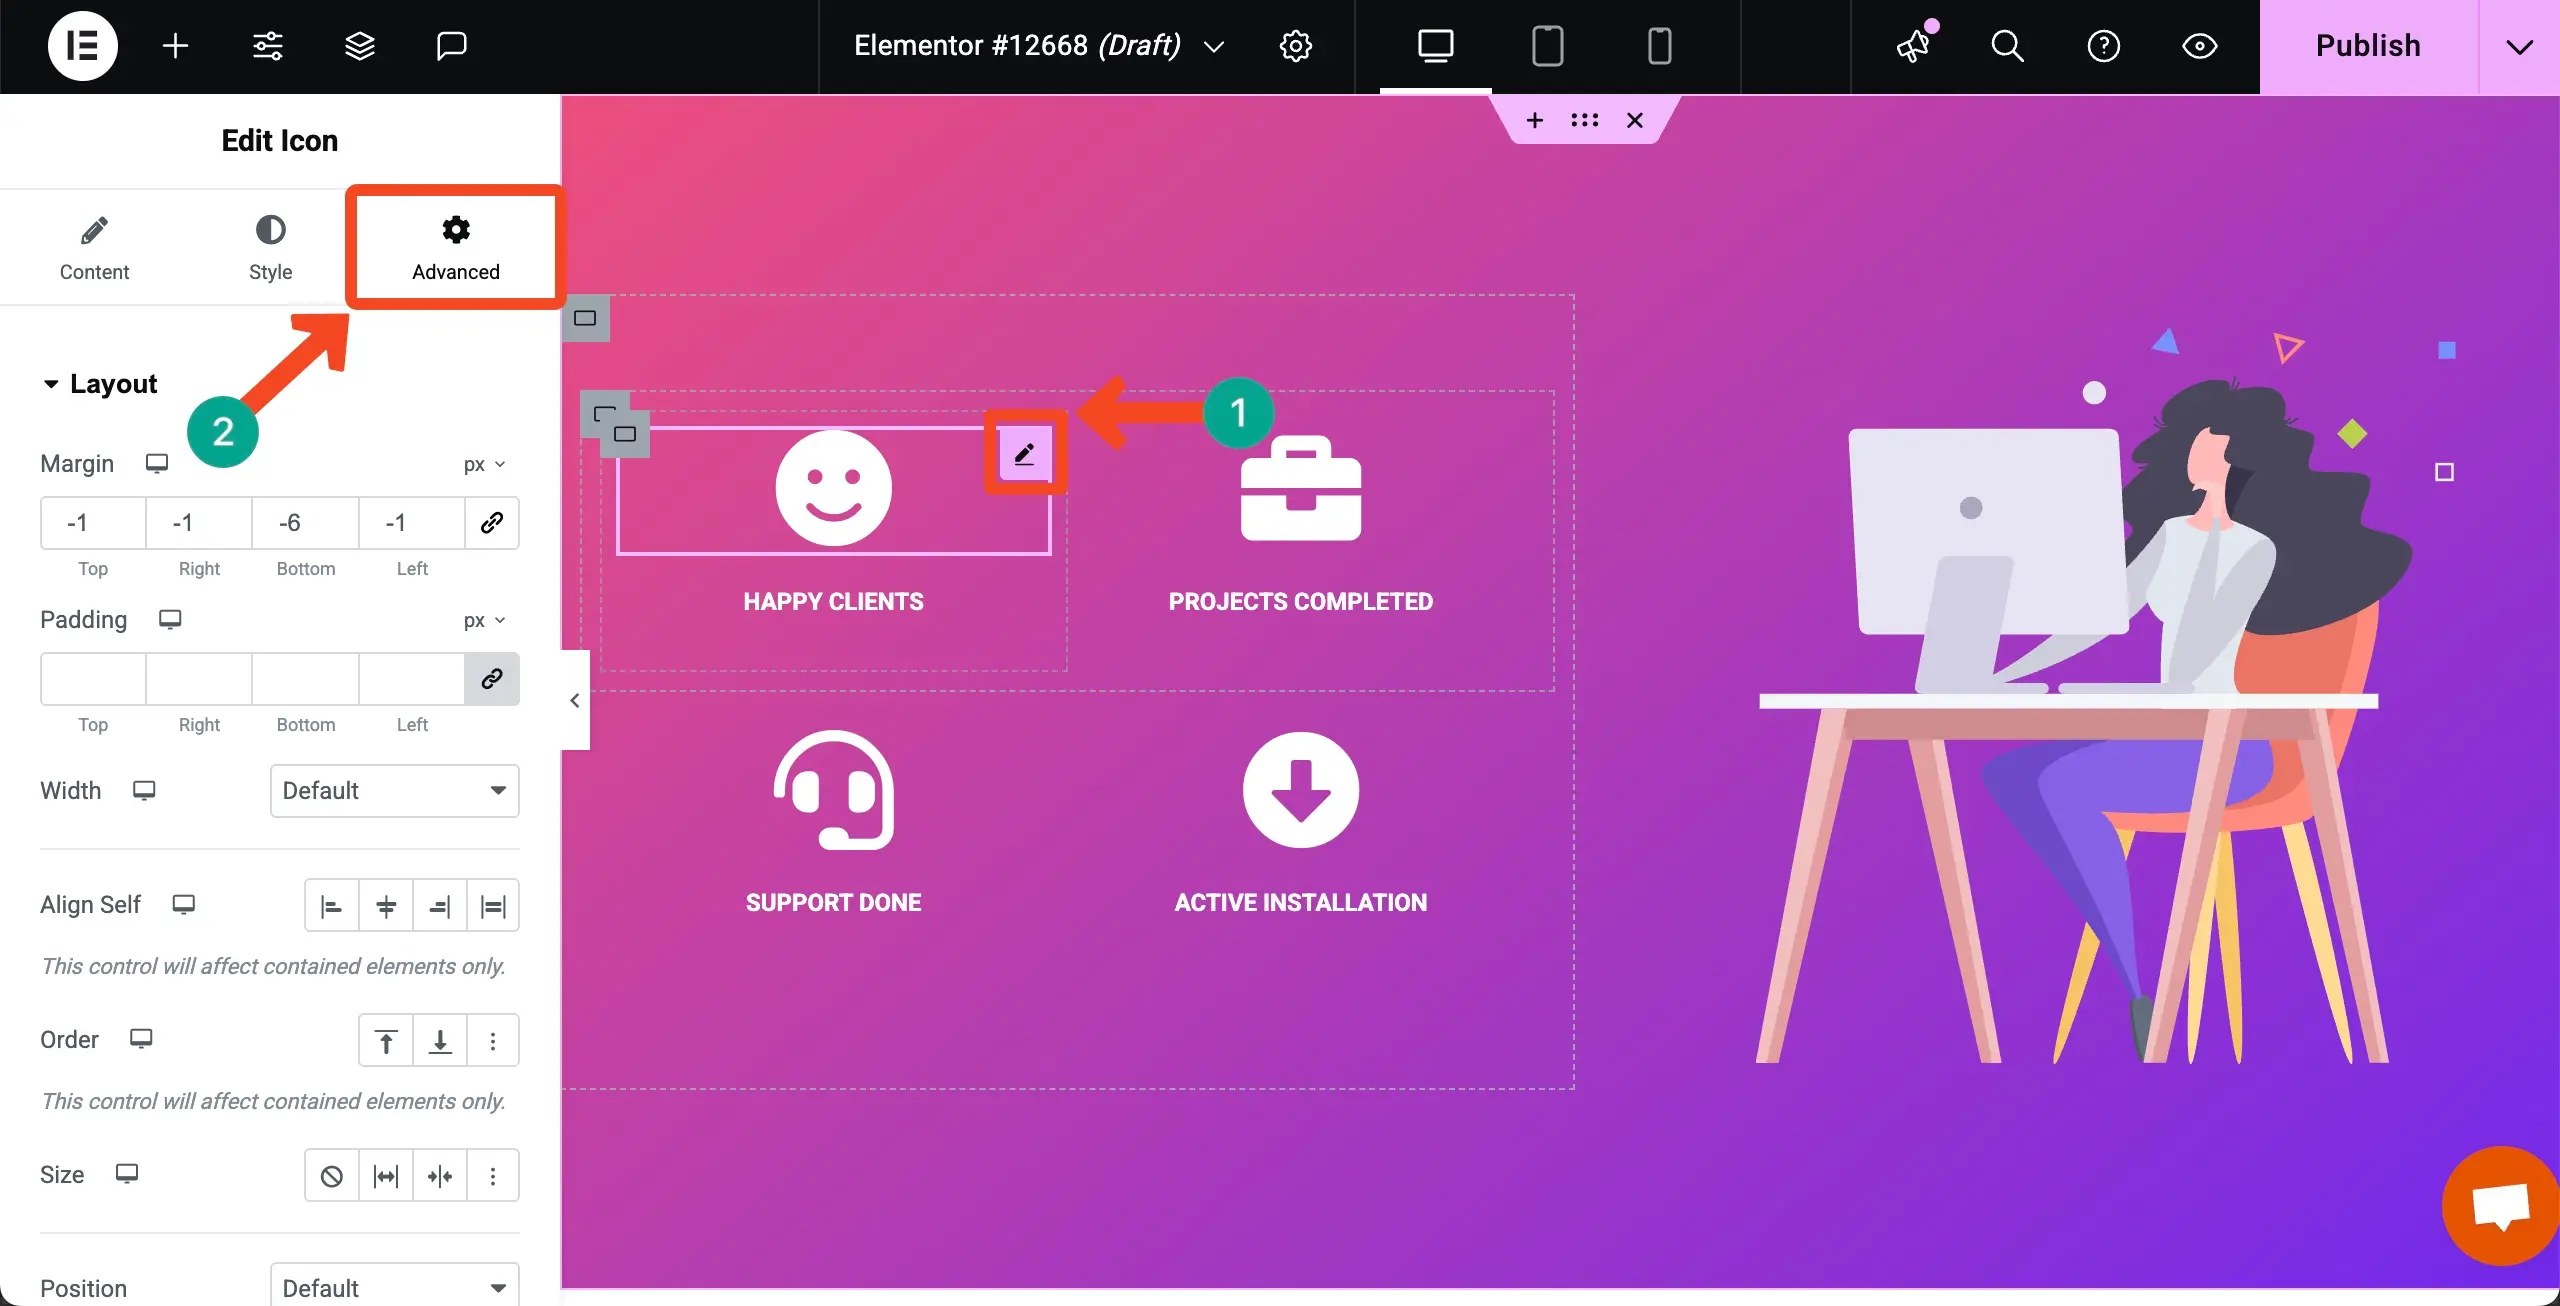
Scrolling down the Elementor panel, come to the Custom CSS option. Expand it by hitting this option. This will open up an editor where you can write any custom CSS code snippet.
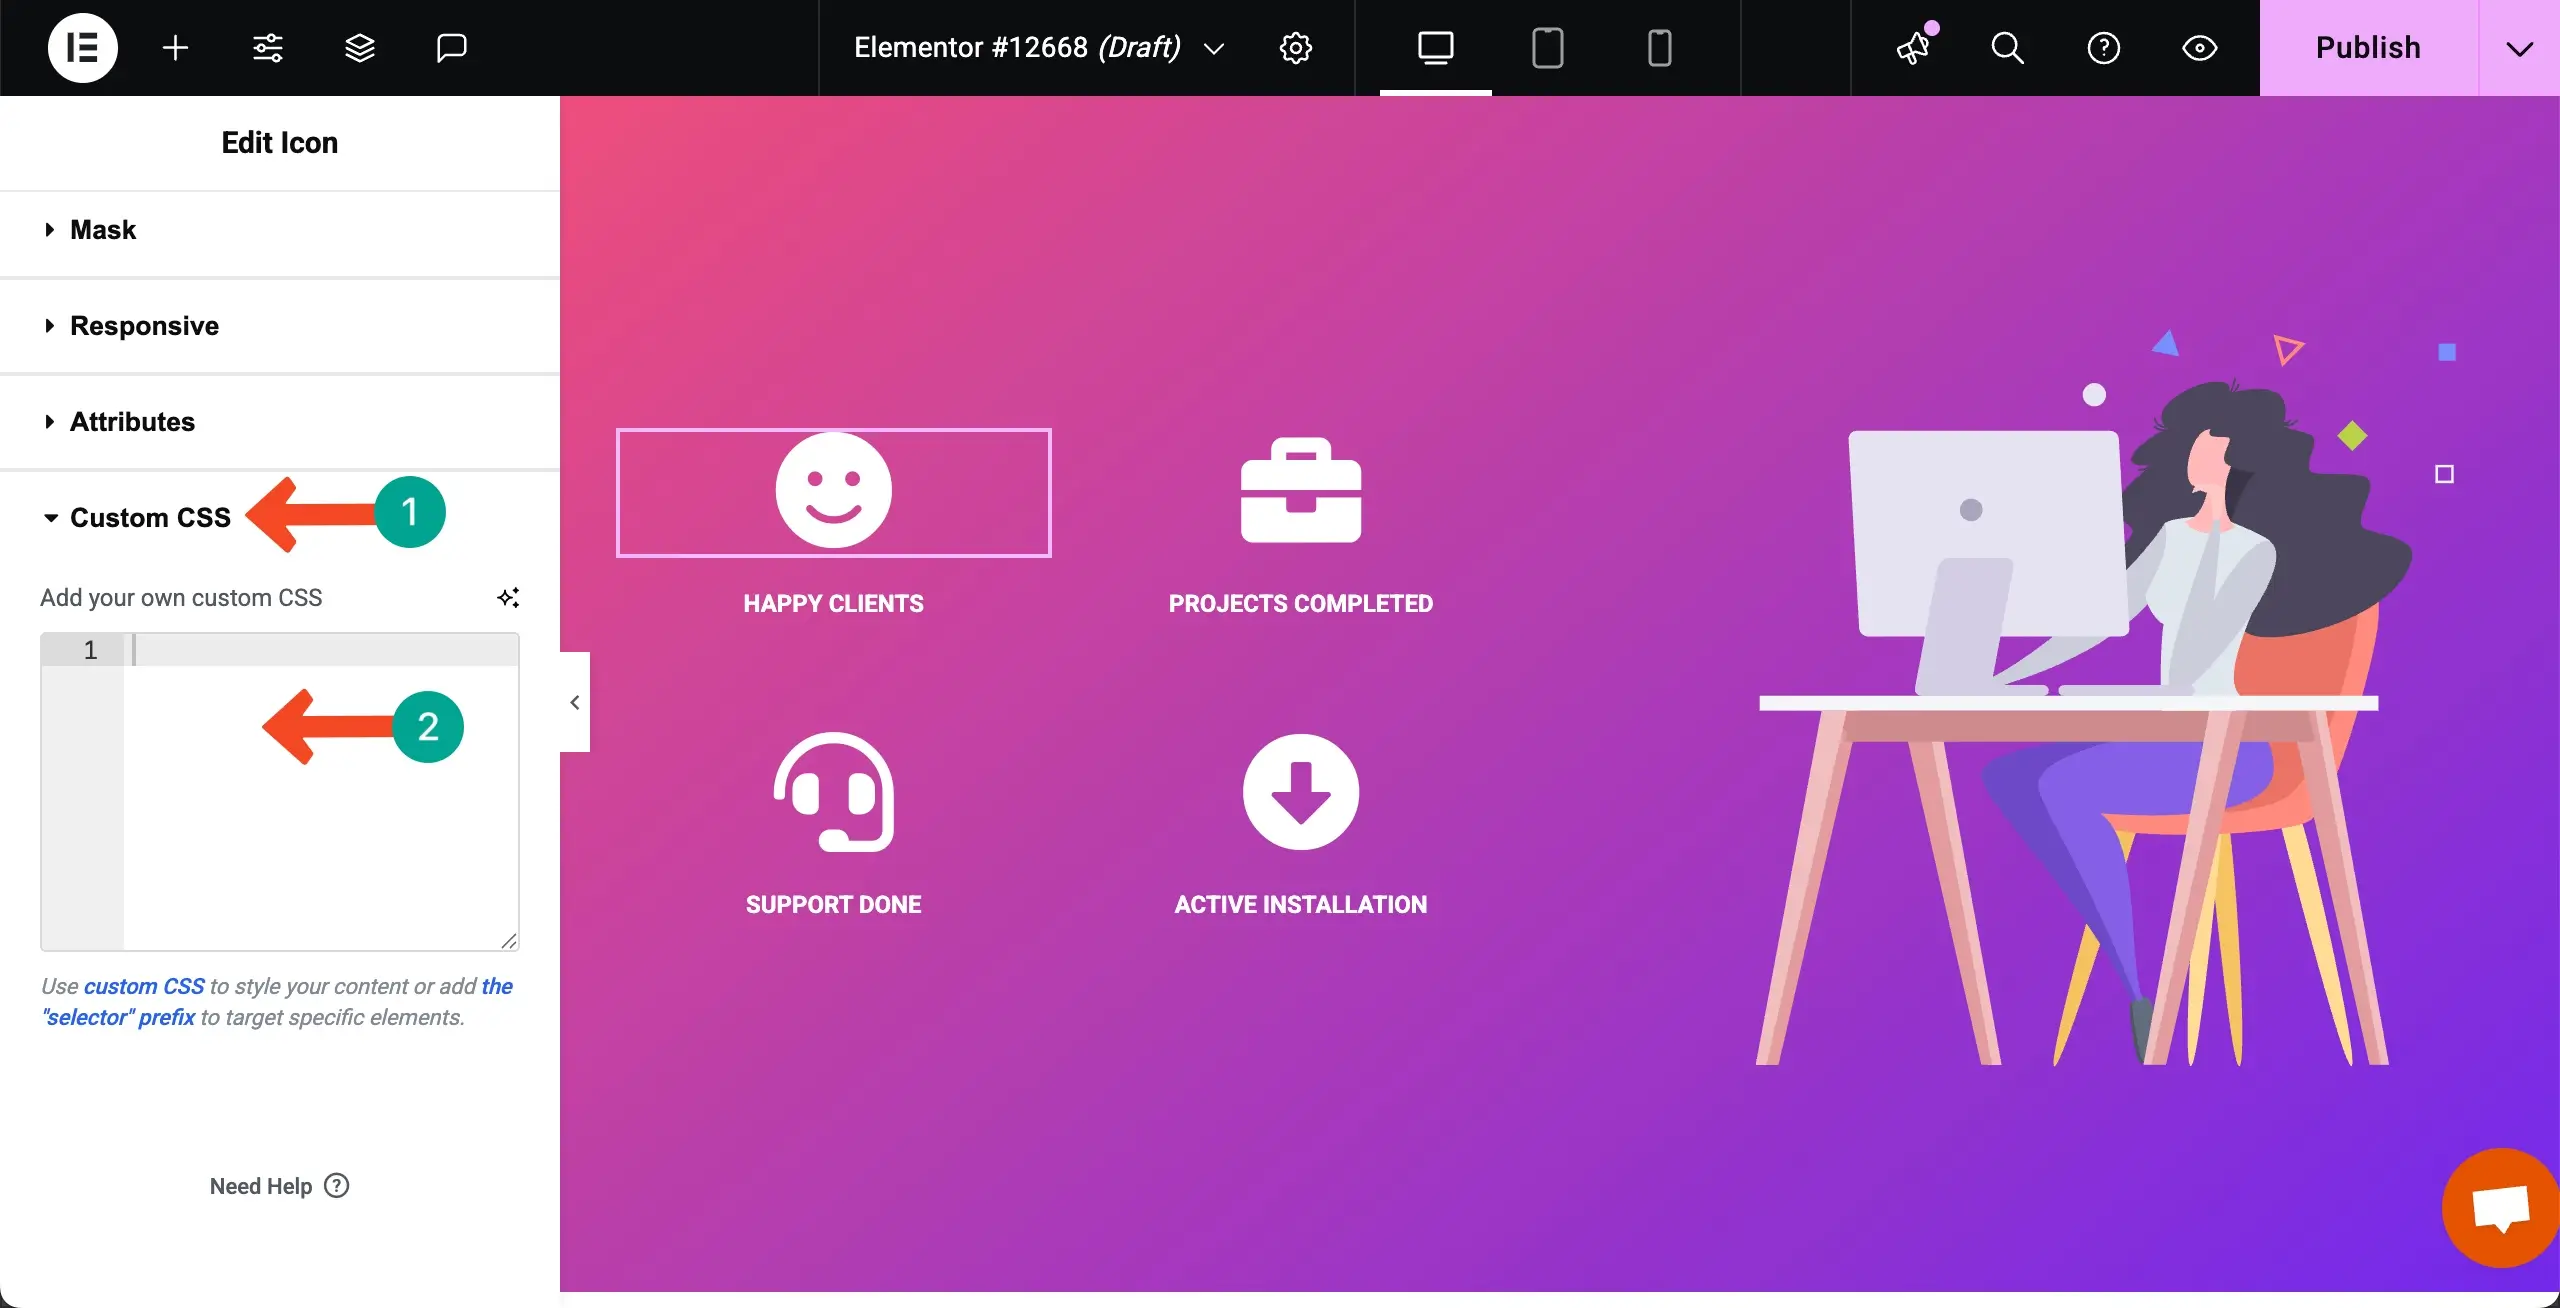
Write your desired custom CSS code snippet in the editor. You can see that we have written some code. This CSS code smoothly rotates the icons by 360 degrees when hovered over the icon.
Step 03: Preview the Effect Created from Custom CSS Codes
According to our code, the icon rotates 360 degrees when hovered. You can see this in the video clip attached below.
Step 04: Write CSS Code Snippets Using Elementor AI
Elementor is no doubt a great solution for no-code users. Not only drag-and-drop, but you can also create custom CSS codes to generate your desired effects for any items just by prompts.
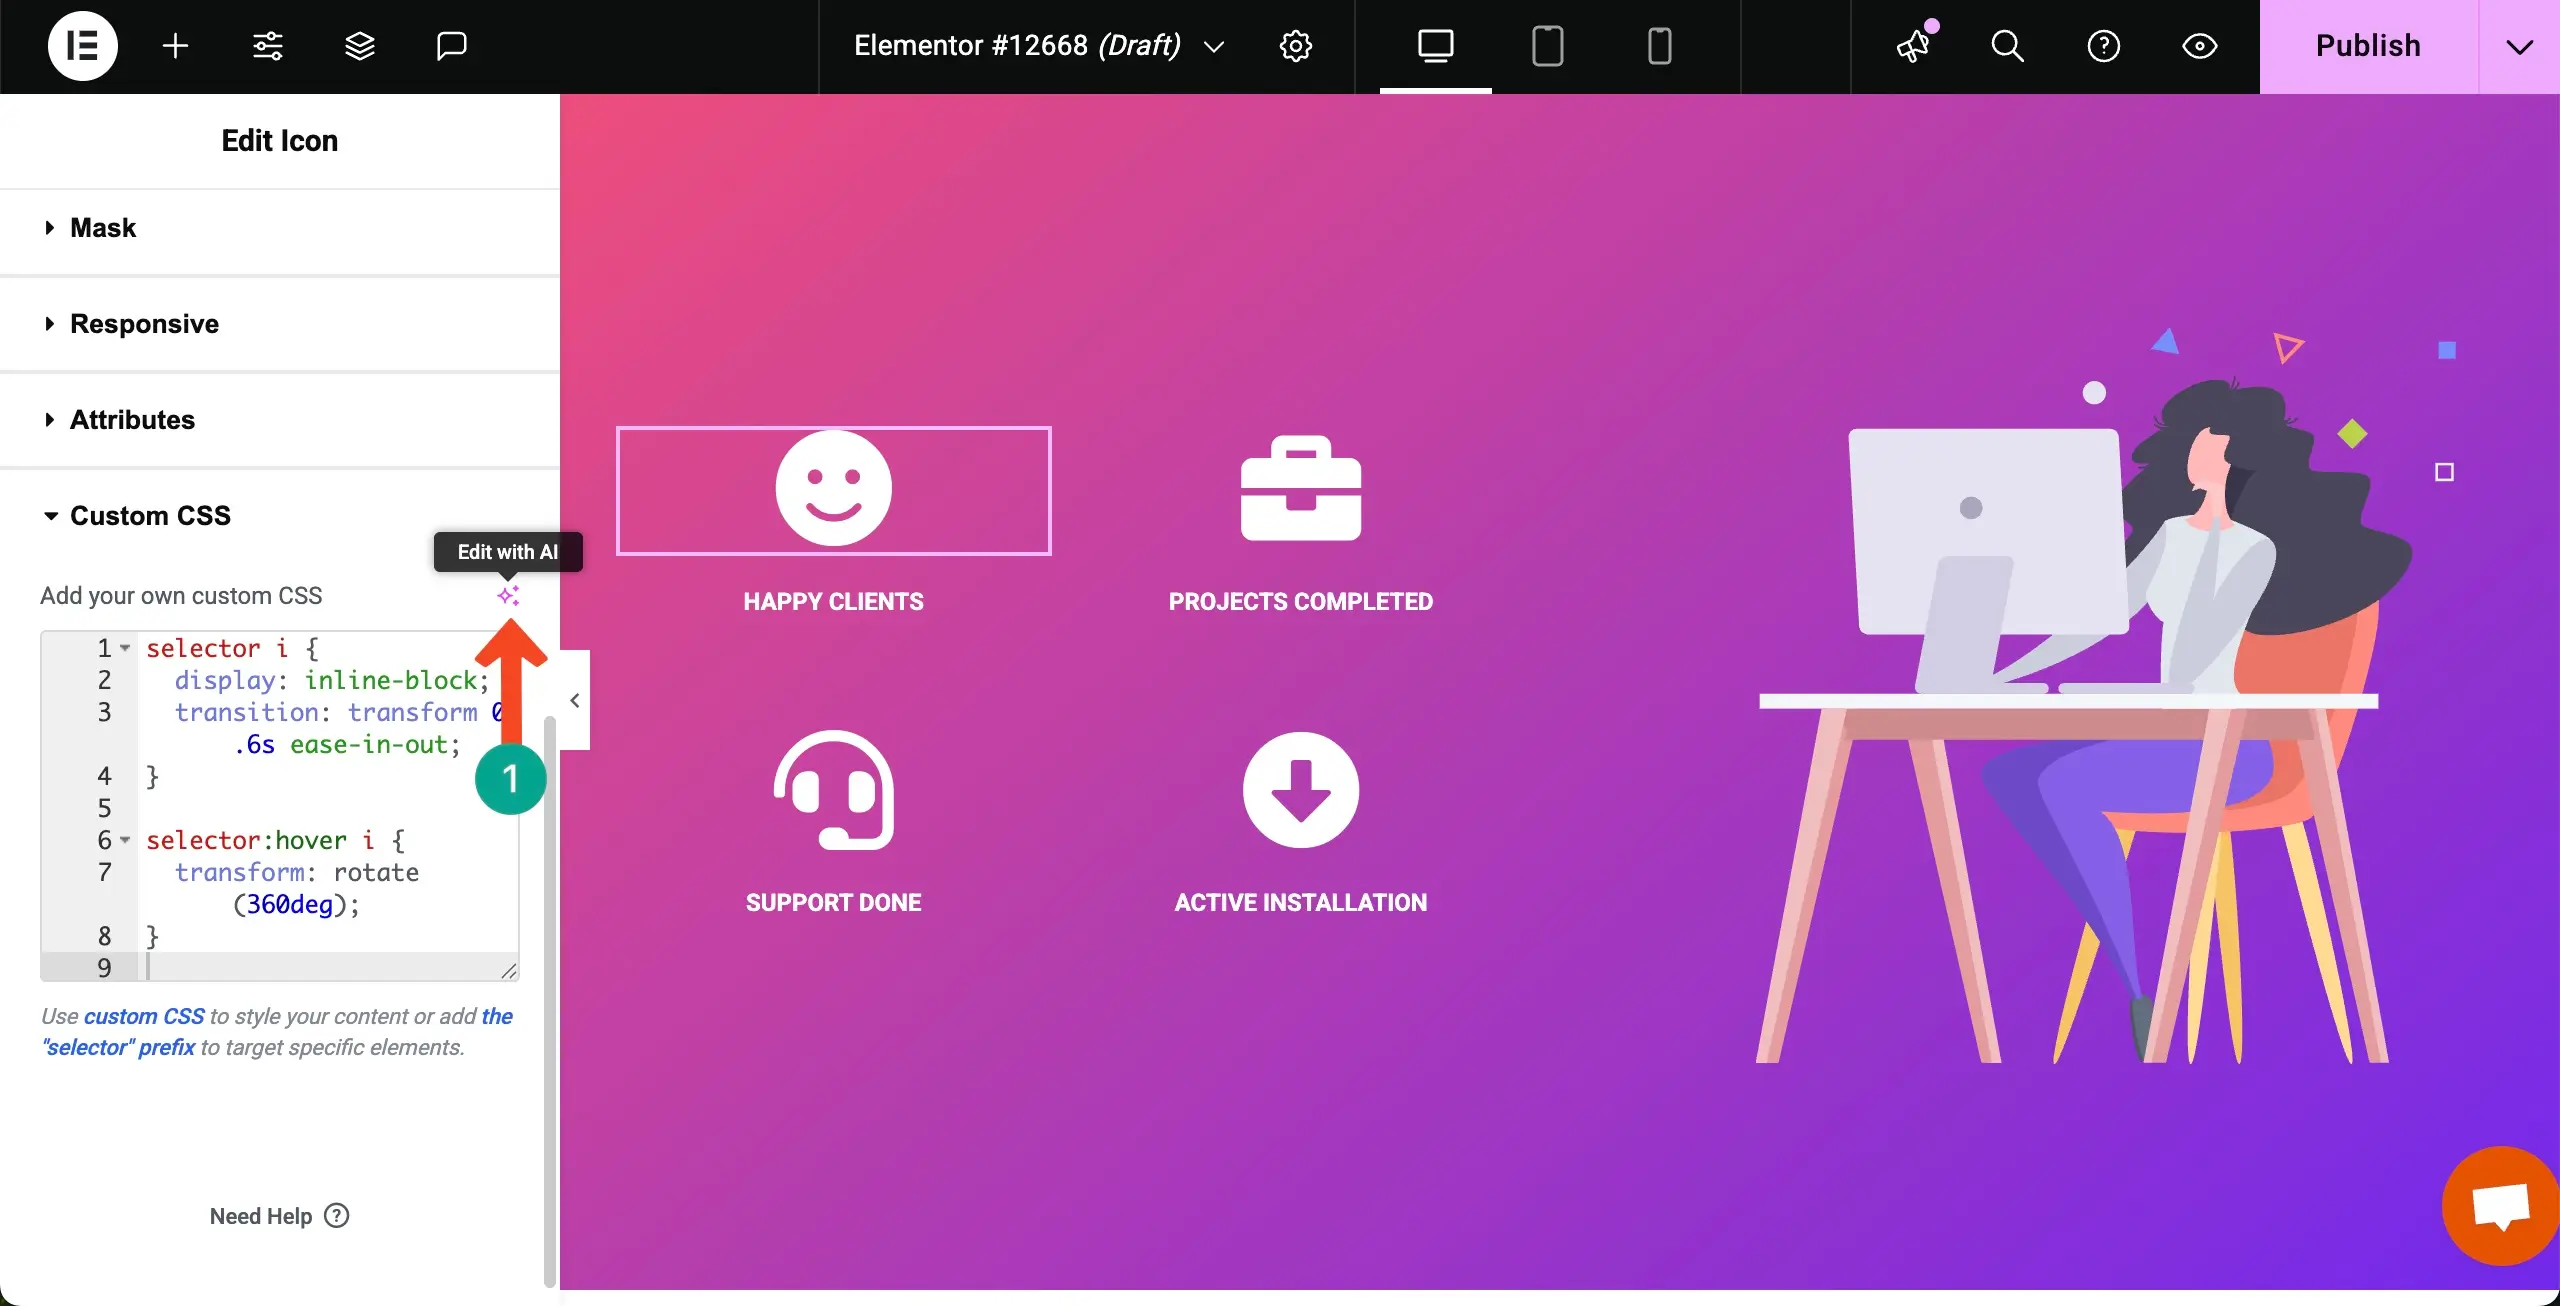
Click the three-star icon (Edit with AI) next to the section.
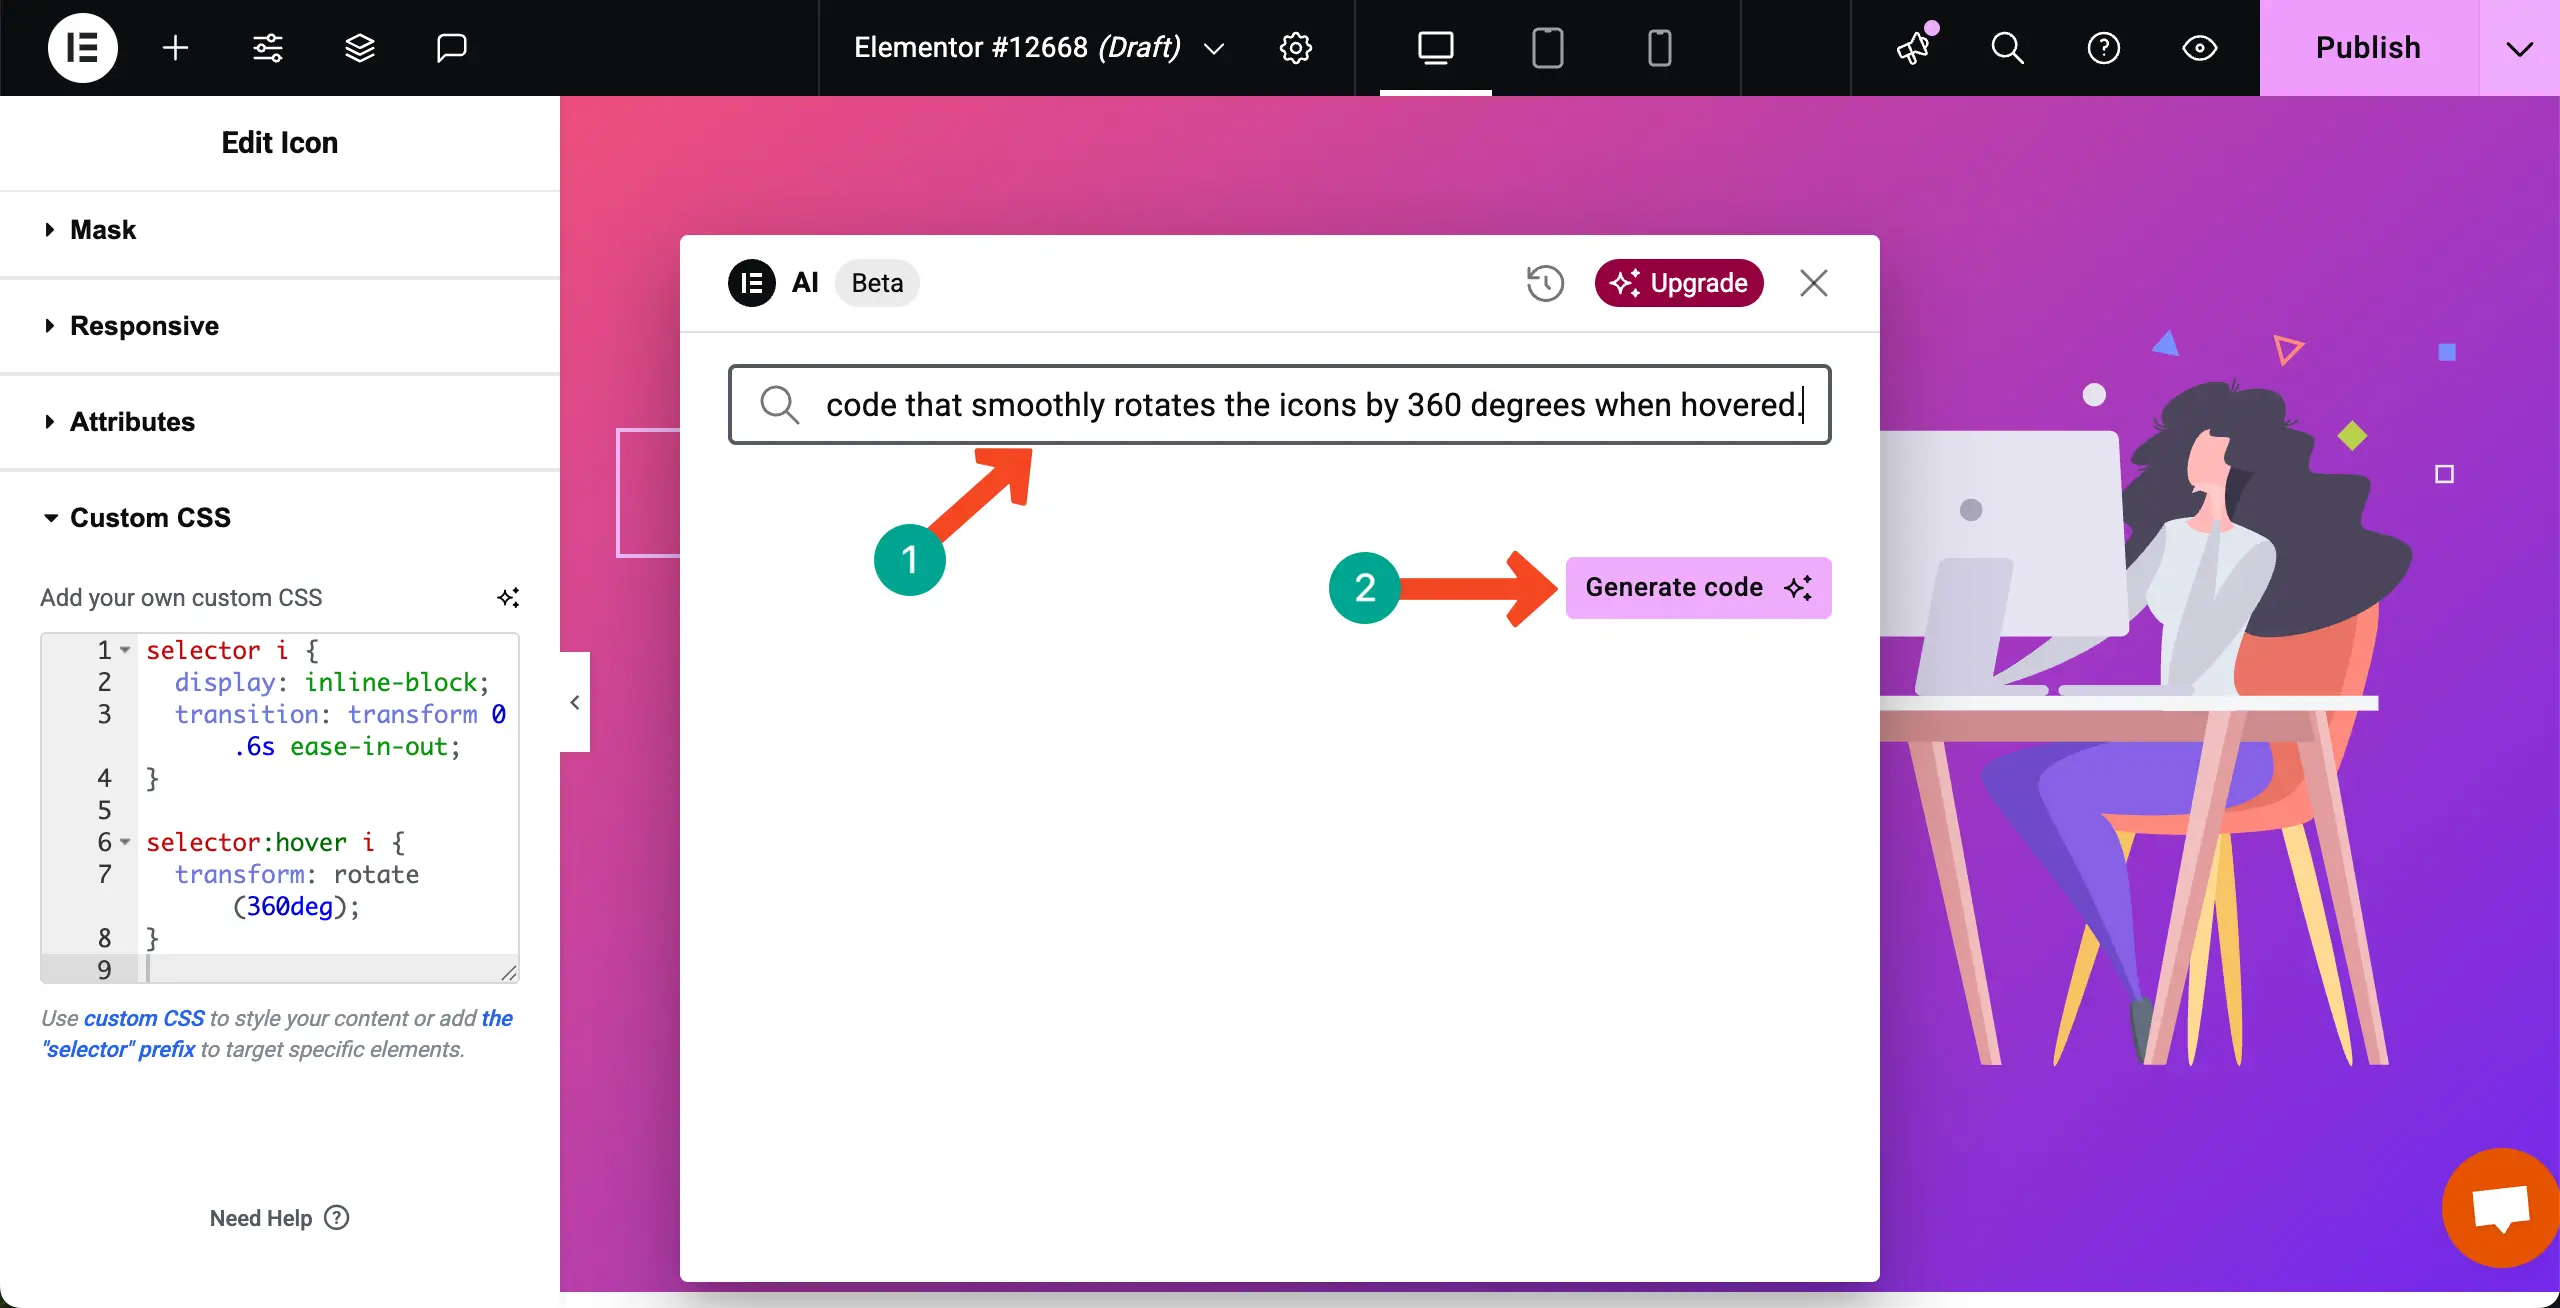
A popup will open up. Describe the type of code you need in the box on the popup. Next, click the Generate code button.
A new CSS code will instantly be generated. After that, you can directly place it in the Custom CSS editor. Thus, you can create codes and update your web design.
Step 05: Final Preview
Now, in the same way, we hope you can add the custom CSS Code snippet to all the other icons. Once done, preview them to check if they are working properly or not.
Add Custom CSS Code Using the Theme Customizer
If you have Elementor, you can add the CSS code snippet using the default theme customizer option of your theme. To do this, follow the steps as explained below.
Step 01: Go to the Theme Customizer Option
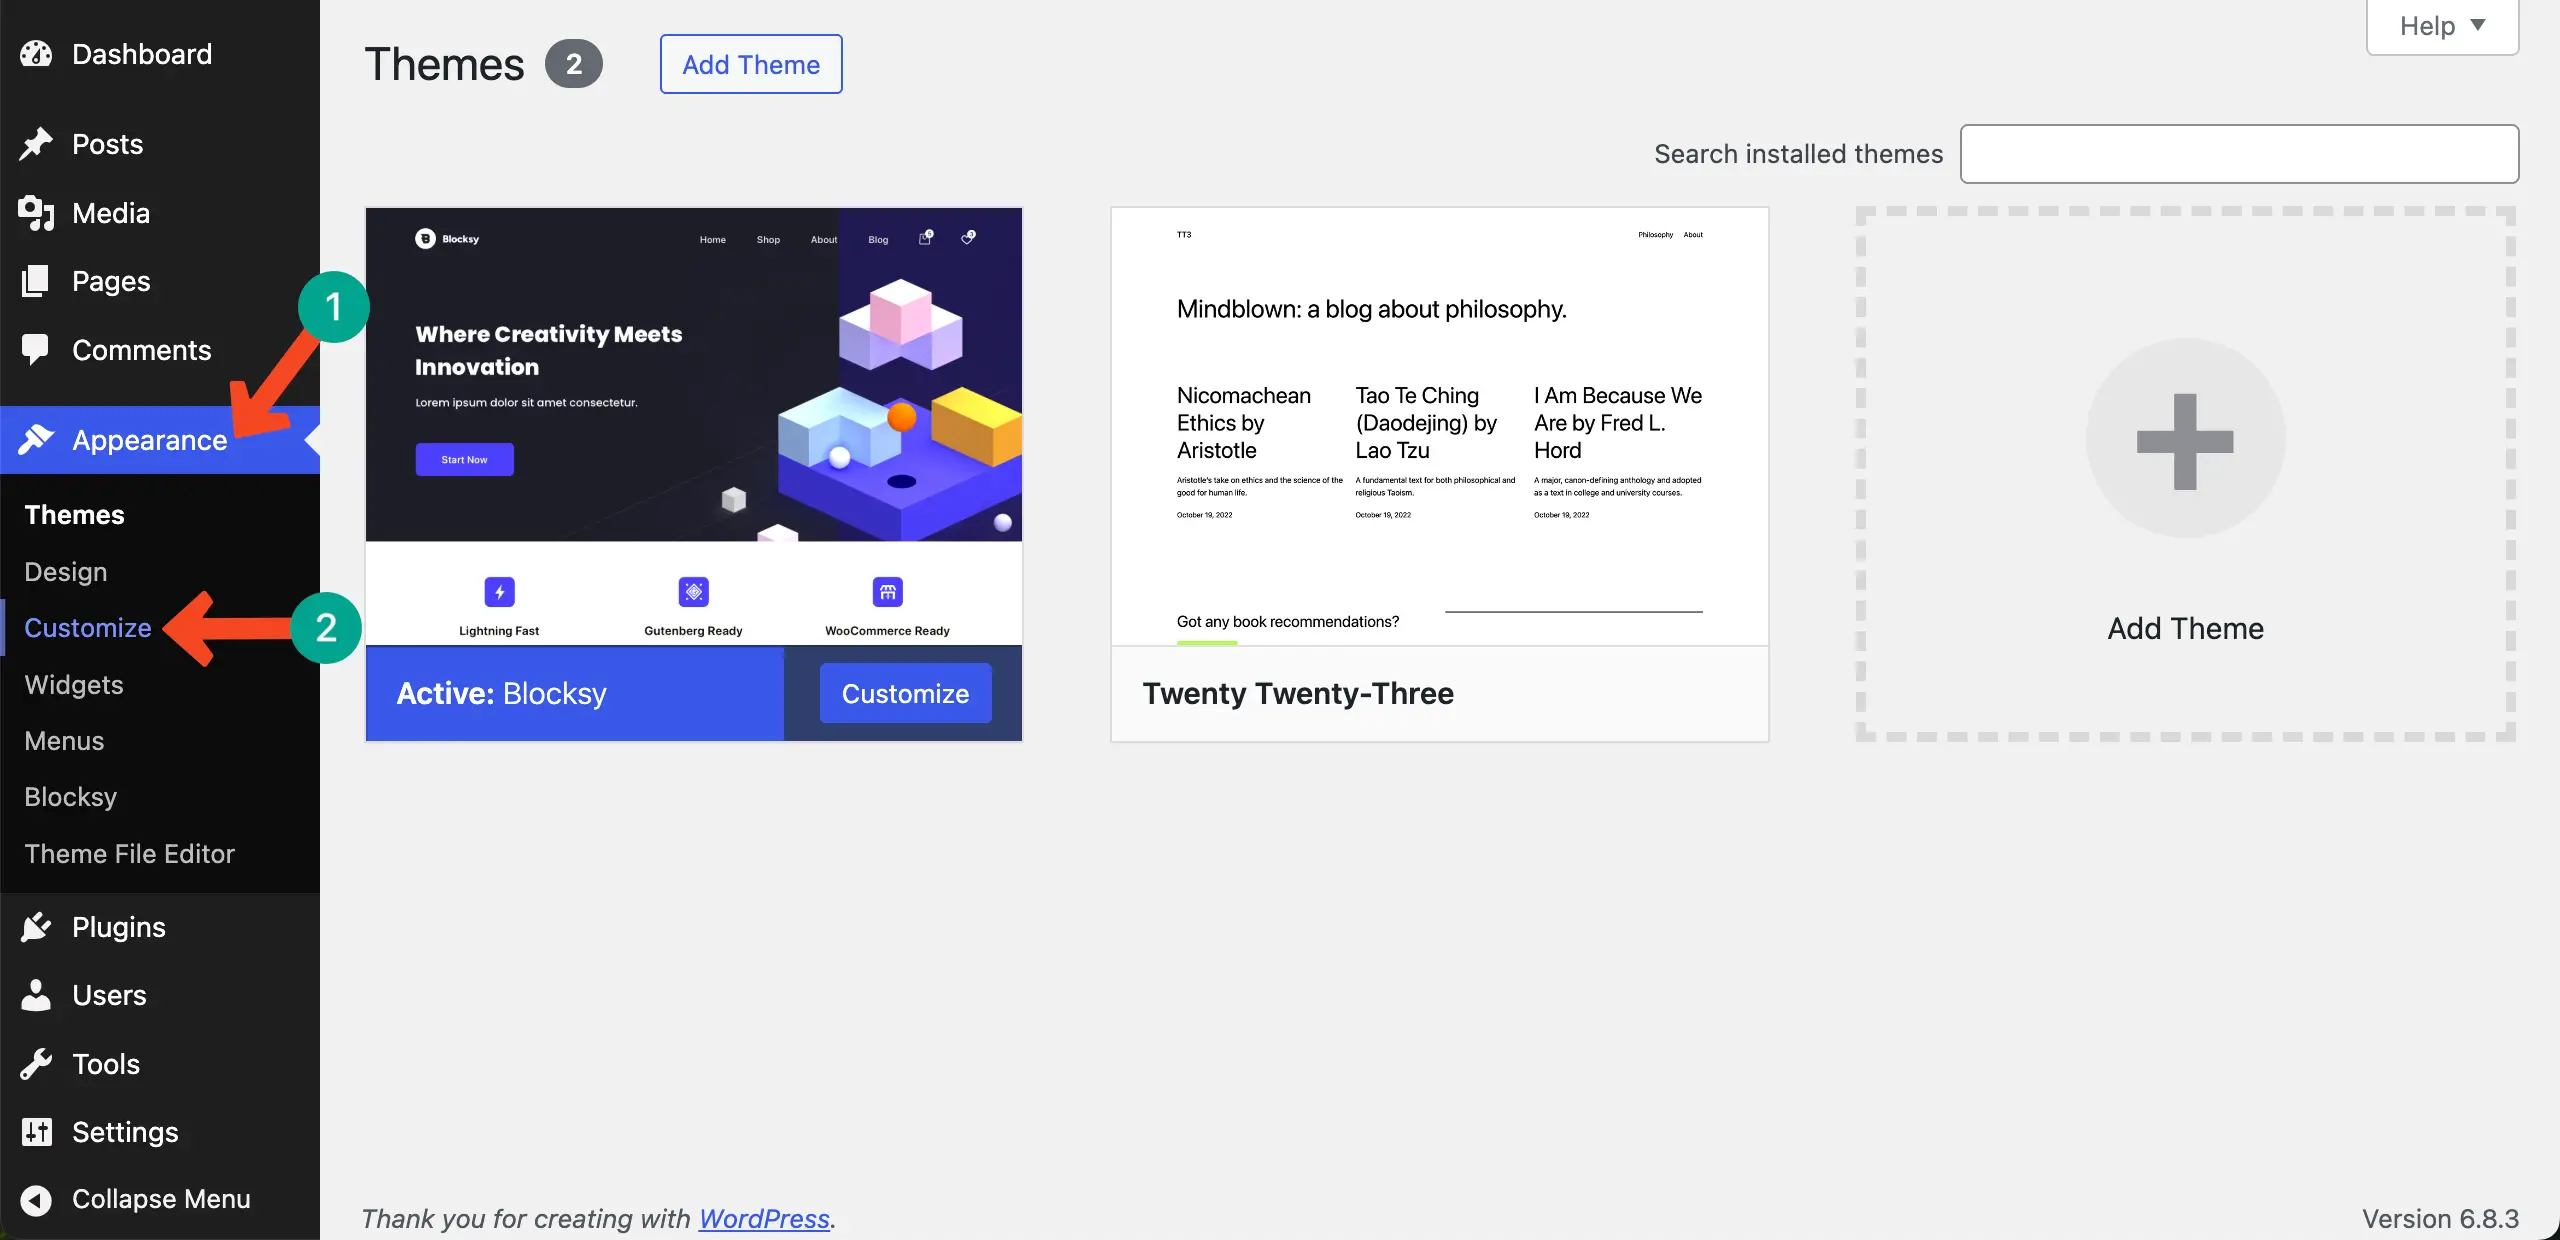
Let’s first log in to your WordPress dashboard. Then, navigate to Appearance > Customize. Based on the theme you are using on your site, this navigation and options may vary slightly.
Step 02: Come to Additional CSS
You’ll instantly come to a new page. By scrolling the left sidebar, locate the Additional CSS option. Expand this option by hitting it.
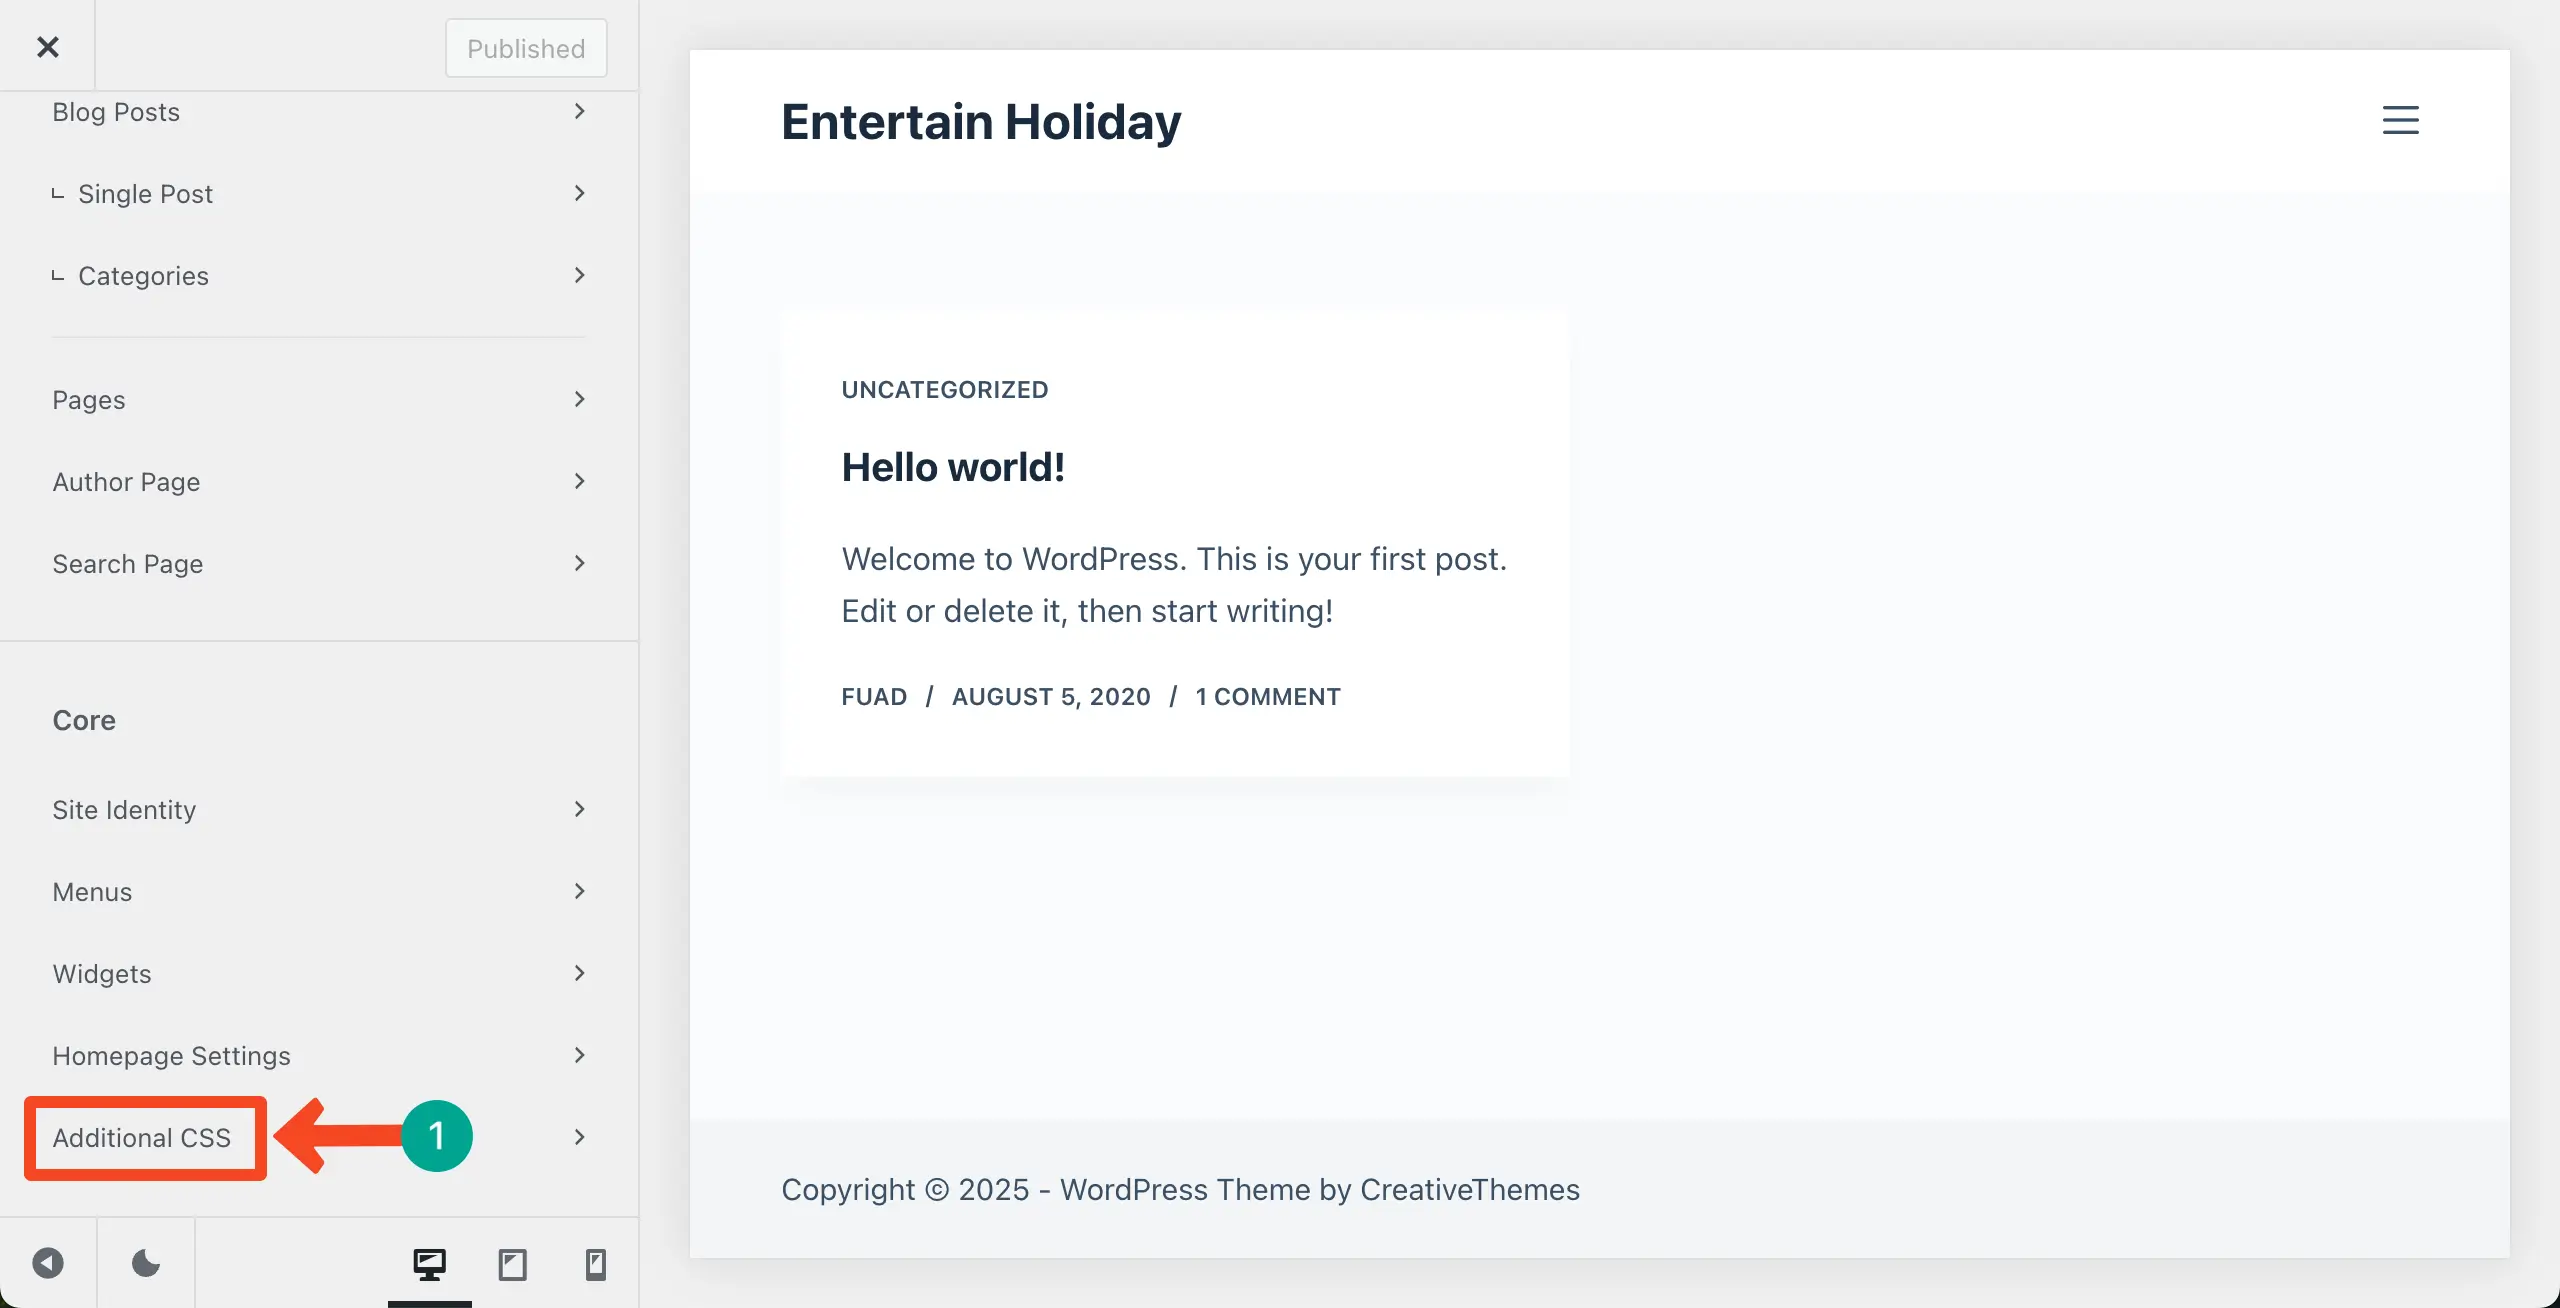
Step 03: Get the Code Editor
Once this option is expanded, you’ll get a code editor where you can write your desired custom CSS code as you did in Elementor. The process is the same.
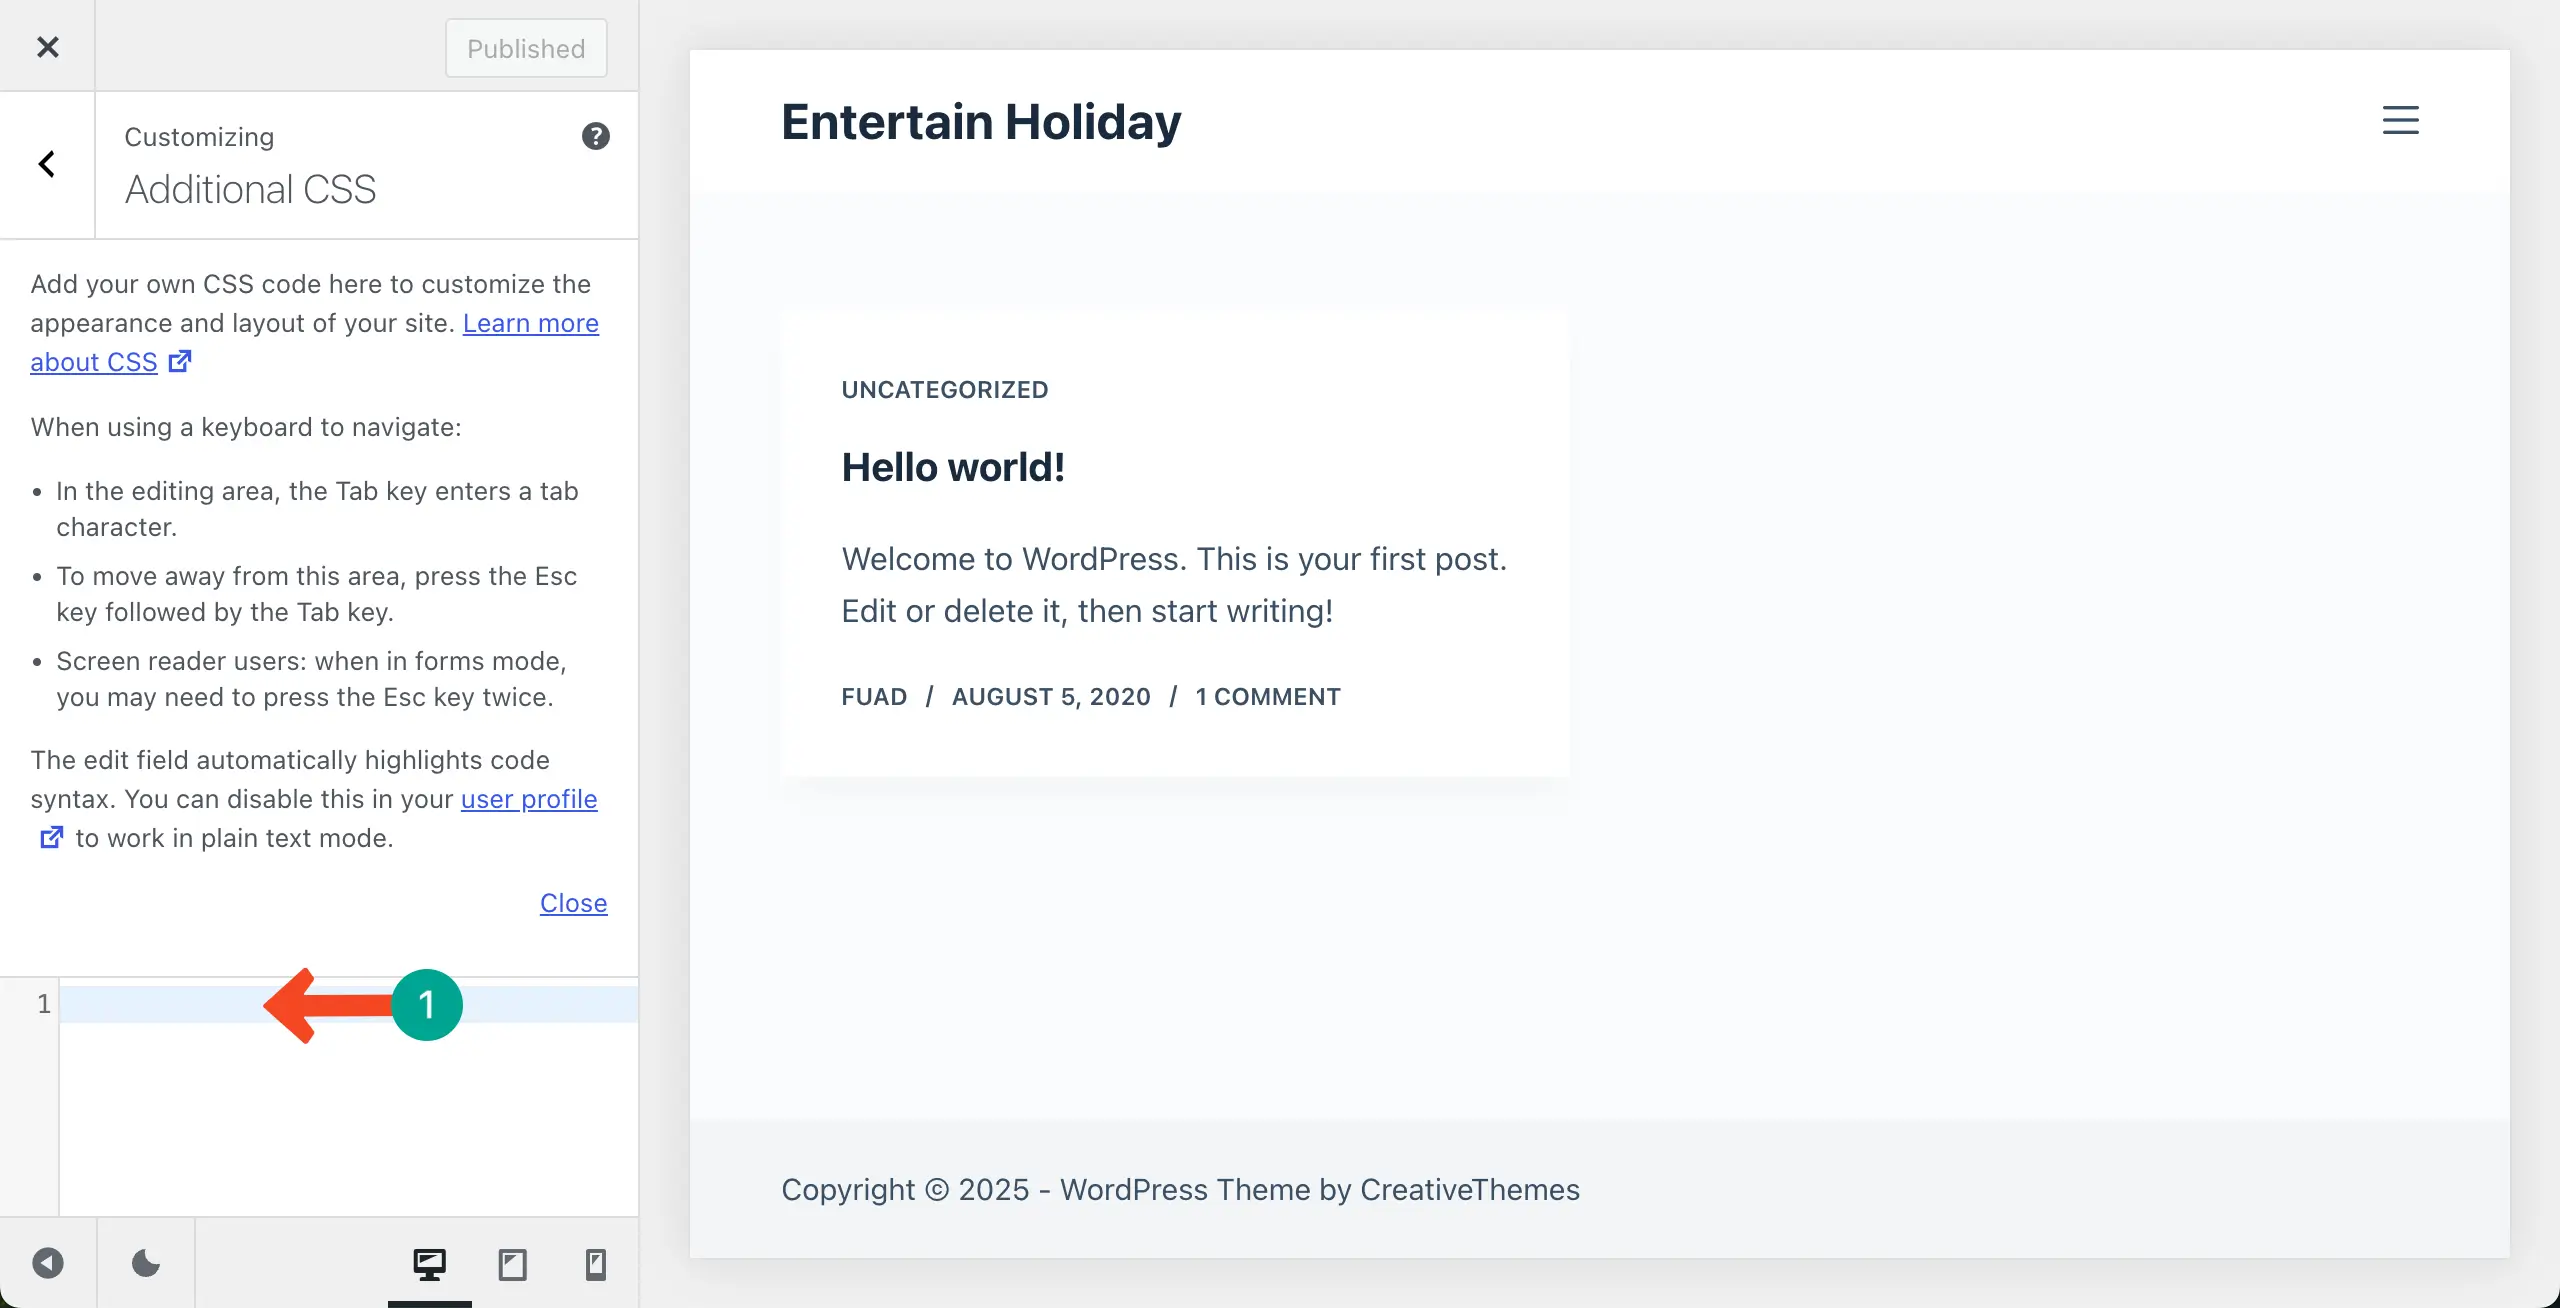
Thus, you can add CSS code snippets in WordPress using the default theme customizer.
Things to Care About When Adding CSS Code
There are several points you must consider carefully to get the best from the custom CSS codes. Take a look at the below.
1. Avoid Conflicts with Existing Styles
When you add CSS code, make sure it doesn’t conflict with your theme or other plugins. Conflicting styles can break your design or make it look different on various pages. Always test the changes on a staging site or preview mode before publishing.
2. Use Specific Selectors
Always write CSS with specific selectors to target the exact element you want to style. Broad selectors can accidentally change styles for multiple elements. This helps maintain a clean and controlled design.
3. Keep CSS Organized and Simple
Avoid writing very long or messy CSS code directly in Elementor. Organize your code and add comments to remember what each part does. Simple and structured CSS is easier to manage and fix later.
4. Check Responsiveness
Make sure your CSS changes look good on all devices—desktop, tablet, and mobile. Elementor has responsive preview tools you can use to check this. Responsive design ensures your website looks professional everywhere.
Use HappyAddons to Enhance the Power of Elementor
If you ever feel like the features and widgets of the Elementor plugin aren’t enough to meet your custom design needs, you might look for additional options. HappyAddons could be a great solution in this case. It’s a powerful addon of the Elementor plugin, with 145+ multipurpose widgets and 32+ features.
It comes with many creative widgets like advanced sliders, interactive galleries, countdowns, and animated content with ease. These widgets make it possible to build professional-looking pages without touching complex code, giving Elementor users more tools to create unique designs.
In addition to widgets, some of its exciting features are cross-domain copy-paste, display conditions, floating effects, live copy, and role manager. These features help you save time, improve workflow, and make your website more dynamic and user-friendly.
By combining Elementor with HappyAddons, you get a complete design toolkit that enhances both creativity and efficiency. Like most other plugins, HappyAddons also has a free and premium version. Get them by clicking the buttons attached below.
Bonus Point: How to Add Custom JS in Elementor
While Elementor allows you to add custom CSS to style your website, it doesn’t provide a built-in option to add JavaScript. This is where the HappyAddons plugin comes in. With HappyAddons, you can easily add Custom JS to your Elementor site and make it more interactive and dynamic.
Custom JS, or JavaScript, is a scripting language that controls how elements behave on your site. This feature gives you the power to add special effects, animations, pop-ups, or any custom functionality that CSS alone cannot achieve.
Unlike CSS, which only changes the look and style, JS can make buttons clickable, forms interactive, sliders functional, and much more. To use Custom JS on your Elementor pages safely and efficiently, you should try the HappyAddons plugin.
Below is a quick video tutorial on how to add Custom JS to Elementor using the HappyAddons plugin.
Final Thought
Well, it’s really easy to add and maintain CSS Code Snippets in your Elementor design. You can design your own site by inserting CSS code and modifying the style of your site as per your requirements.
If you are a non-coder, don’t worry. Elementor itself gives you a lot of custom drag-and-drop controls to customize your site.
Subscribe to our newsletter
Get latest news & updates on Elementor
[yikes-mailchimp form=”1″]




14 Responses
I like what you guys are up also. Such smart work and reporting! Keep up the superb works guys I have incorporated you guys to my blogroll. I think it will improve the value of my site 🙂
Hello Derek,
Thanks for the appreciation. Stay with us. Thanks.
you have a great blog here! would you like to make some invite posts on my blog?
Hello Christian,
Thanks for your appreciation. I will inform you shortly. Keep in touch. Thanks.
so much great info on here, : D.
Hello Creole,
Thanks for your appreciation. have a good day!
I have been absent for some time, but now I remember why I used to love this website. Thanks , I will try and check back more frequently. How frequently you update your website?
Hello Chrisian
this is really nice to hear about. Hopefully, you’ll like it more in the near future. Yes, we do update our website according to our needs.
Elementor causes problems with setting links for svg images. How could I do this with the manual css option? is it possible to set up a link in css for my svg image? I tried this code below, but it’s not working 🙁
selector { a[href*=”http://…”}
Do you have any recommandations?
Thank you so much
Hi Joana,
Sorry to hear that,
can you please share the detailed code snippet. you can use these tools to share the code with us, “Pastebin / gist”.
Thanks.
Hi, thanks for the article. I’m having a little trouble getting my nav menu widget to look how I’d like and I was wondering if you (or anyone) could help me out with the CSS.
I want the Nav menu widget on my footer to have a border around each page, so I’ve added this snippet:
selector .elementor-nav-menu li { border: 2px solid; }
This has partially worked as there is now a border around each individual item on the menu. However, the border itself doesn’t fit the text well – it is far to narrow on the side margins and too tall vertically.
When adding the snippet ‘margin: -3px’ or similar, it only adjusts the margin in between the menu buttons, and not between the border and menu buttons themselves.
What CSS snippet can I add to edit the margins/dimensions of the borders that now wrap each of my nav menu page names?
Thank you.
Hi Hadi,
Gobinda Here,
Sorry to hear that you are going through a terrible condition. It’s really tough for us to investigate the issue of your problem right now. We are extremely sorry. But can you please share any inspiration of your desired design here: [email protected]? so that our team can have a loot into it. If possible we can add the snippet with here or publish a different content. And we like to suggest you try Elementor Pro. It comes with a vast amount of customization flexibility. There are plenty of templates also available in the market.
Thanks.
I am having problems with css in the widgets. Where you put a name and a title only the title shows up, the name does not when you hover over it. Is there something that I can do? This is the code I used. I welcome and advice that you can give.
.kevin-testimonial h3,p {
color: #FFDE01 !important;
}
.kevin-testimonial h3,p:hover {
color: #5804FA !important;
}
Hi Carol,
We are sorry for your trouble. Can you please share the website link with us? It’s quite impossible to find the problem only through the statement.
Your syntax seems ok.
:hover {css declarations;
}
Reference: https://www.w3schools.com/cssref/sel_hover.php
But we need to check the code on the live site. Here I’ve tried to replicate your issue, the element will hide on hover,
https://codepen.io/Gtarafdar/pen/RwaNbaE
& vice versa: the element will appear on hover effect,
https://codepen.io/Gtarafdar/pen/XWdJrMa
BTW you can create a stunning set of testimonials with Elementor and HappyAddons.
Demo: https://demo.happyaddons.com/elementor-testimonial-widget-demo/
Let us know if you find it helpful or not. We will try our best to help you in solving your problem.
Thanks.
Regards,
Gobinda Tarafdar,
Product Co-ordinator of HappyAddons | weDevs.