Do you want to add a responsive slider to your Elementor website? It will surely make your website design sophisticated. Also, a well-structured slider design helps you get better user engagement.
In this blog, we are going to share the easiest way to add a slider to a website using Elementor. We’ll also discuss some important aspects regarding the Elementor slider and its usage.
Let’s get started with a simple question: why is the slider essential for your website?
How Slider Will Make Your Website Look Elegant?

A slider refers to image slideshows, an important web element you often see in modern websites. It can be used for different purposes. In most cases, you find a slider at the top of the landing page or the hero section of a site.
However, you can also use a slider to showcase your eCommerce store products to get customers’ attention quickly. Or you can use a slider to display your client’s testimonials or share other brands’ logos.
Sliders help you-
- Make your website more visual appealing
- Build users engagement
- Optimal to display testimonials
- Showcase online store products
- Use to display blog posts
- Able to share deals or other marketing promotion
How to Use Elementor Slider Widget on Your WordPress Website
Here in the following part of our blog, we’ll guide you on how to create a slider for your website in three simple ways, using the power of the Elementor Slider Widget.
Suppose you already have your WordPress website ready. Now, you need to have the following plugins on your website before we start:
Make sure you’ve installed and activated the Elementor Free & Premium version.
If you are new to Elementor check this guide and learn How To Use Elementor (Step By Step Guide For Beginners).
Step 1: Add Slider Widget
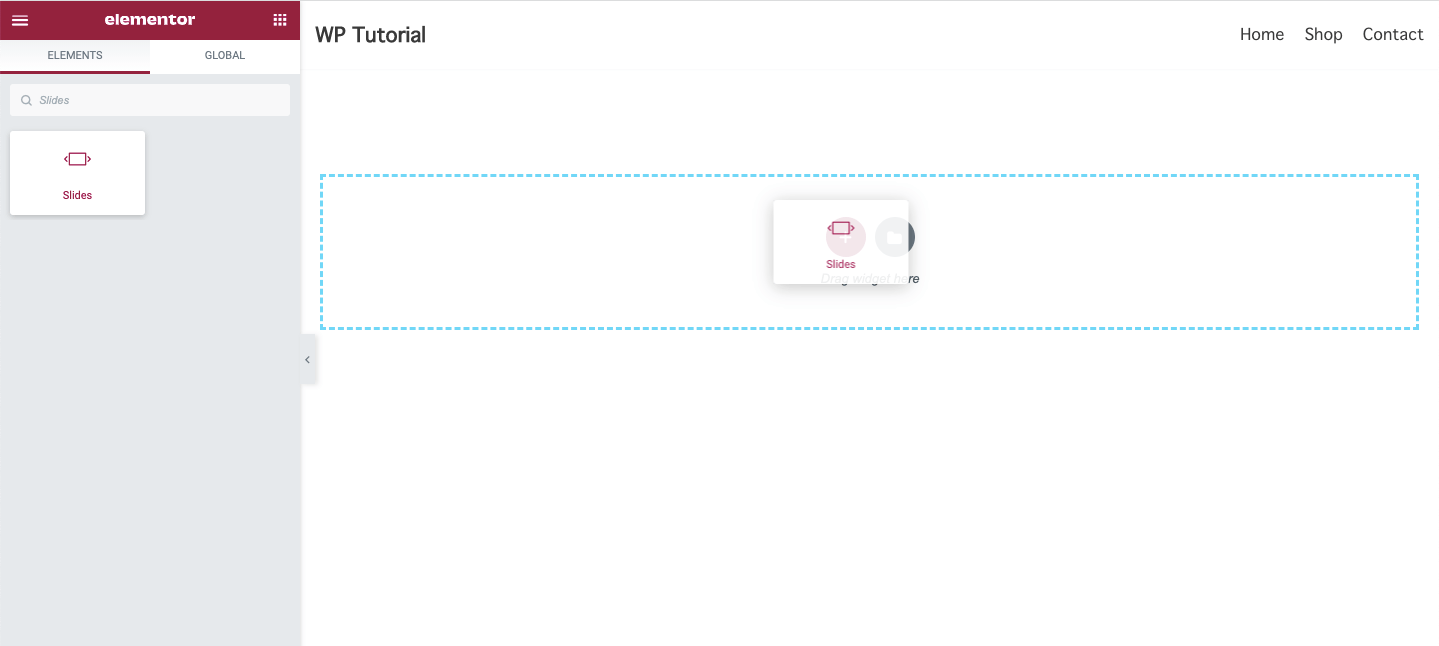
You need to add the Elementor Slides widget to your website’s suitable area to create a slider. You can find the widget from the left-side widgets gallery. Just type the name of the widget from the search bar and drag & drop it into the right place.
Step 2: Manage Slider Content
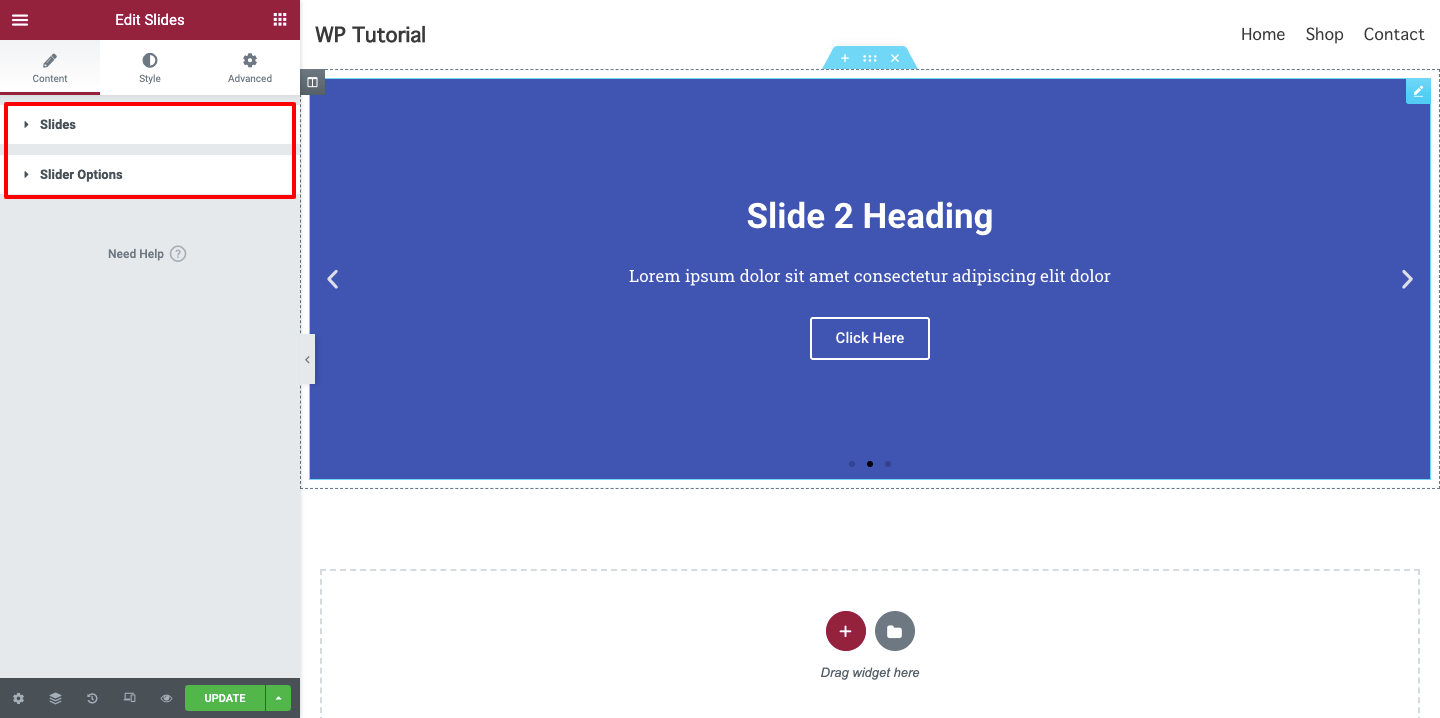
In the Content sections, you’ll get the essential options to add your slide content. You can add the content of your Slides and manage the Slider Options here.
Add & Manage Slides Content
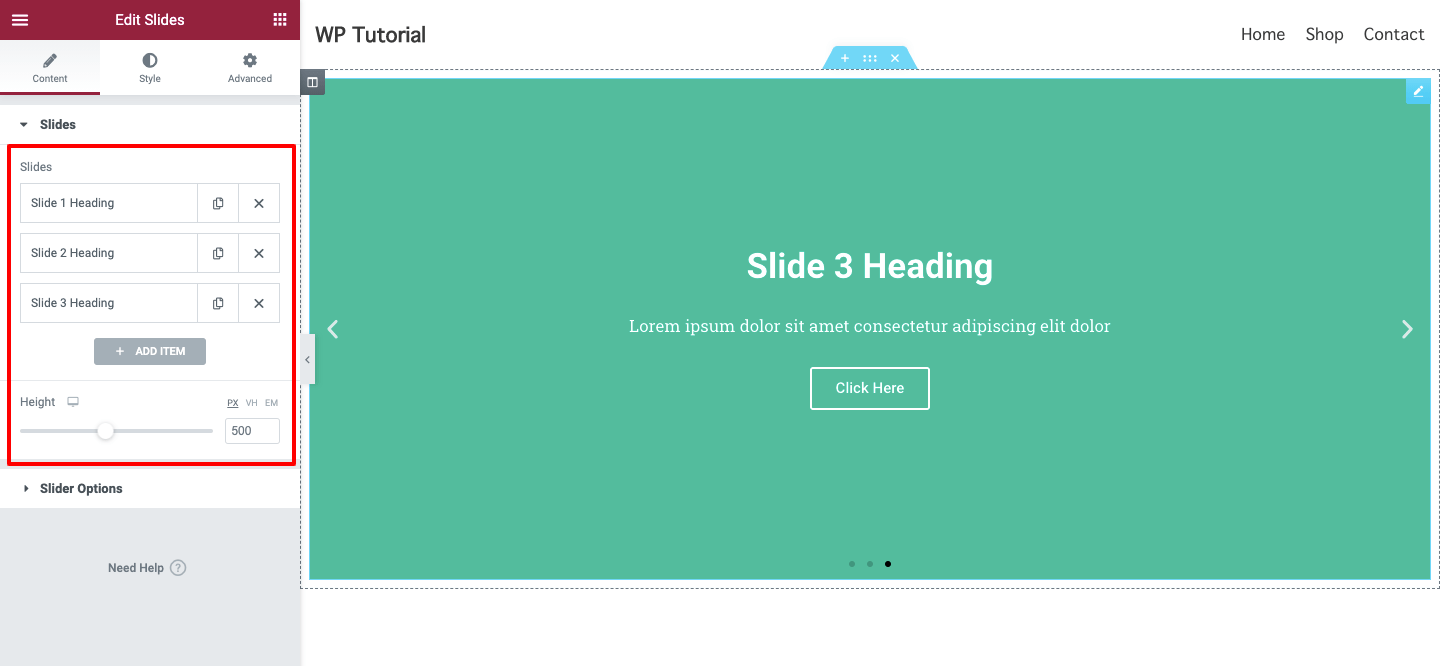
You can add slides items by clicking the Add Item button. Also, you can remove the item, if you want. You are able to duplicate the item and manage the Height of your slider here.
Set Slides Background
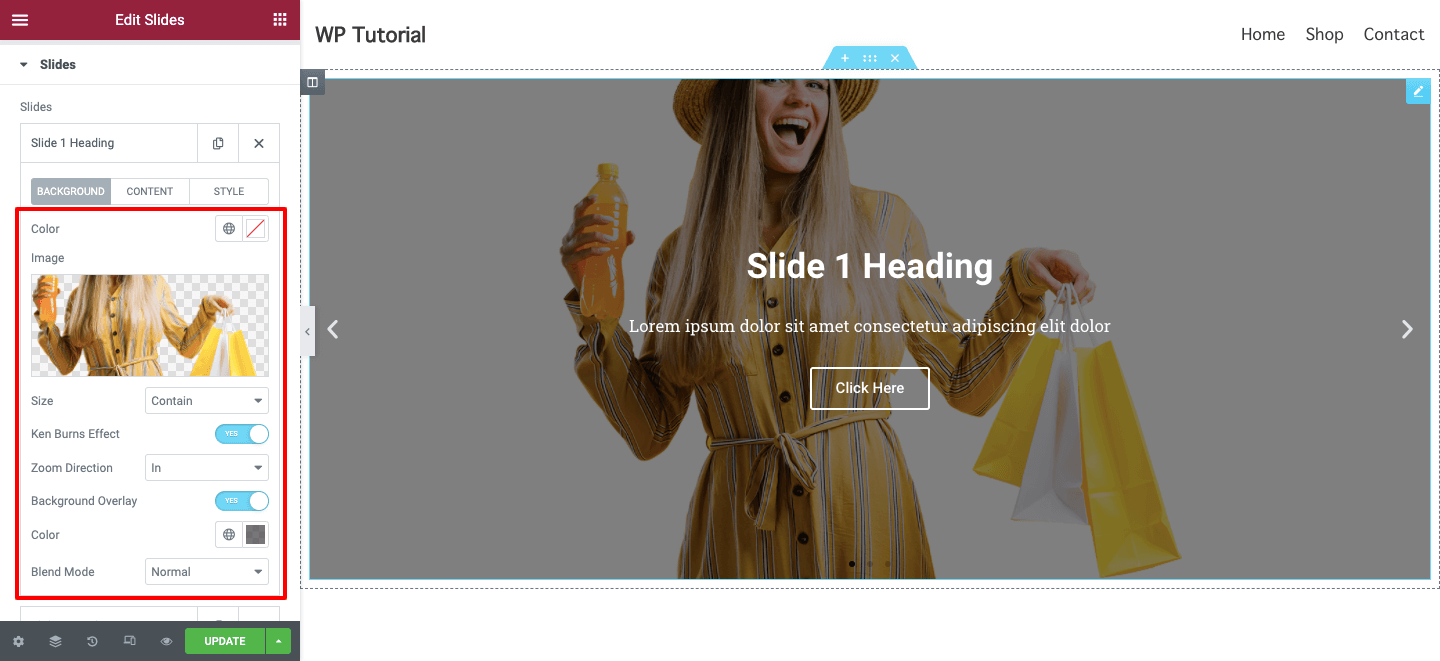
Let’s add a background image to a slide. Open an individual slide first. Here, you will get a Background option. You can add an image, manage the background color, and set the image Size like Cover, Container & Auto.
You are able to activate the Ken Burns Effect that will allow you to set the Zoom effect to the slide image. Here in this area, you can also turn on the Background Overlay and set its color, and select a suitable Blend Mode mode.
Note: Make sure that your slide image should be beautiful and has a perfect size.
Write Slides Content
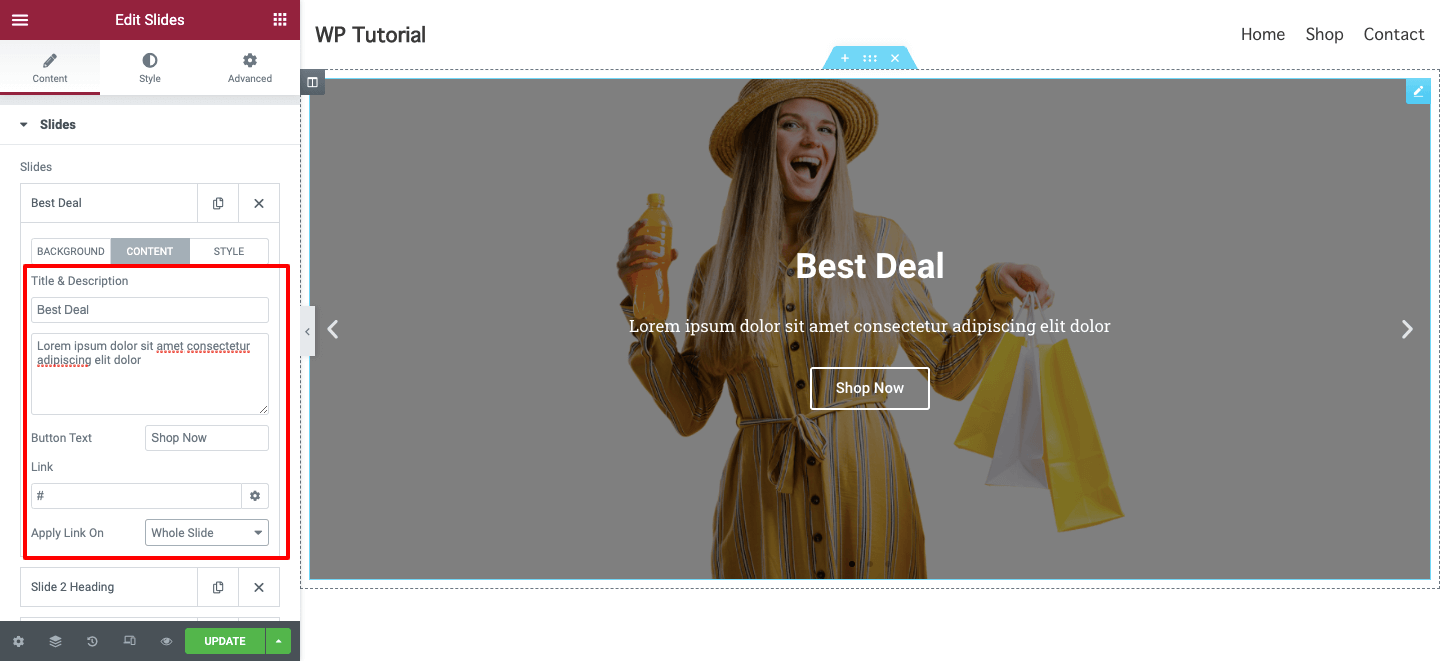
You can write Title & Description to describe the slides and add a Button Text here in the slides content area. If you want to add a custom link to your slide, you can do it here. You are able to set the Apply Link on the entire slide or only the button.
Add Custom Slides Style
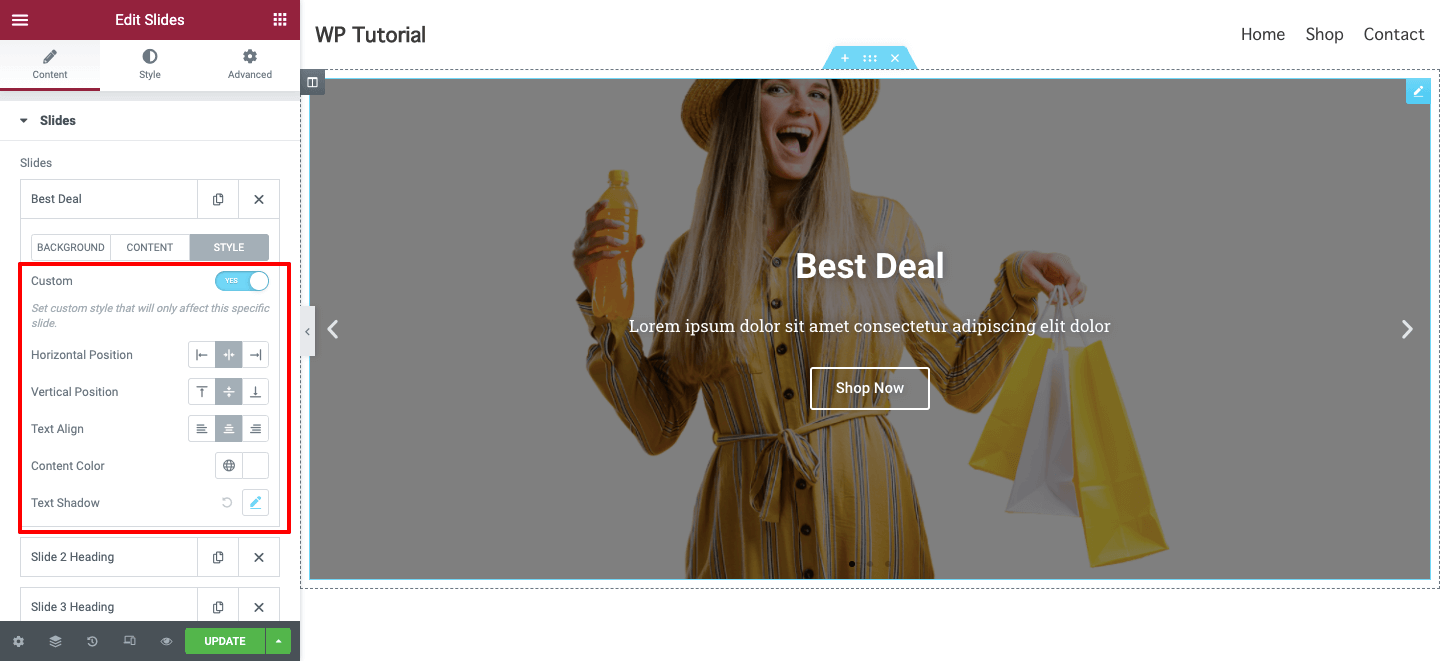
If you want to add a custom style to an individual slide, you just go to the Style option. Then activate the Custom style. Finally, set the styles according to your need. You can set your slide Horizontal Position, Vertical Position, Text Align, Content Color, and Text Shadow.
Step 3: Customize Your Elementor Slider
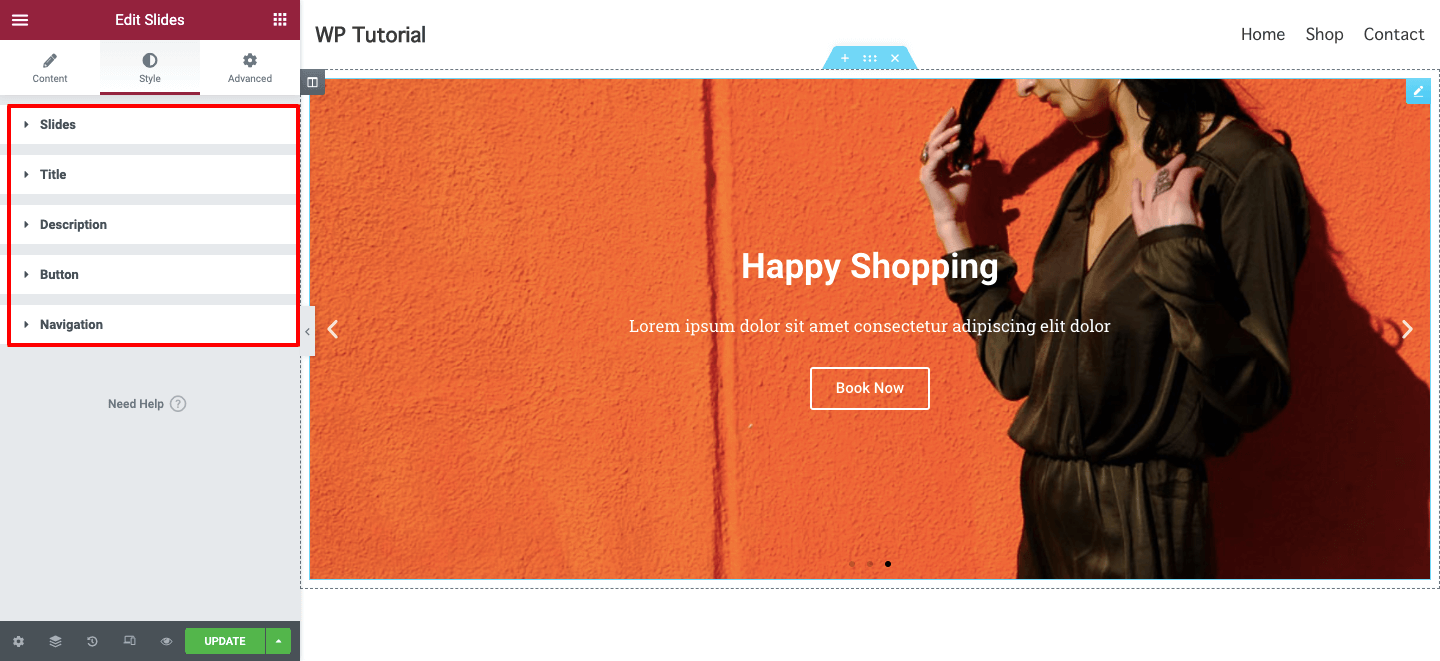
These are the style options that you can use to customize the Elementor slider. Here, you’ll get..
- Slides
- Title
- Description
- Button
- Navigation
Let’s explore how these style settings work.
Slides
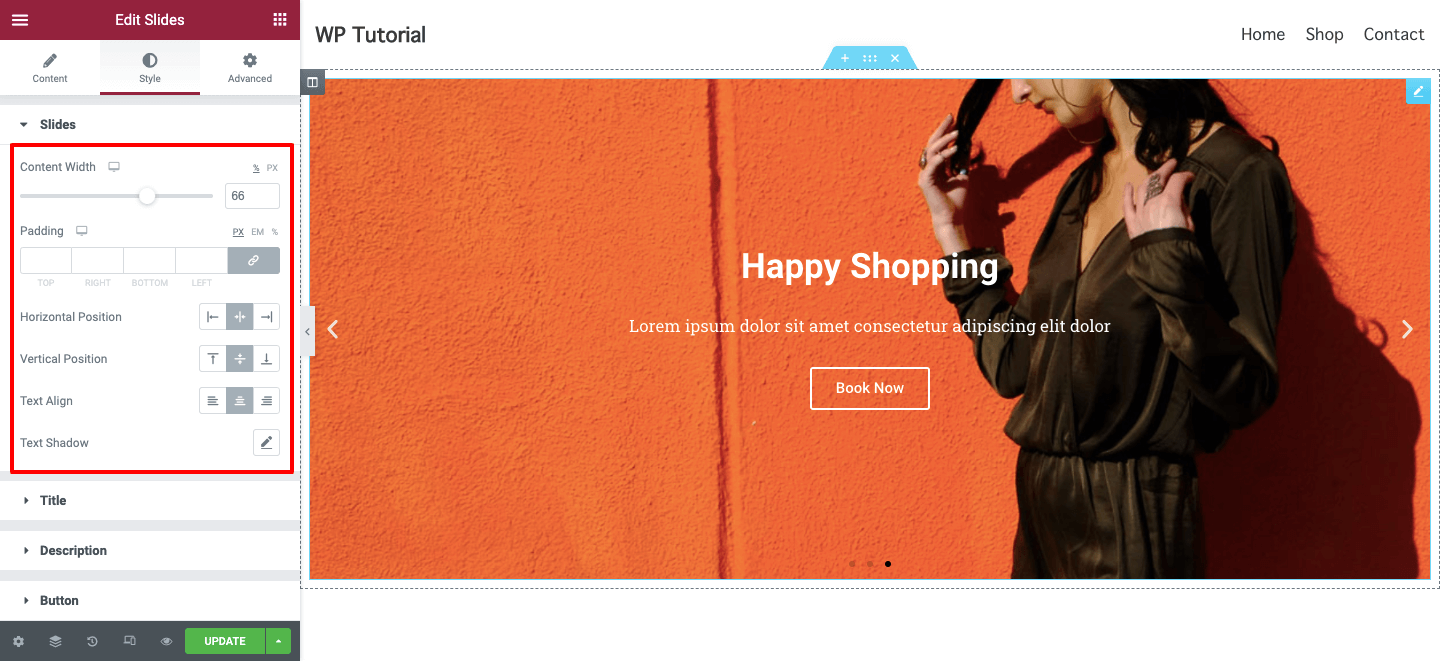
In the Style–>Slides, you can manage the global Content Width, add a Padding, and set Horizontal Position, Vertical Position, and Text Align. You can also add a Text Shadow to your slide content.
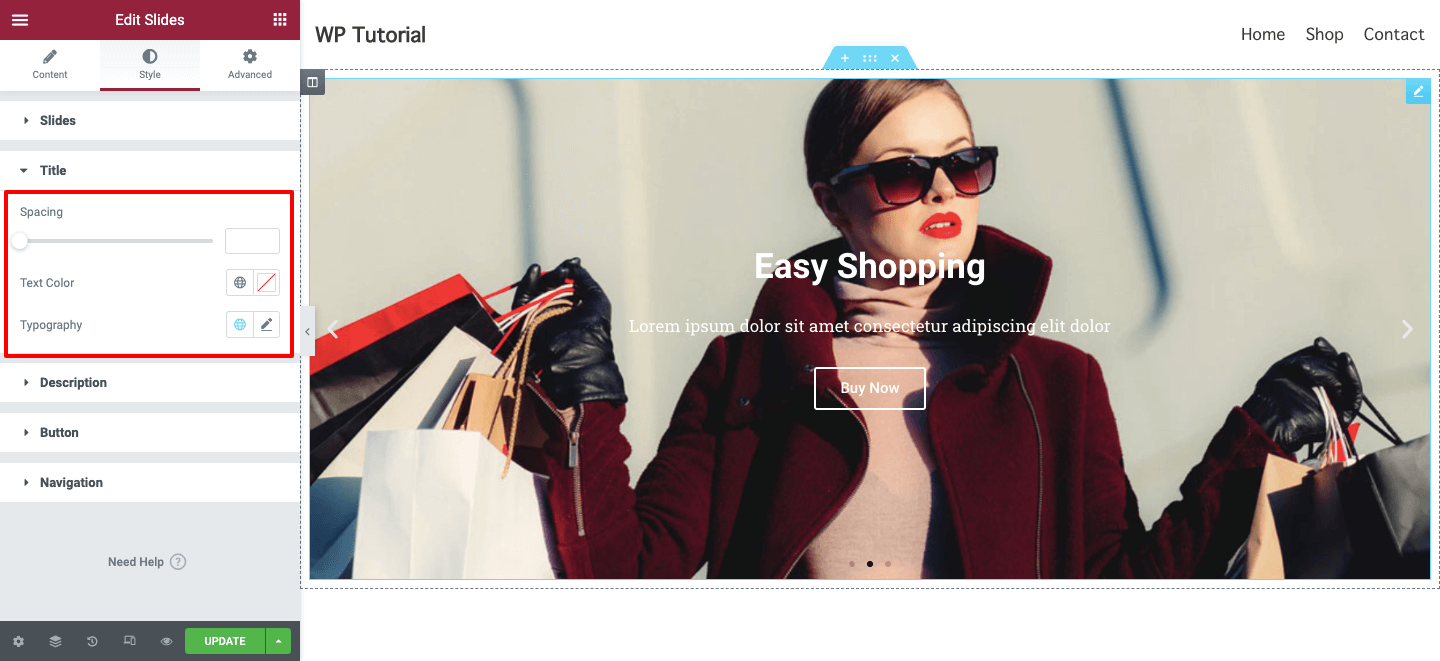
Open the Style–>Title option and design your slide title in your own way. You can manage the Spacing, Text Color, and add new Typography.
Like the Title option, you can also style your slider Description.
Button
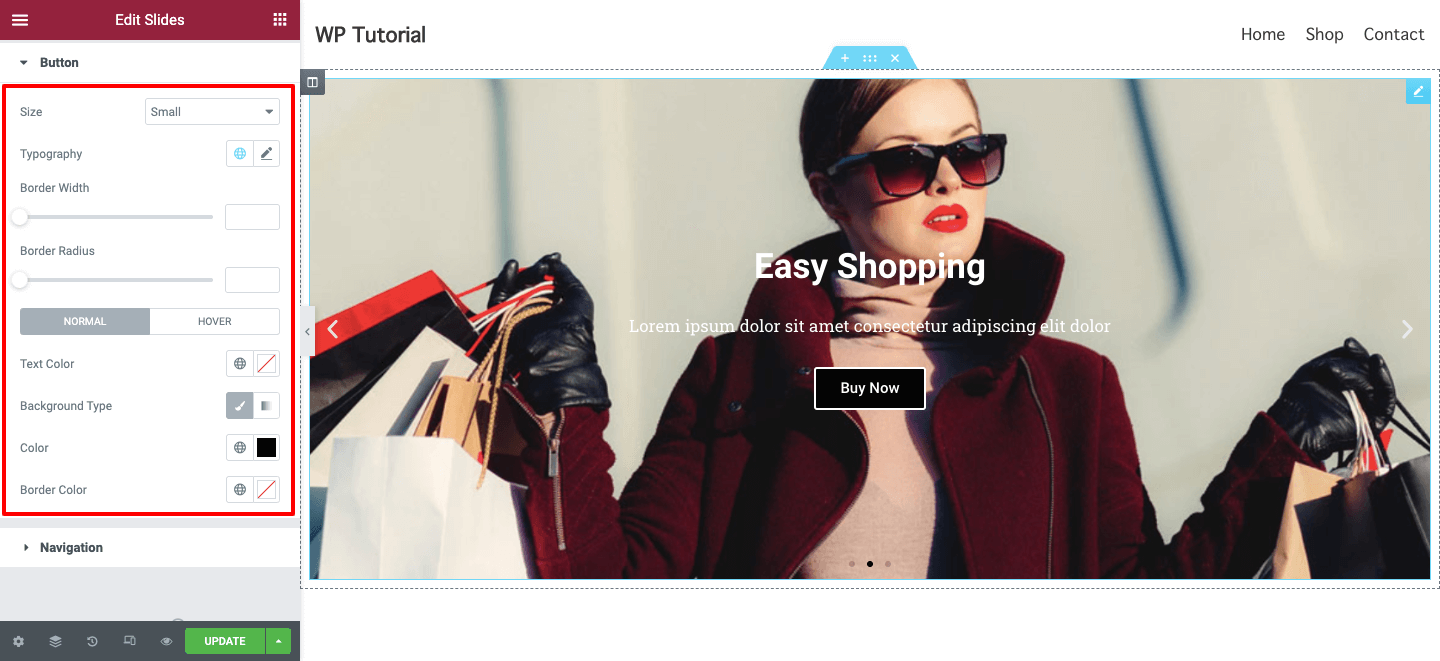
Want to redesign your slide button and make it more catchy to your users. Go to the Style –> Button, you’ll have all the required options to customize the slider button. You can manage the button Size, Typography, Border Width, and Border Radius. Also able to add Text Color, Background Type, Color, and Border Color for a better design.
Navigation
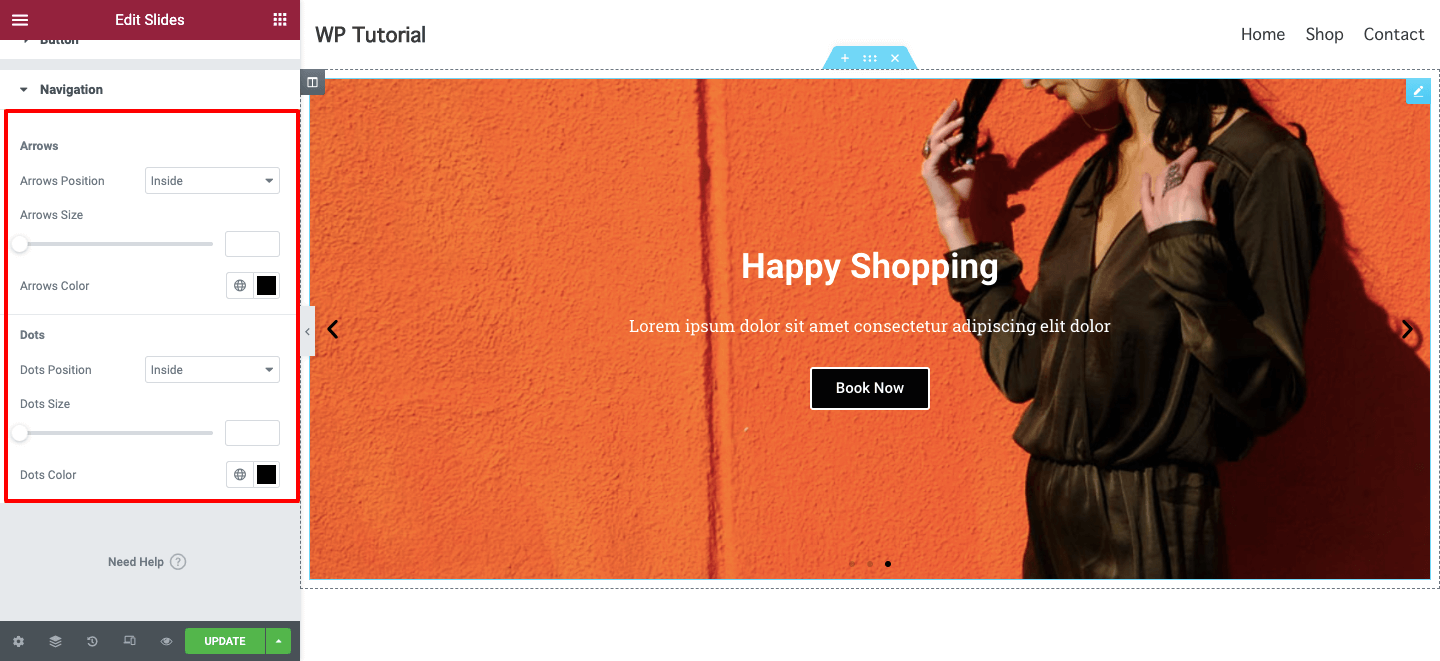
You can style your slider Navigation here in the Style->Navigation area. You can change the Arrow Position inside or outside the slide also manage the Arrow Size and add Arrow Color.
Like the Navigation Arrow, you also change the Navigation Dots.
Final Preview
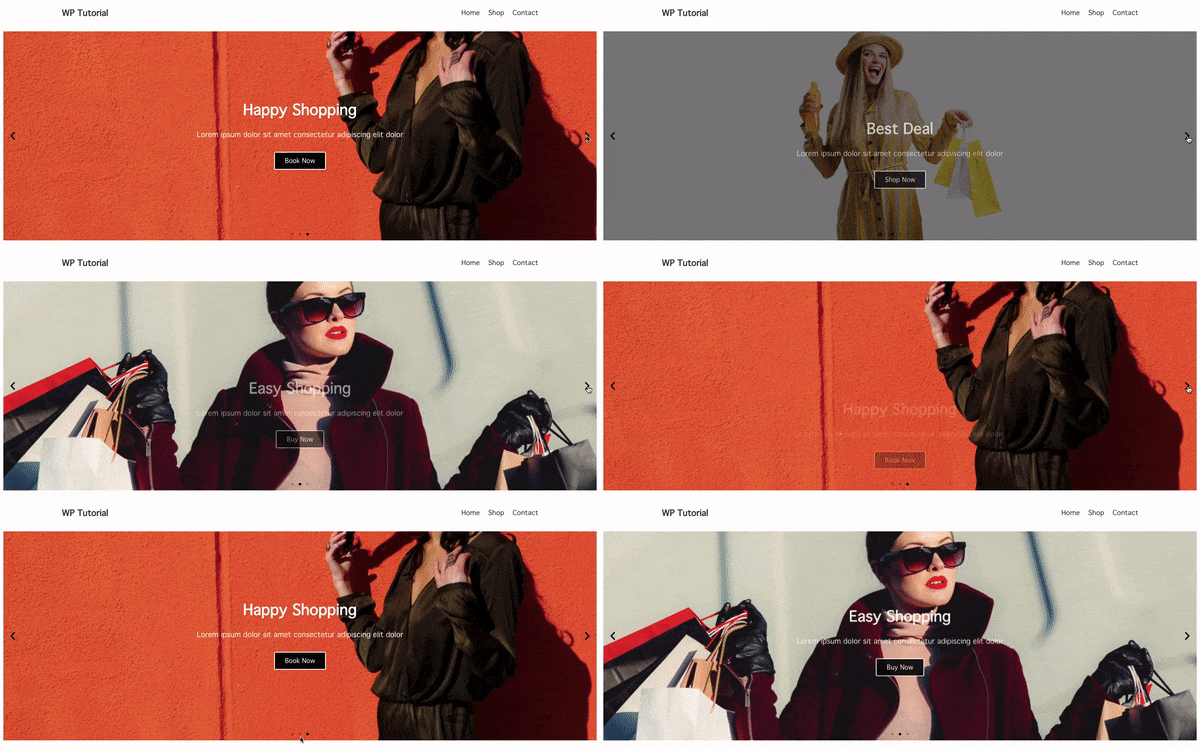
After finishing the design, this is the ultimate look of our Elementor slider:
Bonus: Introducing Happy Addons’ Slider Widget for Designing Exclusive Slider
If you want to add more functionality to your slider, you can consider the other Elementor Addons. Here, we talk about the Happy Addons the super-fast 3rd party Elementor addon out there.
This exclusive addon comes with a slider widget in its free version, which is advanced, easy to use, and fully customizable so that a novice Elementor user can design a unique slider from scratch.
You can also get more features such as…
- Add beautiful animations to your slider
- Use premade amazing slider design
- Offer better customization options
- Get proper documentation & video tutorial
You can also watch this short demonstration video of the Happy Addons’ Slider widget.
Common FAQs for Elementor Slider
People usually ask the below questions when they plan to design an Elementor slider. However, we’ve already covered all the details about making a custom slider using Elementor. To help you further, we’ll also answer these questions.
How Do Insert an Image into an Elementor Slide?
You need to go to the Content–>Slides area. Then open an individual slide where you want to insert an image. Finally, go to the Background here you’ll get the Image adding option. You can choose an image from your website media section or upload it from your device.
Can I Create a Slider To My Website Using Elementor Free Version?
No, You must have the Elementor Pro version on your site if you want to work with the Elementor slider widget.
How Do I Full Width My Elementor Slider?
Click the Section handler where you’ve added the slider. After that, you’ll get the Layout option. Finally select the Content Width–> Full Width.
How Can I Increase Slider Height in Elementor?
Open the Content–>Slides option. Here, you can easily manage the height of your slider using the Height option.
How Can I Link an Image to Elementor Slider?
Go to the Content –>Slides and open the suitable slide where you want to link your slide image. Then click the Content tab and add like into the Link area.
Are You Ready to Design Your First Elementor Slider
In this blog, we’ve shown all the possible ways to create a custom Elementor slider from scratch. We’ve answered some common questions that people are always asked about making an Elementor Slider.
We also have introduced the Happy Addons slider widget that allows you to add a stunning slider to your website and have discussed why sliders are important.
Well, if you have any questions regarding this blog or Elementor or Happy Addons slider widget, you can ask in the below comment box.
Don’t forget to subscribe to our newsletter. It’s FREE!


