The sticky header is a navigation bar that stays at the top of a website even when you scroll through the page and its content. As a result, you can have immediate access to the menu along with search bars and essential links as you don’t have to waste time to get back to the top.
It can remarkably enhance user experience as you can access critical web links and elements immediately. Creating a sticky header is easy today on WordPress using Elementor. It’s a super-easy page builder solution by which you can create various web elements just by drag and drop.
In this blog post, we’ll cover a detailed step-by-step tutorial on how to create a sticky header on WordPress using Elementor.
Why Should You Choose Elementor?

Elementor is a feature-rich and powerful page builder solution that lets you build almost any type of website you can think of just by drag and drop. As said above, it enables even beginners to create websites by themselves without having to code anything.
Its real-time editing feature enables you to view customizations whenever needed for accuracy. Elementor comes with a comprehensive collection of many pre-designed templates, so you can develop a basic version of your web layout very quickly.
If you ever feel the widgets and tools of the plugin aren’t enough for your design needs, no worries! You’ll find over a dozen further feature-rich addons packed with many advanced features and widgets to power up the Elementor plugin.
By using all of them together, you can take your web design abilities to the next level.
What Do You Need To Create a Header With Elementor?
To create a header for your website, you need to access the theme builder features of the Elementor plugin, which is a premium feature. So, to follow this tutorial, you need both the free and premium versions of the Elementor plugin. You can download them by clicking the buttons attached below.
Once these plugins are installed and activated on your site, start following the tutorial explained in the below section.
How to Create a Sticky Header Using Elementor
In this section, we’ll cover a step-by-step guide on how to create a sticky header using the Elementor plugin. Stay with us till the end.
Step 01: Go to Theme Builder
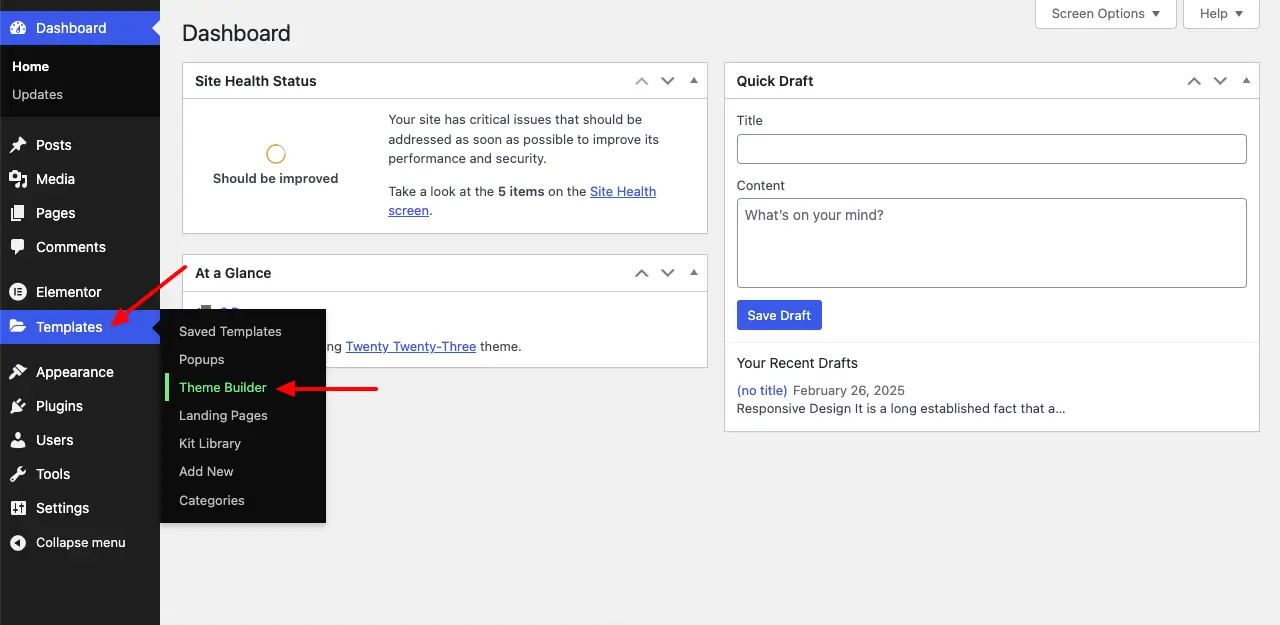
Go to Template > Theme Builder > Select Header
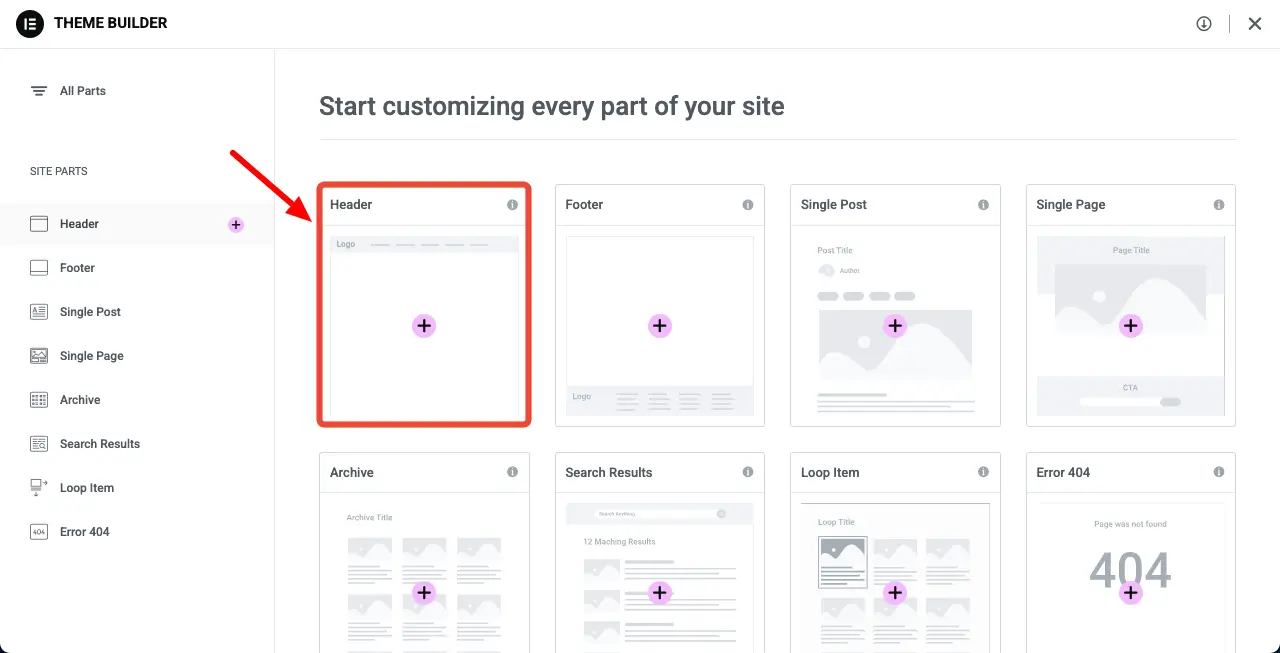
A pop-up will appear. You will be given some options to choose the template type you want.
You’ll be taken to the new page. Click the Header option.
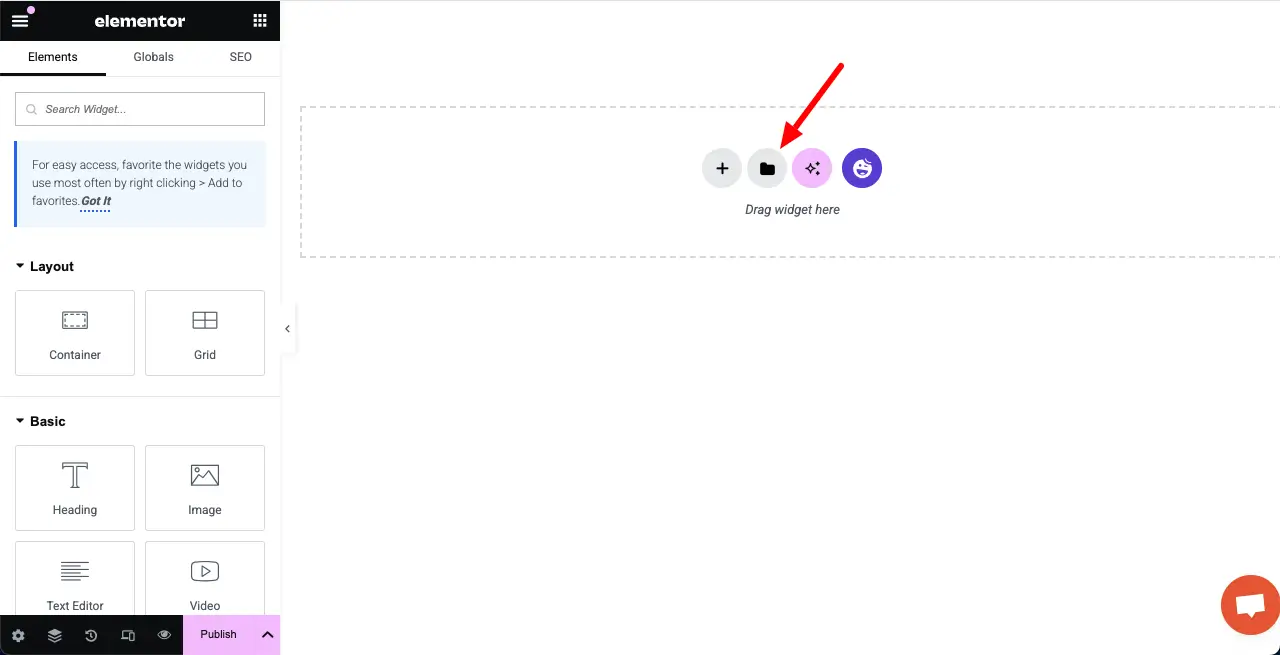
The Elementor canvas will open up on your screen. Click the Elementor Template Library icon.
Elementor will show you many free templates and blocks. You can also save your favorite template.

Step 02: Setting Up The General Layout
To create a custom header, you have to decide what type of layout you need.
To start with, click on the main customization button of your header part to edit the Layout section in the sidebar:
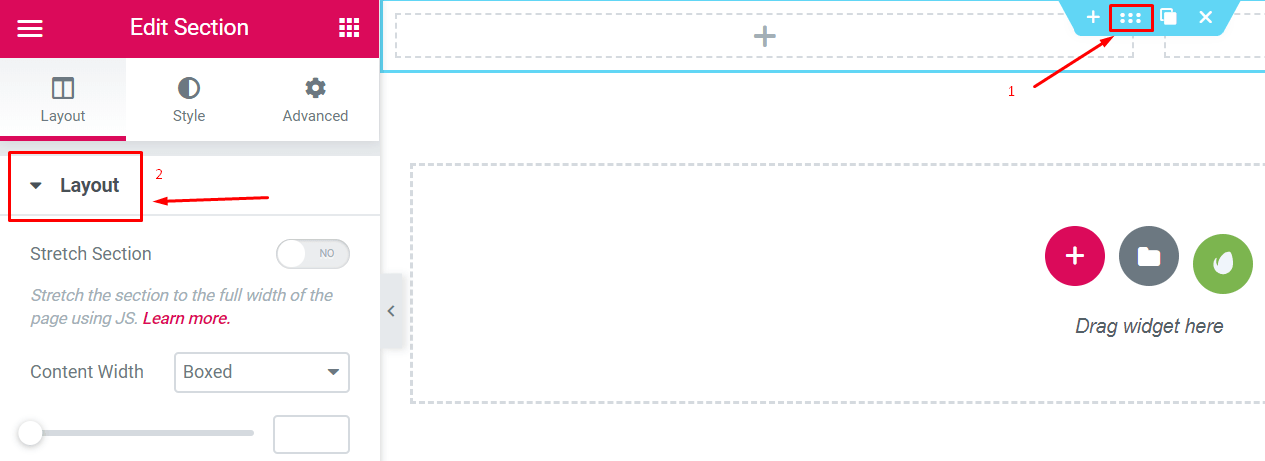
And then pick up the structure you want

Note: We used the marked layout in the above image to create the header.
Step 03: Adding a Logo
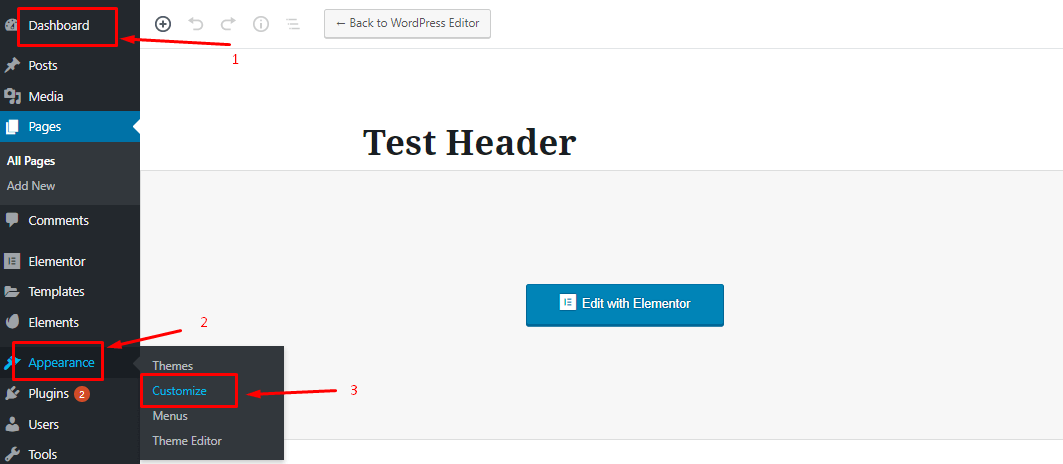
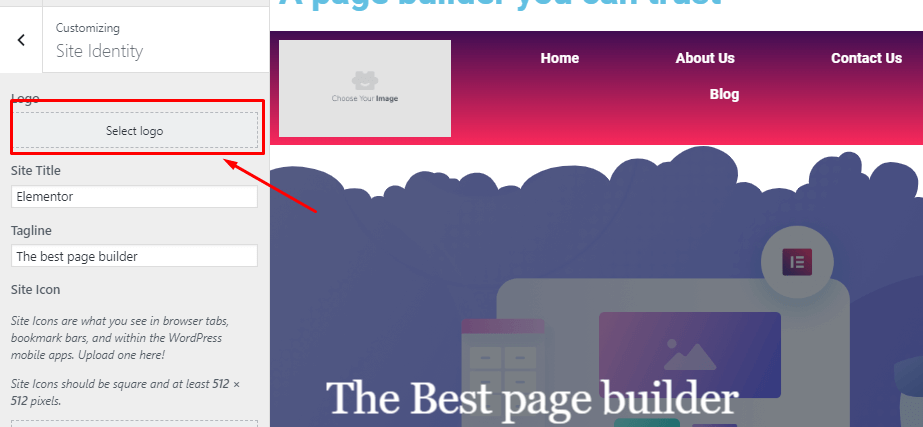
This is a very simple step. You can add a logo very easily. You can do it in two ways. Go to Dashboard > Appearance > Customize > Site Identity.
After that, you can choose the logo and set it on the header.
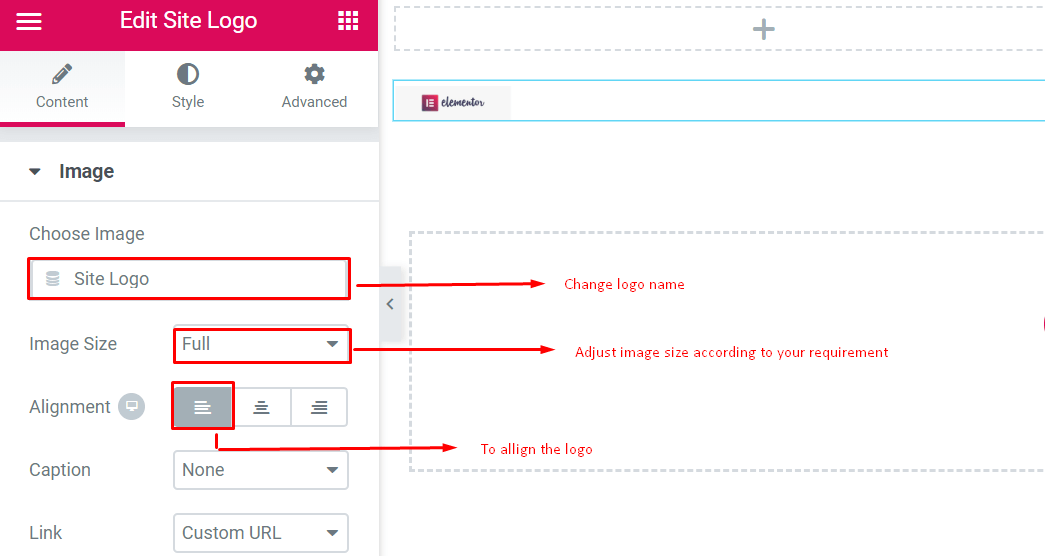
Select the Site Logo block in the sidebar. Drag it where you want to use it.
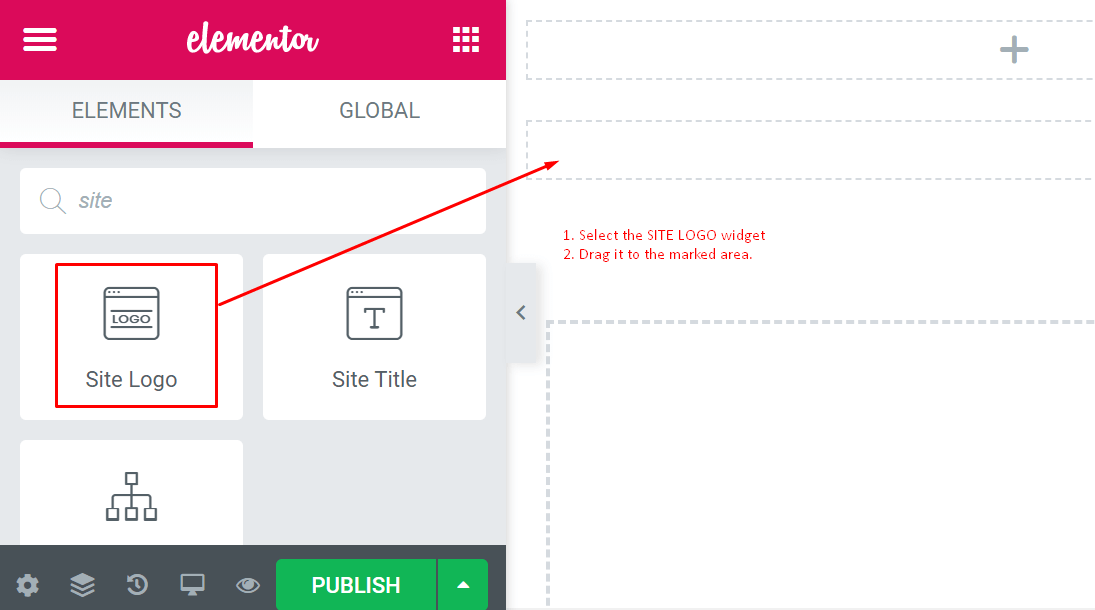
Finally, it will fetch your actual logo automatically after dragging ‘Site Logo‘ to the dotted area.

In this setting, you can choose how the logo should look when you click, and you can also adjust its size and alignment here. You can do a lot of things using Style and Advanced option.
Step 04: Adding a Menu
Select the ‘Nav Menu‘ widget from the left sidebar. Drag it to the header area as in step four.
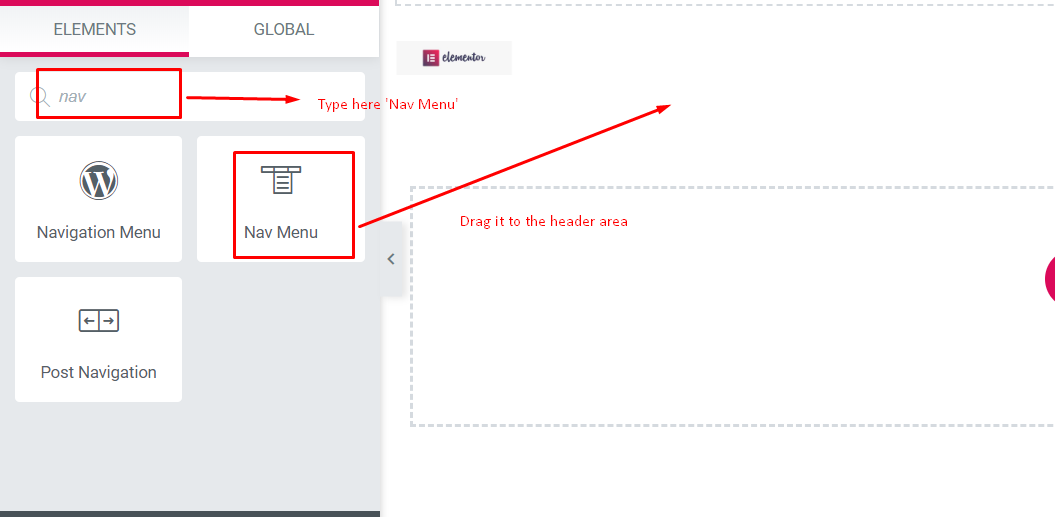
And it will adjust the menu that you have created.
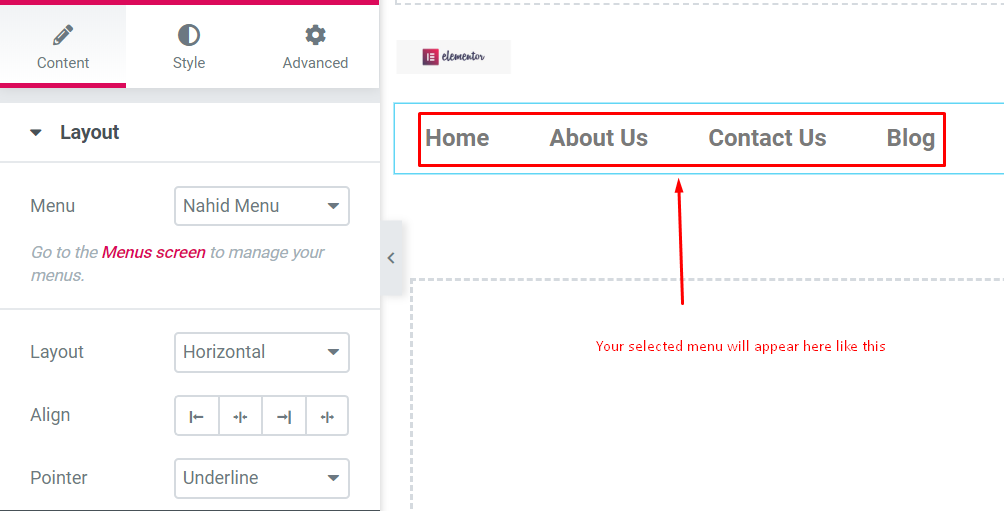
Here are the important things you should know about.

- Menu: Select the menu you want to feature. You can choose from Appearance → Menus
- Layout: You will get Horizontal, Vertical, or Dropdown
- Align: Left, center, right, or stretch to fill the entire available area
- Pointer – How you like to mark the active link
- Animation – How you like the pointer to look like
Step 05: Adding a Search Field
To add the search field in the header you just need to select the search widget and drag where you want to set it.

In this section, you will get:
- Skin – You will get Classic, Minimal, and Full Screen for the
- Placeholder – You can leave this section or keep something like “search” there
- Alignment, Size – You align the search box from here

Step 06: Add other Extra Elements
To make your header lucrative, you can add a widget from the left side of your screen. You can experiment with these widgets to get the amazing effect you like.
Here is a screenshot of the widgets. You can search for whatever you want.

Using widgets, you can add social icons, page header text, and more.
Step 07: Publish your header
Moreover, this is the most important part. After designing your header, you have to be very careful.
To apply this, click on the PUBLISH button on the left side of the footer. You’ll see a popup asking where you like to show your new header.

The basic condition for this section is to select “Entire Site” and then hit the Save and Close button.

Finally, your header part is ready. Hurray!!!

So, by following these steps, you can easily design your own header for your website.
Check the video below to create a website header in WordPress:
Top 5 Sites Build with Elementor
At the very outside of creation, the Elementor has turned into a leading WordPress Page Builder and a useful asset, giving a compact solution for website developers.
As a result, many designers are using Elementor, which results in adding new users every month. Here, we are going to share the top 5 websites that have designed and developed their website through the Elementor page builder.
Elementor reached approximately 2 million active installs
Bringing the web

Bringing The Web is a specialist co-op for a wide scope of online arrangements. It exhibits a well-combined structure language, just as a delicate sea green/blue topic shading.
MO SCHALKX

MO SCHALKX is a commercial photography and film website. The owner of this website is a dutch. And he develops his website with Elementor. This is a portfolio website. On this website, he uploads all his current projects.
CASA DA COMIDA

CASA Da Comida is a Lisbon-based eatery that exhibits everything a cooking site needs to incorporate. The site figures out how to pass on the high quality of the restaurant.
Most importantly, it includes full-screen HD video and images. You will also find an impressive review section for Google, Facebook, and Tripadvisor scores.
CREATER

CREATER is a web solution service provider from Malaysia. The visitors will be surprised to see the black and green mixture background at first sight.
The predictable dark and green background shows up on all pages and is likewise dominant in the diverse custom illustrations on the site.
HEXAGON WEB

HEXAGON WEB is a french development website. Their website is colorful, with trendy illustrations and a fine beehive design in the background.
Additionally, they used shape dividers and curve illustrations on their website, as a result, they achieved a fluid layout effect.
Looking forward to Elementor
Above all, you can assume that the Elementor page builder is becoming the first choice for the web developer. People from all around are using the Elementor page builder to design their websites.
Every month the Elementor team releases a showcase. In this showcase, you will get the top 10 websites that are using the Elementor page builder. Therefore, our list is according to the showcase of the month from the Elementor website.
To power up your site built with Elementor or customize your web pages, we developed HappyAddons, and almost all of our widgets are completely free for you. Don’t forget to give it a try to HappyAddons- the ultimate widget collection for Elementor.
Closing Up!
The sticky header improves user experience by maintaining the visibility of the primary web navigation tools throughout page scrolling. However, a well-designed sticky header needs to be minimal and non-intrusive so it doesn’t create an extra burden over the content under the header.
To ensure optimal performance, keep the header’s height minimal and limit excessive animations so that your site doesn’t slow down. Use contrasting colors for readability and maintain consistency with your overall design.
Finally, test your sticky header on different screen sizes to ensure it functions smoothly across desktops, tablets, and mobile devices. If you have any question answered yet, mention it in the comment box below. We’ll come to you with a viable answer very soon.

