Font style and later arrangement matter a lot for web designers when they put words on web pages. Choosing the right font can make a design more clear, attractive, and easy to read for the people visiting the website. According to Elementor, website fonts account for 90% of the design.
If your website is on WordPress, you already have access to 800+ default fonts. But things become difficult when you want to add custom fonts to brand your website with a unique appearance. Luckily, Elementor has a custom font feature. It allows you to add custom fonts to your website.
This article will show you step-by-step guides on how to add custom fonts to Elementor free and pro, as there are some differences between the two processes. Before that, we’ll briefly discuss the Elementor custom font feature and where to get custom free fonts.
Elementor Custom Font Feature Explained
The word ‘Custom‘ means something made to fit specific needs and preferences. Similarly, Custom Elementor fonts are created to meet your personal needs and preferences. Allow you to design, modify and fine-tune font characteristics beyond what you can achieve with standard default fonts.
Elementor allows you to create and use five types of custom font formats. They are:
- The Web Open Font Format (WOFF) – WOFF is the most recommended format because it’s supported in modern browsers
- The Web Open Font Format (WOFF 2.0) – WOFF 2.0 supports TrueType or OpenType font, providing better compression than WOFF 1.0
- TrueType Fonts (TTF) – This font was developed in the late 1980s by Apple and Microsoft
- SVG Fonts/Shapes – SVG fonts allow SVG to be used as glyphs when displaying text. Make sure to use this format to support old versions of iPhone
- Embedded OpenType Fonts (EOT) – This font file works on IE but not on other browsers. Make sure to use this format to support earlier versions of IE
Note: The European Union is adding a new rule to the GDPR. Anyone using directly hosted Google fonts on their website would violate the GDPR rules. And Google will fine that website 100 euros. So if you have Google Fonts, it must be hosted locally, or you can use your own custom fonts.
However, you can also manage your website’s Google fonts using the Perfmatters plugin. Check out the documentation on how to host Google Fonts locally in WordPress.
Where to Get Custom Free Fonts for Web Design
Several technical skills are required to create and develop custom fonts from scratch. They are typography, using design software, encoding, file formatting, font licensing, scripting, and automation. But if you’re a no-code user, you certainly shouldn’t have these skills.
In this case, you should use pre-designed free or premium fonts. There are dozens of reliable websites online where you’ll get stunning custom fonts. Google Fonts, Font Squirrel, FontSpace, DaFont, and Open Foundry are some worthy websites to mention.
Explore the post best places to get free fonts to learn more about these websites and access links. We’ll now show you how to download a custom from DaFont.
Step 01: Download a Font from the DaFont Website
Go to the website DaFont.com. You’ll get a Download button next to every font on the website. Explore the website and decide on a font you like and hit the Download button.
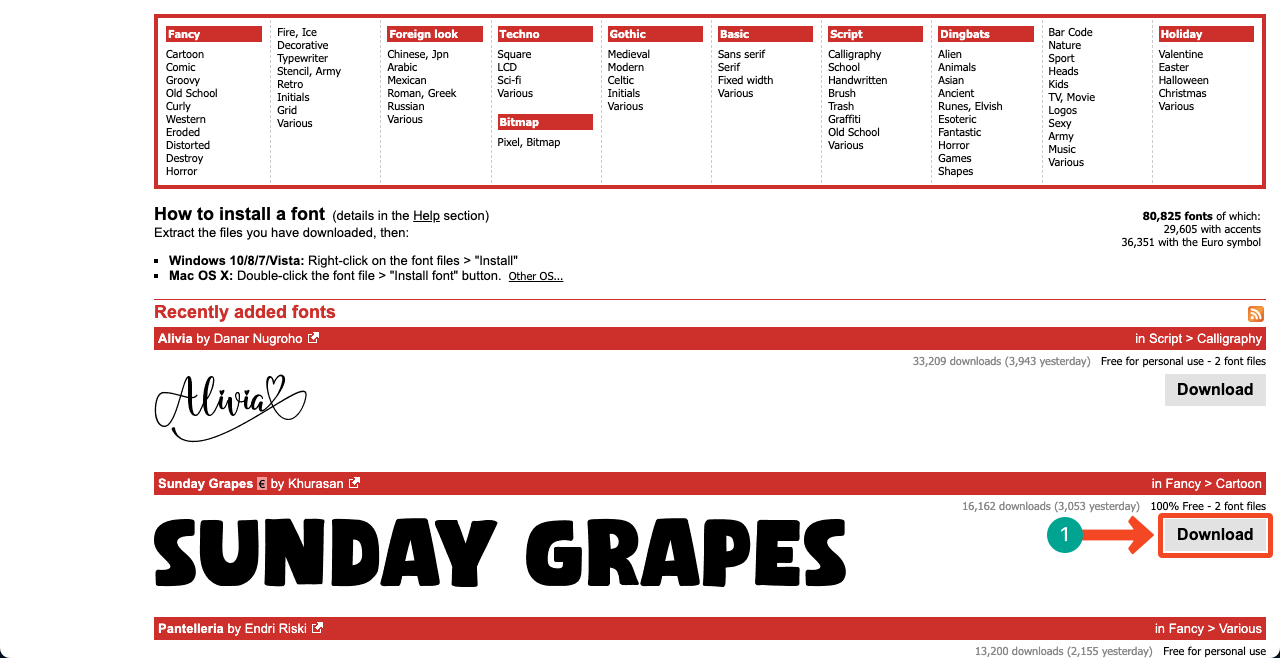
Step 02: Unzip the Downloaded File
The font file will be downloaded as a ZIP file. Please, unzip the file and get into the folder.
Note: You can’t use the ZIP file in Elementor. We’ve already shown you above Elementor allows five specific font formats.

Step 03: Find Out a Suitable Format
You’ll find several formats of the downloaded font in the folder. Find out if there is a format that matches any of the five formats in the list above. Indeed, we can see a .ttf format. Keep it in your mind. We’ll use it in the following tutorials.
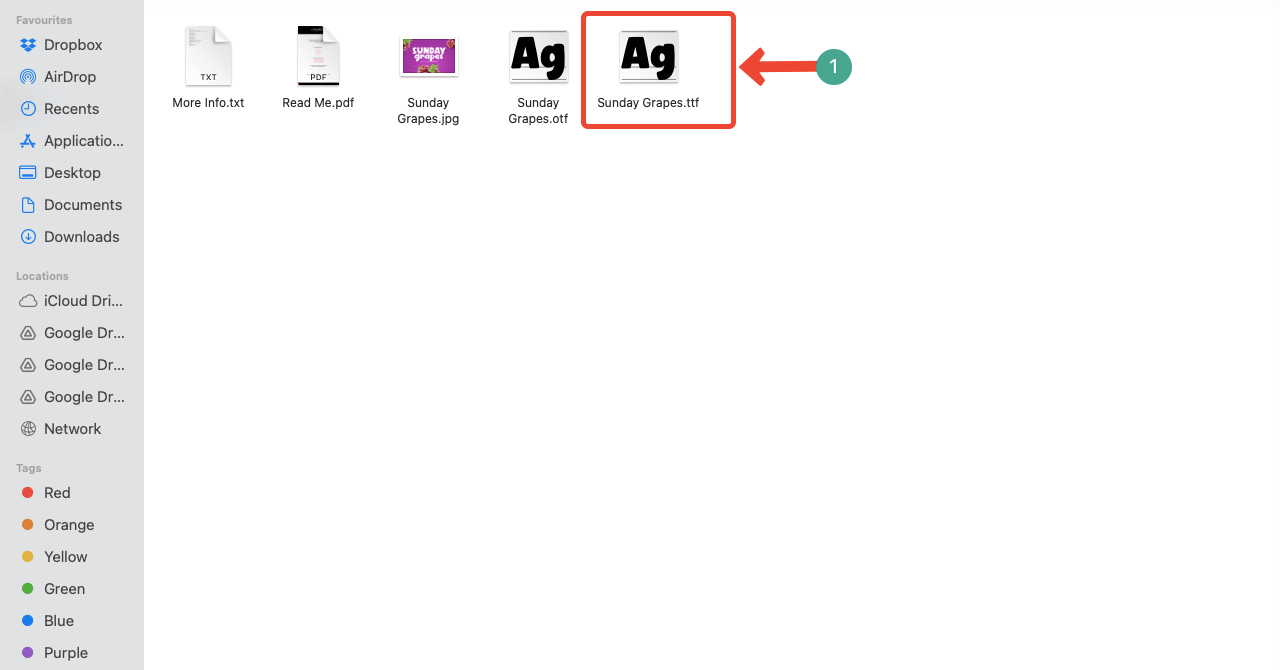
In the same way, you can explore and download fonts from other font foundries.
How to Add Custom Fonts to Elementor Free and Pro Versions: Step-by-Step Guide
The process of adding custom fonts is not the same in the free and premium Elementor versions. The true story is that the Elementor Custom Fonts function works only when you are a premium user. But no worries if you are a free user.
You can still add custom fonts to the Elementor free version in some other ways, using an additional plugin. We will explain all these processes in the tutorial methods below.
Method 01: How to Add Custom Fonts to Elementor Free Versions
There are many plugins that allow you to add custom fonts to your WordPress sites. Custom Fonts and Custom Typekit Fonts are the two best of them. Let’s do it using the Custom Fonts plugin.
Step 01: Install and Activate the Custom Fonts Plugin
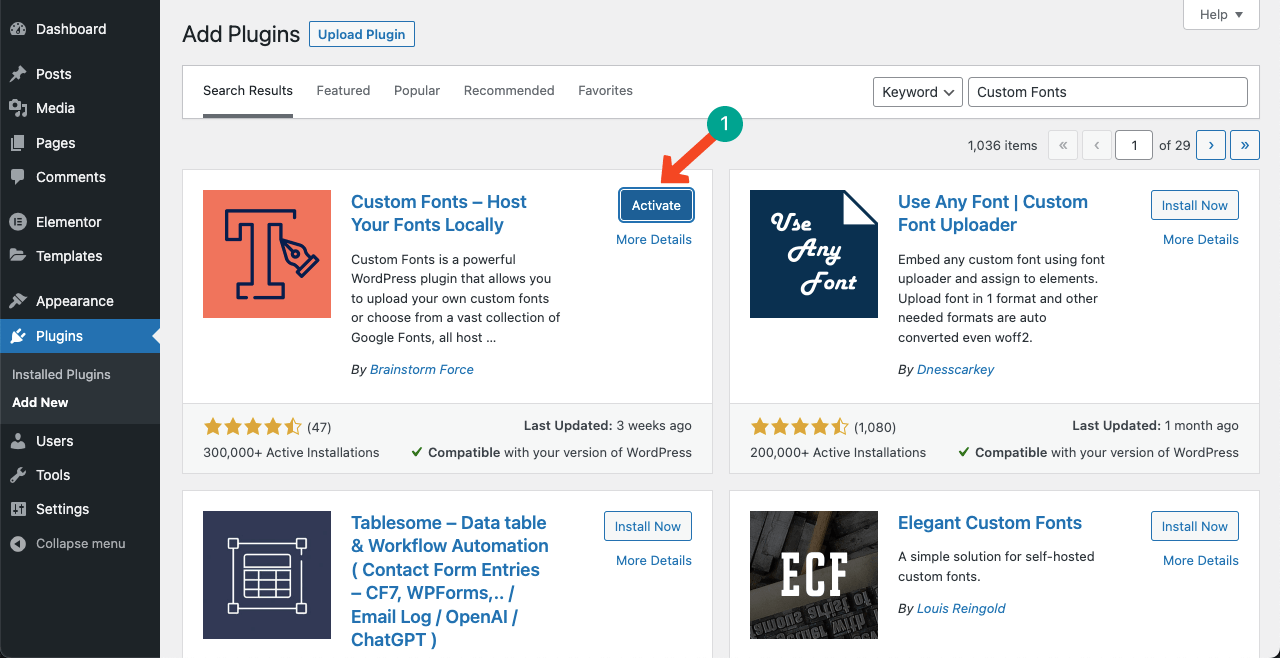
Navigate to Plugins > Add New. Type Custom Fonts in the search box. Install and Activate the plugin when it appears below.
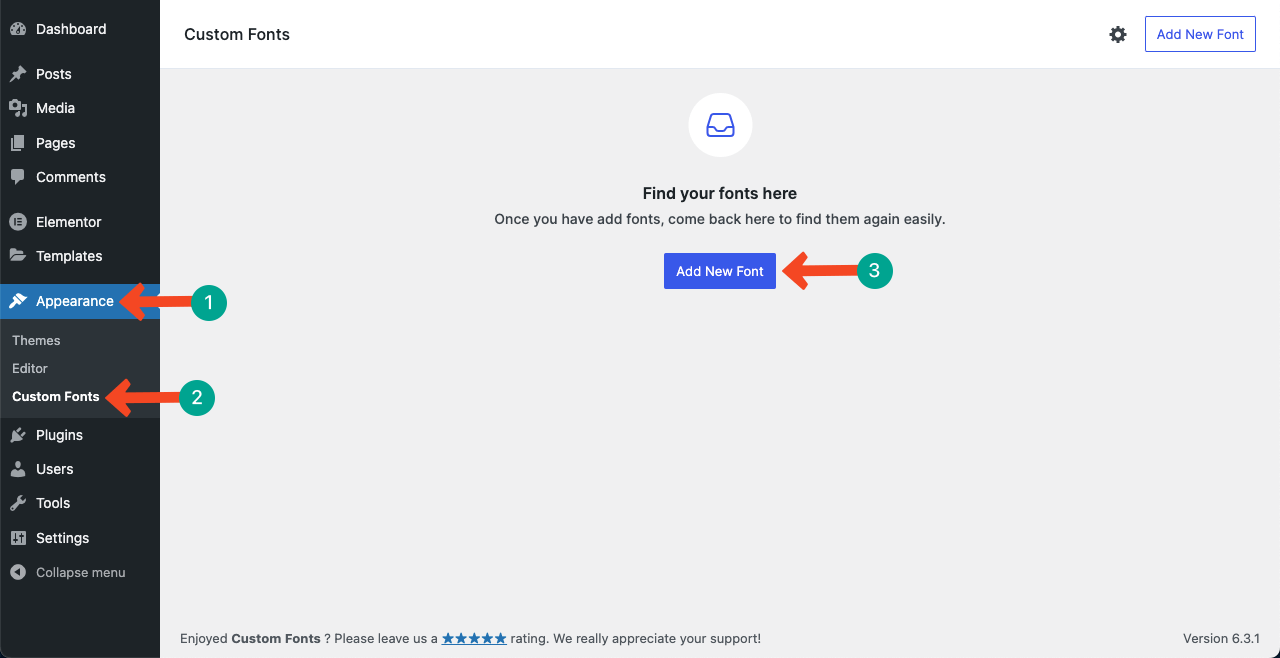
Go the the Appearance section. You’ll see a new menu named Custom Fonts has been created there. Go to the menu. Press the Add New Font button.
Step 02: Upload the Font and Save Variations
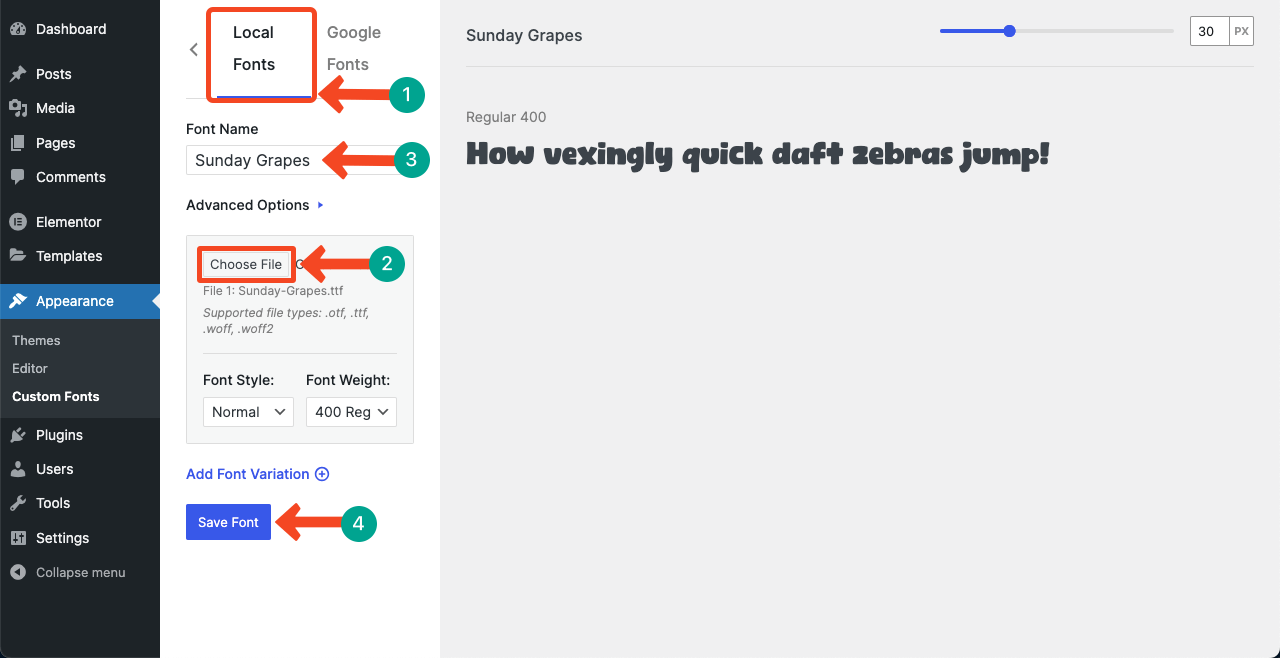
Select the Local Fonts tab first. Pressing the Choose File button, upload the downloaded font file from your local drive. Remember to upload the .ttf format. Give the font a name. For example, we set the name Sunday Grapes for our font in the image below.
You may add several other variations and see the preview on the right side. Hit the Save Font button at the end.
Step 03: Check if the Font Works on Elementor
Open a post or page with Elementor. Drag and drop the Headings or Text Editor widget. Add some texts to the widget.
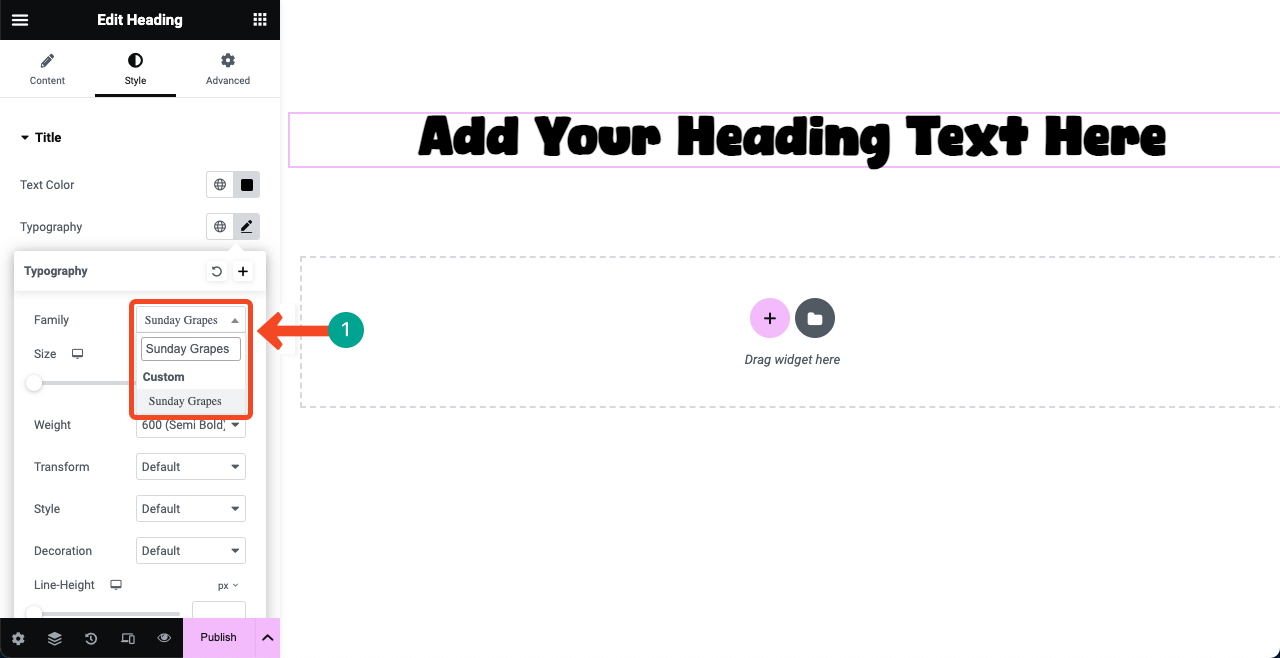
Go to the Style tab and open the Typography option. Open the drop-down list next to Family and search your font by its name.
You can see our added font Sunday Grapes is on the list. So, it’s working well.
Thus, using the Custom Fonts plugin, you can add custom fonts to Elementor free. The process of using the Custom Typkits Font plugin is also almost the same.
Method 02: How to Add Custom Fonts to Elementor Pro
Hope you have the Elementor Premium version installed and activated on your website. As we said just a while ago, only after that the Elementor Custom Fonts function will work on your site. Let’s jump into the tutorial now.
Step 01: Add a Custom Font to Your Site
First, navigate to the Elementor > Custom Fonts

Here, you can create custom fonts. For instance, click the Add new button to create a custom font structure.

Give a title to your Font. And then click on the Add Font Variation.

Step 02: Add a Font Variation & Upload Font Files
Here, you can add some additional options to the Font. Such as Font weight, style, and font files.
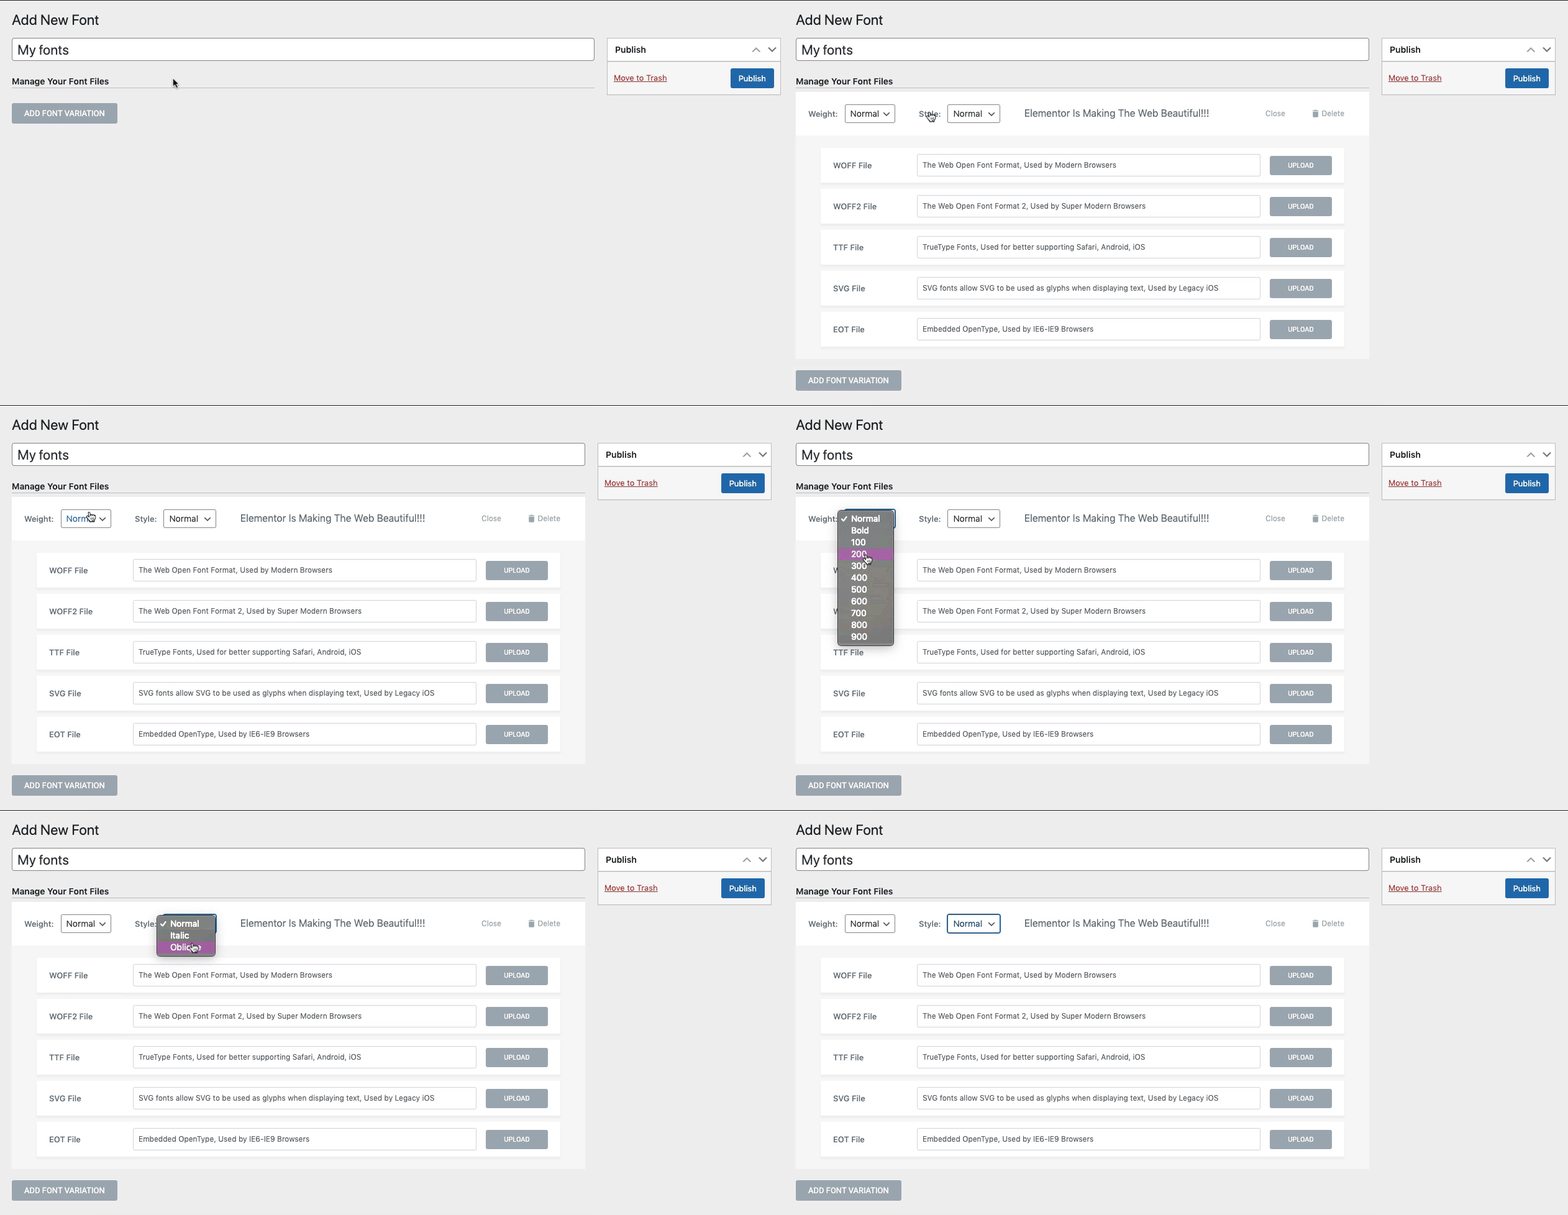
Let’s upload a TTF custom font file. For that, click on the upload button.

Upload the Font file from your device or located folder.
Note: Make sure to keep your preferred Font files on your device before you upload them here!

Once you’re done, you can see the font details from here.

Following the same process, continue the Font File Upload process for each format. Let’s upload another font variation. For instance, click on the Add Font Variation button and set the font-weight and style.
Set the font weight to 100 and again click on the upload button.

Once you upload the file, you can add it from the media gallery.

Step 03: Publish the Final Custom Font
Doing the same process, add different Font variations to your site. Once you’re done, just hit the Publish button.

Step 04: Use The Custom Font to Your Elementor Design
Now, you may be thinking about how to use this custom font. Right? Let’s see how to find and use this custom font, you need to open any of your Elementor pages on the Elementor design panel. And then add any of the text widgets on the panel.
Add the Heading Widget to the Elementor Editing Panel.

Once you add the Text widget (heading),
- Navigate to the Style section
- Click on the Typography
- And here you can find the font that you have just created earlier (My Font). Just select the font.
Once you have added the font, it’s your time to experience the other Typography options to make your Text or Font look better and more appealing. Such as font size, weight, transform, style, decoration, line weight, and more!

Well, an extraordinary design could grab customers attention than a simple one. So if you want to make your web page’s heading more smart and delightful, the next section is right there for you. Here we’ll show how you can stylize your heading using the Happy Addons Animated Text widget.
Method 03: Add Font to Elementor Using Codes
Let’s see how you can add Fonts to your Elementor site following a manual process.
- Add a new “fonts” folder to your theme’s folder via an FTP client or using the cPanel. The new folder should be located in the wp-content/themes/fonts
- Once, you’ve added the new “fonts” folder add all font files to it
- Now, open the theme’s stylesheet (style.css) and add the following code to it:
@font-face {
	font-family: 'nameofnewfont';
	src: url("/fonts/nameofnewfont.woff2") format("woff2"),
		 url("/fonts/nameofnewfont.woff") format("woff");
	font-weight: normal;
	font-style: normal;
}- Configure the elements that will use this font by adding them to the same stylesheet.
- This method can be a pain for beginners. Whenever you’d like to add configurations like “italics” or “bold”, you’ll have to go through the same process and add those parameters. There is a lot of coding involved.
For those who don’t want to deal with this technical process, you can follow the process below to successfully add custom fonts to your Elementor site.
Let’s learn How to Design a Custom Elementor Header
Stylize Your Font with Happy Addons Text Animation Widget

The Animated Text widget is a pro feature of Happy Addons. Using this cool widget, you can make your text so interesting and appealing. It has 10 pre-built design layouts to reduce your extra effort and difficulties.
So, once you add it to your Elementor design panel, you need to pick up the right design layout and customize it depending on your webpage structure. Let’s see practically how you can use the Animated Text widget on your WordPress site instead of an ordinary text or font.
To get started, you need to install and activate these plugins:
- Elementor Free
- Happy Addons Free & Pro
Step 01: Add Animated Text Widget
First, drag-drop the widget from the widget gallery.

You will get the initial view of the widget on the screen.

Use the custom font text you have created earlier. To select it, tap on the style button, and typography and choose My Fonts.

Step 02: Add Designs to Your Text
Now tap on the content section once again. Choose the design that you like the most.
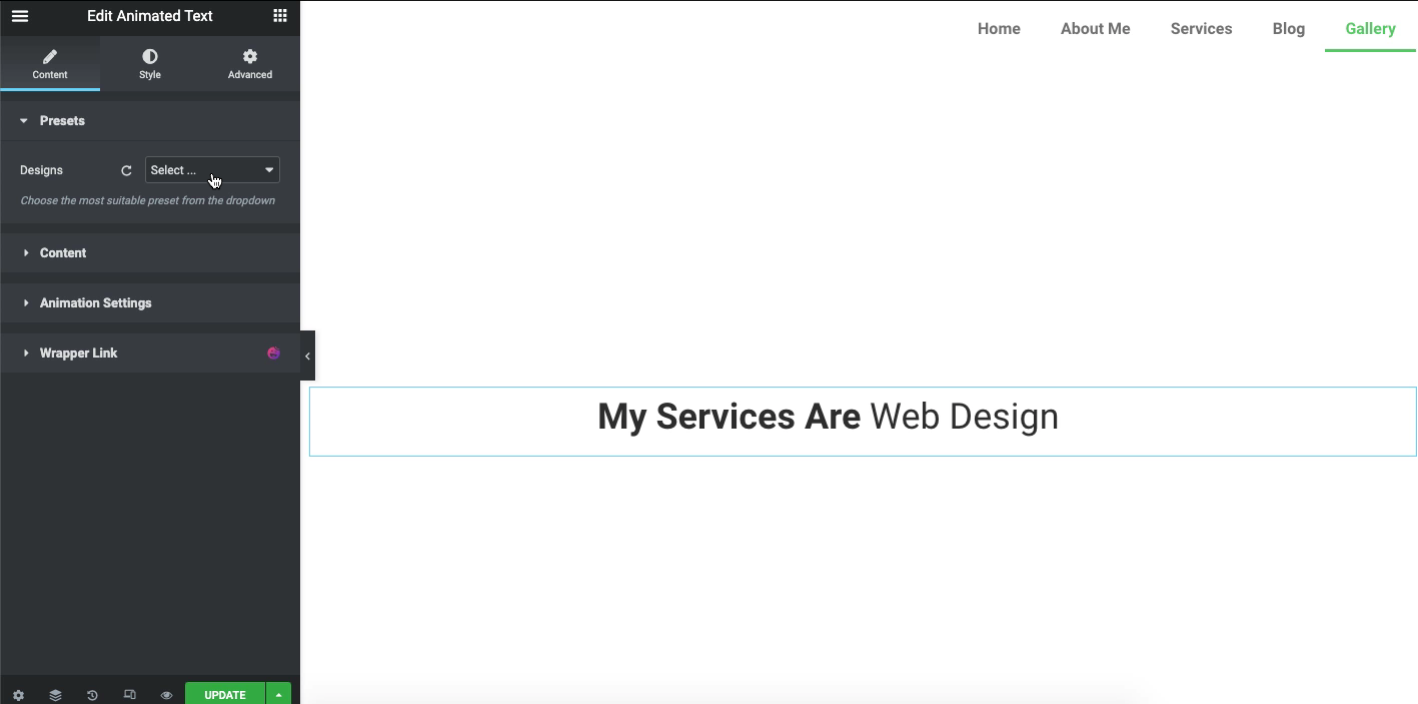
Once you confirm the design, it’s time to adjust the animation style. To do so, click on the Content and find the Animation type there. Explore each type individually to bring out a better output for your website.
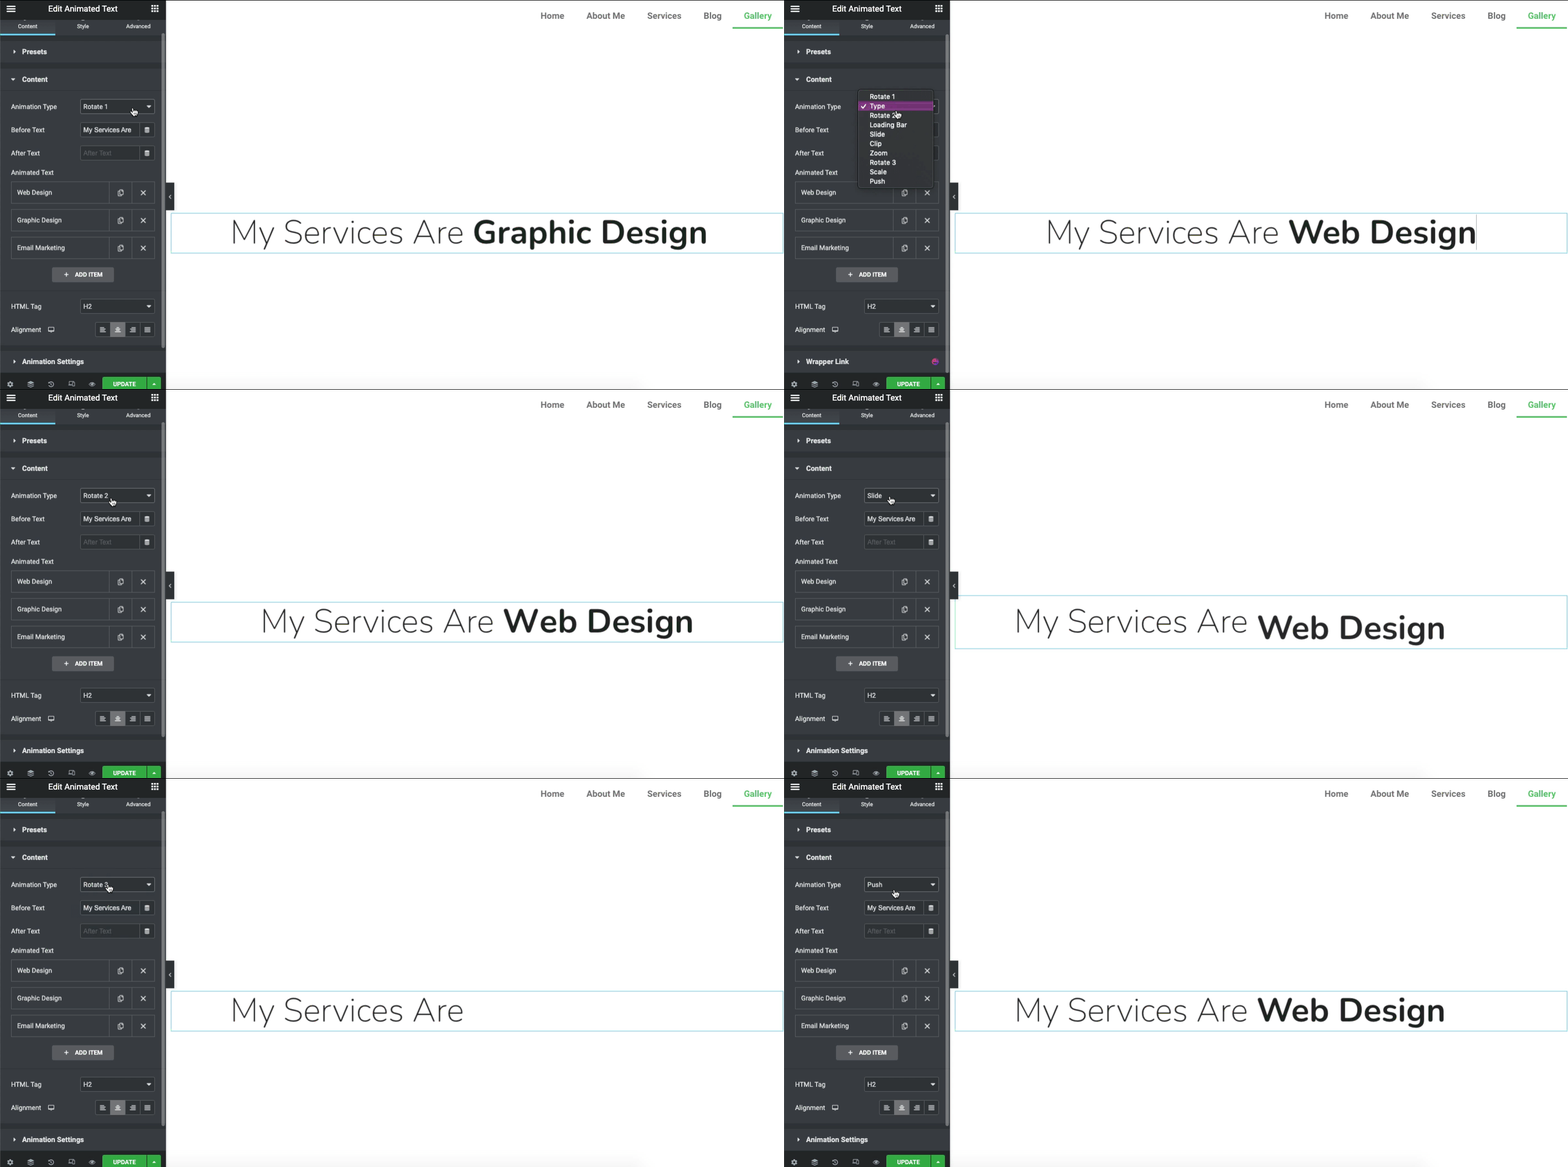
Note: Animation Delay in milliseconds. Min 1000 and Max 30000.
Step 03: See The Final Output of Your Animated Text on the Web Page
Let’s see the final output after you customize the Animated text widget on your Font.

So this is how the Animated Text widget of Happy Addons helps to moderate your boring-looking fonts or text. However, if you want to get a detailed go-through of this widget, you can check out the official documentation of this widget.
Or, for better visualization, you can check out the video tutorial of Animation Text below.
Some General Queries About Elementor Custom Fonts
How to add Google fonts to Elementor?
To do that, go to Elementor > Settings > Advanced tab and change the Google Fonts Load to one of the options. From the dropdown menu, select from the following loading options.
Default – The font display strategy is defined by the browser.
Blocking – Hides the text until the font has fully loaded.
Swap – Use a fallback font to display until the font has fully loaded.
Fallback – Hides the text for a minimal period and will use the font only if loaded within a few seconds.
Optional – Hides the text for a minimal period and will use the fallback font unless the font is already fully loaded.
Why is font not working in Elementor?
Most of the time this incident happens to Elementor widgets only. But not to the default widgets or menu. If you see anything unusual to using your fonts, then set Elementor fonts to Default. So the Typography settings could take the initiative.
How to manually add a font to WordPress?
01. First, download the font that you’re willing to use to your computer and then extract the zip-file
02. After that, upload your font file to wp-content/themes/your-theme/fonts directory.
03. And finally, press the Update File button to save your changes
How to add OTF fonts to WordPress?
01. Upload the plugin files to the /wp-content/plugins/custom-fonts directory, or install the plugin through the WordPress plugins screen directly
02. Activate the plugin through the ‘Plugins’ screen in WordPress
03. Use the Appearance -> Custom Fonts -> Add Custom Fonts name, WOFF2, WOFF, TTF, EOT, OTF, and SVG files
How to add a font to WordPress without a Plugin?
01. Find the Google Font. All Google fonts are searchable
02. Get the Code to Insert into the Website
03. Insert the First Piece of Code into <head>
04. Add the Second Piece of CSS Code.
Ready To Explore Elementor Custom Font Feature?
Custom fonts have diverse facilities. From establishing a unique brand style to acquiring more customers, custom fonts always support marketers, designers, or website owners. Apart from using regular Google fonts, custom fonts could help your online business to grab more customers with its unique style & look.
So, we hope this Elementor tutorial post will enrich your knowledge to use custom fonts on your WordPress site smartly. Plus, the animated text widget of Happy Addons will help you modify the text to the next level and add extra value to the overall website design.
If you like this tutorial, you can subscribe to our newsletter to read more interesting articles like WordPress tutorials, Elementor tutorials, tips & tricks, and the latest updates!
Why HappyAddons Pro is your ideal Elementor companion!
HappyAddons vs. The Rest: Unmatched Features and Stellar Support for your design journey
-
150+ exclusive collection of customisable widgets
-
20+ feature set to unleash your potential
-
500+ premium templates for inspiring designs
-
Our expert support team is always at your service
-
14-Days Money back. Peace of Mind Guaranteed
Subscribe to our newsletter
Get latest news & updates on Elementor


