The coming soon page is created before a website or project is entirely completed and launched. With Elementor, you can create coming soon pages from scratch or use readymade templates. Elementor is a powerful page builder by which you can create and add different types of pages and important elements to your website.
The coming soon page is such an invaluable website element that you can create with the Elementor plugin. In this article, we’ll show you a step-by-step guide on how to create a Coming Soon Page with Elementor.
What Is a Coming Soon Page?
A coming soon page is a temporary web page that is displayed to visitors before the respective website or project is finally launched. It actually serves as a teaser. It provides information about what is coming and allows visitors to subscribe or stay updated until the official launch of the page or project.
It often includes a brief description of the upcoming offering, a countdown timer, and options for visitors to subscribe or follow updates. It acts as a marketing tool to capture leads and build a pre-launch audience to set the stage for a successful launch.
When and Why You Should Create a Coming Soon Page
Creating a coming soon page can be beneficial for your business a lot from a marketing perspective. However, you must be strategic enough to anticipate the future and implement your plans accordingly. Below are some points on when and why you should create a coming soon page.
- Website Development
If you’re building a new website or redesigning an existing one, a coming soon page can serve as a noticeboard while you work on the site behind the scenes. It allows you to inform visitors that your website is under construction and gives them an idea about what’s coming.
- Pre-launch Marketing
A coming soon page can be a powerful way to create a buzz and anticipation for an upcoming product or service. By providing a sneak peek of what’s coming, you can hold the interest of potential customers and start building a pre-launch audience.
- Generate Leads
One primary purpose of the coming soon page is to collect email addresses and contact information from interested visitors. You can gather leads and build a list of potential customers by offering a subscription form or a call-to-action to stay updated. Check the best WordPress lead generation plugins.
- Brand Awareness
A well-designed coming soon page can help establish your brand identity and create a memorable first impression. By incorporating your brand colors, logo, and messaging, you can start building brand recognition even before your website is fully launched.
- Social Media Promotion
A coming soon page provides an opportunity to promote your social media accounts and encourage visitors to follow you on platforms like Facebook, Instagram, or Twitter. This allows you to stay connected with your audience and provide updates on the progress of your website or upcoming launch.
How to Create a Coming Soon Page in Elementor
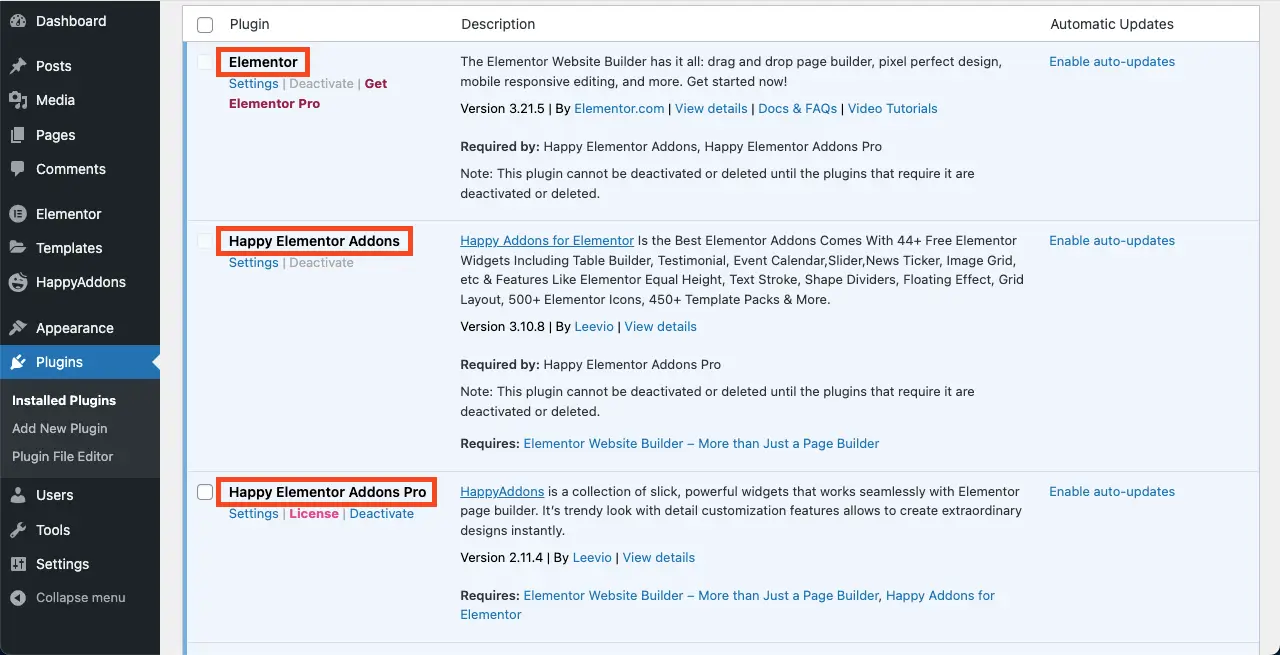
We’ll now show you how to create a coming soon page in Elementor in this section. But before jumping into the tutorial section, make sure you have the following plugins installed on your site.
You might ask – why HappyAddons instead of Elementor Pro? The answer is you’ll hardly find any readymade coming soon page template in Elementor. But HappyAddons offers a good collection of coming soon page templates to get your page ready right away.
You can use the free versions to create the coming soon page from scratch. In this case, you will miss many exciting premium plugins. However, we’ll use the HappyAddons Pro plugin in this section to complete this tutorial.
There are two methods of creating the coming soon page. Explore them with us below.
Method One: Create the Coming Soon Page Using a Readymade Template
As we said above, HappyAddons offers lots of readymade coming soon page templates. It will take you only a few minutes to get your coming soon page ready using those templates. Here’s the process:
Step 01: Install and activate the Above Mentioned Plugins
As we said, ensure these three plugins, Elementor, HappyAddons, and HappyAddons Pro, are installed and activated on your site.
Step 02: Open a Page with Elementor Canvas
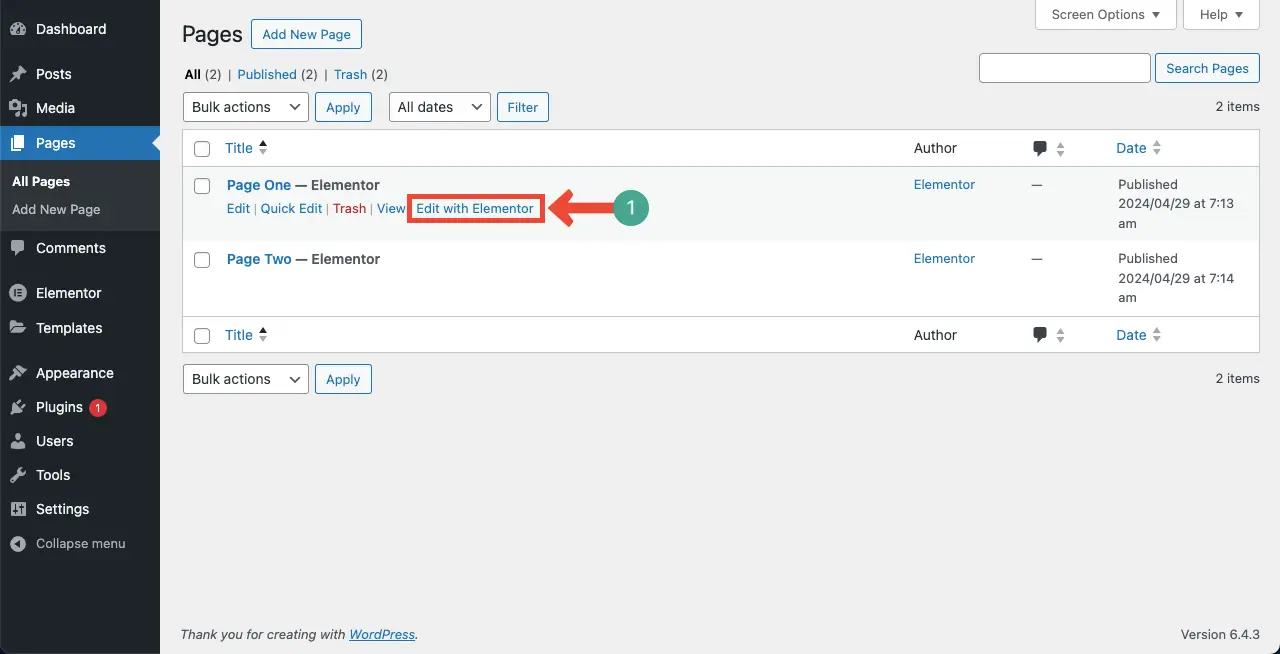
Go to Pages > Add New Page. Then, open the page with Elementor.
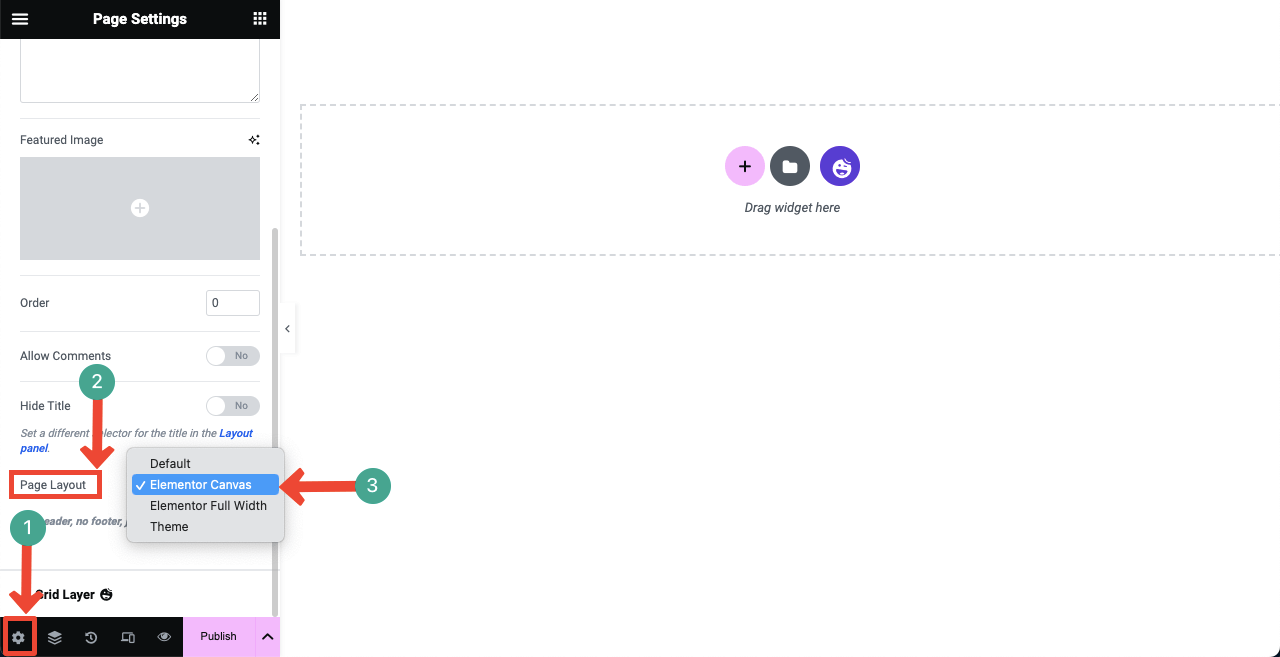
Once the page is opened with Elementor, Go to Settings > Page Layout. Select Elementor Canvas from the dropdown list.
Elementor Canvas will remove the header and footer from the page. Actually, the coming soon page doesn’t require the header and footer to be displayed. So, we have removed them by selecting the Elementor Canvas option.
Step 03: Import a Coming Soon Template
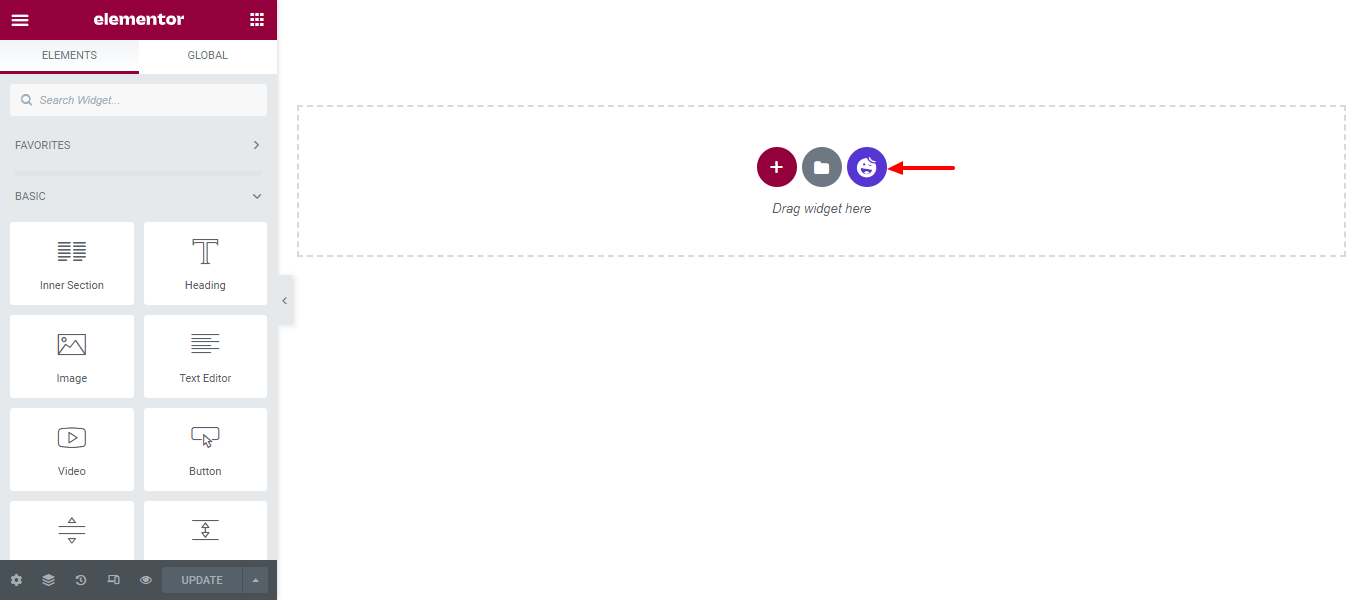
Click the HappyAddons template library icon to open and access the template library.
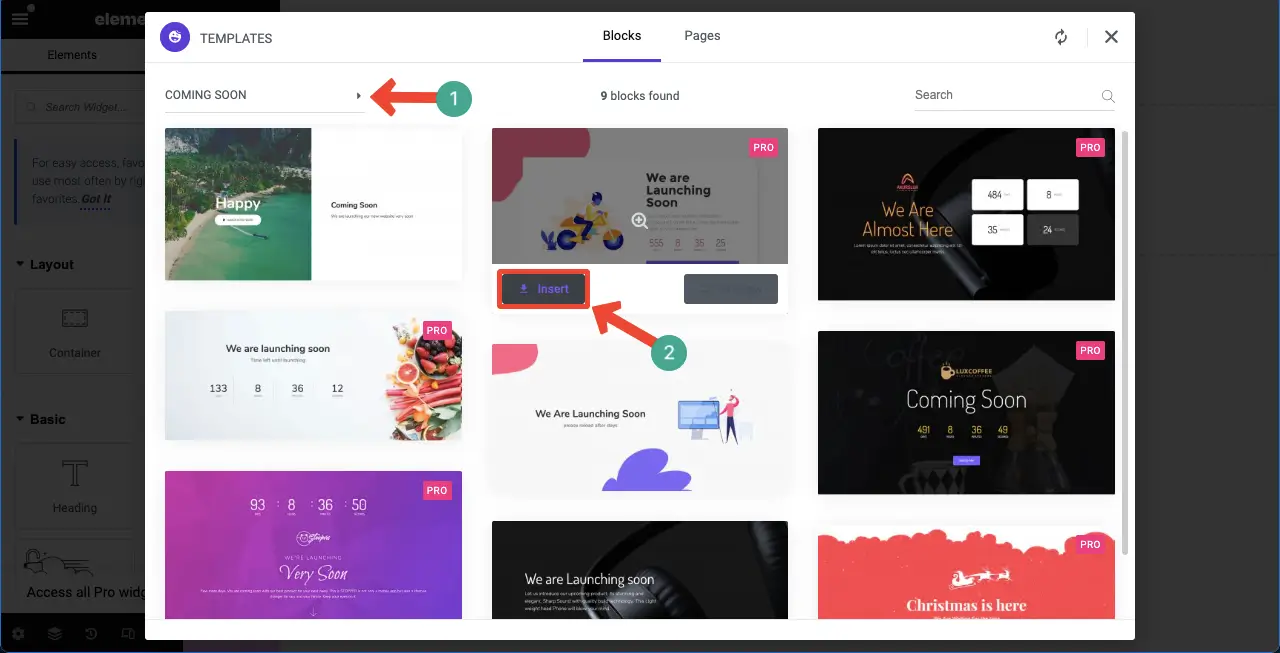
It’s easy to filter and find the coming soon page template. Click the arrow sign on the top-left part.
Select the coming soon option. All the blocks and related pages that are coming soon will appear on the screen.
Hit the Insert button to add the template you like to the canvas.
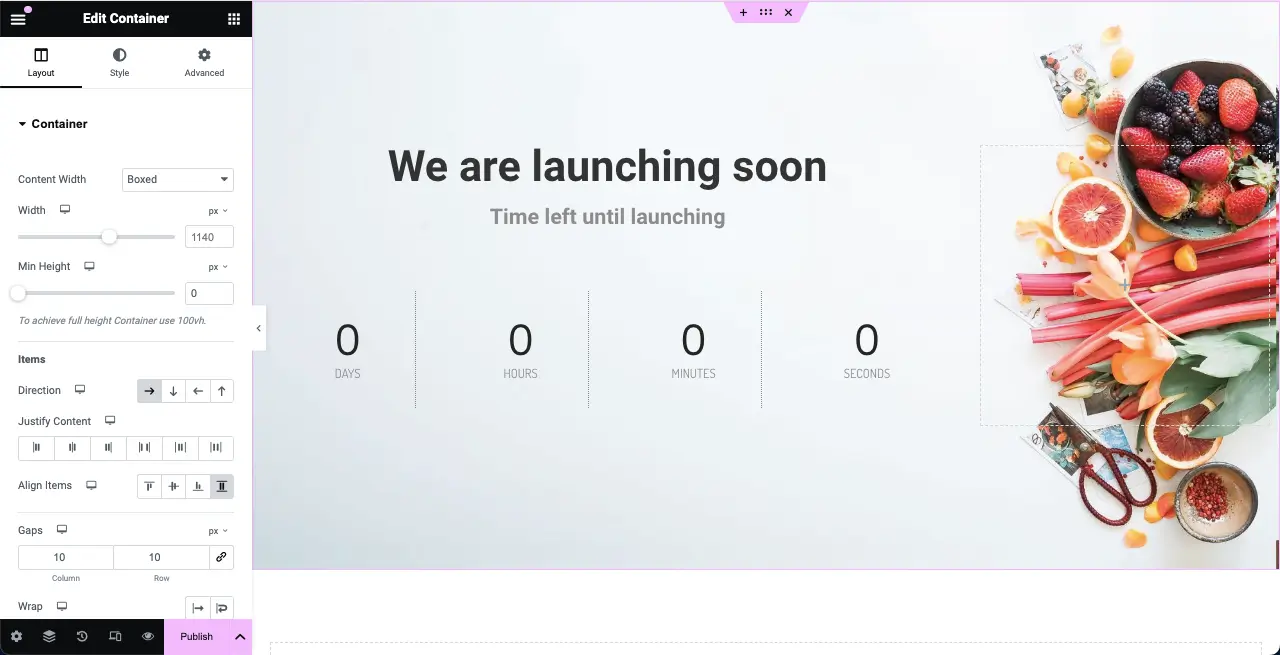
The coming soon page template will be imported to the canvas in a few seconds. You can now modify this by adding new widgets and elements to it.
Method Two: Create the Coming Soon Page from Scratch
You will get numerous helpful widgets in the Elementor panel, which will allow you to create a coming soon page easily from scratch. We’ll show you how to do it in this method. Let’s first take a look at the widgets you will need to create the coming soon page.
Now, jump into the tutorial.
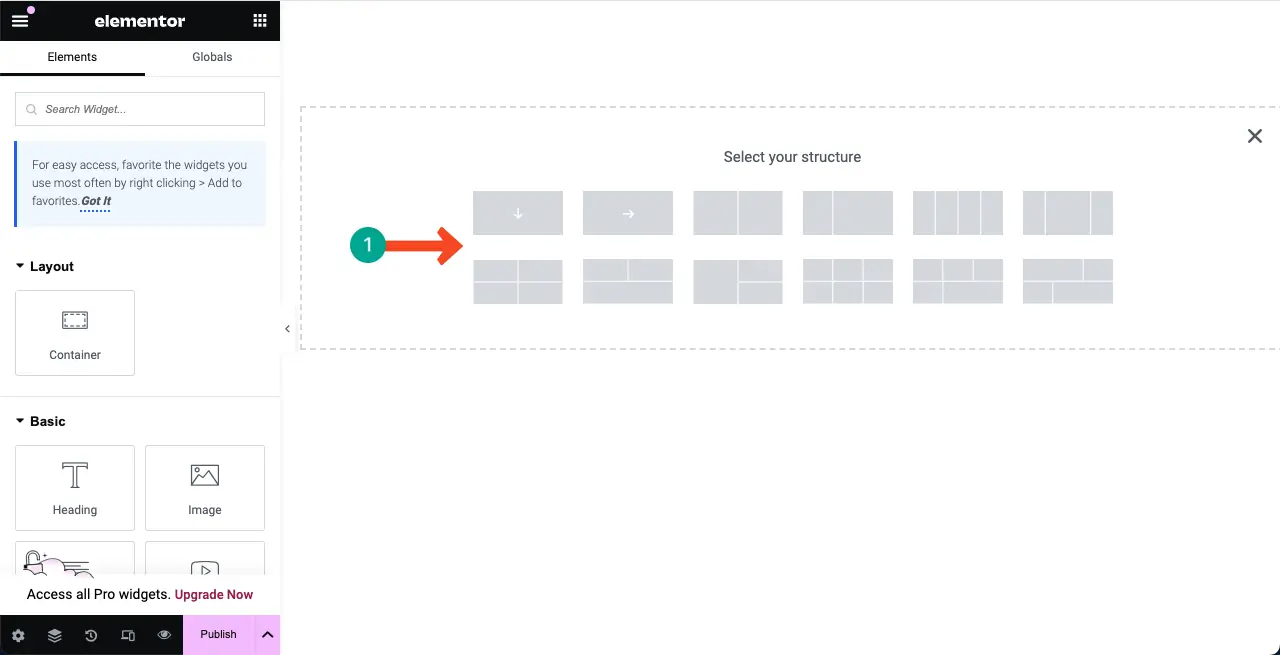
Step 01: Select a Structure to Add Content on the Elementor Canvas
Elementor released the Flexbox container with its update 3.6. It has made content adding and page design with Elementor very easy. Choose a Flexbox column structure on the canvas so you can add widgets and design the coming soon page.
We’ll select the first column structure for this tutorial.
Step 02: Add a Color or Image to the Background of the Structure Column
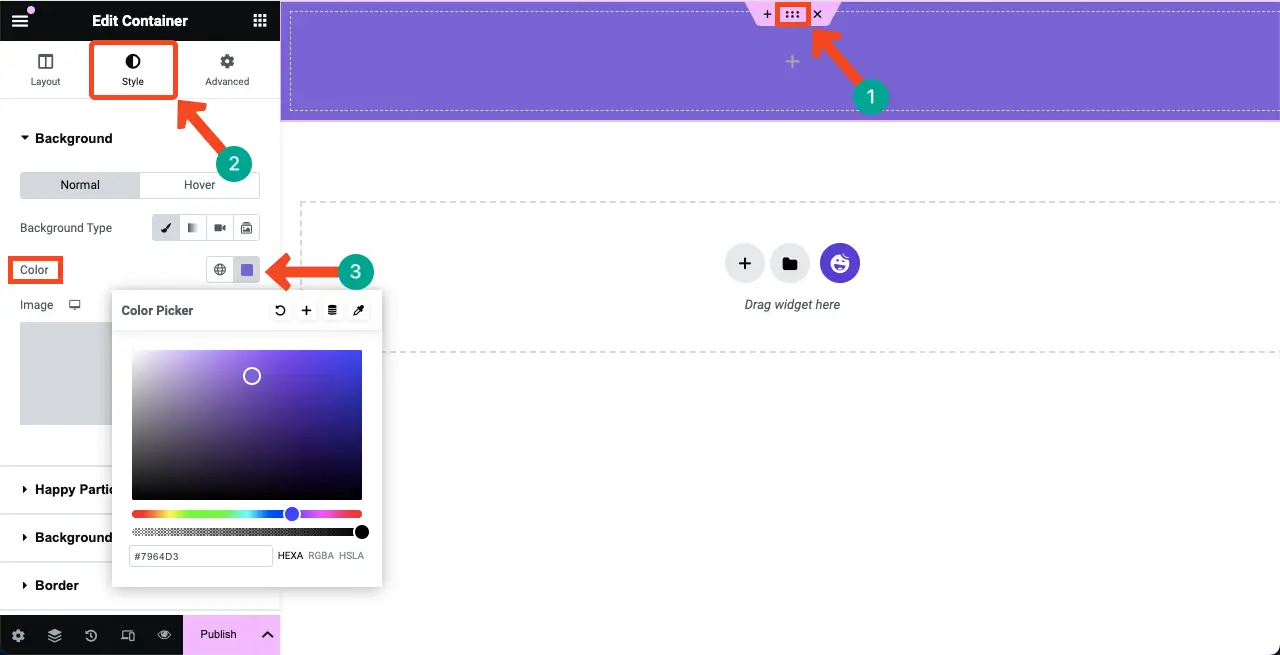
By adding a suitable color to the background of the column, you can create a vibrant environment to present the information and design elements of the coming soon page.
To add a color to the background of the column, click the six-dot icon on the column. Go to the Style tab. Hit the color option under the tab.
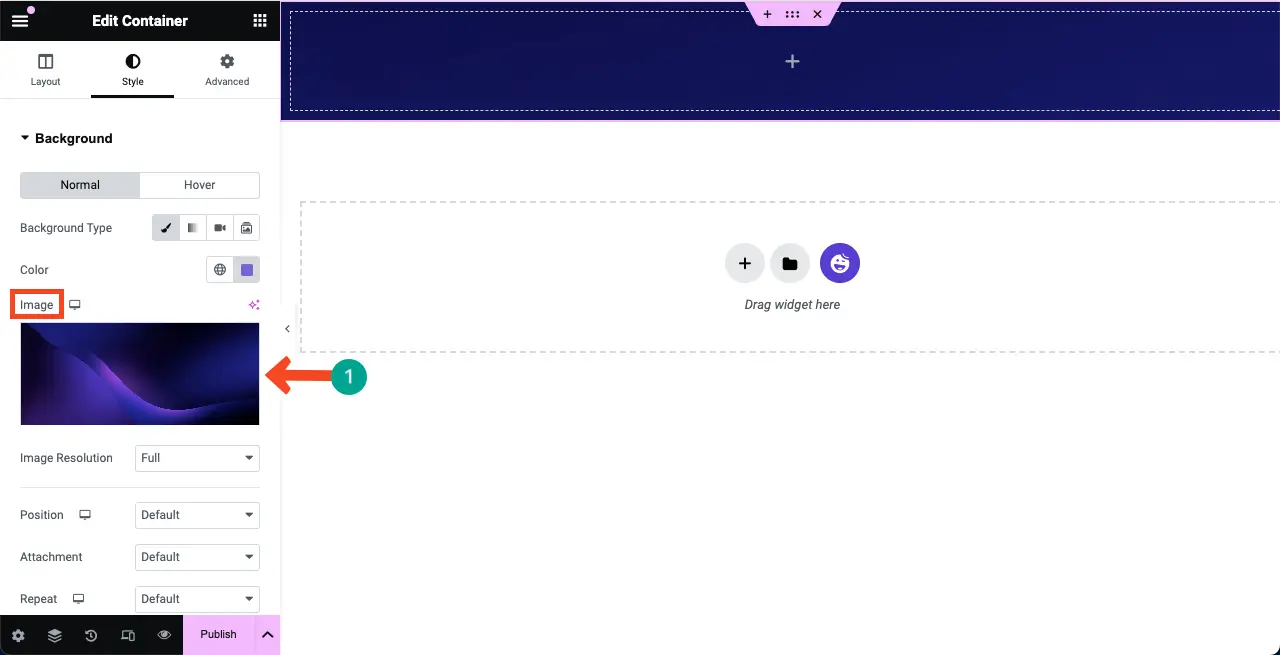
Or, you can add an image to the background by hitting the Image option under the Style tab.
Step 03: Add the Spacer Widget on top of the Structure
Find and add the Spacer widget to the selected area on the canvas. It will create a space between the top and another part of the selected area. Otherwise, your content might be displayed aligning the top edge which won’t look good.
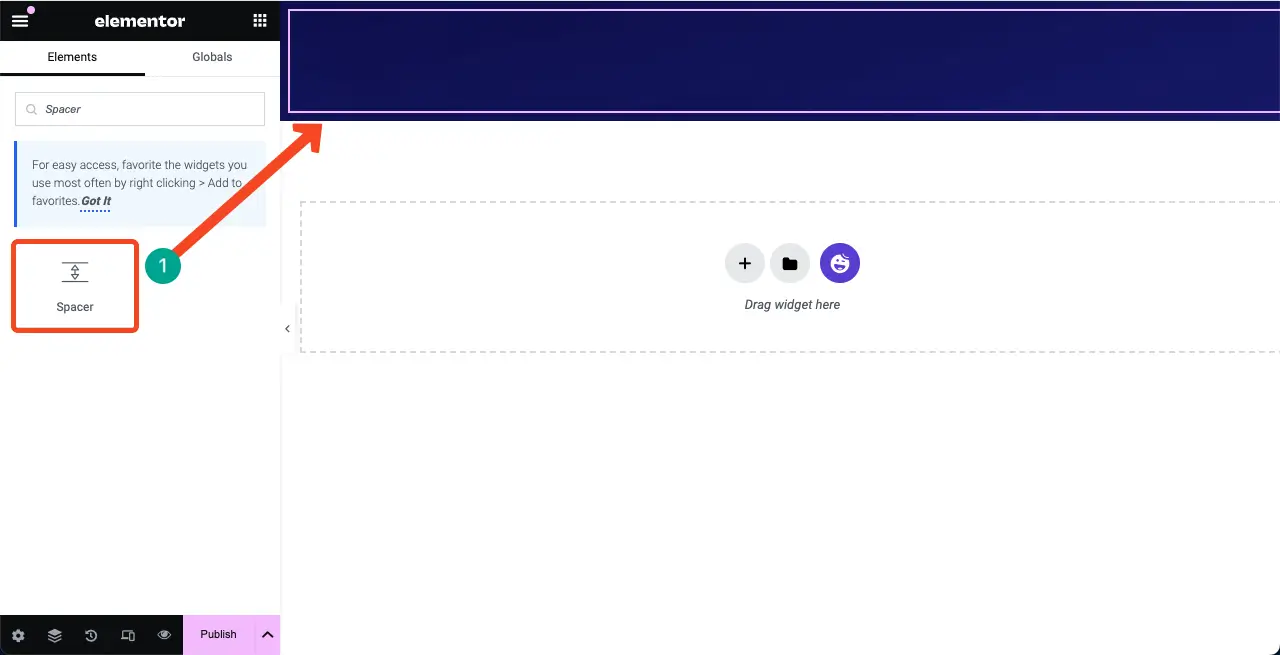
You can customize the height of the widget from the Content tab.
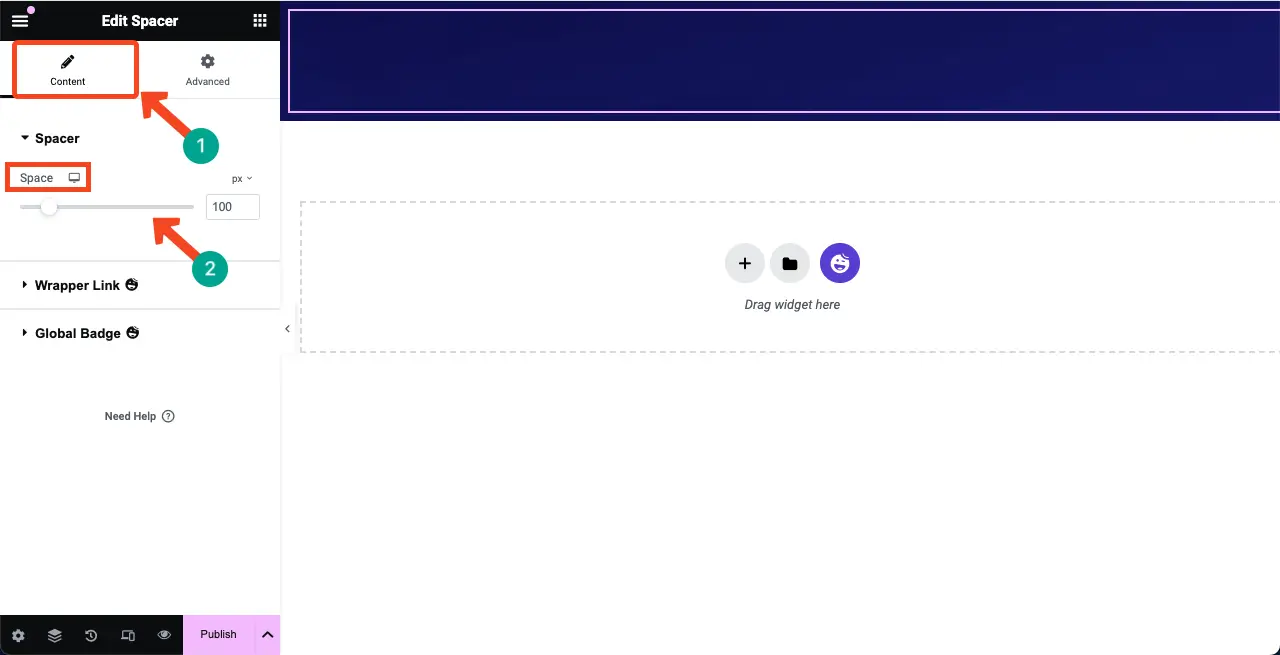
Step 04: Add the Text Editor Widget to the Selected Area
Drag and drop the Text Editor widget to the canvas on your selected area. It will allow you to write a copy for the coming soon page.
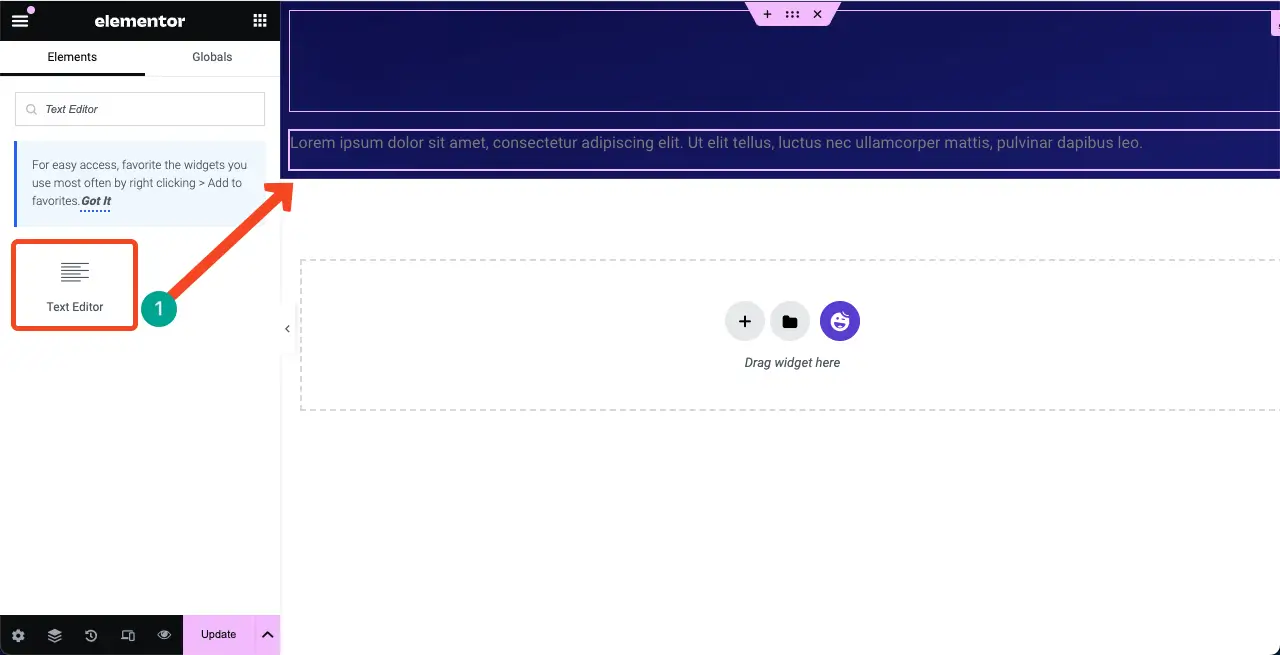
You can see we have written a text on the widget. After that, we have customized its color, alignment, typography, and font weight from the Style tab.
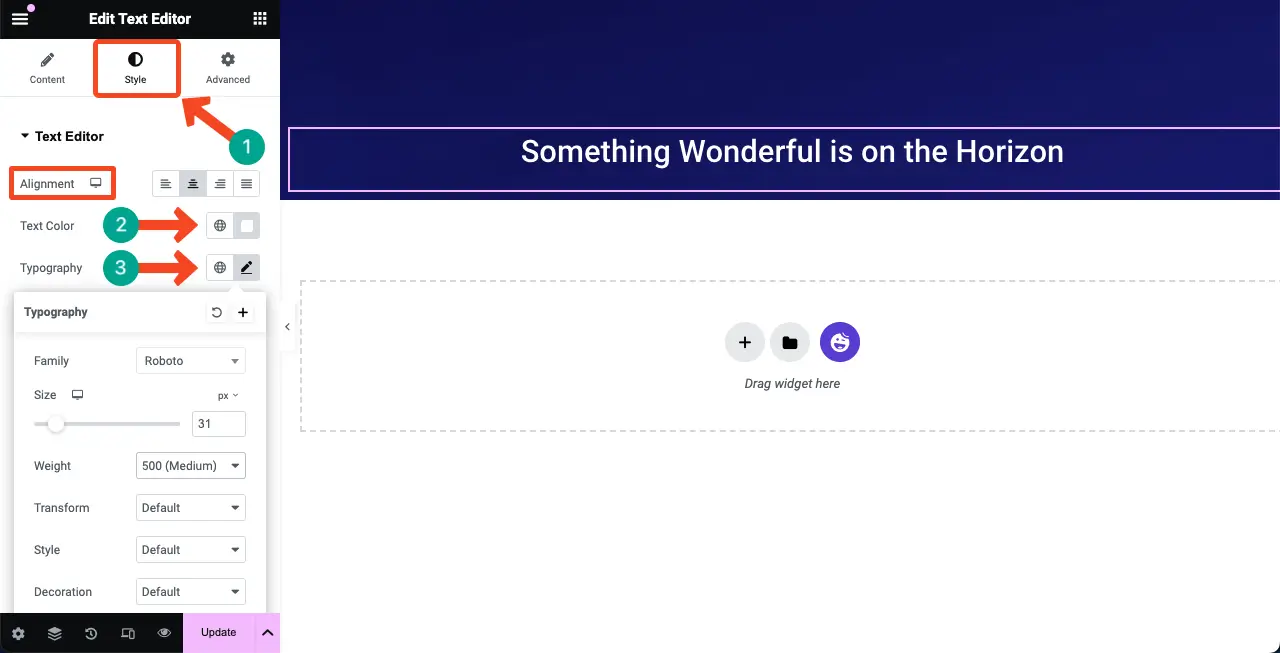
Step 05: Add the Countdown Widget to the Elementor Canvas
HappyAddons has a Countdown widget. Find and add it to the Elementor Canvas.
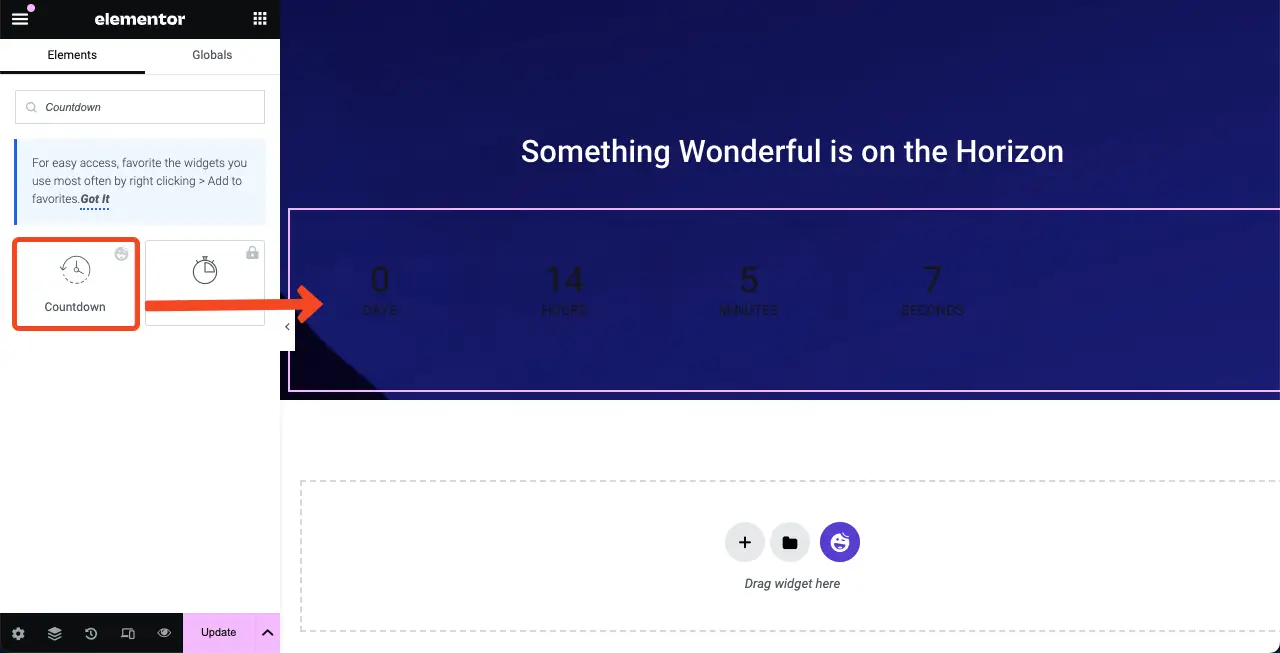
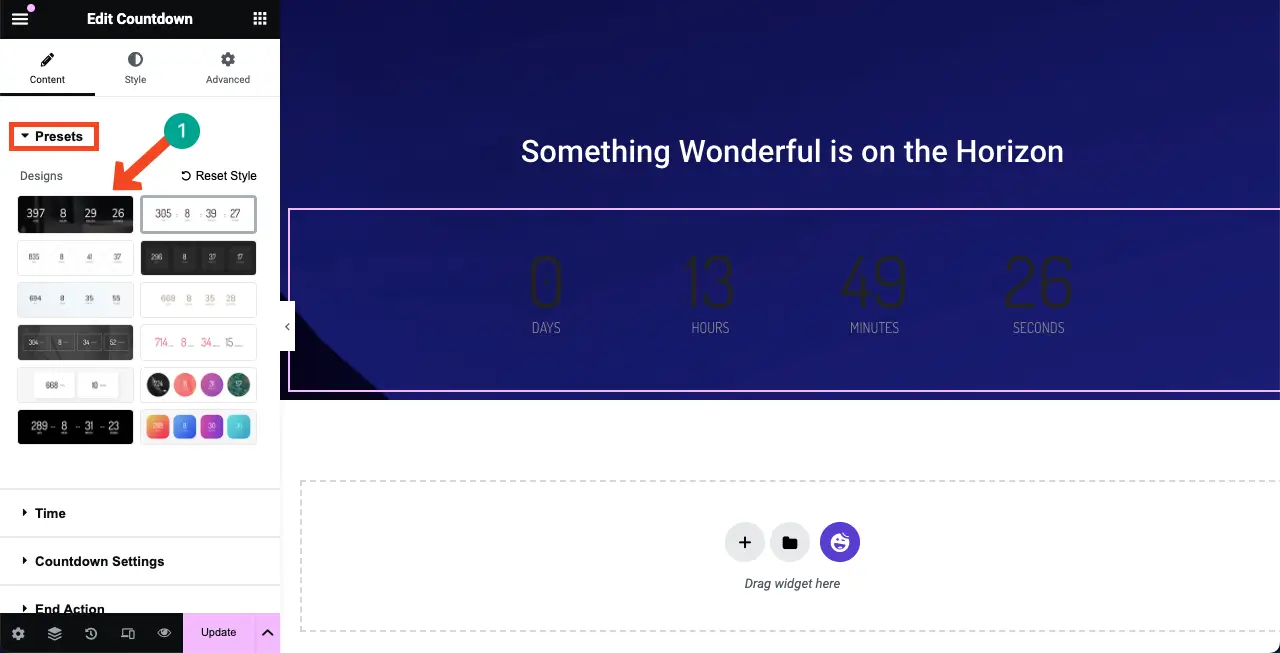
The Countdown widget includes several templates under the Presets section. You may select a template or customize it from scratch. However, we’ll select a template for the tutorial.
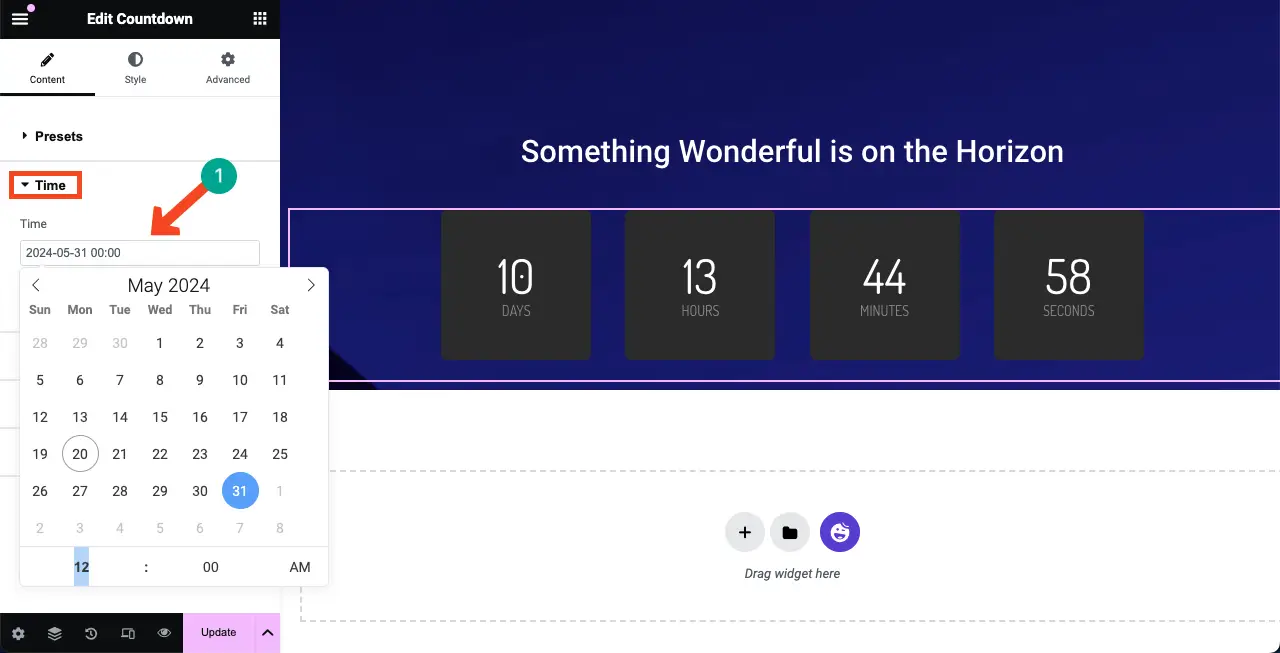
From the Time section, you can set how long you want the countdown to last.
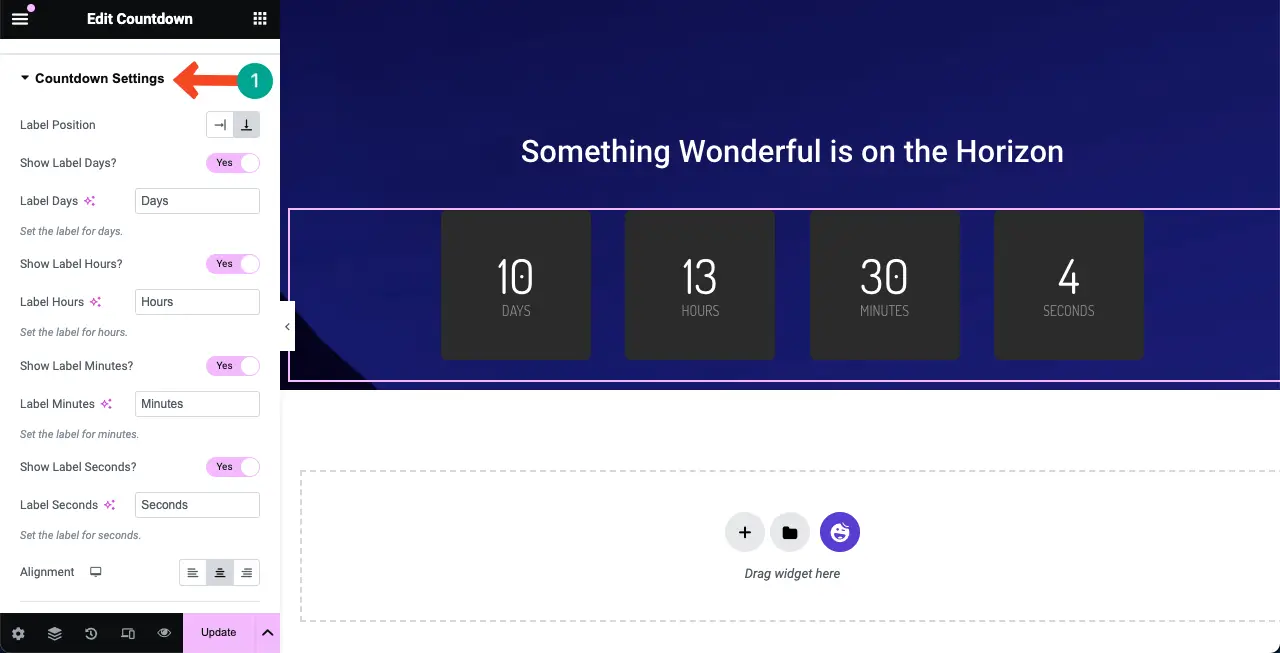
From the Countdown Settings, you can rewrite the labels of the countdown options and their alignment.
Come to the Style tab. You’ll get options to stylize the widget using respective settings. You can modify the widget color, font size, padding, margin, and more.
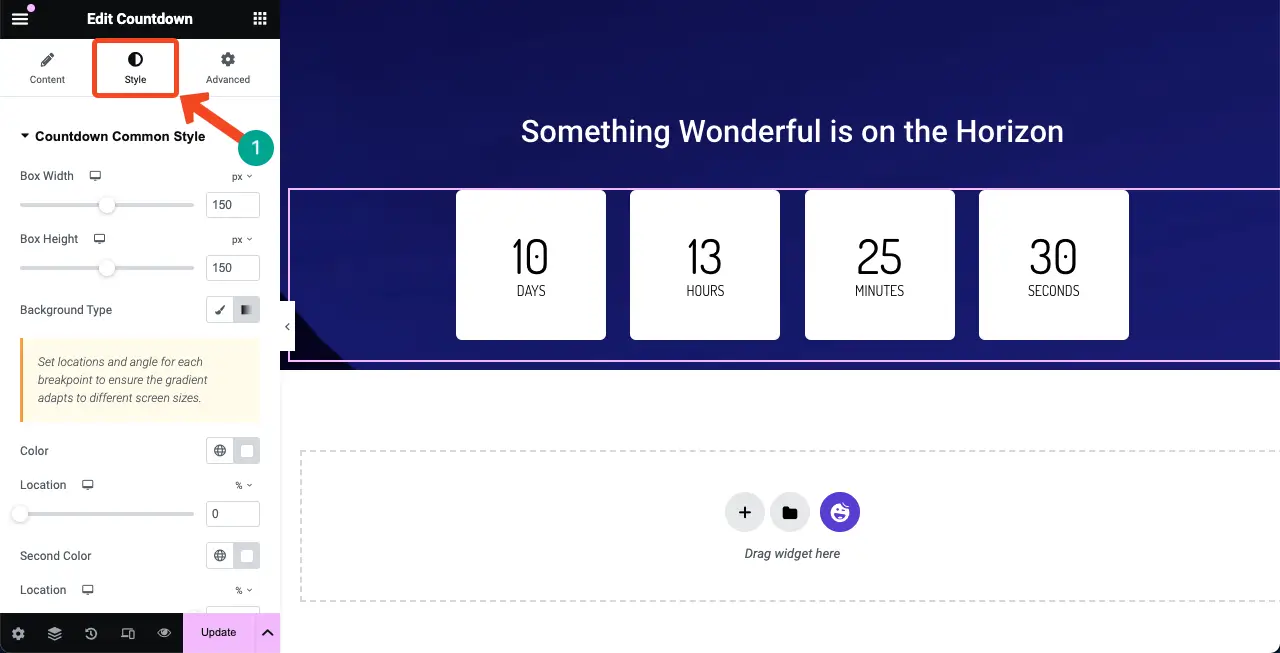
Step 06: Add a Contact Form
Adding a contact form to the coming soon page is crucial. It allows you to gather email IDs of interested audiences who want to get updated with you. HappyAddons has integrations with numerous form builder plugins, like Contact Form 7, WP Forms, Ninja Forms, Caldera Forms, weForms, etc.
To add a contact form, make sure you have a form plugin installed in the backend. For this tutorial, we have installed the Contact Form 7 plugin. Take a look at some other best WordPress contact from plugins.
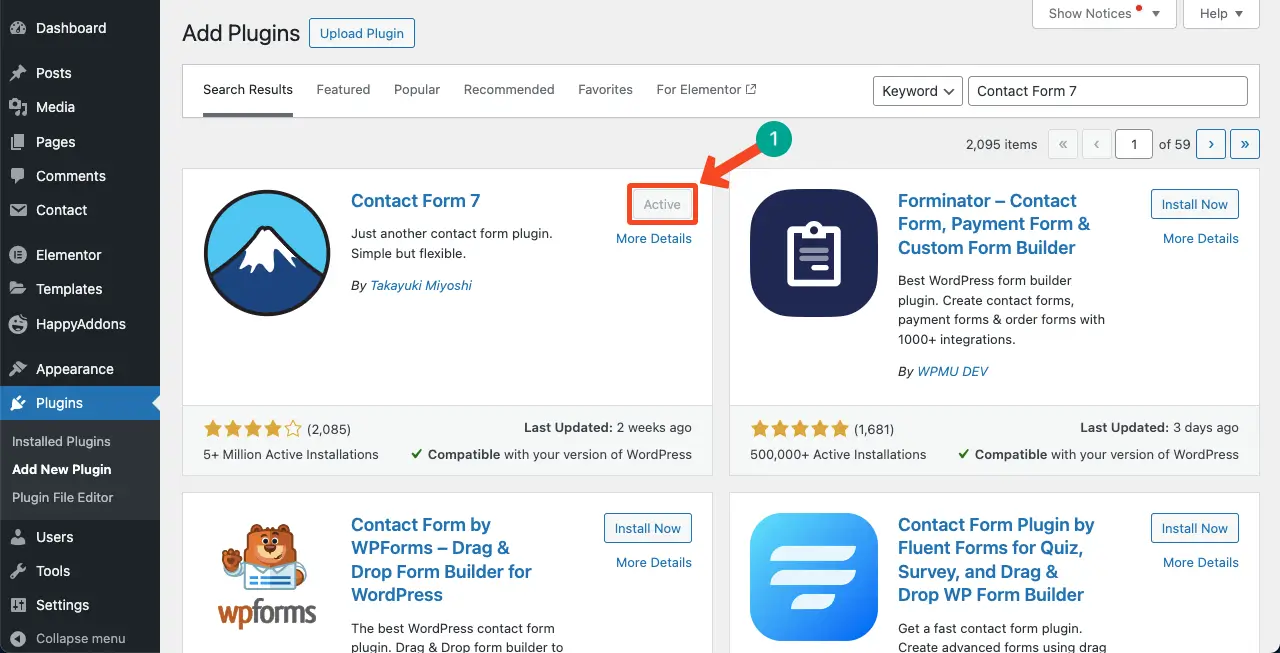
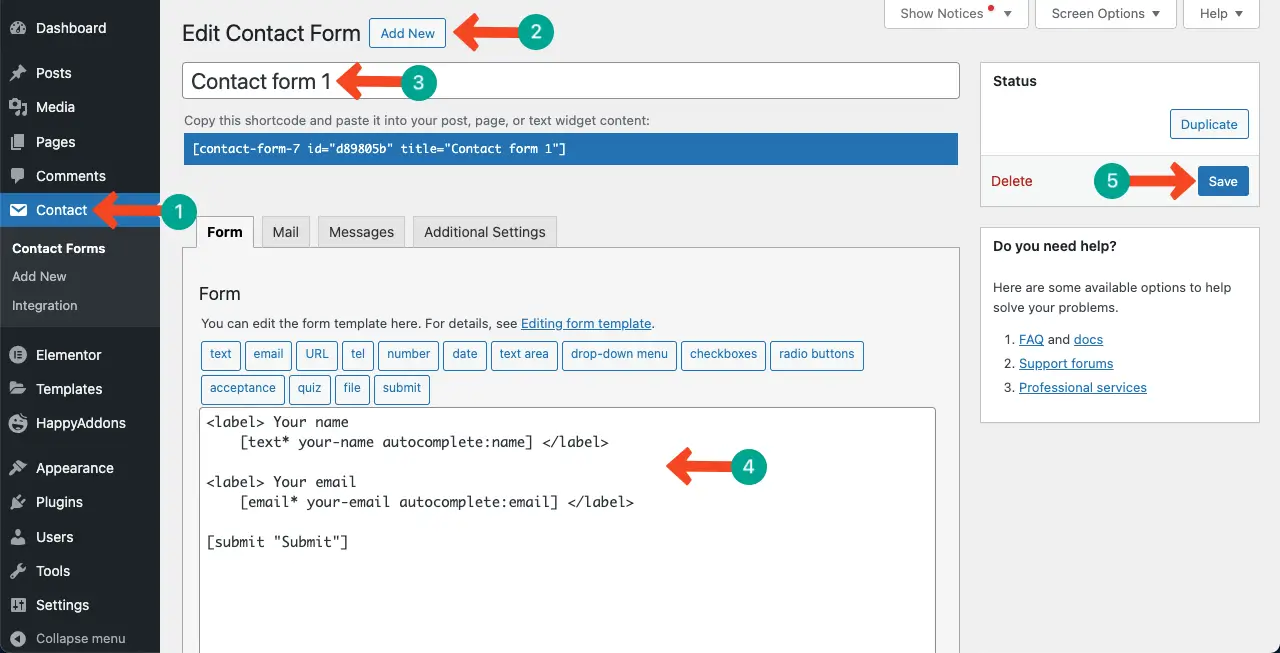
Create a contact form using the plugin. We can see we’ve created it and named it Contact form 1.
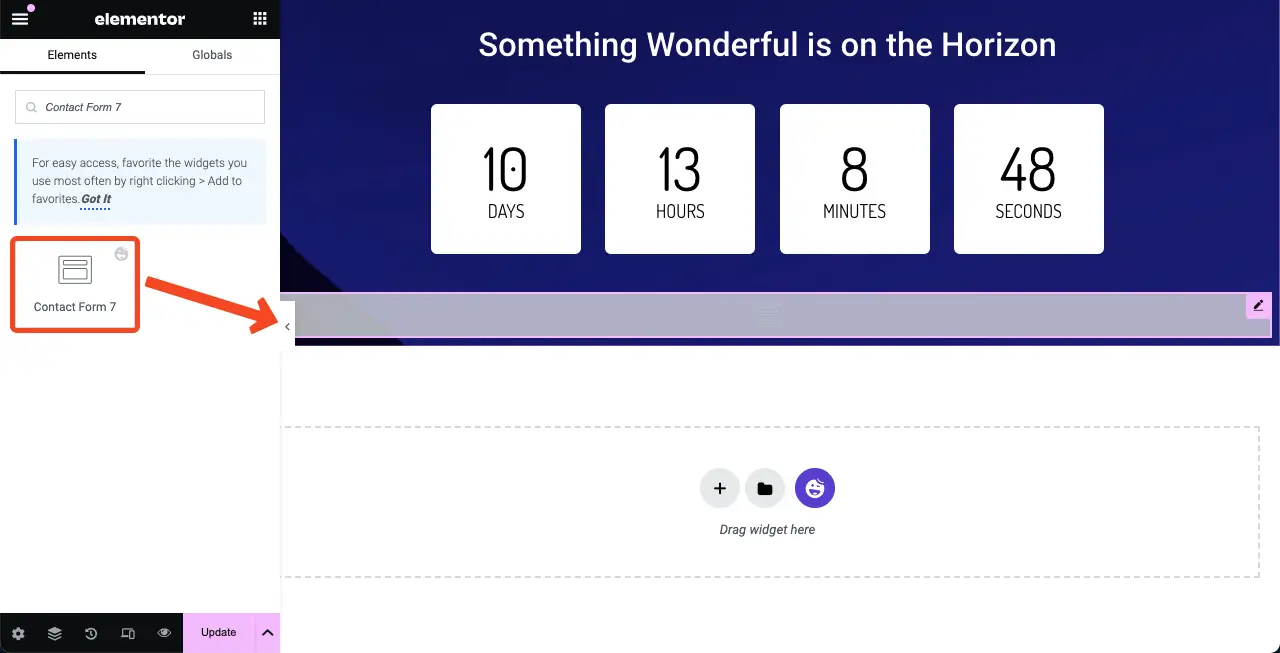
Find and add the Contact Form 7 widget to the Elementor Canvas
Now, you have to select the contact form to be displayed on the canvas. Go to Content > Contact Form 7. Select the name of the form you created in the backend. See the video below to explore the process.
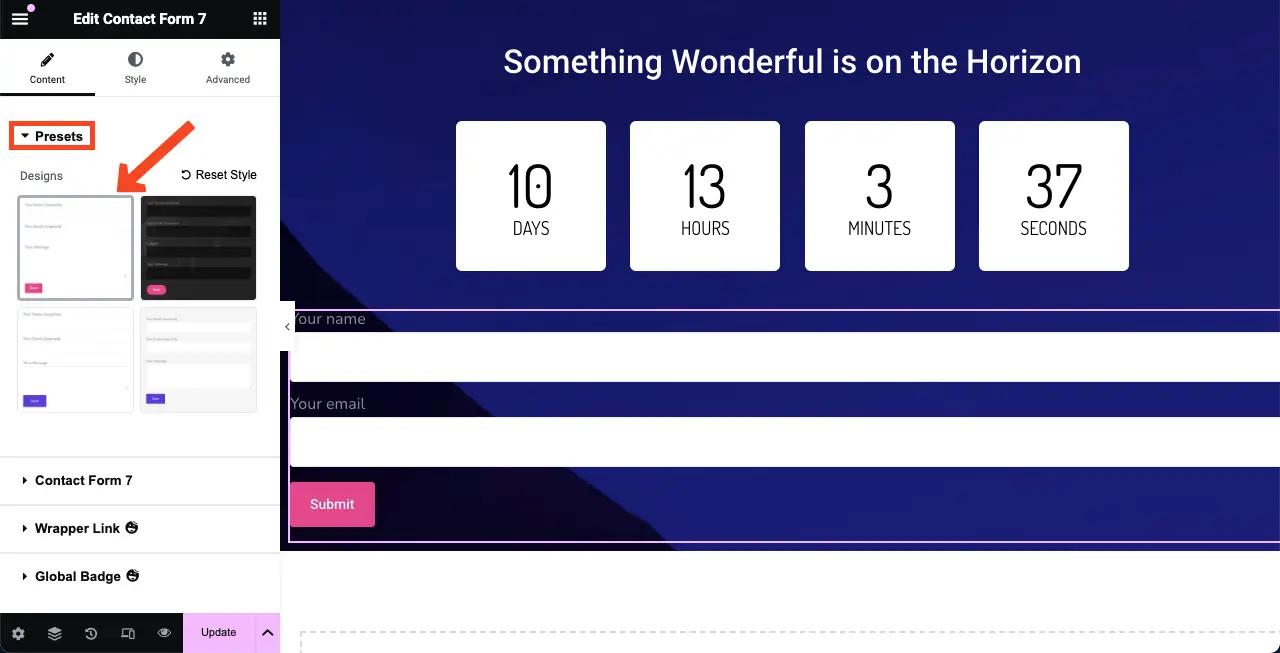
Select a template for the contact form by going to the Presets option under the Content tab.
# Stylize the Contact Form
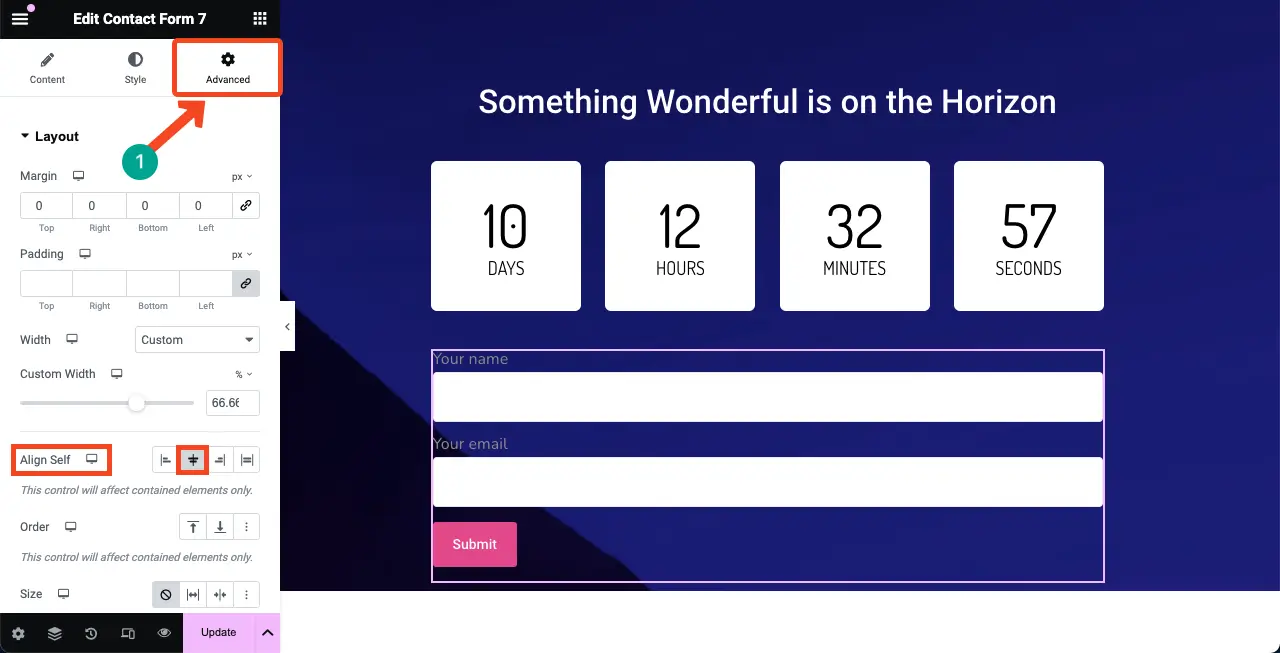
As you can see, the contact form is excessively wide, which doesn’t go with the design. You can reduce the width of the form by holding its right side edge and dragging it to the left.
Go to the Advanced tab. You’ll get the Align Self option under it. From here, you can choose the central align option to showcase the form in the middle part of the canvas.
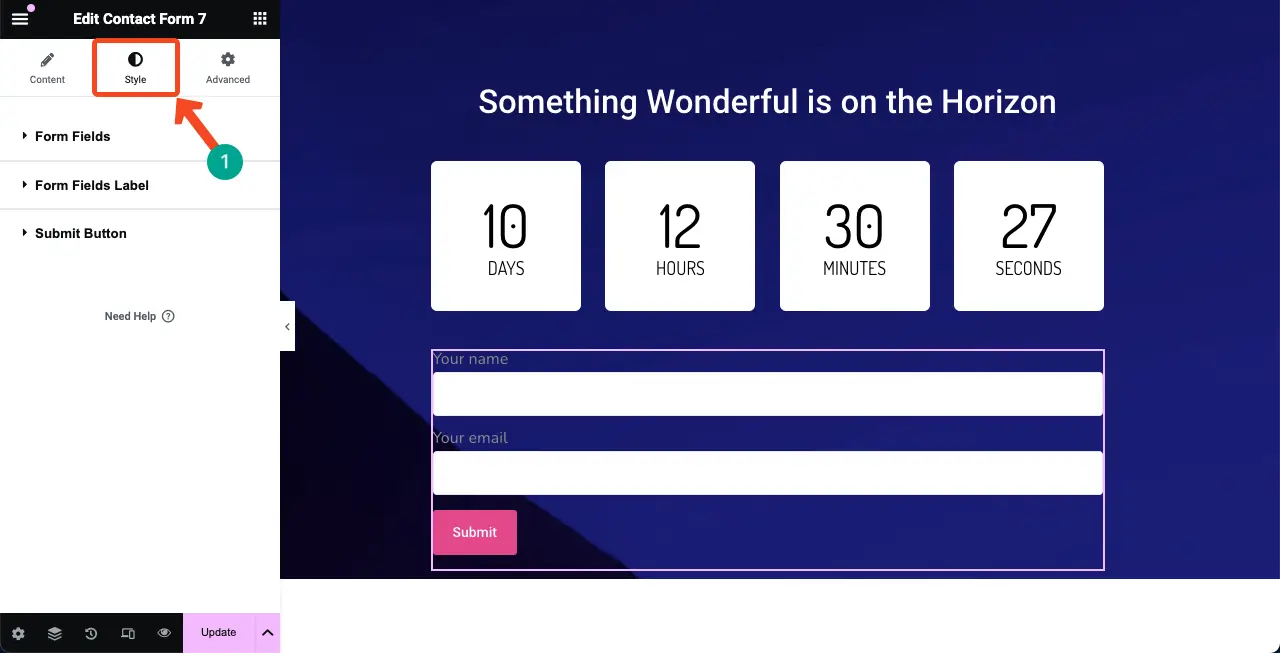
Come to the Style tab. You will get options in this tab to customize the label color-size-weight, placeholder color, font size, and the CTA button.
We are not explaining the details here. Hopefully, you can do it yourself.
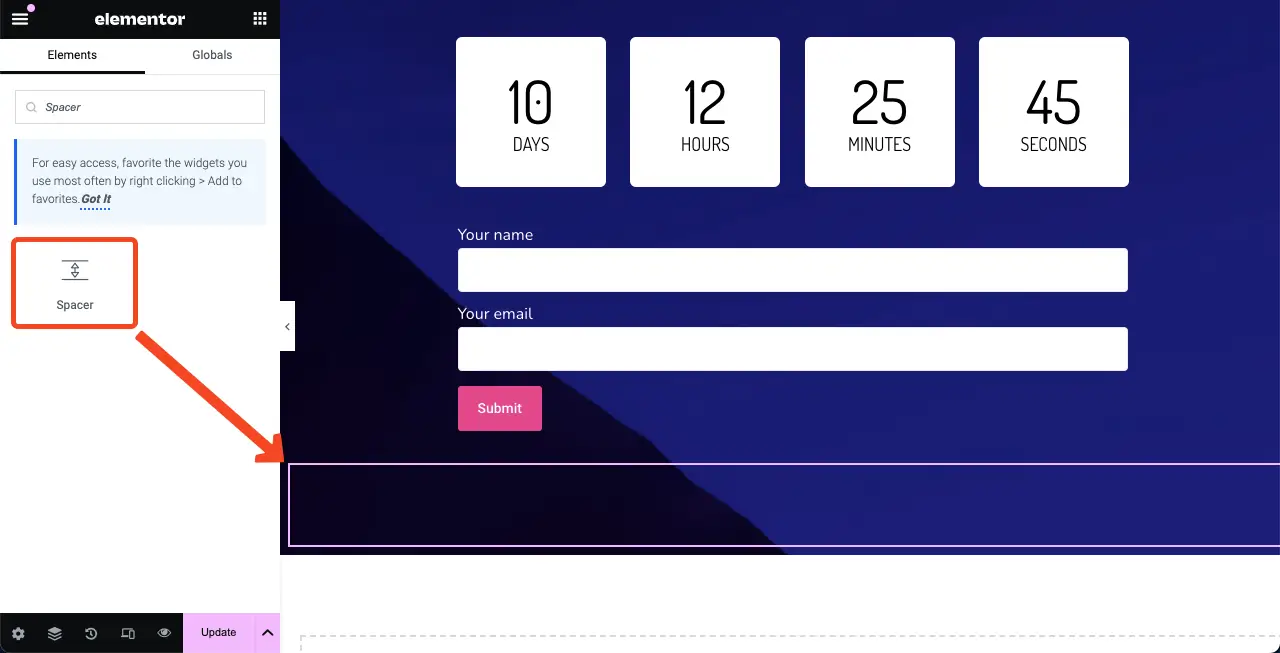
Step 07: Add the Spacer Widget at the End
Add the Spacer widget again to create a space between the bottom line of the canvas and the main content. This will make the coming soon page design look good.
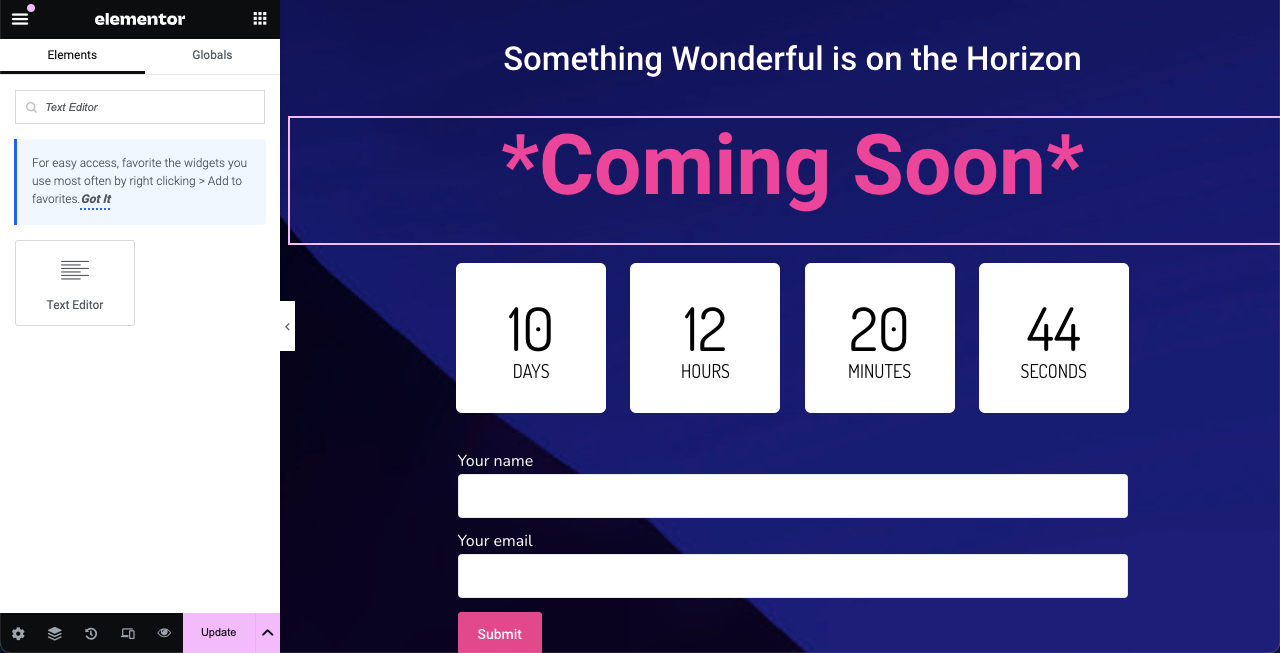
Step 08: Add the ‘Coming Soon’ Text
Hey, as this is a coming soon page, you must include the ‘Coming Soon’ to the canvas to make your design more meaningful. We forgot to add it at the beginning. But it’s never too late to do the right thing once you discover.
Using the Text Editor widget, you can easily add the ‘Coming Soon’ text to the canvas. See the image below; we have done it.
Step 09: Make the Coming Soon Page Mobile Responsive
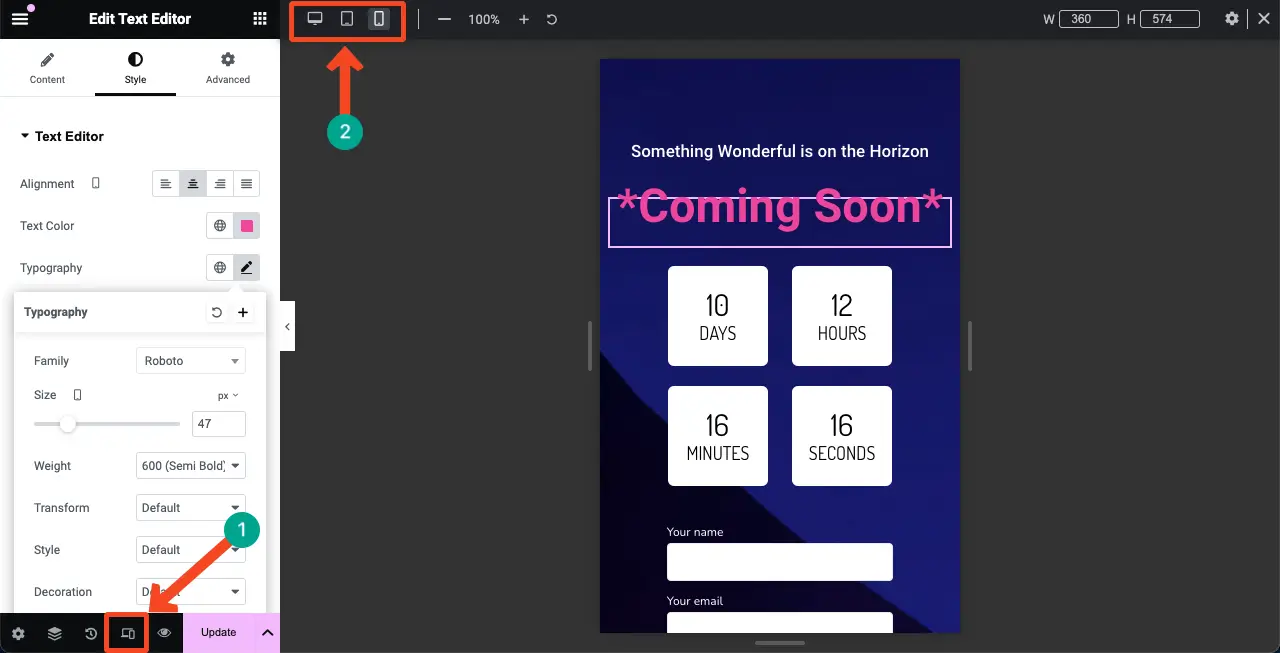
As mobile and tablet devices have screens that are comparatively narrow in width, you must reduce the sizes of your page elements so they perfectly fit the screen.
Click the Responsive Mode option at the footer of the Elementor panel. It will open up the options to switch between different breakpoints based on devices.
Whatever device you switch to, customize the content to make it perfect for the screen size. Customization particulars will be saved for that device’s screen size.
Note: Don’t delete any element on any screen; it will be equally applied to all device modes.
Check how to make an Elementor site mobile responsive.
Step 10: Save the Design
Once your design is done, save it and all the changes by clicking the Publish or Update button on the Elementor panel.
Note: Save the page with a suitable name like ‘Coming Soon’ so you can find it later whenever needed.
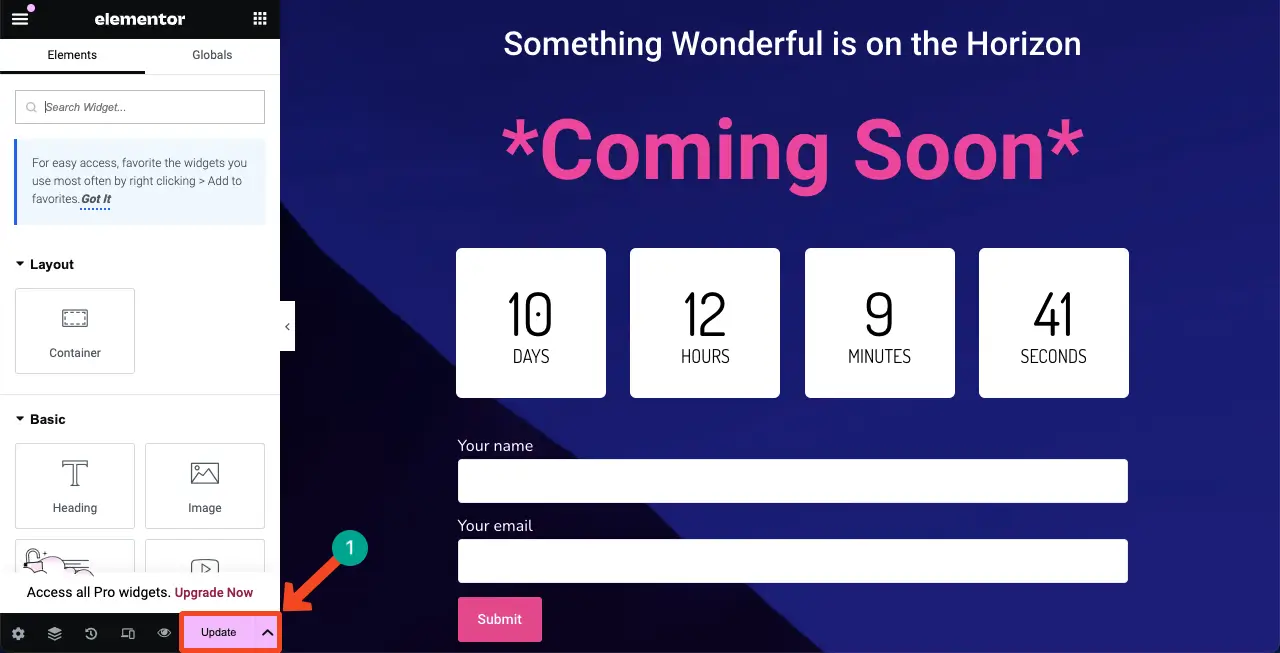
Thus, you can create the coming soon page with Elementor. You can now use it as coming soon landing page or as a template. The template can be imported and used on other sites built with Elementor.
How to Enable Coming Soon with Elementor in WordPress
So far, you have just designed the Coming Soon page with Elementor. You now have to complete a little more configuration to display it on your frontend. Go to your WordPress Dashboard. Navigate to Elementor > Tools > Maintenance Mode.
Select Maintenance from the Choose Mode option.
From the Who Can Access, you can define who will see the coming soon page.
Next, select the page you created just a while ago from the Choose Template option.
Click the Save Changes button at the end.
You’ll see that Maintenance mode has been activated, and your page will be displayed on the frontend.
Wrapping Up!
In wrapping up, setting up a coming soon page with Elementor in WordPress is a fantastic way to keep your audience engaged while you finalize your website. With Elementor, you can easily create the page while keeping it both eye-catching and well-functional.
Though adding a contact form isn’t mandatory, we recommend you complete the page by adding a contact form backed by a robust plugin so you never miss a potential lead. If you ever face any problem, just type it in the comment box or send it to our support through our chatbox.

