






Do you want to enhance your WordPress site’s user experience with a lucrative design? You’re just at the right place if this question is hovering around your mind.
The user journey just starts after they enter your website. What if your visitors find your site unorganized or complex? For sure, your site will get a bad impression, and users will not be able to find their preferred content.
61% of users try a different site if they can’t find what they’re looking for quickly.
Google
So, what could help you to develop your website structure for a better user experience?
In today’s tutorial post, we’ll show how you can improve your website’s user experience by utilizing the Nav menu & Portfolio widget on your Elementor site.
Let’s start with the Elementor Nav Menu Widget.
What is the Elementor Nav Menu?

The navigation menu or nav menu is a website segment that showcases all-important clickable links conjointly. If users enter the site, they can click each link to find their preferred content on the website. Nav menu can be presented in different ways. Such as horizontally, vertically, and drop-down.
Depending on your website’s template, you can choose any of them. But we recommend you to use the most compatible one that matches your site’s design.
Here is a sample of Happy Addons current menu. It looks great and simple. Try to keep your website menu like this one and include all important links.
How Elementor Nav Menu Works (Types of Navigation Menu)
We know the Elementor Nav Menu widget has three types of patterns that you can use on your WordPress site. Like other widgets of Elementor, the nav menu widget is also easy to implement and totally flexible. You don’t need to use third-party extensions to apply this widget.
Apart from these three types of layout, you can add pointers & animations, pre-meditated menu customization, sub-menu, mobile responsiveness, and so on.
Let’s discuss one by one part and see how it works on any WordPress site:
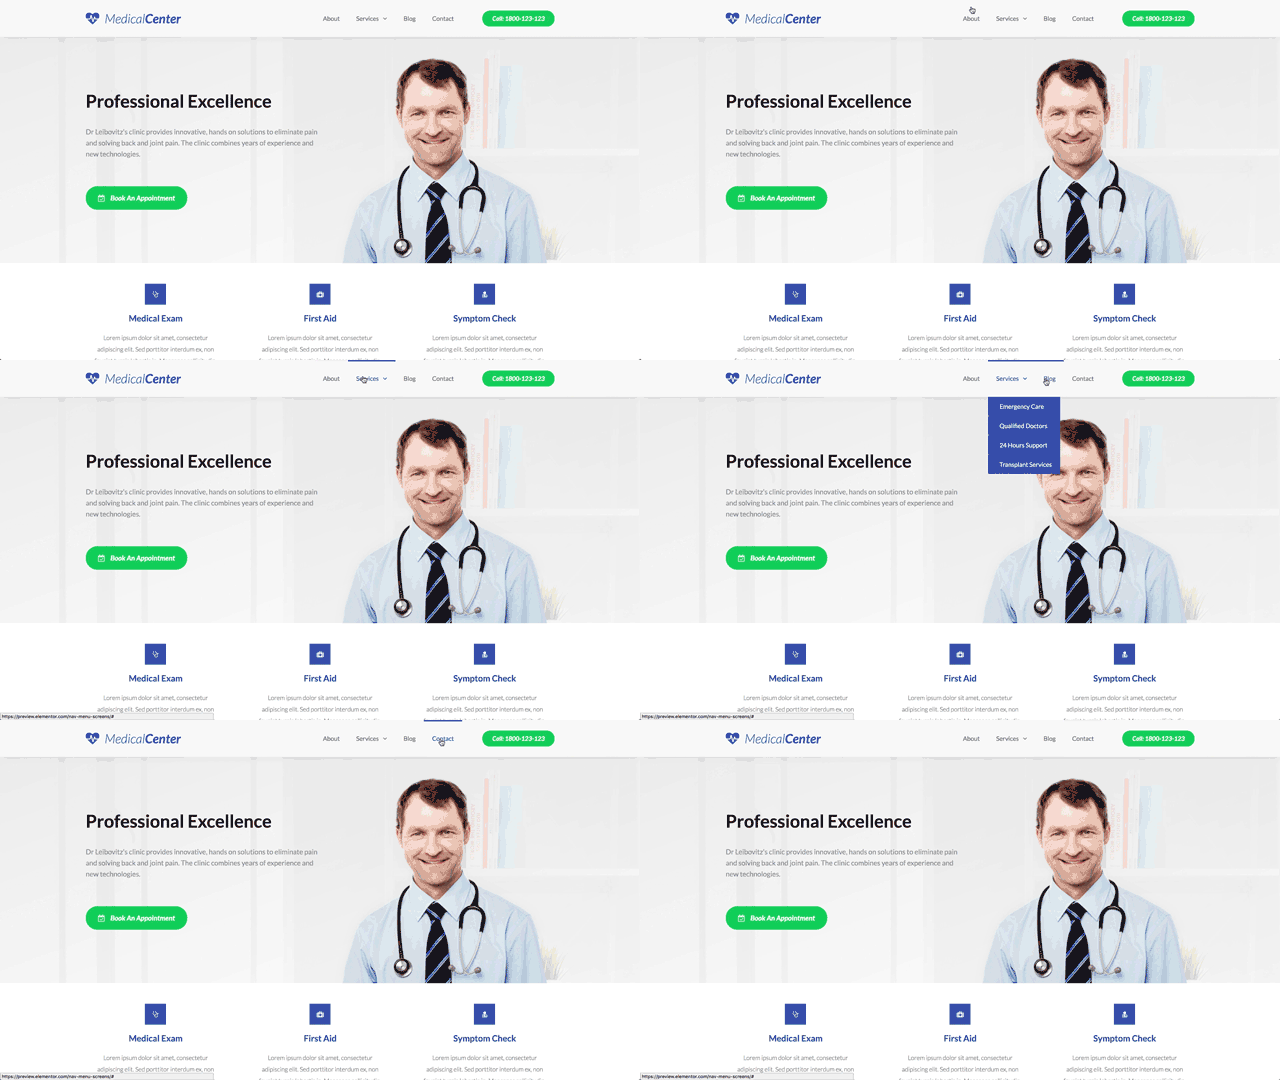
Horizontal Nav Menu
Using this pattern, the menu will be expanded horizontally from the left side to the right side. This design layout is especially for users who want to keep their website simple and neat. Such as for professionals, public figures, news portals, and other types of Elementor websites.
Vertical Nav menu
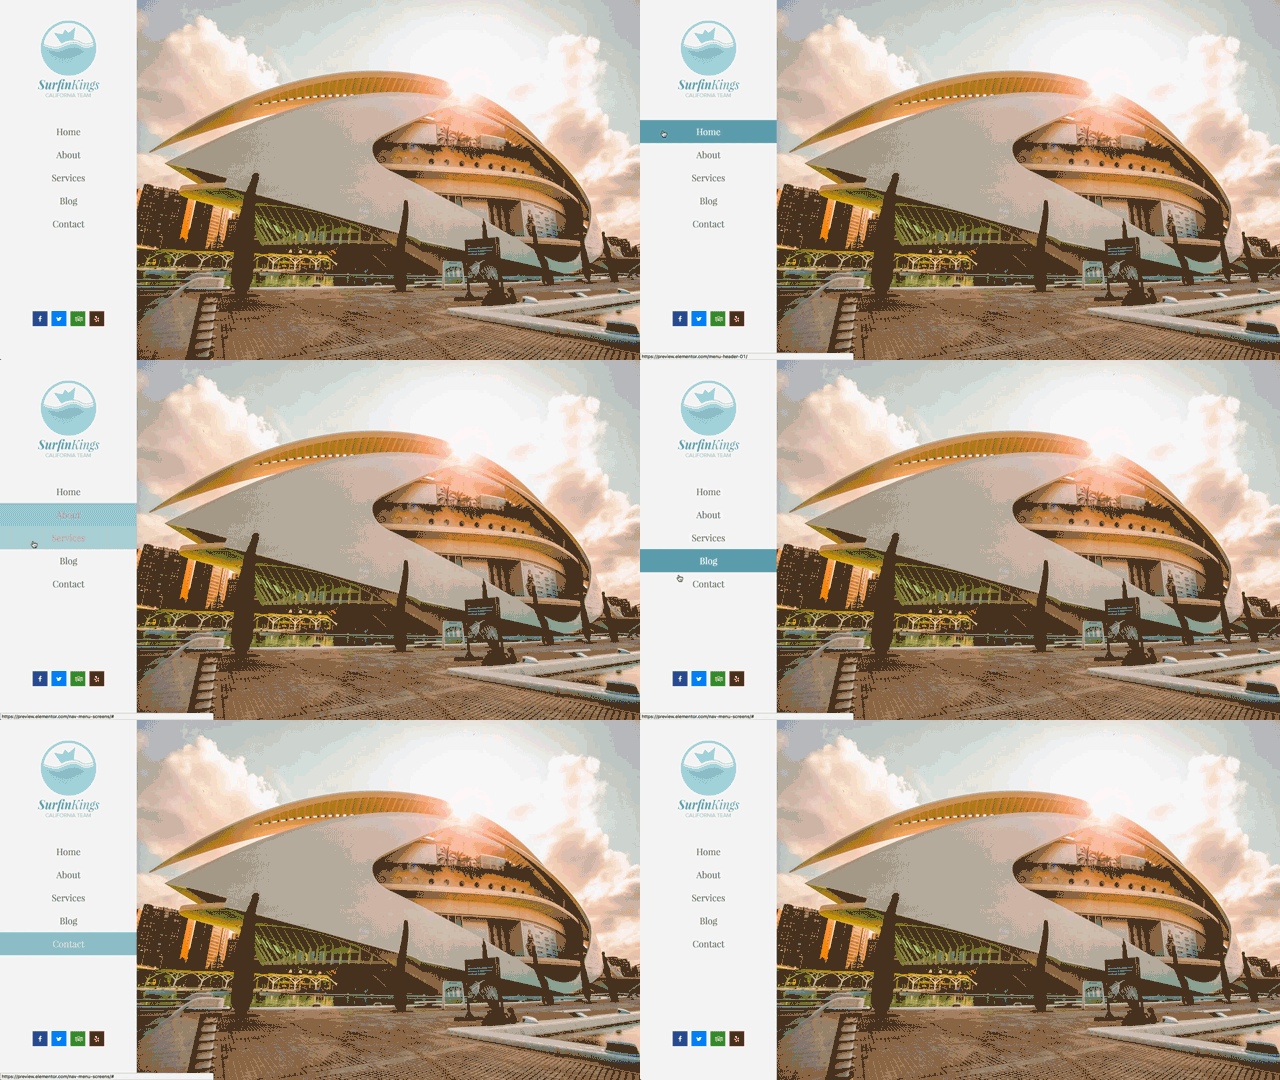
Like the horizontal menu, the vertical menu expands the menu from top to bottom. This layout looks great and fashionable & simple. You can apply this layout on your Elementor site if your site represents real estate, education, or any online agency.
Learn more: How to create a high converting landing page for online business
Drop-Down Nav Menu
It looks vertical but menus will open after you click on the drop-down button. You can use this simple yet great-looking layout if you want to keep space on the header section. Enough space gives users a nice view of the website, including the logo, header text, social buttons, and more.
You can utilize this design pattern if you have a portfolio website, passion website, music, or personal website. Here is an example that you can see.
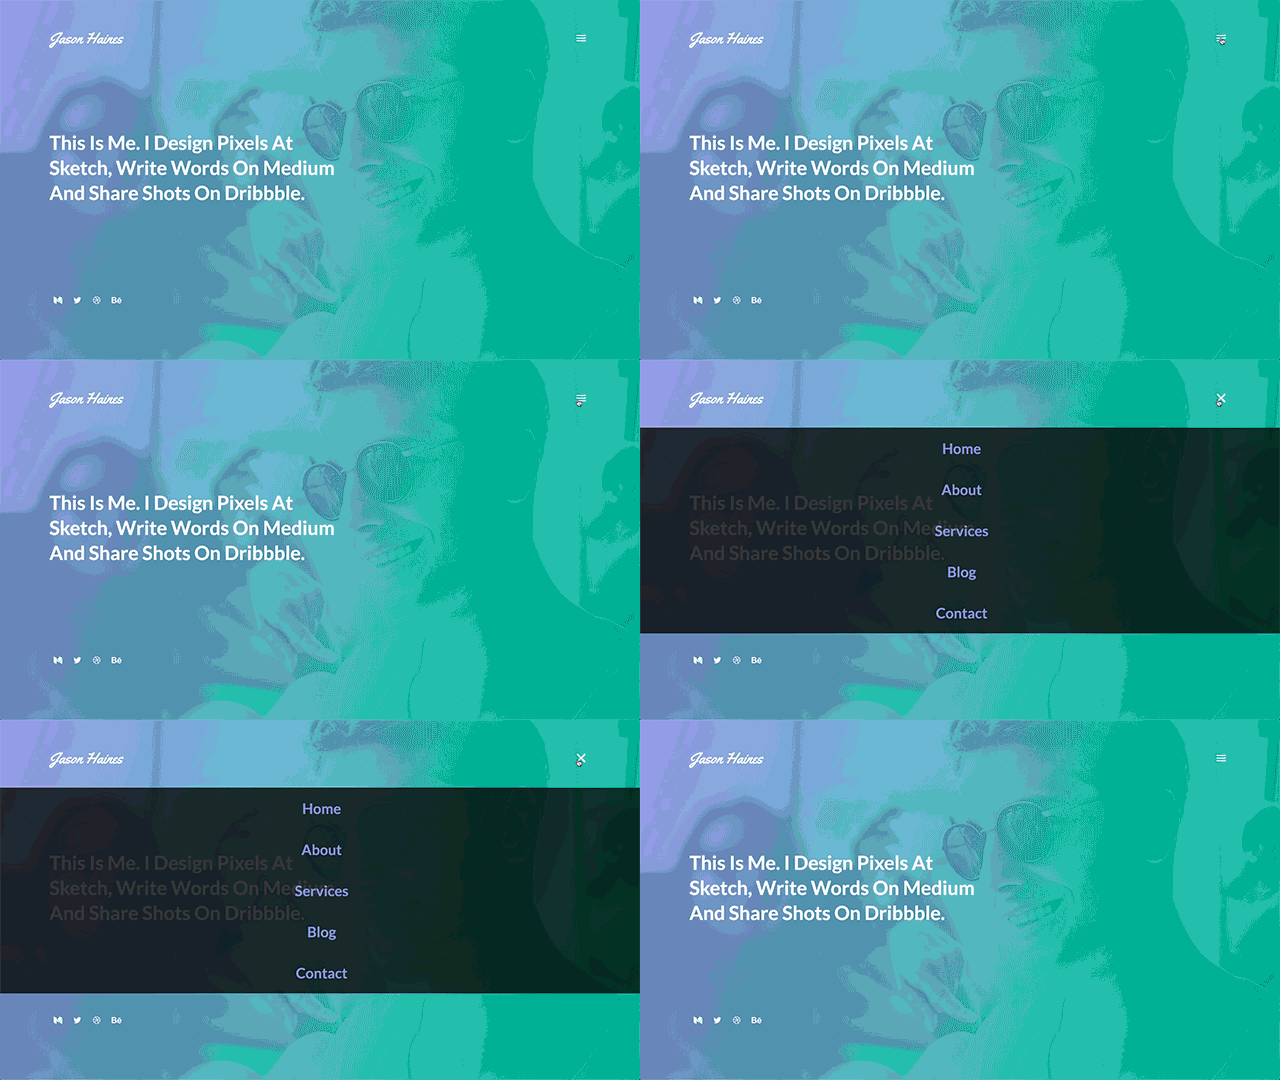
How To Add Menu in Elementor
Below, we show you the step-by-step process to add the Elementor nav menu to your WordPress site.
Prerequisites
- WordPress site
- Elementor (FREE)
- Elementor (Pro)
Let’s say you have an existing WordPress site. And you have installed both Elementor FREE and the Pro version. The nav menu is a premium feature. So you must purchase the pro package before using this widget.
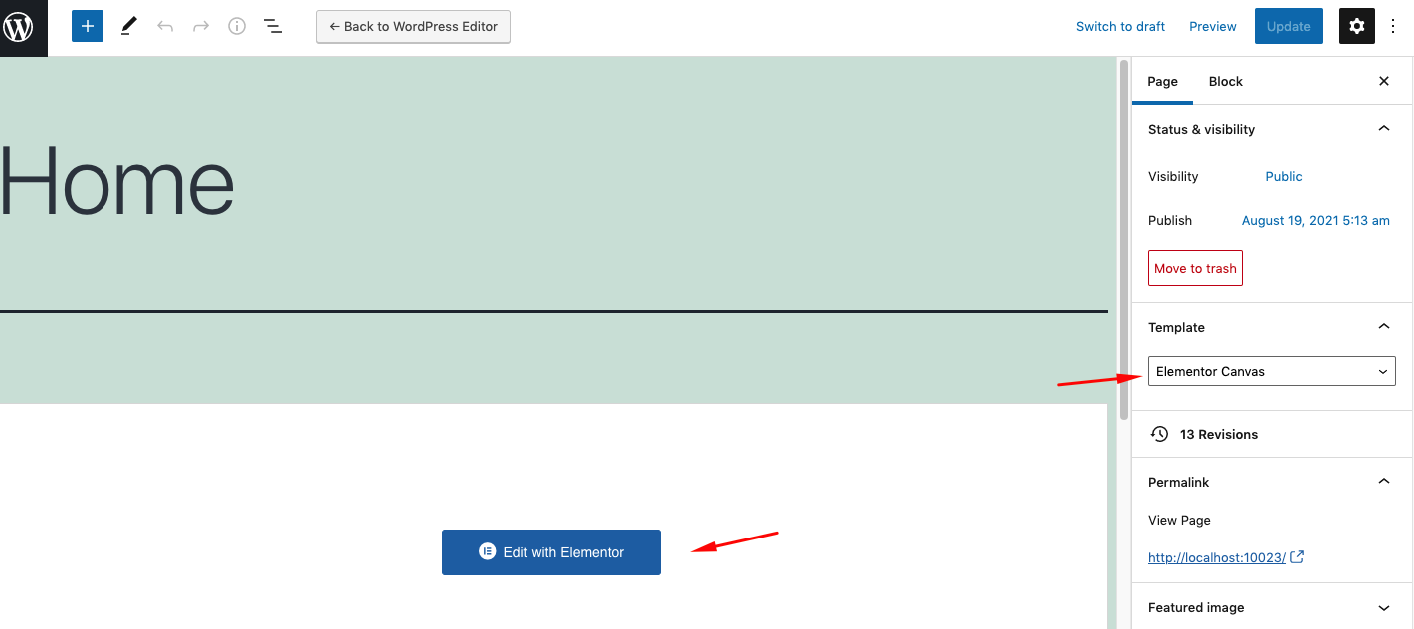
Step One: Open A New Page
- Select Elementor canvas and click on the ‘Edit with Elementor‘ button.
Step Two: Add a Section
- As you selected Elementor Canvas, you’ll get a fresh interface. To do that click on the red (+) button. And then choose your preferred section that you want to use. In our case, we have selected the second pattern.
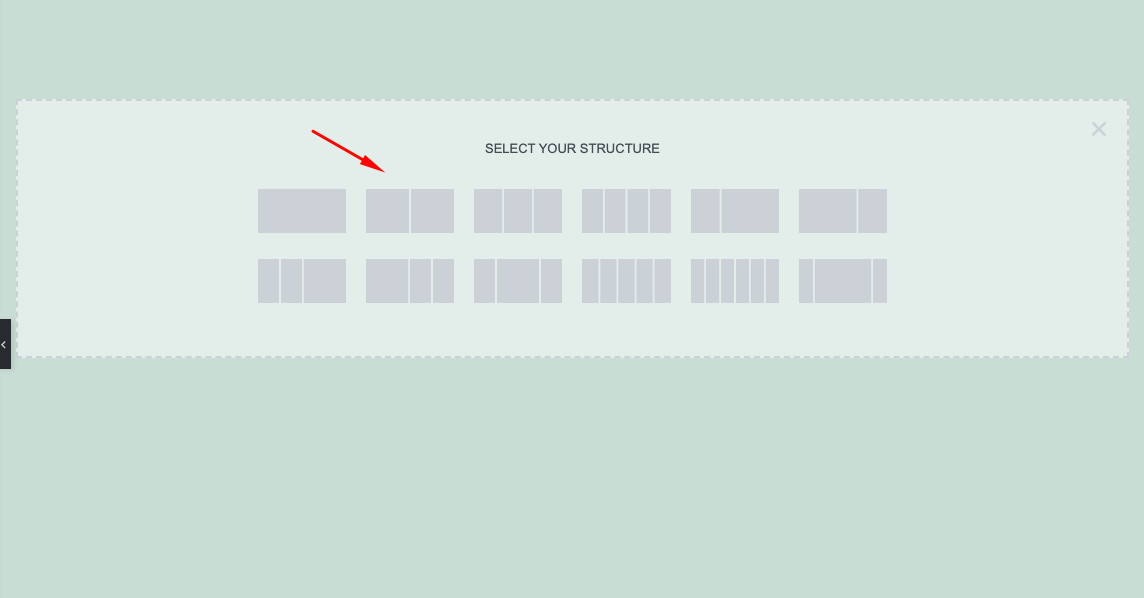
- After selecting the second pattern, you can see the two sections at the top of the screen.
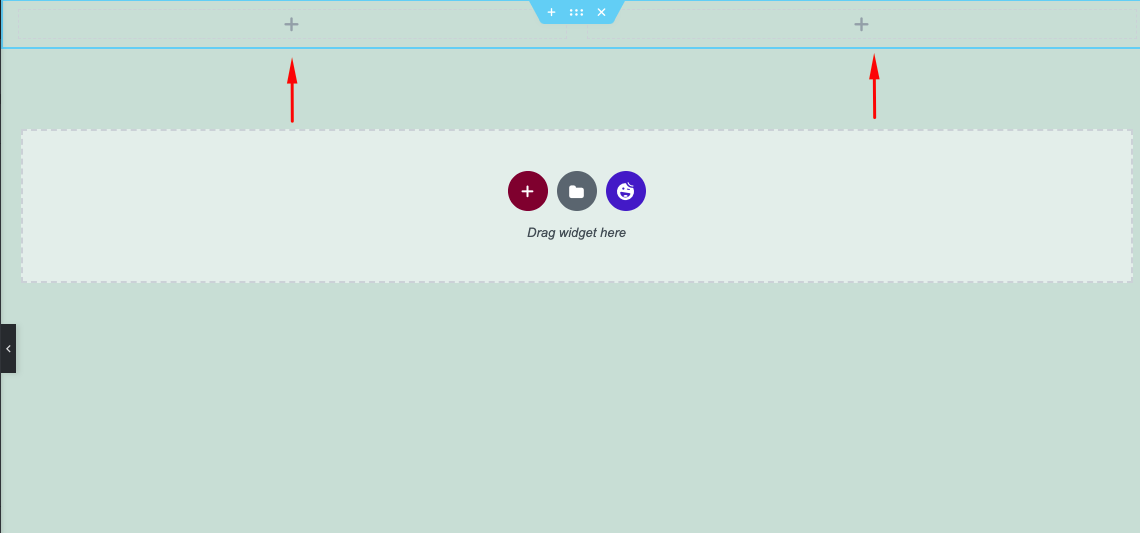
- Now seach for the widget ‘Nav Menu’ on the Elementor searchbar.
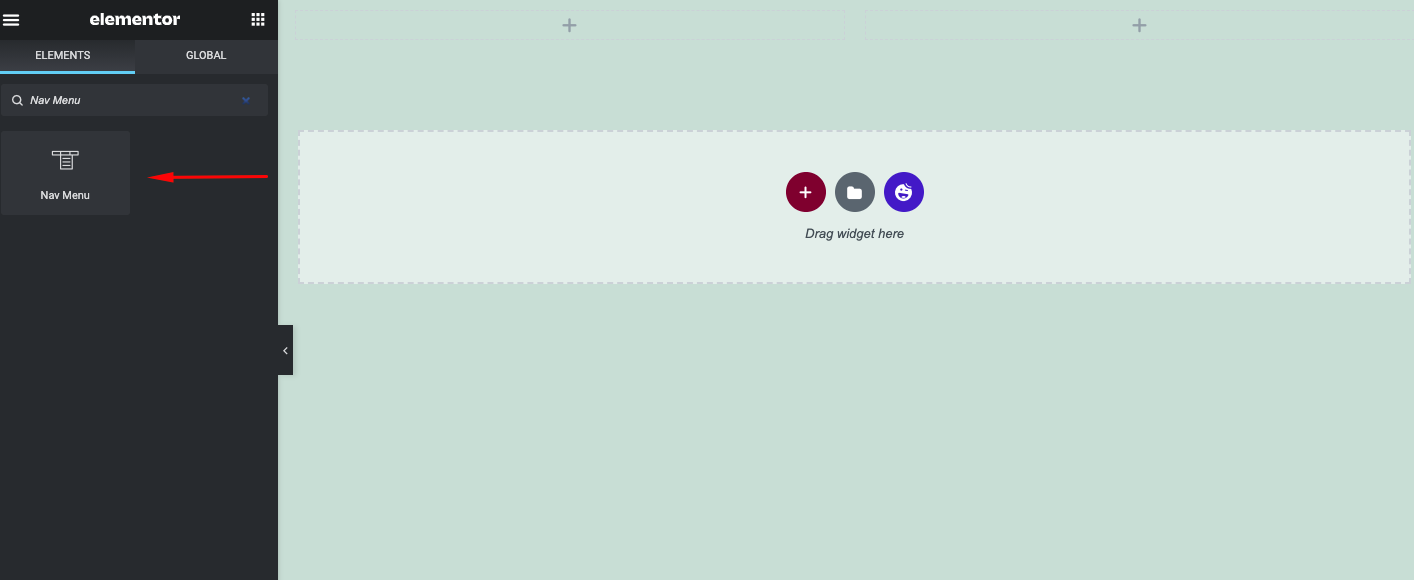
- Once you have found it, drag and drop the widget on the section you like. We recommend you to paste it on the right side of the section.
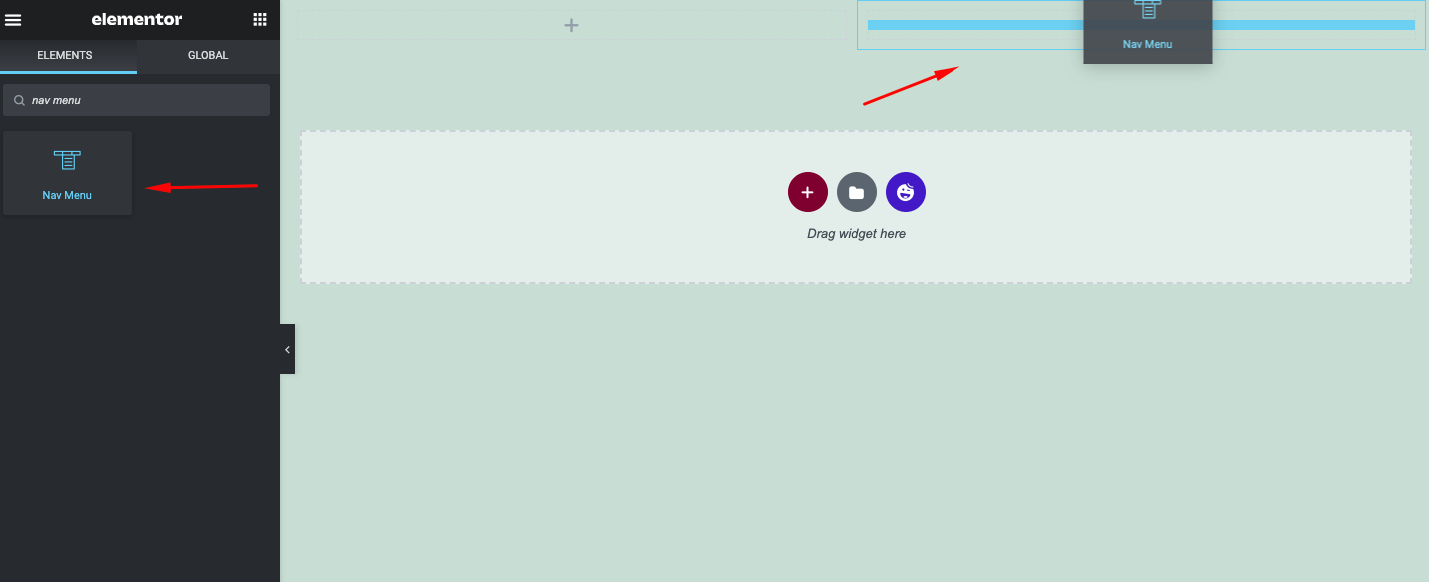
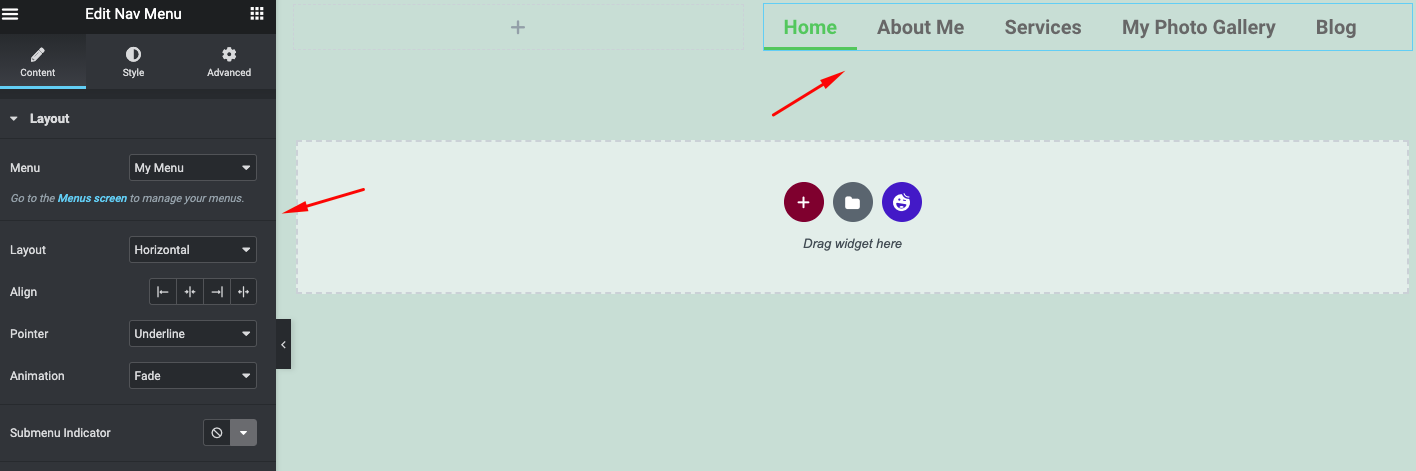
- Once you add the menu on the section it will appear immidiately.
In case you don’t how to create a menu in WordPress, check out the guide here.
Step Three: Customize Nav Menu
Well, you’re all set to customize the menu of your site. In this customization, you can utilize three crucial parts.
- Content
- Style
- Advanced
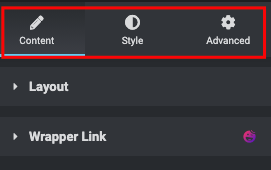
Content Customization
In content, you can find two options. Layout and Wrapper link. Now tap on the Layout button. You’ll find all the related customization options for your menu design.
- Menu: Select the menu that you created on your WordPress site.
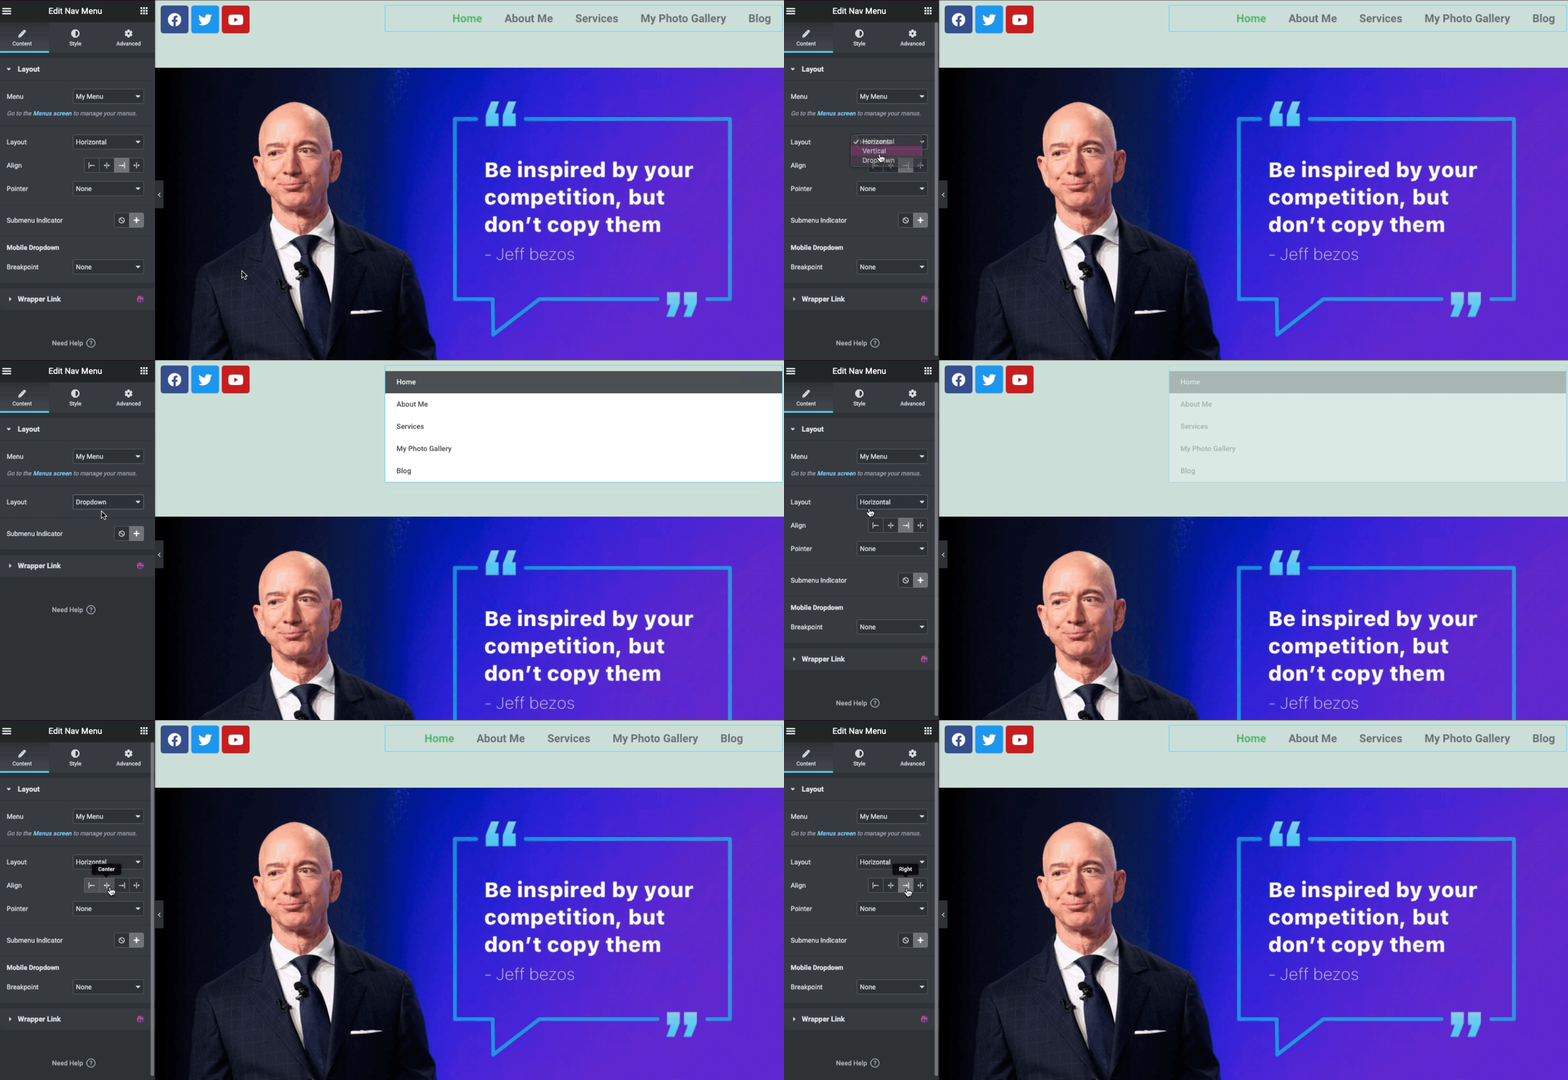
- Layout: Three types of layouts are available. Horizontal, vertical, and drop-down.
- Align: To change the alignment of your menu.
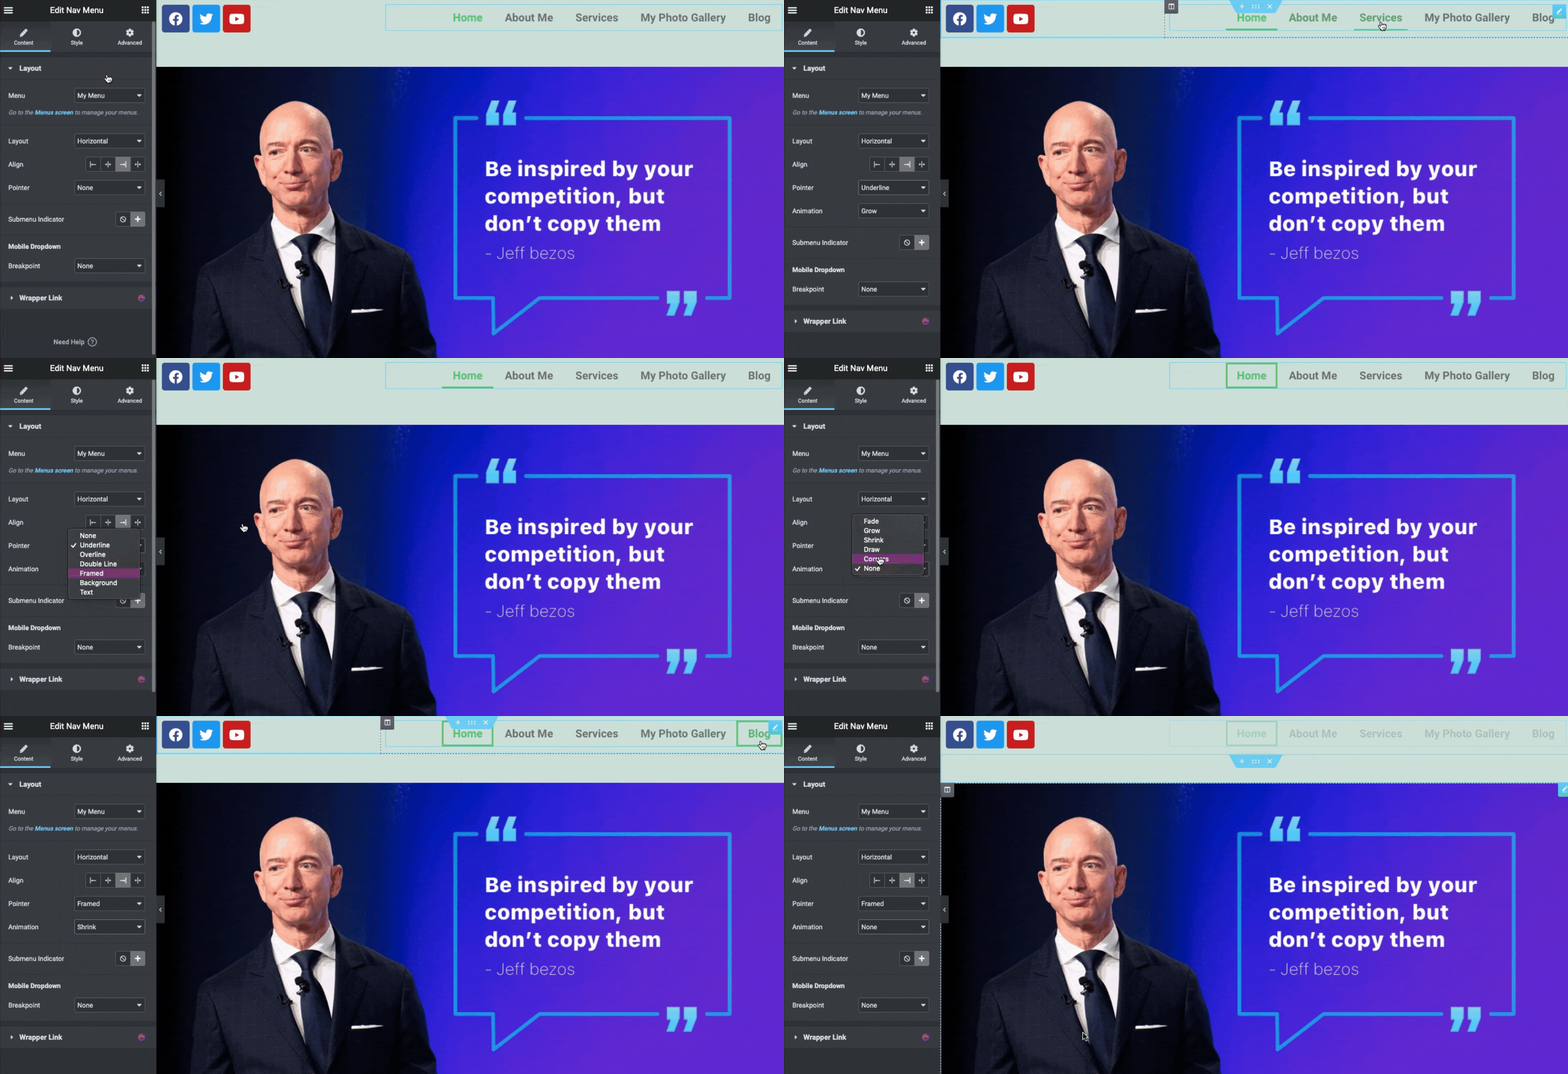
- Pointer: Add them to make your menu look better. Such as underline, overline, framed, text, etc.
- Animation: With it you can add animations to your menu. Such as fade in-out, Shrink in-out, and more.
- Modile dropdown: Check whether your design is mobile responsive or not.
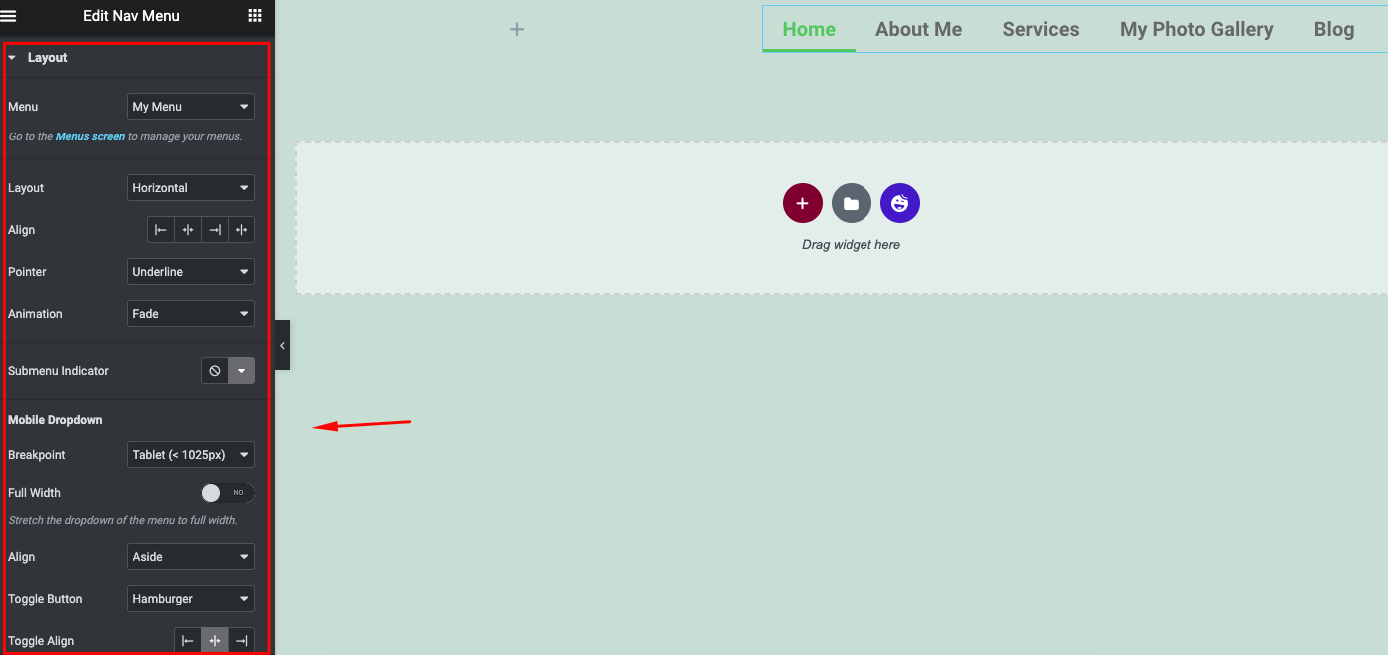
- Let’s see how you can add a layout on this widget
- In the same way, you can apply animation on the widget.
Style Customization
After the initial customization, you can stylize the menu. For that, tap on the Style button. And you’ll find two options – Main menu; Dropdown.
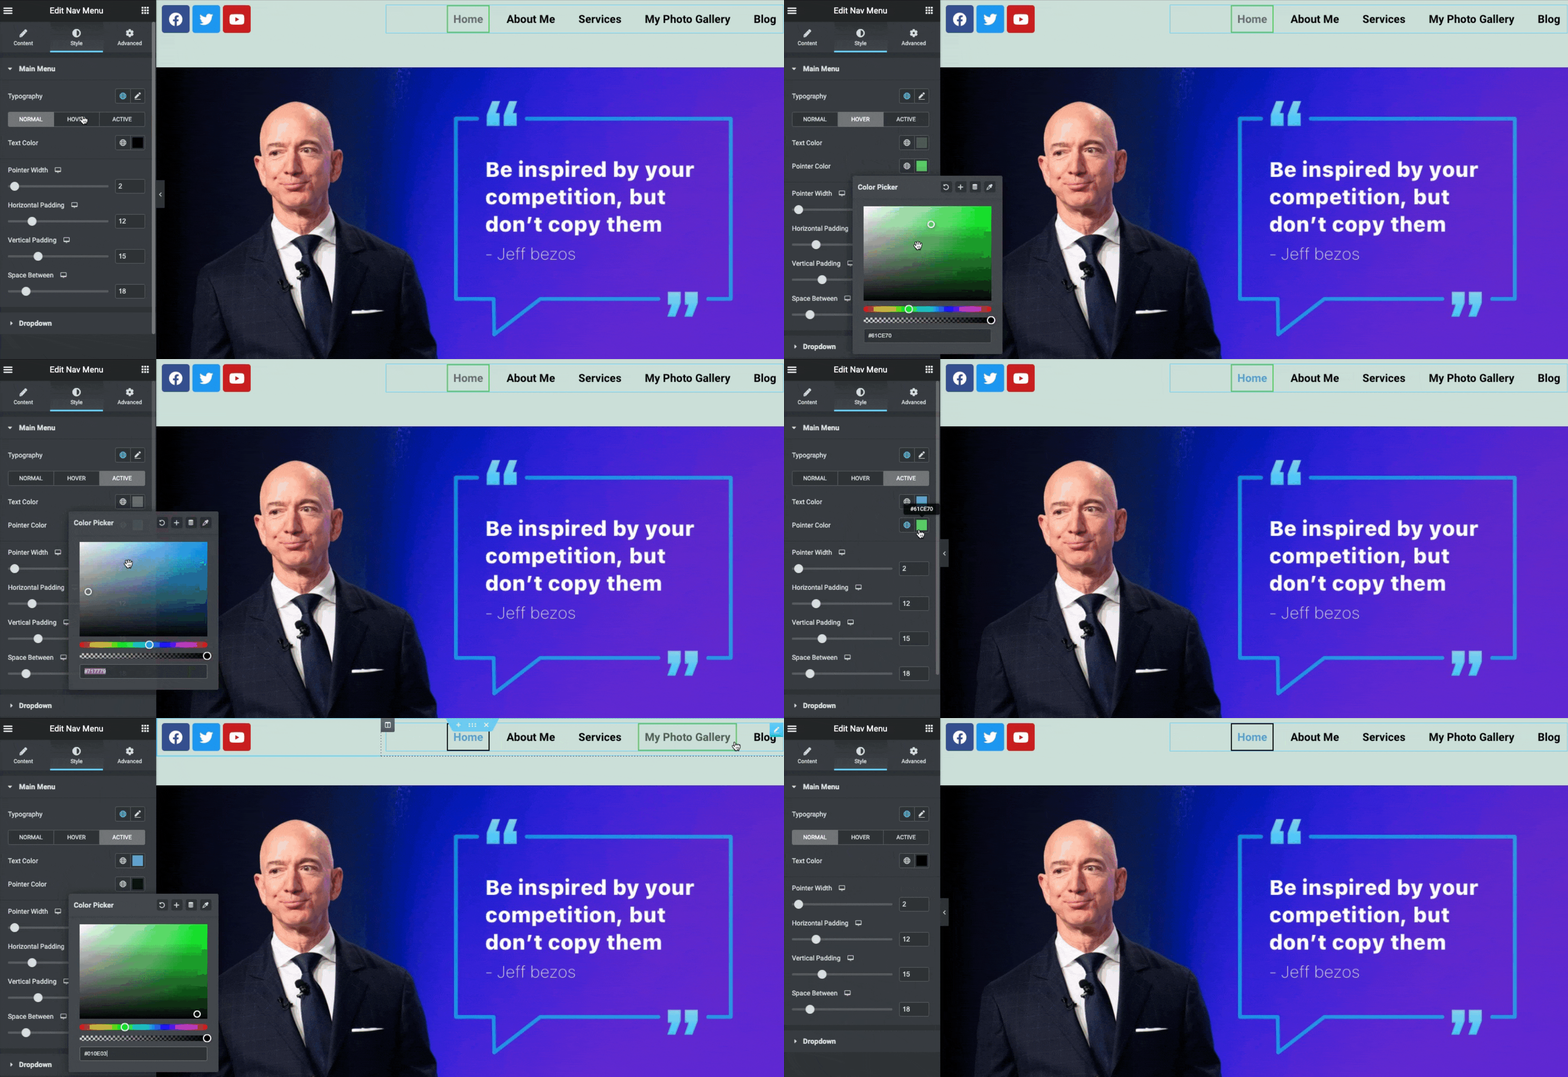
- Let’s see how you can quickly add the features on your Elementor nav menu widget. Here you can change the text color, width, padding, vertical padding, and space.
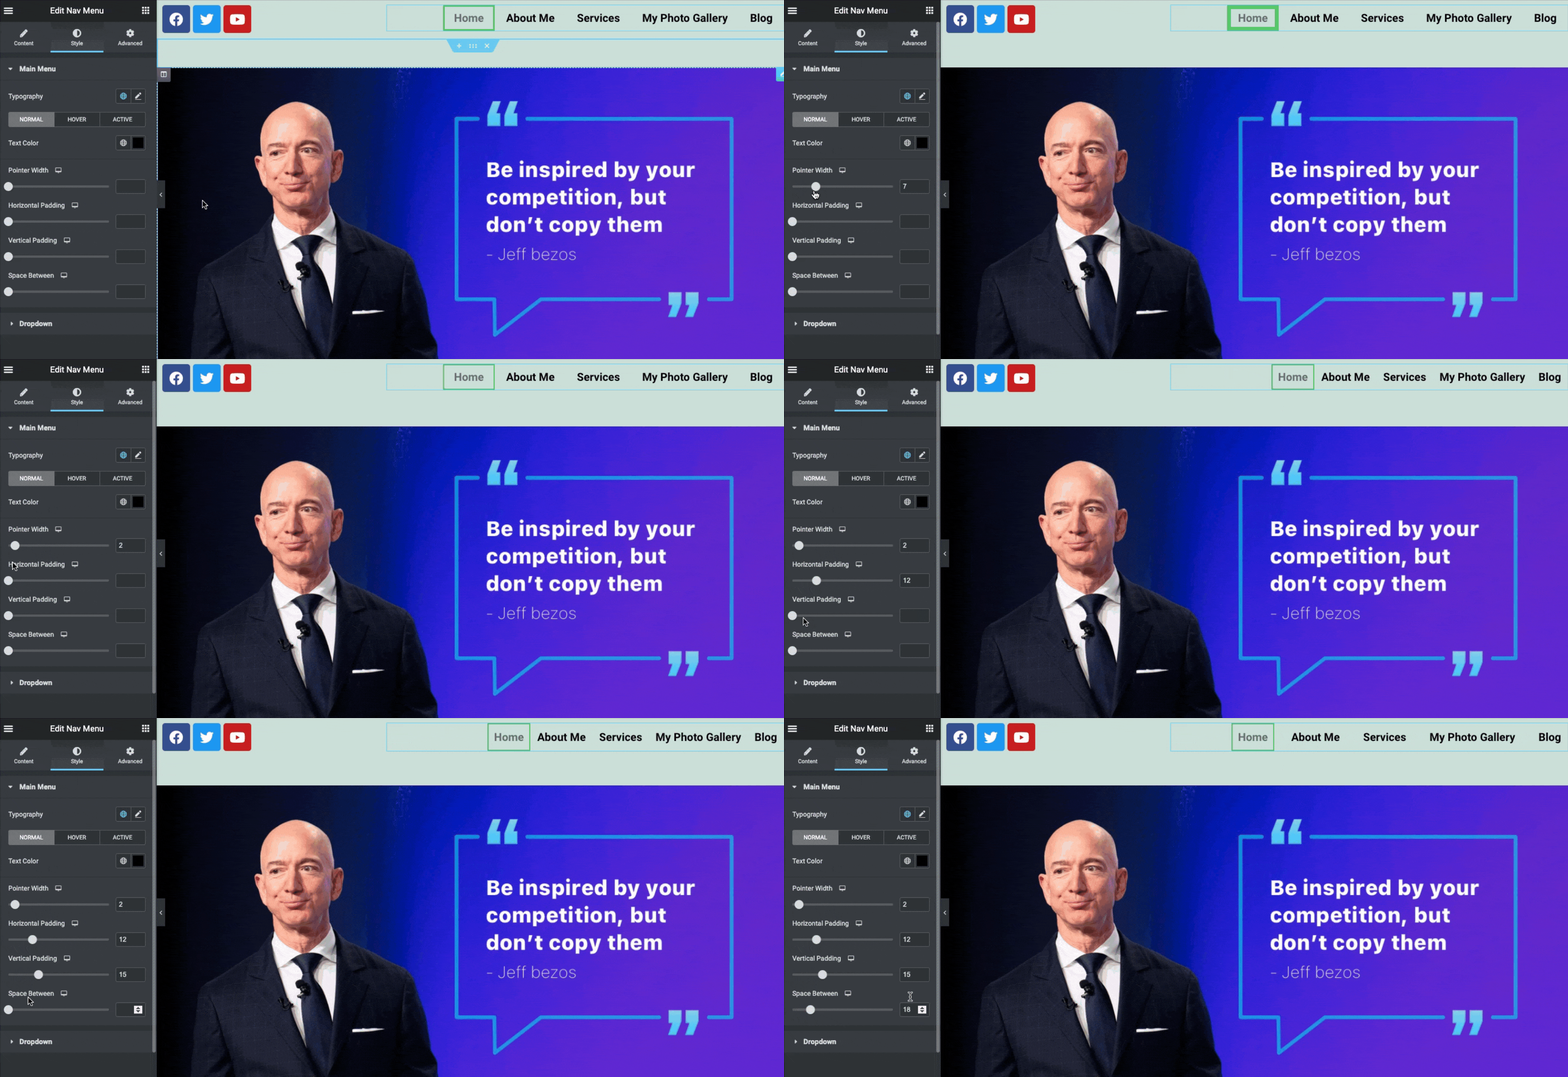
- To ad colors on the hover, click on the hover and change the prefered colors that you want to add.
Advanced Features
With the advanced features, you can do more with your current design. Such as motion effects, background, border effect, masking, positioning, responsiveness, custom CSS, and more.
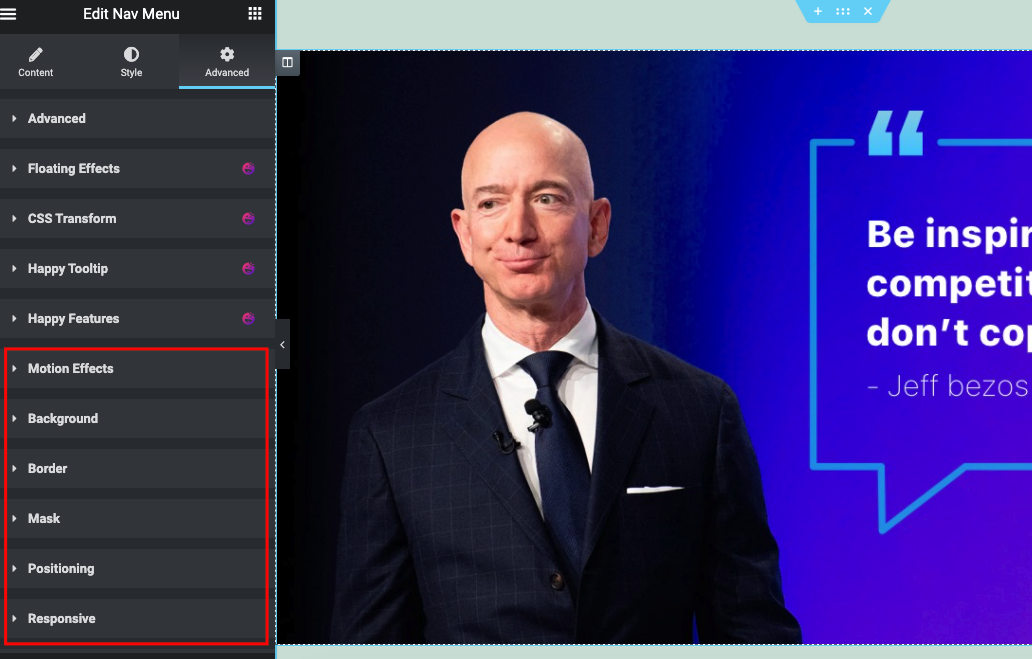
- Once you’re done with the entire design, click on the Publish button. And your Elementor nav menu will like below one:

So this is how you can add the Nav menu widget on your Elementor site. We just tried to show how the feature works and apply it to the design. Now it’s your turn to apply them one by one.
However, if you want to get a detailed guide, here is the video you can check out now.
What’s More You Can Add with The Elementor Nav Menu?
- Underline animations
- Background animations
- Text animations
- Menu spacing & alignment
- Color, background & typography
- And more
Therefore, utilizing these features, you can improve your WordPress menu structure and give it a standard look. But remember; try to implement them following the proper steps. For instance, you can try one by one on your local server. Once you confirm the final design, apply it on your live site. Try to practice this rule if you don’t want to break down your website’s template formation.
Bonus Tip: Introducing Happy Addons Mega Menu Widget
Apart from combining these features to your website’s menu, you can add more advanced features using the Happy Addons mega menu widget. You can create mega menus like dribble, InVision, Bobbi Brown, Adidas, Puma, Evernote, and more from your imagination.
Also, you can add custom icons, badges, and default WordPress menus on your site and help to make them more beautiful for your users.
Here is a short tutorial that you can check to learn about the Happy Addons Mega menu widget.
To get a detailed guide you can also check out the official documentation to learn how this widget works and the application process.
How To Customize Your WordPress Site Using Elementor Portfolio Widget

Here we’re going to talk about another premium feature of Elementor – the portfolio widget. After customizing your Elementor nav menu, you can beautify your site’s look by applying the portfolio widget. This widget helps to display your posts, pages, and custom post types in an attractive, filterable grid. To complete the process requires only a few steps. So you can easily use utilize this widget on your site.
However, let’s check out how to add a portfolio with Elementor. We’re assuming that you’ve already a portfolio website built with Elementor. If not, you can check out the article to learn how to create a portfolio website using Elementor.
Step One: Create a Page
First of all, open a page that you want to add a portfolio widget. And then click on Edit with Elementor.
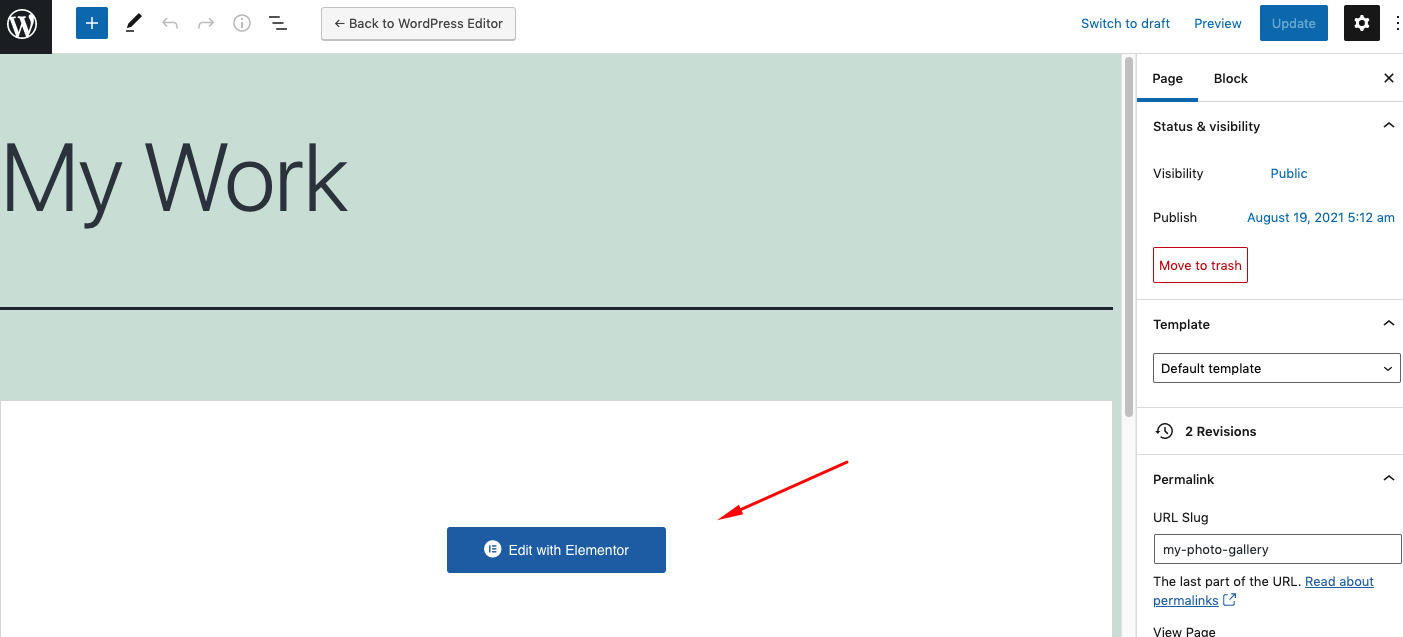
After that, your design canvas will open. The way you added the Elementor nav menu widget, similarly, you can add this widget.
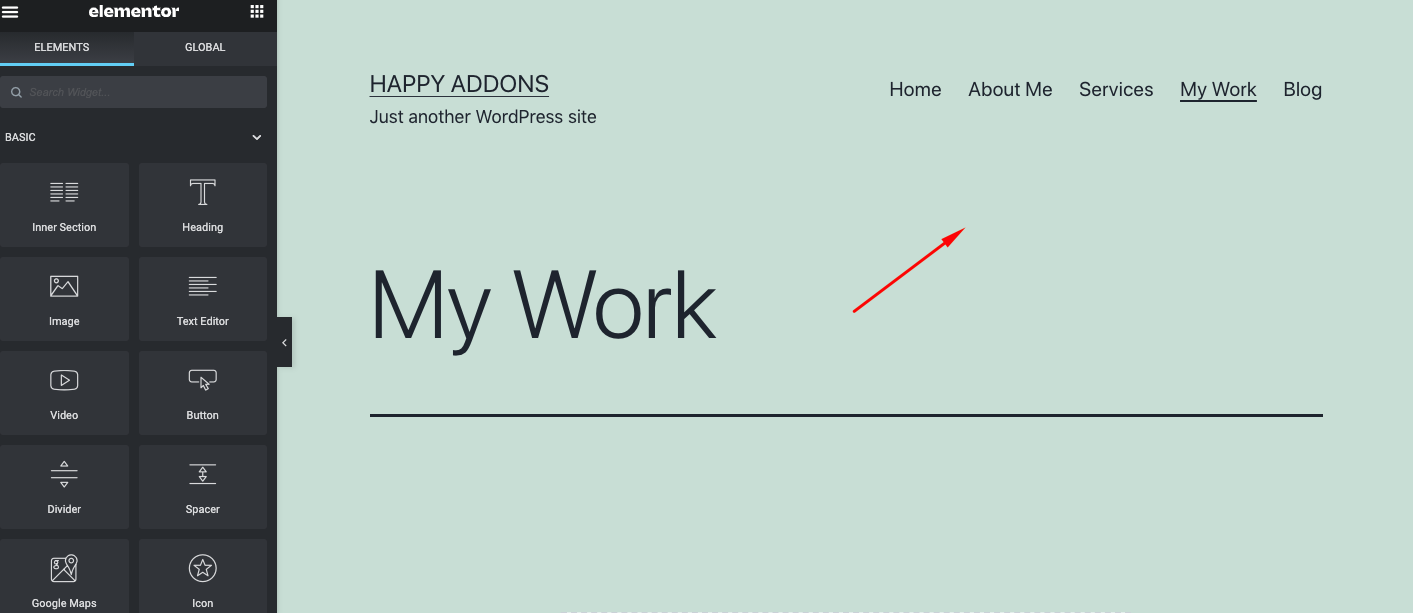
Step Two: Add Portfolio Widget
Search for the Portfolio widget on the search bar and drag it on the canvas.
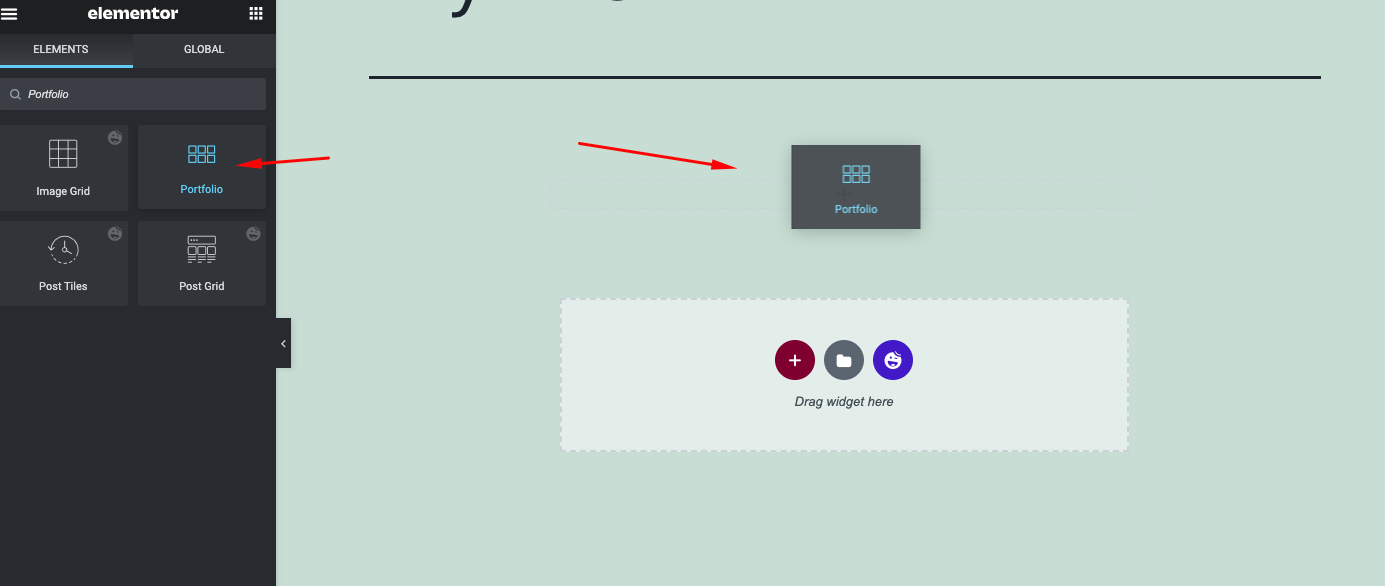
Note: The Portfolio widget ONLY works with posts, pages, and custom post types. The Portfolio widget does NOT work with Galleries.
Step Three: Customize the Portfolio Widget
Once you add the widget, your posts will automatically appear on the screen.
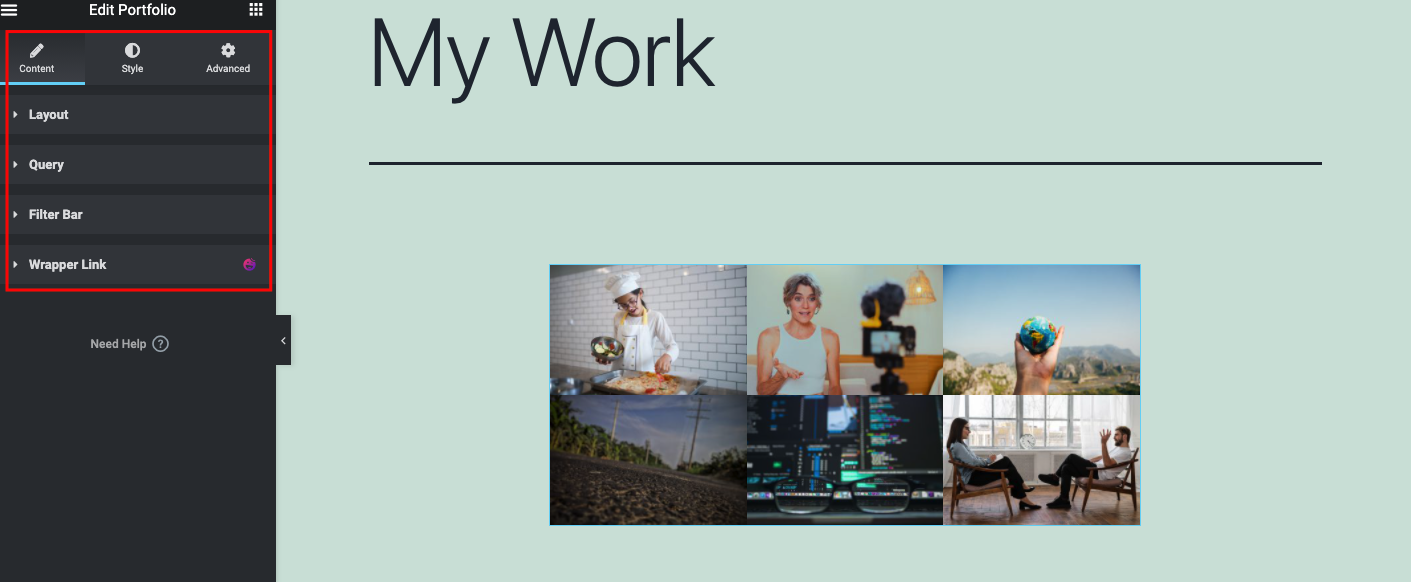
The entire customization consists of three parts. Content, style, and advance.
Content
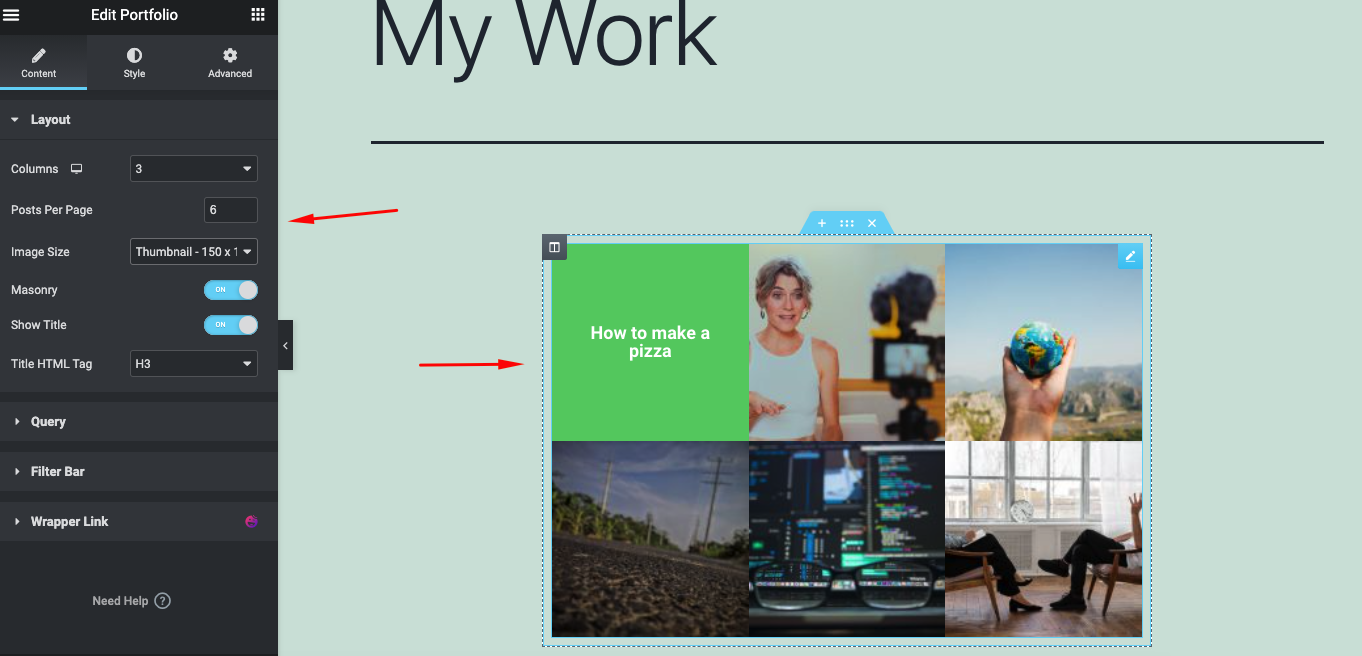
- Columns: Set the number of columns displayed in the widget
- Posts count: Set the exact amount of posts to be displayed in the widget
- Image size: Set the size of the images
- Item ratio: Set the ratio of the items
- Show title: Choose whether to show or hide the title. The title will display while hovering over the images
- Title HTML tag: Wrap the title with a tag, either H1…H6, span, div or paragraph
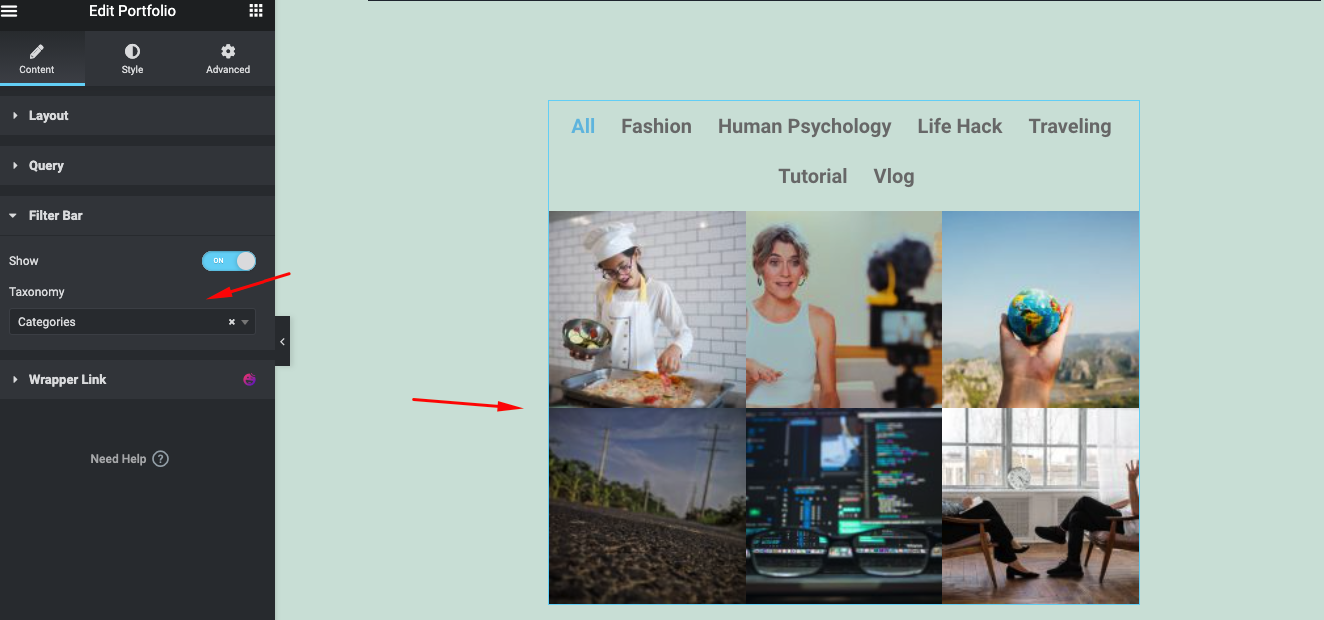
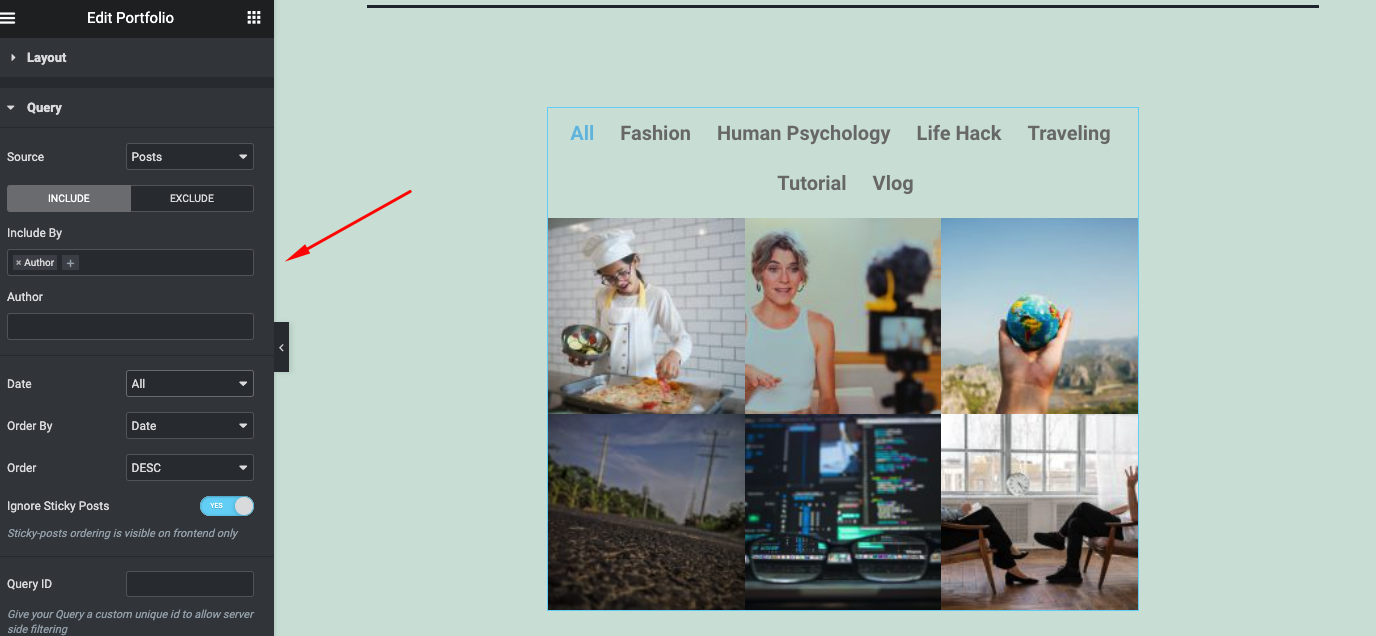
- Filter bar: Set whether to show or hide the filter bar above the portfolio. Choose the taxonomy from which to display the posts. Options include: Categories, Tags, and any custom post-type taxonomies.
- Query: Select the source from which the widget will display the content. Options include posts, pages, custom post types if available, manual selection, current query, and related.
Style
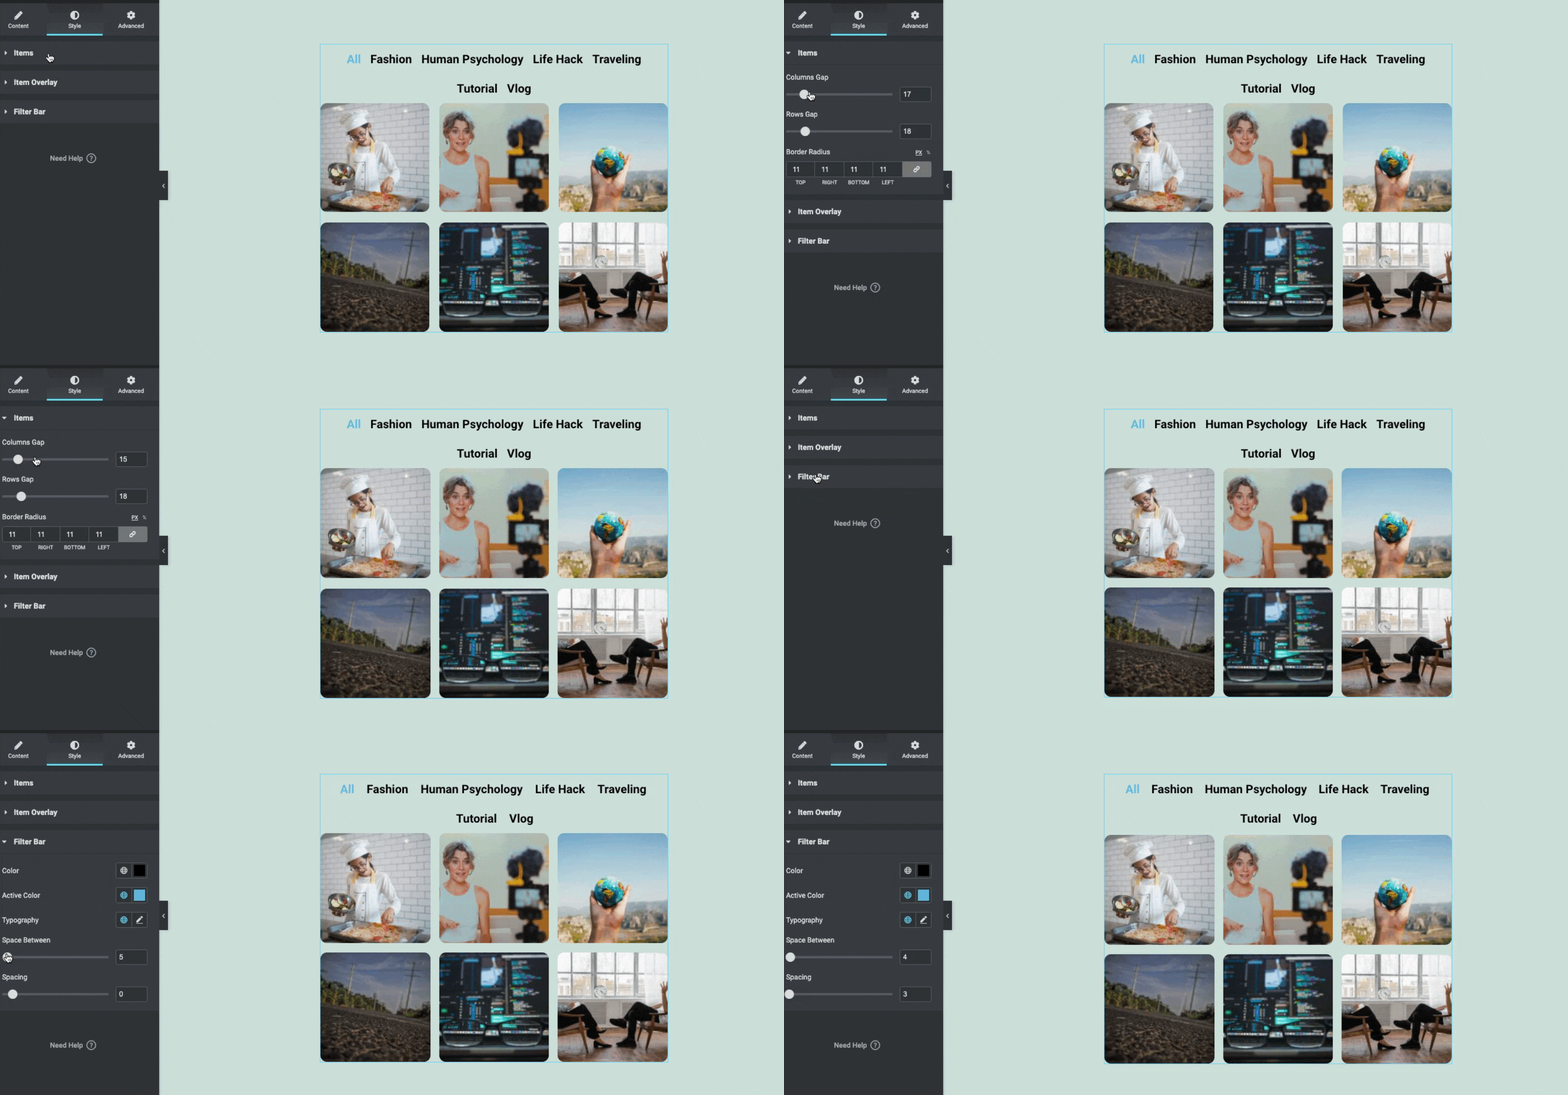
- Item Gap: Set the exact gap between the items
- Rows Gap: Set the exact gap between rows of items
- Border Radius: Set the border radius for the images to control corner roundness
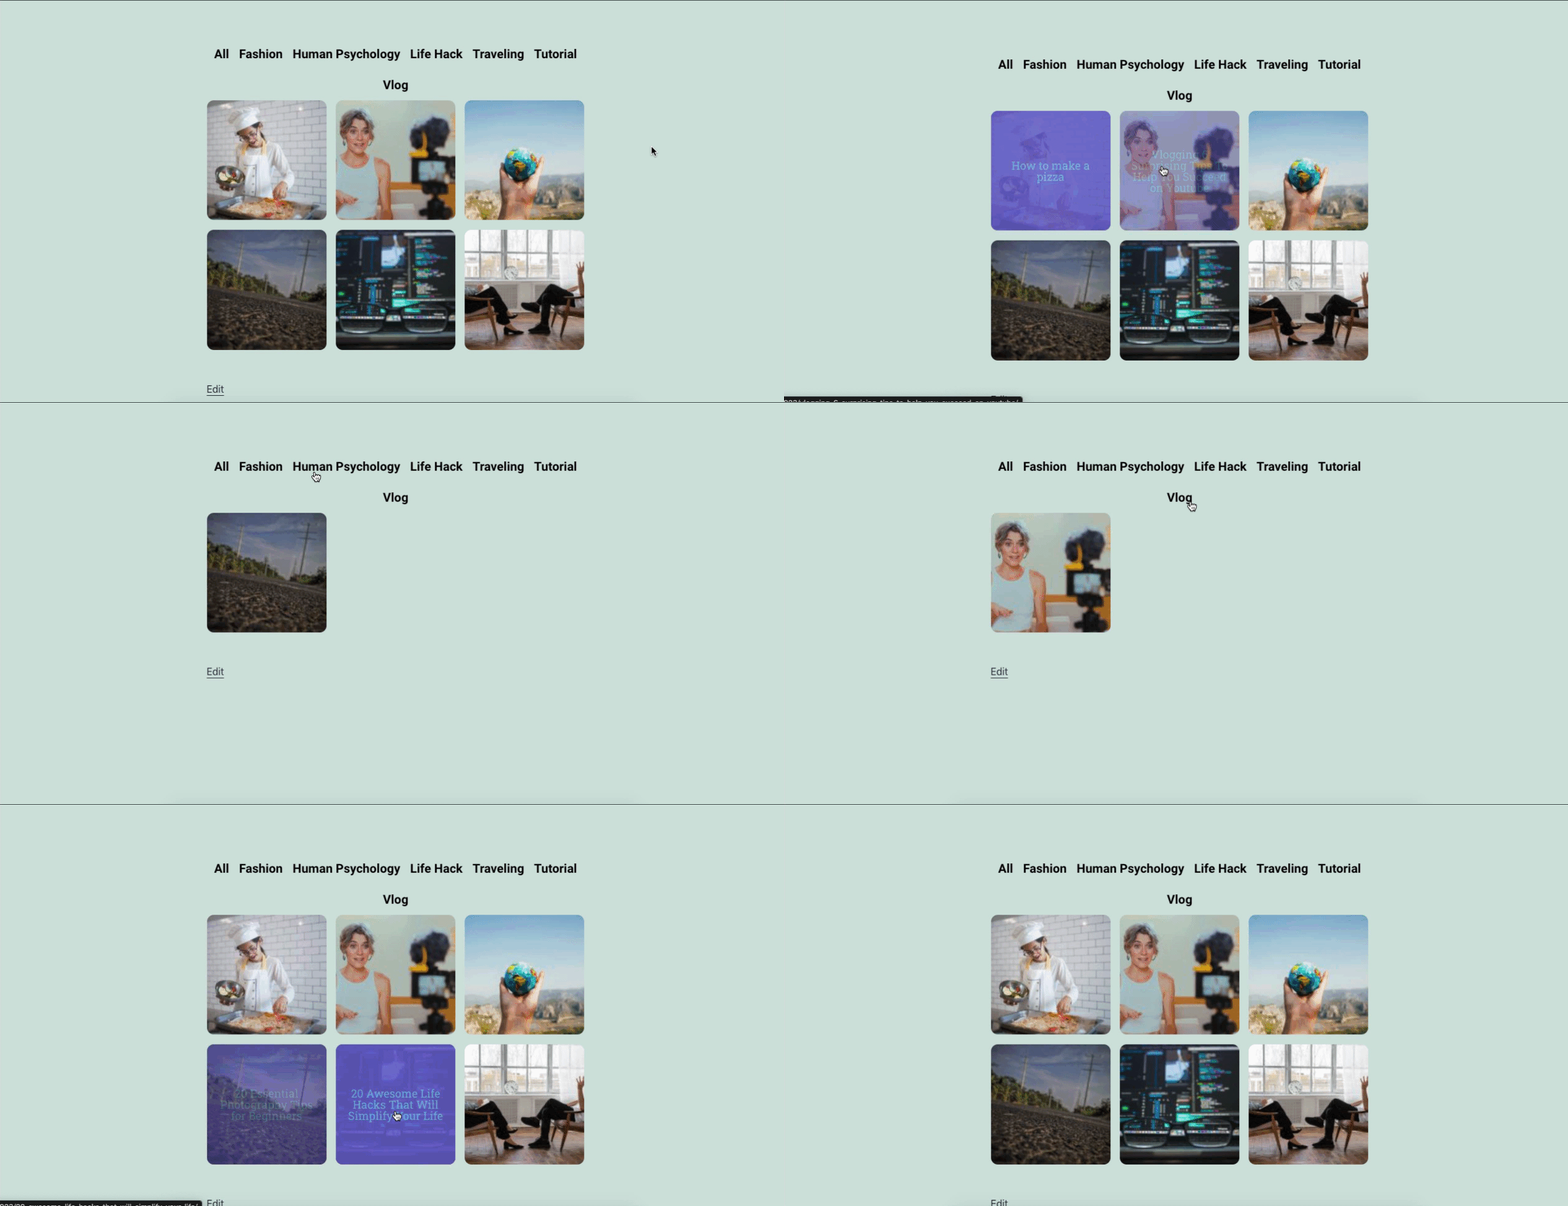
- Background Color: Set the background color of the overlay when you hover over the image
- Color: Set the post’s Title color. The title appears within the overlay when you hover over the image
- Typography: Customize the typography of the Title
- Color: Set the color of the Filter Bar text
- Active Color: Set the color for the Filter Bar’s active text
- Typography: Customize the typography of the Filter Bar text
- Space Between Items: Set the space between the items in the Filter Bar
- Filter Spacing: Set the spacing between the Filter Bar and the images
Advanced Features
You can add some advanced features to your design. Such as margin, padding, Z-Index, CSS, motion effects, background, border, masking, attributes, and more.
So after customizing all your design settings, here is how it will look on your live site.
However, if you want to add a more detailed tutorial, you can check out the following video tutorial.
Some FAQ regarding Elementor Menu And Portfolio Widget
Can I use the Elementor nav menu with any theme?
Ans: Yes, of course. Elementor is fully compatible with any themes out there in the WordPress ecosystem. Also, for the pro features. No matter which theme you’re using, you can apply the Nav menu to your site
Will the Elementor menu & portfolio widget work, if I don’t renew the pro package?
Ans: Once you upgraded the pro plan, you will be able to use all the premium features. But if your date expires, then you can’t get premium support. Such as software updates, support, and other stuff. To clear this confusion, you can read this article. It will give you an idea of What Happens When Elementor Pro Expires (Learn What You Should Do).
Can I transfer my Pro license from one domain to another?
Of course. Just deactivate Elementor from your previous domain and activate it on the new one. You can manage it in your account through View Websites > Manage License.
How do I migrate my Elementor website from one domain to another?
Yes, you can do that. For instance, you need to follow some steps to successfully transfer all data without missing any single one.
Step 1: Some Preliminary Housekeeping
Step 2: Move Files to New Server
Step 3: Export Database
Step 4: Create a New MySQL Database
Step 5: Import Database
Step 6: Edit wp-config
Step 7: Find and Replace Urls in Elementor Content
Step 8: Regenerate Elementor CSS
For more details, check out the detailed guide here.
Will the nav menu & portfolio widget hamper my SEO ranking?
No, you don’t have to use Elementor Pro for SEO purposes. SEO is concerned to be an effective method for content but not for the technical design side. It’s also true that a better web structure will improve your user experience. So consider thinking on that point.
Conclusion
Creating a website menu requires a lot of hard work and patience. But open-source platform like WordPress makes it easier for us. The available resources, plugins, documentation, and other short tutorials could easily help anyone to build & customize their sites.
However, there are several ways to create a custom WordPress menu & portfolio site. You can do it manually or follow the process we have shown above. But we recommend you avoid the manual process. It can break your site structure if you don’t have enough experience in website design.
To automate your process & reduce unnecessary effort, the Elementor nav menu widget could be the ultimate choice. And the portfolio widget can help you to redesign your site by making your web pages more lucrative & engaging.
If you want to power up your Elementor site design experience to the next level, you can utilize Happy Addons. It’s a collection of diverse Elementor features and widgets. Using them properly, you can enrich a professional look within a short time.
![Black Friday and Cyber Monday are around the corner, and people are waiting for these festivals to grab the best product deals. That is why giving an attractive look to your website during this festive season is very necessary. But, creating a whole new landing page might be difficult in a short period of time. Don't worry. By using Happy Elementor Addons Black Friday and Cyber Monday Landing Page templates, you can easily develop a whole new landing page in a few minutes. In this today's blog, we are going to show how to boost your website design using HappyAddons templates during this festival season. Before that, we'll talk a bit about these two festivals and why they are important to online business communities. What are Black Friday and Cyber Monday? Black Friday is the immediate following of the famous Thanksgiving day. This is when people start shopping to celebrate the Christmas festival. Since the late 1980s, retail sales on this day have constantly been suppressing the past volumes. See the graph below. Source: Salecycle.com The first Monday following Thanksgiving day each year is called Cyber Monday. It was first introduced in 2005 by the USA National Retail Federation to encourage people to buy online. Though this festival originated in the USA, it is celebrated globally today. See the stats below. Source: Salecycle.com It indicates customers' buying behavior around this day is growing up over time. Many customers today keep a budget to buy products on these two days. So, why won’t you prepare a Cyber Monday landing page if you have an online store? Importance of Designing Landing Pages for Black Friday and Cyber Monday Festival Having a well-design website is one of the major checklists if you are running an online business. Most importantly, you have to make sure that your website remains up-to-date to boost your sales. That is why you need to redesign your website or make a new landing page during the Black Friday and Cyber Monday festivals. Because most online product & service-based businesses promote special deals during these two festivals. Here are some remarkable ways dedicated landing pages during these festivals can positively impact the performance of your online business. Boosts your product salesIncreases conversion rateOpportunity to collect potential email leadsGrabs users' attention toward your siteReduces bounce rateIncreases website visitors. Elementor Black Friday New Seasonal Kit is Already Here! Source: Elementor To make this Black Friday more enjoyable, Elementor has launched a New Seasonal Kit that includes landing pages, sections, pop-ups, and vector assets. All these design elements are made by the Elementor team so that one can easily use them on their website to ensure more sales and conversions. New Elementor Black Friday Seasonal Kit offers: 3 Landing pages6 Sections 6 Popups A collection of stickers & animations You can only get these ready-made Black Friday landing pages and sections if you have Installed Elementor Pro on your site. However, if you are looking for templates that are outside of the box, you can go with Happy Addons, the fastest Elementor Addons on the market. It's very easy to use, flexible and has tons of advanced features and widgets that can ease your website design journey. Also, you'll get several festival landing page templates & blocks. Moreover, you can use free Black Friday and Cyber Monday design blocks and templates to decorate your site. Most importantly, these templates and blocks are easy to customize and can be used for multiple purposes. Now let's see how you can use the Happy Addons templates to design your website according to the Black Friday theme. Pre-Requisites to Use HappyAddons Templates to Design Black Friday and Cyber Monday Landing Pages You must have the following plugins installed on your site to get access to the HappyAddons Template library. Make sure you’ve installed and activated the Happy Addons Free & Premium version of your website. Elementor (Free)Happy Addons (Free)Happy Addons Pro If you are new to Elementor, check this Step By Step Guide For Beginners. If you want to explore the readymade templates of HappyAddons before installing these plugins, you may visit by clicking on the button below. Check out Happy Addons Templates How to Design Black Friday Landing Page on Your Website Once you have the plugins (mentioned above) installed, your website is ready to follow the tutorial guide explained in this section. Get ready now! Step 1: Open a New Page with Elementor Create a new page or open the existing page with Elementor. Next, you have to select the Elementor Canvas option.Unless you select Elementor Canvas, you may watch the header, footer, and unnecessary other texts on the page. These might be irritating to you.Once you open the page with Elementor Canvas, your page will be completely clean. Watch the video below on how to do it. Step 02: Go to HappyAddons Library Click on the HappyAddons Library Icon. It will open up a modal popup. Here you'll find numerous stunning premade Blocks and Pages created by the Happy Addons team. Kindly explore them to create a list of your favorite items. Step 03: Import a HappyAddons Black Friday Template Go to the Page tab on the modal popup.Select Black Friday from the left-side filter option.You will several good-looking templates on your screen.Take your cursor on the one you like and hit on the INSERT button. Wait for a while to finish the installation process. You will get the template on your screen with editable sections and options. Step 04: Set the Black Friday Campaign Deadline A deadline creates a sense of urgency in customers' minds. So, better if you add a deadline section on the page to show your Black Friday deals. The good thing is that if you select the template as we did, you will automatically get a deadline or countdown option. You have to customize it as you want. Step 05: Show Image Carousel Slider on Your Black Friday Landing Page Using the Image Carousel, you can slide show demonstrating discounts on your product categories. Drag and drop the Image Carousel widget on any landing page section. Next, from the Elementor panel, you can add photos and text to the widget. Do it accordingly. Thus, you can add more sections and options on the landing page. Hope you can do it yourself. Step 06: Make the Black Friday Landing Page Mobile Responsive Making a web page mobile responsive with Elementor is super easy. You'll get the mobile responsive option on the Elementor footer section. Clicking on it will open up the option to view your landing page on different device screens. We have explained the process in the video below. Note: Don't delete any widget or section while customizing your landing page for any particular device. Because if you delete a widget or section on any device screen, it will also be applied on other devices. However, you may change their position or alignment or hide them. It won't make any impact on other devices. Step 07: Final Preview of Our Landing Page Here is the final interface of our Elementor Black Friday landing page that we've designed using the Happy Addons' ready-made Template. Get Happy Addons to Add a Black Friday Theme Landing Page on Your Website How to Design Cyber Monday Landing Page on Your Website You will require the same prerequisites (Elementor and HappyAddons Plugins) to design the Cyber Monday landing page on your website. Hope you have them ready on your website. Now, let's get into the tutorial part. Step 01: Import a Cyber Monday Readymade Landing Page Template Go to the HappyAddons Template library.Choose the Cyber Monday template you like.Click on the INSERT button. Wait for a while to finish the installation process. You'll get a page design like the following image below. Step 02: Edit Different Sections of the Page In the first tutorial, you saw the deadline/countdown option was already embedded in the template. But this template doesn't have it. So, you can bring it to your page? Very simple. Create a new section by clicking on the plus icon.Type Countdown on the Elementor search bar.Drag and drop the widget on the section. Customize the Countdown section from the Content and Style tabs of the Elementor panel. Using the Heading widget, we have added the FLASH DEALS text next to the countdown to make it more meaningful. Thus, you can use other exciting widgets on the template to make your landing page super gorgeous. Step 03: Promote Products on the Landing Page Promotional landing pages usually include a section to showcase some hot-selling products to generate instant sales. Using the Image and Button widgets, we have created this section under the FLASH DEALS.You may customize it more as you wish. Step 04: Make it Mobile Responsive We already showed you the process in the first tutorial on making a mobile web landing page responsive. Hope you can do it here as well, following the same guideline. Click on the Responsive Mode icon and do the rest yourself. Bonus: Black Friday and Cyber Monday Landing Page Design Key Considerations Whenever you design a landing page, you need to consider why you need to design this page and what elements they should keep on the page. Because if you are not adding all the necessary features to your page, it will not serve its purpose. This is why you need to focus on a few things before designing your Black Friday landing page. Here are some points you must consider in designing Black Friday and Cyber Monday landing pages. Add Black Friday textSet deals deadlineShow your best-discounted productsAdd coupon code Focus on responsive page designMake your page visually appealingImprove your page user experience or page structureSet a proper website navigation FAQ on Black Friday and Cyber Monday Landing Page Design Now, we'll answer some common questions on Black Friday and Cyber Monday Landing page designs commonly found online. How much does it cost to design a landing page?The cost of designing a landing page varies depending on the complexity of the design, the level of customization required, and whom to hire for the page. A simple landing page can be designed for as little as $25, while a more complex design with multiple customizations can cost upwards of $2,00.However, if you have Elementor and HappyAddons installed, you can design unlimited landing pages at a minimal cost. But like any other tool, you must have a kind of enterprise on them. As they are drag-and-drop builders and their numerous tutorials and documentation are available, they won't take you more than a month to be used to. Check out some wonderful YouTube tutorials on these two plugins. Hope you will enjoy them.How many hours does it take to design a landing page?It mainly depends on the level of design complexity and your web design skill. However, both in Elementor and HappyAddons, you will get countless readymade templates and block sections. You can design a beautiful landing page in 3-5 hours by making a proper combination of them.Can I design Black Friday and Cyber Monday Landing pages with Elementor and HappyAddons free versions?Surely, you can design Black Friday and Cyber Monday Landing pages with Elementor and HappyAddons free versions. But only with the pro versions, you can't add too many exciting features to your pages. For example, free versions will give you access to only a limited number of readymade templates.If you are just a beginner-level designer, free versions are enough. But if you are a professional designer or have a web designing agency, pro versions are a must. Are You Ready To Design Your Black Friday and Cyber Monday Landing Page? Customers look forward to this kind of occasion to buy their favorite products at a minimum price. Naturally, they are drawn to websites that look good and give a festive vibe. That is why adding a Black Friday and Cyber Monday landing page during the festival season will give you an extra edge over the competitors. The above guide shows how to design your Elementor Black Friday Landing page using the Happy Addons' Black Friday Templates and how it can help boost your holiday sales. So if you have any queries regarding this blog, you can comment on us in the below box. If you like this post, then share it on your social channel. Don't forget to subscribe to our newsletter. Also, follow our Facebook and Twitter channels for regular updates. Subscribe to our newsletter Get latest news & updates on Elementor [yikes-mailchimp form="1"] ":36560} /--](https://happyaddons.com/wp-content/uploads/2021/11/How-to-Design-Black-Friday-and-Cyber-Monday-Landing-Page-300x188.png)