A portfolio page is one of the best ways to showcase your work online. This page is important not only for individuals but also for organizations and agencies. On this page, anyone can highlight the projects they have completed in captivating ways so they can attract more customers and clients.
Having a portfolio site has become a common norm in this modern world, no matter if you are a distinguished employee or a fresher in the job market. This way, clients worldwide can find you, connect with you, and offer new projects. Thus, it can open up limitless opportunities for you.
With WordPress and Elementor, creating a portfolio web page is so easy. Because you can do it just by drag and drop, without coding. In this tutorial post, we’ll explain to you how to create a portfolio page in WordPress with Elementor. Get started!
What Is a Portfolio Web Page?
A portfolio web page is a dedicated page where you can display your work, skills, and achievements. It acts like a digital showcase, allowing visitors to see what you can do and what you have done in the past. It can include images, videos, case studies, testimonials, and other content that proves your abilities.
Portfolio websites are popular among creative professionals such as designers, photographers, writers, developers, and artists. The main goal of a portfolio website is to impress potential clients or employers and encourage them to hire you or work with you.
Differences Between a Portfolio Website and a Portfolio Web Page
Many people get confused between a portfolio website and a portfolio web page. Though they sound similar, they are different in how they present your work online. Understanding these differences will help you decide which one suits your needs better when building your online presence.
| Feature | Portfolio Website | Portfolio Web Page |
| Definition | A full website dedicated to showcasing your work, skills, and services | A single page within a larger website that shows a selection of your work |
| Size | Covers multiple pages (Home, About, Services, Blog, Contact) | Just one page focused on your portfolio only |
| Content | More detailed with extra information | Limited content, mainly focused on showing projects or samples |
| Navigation | Has a menu to navigate between different pages | No menu, or minimal navigation within the single page |
| Purpose | To build a complete online presence | To add a portfolio section inside an existing website, often for quick showcase |
| Flexibility | More flexible to add new sections and content regularly | Less flexible as it’s only one page, mostly static content |
Check how to create a portfolio website in WordPress with Elementor.
Elements a Portfolio Web Page May Have
As you know by now that a portfolio page usually has less content than a full website, it should focus on the most important parts that show your work clearly. Below are the things you may consider displaying on the portfolio web page.
1. A Brief Introduction
A brief introduction that tells who you are and what kind of work you do. This helps visitors connect with you right away without reading a long bio.
2. Portfolio Gallery
This is the main section to display your projects. Use clear images or videos with short titles or descriptions. Organize your work well, so visitors can easily see your best skills. Learn how to use the Elementor Image Gallery.
3. Contact Info or Button
Add a simple way for people to contact you, like an email address, phone number, or a contact button linking to a form or email.
4. Call to Action (CTA)
Guide visitors on what to do next. Whether it’s hiring you, asking for more details, or viewing more work, a clear CTA helps turn visitors into clients.
How to Create a Portfolio Page in WordPress with Elementor: Step-by-Step Guide

Remember that a portfolio page is a part of a website. As already mentioned, portfolio pages can be created for any website. So, if you want to design a portfolio page, you may often feel the need to design or modify other pages on your website. Now, to design your portfolio page with Elementor, you will need the following plugins.
HappyAddons is a well-known addon of the Elementor plugin. It comes with 130+ additional widgets and several dozen powerful features by which you can overcome the limitations of the Elementor plugin and enhance the design of your website. Both together can create unlimited possibilities on your site.
Once these plugins are installed and activated on your site, start following the steps explained below.
Step 01: Decide on the Elements You Want to Show on the Portfolio Page
Before you start designing, it’s important to decide what you want to include on your portfolio page. Since this page should be clean and focused, you need to select only the most essential elements that highlight your work effectively. We have already told you what to include in the page.
- A brief introduction
- Portfolio gallery
- Contact Info or Button
- Call to action
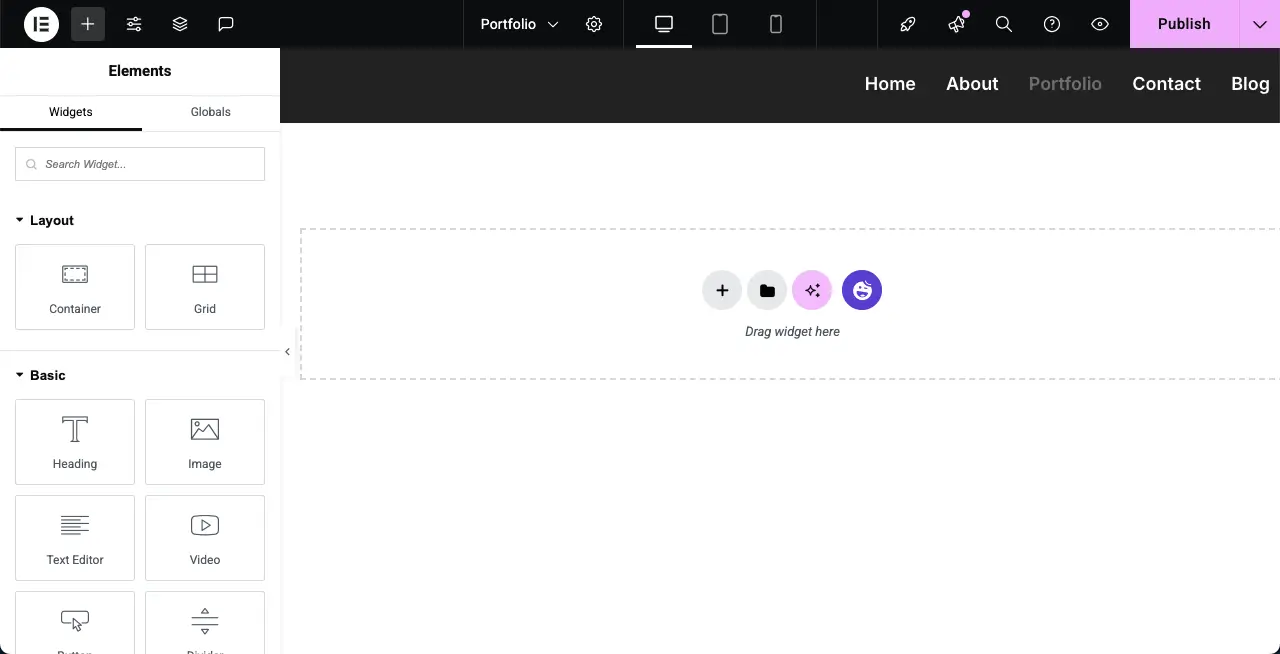
Step 02: Open a Page with the Elementor Canvas
Now, open a page with the Elementor Canvas. Here, you have to drag and drop elements and add suitable content.
Note: We already created a header with the theme builder that appears at the top.
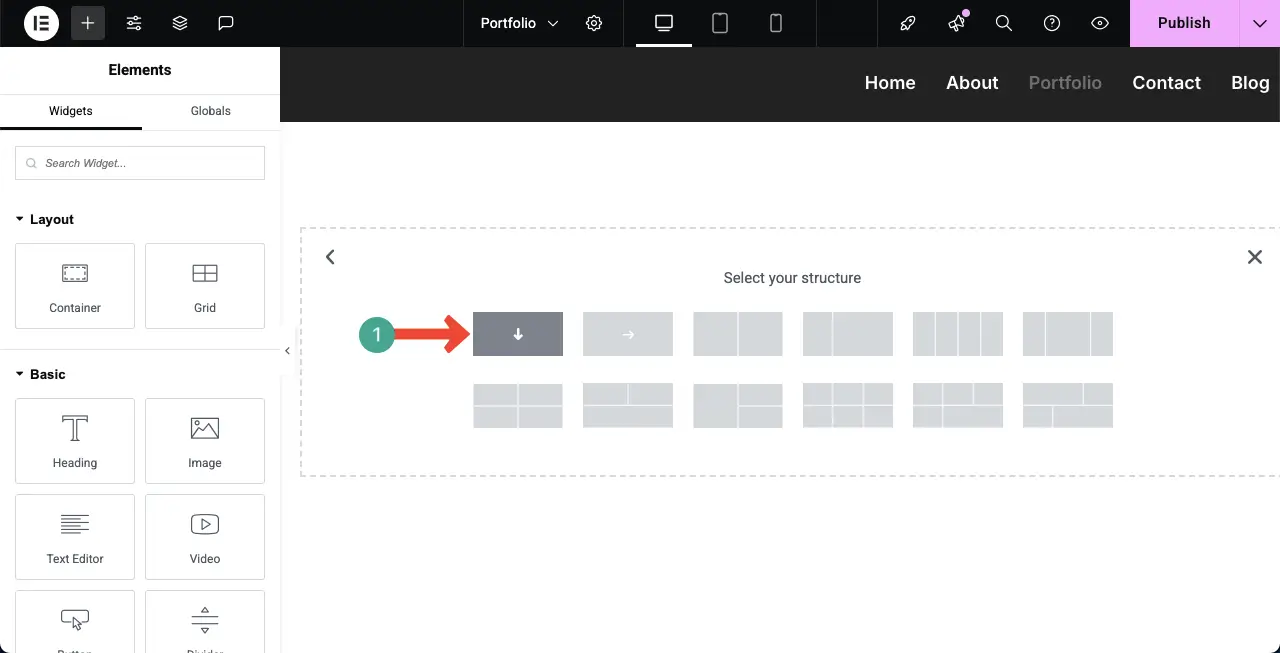
Step 03: Add a Short Description
Select a suitable column size for the canvas based on the width your content may require. We are selecting the single-column container.
To align the container’s design with the header, we will change its background color. To do this, hit the six-dotted icon on top of the container, go to the Style tab, and click the color option under the background section.
Now, choose a color for the container.
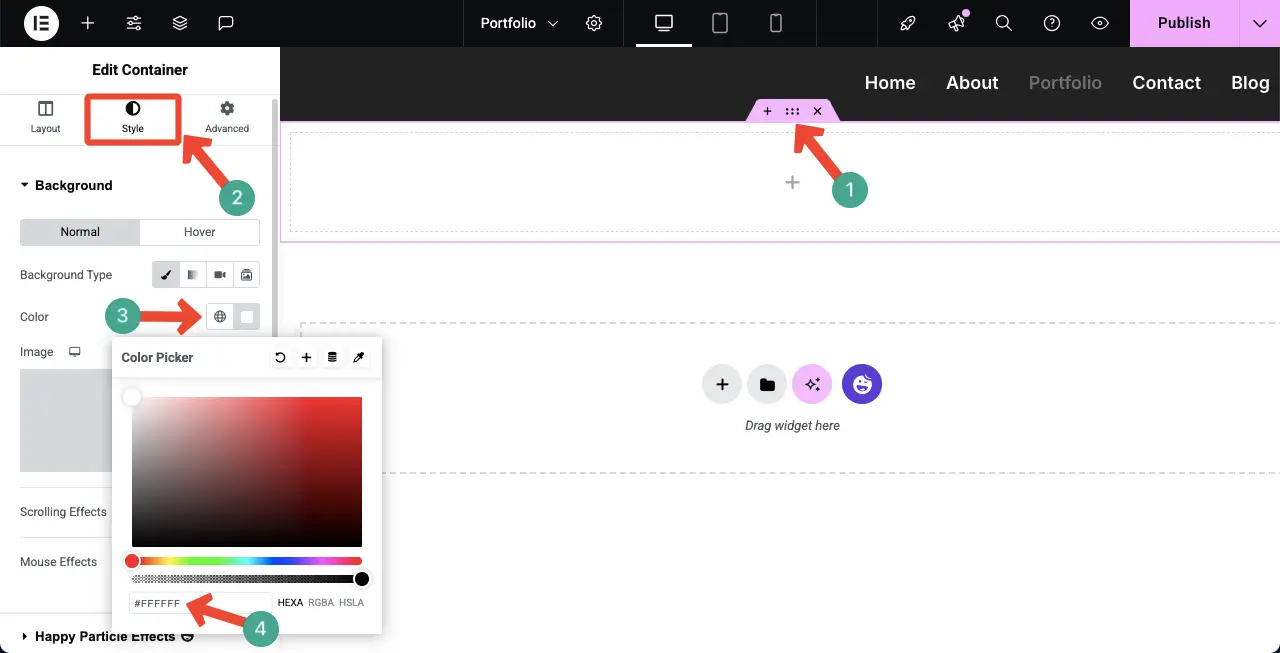
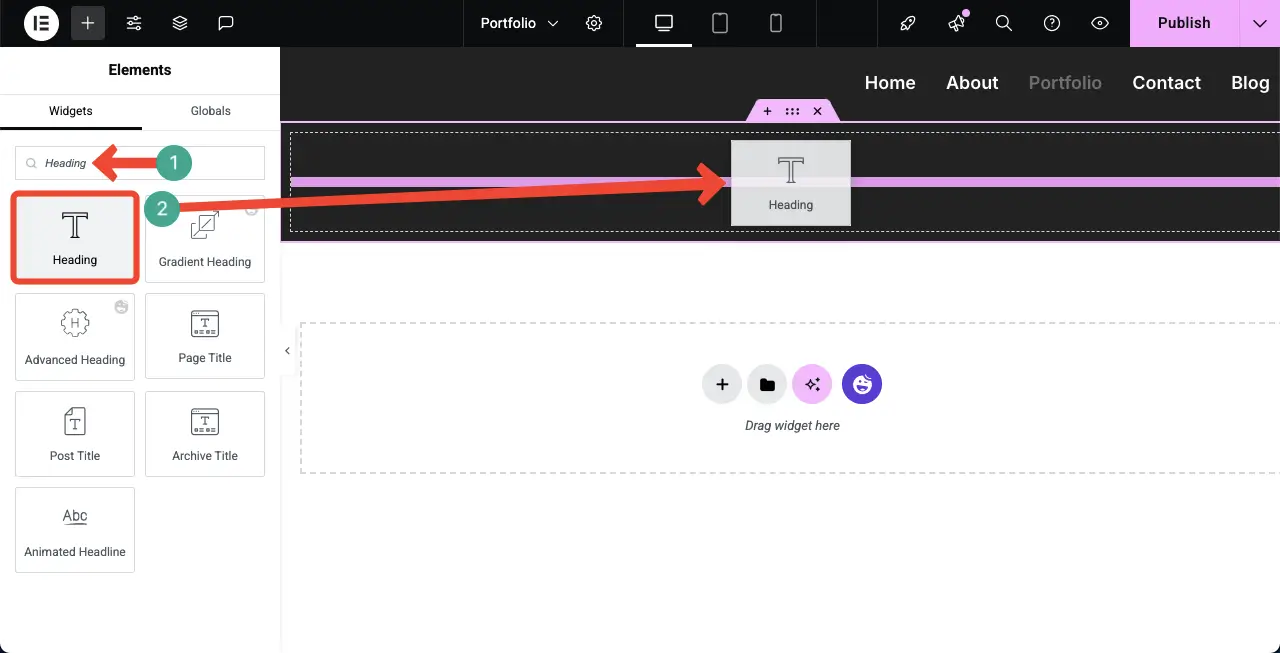
When your desired color is applied to the background of the container, find and add the Heading widget to the container.
This widget will create a space where you will be able to write a title or heading for the page. Do it.
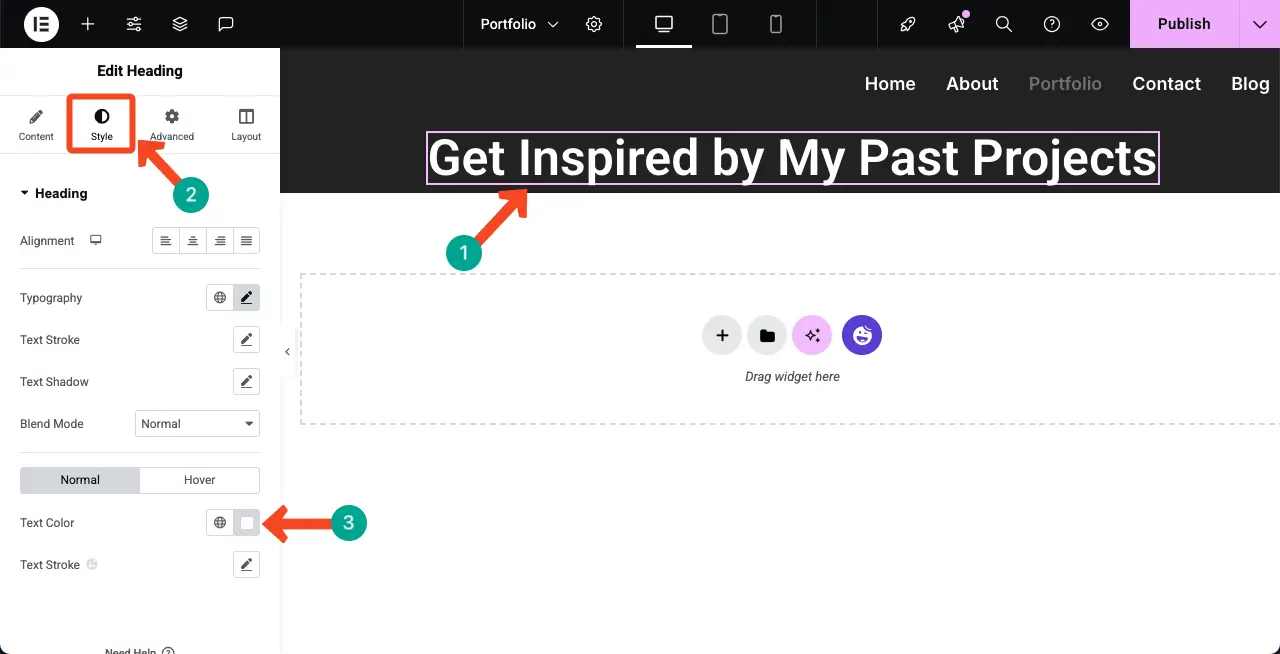
You can see that we have written a title for the page ‘Get Inspired by My Past Projects.’ You can stylize its size, typography, color, and many other options from the Style tab.
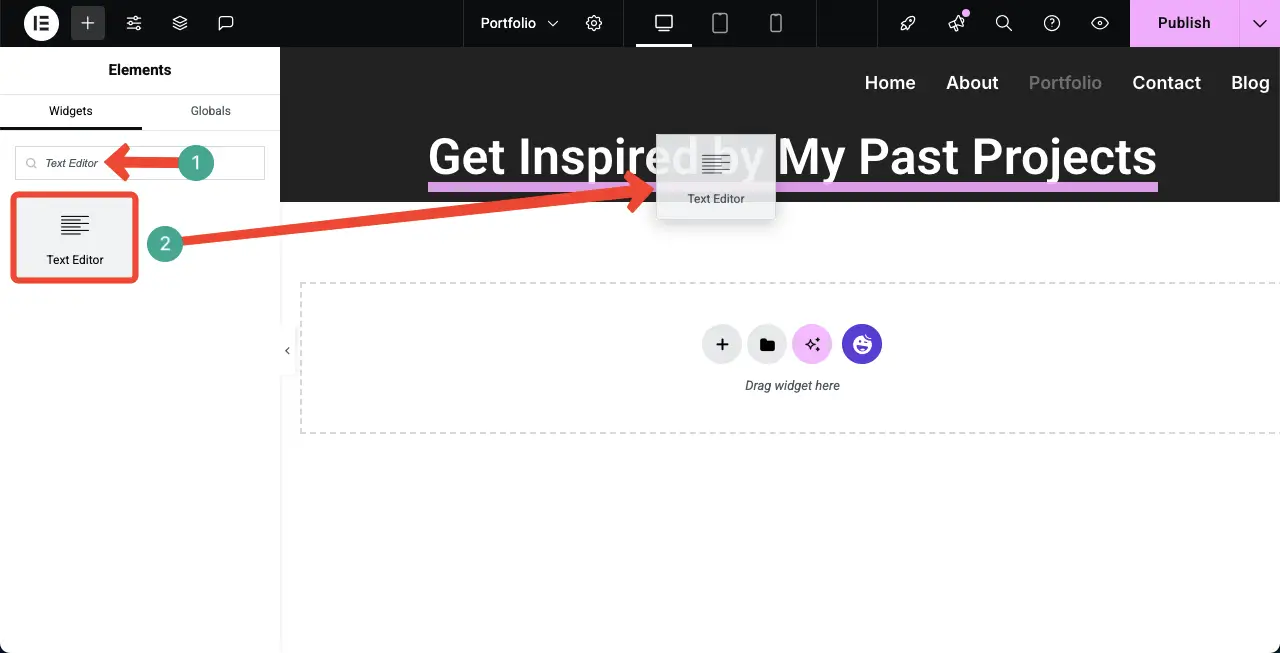
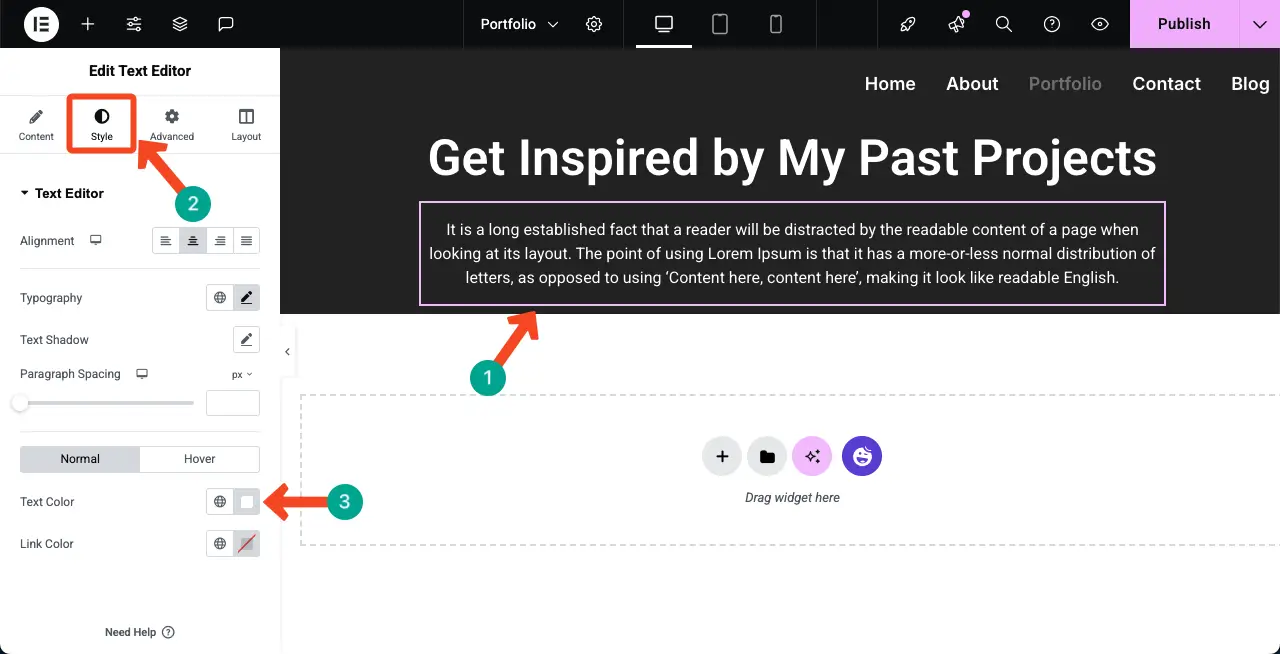
Add the Text Editor widget below the heading widget as shown in the image attached below. This will allow you to write a short description.
In the same way, we have added a description to the portfolio page and set a suitable alignment, typography, and color for the text.
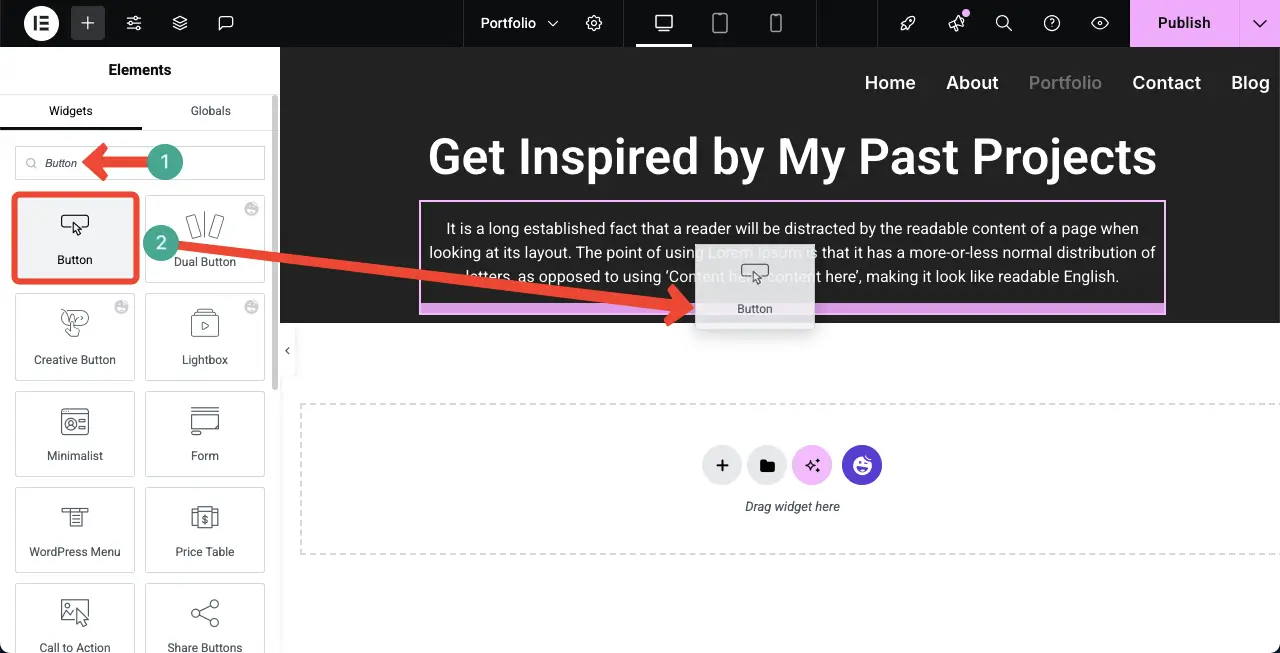
Step 04: Add a Button to the Page
With a CTA button, you can push users to visit some other page you want. So, it’s better to add a button before you create the portfolio section.
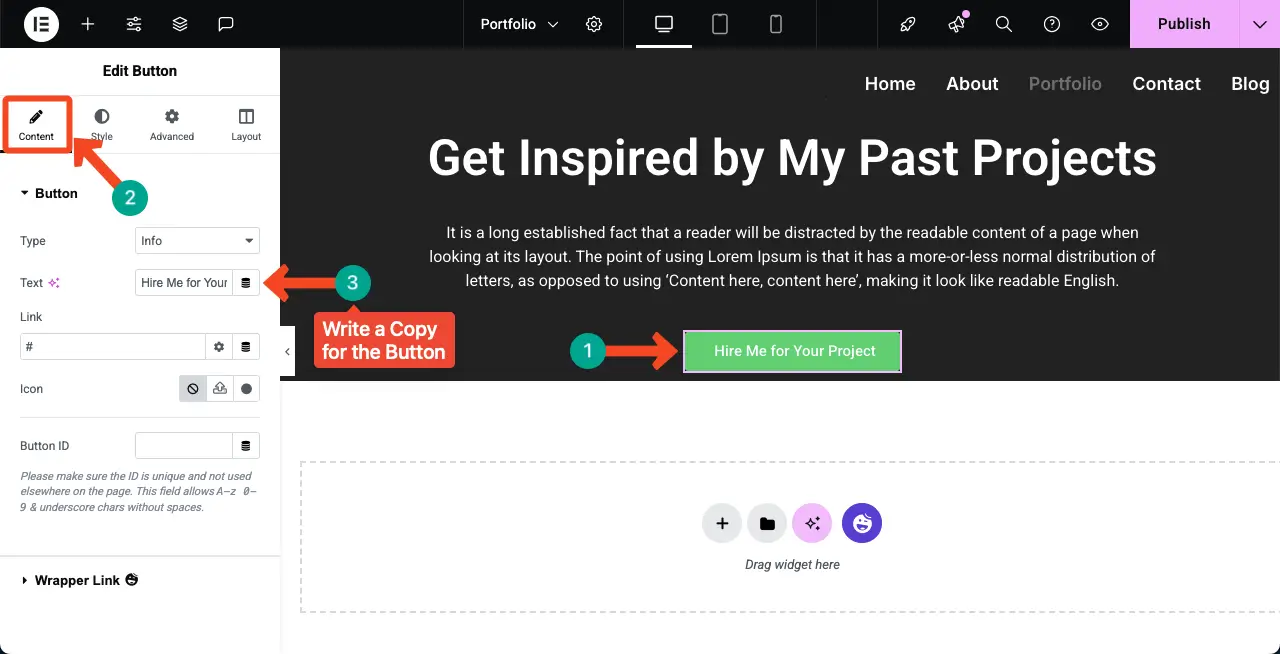
From the content tab, you can add your desired copy for the button.
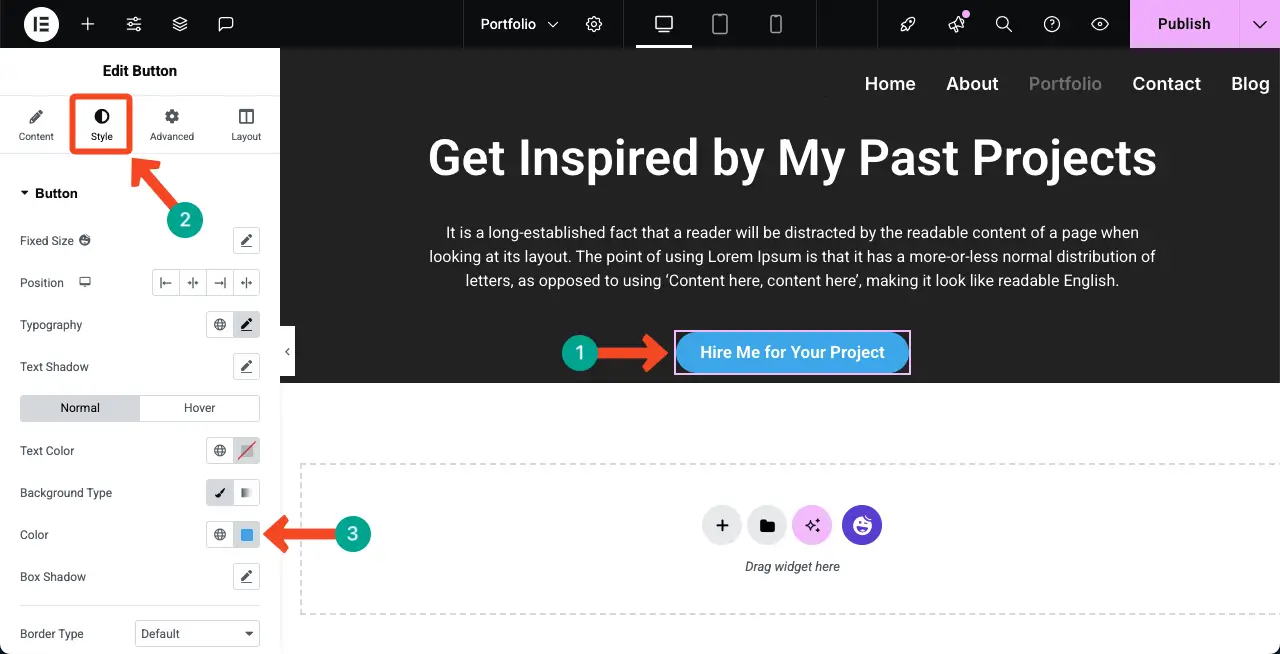
By adding padding
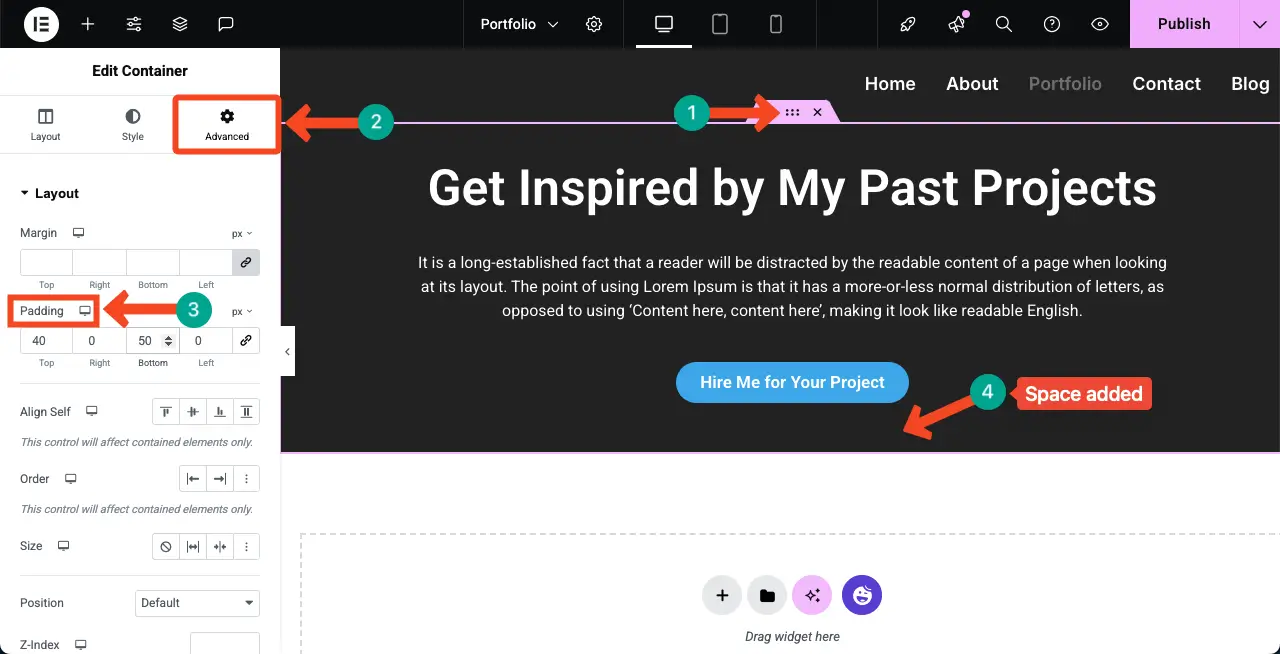
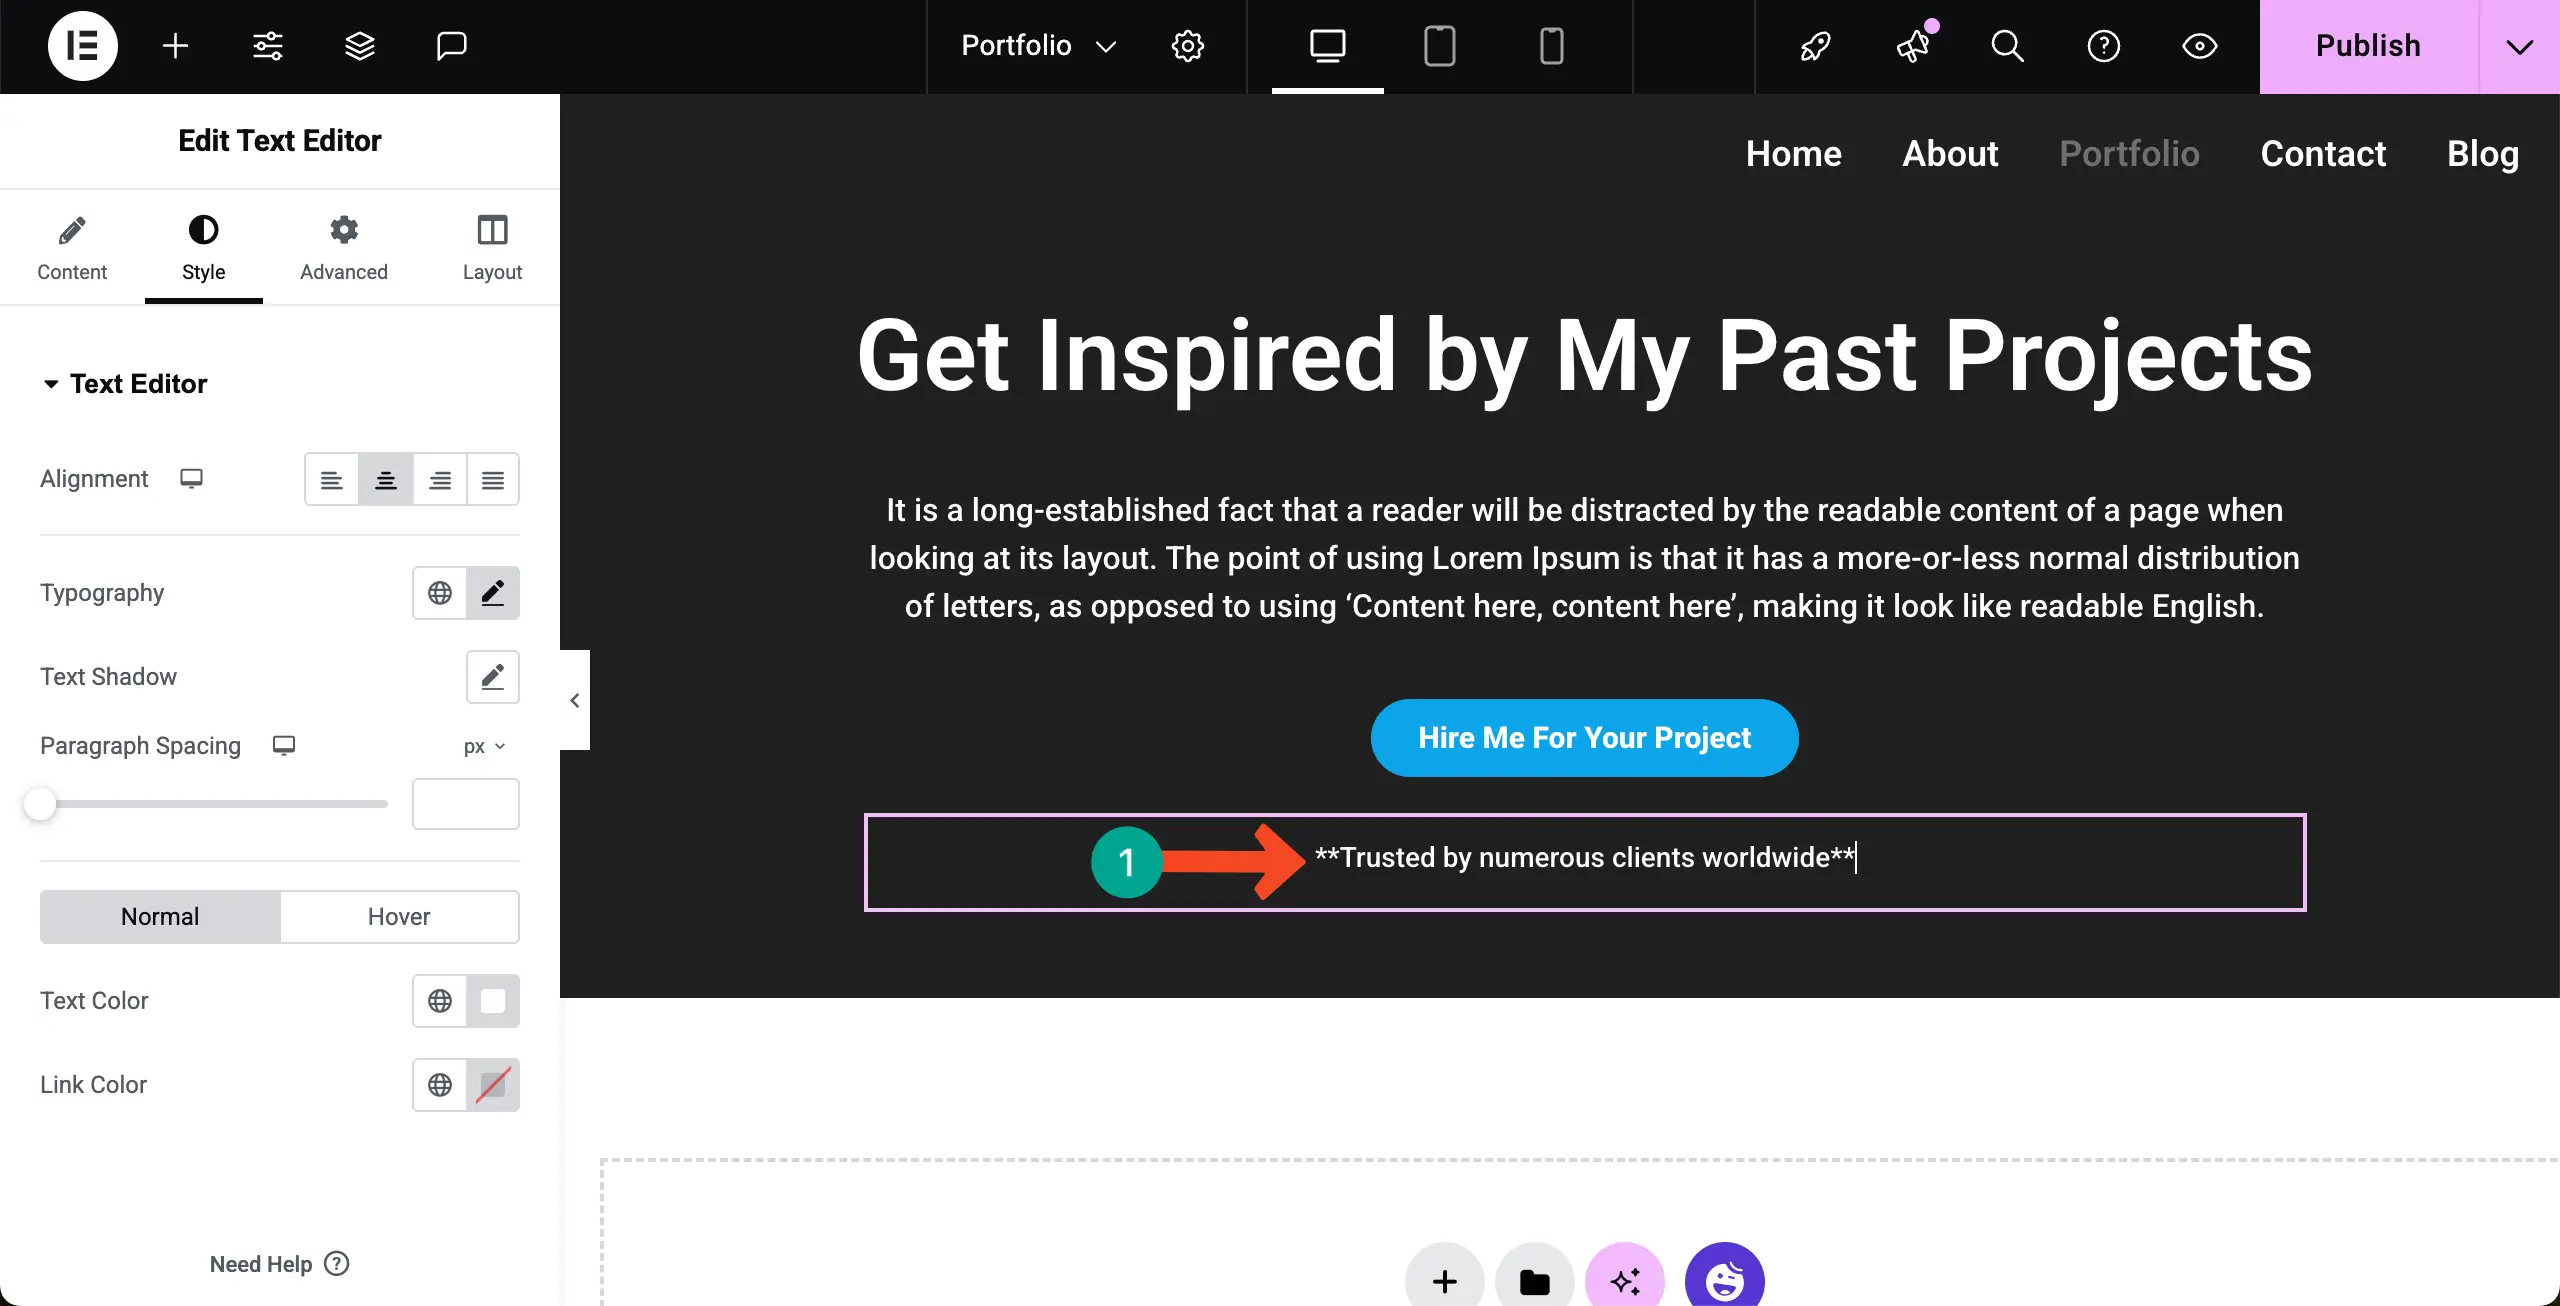
After the button, I have added a short text that gives a vibe of trustworthiness to the users.
Step 05: Create the Portfolio Section
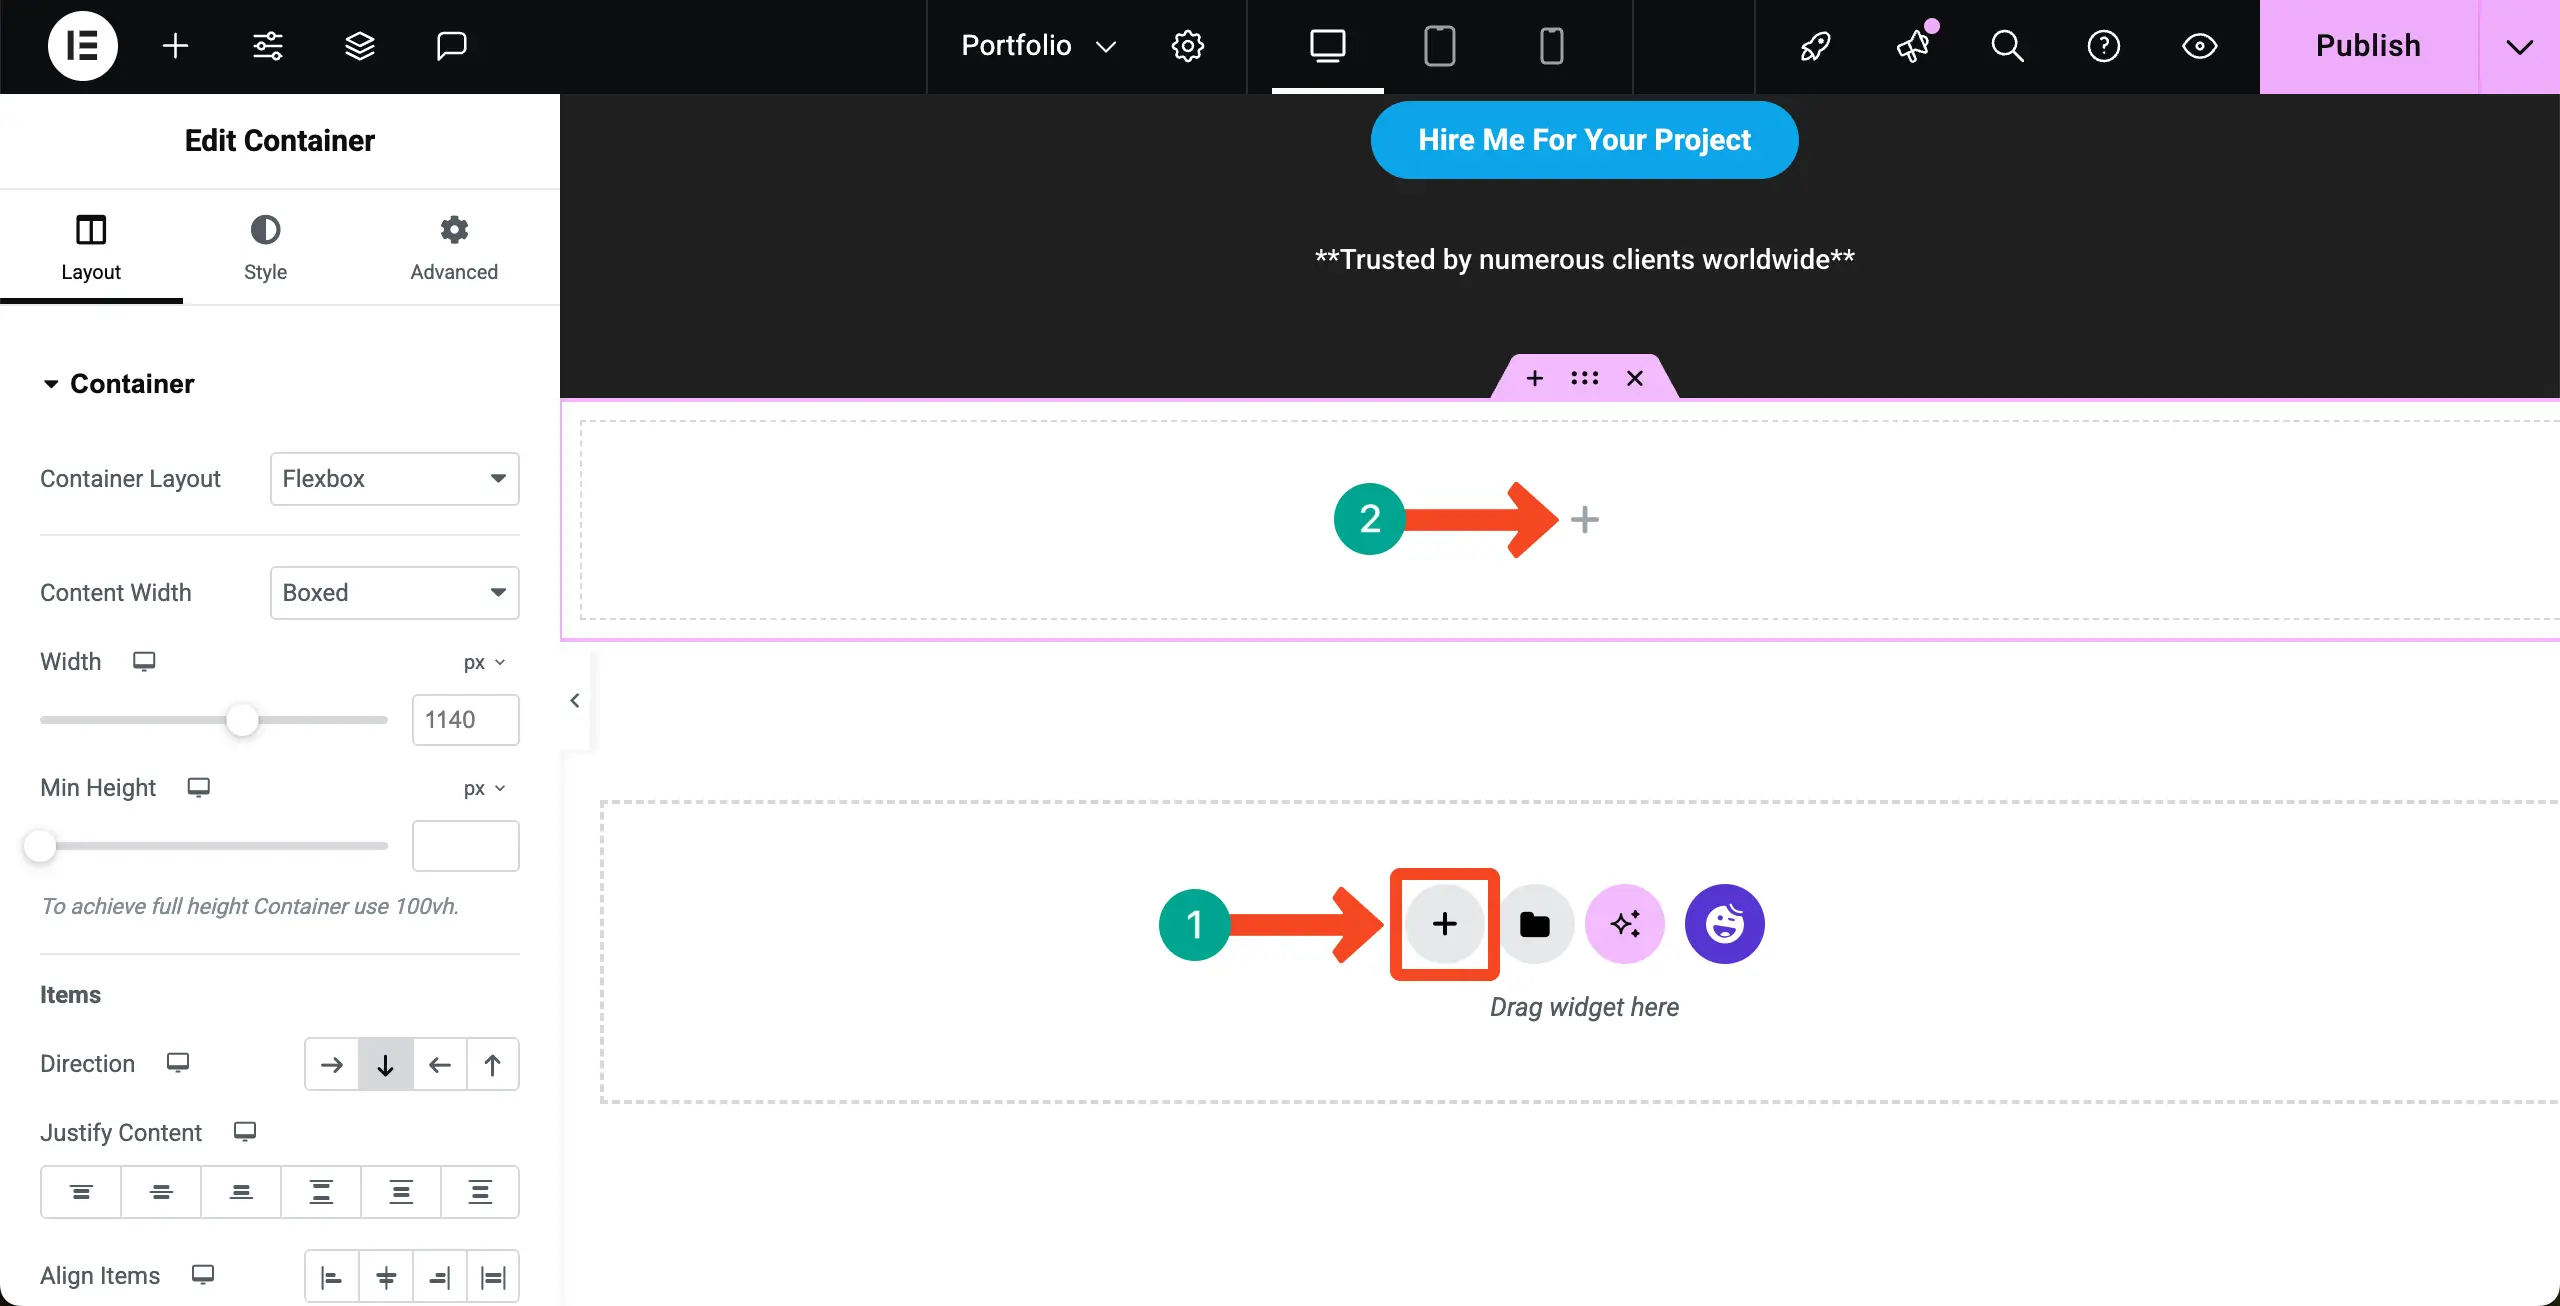
Now, it’s time to create the portfolio section where you’ll visually showcase your tasks. To do this, first add a new container under the first section.
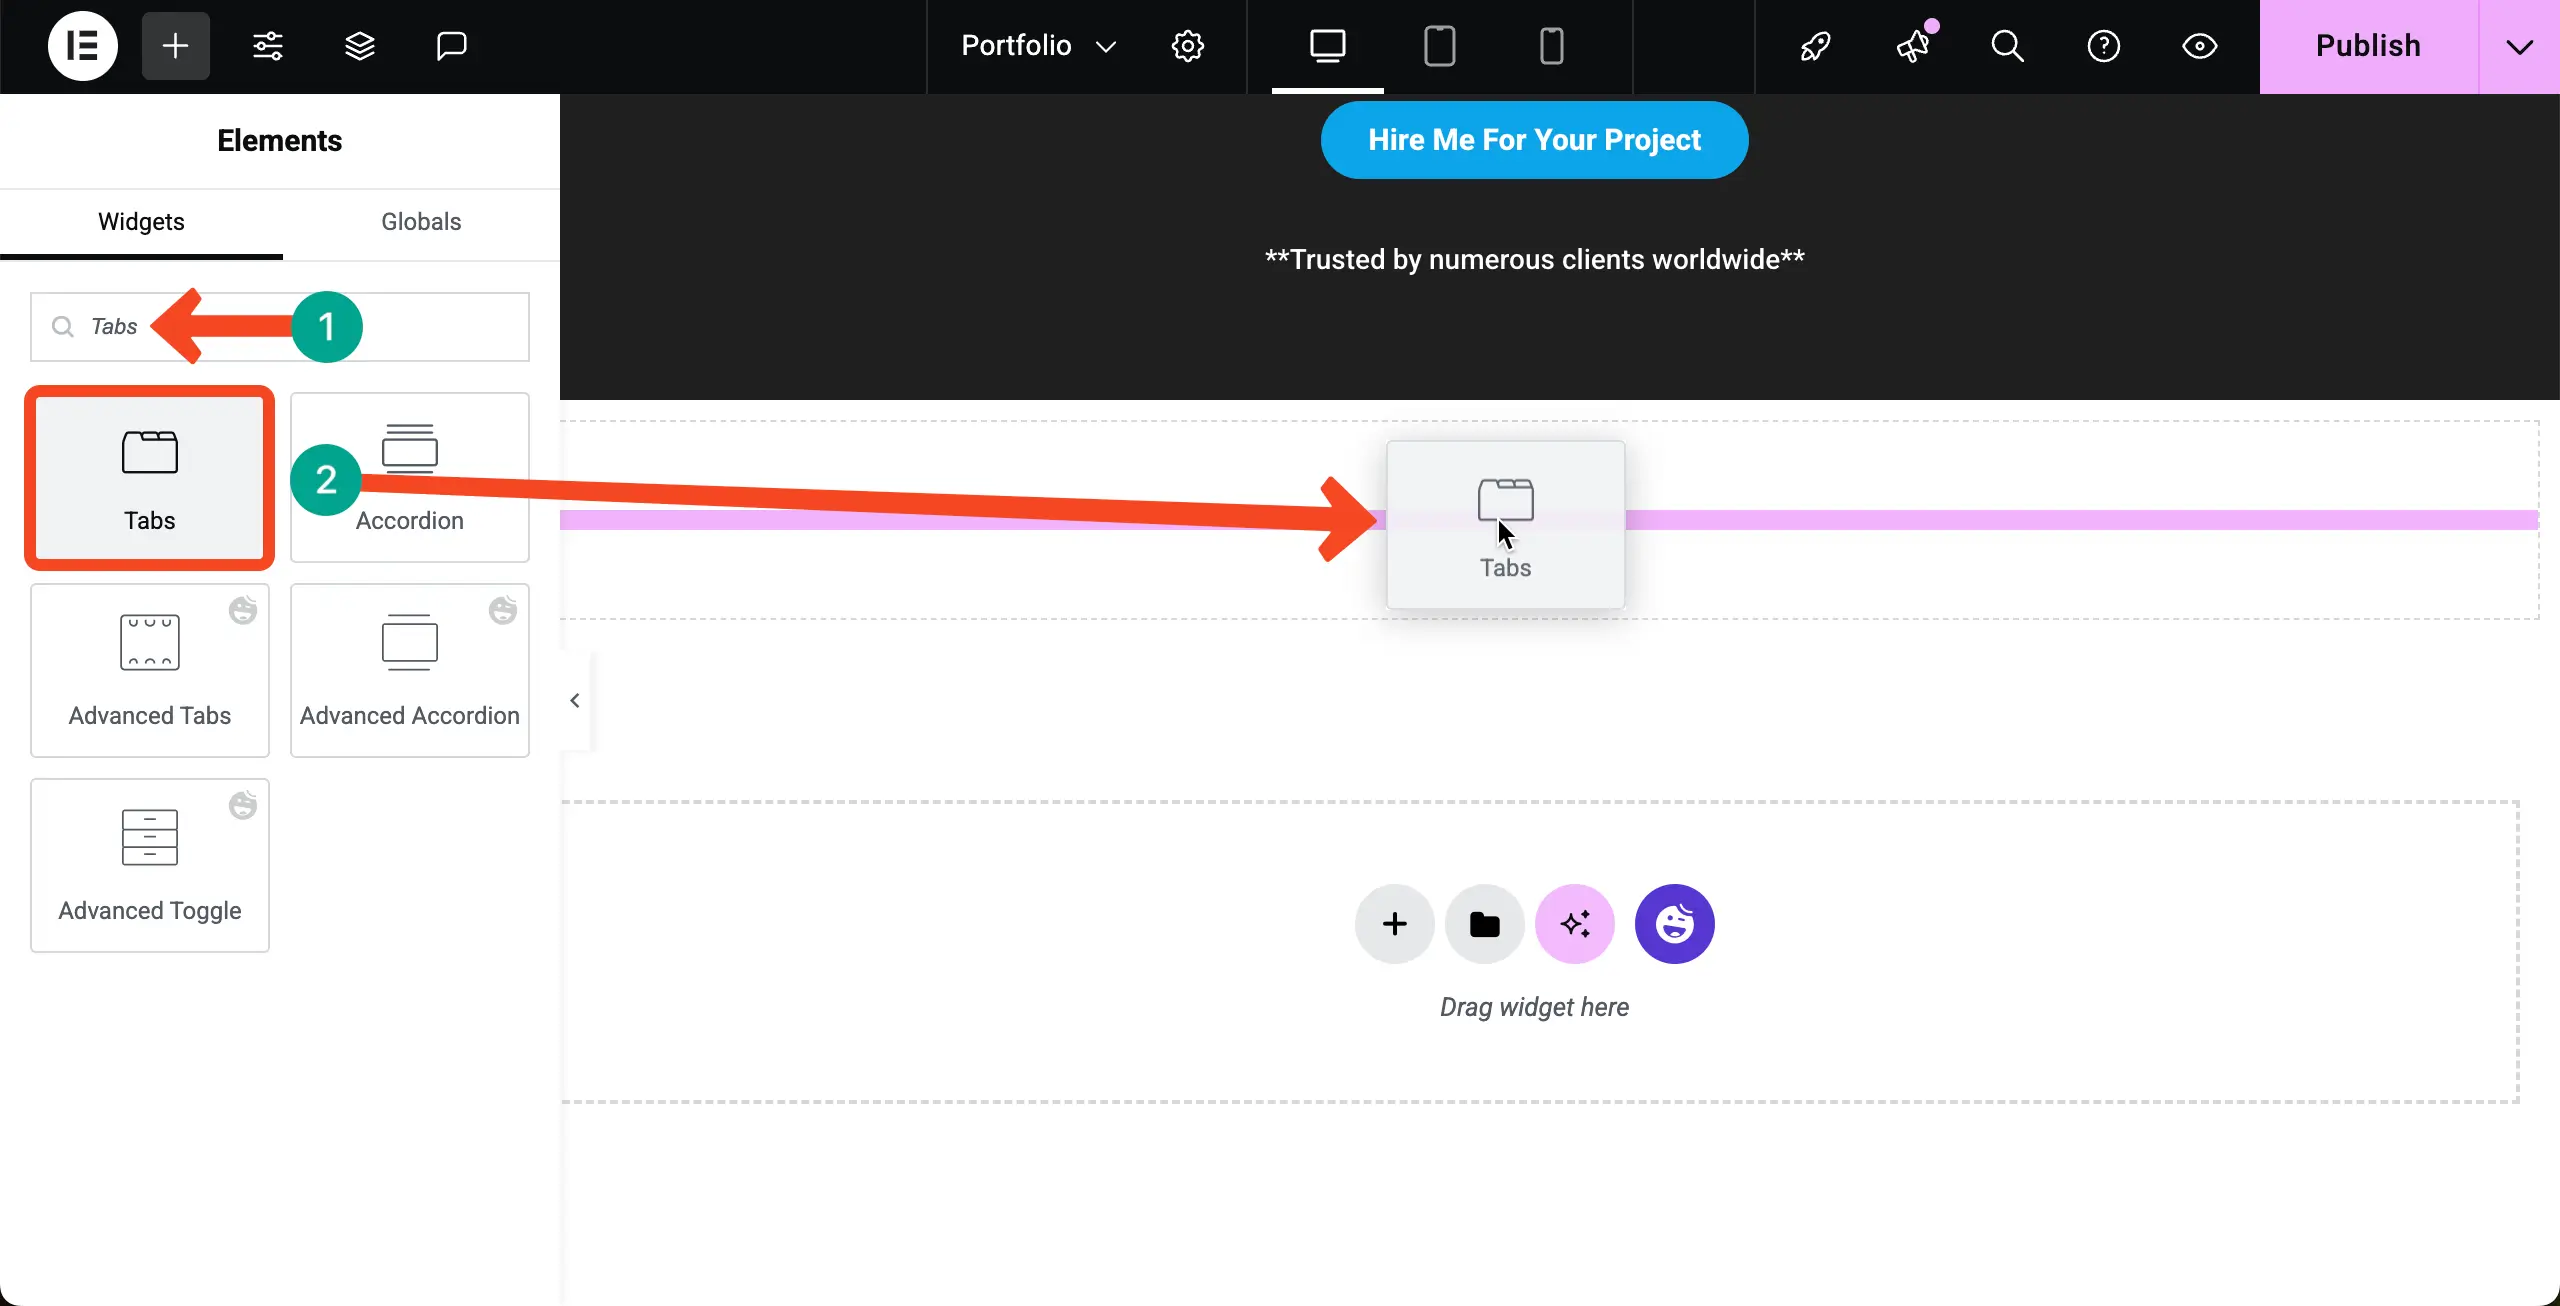
Add the Tabs widget to the portfolio section. This widget will allow you to create unlimited tabs and then add suitable widgets to each tab so you can display any type of content you want separately.
# Name the Tabs
Each tab is supposed to work as a category. So, you must rename them.
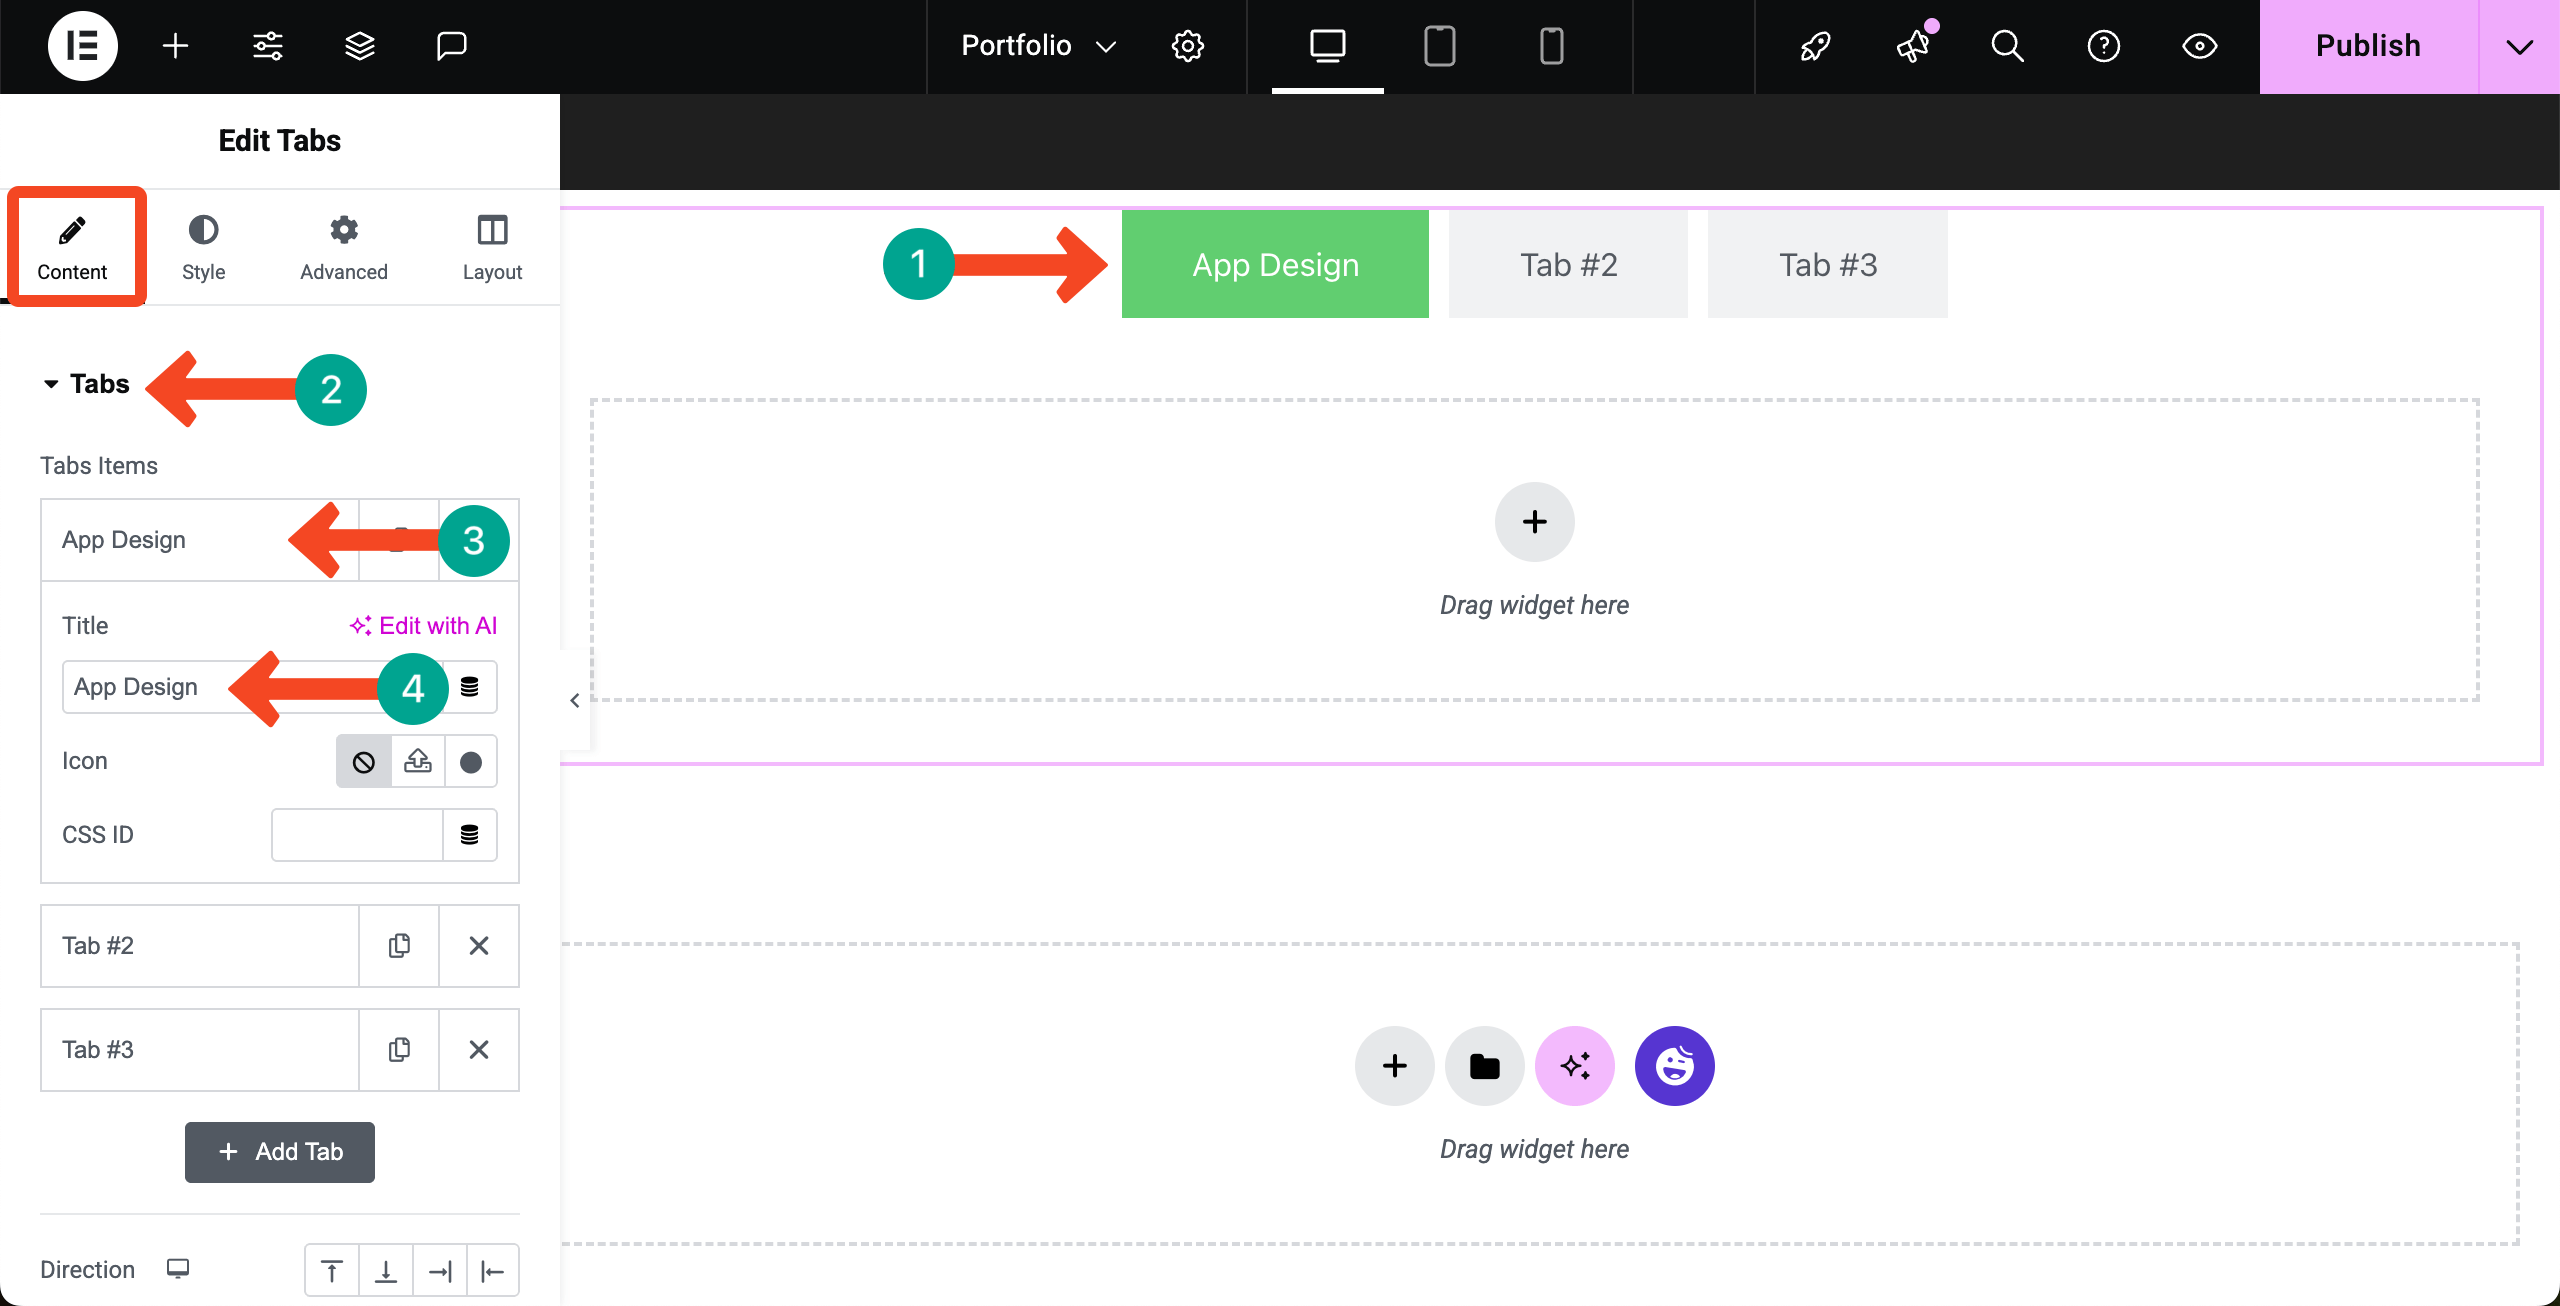
To rename the tabs, select the widget, go to the Content tab, click to open a tab you want, and write a name for the tab under the title.
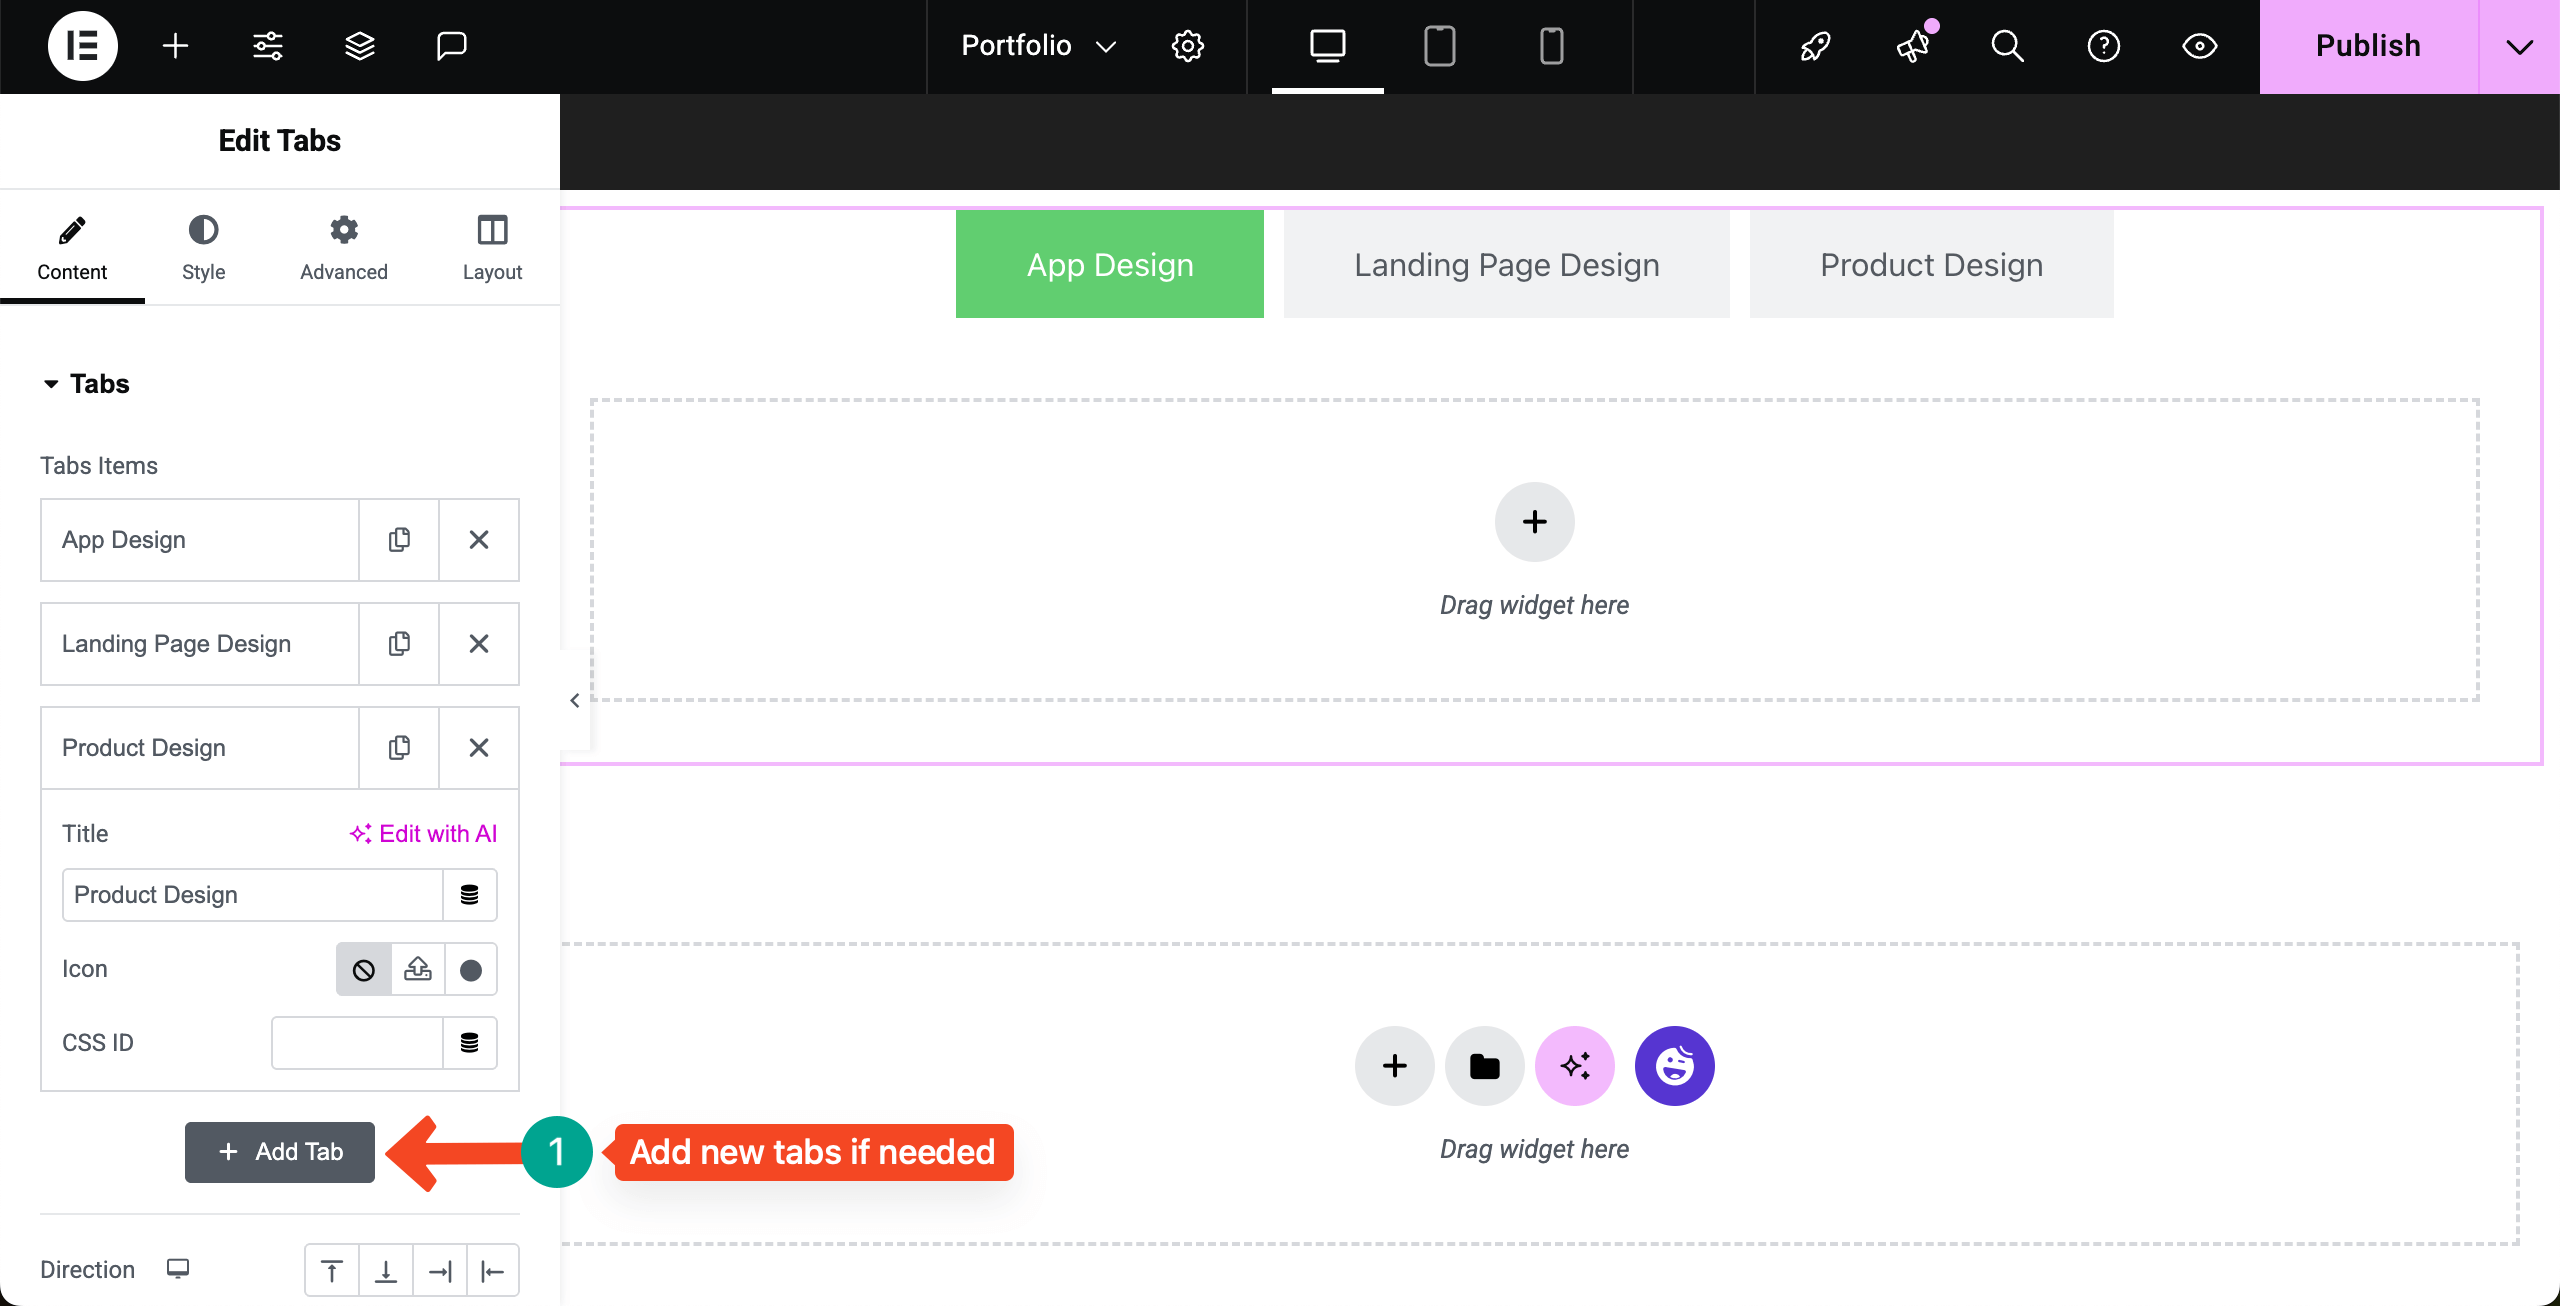
In the same way, add names to all the tabs. Then, if needed, by clicking the + Add Tab button, you can add more tabs to the portfolio section.
# Stylize the Tabs Widget
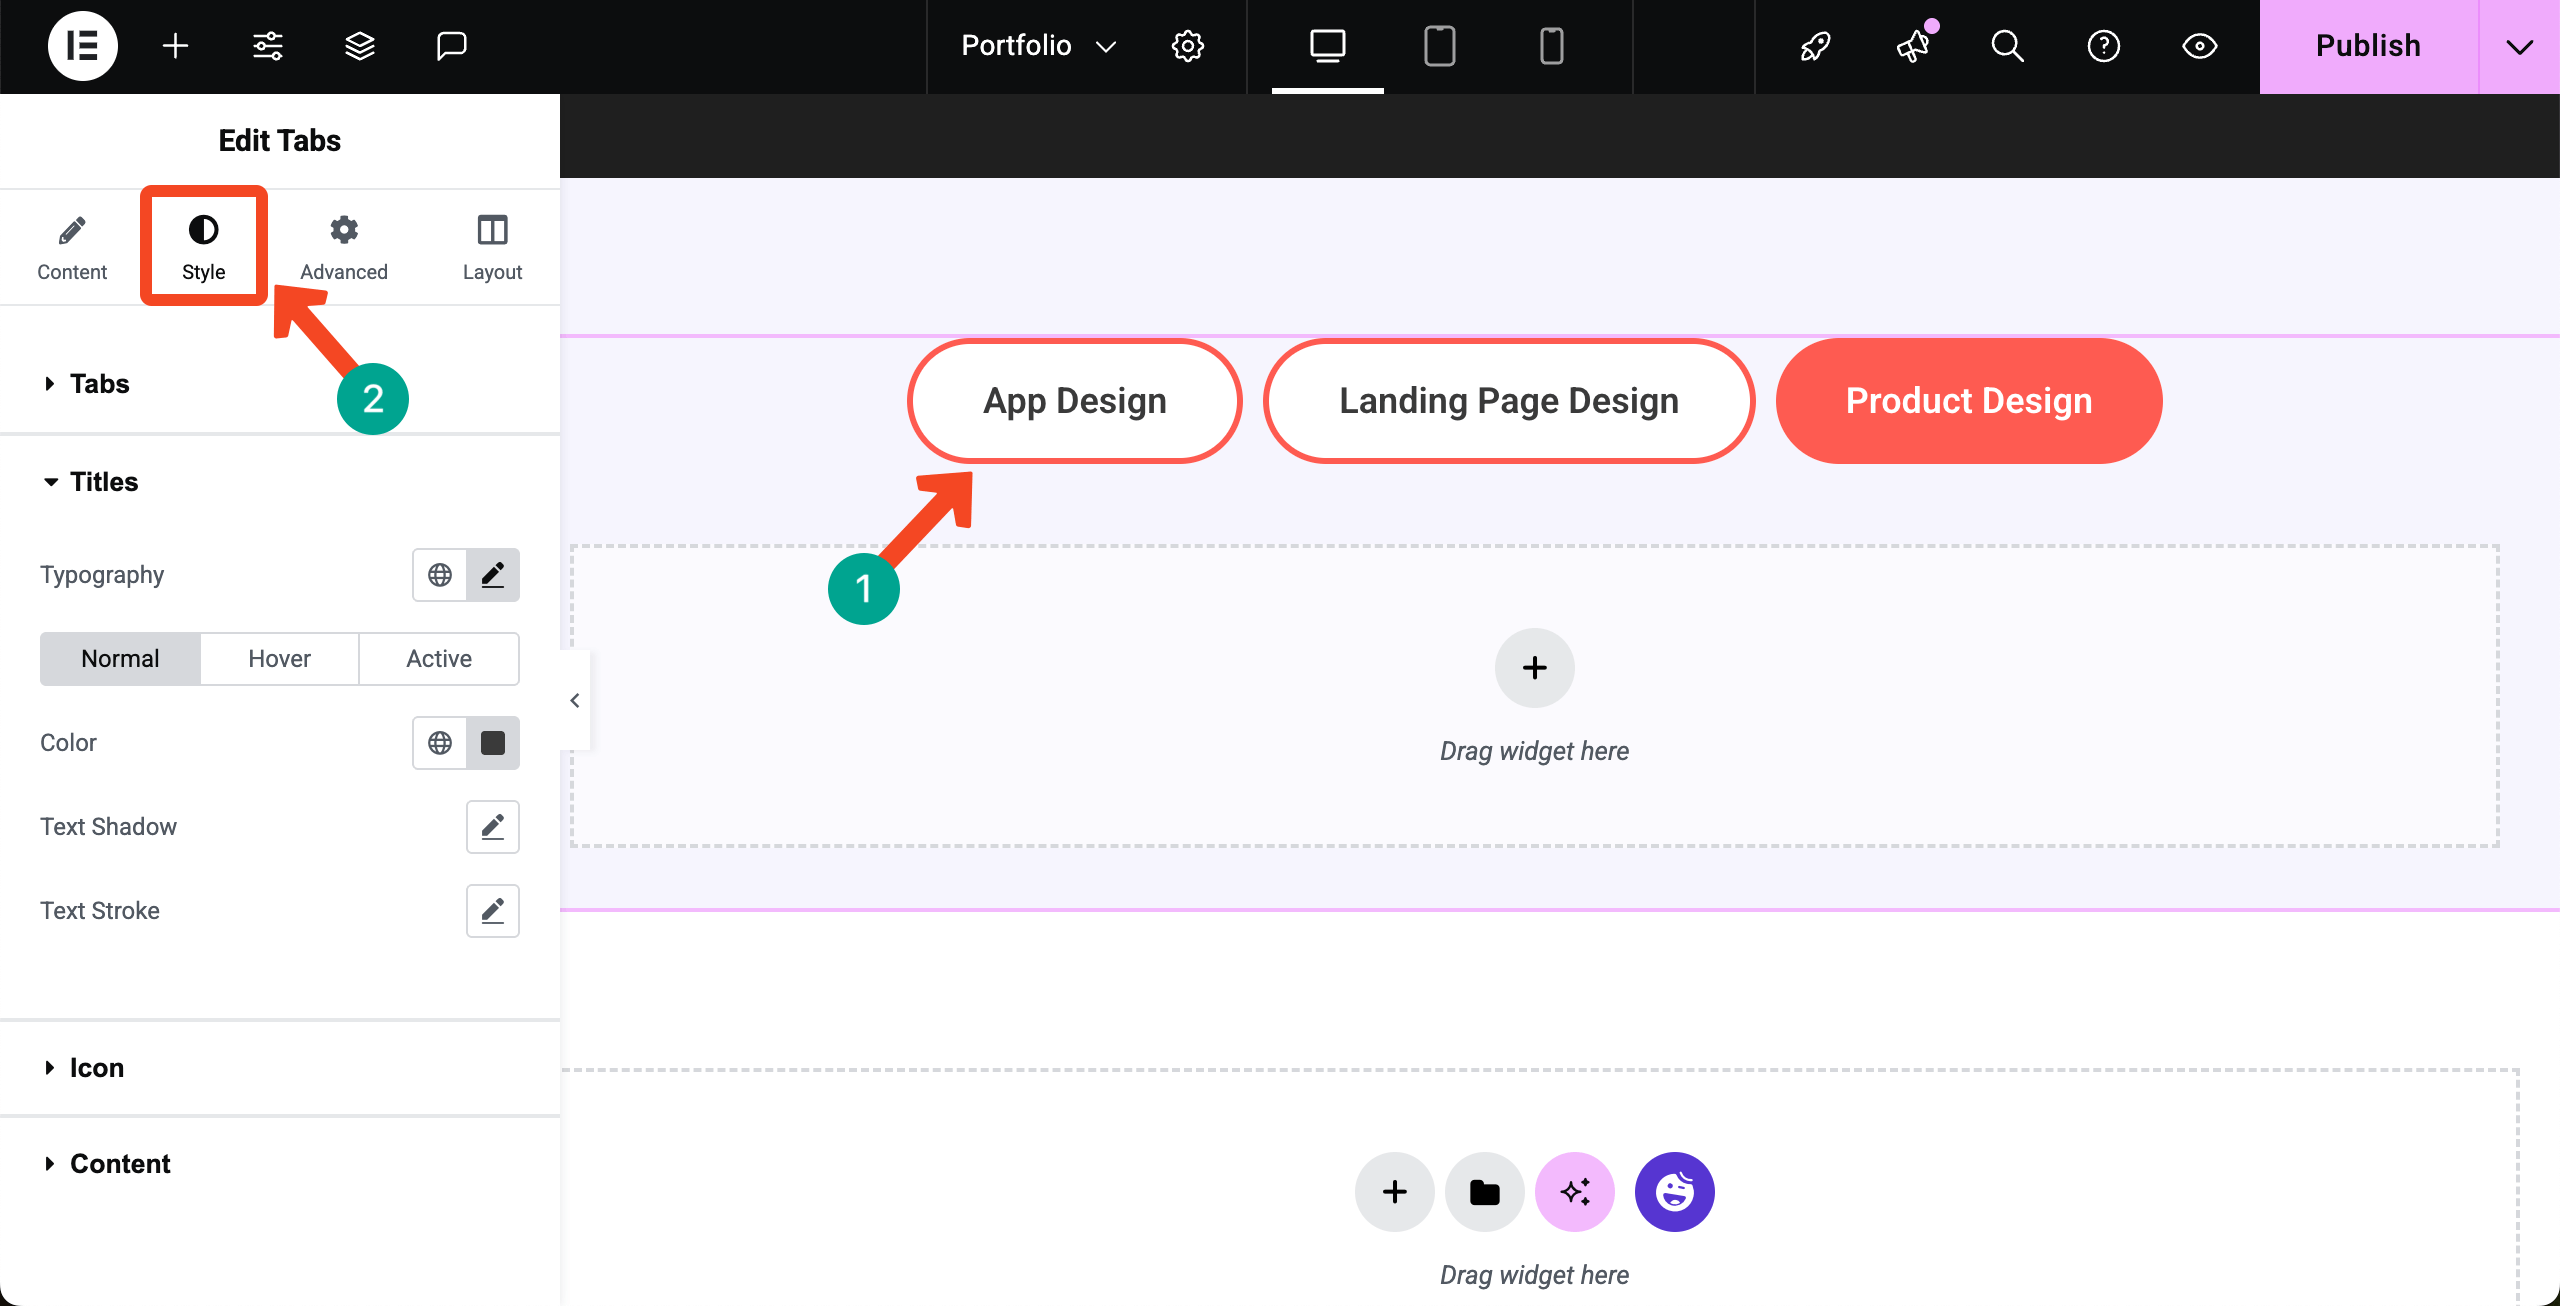
Now, from the Style tab, you can add a background color to the tabs, change their typography, add a border color, and more. Do these necessary customizations yourself.
Step 06: Start Adding Content to the Tabs
Just like the default Elementor canvas, you will get a similar interface in each tab to add widgets and display respective content. Click the plus (+) icon.
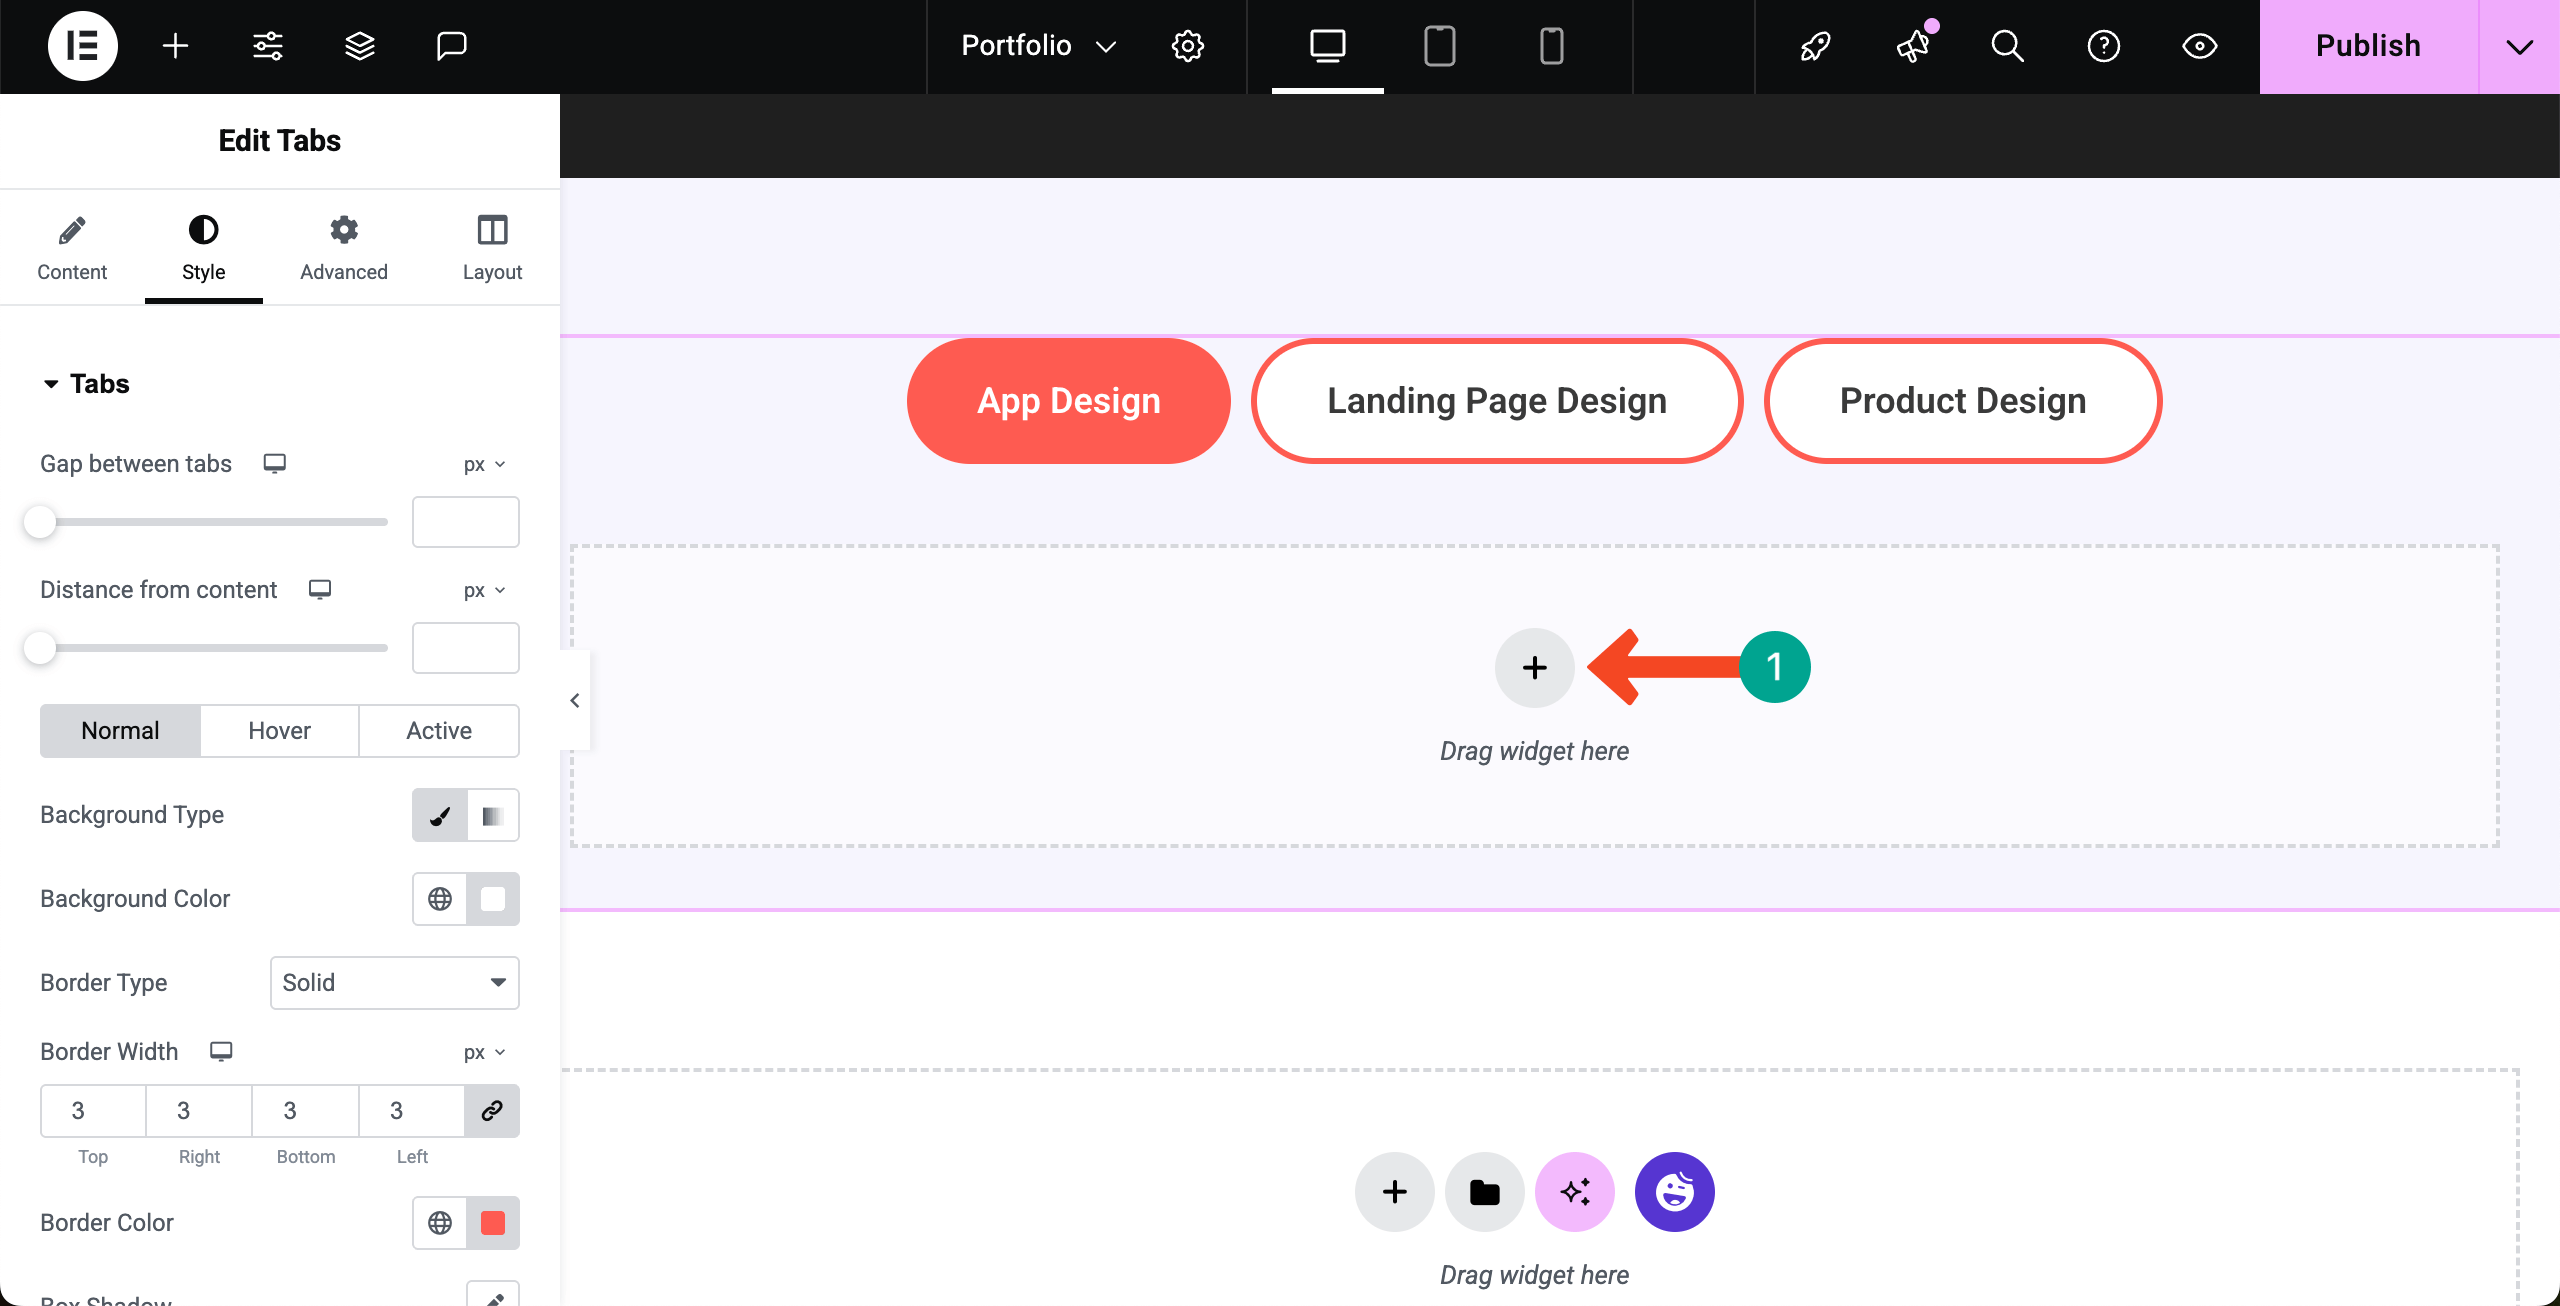
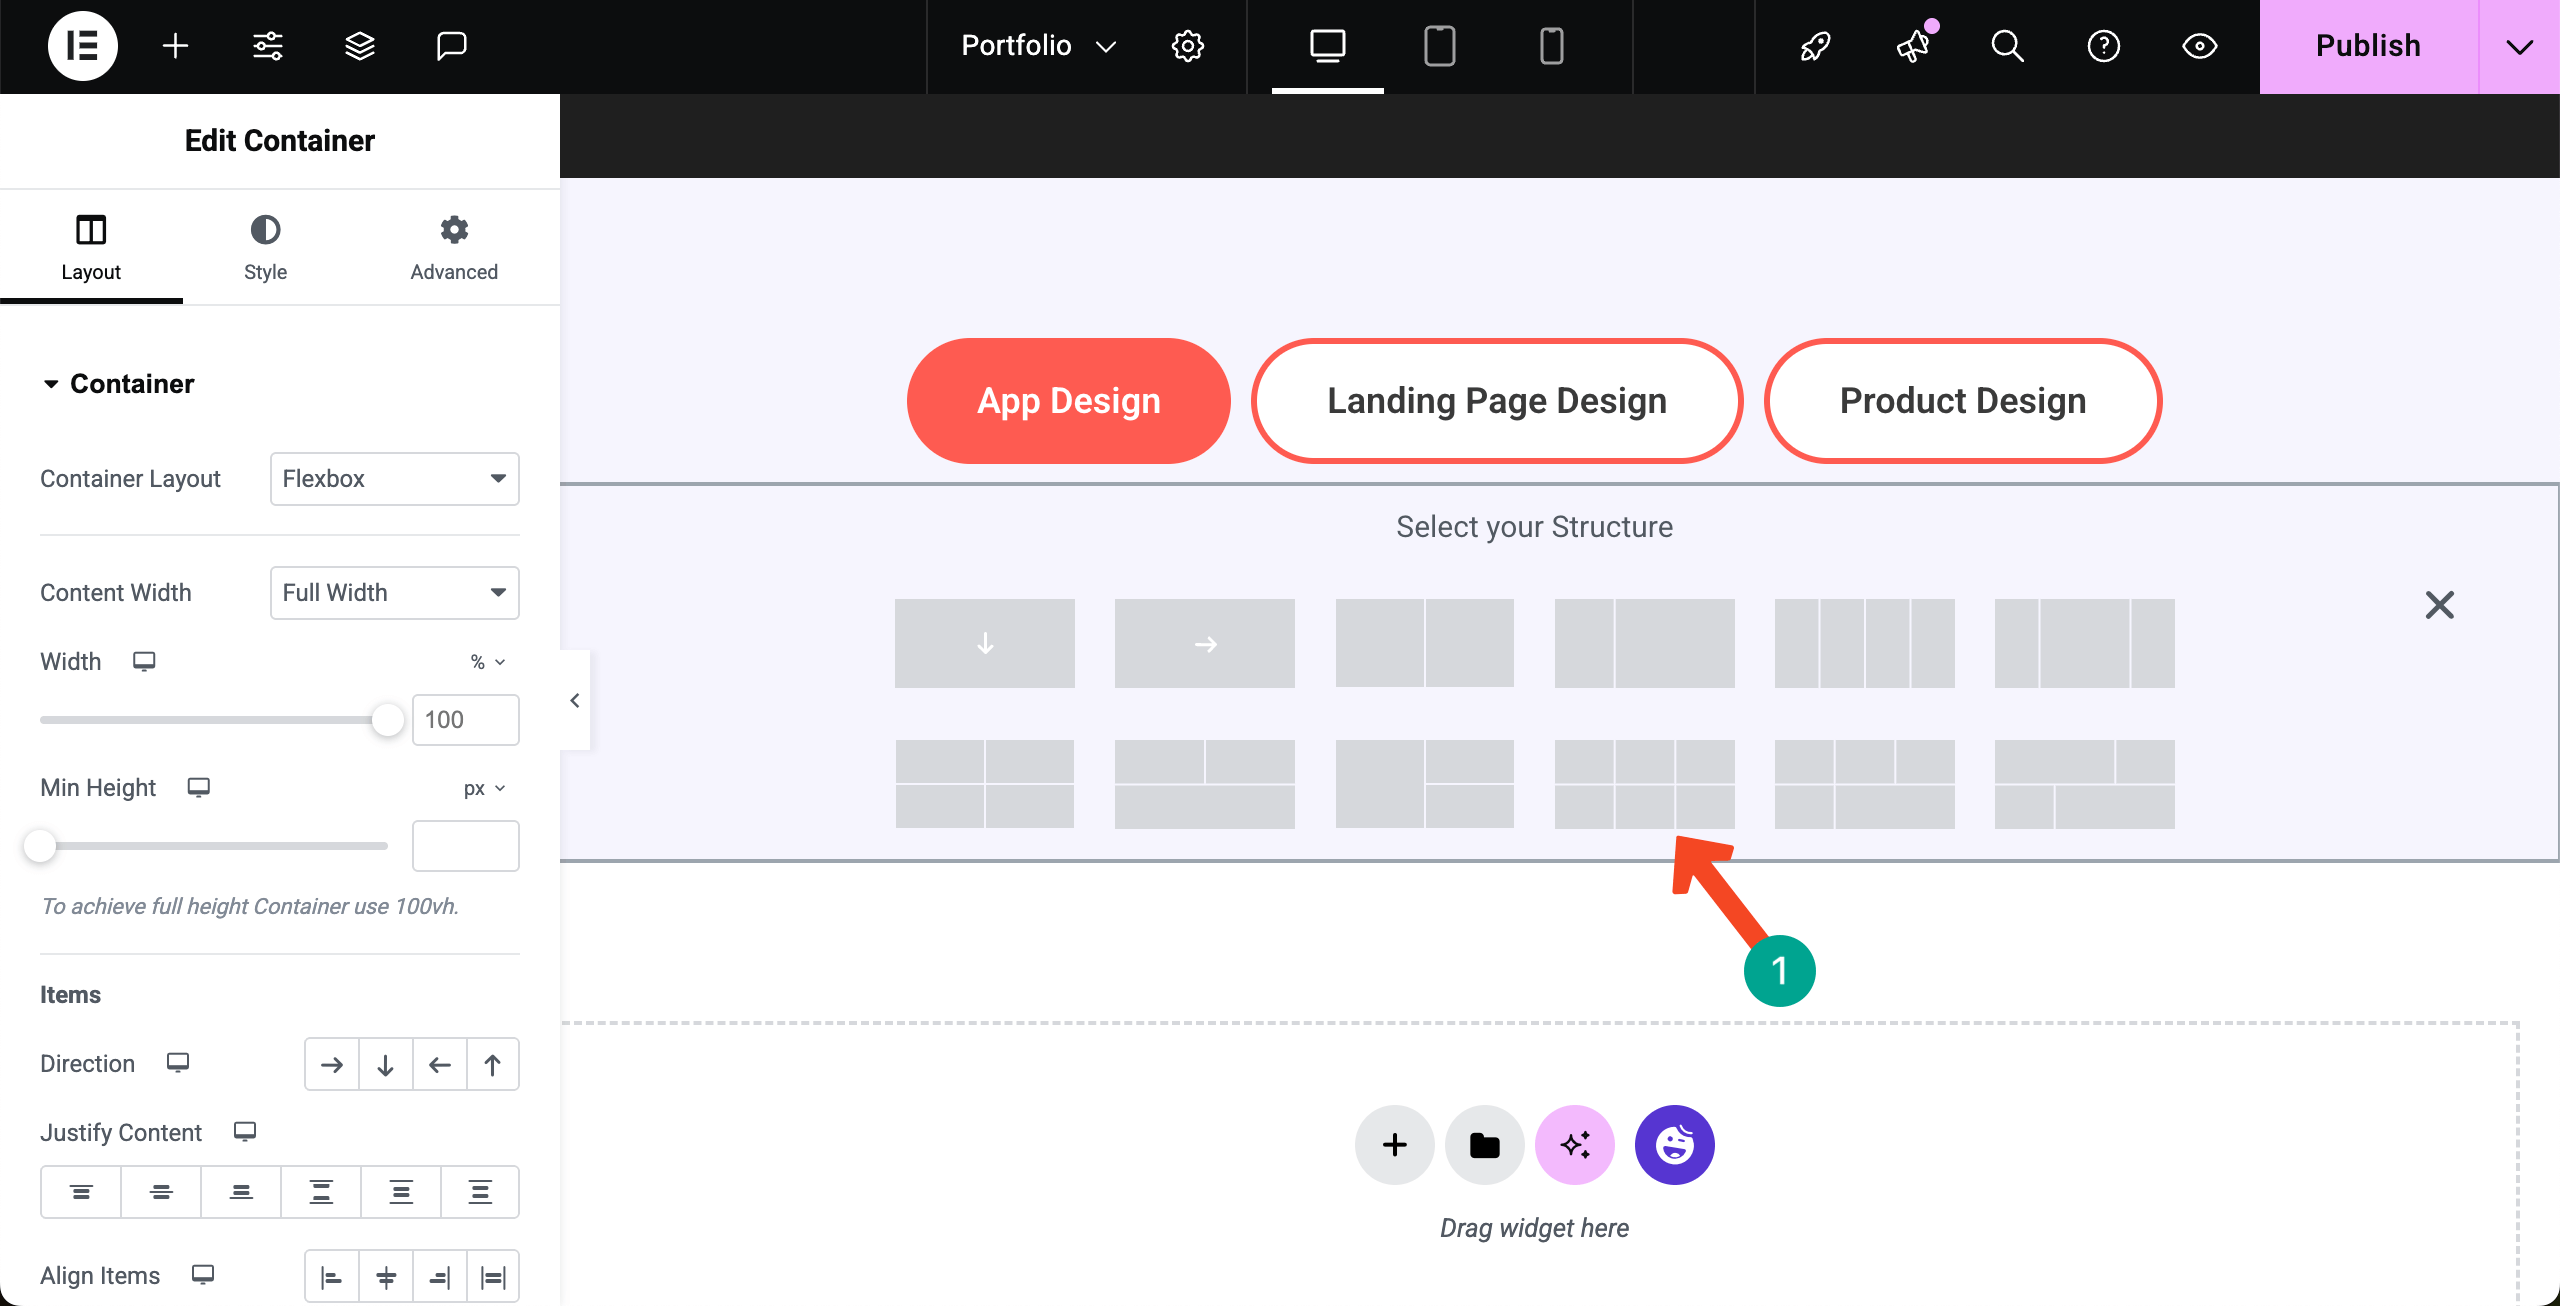
Select a suitable column structure for the portfolio section. We are selecting the 3-column but six-container structure. Then, you may add any widget that is able to display your desired content.
# Display Portfolio Content
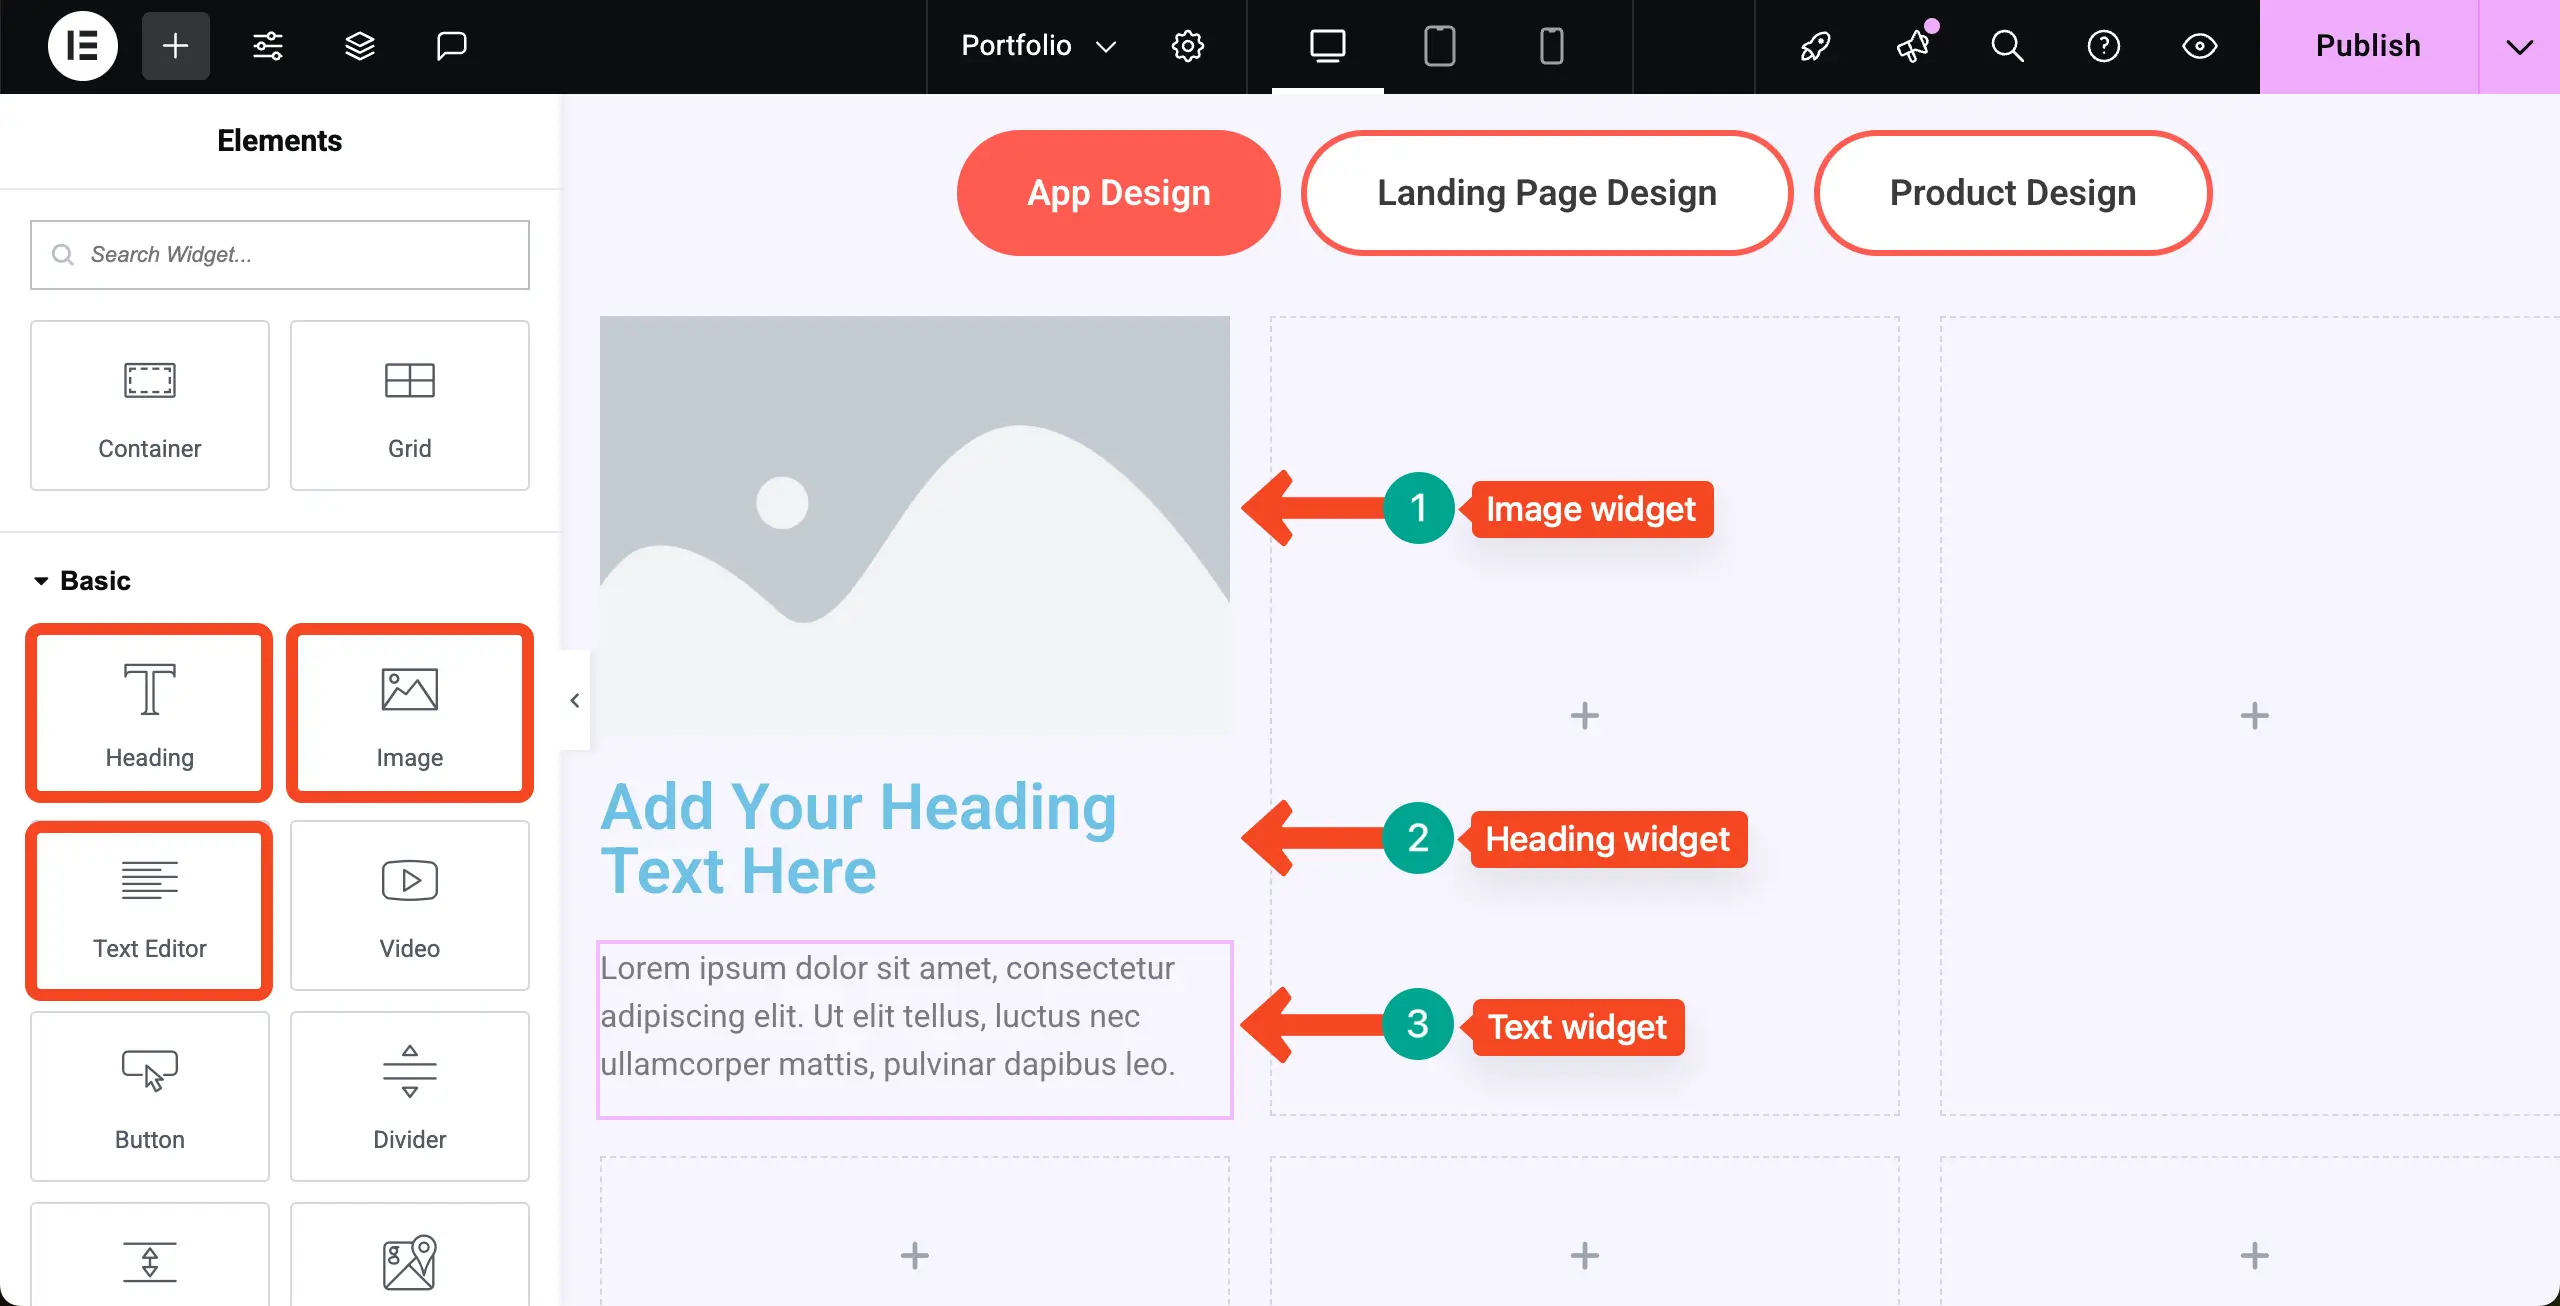
For example, we have added the Image, Heading, and Text Editor widgets serially to a container to create our content layout.
Using these widgets, you can display your portfolio items visually and accompany them with textual content as much as you need.
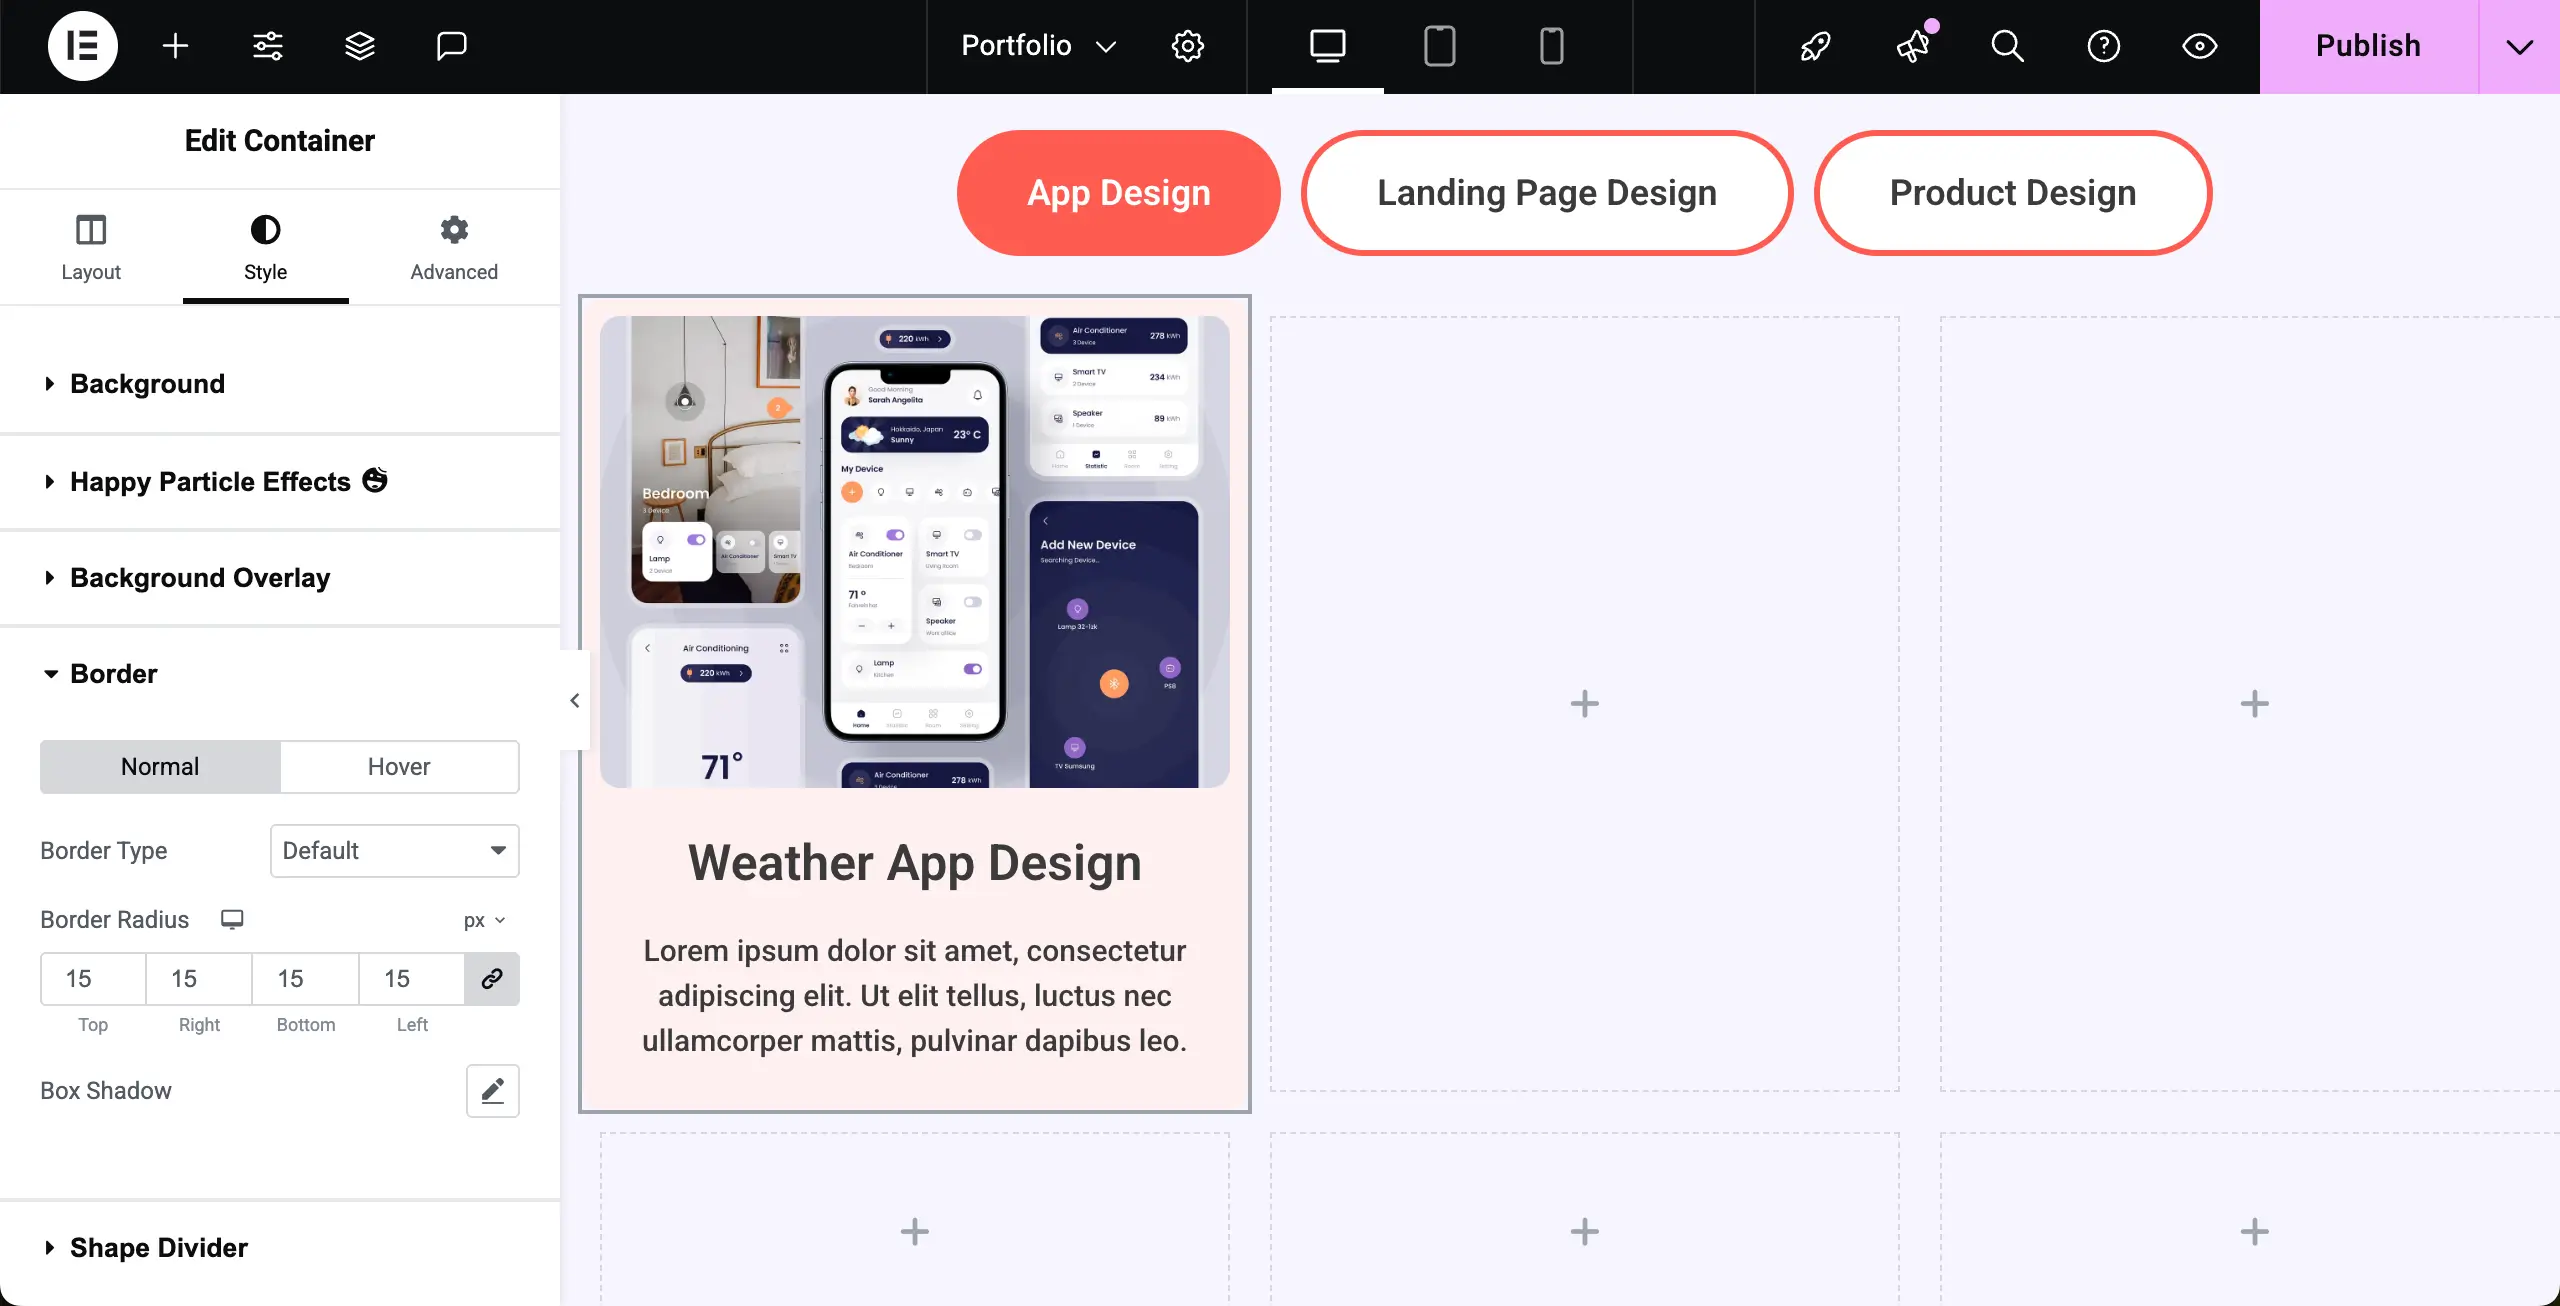
You can see that we have added content to the container. After that, we have set a color for the heading and description. Also, we have added a radius to the widget and container border. Hope you can do these yourself.
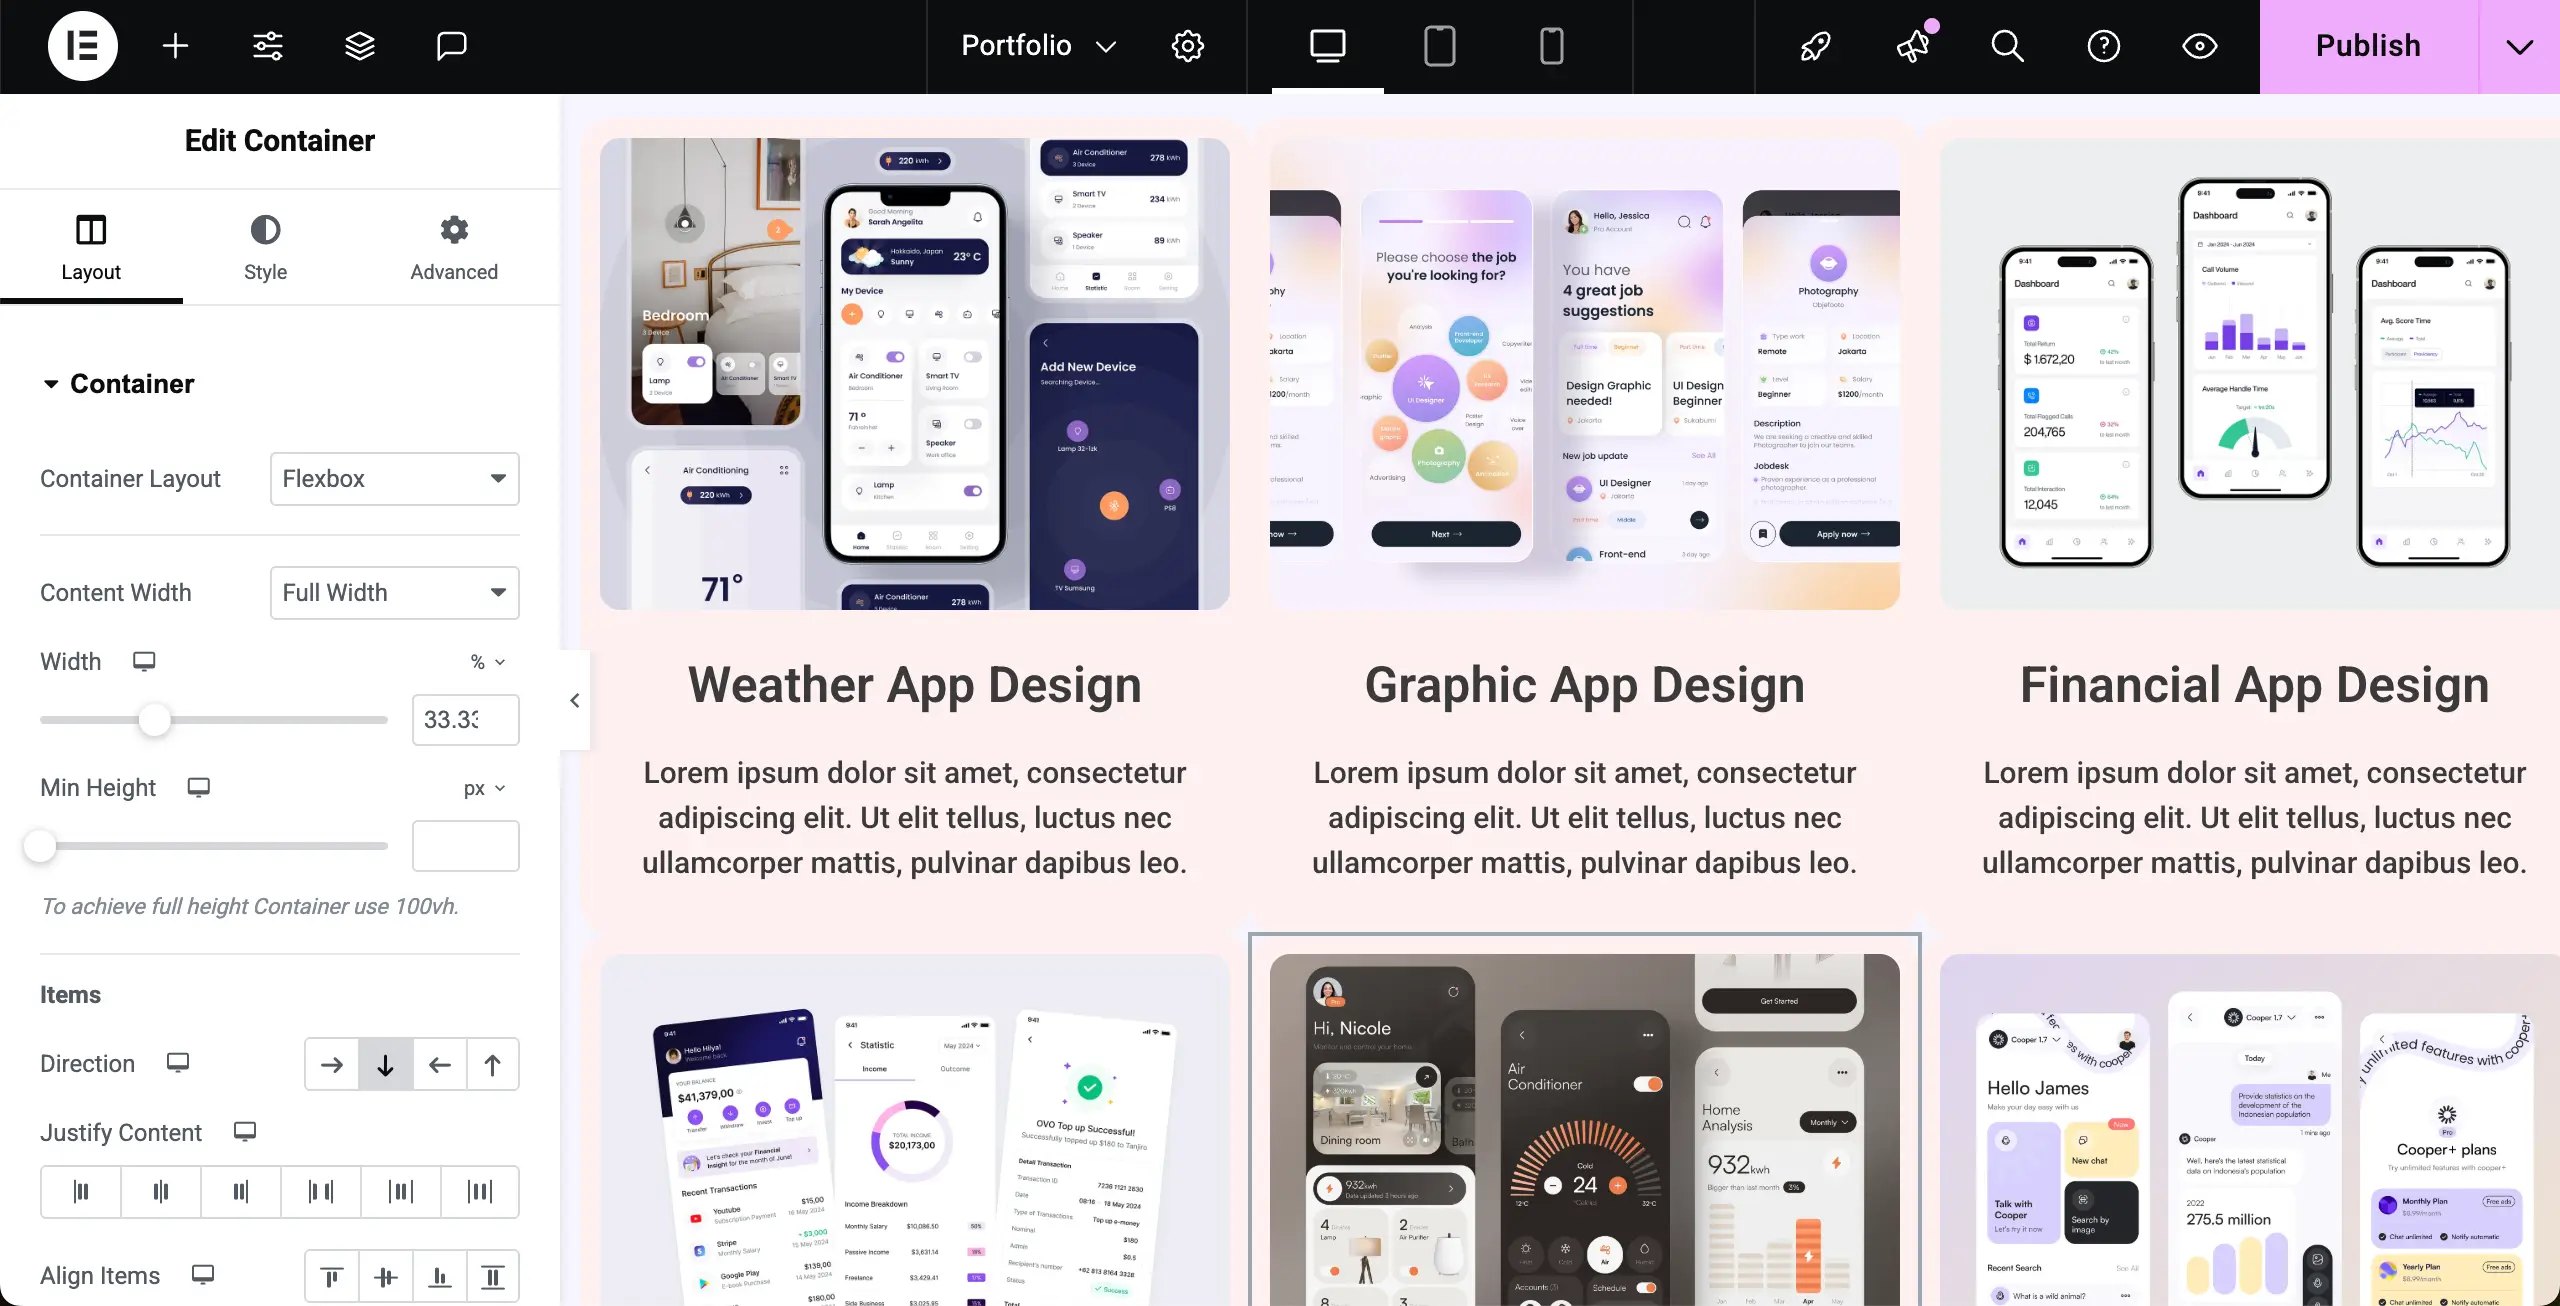
In the same way, add your portfolio content to all containers.
Note: But all this content may look so messy, right? It’s because they don’t have space in between.
# Add Spaces Between Containers on the Portfolio Page
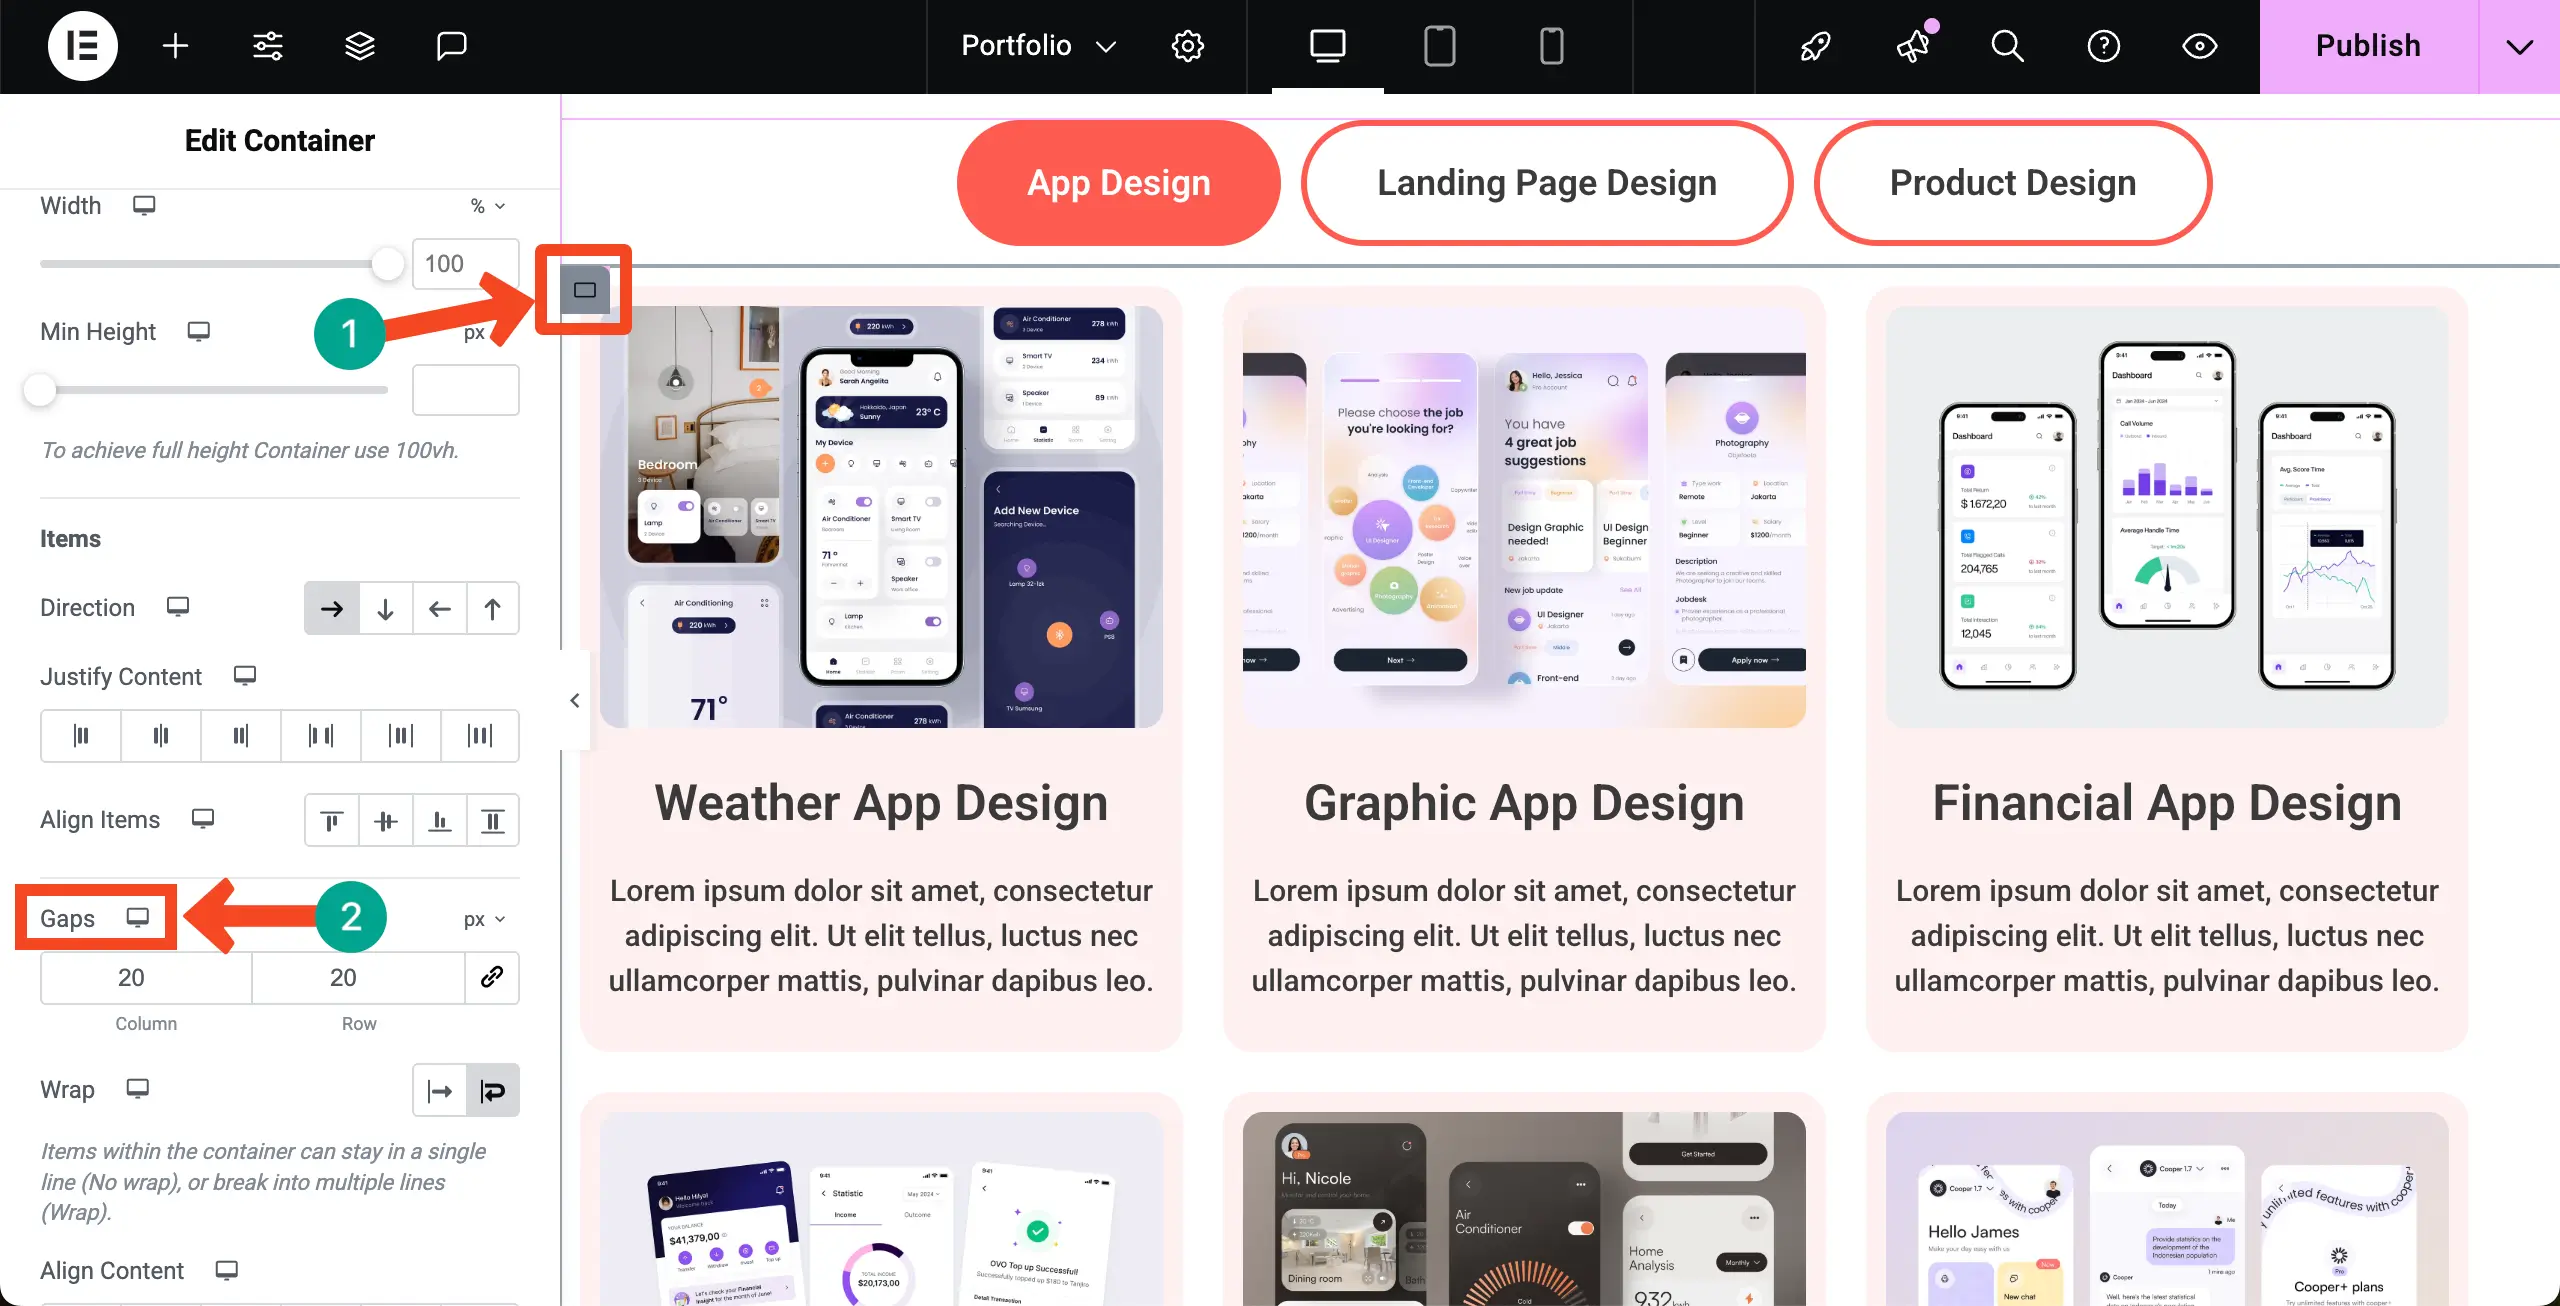
To add space between them, select the mother container, go to the Content tab, come to the Gaps option, and enter values to add space between the containers.
You can see the difference in the image attached below.
Step 07: Add Content to the Other Tab
Not all the tabs need to follow the same content layout. It’s not mandatory. You may create different layouts for different tabs.
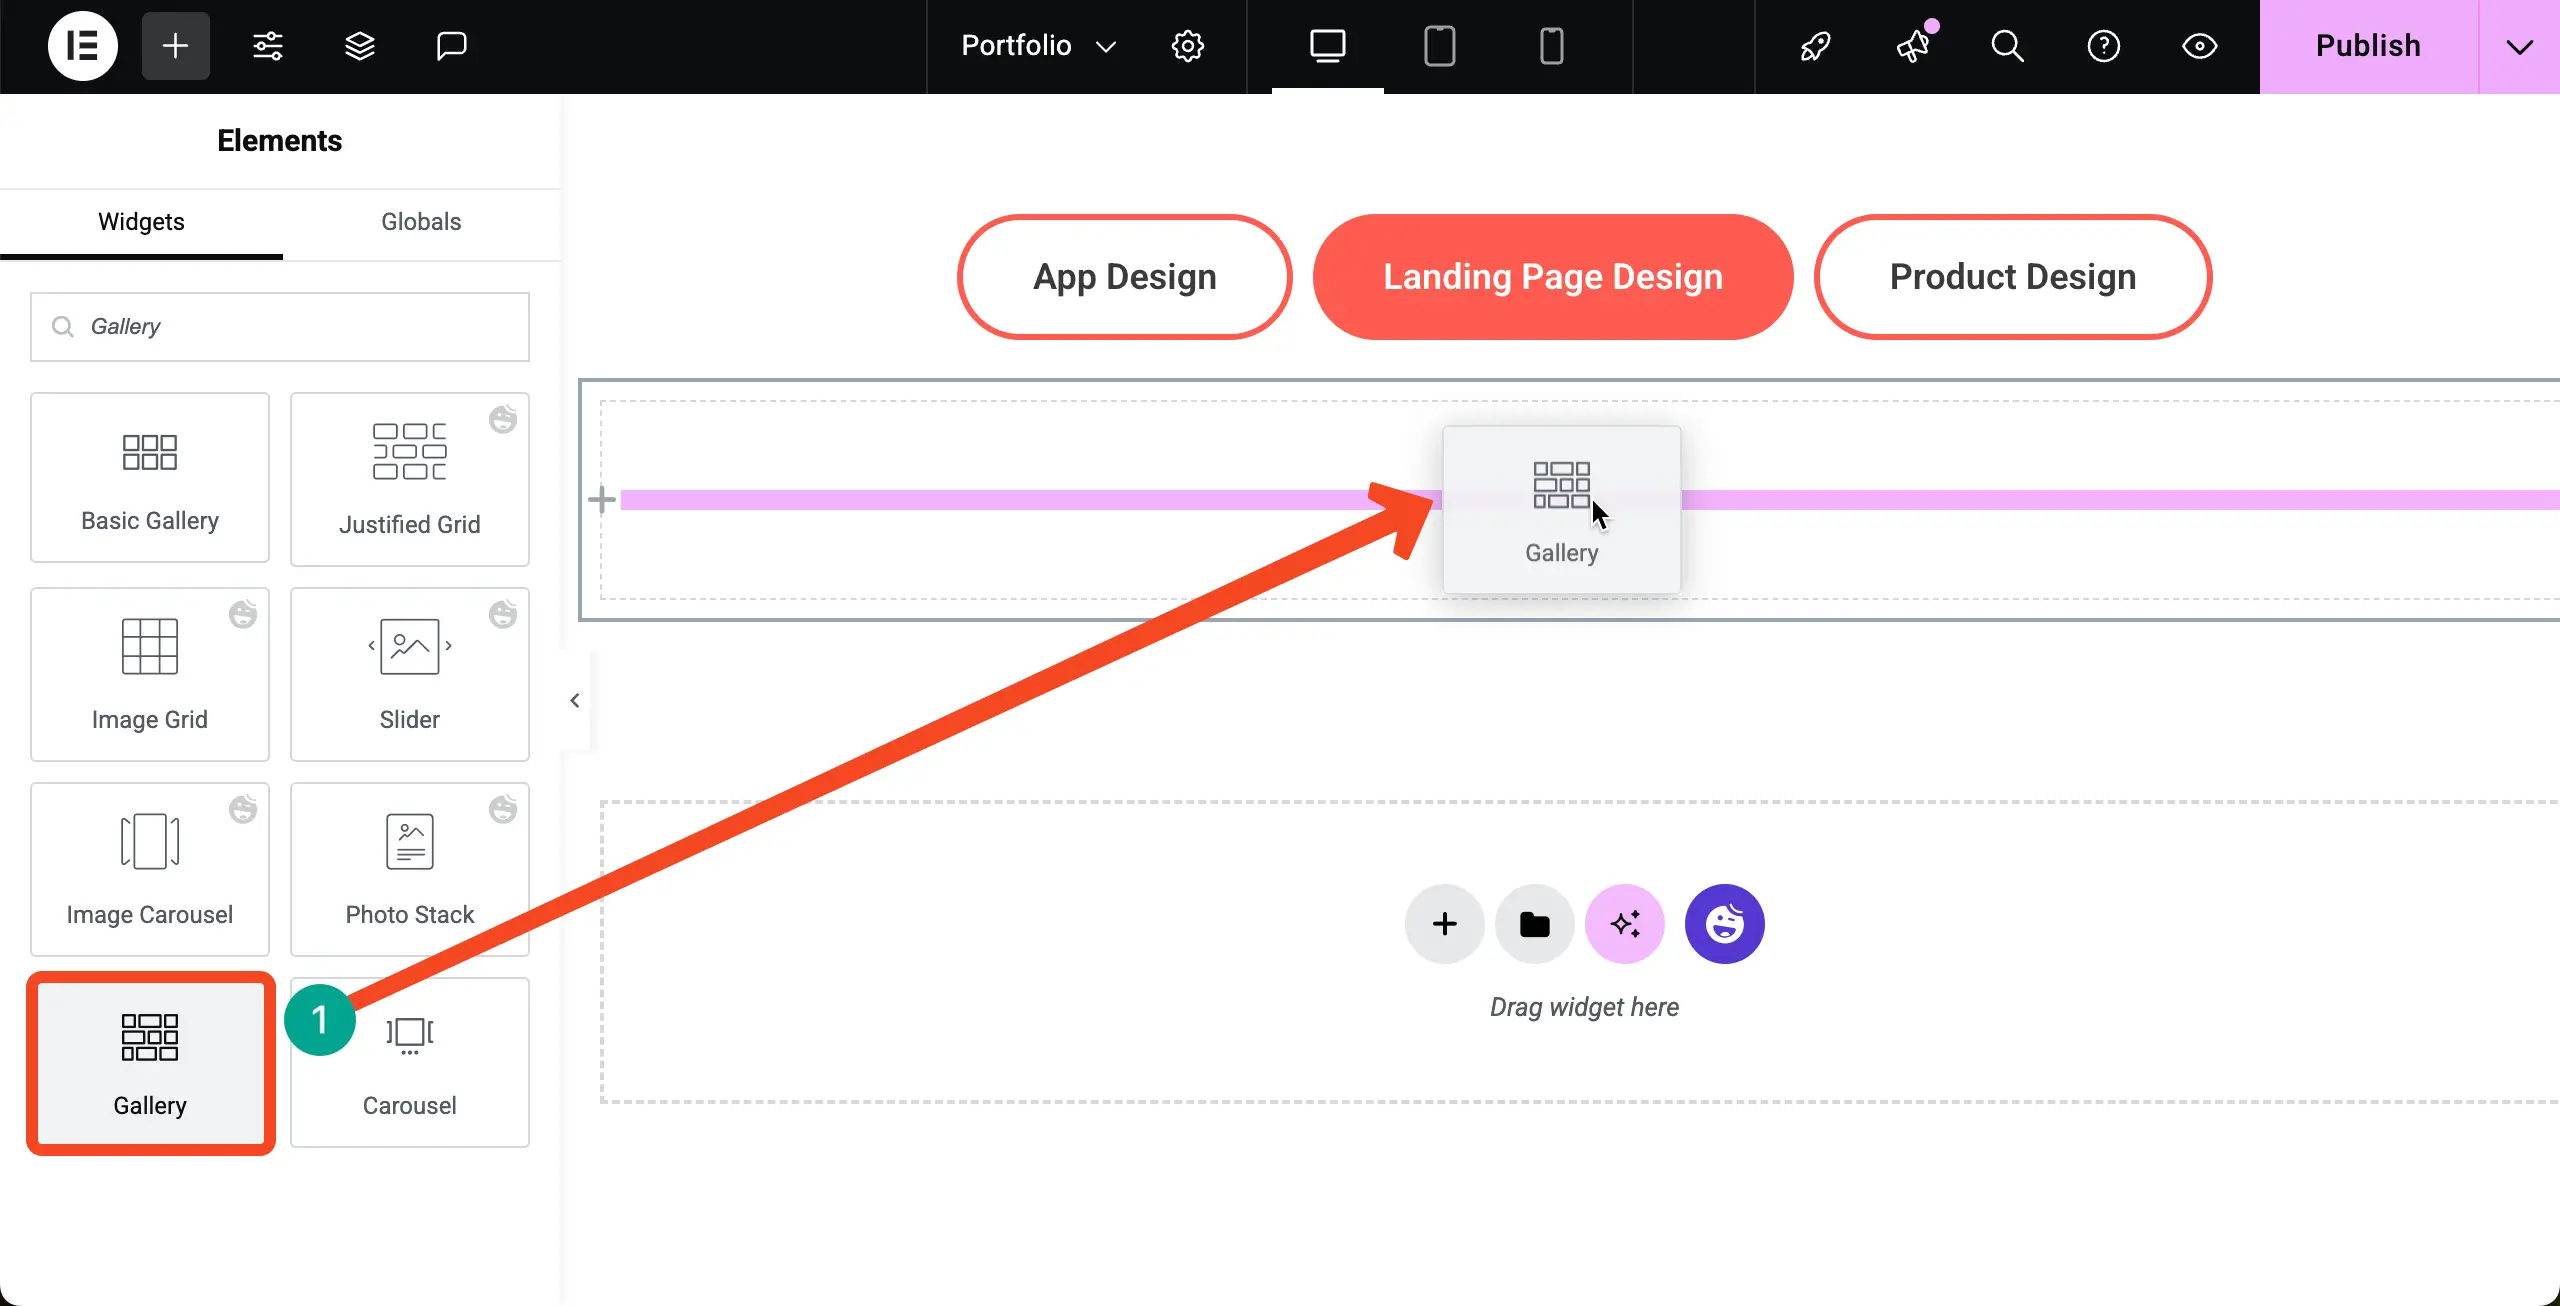
For example, we’ll add the Gallery widget to the second tab. With this widget, you can display your portfolio items only visually. No textual information is possible to display.
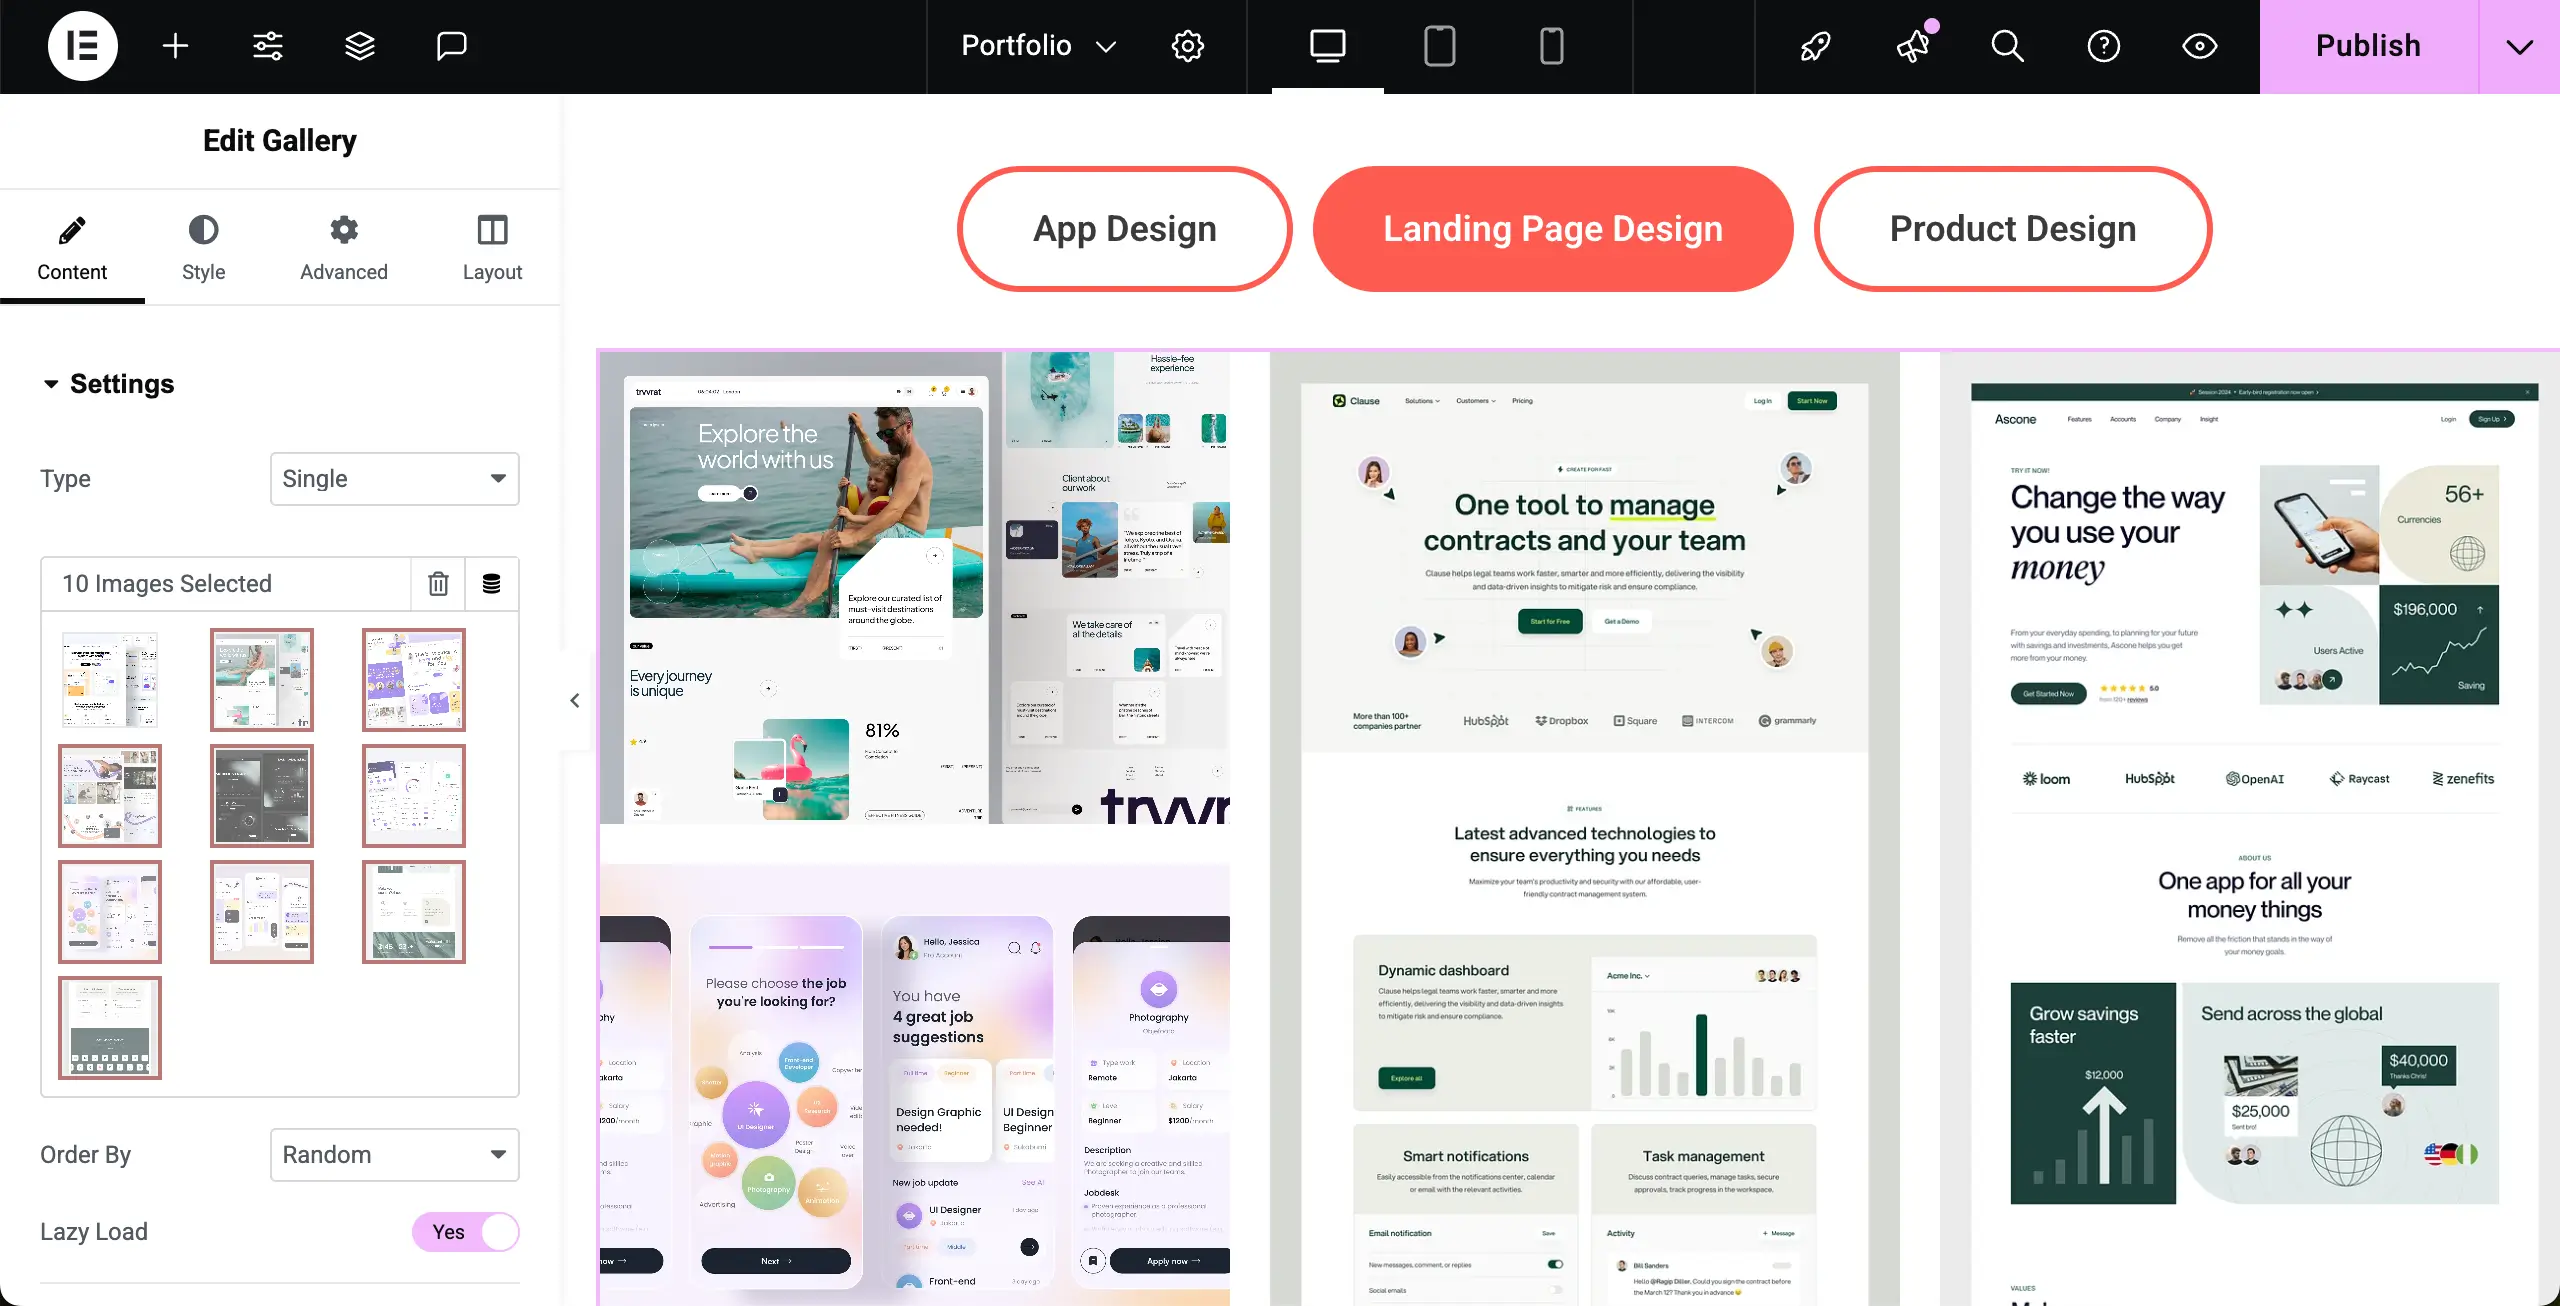
You can see that we have added images to the gallery.
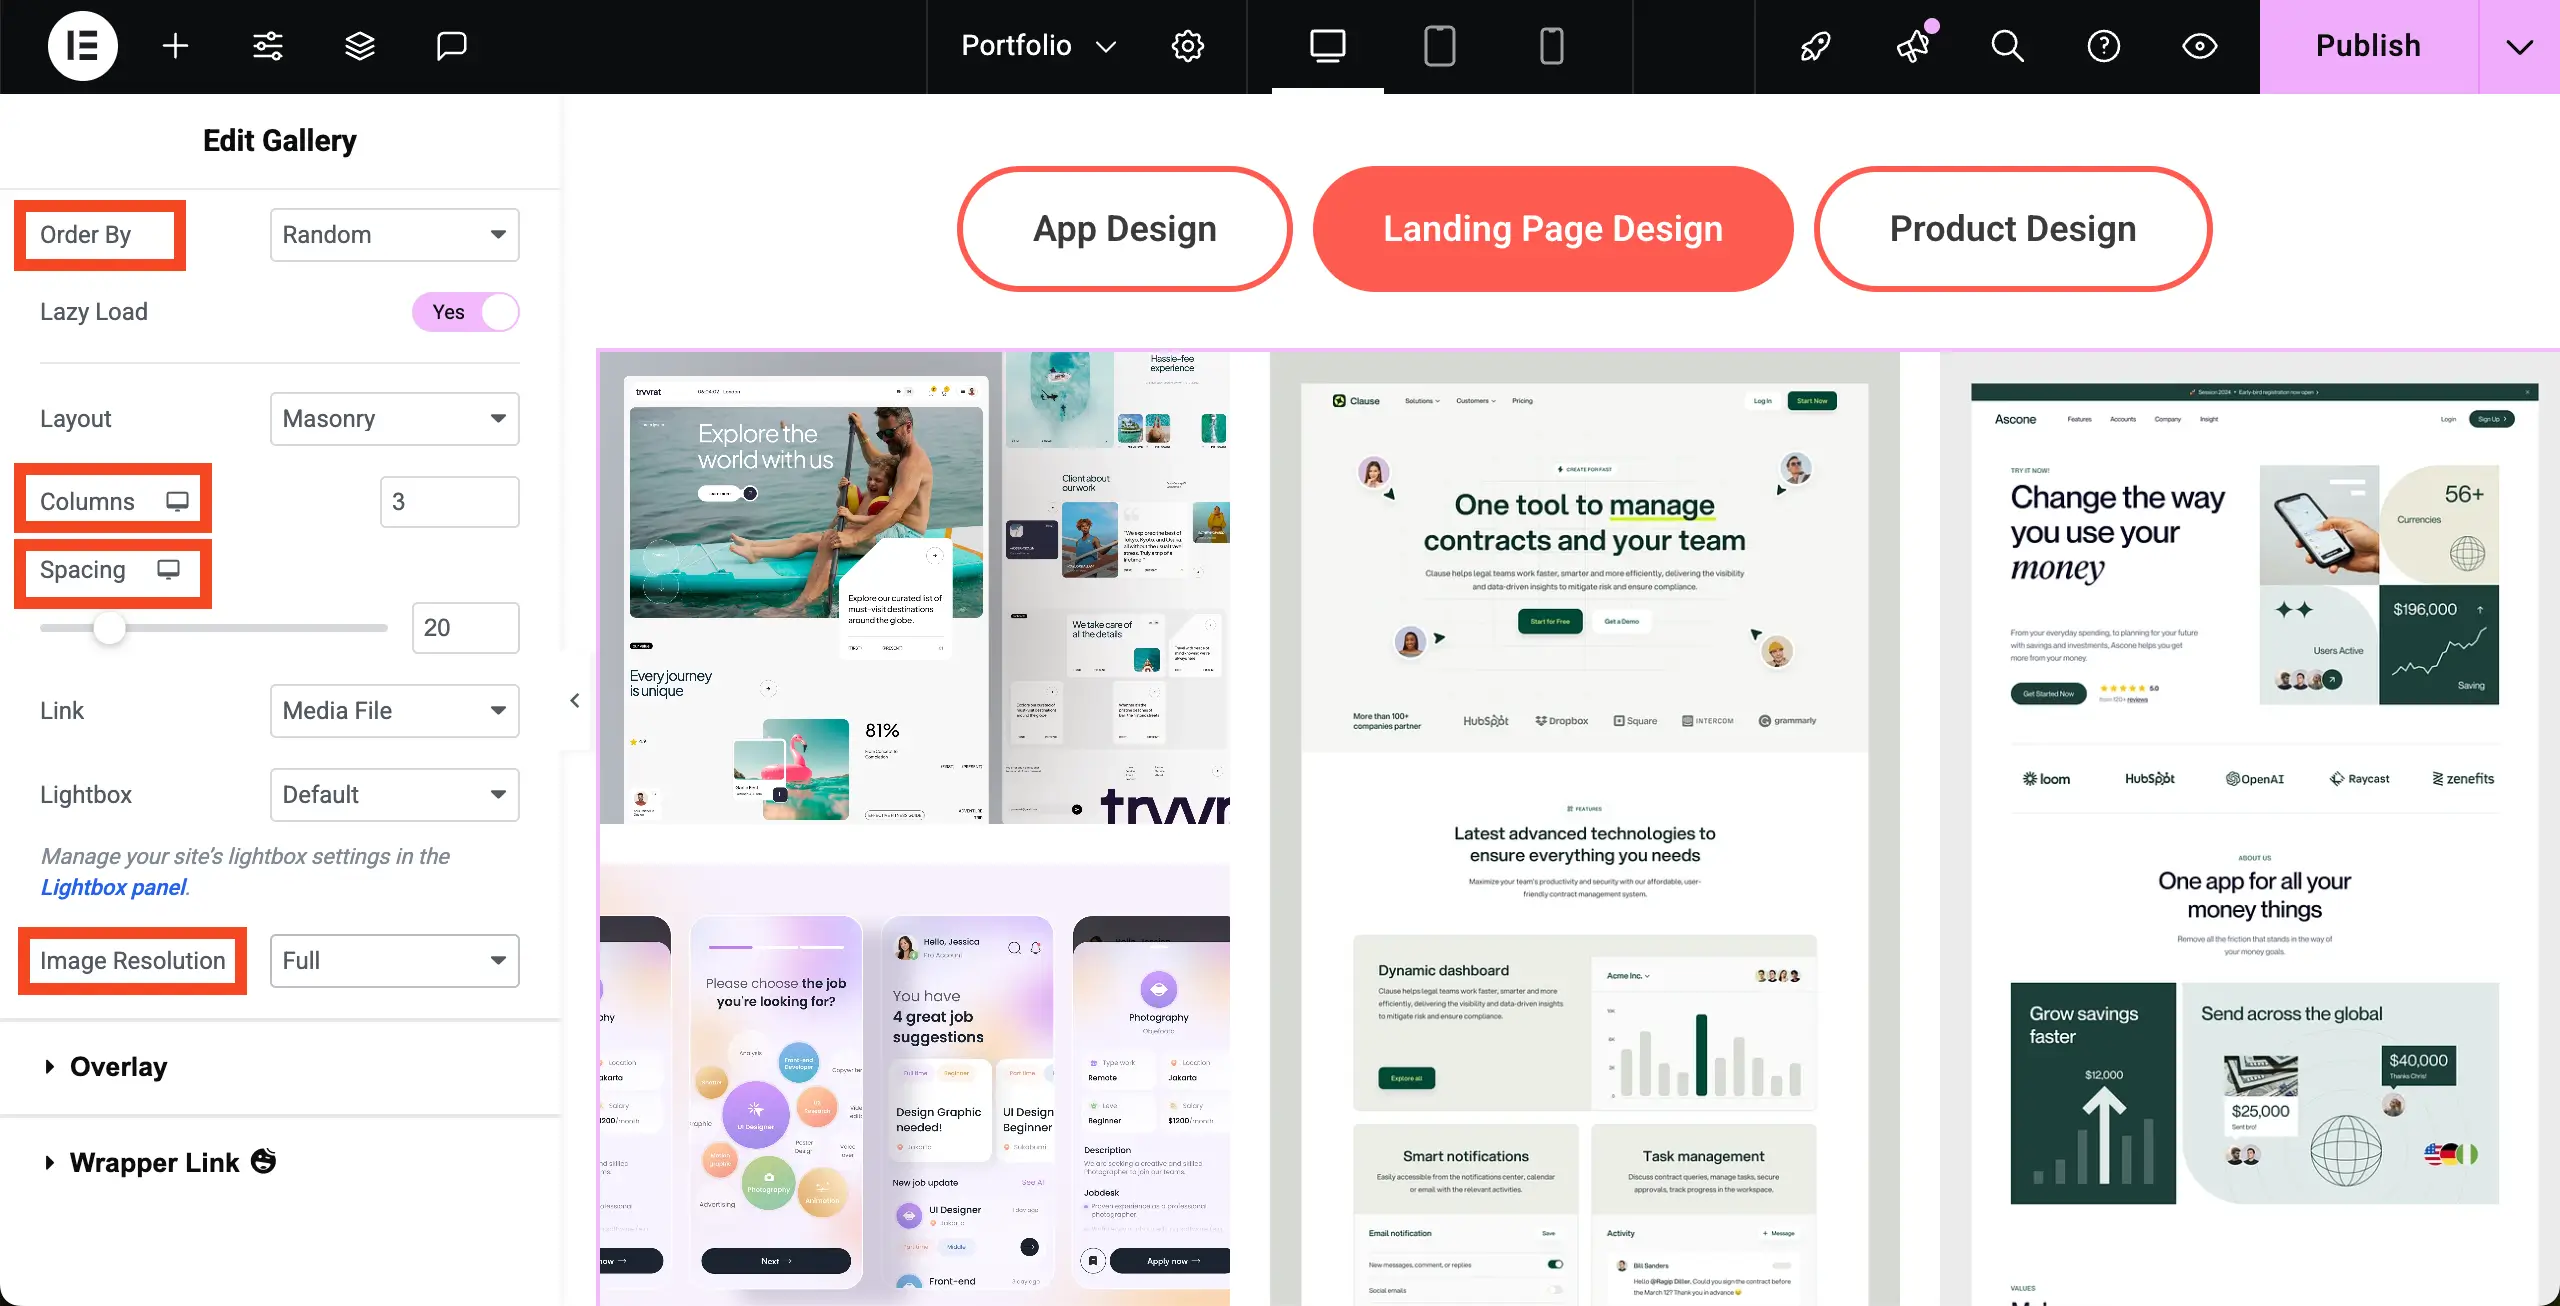
By scrolling down the content tab a bit, you’ll get options to customize the image order, column number, spacing, gallery type, and image resolution.
In the same way, add content to the remaining tabs. Thus, you can complete creating your portfolio section.
Step 08: Add a Form at the End of the Page (Optional)
So, your portfolio section is ready. You may end your page here or add some more elements, like a contact form, a call to action, or else.
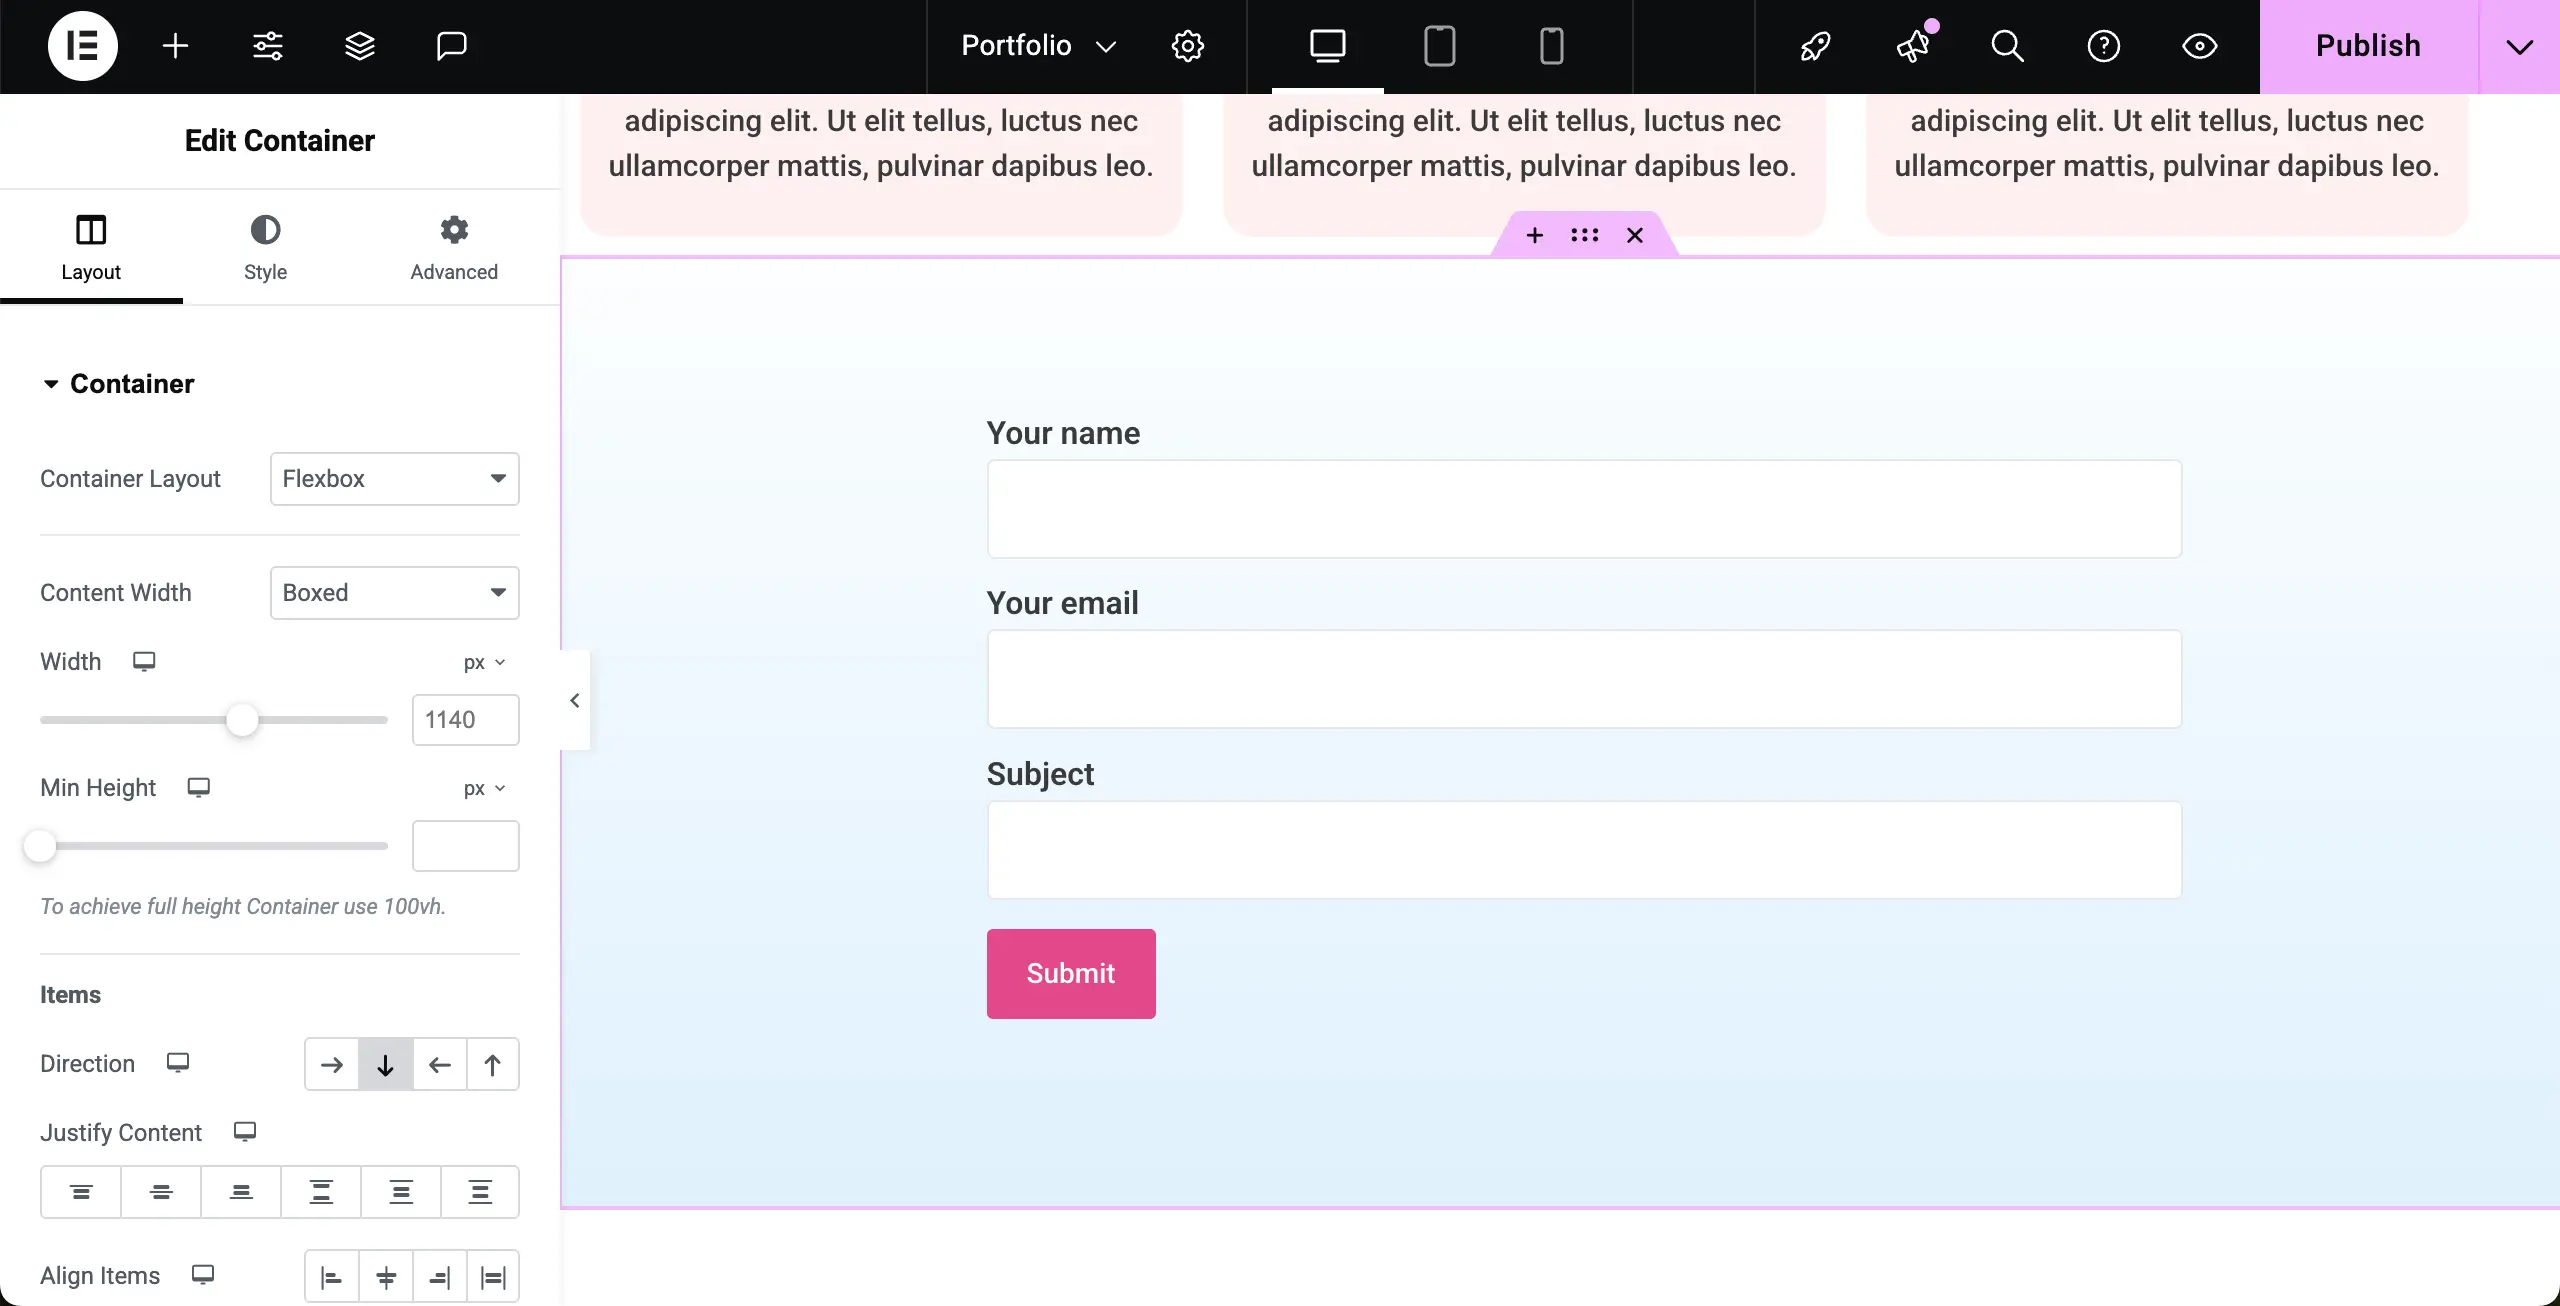
You can see that we have added a contact form at the end of the page. Learn how to create a contact page in Elementor.
Step 09: Preview the Portfolio Page
When everything is done, go to the portfolio page to check if everything works well or not. You can see in the short video clip attached below that Tabs widget, meaning the main portfolio section is working flawlessly. Hope it will work well on your end as well.
Thus, you can create a portfolio page on your WordPress site with the help of Elementor and HappyAddons plugins.
Final Word!
We have presented the demo of a basic portfolio page in this tutorial. Obviously, when it will be your turn, you will definitely try to create a comprehensive and content-rich portfolio page. But hope you can realize that presenting everything in just a blog/tutorial post is never easy.
We just wanted to introduce you to the tools and how to use them for creating a portfolio page. We are sure that you can do the rest yourself. However, if you need any suggestion or advice regarding Elementor, HappyAddons, and website designing, you may mention it in the comment box below.
Or, you can give us a chat. Our support team will get back to you very soon. Thanks for being with us till the end. Have a nice day ahead!

