Are you looking for a cost-free way to create the header and footer for your website?
The Header and footer are two essential parts for the consistent stylizing and branding of any website. Elementor is a great page builder plugin that has made header and footer customization super easy for WordPress users.
Today, we’ll introduce you to an extension of this plugin (names HappyAddons), by which you can create the header and footer on your site completely for free.
So, let’s get into the discussion – how to create header and footer in Elementor websites for free, without wasting any more time.
What are Header and Footer on a Website?
The header visually sits at the top of any website and typically appears on all web posts and pages. It includes elements like the search bar, navigation menu, logo, and site title. In many cases, the header also includes a login/signup button, a shopping cart, social media account links, and more.
On the flip side, the footer appears at the bottom of a website. It includes information like copyright, company policy, and products/services they have. The footer also works as a navigation menu, as it includes links to important pages, social channels, career openings, and more.
Importance of Header and Footer on a Website

There is a variety of functions the header and footer can play depending on the type and nature of the website. Here, we’ll show you some of the most important of them, so the importance of header and footer on a website isn’t overlooked.
a. Create a Quick Fast Impression
A flawlessly organized header and footer can help visitors instantly get an idea about the topics and content it has. It enables him to decide whether to forward on the website or move away.
b. Make the Navigation Easy
The header and footer typically contain the main navigation menu and links to important pages. So users can quickly navigate the pages they are looking for, which saves them time.
c. Ease the Search Functionality
Having a search bar increases the beauty and efficiency of a header. It allows users to quickly find out the content they’re looking for just by keywords.
d. Help in Branding
The header and footer include brand elements like the site logo and site title. It establishes the brand of the website and helps users identify it by seeing only the logo next time.
e. Search Engine Optimization (SEO)
Headers and footers include links to important pages, social channels, local addresses, and more. It helps search engines understand the structure of the website and crawl better.
How to Create Header and Footer in Elementor for Free (Step by Step)
You’ll need an additional tool named HappyAddons to create the header and footer for free with Elementor. HappyAddons is actually a powerful add-on to the Elementor plugin. It can further power up your Elementor site with more exciting features and widgets.
We will cover the tutorial process in two separate parts under this section. Before that, you must ensure the following plugins are installed on your site.
Once you have them ready, get into the tutorial process coming below.
Part One: How to Create Header with Elementor And HappyAddons Free
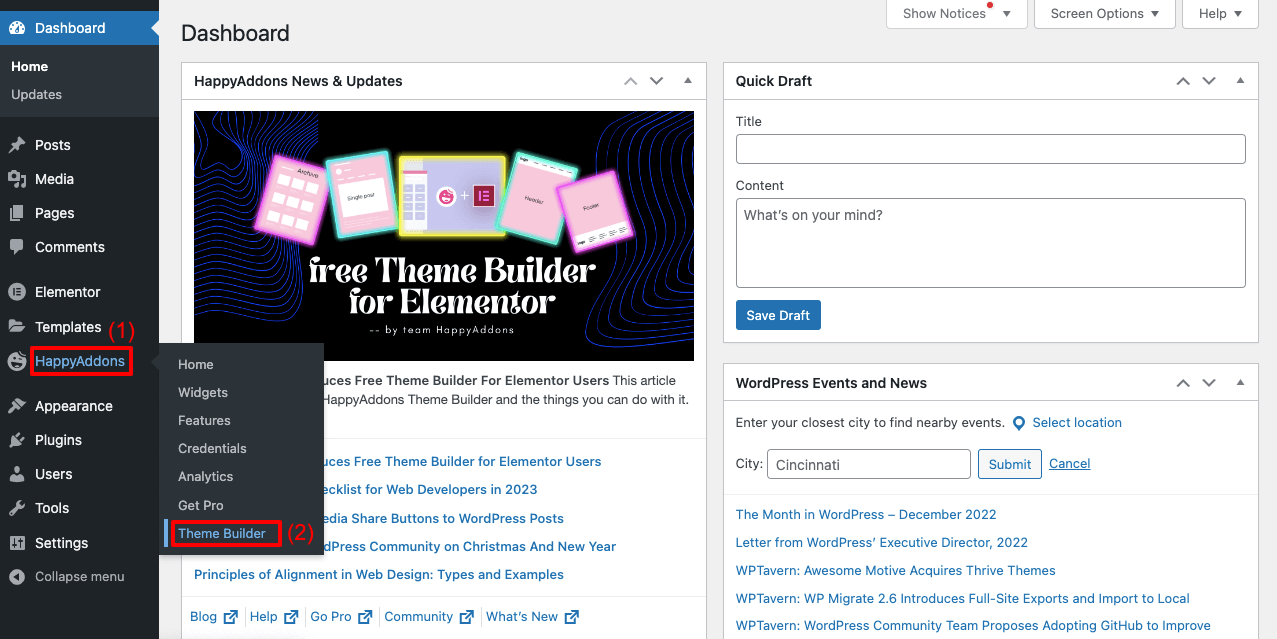
- Navigate to HappyAddons > Theme Builder.
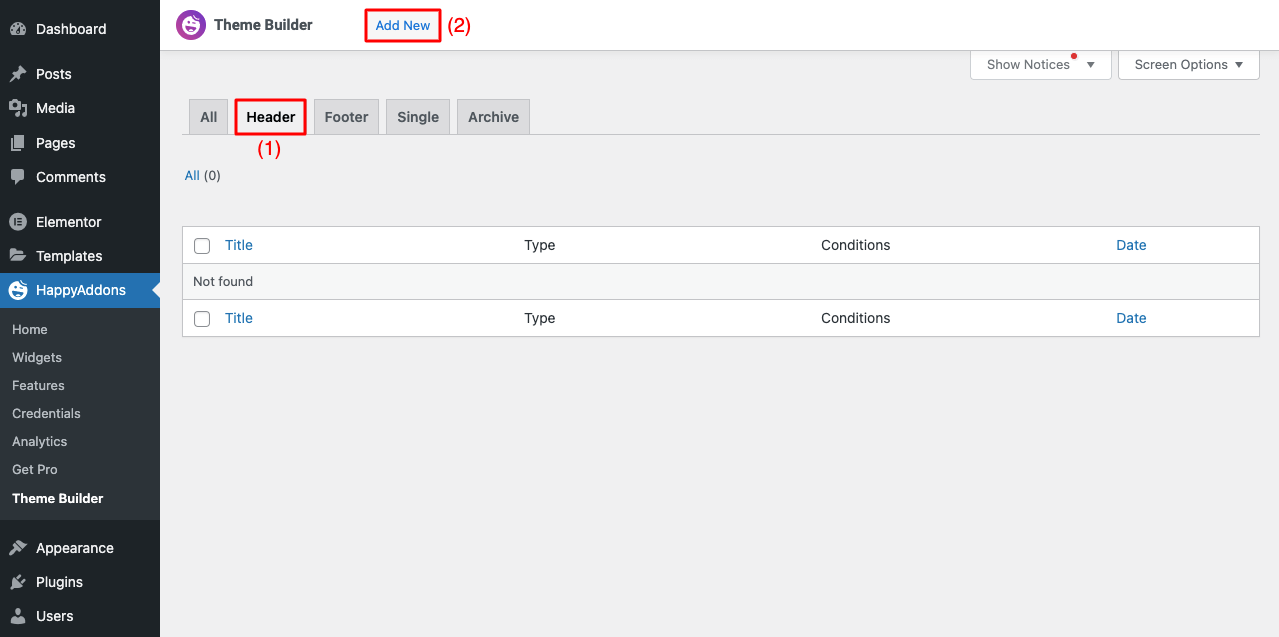
- Select the Header tab.
- Click on Add New button.
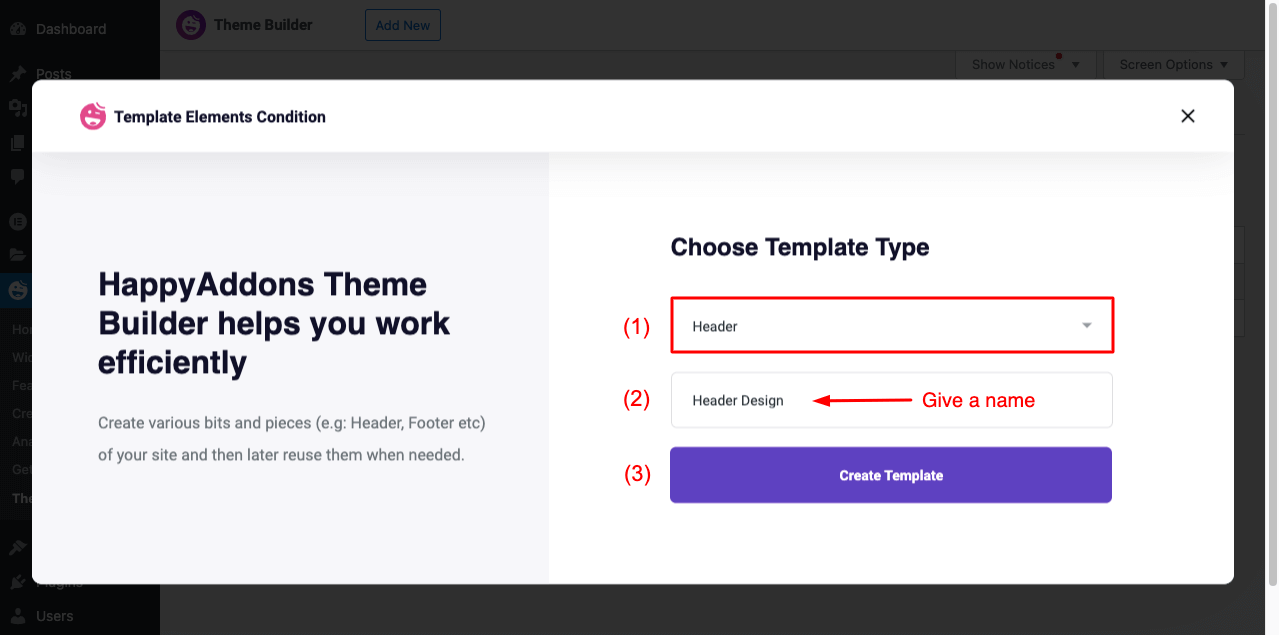
- You will get a pop-up of Choose Template Type.
- Select Header from the drop-down menu.
- Give a name to the template.
- Click on Create Template at the end.
- You’ll get the Elementor Canvas opened on your screen.
- Now the rest of the process is very simple. Maybe you know that.
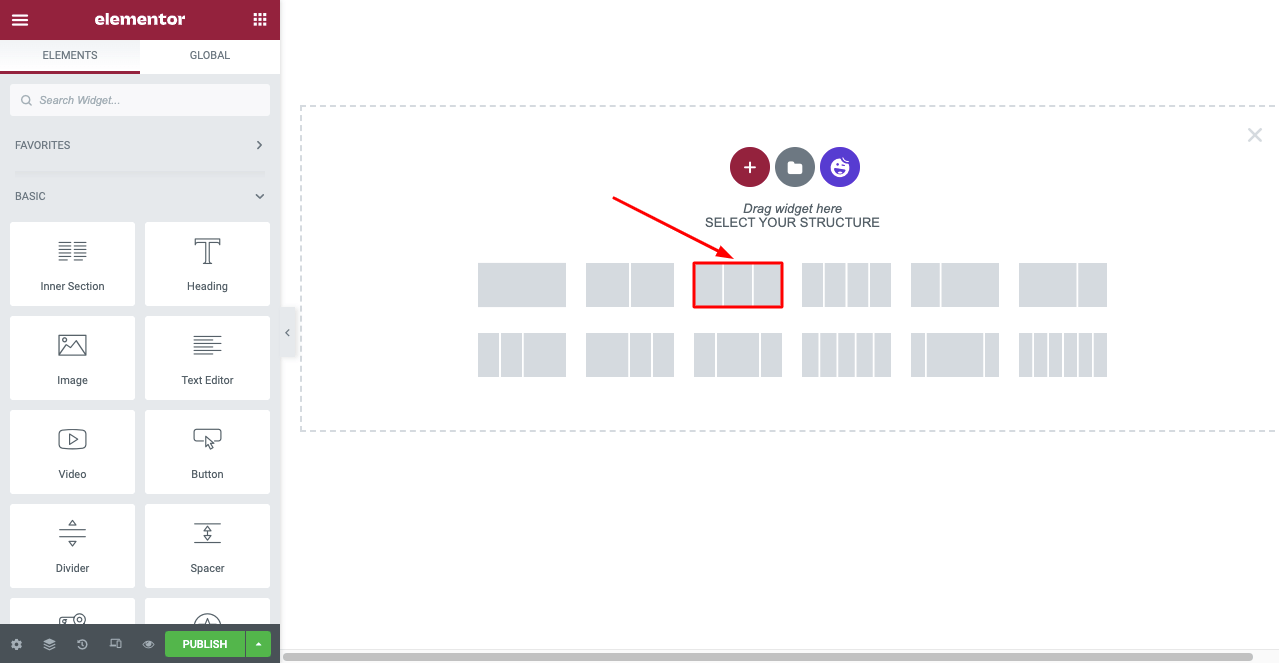
- Select your desired structure (we’ve selected the three-column structure).
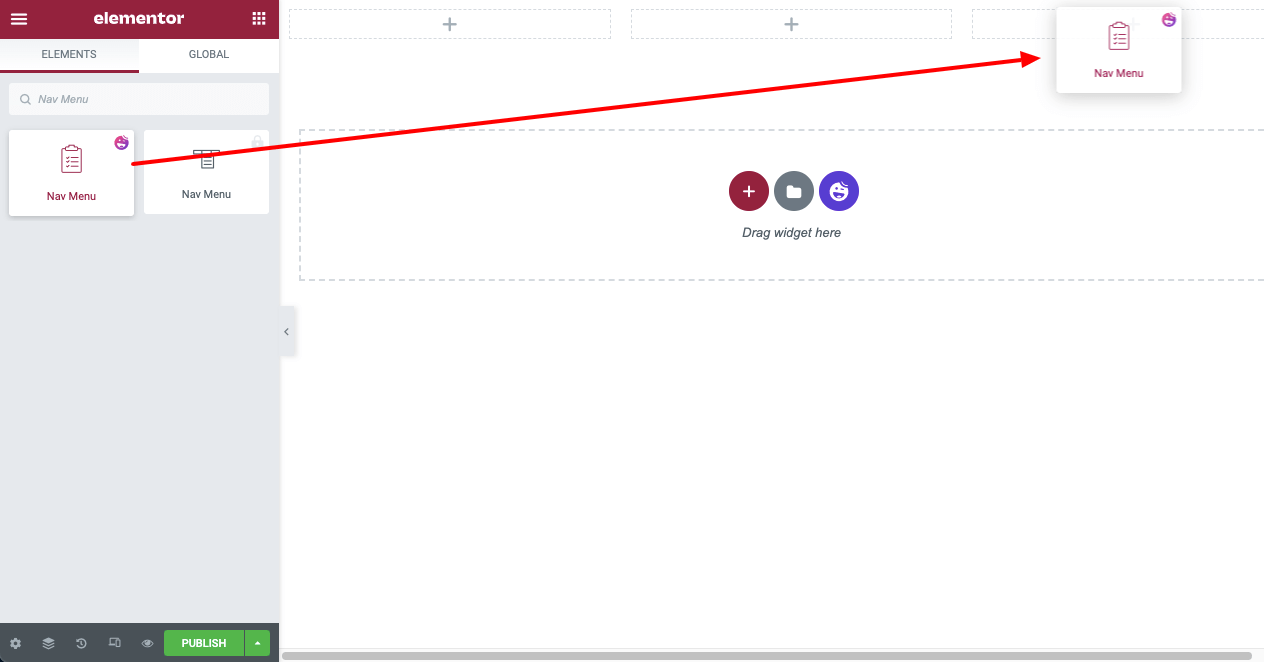
- Type Nav Menu on the Elementor Panel.
- Drag and drop the widget on your desired section.
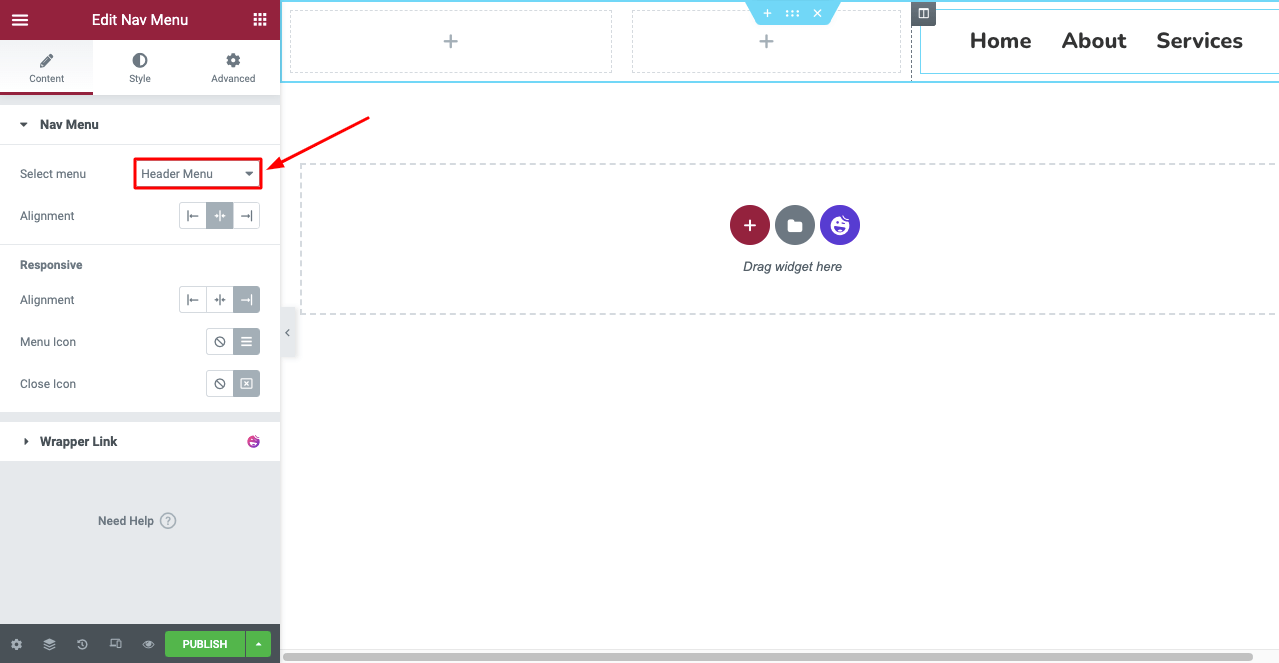
- Select your menu from the Nav Menu widget.
- You’ll see your menu is appearing on your canvas.
Note: You can stylize and customize the menu text with color and effects afterward.
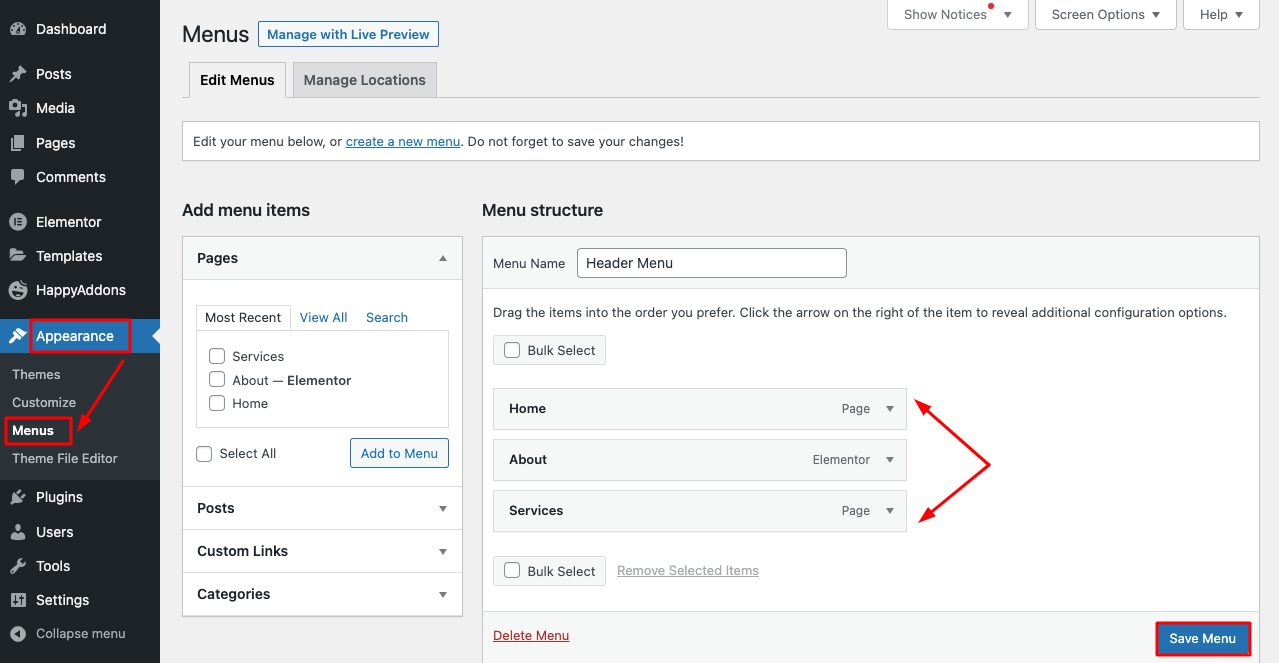
Note: If the drop-down menu of this Nav Menu doesn’t work, the reason might be you haven’t created or enabled it on your WordPress backend.
- Go to Appearance > Menus.
- You will get the option to create a new menu.
- Once you have saved a menu, you’ll see it working on the Nav Menu widget.
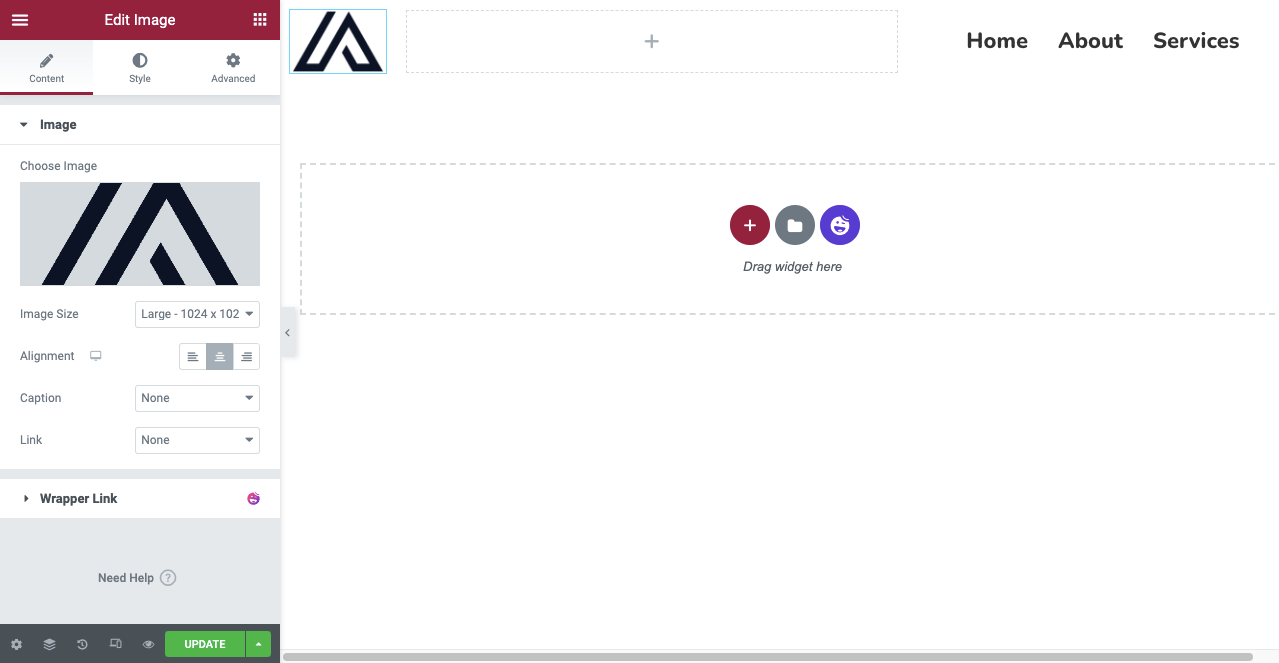
- Next, you can add a logo to the header using a suitable widget from the Elementor Penal.
- We’ve used here the image widget.
- Next, you have to make the header mobile-responsive.
- Click on the Responsive Mode from the bottom of your Elementor Panel.
- It will open up different screen options above your Elementor Canvas.
- Switch the canvas into different modes and customize your layout, so it becomes perfect on all devices.
The process is shown in the video below –
- When you are done designing your header, click the PUBLISH/UPDATE button.
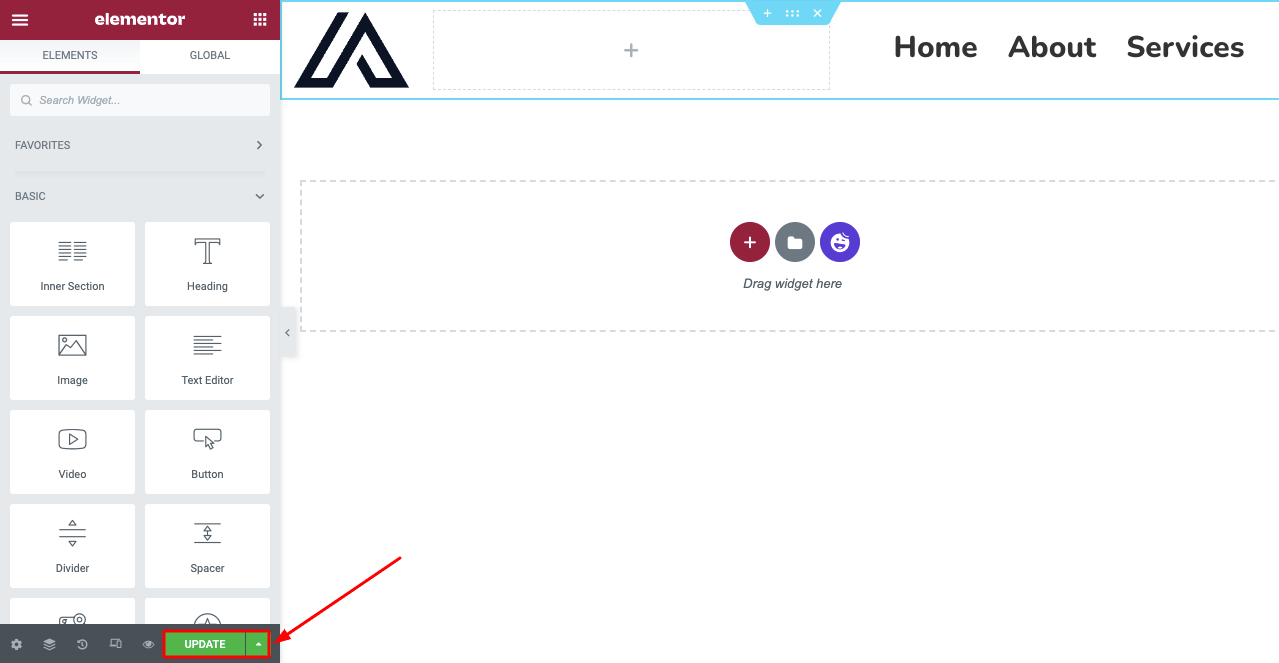
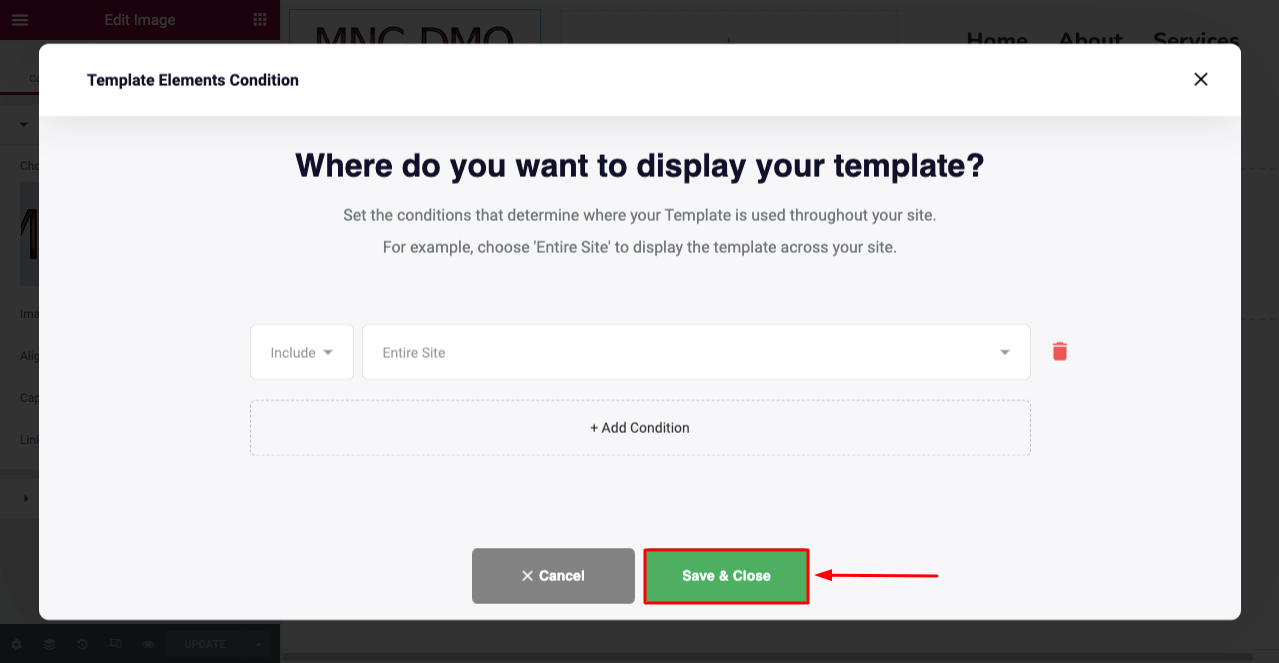
- You will get a new pop-up opened to define the template condition.
Note: With the HappyAddons Free version, you can set conditions: Entire Site, All Archives, and All Singulars. But if you want to set the header template specifically for individual posts and pages, you need to upgrade to its premium version.
Explore this blog for more inspiration on how to create a catchy header for your website.
Part Two: How to Create Footer with Elementor and HappyAddons Free
The footer creation process is very similar to the header. We showed you completing the above process from scratch. Here, we’ll show you how to create the footer using a template.
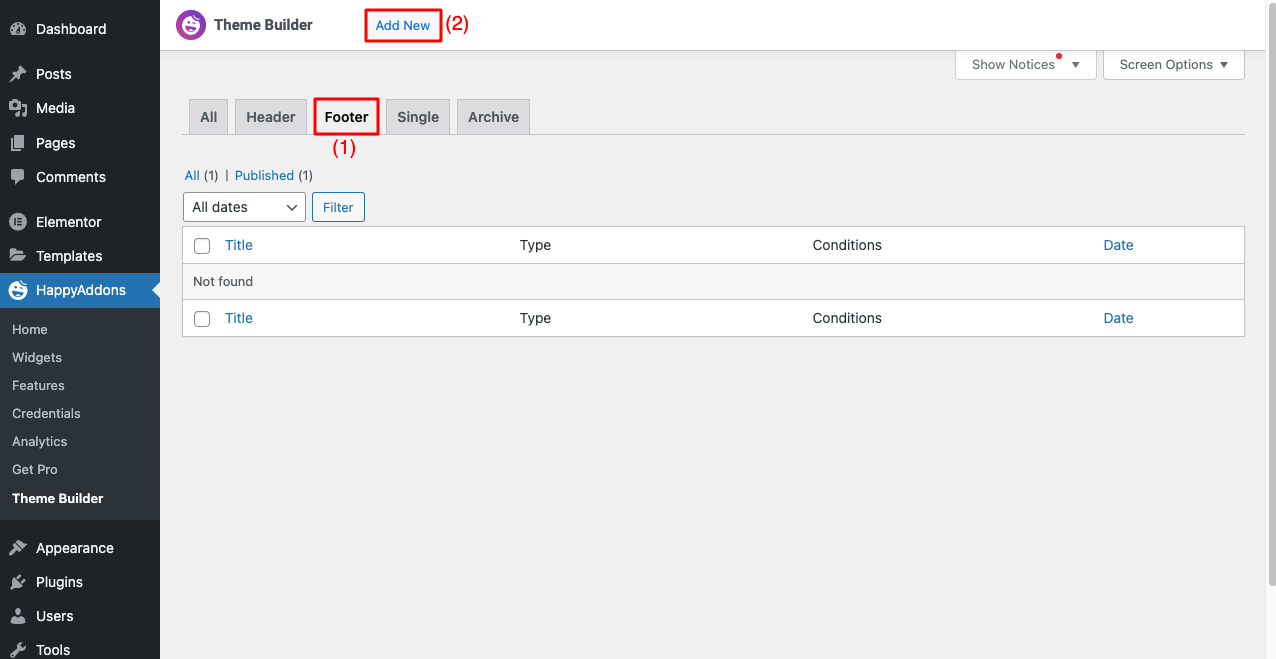
- Navigate to HappyAddons > Theme Builder.
- Go to the Footer tab.
- Click on Add New button.
- You will get a pop-up of Choose Template Type.
- Select Footer from the drop-down menu.
- Give a name to the template.
- Click on Create Template at the end.
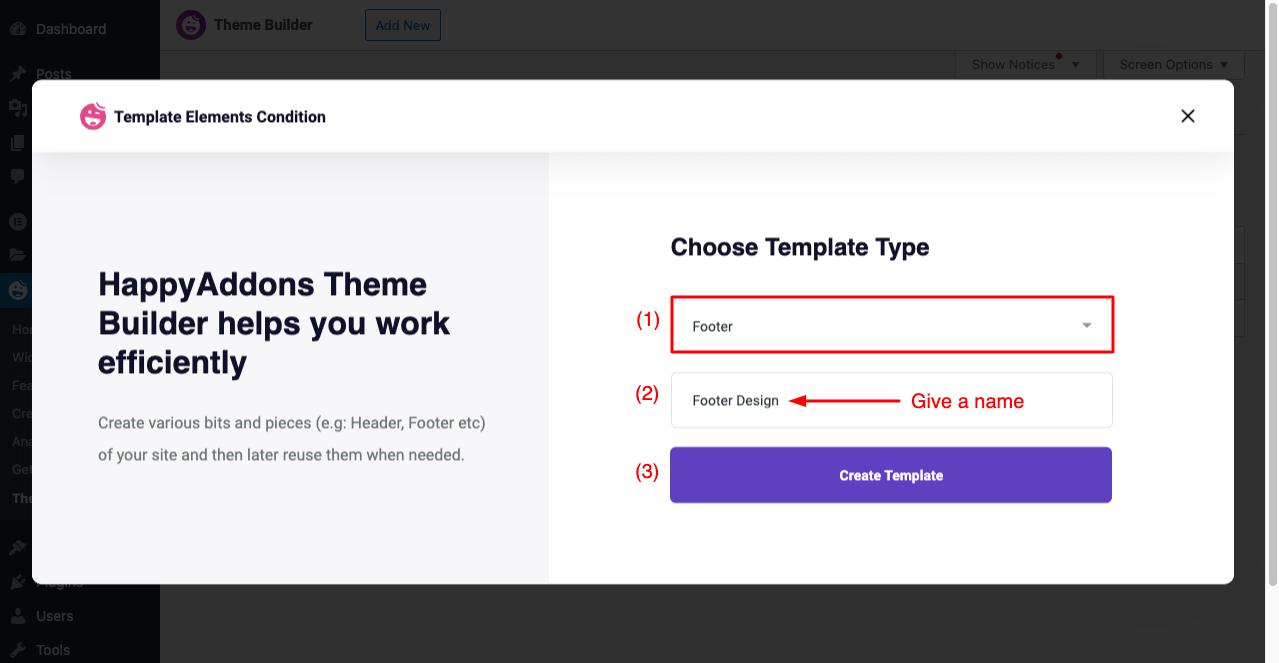
- You’ll get the Elementor Canvas opened.
- Click on the HappyAddons Logo/Icon.
- Type ‘Footer’ on the search bar.
- You’ll get free and pro footer templates.
- Select the one you like and click on its INSERT button.
The process has been explained in the video attached below.
- Now, you need to make the footer mobile responsive now.
- The process is the same as shown for the header.
- Click on Responsive Mode from below and customize the footer.
- Once you are done, click on the PUBLISH button.
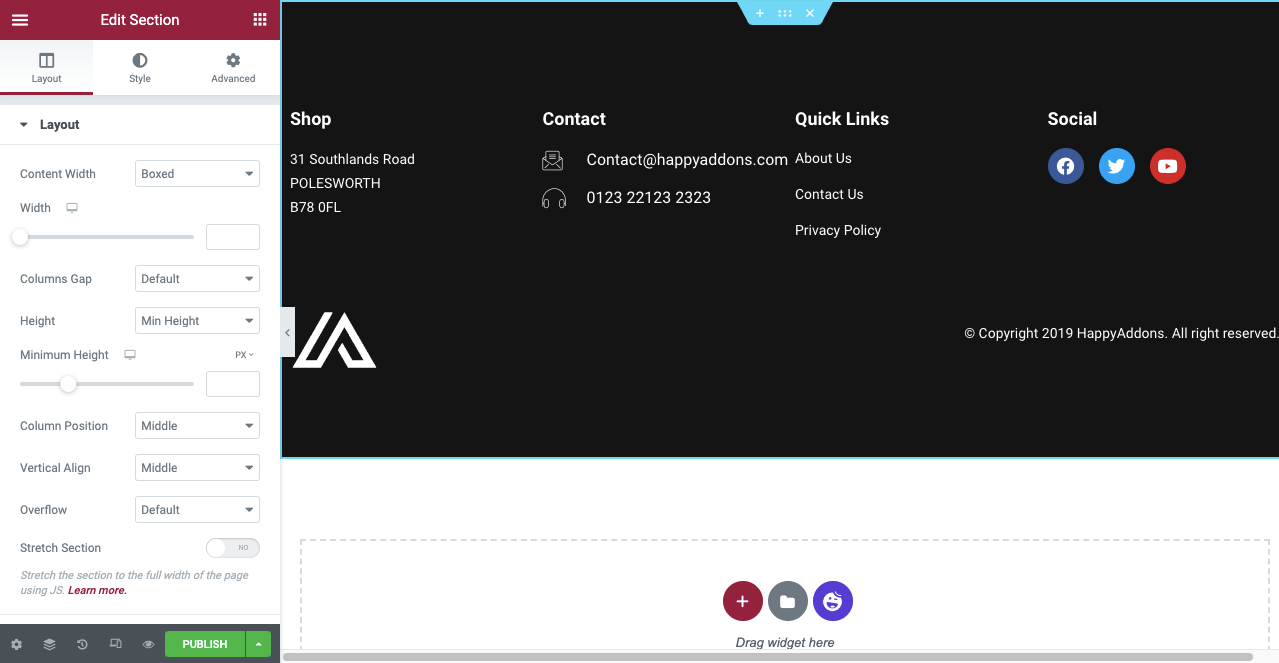
- You will get the pop-up opened to let you define the template condition.
- Select Entire Site as the footer must come under all your posts and pages.
- Click on the Save & Close button.

Click this link to explore how to create a catchy footer for your website.
# Preview of The Header and Footer
Check out the header and footer we have created freely with the help of HappyAddons Theme Builder.
Get the HappyAddons Header and Footer Builder
Theme Builder is a special addition to HappyAddons. It includes dozens of exciting new features by which you can create stunning headers and footers alongside single post and page templates for your website completely free of cost. To explore more about it, click the Get Now button below.

Bonus Point: Best Practices of Creating Elementor Header and Footer
You can make the best of your header and footer only when you know how to build and design them smartly. There are some basic things you need to ensure while creating them for your website. Have a quick look at them below.
1. Keep It Simple and Consistent
Though header and footer are important for a website, you shouldn’t be busy adding too much information. Use a hamburger menu if you have many pages and product categories.
2. Use Appropriate Fonts and Contrasting Colors
Using contrasting colors and appropriate fonts can create an eye-soothing environment on the web surface. It can help dyslexic people read your web content without any problem. Check out the fundamentals of typography in web design.
3. Use Enough White Space
Just like the font and color, white space is another crucial element. A good balance between the white space and elements can take your header-footer aesthetic to the next level.
4. Make It Mobile Responsive
Your header and footer should be optimized for different screen sizes, so they seamlessly work on any device, like desktops, tablets, and mobile phones.
5. Create a Sticky Header
It’s a type of header that stays fixed on the top even when users scroll the page. Users don’t have to go to the top if they want to switch to a new page. Explore how to create a sticky header.
6. Include Additional Information in the Footer
If you want to showcase numerous information like Google Maps, mobile app links, product delivery information, shop location, and more, better to add them in the footer.
FAQ on How to Create Header and Footer in Elementor for Free

Hopefully, you are enjoying this discussion. This section will answer some common questions frequently found online related to the topic of this blog post.
-
What should be in the header of a website?
1. Navigation Menu
2. Site Logo
3. Site Title
4. Multi-language toggle
5. Shopping Cart
6. Page Links
7. Site Tagline -
What should be in the footer of a website?
1. Copyright Notice
2. Privacy Policy
3. Sitemap
4. Contact Information
5. Social Channel Links
6. Important Page Links
7. Email Form -
What is the best website header size?
The width of the content area for website headers shouldn’t be more than 1024 px. For the home page, especially for the eCommerce home page, the height of headers may be up to 600 px. But for other pages and posts, the header height shouldn’t be over 300 px.
-
What are common mistakes in designing the website header and footer?
1. Having identical information in both the header and footer
2. Not optimizing them for mobile-responsiveness
3. Designing an unnecessarily long header
4. Saturating both of them with too much information
5. Using eye-screaming color -
What is the standard number of columns for the header and footer?
Three columns are the best for headers. But for the footer, three-four columns are best for presenting data.
Final Thoughts
A website instantly loses its acceptance among users at first glance without the header and footer. With HappyAddons, powered by Elementor, you can enjoy optimum control over every single element of these two things on your website.
In this article, we have tried explaining to you how to create the header and footer for your website in the easiest way. It’s now your turn to practice this tutorial. If you face any problem mid-way, just let us know through the comment section.

