The header is the first thing people notice when visiting your website. It highlights your brand logo, page links, and many important features that create a quick impression in visitors’ psychology. Not only does it organize your website, but it also creates a positive experience among the users.
The sticky transparent header can be a great way to take the user experience to the next level. It allows your web visitors to navigate the entire website without having to scroll to the top every time they want to visit a new page. It makes your website visually more appealing as well.
Elementor is a powerful page builder plugin by which you can create stunning transparent sticky headers without any coding experience. In the following parts of this article, we’ll show you how to create Elementor sticky transparent headers in two easy ways.
You can adopt the method which is comparatively easy and cost-effective for you. Let’s get into the discussion without wasting any more time.
Table of Contents
- What is a Sticky Transparent header and Example?
- Why Should You Use Sticky Transparent Headers on Your Websites?
- How to Create Elementor Sticky Transparent Header: Step-by-Step Guide
- FAQs on How to Create Elementor Sticky Transparent header
- Final Takeaways on Elementor Sticky Transparent Header
What is a Sticky Transparent header and Example?
A sticky transparent header is a navigation bar that stays fixed at the top of the screen when users scroll down the web page. It is typically used on websites having long pages like articles, blog posts, product-review pages, and one-page websites.
A sticky transparent header is often semi-transparent, which lets the users see the rest of the content on the page. It allows web owners to blend the header with the website’s background color, giving it a more polished look.
The following video shows an example of how the sticky transparent header works.
Why Should You Use Sticky Transparent Headers on Your Websites?
Sticky transparent headers have become a common trend in modern web design. Because it adds great graphical value to a website which helps to grab readers’ attention. Below are some key reasons why you should consider having sticky transparent headers on your website.
1. Escalates Branding Awareness
Sticky transparent headers allow web owners to showcase the brand logo, slogan, business message, and promotional offer as long as visitors are on the website. It helps to grow brand awareness in the subconscious mind of web visitors.
2. Boosts User Experience
If you have an affiliate site, news portal, or eCommerce website where most pages are so long, sticky transparent headers can ensure a pleasant experience for the web visitors. It’s equally effective for mobile phone and tab device users whose screen size is relatively small.
3. Improves Easy Navigation
If you have sticky transparent headers on your website, users won’t have to scroll to the top whenever they want to take action. They can instantly visit the cart section, my account, or any page they wish. It makes a website highly actionable as well.
4. Makes Hero Section Attractive
After the header, the hero section is the second most important element that instantly arrests visitors’ attention. The sticky transparent header allows you to blend its background color with the hero section to give it a super-gorgeous appearance.
How to Create Elementor Sticky Transparent Header: Step-by-Step Guide
Getting maximum authority on web headers is something all web owners want. When you install a theme, it automatically comes with a header. Depending on the theme, you may have certain options to edit particular header parts.
But it’s quite frustrating to many web users because they can’t rebuild it as they want. With the Elementor page builder plugin, you can overcome this worry. Using this plugin, you can build and design any type of web header you want. You can make it sticky and transparent too.
Here, we’ll show you two methods to create sticky transparent headers with the Elementor page builder plugin. Keep reading!
Method 01: Create Transparent Sticky Header with Elementor
You must have both the Elementor Pro and its Lite version installed to create the sticky transparent header on your site. If you already have them on your site, that’s good. But if you don’t, you can download them by clicking on the following links.
Once they are installed, start following the steps explained below.
Step 01: Create a Menu First
The menu is an important part of any web header. It includes links to different web pages and important sections of a website. So, before building a header, you must create a menu list first.
- Navigate to Appearance > Menus.
- Give a name to the menu.
- Tik mark Header on Display location.
- Click on the Create Menu button.
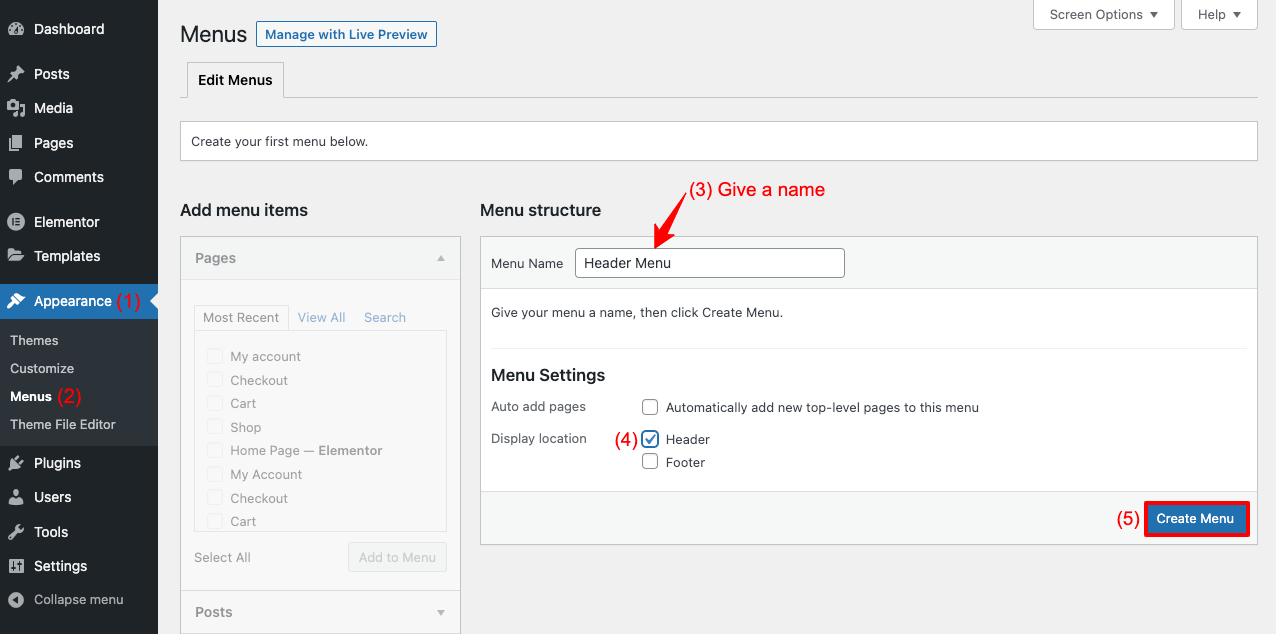
- Tik mark the pages, posts, or categories from the Add menu items.
- Click on Add to Menu button to add the tik marked items to your menu list.
- Click on the Save Menu button. Your menu will be ready!
Step 02: Select a Header Template from the Elementor Template Library
Elementor Pro users have access to the Elementor library section. There you will find tons of readymade templates useful for designing different website sections. You will get a variety of header templates there as well.
- Go to Templates > Add New.
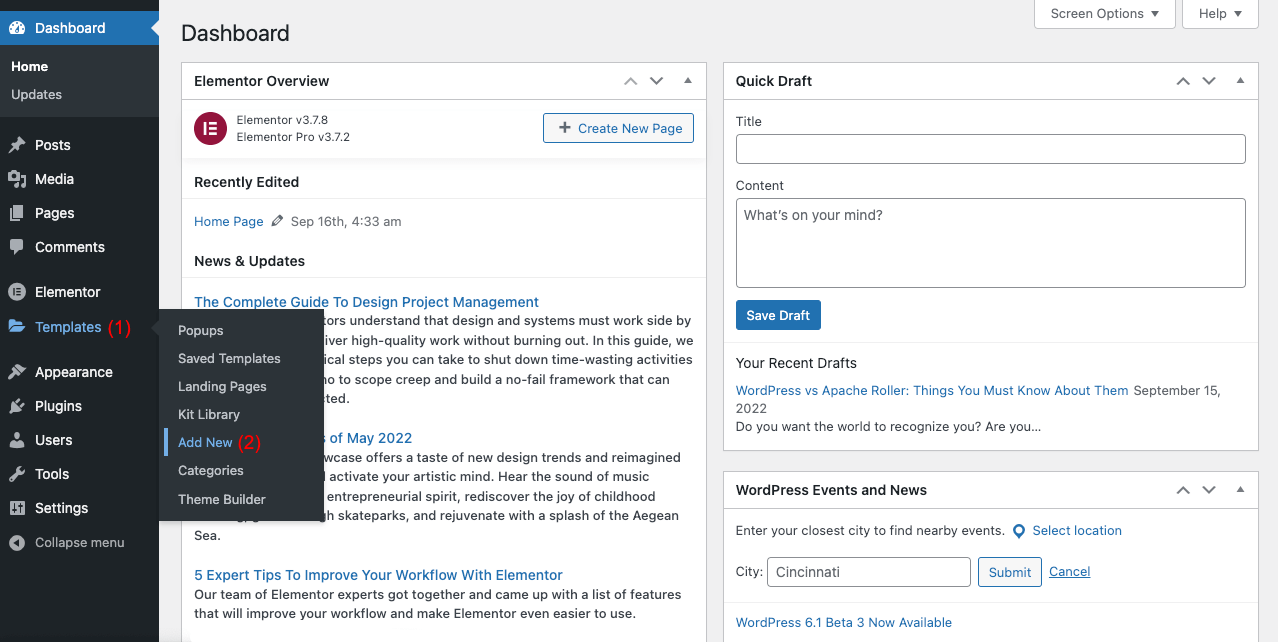
- You’ll see a pop-up modal
- Select the Header option from the type of template you want to work on
- Click on the Create Template button at the end
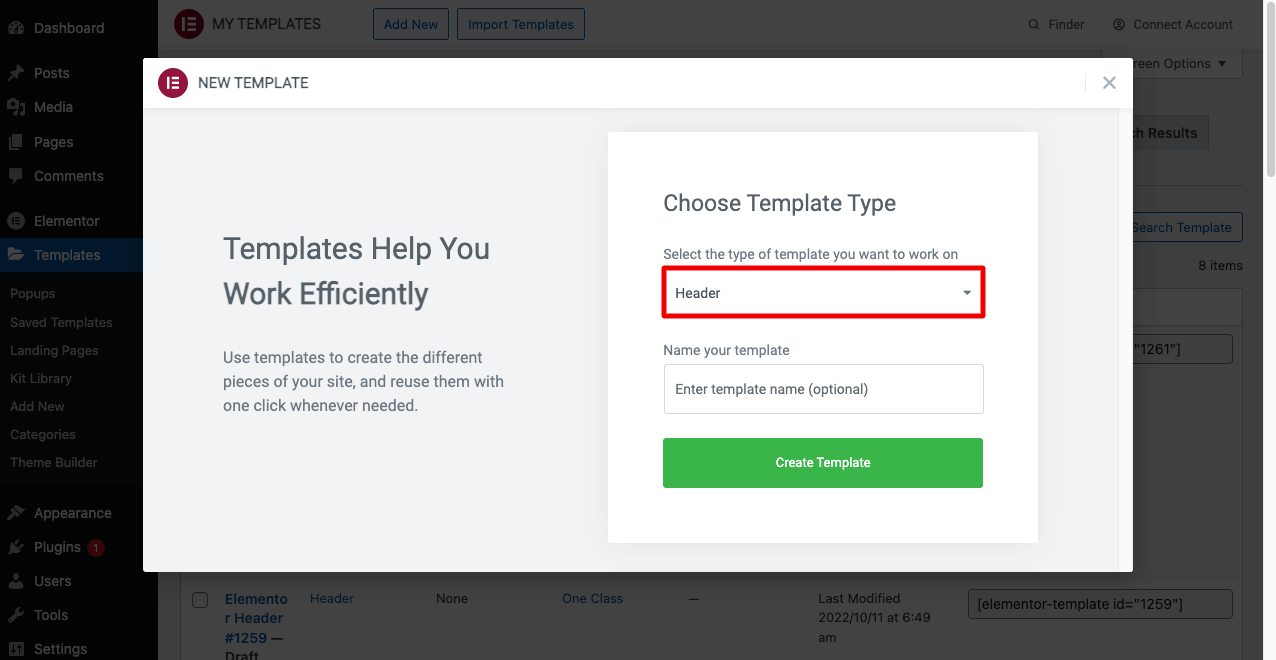
After you select “Create Template” You will find another pop-up modal as the next stage. There you will see a variety of header templates. Explore them to decide the one you want to use.
- Once choose a template, click the INSERT button beneath it.
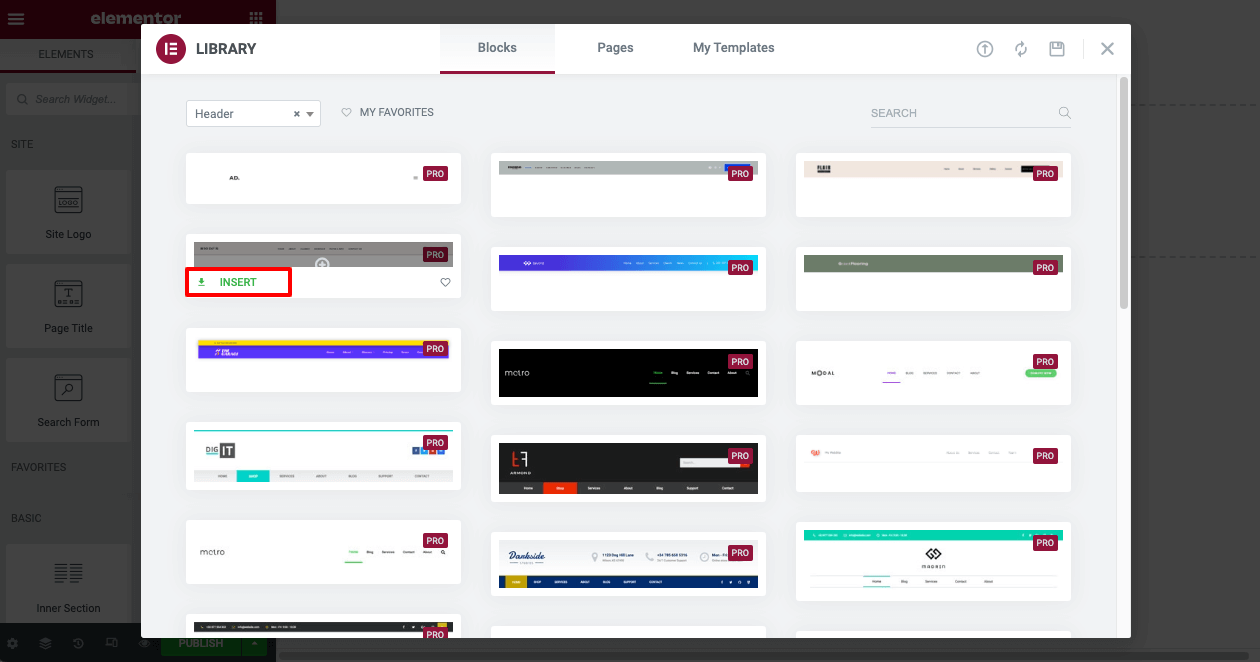
- You’ll see the header template opening on the Elementor Canvas.
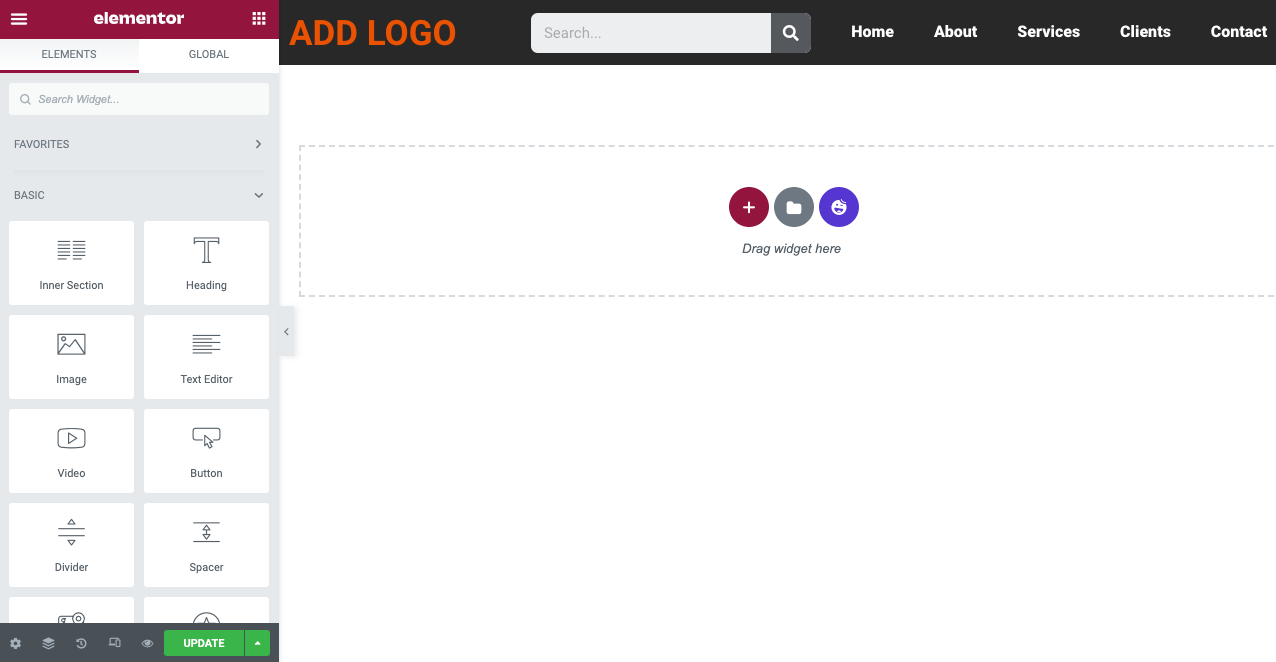
Step 03: Set the Sticky Feature to Your Header Template
The Sticky feature will keep the header fixed on the screen even when a web user scrolls down the page.
- To enable the sticky feature, click the six-dotted icon on your header template first.
- It will select the entire header section.
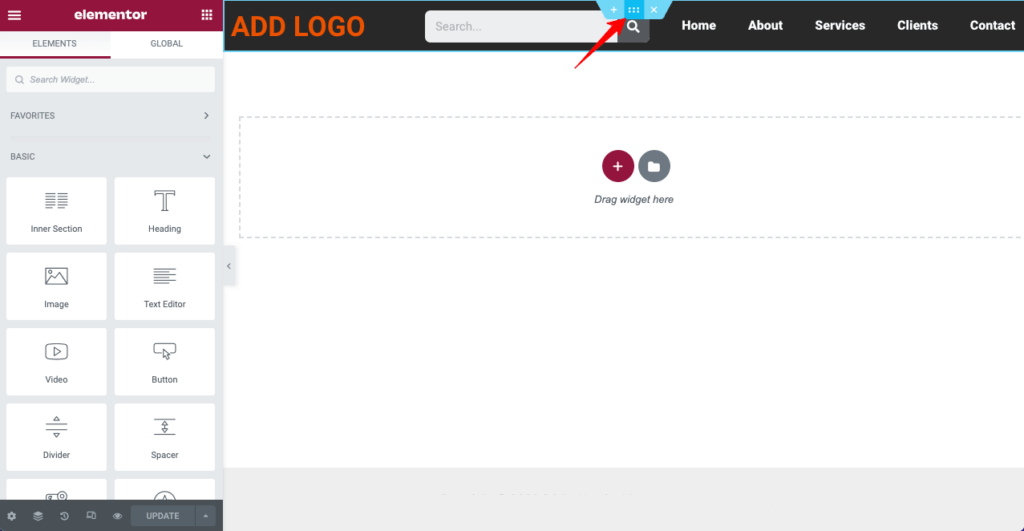
- Go to Advanced > Motion Effects > Sticky.
- From the Sticky drop-down menu, you can set whether your header will be displayed on top or bottom.
- You can specify the devices on which the sticky header will be displayed from the Sticky On box,
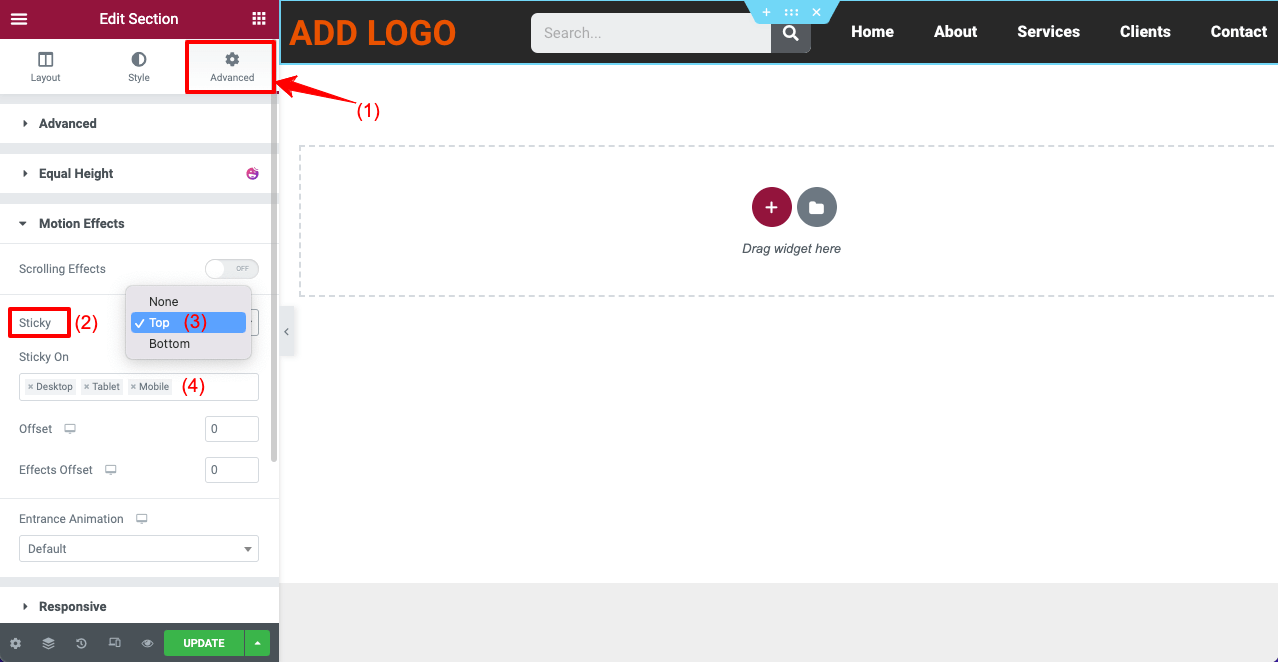
This will enable the sticky feature on your web header.
Step 04: Make the Elementor Header Transparent
Select the entire header section by clicking on the six-dotted icon as you did before. Follow the below guide next.
- Go to the Style tab from the Elementor panel.
- Come to the color option under the Background section.
- Click on the color icon and bring its opacity down to zero.
The below video explains the process.
Once your header is transparent, some text on it may become invisible because of the color contrast. For example, the above video shows our menu texts have disappeared. Because the menu texts were designed with white color.
So, the text can’t create a contrast with the transparent header. We have to change its color tone to make it visible.
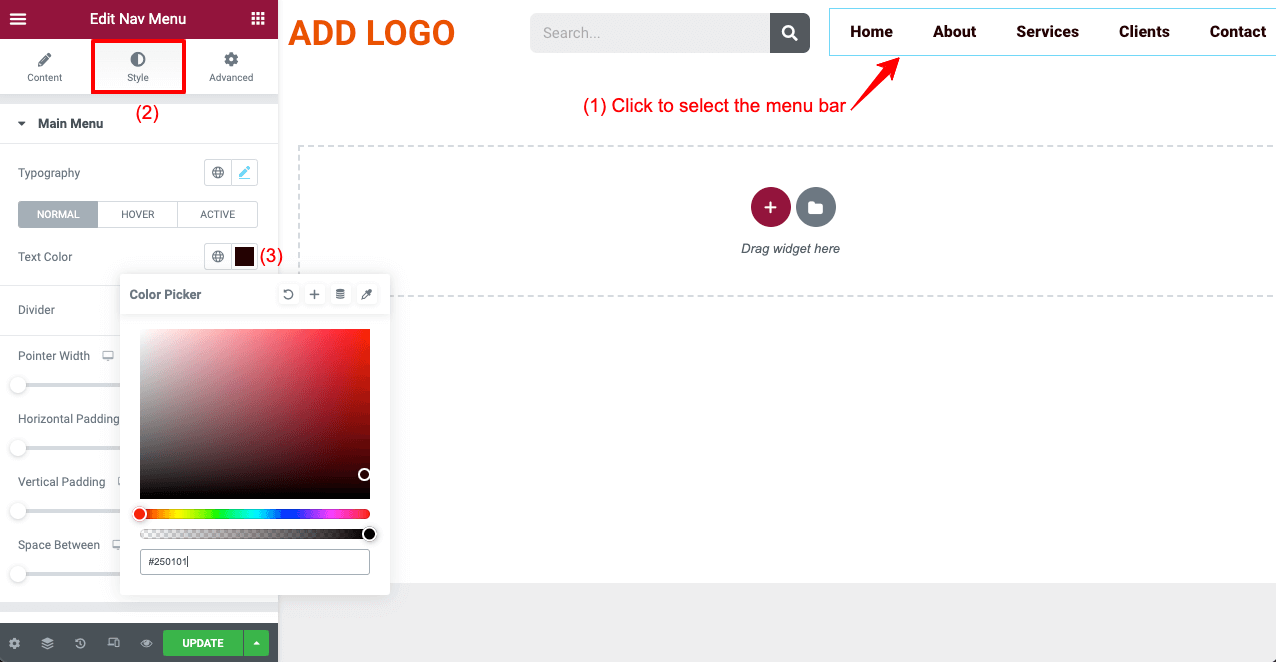
- Click on the menu bar to select it.
- Come to the Text Color option from the Style tab.
- Set the color you want.
- Click on the Update button at the end.
Step 05: Open the Header on a Web Page
Once you are done with creating Elementor sticky transparent header, you need to check your web pages. If everything works fine, that’s good. Sometimes you may need to change the color of the header elements to make it work nicely with the background.
Check out the header we created on our website in the video below.
Method 02: Create Transparent Sticky Headers with HappyAddons
If you are an Elementor Pro user and want to stick with it, that’s okay. But if you are looking for an additional solution to make your website more powerful, you can check out the HappyAddons plugin. It’s a powerful addon to the Elementor plugin, coming up with many exclusive features and widgets.
So if you have both the Elementor and HappyAddons plugins, you can do magic to your website. Now, we’ll show you how to create a header with the Nav Manu widget of HappyAddons and make it sticky and transparent. Plugins you need for this tutorial part:
Once you have them installed, start following the steps explained below.
Step 01: Toggle on the Happy Menu Widget
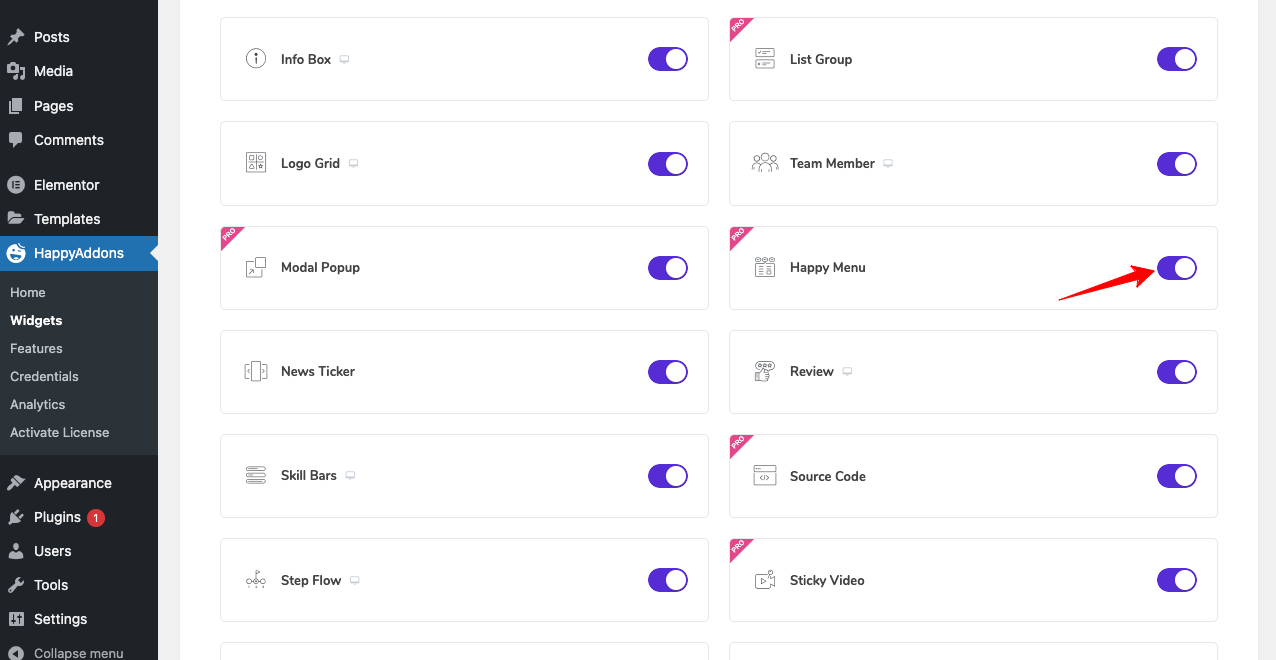
After installing the above plugins, you need to enable the Happy Menu widget first. To do that:
- Navigate to HappyAddons > Widgets.
- Toggle on the Happy Menu widget.
- Scroll back to the top and click on Save Settings.
Note: You may toggle off the unused widgets from here to make your website lightweight.
Step 02: Create a Menu
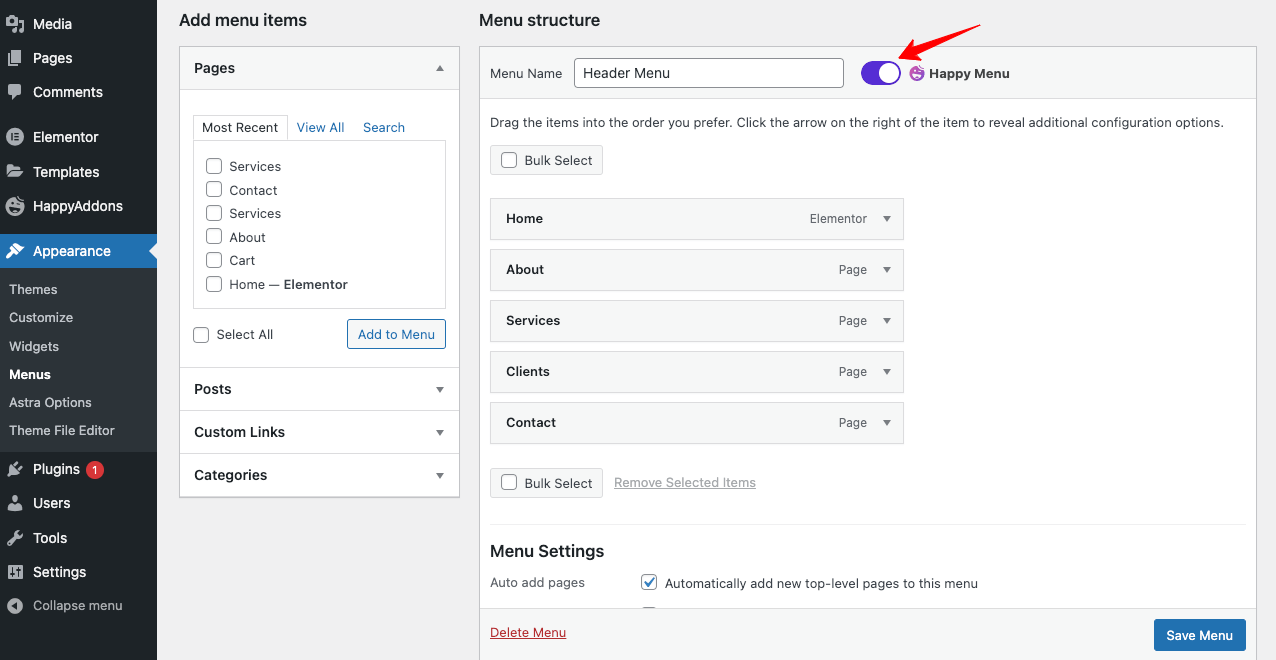
Since we created a menu in the first method, we don’t need to create a new one. You just need to toggle on the Happy Menu icon from your Appearance > Menus section. Click on the Save Menu button at the end.
Step 03: Open Your Web Page on the Elementor Canvas
Open a new or existing web page with Elementor Canvas. It will remove the header texts that come with the theme installed and make your page completely fresh.
Step 04: Create a New Header
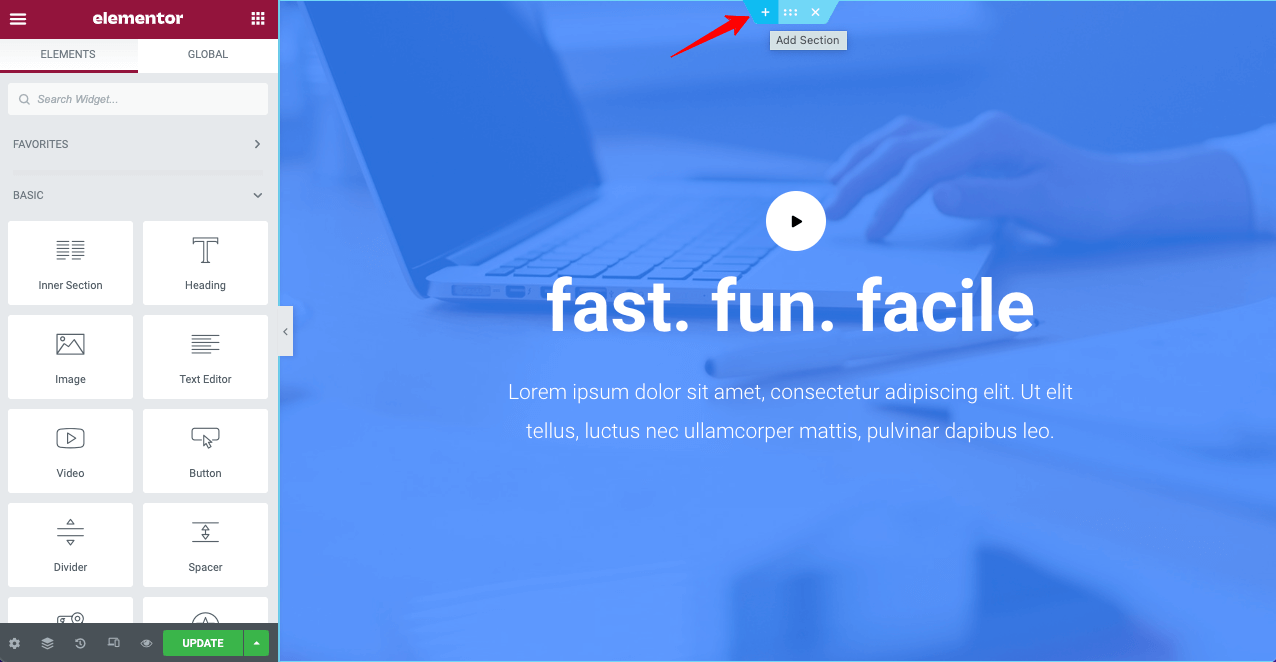
You need to create a new section on top of the page to create a new header.
- Click on the Add Section icon at the top of your page.
- Select the layout structure you want.
- Drag and drop the Happy Menu widget on your new section.
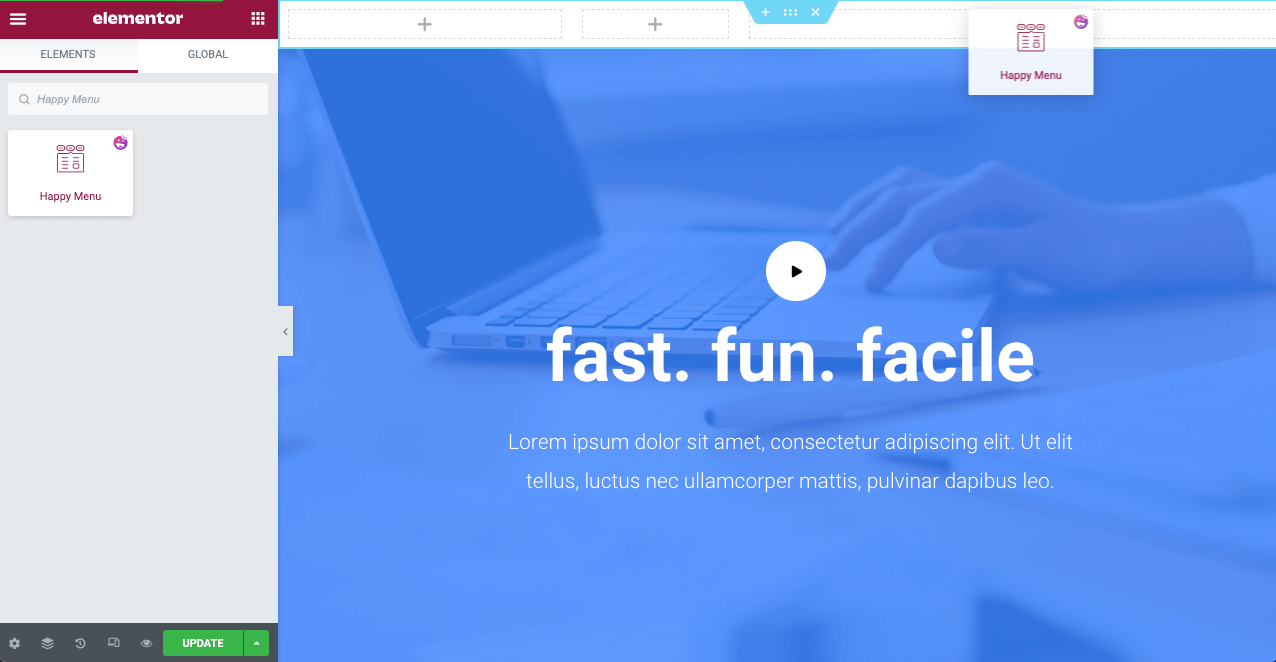
- Go to Content > Navigation Menu on the Elementor panel.
- Select the menu you created on your backend.
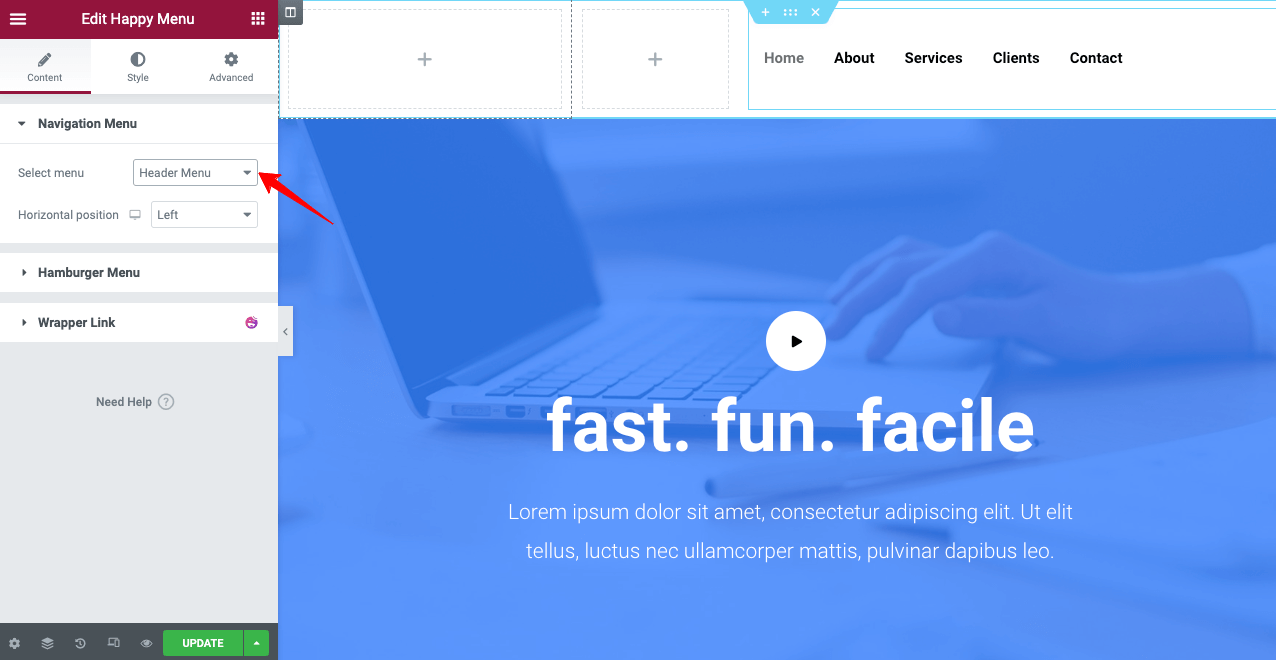
Stylize the menu and header bar as you wish. You may visit this documentation on stylizing the Elementor header with Happy Menu.
Step 05: Make Your Header Sticky
A good thing about using HappyAddons is that you can add the sticky feature to your header elements (logo, menus, search bar) separately. Suppose you want to make your menu bar sticky only.
- Click on the menu bar.
- Go to Advanced > Layout from the Elementor Panel.
- Set the position Fixed.
It will make your menu bar sticky on top. You can apply the same feature to your logo as well.
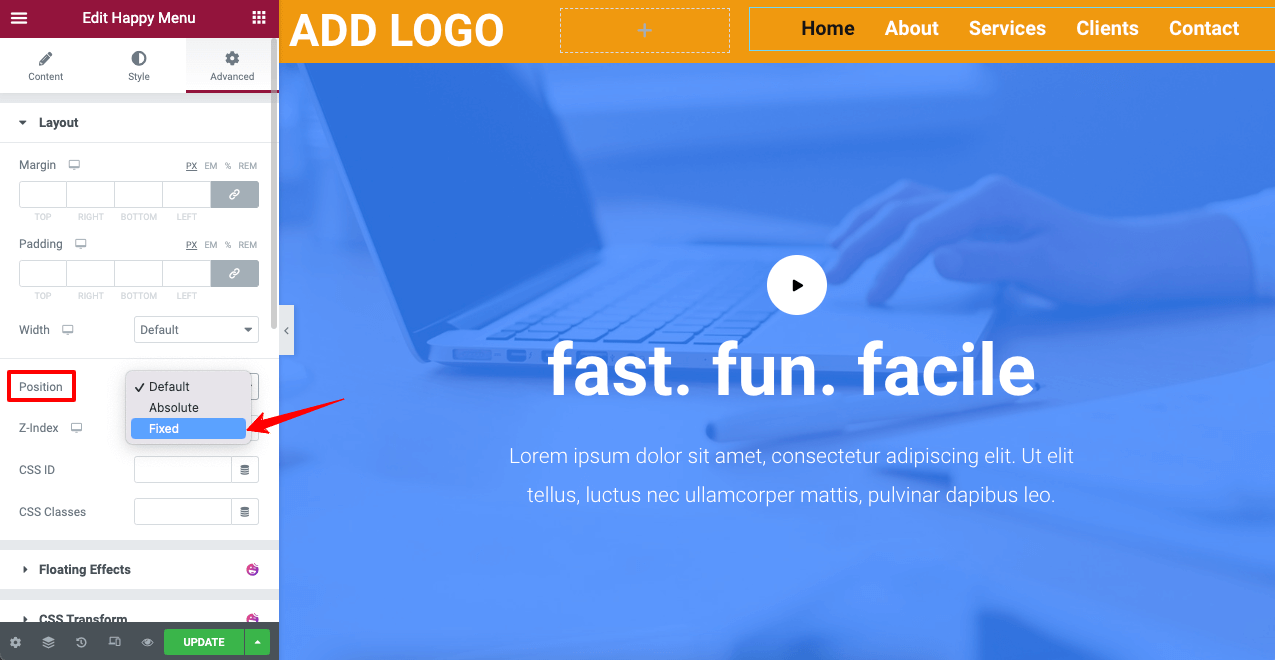
Now, scroll your page to see if your header elements have really been sticky.
Step 06: Make Your Header Transparent
The process is the same as we explained in method one.
- Select the header section by clicking the six-dotted icon.
- Go to Style > Background > Color.
- Reduce the color opacity as you want.
It will make your header transparent.
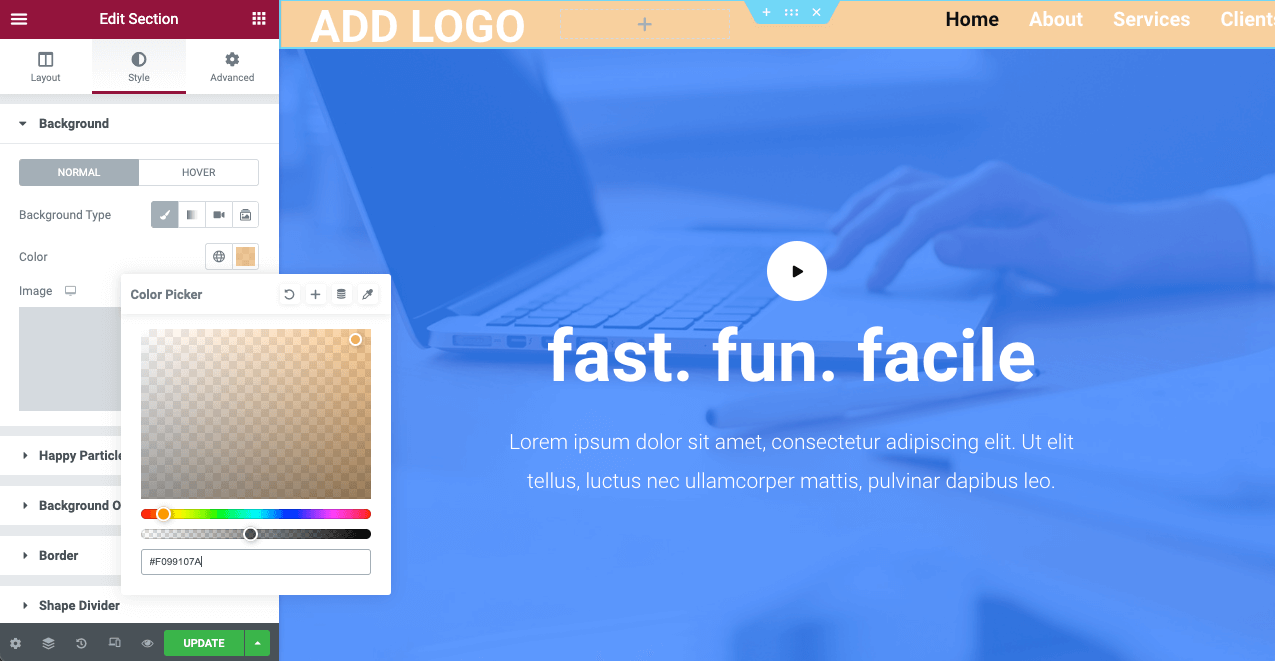
Step 07: Bring Your Hero Section Above
If your header texts become disappear due to making the background transparent, don’t worry. Just bring your web hero section above. It will give you a contrasting view.
- Select the hero section by clicking the Six-dotted icon.
- Go to Advanced > Advanced > Margin.
- Deselect the link by clicking.
- Put a minus(-) value on the Top section.
It will bring the hero section on top and create contrast between header texts.
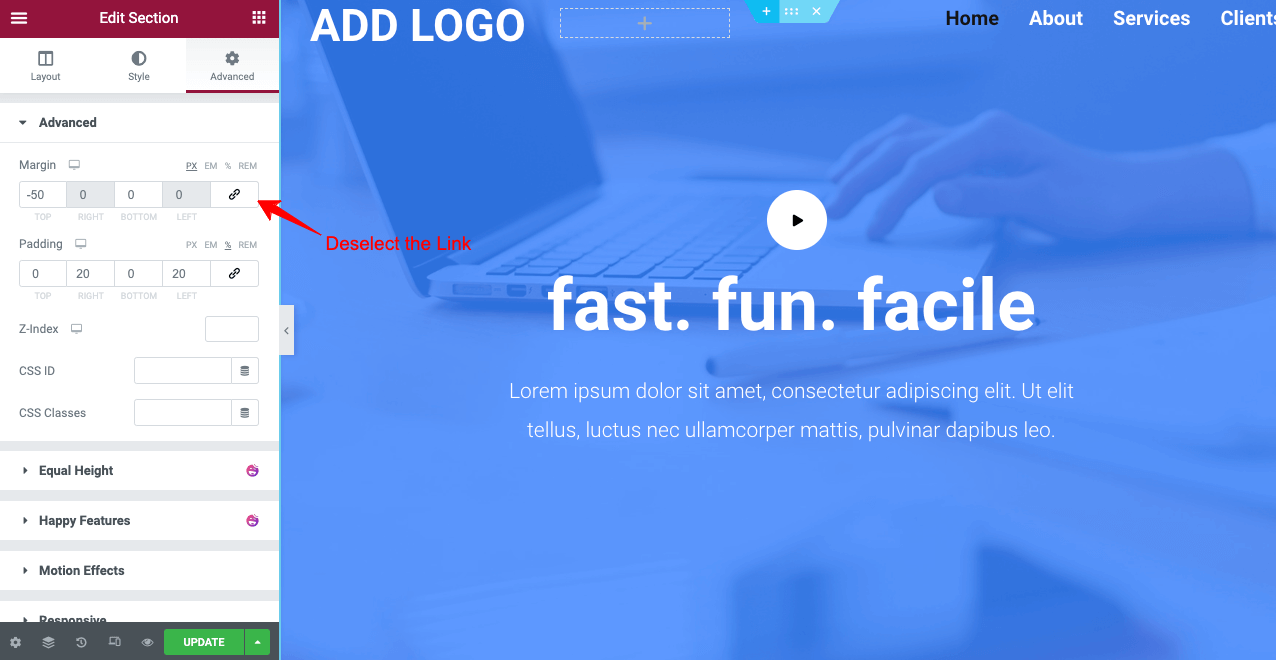
So, your Elementor sticky transparent header is ready with the help of HappyAddons. If you face any problems while doing that on your website, just give us a message or comment below. We’ll get back to you very soon with solutions.

FAQs on How to Create Elementor Sticky Transparent header
Here, we’ll answer some most frequently asked questions related to Elementor sticky transparent header commonly found on the web.
-
Is there a color code to create a sticky transparent header in Elementor?
You don’t need to apply any color code to create a sticky transparent header in Elementor. Just reduce the color opacity to zero. However, if you really need a color code, you can apply the white hex code of #FFFFFF for that.
-
What are the elements of a web header?
Based on the purpose of a website, header elements usually vary. Below are some common elements we usually see on web headers.
1. Logo, brand, or slogan.
2. Manu bar.
3. Contact information.
4. Social Media links.
5. Search field.
6. Account login field.
7. Cart icon.
8. Notifications. -
How to create a great web header?
You can apply the following tips to create a great website header.
1. Include a catchy logo.
2. Make sure the navigation links aren’t broken.
3. Don’t use eye-screaming colors on fonts and backgrounds.
4. Use easy-to-read text fonts.
5. Have a search bar on it.
6. Don’t stuff the header with unnecessary elements.
7. Make it responsive and mobile-friendly. -
What should be the size of a header?
There is no specific rule for that. Some creating and sporting websites are seen to maintain extra-widened headers. And they are getting good enough responses from the visitors as well. However, 1024 px is still the most popular size of headers on the web.
-
Do I require Elementor Pro to create a sticky transparent header?
Without Elementor Pro, you won’t have access to the theme builder, template library, and navigation menu widget. It won’t be possible for you to create a header. Still, you can make any of your web sections sticky and transparent with the Lite version. But to create a header, you must have access to the Pro version.
However, if you have an addon like HappyAddons Pro, you won’t need Elementor Pro to create sticky transparent headers. You can do it with the support of the addon. We’ve explained the process above in detail.
Final Takeaways on Elementor Sticky Transparent Header
According to Standford Web Credibility Research, 75% of people judge the credibility of a website based on its look. And visitors look at the header first right after they land on a website. It becomes difficult to extend the visitors’ session on any website without giving an eye-catchy look to the web header.
Sticky transparent headers can help you a lot in this case. We hope this article has been able to cater to your needs on how to create sticky transparent headers with Elementor. If you have any more questions regarding this topic, we request you let us know through the comment section. Our team will answer you soon.
If you love to receive more interesting articles like this one, subscribe to us and follow our Facebook and Twitter channels.
Subscribe to our newsletter
Get latest news & updates on Elementor
[yikes-mailchimp form=”1″]



2 Responses
Thank you so much for the information—it’s exactly what I needed! I’m interested in knowing which program you use to build your impressive and fast website. I’m working on setting up a simple website for my business and need advice on picking a name and hosting provider. ASPHostPortal has a strong reputation, but are there any other hosting options you would recommend? I’d be grateful for your suggestions!
Hello Martina, thanks sharing your thoughts, we have already prepared a blog on best hosing providers for Elementor, here it is https://happyaddons.com/best-hosting-plan-for-wordpress-and-elementor/
Regards,
Gobinda,
Team HappyAddons.