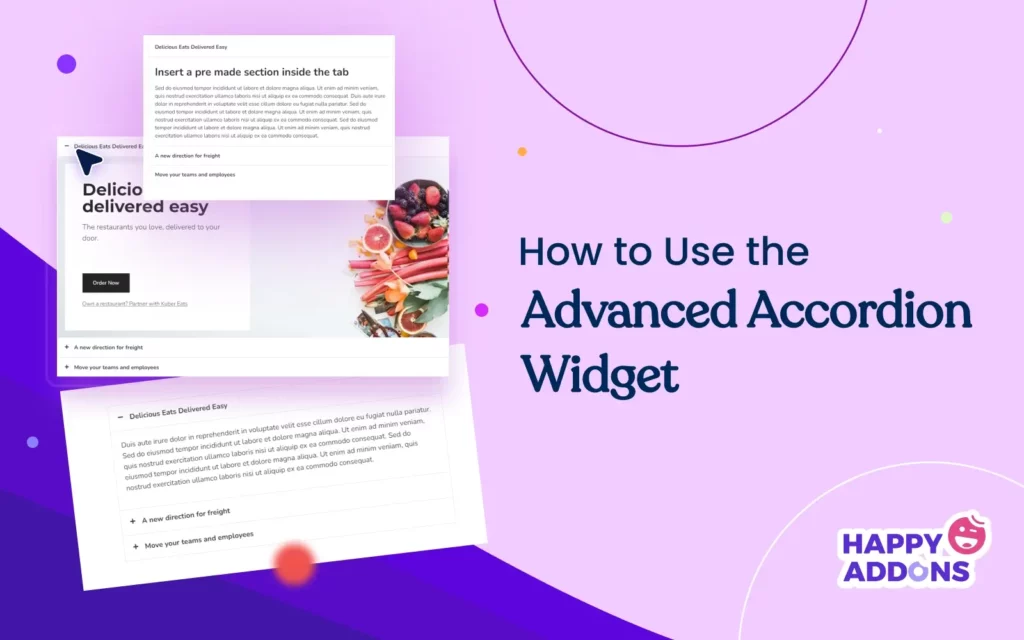
Accordion widgets are a great way to present and organize long-form content compactly, without increasing the page length. You can add as many collapsible sections as you want to your posts and pages with the widget so visitors can explore the content at their own pace.
Elementor is a powerful page builder plugin with 100+ exciting widgets. HappyAddons is an addon of the plugin with an additional 110+ widgets and features. Both these plugins provide an accordion widget. But the HappyAddons’ widget is more feature-rich compared to the other one.
In this article, we’ll show you how to use the Elementor advanced accordion widget of HappyAddons with a detailed tutorial. Before that, take a quick look at the advanced accordion widget. Let’s begin.
What Is the Advanced Accordion Widget?
Simply, the advanced accordion widget allows you to create collapsible content sections on your website. Users can expand and collapse the sections with a simple click to explore their content. A key advantage of the widget is a large amount of information in a small section with it.
This can save users from getting overwhelmed due to a large amount of information. This widget is particularly useful for websites that cover lots of textual content and frequently update it. This can help you maintain a clean and organized interface on your web page.
How to Use the Elementor Advanced Accordion Widget of HappyAddons
In this section, we’ll explain to you how to use the advanced accordion widget of HappyAddons. Make sure you have the following plugins installed and activated on your site.
Now, follow the steps outlined below to learn how to use the advanced accordion widget.
Step 01: Drag and Drop the Advanced Accordion Widget to the Elementor Canvas
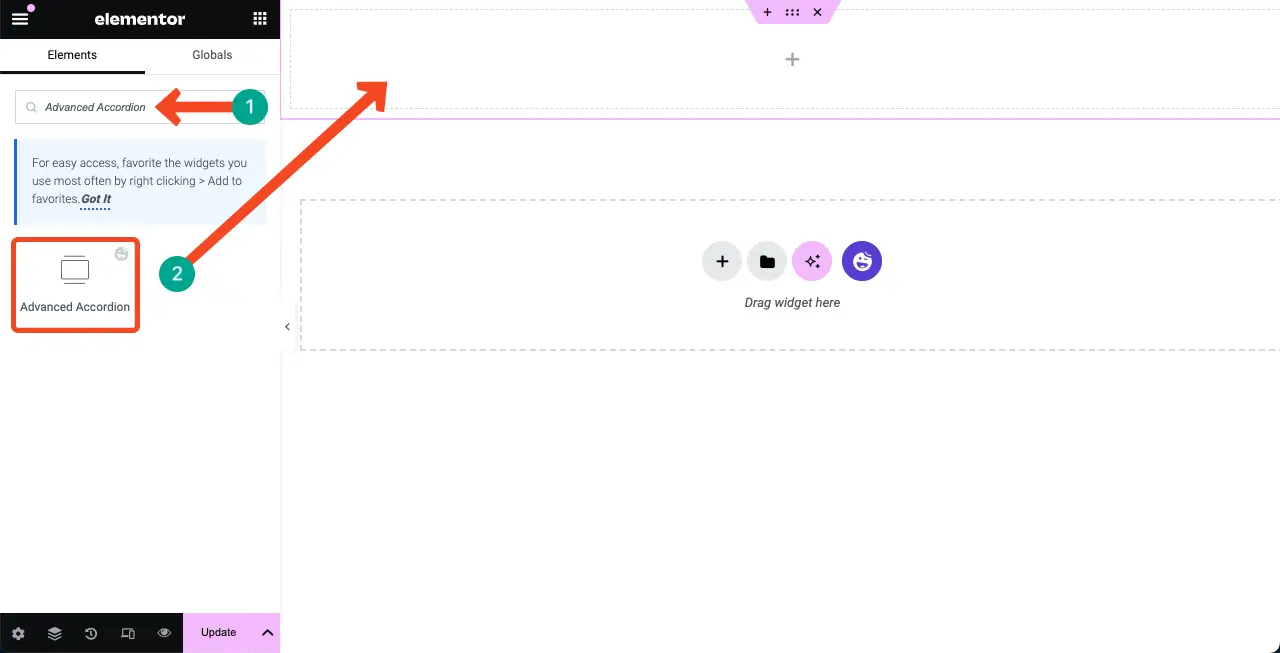
Open your desired page with the Elementor canvas. Then, create a section layout by clicking the plus (+) button. You’ll get several column-based layouts. Select the one you like. For this tutorial, we’ll select the one-column layout.
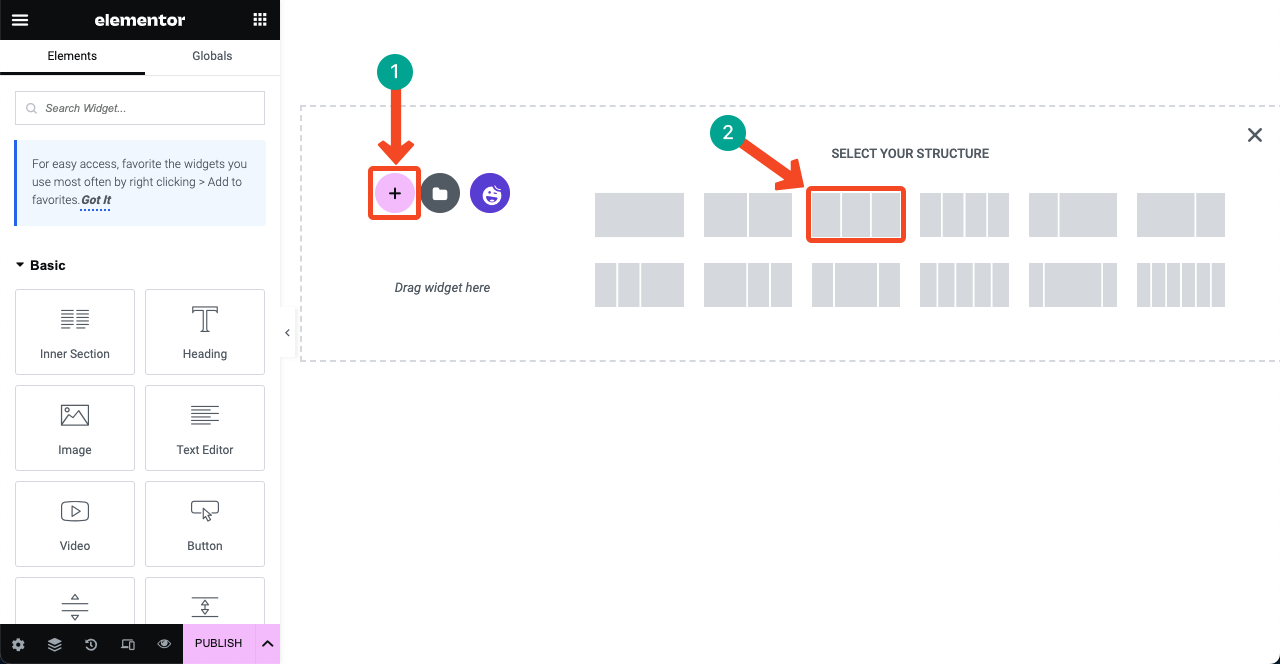
Find the Advanced Accordion widget by typing it in the search bar of the Elementor panel. Once the widget appears, drag and drop it to your selected Elementor canvas area.
Step 02: Change the Advanced Accordion’s Layout Style
By default, the widget comes with a black-and-white background. However, HappyAddons provides several pre-designed presets. You can change the widget’s layout using these presets.
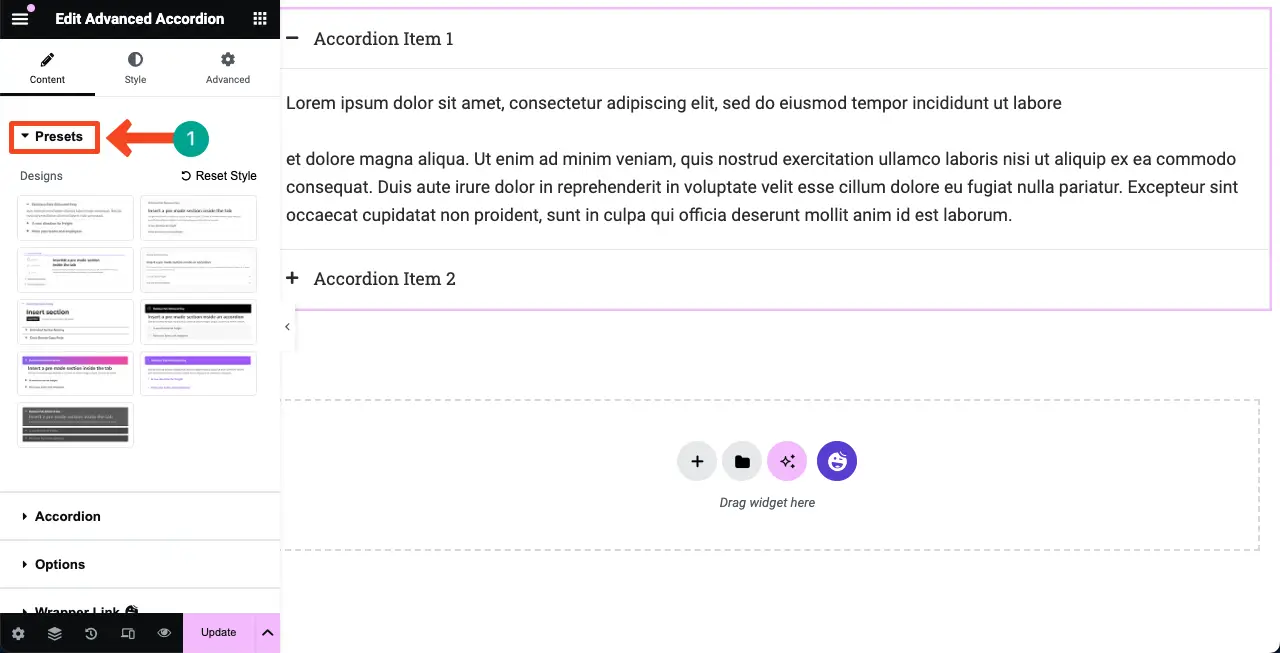
Go to Content > Presets. Click on the presets available there to explore them. Check the video below to learn how to do this. Select a preset you like.
Step 03: Add New Items to Advanced Accordion
Go to Content > Accordion on the Elementor panel. Expand the Accordion section. Click the + Add Item button to add a new accordion section to the widget.
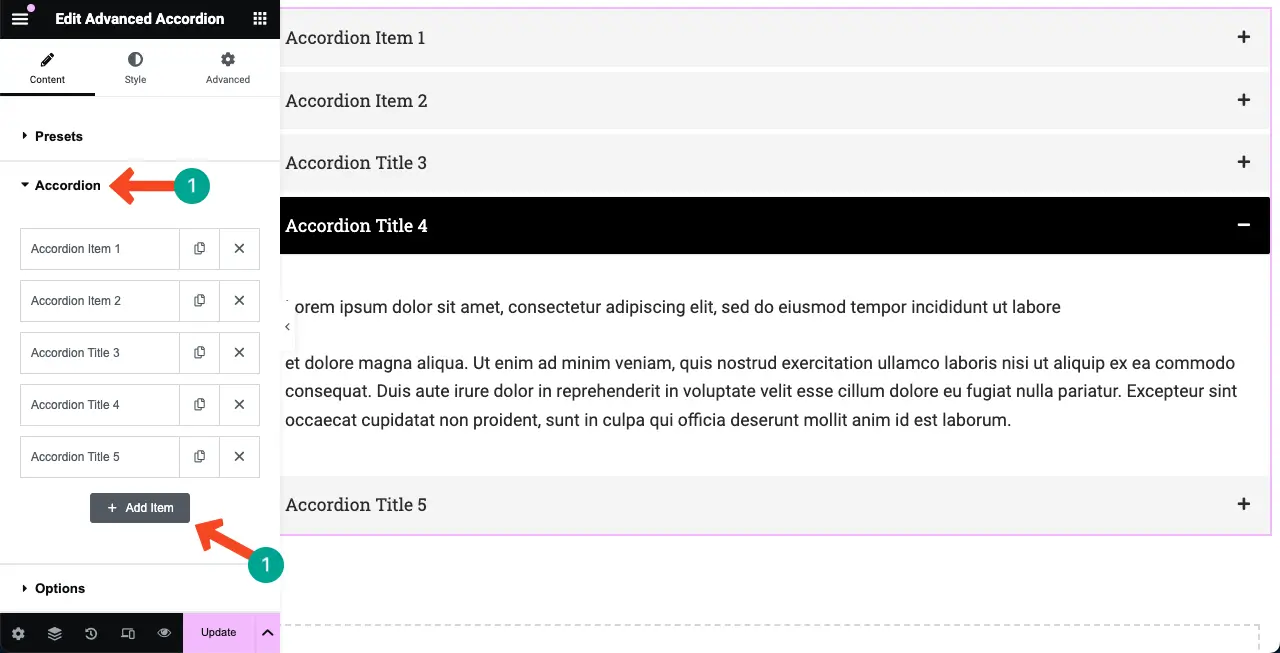
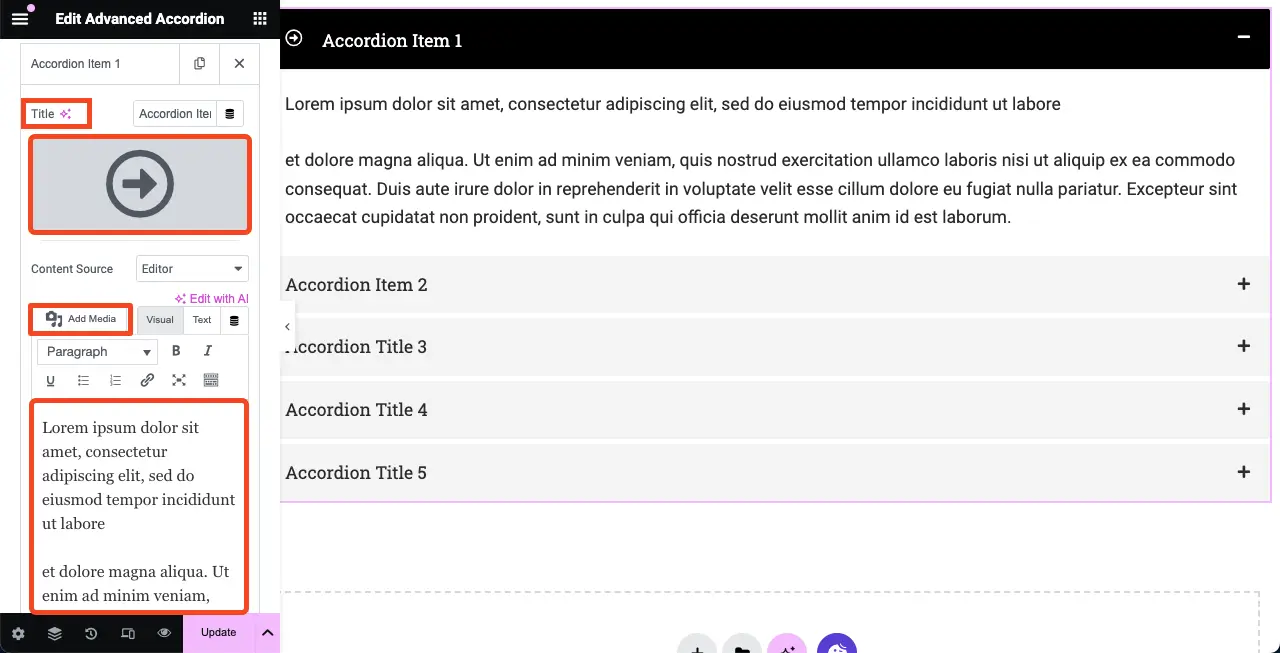
Now, click and expand the item tab you want to add content. Types of content you can add are title, icon, media file, and textual description. Hope you can do it yourself.
# Import Template to Accordion
The advanced accordion widget of HappyAddons allows you to import templates. Let’s see how to do this. But make sure you have created and saved templates firsthand.
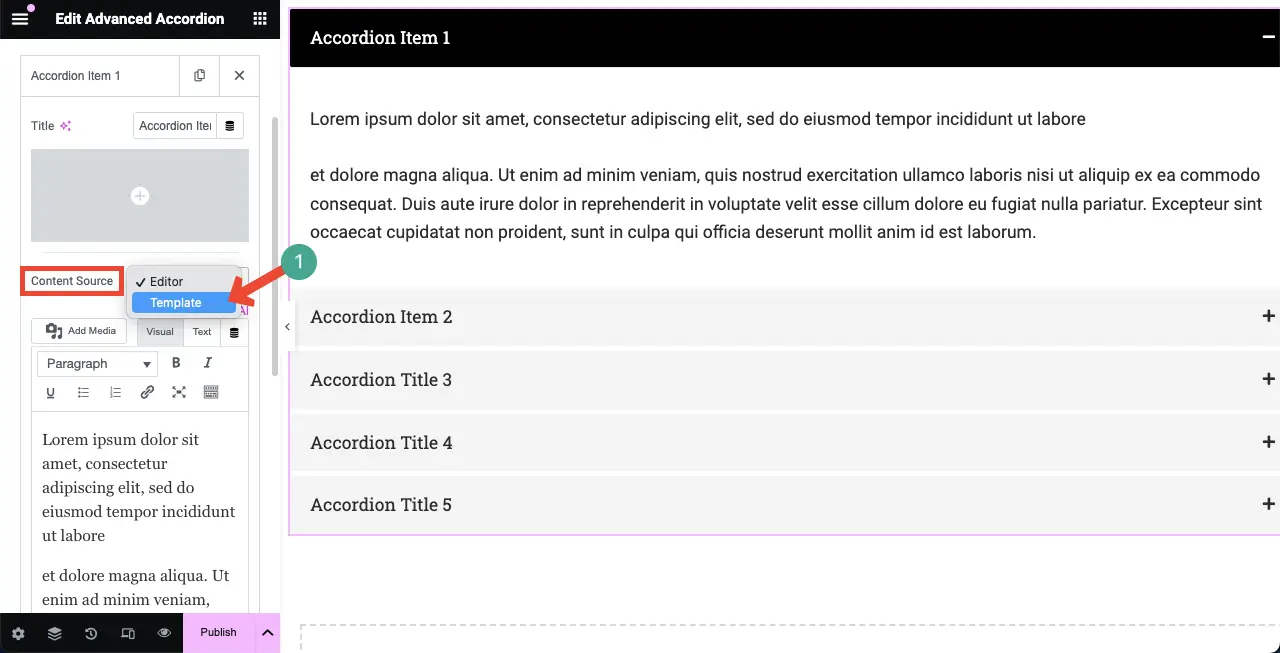
Click the Dropdown list next to Content Source. Select the option Template on the list.
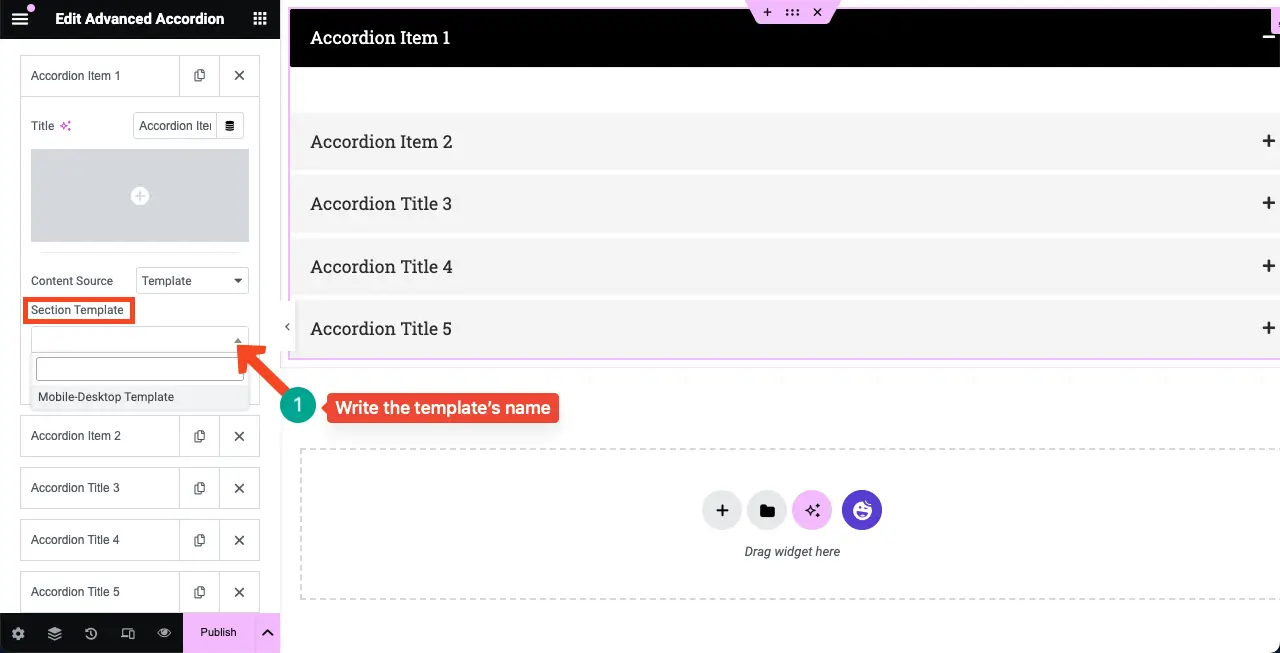
Write the template’s name in the Section Template box to find it. Once the template appears, click on it.
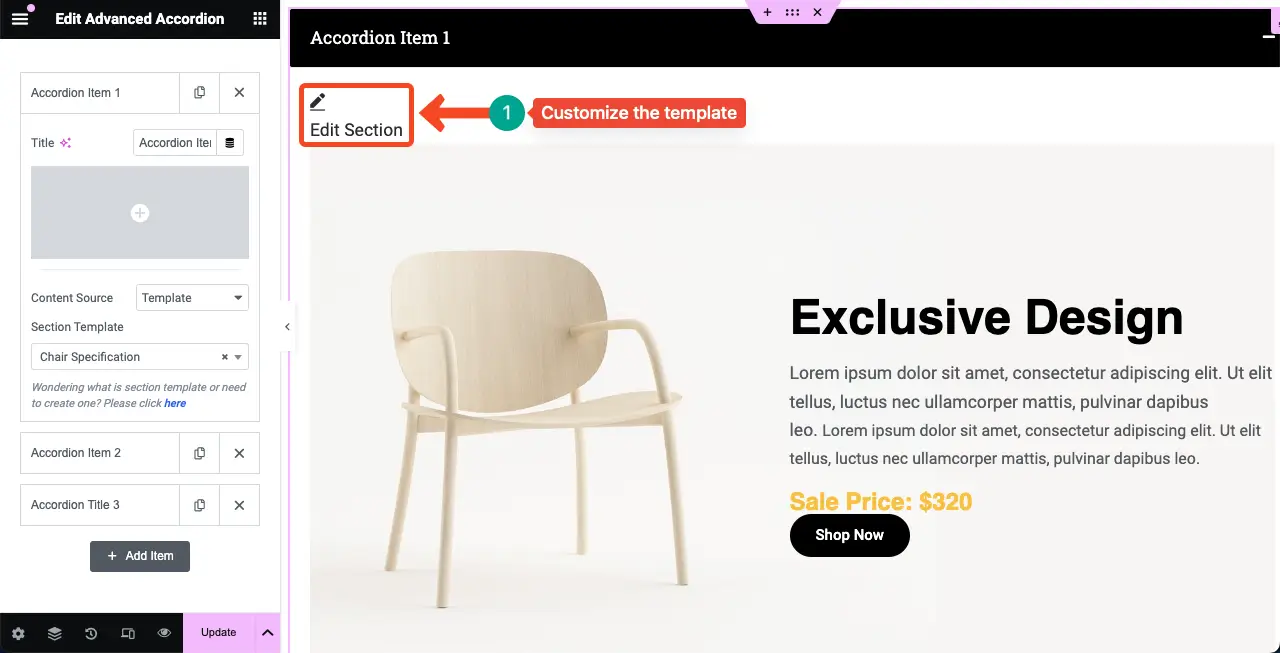
You can see the template has appeared within the advanced accordion section. To customize it, click the Edit Section option. You’ll be allowed to customize the template.
Note: We’ll explain today’s tutorial using textual content, not with templates.
Step 04: Add Icons to Advanced Accordion
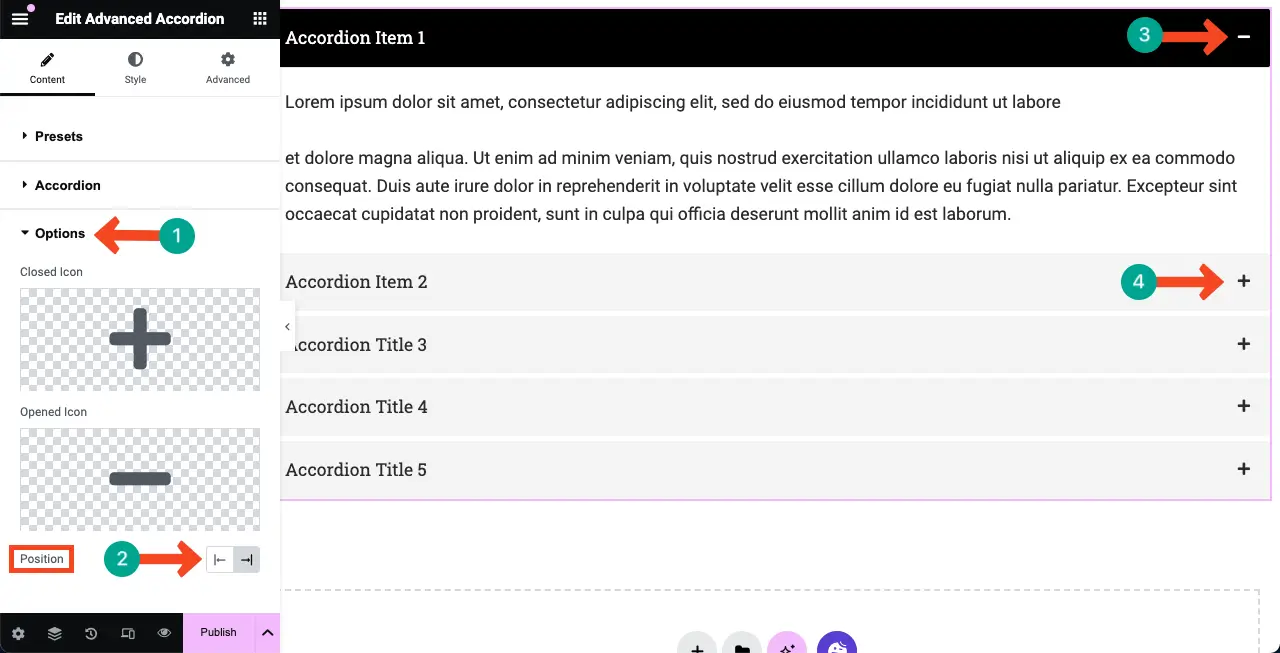
Expand the Options option. You’ll get options to change the Closed icon and Opened icon. You can also change the icon position as well on the right or left.
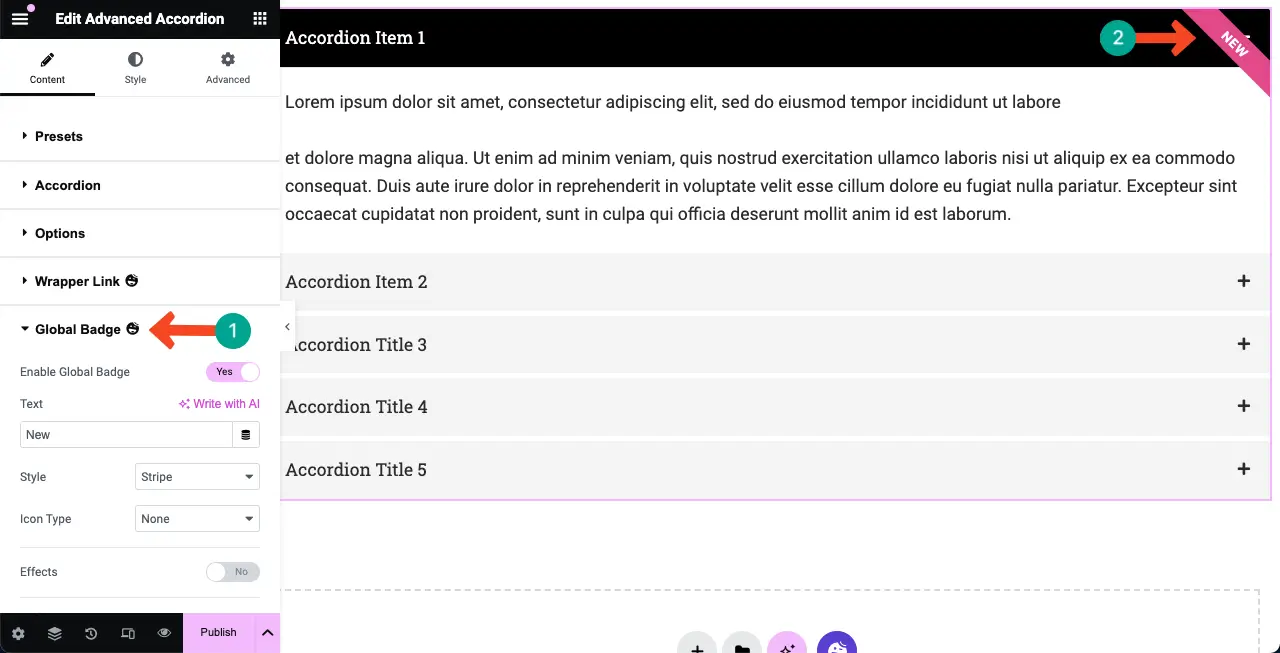
Step 05: Add Global Badge
A global badge is a sophisticated badge style used to decorate web elements. You can enable a badge for the advanced accordion widget from this option.
Users can choose from different badge styles such as Stripe, Flag, Triangle, Circle, Bookmark, or even create a custom layout. You can also add an icon, image, and Lottie to the badge if you want.
Step 06: Stylize the Advanced Accordion Widget
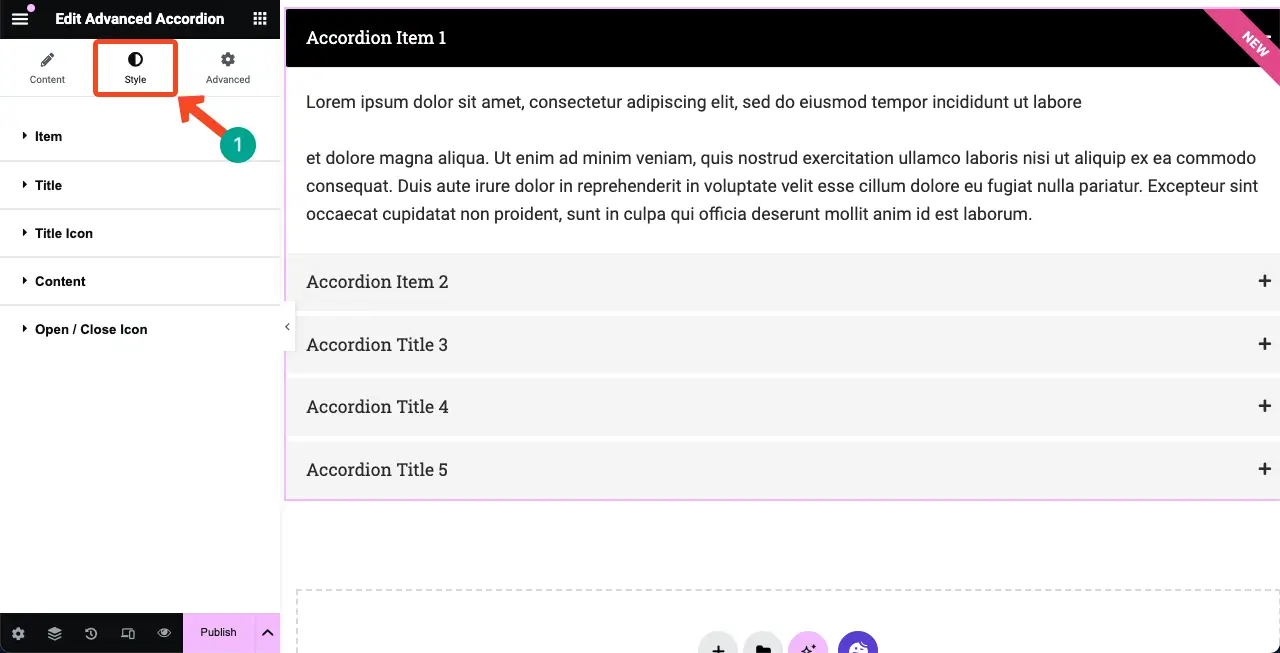
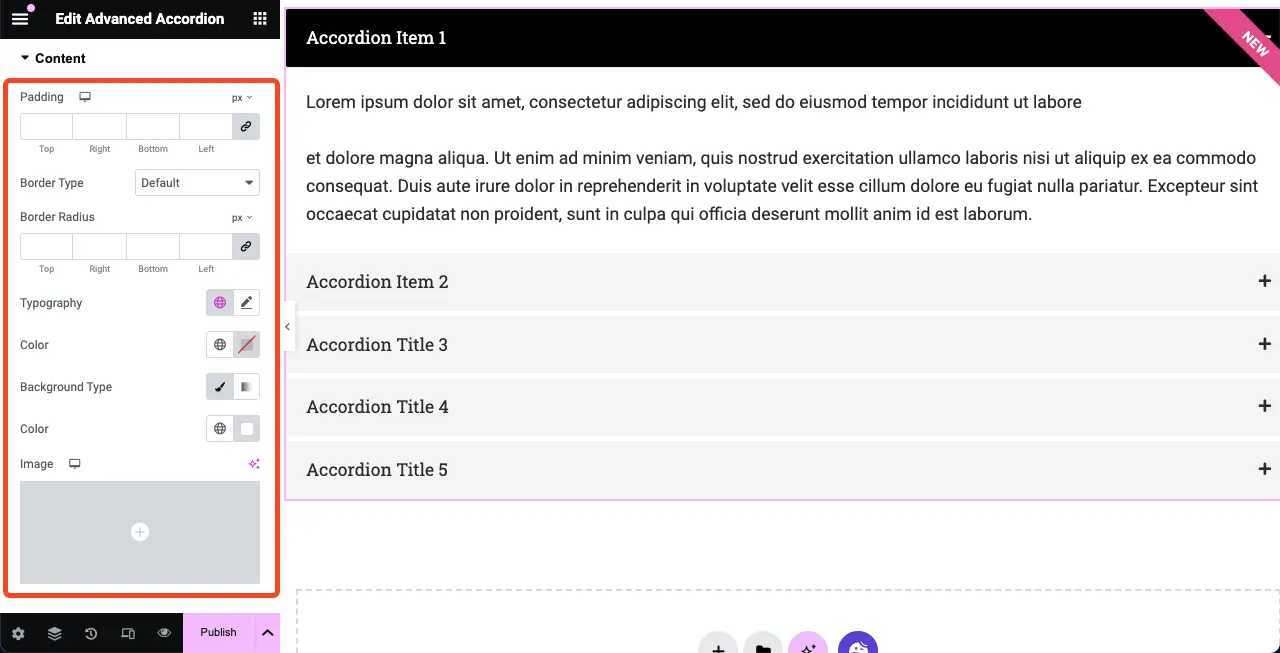
Come to the Style tab once you are done with the content. You can customize their padding, typography, shadow effect, border radius, text color, color, background type, spacing, and various other options.
Below is a snapshot of the things you can customize for the respective elements of the widget. Based on the elements, customization options will be different.
Step 07: Make the Advanced Accordion Widget Mobile Responsive
Making the Advanced Accordion widget mobile responsive is so easy. As in other widgets, extensive customization needs to be done by changing the position of various elements starting from the elements; in the case of Advanced Accordion widgets, it is not necessary to do so.
Just check if the widget looks perfectly well on all screen sizes. If it requires any minor correction, do so. Visit this post for more guide on how to make an Elementor site mobile responsive.
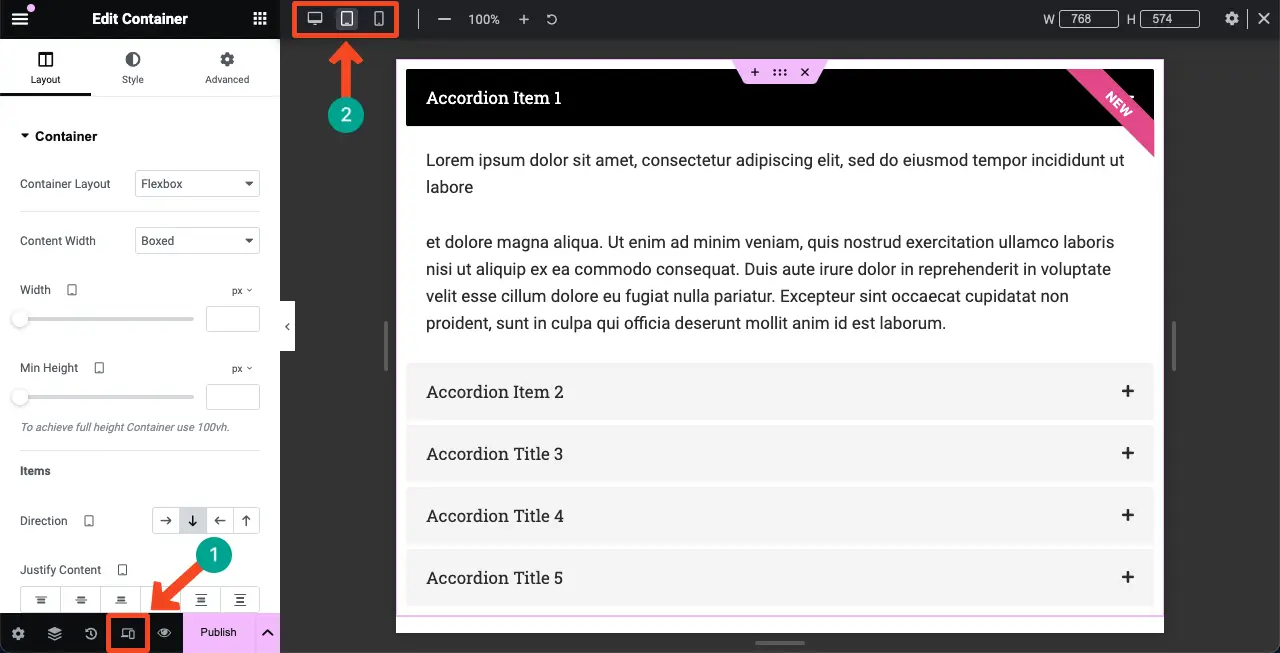
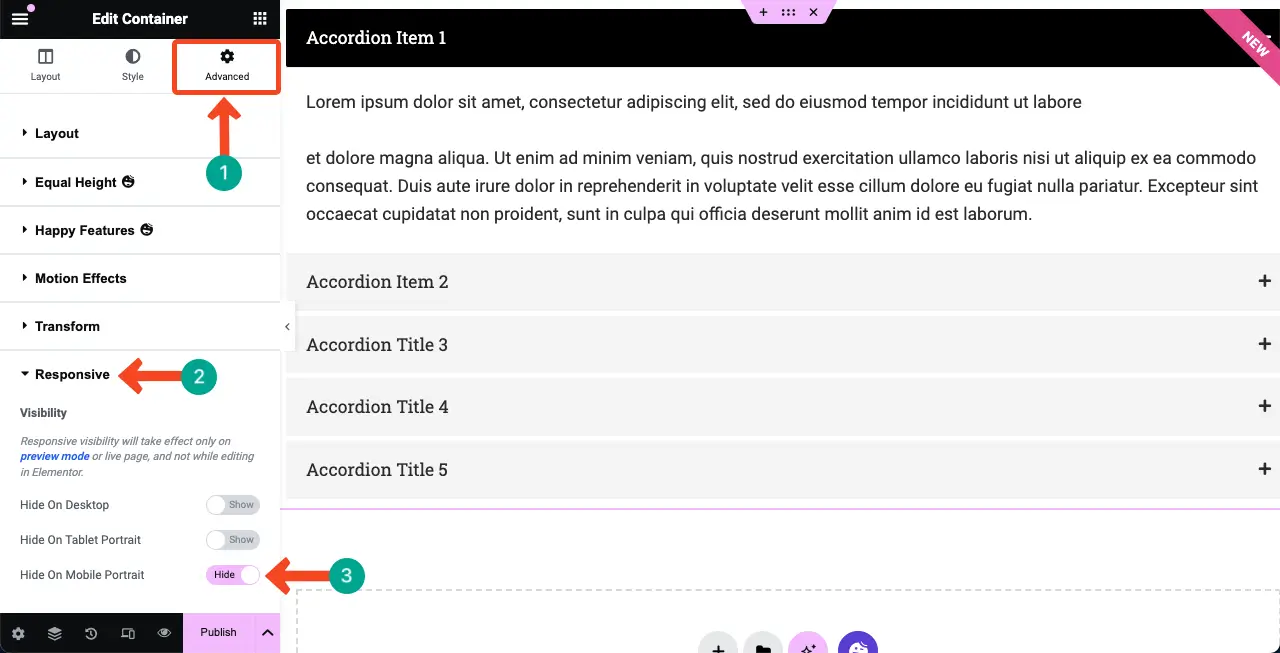
You may prevent this widget from being displayed on any particular device type or screen size. Go to Advanced tab > Responsive. Hide the widget on any particular device by toggling on the option next to it.
Step 08: Preview and Publish the Advanced Accordion Widget
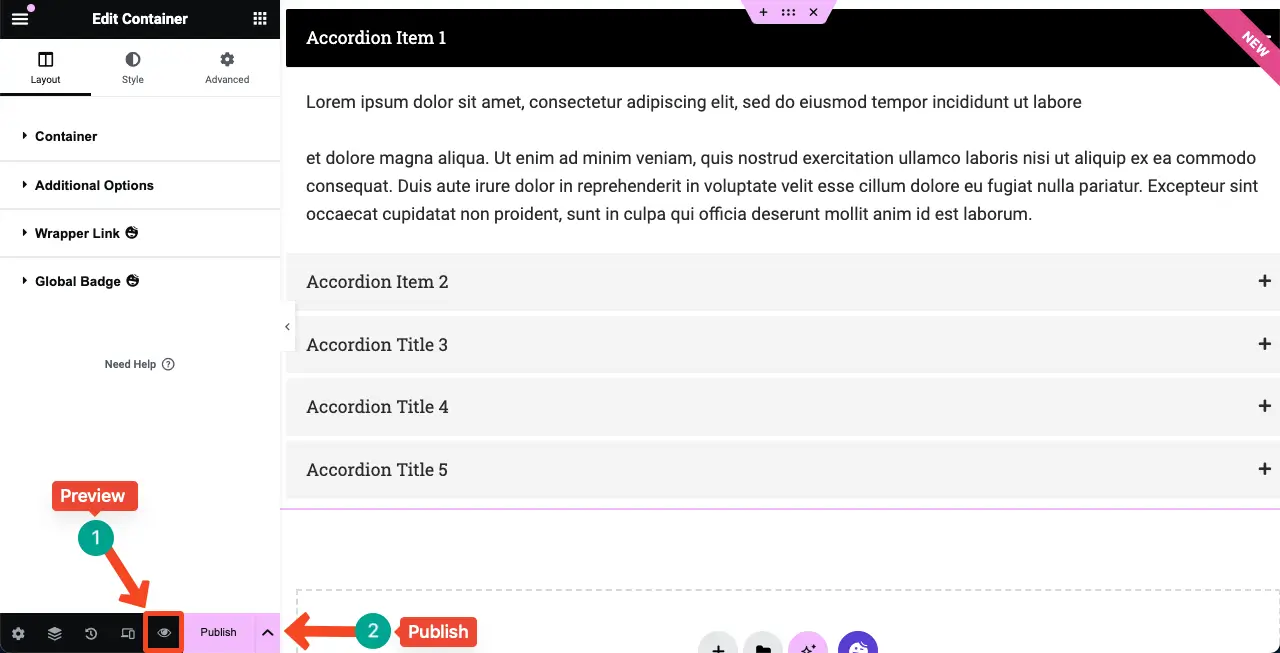
Hopefully, your content should be okay by now and ready to publish. But previewing any content before publishing is always a good practice. By clicking the Preview icon on the bottom bar of the Elementor panel, you can preview the widget. Next, publish it
For more guidance, check our documentation on the advanced accordion widget.
Things You Can Do with the Advanced Accordion Widget of HappyAddons
You can curate different types of content with the Advanced Accordion widget of HappyAddons to captivate users. Below, we have listed some such use cases.
1. FAQ Pages/Sections
The advanced accordion widget is perfect for creating FAQ (Frequently Asked Questions) pages or sections. It allows you to organize and display a list of questions and answers in a compact and user-friendly manner. Users can easily explore the corresponding answers by clicking the questions.
2. Collapsible Content
Collapsible content allows you to hide and show content sections by clicking. This can save you valuable space. If you want to cover lengthy content but are worried about whether it will create negative user experiences, you can display it using the widget.
3. Product Features
The advanced accordion widget is an excellent tool for showcasing the features of your products or services. You can create an accordion-style layout with a question or title representing each feature. When users click on the question or title, the corresponding feature details will appear.
4. Tutorials or Step-by-Step Guide
You can structure tutorial guides into a series of steps or stages, with each step represented by a collapsible accordion. Users can follow the guide at their own pace, expanding each step to explore the detailed instructions or information.
5. Terms and Conditions
Terms and conditions may often be extremely lengthy, which could be overwhelming for users. So, instead of displaying all the text at once, you can use the advanced accordion widget to break it down and display it in short and manageable sections.
Differences Between the Advanced Accordion (HappyAddons) and Accordion (Elementor) Widgets
By now, we hope you understand that the advanced accordion is a widget from HappyAddons, and the accordion is a widget from Elementor. Both of them have some mentionable differences. We’ll present the differences between them in the following table.
| Topic | HappyAddons | Elementor |
| Accordion Icon | Yes! You can add separate icons for each accordion section. | No! You can add only open and closed icons but not accordion-specific icons. |
| FAQ Schema | No! HappyAddons doesn’t have the FAQ schema. | Yes! Elementor provides the FAQ schema for the widget. |
| Import Template | Yes! It allows you to add and display templates using the widget. | No! You can display only texts and images. No template is allowed. |
| Premium | Yes! This widget is reserved only for premium users. | No! Open for all users. |
Conclusion
Elementor with HappyAddons has truly revolutionized the web development realm, specifically for no-code users. Like many other sophisticated design creations and customization, you can do many stunning things on your website with them.
Throughout this tutorial post, we have explored the various features and functionalities of the Advanced Accordion widget of HappyAddons. We have learned how to create accordion-style sections, add content within each accordion item, and customize the appearance and behavior of the accordion.
By implementing the tips and techniques shared in this blog post, hope you can use the widget yourself. But in case you face any problems, we request you to let us know the issue through the comment box or contact our support team.

