In recent years, online marketers continuously remodeling their strategies to keep pace with the fast advancement of digital marketing. Social media marketing is one of its efficient wings to expand your business globally in the shortest time.
More than 52% of social media marketers expressed that social media has helped increase their company’s revenue and sales
Clutch
In the way you use social platforms to increase your website visitors, your website can also be a great way to promote your social platforms as well. Having a seamless connection between social media and your site- you can extend your online networks and improve conversion rates, too.
In today’s blog, we’ll walk you through a simple way of integrating social media feed on an Elementor website.
Let’s get started with-
Why You Should Embed Social Media Feeds on Your Website

In simple words, ‘Social media feed‘ means a platform (on a website’s page) where visitors interact with social posts, comments, and replies from Facebook, Twitter, Instagram, etc.
‘Feed’ is an effective medium that provides updates whenever new content is available.
Well, let’s shortly know how social feeds on a website can instantly contribute to business success in the following ways:-
- Provide relevant web content to the users
- Shares collaborative tools
- Show contact and location information
- Increase social engagement and subscribers numbers
- And more
However, social feeds can effectively target the communication objectives of an organization and also give personalized service to users. Therefore, it can boost business growth by streamlining and enhancing all marketing efforts into one successive plan.
Introducing Happy Addons Social Media Feed: An Easy Way to Display Your Social Contents

Both websites and social channels have the ability to generate leads and conversions. But what if you could merge these two platforms into one. Of course, it will produce some remarkable results.
This is where the social feed on the website does the trick. Users will be able to see your social activities (recent posts, comments, reviews, and more) while browsing the website at the same time.
Let’s assume that you want to show your social content to your Elementor site. If you have Happy Addons then you require no other tools for your social post embedding. Happy Addon’s social media feed makes this task easier than ever.
However, Happy Addons includes four widgets in social feed features. So, in today’s tutorial, we’ll show you the functionality of these social feed widgets one by one:-
- Facebook Feed (Pro):- It will help you to display the feed of your Facebook page on the website in a different and creative way.
- Twitter Feed (Free):- A perfect widget to showcase your Twitter posts, retweets, likes, replies, and more.
- Twitter Feed Carousel (Pro):- Showcase your social updates through the Twitter Feed Carousel, applying various styles, texts, images, and social links.
- Instagram Feed (Pro):- Display your beautiful photos from your Instagram accounts with tons of styles using the Happy Instagram widget.
Below, we’ll show you the steps to add these social platforms to your WordPress site using Happy Addons.
How to Connect Your Social Media Feed to Your Elementor Website

To get started with the process, you must have the following things:
- A WordPress Site
- Elementor (Free)
- Happy Add-ons (Free and Pro)
Do make sure that you have a domain name and purchased hosting plan for your WordPress site.
Now configure your WordPress site by installing Elementor and Happy Addons. Then, follow the below instructions step by step.
However, if you are new to Elementor, check out this article on how to create a landing page in a few steps.
How to Use Facebook Feed Widget
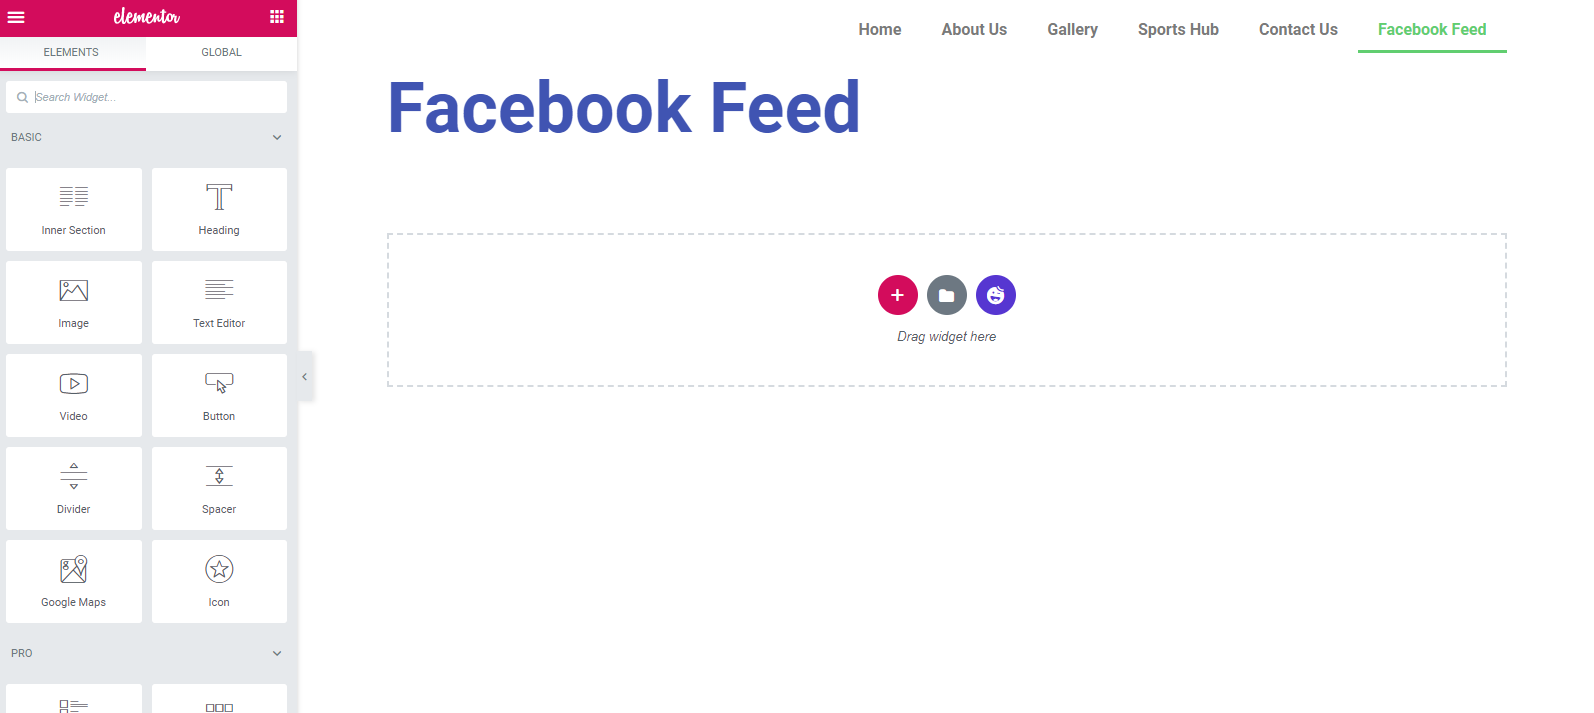
First of all, navigate to the page you want to add the Facebook Feed widget. Here’s what your initial surface looks like.
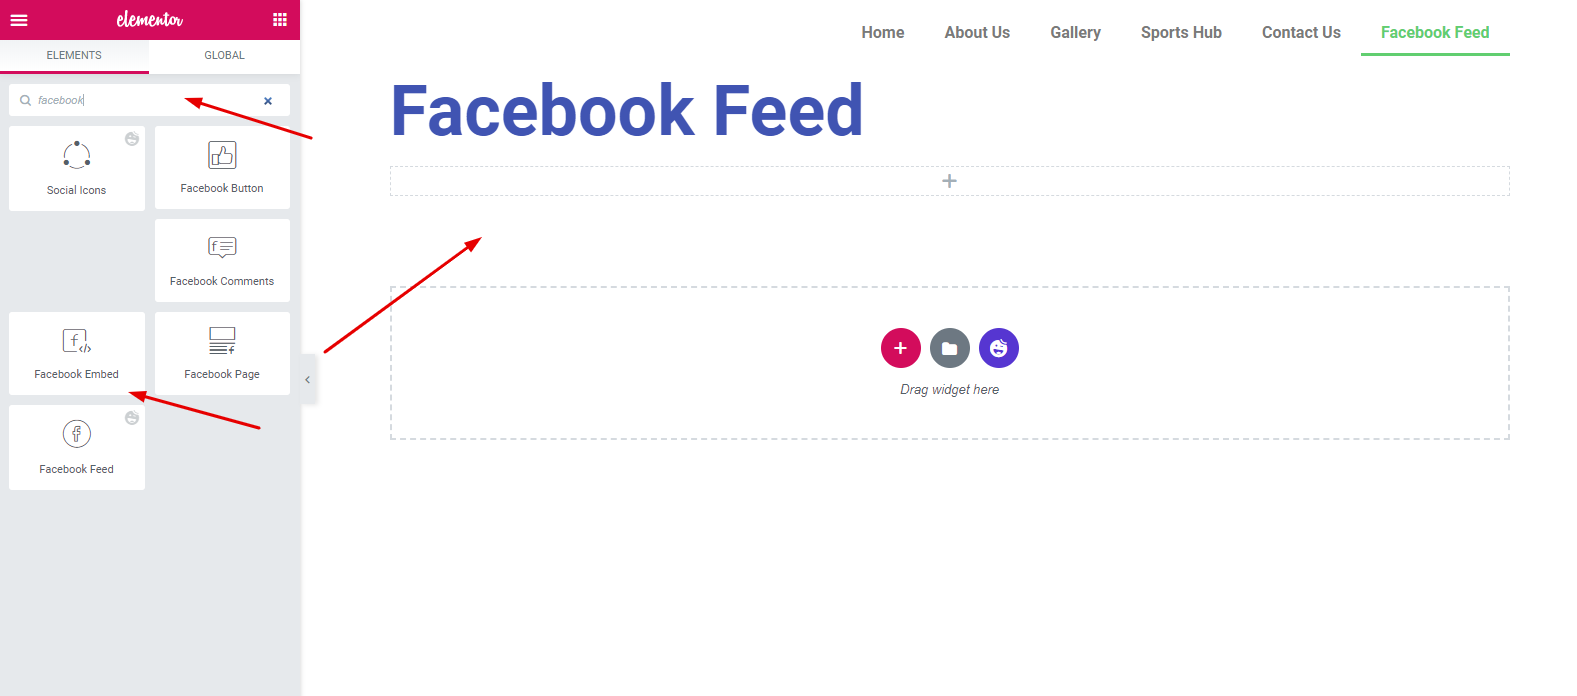
Next, search for ‘Facebook Feed‘ on the left top corner of the screen. And then select the widget. Drag it to the marked area.
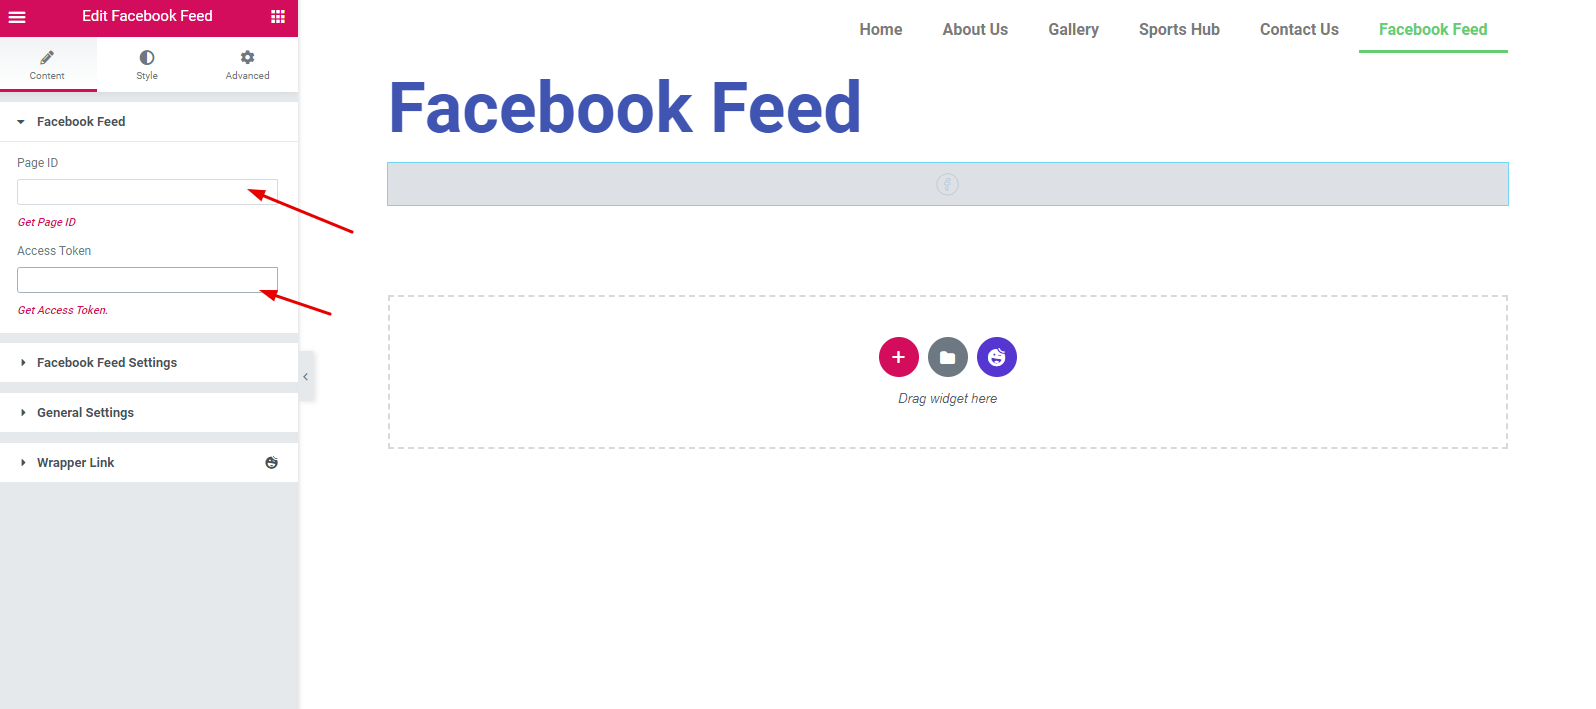
Now, you need to insert your preferred Facebook page ID and access token.
Generate Page ID and Access Token
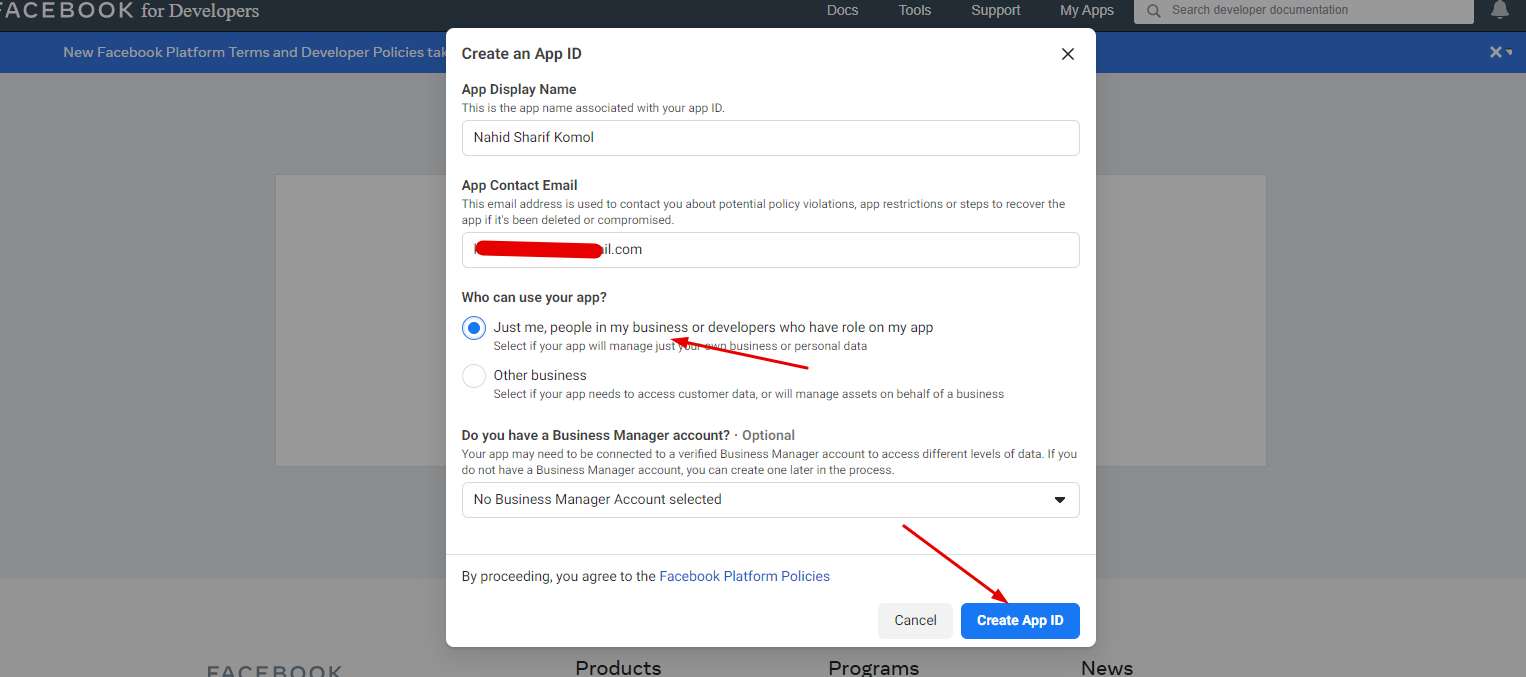
To generate a Page ID and access token, navigate to Facebook Developers Account. Here, you need to log in first. Then, create an app and click on the My App button.
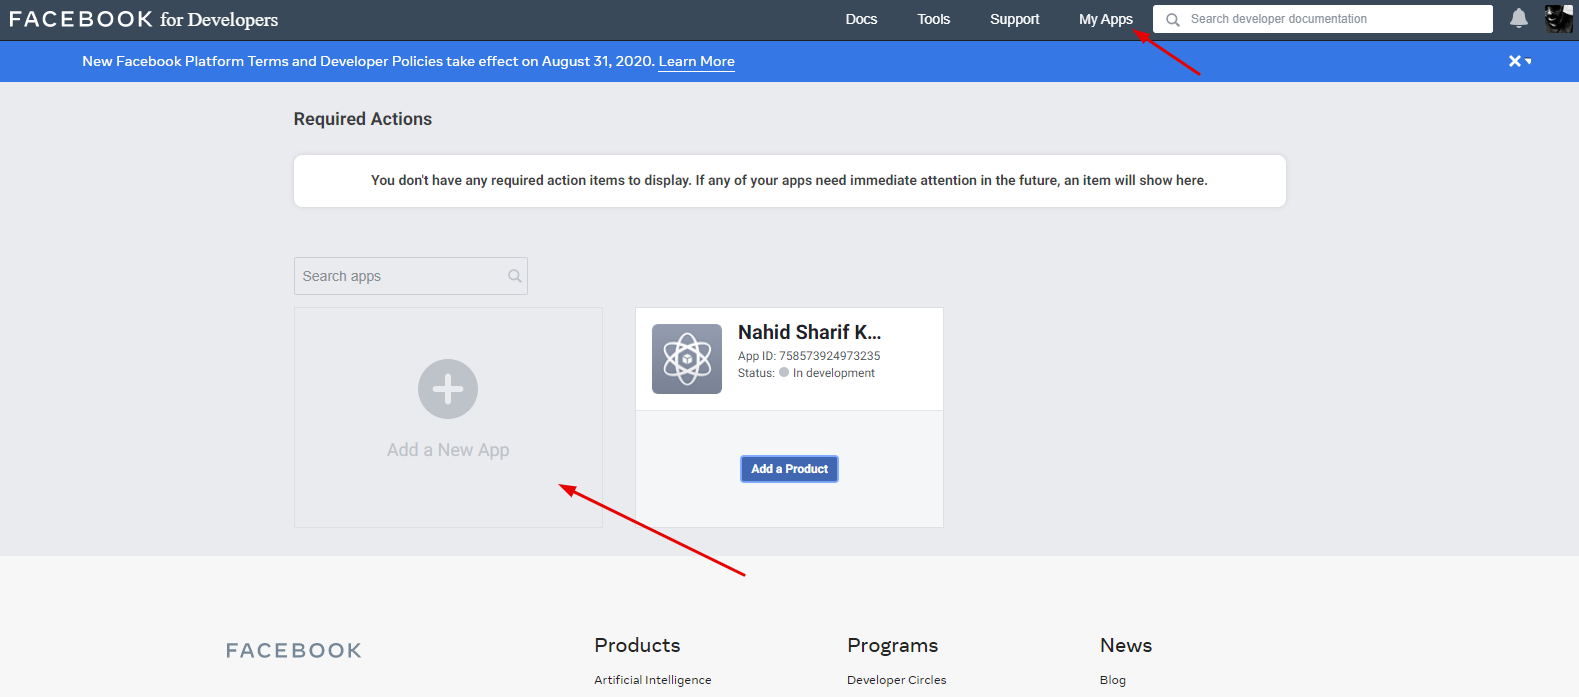
Next, fill in the box and click on the ‘Create App ID‘
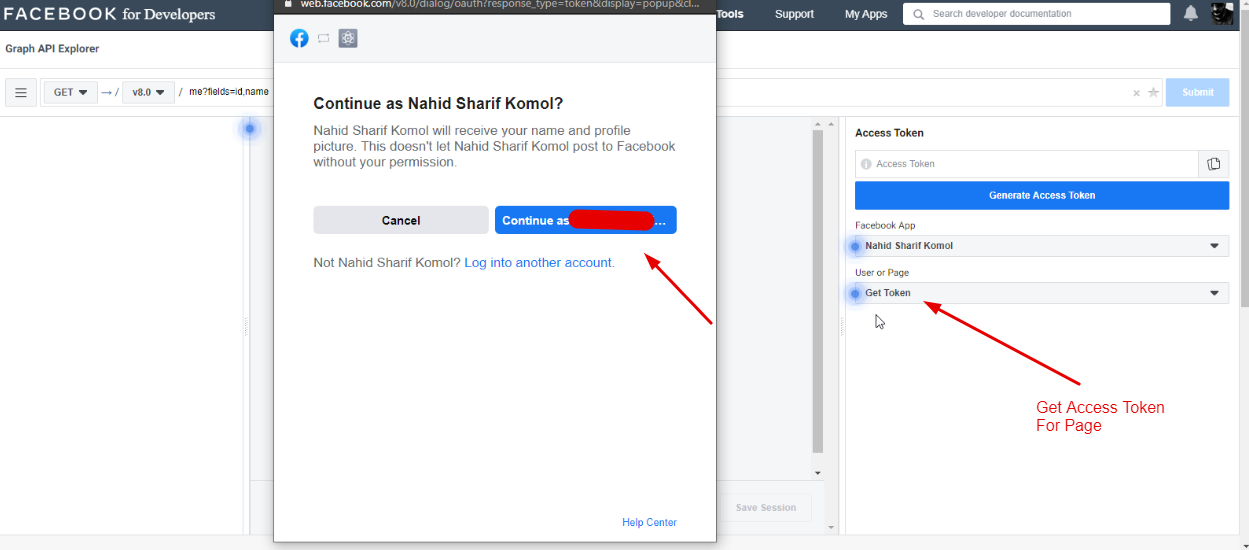
Click on ‘Tools‘ and select ‘Graph API Explorer‘

Then click on the ‘Get access Token‘ button. Select the access token for a page. And you will get the below window. Continue with your ID.
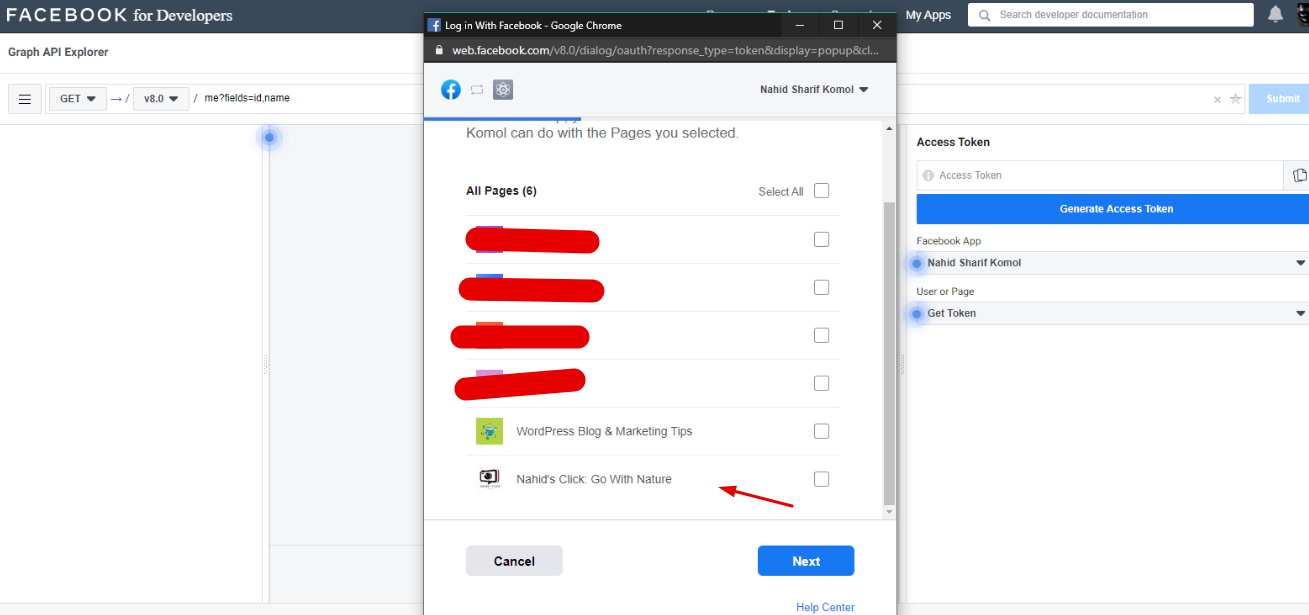
Now select your preferred page that you want to display on the website.
Click on the ‘Done’ button.
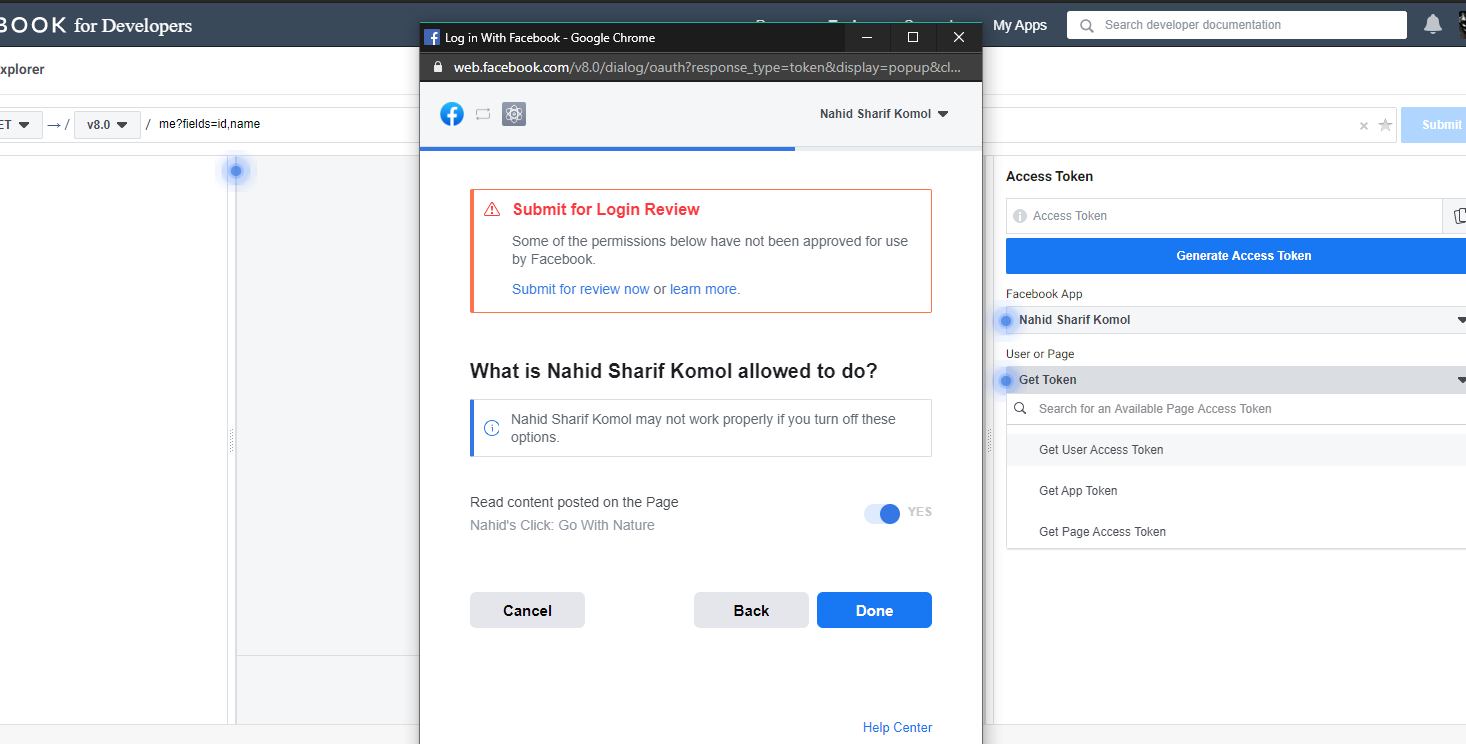
Hit the submit button. But before you do that, you need to select your page first. Hurrah! Your page ID and the access token are ready to apply. So copy them.
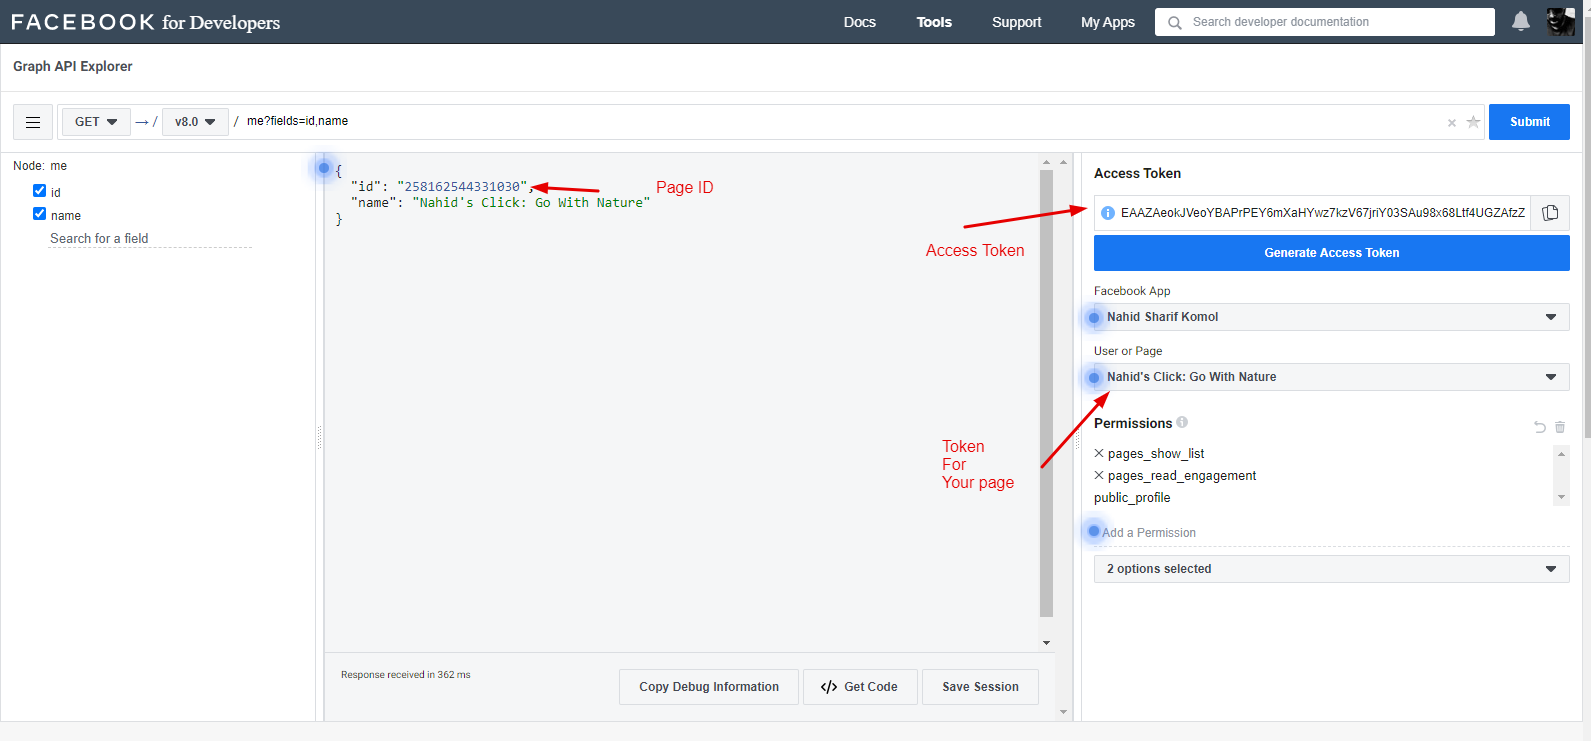
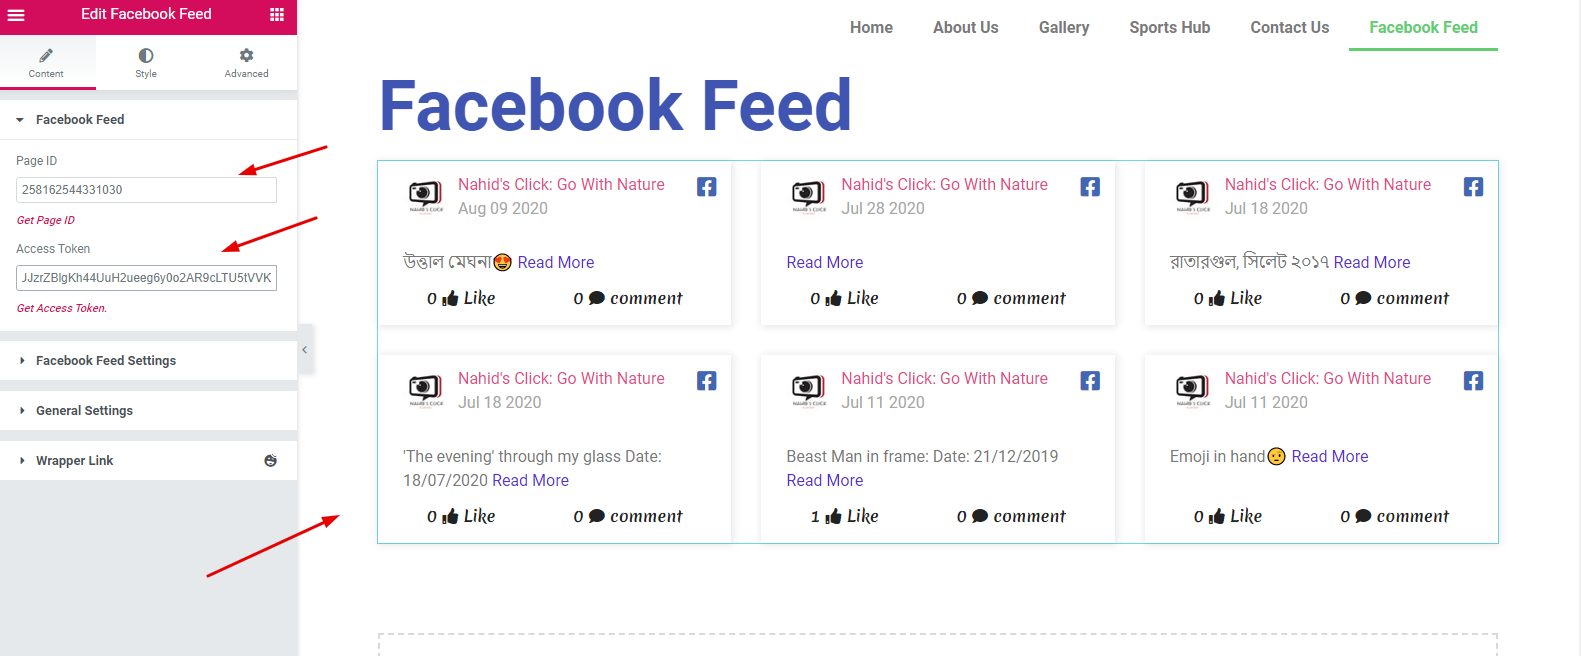
Now paste the page ID and access token number here. So, after adding the Page ID and token number, your page’s posts will be shown up.
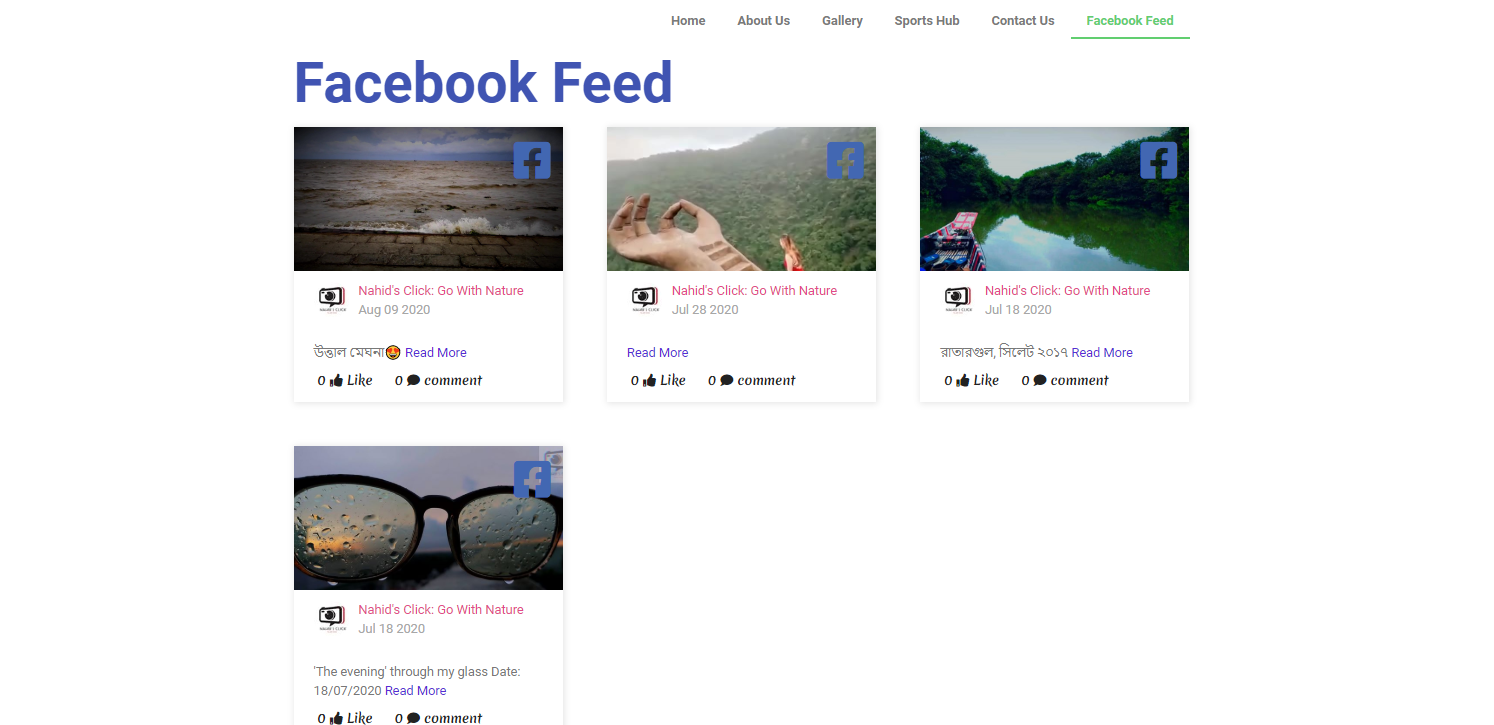
Here’s what it will look like:-
Customize Your Facebook Feed Design
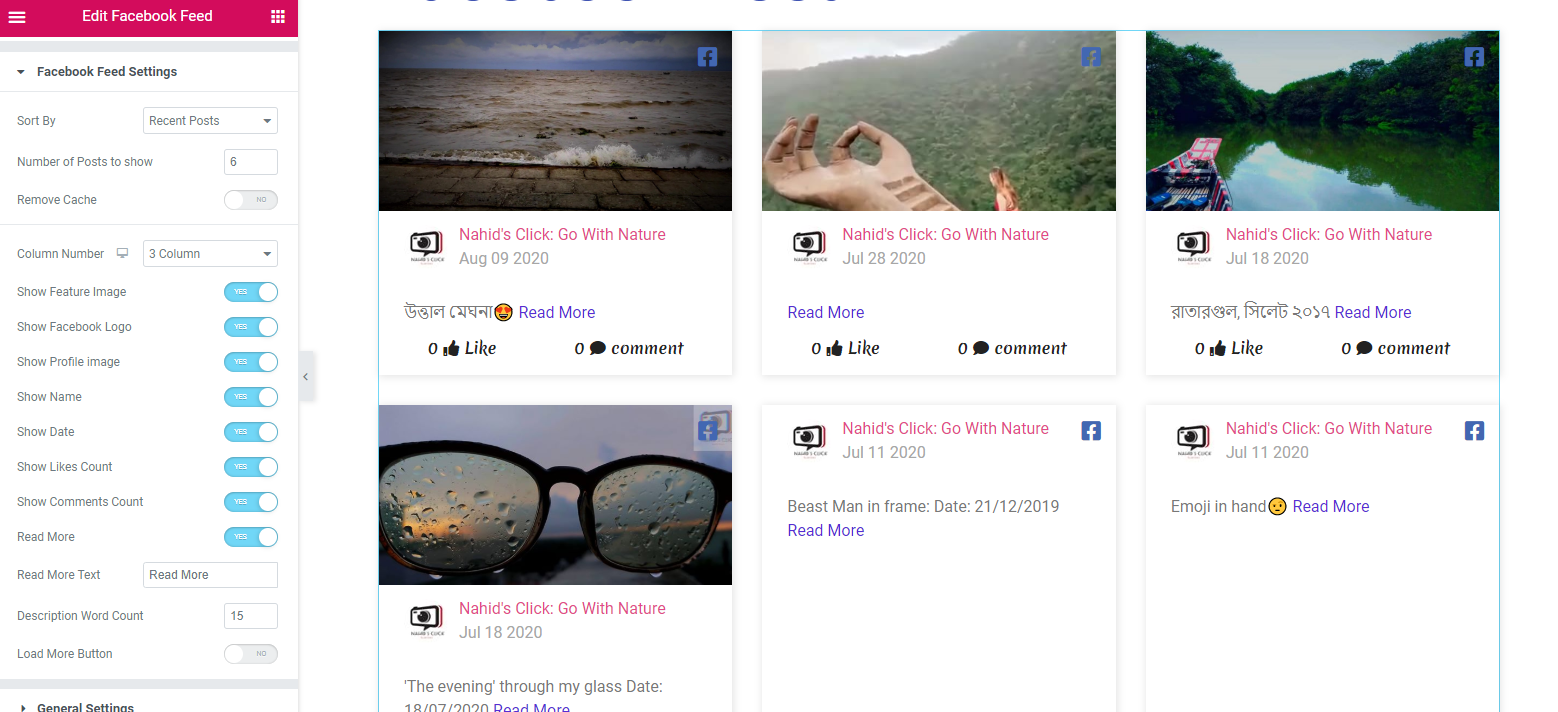
Now, it’s time to customize it and give it a design. To do that, click on the ‘Facebook Page Settings’. Here, you can customize a few things.
For example, you can show:-
- Recent Posts
- Old Posts
- Likes
- Comments
And also, you can toggle on-off Column Show, Feature Image Show, Facebook Logo Show, Profile image Show, Name Show Date Show, Likes Count, Show Comments, etc.
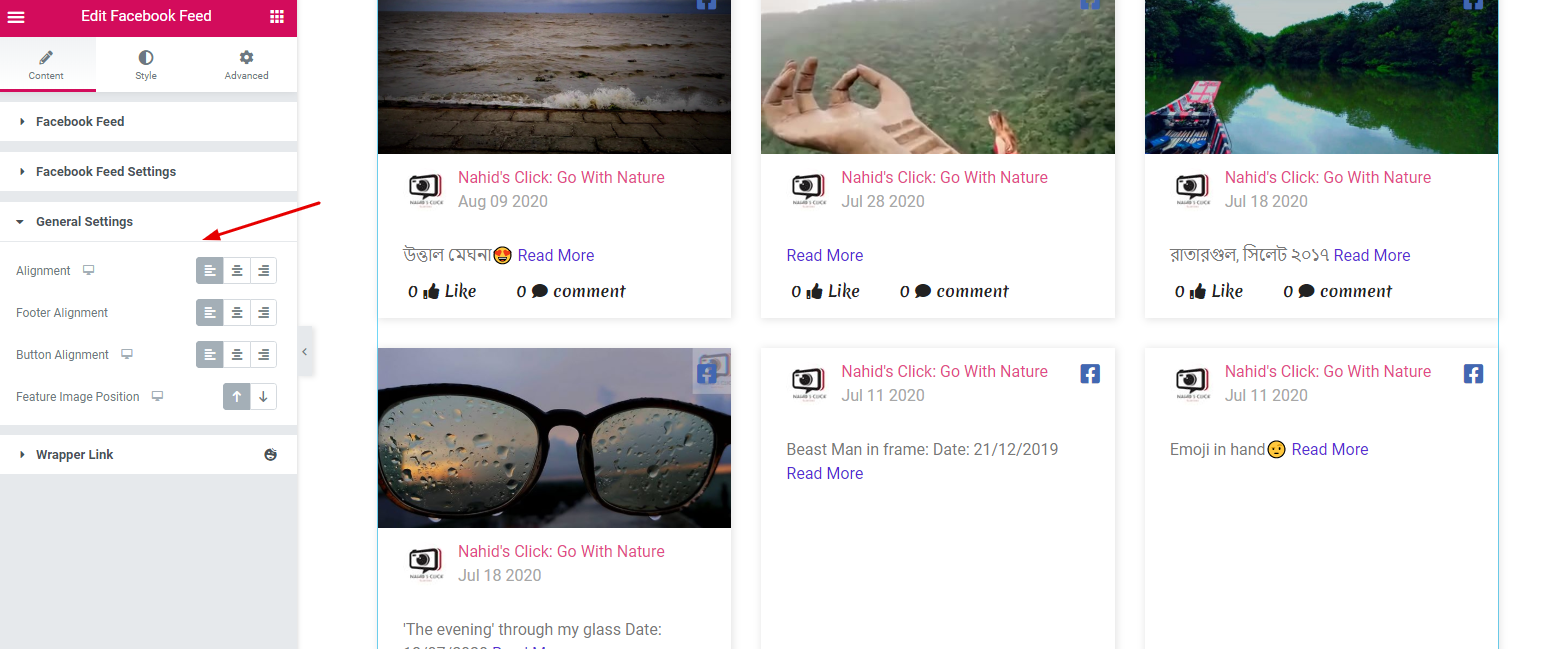
To update its settings like alignment, footer, header, and feature image position, tap on ‘General Settings‘
You have more options in your hand to give a stylist a lucrative look over the Facebook social feed widget. Just click on the ‘Style‘ button.
Here you can stylize:-
- Common: Size, padding, margin, shadow, box-shadow, space, etc.
- Feature Image: Image size, margin, padding, shadow, box shadow, border, etc
- User info: Page logo, size, space, height
- Content and Footer: In the same way, you can also customize content and footer’s padding, margin, space, color, and more.
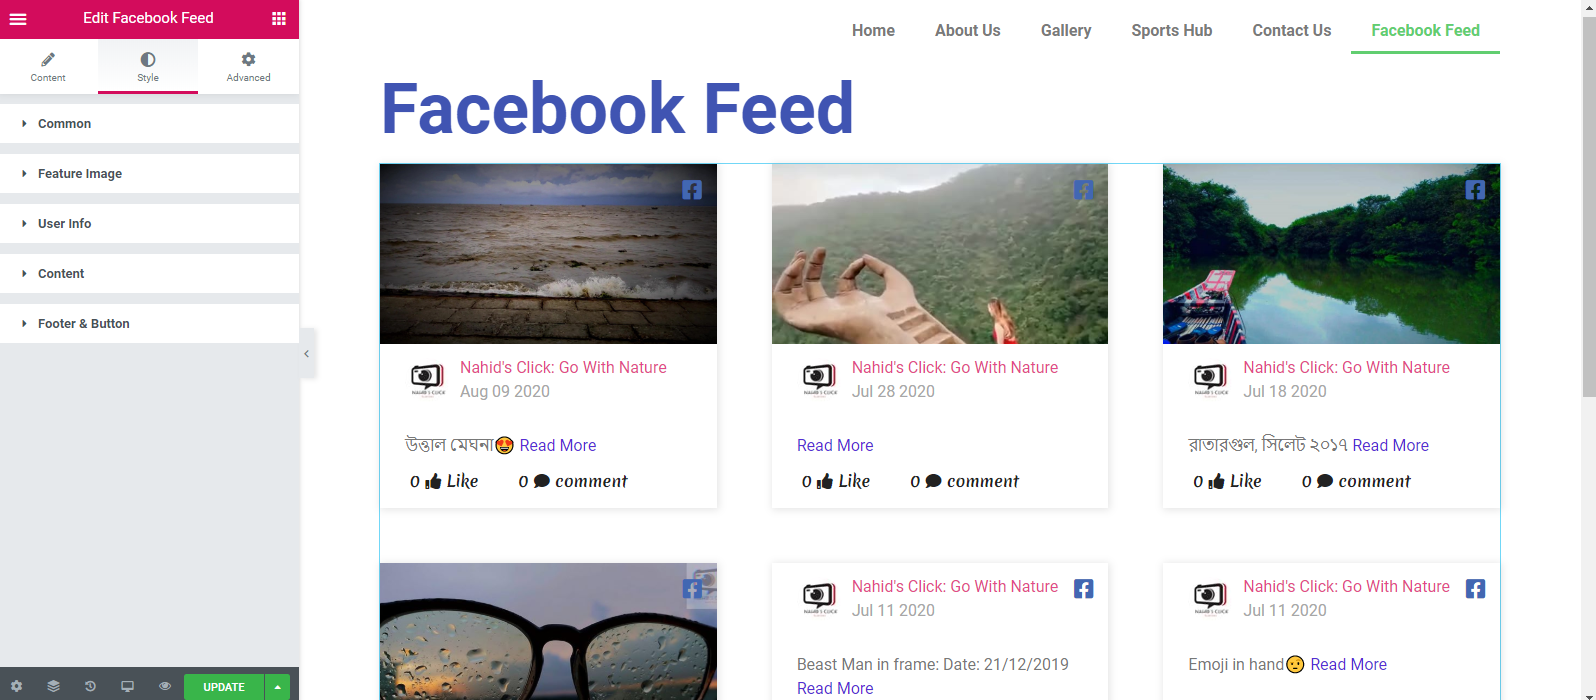
So after designing the widget, the final look on the website will be:-
Anyways, you can also check out our official documentation of ‘Facebook Feed‘ for an advanced guideline.
How To Use Twitter Feed Widget
To add Twitter Feed on the website, select the ‘Widget’ and paste it on your marked area.
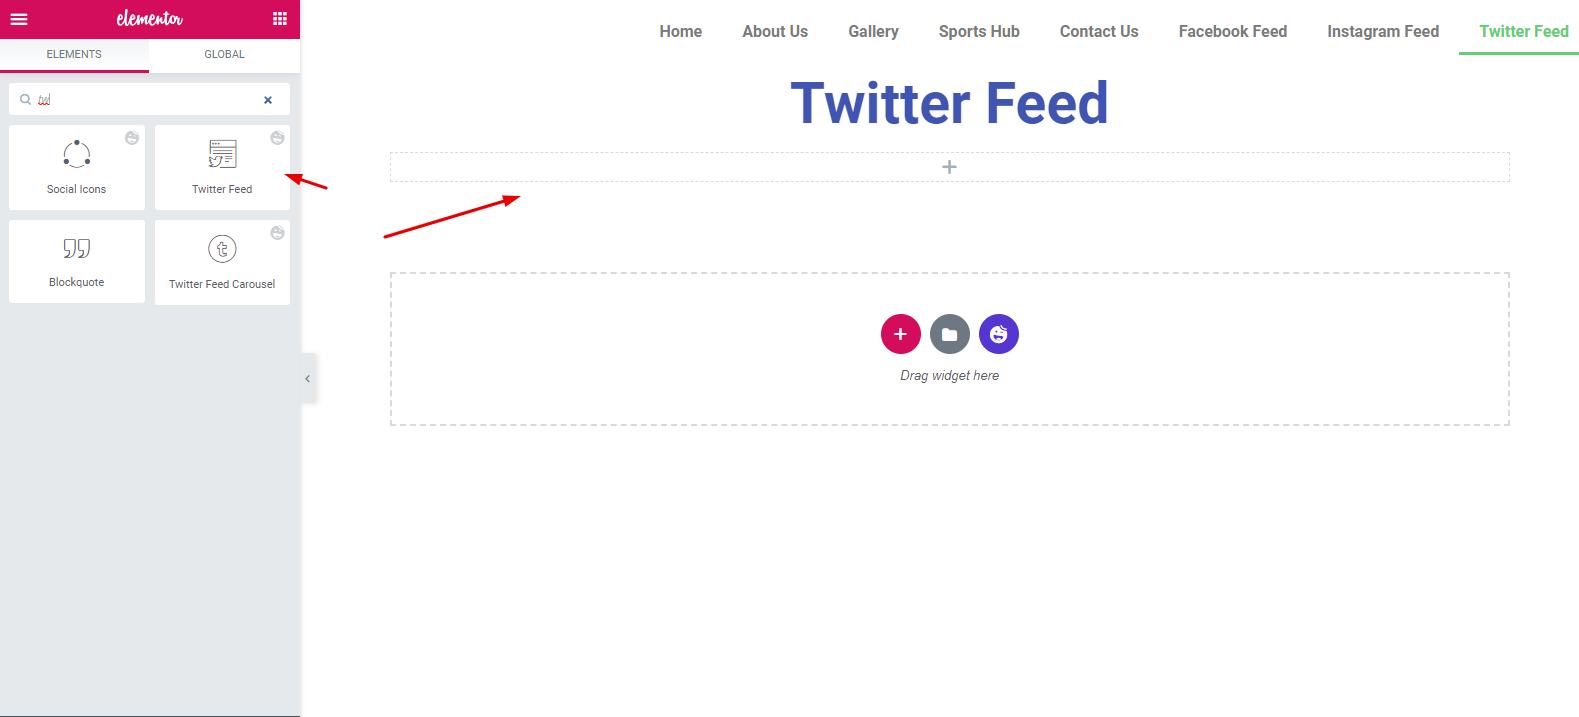
After you add the widget, you’ll need to put a User ID & Access token to get started with the process.
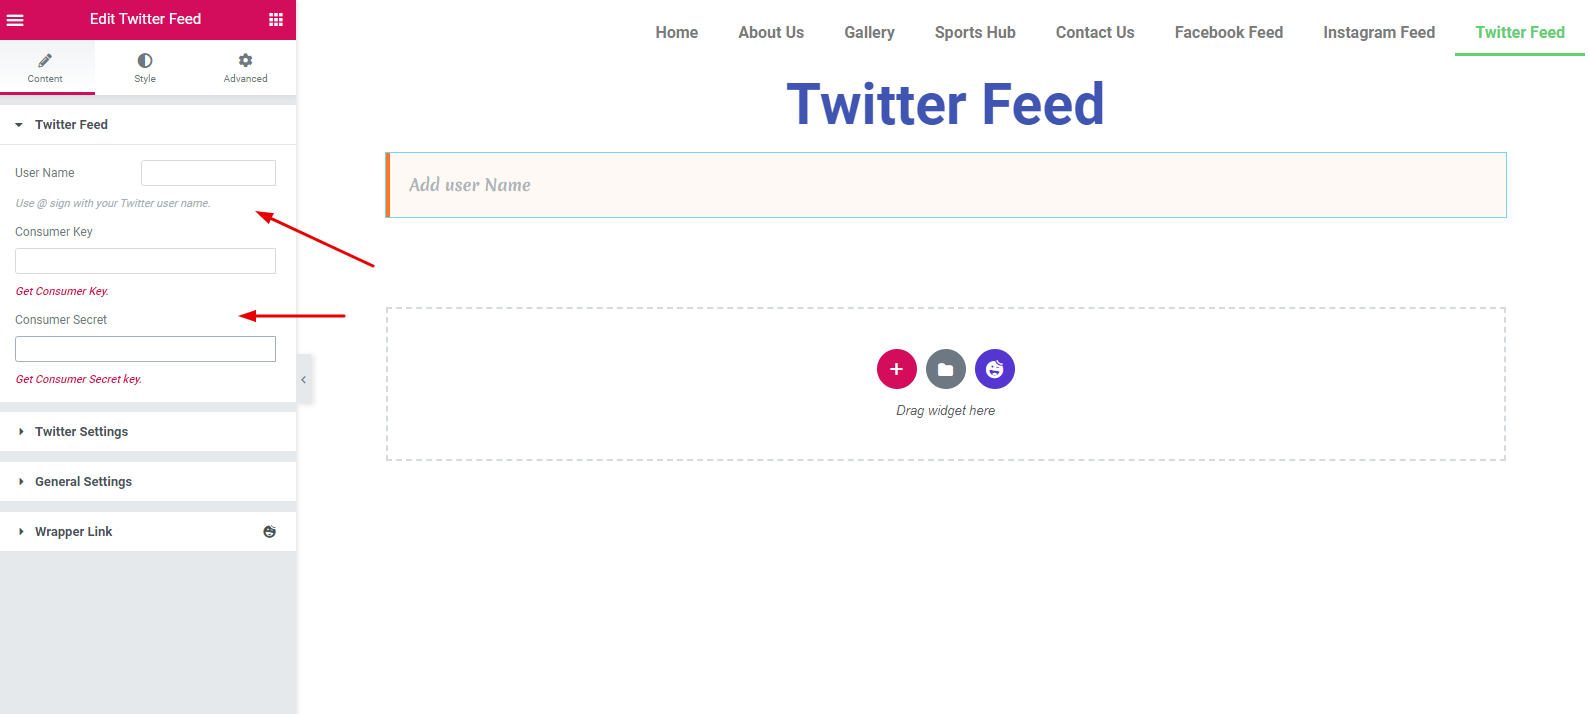
Now, you’ll need to carefully follow the instructions to get Access Token and User ID.
- Create a twitter developer account
- Generate Access Token and User ID
- Implement on the Website
Create a Twitter Developer Account
To create a developer account, navigate to the Twitter developer onboarding page. Then, click on ‘Create an app‘.

Next, you’ll have a window where you are asked to fill up some formalities. It says for what purpose you need an API key. As we are going to use a Twitter feed, so click on ‘Exploring The API‘.
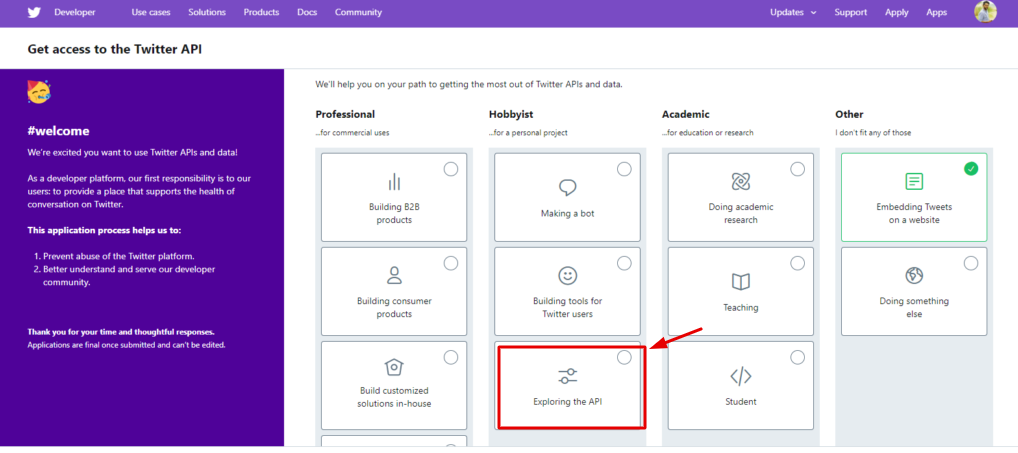
After that, you’ll get some form to fill up. This is how they will ask you about how you’ll utilize the Twitter data as a developer, etc.
So, provide legal information here by answering some questions.

So when you’re done, checkmark the option and then hit the ‘Submit Application‘ button.

Hurrah! You did it. Now check your email and click to confirm.

Well, after submitting the application, it will go under review by the Twitter authority to check whether you’re eligible as a developer or not.
So ready for the next steps.?

Important note: This review process may take two or more days, so you should always keep an eye on your email.
Get Access Token & User ID
So after getting approved by the Twitter authority, log into your Twitter developer account again.

That link will redirect you to the Twitter developer dashboard. You are only a few steps away to get your access token and secret key.
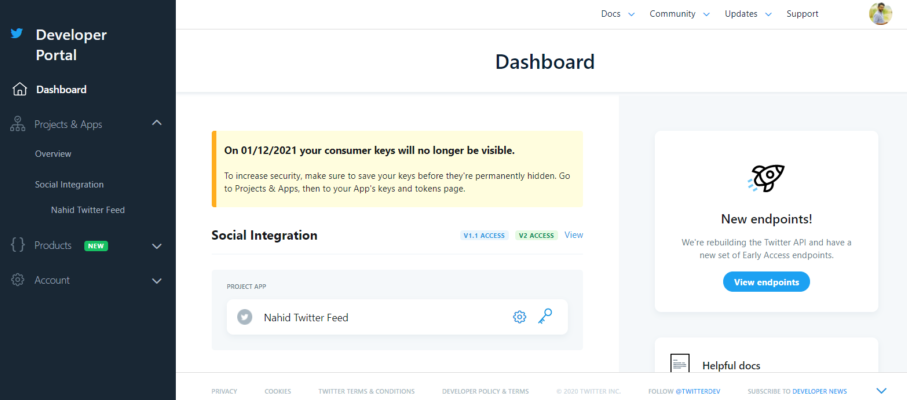
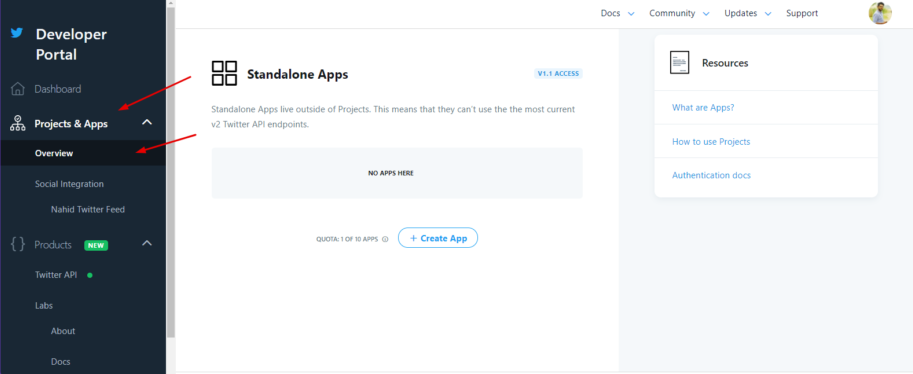
Next, navigate to Products and Apps -> Overview -> click on Create App
Give the name of your app, or you can type the purpose of your app here. [Note: Keep it unique]
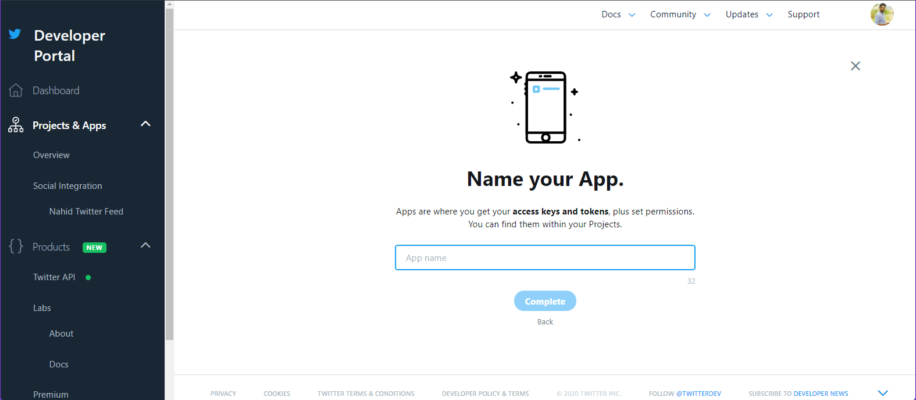
After providing a unique name, you’ll get your desired Twitter API key and Access token number. So copy it and move on to the next step.
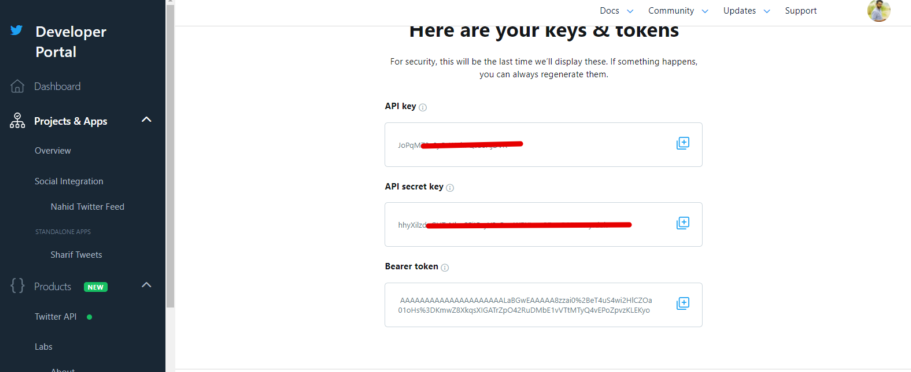
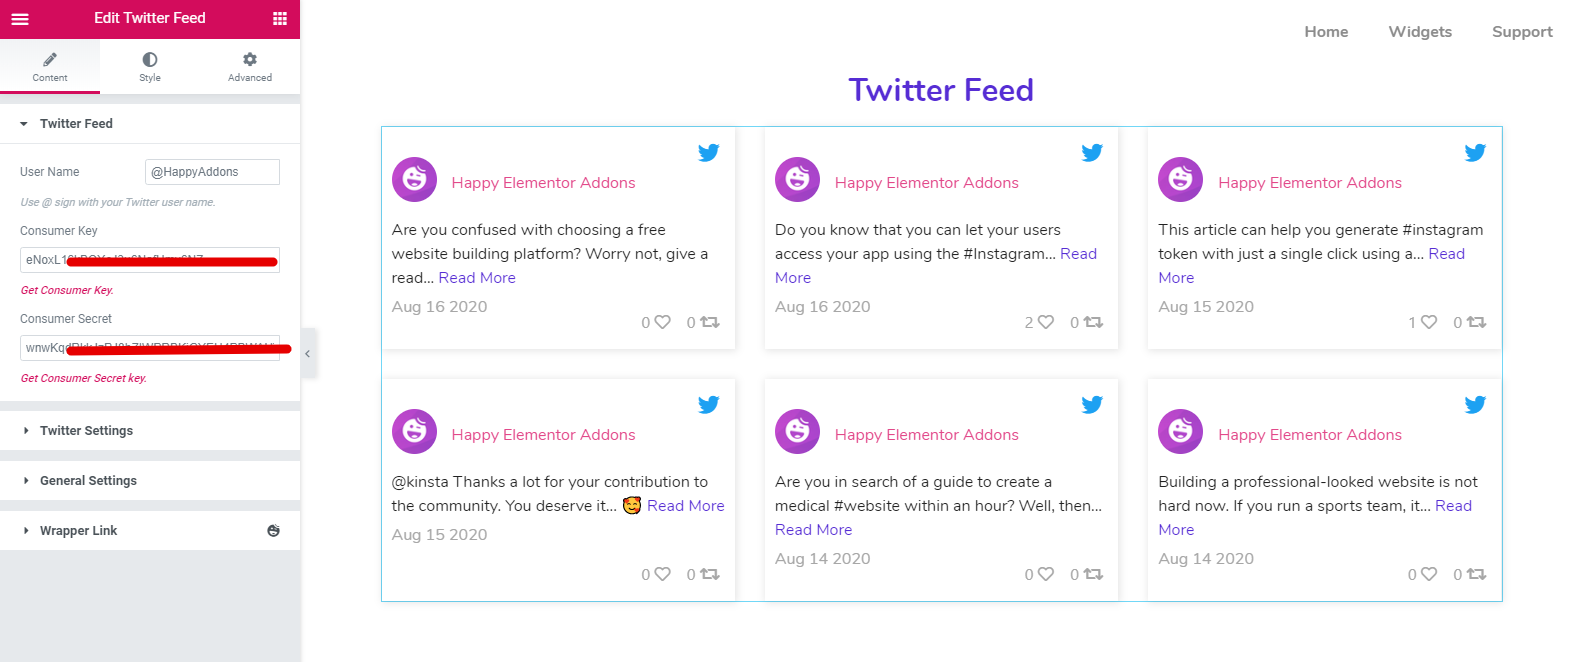
Now paste the ‘Consumer key‘ and ‘Consumer secret key‘ with your preferred Twitter user name on your Elementor website.
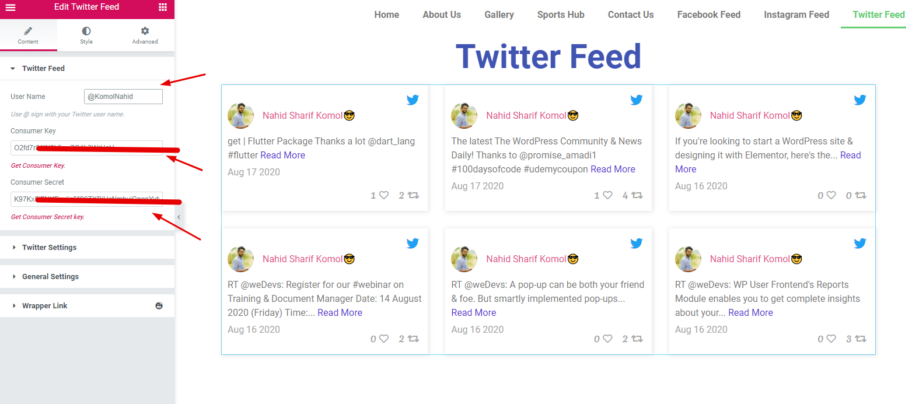
Customize Twitter Feed Widget
Automatically, all your tweets will appear next to the right side. So now you can customize, design, and give it an elegant look to make your website more professional and extra-ordinary.
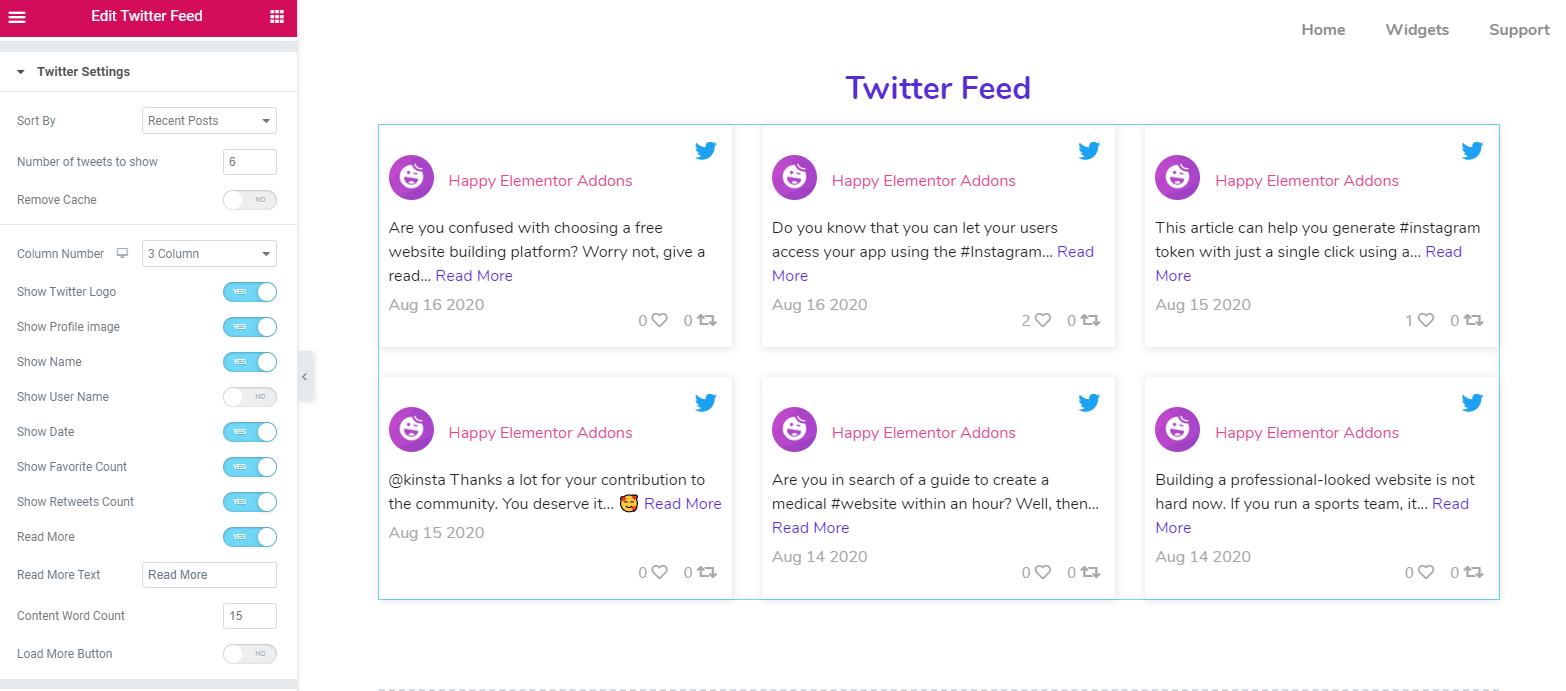
Here, you will get twitter settings, general settings, and wrapper link.
Here you can select how many posts you want to show, categorize them, and many more.
In the general setting tab, you can align your posts, contents, and button links.
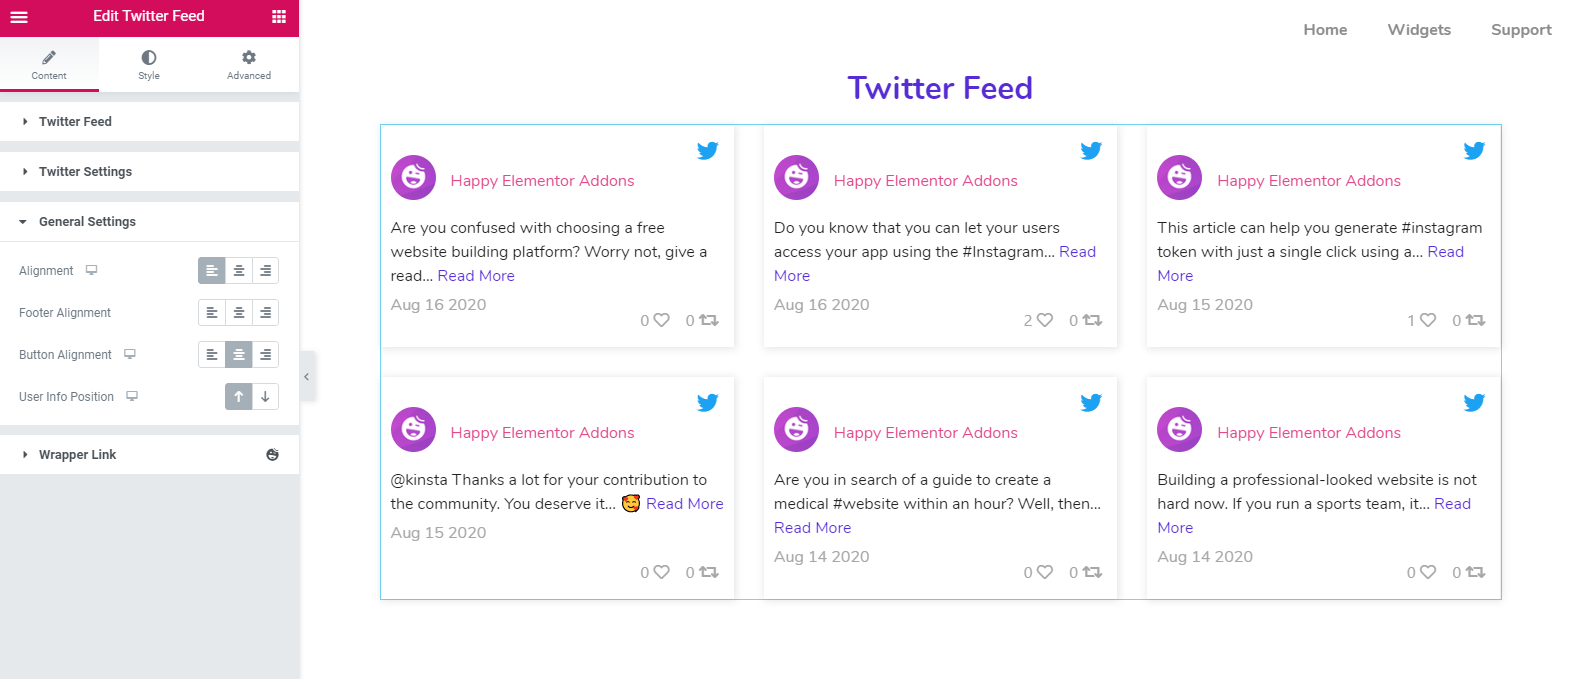
To stylize this design, tap on ‘Style‘ button. Here, you can customize each and every part and set individual designs to make it more beautiful.
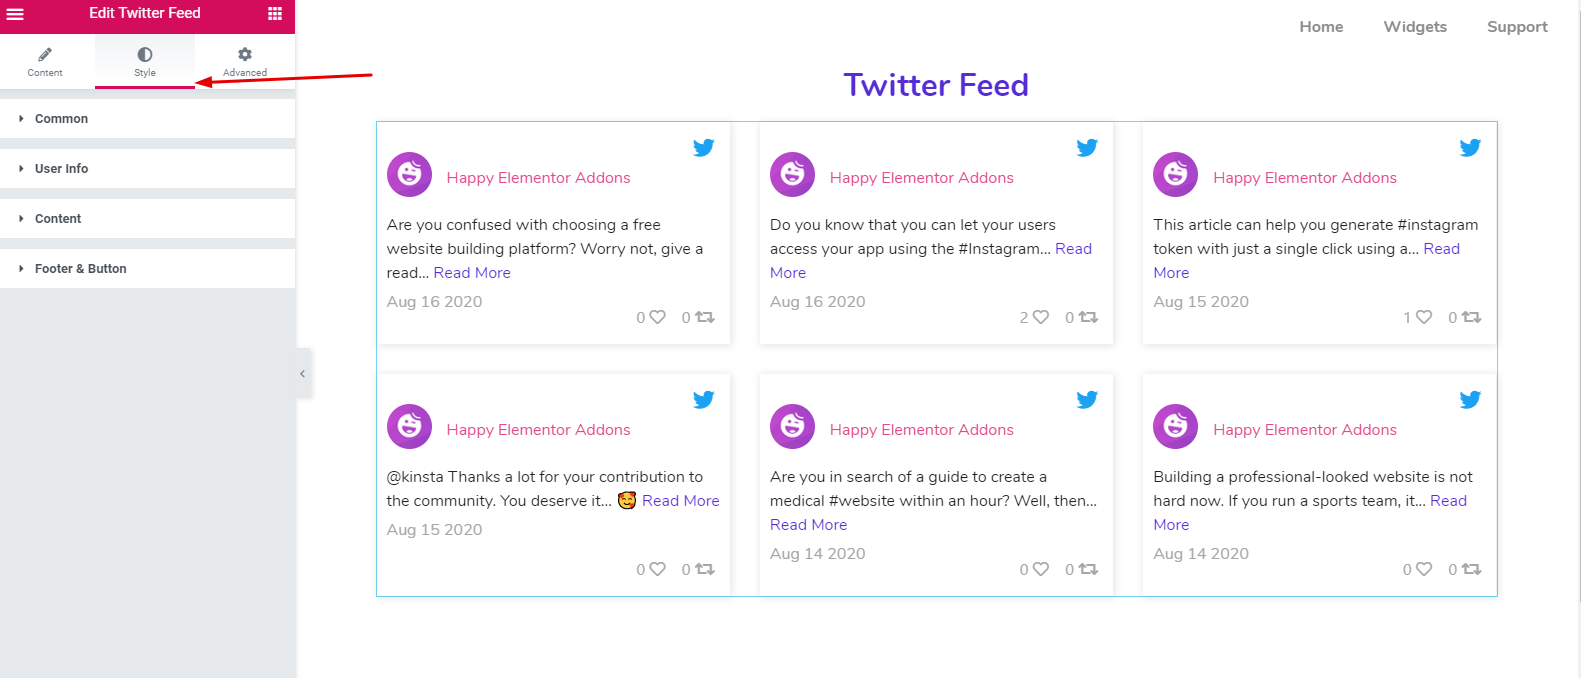
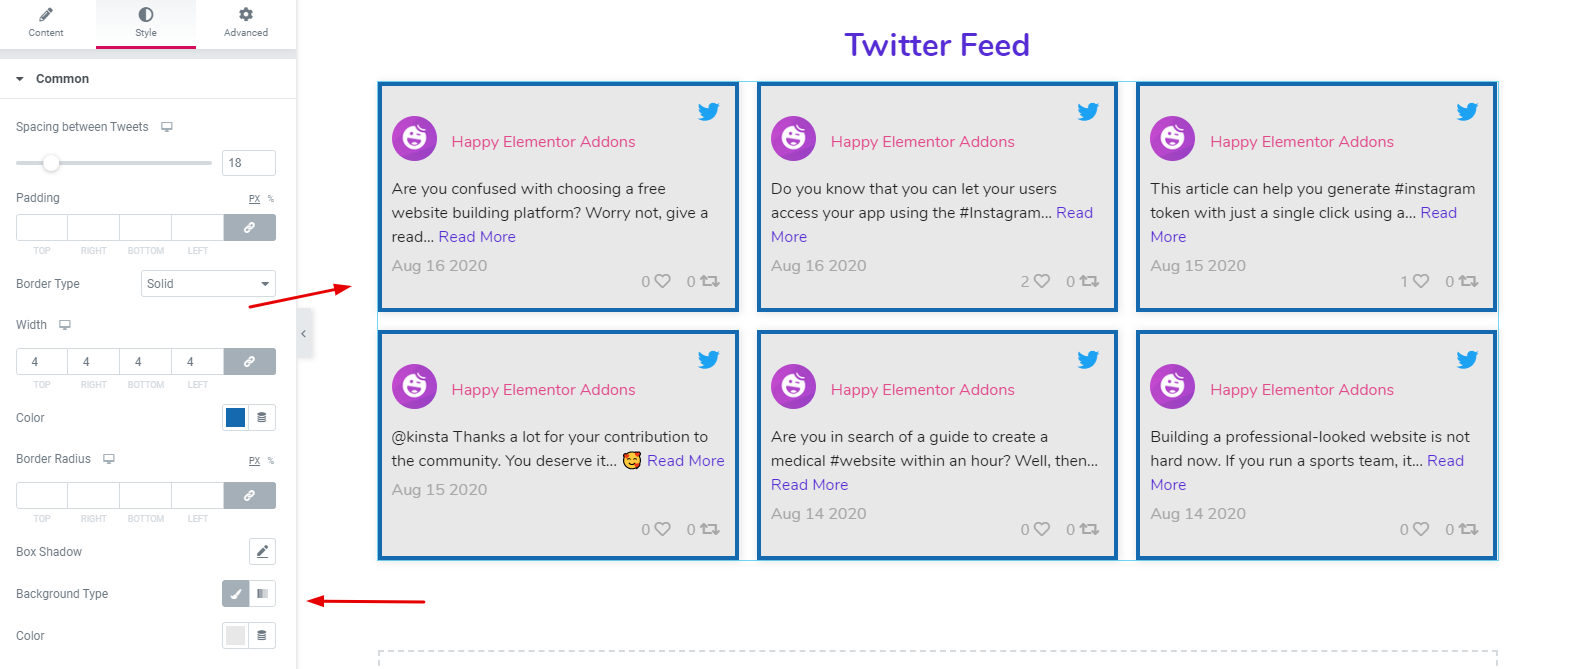
- Common:- This option is for each block. For example, you can set the padding, margin, border, border type, and background.
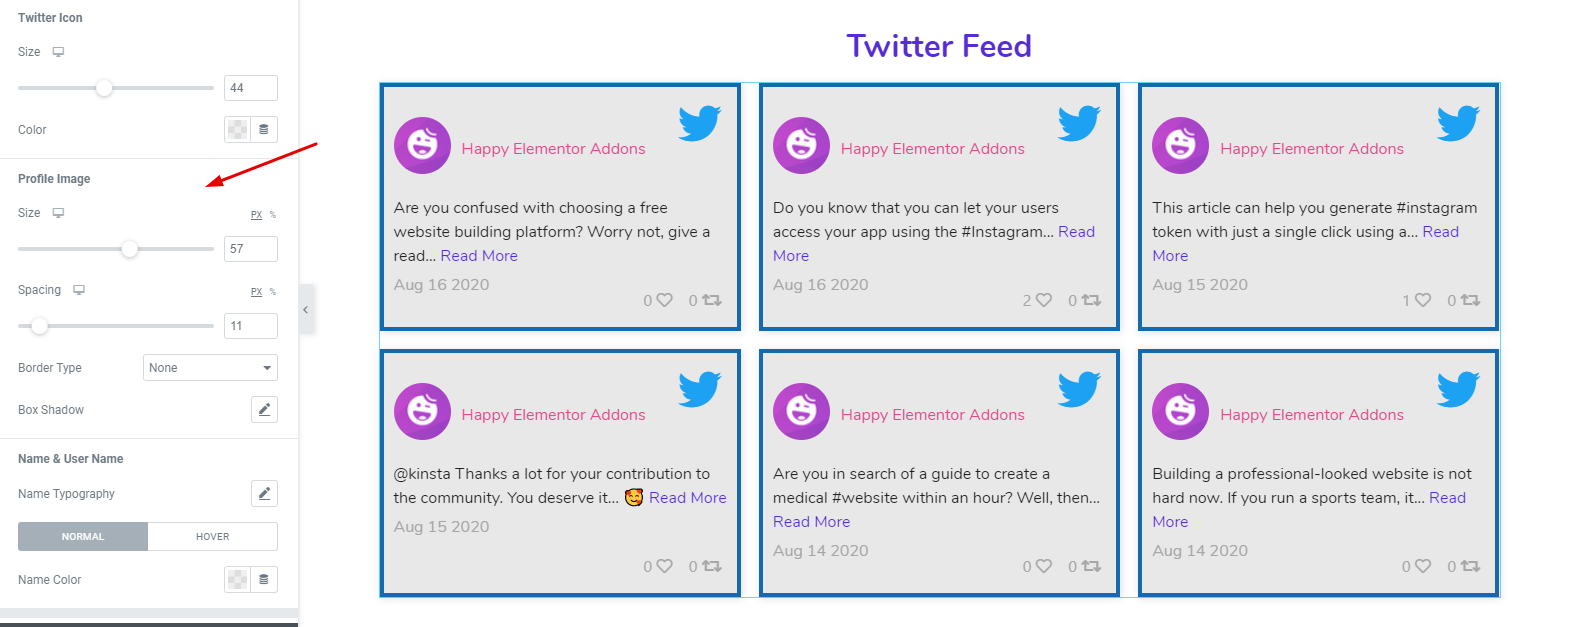
- User Info: In the user info, you can customize user icon, size, spacing, profile photo and more.
- Content: To edit content and change its color, tap on the content. And here you will get all the customizing options. For example, content spacing, bottom spacing, colors, button colors, date colors, etc.
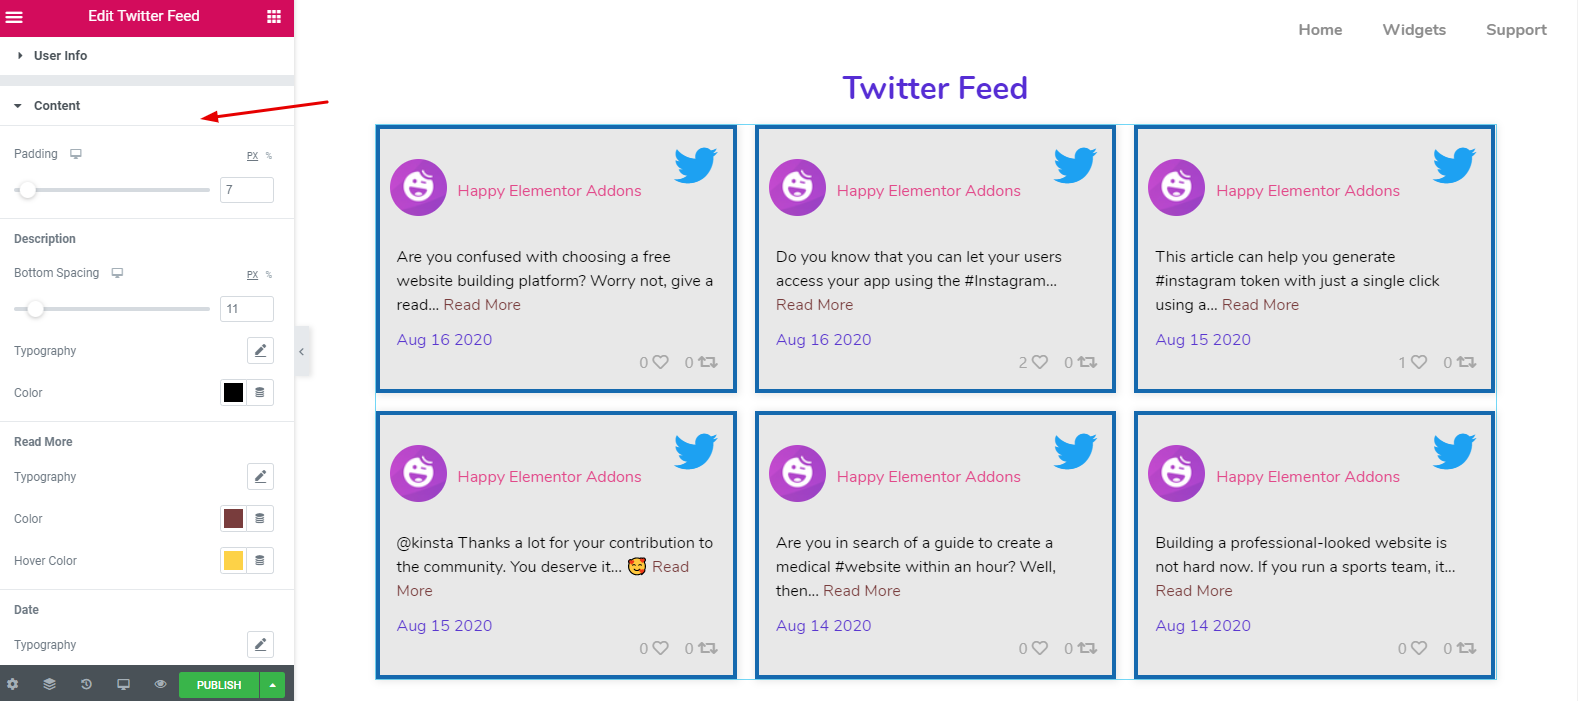
- Footer and Retweet: Similarly, you can also customize footer and retweet portion. Tap on the button and change the amount that you like. That’s it!
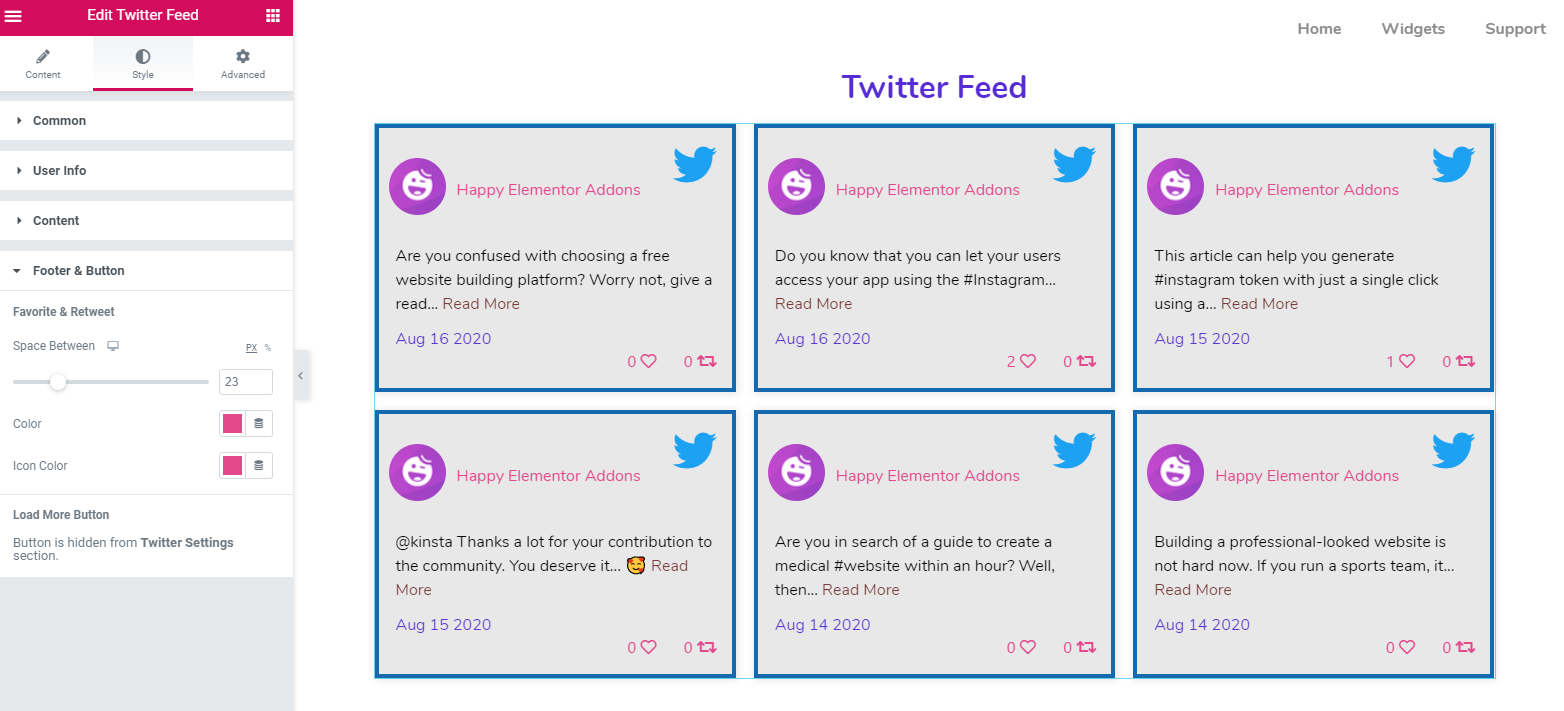
So after finishing with the design, your final look will be:-

However, to get a quick direction, you can watch the video tutorial below about ‘Twitter feed‘. Here you’ll get a full guideline of how to use or customize twitter feed well. Or you can check out our official documentation for an advanced guideline.
How to Use Twitter Feed Carousel Widget
Well, the ‘Twitter Feed‘ and ‘Twitter Feed Carousel‘ are almost same. But Twitter Feed Carousel offers some extra functionalities. So now we’re going show you how you can use Twitter Feed Carousel on your Elementor site and design it accordingly.
However, you’ll also need a access token and User ID to get started with the process. But the interesting part is, you can use the access token and User ID that you used earlier for Twitter Feed.
So now follow the below instructions carefully:-
- Create a Twitter Developer Account
- Get Access Token and User ID
- Start Designing Twitter Feed Carousel
Customize Your Twitter Feed Carousel
After you add the user name, Access token and User ID, you’ll see the reflect of your tweets on the right side of your screen.
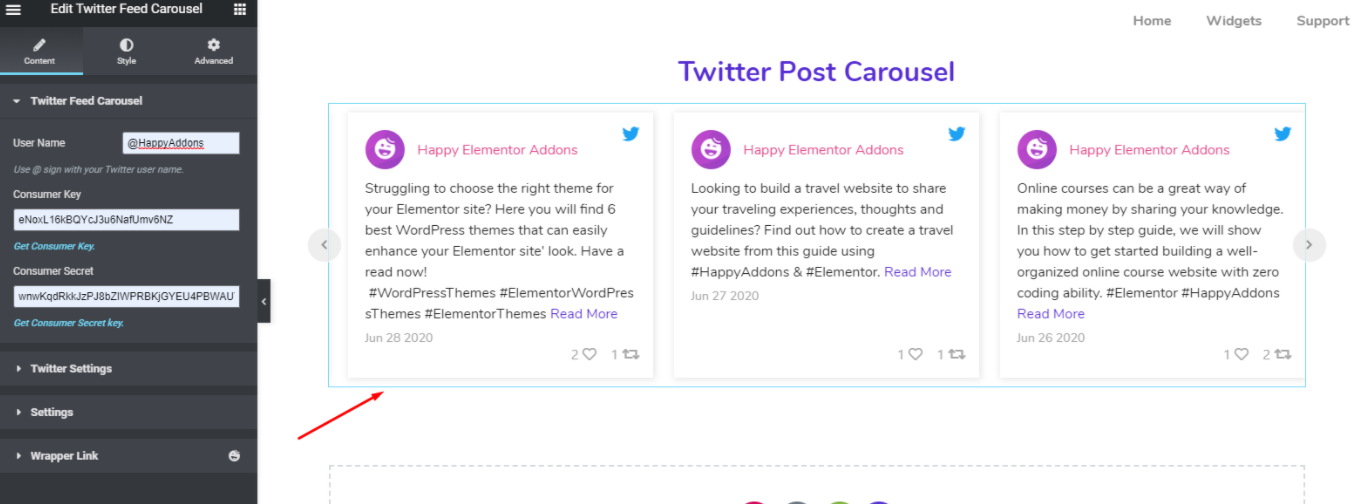
Next, tap on the ‘Twitter Settings‘. Here you can sort out the options according to the below category:-
- Recent posts
- Old posts
- Favorite posts
- Number of posts
- And retweets, etc.
Additionally, you can also customize the your twitter logo, profile picture, name, user name, date, react count, retweets count, and read more button, etc.
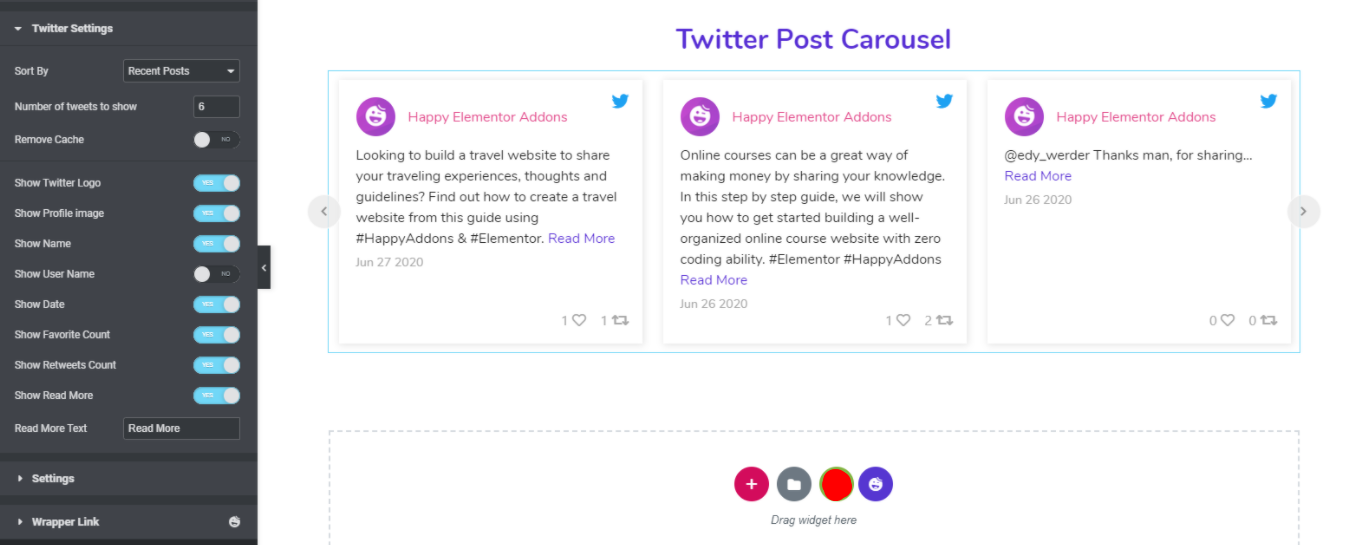
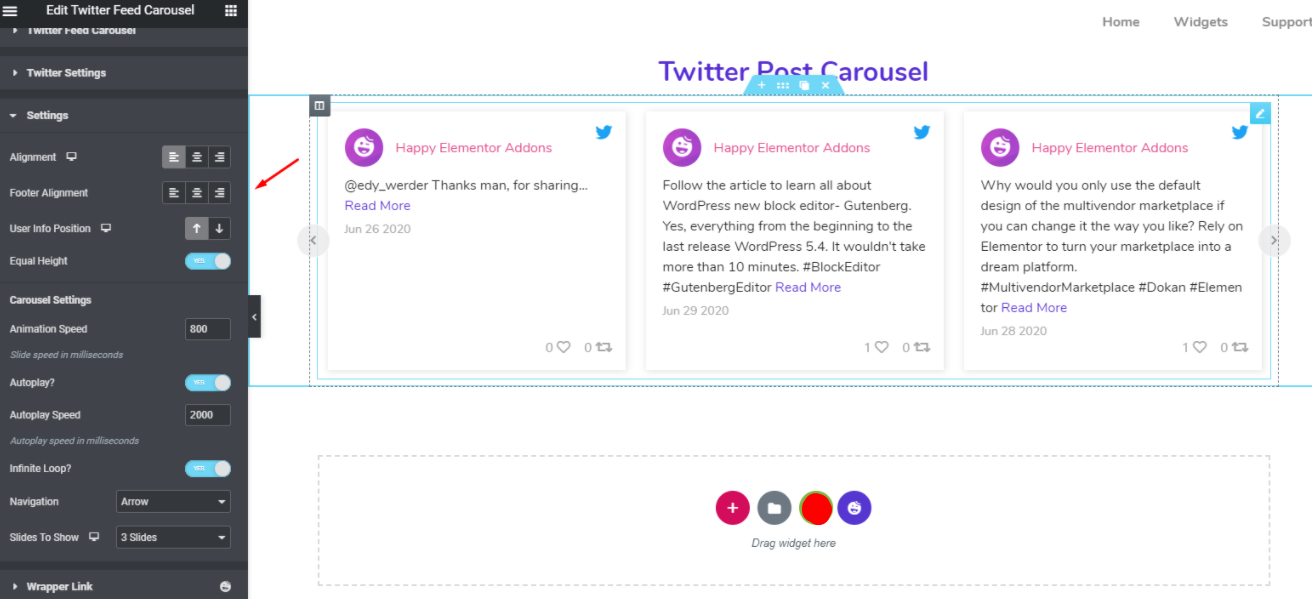
In the settings section, you’ll get more options to customize your design. For example, alignment, footer alignment, user info position, animation speed, how many slides you want to show, post navigation, and more.
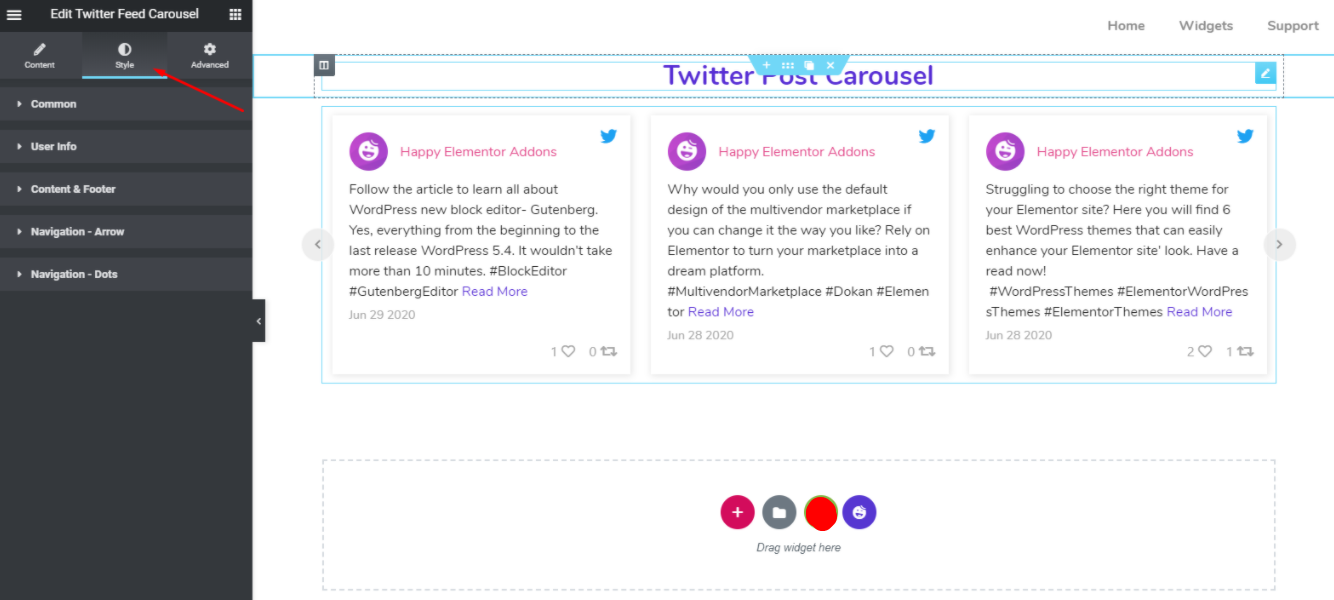
Now it’s time to stylize the section. To do that tap on the ‘Style‘ option.
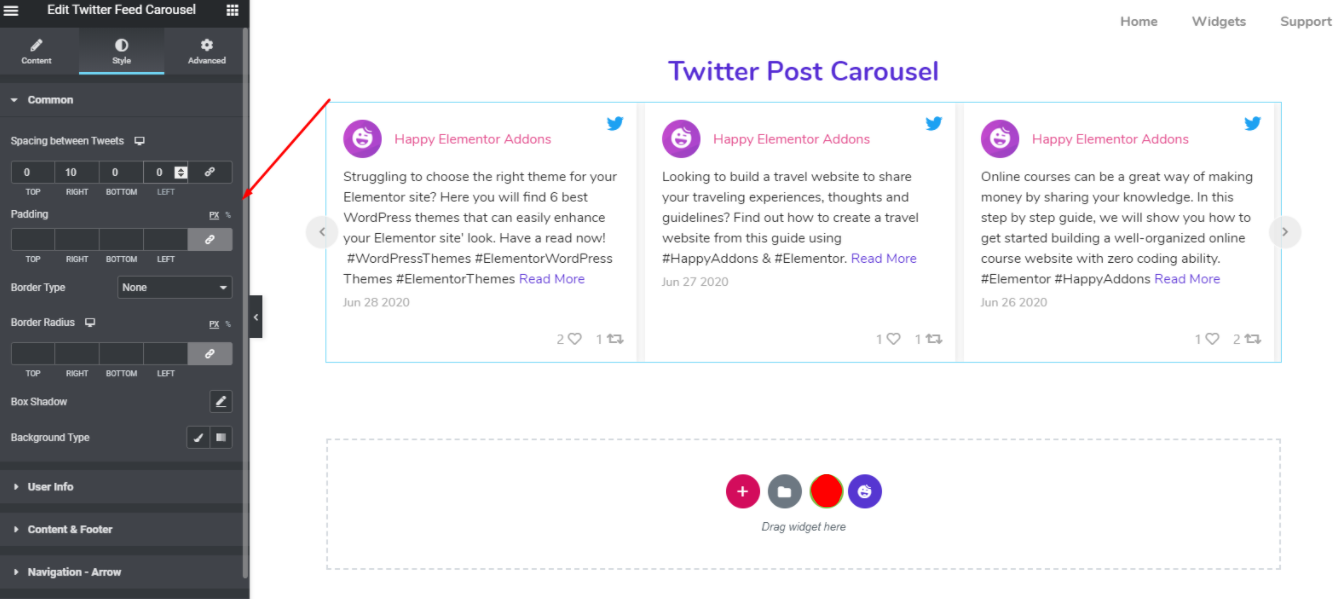
To change the design of the widget, you can change its spacing, padding, border type, box-shadow, and background type, etc in the Common section.
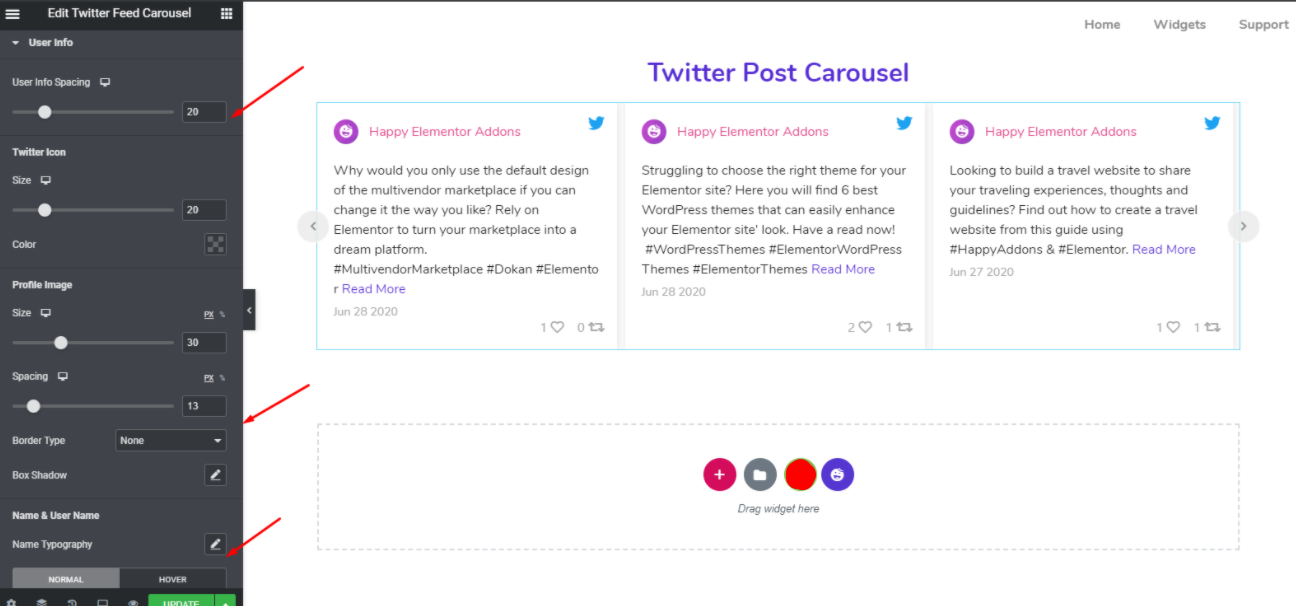
Next, you can also customize User Info. For example, User Spacing, icon, profile image, spacing, border type, colors, and typography (name and User Name), etc.
Next, you can edit Content and Footer part. Similarly, you can stylize padding, spacing, colors, typography, icon colors, etc.
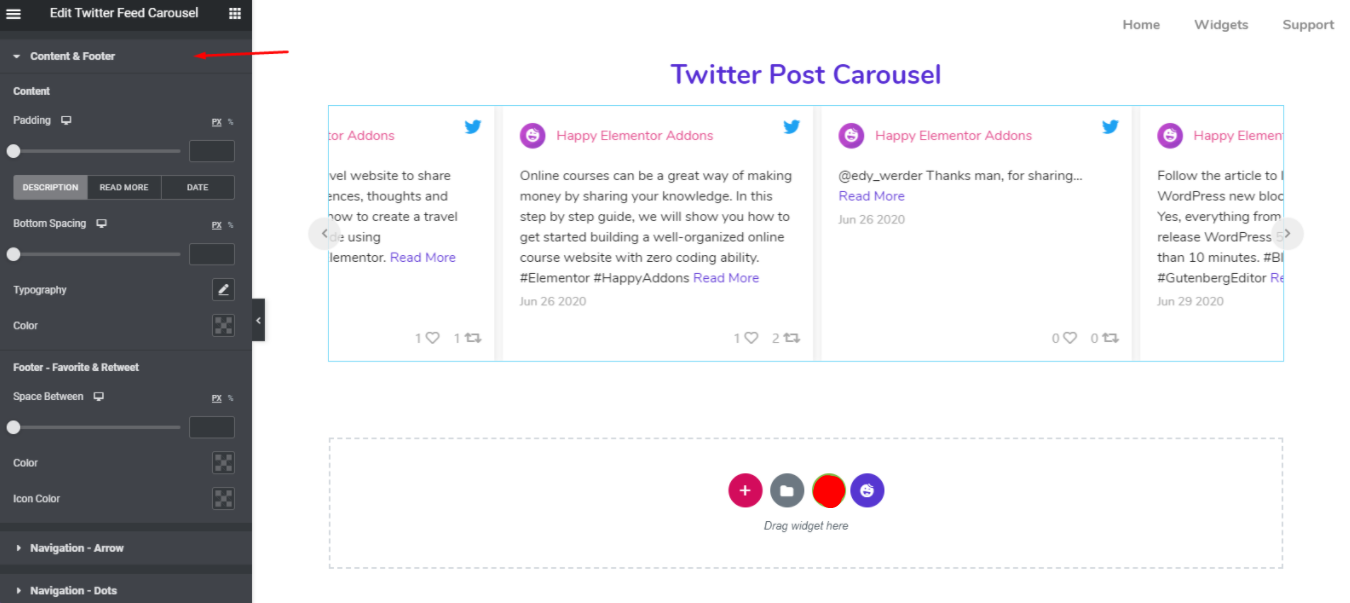
Applying the same process, you can do the process for Navigation arrow and Dots also.
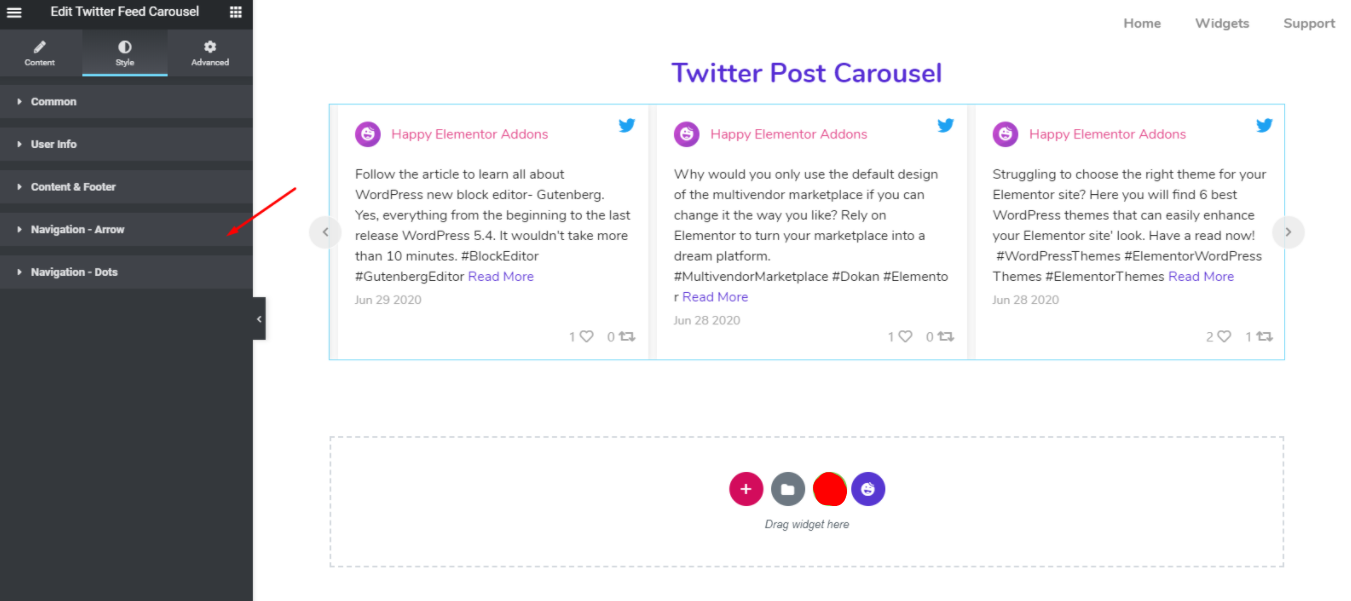
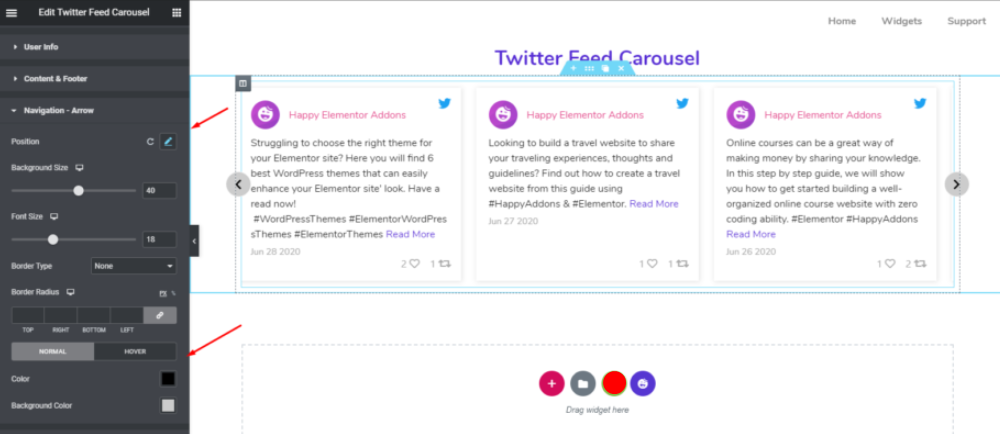
Next click on the ‘Navigation Arrow‘ section. So here you can customize arrow position, background, font size, border type, border-radius, color, background color, etc.
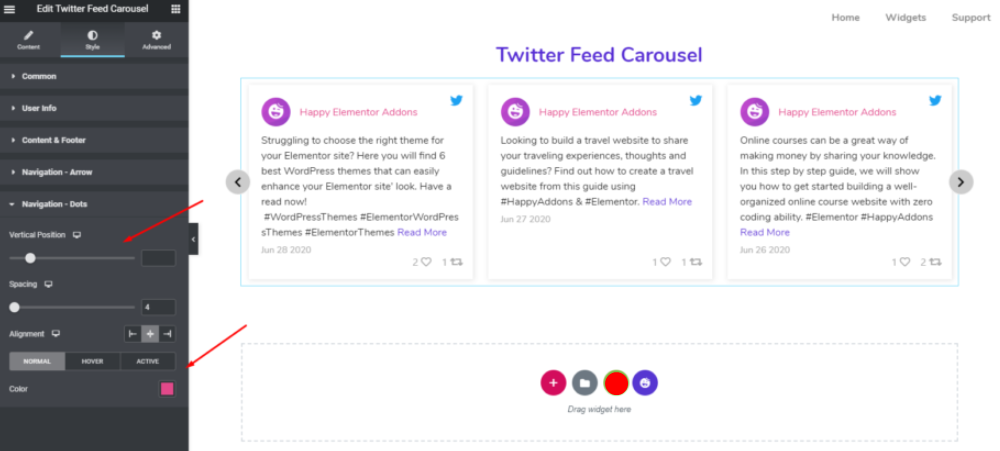
Well, in the last part of the style section, here you’ll have ‘Navigation Dots‘. You can easily change its styles like vertical position, spacing, alignment, and color, etc.
So this is how you can use the Twitter feed carousel on your Elementor site. However, you can take a look at our official documentation on the Twitter feed carousel to get a detailed idea.
How to Use Instagram Feed Widget
The Instagram Feed widget fetches posts from your Instagram account and shows them in a grid view on your website. You need to go through some easy steps to get the Instagram access token.
Check our official documentation and customize your Instagram Feed Widget in your way.
The Ending Notes
Finally, our post has come to an end. Here we have described the easiest way to easily grasp the usages of social media feeds and how to implement it directly to your Elementor website.
So if you solely intend to increase both web traffic and followers on your social channel, then it’s high time that you should use Happy Addons social feed features.
However, if you’ve any further queries regarding this social media feed, please feel free to reach us anytime. We’ll be glad to answer all your questions.





11 Responses
Nicely done Nahid. Really appreciate this social media feed of Happy Addons. Worth reading this post?
Hey Adward, thanks a lot for your compliment. Read our other blog to know more about Happy Addons and its features.
Wow, it’s just a package. Everything is just one place. Surely I will try them for my website. Thanks for showing such a wonderful way.
Thanks, Anwarul for your precious time to read our blog and give such meaningful feedback.?
Outstanding!!!
The actual path have been showed here, it’s a combination of everything. The way you have covered everything is just WOW ?
Thank you Foysal for your wonderful comment. ?
Wow that’s great…
Thanks, Poroma for your comment.?
Wow!!!!that’s wonderfu… Appreciate it??
Hello Tasfia
Thanks for your appreciation & your time to read our blog.?