If you are planning to start an e-learning platform where you can interact with your learners smoothly, then follow this step-by-step guide. Today, we will show you how to create an online course website using Elementor from scratch.
Online training and courses continue to grow in popularity. The global e-learning market is expected to exceed $300 Billion by 2025.
If you have any particular expertise and intend to share this knowledge with others, you can also join this growing industry of eLearning.
You may wonder, thinking about where do you start from. Well, you need a platform to conduct your online courses. But in this manner, a lot of questions can arise in your mind:
- How to create a good lesson plan
- How to set up my lesson content
- Is it really profitable to run an online course website
- How to launch my own online course website
Well, we have created this guide to answer all these questions elaborately. We will walk you through every tiny detail of creating your own online course website using Elementor & HappyAddons. I promise it won’t take more than 30 minutes to build.
Before going further, let me clear your doubts about-
Why Build Own Site Instead of an Online Course Platform

Well, it’s always better to have full control over your product or services. Suppose, you host your educational activities from your own online course website. Then you will have all the power regarding how you want to interact with your potential audience.
But if in case, you are using any course solution like Udemy or Teachable, then you don’t get full flexibility with the process of promoting your course or interacting with your students.
Also, you have to pay a handsome amount to promote your courses there. Not only that, your courses have to compete with thousands of other courses to afloat in the sea of competition.
On the other hand, by owning your own online course website you can operate everything in your way. Elementor provides you with a handful of design tools. That makes Elementor super easy for even non-coders to create any WordPress website they want.
Let’s go ahead and show you how to create an online course website using Elementor & HappyAddons.
Setting Up Your Online Course Website with ZERO Coding Ability
Here are the pre-requisites to create your online course website:
- A WordPress Site
- Elementor (Free & Pro)
- HappyAddons (Free & Pro)
- Your complete attention for the next 30 minutes
Let’s assume you already have a suitable domain and hosting plan for your website. Then, configure your WordPress site and install all the required plugins, including Elementor & HappyAddon.
Meanwhile, if it’s your first time with WordPress, go through this easy step-by-step guide or you can follow this guide to try WordPress in the localhost.
Step 1: Create Your Homepage
First, log in to your WordPress dashboard with your personal credentials. Follow these actions carefully:
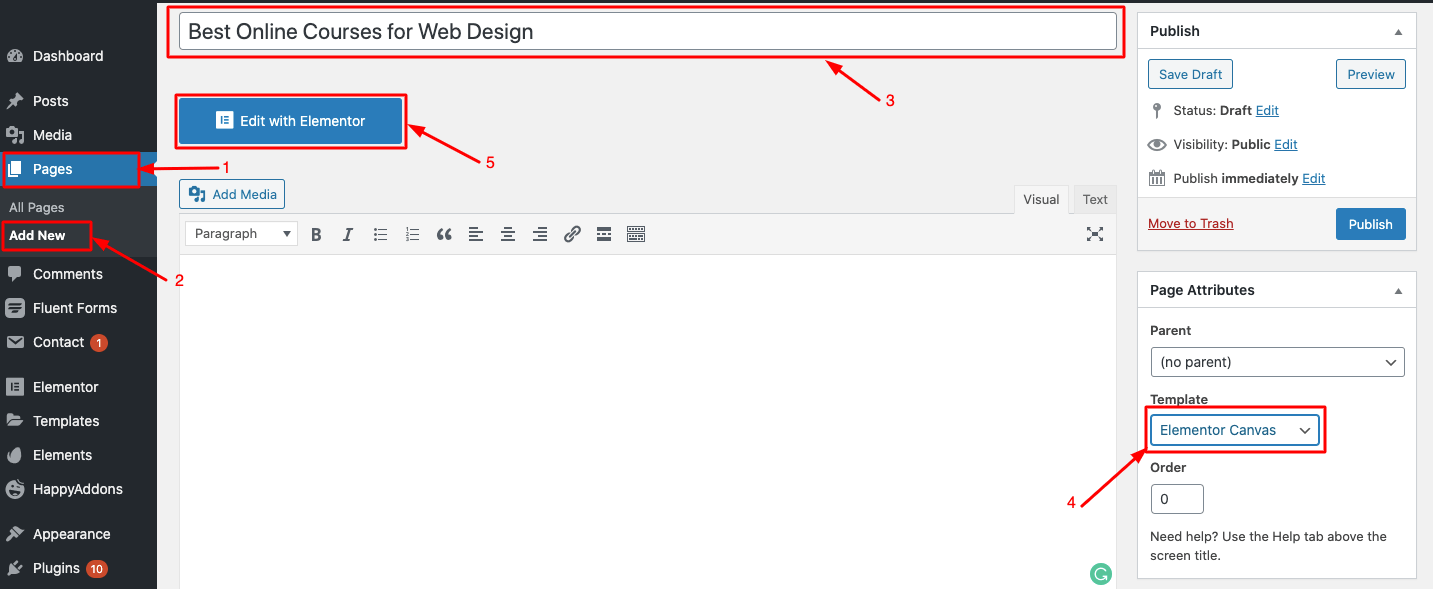
- Navigate to Dashboard → Page
- Click on “Add New”
- Add a title for your Home Page
- Set the template as “Elementor Canvas” from the drop-down menu of the bottom right corner
- Click on the button “Edit with Elementor”
Step 2: Select a Pre-made Layout Template
If you are new to Elementor, check out this Easy Beginner Guide to get introduced to its designing tools.
Now it’s up to you whether you select a basic template to design your online course website or do it from scratch. Well, today I will customize my site using a free template of Elementor.
To do so, click on the Add Template icon.
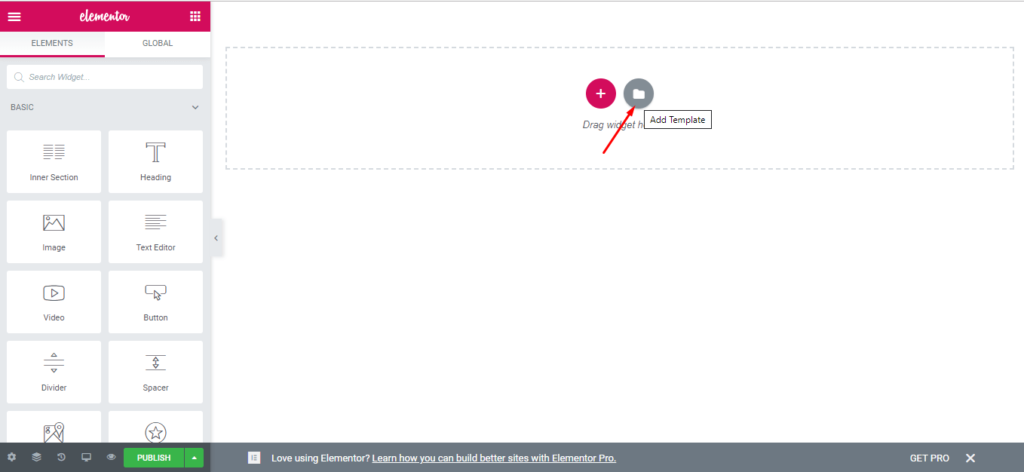
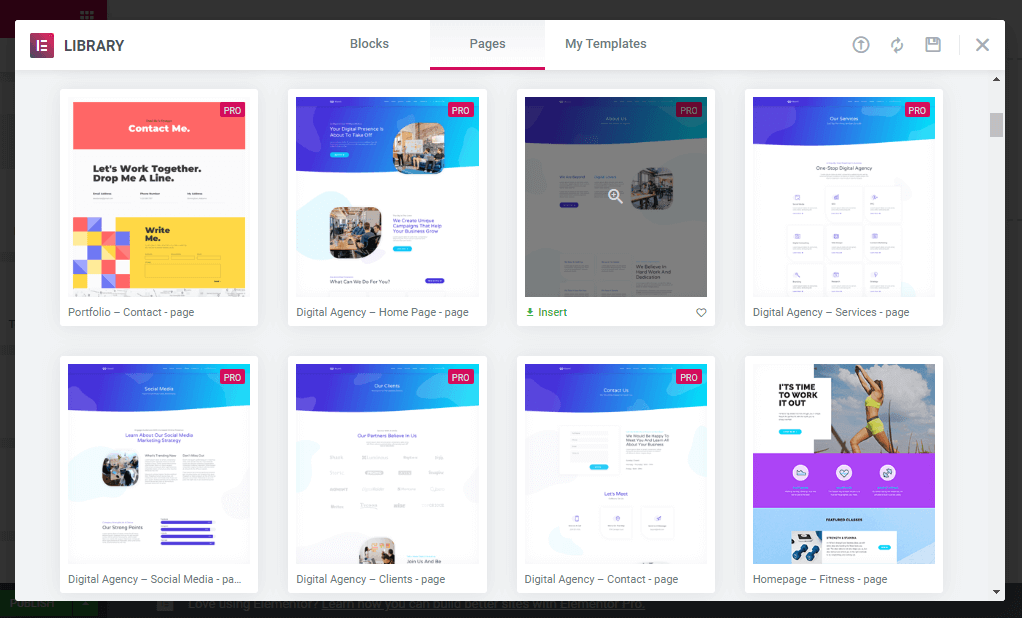
A pop-up window will appear in front of you, including a number of pre-designed blocks and pages.
Go to the Pages section. Here, you can search for a specific type of template from the search bar or scroll down to choose the right layout for your website.
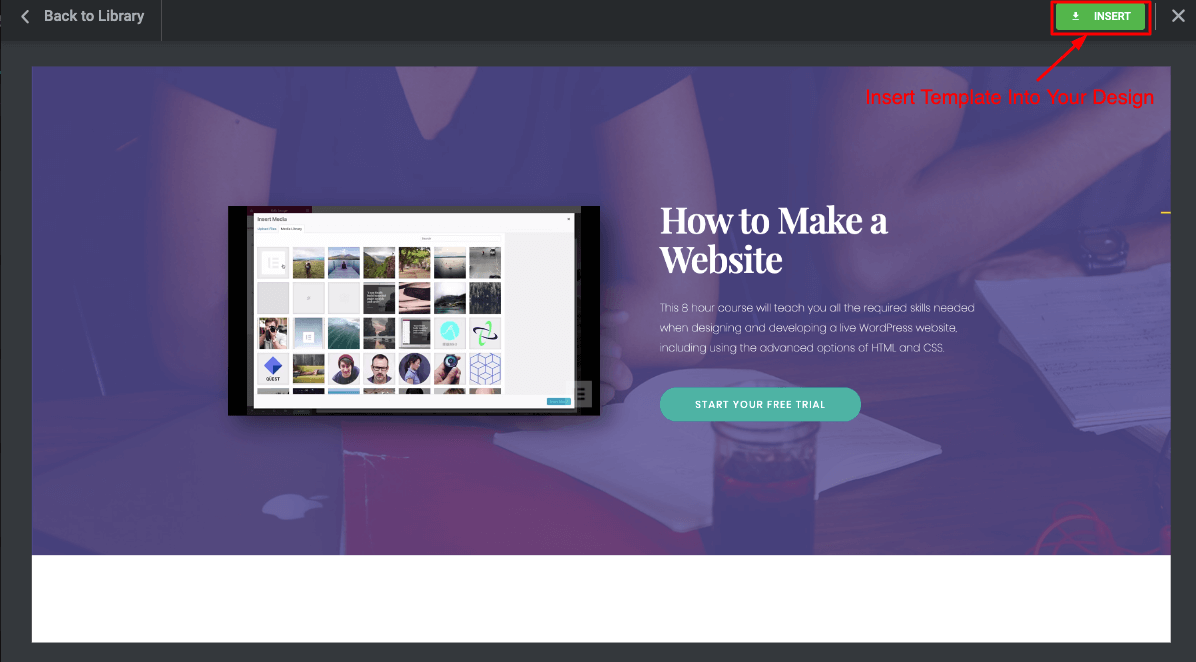
You can see the preview of any template just by clicking on it. If you find it appropriate for your niche then click on the insert button to add it to your design.
Step 3: Customize Your Homepage
Now, this is the time to arrange your website as per your imagination. There are thousands of customization options available to design your site in a unique way. Let’s show you some design tricks that you can also apply to your online teaching site.
First, I will design the header portion of my Home Page. This is the most important part of your website to increase the conversion rate.
Here, I customize the template layout with my own content. You can also edit the content directly from the design or left editing panel.
Also, you can change the media file type. Actually, with Elementor, you have the flexibility to edit every inch of your site as per your needs.

After selecting a segment of your design, you will get three tabs on your Elementor Panel, including Content, Style, and Advanced. It allows you to modify the blocks as per your preference including color, typography, text style, alignment, size, and so forth.
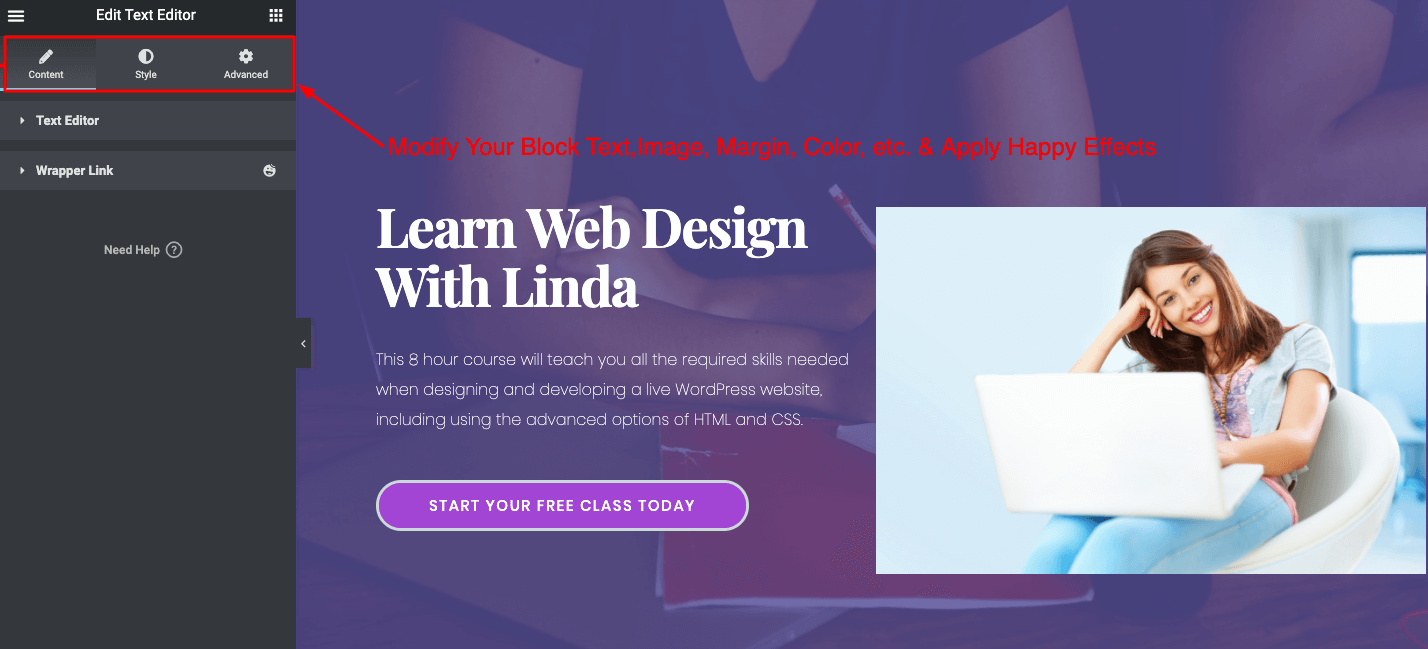
Now, select every individual section of your template and change the content according to your plan.
In order to insert an additional section, just click on the “+” button where you want to place it. And select the widget type from the left design panel of the Elementor editor.
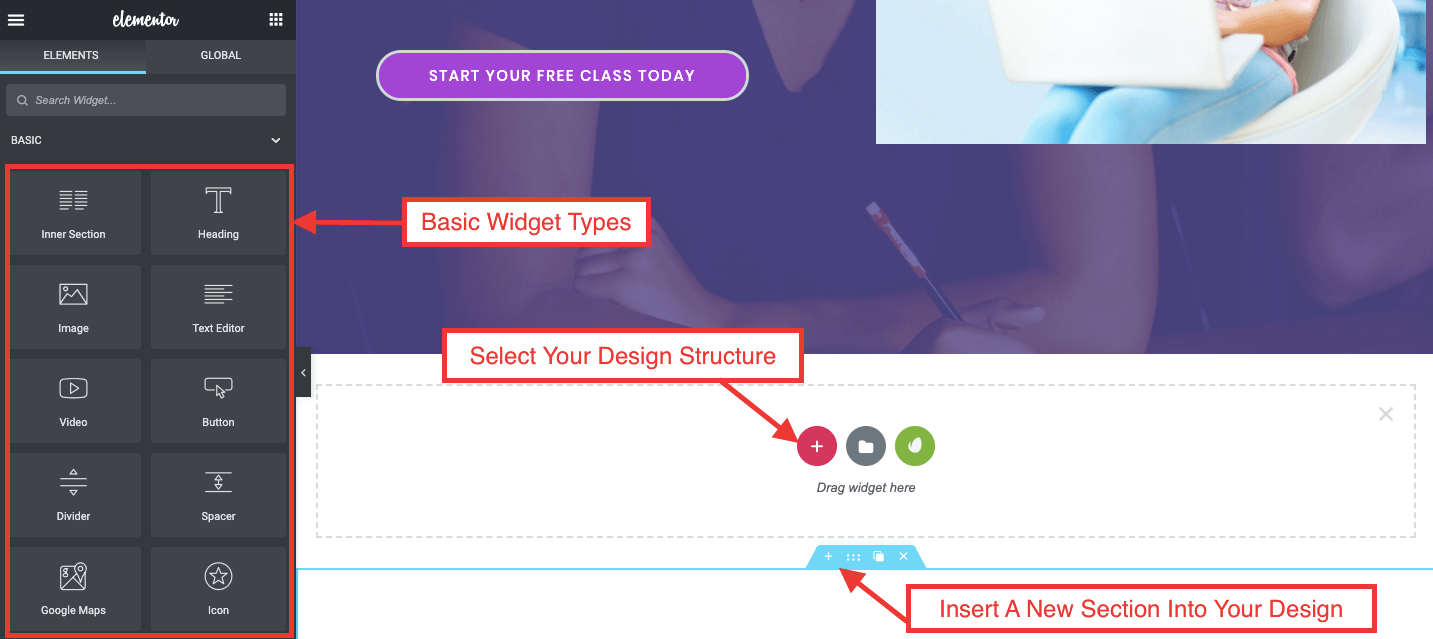
Alternatively, you can add pre-designed blocks as well from the library.
Here, I insert a readymade block to give a quick glance at the course output.
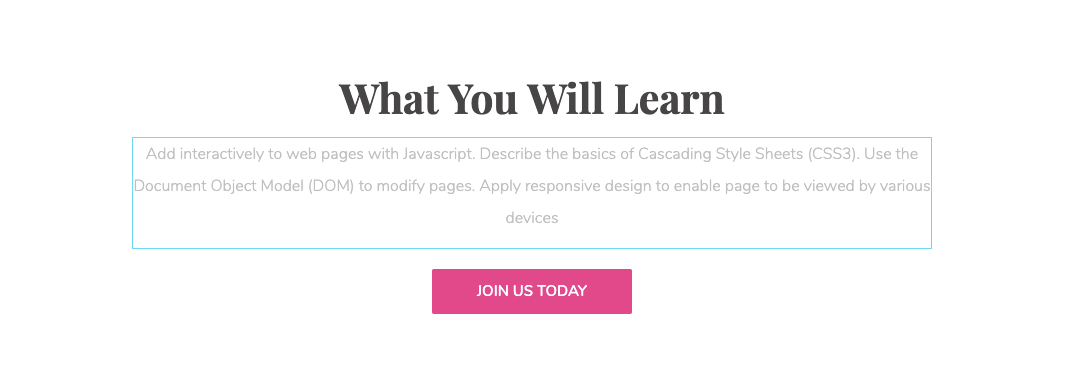
Here, I used the “Happy Card Widget” to represent the popular courses and customize the content accordingly.
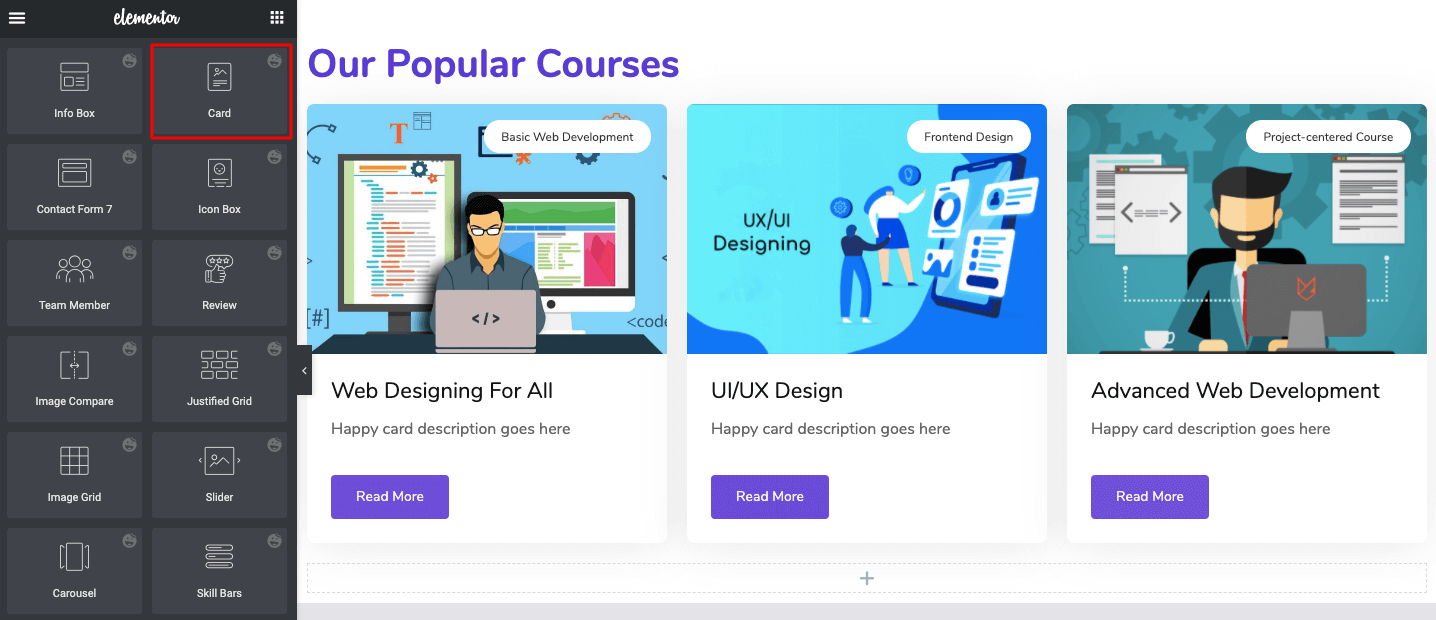
After that, we will insert a toggle bar to add the links to our lesson pages. So readers can easily navigate to all the lessons from the homepage. Also, get a quick glimpse of the entire course.
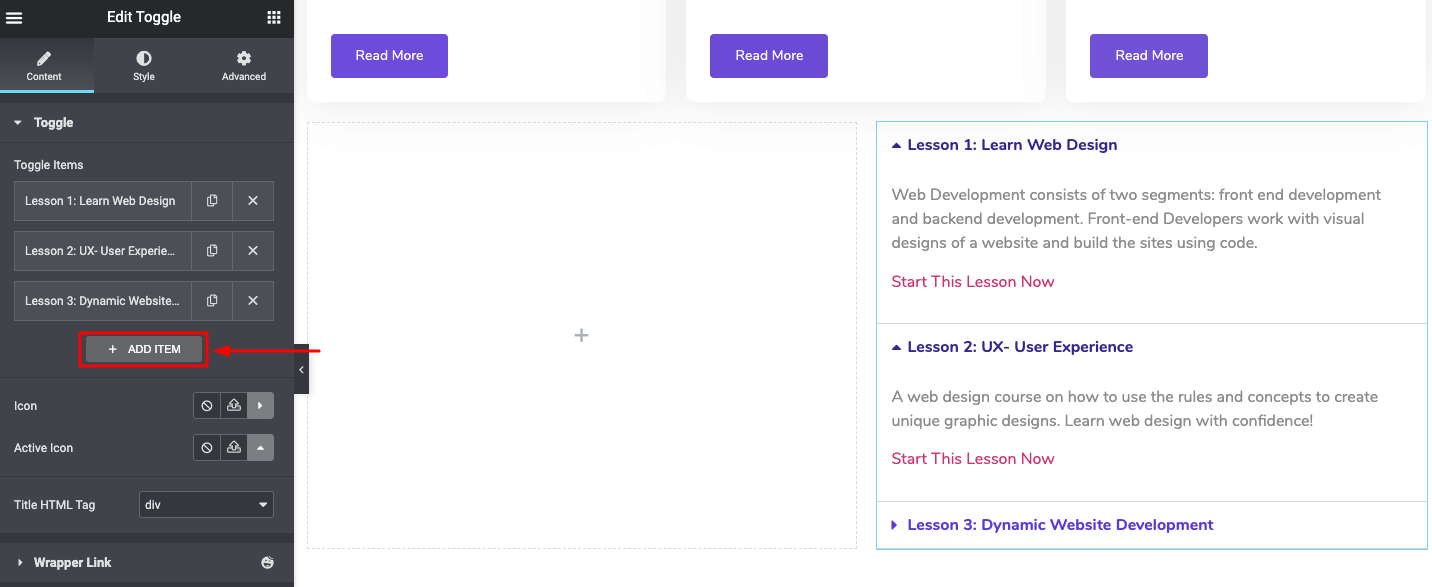
In this way, you can design the rest of the section of your homepage.
When you are done, click on Save Draft.
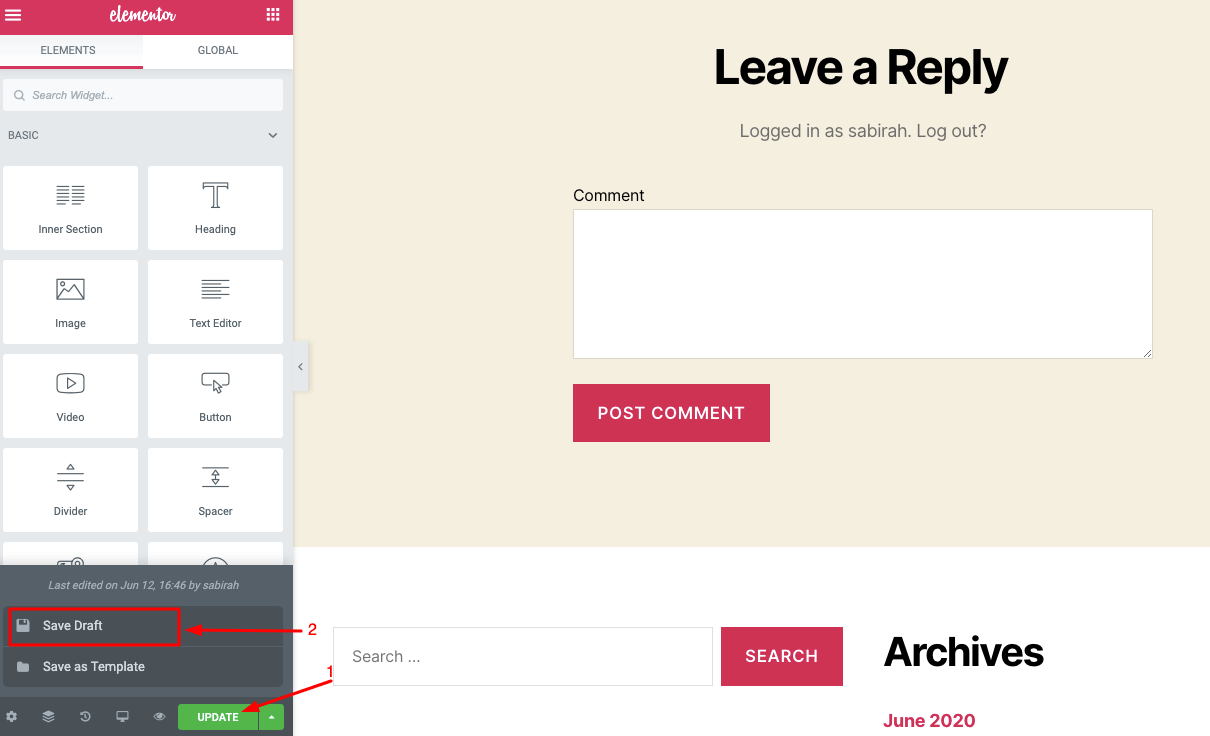
Step 4: Setting Up & Adding Contents
Now, you will show you first how to create each lesson as a separate post. Then, we will archive them all together as a course.
In this step, we will use WordPress’ Category option to create dynamic links to our lessons or posts.
Here, you will get a big advantage of using WordPress. It’s a well-organized content management system, so you can manage your posts and archives easily.
From your WordPress Dashboard, click on the Posts tab and select Categories.
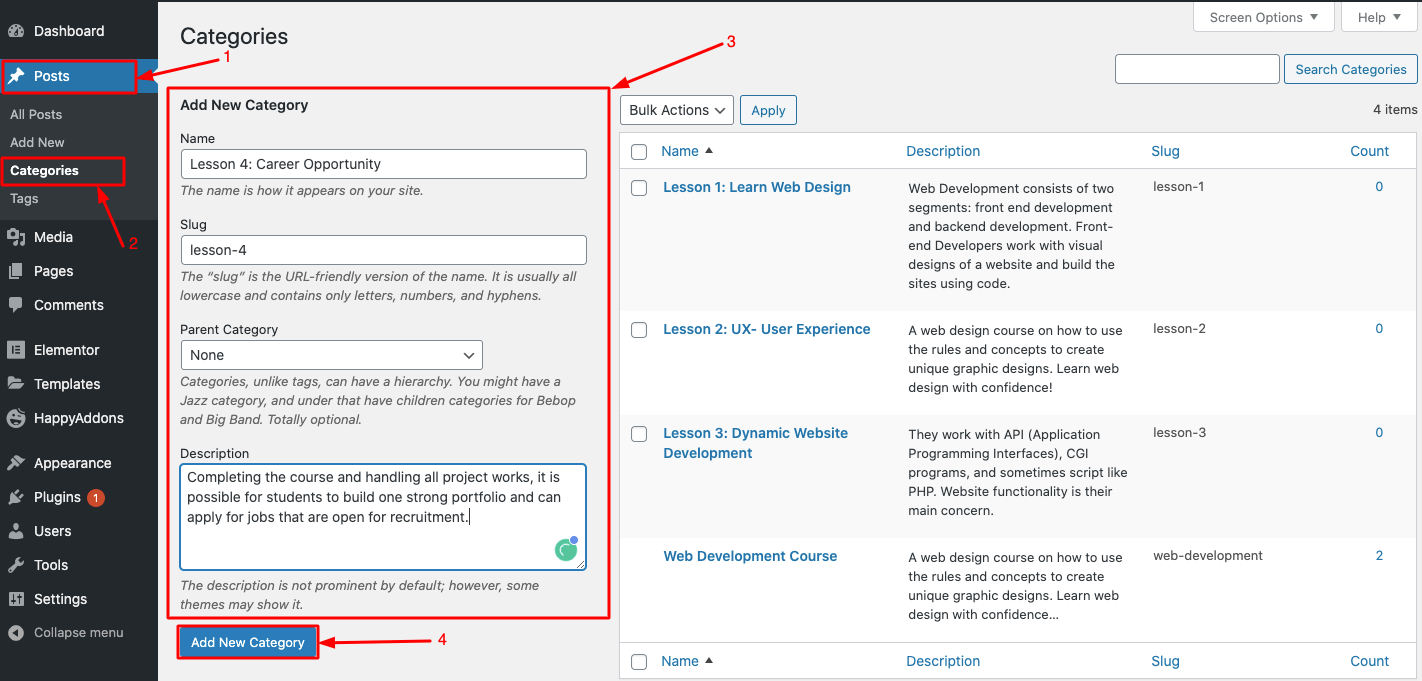
Here we will add each lesson as a category by copy/pasting the title of each lesson.
In this tutorial, we have added 4 lessons to demonstrate the complete process for our readers.
After creating the categories, it’s time to prepare the lessons. We will add the lessons as similar as we would do for any other content.
Navigate to Dashboard → Posts → Add new. Now, arrange the content of your first lesson as per the outline you have prepared before.
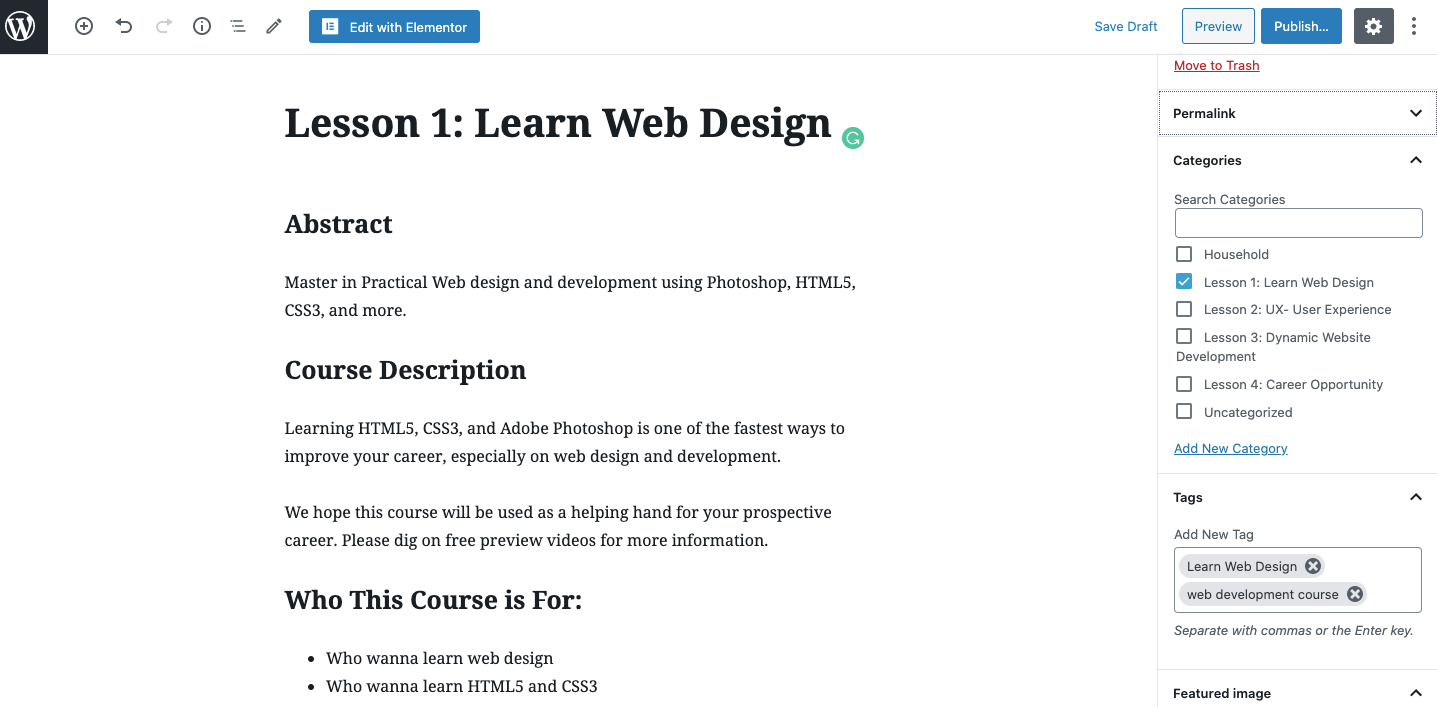
Here, you can insert your keywords into the description, tags, slug, excerpt, etc. Click the Save Draft button once you are done.
In addition, you can insert some custom dynamic fields into your post. For this post, we will add a custom field to show the estimated time limit a student may require to complete the lesson.
First, click on the menu icon (three vertical dots) in the top right-hand corner of the post. Scroll down the menu and then select Options from there.
Finally, check on the Custom Fields under Advanced Panels.

Scrolling down to the post, you will find the Custom Fields appearing just below the post’s content box. Now click on Enter New to create a new field with a new name.
The label we will assign here is completely for us so that we can easily find it later while editing the post on Elementor. Also, insert the value and click on the Add Custom Field button.
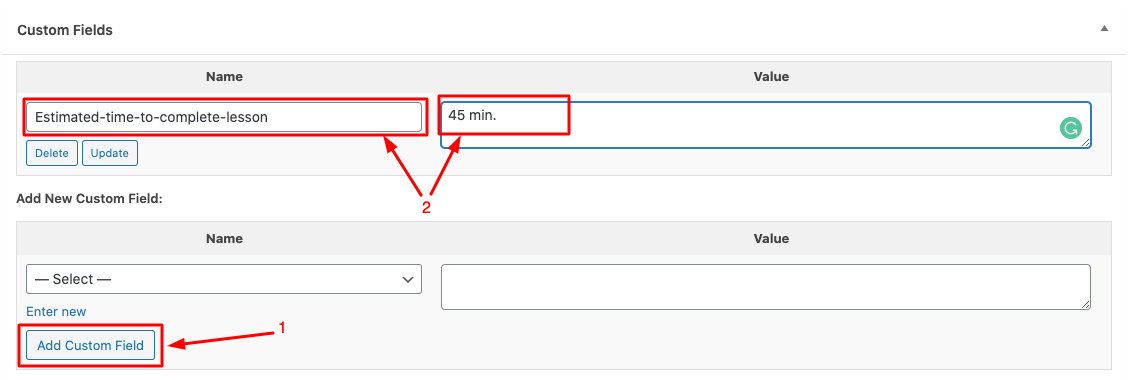
Well, you can create the other lessons in the same way we have describe above. In the next step, we will design a cool template to represent these lessons in an appealing way.
Step 5: Create and Customise a Lesson/Post Template
From your WordPress Dashboard, go to Template → Theme Builder→Add New.
Now, we are going to set up a template for our lesson post in the same way we do for the other posts.
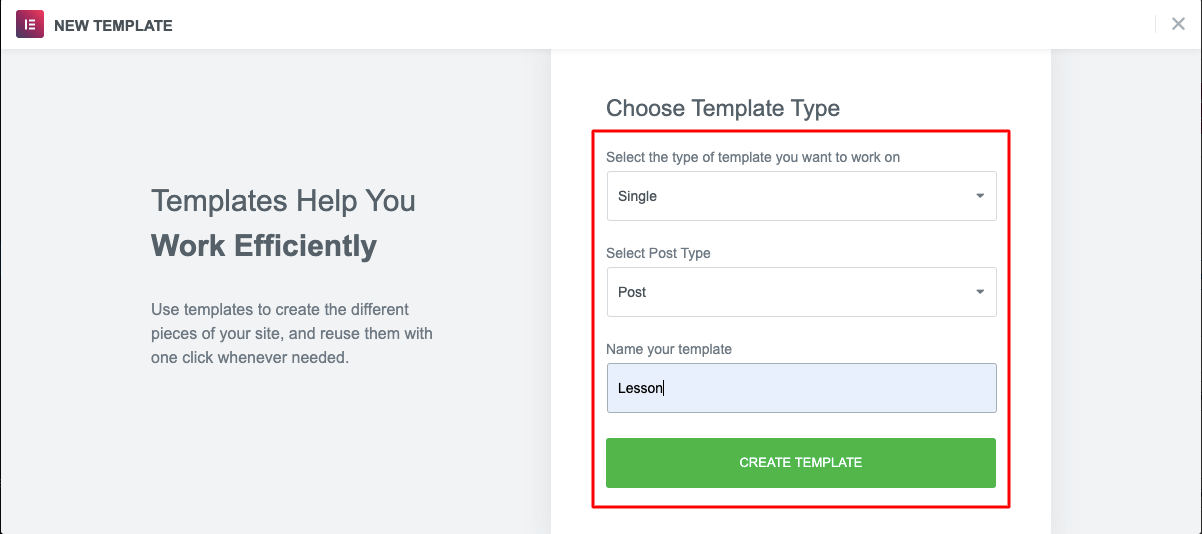
Select the type of template Single from the first drop-down menu, then set Post for the Post Type. We will name the template Lesson, and lastly, click on the Create Template button.
From here, we can go straight to the Elementor editor to design our Post template from scratch or select a template from the library.
Here, we will design our template manually, as we have done above. So, we can get all the flexibility to paint our imagination as we want.
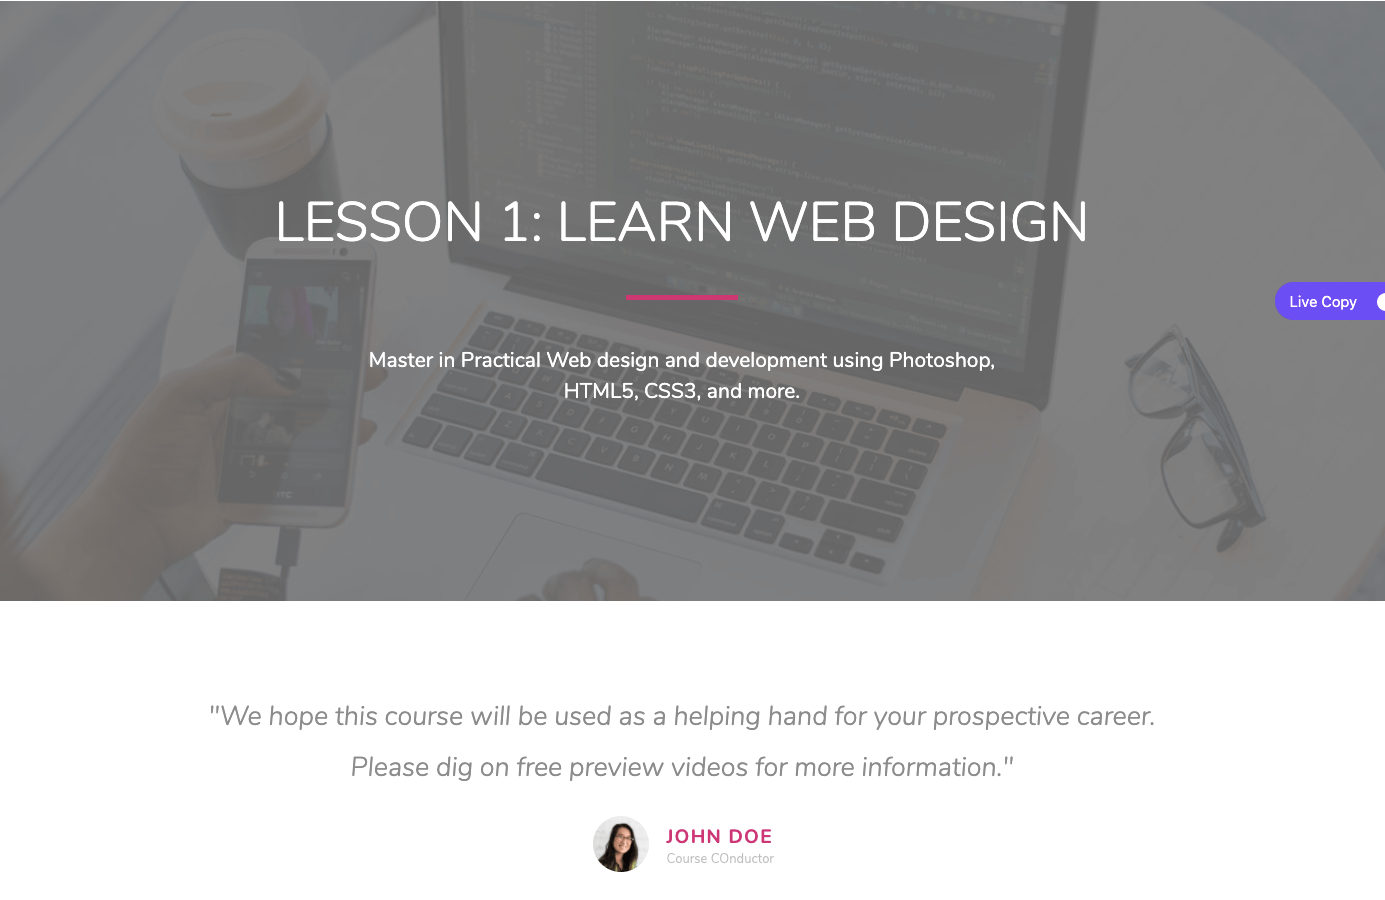
Here, we have used Happy widgets, like Review and Skill bar to attractively showcase the design.
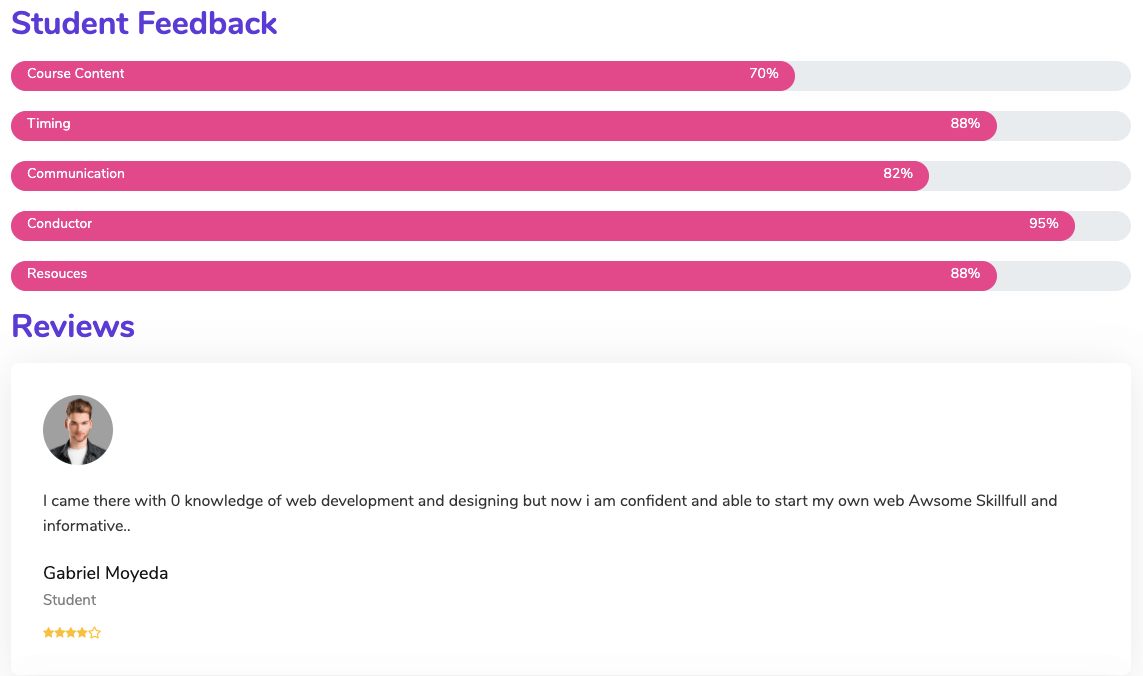
You can also use other widgets from Elementor or HappyAddons to design your page, as we have shown. Moreover, you can apply the Floating Effect to add animation or motion effects to any of your widgets (both Elementor & HappyAddons).
Next, we will add the Estimated Time field that we created earlier. To do so, insert a new section on your Elementor editor. Now, search for the Post Info widget from the editor panel. Drag and place it on the page, whoever you want.
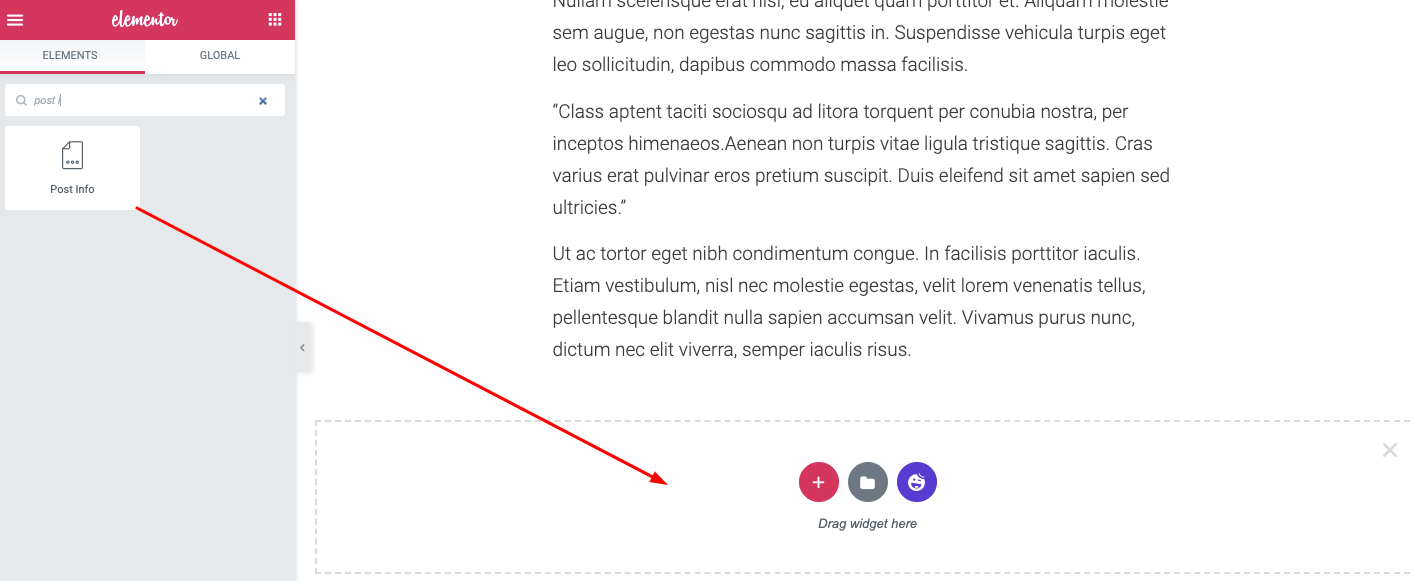
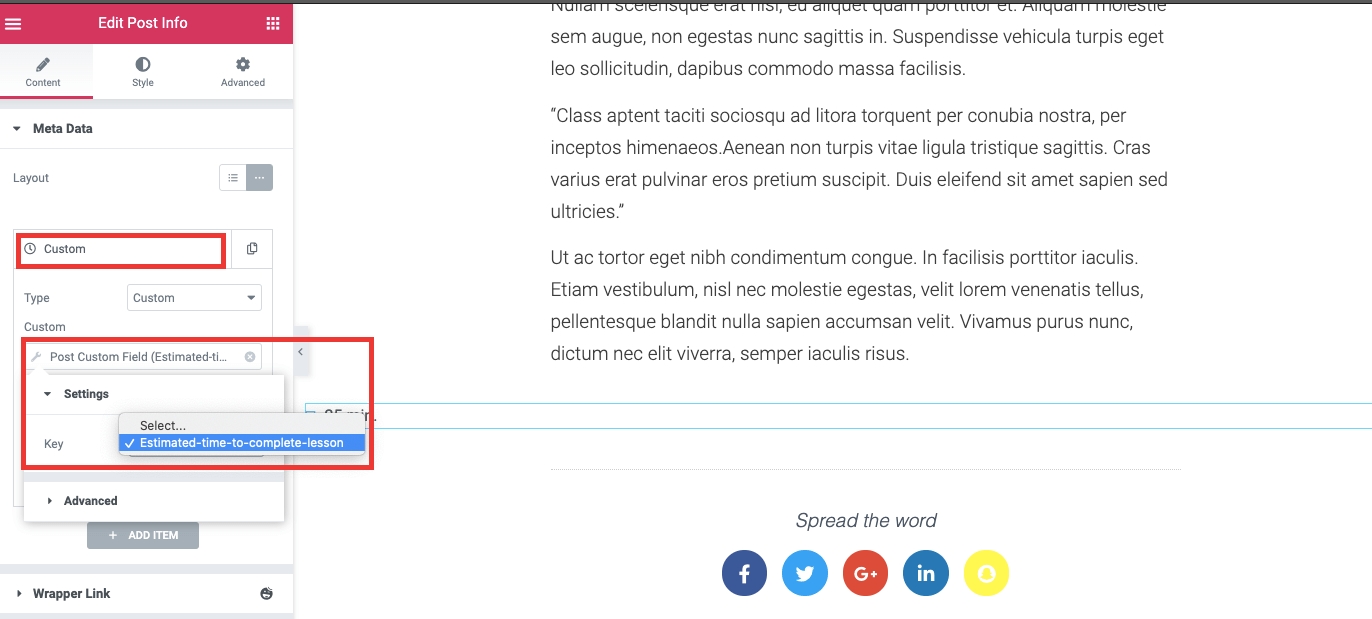
Select the widget and get back to the editor panel. Go to the Content Tab and delete all of the superfluous fields, leaving one. Now click on that field to access the options.
From these options, we will change the Field Type to Custom. Then click on the Dynamic Tags icon to access the menu. Here, we will select the Post Custom Field.
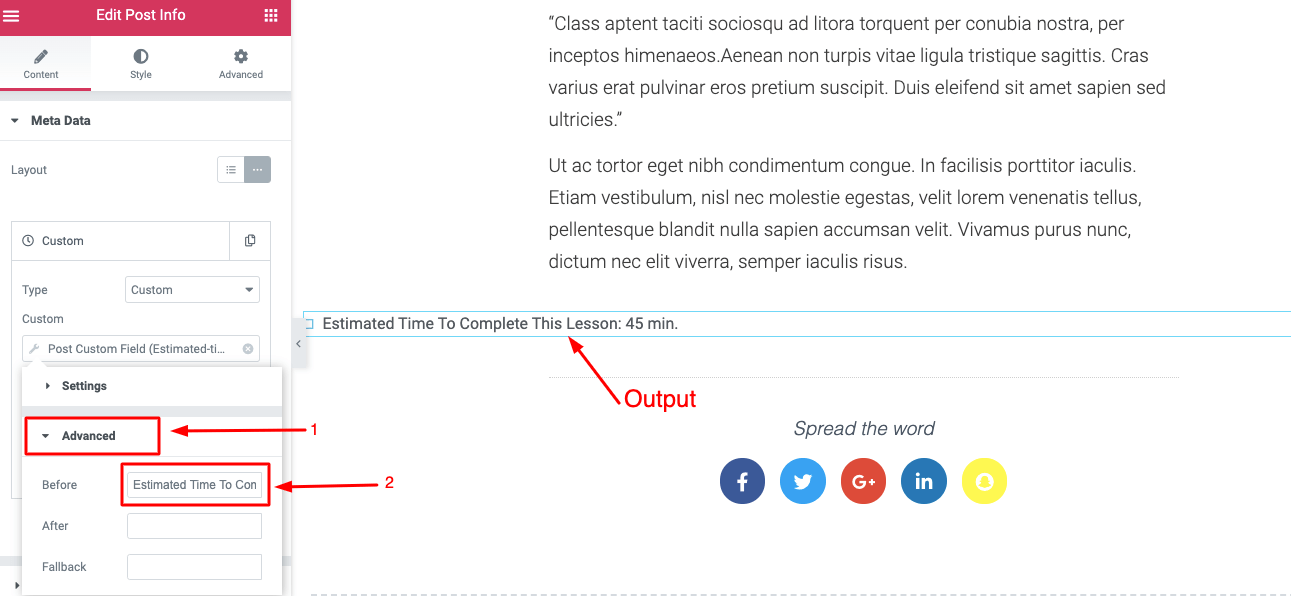
From the Advanced tab, you can add a label you intend to show before your custom field value. Here, we insert the text “Estimated time to complete this lesson” to appear before the value field.
Furthermore, you can edit the typography and color of the field from Style Tab in any way that you wish.
Once we are satisfied with our template design then, we will publish it, but click on the Publish button. As soon as we do that, a condition page will appear. From there, you can set the conditions to display your template under a specific category.
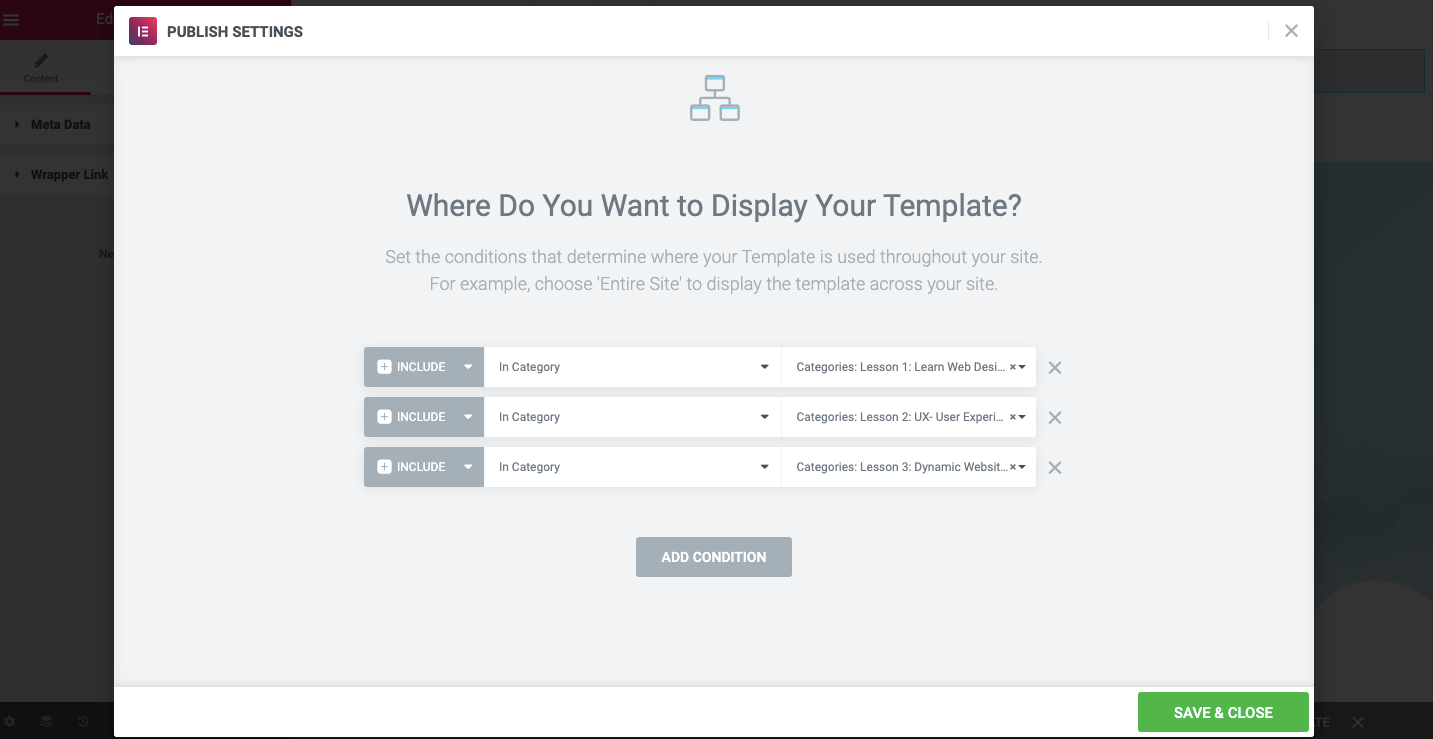
Finally, click the Save button when you are done.
Well, designing a website is an art. Here, we tried to cover all the basics you need to start your journey. Now, make your imagination wider and design your site accordingly.
You may also like: How To Create A Stunning Sticky Header Using Elementor.
Final Preview of Your Online Course Website
Here is the final view of the homepage & lesson page that you have just created.

And here’s the live video version of your online course website
Above, we tried to describe all the things you need to know to get your online course website ready in the shortest time period and the least amount of money.
But before starting with your site, you should spend some time researching your market, learners’ preferences, course resources, and others.
Have a quick look!
Considerations to Build an Online Course & Learning Website

The success of your online course website depends largely on its right approach. So, you should be strategic and focused to avoid common pitfalls and mistakes while building your online course.
However, there are a ton of practices to make your students’ learning experience effortless on your eLearning website. Here we have focused on the 6 major pre-launch activities you should consider while planning for the development of your online course website.
Pick the Right Topic
Choose a topic you have a lot of experience in or you want to learn yourself. You may ask following questions to yourself:
- On which topic do people ask for your help usually, and you are considered an expert?
- Can you solve some specific type of problems seamlessly that others are struggling for?
- Are you an expert on some software or methods that others want to use?
Answers to these questions will help you to decide the course topic for your website. More preciously, your topic can be about anything you feel passionate about. It would be cooking, yoga, poetry, dancing, any software development, or anything you love to talk about.
Maybe you are an expert in your subject. But there is always something new to explore. So, do an online search and study your subject as much as you can. Never stop learning new things, as in this evolving world, nothing is constant. Learn your field as no one does!

Find-out Audience Demand
Defining the topics people are talking about online, learning, and teaching related to your area is crucial. It helps you to create your course outline in an effective way. Go and actively participate where your potential learners hanging out. Try to follow their discussion and figure out their needs.
So that you can make your course plan accordingly and include those topics in your site. It will make your resources more valuable, and you can easily draw the attraction of your learners.
You will also get ideas on how to divide the main topic into some sub-topics that can make your audience’s learning process smooth yet fruitful. However, it’s worthless to make something no one would benefit from.
Do a Proper Keyword Analysis

A great way to find out useful keywords for your site is to understand your audience’s interest. A lot of people ignore keyword research while planning for their site and face a huge disaster in the long run. So, find out the words or phrases people use to search for the products or services you intend to provide on your learning site.
For instance, see the following two phrases. Which of these two-course titles do you think ranks better on Google-
- How to learn PHP web development
- PHP web development
They might look alike as they have very little difference between them. But this tiny difference can largely affect their search engine ranking. Therefore, get the best working keywords for your industry and use them for your title, meta, tags, and other important descriptions as well.
Analyze the Competition
To give something better than others, you need to know about those who are already ruling the industry. You can follow in their footsteps while planning your own course outline. It assists you in avoiding similar mistakes and brings something extraordinary no one has thought of before.
Keep in mind, however, that healthy competition can lead you toward innovation, and you can serve your audience with something really valuable.

Choose the Way to Share Your Knowledge
You have immense knowledge of your topic, know your learner’s intent, have a great understanding of your competitors- now you have to identify the way you will represent the resources to your audience.
A Series Of Posts: To make your students’ learning process easier you can divide your course into some small parts. And publish the lessons part by part. So your students can easily go through these lessons and assemble their findings appropriately.
Video Lessons: Instead of plain text, you can use video tutorial for your learners. It’s undoubtedly more attractive to draw their attention and magnetize them sitting in-front of the PCs.
Mixed Content: Well, the best idea is to add every flavor to your dish. You can add videos with text transcriptions. Also, include high-definition graphics to spice things up. It will make your presentation more striking for your audience.
In short, make content that builds your audience.
In addition, distribute your course content in an organized way, starting with the basics. Keep the context logical and easier to remember. It’s, however, better to show examples, analytics, or explain things elaborately if needed. It keeps your students on the right track in the right direction to accomplish their goals.
Get the Promotional Channels Ready

After configuring everything you would require a proper medium to promote your online course website. Remember, no matter how much you care about your content or how deliberately you want to help people. Unless you get handsome traffic on your site, all your efforts will go down the drain.
No worries! Utilizing proper ways of marketing, you can generate thousands of followers for each course. It would be-
Importantly, 91% of content gets no traffic from Google. If you want your website to rank high on the search engine, join the other 9% of web pages providing great content and reach out to your potential customers in the proper way.
Let’s Start Planning So You Can Launch Your Own Online Course Website Swiftly
The Internet brings us closer together. People from all over the globe are sharing the same platform today through websites. It surely increases the opportunity for businesses and individuals.
Needless to say, the massive expansion of technology has changed the educational landscape mostly. Now, people also intend to learn online rather than attend a physical class.
Therefore, online courses can be a great way to start making money just by sharing your knowledge. If you have any specific passion, skill, or hobby, you’ll find similar people who are ready to pay to learn.
It’s important to decide things carefully about learning materials, course plans, content quality, representation techniques, marketing channels, and others. After conducting your research and planning follow these steps and get your site ready to live:
- Get your WordPress site ready
- Install and activate Elementor & HappyAddons
- Create your first online course page
- Add lessons to your course
- Launch your website & start promoting
Do you still have questions about creating an online course website? Ask away in the comments!




5 Responses
Love the way you have described every details. Now i have the confidence to build my own website. Thank you for this insightful article.
Hello Clark,
Thanks for the appreciation. You can check our other blogs as well related to this topic.
Cheers 🙂