






Building a real estate website is one of the most high-stakes web projects you can take on. People who want to buy, sell, or rent properties expect a professional website. They want features like property search, maps, mortgage calculators, agent profiles, and a smooth experience.
The good news is that you no longer need to hire an expensive developer or learn coding to design such a website. With WordPress, Elementor, and HappyAddons, you can create a professional real estate website on your own from scratch, even if you are a beginner.
In this guide, you will learn every step of the process. We will show you how to register a domain, create property listing pages, build agent profile pages, and design a homepage that helps turn visitors into potential customers. Let’s get into it.
Why Should You Have a Website for Your Real Estate Company?
A professional website is no longer optional for real estate businesses. Most property buyers and sellers start their search online before contacting an agent. A well-designed website helps you attract more leads, build trust, and grow your business faster. Check how:
a. Showcase Your Property Listings 24/7
Unlike a physical office, your website is available all day, every day. Potential buyers can browse properties whenever it is convenient for them. You can display property photos, videos, virtual tours, floor plans, pricing details, and location information in one place.
b. Build Trust and Professional Credibility
People are more likely to work with a real estate company that has a professional online presence. You can strengthen your credibility by displaying customer testimonials, successful property sales, certifications, awards, and information about your team.
c. Generate More Qualified Leads
Visitors who are actively searching for properties are already interested in buying, selling, or renting real estate. By adding contact forms, inquiry forms, appointment booking options, and call-to-action buttons, you can collect leads and connect with potential clients more efficiently.
Here’s a guide on how to create a contract form to generate qualified leads.
d. Reach a Larger Audience Through Search Engines
A website gives you the opportunity to appear in search results when potential clients search for related terms. By publishing property listings, market updates, and helpful real estate content, you can attract organic traffic and introduce your services to a wider audience.
e. Gain a Competitive Advantage
Many real estate companies still depend heavily on third-party listing platforms and social media pages. When you have a website, you can control how your properties are presented, how leads are collected, and how your brand is perceived. This can help you stand out from the competitors.
What You Need to Create a Real Estate Website on WordPress

Before you dive into the tutorial, let’s have a quick snapshot of the things you need to create a real estate website properly on WordPress. Once you have all of them in one place, the whole process will seem much easier and less stressful. We can classify them into two categories.
- Domain
- Hosting
- WordPress
- Elementor Free
- HappyAddons Free
- HappyAddons Pro
- WP User Frontend
- WP User Frontend Pro
The above ones are the mandatory things without which you can’t create or design a real estate website. However, to run a website effectively, there are several other tools you will need over time. For example, Rank Math SEO, Wordfence, Booking Plugin, etc.
You won’t need them initially. So, let’s ensure you have the above-mentioned things and tools. Once ready, let’s follow the step-by-step guide as explained below.
How to Create a Real Estate Website on WordPress: Step-by-Step
Now, we are in the main part of this blog post. You’ll learn so many things step-by-step here with a step-by-step navigational guide. Keep reading!
Step 1: Register a Domain Name
Your domain name is your online address. For example, cityhomesrealty.com or findmypropertybd.com. Several things you must keep in mind while choosing a name. It should be:
- Short, memorable, and easy to spell
- Include a relevant keyword like ‘homes,’ ‘realty,’ ‘property,’ or ‘estates’ if possible
- Uses a .com extension wherever available
For hosting, look for providers that offer one-click WordPress installation, fast SSD storage, free SSL certificates, and at least 99.9% uptime guarantees. Popular choices include Namecheap, SiteGround, Hostinger, Bluehost, and Cloudways.
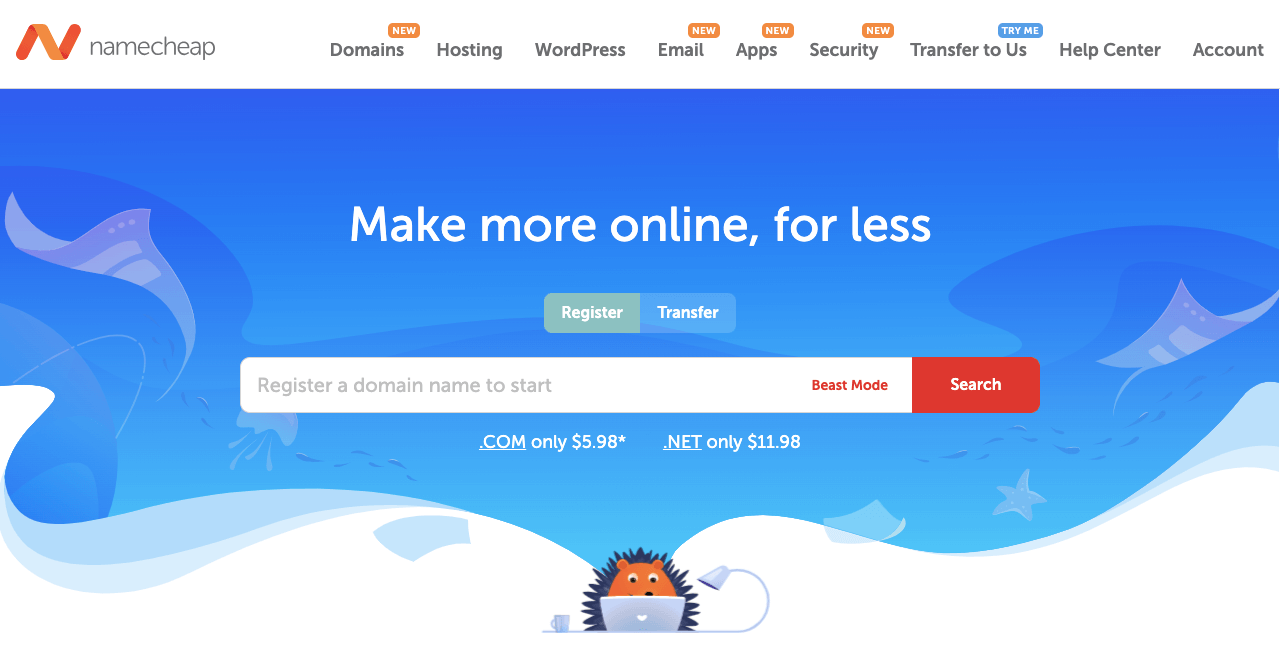
Here is a guide on how to get a perfect domain name for your website.
Step 2: Get a Hotinger Package
Once you have registered your domain, you need a hosting provider. This is actually where all your web content will be stored. Though you will find lots of prominent hosting providers online, we recommend you use FlyWP to host your real estate website.
Not only does it offer you hosting services, but it also provides a feature-rich cloud server control panel. Its advanced server caching and resource management ensure your site stays lightning-fast even while running heavy property search filters and media-heavy listing pages.
Take a look at some key reasons why you may consider FlyWP to host your real estate site instead of other well-known platforms.
- Unified Control Panel: It acts like a universal remote control. It lets you manage multiple websites across different server companies from one single, easy visual dashboard.
- Visual Resource Health Checks: It gives you an easy-to-read health dashboard displaying your CPU load, RAM usage, and disk space with a simple color-coded system.
- Proactive Traffic-Spike Alerts: It acts like an early warning system that catches sudden resource overloads early, giving you a chance to upgrade your server capacity before any problem.
- Plugin Bloat Detection: It operates as a performance inspector, helping you instantly see if a newly installed WordPress plugin is secretly eating up too much memory.
- Docker Container Isolation: It places your website in a digital quarantine box so that security issues on other sites cannot harm yours.
- FastCGI and Redis Caching: It uses a high-speed memory bank to store your web pages, making them load instantly for visitors without slowing down.
- OpenLiteSpeed and Nginx Engines: It runs on advanced, heavy-duty web engines built specifically to handle massive crowds of visitors without crashing.
- Staging Environment: It creates a hidden copycat site where you can safely test new changes without risking your live, public website.
In addition to these, there are numerous benefits of FlyWP that you’ll definitely love this platform, whether you are a non-technical or high-end user.
Step 3: Install WordPress on FlyWP and Connect the Domain
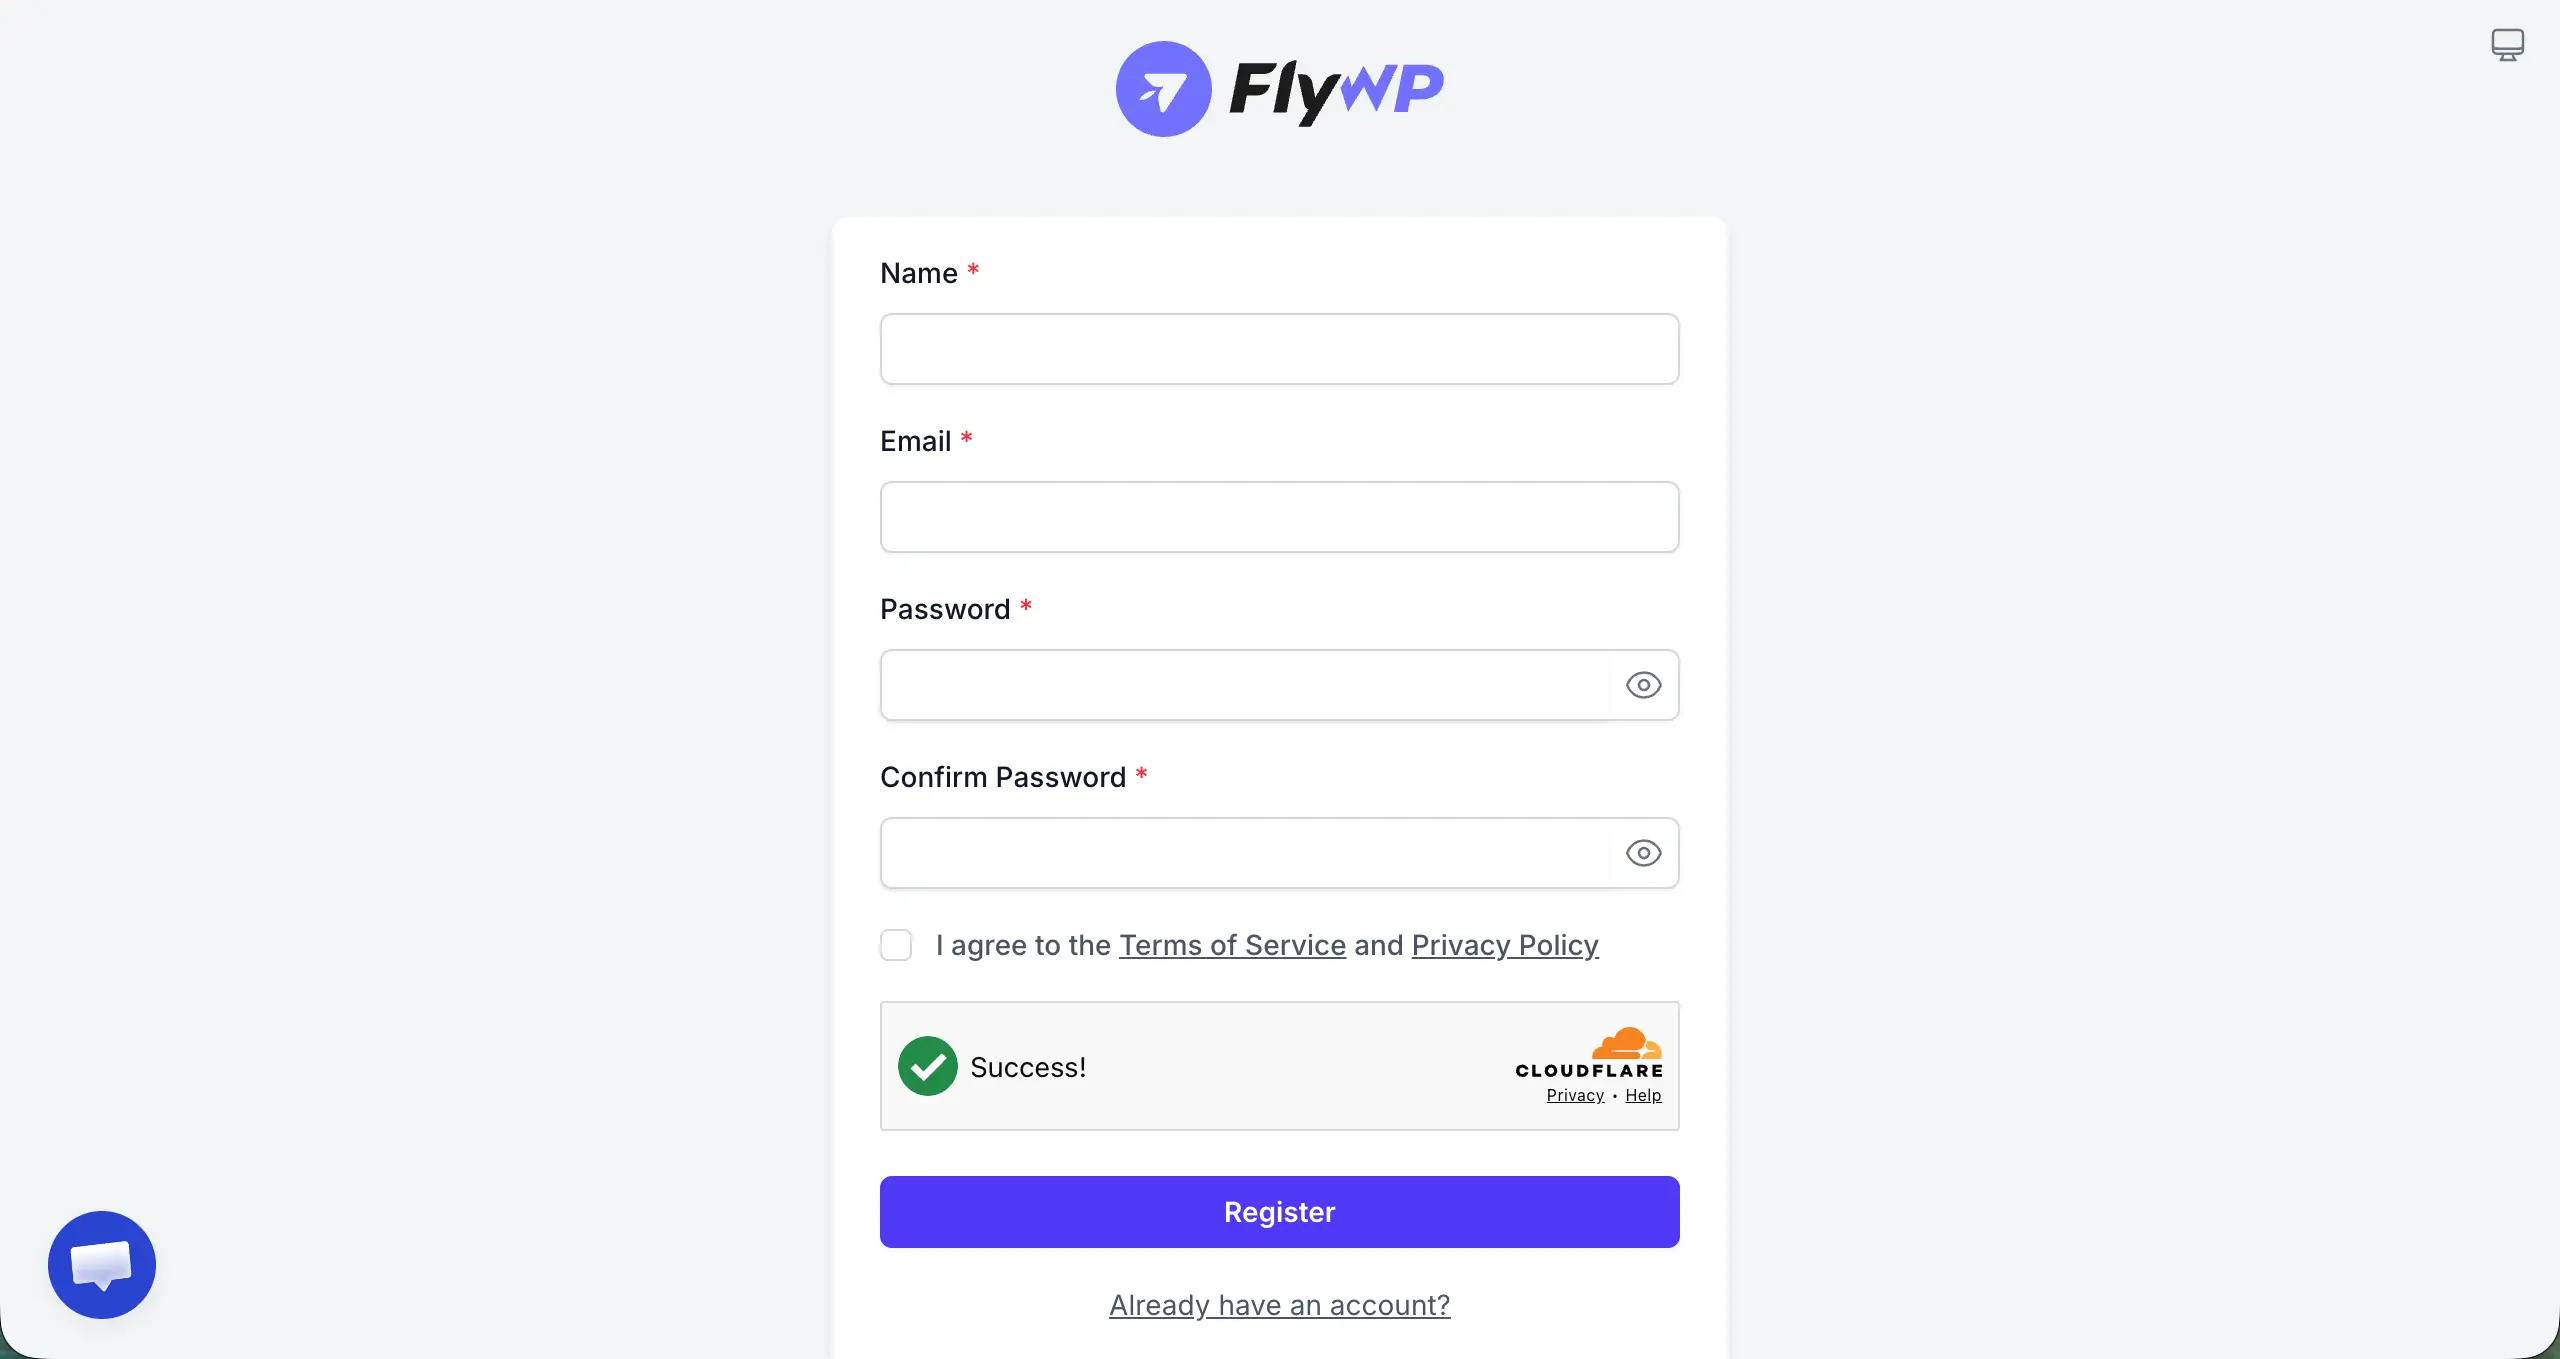
Installing WordPress on FlyWP is very easy. This will take you only a few steps. Register on FlyWP with your account information.
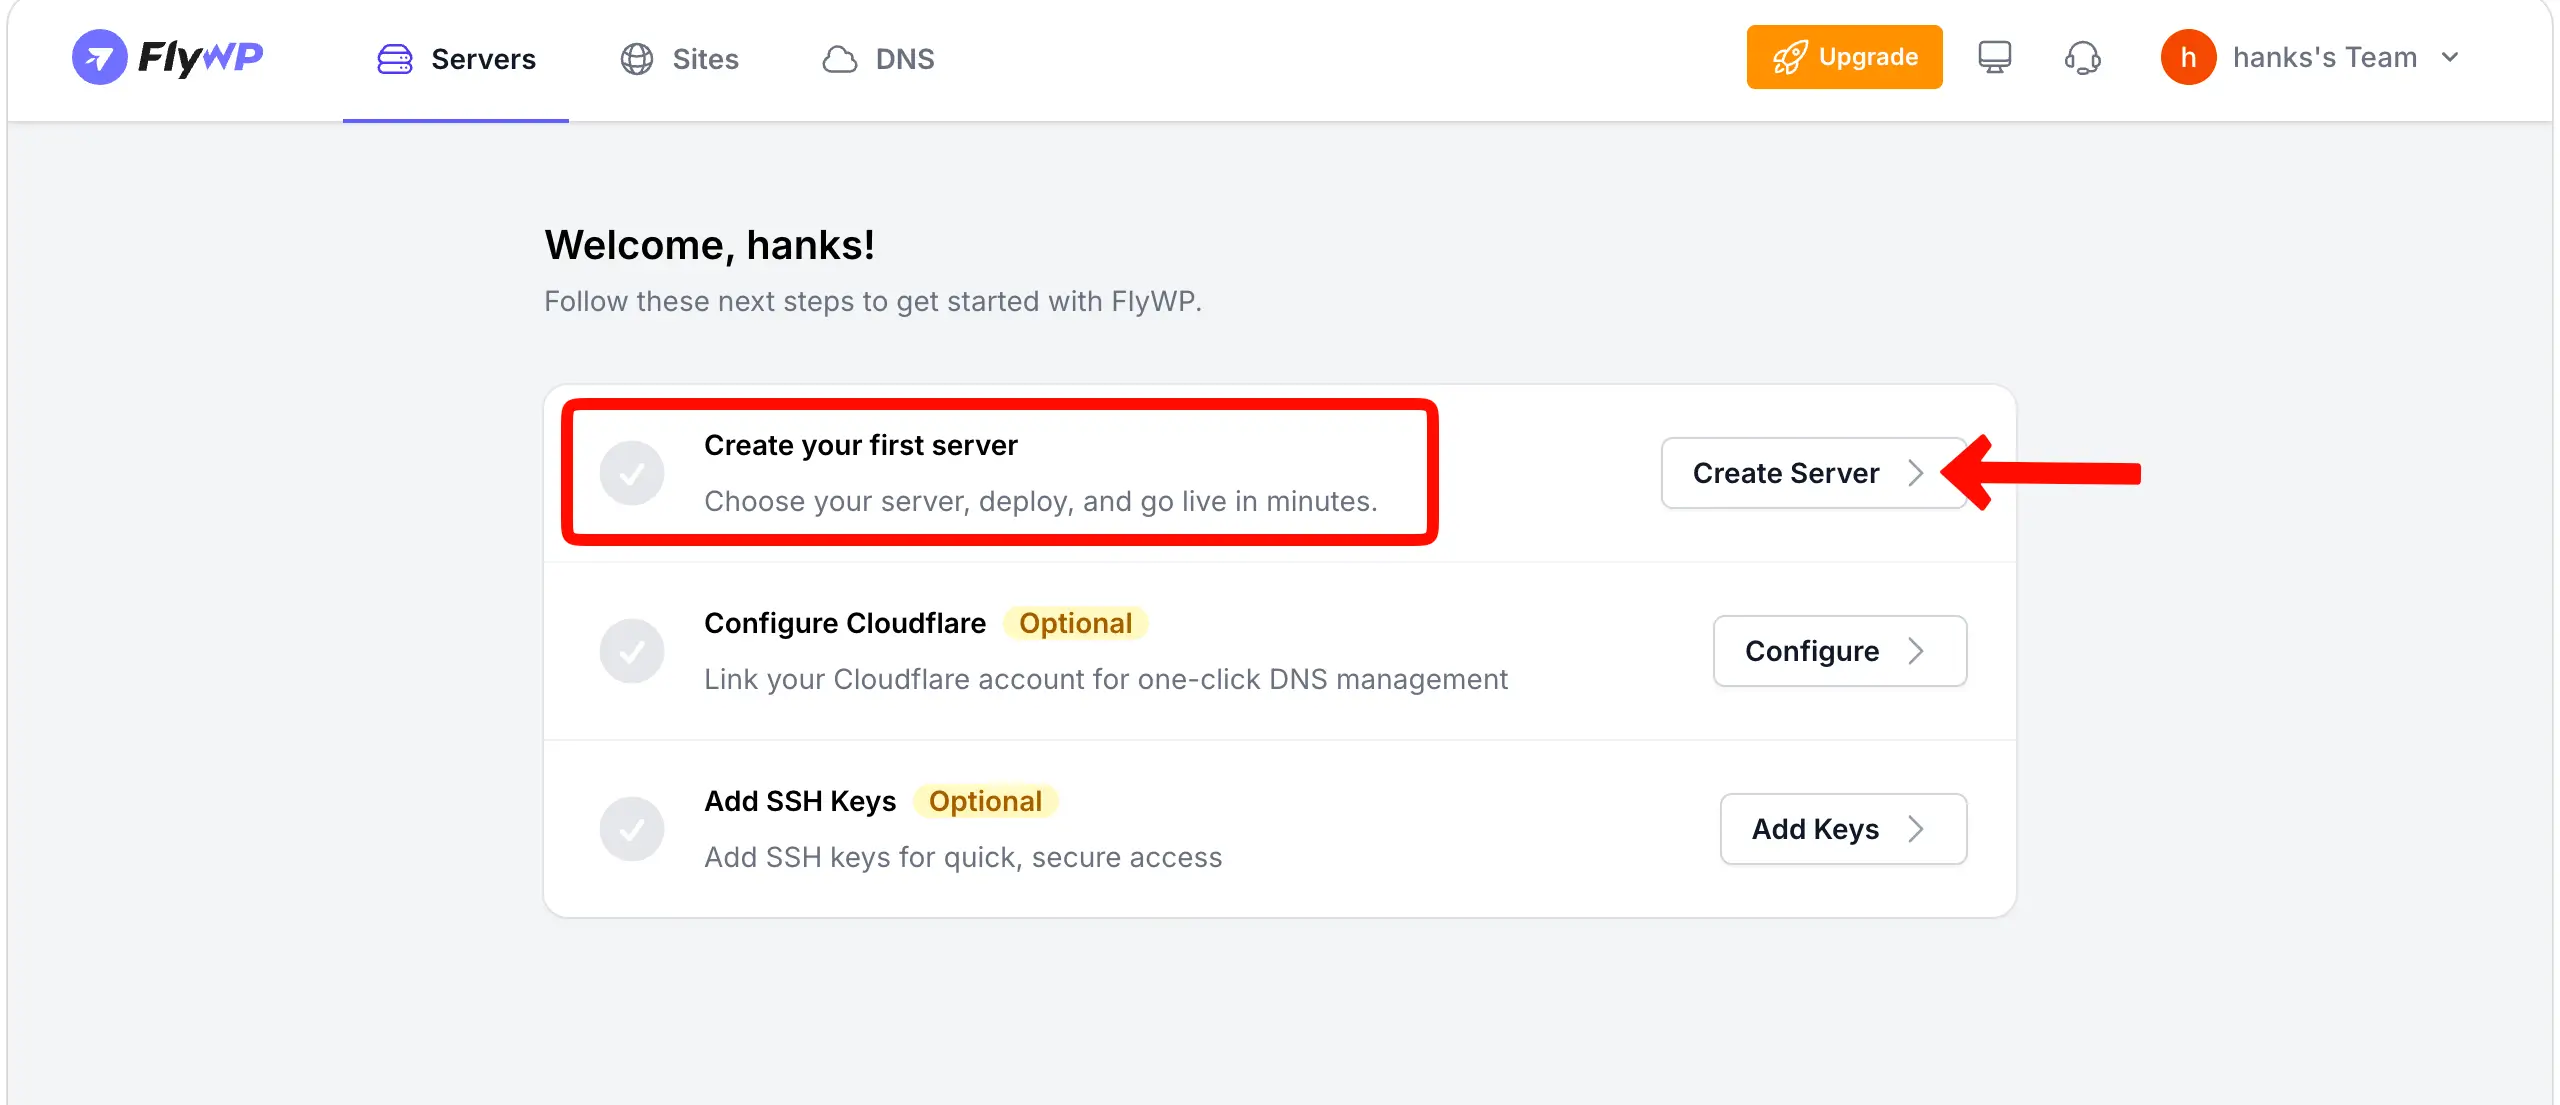
After successfully registering on FlyWP, log in with your credentials. Then, start creating your first server by clicking the Create Server button.
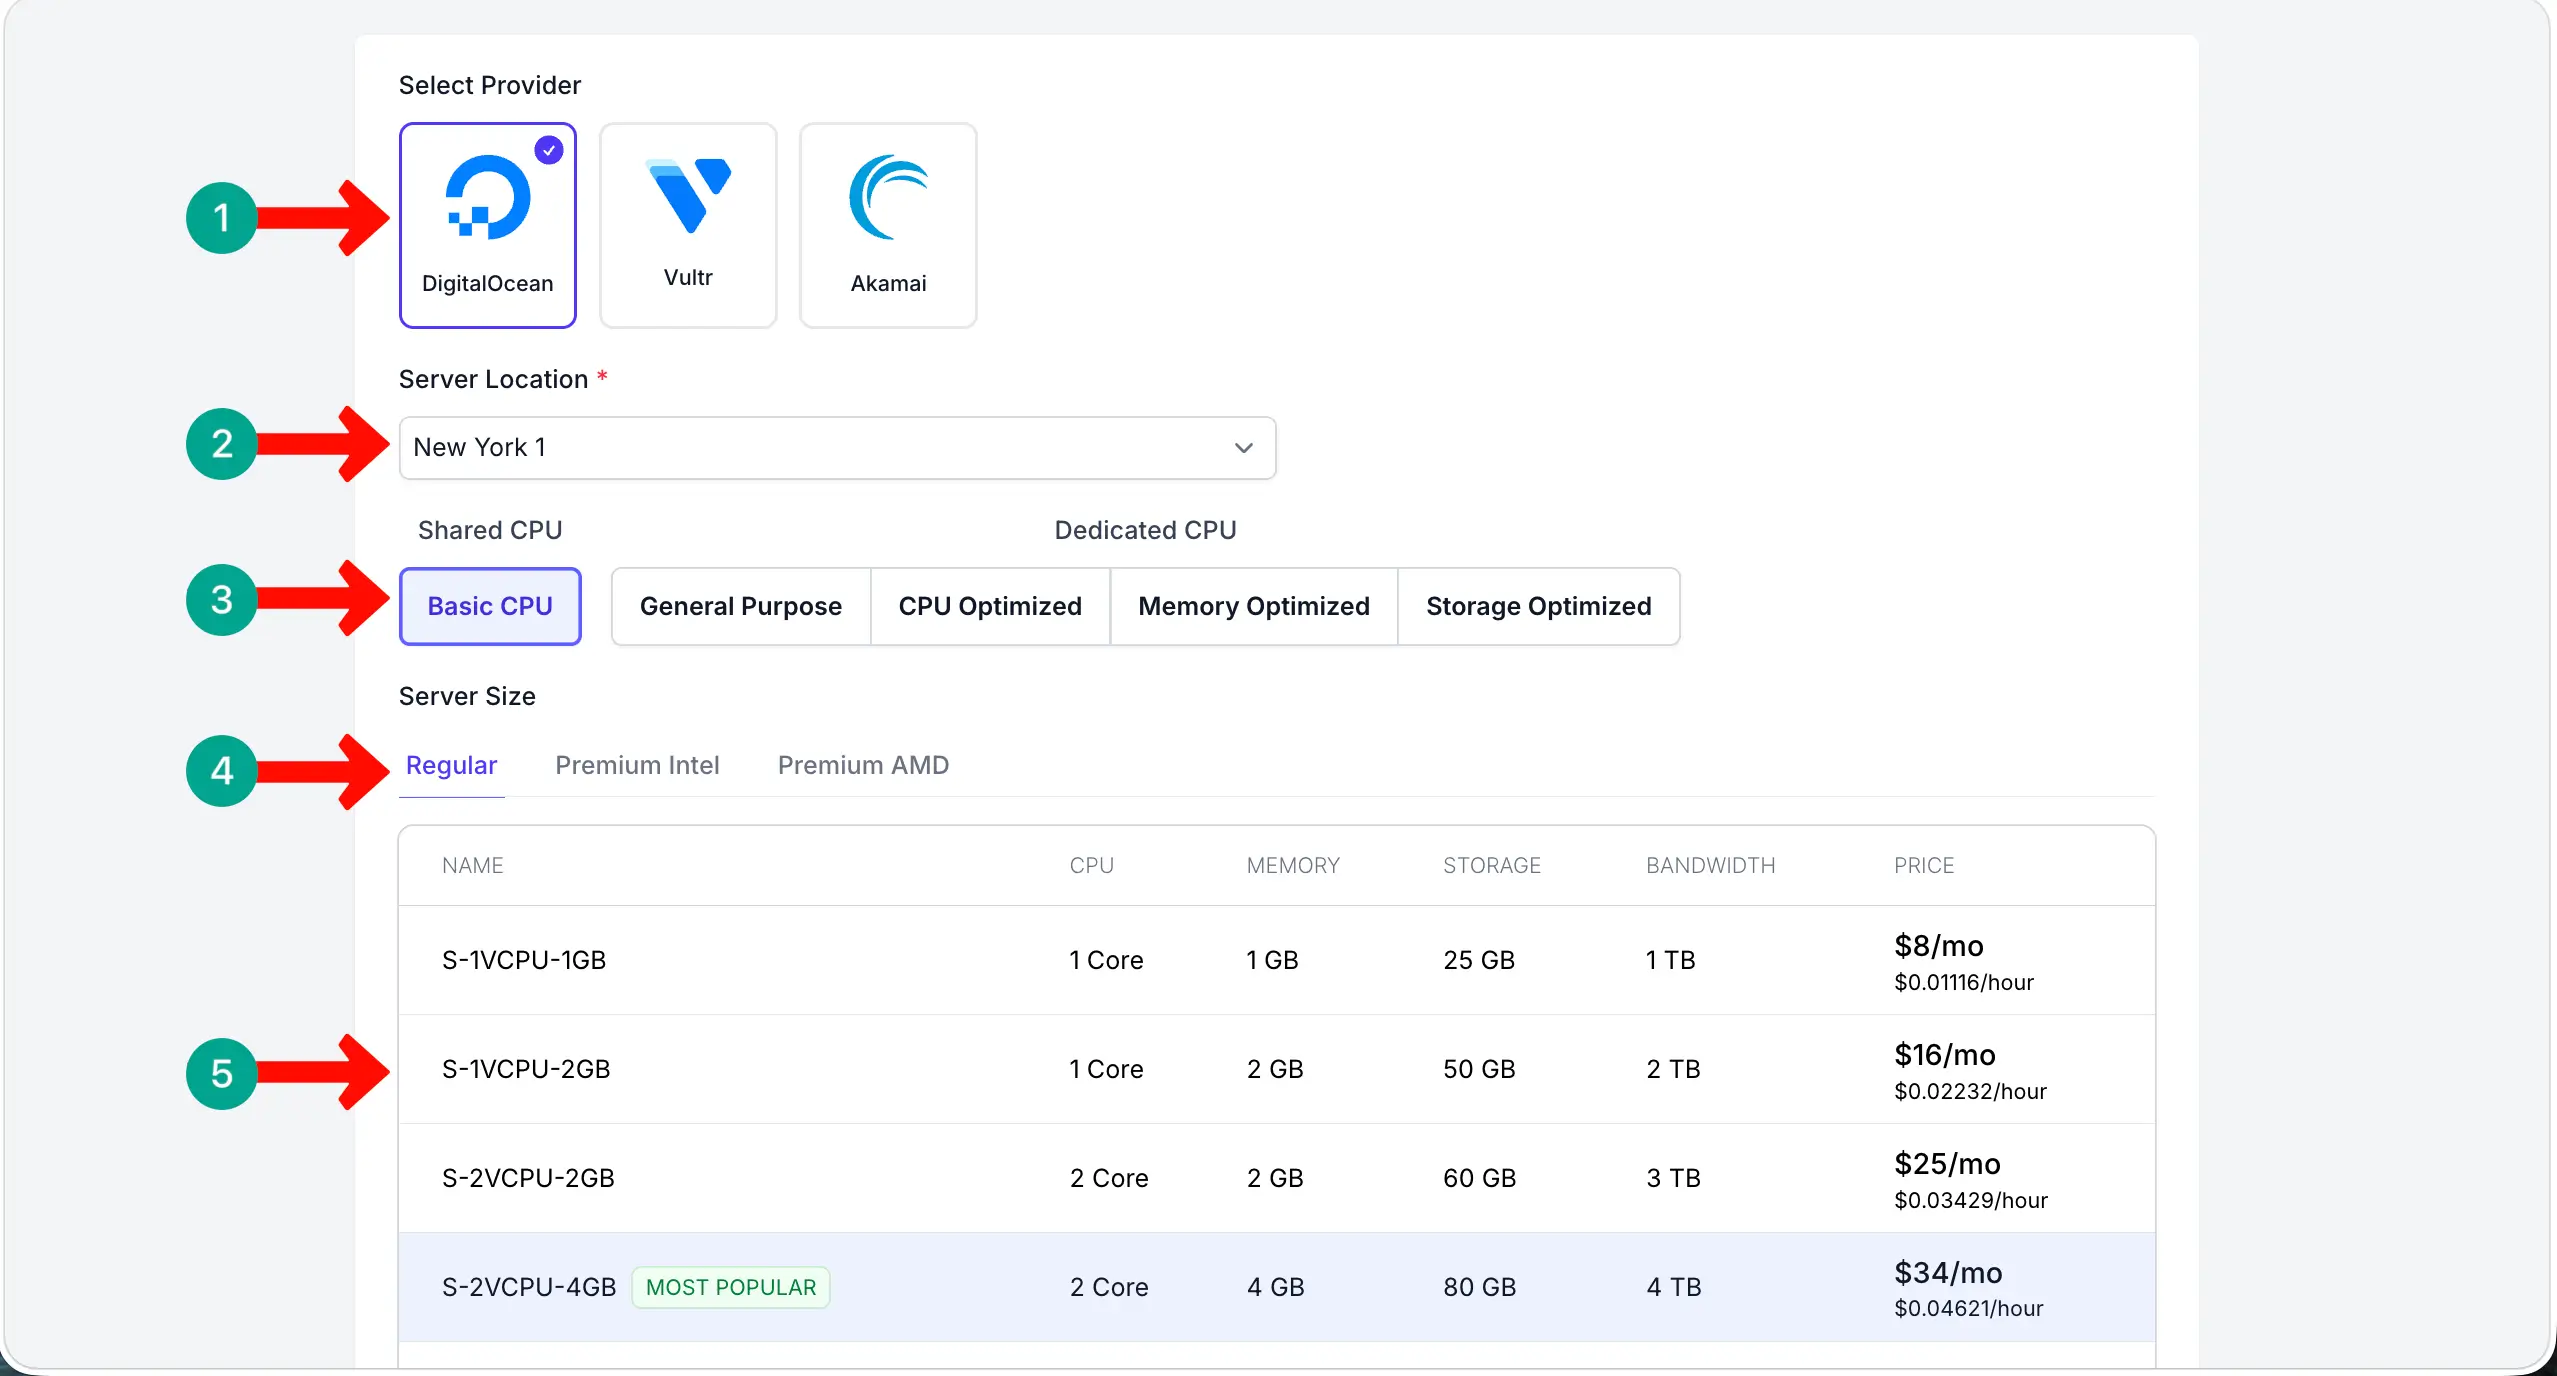
Next, you will see three cloud service providers’ names. Choose any one you like. Then, select a server location, CPU type, server type, and server size. Based on your choices, the pricing plans will change.
Write a name for your server hosting so you can easily identify it later. Select an operating system. Add a payment method to clear the payment. Finally, hit the Launch Server button,
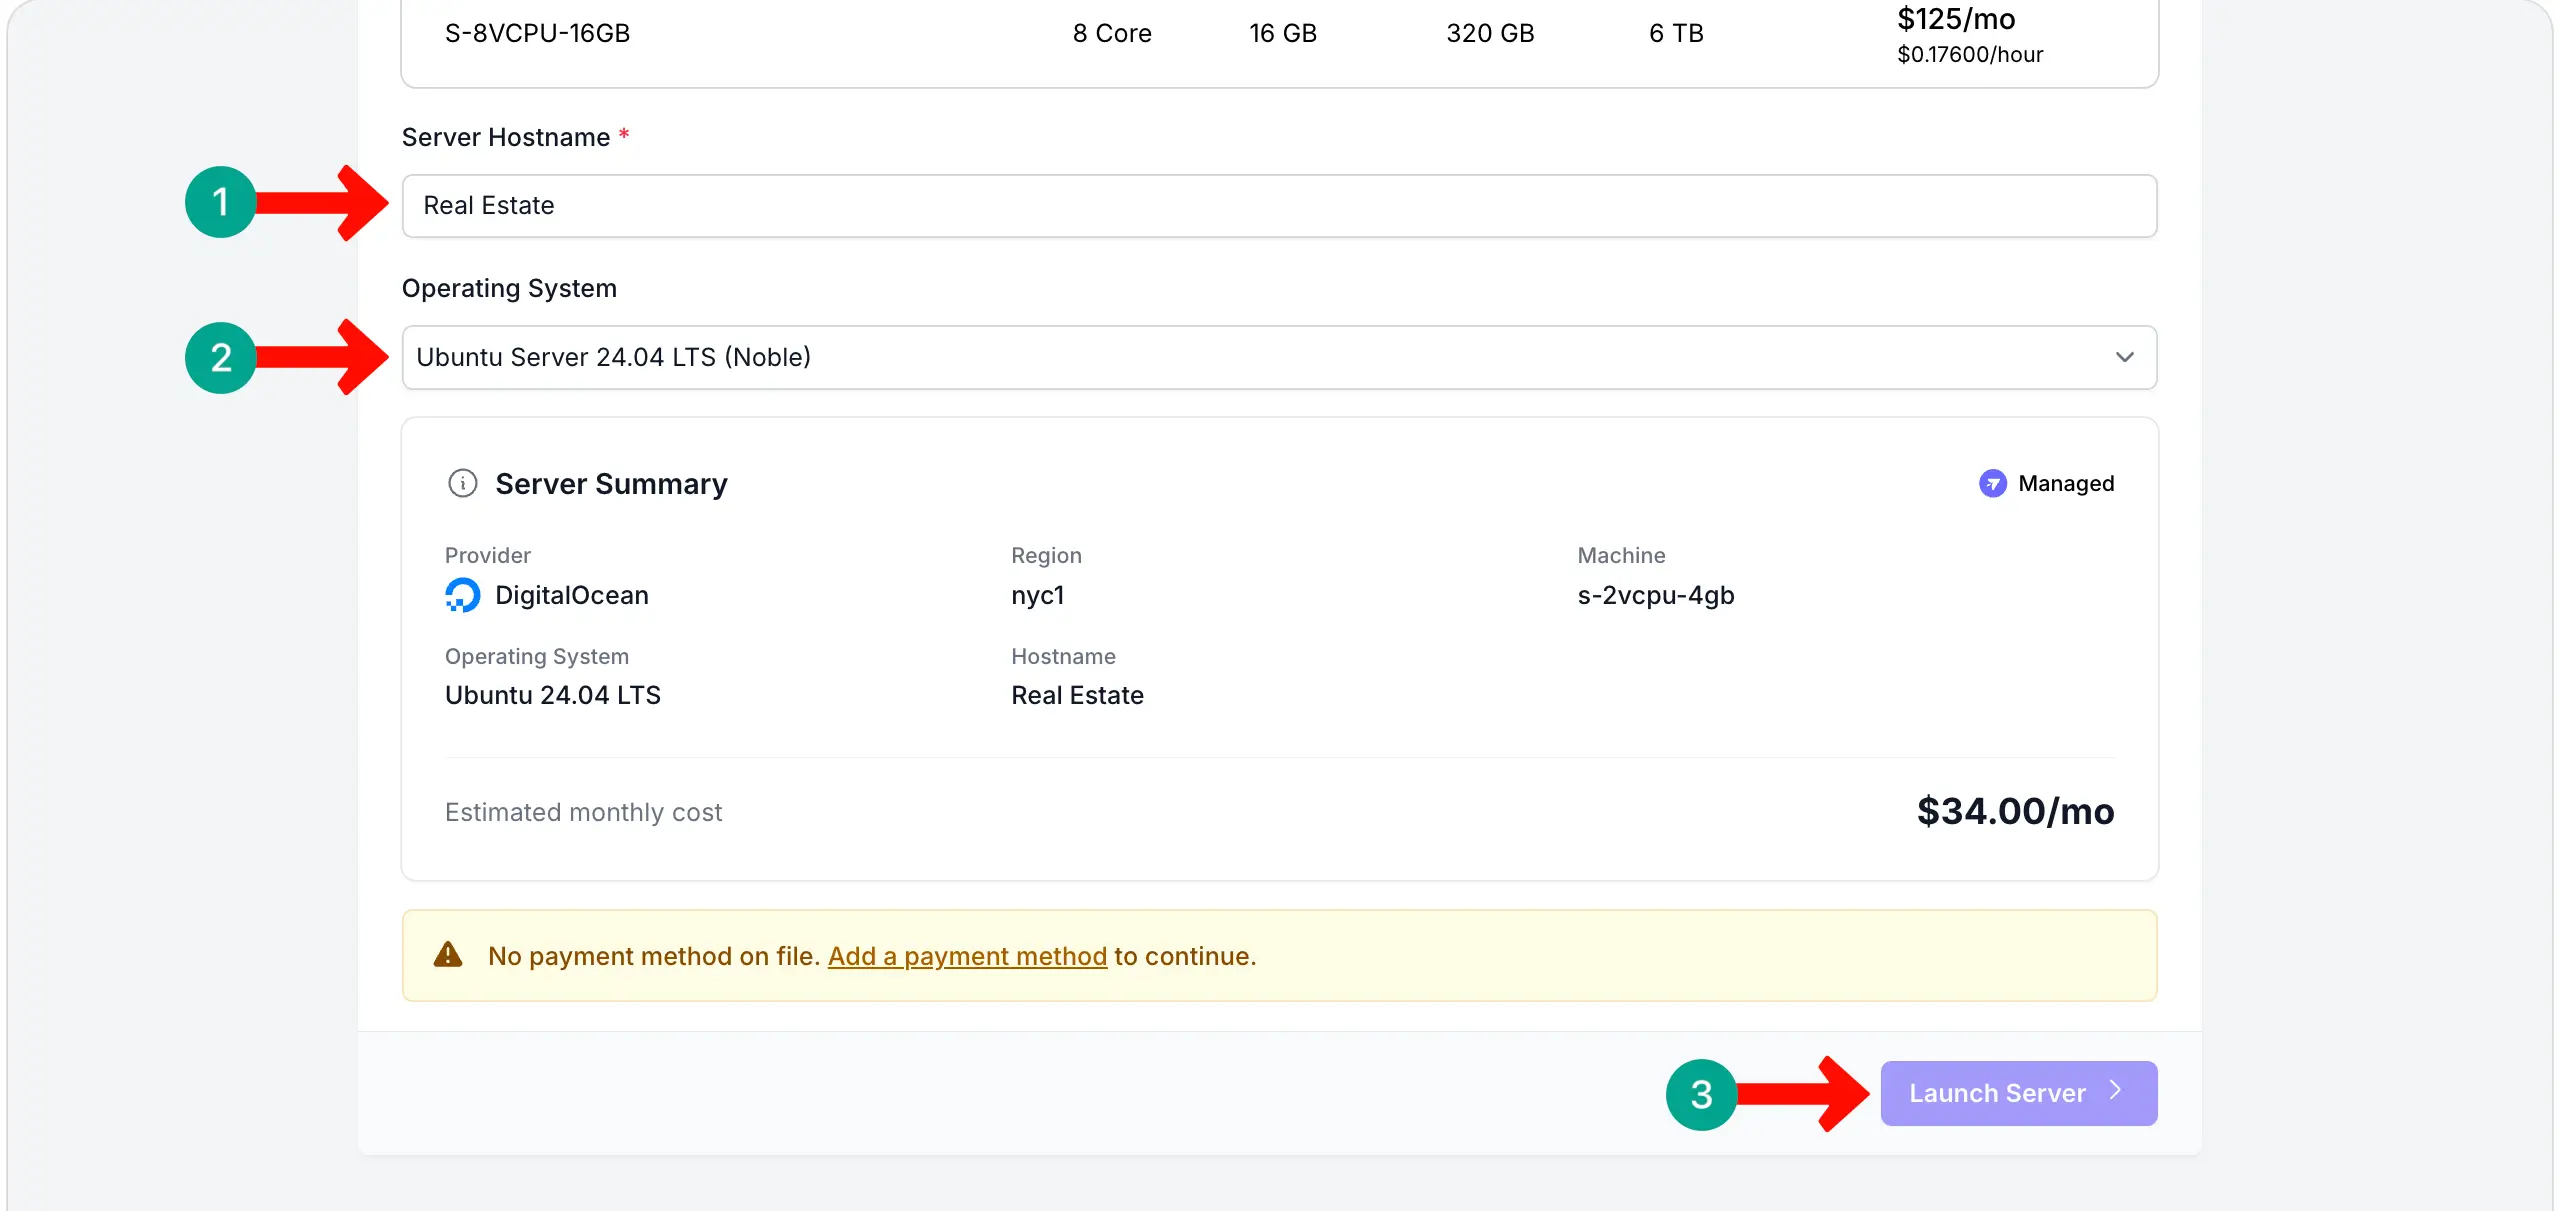
This will take only a few minutes for the server to be created. You may have to navigate between a few points as well for that.
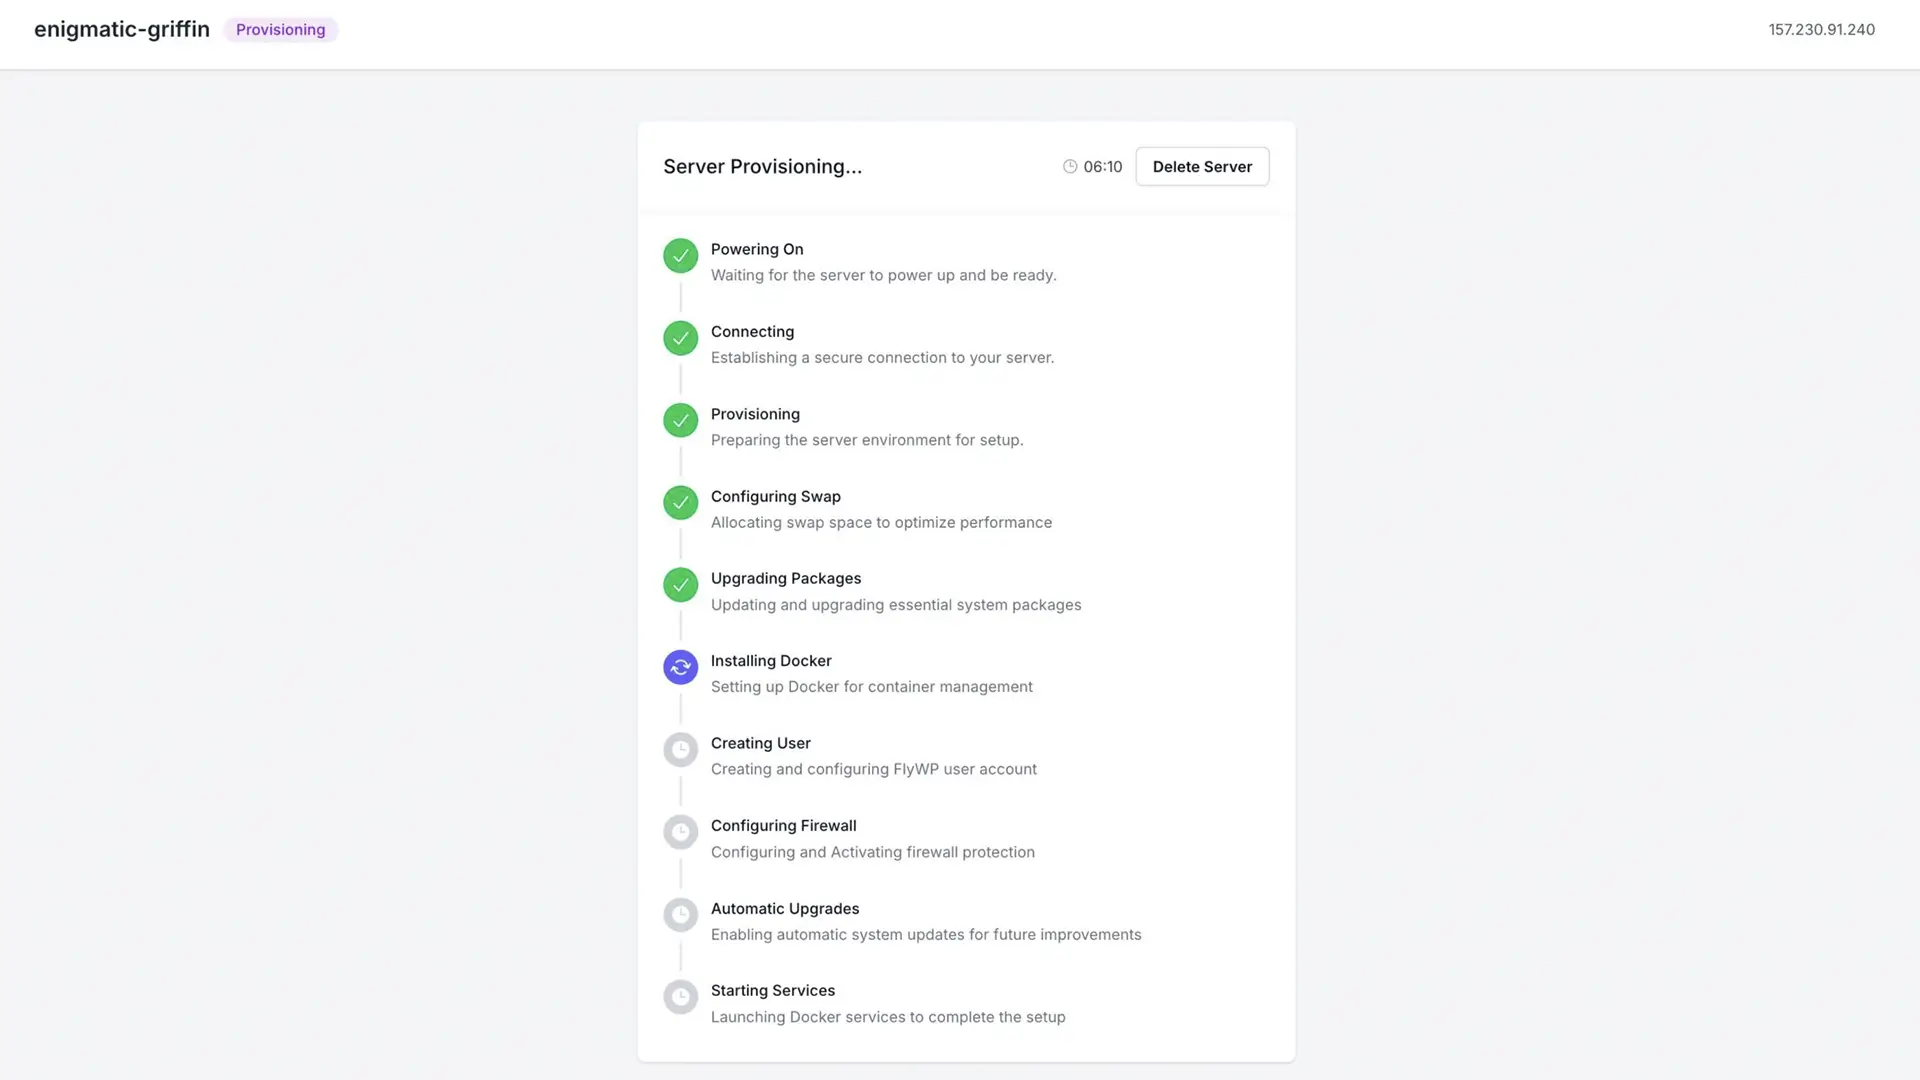
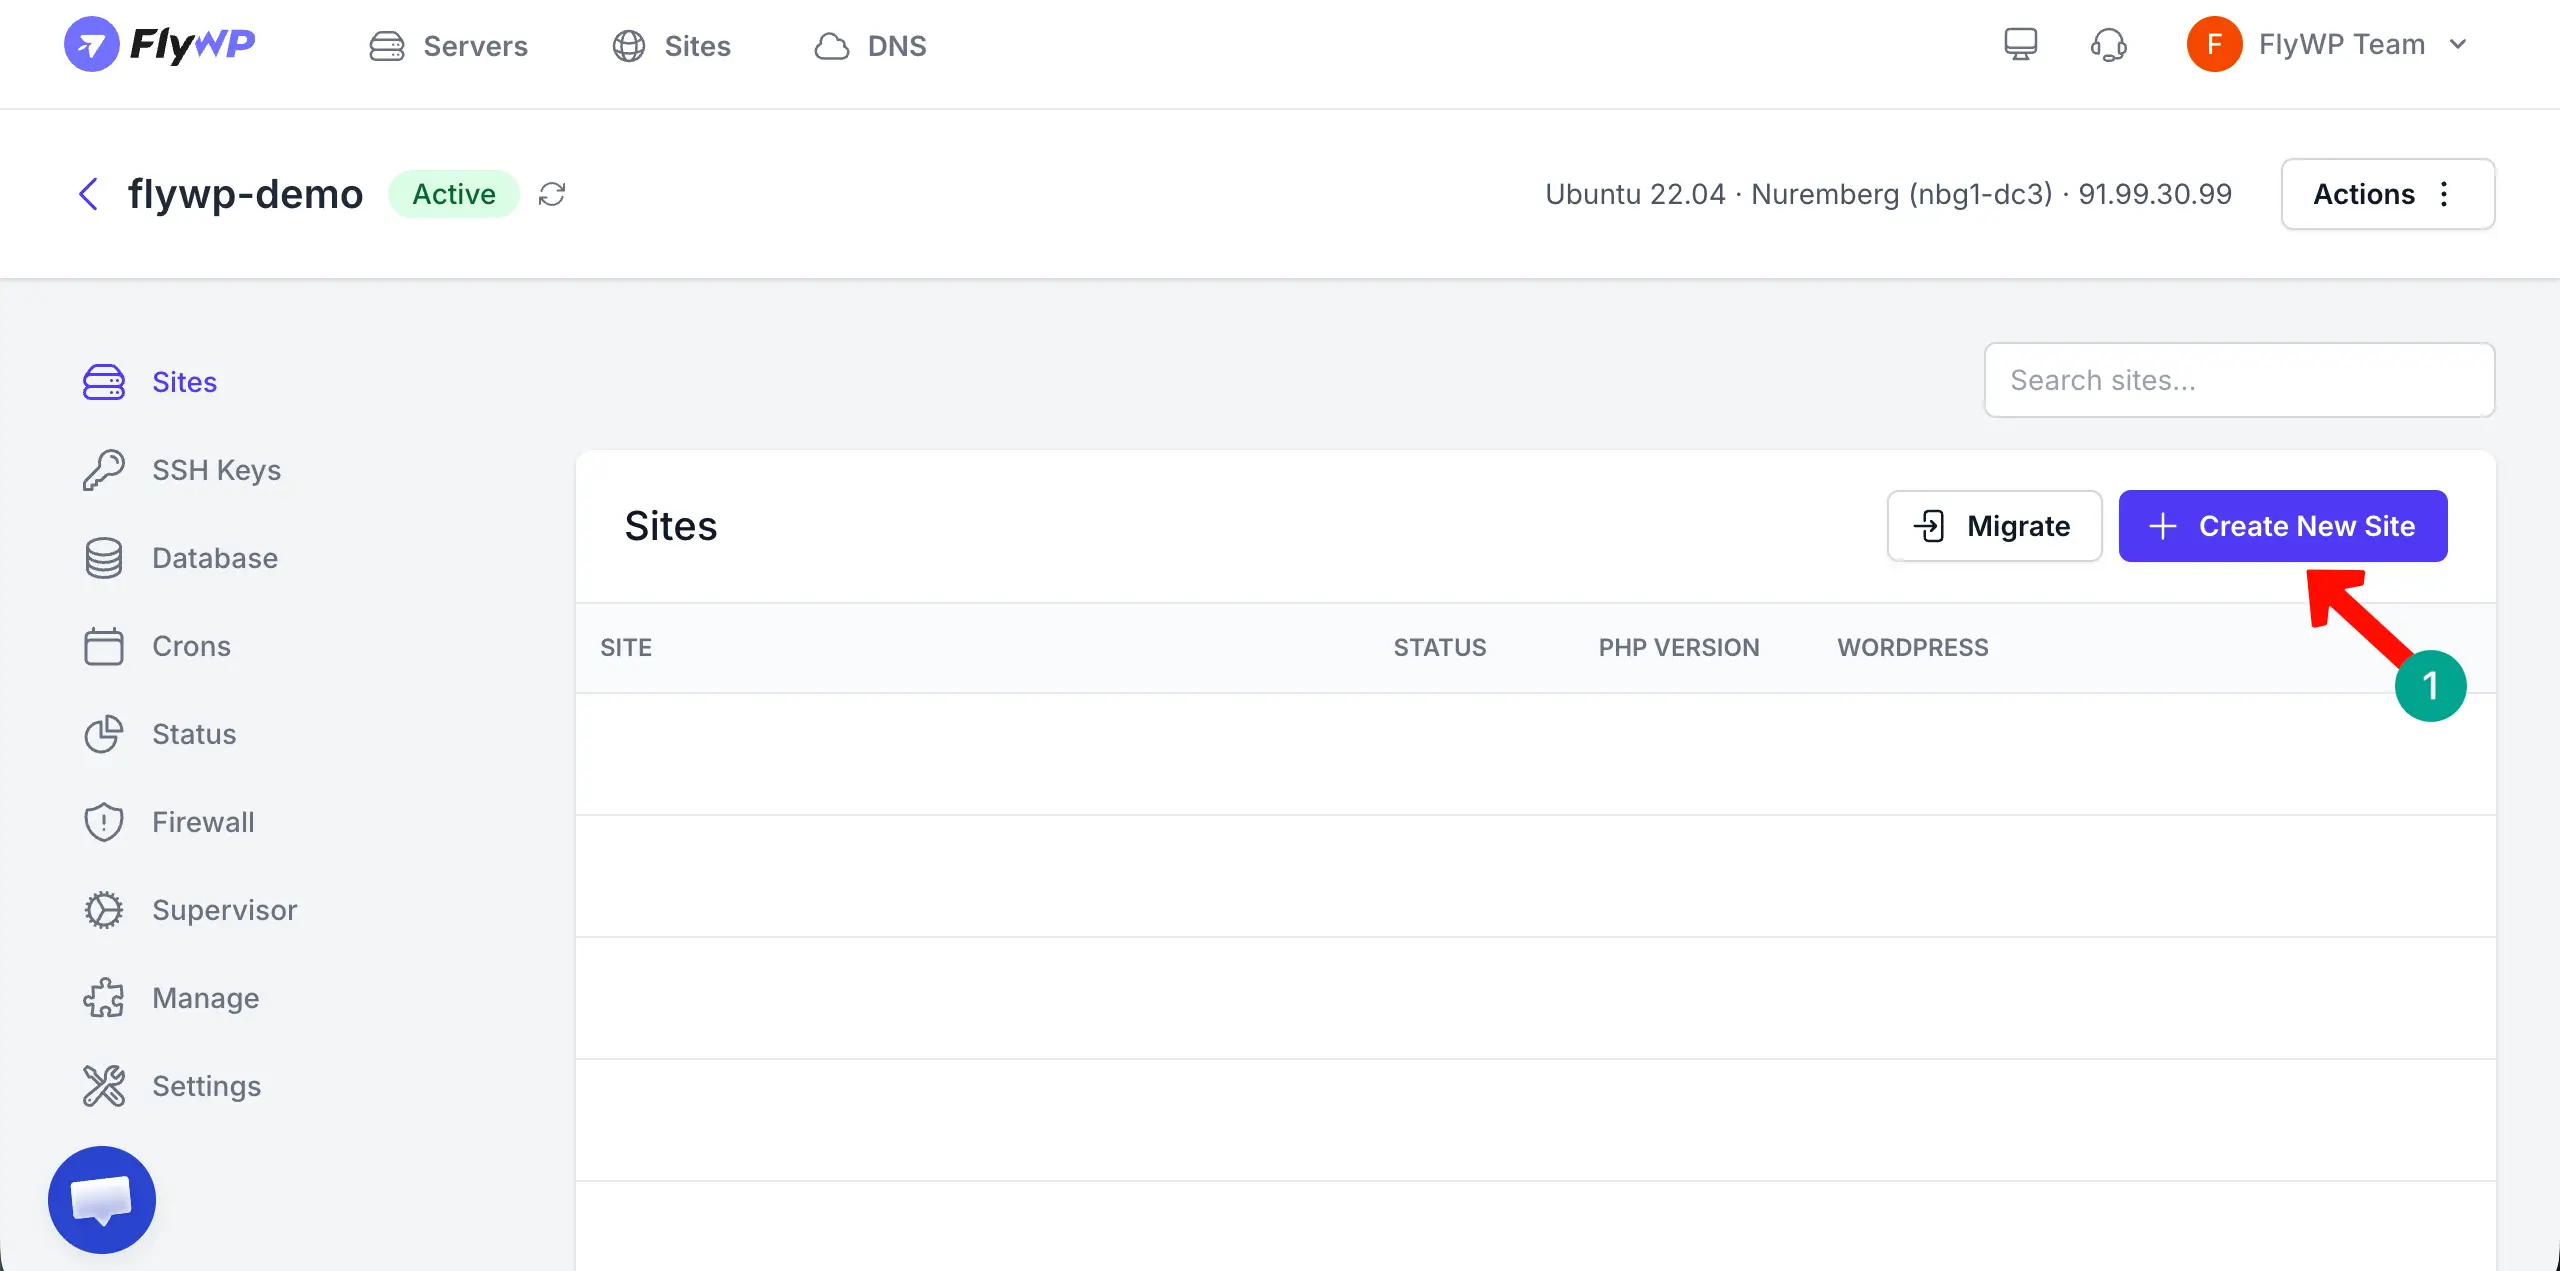
Once everything is done, it’s time to create your site. Just click the button + Create New Site.
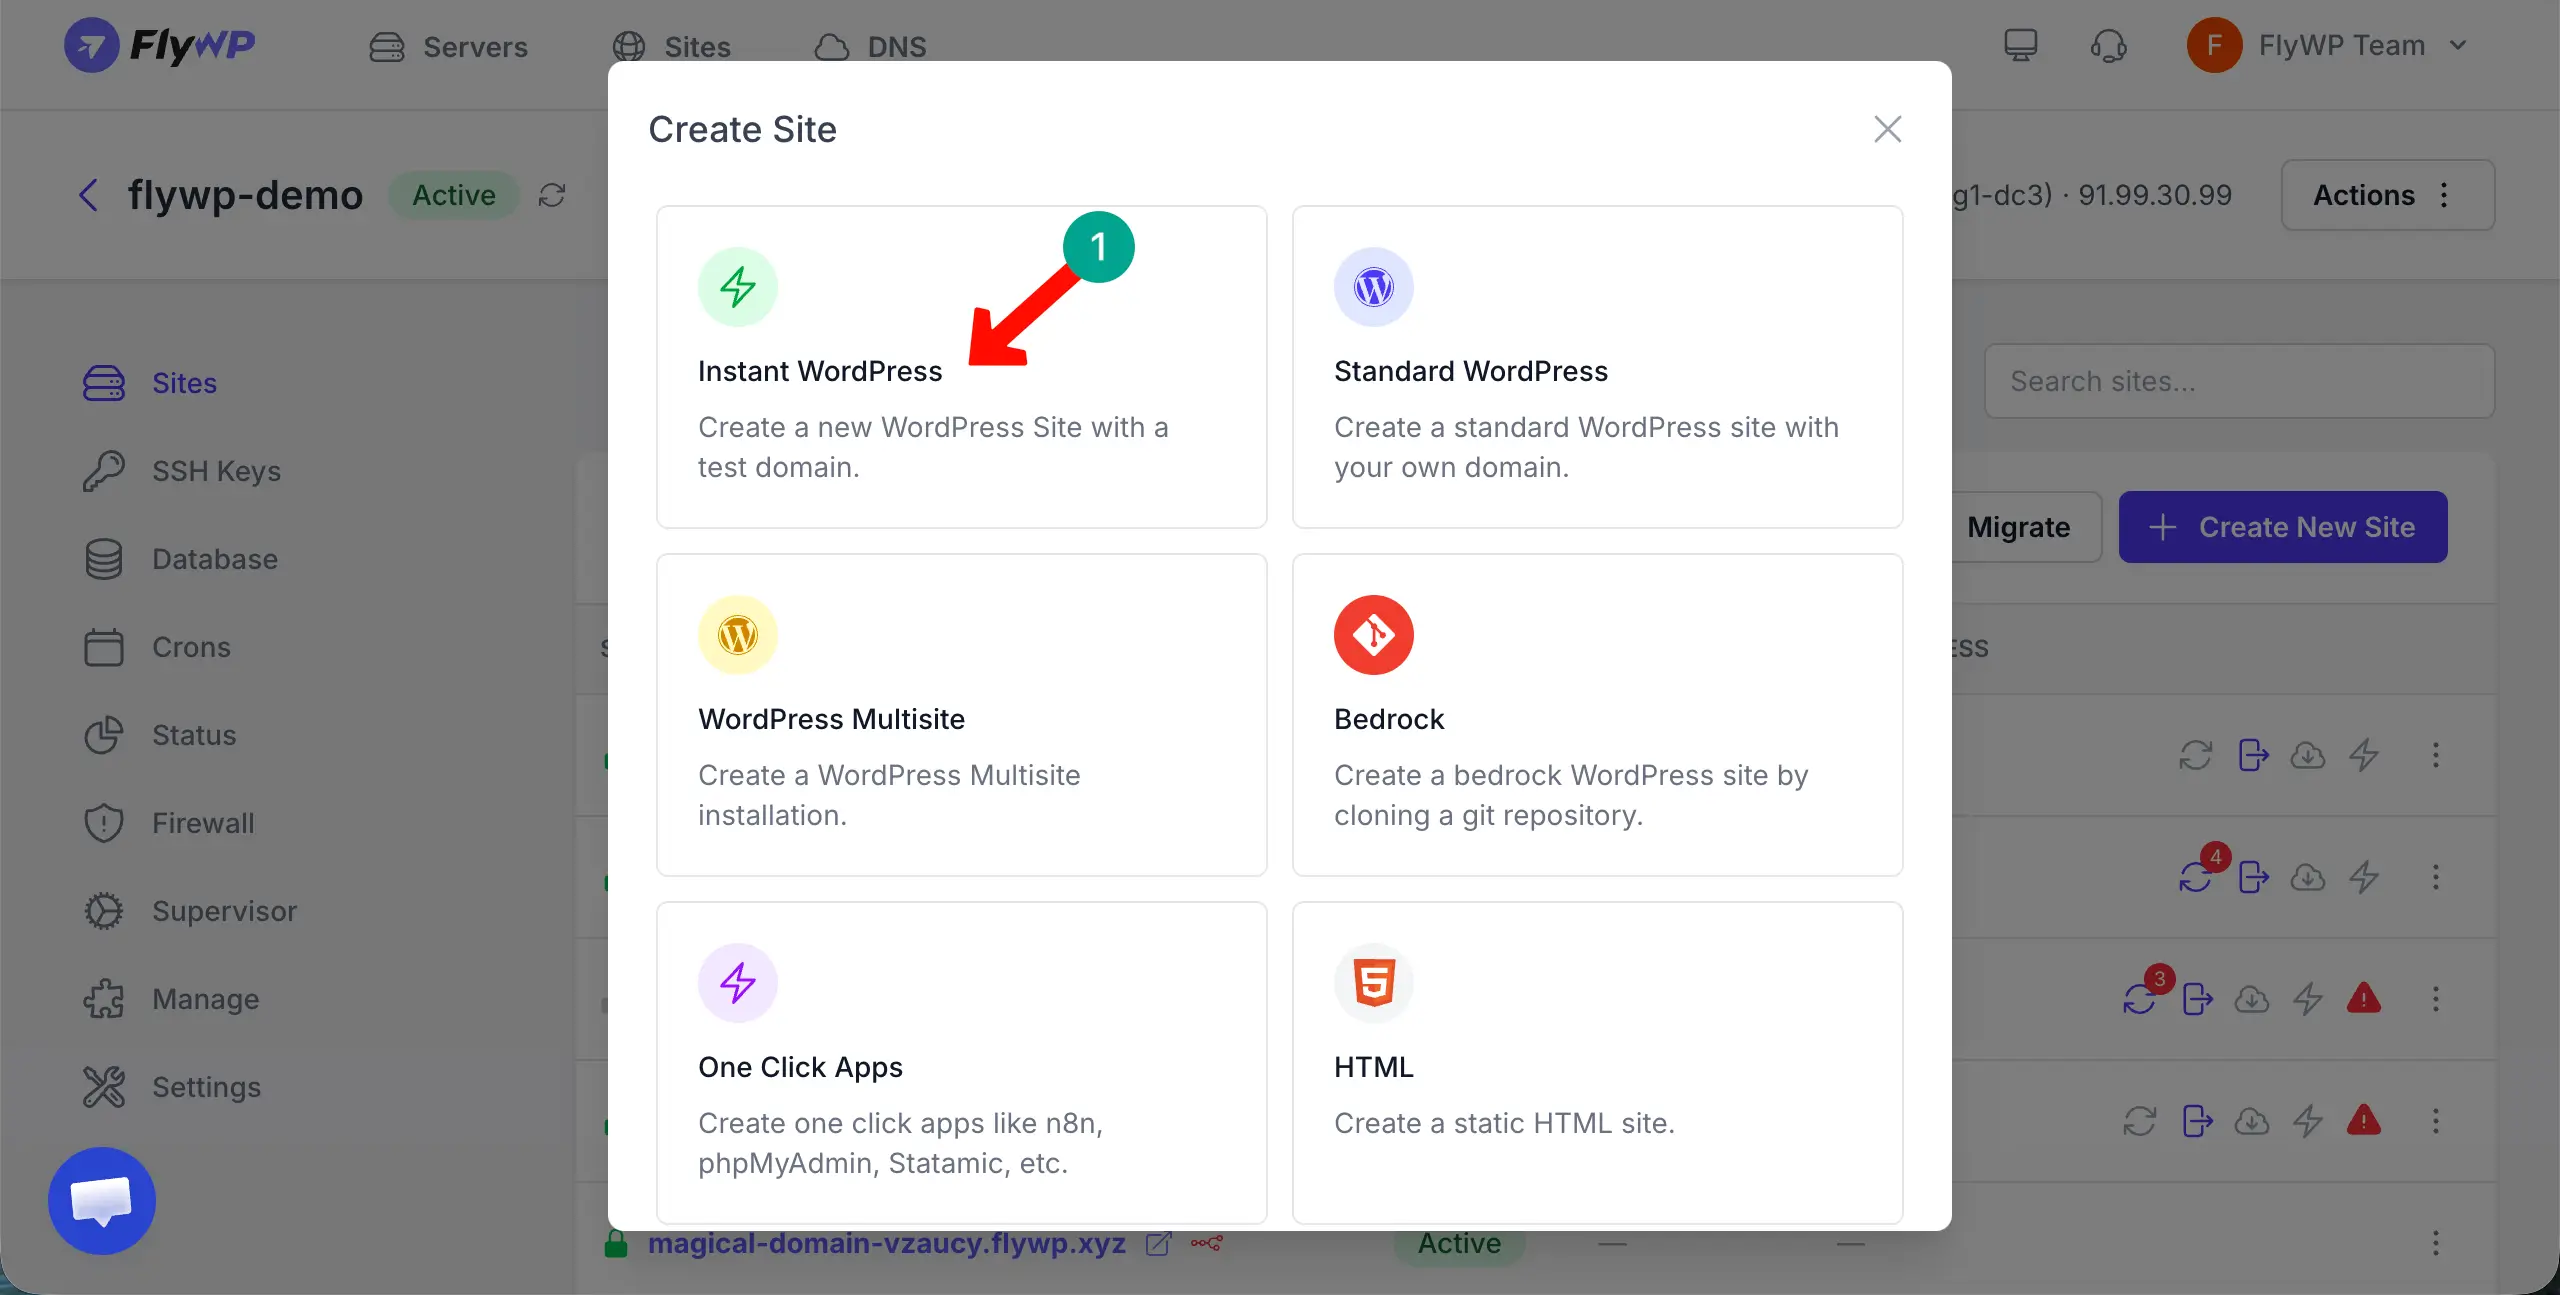
Choose any option you like to install WordPress on FlyWP. Let’s select Instant WordPress.
Now, it’s time to add your domain. To do this, first, toggle off the test domain option as pointed out in the image attached below. This will show you a new field where you can type your custom domain. Then, click the Next button to begin the final installation process.
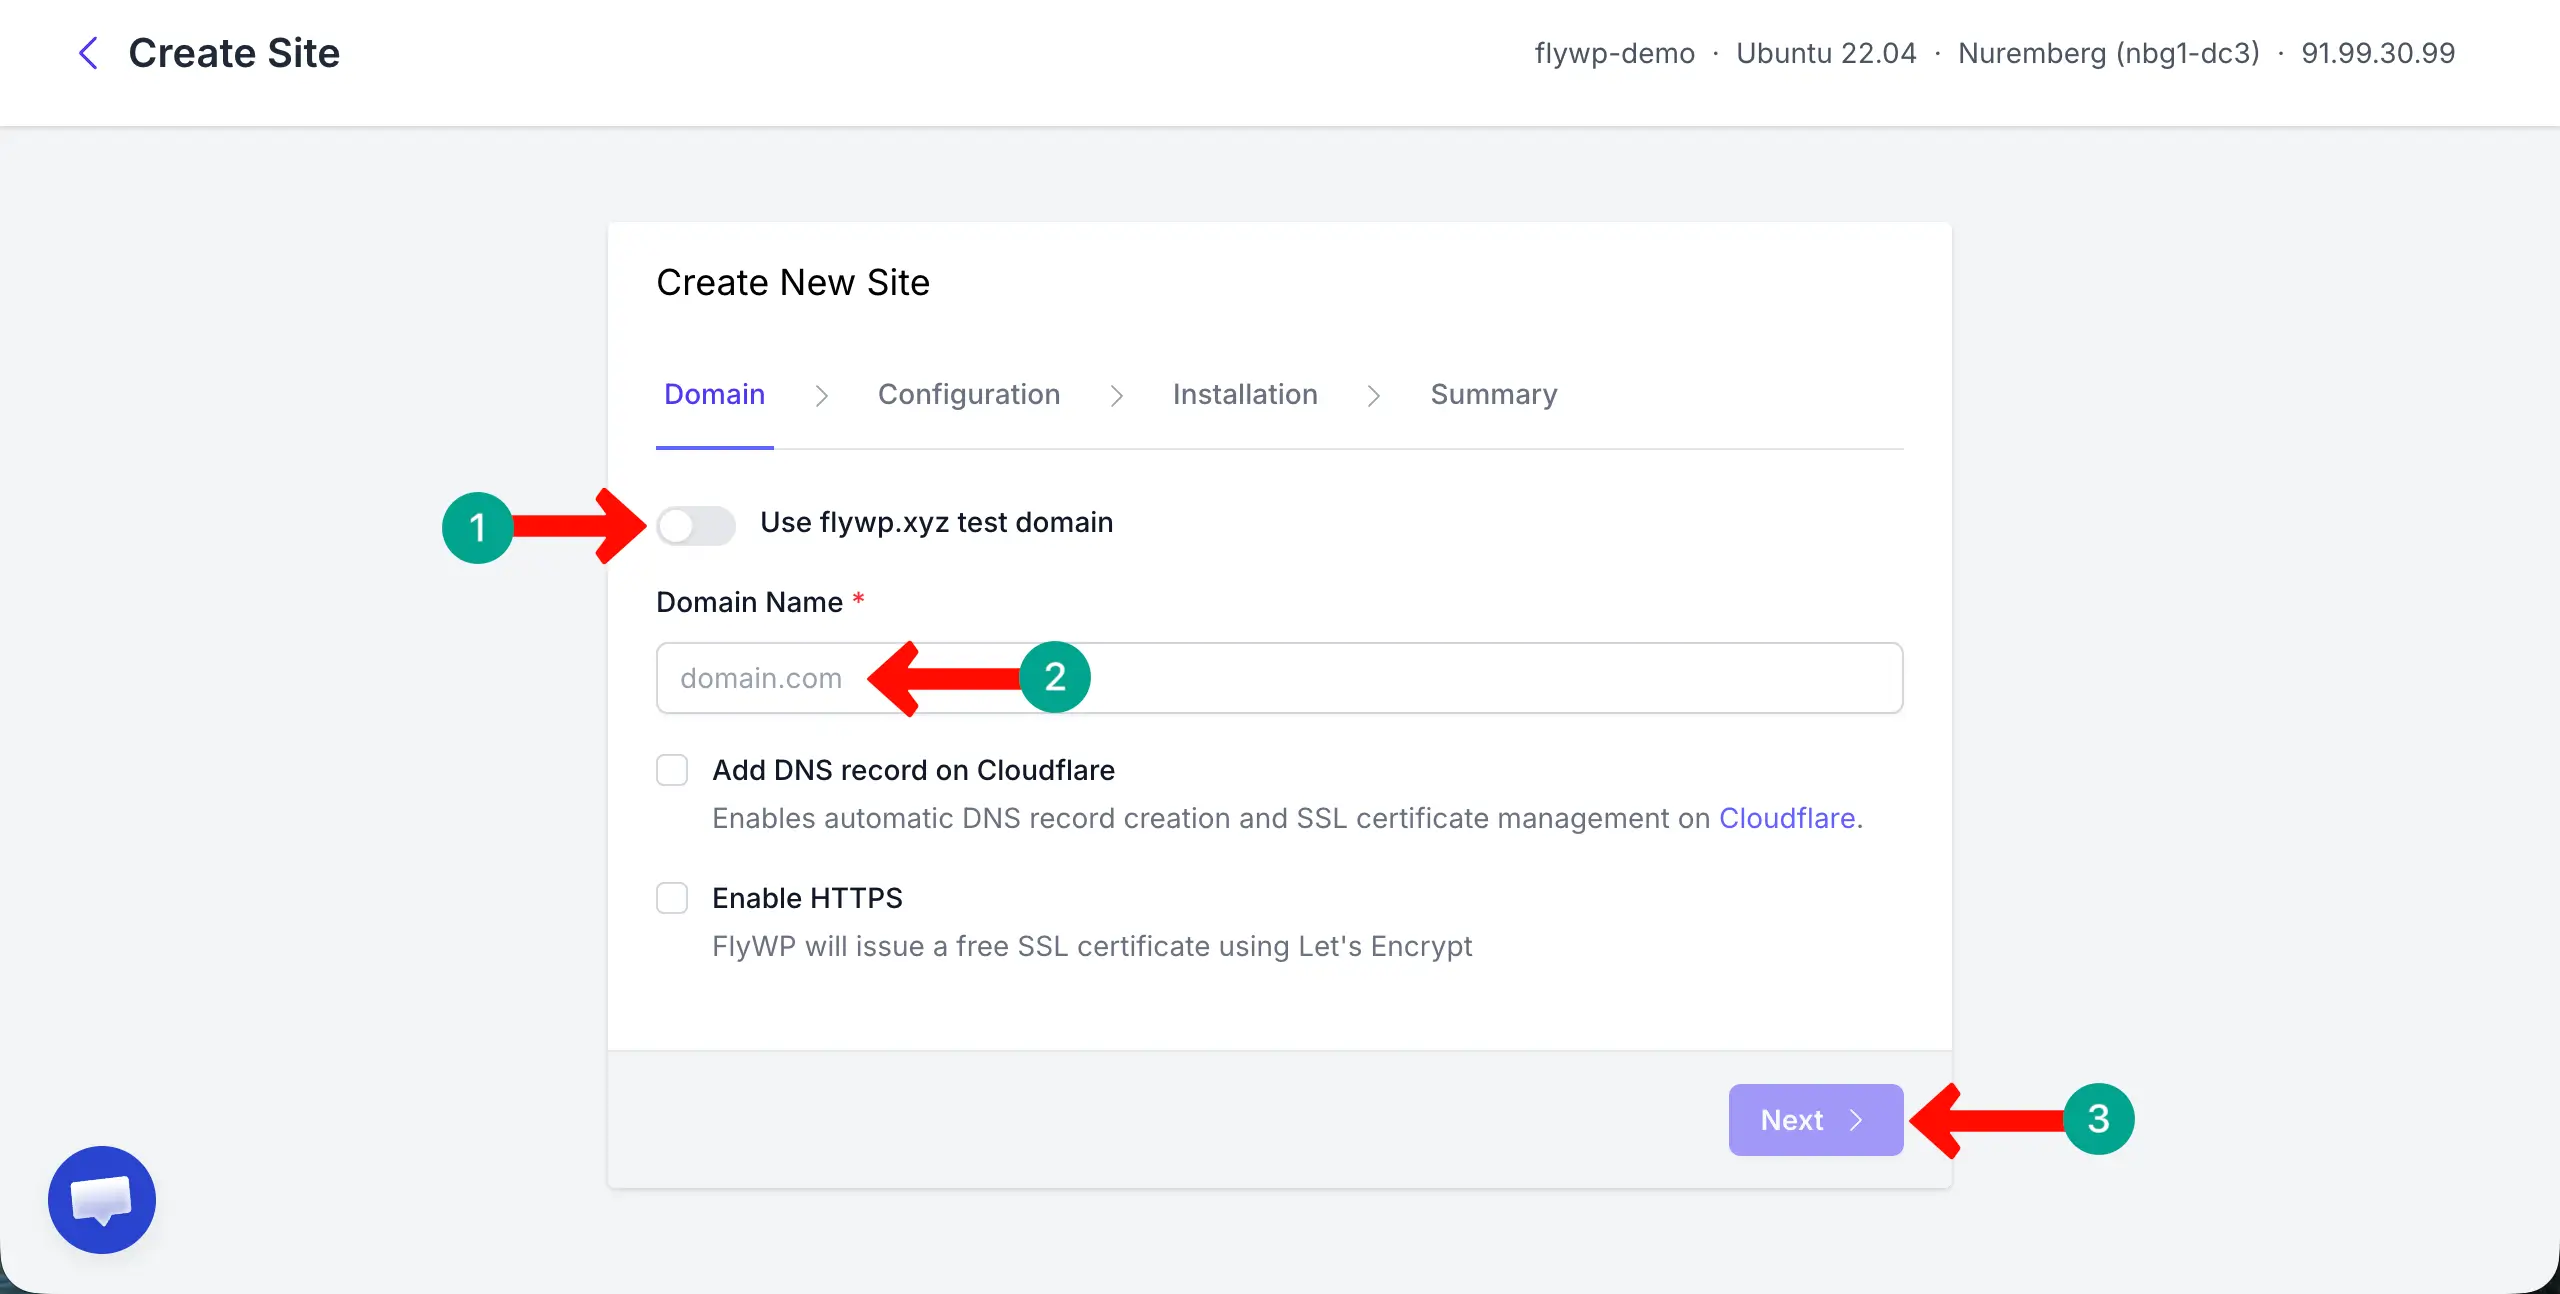
Once everything is done, you can visit your site or dashboard by clicking the respective option as shown below.
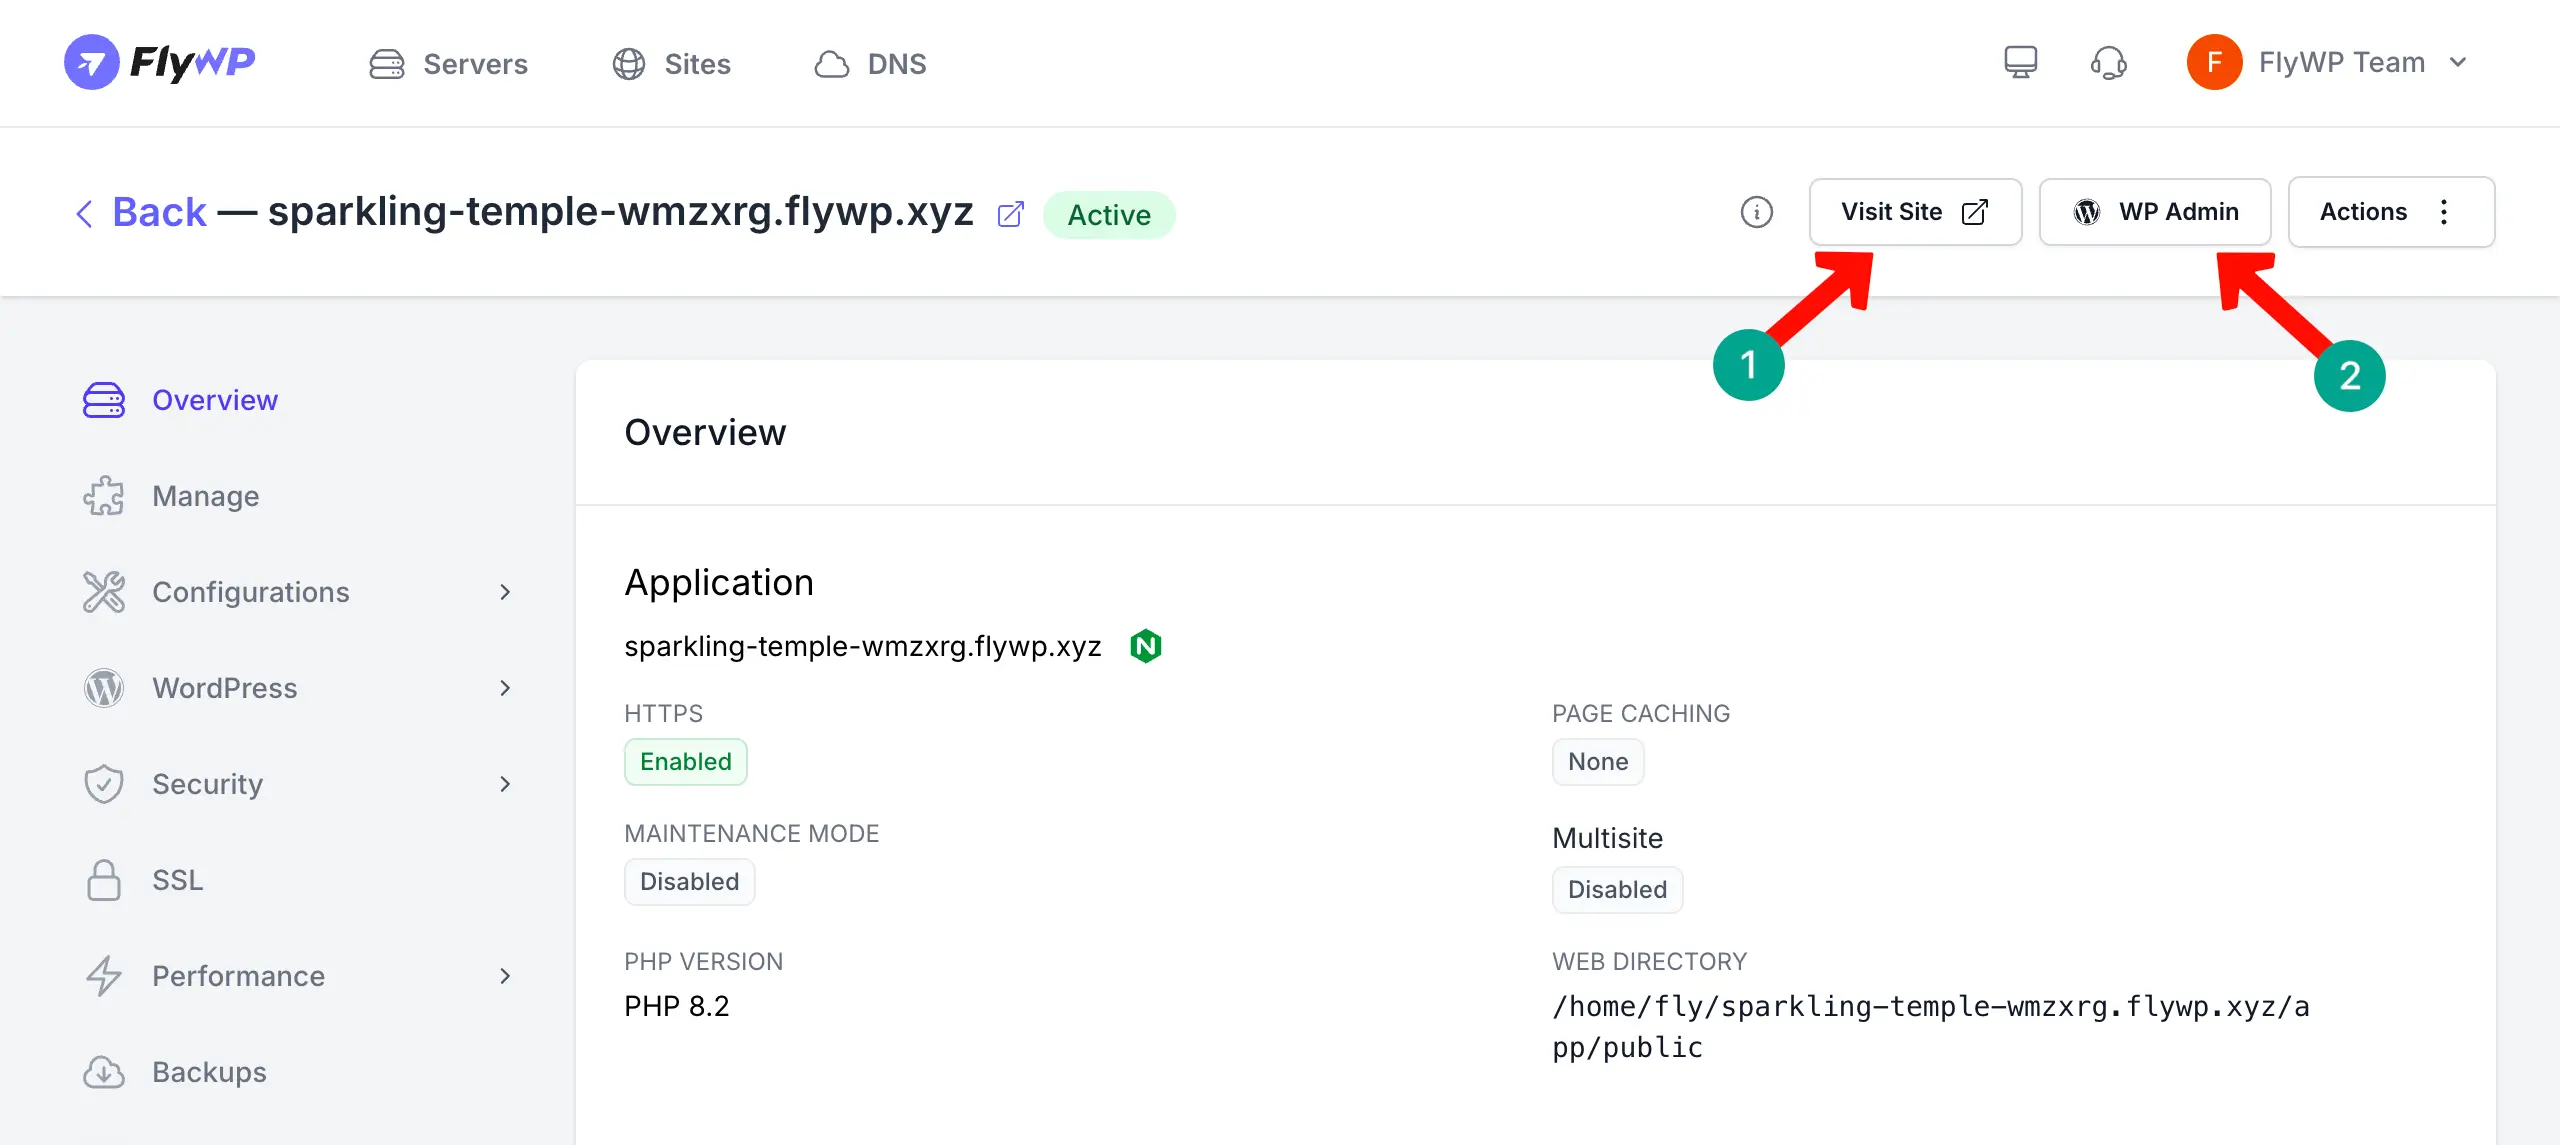
Thus, you can connect your domain to FlyWP’s hosting, install WordPress, and create your site. So, hope you saw how easy it is to get started with FlyWP.
Note: Though using FlyWP is so easy, you may still look for alternative platforms to host your site. So, to help you out, here’s a list of the best hosting platforms for Elementor sites.
Step 3: Install Required Plugins
As said above, install the following plugins on your site:
# Why HappyAddons?
Yes, Elementor is a great page builder. You can do a lot with it. But definitely, it has so many limitations that you need to add addons to your site. HappyAddons is the most capable addon that can power up your Elementor site with an additional 150+ widgets and 35+ features.
# Why WP User Frontend?
WP User Frontend lets you create custom forms and collect information from users without requiring access to the WordPress dashboard. You can use it to create custom post types, build submission forms, and store data. For example:
- Property prices
- Locations
- Images
- Property sizes
- Contact details
On a real estate website, WP User Frontend can be used to create and manage property listings. Instead of manually creating every property page, agents or property owners can submit listings through a form, and the information is automatically saved as property data.
This data can then be displayed dynamically using Elementor, allowing you to build searchable property listings, property detail pages, and agent profiles while keeping all property information organized and easy to update.
Step 4: Set Up Your Property Listing System with WP User Frontend
This is the most important setup step in the entire tutorial. Here, you build the data structure and submission system that powers your entire property listing engine.
# Register a Custom Post Type for Properties
Here, you need just an additional plugin to register a custom post type for properties. The free version is enough to do this. So, install the Custom Post Type UI plugin.
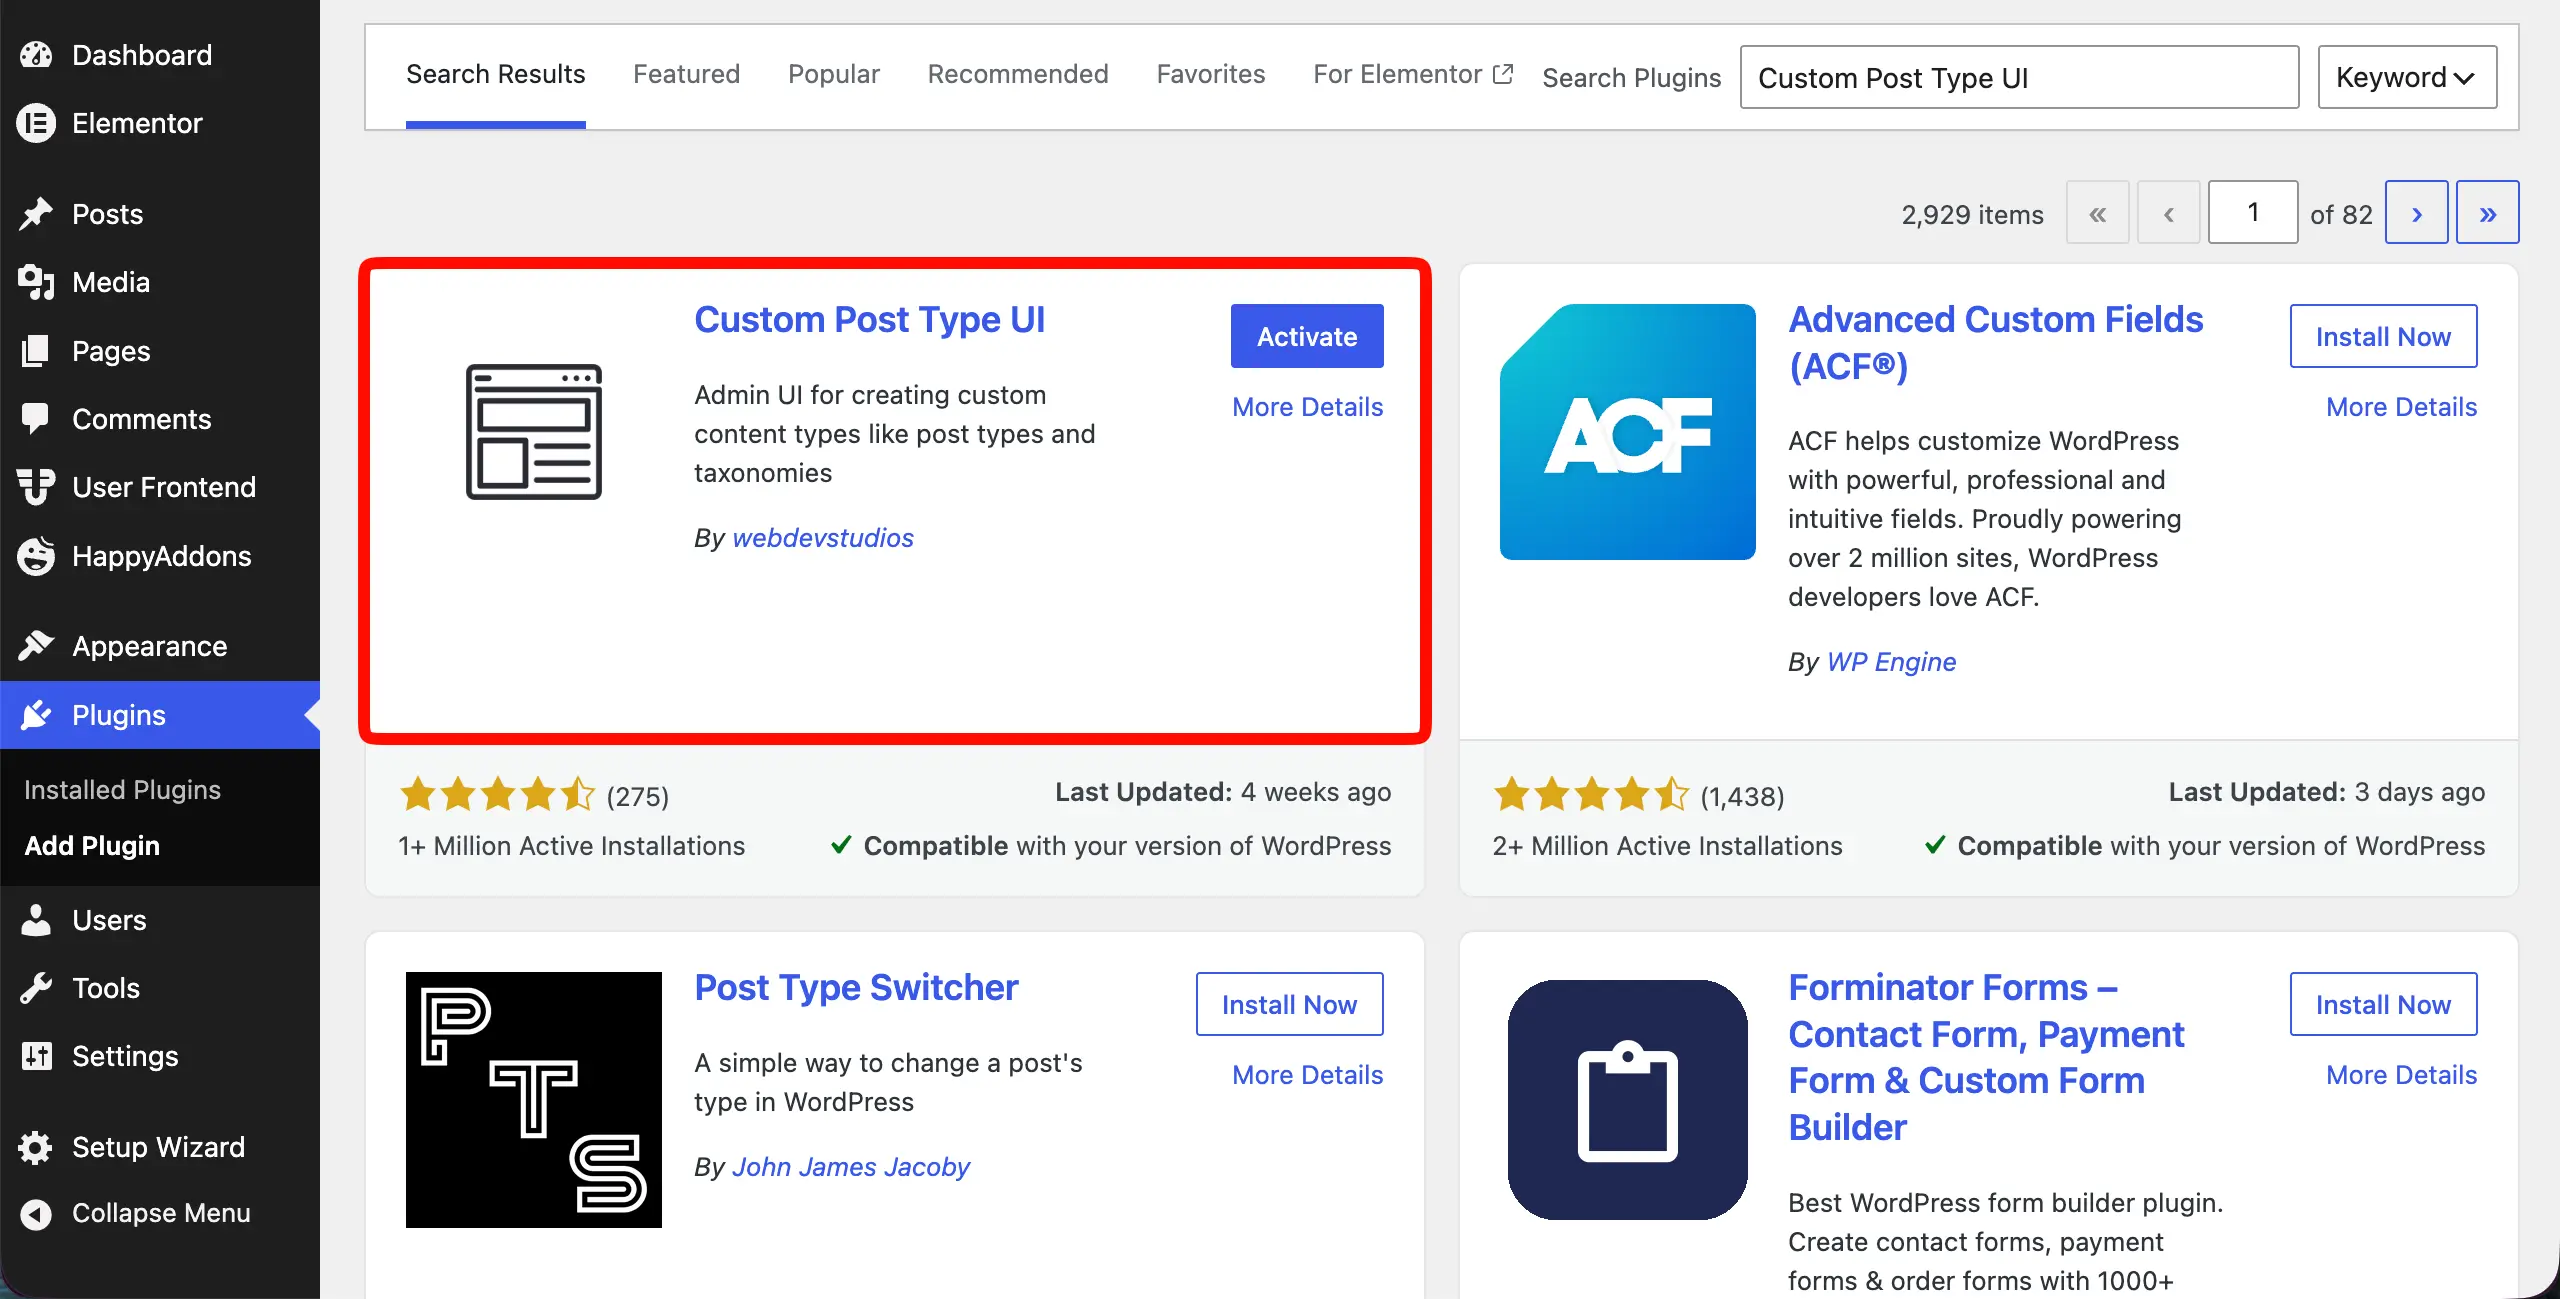
# Register your Property post type:
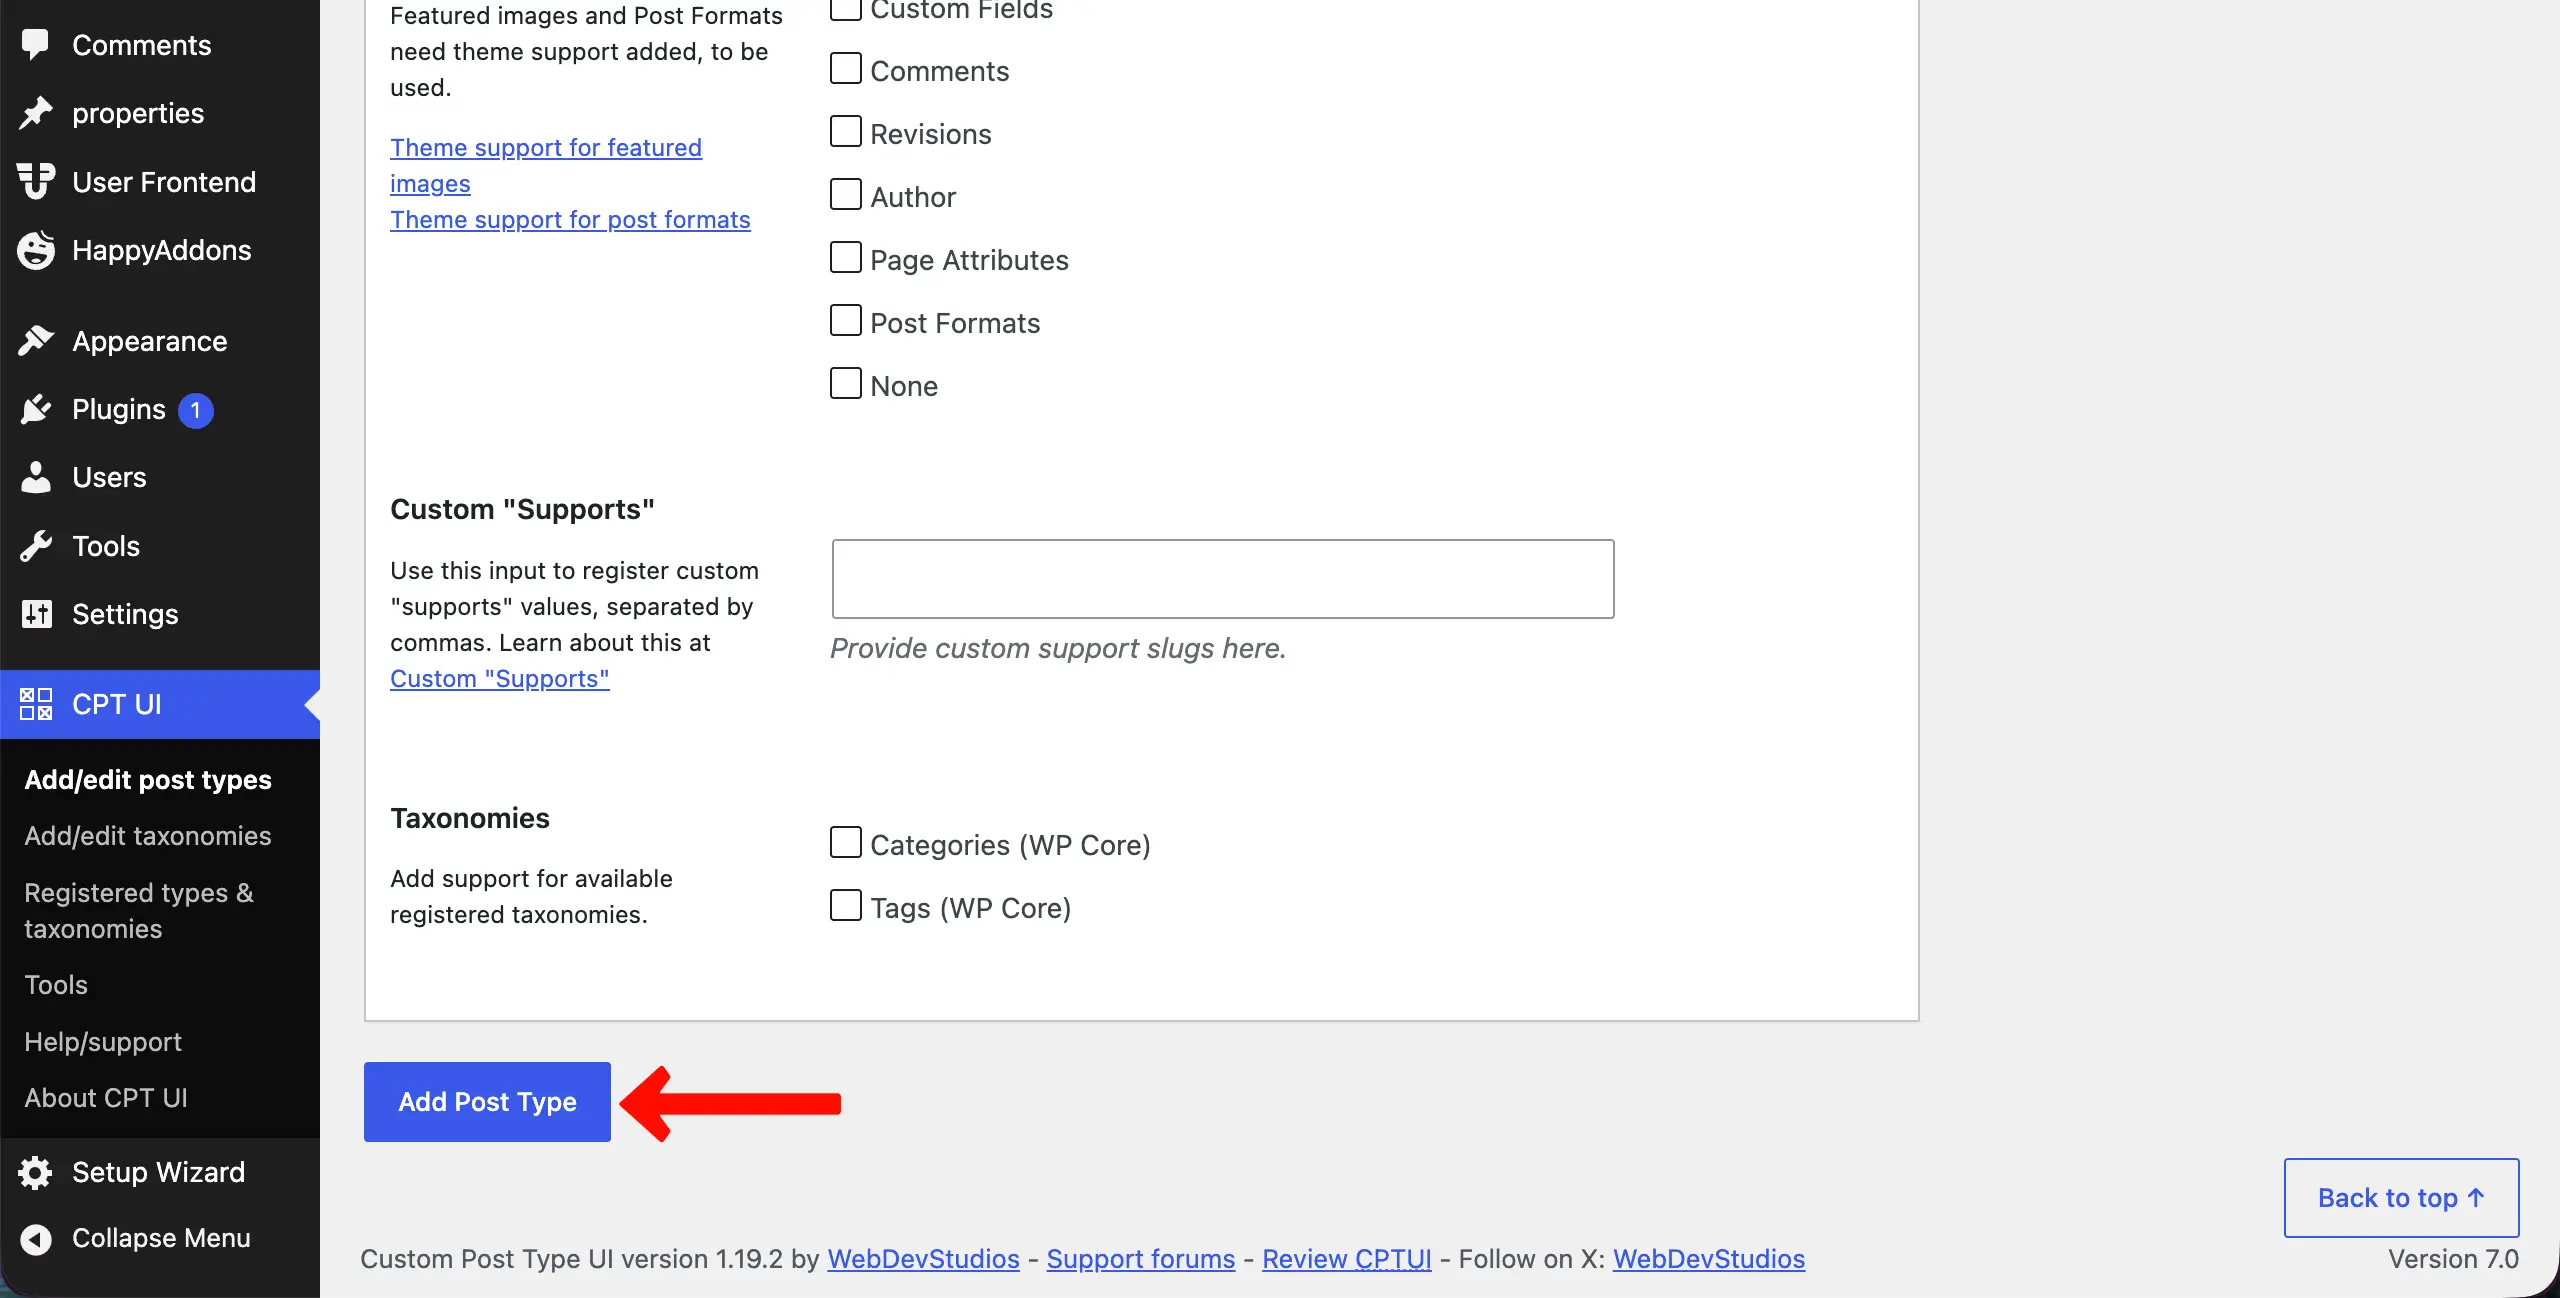
Go to CPT UI → Add/Edit Post Types. Set Post Type Slug to property. Set Plural Label to Properties, Singular Label to Property.
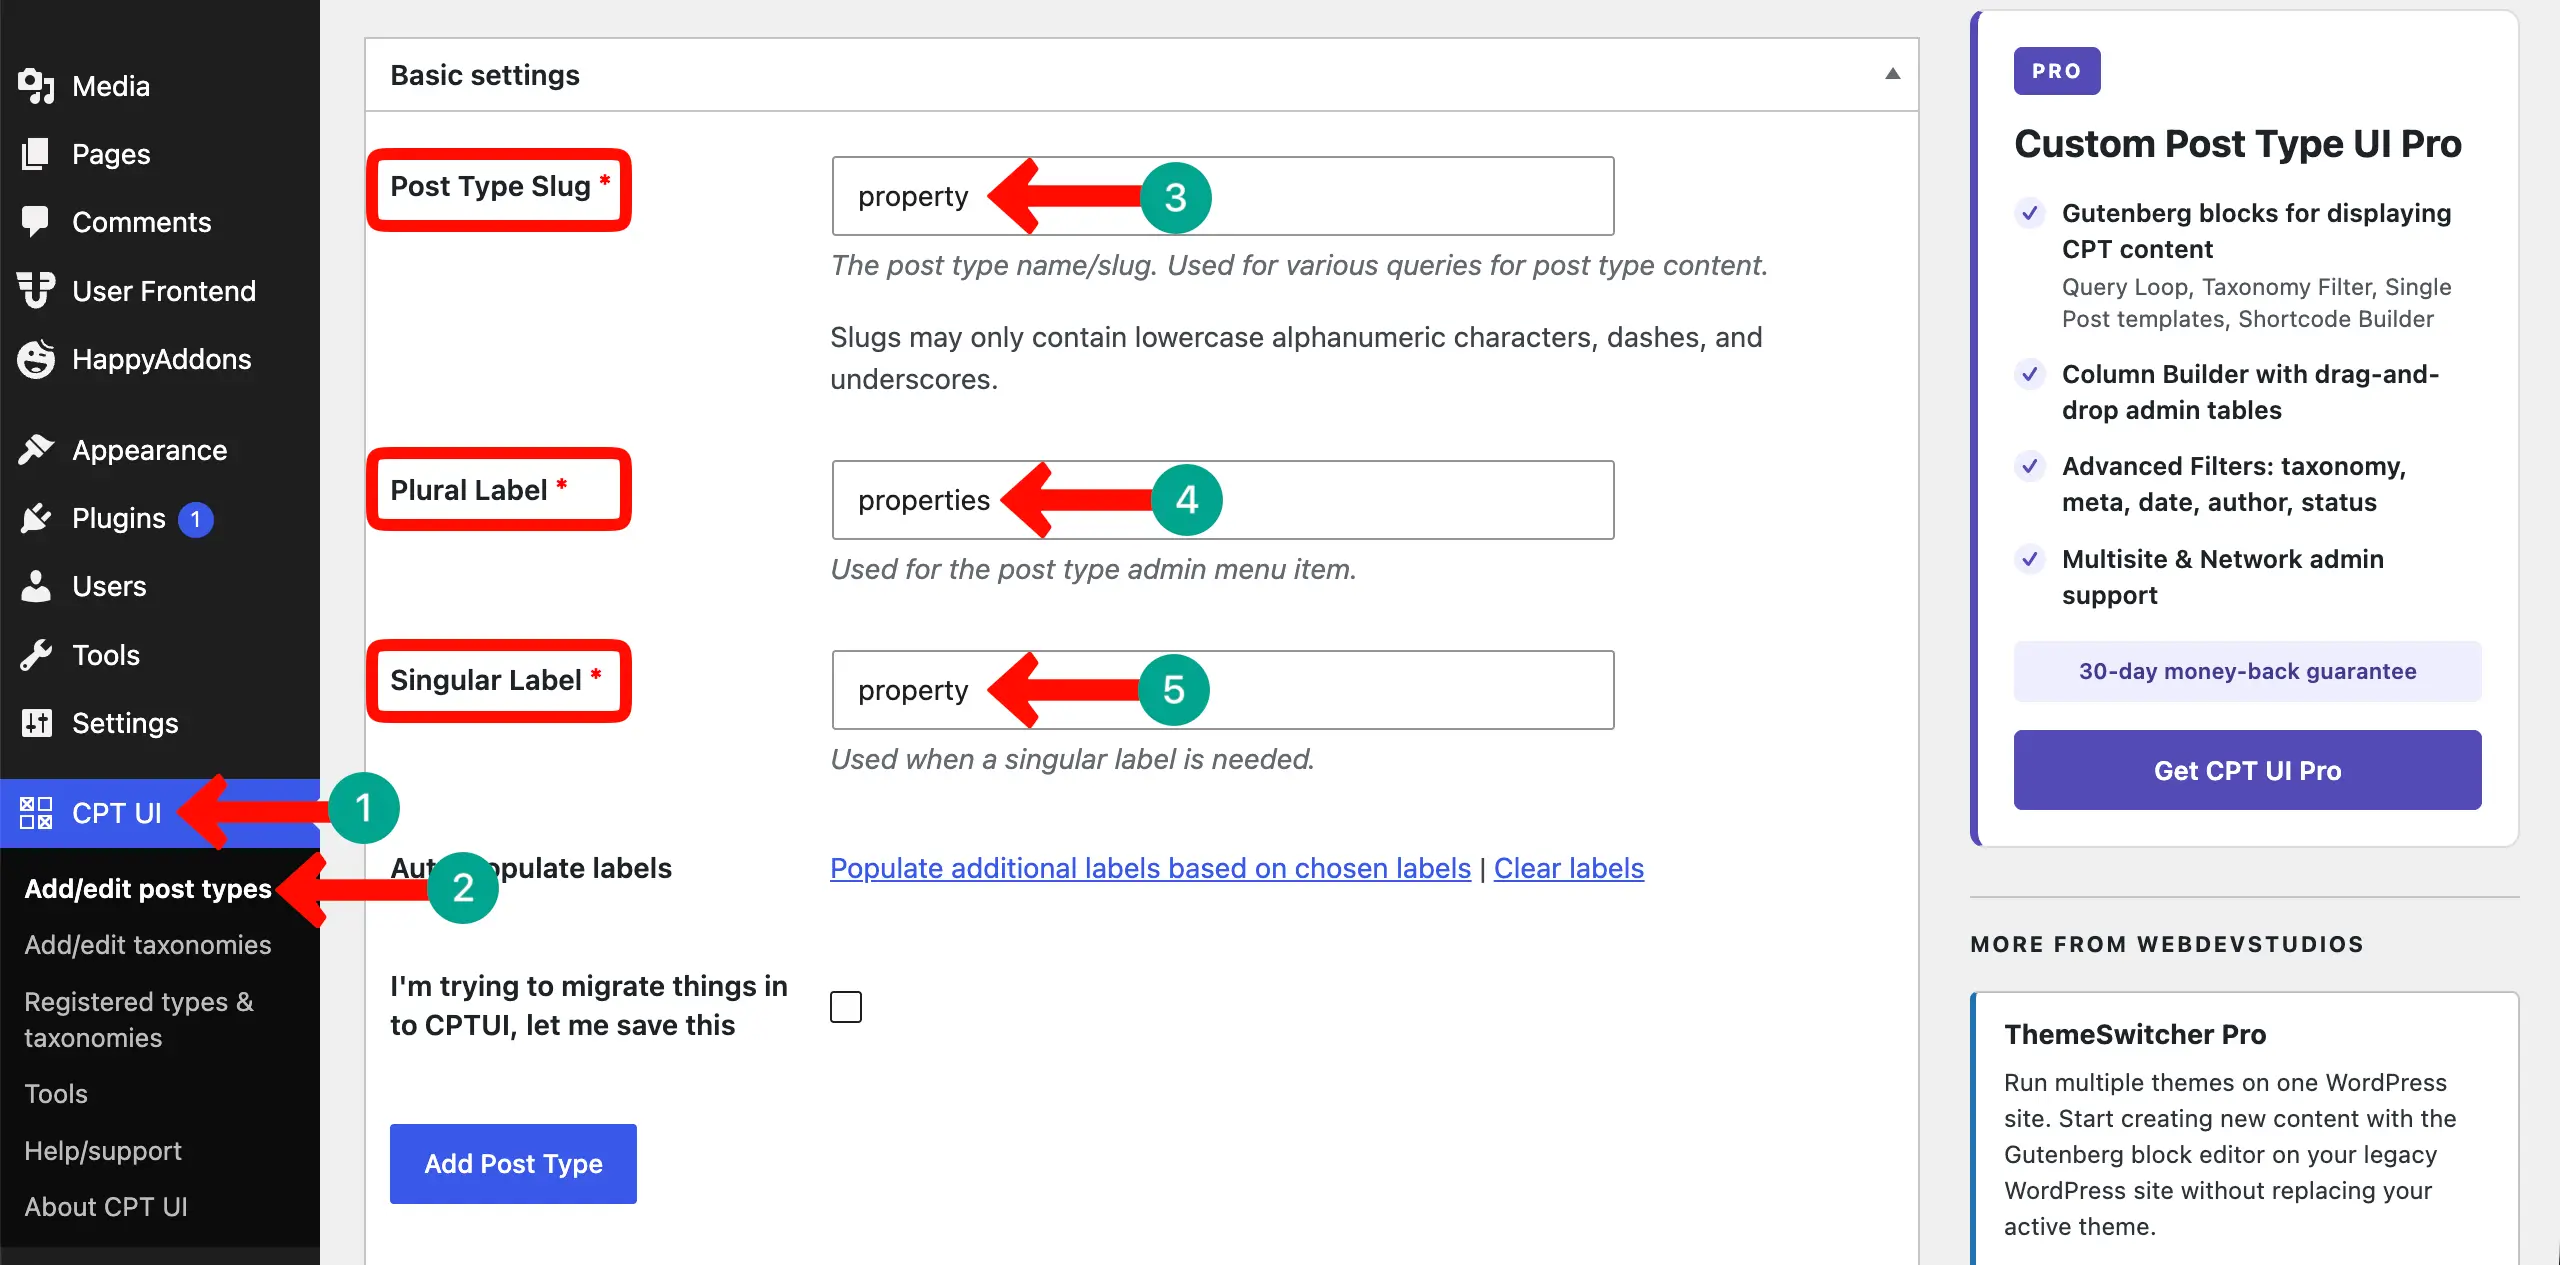
Under Settings, find these options and enable them – Has Archive (true), Publicly Queryable (true), Show in REST API (true). Finally, save all changes by clicking the Add Post Type button.
# Registering your Property taxonomies
Go to CPT UI → Add/Edit Taxonomies and create three taxonomies, each attached to your property post type. For example, you can set:
- Taxonomy Slug: property-type | Plural Label: Property Type | Singular Label: Property Type
- This will later cover terms like Apartment, Villa, House, Commercial, Office Space, Land
Tick the Properties option under the Attach to Post Type section.
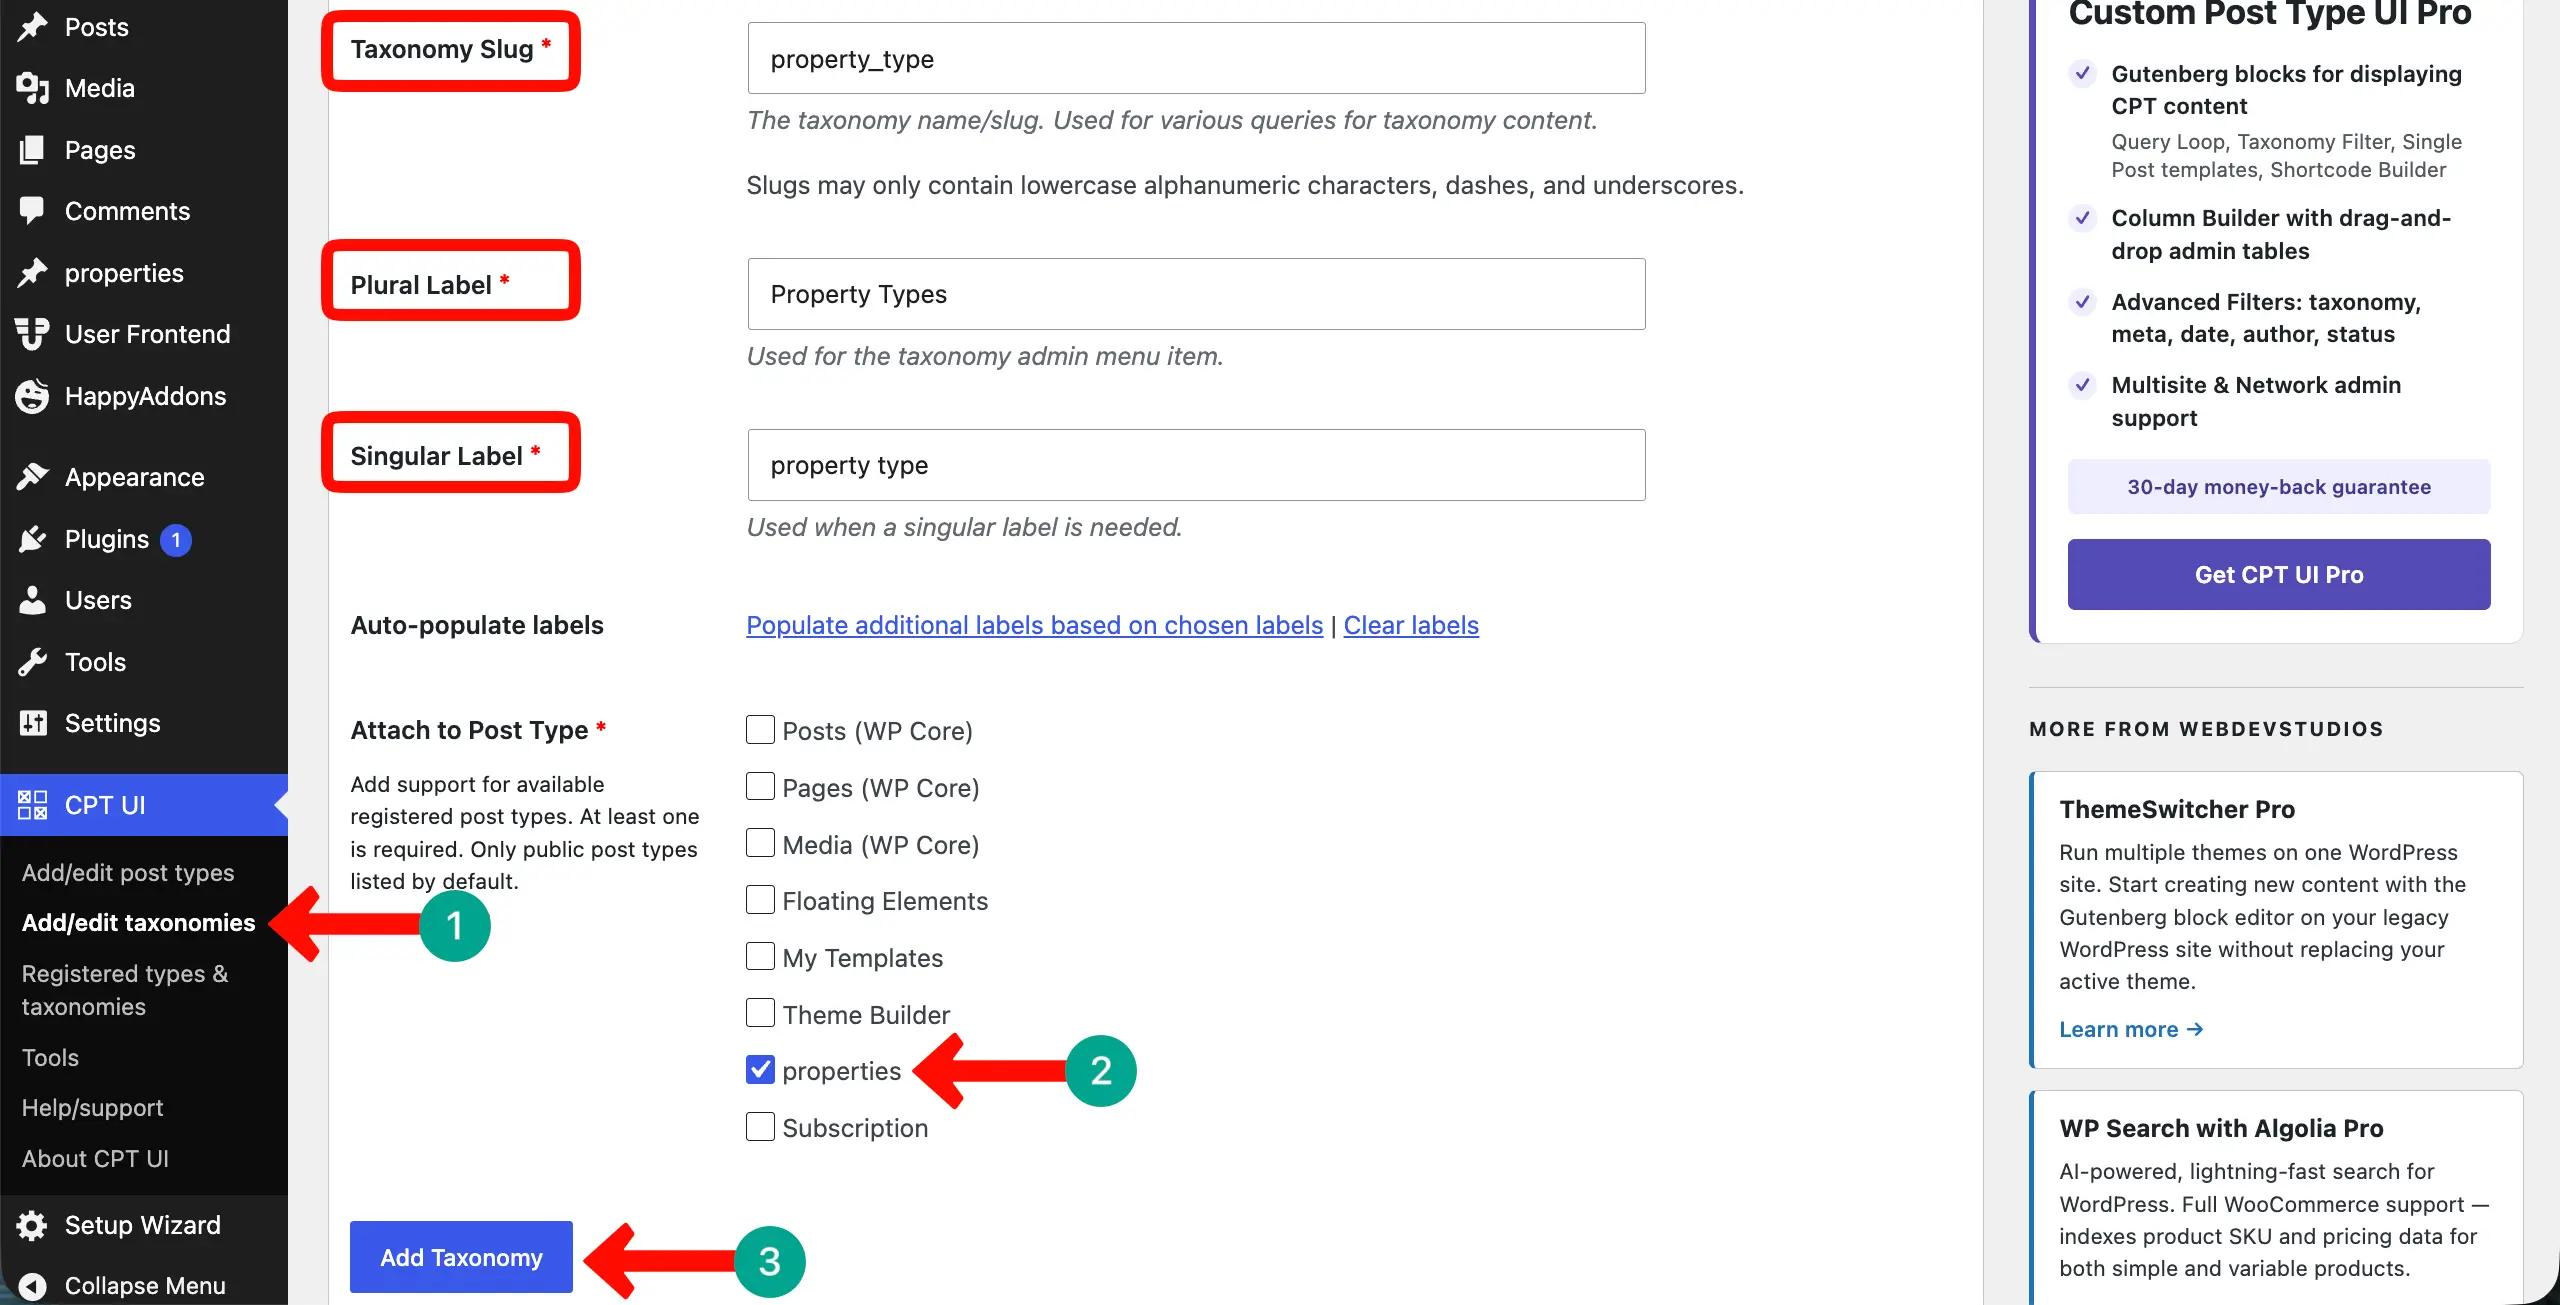
In the same way, add two more taxonomy slugs
- Taxonomy Slug: property-location | Plural Label: locations | Singular Label: location
- This will later cover terms like Times Park, Manhattan, Brooklyn, Queens, etc.
- Taxonomy Slug: property-status | Plural Label: Listing Status | Singular Label: Status
- This will later cover terms like For Sale, For Rent, Sold, Rented
These taxonomies will power your filter system later.
Step 5: Build the Property Submission Form in WPUF
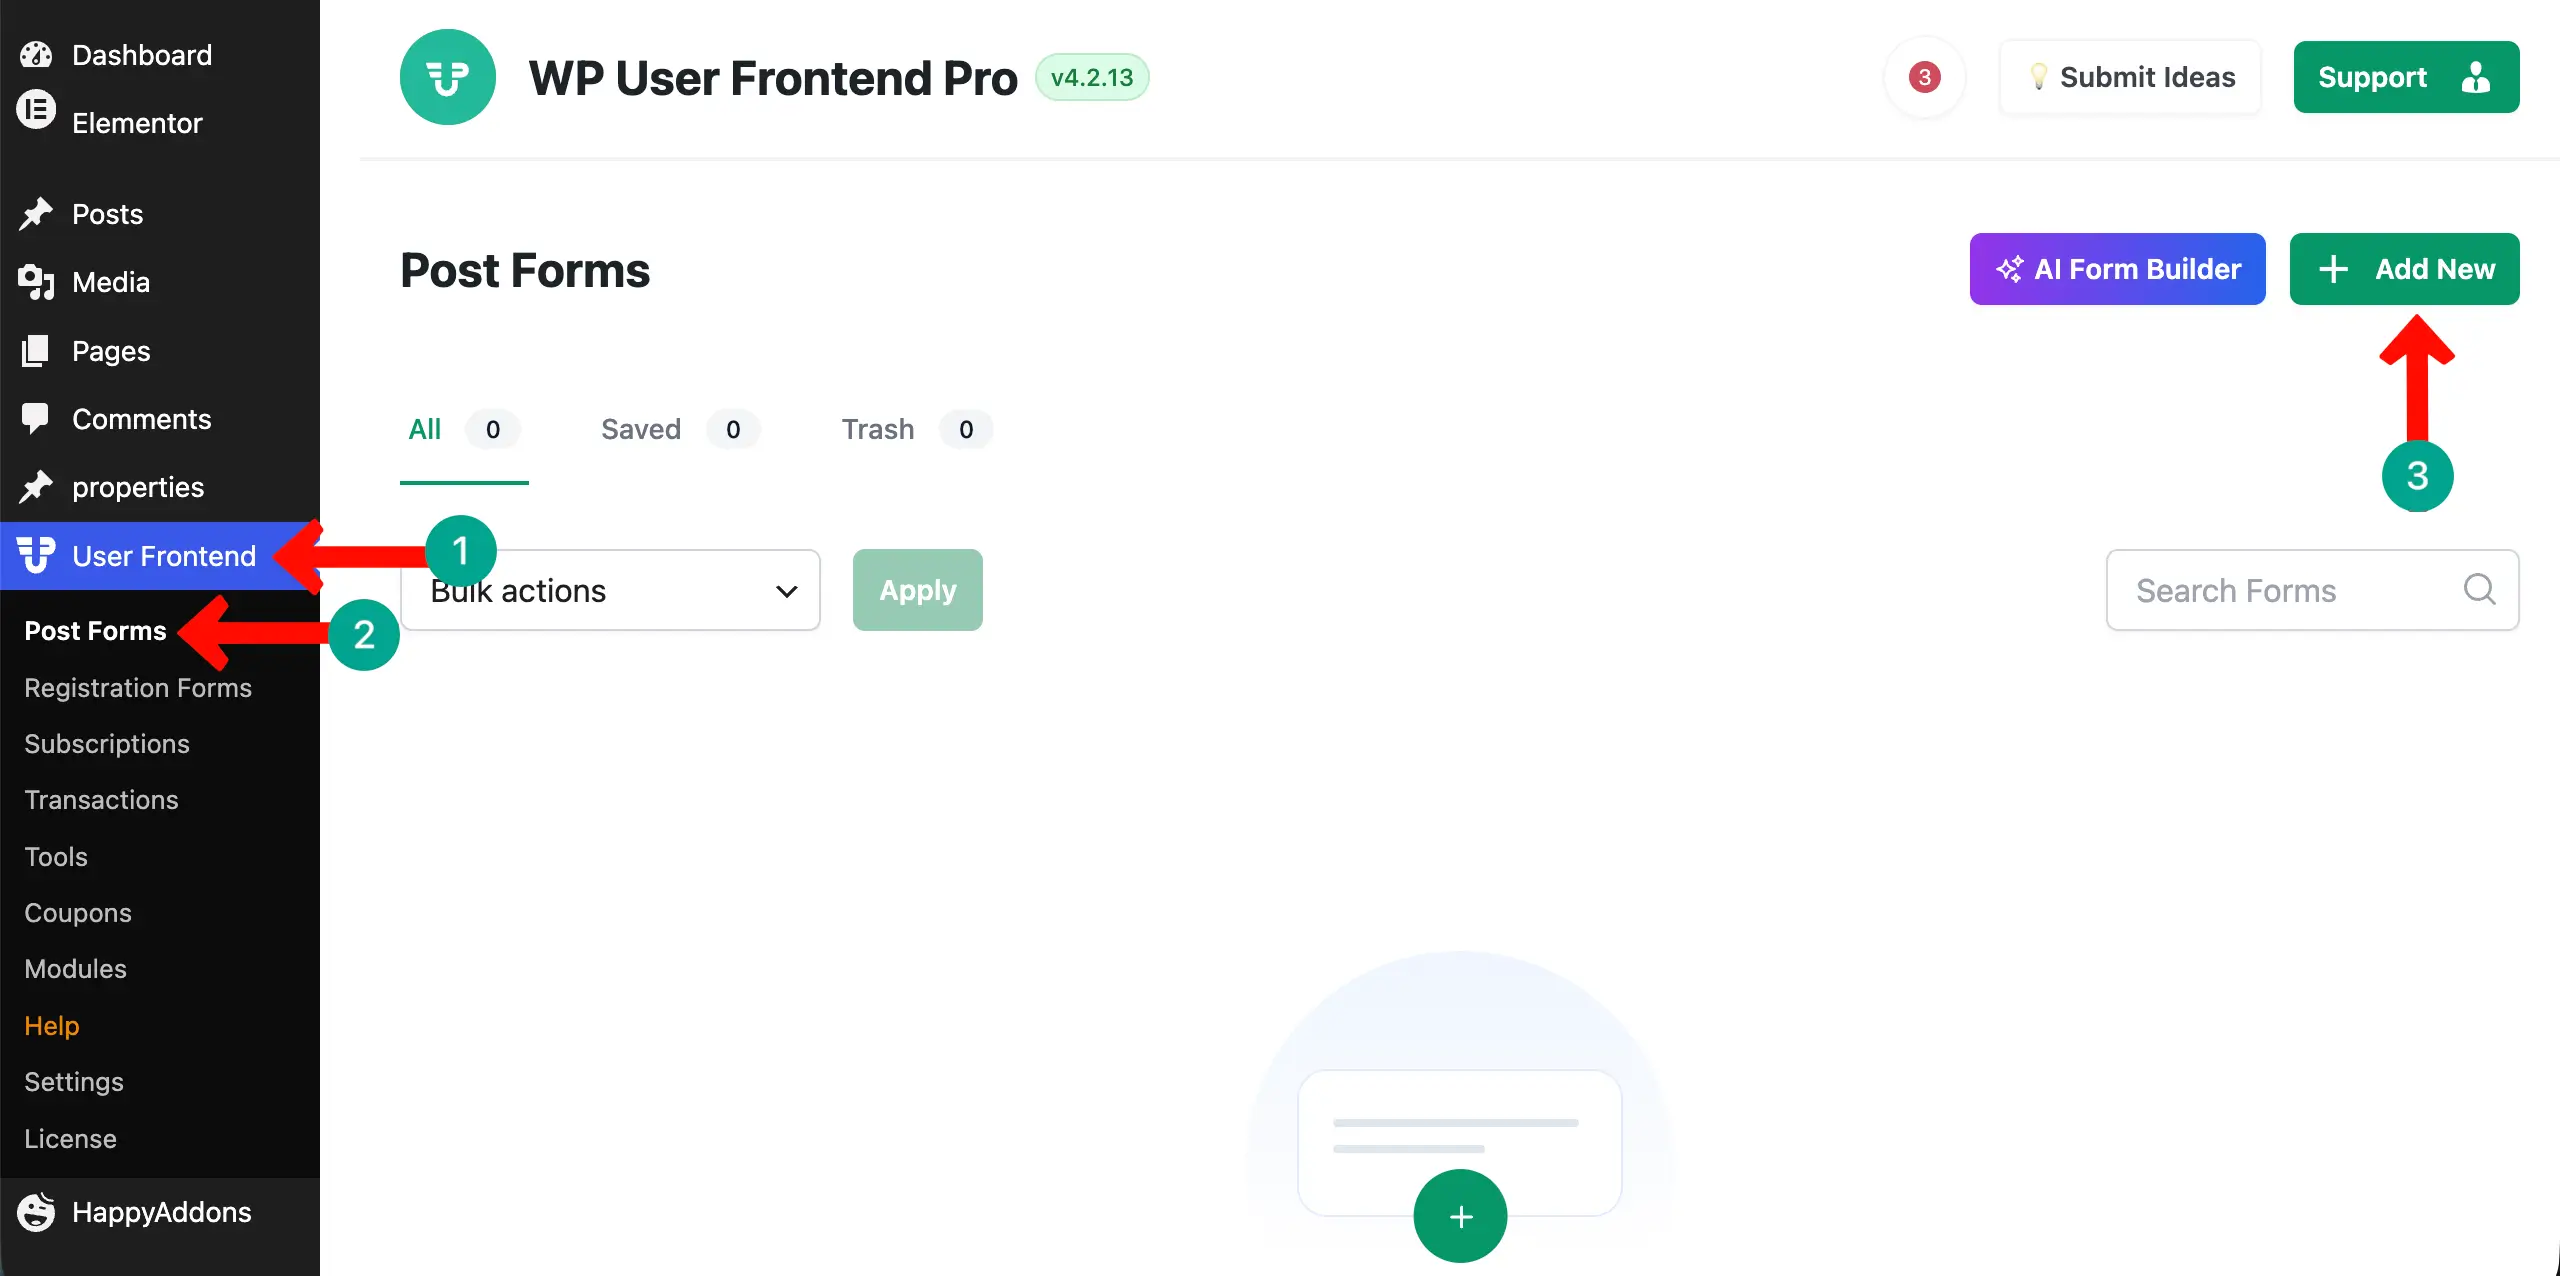
Now go to WP User Frontend → Post Forms → Add New.
# Build the Form
Build your property form by dragging these field types from the left panel onto the form canvas:
- Post Title field — label: Property Title
- Post Content field — label: Property Description
- Price field — label: Property Price
- Dropdown field — label: Listing Type — options: For Sale / For Rent
- Dropdown field — label: Property Type — linked to property-type taxonomy (renders as dropdown)
- Dropdown field — label: Location — linked to property-location taxonomy
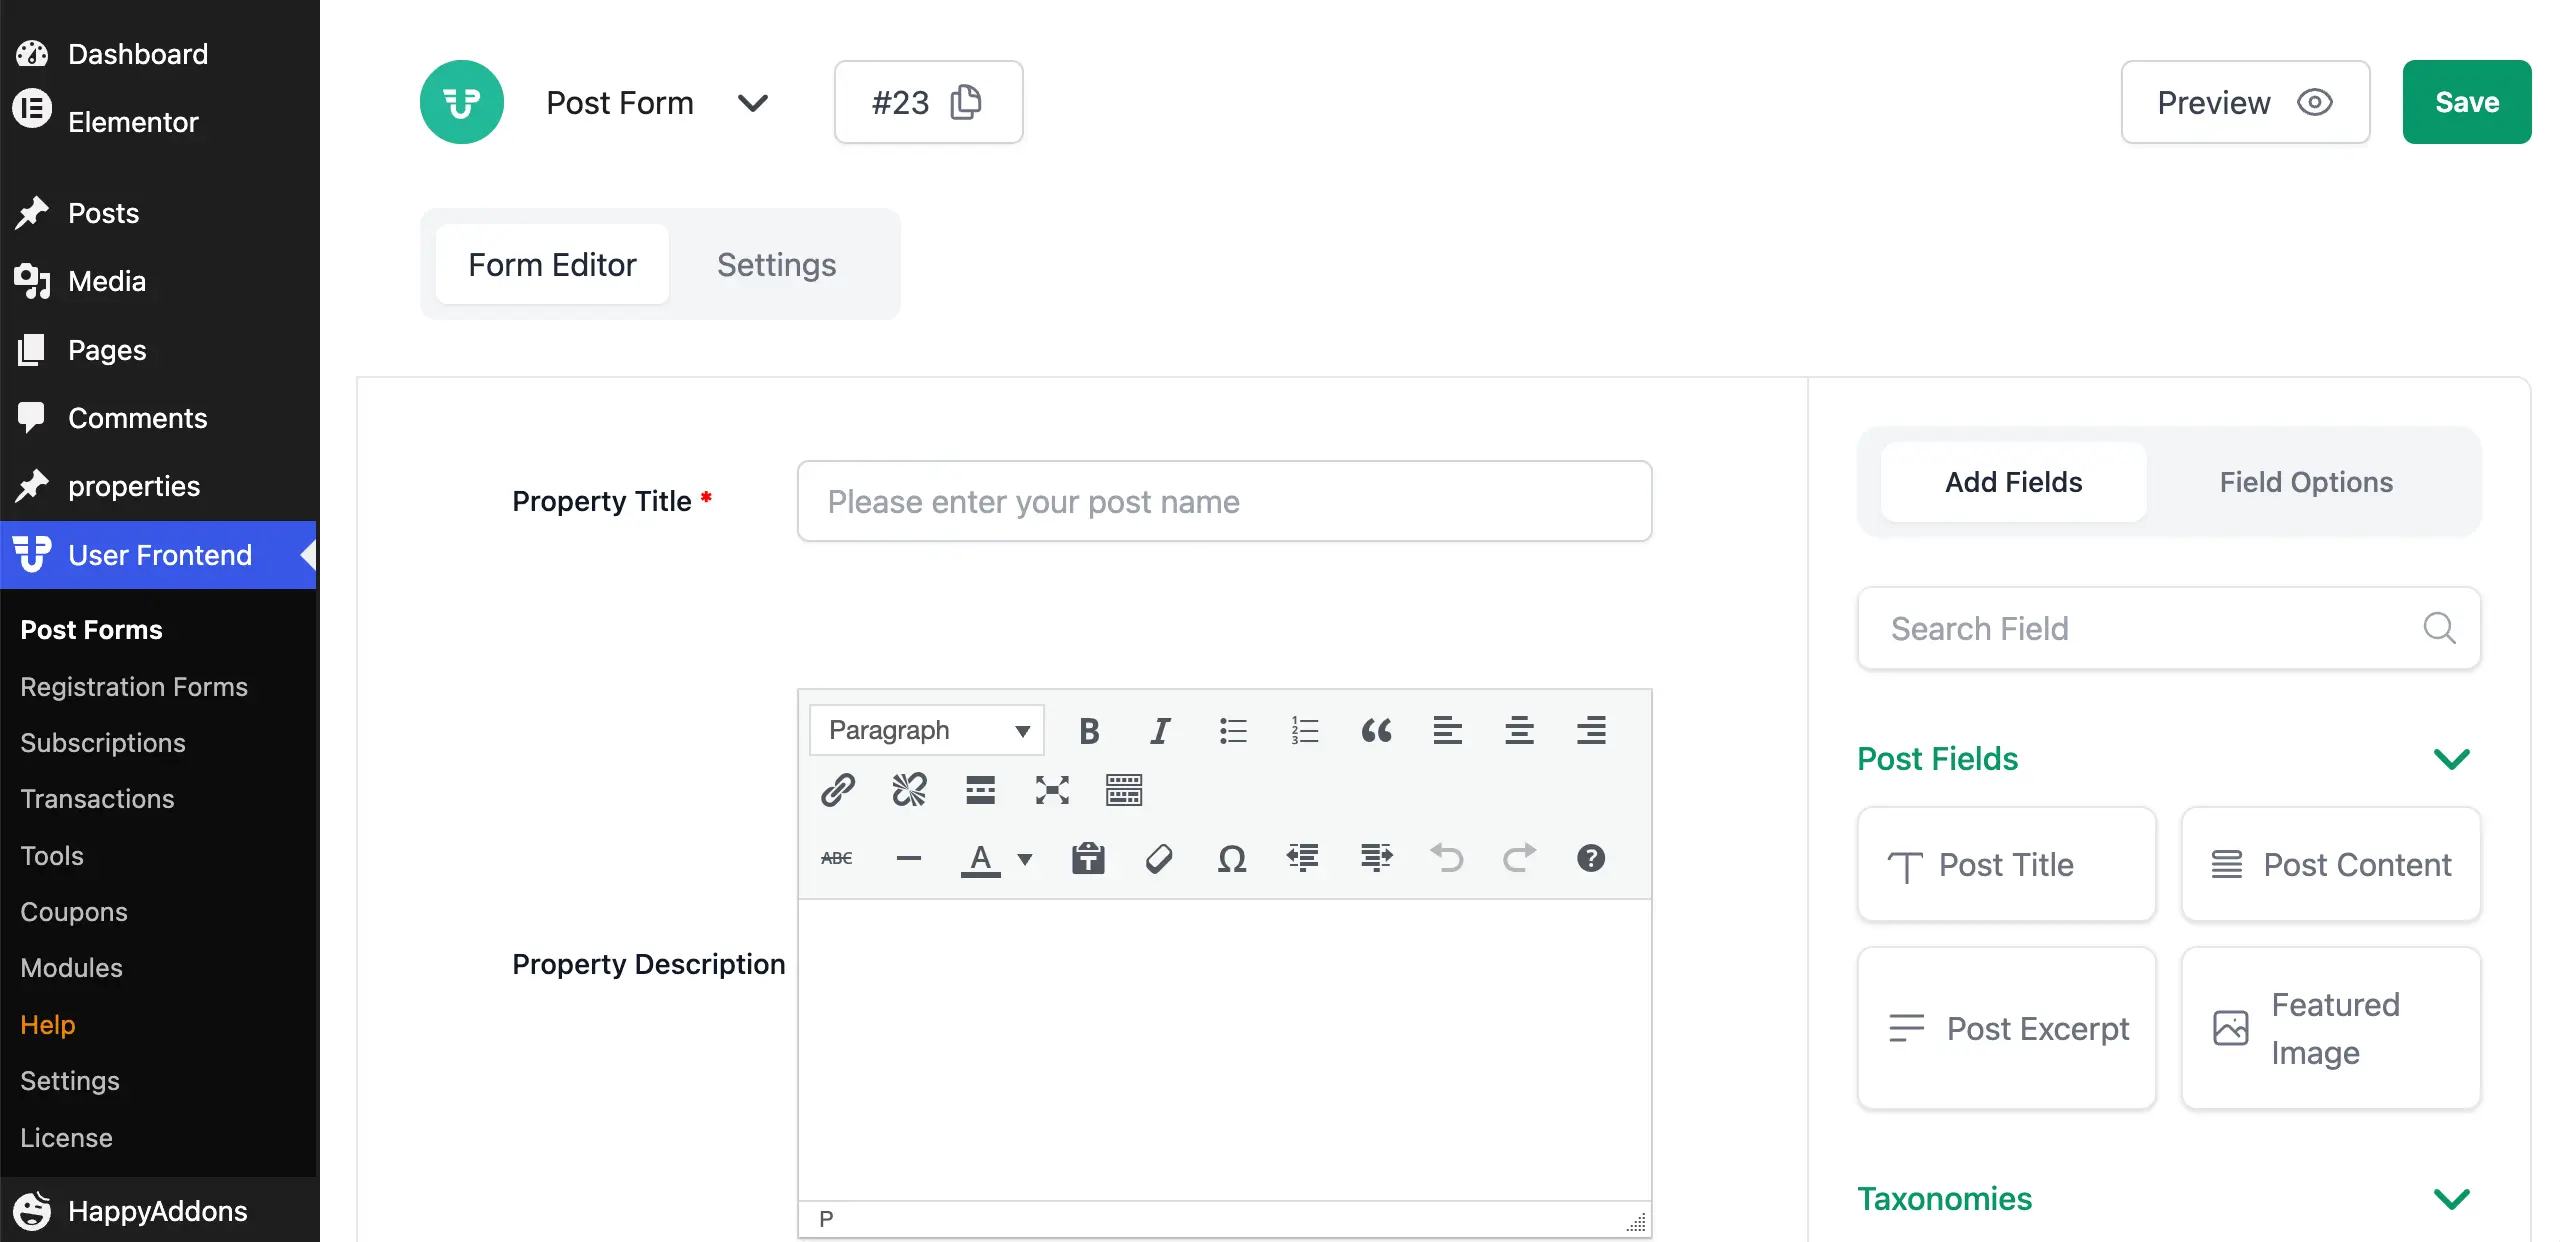
Very Important: In the form settings panel on the right, set the Post Type to property.
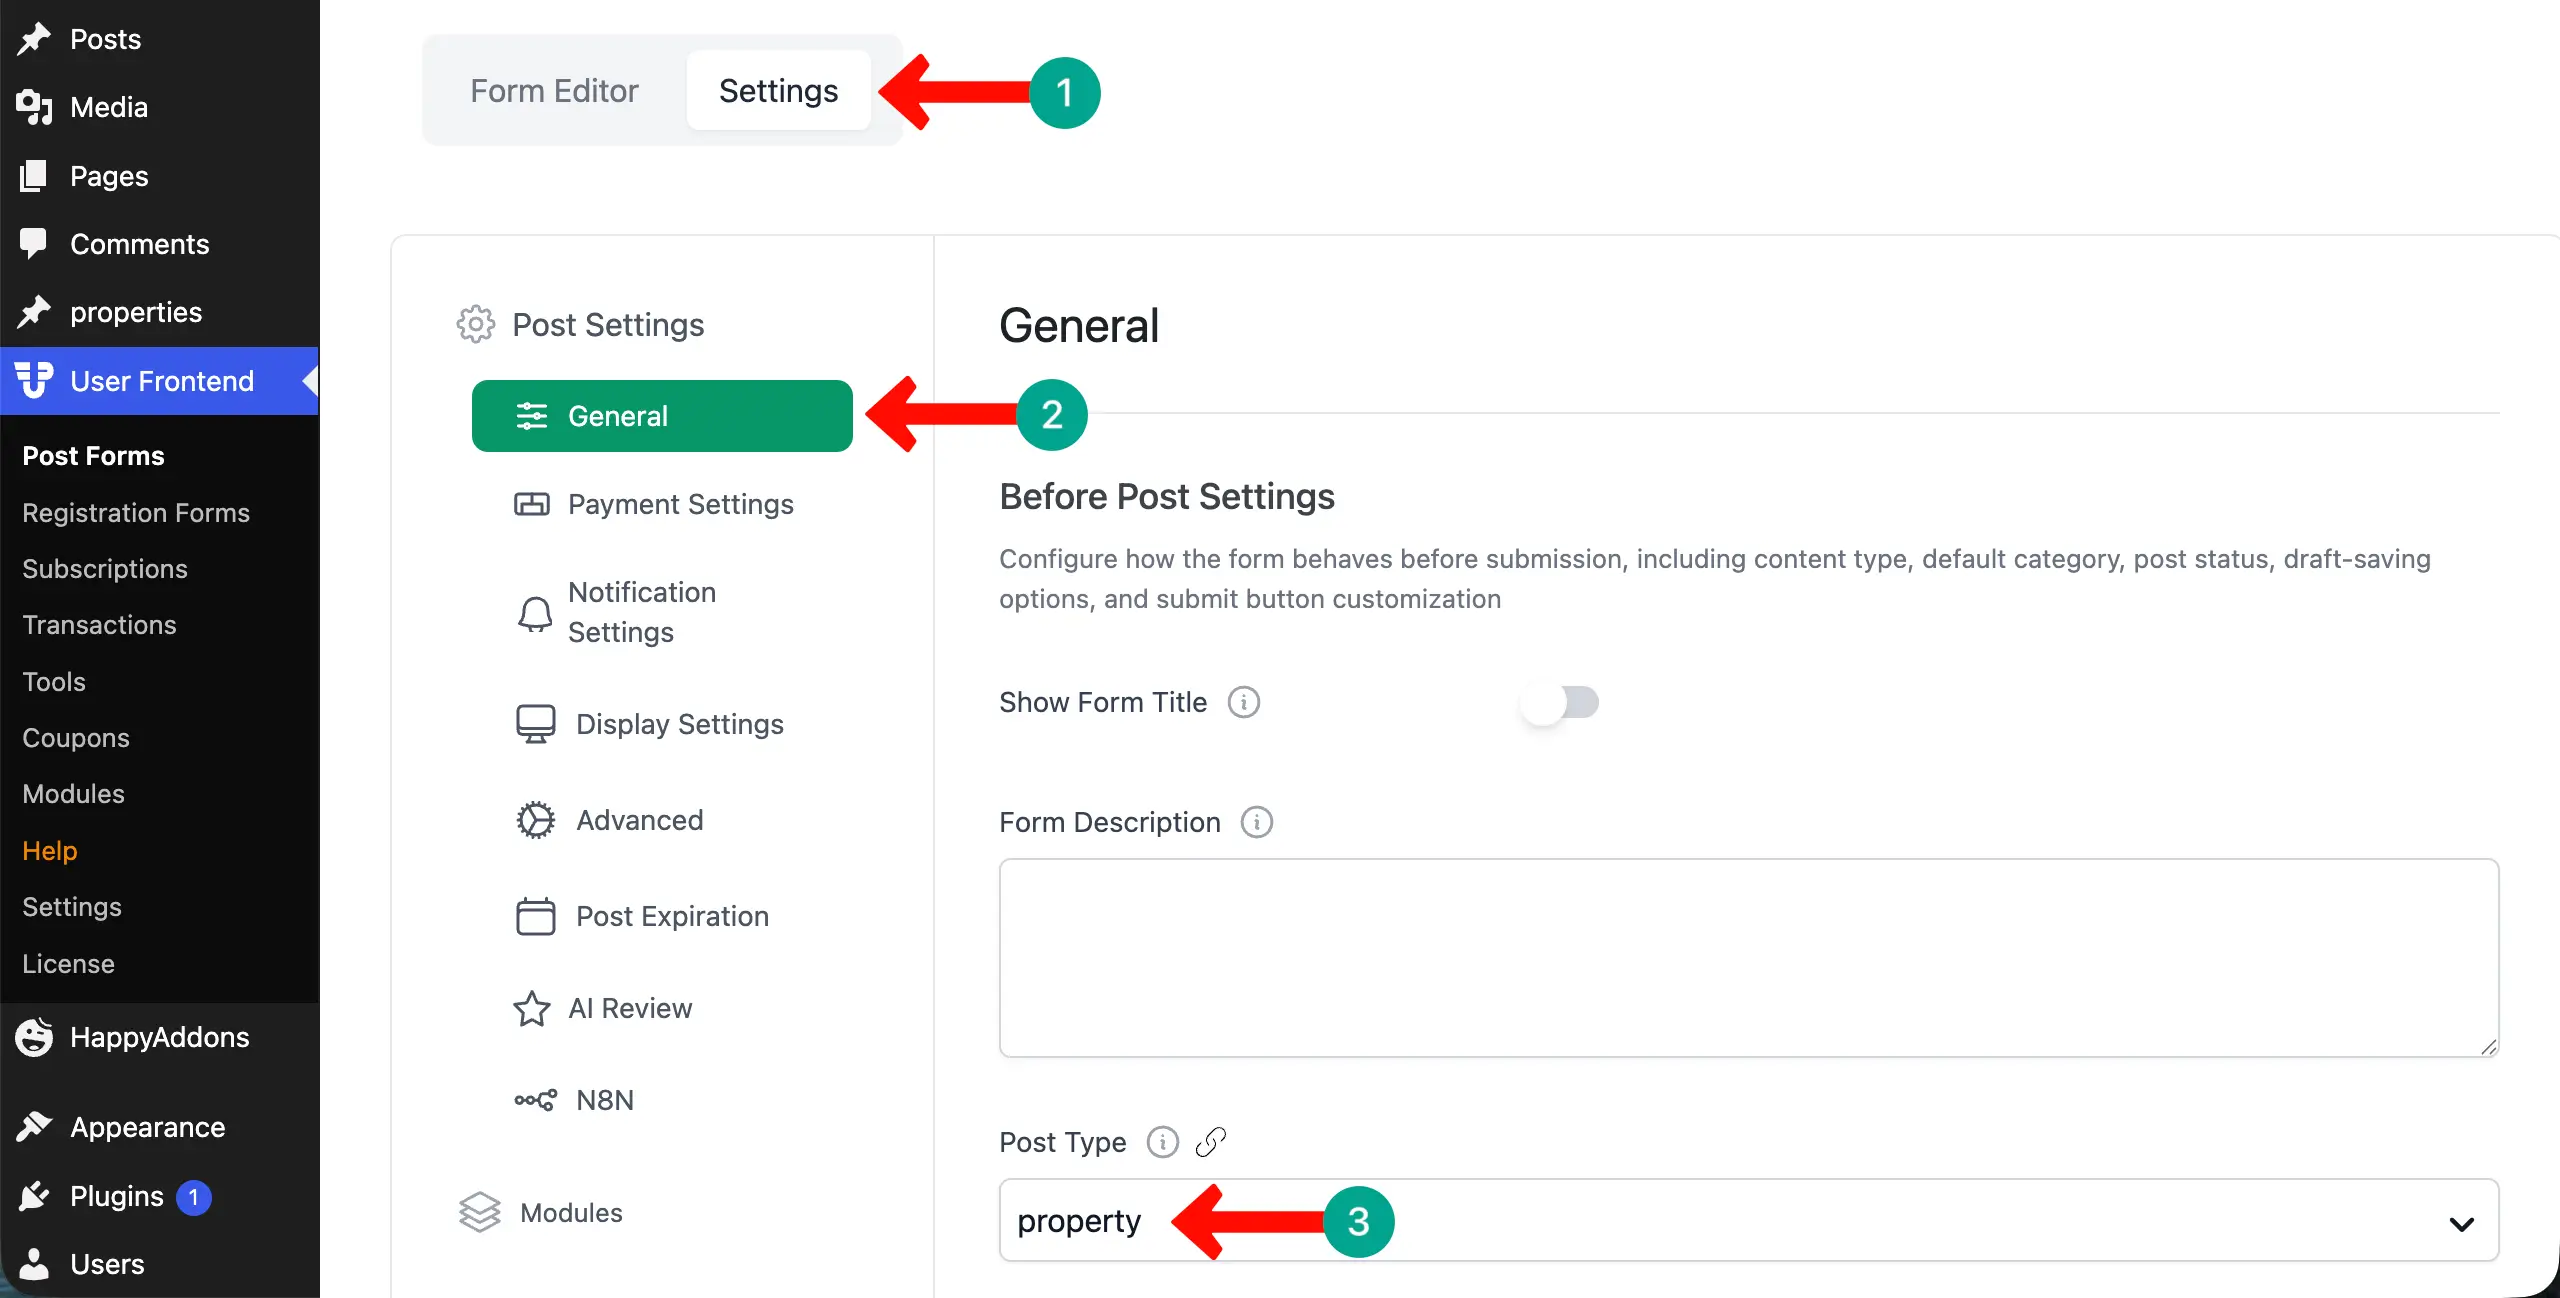
In the same way, you can add more fields to the form if needed. Hope you have learnt the process well. Finally, save the form. Note the form shortcode — it will look like
.Step 6: Create the Frontend Property Submission Page
Go to Pages → Add New, title it “Submit a Property” or “List Your Property”. Open it in Elementor.
Add a Section with a clean background. Place the Elementor Heading Widget at the top — “List Your Property“ — with a sub-headline setting expectations.
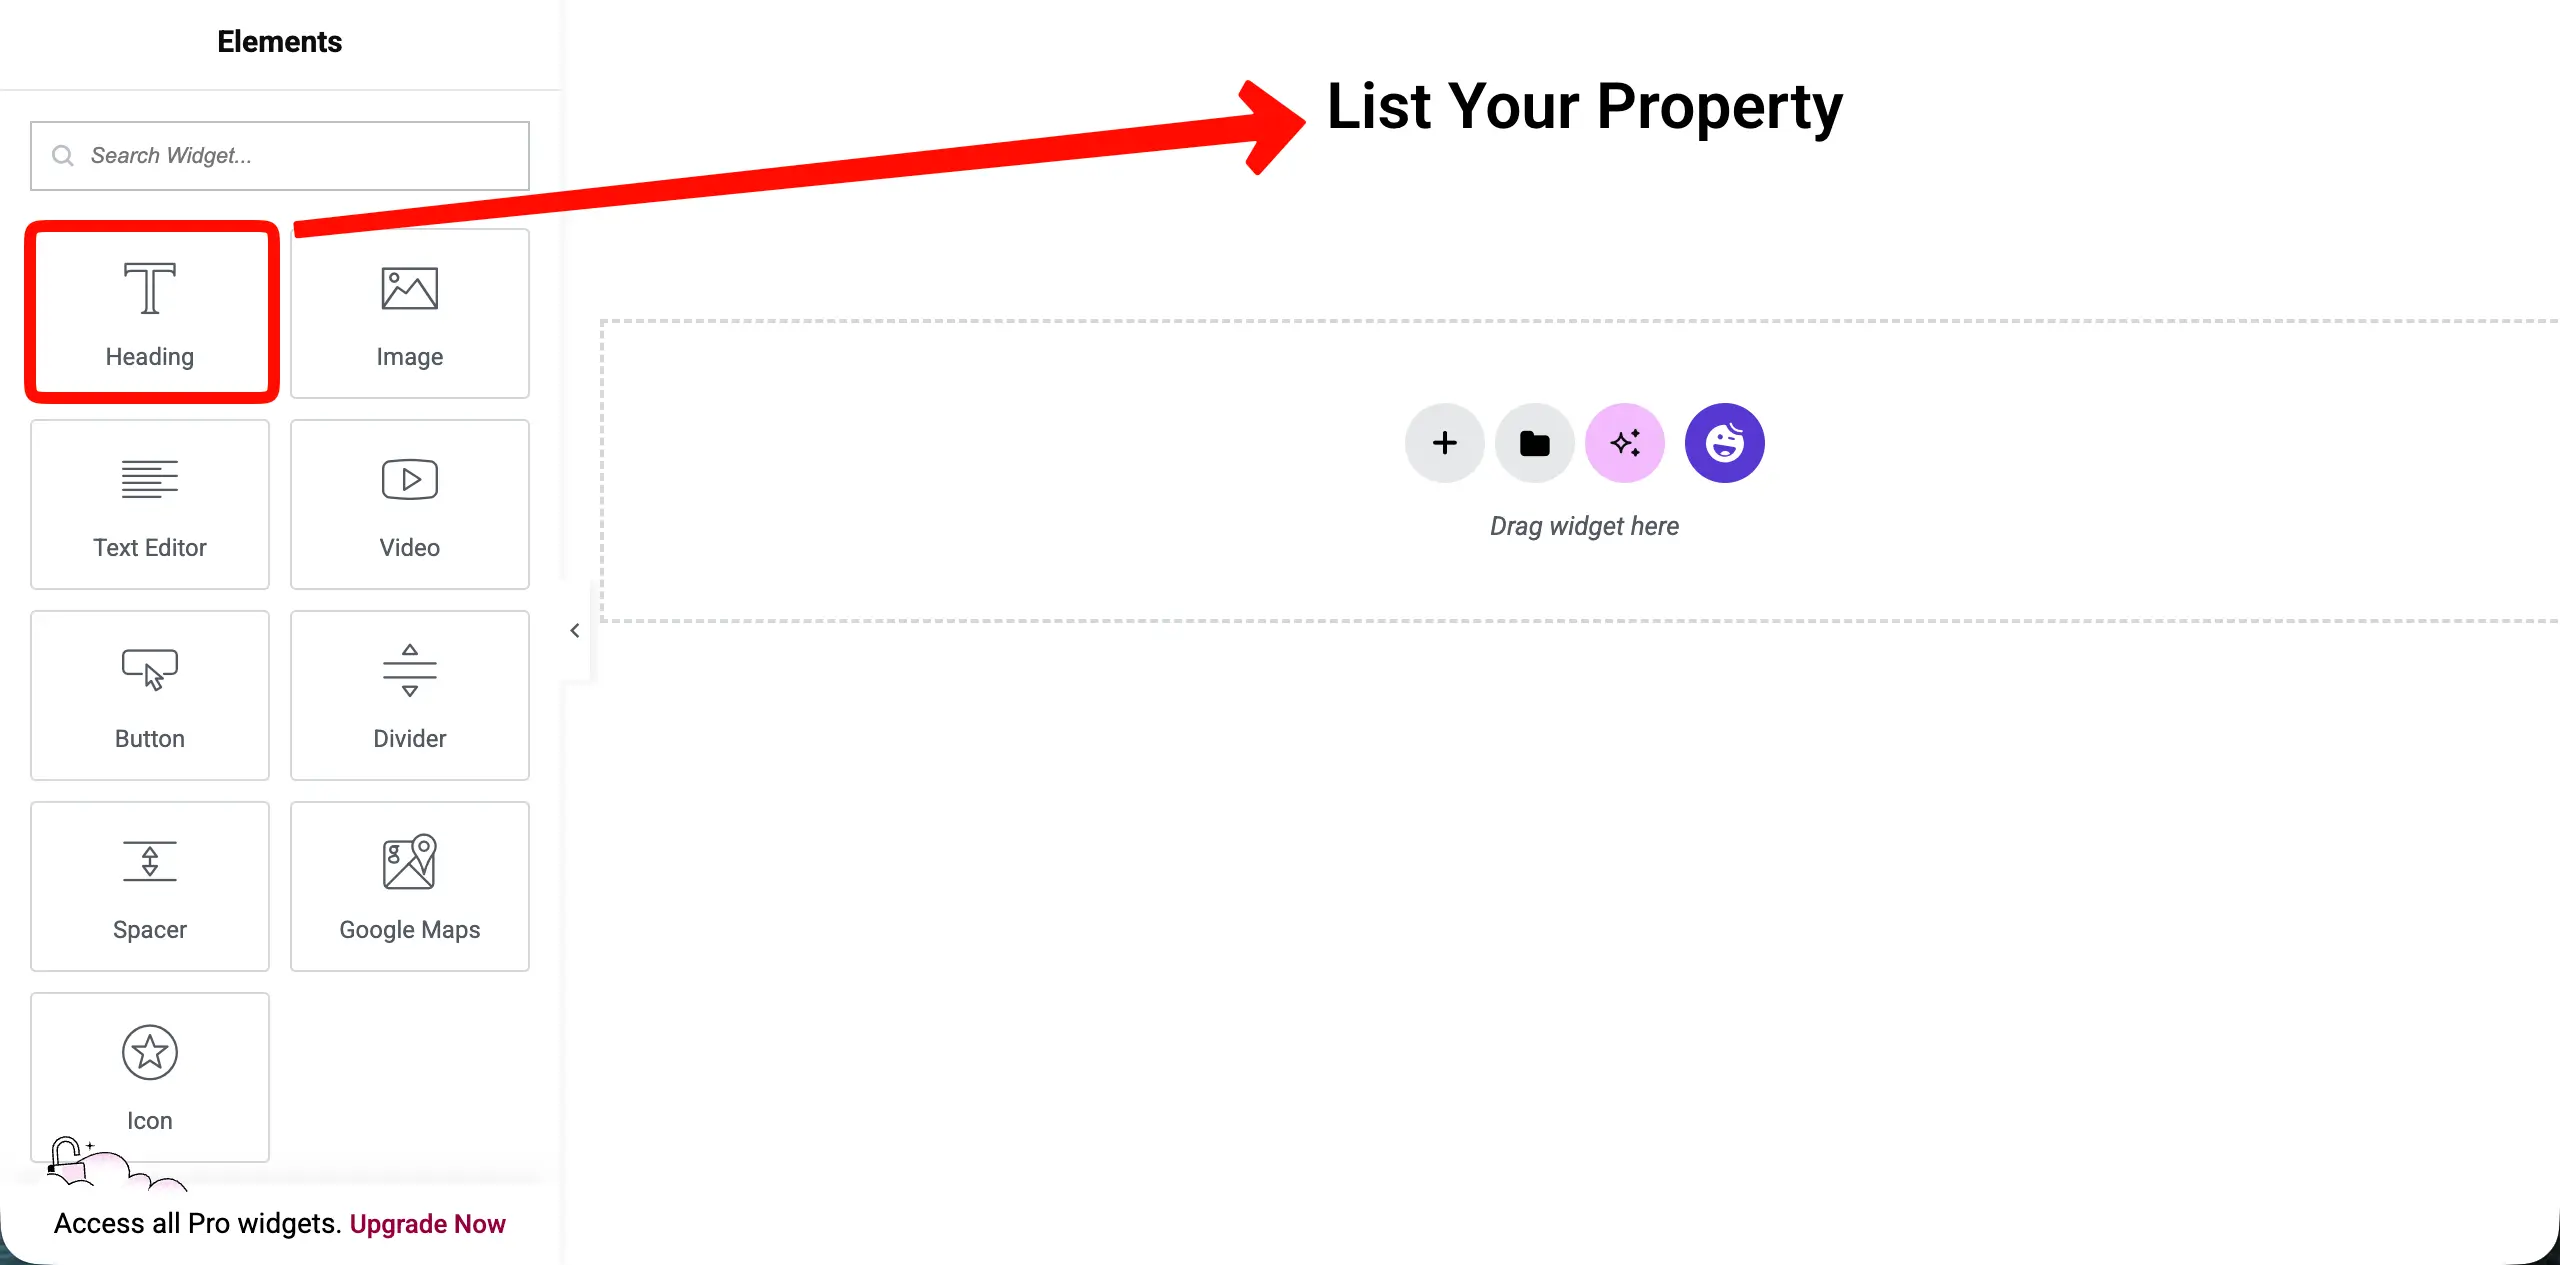
Below it, add the Elementor Shortcode Widget and paste your WPUF form shortcode:
. The WPUF form renders fully inside the Elementor layout.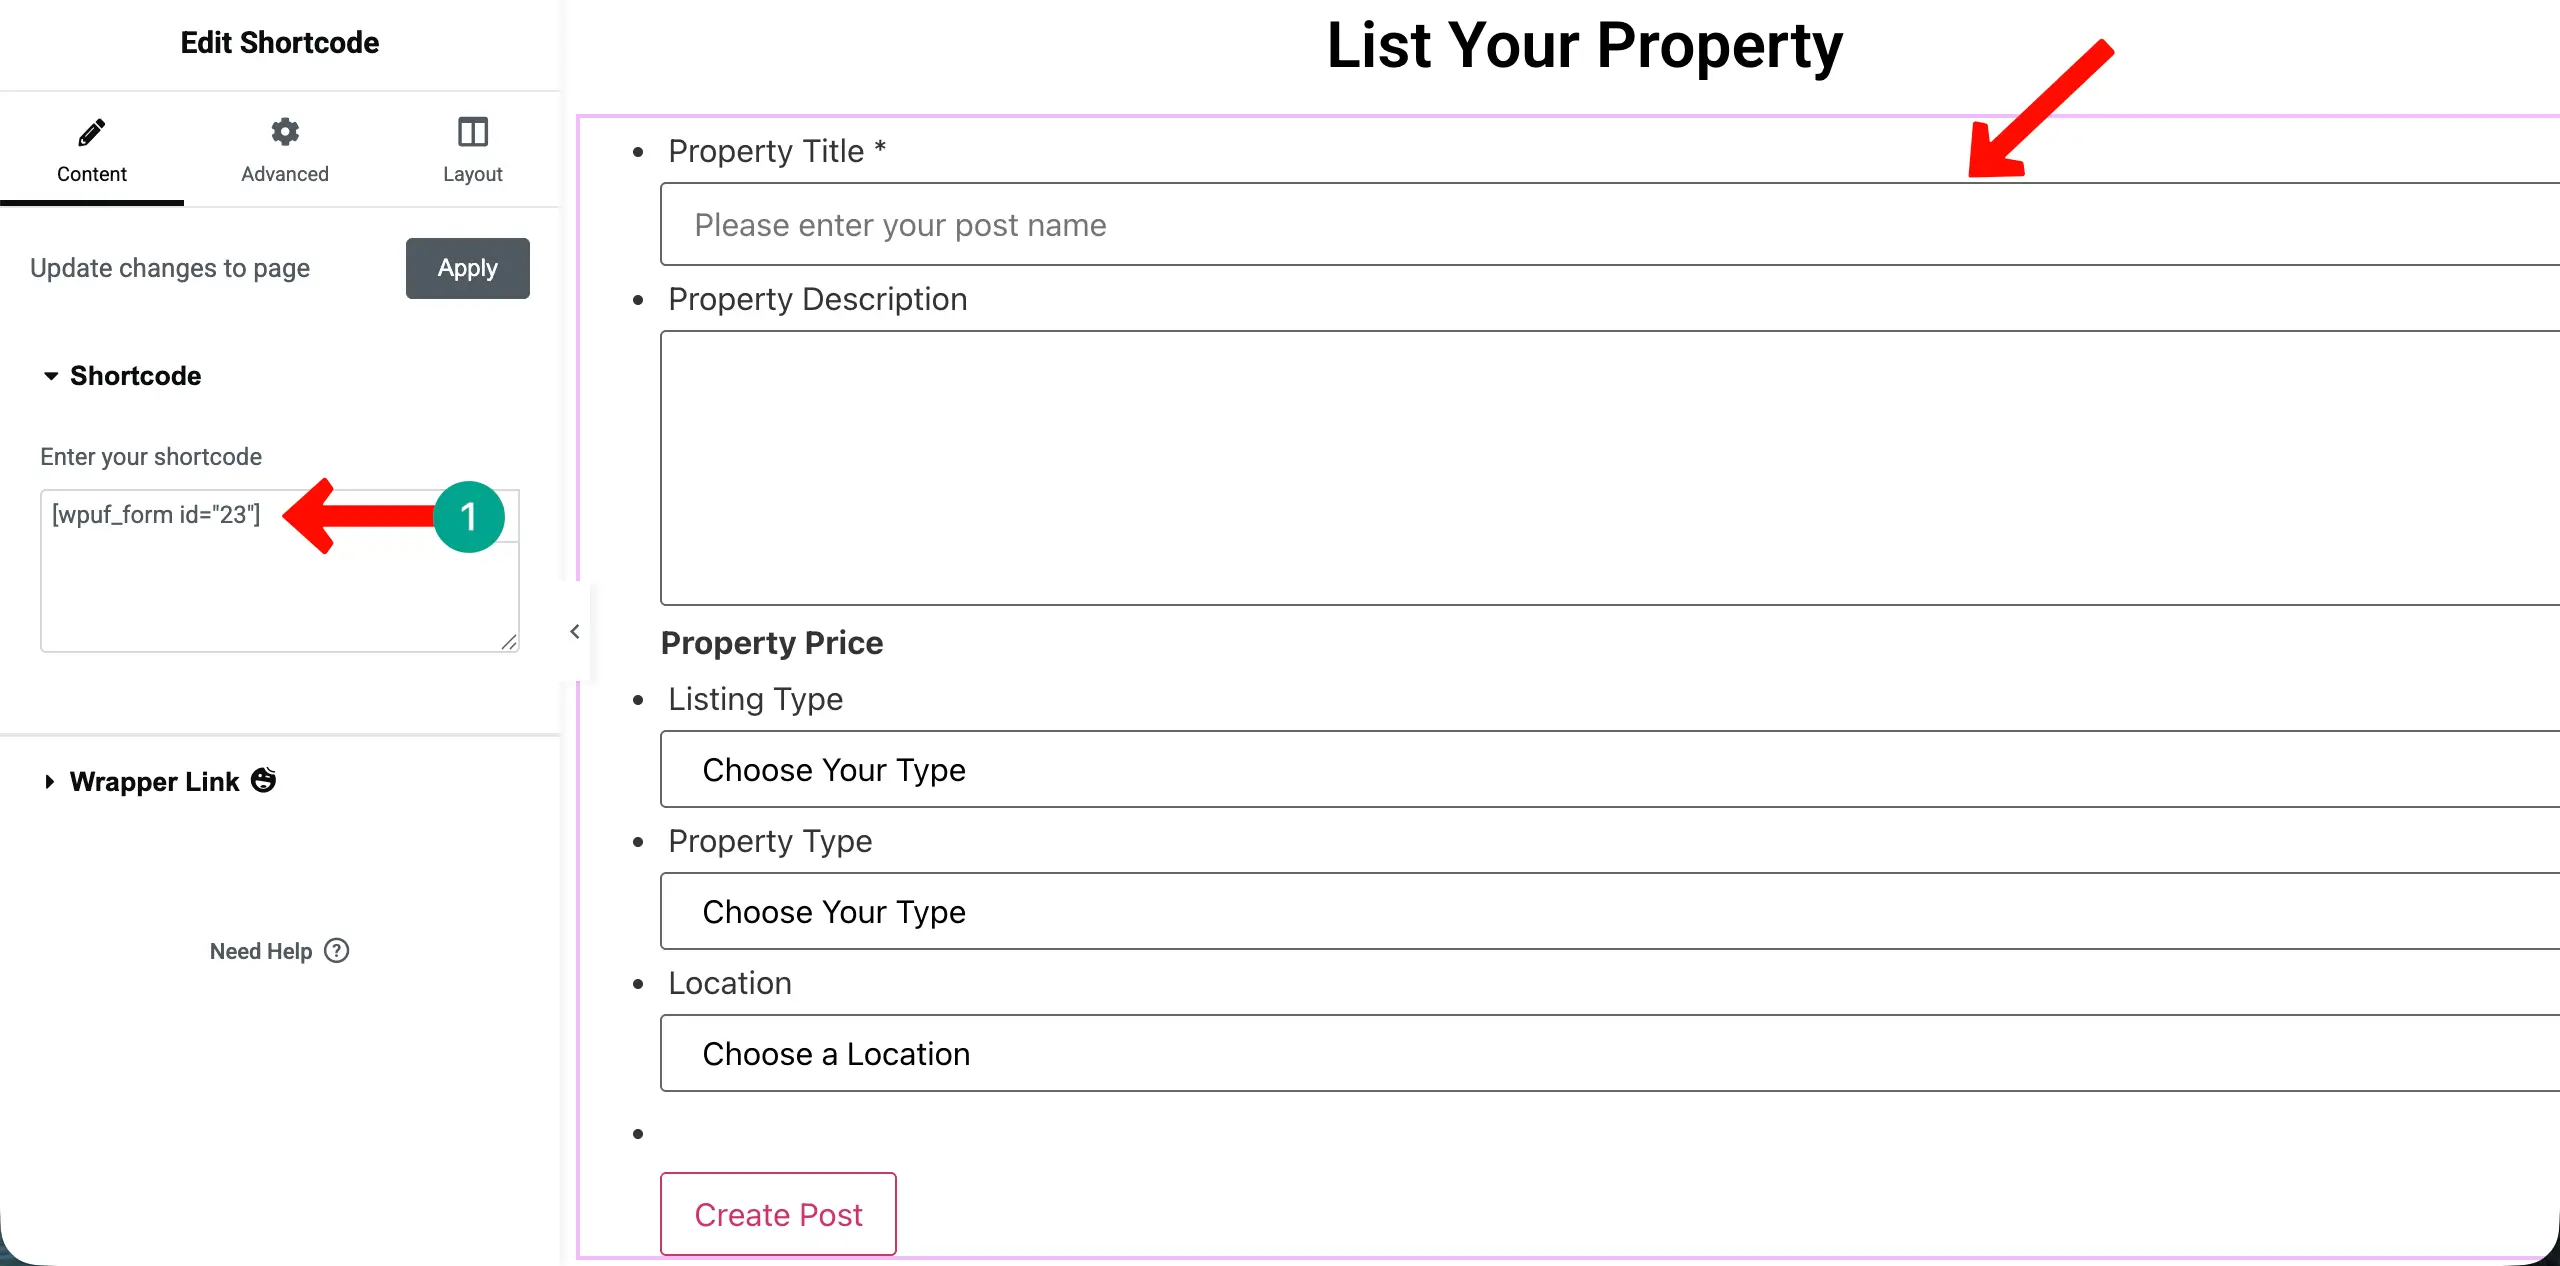
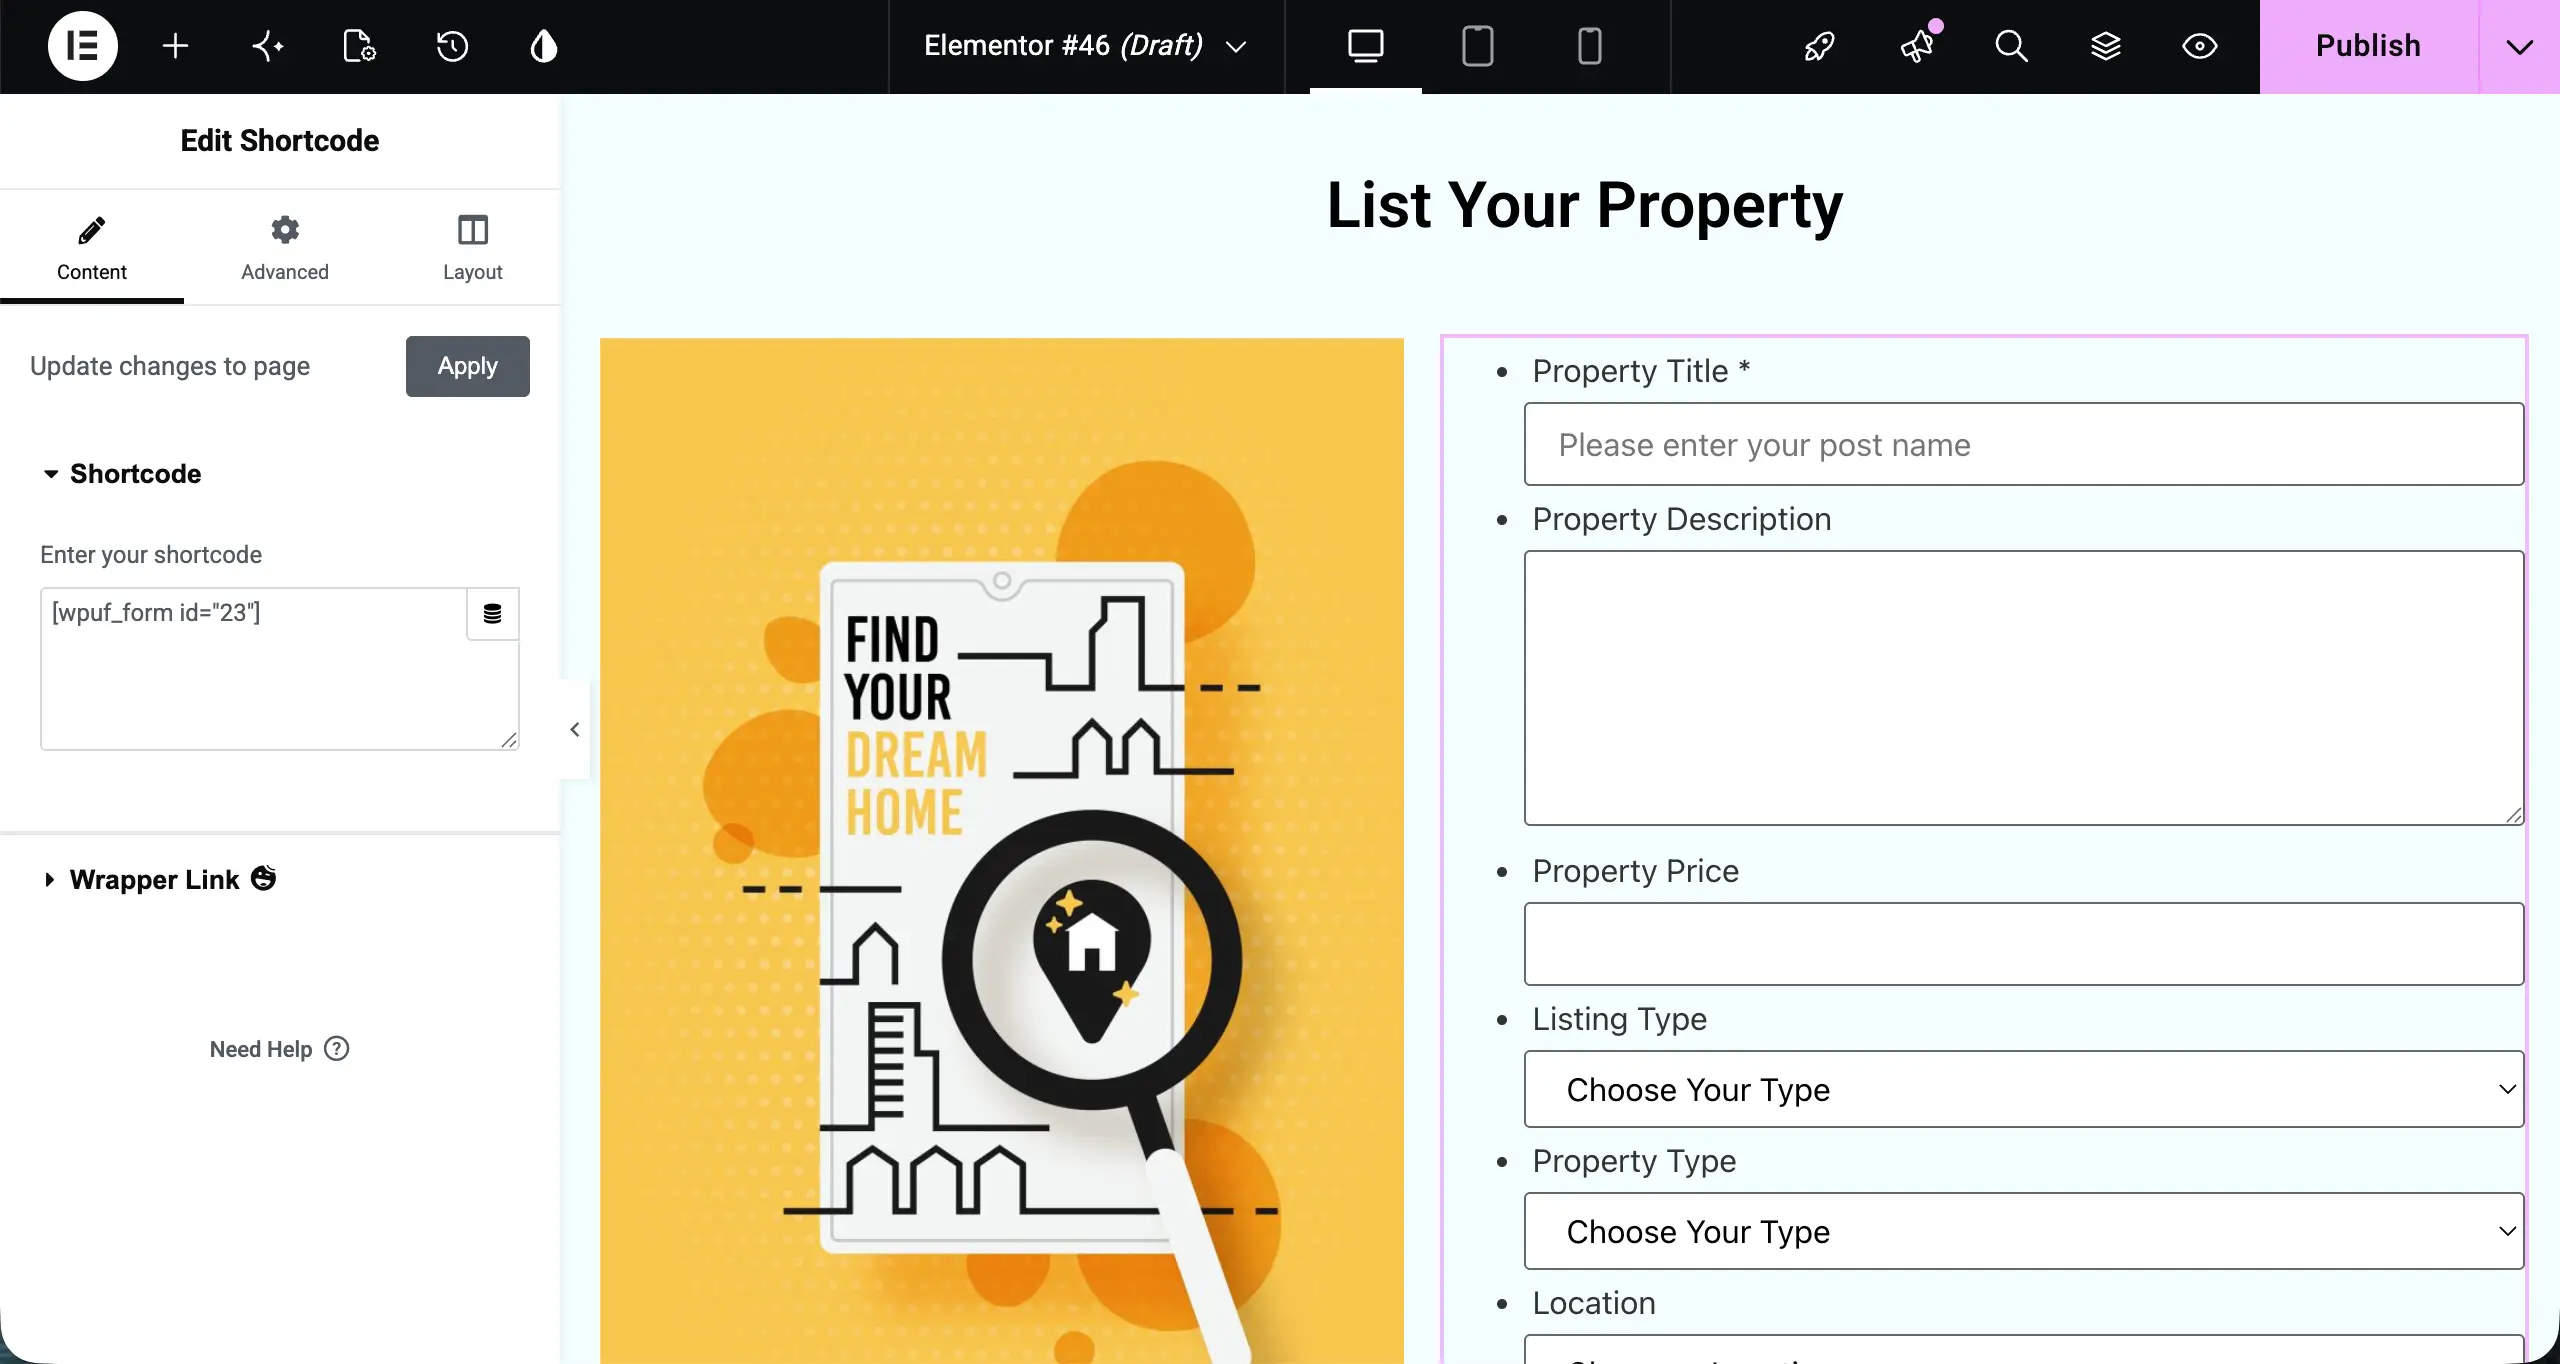
It’s now your turn to design the landing page using other widgets, creating layouts, various colors, typography, and more. Hope you can do these yourself alone.
For example, just for this tutorial, we have attached an image and a suitable background color the page.
Step 7: Create the Agent Frontend Dashboard
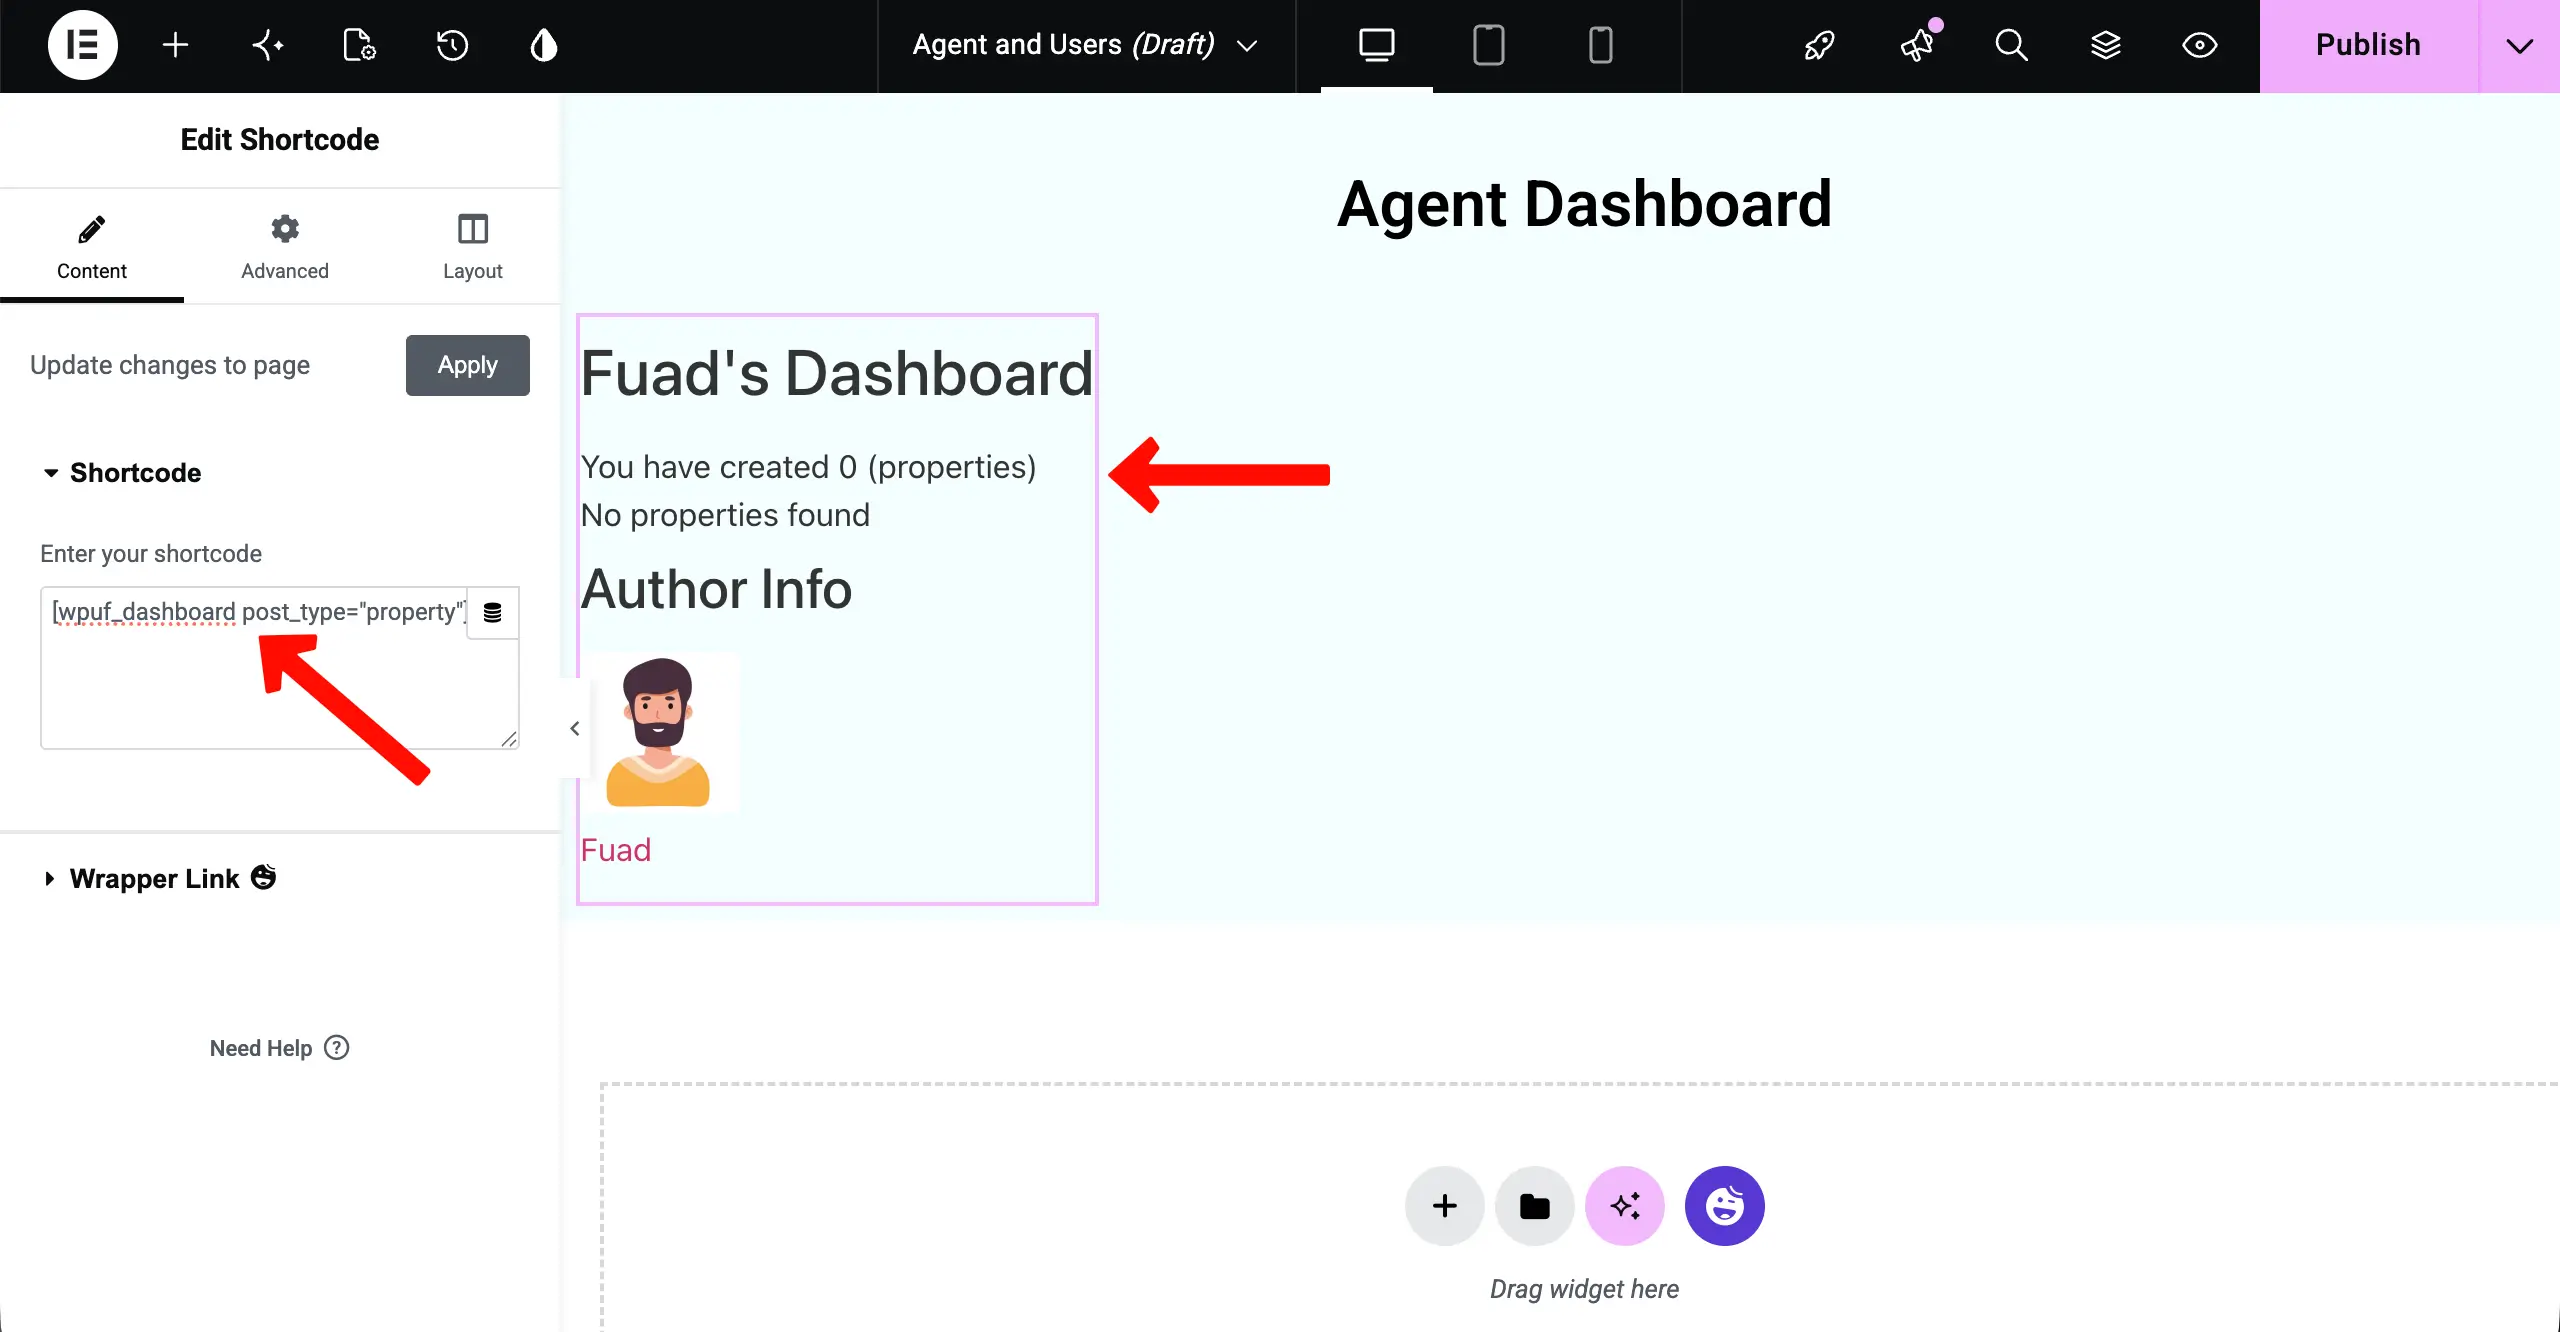
Agents need a place to manage their listings without any backend access. Go to Pages → Add New, title it “My Dashboard”. Open in Elementor. Add the Shortcode Widget and insert:
This renders a complete, functional agent dashboard showing all of the logged-in user’s submitted properties — with options to Edit, Delete, and track each listing’s approval status. Style the surrounding page in Elementor with a branded header and helpful guidance text.
As I haven’t submitted any property information, it shows 0. Whenever a user will create and submit a property list, the number will instantly be shown here.
Step 8: Set Up Subscription Packs (Optional — For Monetization)
If you want to charge agents to list properties on your platform, go to WP User Frontend → Subscription Packs → Add New and create your plans:
- Basic Plan — 3 active listings — $10/month
- Standard Plan — 10 active listings — $25/month
- Professional Plan — Unlimited listings — $50/month
Set the payment gateway under WP User Frontend → Settings → Payments (connect PayPal and/or Stripe). Create a dedicated Pricing page in Elementor, and use the HappyAddons Happy Pricing Table widget to display your plans in a polished, conversion-optimized layout.
Insert the shortcode on the same page to show the purchasable plans.
Step 9: Plan Your Website’s Pages
In addition to the above two pages, a highly professional website for real estate companies must have many other pages. Here, we have made a short list of pages.
- Homepage
- Properties
- Submit a Property
- My Dashboard
- Agents / Our Team
- About Us
- Blog
- Contact Us
- Subscription Plans / Pricing
You will find that we have already covered a massive collection of how to create all these different types of pages on our blog archive page.
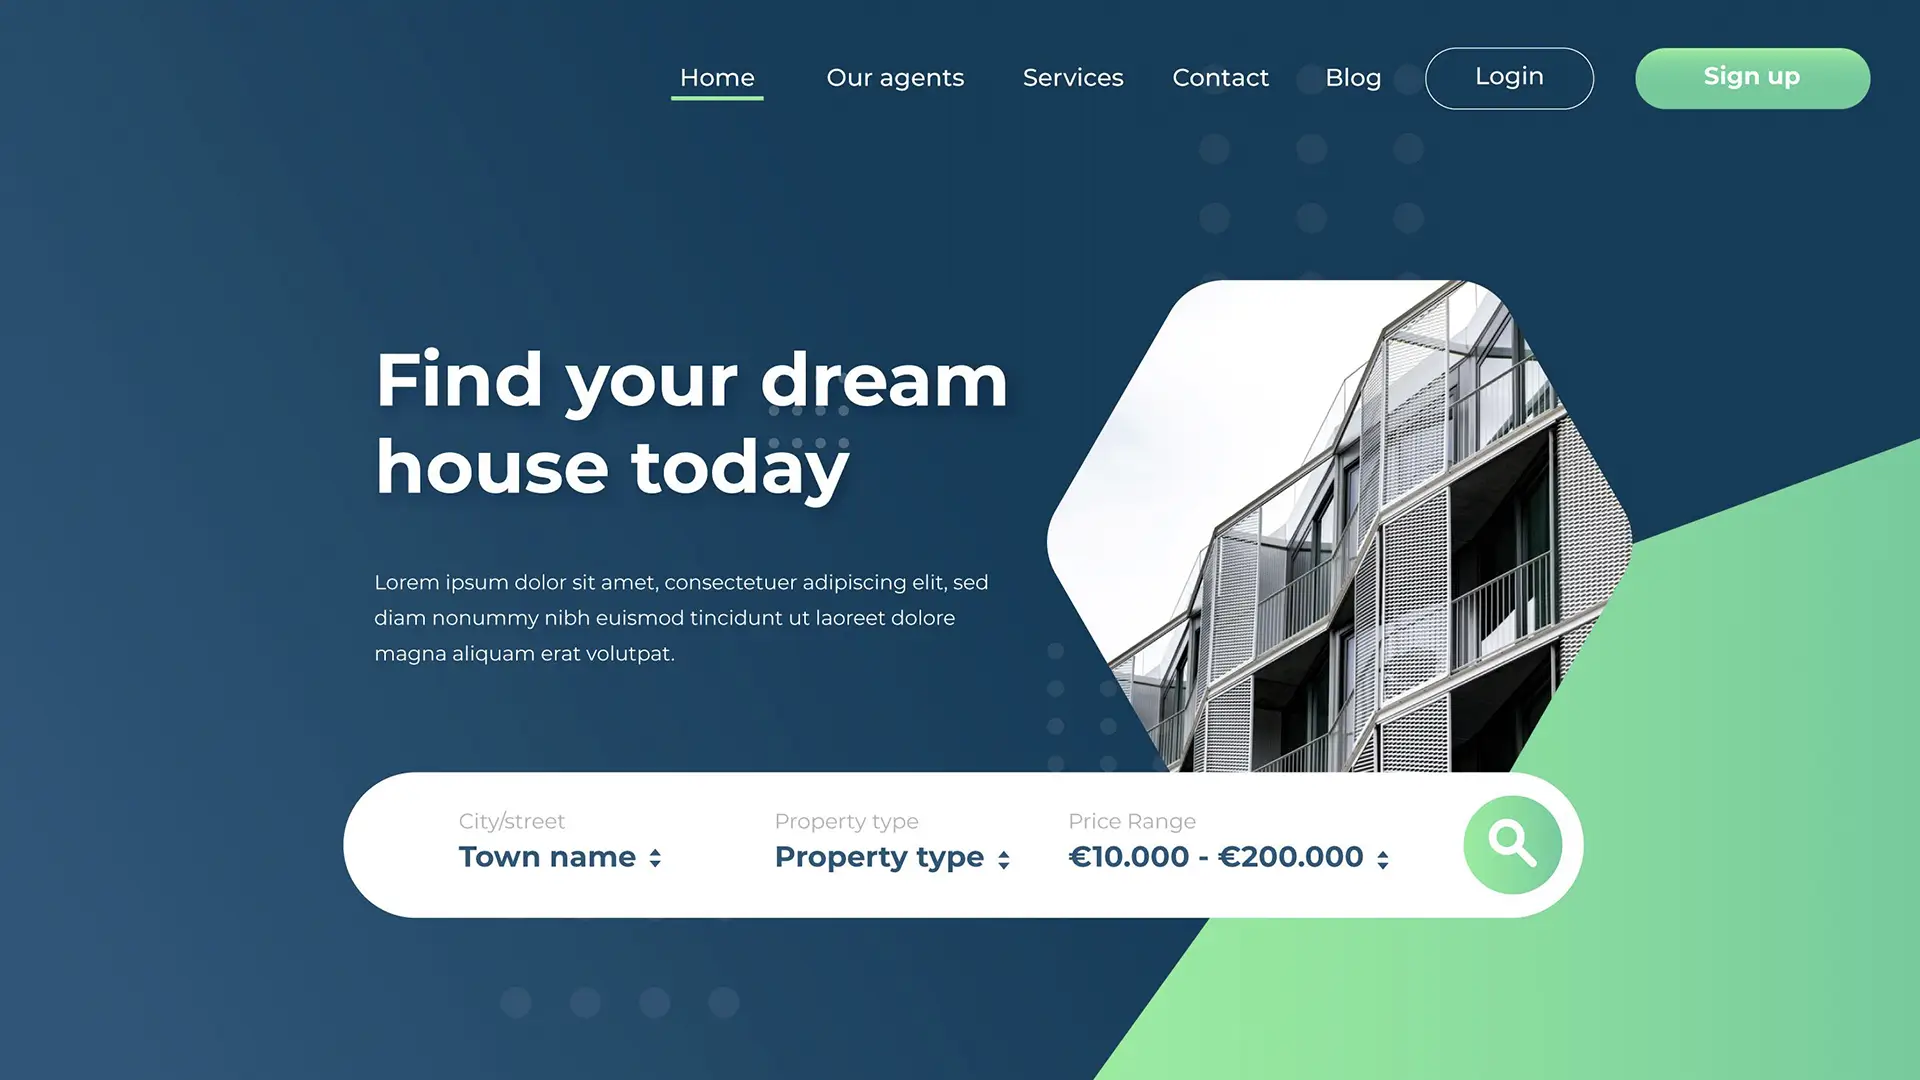
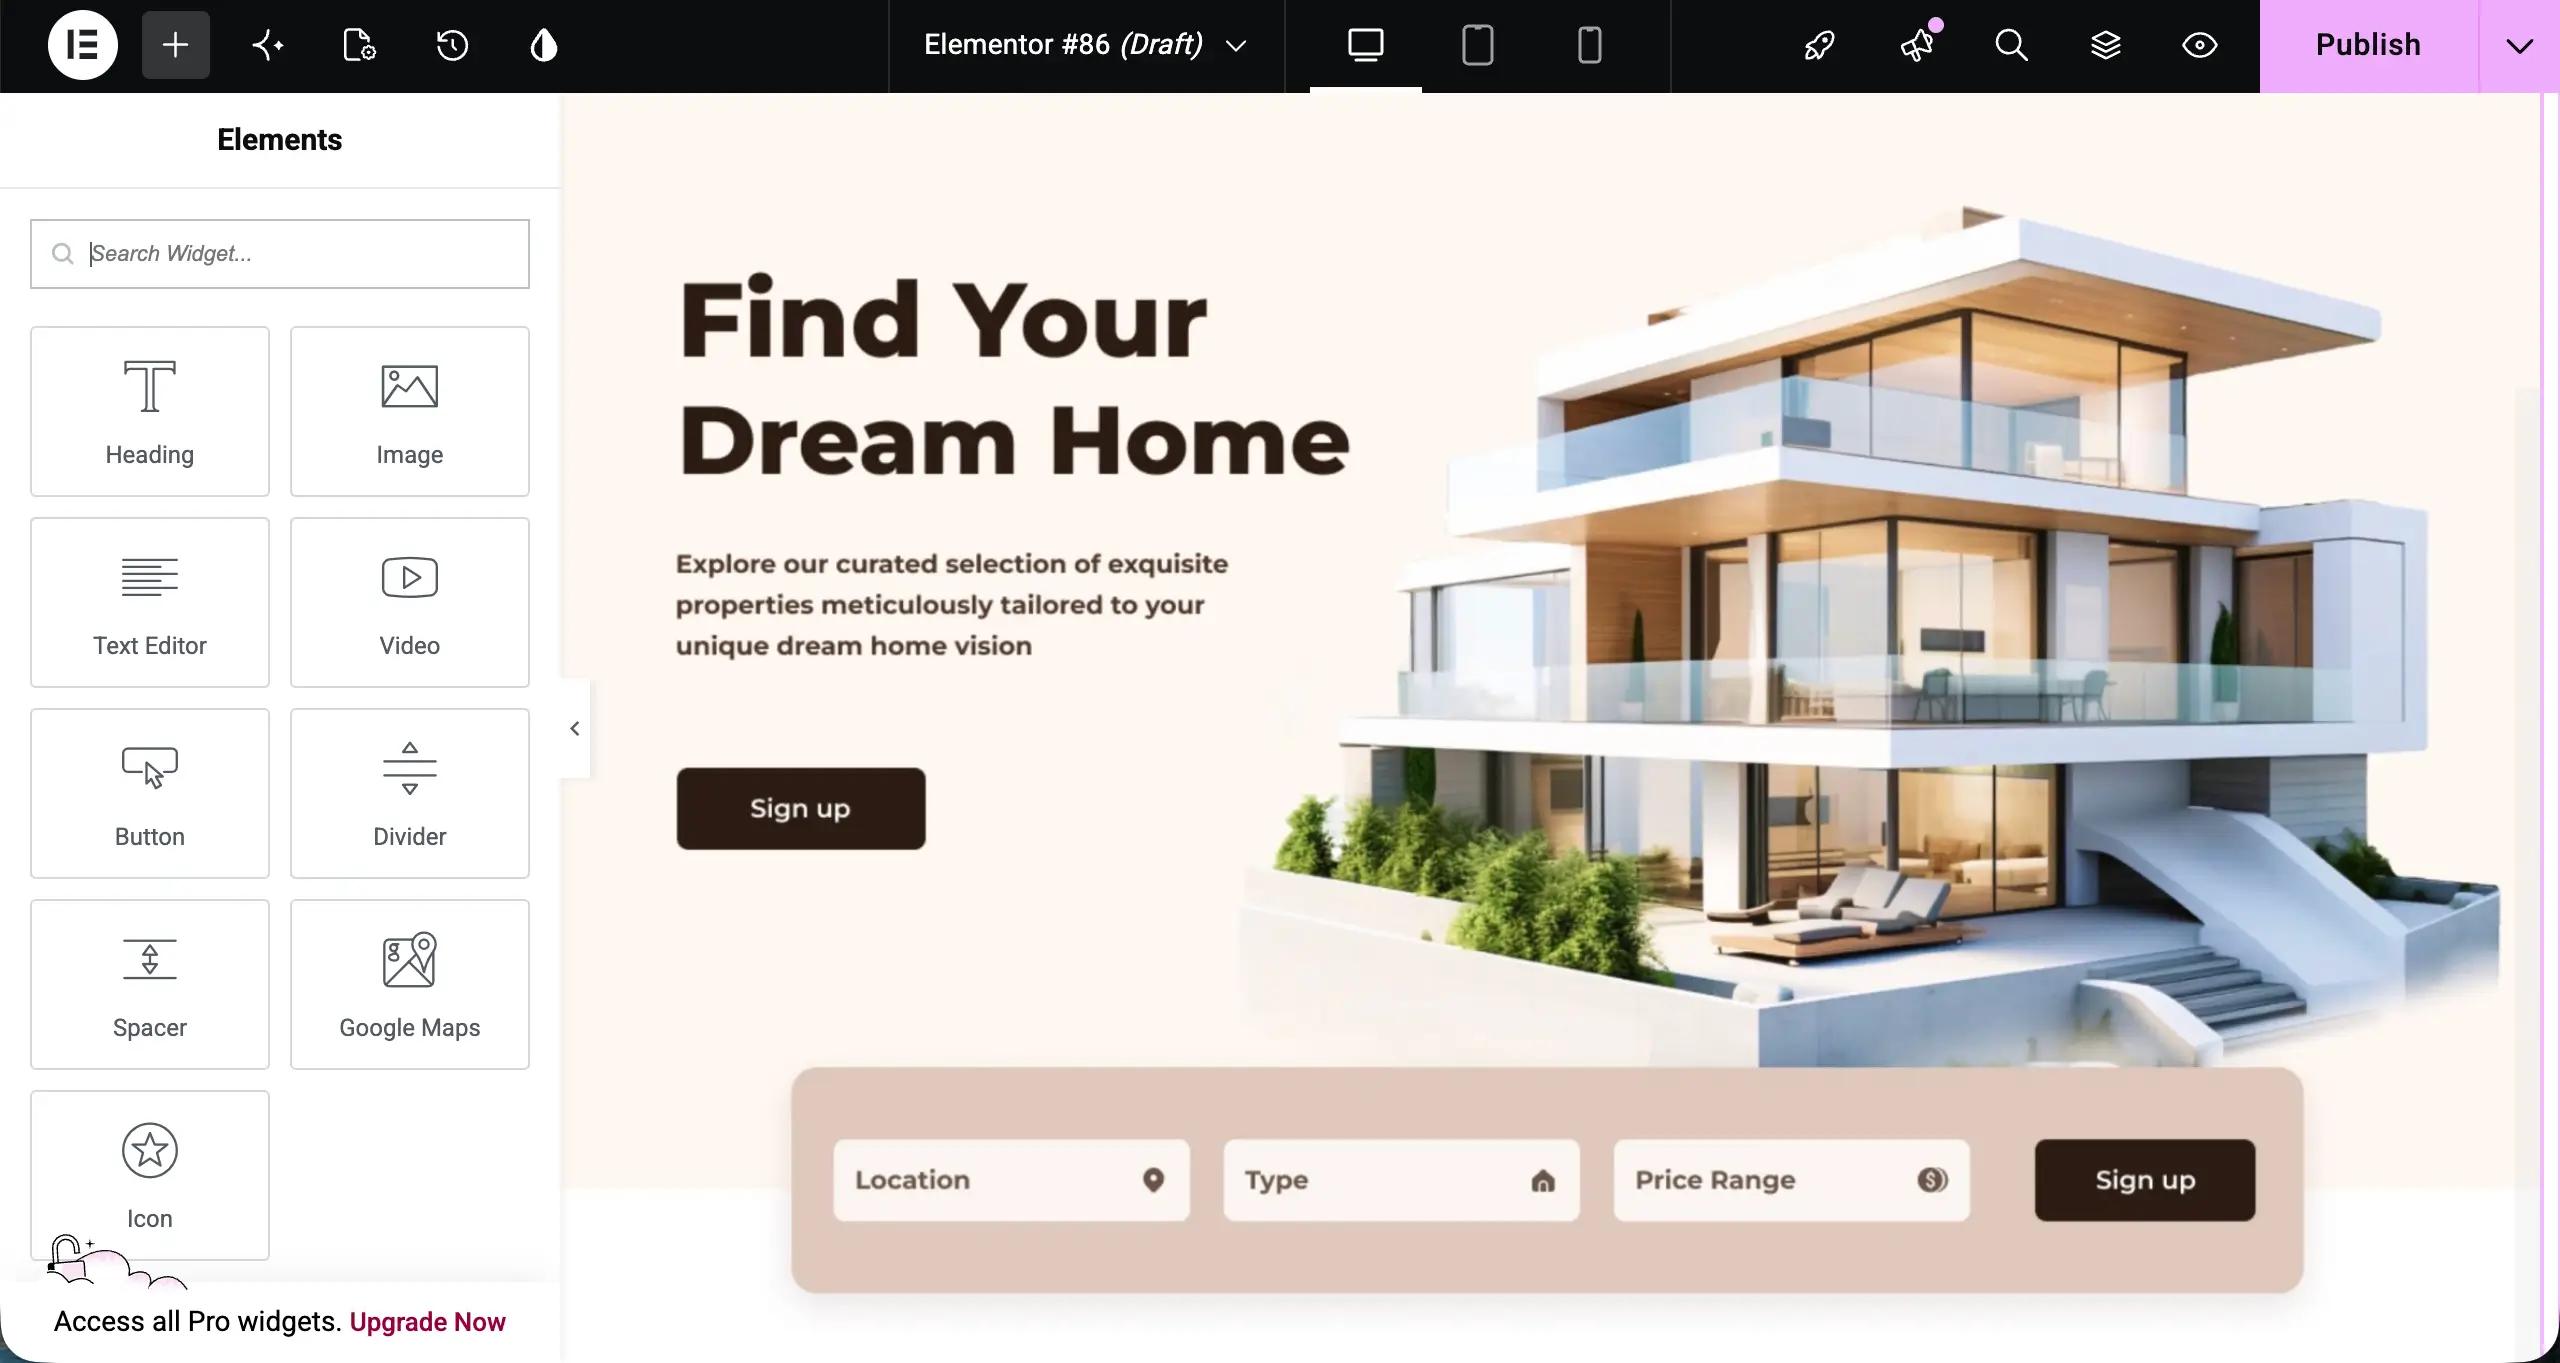
For example, below you can see a glimps of the home page create for the real estate website with HappyAddons and Elementor. To learn the process, check how to create a landing page with HappyAddons.
In the same way, you can create and design as many pages as you want to your website. To help you out, below is a list of many helpful how-to tutorial blog posts on designing landing pages.
- How to create a contact page
- How to create blog post template
- How to create blog archive page
- How to create an author archive page
- How to create a pricing page
- How to create a searchable member directory
Step 10: Create a Header and a Footer for the Website
People used to rely much on Elementor Pro for using theme builder. Without this, it was impossible to build the header and footer for any website. But a good news is that, you don’t have to depend on Elementor Pro any more.
HappyAddons also includes a powerful theme builder with all the features that Elementor Pro covers. With this, you can easily build header, footer, blog post template, and numerous things for your website. We are not covering this in detail here.
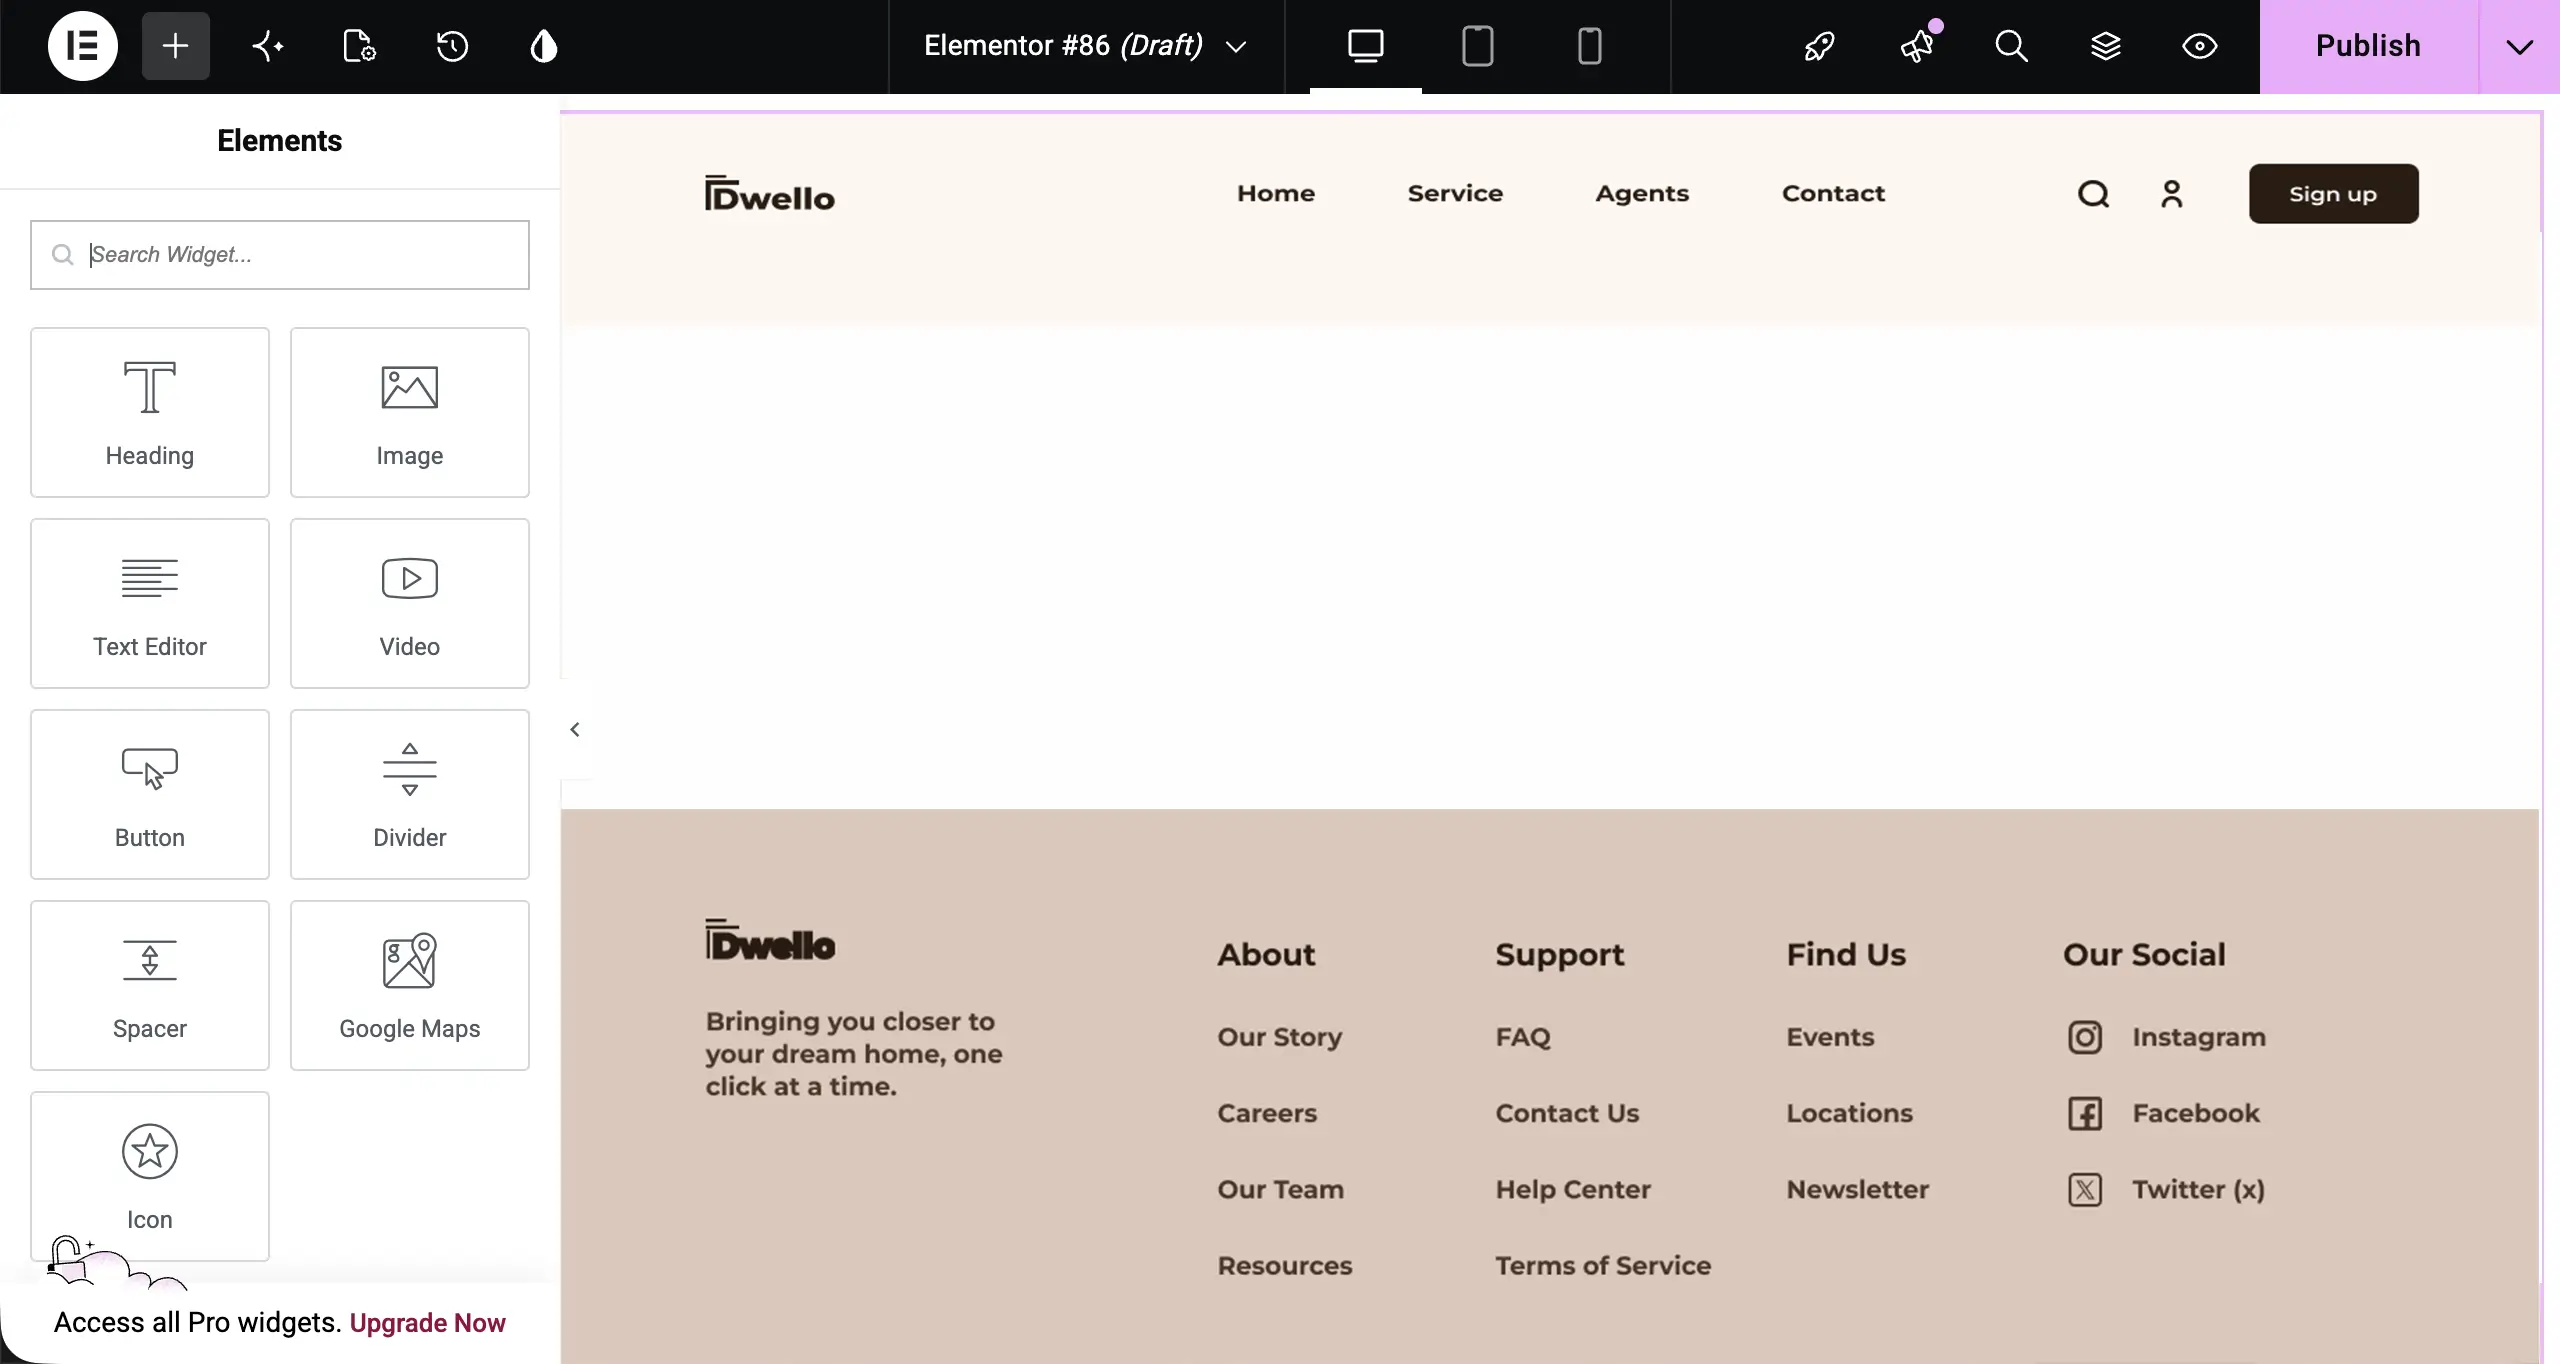
Because we already have covered a detailed tutorial post. Check and learn how to create a header and footer with HappyAddons on Elementor websites.
Step 11: Configure Global Design Settings
Before designing any pages, you can set up global design tokens so your entire website maintains visual consistency automatically. This will save you a lot of time while designing your website because you don’t have to configue the same setting repeatedly.
To configure global settings in WordPress, go to Elementor → Site Settings.
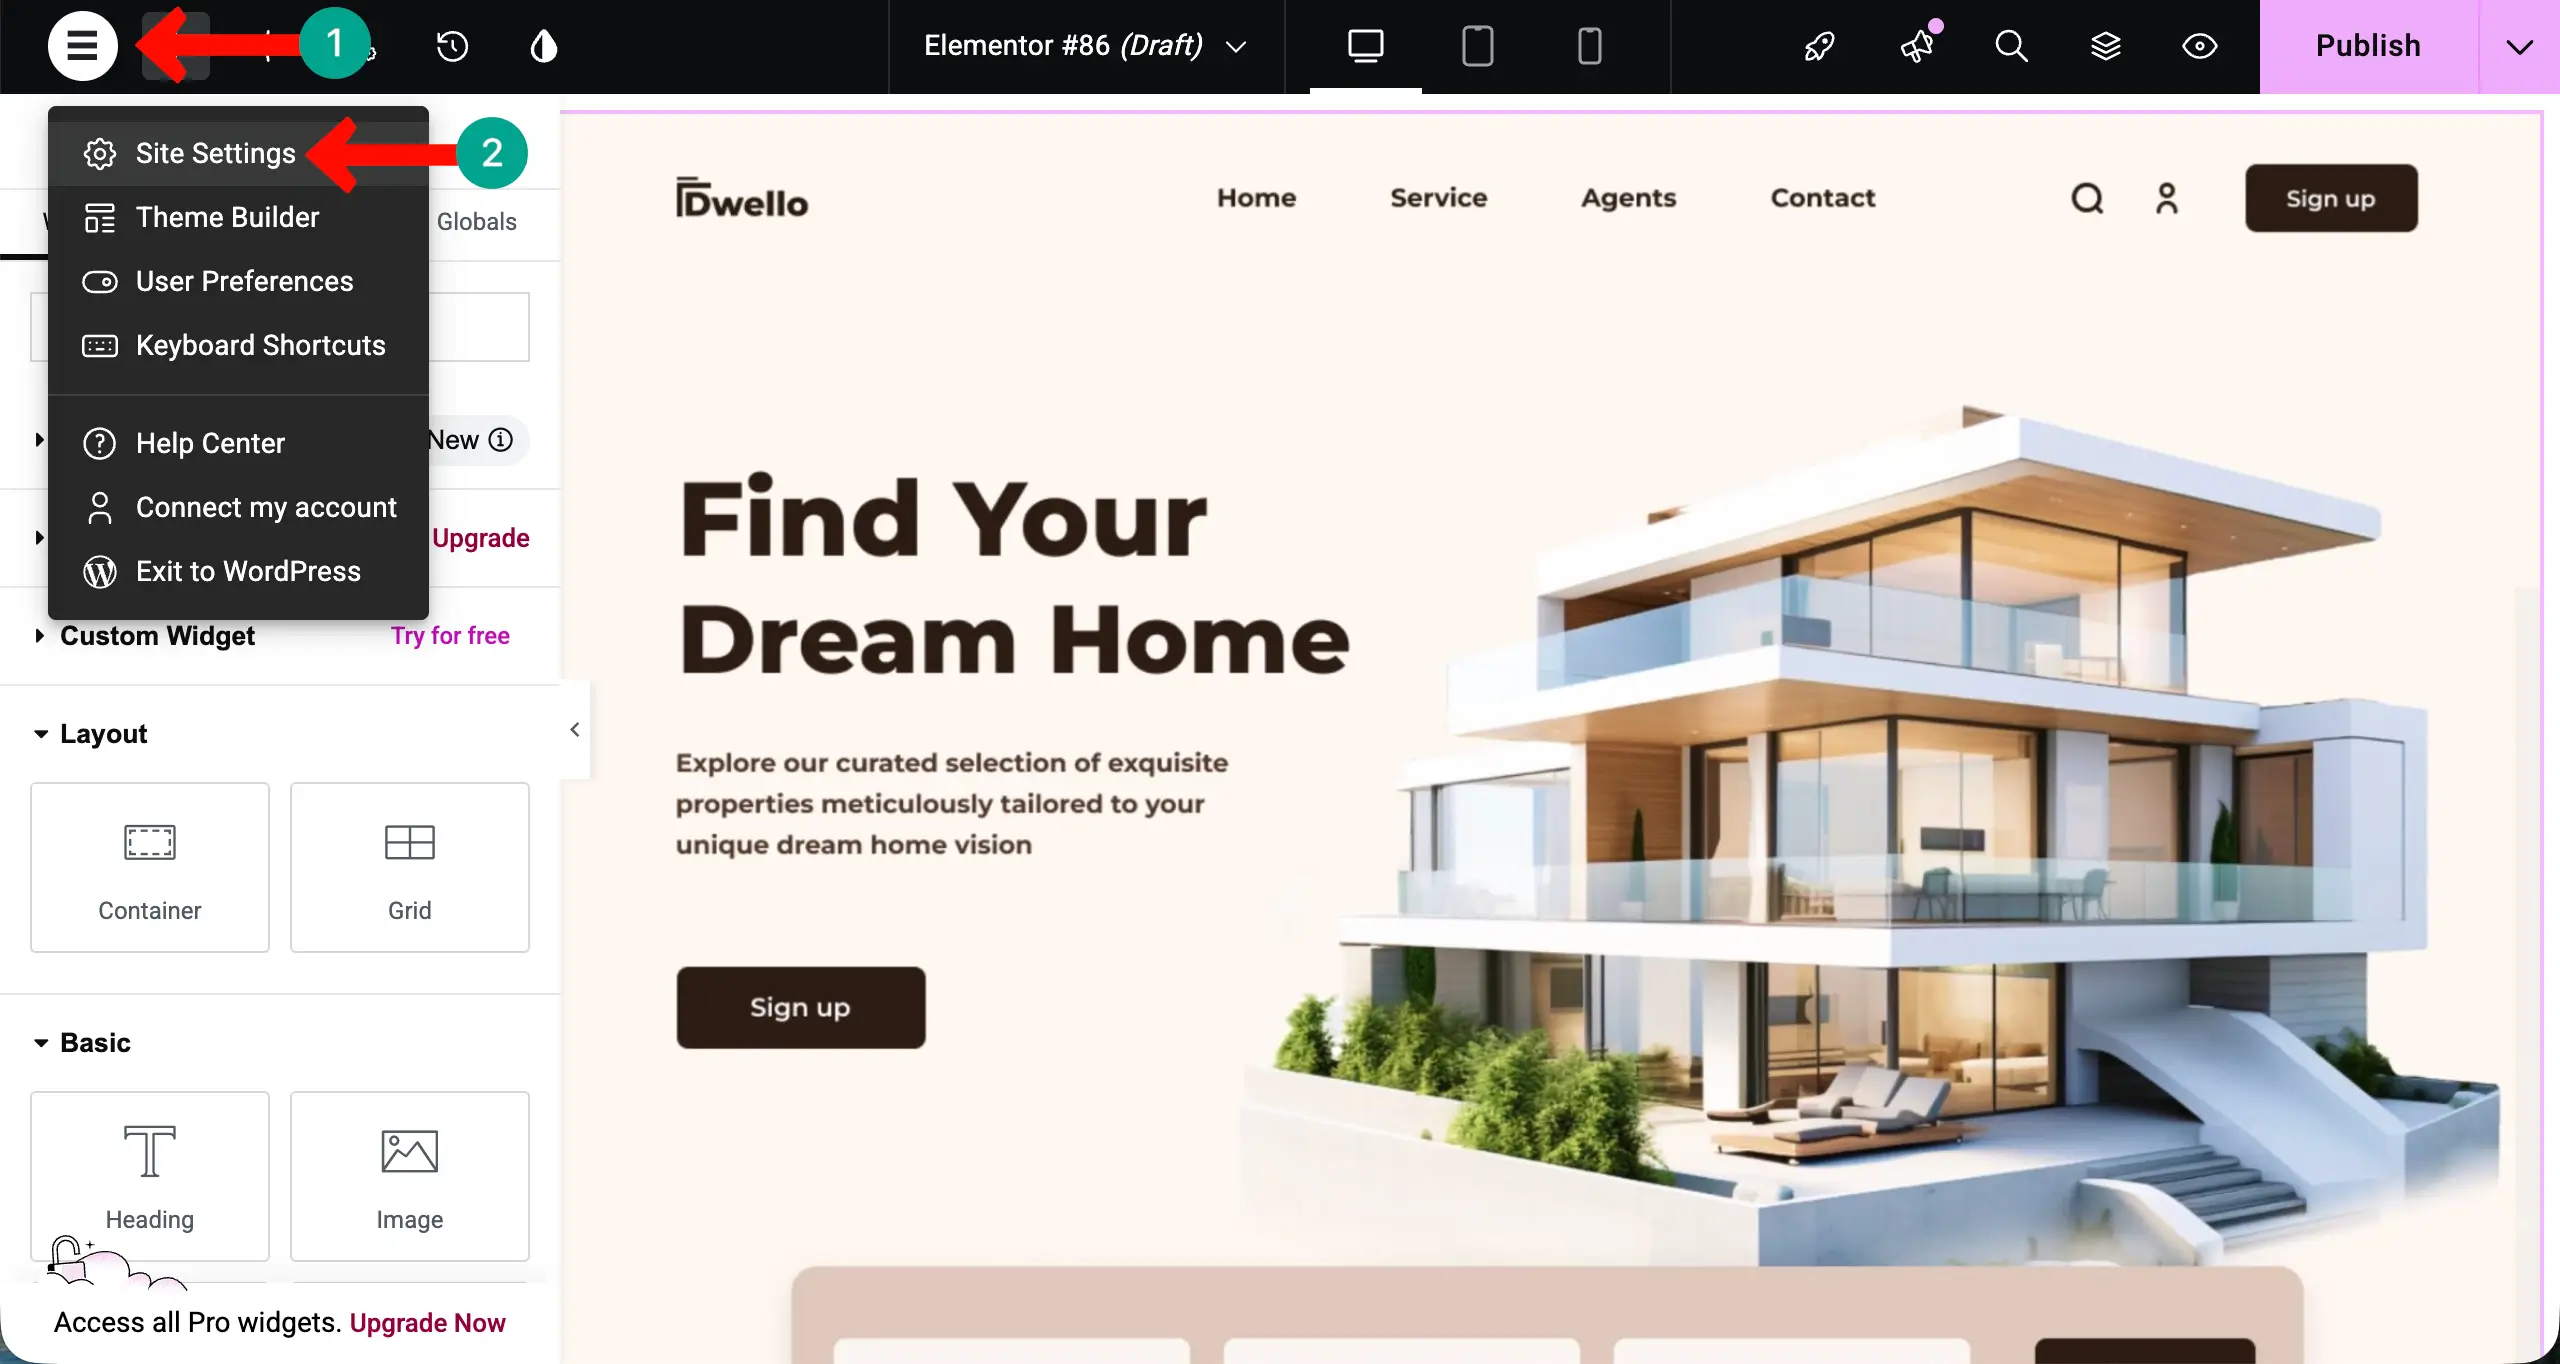
# Set your Global Colors
Now, go to the Global Colors section.
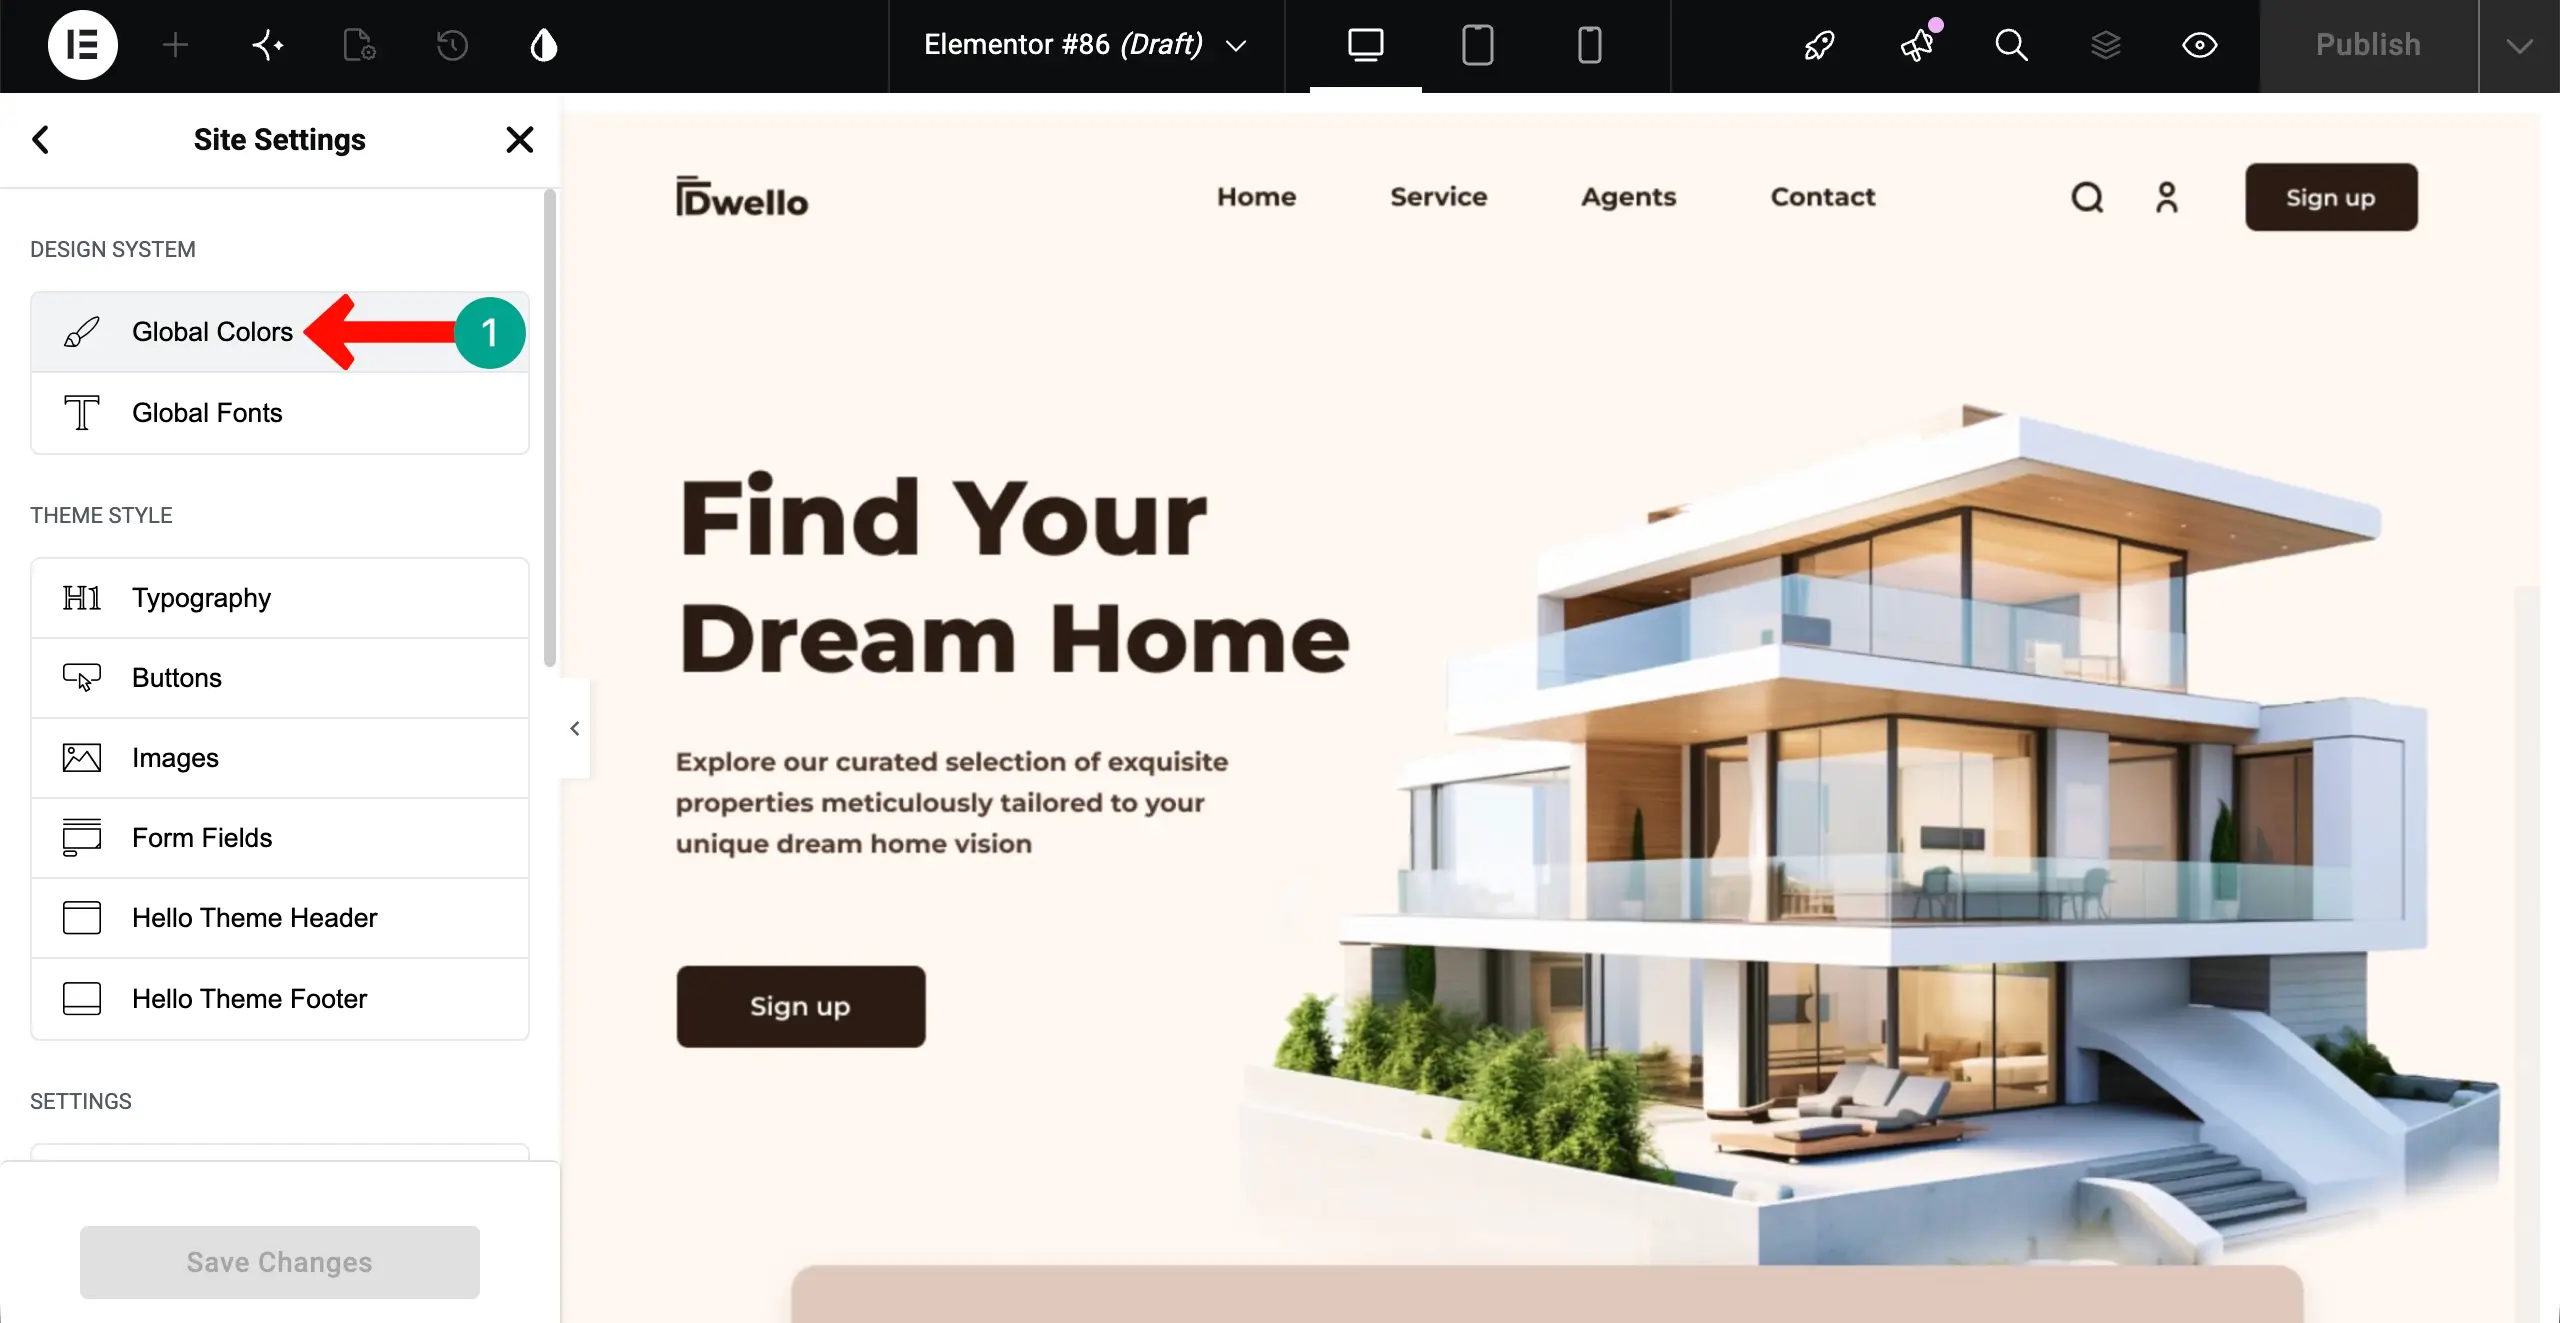
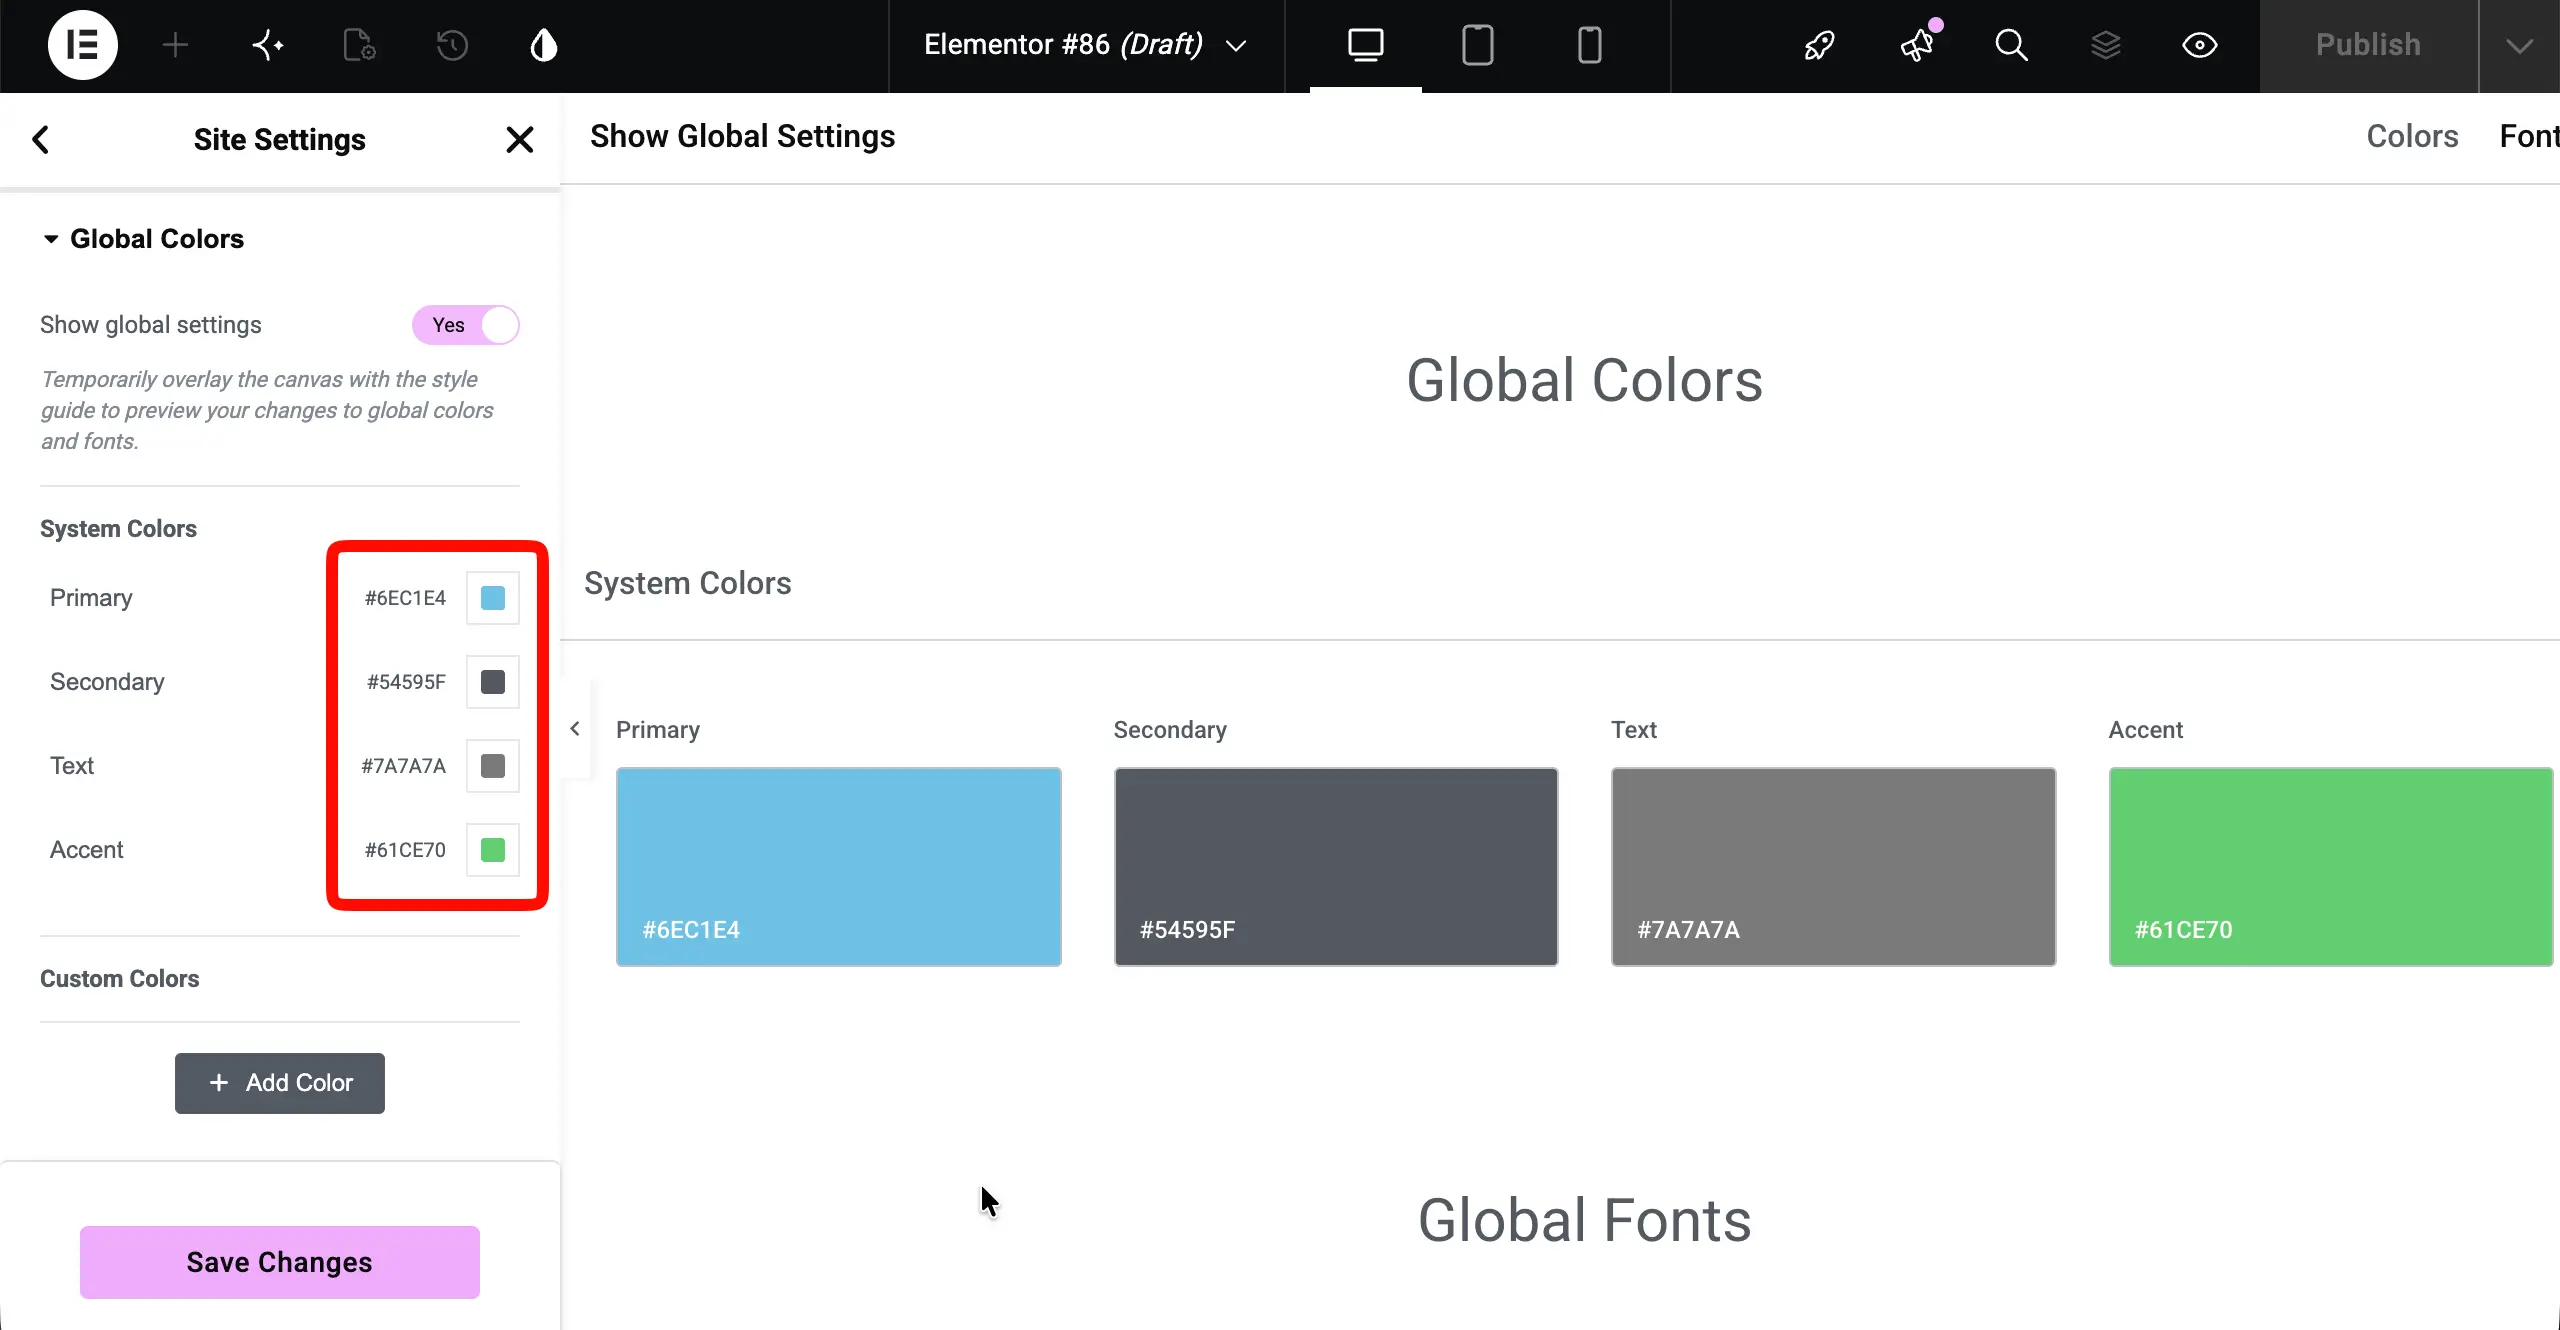
Now, you can set your desired primary, secondary, text, and accet colors. These will be applied throughout the website.
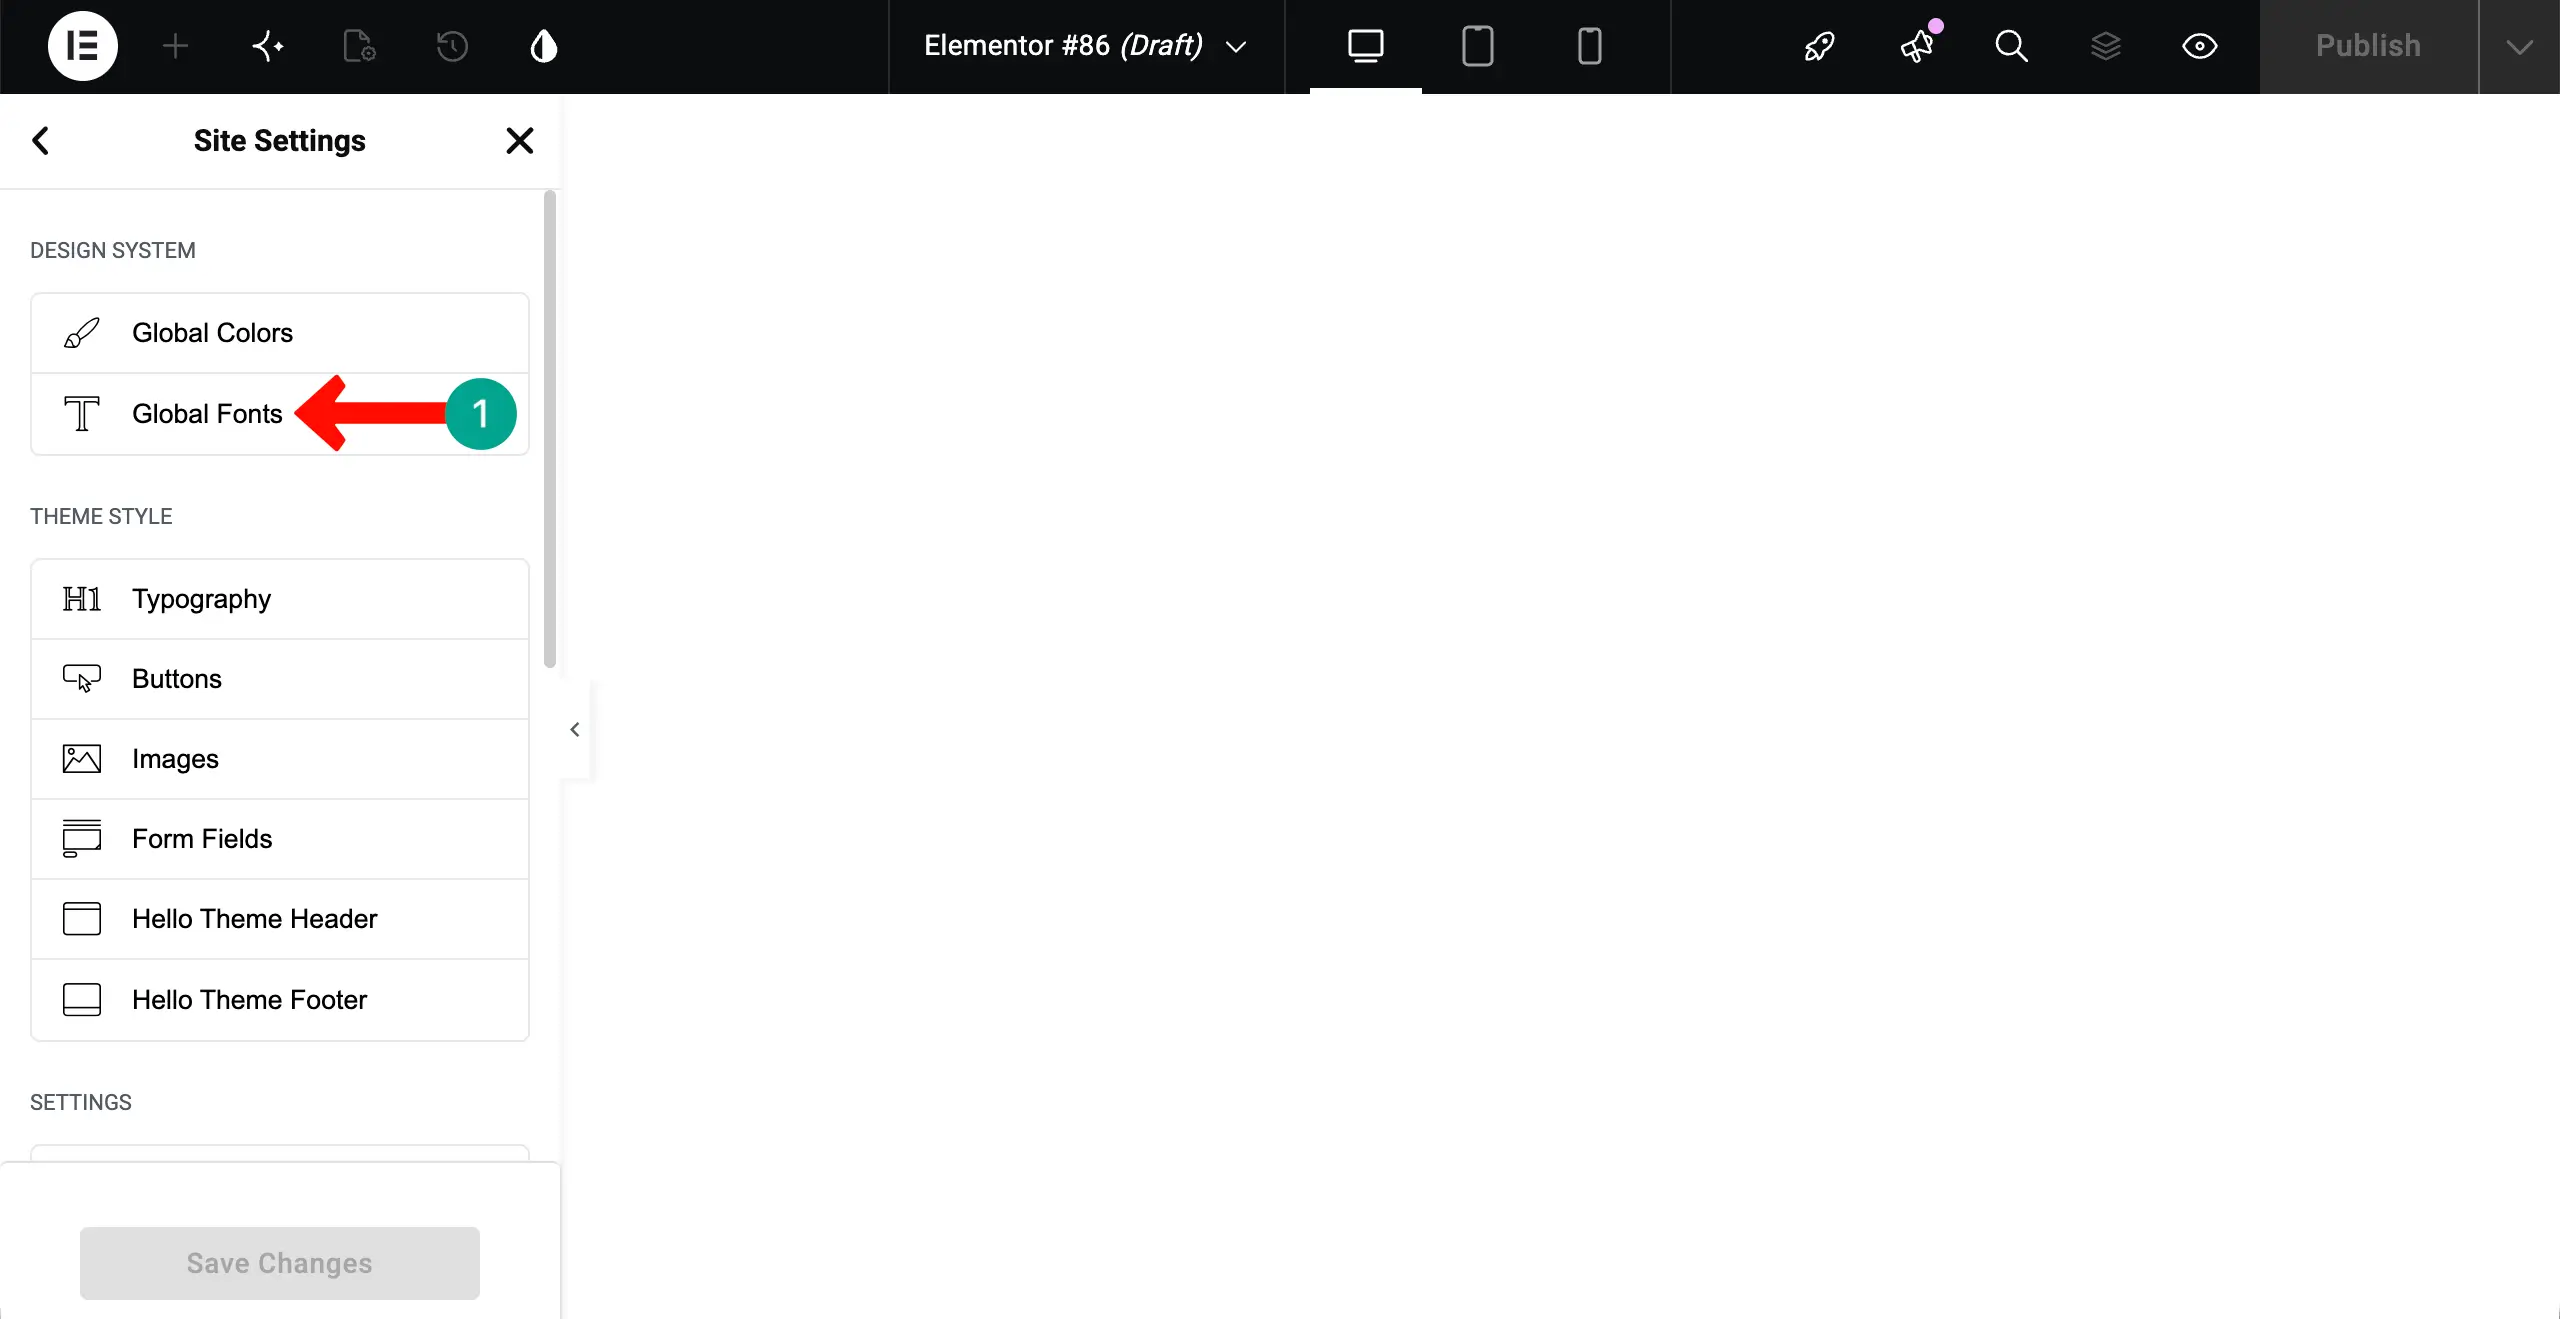
# Set your Global Fonts
In the same way, you can configure settings for Global Fonts. Go to this option.
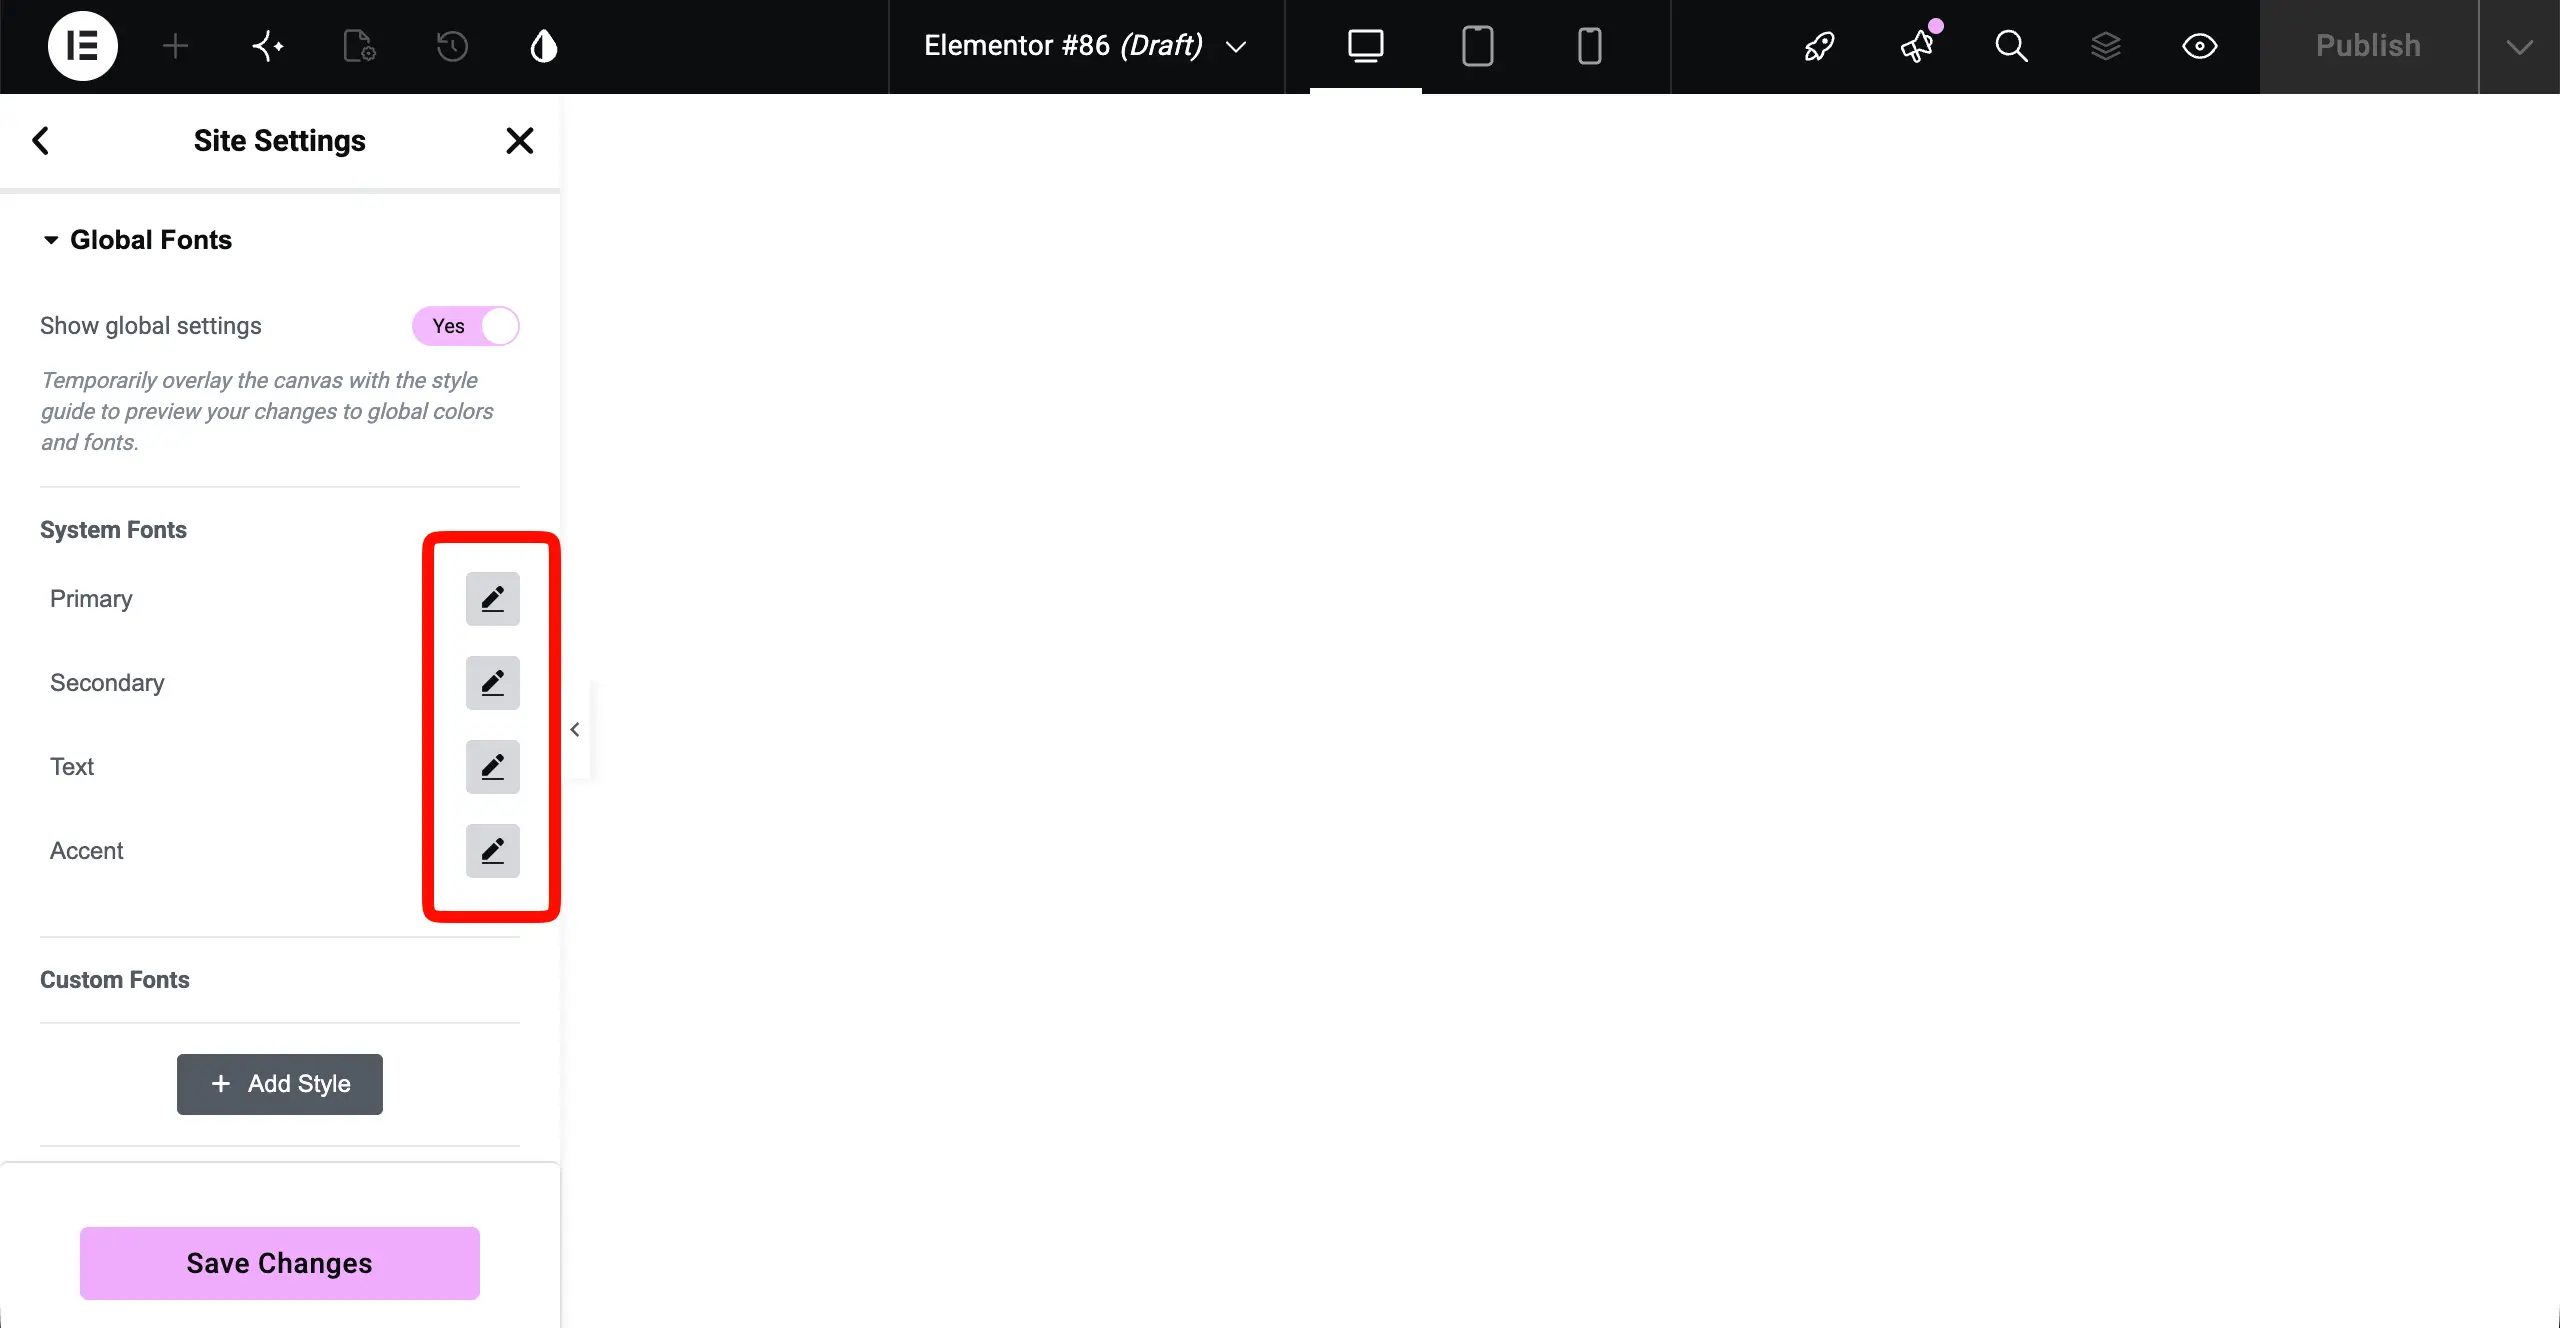
Here, you can configure fonts for primary, secondary, text, and accent typographies.
Step 12: Optimize for SEO
Without proper SEO, your site won’t be found by your target audiences. Below are the things you must consider with proper importance.
- Write keyword-rich SEO title and meta description for every page.
- Add Local Business Schema
- Add Real Estate Listing Schema to property pages
- Target hyper-local keywords in page titles and content
- Create location landing pages for every area you serve
- Submit your XML sitemap to Google Search Console
- Optimize every property image alt text
To make this easy, there are several SEO plugins on WordPress repositories from which you can choose the suitable one. Some of the most popular ones are Rank Math SEO and Yoast SEO.
Step 13: Make Your Website Mobile-Friendly
Over 65% of property searches happen on smartphones. Elementor is responsive by default, and all HappyAddons widgets are mobile-optimized. Still, review each key page on mobile.
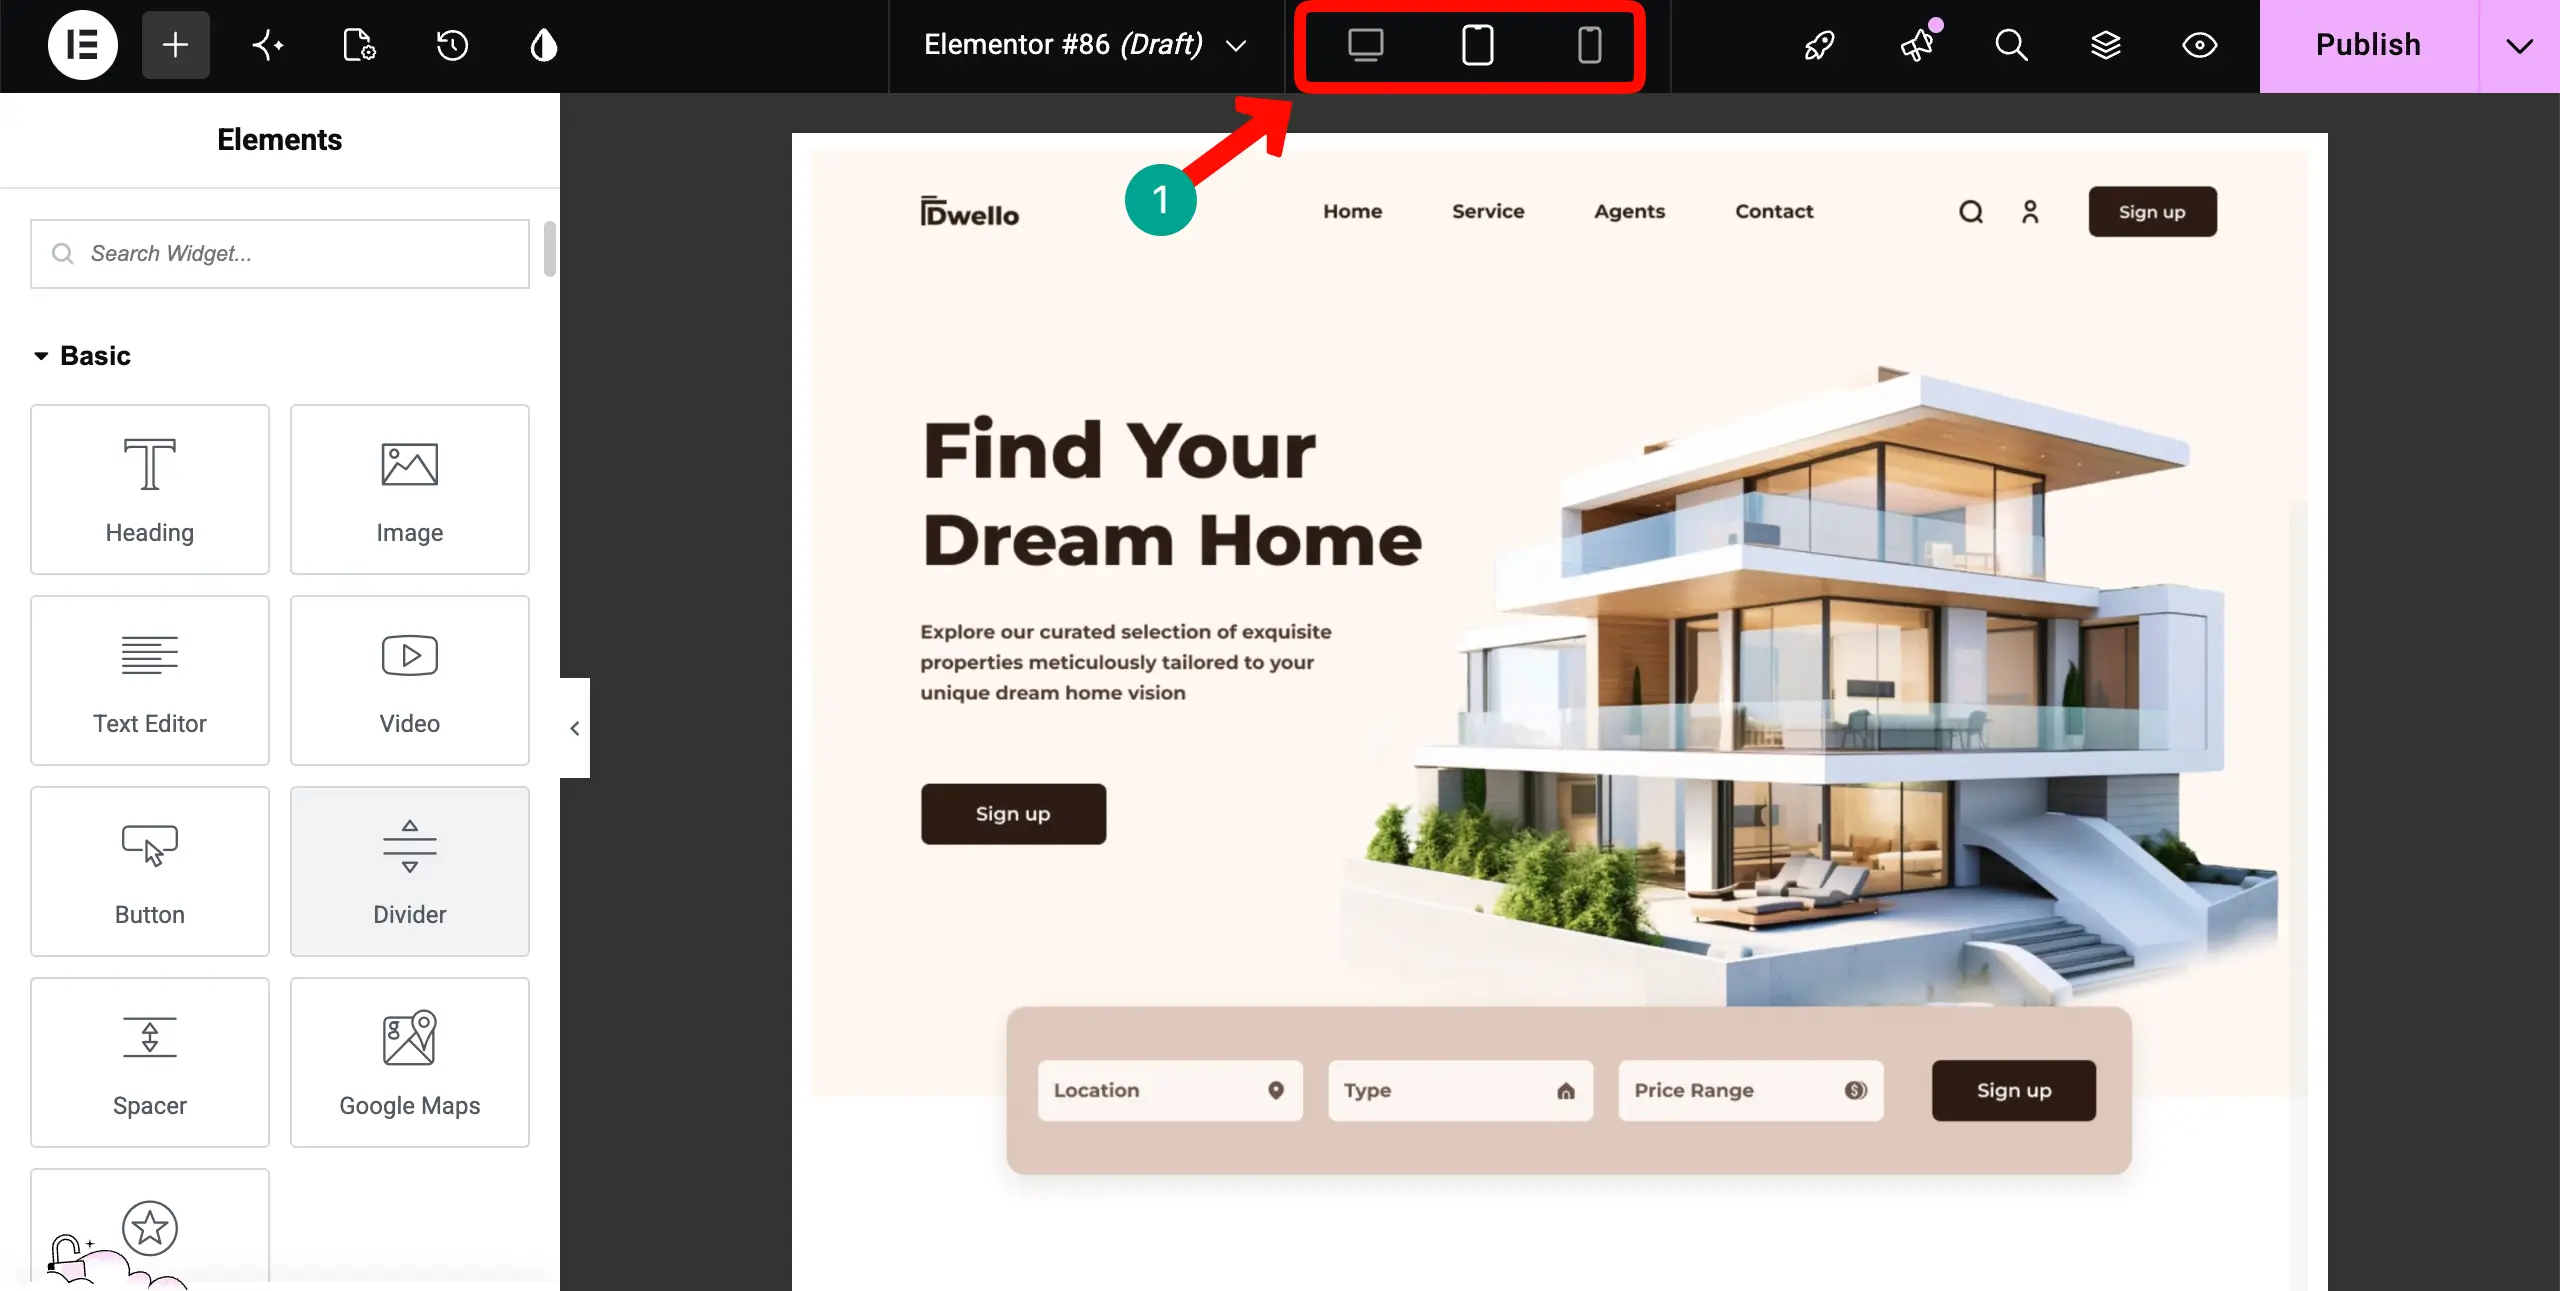
Inside Elementor, click the Responsive Controls icon (bottom toolbar) and switch to Mobile view.
Now, the customizations you make for a specific device mode will be saved only for that device. But remember, do not delete any content, because if you do, it will also be deleted from other display modes.
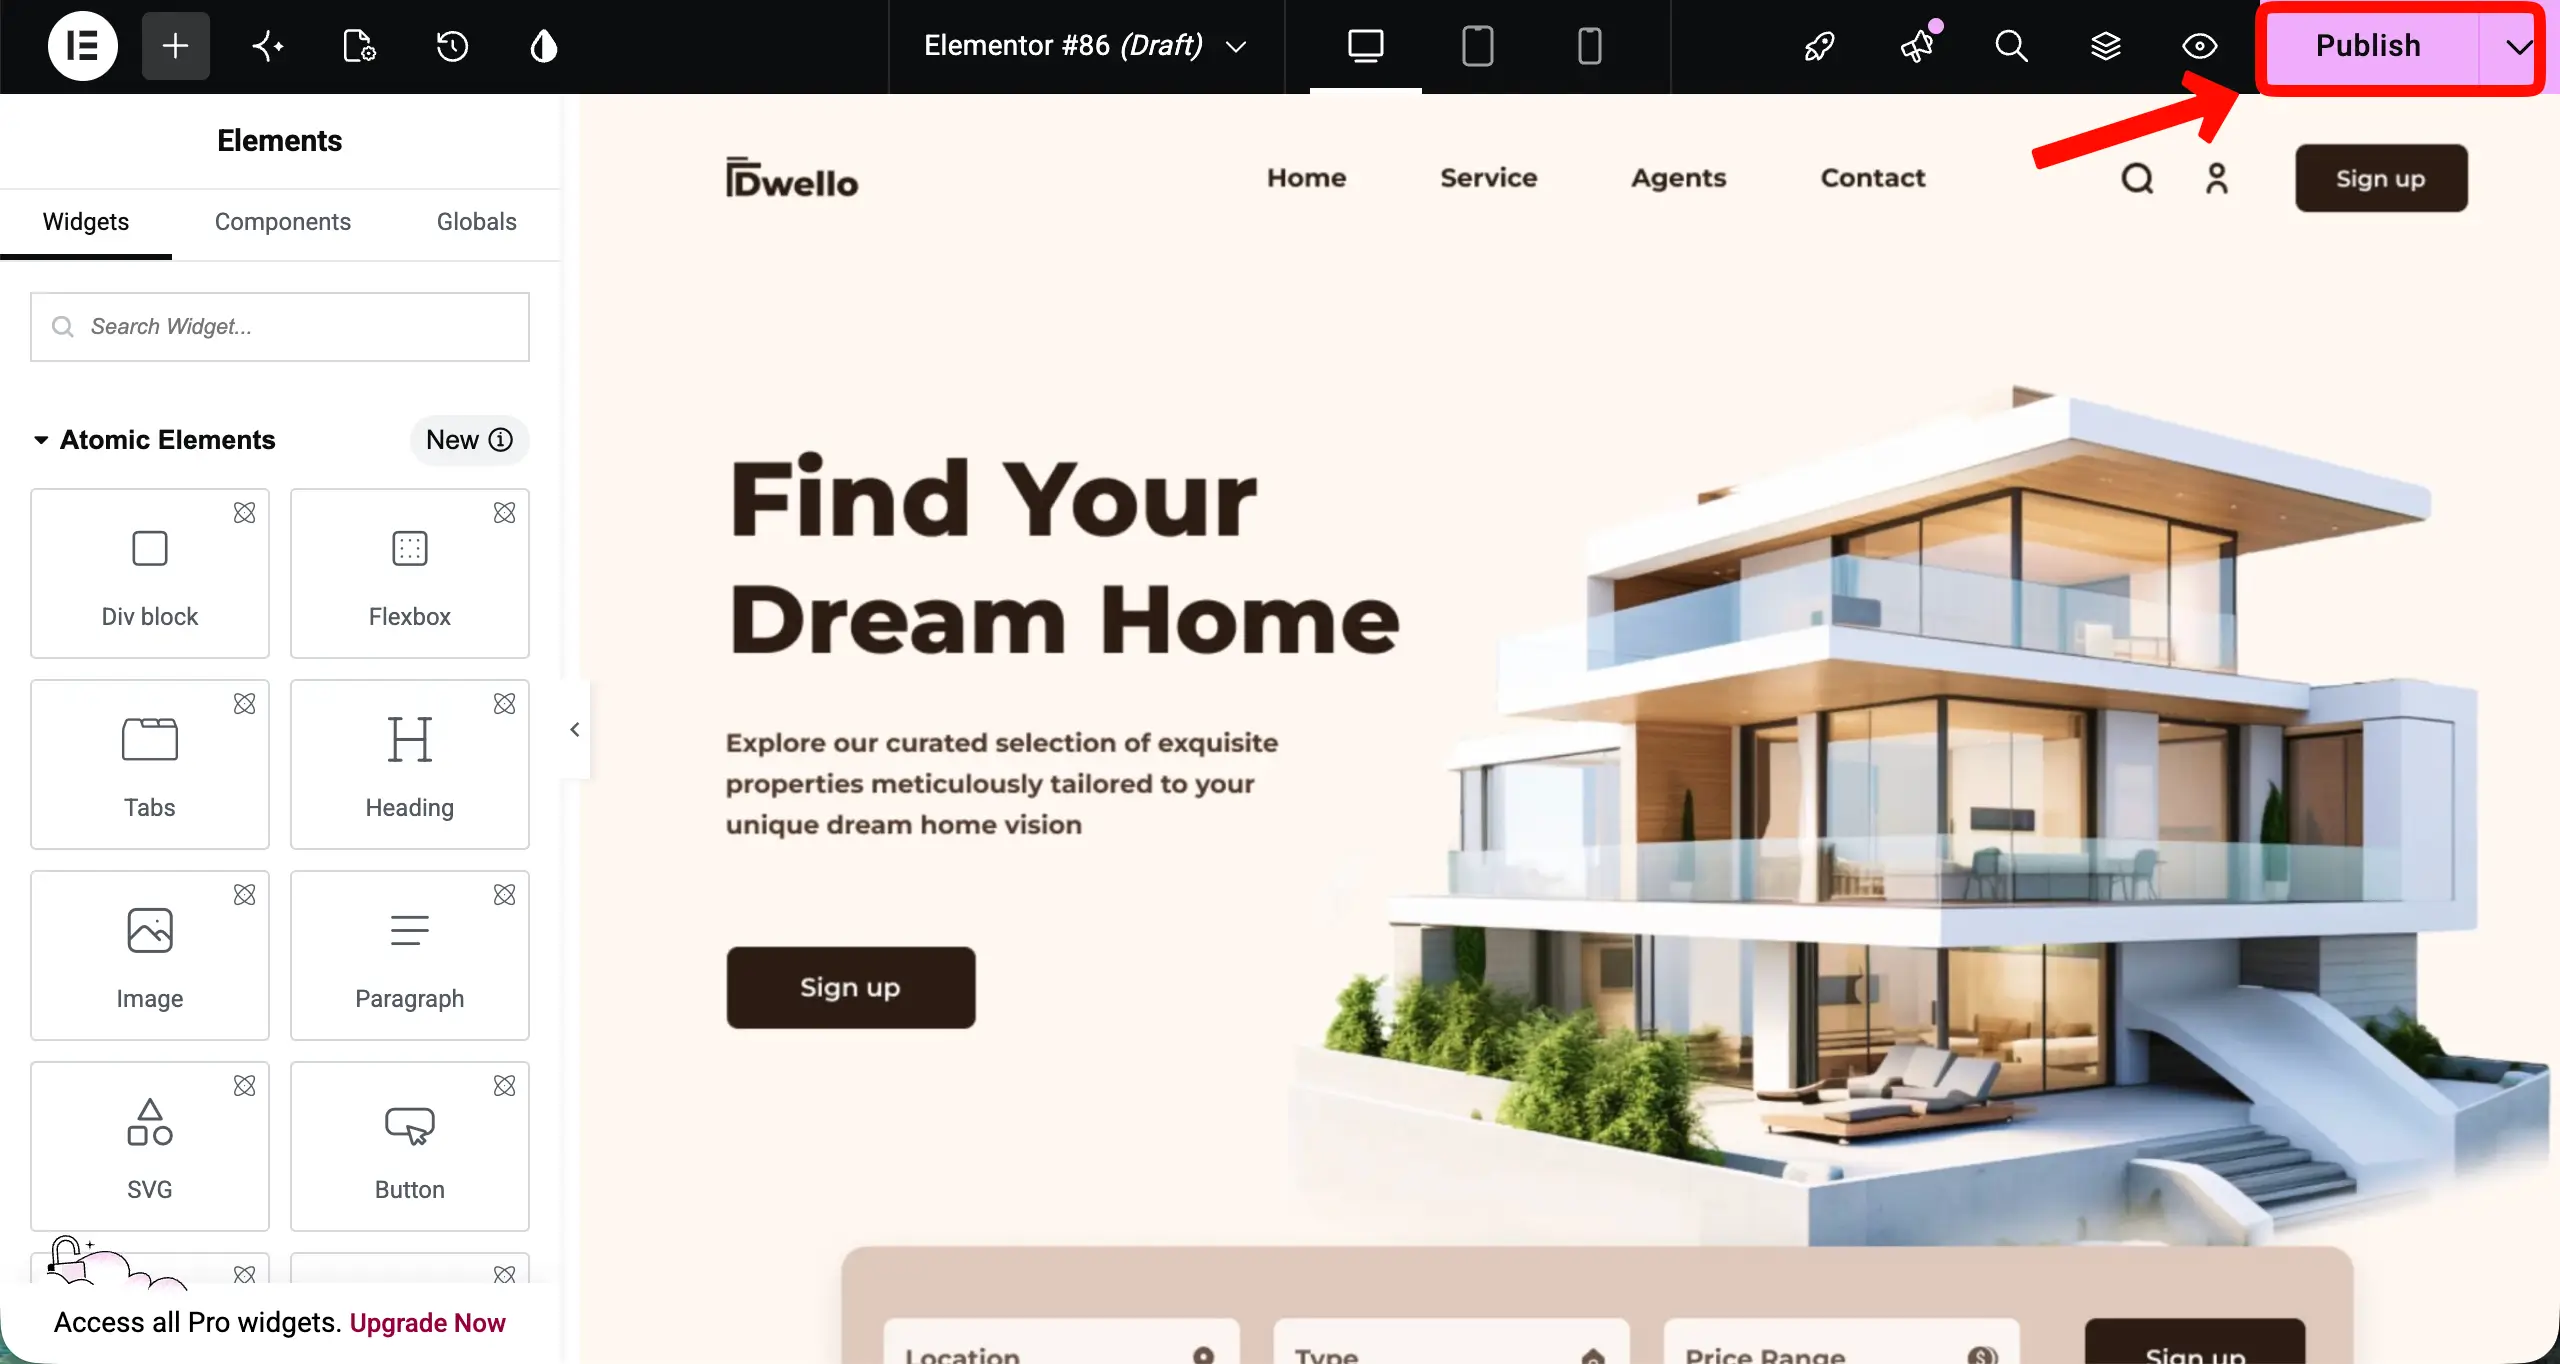
Step 14: Publish the Website
Whenever a page design is done, keep publishing them one by one.
Things to Do After Publishing the Website
Just designing web pages isn’t the only thing in a website. There are some more things you must mandatorily consider doing. Below, we have covered a snapshot of these.
- Run through Google PageSpeed Insights to check the loading speed of your web pages. Target 80+ on mobile.
- Install WP Rocket or the free W3 Total Cache for page caching
- Optimize property images with ShortPixel or Imagify. Because unoptimized photos are the top cause of slow real estate sites
- Enable lazy loading in the Happy Smart Post List widget settings
- Activate Wordfence Security (free), confirm SSL is active (padlock in the browser bar), and enable two-factor authentication for your admin account.
- Proofread every page. Verify all phone numbers, emails, office hours, and property details are accurate.
- Check all navigation links — no 404 errors
How Much Does It Cost to Build a Real Estate Website with Elementor on WordPress?
Now, you might be wondering how much it costs to build an entire real estate website with Elementor on WordPress. To help you out, below, we have covered a quotation so you can instantly get an idea.
| Item | Estimated Cost |
|---|---|
| Domain Name | ~$10–$15/year |
| Web Hosting | ~$84–$120/month |
| WordPress | Free |
| Elementor Free | Free |
| Elementor Pro | ~$59/year |
| HappyAddons Free | Free |
| HappyAddons Pro | From ~$39/year |
| WP User Frontend Free | Free |
| WP User Frontend Pro | From ~$49/year |
| Rank Math SEO | Free |
| Wordfence Security | Free |
| Total (Year 1) | ~$241–$282 |
For a professional real estate website that a traditional agency would quote $5,000–$15,000 to build, this is extraordinary value.
Frequently Asked Questions (FAQs) on How to Create a Real Estate Website
Now, in this section, we’ll cover answers to some common questions about the topic of how to create a real estate website on WordPress with Elementor.
Do I need coding skills to build a real estate website on WordPress?
No. Elementor’s visual drag-and-drop builder and HappyAddons’ widget library let you design every page without a single line of code. WP User Frontend’s form builder is equally visual — you drag fields onto a canvas to configure your property submission forms.
Can WP User Frontend really replace a dedicated real estate plugin?
Yes, for most real estate website use cases. WPUF gives you a fully custom Property post type with any fields you need, a frontend submission system for agents, a frontend listing management dashboard, pay-per-listing and subscription monetization, a Google Maps field, and conditional logic in forms.
The main difference from dedicated real estate plugins is flexibility: WPUF lets you build exactly what you need rather than forcing you into a pre-defined template. For most independent agencies and property portals, that flexibility is an advantage.
Do I need Elementor Pro or just the free version?
For a real estate website, Elementor Pro is strongly recommended. It adds the Form Widget (essential for inquiry forms), Theme Builder (essential for global headers, footers, and single property page templates), Dynamic Tags (essential for pulling custom field data onto property pages), and Popup Builder (essential for lead capture overlays). HappyAddons Pro extends all of this with 150+ additional widgets.
Is HappyAddons compatible with Elementor Pro and WP User Frontend?
Absolutely. HappyAddons is built as a native Elementor addon and works seamlessly alongside Elementor Free, Elementor Pro, and WP User Frontend. With 400,000+ active users, it is one of the most trusted Elementor addons available.
How long does it take to build a real estate website with this method?
With all plugins installed and your content and images ready, a fully functional real estate website following this guide takes approximately 3–7 days. The design work with Elementor and HappyAddons is the fastest part — especially when you import pre-built page layouts from the HappyAddons Pro template library and customize them for your brand.
Final Takeaways
You now have the complete roadmap to build a professional, conversion-focused real estate website on WordPress — using Elementor, HappyAddons, and WP User Frontend.
This is now your turn. Register your domain, get your hosting, install WordPress, and start building — one step at a time. Your first property inquiry is closer than you think.
However, if you find any difficulties while creating your real estate site using HappyAddons or Elementor, you can instantly reach our support team through the live chatbox.
Besides, you can leave your feedback in the comment box below as well. Our team will get back to you very soon with a satisfying answer. Thanks for being with us till the end.

![Black Friday and Cyber Monday are around the corner, and people are waiting for these festivals to grab the best product deals. That is why giving an attractive look to your website during this festive season is very necessary. But, creating a whole new landing page might be difficult in a short period of time. Don't worry. By using Happy Elementor Addons Black Friday and Cyber Monday Landing Page templates, you can easily develop a whole new landing page in a few minutes. In this today's blog, we are going to show how to boost your website design using HappyAddons templates during this festival season. Before that, we'll talk a bit about these two festivals and why they are important to online business communities. What are Black Friday and Cyber Monday? Black Friday is the immediate following of the famous Thanksgiving day. This is when people start shopping to celebrate the Christmas festival. Since the late 1980s, retail sales on this day have constantly been suppressing the past volumes. See the graph below. Source: Salecycle.com The first Monday following Thanksgiving day each year is called Cyber Monday. It was first introduced in 2005 by the USA National Retail Federation to encourage people to buy online. Though this festival originated in the USA, it is celebrated globally today. See the stats below. Source: Salecycle.com It indicates customers' buying behavior around this day is growing up over time. Many customers today keep a budget to buy products on these two days. So, why won’t you prepare a Cyber Monday landing page if you have an online store? Importance of Designing Landing Pages for Black Friday and Cyber Monday Festival Having a well-design website is one of the major checklists if you are running an online business. Most importantly, you have to make sure that your website remains up-to-date to boost your sales. That is why you need to redesign your website or make a new landing page during the Black Friday and Cyber Monday festivals. Because most online product & service-based businesses promote special deals during these two festivals. Here are some remarkable ways dedicated landing pages during these festivals can positively impact the performance of your online business. Boosts your product salesIncreases conversion rateOpportunity to collect potential email leadsGrabs users' attention toward your siteReduces bounce rateIncreases website visitors. Elementor Black Friday New Seasonal Kit is Already Here! Source: Elementor To make this Black Friday more enjoyable, Elementor has launched a New Seasonal Kit that includes landing pages, sections, pop-ups, and vector assets. All these design elements are made by the Elementor team so that one can easily use them on their website to ensure more sales and conversions. New Elementor Black Friday Seasonal Kit offers: 3 Landing pages6 Sections 6 Popups A collection of stickers & animations You can only get these ready-made Black Friday landing pages and sections if you have Installed Elementor Pro on your site. However, if you are looking for templates that are outside of the box, you can go with Happy Addons, the fastest Elementor Addons on the market. It's very easy to use, flexible and has tons of advanced features and widgets that can ease your website design journey. Also, you'll get several festival landing page templates & blocks. Moreover, you can use free Black Friday and Cyber Monday design blocks and templates to decorate your site. Most importantly, these templates and blocks are easy to customize and can be used for multiple purposes. Now let's see how you can use the Happy Addons templates to design your website according to the Black Friday theme. Pre-Requisites to Use HappyAddons Templates to Design Black Friday and Cyber Monday Landing Pages You must have the following plugins installed on your site to get access to the HappyAddons Template library. Make sure you’ve installed and activated the Happy Addons Free & Premium version of your website. Elementor (Free)Happy Addons (Free)Happy Addons Pro If you are new to Elementor, check this Step By Step Guide For Beginners. If you want to explore the readymade templates of HappyAddons before installing these plugins, you may visit by clicking on the button below. Check out Happy Addons Templates How to Design Black Friday Landing Page on Your Website Once you have the plugins (mentioned above) installed, your website is ready to follow the tutorial guide explained in this section. Get ready now! Step 1: Open a New Page with Elementor Create a new page or open the existing page with Elementor. Next, you have to select the Elementor Canvas option.Unless you select Elementor Canvas, you may watch the header, footer, and unnecessary other texts on the page. These might be irritating to you.Once you open the page with Elementor Canvas, your page will be completely clean. Watch the video below on how to do it. Step 02: Go to HappyAddons Library Click on the HappyAddons Library Icon. It will open up a modal popup. Here you'll find numerous stunning premade Blocks and Pages created by the Happy Addons team. Kindly explore them to create a list of your favorite items. Step 03: Import a HappyAddons Black Friday Template Go to the Page tab on the modal popup.Select Black Friday from the left-side filter option.You will several good-looking templates on your screen.Take your cursor on the one you like and hit on the INSERT button. Wait for a while to finish the installation process. You will get the template on your screen with editable sections and options. Step 04: Set the Black Friday Campaign Deadline A deadline creates a sense of urgency in customers' minds. So, better if you add a deadline section on the page to show your Black Friday deals. The good thing is that if you select the template as we did, you will automatically get a deadline or countdown option. You have to customize it as you want. Step 05: Show Image Carousel Slider on Your Black Friday Landing Page Using the Image Carousel, you can slide show demonstrating discounts on your product categories. Drag and drop the Image Carousel widget on any landing page section. Next, from the Elementor panel, you can add photos and text to the widget. Do it accordingly. Thus, you can add more sections and options on the landing page. Hope you can do it yourself. Step 06: Make the Black Friday Landing Page Mobile Responsive Making a web page mobile responsive with Elementor is super easy. You'll get the mobile responsive option on the Elementor footer section. Clicking on it will open up the option to view your landing page on different device screens. We have explained the process in the video below. Note: Don't delete any widget or section while customizing your landing page for any particular device. Because if you delete a widget or section on any device screen, it will also be applied on other devices. However, you may change their position or alignment or hide them. It won't make any impact on other devices. Step 07: Final Preview of Our Landing Page Here is the final interface of our Elementor Black Friday landing page that we've designed using the Happy Addons' ready-made Template. Get Happy Addons to Add a Black Friday Theme Landing Page on Your Website How to Design Cyber Monday Landing Page on Your Website You will require the same prerequisites (Elementor and HappyAddons Plugins) to design the Cyber Monday landing page on your website. Hope you have them ready on your website. Now, let's get into the tutorial part. Step 01: Import a Cyber Monday Readymade Landing Page Template Go to the HappyAddons Template library.Choose the Cyber Monday template you like.Click on the INSERT button. Wait for a while to finish the installation process. You'll get a page design like the following image below. Step 02: Edit Different Sections of the Page In the first tutorial, you saw the deadline/countdown option was already embedded in the template. But this template doesn't have it. So, you can bring it to your page? Very simple. Create a new section by clicking on the plus icon.Type Countdown on the Elementor search bar.Drag and drop the widget on the section. Customize the Countdown section from the Content and Style tabs of the Elementor panel. Using the Heading widget, we have added the FLASH DEALS text next to the countdown to make it more meaningful. Thus, you can use other exciting widgets on the template to make your landing page super gorgeous. Step 03: Promote Products on the Landing Page Promotional landing pages usually include a section to showcase some hot-selling products to generate instant sales. Using the Image and Button widgets, we have created this section under the FLASH DEALS.You may customize it more as you wish. Step 04: Make it Mobile Responsive We already showed you the process in the first tutorial on making a mobile web landing page responsive. Hope you can do it here as well, following the same guideline. Click on the Responsive Mode icon and do the rest yourself. Bonus: Black Friday and Cyber Monday Landing Page Design Key Considerations Whenever you design a landing page, you need to consider why you need to design this page and what elements they should keep on the page. Because if you are not adding all the necessary features to your page, it will not serve its purpose. This is why you need to focus on a few things before designing your Black Friday landing page. Here are some points you must consider in designing Black Friday and Cyber Monday landing pages. Add Black Friday textSet deals deadlineShow your best-discounted productsAdd coupon code Focus on responsive page designMake your page visually appealingImprove your page user experience or page structureSet a proper website navigation FAQ on Black Friday and Cyber Monday Landing Page Design Now, we'll answer some common questions on Black Friday and Cyber Monday Landing page designs commonly found online. How much does it cost to design a landing page?The cost of designing a landing page varies depending on the complexity of the design, the level of customization required, and whom to hire for the page. A simple landing page can be designed for as little as $25, while a more complex design with multiple customizations can cost upwards of $2,00.However, if you have Elementor and HappyAddons installed, you can design unlimited landing pages at a minimal cost. But like any other tool, you must have a kind of enterprise on them. As they are drag-and-drop builders and their numerous tutorials and documentation are available, they won't take you more than a month to be used to. Check out some wonderful YouTube tutorials on these two plugins. Hope you will enjoy them.How many hours does it take to design a landing page?It mainly depends on the level of design complexity and your web design skill. However, both in Elementor and HappyAddons, you will get countless readymade templates and block sections. You can design a beautiful landing page in 3-5 hours by making a proper combination of them.Can I design Black Friday and Cyber Monday Landing pages with Elementor and HappyAddons free versions?Surely, you can design Black Friday and Cyber Monday Landing pages with Elementor and HappyAddons free versions. But only with the pro versions, you can't add too many exciting features to your pages. For example, free versions will give you access to only a limited number of readymade templates.If you are just a beginner-level designer, free versions are enough. But if you are a professional designer or have a web designing agency, pro versions are a must. Are You Ready To Design Your Black Friday and Cyber Monday Landing Page? Customers look forward to this kind of occasion to buy their favorite products at a minimum price. Naturally, they are drawn to websites that look good and give a festive vibe. That is why adding a Black Friday and Cyber Monday landing page during the festival season will give you an extra edge over the competitors. The above guide shows how to design your Elementor Black Friday Landing page using the Happy Addons' Black Friday Templates and how it can help boost your holiday sales. So if you have any queries regarding this blog, you can comment on us in the below box. If you like this post, then share it on your social channel. Don't forget to subscribe to our newsletter. Also, follow our Facebook and Twitter channels for regular updates. Subscribe to our newsletter Get latest news & updates on Elementor [yikes-mailchimp form="1"] ":36560} /--](https://happyaddons.com/wp-content/uploads/2021/11/How-to-Design-Black-Friday-and-Cyber-Monday-Landing-Page-300x188.png)