If we look back into the last decade, creating a website, no offense to anyone, was a nightmare. To build a website, people had to learn at least a programming language, framework, database management system, and other technical stuff. Also, the website-building task was available only for developers with high coding skills.
Those days are gone! After the availability of WordPress and its popular page builders like Elementor, creating a website has, undoubtedly become everyone’s task. Now even you can create a website using WordPress and Elementor, no matter, you are a lawyer, teacher, student, or entrepreneur with zero coding knowledge.
All you need to have is sheer determination, perseverance, and the mentality of creating something amazing. Now the million-dollar question is – do you know how to use Elementor in WordPress?
Don’t give me that look! If you don’t know, let’s start it together from now onwards seeking guidelines from this article. As it’s an article on Elementor that touches every single section and setting of Elementors. So, let’s get started!
Table of Contents
- Get Familiar with Elementor
- What Makes Elementor the Most Popular Page Builder for WordPress
- Introducing Elementor Dashboard
- How to Use Elementor with WordPress
- How to Use Elementor Advanced Features
- Pros and Cons of Using Elementor Page Builder in Your WordPress Site
- Top 3rd Party Elementor Addons to Enhance Your Design
- Free Tutorial: Build Your eCommerce Website Using Elementor and Happy Addons
- Elementor FAQ
- Over to You
Get Familiar with Elementor

Elementor has a vast number of features and functionalities. As a beginner, at first, you need to know these things, otherwise working with Elementor may seem hard to you.
Get to Know about Elementor Basic Features
Elementor lets you create anything and everything from entire websites to specific landing pages. You can design sales pages, promotional pages, and even custom forms. If you can imagine it, this platform can help you to design it.
To let you do this, Elementor comes with;
- Theme Builder: Theme builder helps you to design each of your site parts like header, footer, product page, and more right from the Editor.
- Popup Builder: Helps you to create popups that stand out and completely consistent with the rest of your site design.
- 80+ Widgets: Each widget in Elementor offers advanced design customization so that you don’t need to install extra plugins to get your design done.
- 100+ Pre-designed Templates & 300+ Blocks: You can choose from over 100 full-page WordPress templates and 300 blocks to enrich your design within moments.
Elementor Free vs Elementor Pro
It’s obvious that Elemento Pro offers more widgets, premade blocks, templates, and premium features. However, only using Elementor free version, it is possible to create a website from scratch.
| Elementor Free | Elementor Pro | |
| The #1 Drag & Drop Website Builder | Yes | Yes |
| 40+ Basic Widgets | Yes | Yes |
| 50+ Pro Widgets | No | Yes |
| Theme Builder | No | Yes |
| Popup Builder | No | Yes |
| Motion Effects, Including Parallax & Mouse Effects | No | Yes |
| VIP Support, Including Live Chat | No | Yes |
| Visual Form Builder + Popular Marketing Integrations | No | Yes |
| WooCommerce Builder + Over 15 Shop Widgets | No | Yes |
As a beginner, our recommendation is to try Elementor free first, then go for Elementor pro if it is really necessary for you.
What Makes Elementor the Most Popular Page Builder for WordPress

Elementor is a drag-and-drop page builder for WordPress. This plugin helps you create beautiful pages using a visual editor. This WordPress plugin is an all-in-one solution that lets you control every part of your website design on a single platform.
Basically, Elementor is immensely popular because it empowers people without any technical background to design websites that look as beautiful as those made by professionals.
Using Elementor to build a websites will:
- Save your time and help you more rapidly design and iterate on your websites.
- Allow you to integrate third-party widgets so that you can create a more well-rounded and complete website to provide your visitors a positive online experience.
- Reduce the complexity of your websites, eliminate bugs, and create an easier maintenance process when it comes to updates and testing.
- Save you money and simplify costs so that you can better scope out the price for a project.
For WordPress developers, it’s still a top-choice platform with script optimization, custom attributes, and rollback versions.
To get a better understanding, we have made a comparison between top WordPress page builders. Let’s check it out!
Elementor vs Divi vs Beaver Builder – Comparison Table
Apart from Elementor, there are a few popular WordPress page builders available. Among those page builders, Divi and Beaver are the toughest competitors for Elementor. That is why we have created a comparison table to find out if Elementor is better than those page builders.
| Elementor | Divi | Beaver | |
| Free Version? | Yes | No | Yes |
| Starting Price for Pro | $49 | $89 | $99 |
| Visual Builder? | Yes | Yes | Yes |
| Official Elements | 53 | 46 | 31 |
| In-line Editing? | Yes | Yes | No |
| Pre-made Templates | 300+ | 110+ | 50+ |
| Unique Features | Embed Anywhere | A/B Testing | Beaver Themer |
| Active Installations of Free Version | 5M+ | N/A | 300K+ |
| User Ratings | 4.8/5 (5.7k+ Ratings) | N/A | 4.8/5 (350+ Ratings) |
After analyzing the comparison table, which page builder do you think is better for a beginner? It’s Elementor, right! This is why we chose Elementor over other popular page builders. So, it’s time to get familiar with the Elementor page builder.
Introducing Elementor Dashboard

Getting access to the Elemnetor dashboard, at first, we need to install the Elementor on our WordPress site. Installing Elementor is as easy as pie. Follow the below steps to install and active Elementor in moments.
How to Install and Activated Elementor in WordPress?
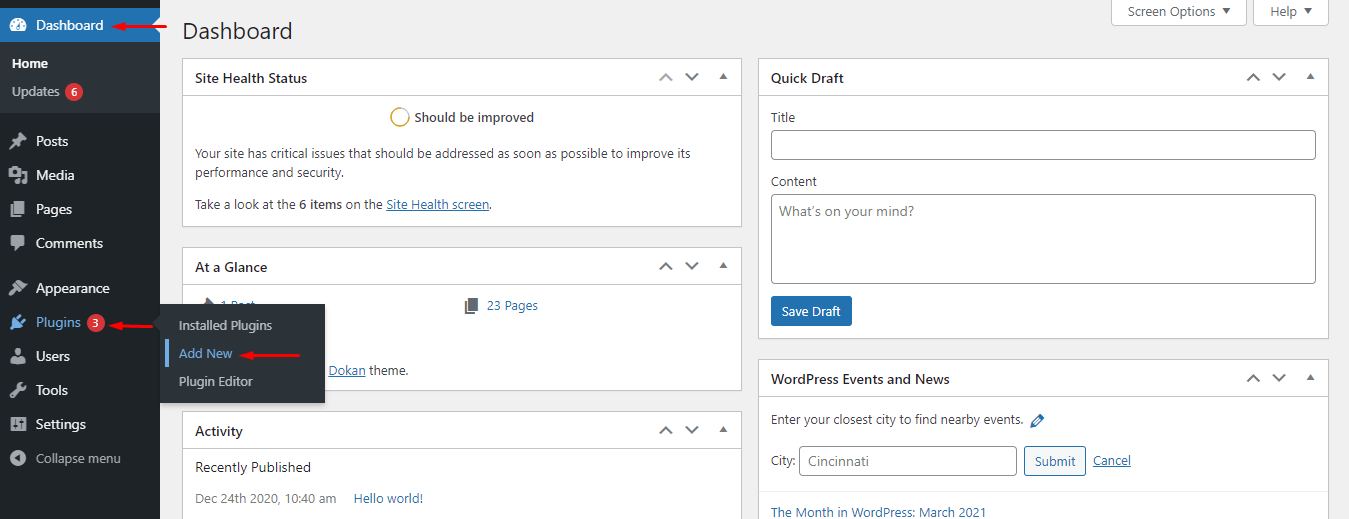
- Step 01: Go to your WordPress dashboard > Plugins > Add New
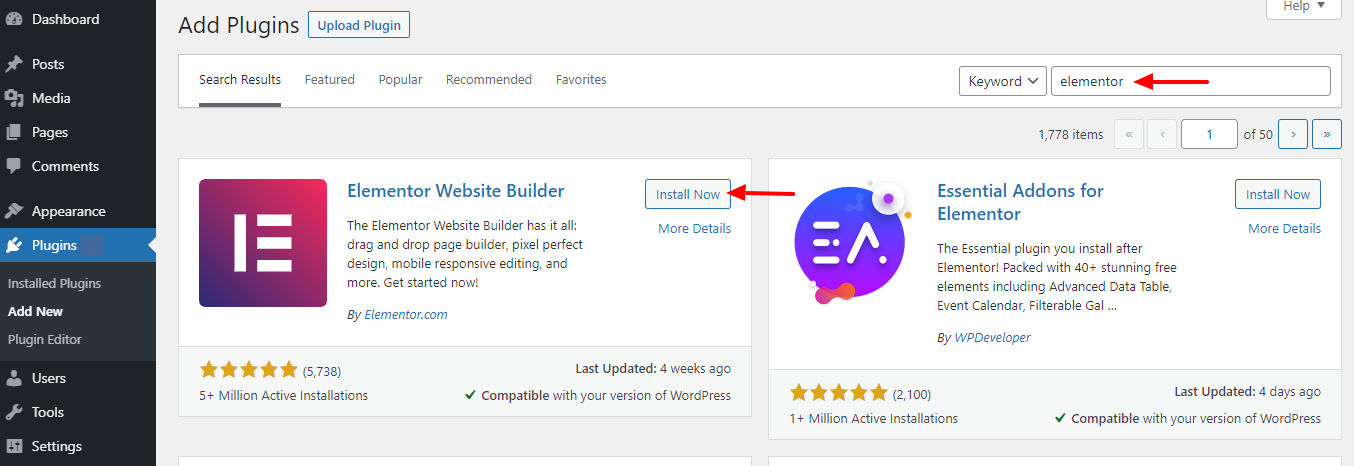
- Step 02: Type “Elementor” in the search box and find Elementor from the search result. Then click the Install button.
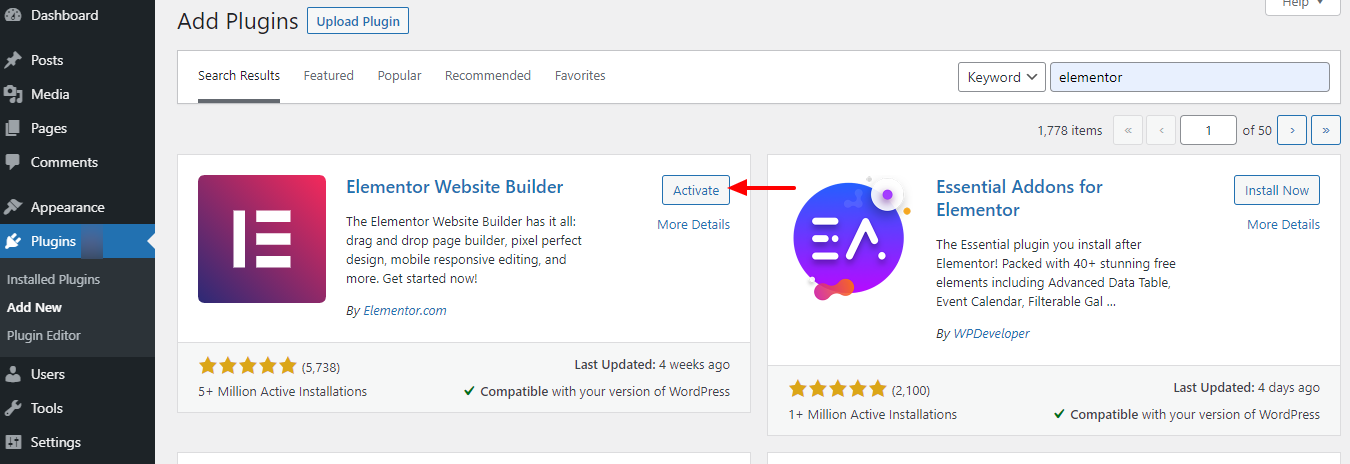
- Step 03: Finally, click the Activate button to activate and use Elementor.
Elementor Settings
After activating the Elementor page builder, you’ll be heading to the below-shown interface. Or, go to your WP dashboard > Elementor, to get this interface.
Settings:
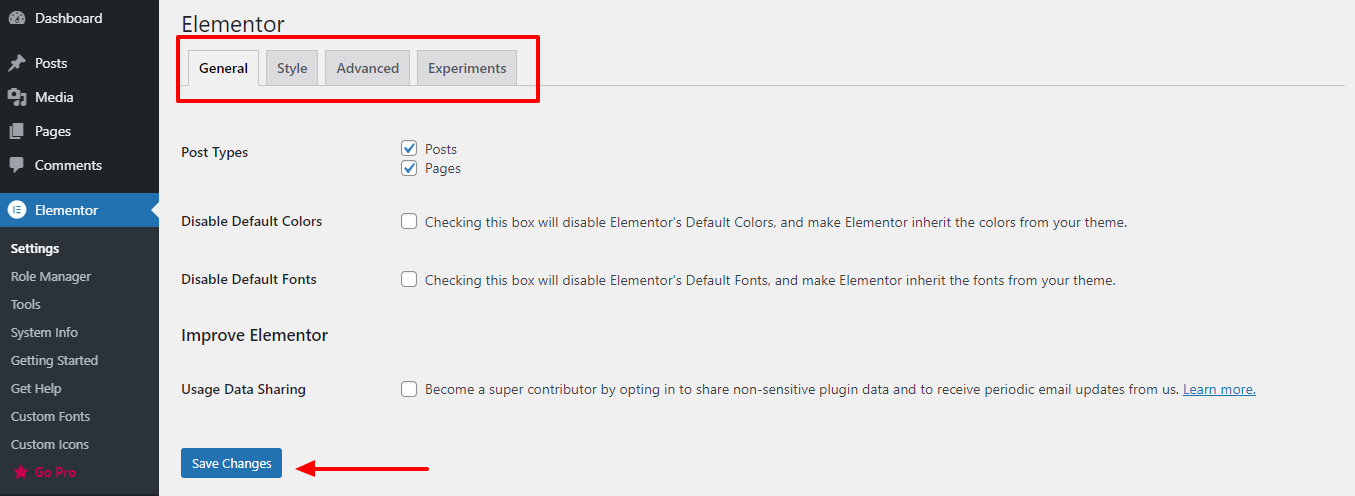
- General: In the General tab of the Elementor settings, you’ll be able to select the post types you plan to use, as well as disable default colors and fonts.
- Style: You’ll find options that include setting default generic fonts, tablet and mobile breakpoints, as well as a checkbox to enable image Lightbox.
- Advanced: You’ll find the option to set the CSS print method, switch the loader method when troubleshooting server issues, and enable SVG support.
Role Manager:
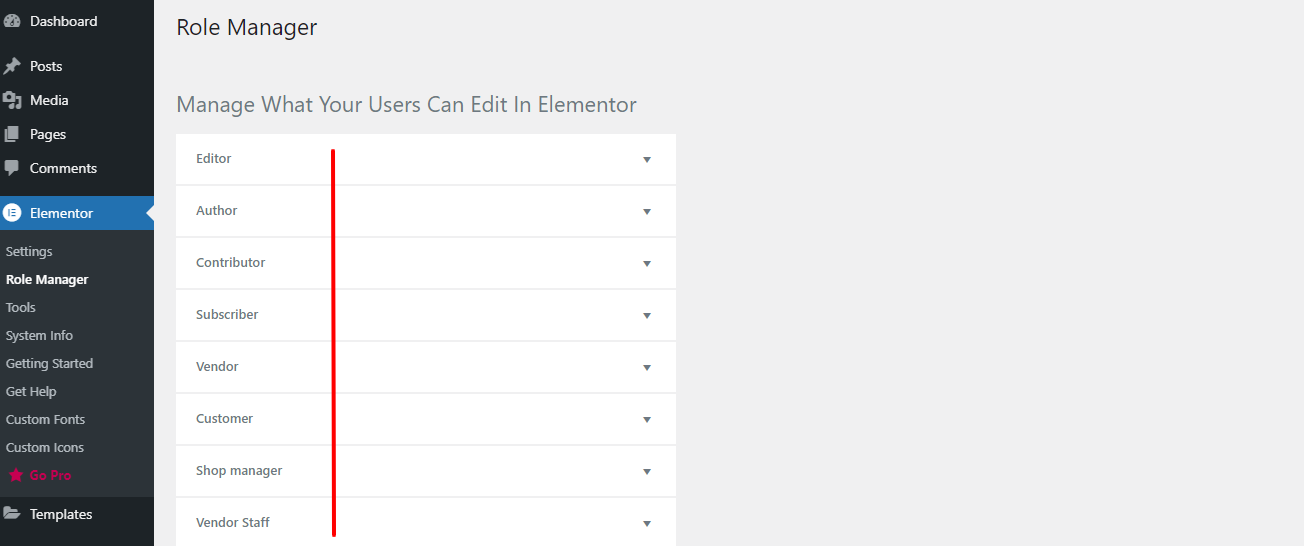
- Different types of users can have different levels of access to your website, depending on their role. If you have the Pro version, you can also limit the users’ access only to content.
Tools:
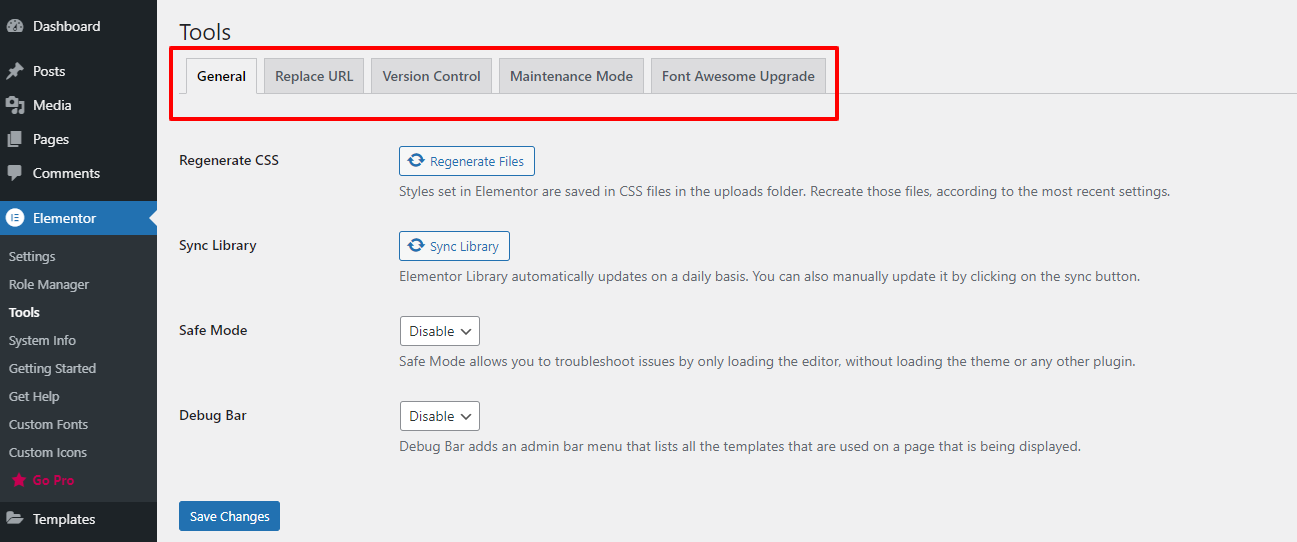
- General: The general tools will let you regenerate the CSS on your website and sync your Elementor library manually If you need to.
- Replace URL: The Replace URL tab is a place where you can, as the name says, replace the URLs if you changed the site address.
- Maintenance Mode: In the Maintenance Mode tab, you get all the controls over the website’s maintenance mode you’ll ever need.
- Font Awesome: It lets you access 1,500+ amazing Font Awesome 5 icons and enjoy faster performance and design flexibility.
Elementor Dashboard
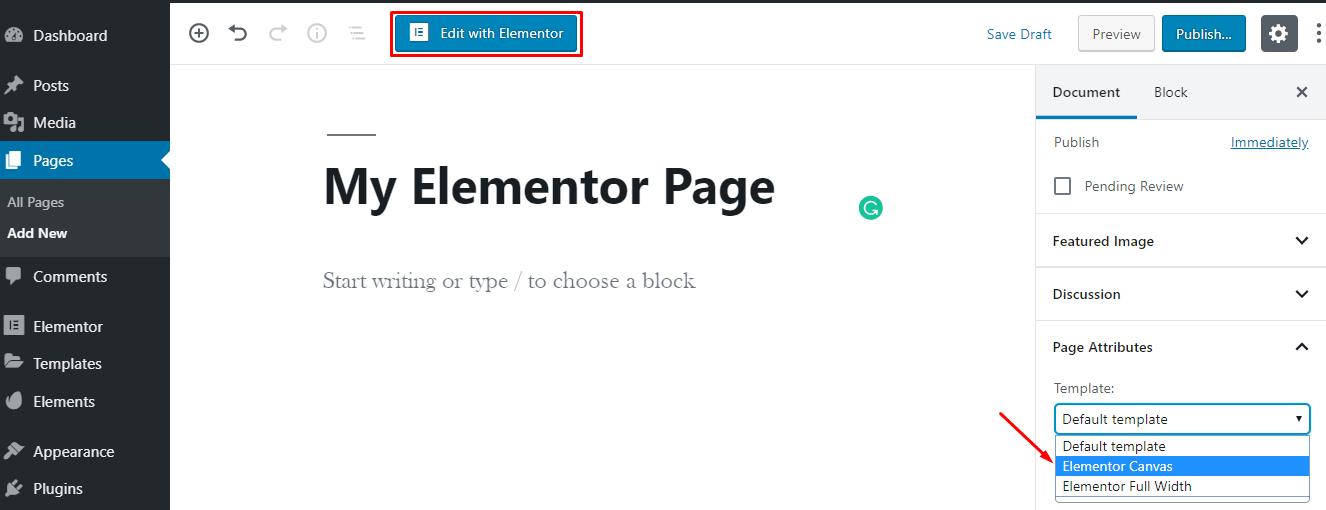
- To get access to the Elementor dashboard, go to WordPress Dashboard > Pages > Add New.
- Then, enter a page title and select the Elementor Canvas option from the right side template dropdown.
- Finally, click on the button “Edit with Elementor” and start working with the most powerful page builder.
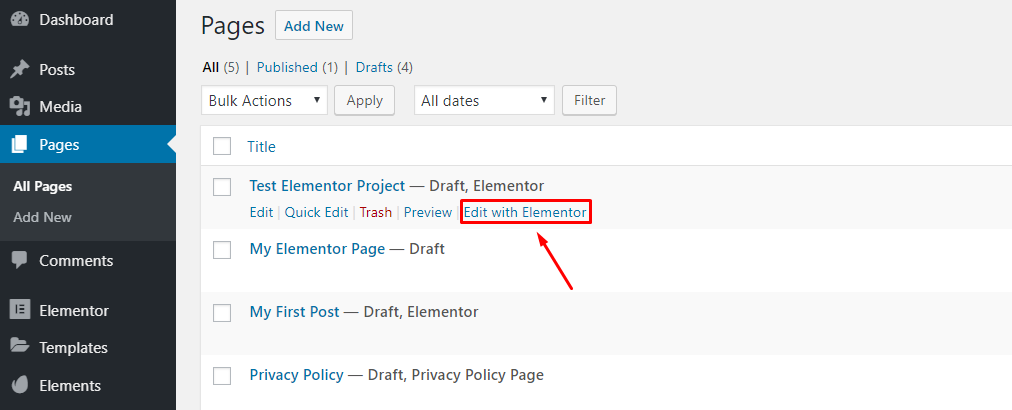
- However, if you want to edit an exciting page with Elementor go to All Pages> Hovering Over a Page.
- Then a button will appear “Edit with Elementor”. Now, click on the button and start editing your page.
Here it is. Our much-awaited Elementor Dashboard. Let’s take a ride into it.
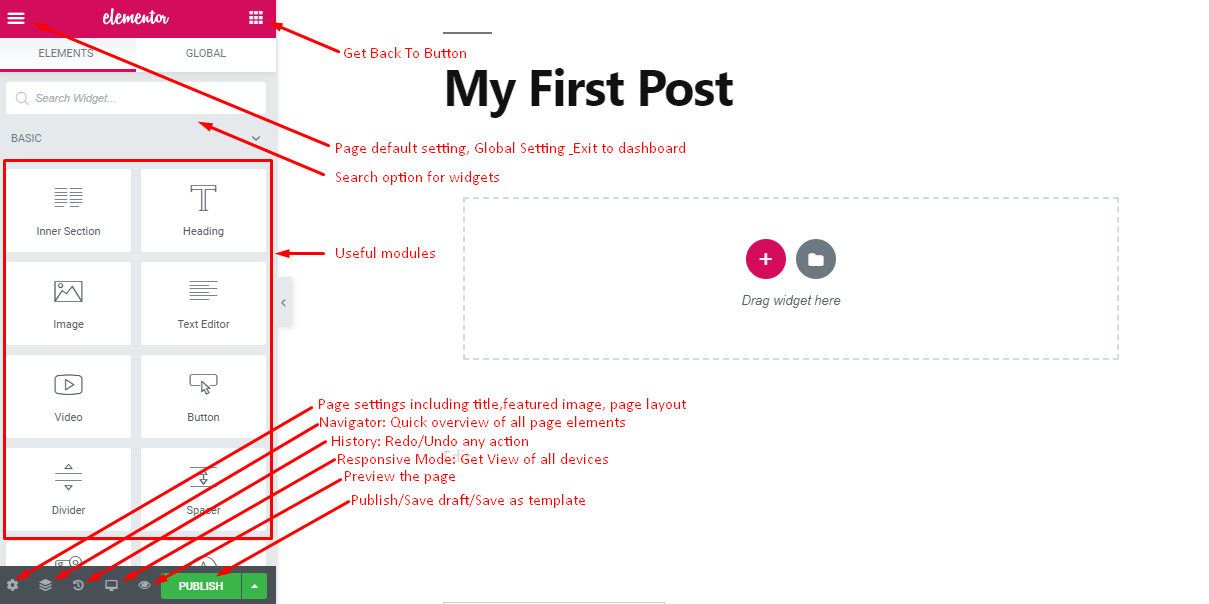
This is the interface where you can design your page with drag-and-drop elements and see the live preview of your site.
- Top of the left, you will find a hamburger icon for some default and global settings.
- At the right top, you will find a dial button in order to get back to the main panel
- After that, a search box appears to find out listed and required widgets quickly
- You will find all the helpful modules in the left panel
- At the bottom, you will find some useful icons for page settings, quick navigation, history, responsive mode, and preview.
- Also, here you will get a Publish button to live your page or save draft/template for using later.
Furthermore, you can make the module panel disappear by clicking on the arrow sign that appears on the right side of the panel.
In this way, you will get a full preview of your page.
Bonus Point: You Can Enhance Your Elementor Experience Using 3rd Party Tools like HappyAddons

Elementor is a powerful page builder for WordPress, no doubt. However, to make it more powerful and give you extra flexibility while designing your website, third-party addons come to play their role.
HappyAddons is such a third-party addon that can help you to create futuristic and next-level designs. Over 200,000 active installations, HappyAddons is one of the most popular addons that seamlessly works with Elementor. It comes with,
- 100+ Widgets
- 200+ Premade Blocks
- Cross-Domain Copy Paste
- Unlimited Section Nesting
- Image Masking
- Happy Particle Effect
- 500+ Line Icon
- Equal Height, and many more
Using HappyAddons with Elementor, you can give your site a premium look in no time.
How to Use Elementor with WordPress
As we said earlier, Elementor comes with a drag-and-drop page builder and a theme builder. So, now we’ll learn how to use these two builders and eventually create a template using Elementor.
- How to Use Elementor Page Builder
- How to Use Elementor Theme Builder
- How to Create a Popup in Elementor
So, basically, our tutorial is going to start from this section. Earlier we got to know about Elementor, now, we are going to work with it in a real way.
How to Use Elementor Page Builder
To show you how to use Elementor page builder, now we are going to create a Homepage for a Travel website. Follow the below steps and try to design your own homepage on your editor to learn it quickly.
Step 01: Create a New Page
- Go to your WordPress dashboard > Pages > Add New

- Give this page a name. Here I named it Homepage.
- Set the default template to “Elementor Canvas” as we want to build the whole page with Elementor. You can choose Elementor Full Width, which will let you customize the whole page without the menu.
- After that, publish the page from the right sidebar. You can also keep it as a draft.
- Click on “Edit with Elementor” and you’ll be redirected to the Elementor page builder.

Step 02: Choose a Suitable Template for Your Travel Website Homepage
Elementor comes with a lot of free and pro-premade templates, you don’t even need to build the pages from scratch. You can just choose an existing template to kickstart your journey.
- Click the Add Template button.
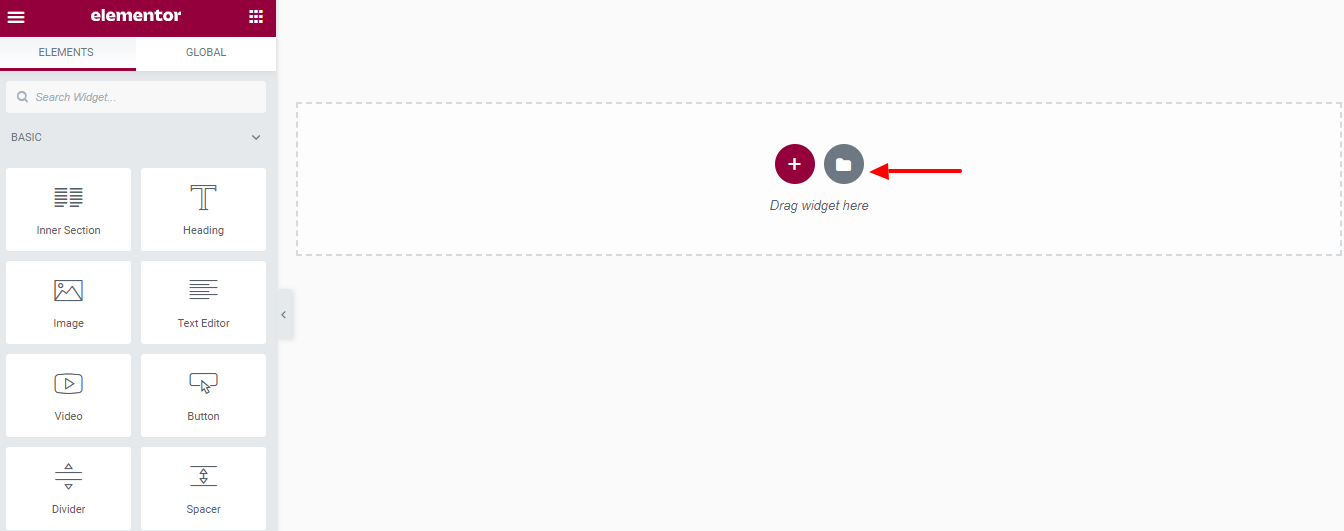
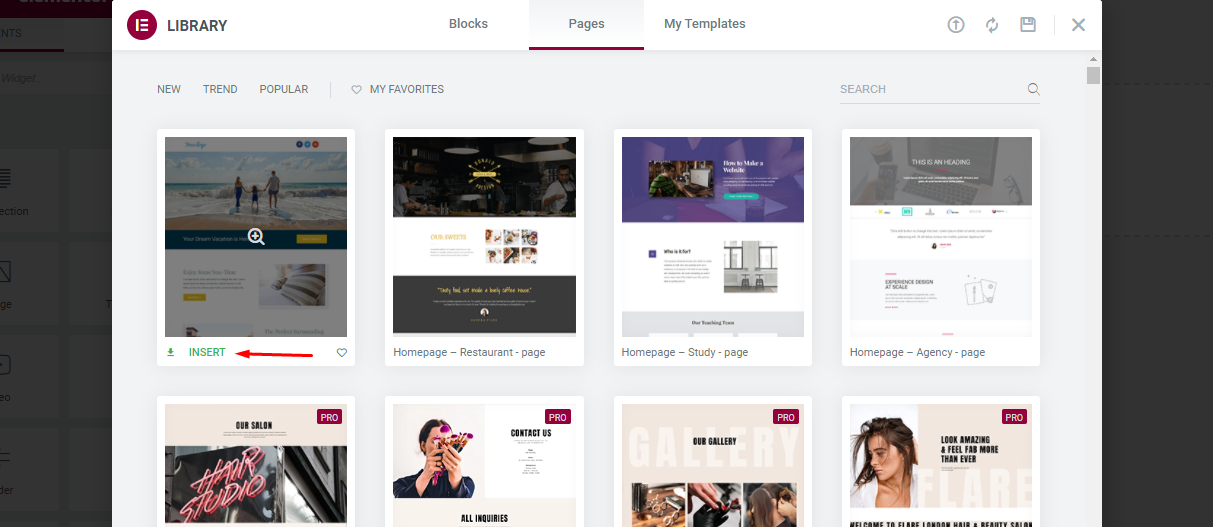
- You’ll get a bunch of premade templates from where you can choose any of the templates and customize them as per your need.
- After deciding the one that you want to use, click the Insert option.
Step 03: Add a Header to Your Homepage
After inserting the templates the page will be ready, and you can customize it to use for your travel website.
- We will start by adding a header to the page, which will display the name and tagline of our website. Here’s how you can do that by just drag & drop and a little bit of styling.
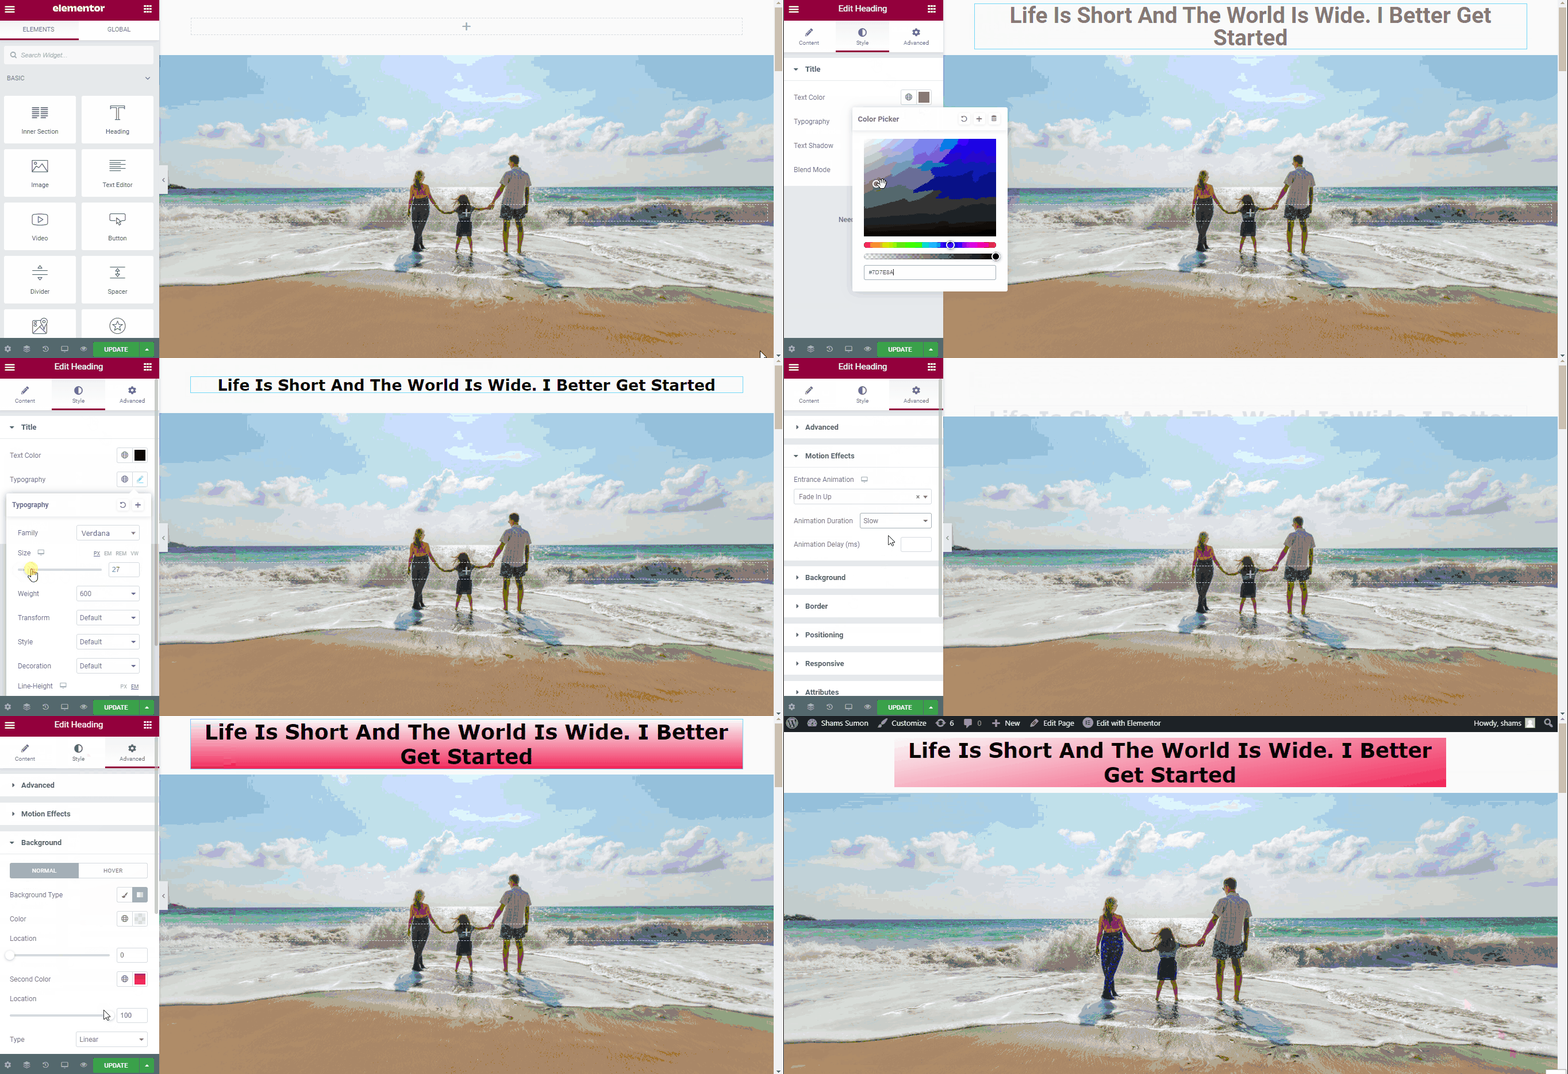
Header helps to display your brand identity instantly once your visitors enter your website. After customizing the header we will now customize the body of the homepage.
Step 04: Highlight Your Hotel Facilities
Once you are done with the Header, it’s time to design the main part of the homepage. That is Hotel facilities like what you’re offering in your hotel if anyone wants to stay at your hotel.
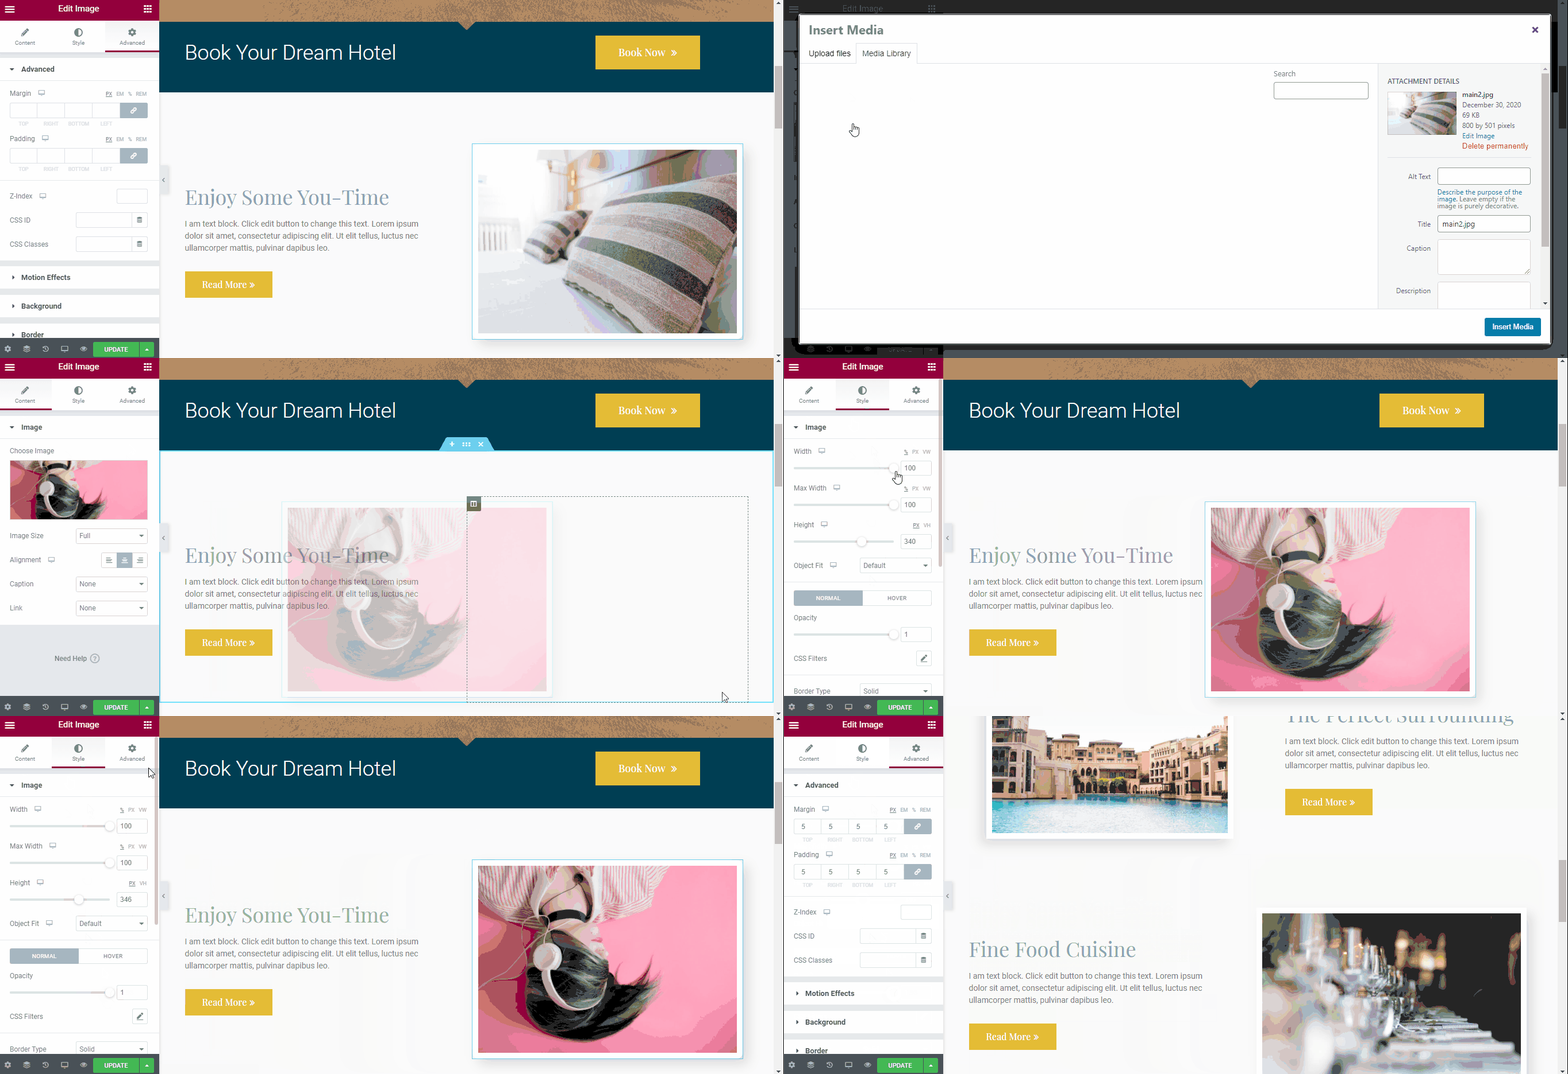
- You can upload any images from your local storage, or you can replace the existing image with already uploaded images from the media section. Follow the below gif file to do that.
- You can adjust the height, width, opacity, margin, padding, and everything from the editing options.
- Adding buttons, texts, descriptions everything is possible from the editing option.
Step 05: Add a Video and Testimonial
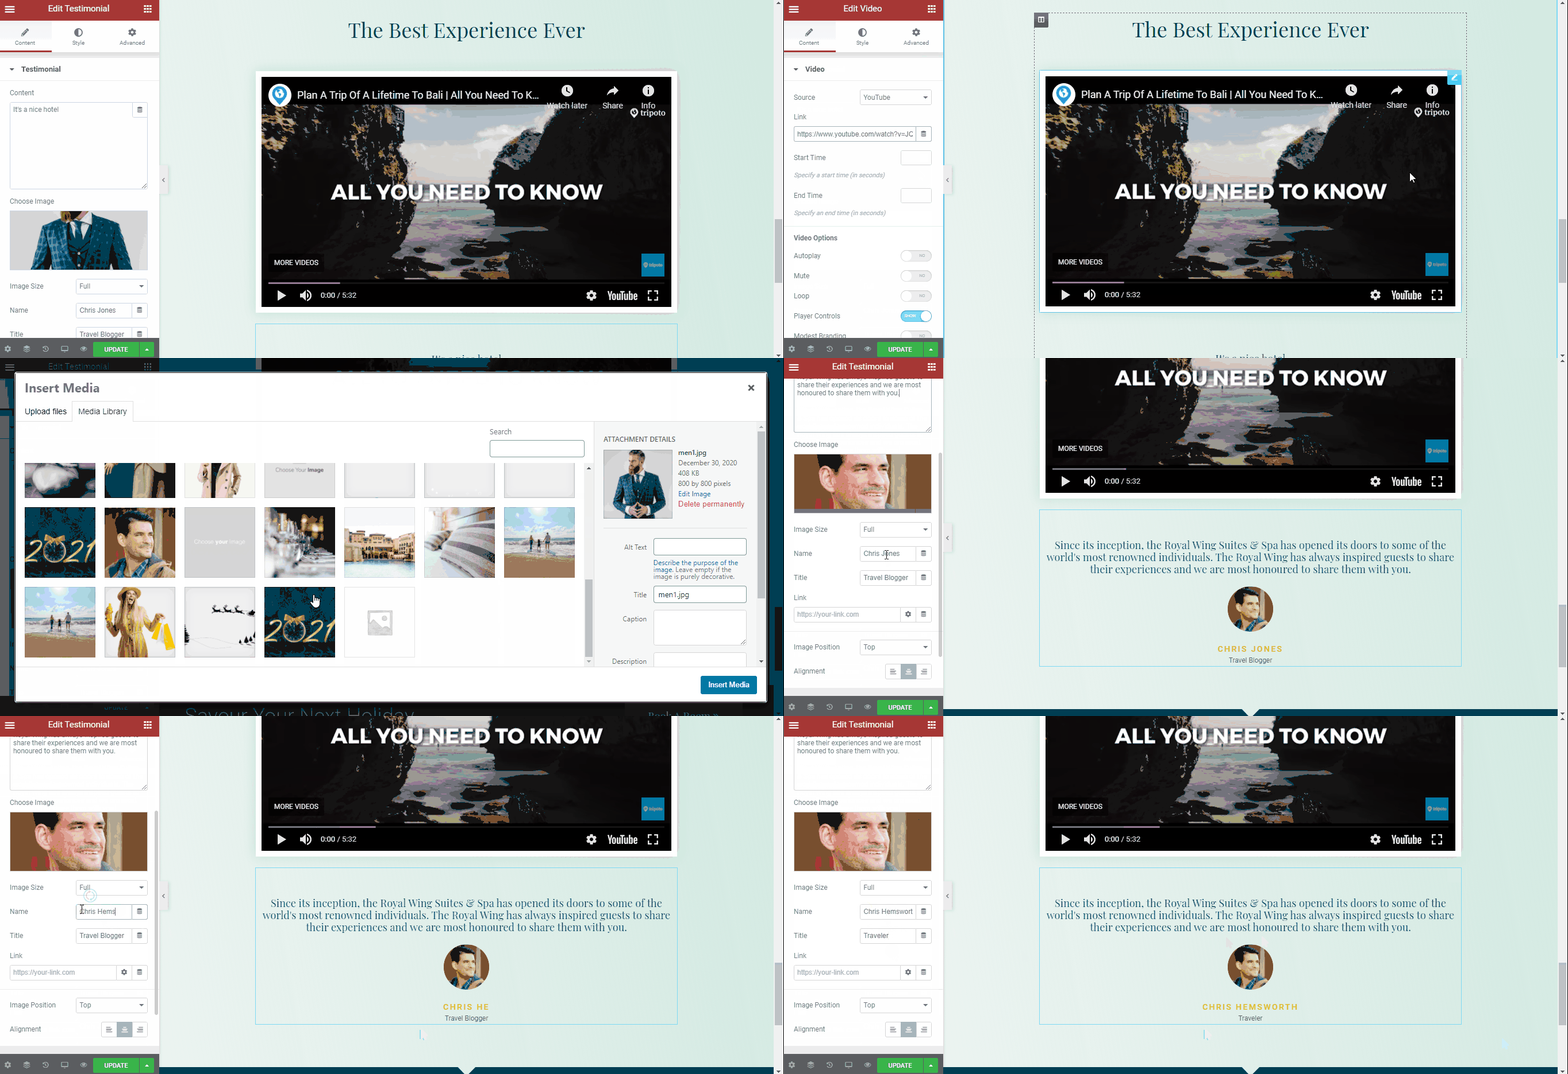
- You can add a video to show what your surroundings look like and how people enjoy your resort when they are here.
- Adding a testimonial is a wise decision to let people know what’s the opinion of your clients about you.
Step 06: Add a Contact Form
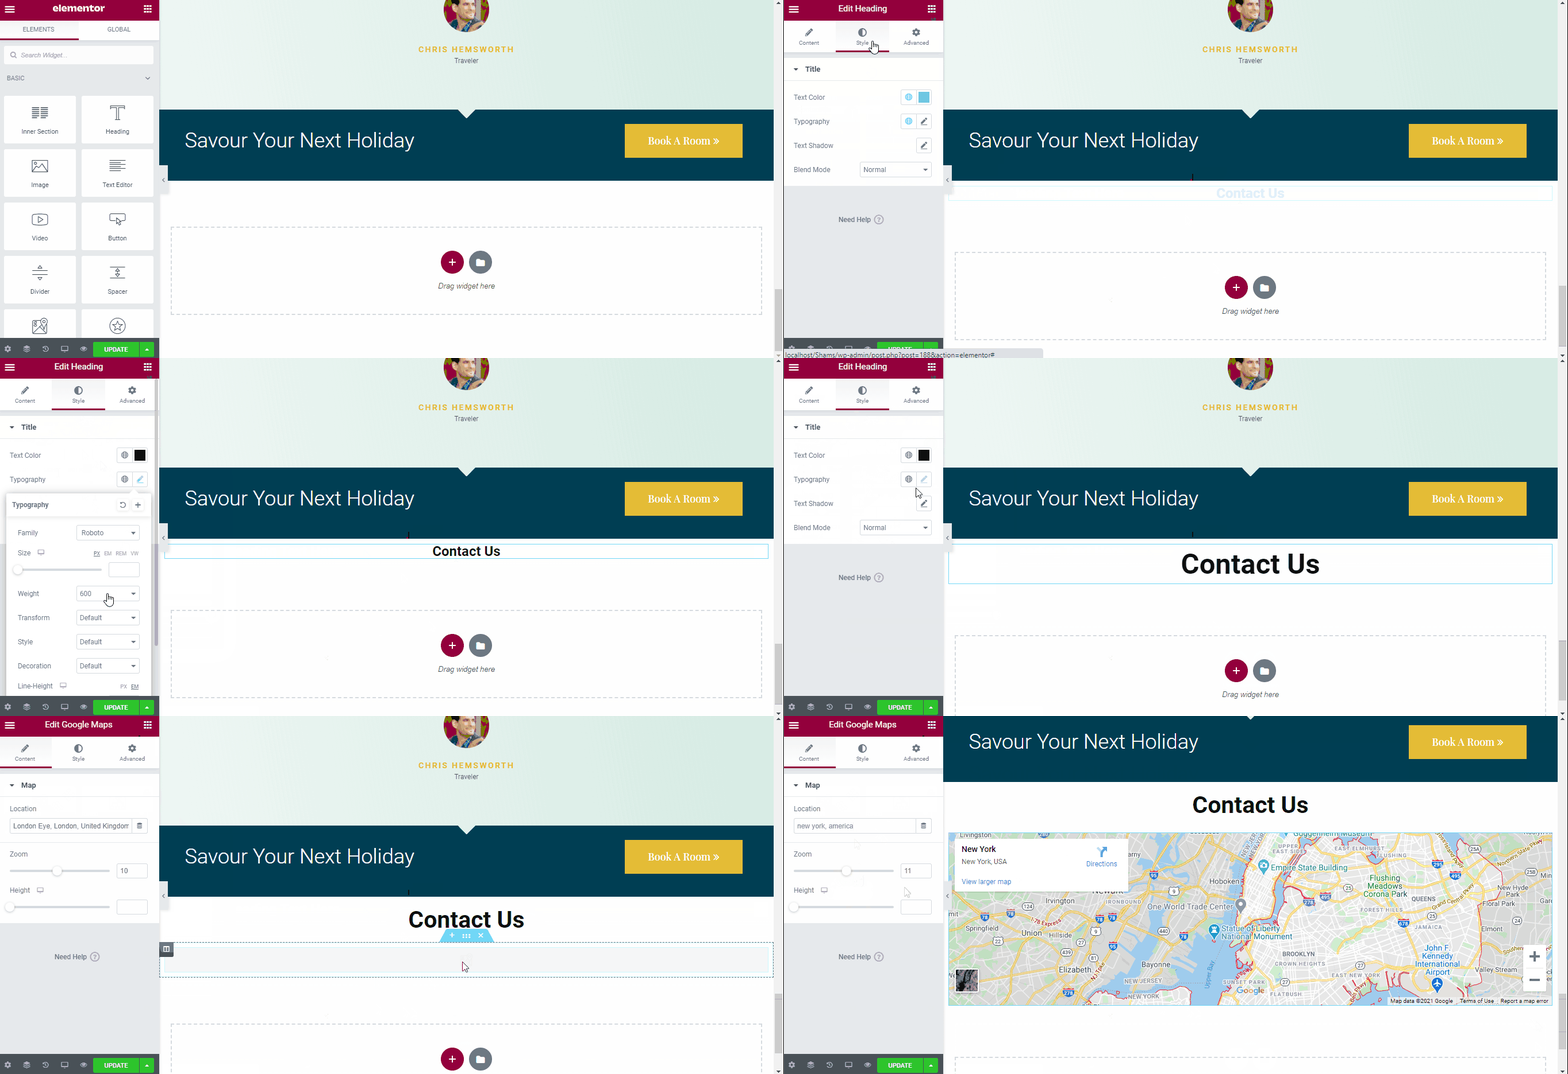
- Add a contact form so that your visitor can contact you. Set your contact numbers like telephone number, email, or Whatsapp number on the contact page that will help your visitors to call you if they have any questions.
- You can also add a Google map so that people can find you where you are from.
Step 07: Make It Responsive Across Platforms
- Make sure that your page is fully responsive and will look properly on all devices. In order to do it click the Responsive Mode option.
- After the customization is done, click the Update button.

Overview of Our Homepage
Here is the final view of our Homepage that we have just created. And this is how you can use Elementor page builder to build any page including the homepage, contact page, feature page, or any other page instantly.

How to Use Elementor Theme Builder

Elementor theme builder is a game-changer for anyone familiar with page builders because it allows you to create custom headers, footers, and other dynamic content for your website. It even allows you to override aspects of your WordPress theme, so you can keep what’s working and just make the changes you want!
In this section, we’re going to show you how you can build beautiful headers with Elementor Theme builder.
Note: Elementor theme builder is available to its pro version. The free version comes with a very limited feature.
Step 01: Choose a Template Type
- Go to your WordPress dashboard > Templates > Theme Builder.
- Then click on the Add New button, or If you saw a header already that you liked the look of, you can import it to use as a starting point.
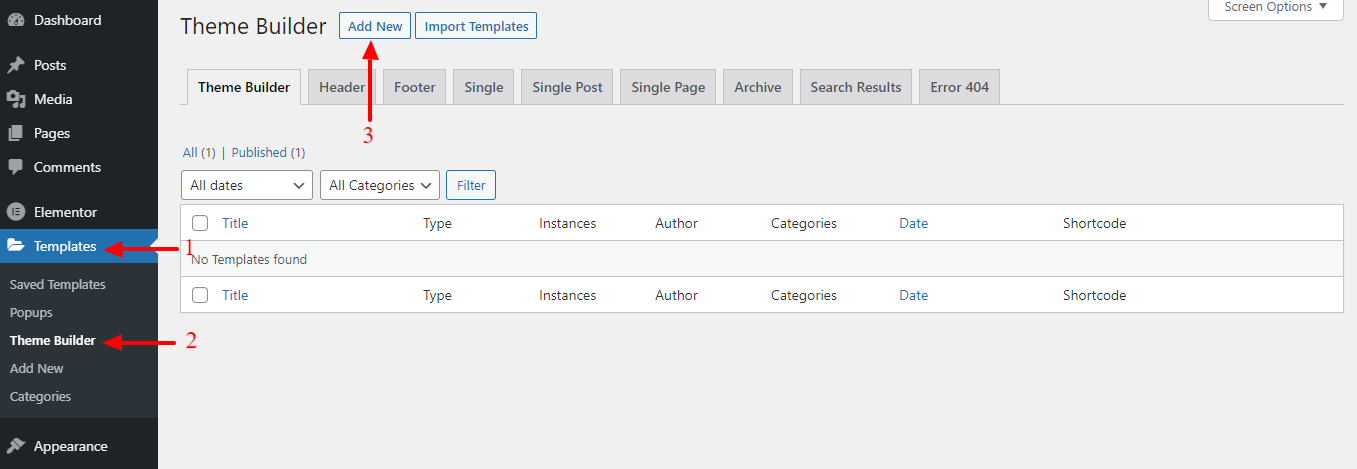
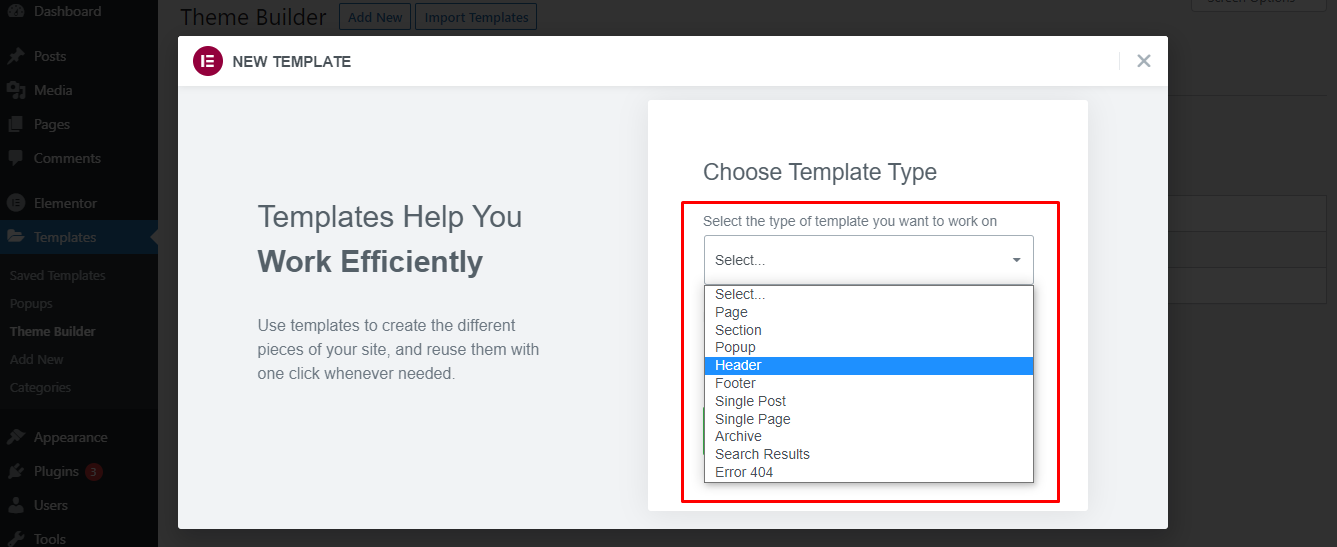
- After clicking the Add New button, a pop-up screen will appear in front of you. There you will see a drop-down menu to choose from a template type.
- Choose a temple type, here we are choosing Header.
- Then put it a name.
- And finally, click the Create Template option.
Note: Elementor Free only includes section and page templates. The Pro version includes several additional template categories, including global widget, header, footer, single, and archive.
Step 02: Customize Your Header in Elementor
You can choose to design your own header or you can pick any of the premade ones from Elementor Template Library.
- Click on the Add Template option to load a premade header to your editor.

If this step looks familiar, that’s because it’s the same exact editor we used to make a full-page earlier. Now, use that experience here to create a header for your website.
After customizing your Header and clicking the ‘Publish‘ button, if you want you can set conditions for where you want your header to be displayed.
Note: You can follow these same steps to create footers for your website too. Just make sure to choose ‘Footer’ as your Template Type when you are designing your footer using the Elementor Theme Builder.
How to Create a Popup in Elementor
Creating a popup with Elementor is super easy. You can design your popup with the visual interface of Elementor where everything is drag and drop. Your job is getting easier since Elementor also offers premade popup templates. You can simply select a template, publish it, and set the trigger. That’s it!
Note: Elementor theme builder is only available to its pro version.
Step 01: Add a New File
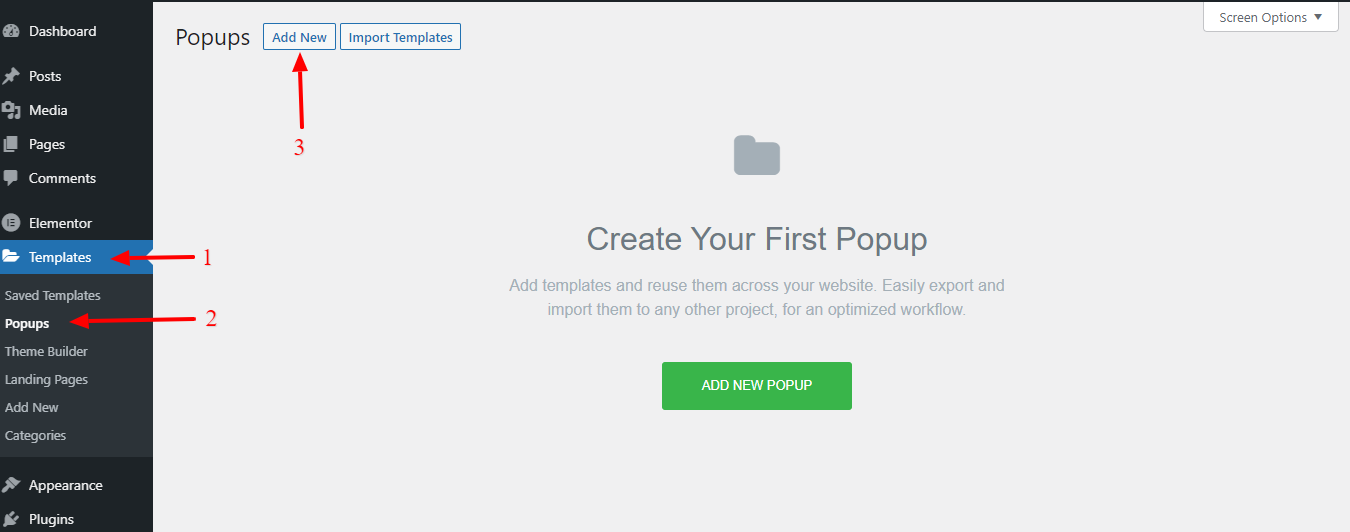
- Go to your WordPress dashboard > Templates > Popups. Then click the Add New button on the top side.
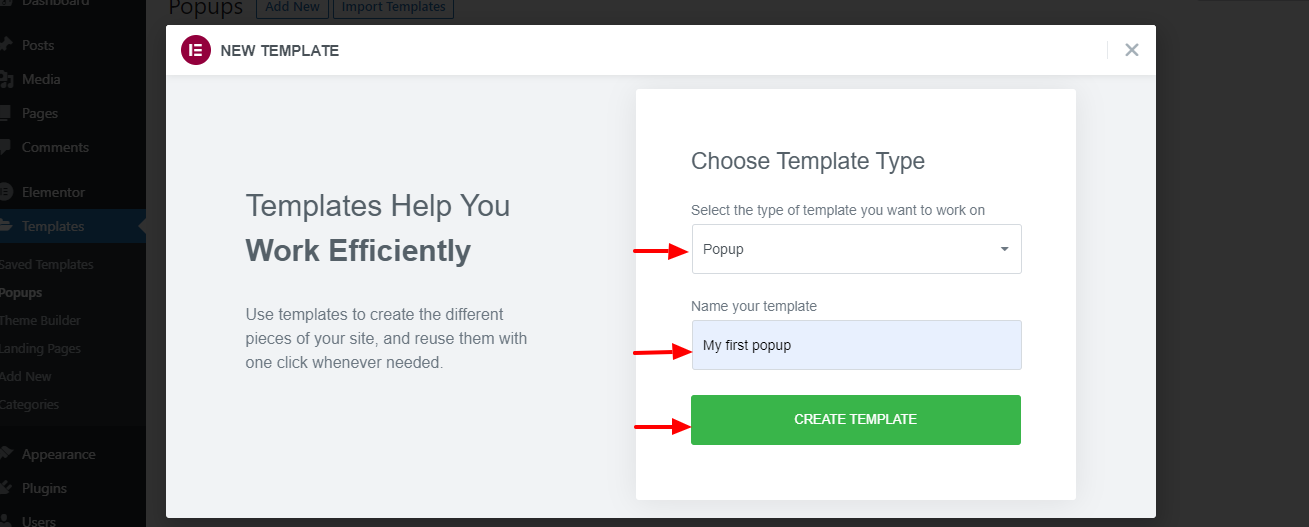
- Give your popup a name and click the CREATE TEMPLATE button.
- Select a popup template you want to use. Hover your mouse over it and click the Insert button to take it to the Elementor editor.
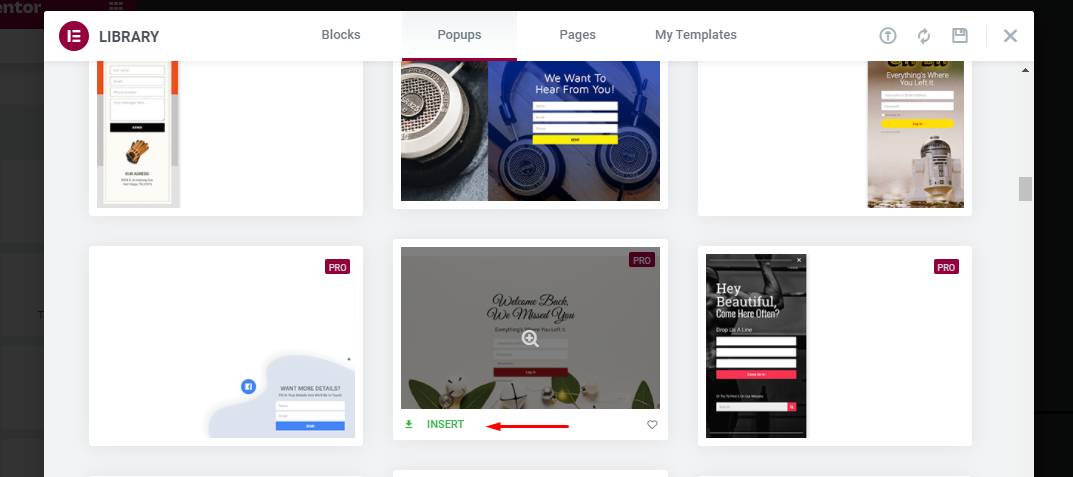
Note: If you prefer to create the popup from scratch, you can simply close the template library to open the Elementor editor.
Step 02: Customize the Popup
After inserting a pre-designed popup into your editor, it’s time to customize that popup. On the Elementor editor, you can customize the popup. You can replace the default content with your own content.
We have already shown you how to customize a pre-designed Elementor template.
Once you are done, click the PUBLISH button.
Step 03: Set Display Conditions and Triggers
In the next step, you will be asked to set display conditions and triggers. There is also an option to set advanced rules.
- Display conditions: Determine on which pages the popup appears throughout your website. You can set the popup to appear on the entire website, specific pages, specific posts, specific categories, and so on.
- Triggers: A trigger is an action to show the popup. Elementor supports 6 trigger types: On Page Load, On Scroll, On Scroll To Element, On Click, After Inactivity, On-Page Exit Intent.
- Advanced Rules: The requirements need to be met for the popup to appear. For instance, you can set the popup to appear if a visitor comes to your website via a search engine or certain UR. Elementor Popup Builder itself has 7 advanced rule options you can set choose from.
If you want to display the popup when a user clicks a button, open the Triggers tab and activate the On Click option. Then click Save & CLOSE.
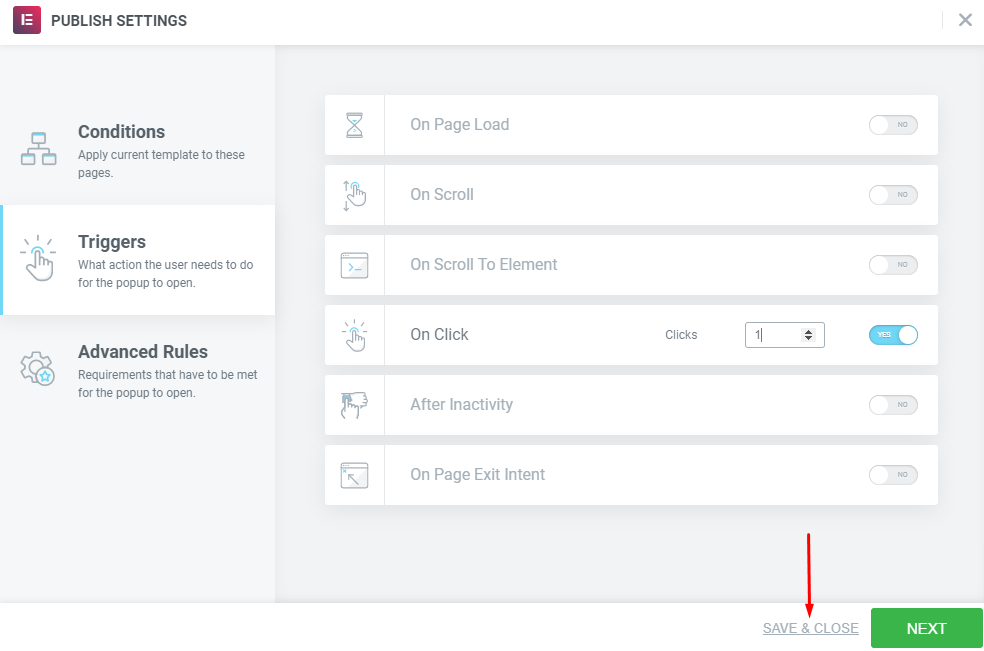
Step 04: Link the Popup to a Page
Create a new page/post and edit it with Elementor (you can also edit an existing one).
- Add a Button widget by dragging it from the left panel to the canvas area. Or, if you are editing an existing page that already contains a button, click the Button widget to turn it into an editing mode.
- On the Button option under the Content tab, set the link to Popup. To do so, you can click Dynamic on the Link section.
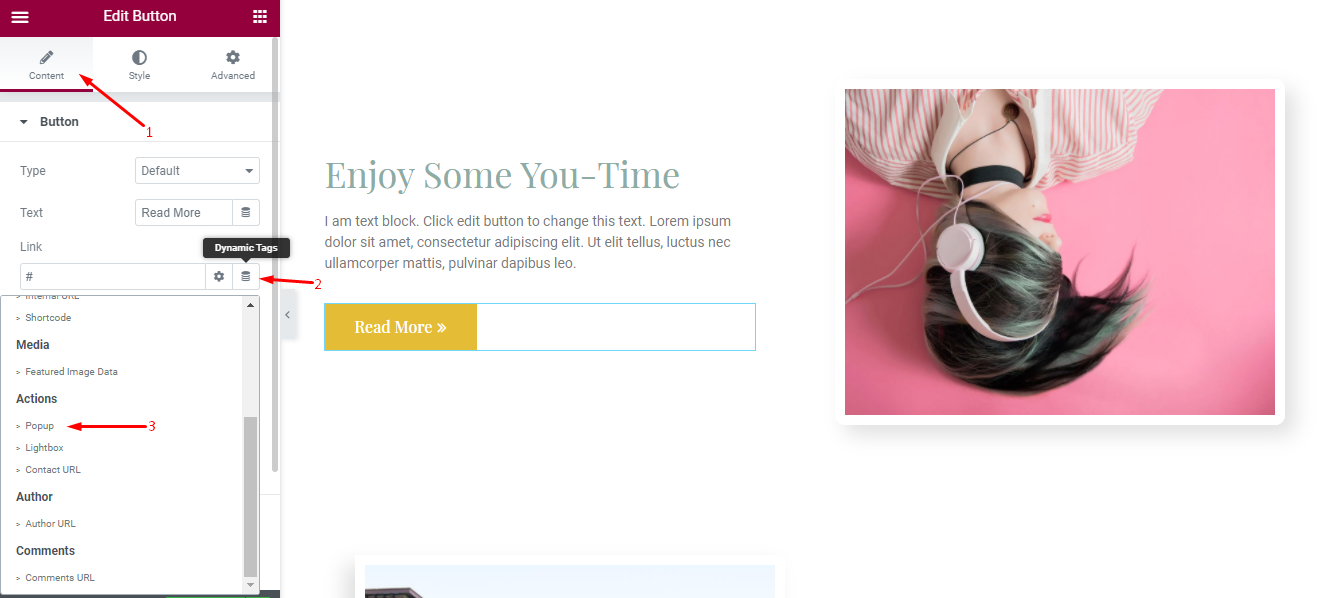
- Click the wrench icon on the Popup field and select the popup you have just created. Type the popup name to find your popup.
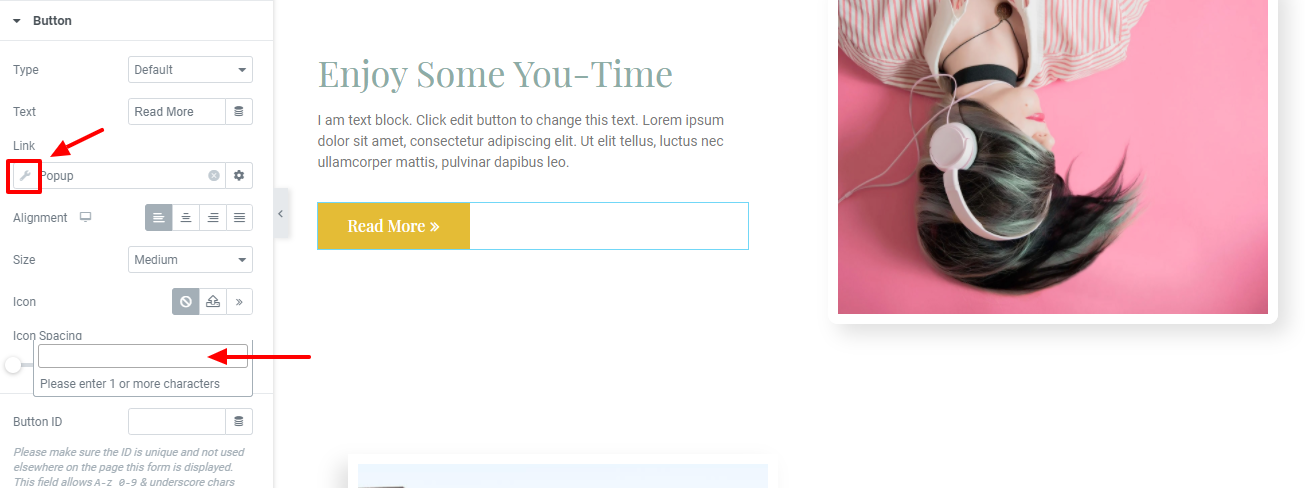
Click the Publish/Update once you are done editing the page.
Before clicking the Publish/Update button, you can preview your page first to see if the popup already works.
How to Use Elementor Advanced Features

In this section, we will focus on mainly two different topics. They are,
- How to Customize WooCommerce Product Page in Elementor
- How to Import an Elementor Template from a JSON File
So, let’s get the ball rolling.
How to Customize WooCommerce Product Page in Elementor
Before you can customize your WooCommerce product page, you’ll need to install and activate WooCommerce on your WordPress dashboard. You’ll also need to add a few products to your website. To do that, you can seek help from this WooCommerce setup (step-by-step) guide.
After setup, you can design your product page. Follow these steps.
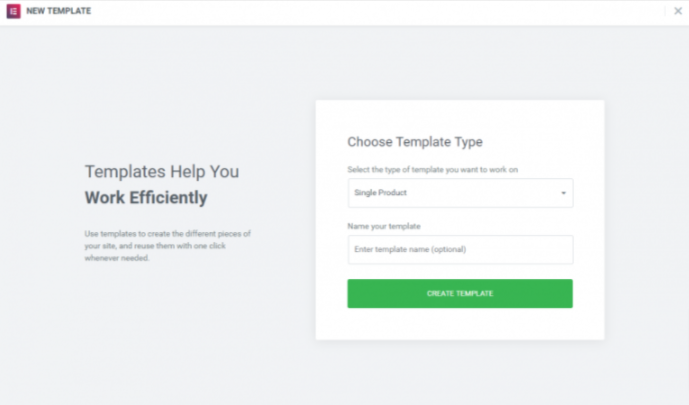
Step 1: Create the Single Product Template
- In your WordPress dashboard, go to Elementor > My Templates.
- Click on the Add New button.
- Choose Single Product as your template type and click Create Template.
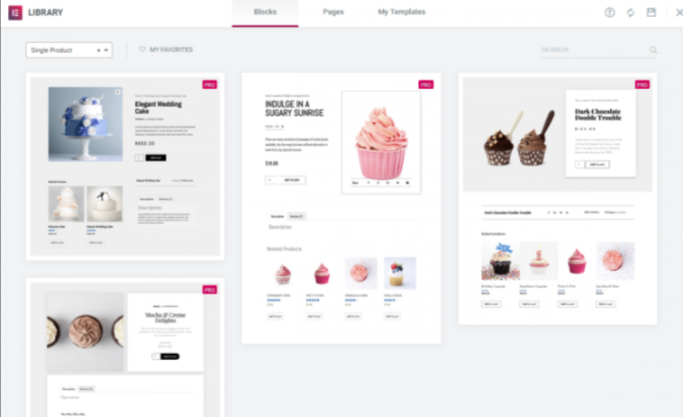
Step 2: Choose a Pre-Designed Product Page Template or Build One from Scratch
- The Elementor Library will load.
- Next, choose a pre-designed product page template or build one from scratch.
- If you choose a premade product page template, customize it as per your designing skills (Now you have the experience to customize a design as we have shown how to customize a page right before this section).
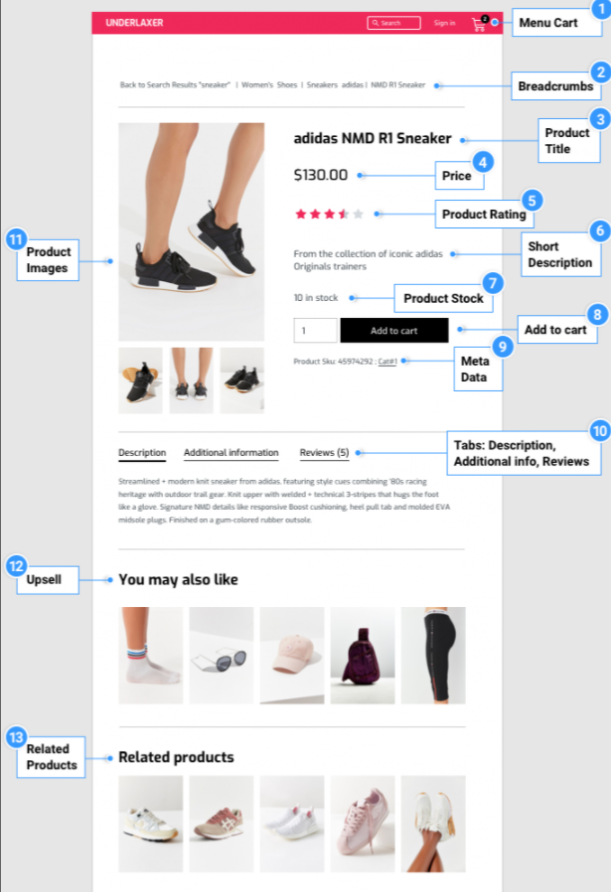
Step 03: Add Different Product Widgets to Customize Your Page
- Now, it’s time to build the elements that will make up your product page. Follow the screenshot below to design your product page. You can add or remove any widget that you need.
Step 04: Publish the Page
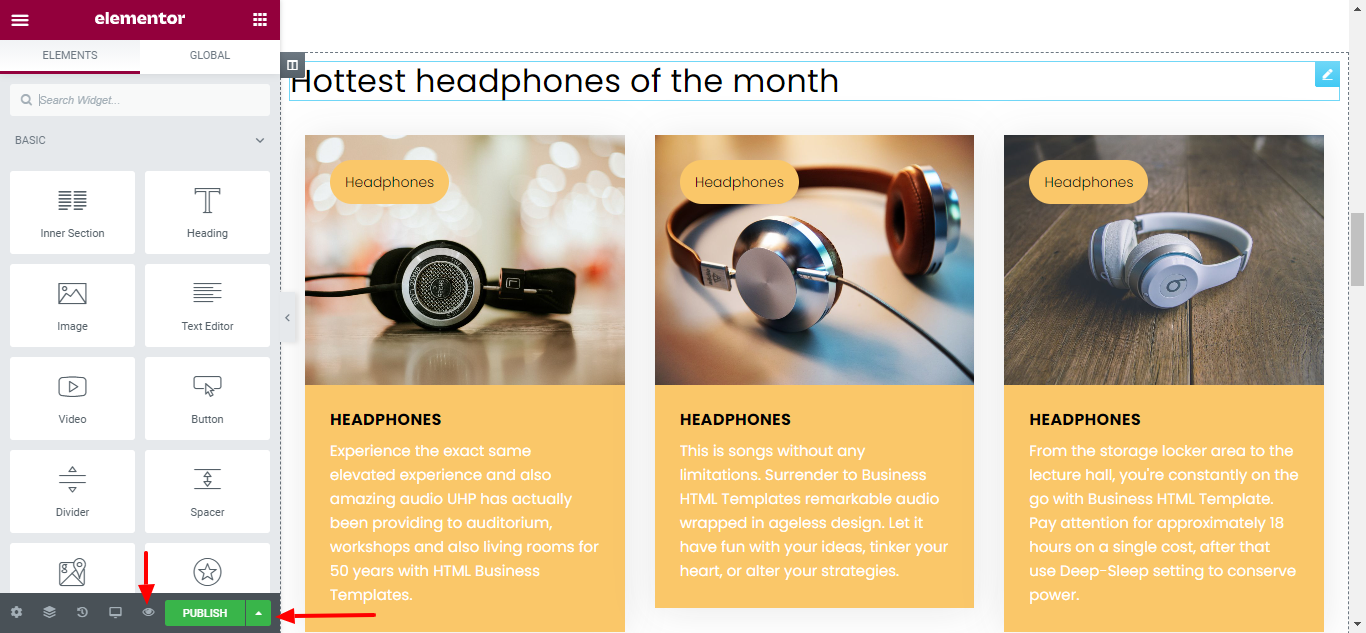
- When you’re ready to preview your page, click on the eye icon on the bottom left panel.
- Click Settings, then choose the product you want to display.
- To publish your page, click the green Publish button on the bottom left panel.
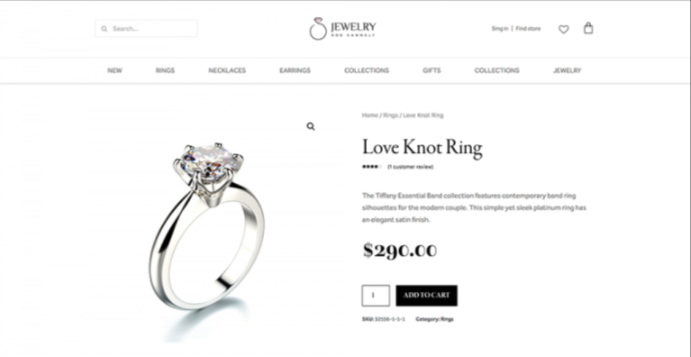
It might look like the below image.
How to Import an Elementor Template from a JSON File
Elementor allows you to import a template from a JSON file. To let you do this, there are two ways available out there. Let’s learn how they work!
1. Via Template Library
- Click on the Add Template button.
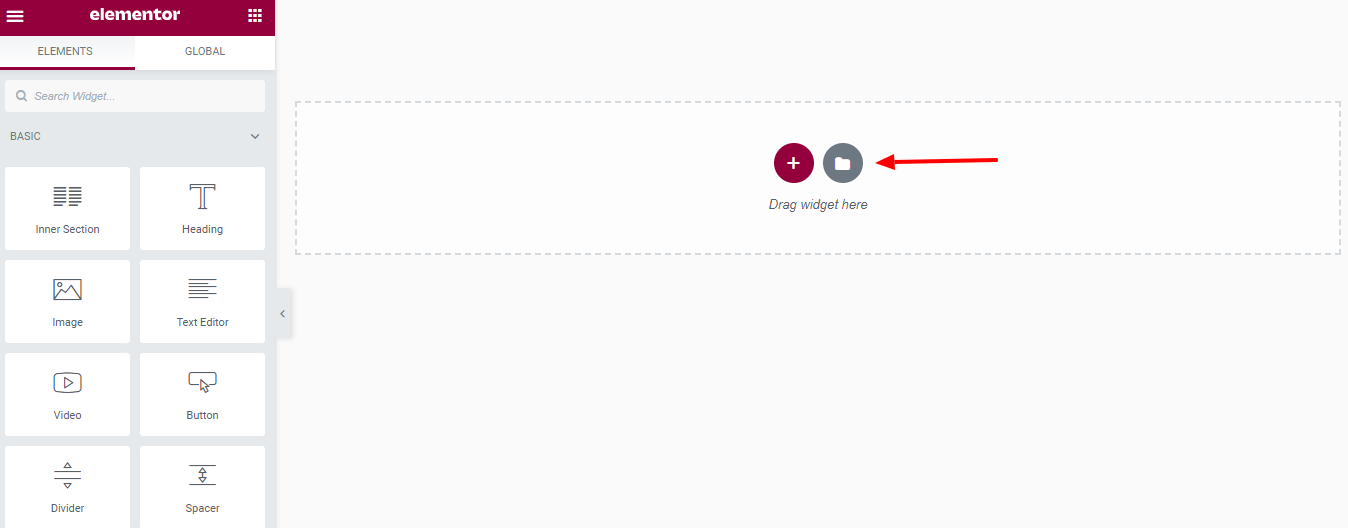
- Click on the arrow icon – Import Template.
- Now, click the SELECT FILE button to select the JSON file you want to import.
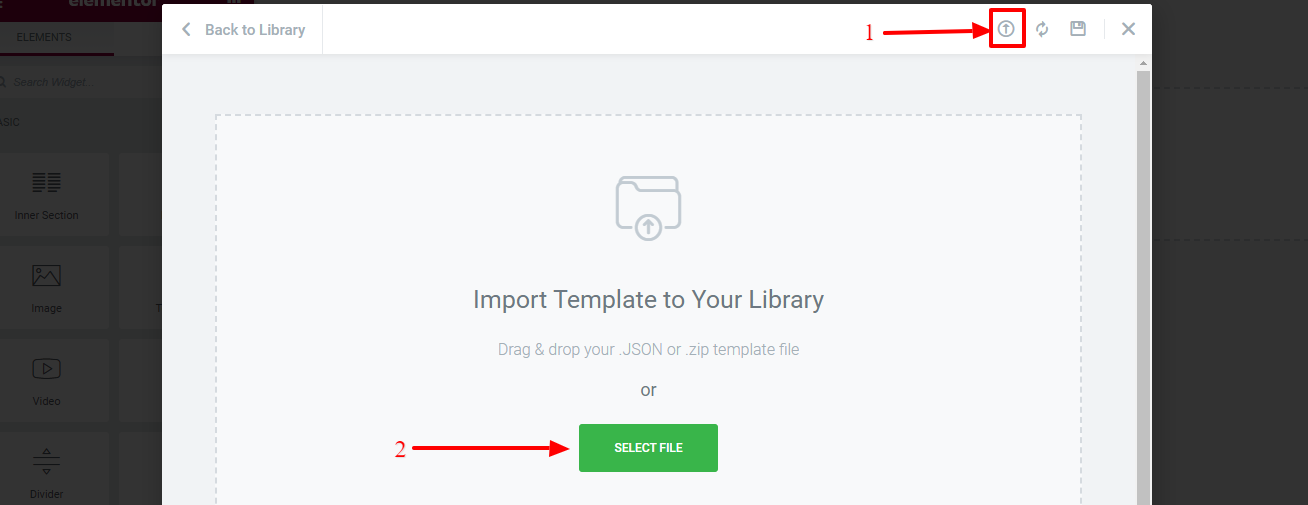
- You can find the template you have just imported on the My Templates tab on the template library.

Reload the template by clicking the reload icon if the template you have just imported doesn’t appear. Hover your mouse over a template and click the Insert button to load it to the Elementor canvas.
2. Via Template Manager
- From your WordPress dashboard, go to Templates > Saved Templates.
- Click the Import Templates button.
- Then clink on the Choose File button to select the JSON file.
- Finally, click the Import Now button to import it.
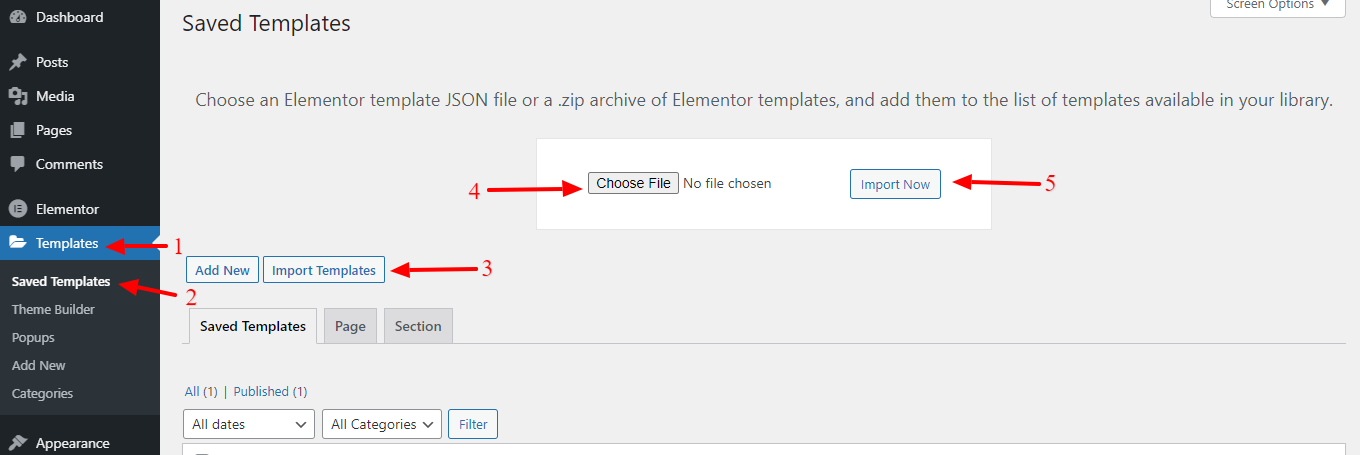
These are the two ways to import an Elementor template from a JSON file. You can choose either of the ways to get your job done.
Pros and Cons of Using Elementor Page Builder in Your WordPress Site

It’s obvious that everything has its dark side as well. But in terms of Elementor, it’s not actually the dark side. Instead, we can say it has some limitations that could be improved over time. What are those?
Well, before that, let’s check its pros at a glance.
Pros of Using Elementor in WordPress
- It’s a free plugin! Most users can fully build out their sites without having to upgrade to the pro version.
- For a free plugin, it has a very wide range of features. The features set on the free version rival a lot of paid plugins.
- The real-time editor allows you to make changes to your site and see what’s happening in real-time, so you don’t have to keep going back and forth between multiple screens.
- You can edit and view multiple versions of your site, desktop, mobile, and tablet, and make unique changes to each of these versions.
Cons of Using Elementor in WordPress
- Elementor is a powerful editor, but with all the flexibility and customization options, it can be hard to get everything right.
- Sometimes, your pages might have layers of different content overlays, and it can be difficult and time-consuming to find the area you want to edit.
- If you build your site using Elementor, you’ll need to keep the plugin installed, otherwise, you’ll lose all your designs and customizations you’ve made.
Top 3rd Party Elementor Addons to Enhance Your Design
Third-party addons are the powerhouse of Elementor. Despite Elementor offering 80+ Fantastic Elements, it is possible that you may want something even more advanced & unique. This is exactly why third-party developers have decided to expand the Elementor functionalities & develop their own Elementor Addons.
Apart from that, you will be getting many special-purpose elements with addons, for example, advanced pricing, team, social elements, creative elements, form styling elements, countdown, etc.
As a result, Elementor now officially recognizes them as its contributors by presenting them on Elementor’s official page. Among them, here is a list of the top 3rd-party Elementor addons that you can use while designing your WordPress website.
- Happy Addons: Comes with 100+ widgets, and 200+ blocks so that you can get the full freedom to design your website in less time and with less budget.
- Premium Addons for Elementor: It offers 55+ highly customizable Elementor essential addons and widgets, 300+ premade Elementor templates that help you to design a website in less time with ease.
- Exclusive Addons for Elementor: A collection of 700+ premade blocks and 10+ useable templates will help you build your websites in less time with no coding.
- PowerPack for Elementor: It offers 60+ creative Elementor widgets and extensions to enhance your Elementor experience.
These addons give you the opportunity to strengthen your website design with its amazing features & layouts. Besides, you can create a special vibe by using the Elementor extensions.
Free Tutorial: Build Your eCommerce Website Using Elementor and Happy Addons

Creating an eCommerce website using Elementor is super easy. And blending HappyAddons with Elementor makes it more fun to design a website. It’s something like the limitless flexibility to design as per our requirements. Let’s check how we can design our eCommerce website with ease using Elementor and HappyAddons.
Here are the pre-requisites to create your eCommerce site:
- Choose your domain name and web hosting plan
- Install WordPress and WooCommerce
- Install Elementor
- Finally, Install HappyAddons (Free + Pro)
05: Choose an eCommerce Template
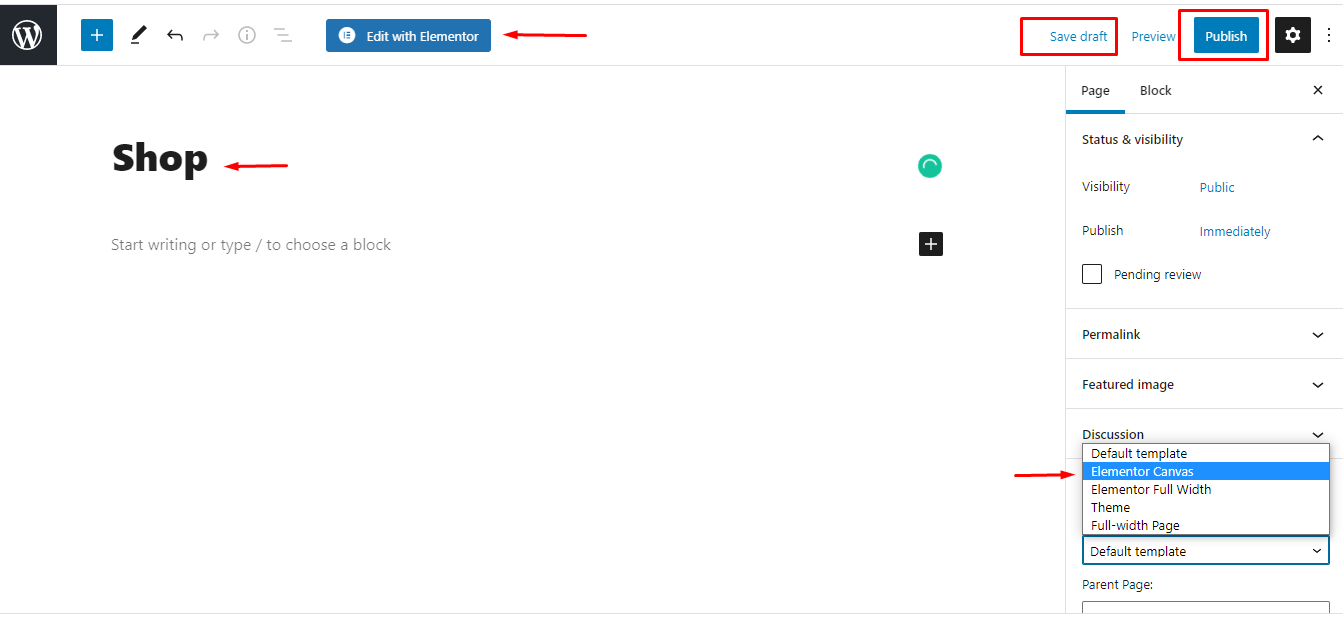
- Go to your WordPress dashboard > Pages > Add New
- Give this page a name.
- Set the default template to “Elementor Canvas” as we want to build the whole page with Elementor. You can choose Elementor Full Width, which will let you customize the whole page without the menu.
- After that, publish the page from the right sidebar. You can also keep it as a draft.
- Click on “Edit with Elementor” and you’ll be redirected to the Elementor page builder.
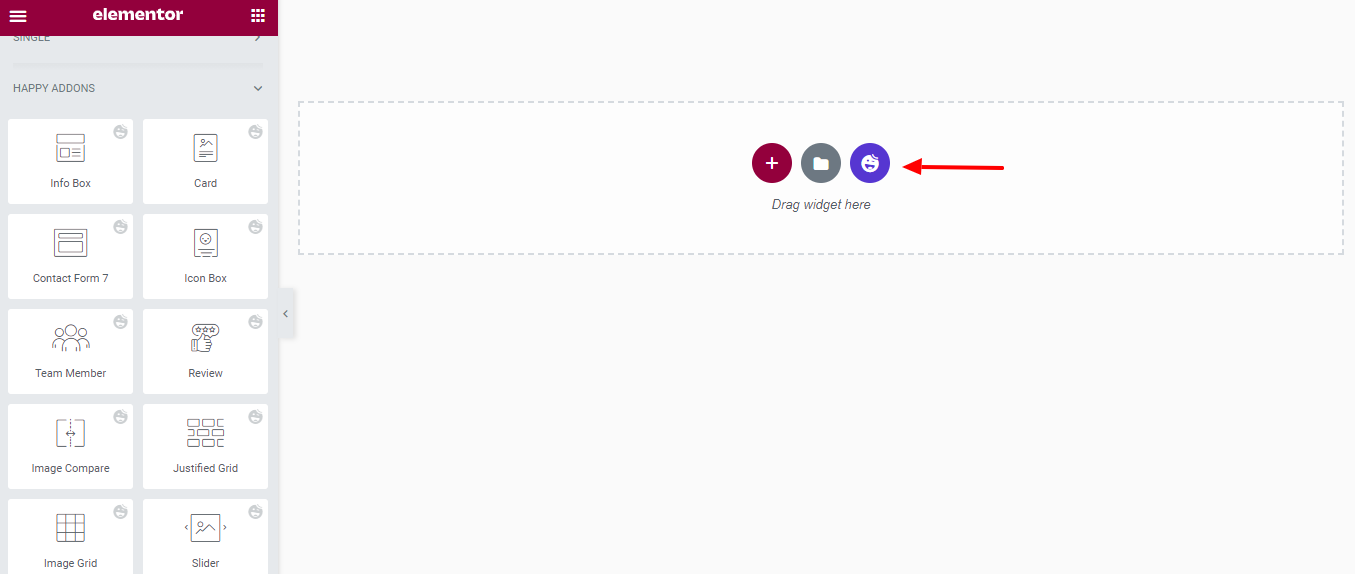
- Click on the HappyAddons sign to add a pre-designed template for your eCommerce site.
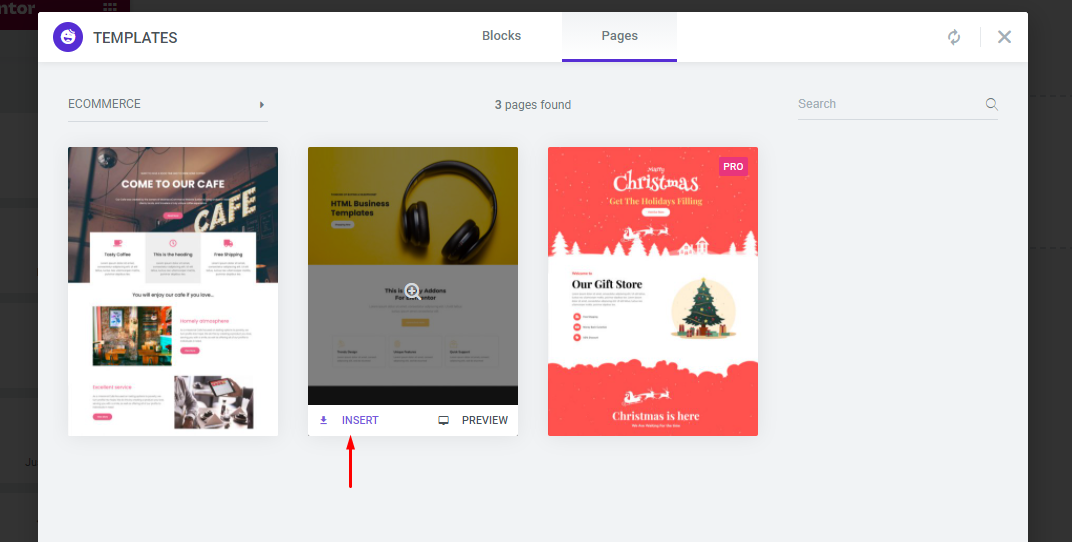
- Choose a pre-designed template and click the Insert option.
06: Customize the Template
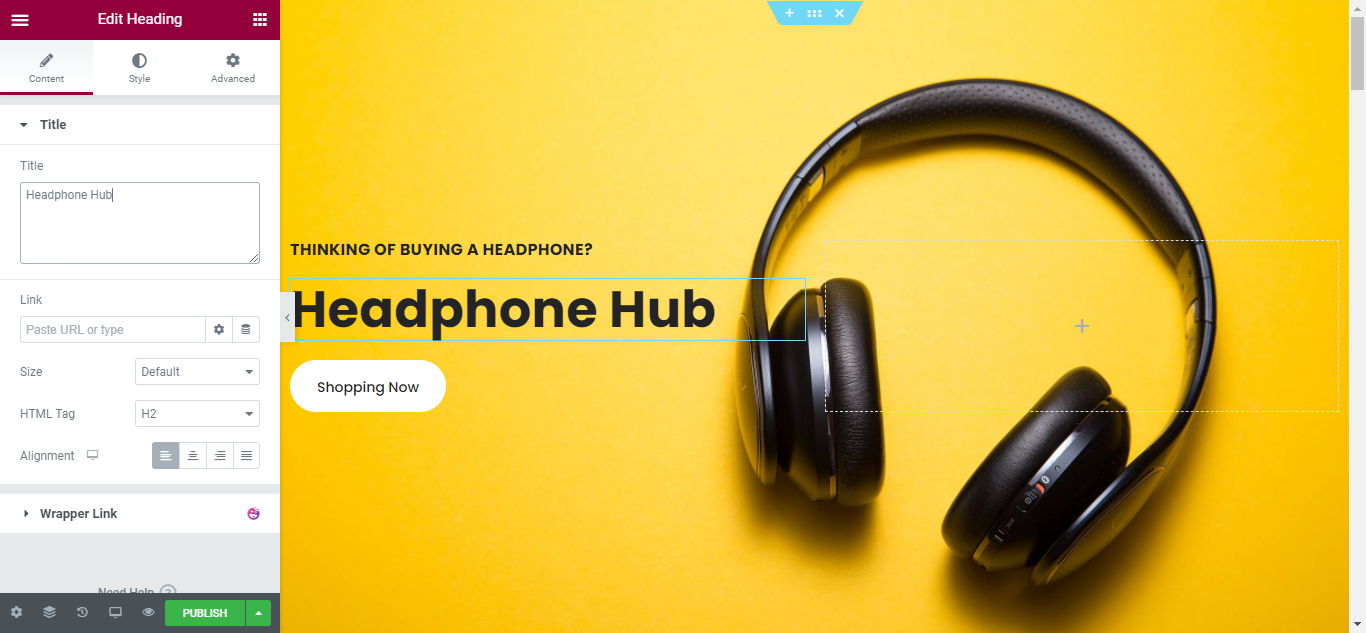
The whole customization process is the same as you have shown in the earlier section – How to Use Elementor Page Builder. Follow the same steps to get your design done.
You can change the logo, color scheme, navigation links, website copy, and any other feature that you wish. You can also use the Elementor and Happy Addons widgets to add specific functionalities to your website.
Step 07: Publish the Page
Once you’re completely satisfied with your website’s design, interface, and functionality, then it’s time to publish it live.
- To preview the site, click the icon.
- If you are satisfied with the result, go ahead and click the Publish/Update button.
- Click ‘Have a Look‘ to view the published page.
Elementor FAQ
1. Is Elementor for WordPress free?
Yes, Elementor for WordPress is free to download and use. And at the same time, Elementor has its pro version as well. If you want to get more features, widgets, premade blocks, and templates, you will need to buy their pro version.
2. Does Elementor Slow Down Your Site?
Elementor does slow down your website if you choose bad hosting, use large media files, external scripts, and additional plugins. Otherwise, Elementor won’t slow down your WordPress website.
3. Does Elementor Work with All the Themes?
Yes, Elementor does work with all the themes that respect the coding standards of WordPress set by its Codex.
4. Does Elementor Work with Other WordPress Plugins?
Yes, Elementor does work with all the other plugins including free and pro seamlessly.
5. How Much Is Elementor Pro?
Elementor Pro comes in 3-different subscription plans. Such as Personal, Plus, and Expert. It costs you only $99 if you want a three-website license and $199 for an unlimited website license.
6. Is Elementor SEO friendly?
Elementor is the most SEO-friendly page builder for WordPress. It was built with the strictest code standards and delivers the best performance when creating page designs.
7. Who Owns Elementor?
Yoni Luksenberg. He is the CEO and co-founder of Elementor.
8. What Happens When Elementor Pro Expires?
You won’t be able to build any new pages with pro features if your pro license is expired. But all your existing projects will remain intact, and the Pro features you used in your previous designs will continue to function as before.
9. Can I Edit My Blog Page with Elementor WordPress?
Yes, you can edit your blog page with Elementor. You will need the Theme Builder to edit it.
10. Can I Create My Own Theme with Elementor?
You can design every part of your theme individually using Elementor Pro templates, but you cannot import and export a complete theme that combines all the theme parts. However, you can import and export every theme part separately.
Over to You
Using Elementor in WordPress isn’t that complicated, actually. It could be more fun if you have a fully comprehensive guide like this step-by-step tutorial.
Just follow this guide, keep practicing for improvements, and prepare a mind setup that you’re going to be the maestro of Elementor. That’s all you need to have to use Elementor and build a WordPress website in moments.
If you face any complications while using Elementor, or you have any suggestions regarding this guide on how to use Elementor in WordPress, do let us know through the comment box below. Good luck!






4 Responses
I think this article will be useful to beginners as well as those who are older. Because I read this article of yours today and I learned the correct rules of many things. Thank you very much.
This is our pleasure to know that you have liked this blog. Thanks for your kind words.
It will help us to create more quality blogs.
I love it but how can I get videos on how to build social website
Currently, we don’t have a video on How to build social websites.
But you can check our youtube channel to get other related videos – https://www.youtube.com/c/HappyAddons
Thank you.