Want to configure Google Map to your Elementor website? Check out the Happy Addons’ new Advanced Google Map widget. With this exclusive widget, you can add different types of Google Maps and also able to use the Snazzy Map to your website in a more organized way.
How To Use Happy Addons’ Advanced Google Map Widget
Pre-requisites
You need to install and activate the below plugins to your site to use that exclusive widget:
- Elementor (Free)
- Happy Addons (Free)
- Happy Addons (Pro)
However, you also need the Google Map Directional API key for using the Google Map. Read the documentation and learn how to create a directional Google Map API. As it’s a premium feature make that you have a proper understanding of the Google Maps Platform Billing.
Note: You also need an authentic Credit Card when configuring the map. Whenever you call an API, it will deduct dollars from your credit card so make sure you only active the must-needed Map features.
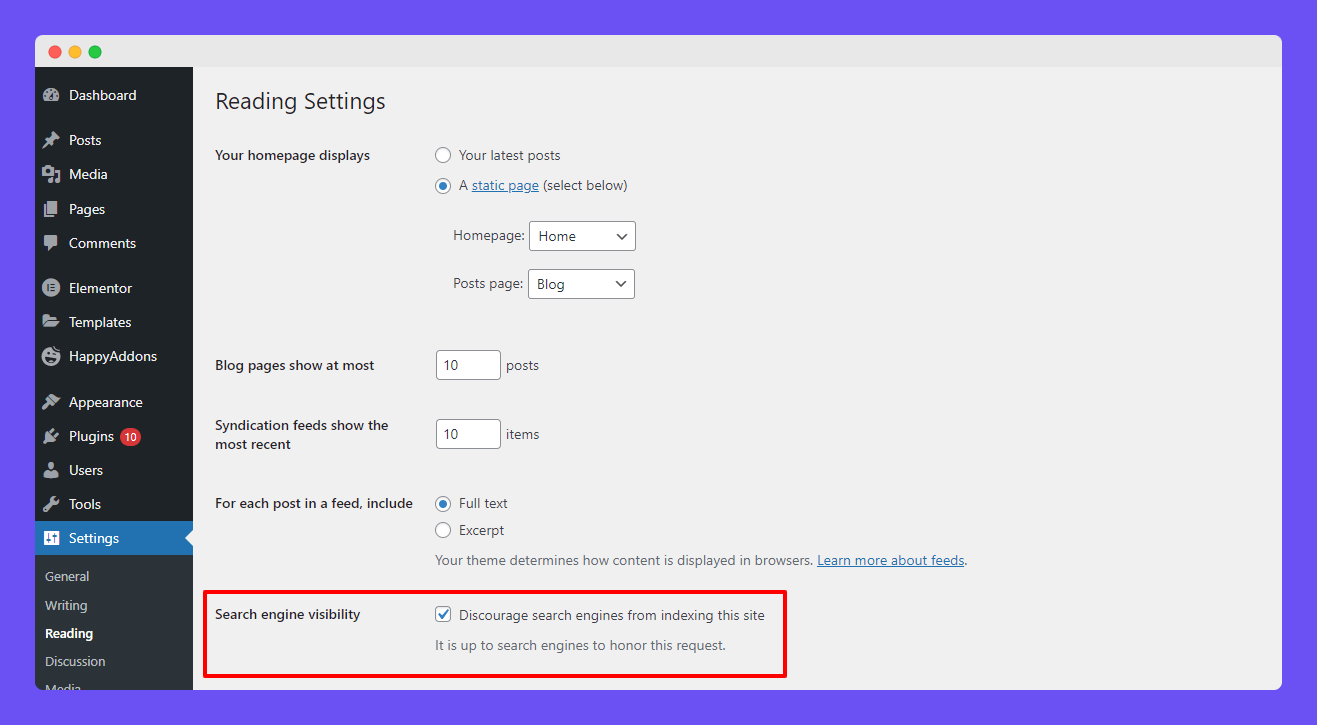
Note: Before configuring the Google Map API, make sure that you uncheck your website’s Search Engine Visibility option. You can find the option Settings->Reading area. Otherwise, you’ll face the JS error.
Let’s get started:
How to Add Google Map Directional API Key
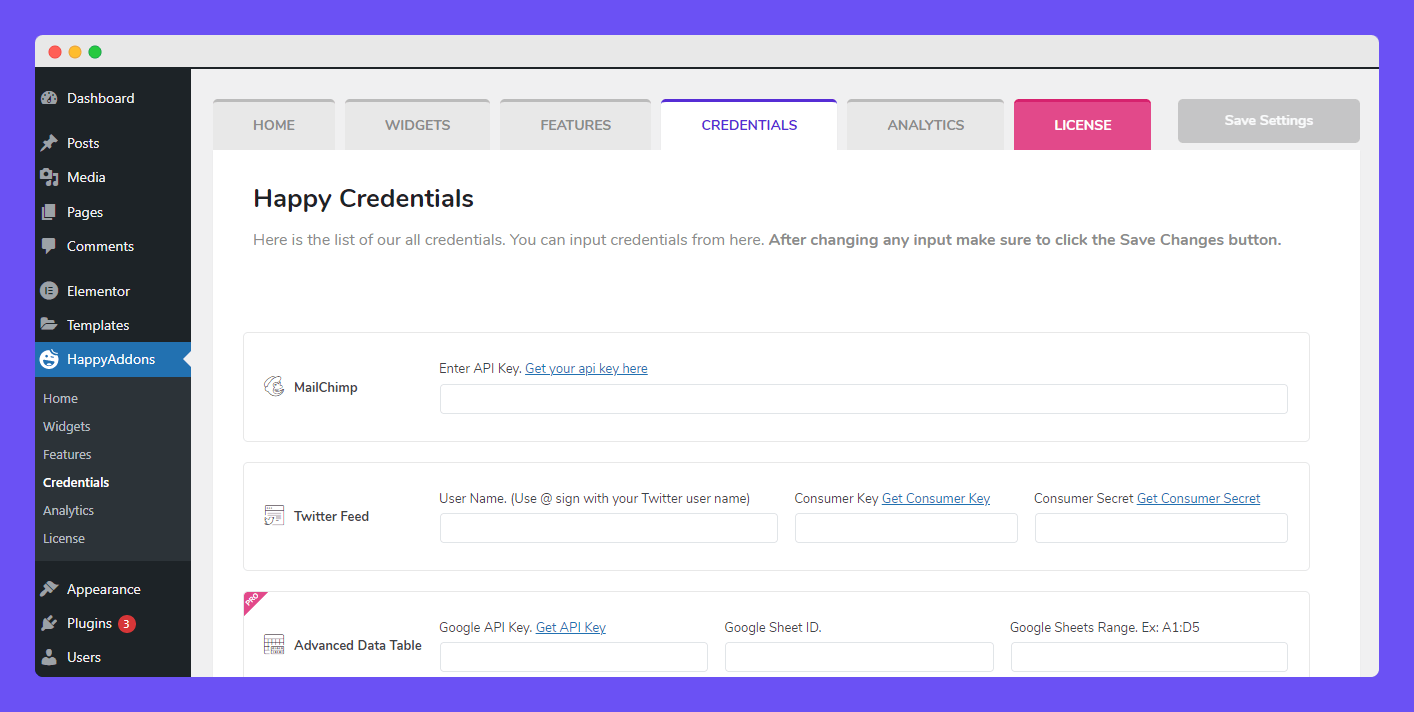
After getting the Google Map API Key, you have to connect the key with the Happy Addons. To do this, go to the Dashboard->HappyAddons->Credentials area.
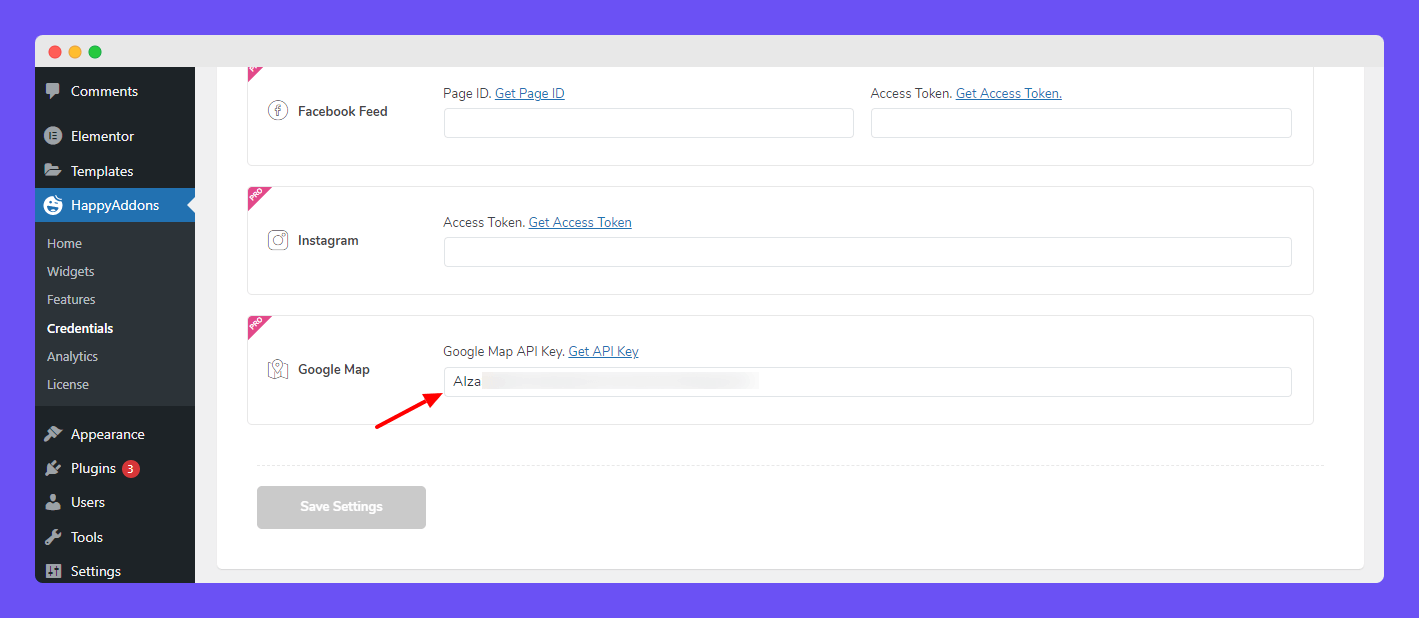
Then scroll down and you’ll get a Google Map option where you need to paste your Google Map API key.
Find & Add Advanced Google Map Widget
It’s time to add the Map to your site. Find the ‘Advanced Google Map‘ widget from the Elementor widgets panel first. Then drag & drop the widget into the suitable place on your website.
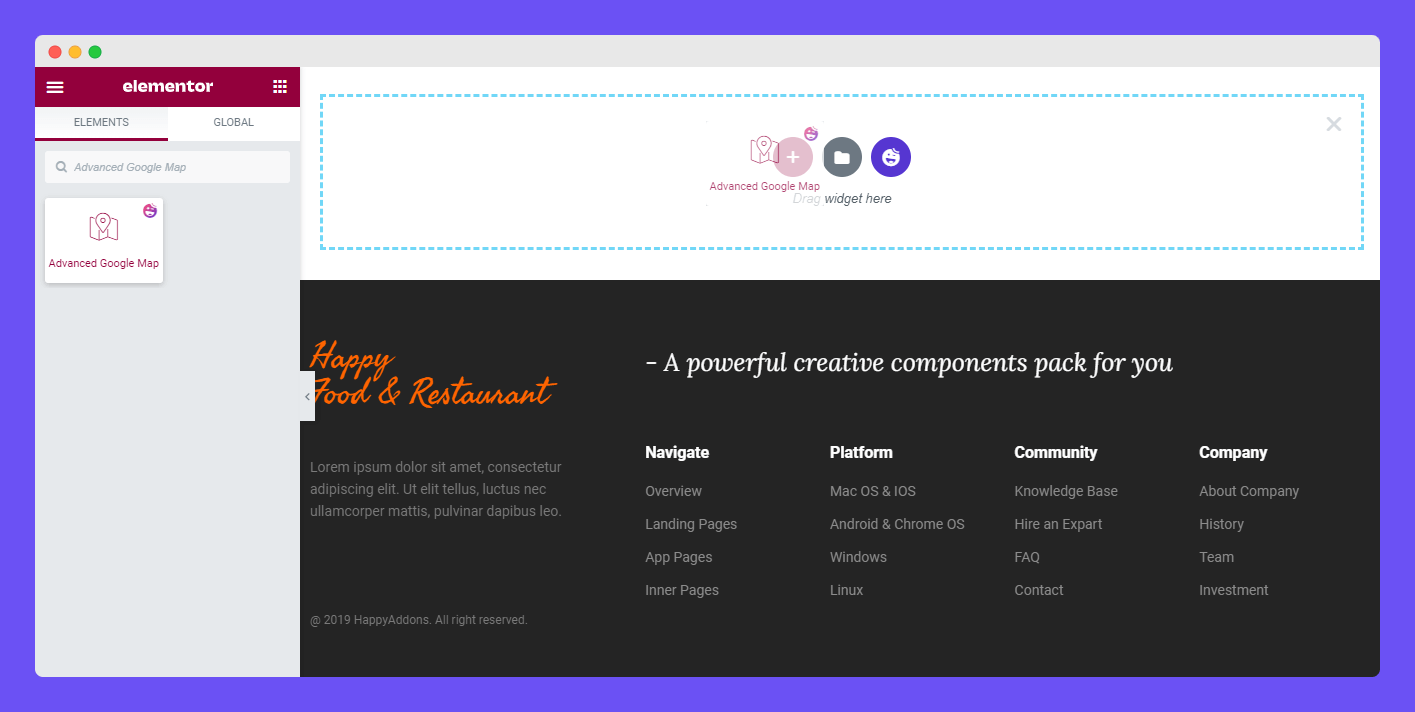
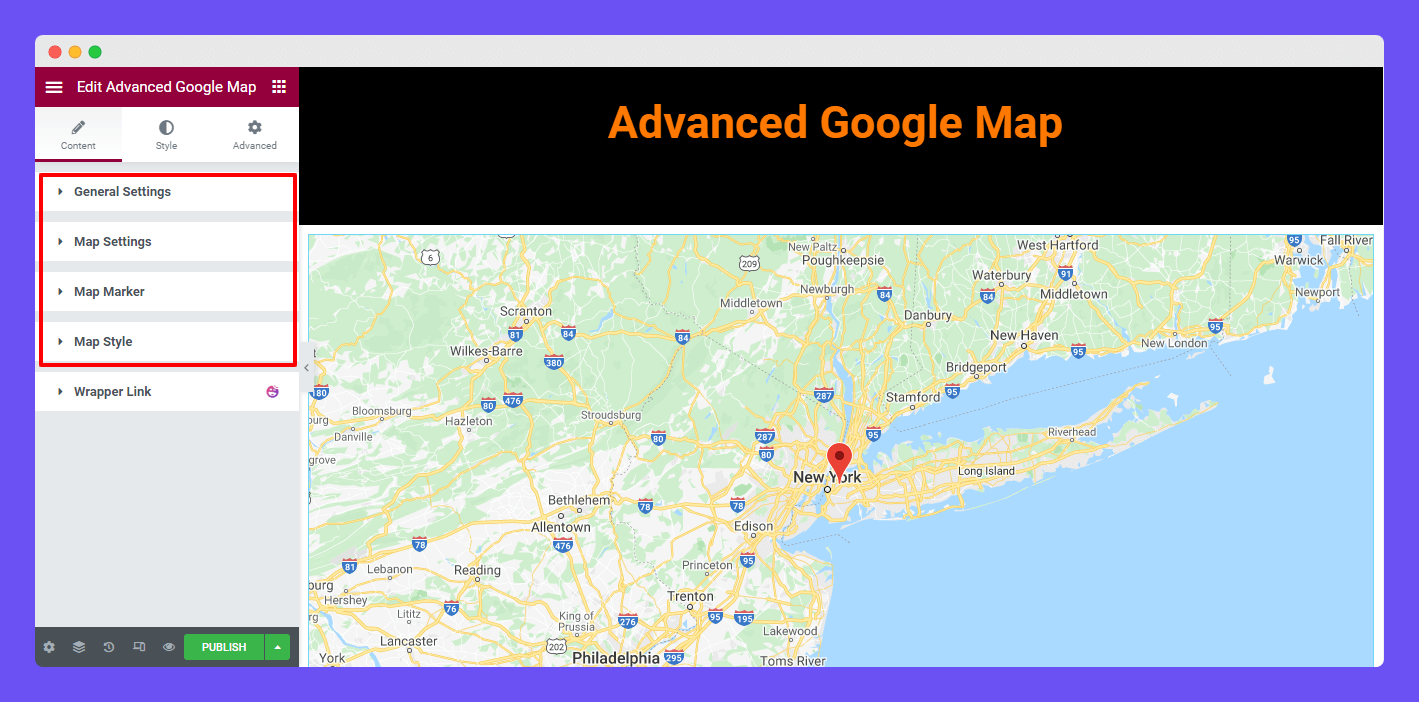
After adding the widget, you see an interface like the image below. In the Content area, you’ll get four different options to add your Google Map content. They are.
- General Settings
- Map Settings
- Map Marker
- Map Style
General Settings
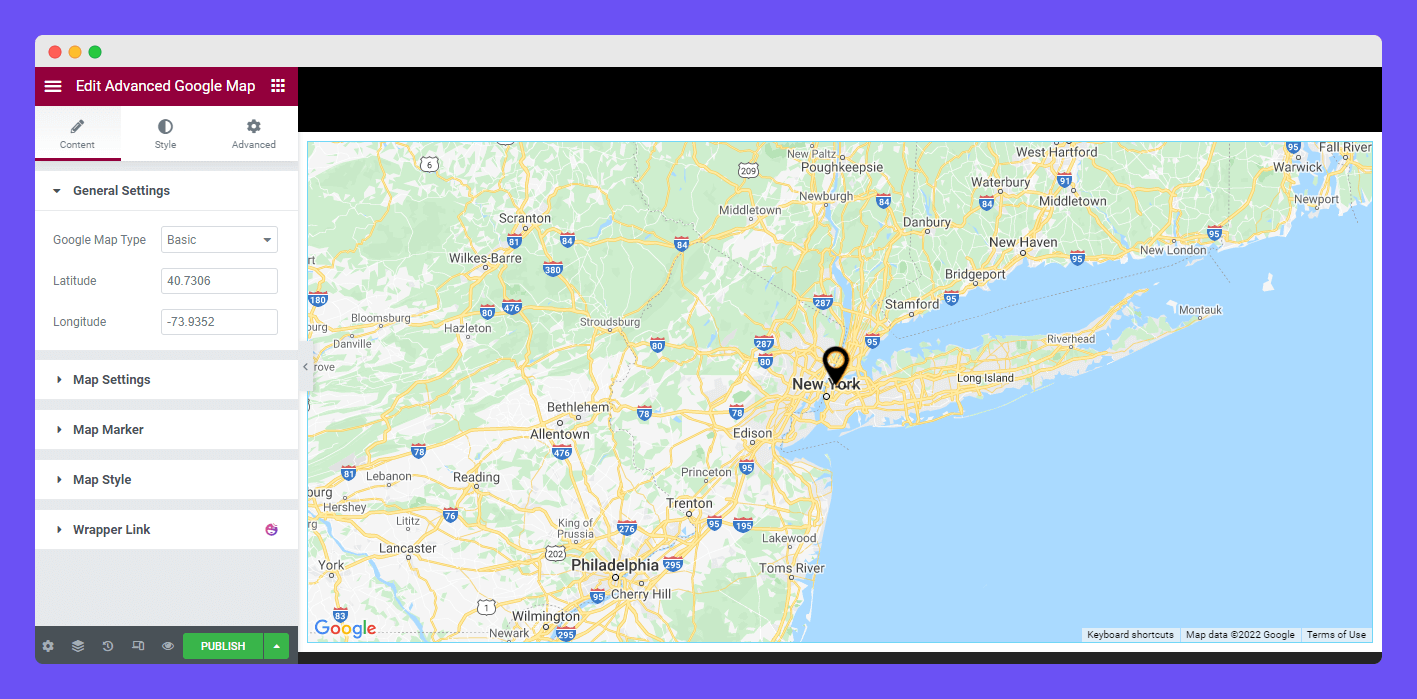
The General Settings has three options such as Google Map Types, Latitude, and Longitude. We’ll talk about the Google Map Types later.
Let’s see how to get the exact location on Google Map using Latitude and Longitude.
How To Find Location by Latitude and Longitude
To show your perfect location, you have to add that location’s Latitude and Longitude. Let’s see how you can find your location’s Latitude and Longitude code.
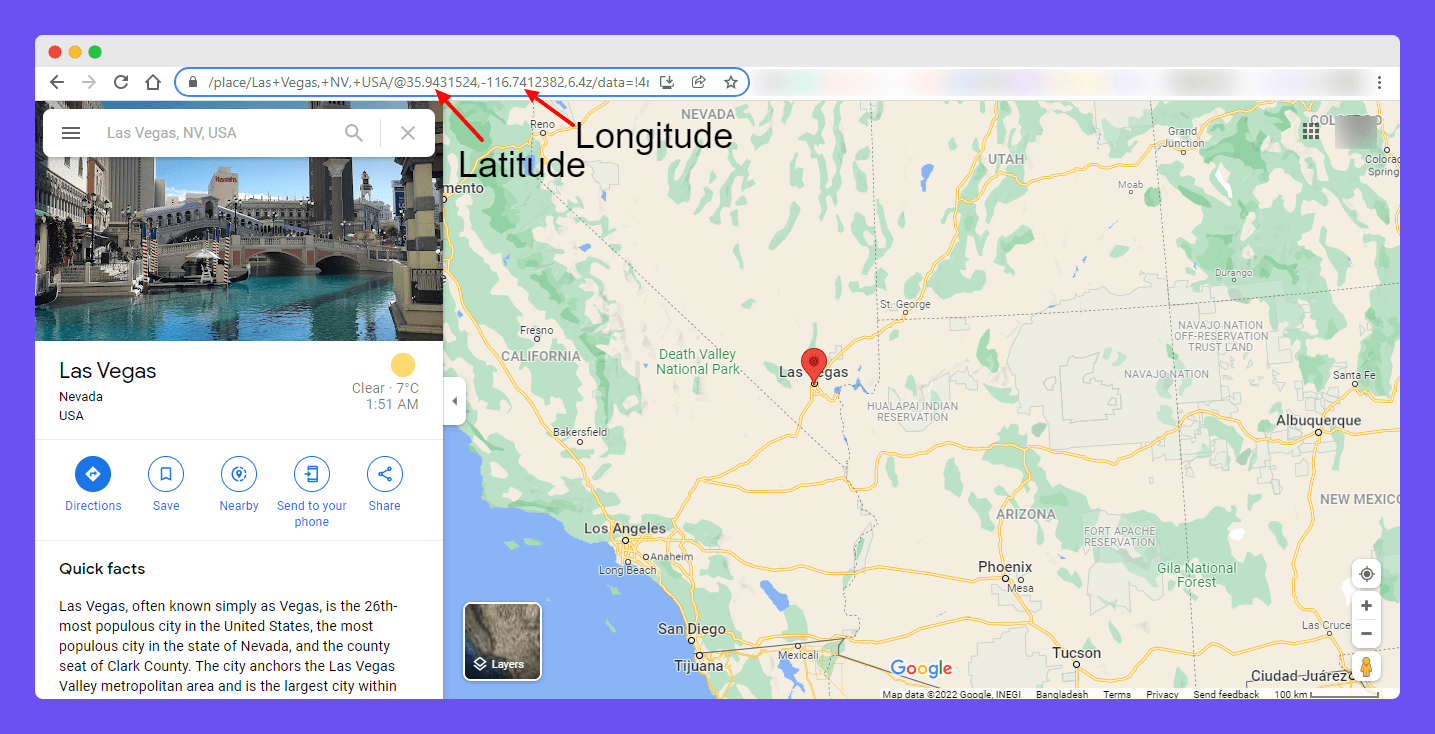
Go to the Google Map and search for your actual location on the Map. Here, we’ve searched for Las Vegas. Now focus on the URL. You notice that two codes are visible on the URL. The first one is for Latitude and the last one is for Longitude. Now copy these two codes and paste the General Settings-> Latitude and Longitude section.
After adding the Latitude and Longitude, the Map pointer always remains in the center of the Map.
There are four types of Google Maps in the General Settings->Google Map Type area. They are Basic, Polyline, Polygon, and Routes.
Let’s see what do these Maps look like?
Polyline Google Map
A polyline is a list of points, where line segments are drawn between consecutive points.
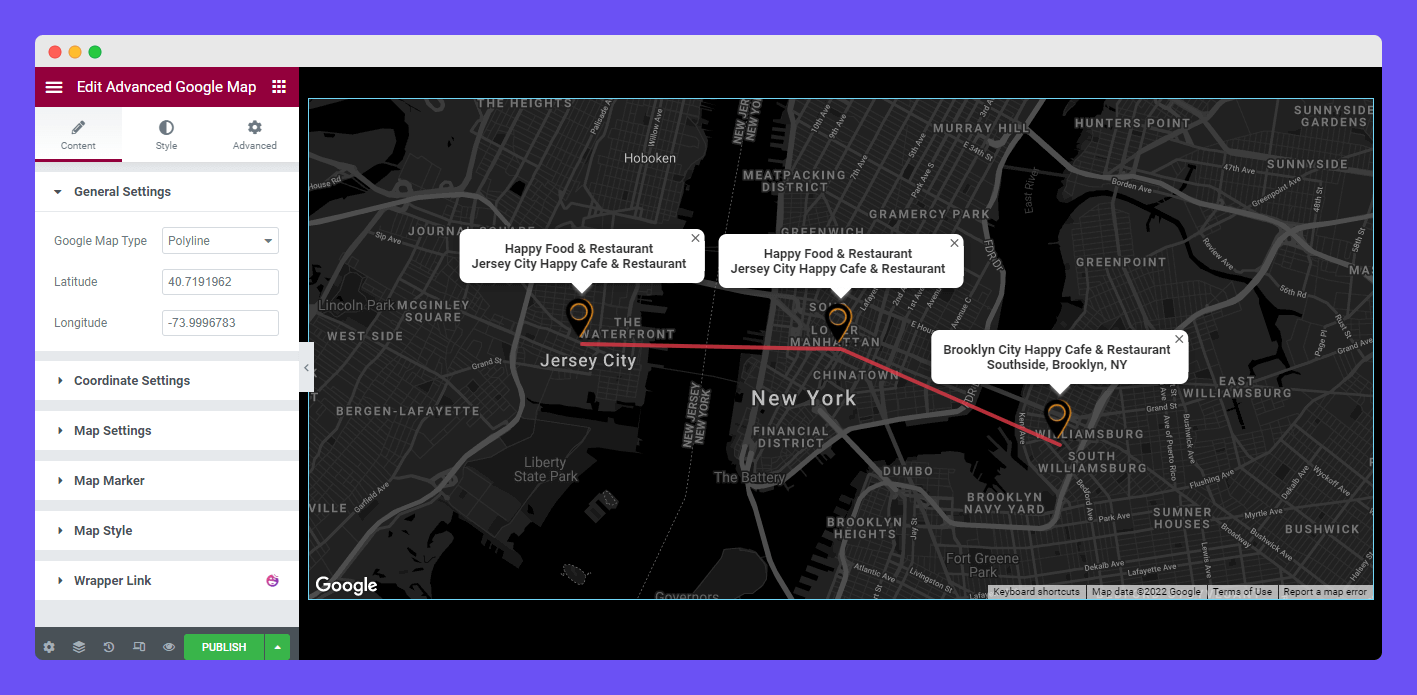
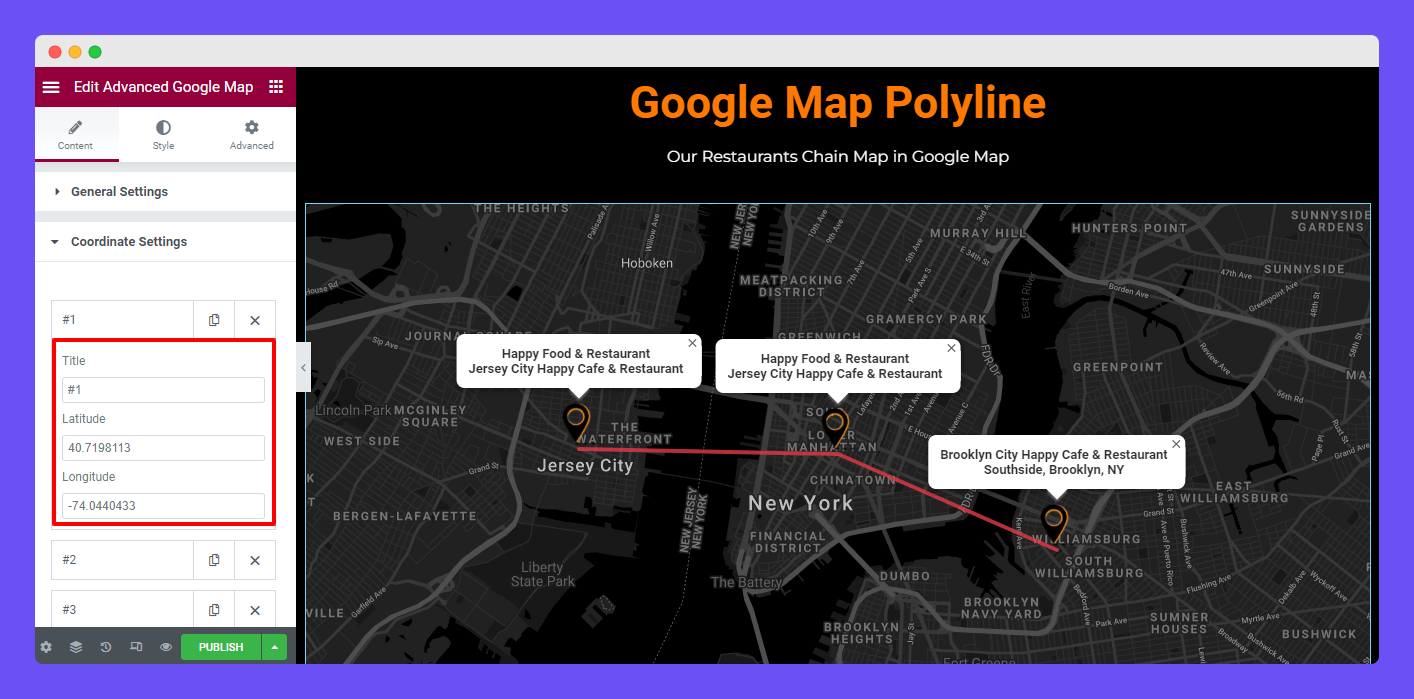
If you select the Map type as Polyline, you’ll get a Map like the image below. With this Map, you can easily set multiple locations on the Map. Here, you notice that we’ve added three different locations using this Map.
Coordinate Settings
Polyline Map has an option named Coordinate Settings that allows you to add different locations. Go to the Coordinate Settings and open an item. Then you can the Title of the location and set the actual location using the Latitude and Longitude code.
Polygon Google Map
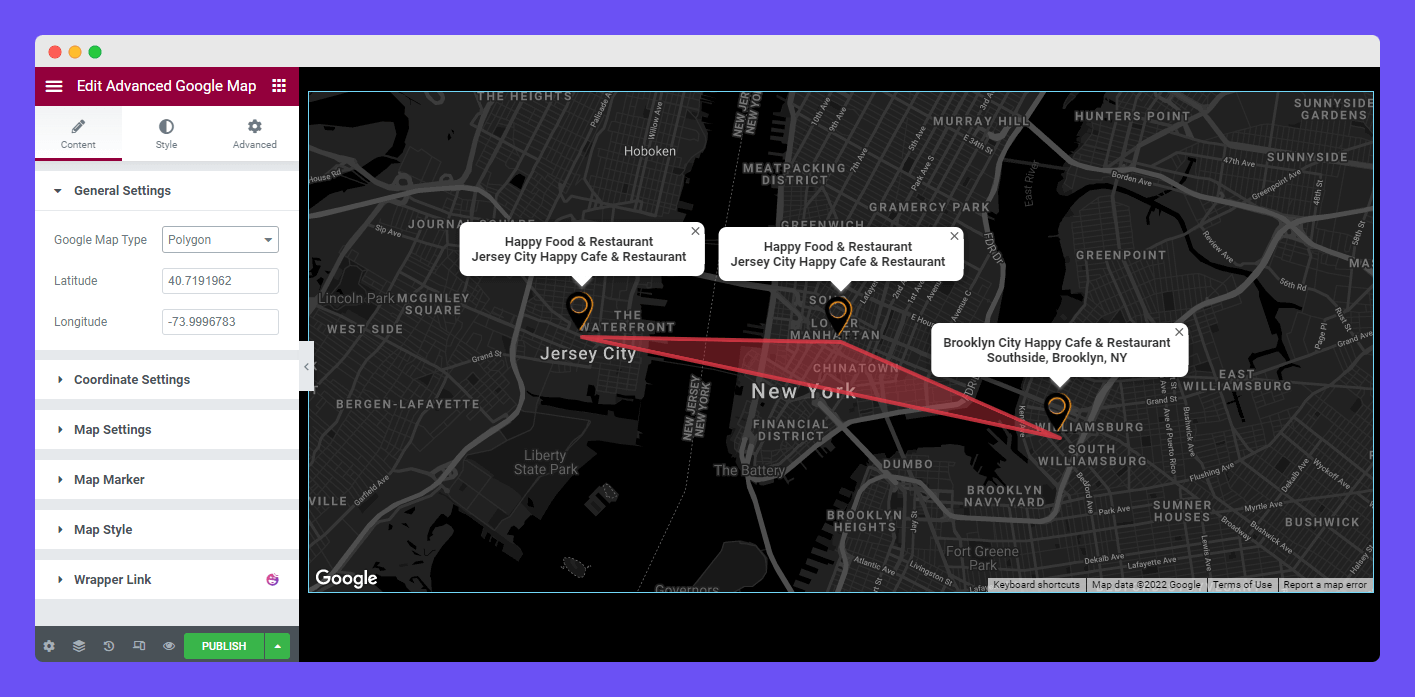
A polygon (like a polyline) defines a series of connected coordinates in an ordered sequence. Additionally, polygons form a closed loop and define a filled region.
If you want to see your Map locations using a rectangle style like the image below, you should set the Polygon Google Map as your Google Map Type.
Like the Polyline Map, the Polygon Map also comes with the same Coordinate Settings for adding the multiple Map locations. We already mentioned in the above section about this setting.
Routes Google Map
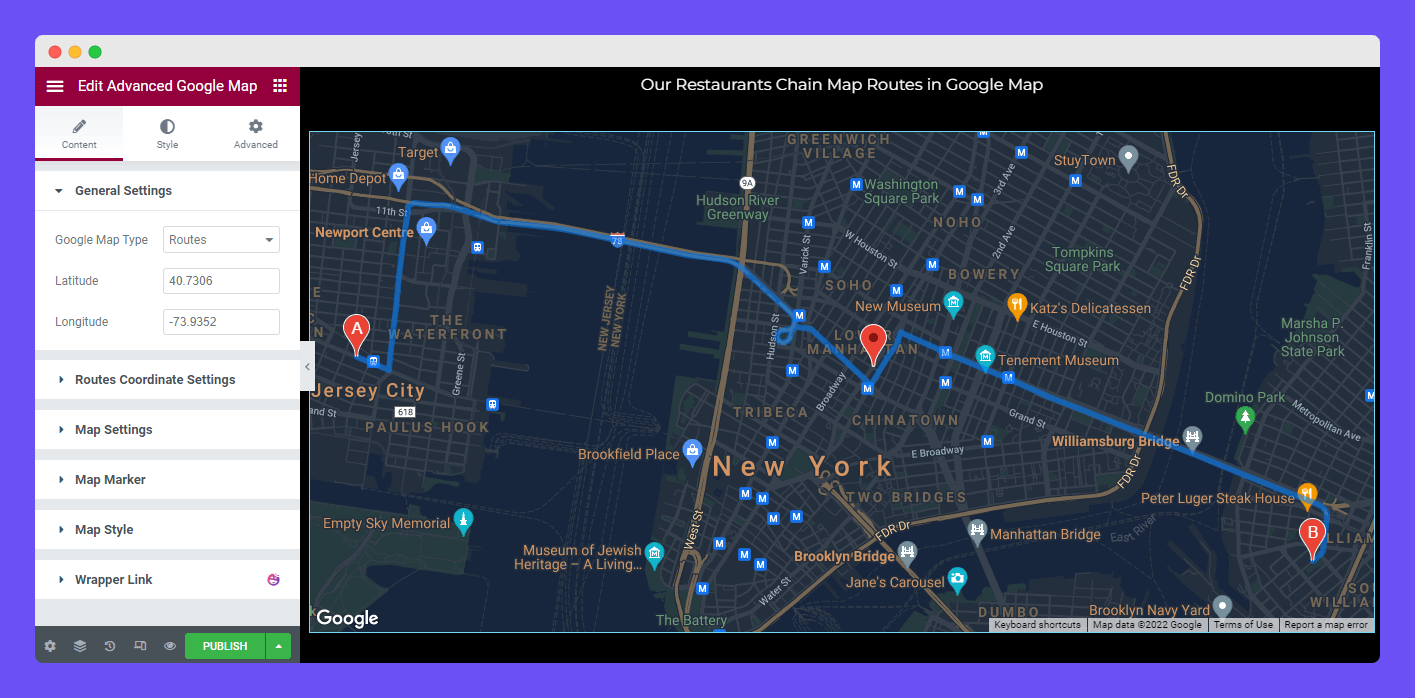
Routes Map automatically finds the best routes and creates a mostly used route or path to your preferred locations.
There is another Google Map type called Routes Google Map. It displays your multiple locations with a route. Using this Map, your users find your location also get a proper idea of how to visit your location.
Routes Coordinate Settings
To set the several locations, the Routes Map offers an extra option called Routes Coordinate Settings. This setting is a little bit different from the Coordinate Settings of Polyline and Polygon. Here, you are able to add the Origin location and the Destination location so that users can see the accurate road map of your location.
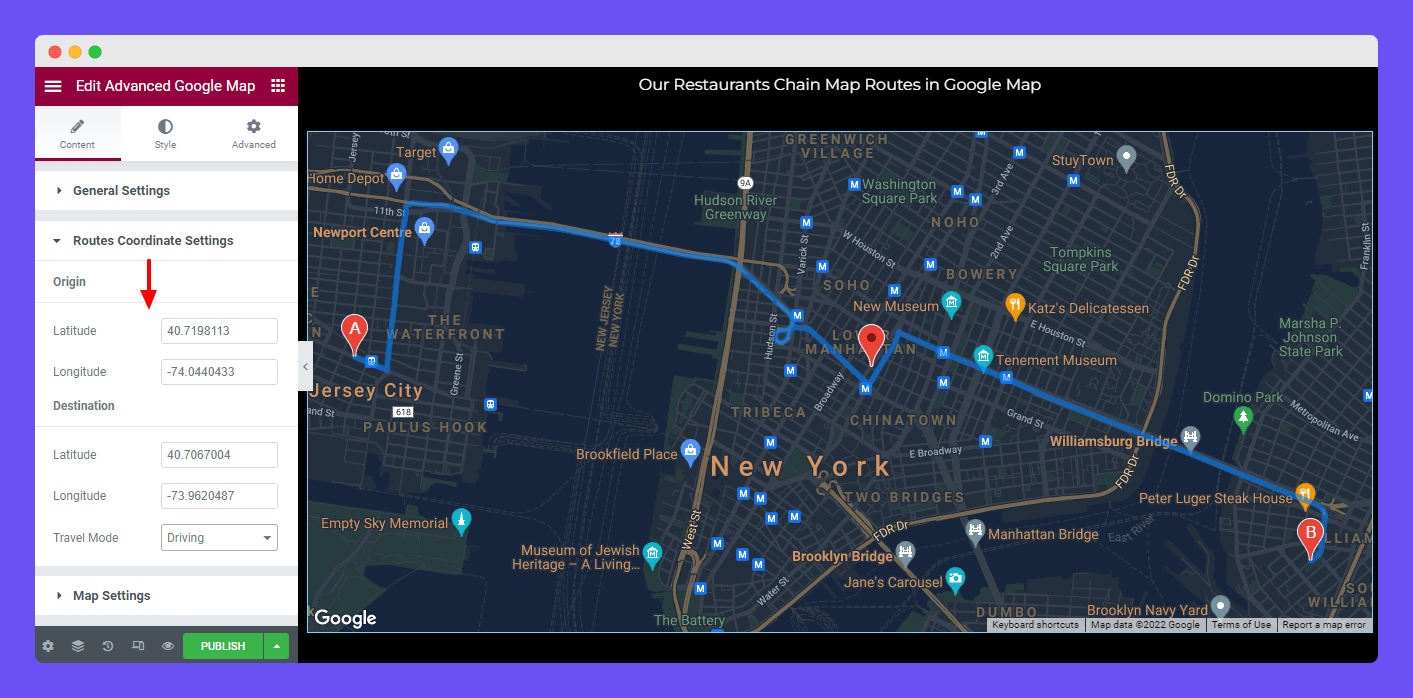
And finally, you can change the Travel Mode to Walking, Bicycling, and Driving. Keep in mind, it depends on google Maps’ data. If there is no route for your selected travel mode map will act wired. So choose it accordingly.
Map Settings
In the Content->Map Settings, you’ll get all the essential settings to control your Map.
Different Map Types
In the Map Settings, you’ll get four different Map types and they are.
- Road Map
- Satellite
- Terrain
- Hybrid
Let’s see how these Maps look like.
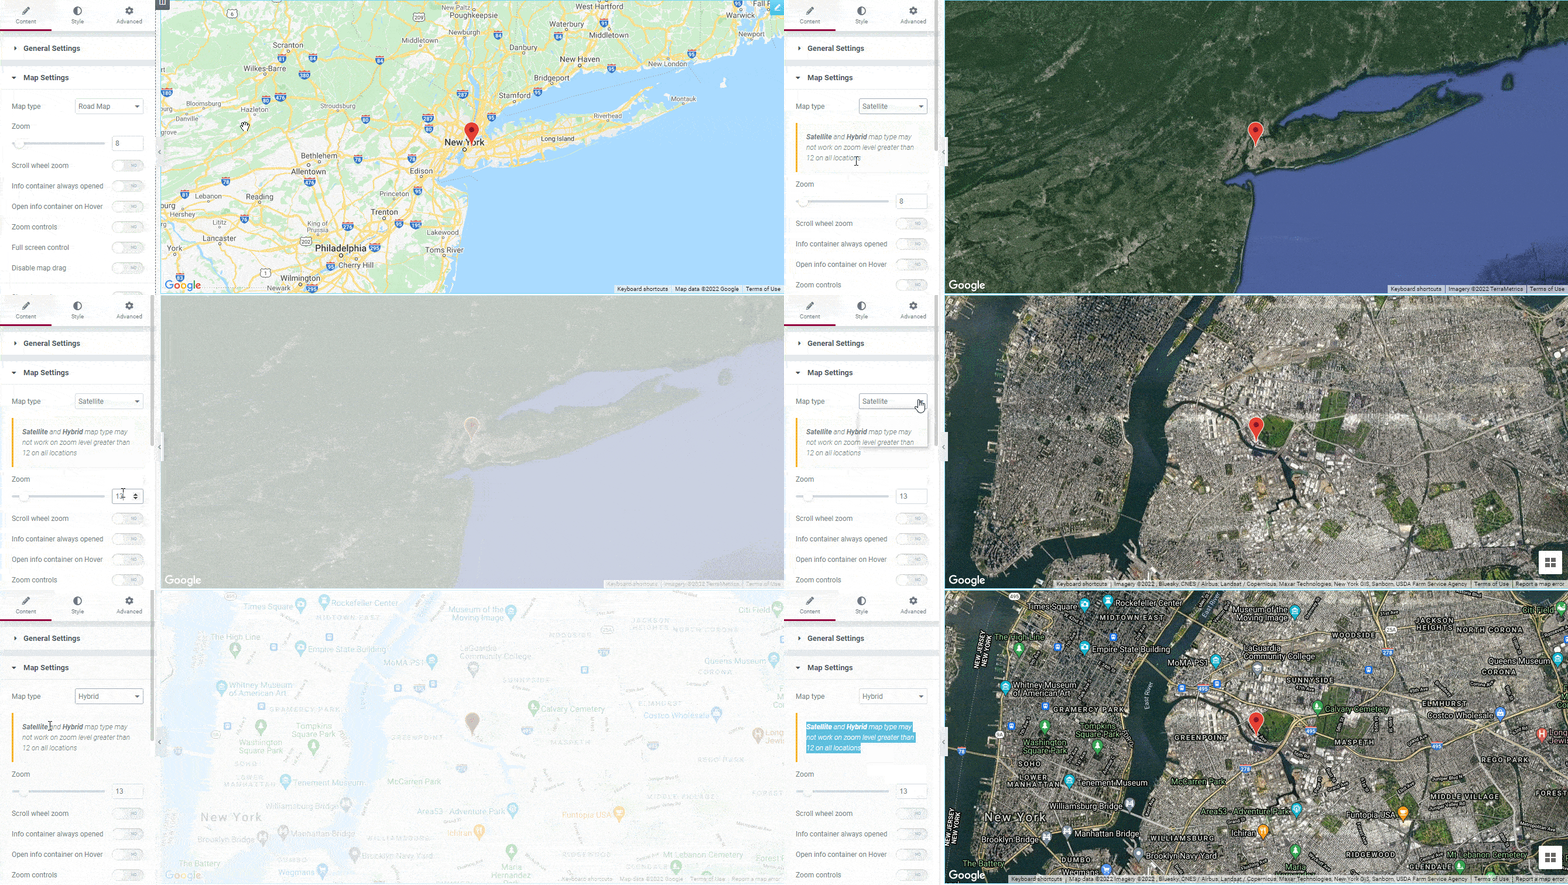
Note: Satellite and Hybrid map types may not work on zoom levels greater than 12 on all locations. Adjust the Map Zoom based on your website’s structure. Keep it as minimal as you can. As per our testing 12-13, the zoom level is perfect for the minimal viewport. This zoom will help you to show the concentrated area of your desired location. Others you will get the default bird’s eye map of google.
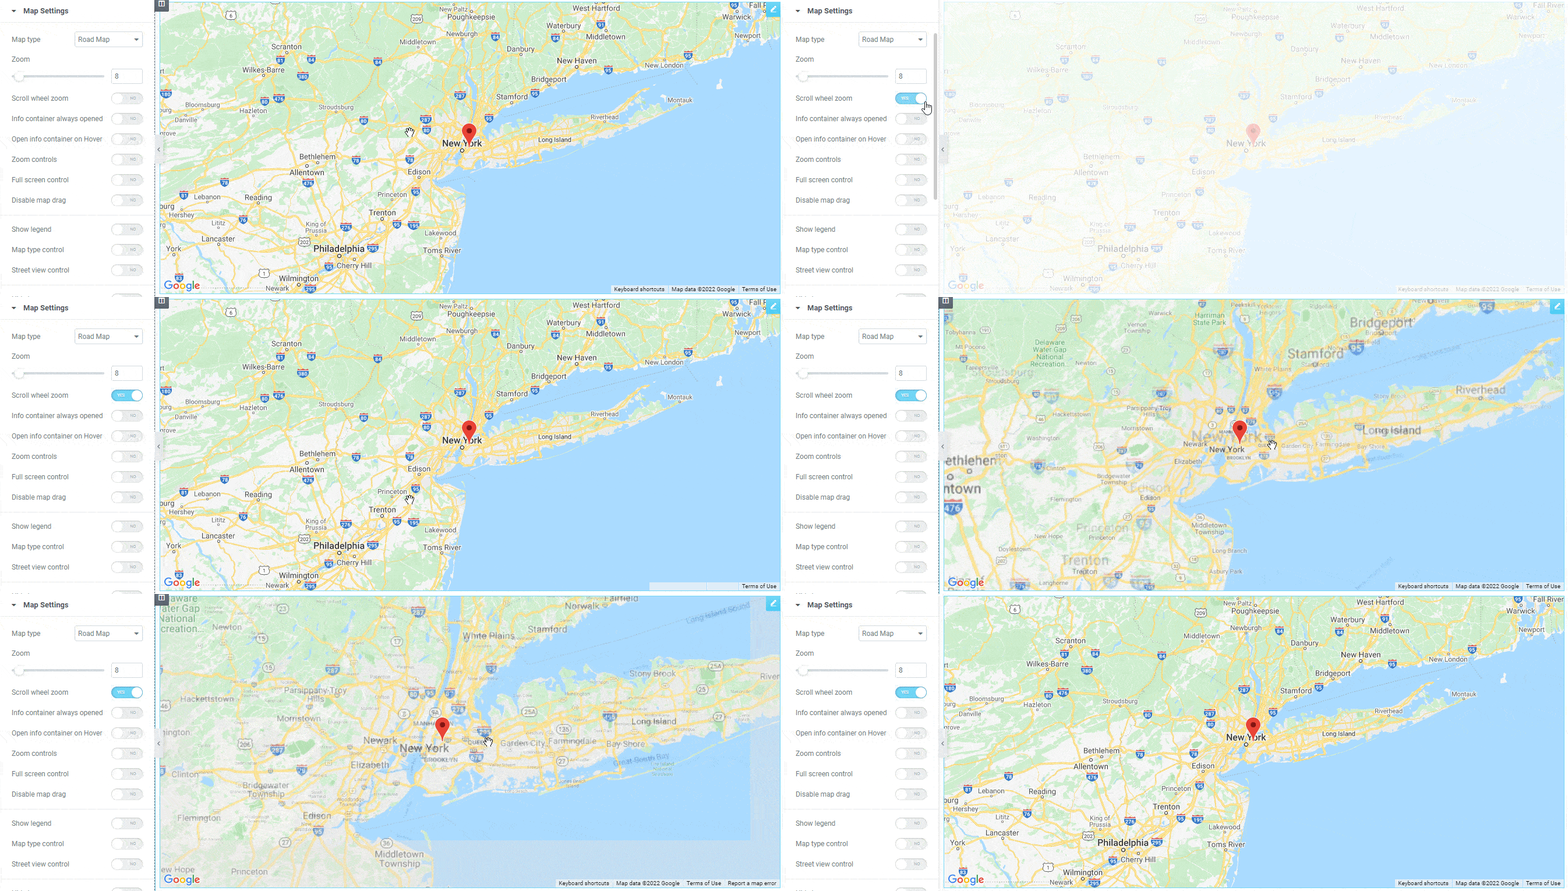
Enable Scroll wheel zoom
If you want to control the zooming using the Mouse Scroll Wheel, you should enable this option.
Other Map Settings
Here are the other Map settings.
1.Info container always opened: According to your need, you can keep the Info Container always opened.
2. Zoom controls: If you want to control Map zooming using the (+) & (-) button then enable the Zoom Control option.
3. Full screen control: You can enable and disable the Full Screen Control using this option.
4. Show legend: You can show & hide the Legend using this handy feature.
5. Map type control: By enabling the May tyle option, you can control your Map types.
6. Street view control: You can active the Street view option by enabling the feature.
7. Hide logo: You are also able to hide the Google logo on the Map.
8. Hide copyright: Like the Google logo, you can hide the Copyright option.
9. Hide terms of use: Also, you can hide the Terms of use option of the Map.
10. Hide keyboard shortcuts: Based on your purpose, you can Hide the Keyboard Shortcuts by enabling this feature.
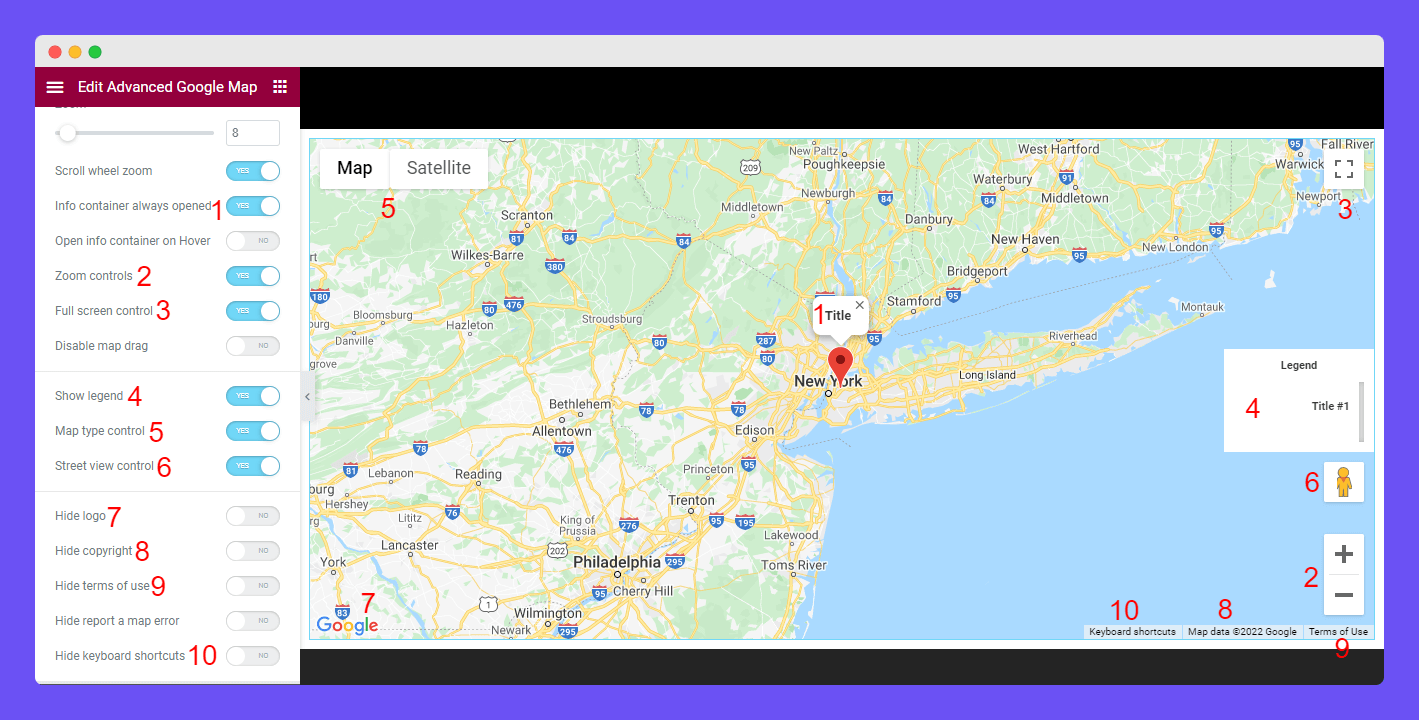
- Open info container on Hover: You are able to Open Info Container on Hover.
- Disable map drag: If you want to Disable the Map drag option, you can do it by enabling the feature.
- Hide report a map error: You are able to hide the report a map error.
Map Marker
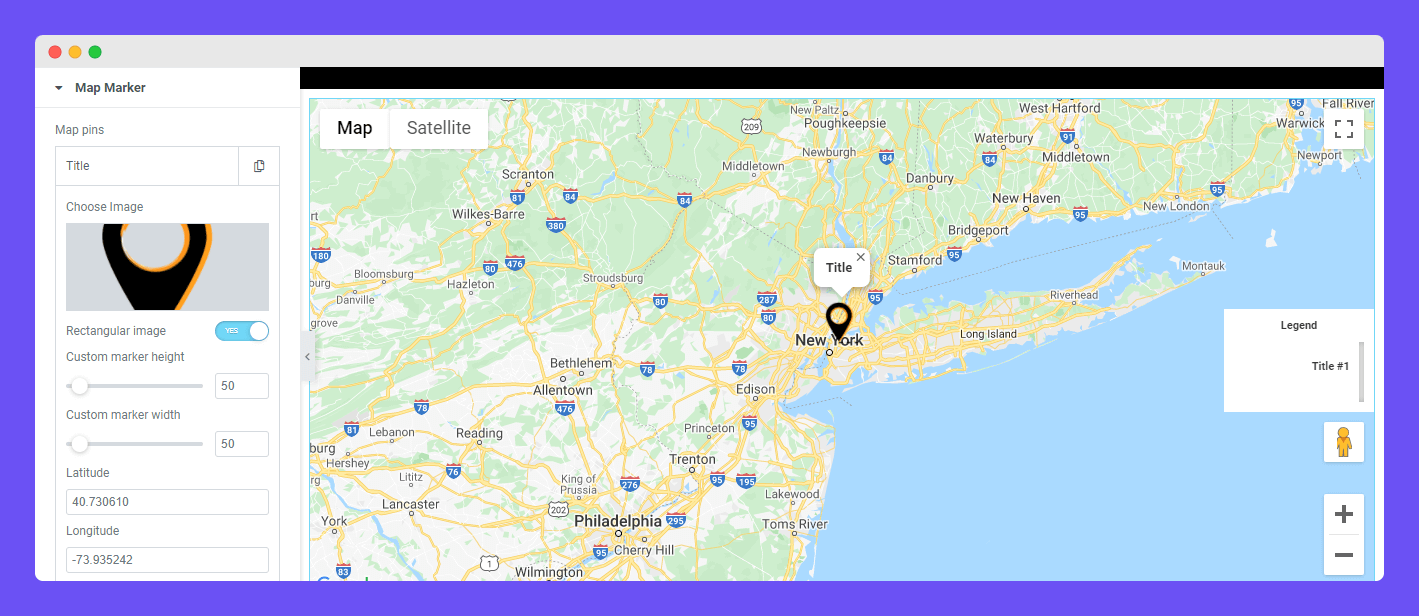
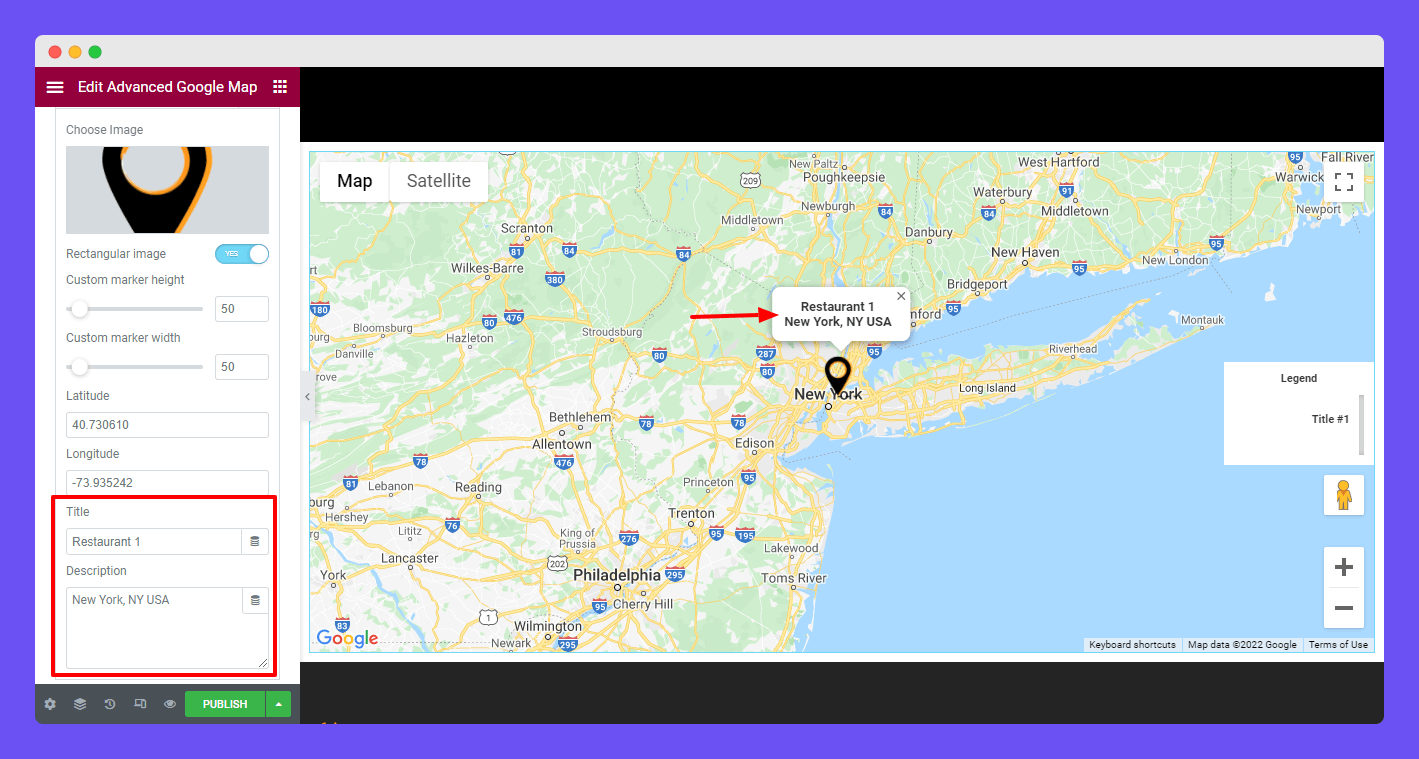
Go to the Content->Map Marker. Here, you can add multiple Markers on the Map by clicking the Add Item button. To add the content to the Item, you need to open it.
Choose Map Marker Image
You can insert an Image, enable Rectangular Image also set Custom marker Height and Custom Marker Width.
Map Marker Description
You are able to add a Marker Title and Description. Here, we’ve added our restaurant number into the Title area and address in the Description area.
Different Map Styles
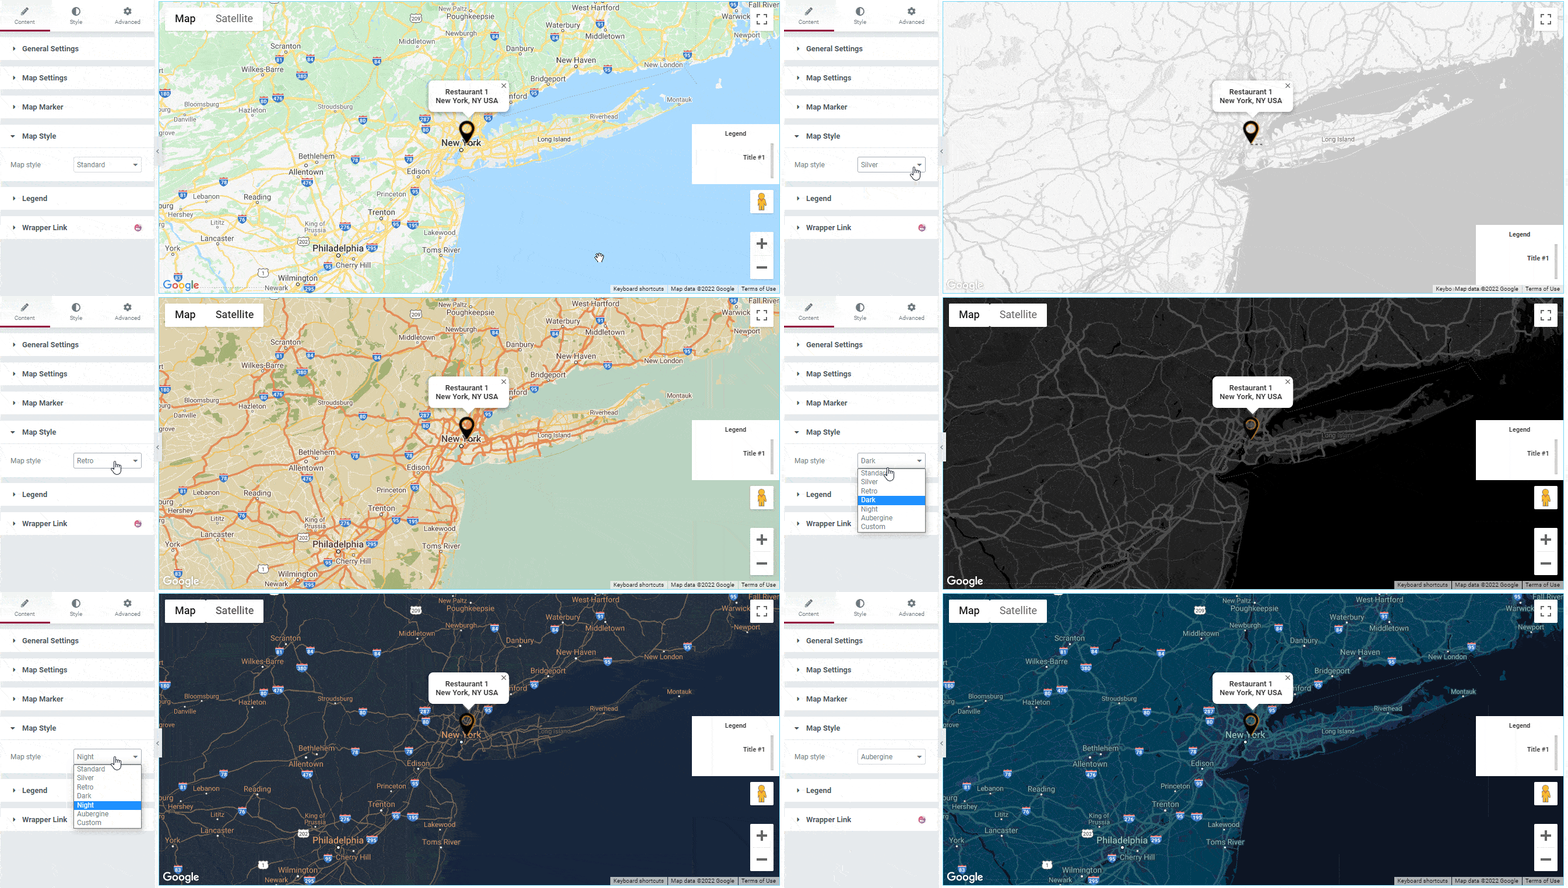
There are seven types of Map Styles you can use according to your purpose. They are.
- Standard
- Silver
- Retro
- Dark
- Night
- Aubergine
- Custom
Let’s see how these Map Styles look likes.
How To Add Snazzy Maps
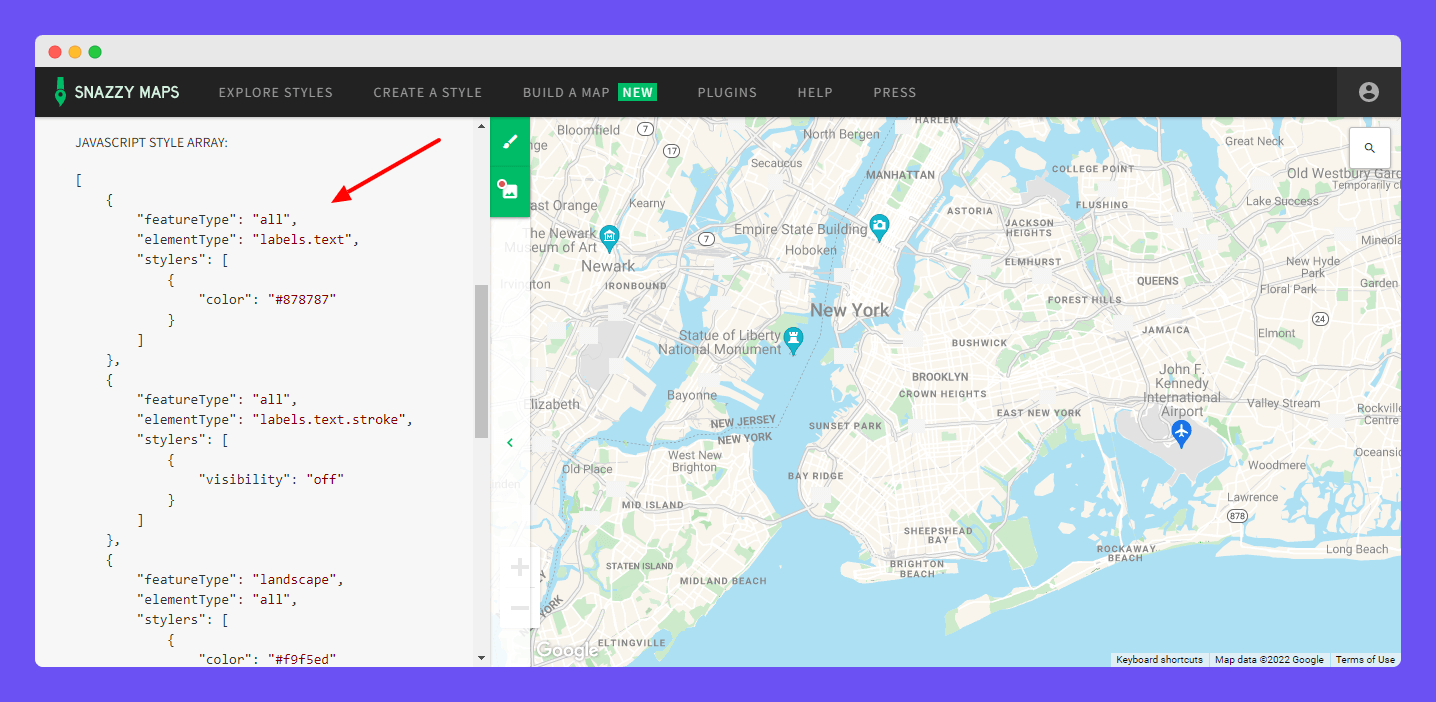
Happy Addons’ Advanced Google Map allows you to add Custom Map. You can a Snazzy Map to your site. To add a custom Snazzy Map, you need to visit its official website. After that, you need to choose a suitable Map style for your website. Then copy the Jason Code.
Paste Snazzy Map Jason Code
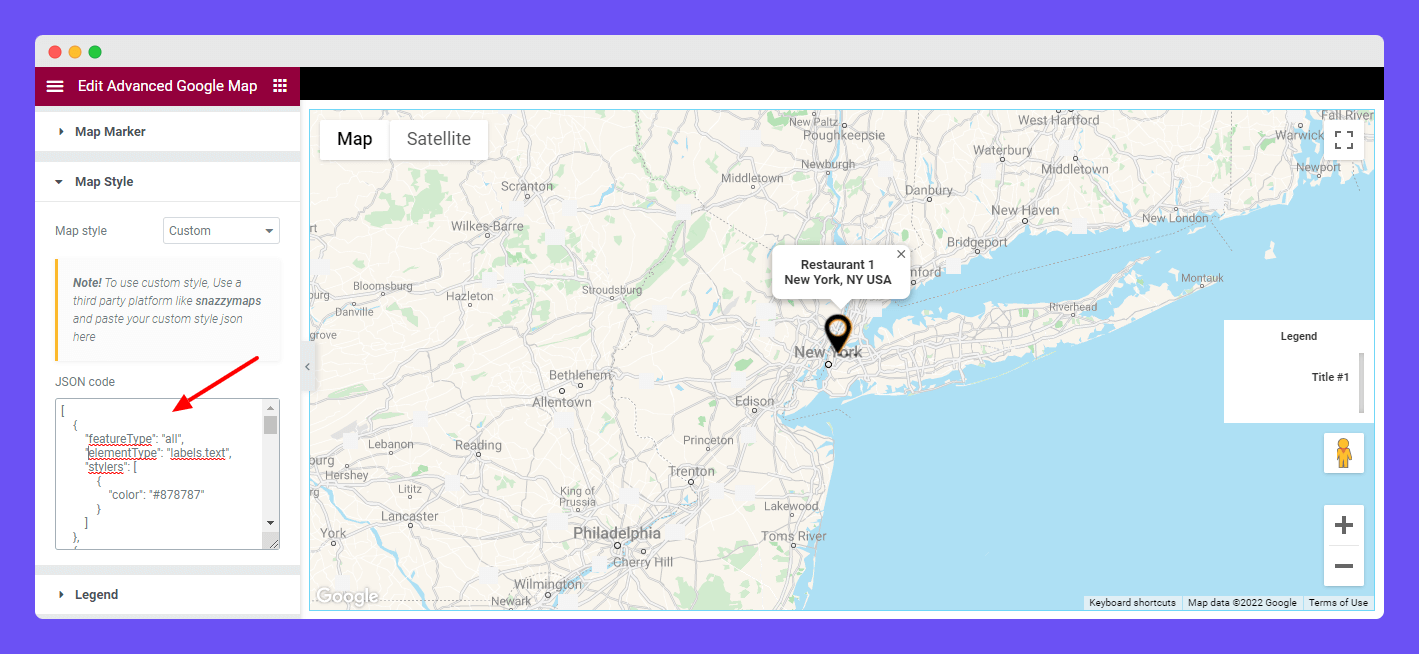
You have to select the Map Style->Custom and paste the Jason Code into the Jason Code area.
That’s it.
Add Legend Conetnt
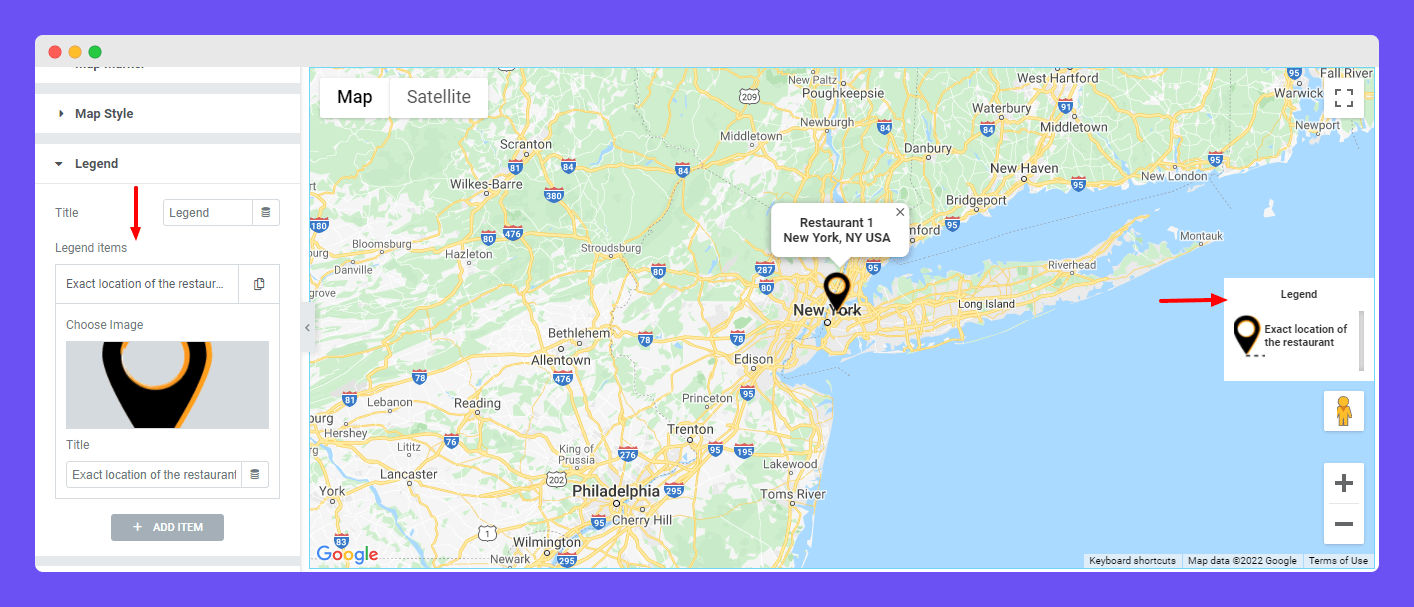
In this area, you can write the Legend Title. And add the Legend Items by clicking the ADD TEAM button. You need to open the Item first to add the Item content. Then you can insert an image and add a Title of the Item.
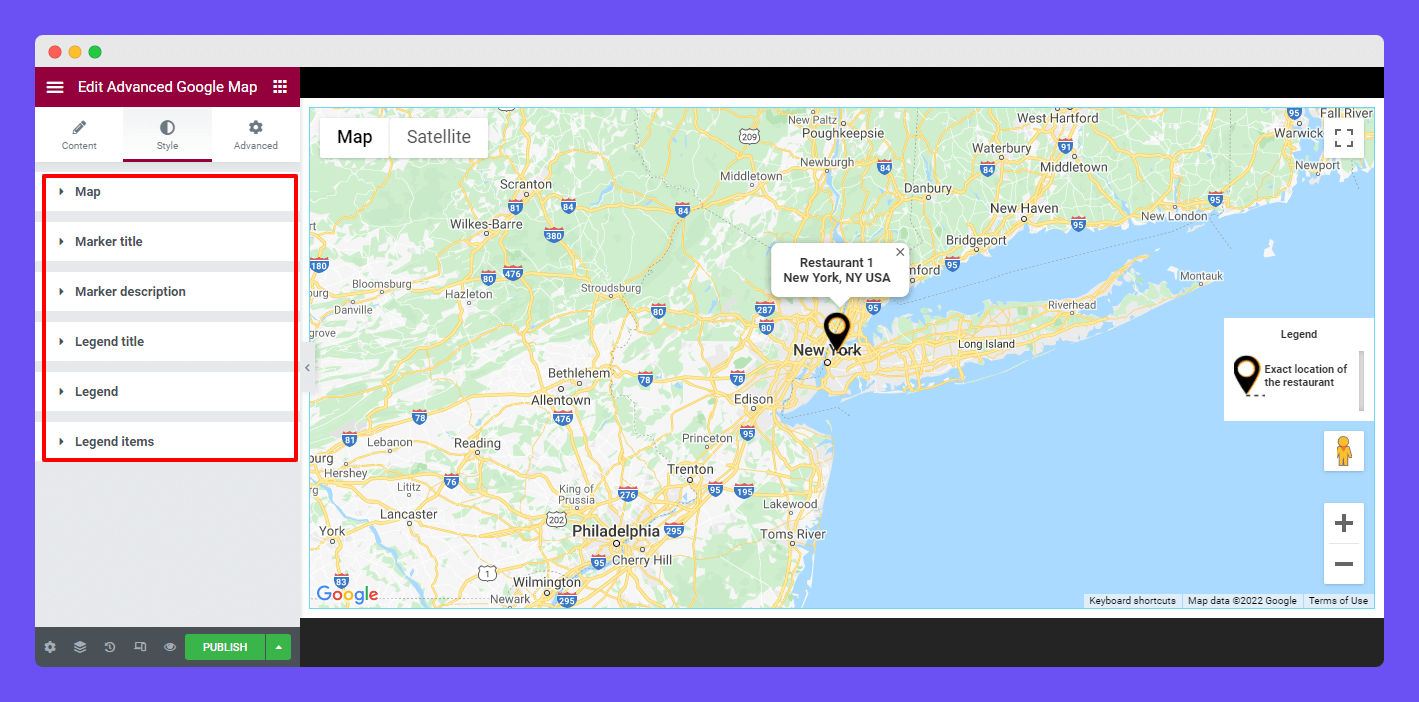
Advanced Google Map Style Options
In the Style area, you’ll get six different options to customize the Map. They are.
- Map
- Market Title
- Marker Description
- Legend Title
- Legend
- Legend Items
Let’s find how these settings work.
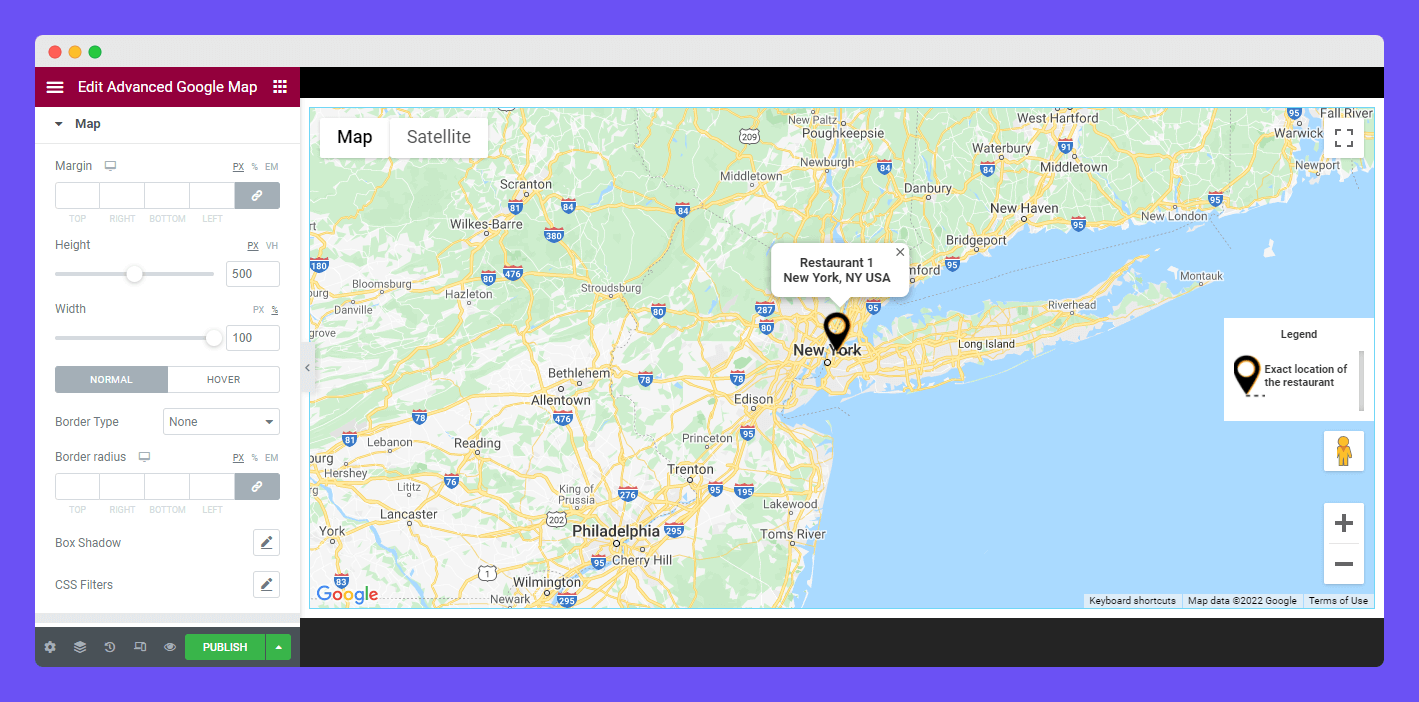
Style Map
In the Style->Map section, you can add Margin, set Height, and Width to the Map. Also, you are able to set the Border Type, Border Radius, Box Shadow, and add CSS Filters to the Map.
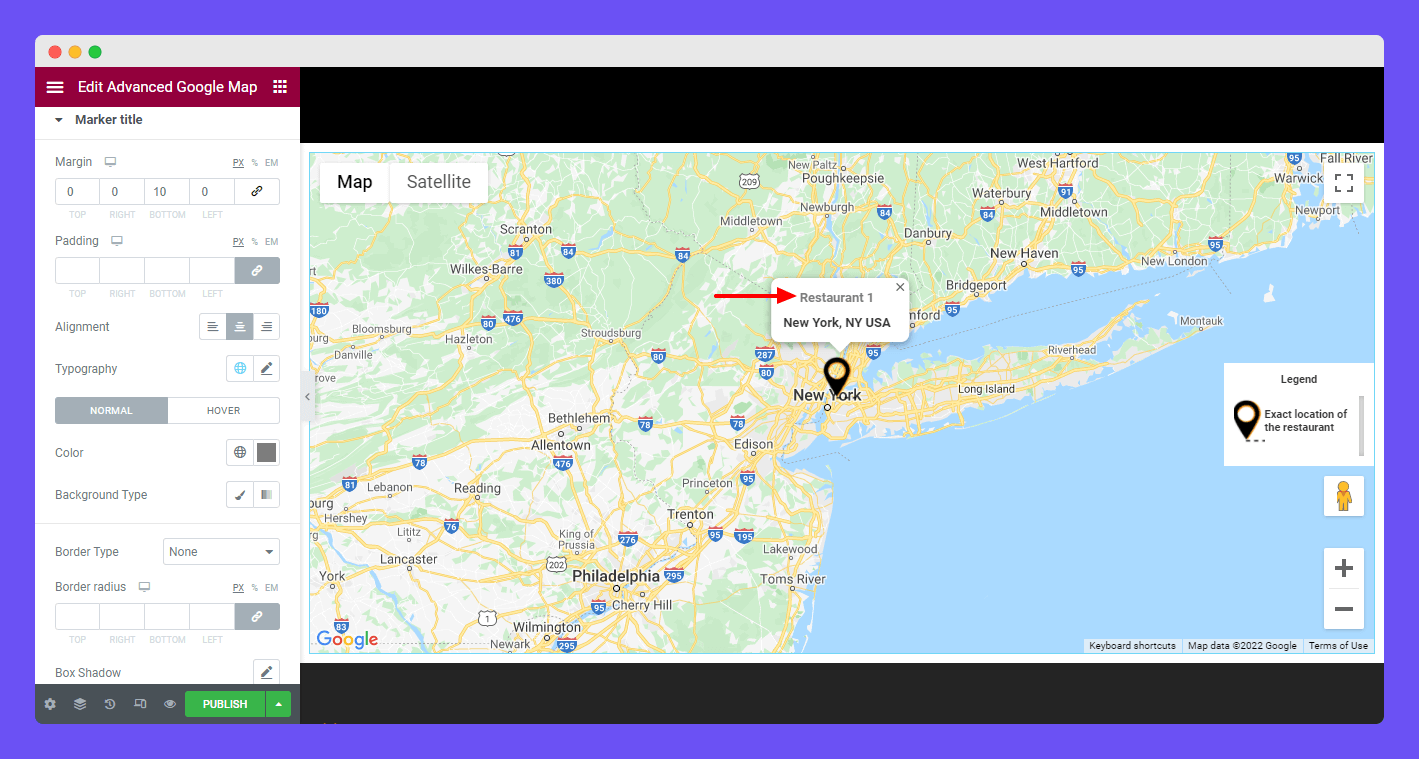
Style Marker Title
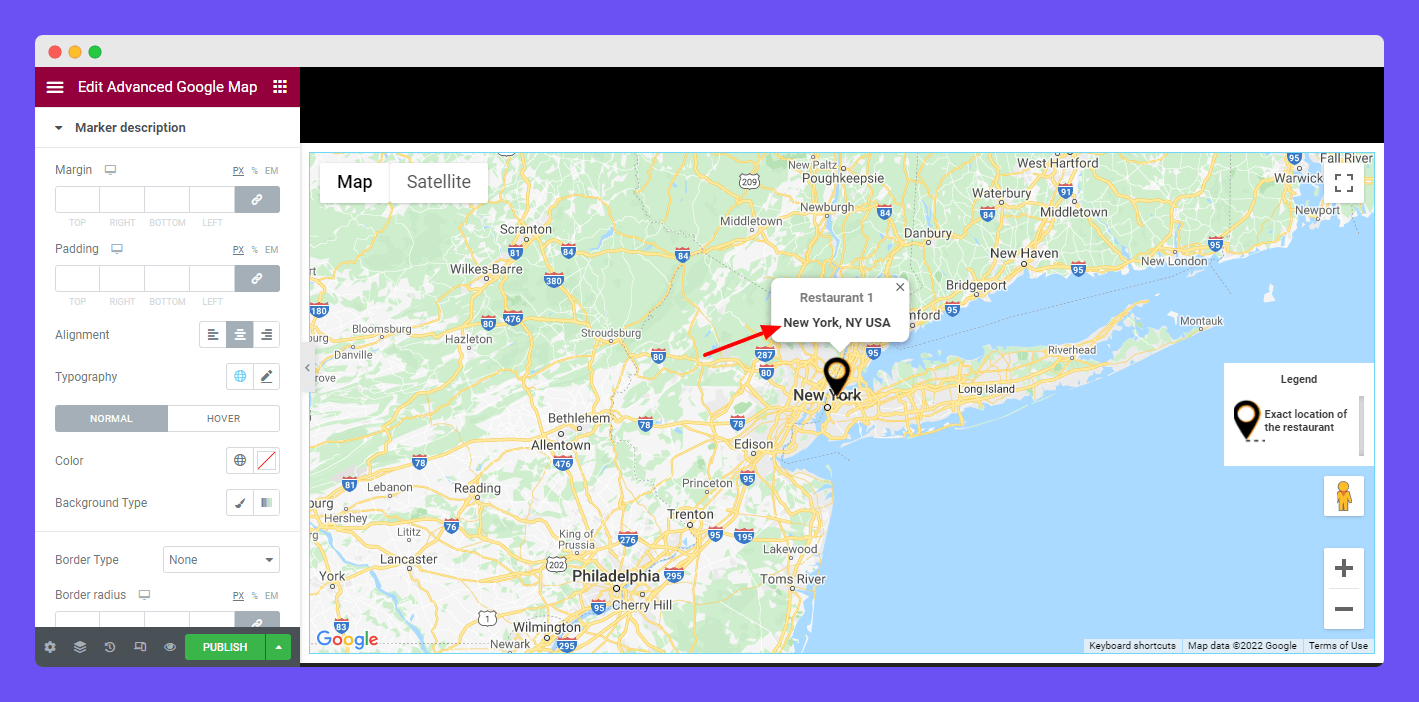
You are able to customize the Marker Title. Go to the Style->Marker Title and change the default style using these styling options Margin, Padding, Alignment, Typography, Color, Background Type, Border Type, Border Radius, and Box Shadow.
Style Marker Description
Like the Marker Title, you can also edit the Marker Description default design using the same styling options.
Style Legend Title
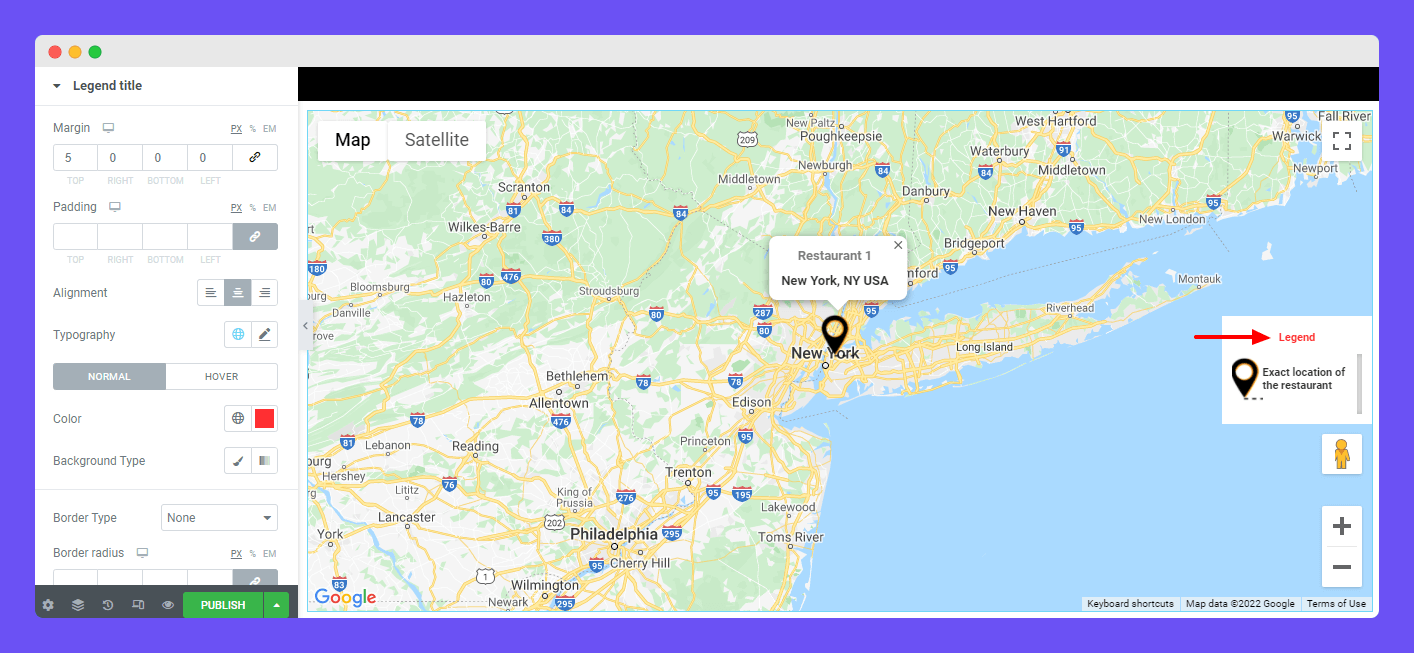
To make your Map Legend Title more cathy, you can change its style. These are options Margin, Padding, Alignment, Typography, Color, Background Type, Border Type, Border Radius, and Box Shadow that you use to customize the Legend Title.
Style Legend
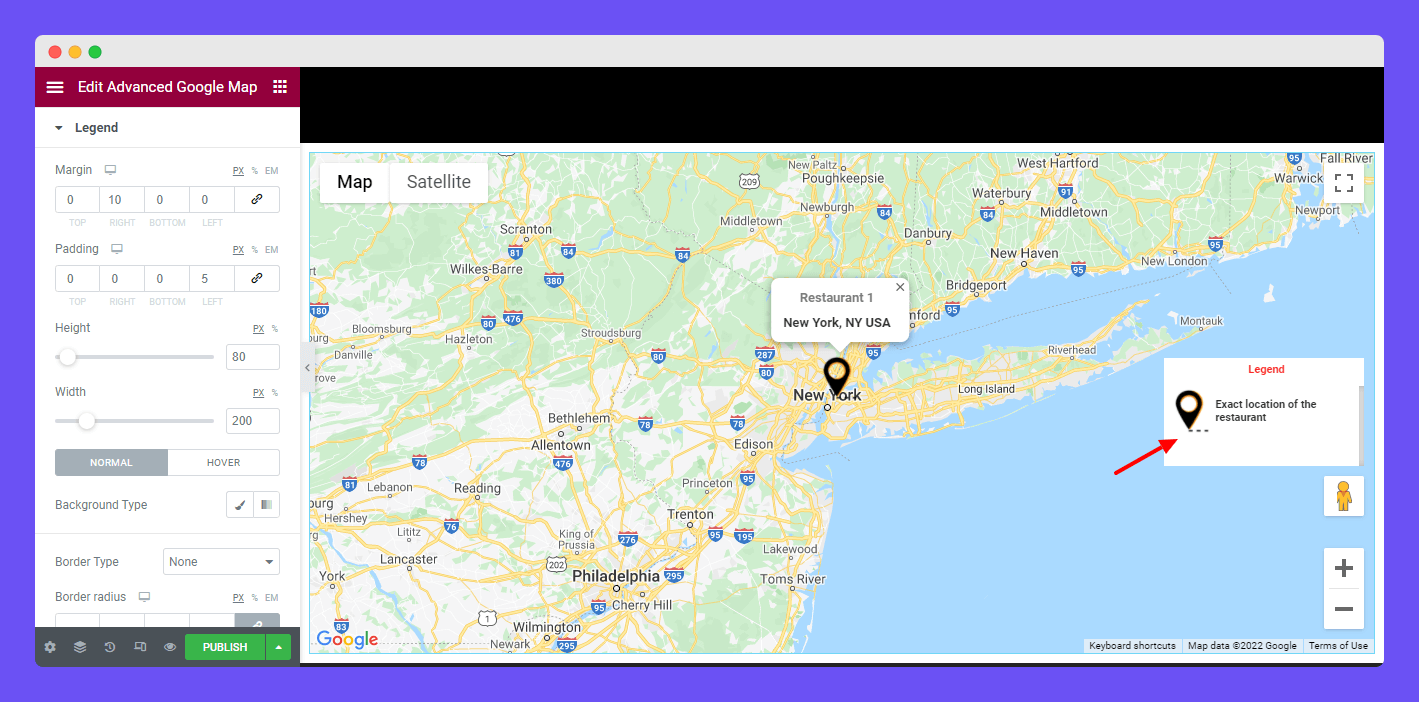
You can add Legend’s Margin and Padding. You are able to set custom Height and Width. Also, change the Background Type, Border Type, Border Radius, and Box Shadow of the Legend.
Style Legend Items
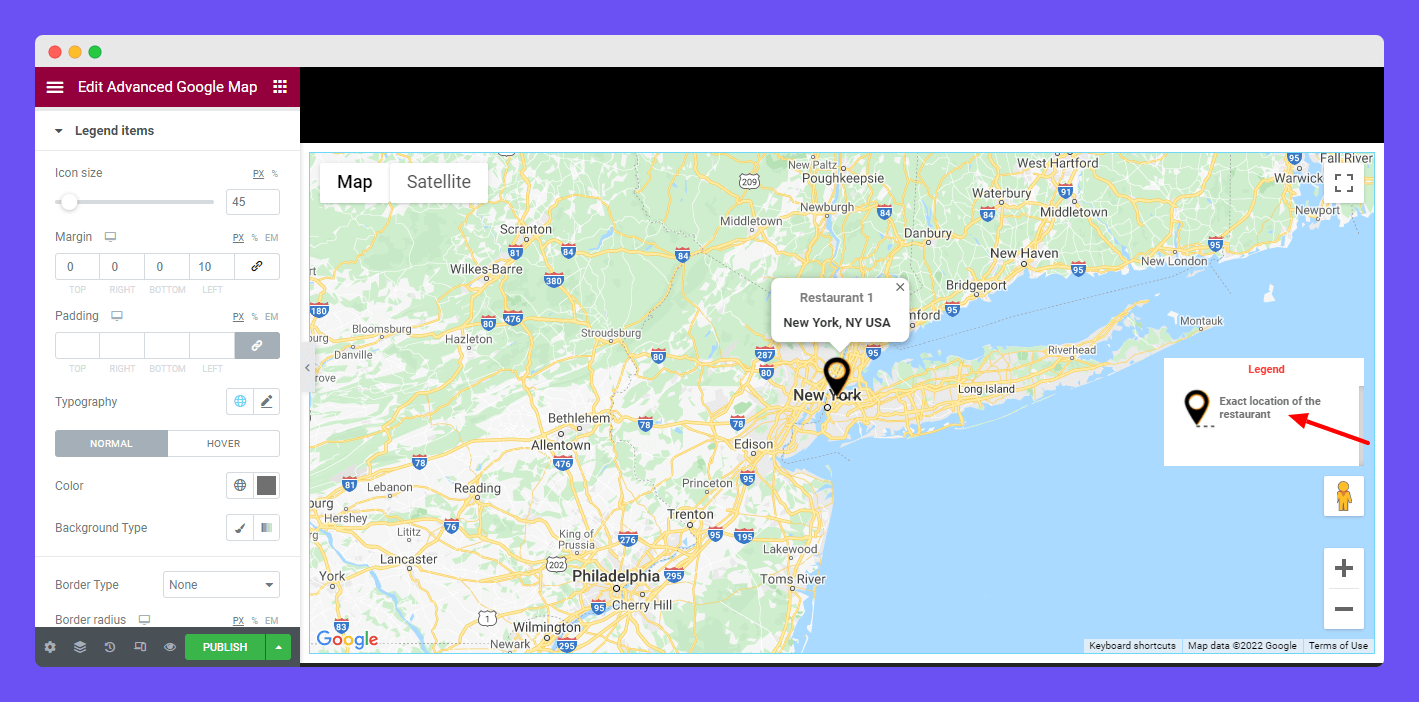
If you want to customize the Legend Items, you can easily do it using some handy styling options. You can change the Icon Size and also add Margin, Padding, Alignment, Typography, Color, Background Type, Border Type, Border Radius, and Box Shadow to the Legend Item.
Advanced Settings
If you want to add motion effects, happy effects, background, or make it responsive and more intriguing, click on ‘Advanced‘ to explore those options. the ‘Advanced‘ is a default feature of Elementor.
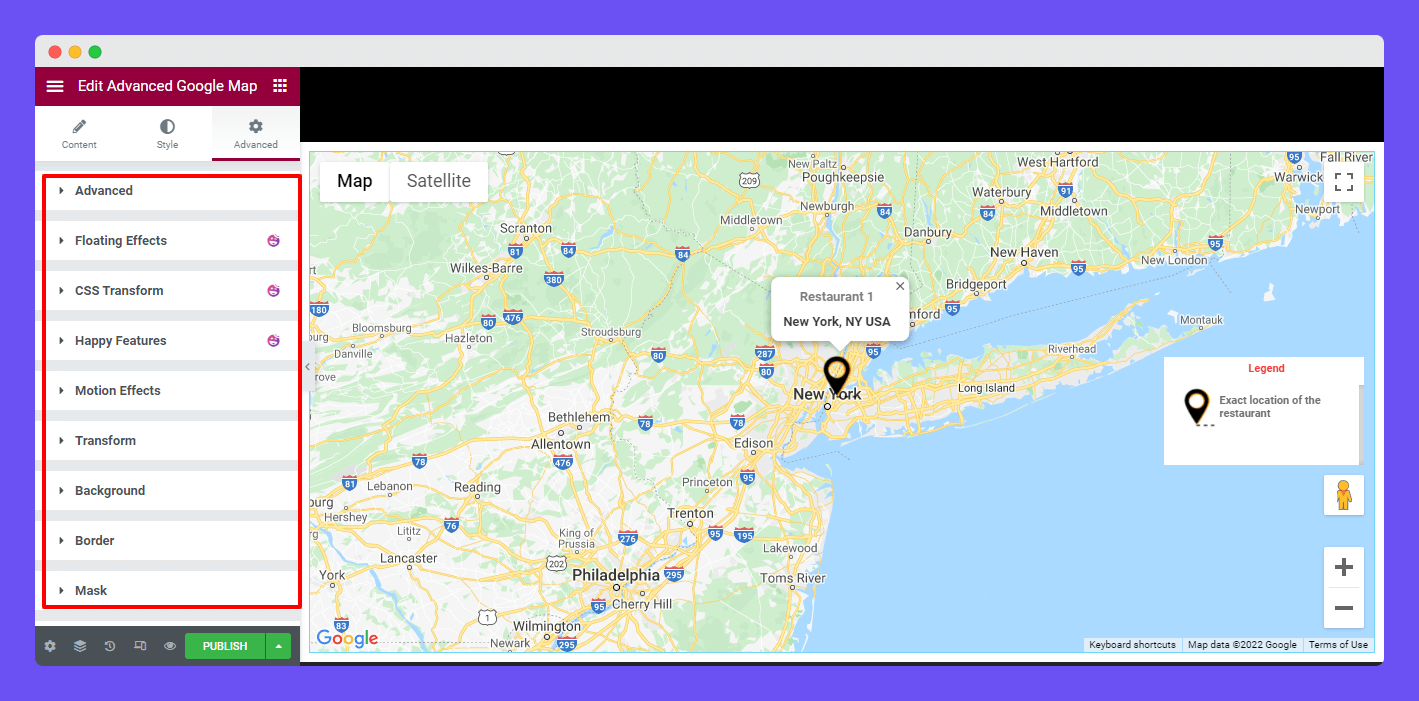
Give a read to this Document to know more about advanced features & functions.
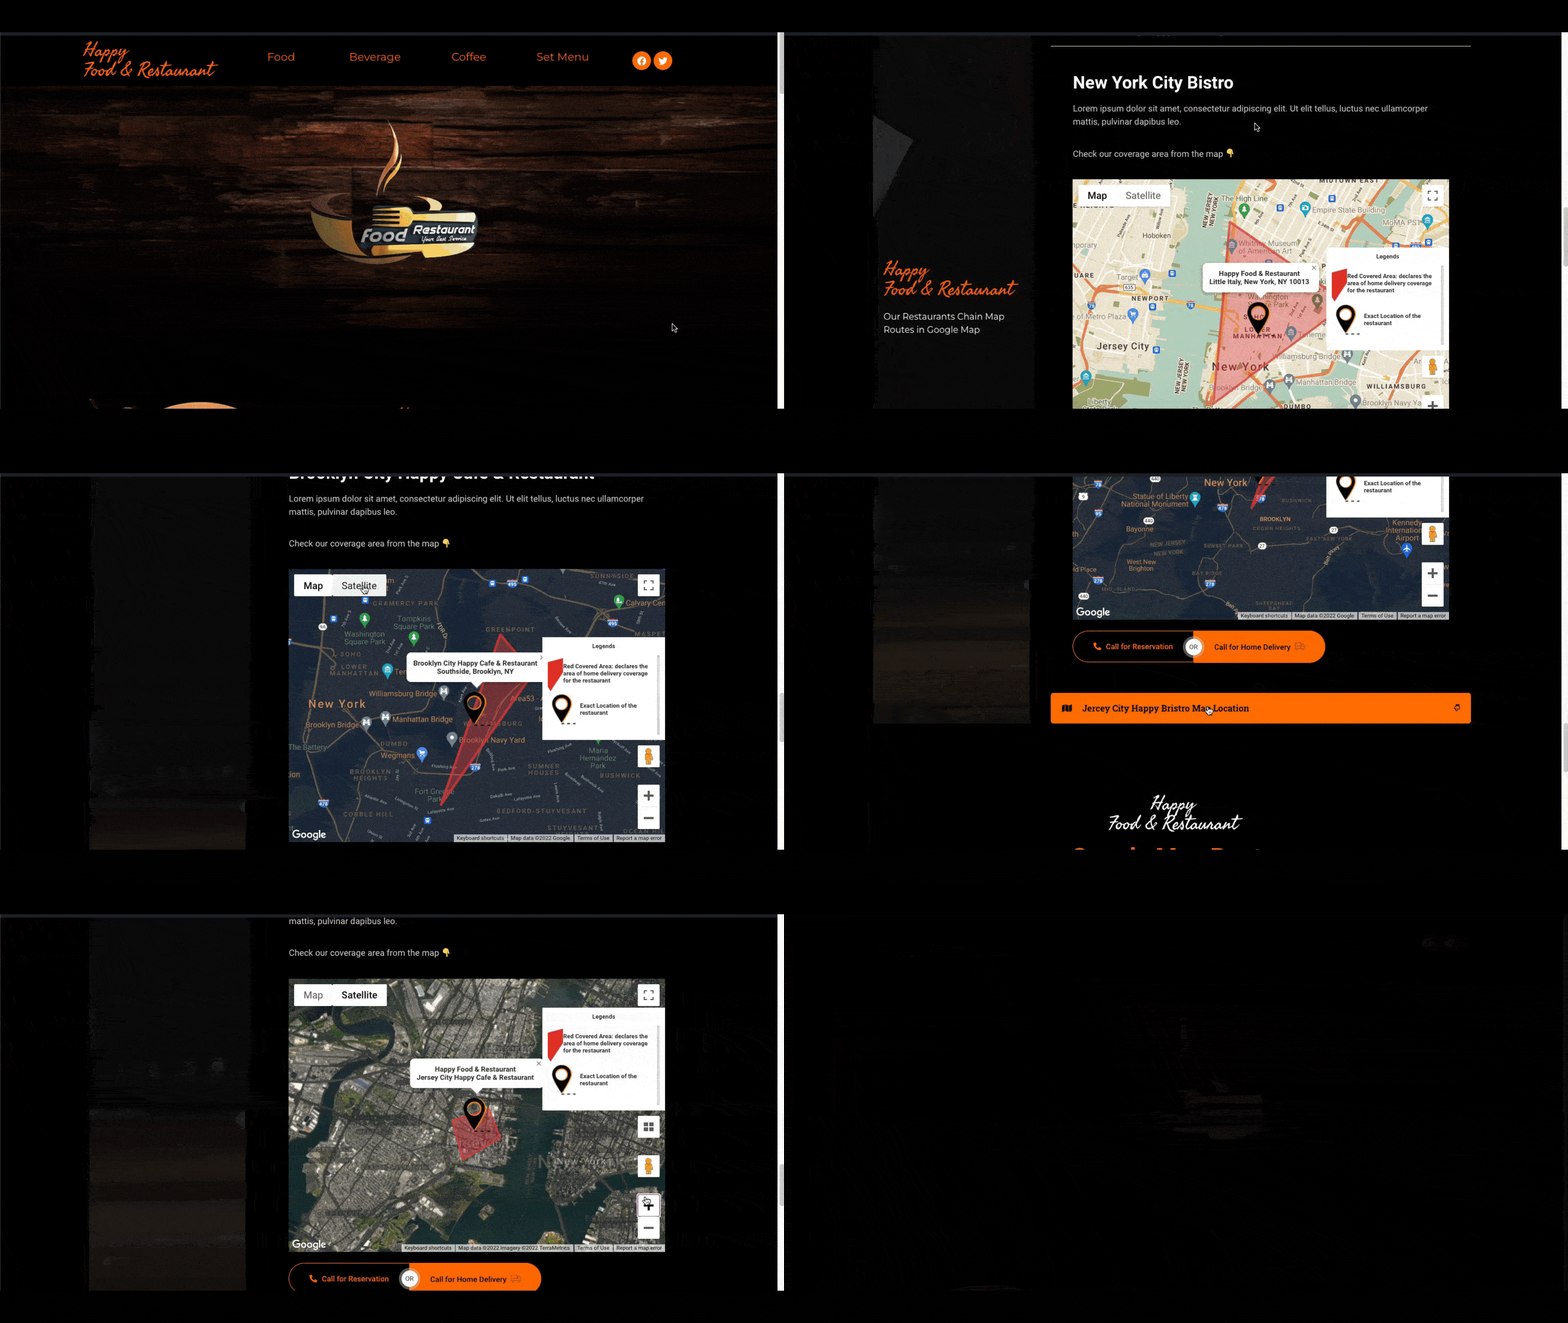
Final Preview
Check this below demo. Where we’ve shown how a restaurant company displays its locations using the Advanced Google Map.
That’s it.
