






The Image Trails feature in Happy Addons lets you create a dynamic visual effect where a trail of images follows the user’s cursor as they move it across a container. You can customize the trail style, image size, opacity, spacing, animation, and even add a persistent magic cursor for a more interactive experience.
This guide explains how to enable and configure the Image Trails feature in Elementor.
Requirements
Image Trails is a Pro feature, so you need both:
- Happy Addons Free
- Happy Addons Pro
- Elementor Free
Make sure both the free and Pro versions of Happy Addons are installed and activated before proceeding.
Enable the Image Trails Feature
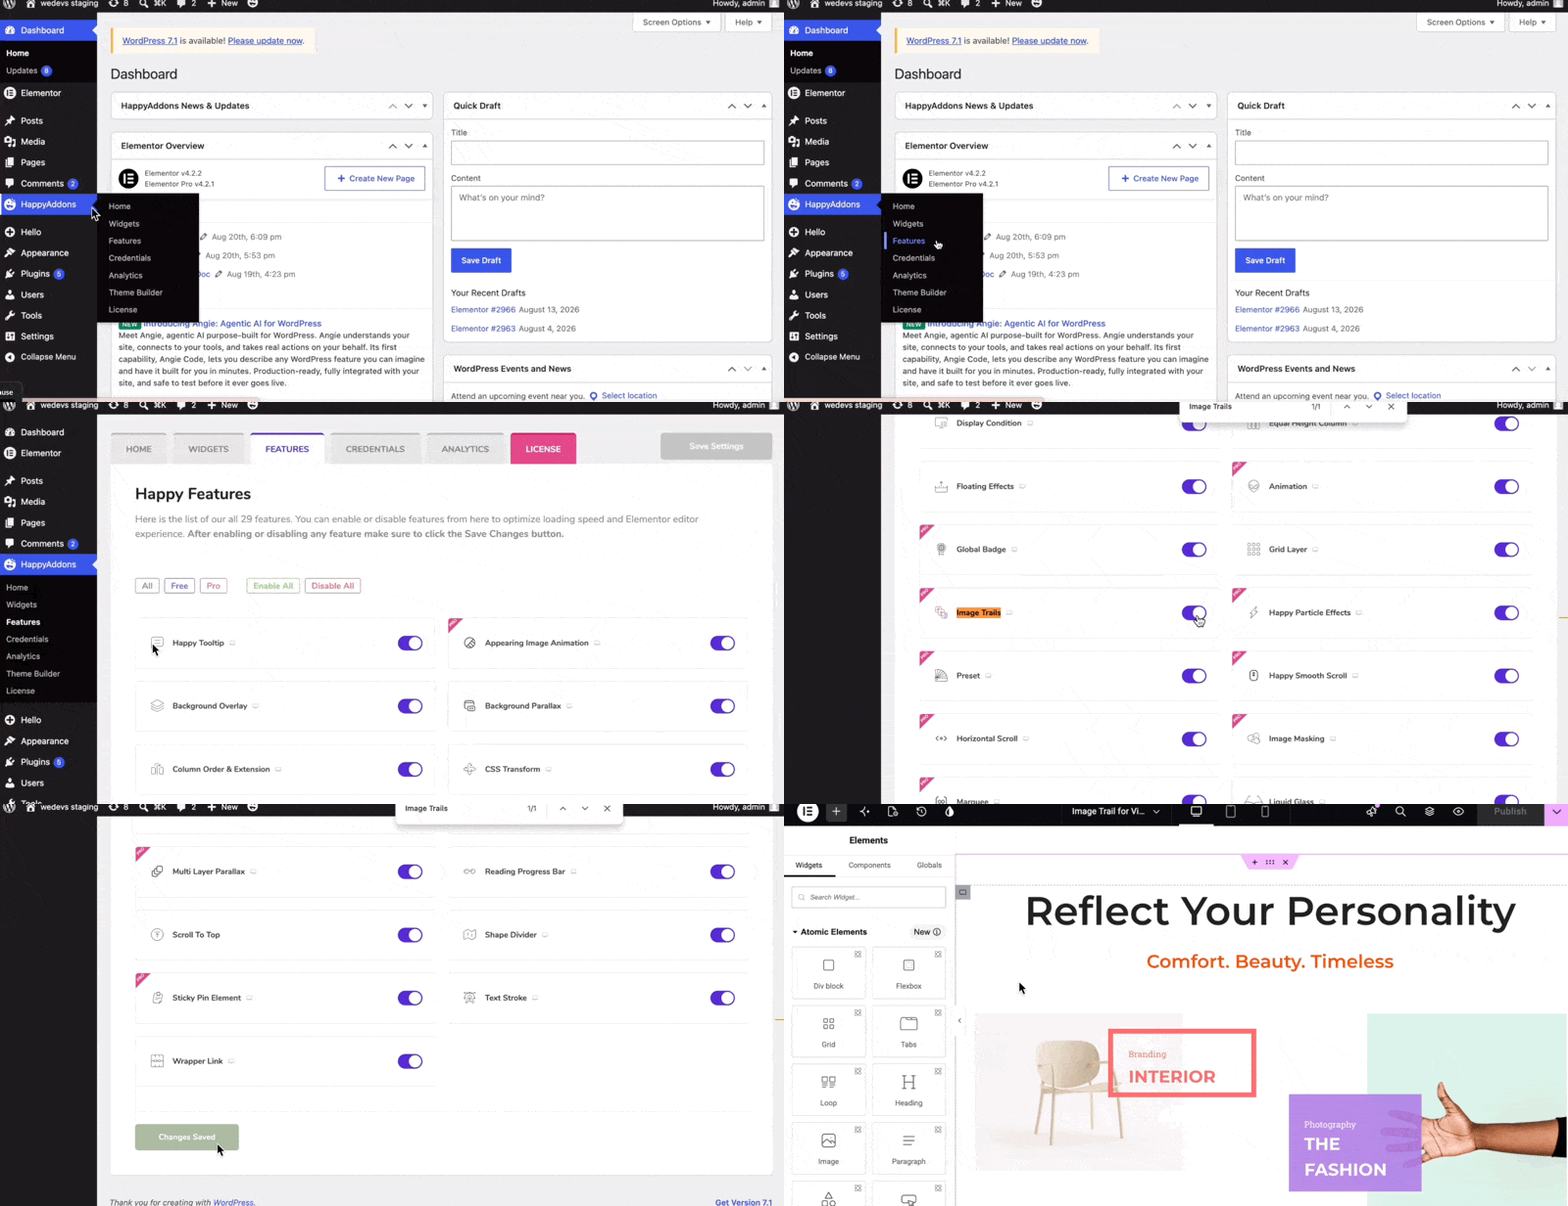
Before using Image Trails on your page, enable the feature from the Happy Addons settings.
- From your WordPress dashboard, go to Happy Addons → Features.
- Find the Image Trails feature.
- Enable it.
Add Image Trails to a Container
The Image Trails feature works only with Elementor containers.
- Open the page where you want to add the effect with Elementor.
- Select the container where you want to use Image Trails.
- Go to the Advanced tab in the Elementor panel.
- Expand the Image Trails section.
- Toggle on Enable Image Trails.
Once enabled, scroll down to access the available Image Trails settings.
By default, no trail effect is visible until you add images.
Add Images to the Trail
The first step is to select the images you want to use for the trail effect.
You can add multiple images to create a varied and dynamic trail.
Once the images are added, move your cursor across the container to see the images follow the cursor.

Configure the Trail Style
The Trail Style setting determines how the images behave as they follow the cursor.
There are two styles:
- Normal — Creates the standard image trail effect, where images follow the cursor.
- Falling — Makes the images immediately drop as you move the cursor.
Choose the style that best fits your design.
Customize the Trail Images
You can customize the appearance and behavior of the images using the available settings.
Image Width
Use Image Width to increase or decrease the width of the trail images.
Image Height
Use Image Height to control the height of the trail images.
Border Radius
You can apply a Border Radius to the trail images. However, a larger border radius can cut off parts of the images, so keeping the border radius at its default value may produce a better result.
Opacity
Use Opacity to control the transparency of the trail images.
- Decrease the value to make the images more transparent.
- Increase the value to make them more opaque.
Z-Index
If necessary, set a Z-Index value to control the stacking order of the trail images relative to other elements on the page.
Adjust the Trail Animation
The Image Trails feature also provides settings to control how the images are distributed and animated.
Trail Distance
Trail Distance controls the space between individual images as they appear along the cursor trail.
Increase the value to create more space between the images or decrease it to create a denser trail.
Animation Duration
Animation Duration controls how long the image movement takes to complete.
Adjust the duration to make the trail animation faster or slower.

Show or Hide the Effect in the Editor
The Show in Editor option controls whether the Image Trails effect is visible while editing the page in Elementor.
- Disable it to hide the trail effect from the editor.
- Enable it to display the effect again while editing.
This can be useful when you want to work on the page without the animation getting in the way.
Enable the Magic Cursor
The Magic Cursor option adds a persistent pointer that follows the user’s cursor.
Unlike the trail images, which appear and disappear as the cursor moves, the magic cursor remains visible and follows the cursor around the page.
Enable the Magic Cursor option to add this effect.
Customize the Magic Cursor
Once enabled, you can customize its appearance using the available settings.
Width and Height
Adjust the Width and Height to control the size of the magic cursor.
Background Color
Choose a Background Color for the magic cursor to match your website’s design.
Border Radius
Use Border Radius to change the shape of the cursor.
- Set the value to 0 for a square shape.
- Set the value to 50 to create a round cursor.
You can adjust the value between these settings to create other shapes.
Transition Speed
Use Transition Speed to control how quickly the magic cursor responds to the user’s cursor movement.
Adjust it according to the desired interaction speed.

Preview the Image Trails Effect
Once you’ve finished configuring the Image Trails settings:
- Save or update the page.
- Preview the page.
- Move your cursor across the container.
- Check the image trail effect and magic cursor.
- Make any final adjustments if necessary.

Your Image Trails effect is now ready to add a dynamic and interactive visual experience to your page.
Conclusion
The Image Trails feature of Happy Addons provides an easy way to create engaging cursor-based image effects without custom code. You can choose multiple images, select different trail styles, control image size and spacing, adjust animation behavior, and add a customizable magic cursor
Use these options to create an image trail effect that complements your website’s design without distracting from the main content.