


The GSAP SVG Draw widget lets you animate SVG graphics by drawing their stroke paths, creating an engaging line-drawing effect as visitors interact with your page. It is ideal for adding eye-catching illustrations, icons, logos, and other SVG graphics that appear to draw themselves.
Prerequisites
The GSAP SVG Draw widget is available in HappyAddons Pro.
Before using it, make sure both of the following plugins are installed and activated on your WordPress website:
- HappyAddons Free
- HappyAddons Pro
Enable the Widget
To enable the widget:
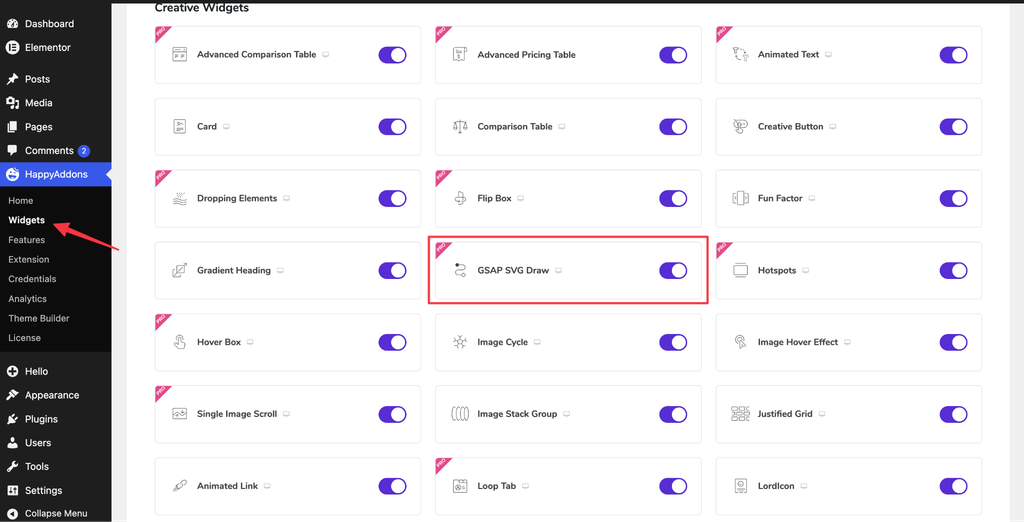
- Go to HappyAddons → Widgets from your WordPress dashboard.
- Search for GSAP SVG Draw.
- Enable the widget.
Add the Widget
To add the widget to your page:
- Edit your page with Elementor.
- Create or select the section where you want to add the animation.
- Search for GSAP SVG Draw in the Elementor panel.
- Drag and drop the widget onto the Elementor canvas.
A default SVG graphic will appear automatically.
Add an SVG
Under the Content tab, choose an SVG Type.
Two options are available:
- SVG Code
- SVG Image
SVG Code
Select SVG Code to paste the source code of an SVG file directly into the widget.
If you don’t have the SVG code:
- Click the SVG 2 Code link below the field.
- Upload your SVG file.
- Copy the generated SVG code.
- Return to Elementor and paste the code into the SVG Code field.
The SVG will appear on the canvas once the code is added.
SVG Image
Select SVG Image if you want to upload an SVG file through the WordPress Media Library.
Important: Use an SVG with Stroke Paths
For the drawing animation to work correctly, your SVG should contain stroke path elements.
An SVG made only from filled shapes may display correctly, but it won’t produce the expected line-drawing effect because there are no stroke paths for the widget to animate.
When preparing an SVG for this widget, make sure its paths use stroke properties.
Physical Settings
Expand the Physical Settings section to configure how the SVG drawing animation behaves.
Method
The Method option determines which portion of the SVG path is animated.
Available methods:
- FromTo
- From
- To
FromTo
FromTo lets you define both the starting and ending positions of the animation.
For example:
- From: 30%
- To: 80%
In this case, the animation covers the portion between 30% and 80% of the SVG path.
To animate the complete SVG, use:
- From: 0%
- To: 100%
From
From starts the animation from the specified position and continues to the end of the path.
To
To animates the SVG from its current state toward the specified ending position.
For most use cases, FromTo provides the most control over which portion of the SVG is animated.
Duration
Duration controls how long the drawing animation takes to complete.
Increase the value for a slower drawing effect and decrease it for a faster effect.
Delay
Delay specifies how long the widget waits before starting the animation.
Use this when you want the SVG animation to begin after a short pause.
Timeline
Enable Timeline when working with repeated or reversible animations.
It allows options such as Repeat, Repeat Delay, and Yoyo to work together as part of the animation timeline.
Yoyo
Yoyo reverses the animation after each loop.
When enabled, the SVG can continuously draw and reverse, creating a draw-and-erase effect.
Repeat
Repeat controls how many additional times the animation plays after its initial run.
For example:
- 10 → Repeats the animation 10 additional times.
- -1 → Repeats the animation indefinitely.
Repeat Delay
Repeat Delay adds a pause between animation loops.
For example, if you set the value to 1, the animation waits for one second before starting the next loop.
Easing
Easing controls the speed curve of the animation.
Different easing functions change how quickly the drawing starts, progresses, and finishes. Experiment with the available easing presets to find the motion that best matches your design.
Scroll Trigger
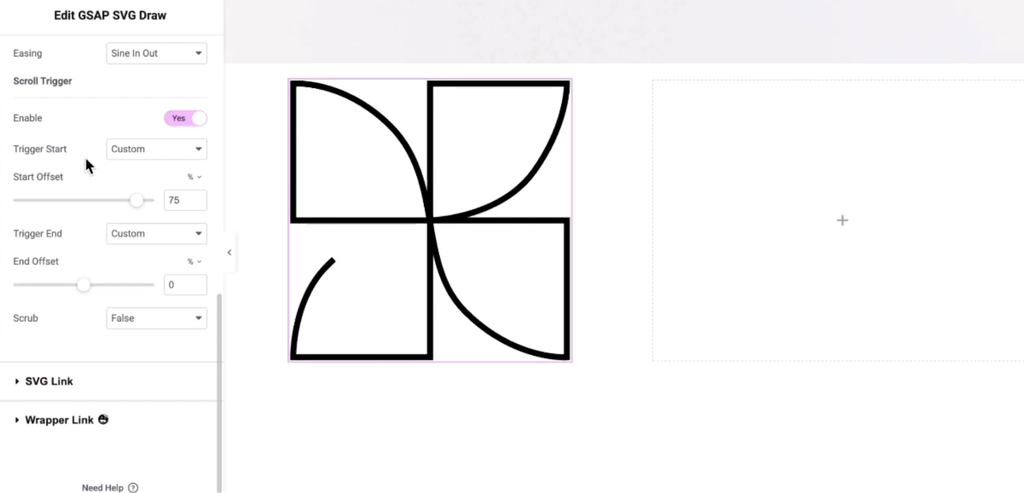
Enable Scroll Trigger if you want the SVG drawing animation to respond to page scrolling.
The main options are:
- Trigger Start
- Trigger End
- Scrub
- Custom Trigger Offset
Trigger Start
Trigger Start determines where the animation begins in relation to the viewport.
You can select from preset positions or choose Custom for more control.
For example, when using Top Center, the animation starts when the top of the SVG reaches the center of the viewport.
Trigger End
Trigger End determines where the scroll-triggered animation reaches its ending point.
Like Trigger Start, you can use a preset position or select Custom.
Scrub
Scrub controls how closely the animation follows the user’s scrolling.
Available options include:
- False – The animation plays independently of the scrollbar.
- True – The animation progress is synchronized with scrolling.
- Custom – Lets you specify a Scrub Number to control the smoothness.
A Scrub Number between 1 and 2 generally provides a good balance between smoothness and responsiveness.
Custom Trigger Offset
When Custom is selected for Trigger Start or Trigger End, additional offset settings become available.
The offset is specified as a percentage of the viewport.
For example:
- Start Offset: 50% → The animation starts when the SVG reaches the middle of the viewport.
- End Offset: 50% → The animation ends when the SVG reaches the middle of the viewport.
SVG Link
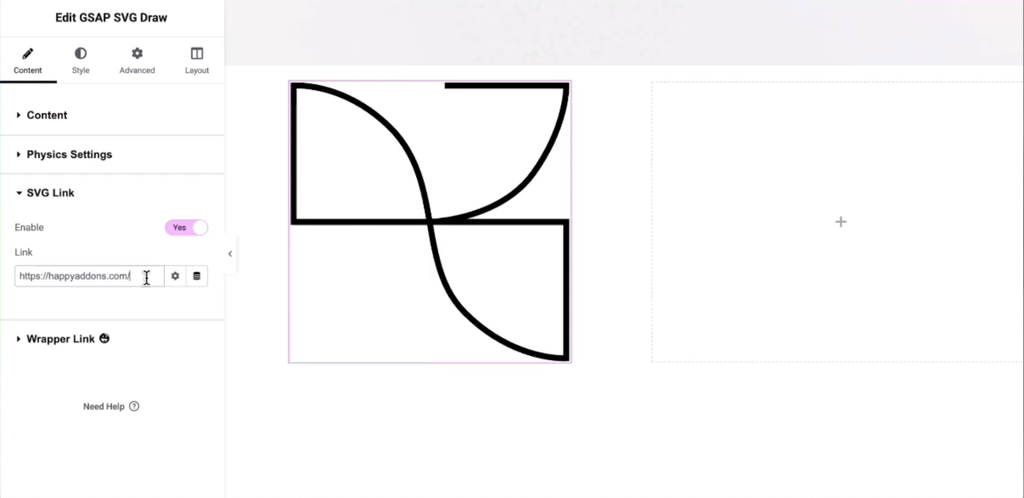
Enable SVG Link if you want the SVG graphic to function as a clickable link.
After enabling the option:
- Enter the destination URL.
- Save or update the page.
- On the front end, visitors can click the SVG to navigate to the specified URL.
Style Settings
Open the Style tab to customize the appearance and dimensions of the SVG.
The available options include:
- Color – Changes the stroke color of the SVG.
- Width – Adjusts the width of the widget.
- Height – Adjusts the height of the widget.
Use these settings to make the SVG fit naturally within your page layout.
Final Result
You can add multiple GSAP SVG Dracsw widgets to the same Elementor page and configure each one independently.
By combining different SVG graphics with animation, easing, repeat, and scroll-trigger settings, you can create engaging line-drawing effects for:
- Illustrations
- Icons
- Logos
- Decorative graphics
- Interactive website sections
For the best results, use SVGs with clearly defined stroke paths and experiment with the animation and scroll-trigger settings to achieve the desired effect.