


The SVG Morphing Widget of Happy Addons lets you create smooth and eye-catching SVG morphing animations in Elementor. You can add multiple SVG shapes and customize their colors, gradients, animation speed, easing, looping behavior, and more.
Requirements
The SVG Morphing Widget is a premium widget. To use it, make sure both of the following plugins are installed and activated on your WordPress website:
- Happy Addons Free
- Happy Addons Pro
Enable the SVG Morphing Widget
Before adding the widget to your page, you need to enable it from the Happy Addons settings.
- From your WordPress dashboard, go to Happy Addons → Widgets.
- Find the SVG Morphing widget.
- Enable the widget.
- Click Save.
Now, open the page where you want to add the animation with Elementor.
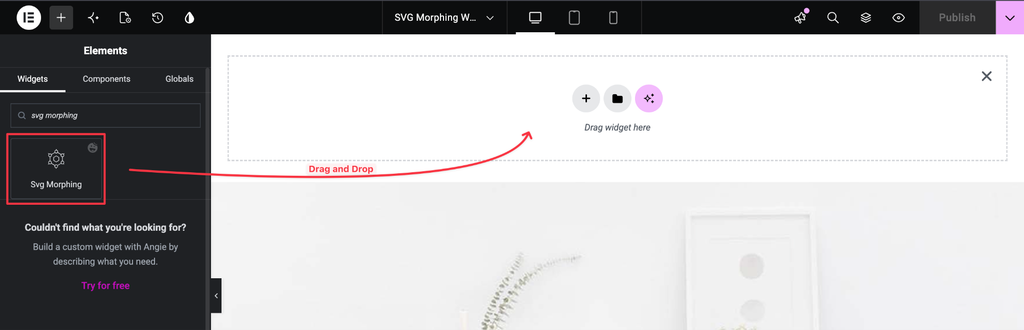
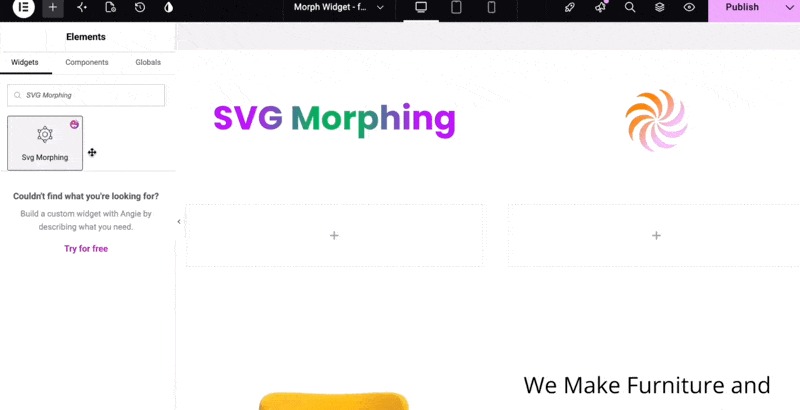
- Search for SVG Morphing in the Elementor widget panel.
- Drag and drop the widget onto the Elementor canvas.
A default SVG morphing animation will appear automatically.
Configure SVG Shapes
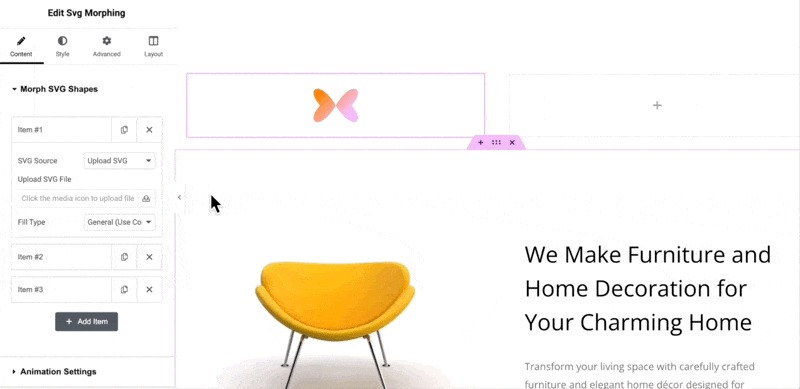
After adding the widget, go to the Content tab in the Elementor panel.
Expand the Morph SVG Shapes section.
By default, the widget includes three tabs. Each tab represents an individual SVG shape.
You can keep all three shapes or remove one if you only need two.
Important: You must have at least two shapes/tabs for the SVG morphing animation to work.
For example:
- Tab 1 → Shape 1
- Tab 2 → Shape 2
- Tab 3 → Shape 3
The widget morphs one shape into the next during the animation.
Add an SVG
Expand the first shape tab, such as Shape 1.
Click the dropdown beside SVG Source. You will find two options:
- Upload SVG
- Custom SVG Code
Upload SVG
Select Upload SVG if you want to use an SVG file directly.
Depending on your WordPress and Elementor configuration, you may not be able to upload an SVG directly from your local drive.
If the upload fails:
- Upload the SVG file to the WordPress Media Library.
- Return to Elementor.
- Select the SVG from the Media Library.
This provides an alternative way to add the SVG to your page.
Note: SVG uploads can be restricted by WordPress or Elementor for security reasons.
Custom SVG Code
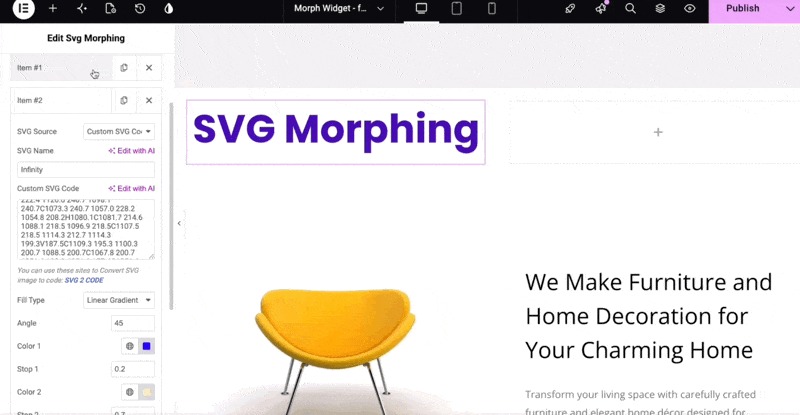
You can also add an SVG using its code.
- Select Custom SVG Code from the SVG Source dropdown.
- Enter a name for the SVG, if desired.
- Paste the SVG code into the Custom SVG Code field.
The name is optional and does not affect the animation.
The SVG should appear on the Elementor canvas after you add the code.
Image Placeholder: Screenshot showing the Custom SVG Code field with an SVG code pasted into it.
Get SVG Code
If you don’t have the SVG code, use the SVG 2 Code link provided below the custom SVG code field.
This opens a page where you can upload your SVG file. The SVG code will then be generated automatically.
- Upload your SVG file.
- Wait for the code to be generated.
- Copy the generated code.
- Return to Elementor.
- Paste the code into the Custom SVG Code field.
For the SVG to display correctly in the morphing widget, paste the same SVG code into the other shape tab as well.
For example, if you are using Shape 1 and Shape 2:
- Shape 1 → Paste the SVG code
- Shape 2 → Paste the same SVG code
You can then customize each shape’s fill and animation settings separately.
SVG Path Requirements
If your SVG does not appear on the canvas, check the SVG code.
The SVG code should contain path properties. Without the required path data, the SVG may not display or morph correctly.
Before troubleshooting the widget, verify that your SVG contains the necessary <path> elements and path data.
Customize SVG Fill
Once your SVG is added, you can customize its appearance using the Fill Type option.
The available options are:
- General
- Solid Color
- Linear Gradient
- Radial Gradient
Solid Color
Select Solid Color to apply a single color to the SVG shape.
If different colors are assigned to different shape tabs, the color will also transition during the morphing animation.
For example:
- Shape 1 → Blue
- Shape 2 → Purple
During the animation, the SVG will smoothly morph from the first shape/color combination to the second.
Linear Gradient
Select Linear Gradient to apply a gradient that transitions across the SVG in a straight direction.
You can configure:
- Color 1
- Color 2
- Angle
- Stop 1
- Stop 2
Angle
The Angle controls the direction of the gradient.
The default angle is 45°, but you can change it to any value you prefer.
Stop 1
Stop 1 determines where the first color begins transitioning into the second color.
For example, a value of 0.2 means the first color remains solid through approximately the first 20% of the gradient before the transition begins.
Stop 2
Stop 2 determines where the second color becomes fully visible.
For example, a value of 0.7 means the transition finishes at approximately 70% of the gradient. The remaining 30% displays the second color.
Radial Gradient
The Radial Gradient option creates a gradient that spreads outward from a central point rather than moving in a straight direction.
You can configure two colors and adjust the available gradient settings.
The concept is similar to a linear gradient, but the color transition spreads outward in a circular or oval pattern.
Configure Additional Shapes
After configuring Shape 1, expand Shape 2.
If you are using the same SVG file for the morphing animation, paste the SVG code into Shape 2 as well.
You can then configure the Fill Type and color settings independently for Shape 2.
If you don’t specify a color for Shape 2, the widget will use the default color settings configured under the Style tab.
How SVG Morphing Works
Each tab represents a different shape.
For example:
- Tab 1 → Shape 1
- Tab 2 → Shape 2
During the animation:
Shape 1 → Shape 2 → Shape 1
When different fill colors are assigned to the shapes, the colors transition along with the shapes.
There are three common ways to configure the colors.
Combination 1: Same Color
Set the same color for both shapes.
Result: The shape morphs, but the color remains consistent throughout the animation.
Combination 2: Different Colors
Set different colors for each shape.
Result: Both the shape and color transition during the animation.
Combination 3: Leave the Second Shape Empty
Leave the color settings of Shape 2 empty.
Result: Shape 2 uses the default color settings from the Style tab.
Animation Settings
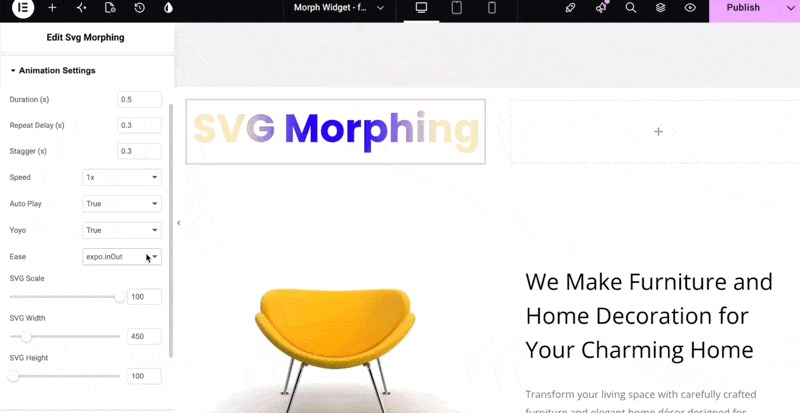
Expand the Animation Settings section to control how the morphing animation behaves.
Duration
Duration controls how long it takes for one shape to completely morph into another.
For example:
- 0.1 → Very fast morphing
- 0.5 → Faster but more noticeable
- Higher values → Slower morphing
For a visible and smooth animation, a duration of at least 0.5 seconds is recommended.
Repeat Delay
Repeat Delay adds a pause between animation loops.
For example, setting Repeat Delay to 0.3 means the animation pauses for 0.3 seconds before starting the next morph.
Stagger
Stagger is useful when your SVG contains multiple paths.
It controls the delay between the animation of individual paths.
For example, with a value of 0.3, the next path can begin its animation 0.3 seconds after the previous path.
This creates a staggered animation rather than having all paths morph simultaneously.
Speed
Speed acts as a multiplier for the animation duration.
Increasing the speed makes the animation run faster, while reducing it makes the animation slower.
For example, a speed multiplier of 2x makes the animation run approximately twice as fast as its normal rate.
Autoplay
Autoplay determines whether the animation starts automatically when the page loads.
- True → Animation starts automatically.
- False → Animation does not start automatically.
Yoyo
Yoyo controls whether the animation plays backward after reaching the next shape.
- True → The animation smoothly plays forward and backward.
- False → The animation reaches the next shape, jumps back to the starting shape, and begins again.
For a seamless looping effect, enable Yoyo.
Ease
Ease controls how the animation accelerates and decelerates during the morphing process.
The widget provides 24 easing options, each producing a different animation effect.
Some examples include:
- Power1.inOut — Creates a smooth and gentle transition.
- Back.in — Adds a slight backward movement before progressing forward.
- Expo.in — Starts slowly, accelerates significantly, and then slows toward the end.
Experiment with different easing options to find the motion that best suits your design.
SVG Size Settings
The widget also provides options for controlling the SVG’s size.
SVG Scale
SVG Scale works like a zoom control for the SVG.
A value of 100 displays the SVG at its original scale.
Adjust the value when you need to make the SVG appear larger or smaller within the widget.
SVG Width
Use SVG Width to control the width of the SVG widget.
SVG Height
Use SVG Height to control the height of the SVG widget.
Style Settings
After configuring the content settings, go to the Style tab.
Expand the Gradient Style section.
Here, you can select a default fill type:
- Linear Gradient
- Radial Gradient
- Solid Color
The available gradient and color controls are similar to those found in the individual shape settings.
Default vs. Individual Shape Settings
The Style tab provides default styling settings for the SVG shapes.
If you don’t configure color settings individually under the Content tab, the default settings from the Style tab will be applied.
However, if you configure a color or fill type for an individual shape under the Content tab, those individual settings take priority and override the default Style settings.
In other words:
Individual Shape Settings → Higher Priority
Style Tab Settings → Default/Fallback
This allows you to either use one consistent style for all shapes or customize each shape individually.
Add More SVG Shapes
You can add additional SVG shapes to the Morph SVG Shapes section to create more complex morphing sequences.
For example:
Shape 1 → Shape 2 → Shape 3 → Shape 1
Configure the SVG code and styling for each shape as needed, then preview the animation on the Elementor canvas.
Final Preview
Once you have configured the SVG shapes, colors, animation settings, and styling, preview the page to see the final morphing animation.
You can continue adjusting the duration, easing, speed, colors, gradients, and SVG size until you achieve the desired effect.
Troubleshooting
The SVG is not displaying
Check the following:
- Make sure at least two shape tabs are available.
- Verify that the SVG code has been added correctly.
- Make sure the SVG code contains the required <path> elements and path data.
- If using Custom SVG Code, try pasting the same SVG code into the other shape tab.
- If uploading an SVG fails, upload it to the WordPress Media Library first and then select it from Elementor.
The color is changing during the animation
This is expected when different colors are assigned to different shape tabs.
If you want the color to remain the same, use the same color for each shape.
The animation is too fast
Increase the Duration or adjust the Speed settings.
The animation doesn’t start automatically
Check that Autoplay is enabled.
The animation jumps back instead of smoothly reversing
Enable Yoyo to make the animation play smoothly forward and backward.
Summary
The Happy Addons SVG Morphing Widget provides an easy way to create animated SVG transitions in Elementor.
The basic workflow is:
- Install and activate Happy Addons Free and Pro.
- Enable the SVG Morphing widget.
- Add the widget to your Elementor page.
- Add at least two SVG shapes.
- Add SVG files or custom SVG code.
- Configure fill colors or gradients.
- Customize animation settings.
- Adjust the SVG size.
- Configure default styling from the Style tab.
- Preview and fine-tune the animation.
With different SVG shapes, colors, gradients, easing effects, and animation settings, you can create a wide range of smooth SVG morphing effects for your Elementor website.